Trilogy - Stroller Inglesina - Free user manual and instructions
Find the device manual for free Trilogy Inglesina in PDF.
| Product type | Stroller |
| Brand | Inglesina |
| Model | Trilogy |
| Category | Combination stroller (carrycot, seat, car seat) |
| Maximum child weight (carrycot) | 9 kg |
| Maximum child weight (seat, according to EN1888:2012 standard) | 15 kg |
| Maximum child weight (forward-facing seat) | 20 kg |
| Maximum child weight (group 0+ car seat) | 13 kg |
| Maximum basket load | 3 kg |
| Maximum bottle holder load | 0.5 kg |
| Warranty | 24 months |
| Safety standards | EN1888:2012 |
| Recommended age (carrycot) | From birth until the child can sit up unaided |
| Restraint system | Waist belt and crotch belt (5-point) |
| Brake | On rear wheels, lever-operated |
| Front wheels | Swiveling with lockable option |
| Folding system | Simple, with rear handle and lever |
| Canopy | Adjustable, with ventilation (selected models) |
| Included accessories | Trilogy carrycot, transport seat, bottle holder, basket, rain cover (depending on version) |
| Fabric care | Hand wash at 30 °C, flat dry in shade, do not bleach, do not iron |
| Care of plastic and metal parts | Damp cloth with mild detergent, dry after contact with water |
| Spare parts | Contact an authorized Inglesina dealer |
Frequently Asked Questions - Trilogy Inglesina
User questions about Trilogy Inglesina
0 question about this device. Answer the ones you know or ask your own.
Ask a new question about this device
Download the instructions for your Stroller in PDF format for free! Find your manual Trilogy - Inglesina and take your electronic device back in hand. On this page are published all the documents necessary for the use of your device. Trilogy by Inglesina.
USER MANUAL Trilogy Inglesina
natural_image
Line drawing of a stroller with adjustable legs and wheels, no text or symbols presentMANUALE ISTRUZIONI
INSTRUCTION MANUAL
MANUEL D'INSTRUCTIONS
BEDIENUNGSANLEITUNG
MANUAL DE INSTRUÇÕES
INSTRUCTIEHANDLEIDING
MANUAL DE INSTRUCTIUNI
PŘÍŘUČKA POKYNŮ
HASZNÁLATI ÚTMUTATÓ
IMPORTANT - READ THESE INSTRUCTIONS CAREFULLY BEFORE USE AND KEEP FOR FUTURE REFERENCE.
|
| _
-
1
TRILOGY
MODULAR SYSTEM
ITALIANO ....18.
ENGLISH ...23.
FRANÇAIS ... 29.
DEUTSCH ...35.
ESPAÑOL ....41.
PORTUGUÊS ....47.
NEDERLANDS ...53.
РУССКИЙ ... 59.
POLSKI 65
ROMÂNĂ ...70.
ČEŠTINA ...76.
MAGYAR ....81.
БЪПГАРСКИ ....87.
SLOVENSKÝ ...93.
ΕΛΛΗΝΙΚΑ ...98.
TÜRKÇE ....10
한국이한국어 ....109

122
1
TRILOGY STANDARD TRILOGY CITY
TRILOGY STANDARD TRILOGY

natural_image
Three grayscale illustrations of baby car seats with different seat designs, no text or symbols present.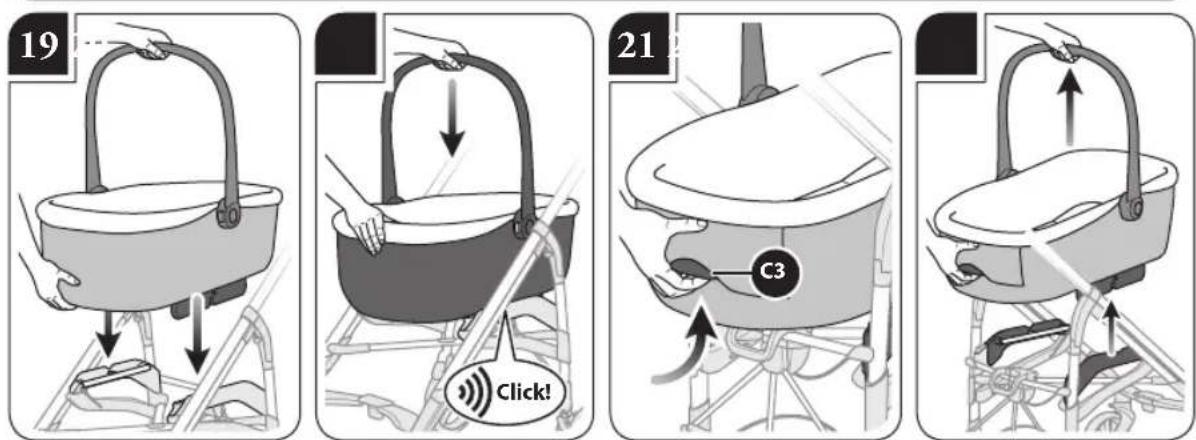
natural_image
Illustration of a baby seatbelt device being adjusted for a hand, showing two views (no text or symbols)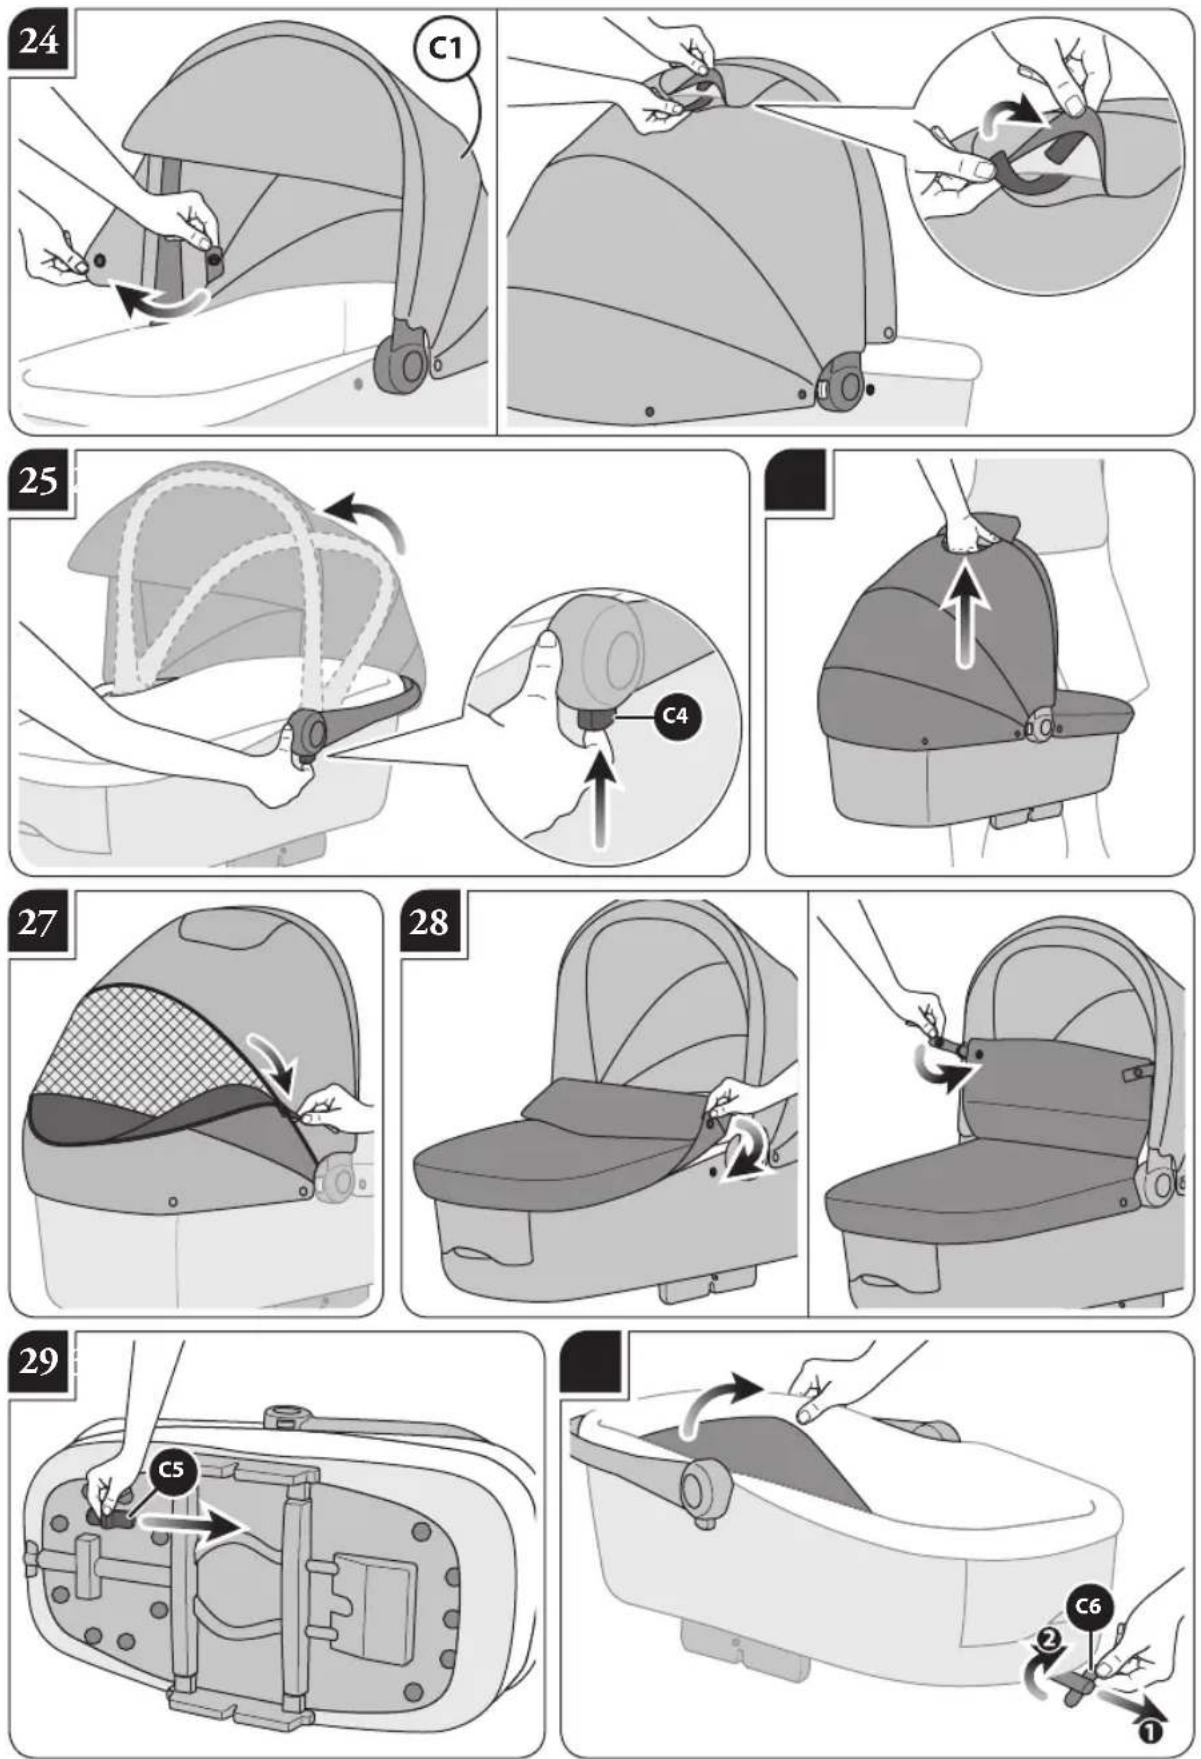
natural_image
Illustration of a baby car seatbelt being lifted by adult hands, showing pressure points and seatbelt placement (no text or symbols)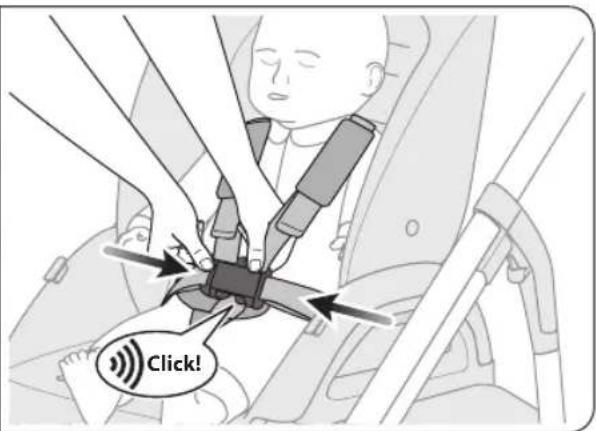
natural_image
Mechanical component diagram showing a hand holding a belt with an arrow indicating direction (no text or symbols present)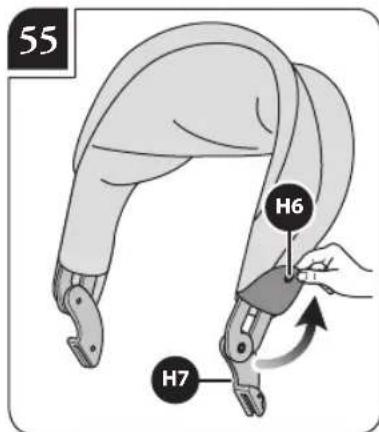
natural_image
Illustration of a robotic leg being adjusted to form a foot, showing the motion of the grip (no text or symbols present)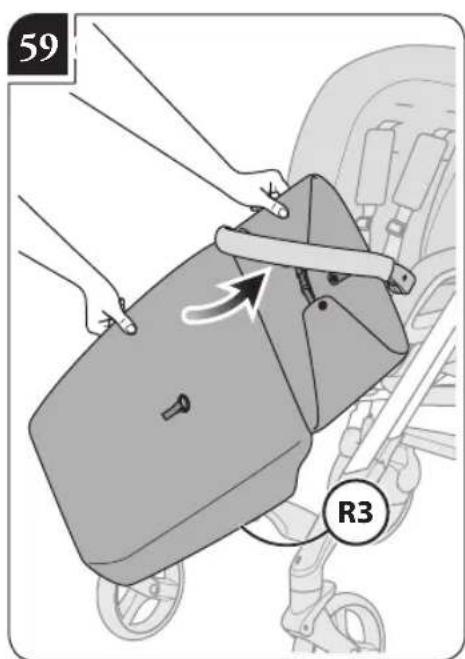
natural_image
Illustration of a bicycle seatbelt being adjusted for a person's seatbelt, showing the handle and angle (no text or symbols)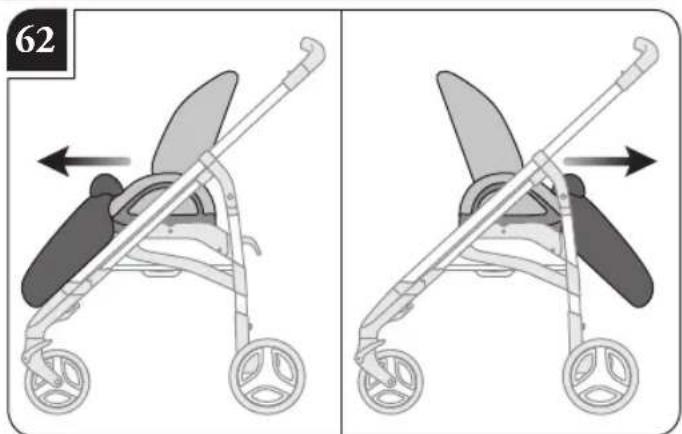
natural_image
Illustration of a stroller with directional arrows indicating motion (no text or symbols)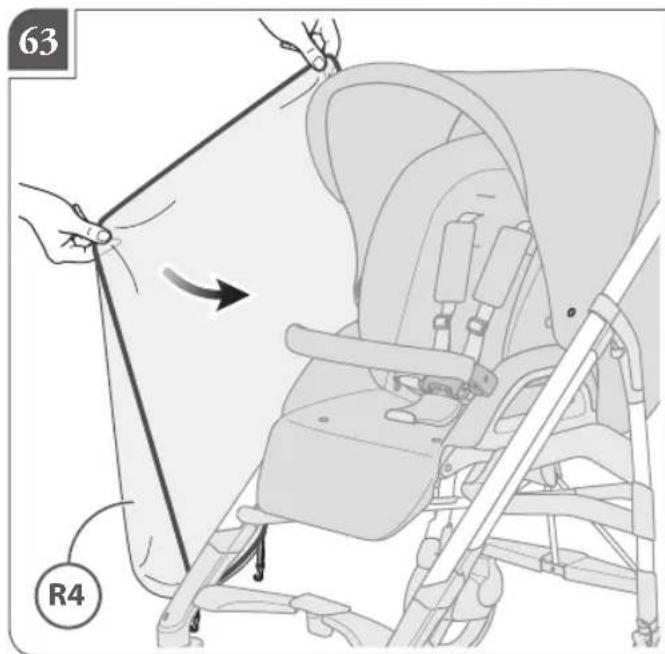
natural_image
Illustration of hands adjusting a seatbelt switch mechanism inside a car (no text or symbols visible)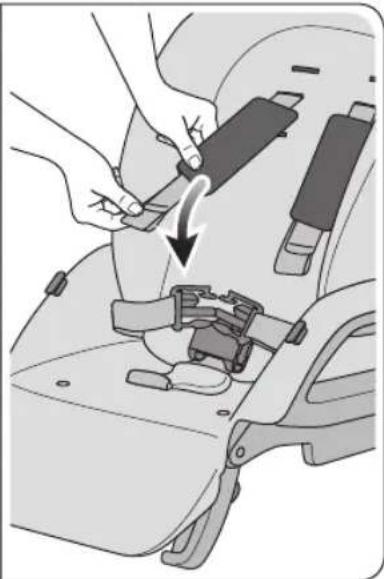
natural_image
Illustration of a car seatbelt buckle being adjusted for a seatbelt, showing the buckle being inserted (no text or symbols present)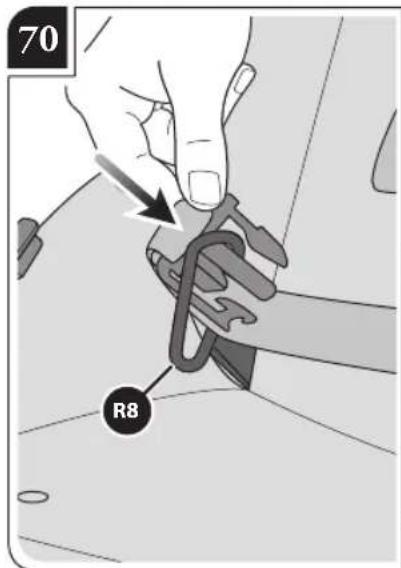
natural_image
Illustration of a hand adjusting a car seatbelt buckle (no text or symbols)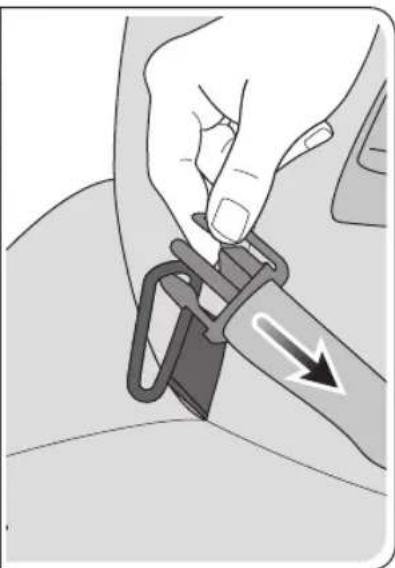
natural_image
Illustration of a hand adjusting a car seatbelt buckle with an arrow indicating direction (no text or symbols)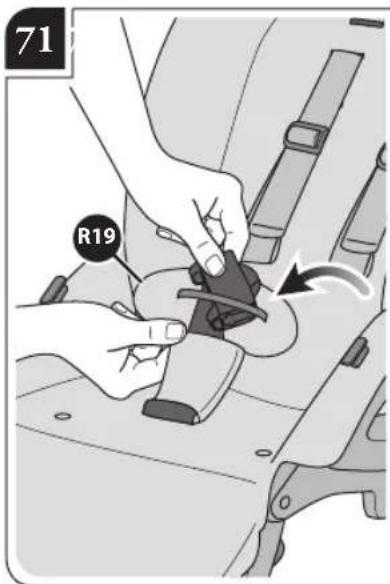
natural_image
Illustration of hands adjusting a car seatbelt switch mechanism (no text or symbols visible)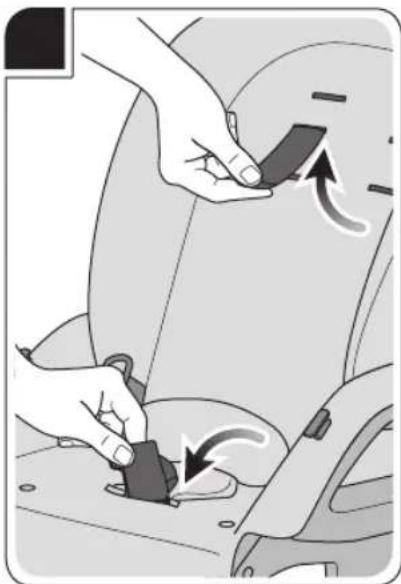
natural_image
Illustration of hands adjusting a car seatbelt with arrows indicating rotation (no text or symbols)AVVERTENZE

IMPORTANTE - LEGGERE ATTENTAMENTE LE ISTRUZIONI PRIMA DELL'USO E CONSERVARLE PER FUTURO RIFERIMENTO. LA SICUREZZA DEL VOSTRO BAMBINO PUÒ VENIRE COMPROMESSA SE NON SEGUITE ATTENTAMENTE QUESTE ISTRUZIONI. LA SICUREZZA DEL BAMBINO È VOSTRA RESPONSABILITÀ.
ATTENZIONE! MAI LASCIARE IL BAMBINO INCUSTODITO: PUÒ ESSERE PERICOLOSO. PORRE LA MASSIMA ATTENZIONE QUANDO SI UTILIZZA IL PRODOTTO.
PER EVITARE GRAVI DANNI DA CADUTE E/O SCIVOLAMENTI, USARE SEMPRE LE CINTURE DI SICUREZZA CORRETTAMENTE AGGANCIATE E REGOLATE.
CULLA
IMPORTANT - READ THE INSTRUCTIONS CAREFULLY BEFORE USE AND KEEP FOR
FUTURE REFERENCE. FAILURE TO FOLLOW THESE INSTRUCTIONS CAN JEOPARDISE THE SAFETY OF YOUR CHILD.
YOUR CHILD'S SAFETY IS YOUR RESPONSIBILITY.
WARNING! NEVER LEAVE THE CHILD UNATTENDED: IT CAN BE DANGEROUS. PAY UTMOST CARE WHEN USING THE PRODUCT.
TO PREVENT THE BABY FROM FALLING
AND/OR SLIDING OUT WITH SERIOUS INJURY RISKS, ALWAYS USE THE SAFETY BELTS PROPERLY FASTENED AND ADJUSTED.
CARRYCOT
• This product is suitable for babies from birth up to 9 kg.
SEAT UNIT
- This product is suitable for babies from birth up to 15 kg according to European Standard EN1888:2012.
- This product is usable for babies up to 20 kg with the seat unit facing forward.
INFANT CAR SEAT (group 0+)
• This product is suitable for babies from birth up to 13 kg.
- With newborn babies, it is preferable to use the carrycot
and/or seat in its most reclined position.
• Always use the restraint system and never leave the child unattended.
• Always use the crotch strap in combination with the waist strap.
- Restraints conforming to the standards in force, other than those supplied with this product, can be used, taking care to secure them to the side rings on the seat (Fig. 46 - detail R8).
- The correct use of the restraint system is not a substitute for proper adult supervision.
- Be aware that the bumper bar is not an effective restraint. Always use the restraint system.
CARRYCOT
• THIS PRODUCT IS ONLY SUITABLE FOR A CHILD WHO CANNOT SIT UP
UNAIDED.
- ONLY USE ON A FIRM, HORIZONTAL LEVEL AND DRY SURFACE.
• DO NOT LET OTHER CHILDREN PLAY UNATTENDED NEAR THE CARRYCOT. - DO NOT USE IF ANY PART OF THE CARRY COT IS BROKEN, TORN OR MISSING.
-
THIS PRODUCT IS SUITABLE FOR A CHILD WHO CANNOT SIT UP BY ITSELF, ROLL OVER AND CANNOT PUSH ITSELF UP ON ITS HANDS AND KNEES. MAXIMUM WEIGHT OF THE CHILD: 9 KG.
-
Use only the Inglesina mattress for Easy Clip Carrycots.
- Do not add any mattress other than those provided with the carrycot.
- Only use the Trilogy carrycot with the Inglesina Stand-Up.
- When the child is in the carrycot, ensure that their head is higher than their body, on the horizontal plane.
- Before carrying or lifting the carry cot, always check that the handle is in its vertical position and properly locked on both sides.
- Before carrying or lifting the carry cot, always adjust the backrest in the lowest position of use.
- Always remove the components of the Vehicle Kit's strap assembly or place them in the dedicated side pockets in the internal lining, when the carry cot is not used for transport by car, for prolonged periods of sleep without the continuous surveillance of an adult.
SAFETY
- Before assembly, ensure that the product and all its components have not been damaged during transport. Should this be the case, do not use the product and keep it out of reach of children.
- For the safety of your child, remove and eliminate all plastic bags and elements belonging to the packaging before use and, in any case, keep them out of reach of newborns and children.
- This product must be used only for the number of children it has been designed for.
- Use this product to carry only one child per seat.
- Do not use this product, unless all its components are properly fastened and adjusted.
- Before use, make sure that the product is fully open and ensure that all the locking devices are engaged.
- Do not insert your fingers inside the mechanisms.
- Carefully read the instructions concerning the use of the chassis, when attaching the carrycot/seat/infant car seat.
- Never place the product close to stairs or steps.
- Do not leave the stroller/carrycot/travel system on a slope with the baby inside, even if the brake is engaged. Brake efficiency is limited on high gradients.
- Do not take stairs or escalators when the child is in the stroller/infant car seat/carrycot.
- When parking check if the brake is properly engaged by moving forward/rearward the product.
- Maximum weight for objects placed in basket is 3 kg. The maximum load of the bottle holder is 0,5 kg. Exceeding the recommended maximum weight is strictly prohibited,
because it may cause a hazardous unstable condition.
- Any load applied to the handle and/or the backrest and/or laterally to the product can compromise the stability of the product.
- Be aware of the risks related to open flames or other heat sources, such as radiators, fireplaces, electric and gas stoves, etc.: do not leave the product close to these heat sources.
- Make sure that all possible sources of hazard (e.g. cables, electric wires, etc.) are kept out of reach of the child.
- Never leave the product with the child inside in places where ropes, curtains or other objects can be used by the child to climb up or cause choking or strangling hazards.
HINTS FOR USE
- Do not use the product if any part is broken, torn or missing.
- Regularly inspect the product and all its components to detect any damage and/or signs of wear, unstitching and tears. In particular, ensure the physical and structural integrity of the handles, carry handle and of the bottom of the carrycot.
- Do not let other children or pets play unattended near the product or climb on it.
• Always make sure that the brake is engaged when positioning the child into the stroller seat/carrycot or taking him/her out, as well as during stops, and when assembling/disassembling any accessory.
- Assembly, disassembly and adjustments must be carried out only by adults. Make sure that the person using the product (baby-sitter, grandparents, etc.) are aware of its correct operation.
- While performing any adjustment, make sure that no moving part of the product (e.g. backrest, hood, etc.) comes into contact with the baby. Always make sure that the brake is duly engaged when performing these operations.
- Do not open, fold or disassemble the product with the baby inside.
- In any case, be particularly careful when performing these tasks with the child nearby.
- Finger entrapment and scissoring actions may happen during these operations.
- Do not leave the baby in the product when travelling on other transport means (eq. train, subway, bus, airplane etc).
- When the product is not used, it must be stored out of reach of children. The product shall not be used as a toy! Do not let the child play with it.
- The product is equipped with a rear platform that helps tackling steps and obstacles. Do not use this platform to carry another child.
- Do not transport the baby in the stroller seat separately from the chassis.
- In case of prolonged exposure to sunlight, let the product cool down before using it.
- Use only with Trilogy carrycot and Huggy Multifix infant car seat by Inglesina specifically designed and provided with Easy Clip hooking system. If in doubt, visit inglesina.com or contact your Authorised Retailer or the Inglesina Customer Care Service.
- Using the infant car seat with chassis does not replace the carrycot or a bed. When the child needs to sleep, it is preferable to use a carrycot or a bed. The car seat is not designed for a long sleep.
- The Huggy Multifix child seat can also be used as a reclined cradle.
- Do not use the reclined cradle once your child can sit unaided.
- This reclined cradle is not intended for prolonged periods of sleeping.
- It is dangerous to use this reclined cradle on an elevated surface, e.g. a table.
RAINCOVER
WARNING!
- Use under an adult surveillance.
- When in use make sure the rain cover does not come in contact with the face of the child.
- Don't use the raincover on the product without a hood that can hold it.
- Use only on the Inglesina stated product.
- Do not use on products other than those recommended by the Manufacturer.
- To avoid risk of suffocation or overheating do not use it on sun or in enclosed areas.
- Hand wash at 30^ C .
MANUFACTURER'S CONVENTIONAL WARRANTY
- Inglesina Baby S.p.A. guarantees that every article has been designed and manufactured in compliance with the general product quality and safety standards/regulations in force in the European Union and the countries it is marketed in.
- Inglesina Baby S.p.A. guarantees that during and after the manufacturing process, every product has undergone various quality controls. Inglesina Baby S.p.A. guarantees that, at the time of purchase from the Authorised retailer, every product had no installation or manufacturing defects.
- This warranty does not invalidate the rights acknowledged to the consumer by the applicable national legislation, which may vary depending on the country in which the product was purchased and the provisions of which, in the event of a contrast, prevail over the contents of the warranty herein.
- In the event of material or manufacturing defects detected at the time of purchase or during normal use, as described in the relevant instruction manual, Inglesina Baby S.p.A. grants a consecutive 24-month warranty from the date of purchase.
- The warranty is only valid in the country where the product was purchased and if it was purchased from an Authorised Retailer.
- The warranty acknowledged is valid for the first owner of the product purchased.
- The warranty covers the replacement or repair free of charge of parts with factory defects. Inglesina Baby S.p.A. reserves the right to decide at its sole discretion whether to apply the warranty via the repair or the replacement of the product.
• To apply the warranty, the product serial number needs to be presented, along with a copy of the receipt issued at the time of purchase of the product, making sure that the date of purchase is indicated in a clearly legible form.
- This warranty will be automatically made null and void in the event that:
- the product is used for purposes that are not expressly indicated in the relevant instruction manual.
- the product is not used in compliance with the relevant instruction manual.
- the product has been repaired by unauthorised and unaffiliated Customer Care centres.
- the structural or textile part of the product has been modified and/or tampered with, without prior expressed authorisation by the manufacturer. Any modifications made to the products relieve Inglesina Baby S.p.A. from any liability.
- the defect is due to negligent or careless use (e.g., violent shocks to the structural parts, exposure to aggressive chemical substances, etc.).
- the product presents normal wear (e.g., wheels, moving parts, fabrics) due to prolonged and continuous use.
- the product has been damaged, even accidentally, by the owner himself/herself or by third parties (for instance when it has been sent as luggage in air freight or using other means).
- the product is sent to the retailer for assistance without the original receipt and/or without the serial number or when the date of purchase on the receipt and/or the serial number are not clearly legible.
- Any damage caused by the use of accessories not supplied and/or not approved by Inglesina Baby, shall not be covered by the warranty.
- Inglesina Baby S.p.A. shall not be held liable for any damage to property or injuries to persons resulting from the improper and/or misuse of the product.
• After the warranty period has expired, the Company guarantees customer care service for consideration for its products for a maximum period of four (4) years from the date said products were placed on the market; after this period, assistance interventions will be assessed case by case.
SPARE PARTS / AFTER SALES SERVICES
- Regularly inspect the safety devices to ensure the product's functionality over time. Do not use the product in the event of any malfunction and/or anomaly. Promptly contact your Authorised Retailer or the Inglesina Customer Care service.
- Do not use spare parts or accessories not supplied and/or not approved by Inglesina Baby.
WHAT TO DO IF YOU REQUIRE ASSISTANCE
- If you require assistance for your product, immediately contact the Inglesina Retailer that sold it to you, with the "Serial Number" relative to said object ready on hand (the "Serial Number" is available from the 2010 Collection).
- It is the Retailer's duty to contact Inglesina to assess the best suited intervention case by case and then provide the subsequent indications.
- The Inglesina Customer Care Service can provide any information, following written request by filling out the form provided on the website: inglesina.com - Warranty and Assistance section.
HINTS FOR CLEANING AND MAINTAINING THE PRODUCT
- This product requires regular maintenance by the user.
-
Never force any mechanisms or moving parts; in case of doubt, check the instruction first.
-
Do not store the product if it is still wet and do not leave it in humid environments since mildew may form.
- Store the product in a dry place.
- Protect the product against weather agents, water, rain or snow; moreover, continuous and prolonged exposure to sunlight can cause changes in the colour of many materials.
- Should the product be used on the beach, carefully clean and dry it afterwards in order to remove sand and salt.
- Clean the plastic and metal parts with a damp cloth or with a mild detergent; do not use solvents, ammonia or benzine.
- Carefully dry metal parts after any contact with water to prevent the formation of rust.
- Keep all moving parts clean and, if necessary, lubricate them with light oil.
- Keep the wheels free from dust and/or sand.
HINTS FOR CLEANING THE TEXTILE LINING
- It is recommended to wash the lining separately from other items.
- Periodically revive the fabric parts using a soft clothes brush.
- Follow the lining washing instructions on the labels.

Handwash in cold water

Do not bleach

Do not tumble dry

Dry flat in shade

Do not iron

Do not dry clean
Do not spin-dry
- Dry the textile lining completely before using or storing it. - To prevent formation of mildew, it is advisable to air the carrycot periodically. In particular, separate the textile lining from the structure and run a dry cloth over the bottom.
INSTRUCTIONS


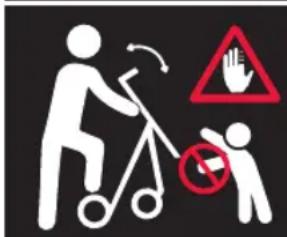

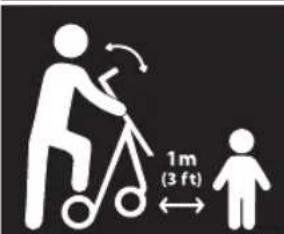
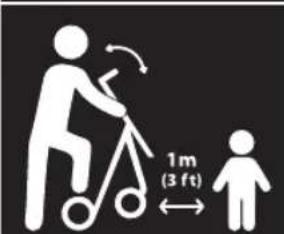
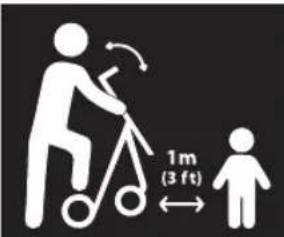
To prevent injuries, keep your child away when unfolding and folding this product.


Never use the rear handle to lift the stroller with the baby inside.
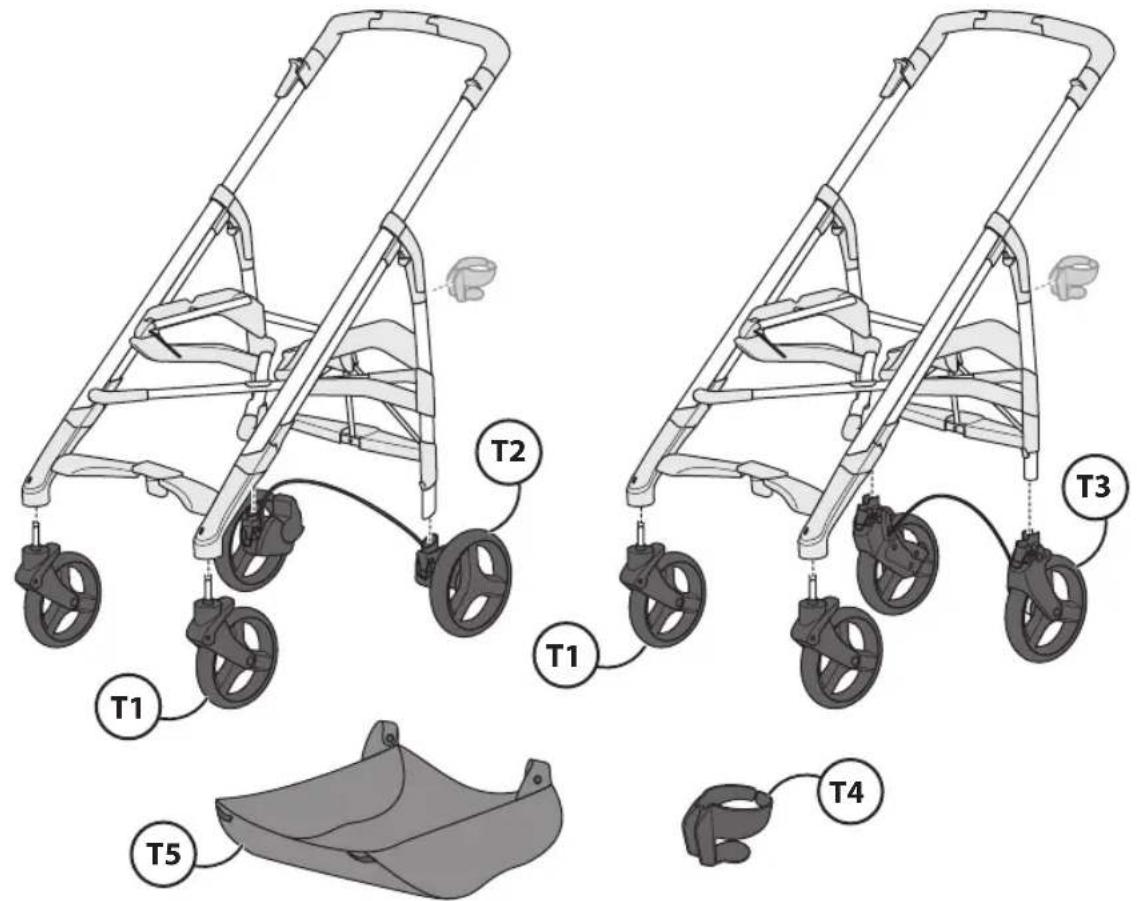
LIST OF COMPONENTS
fig. 1
Chassis
T1 Front wheel assembly
T2 Std Trilogy rear wheel assemblies
T3 City Trilogy rear wheel assemblies
T4 Feeding bottle holder
T5 Storage basket
Transport Seat
R1 Handrail
R2 Pushchair seat hood
R3 Muff (if available)
R4 Rain cover (if available)
Carrycot
C1 Carrycot hood
C2 Carrycot apron
Infant Car Seat (if available)
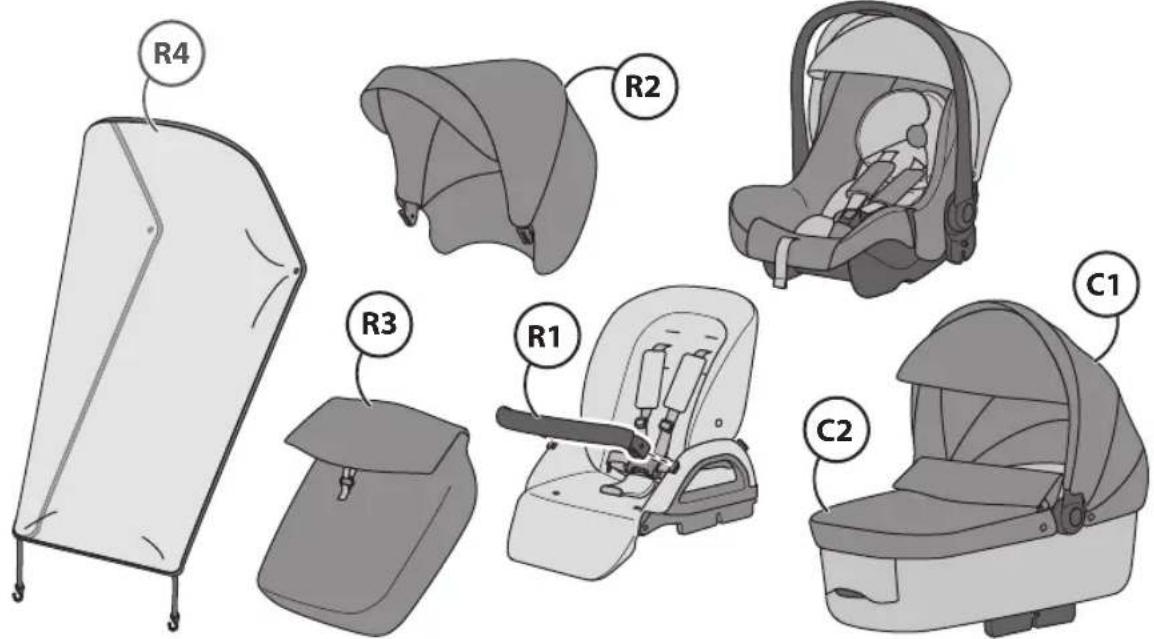
CHASSIS
ASSEMBLY/REMOVAL OF REAR WHEEL ASSEMBLY
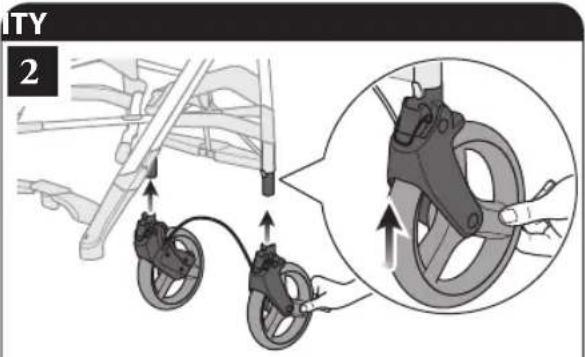
fig. 2 Insert the wheel assembly in correspondence of the rear tube
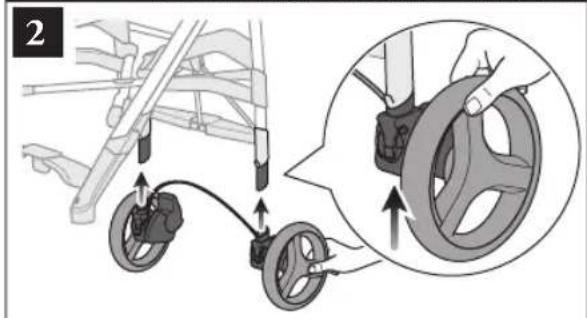
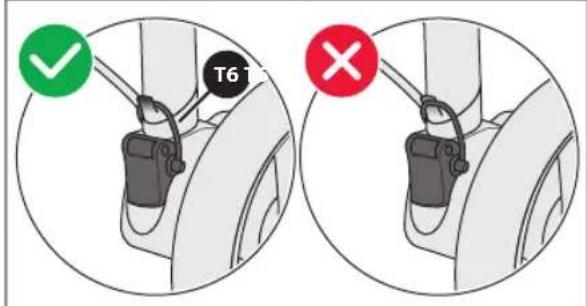
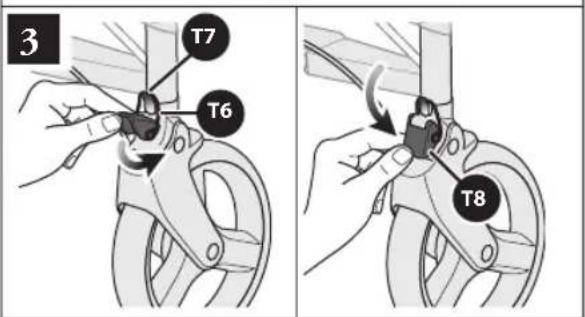
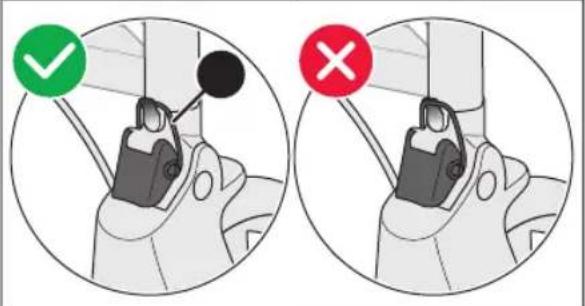
fig. 3 Attach the ring (T6) to the bracket (T7), and press the lever (T8) until it is fully attached, making sure that the ring (T6) is properly positioned in its housing.
CAUTION: make sure that the wheels are properly attached before use.
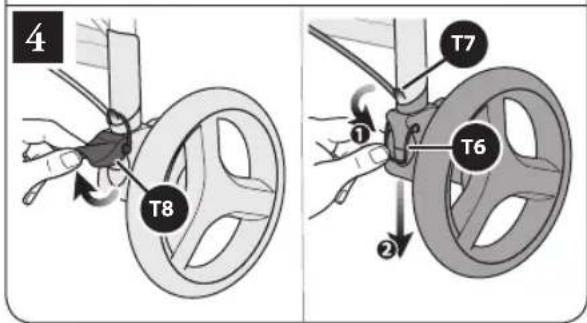
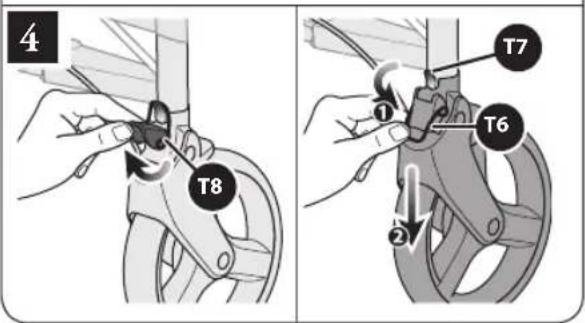
fig. 4 To remove the rear wheel assembly, lift the lever (T8) and unhook the ring (T6) from the bracket (T7), until it is completely free.
OPENING THE CHASSIS
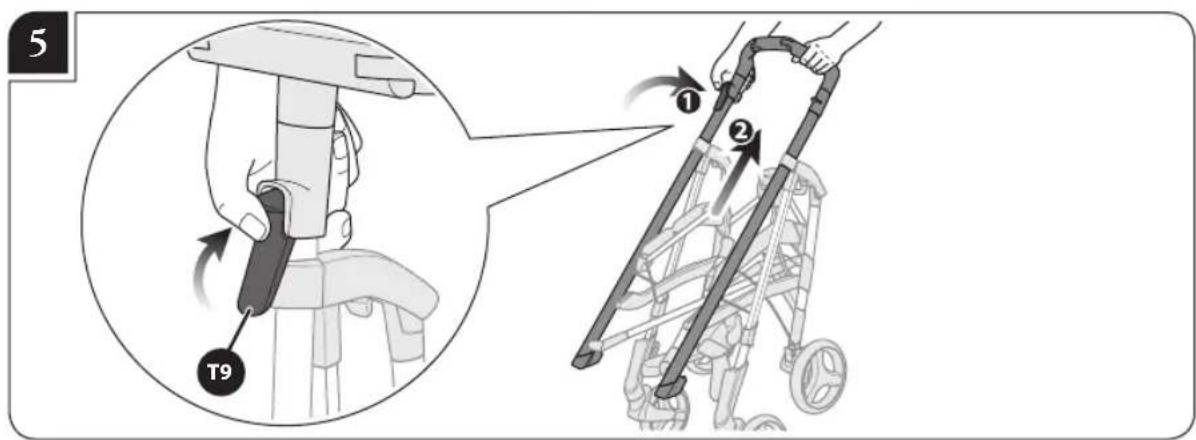
fig. 5 Keeping pressed the lever (T9) positioned on the right handle, firmly lift the frame until it is completely open.
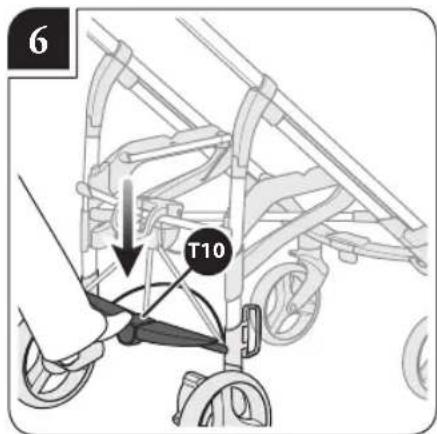
fig. 6 Complete the procedure by pushing on the pedal control (T10) until it is locked in horizontal position.
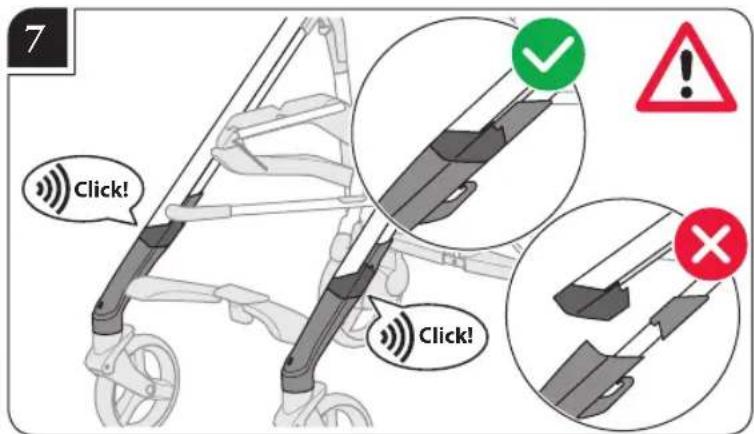
fig. 7 CAUTION: make sure that all clos mechanisms are properly attached on both sides before use.
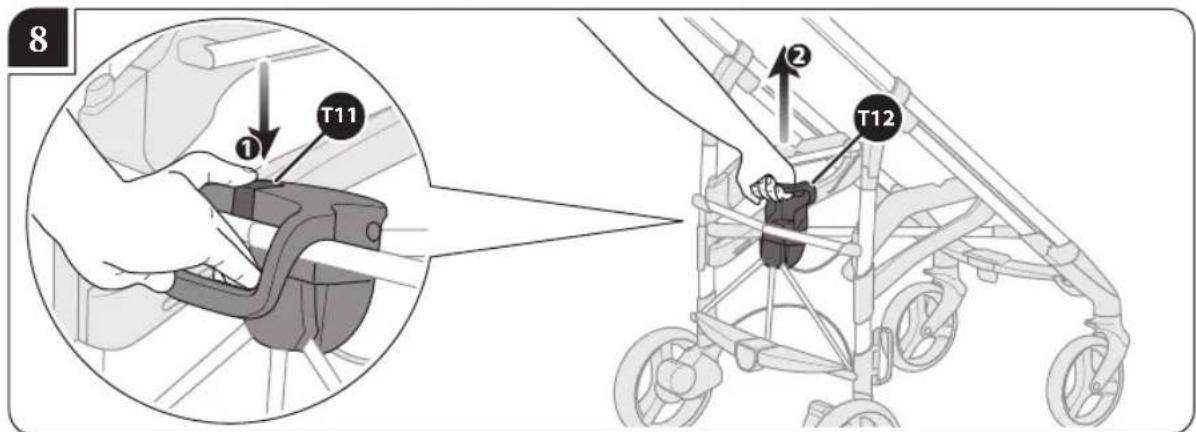
CLOSING THE CHASSIS
fig. 8 Press the button (T11) and lift the rear handle (T12).
fig. 9 Firmly pull the rear handle (T12) upwards until the chassis is completely folded
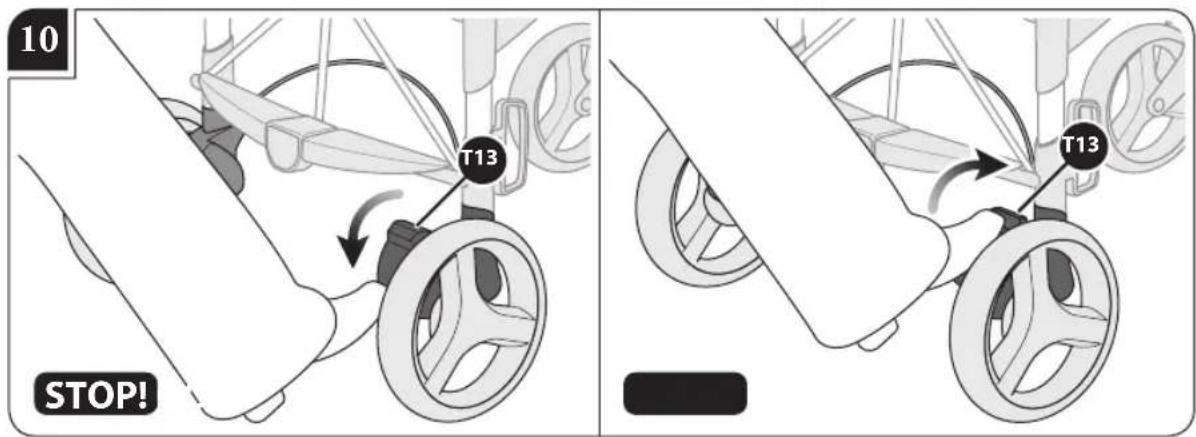
REAR WHEELS BRAKE
fig. 10 To engage the brake, push down the lever (T13) positioned on the right rear wheel assembly
Always engage the brake during stops.
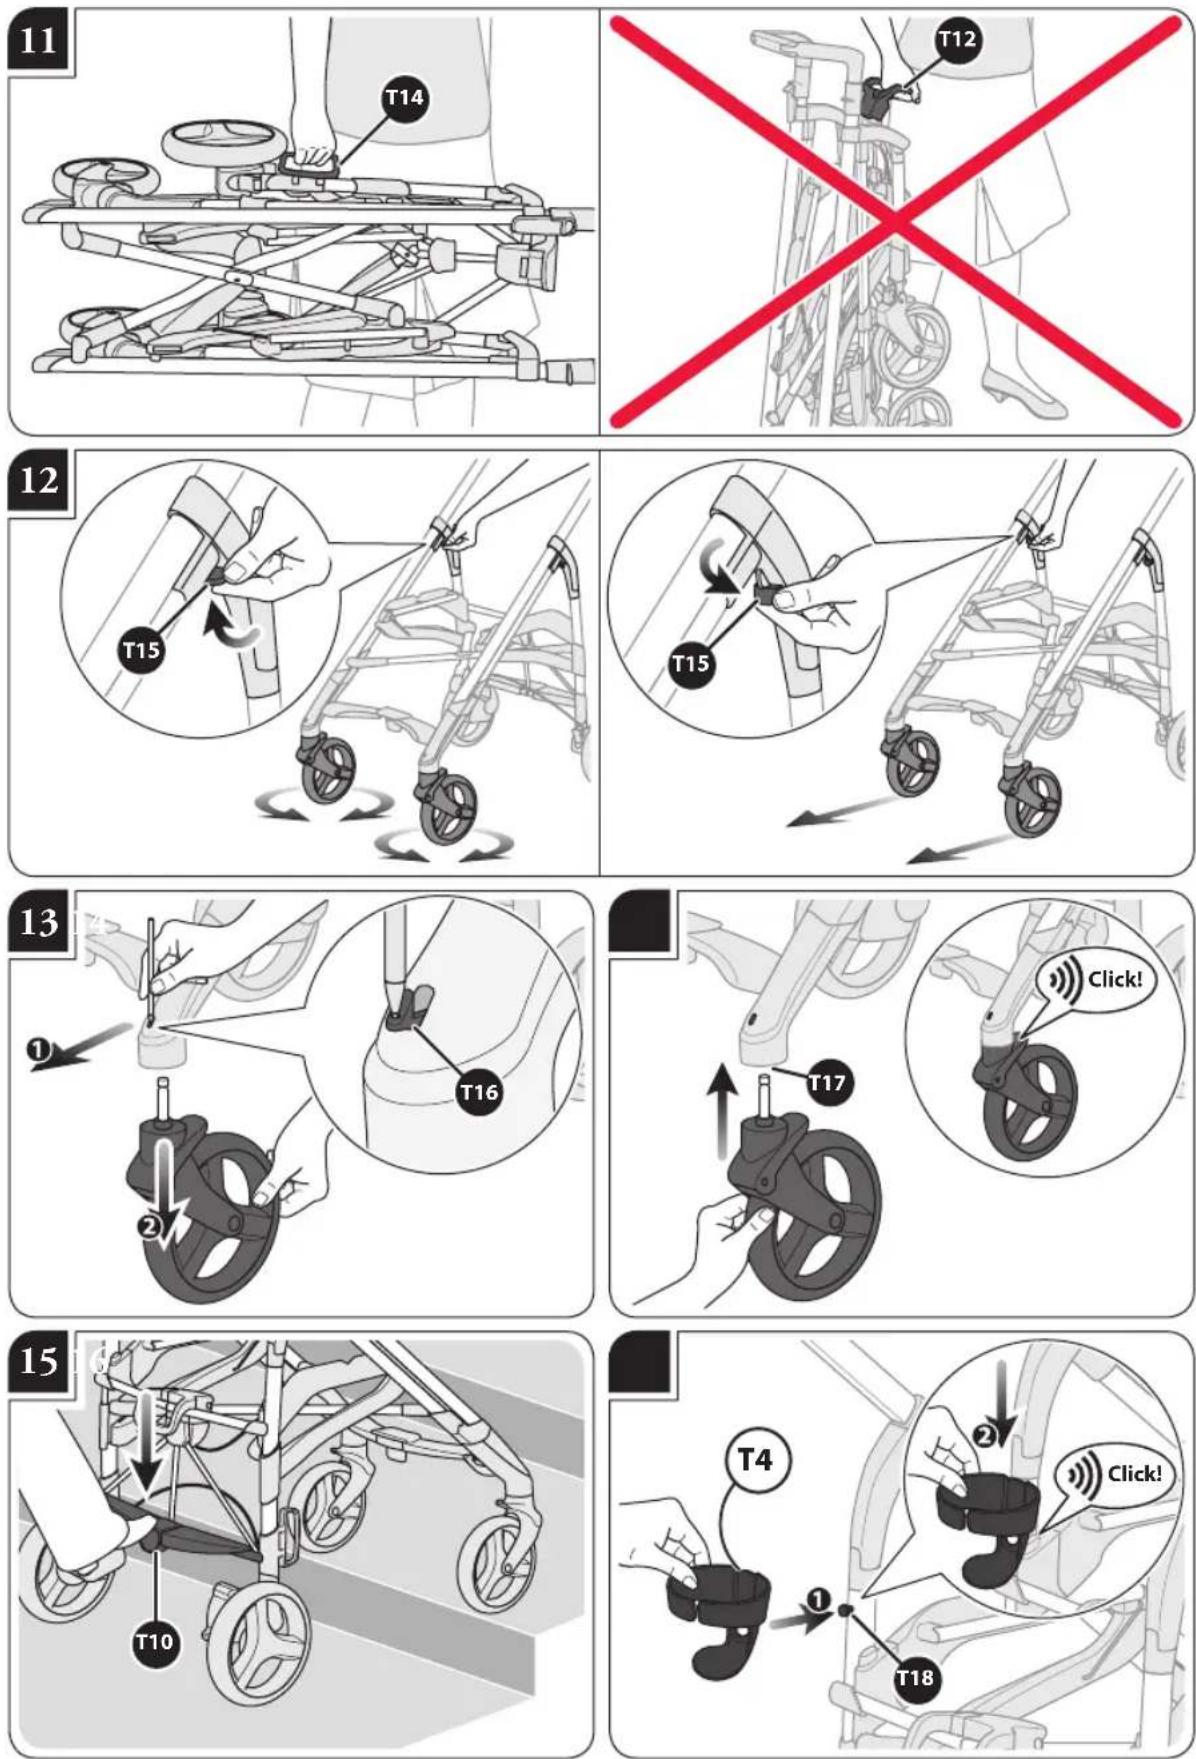
CARRY HANDLE
fig. 11 To transport the folded chassis, use the handle (T14). Do not lift the chassis by the opening handle (T12).
fig. 12 The chassis is equipped with swivel wheels, which can be blocked/unblocked by means of the lever (T15) located in correspondence of the central joint.
REMOVING THE FRONT WHEELS
fig. 13 If necessary, the front wheels can be easily removed. To do so, push the lever (T16) forwards, as shown in the figure and, simultaneously, remove the wheel.
fig. 14 To reattach the wheels, insert them in correspondence of the opening (T17) and push until it clicks into place.
CAUTION: make sure that the wheels are properly attached before use.
REAR PLATFORM
fig. 15 Adjust the rear platform (T10) with your foot to cross obstacles.
FEEDING BOTTLE HOLDER
fig. 16 The chassis is equipped with a standard feeding bottle holder (T4).
To fasten the feeding bottle holder, place the upper guide in correspondence of the hook (T18) on the chassis and push it in its housing until it is fully attached.
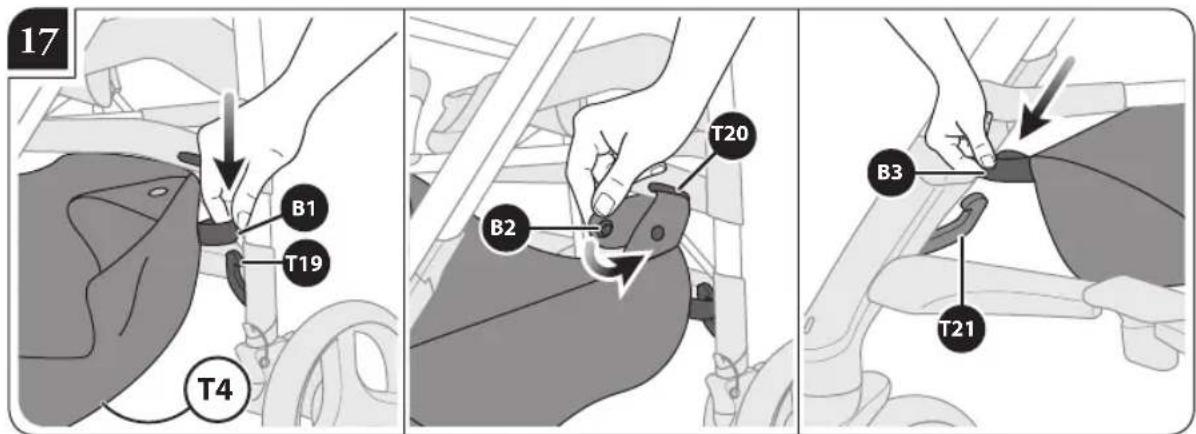
STORAGE BASKET
fig. 17 The chassis is equipped with a capacious storage basket (T5). To secure it, insert the eyelets (B1) onto the rear hooks (T19) on the chassis.
Let the fins (B2) pass through the eyelets (T20) on the side of the frame and fasten the corresponding press studs.
Finally, insert the eyelets (B3) onto the front hooks (T21) on the chassis
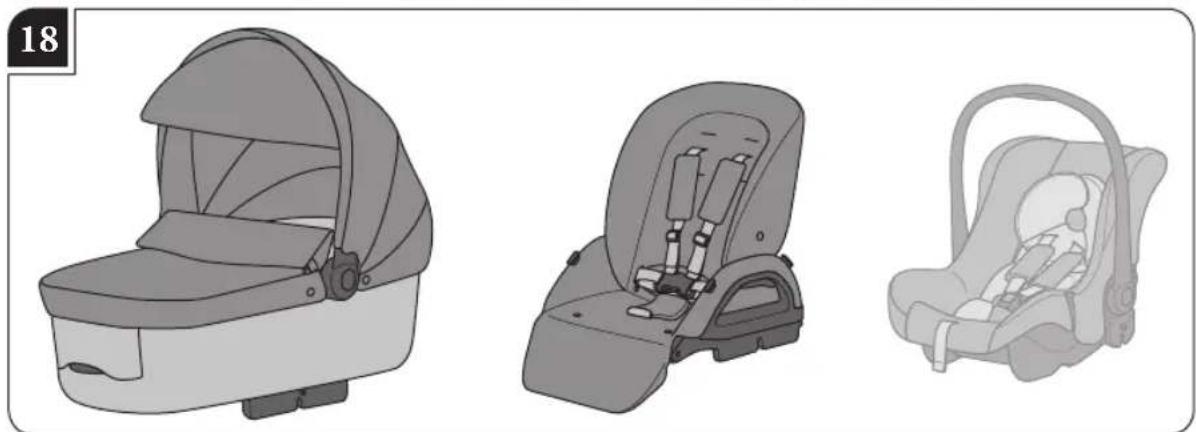
ADDITIONAL TRANSPORT UNITS (CARRYCOT, INFANT CAR SEAT (if available), PUSHCHAIR SEAT)
fig. 18 The chassis can be used with the Trilogy carrycot, the pushchair seat and the Huggy car seat (if available).
TRILOGY CARRYCOT
ATTACHING THE CARRYCOT TO THE CHASSIS
fig. 19 Take the carrycot from the handle and attach it to the chassis in correspondence of the housings on both sides of the structure and place it solely in rear facing position.
fig. 20 CAUTION: make sure that the carrycot is properly attached before use.
DETACHING THE CARRYCOT FROM THE CHASSIS
fig. 21 Use the lever (C3) on the outside of the carrycot.
fig. 22 Simultaneously, lift the carrycot by holding it by the ghandle.
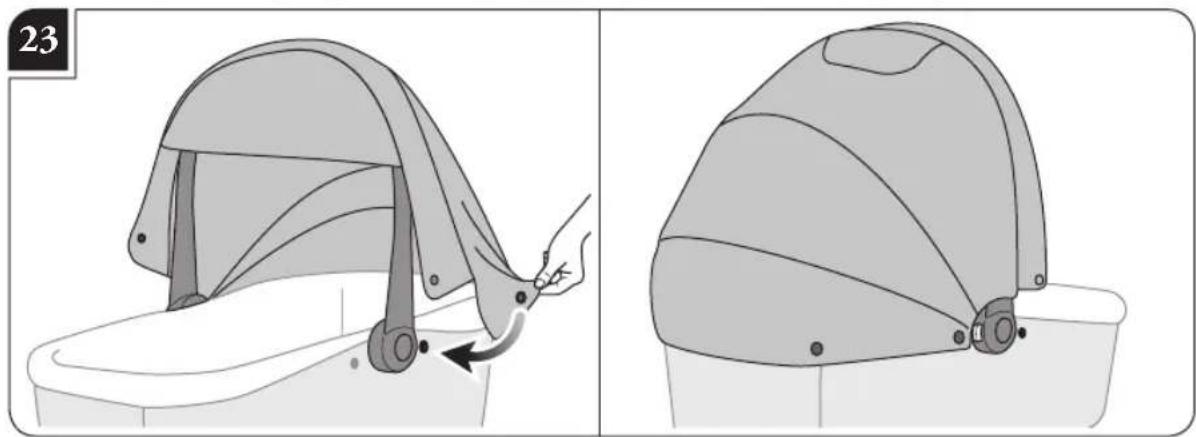
ATTACHING THE HOOD
fig. 23 Fasten the press studs to the carrycot structure.
fig. 24 Wrap the hood (C1) around the handle, fastening it by means of the press studs.
HANDLE AND HOOD ADJUSTMENT
fig. 25 To adjust the handle and the hood, press the two buttons on the sides (C4) simultaneously.
fig. 26 CAUTION: to transport the carrycot, always hold it by the handle.
HOOD VENTILATION (IF AVAILABLE)
fig. 27 The hood is equipped with a mesh netting that allows for proper ventilation inside the carrycot.
ATTACHING THE APRON
fig. 28 Fasten all the apron buttons to the carrycot.
INTERNAL VENTILATION
fig. 29 Internal ventilation can be adjusted by means of the lever (C5).
BACKREST ADJUSTMENT
fig. 30 Operate the lever (C6) to adjust the backrest: once the desired position is reached, set the lever to the starting position.
MATTRESS
AND
INTERNAL
LINING
MAINTENANCE
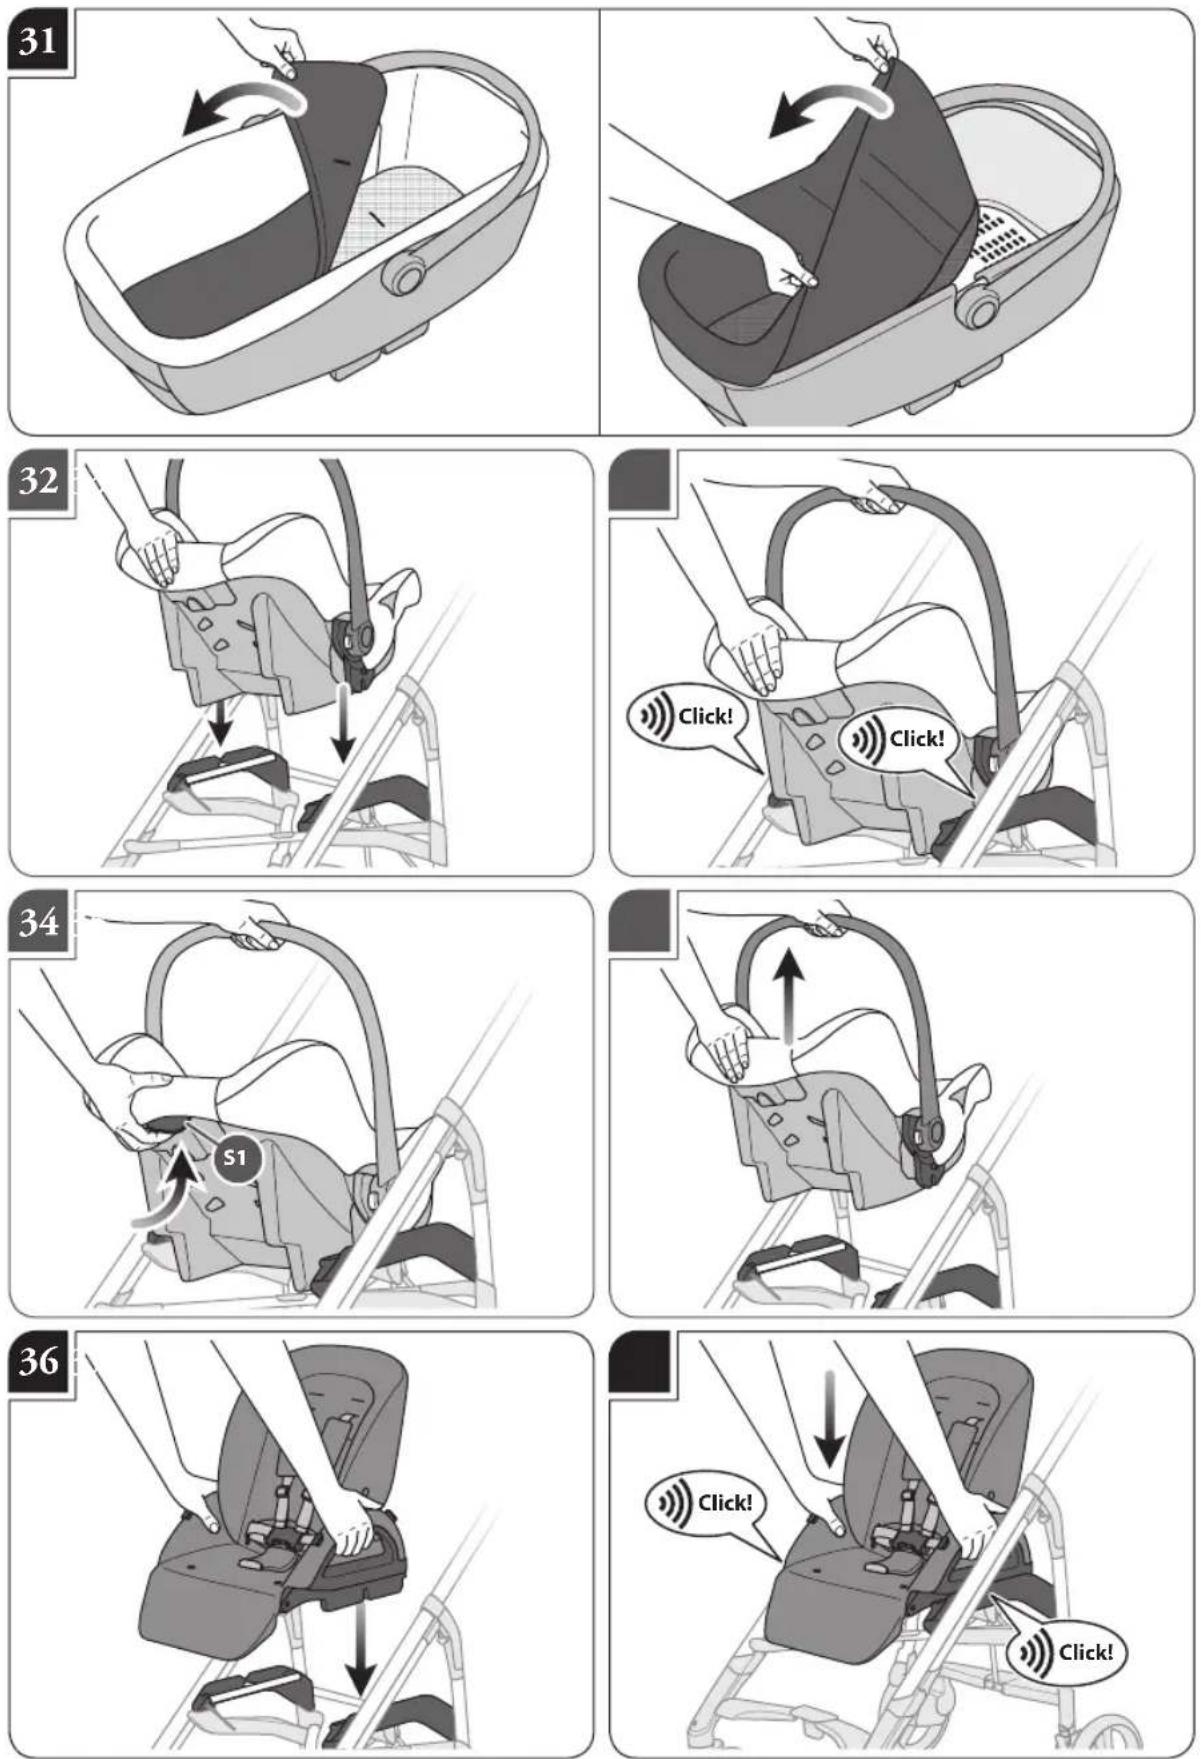
fig. 31 It is advisable to remove the mattress and internal
lining periodically for correct maintenance.
HUGGY INFANT CAR SEAT (IF AVAILABLE)
ATTACHING THE INFANT CAR SEAT TO THE CHASSIS
fig. 32 Take the infant car seat from the handle and attach it to the chassis in correspondence of the housings on both sides of the structure and place it solely in rear facing position.
fig. 33 CAUTION: make sure that the infant car seat is properly attached before use.
DETACHING THE INFANT CAR SEAT FROM THE CHASSIS
fig. 34 Use the lever (S1) on the rear of the infant car seat.
fig. 35 Simultaneously, lift the seat by holding it by the handle.
To use the Huggy infant car seat properly, refer to the dedicated manual.
PUSHCHAIR SEAT
ATTACHING THE PUSHCHAIR SEAT TO THE CHASSIS
fig. 36 Attach the pushchair seat to the chassis, in correspondence of the housings on both sides of the structure.
fig. 37 CAUTION: make sure that the pushchair seat is properly attached before use.
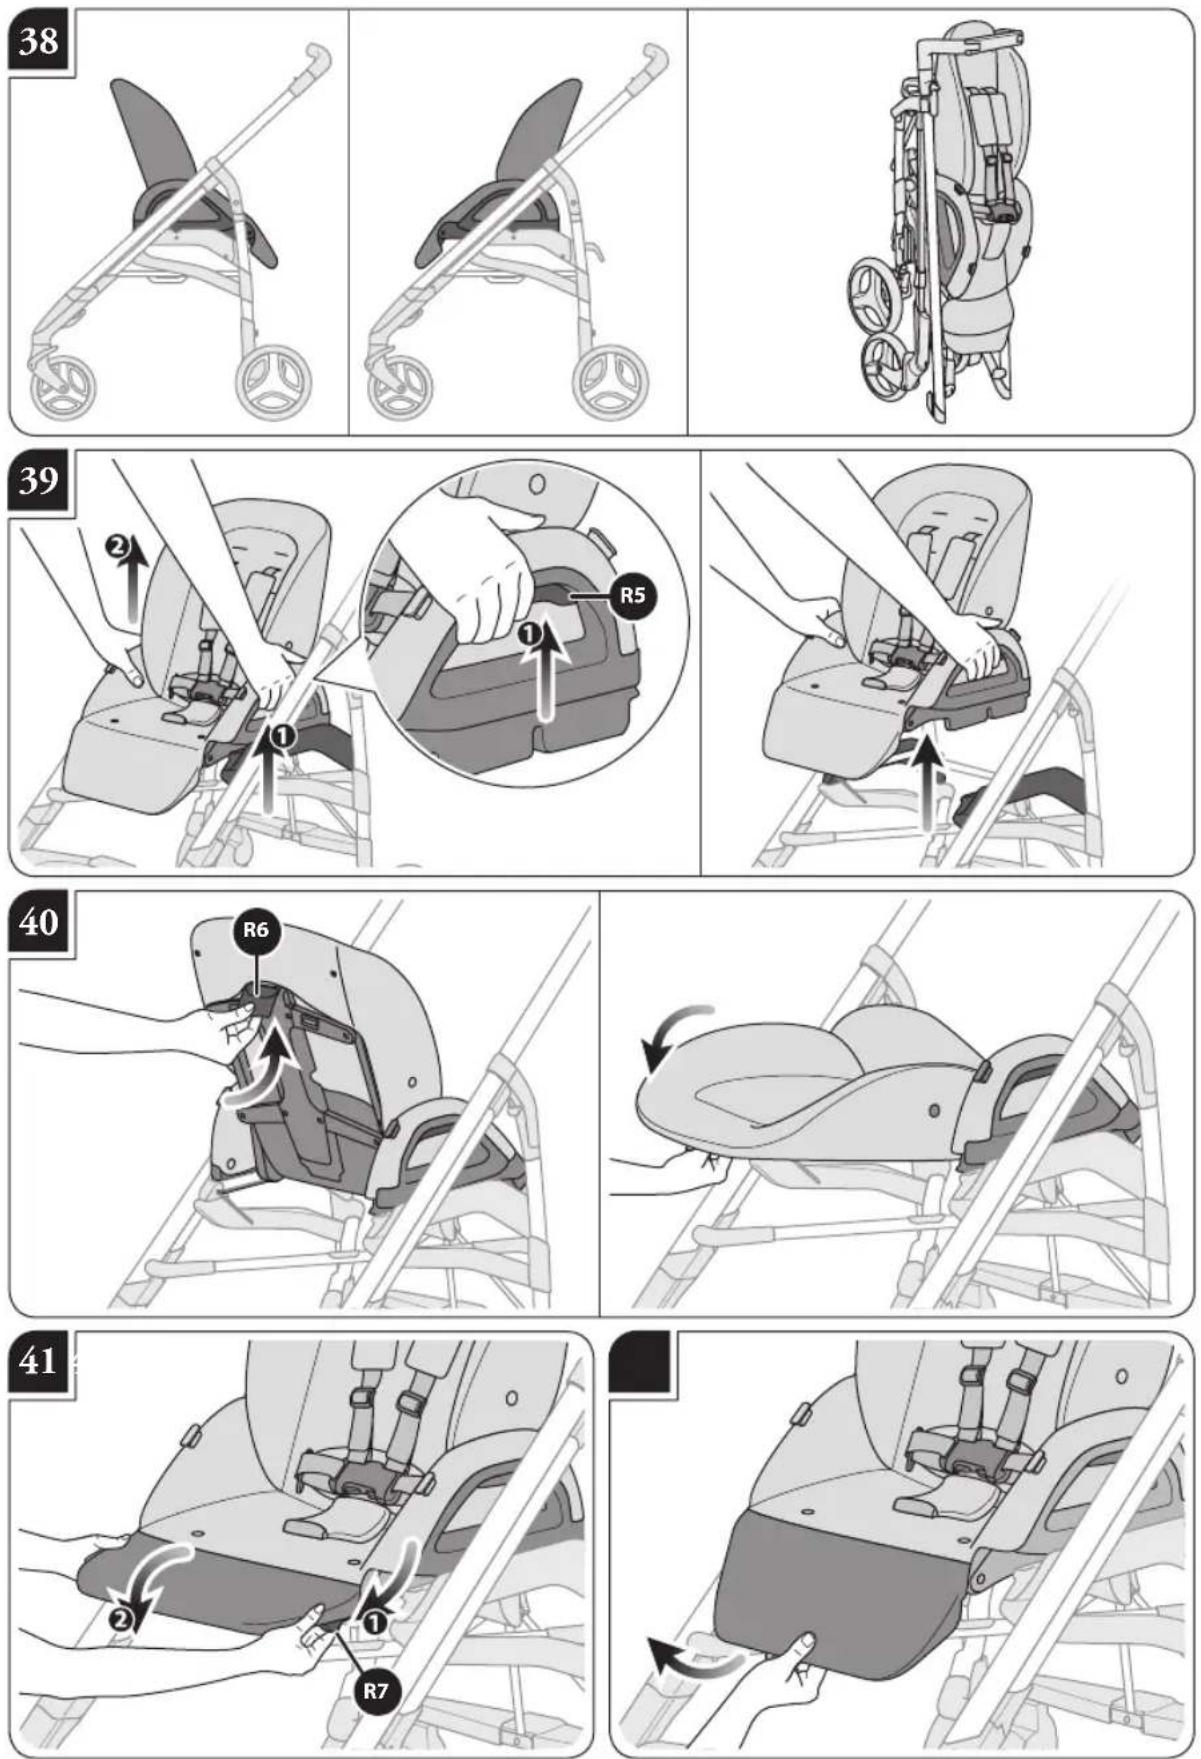
fig. 38 The pushchair seat can be used in rear facing and forward facing position, and the chassis can be folded with the pushchair seat attached.
DETACHING THE PUSHCHAIR SEAT FROM THE CHASSIS
fig. 39 Press the handles (R5) simultaneously and lift the pushchair seat off the chassis.
CAUTION: do not, under any circumstance, carry out this operation with the baby inside.
fig. 40 The backrest can be adjusted to 3 positions; use the central device (R6) and bring the backrest to the desired position.
ADJUSTING THE FOOTREST
fig. 41 To lower the footrest, use both levers (R7) positioned on the lower part and simultaneously press them downwards.
fig. 42 To lift the footrest, simply pull it upwards and it shall automatically lock into position.
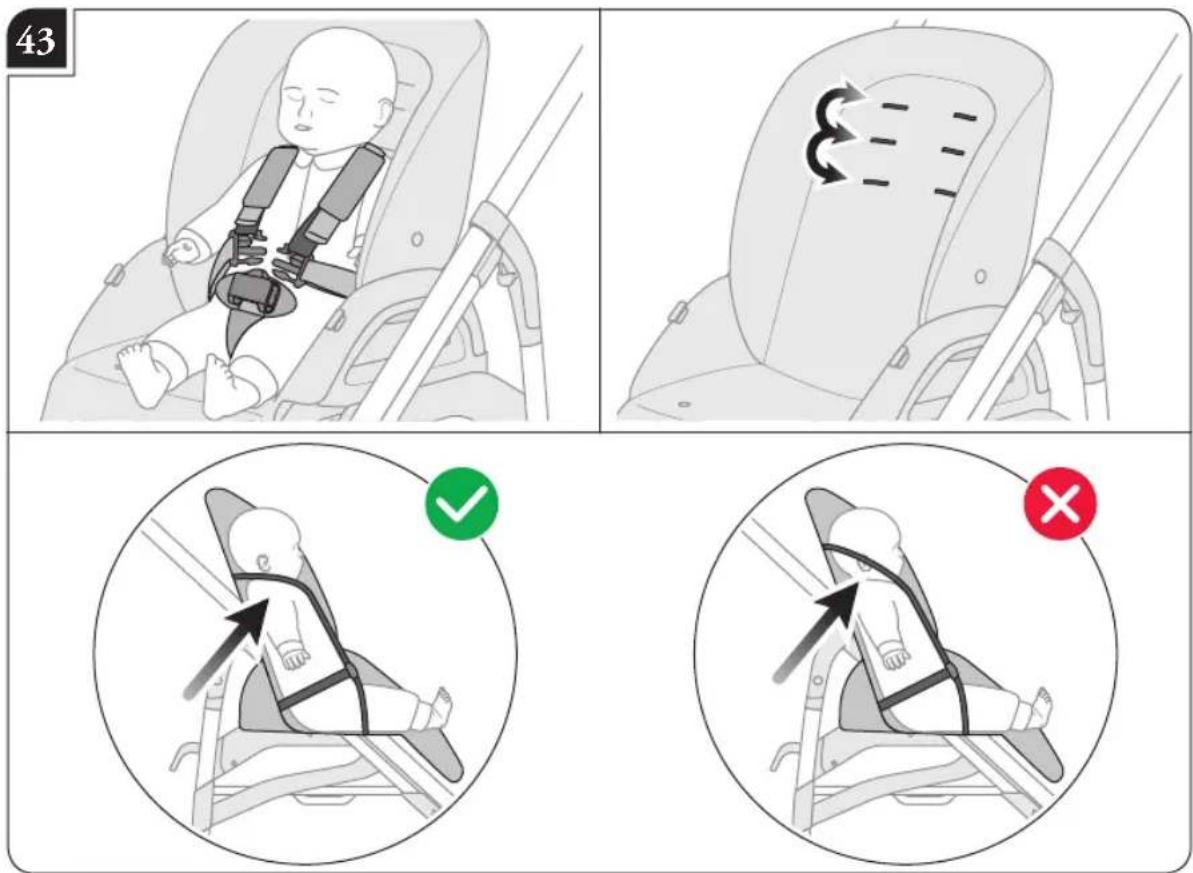
SAFETY BELTS
fig. 43 Ensure that the safety belts are inserted in the eyelets at the height of the shoulders or immediately above. If the position is not correct, remove the belts from the first pair of eyelets and reinsert them in the second one; always use eyelets at the same height.
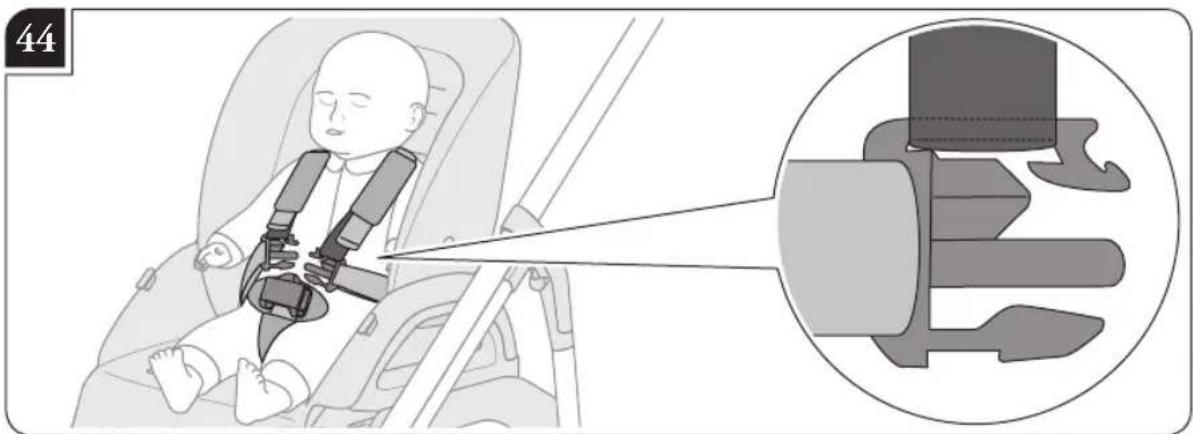
fig. 44 Make sure that the back strap is properly inserted in the ends of the waist one.
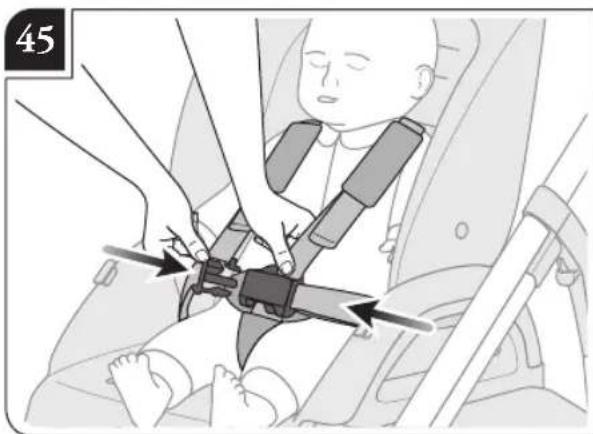
fig. 45 Fasten the ends of the strap belt to the central buckle.
fig. 46 The waist strap must always pass through the side loops (R8) and, when being used, it must be adjusted in order to properly secure the baby.
fig. 47 Always use the crotch strap together with the waist one, adjusting both of them properly.
CAUTION! Failure to comply with this precaution can cause the baby to fall or slide out, with serious injury risks.
ATTACHING THE HANDRAIL
fig. 48 Mount the handrail (R1) by pressing the buttons (R9) and attach it in correspondence of the relative housings on the pushchair seat (R10).
fig. 49 The handrail can be open on one side or fully removed; to open it, press the button (R9) and remove it from its housing; to remove it, repeat the procedure on the other side.
ATTACHING THE HOOD
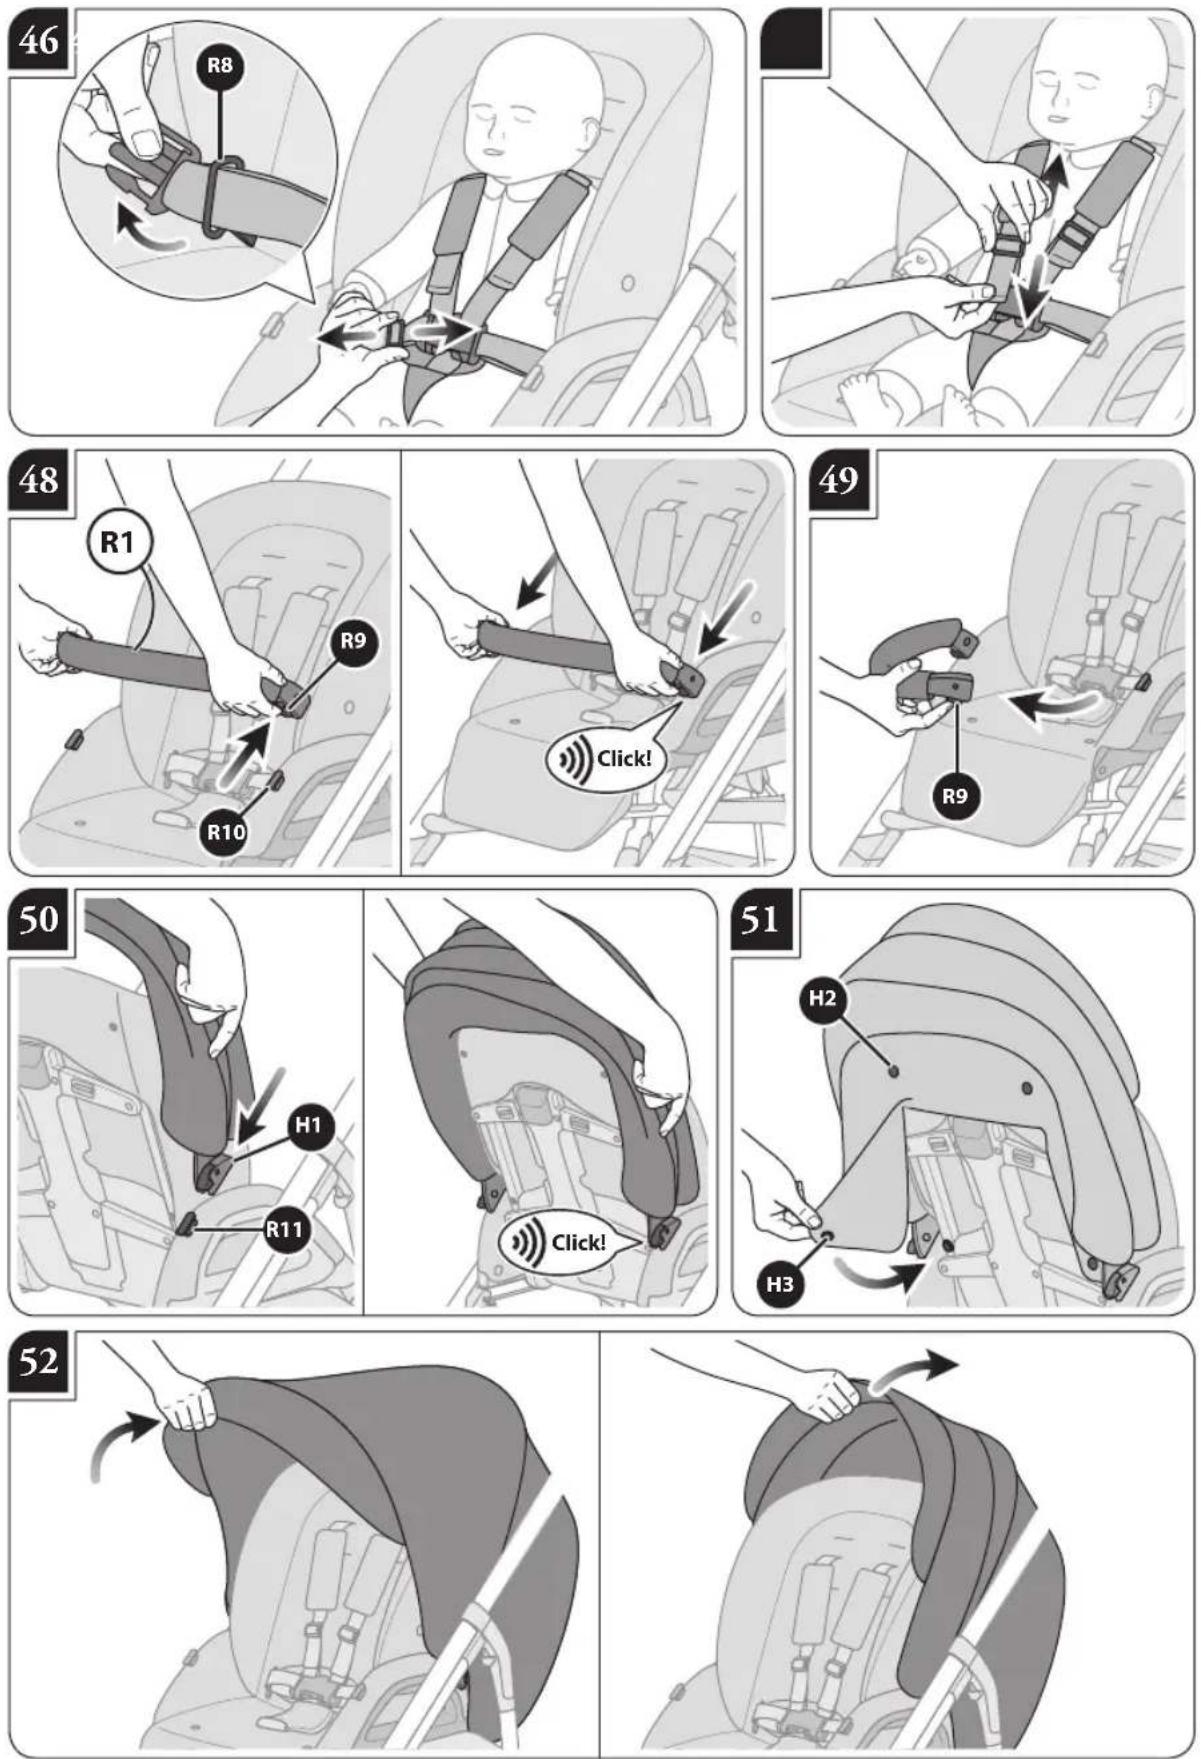
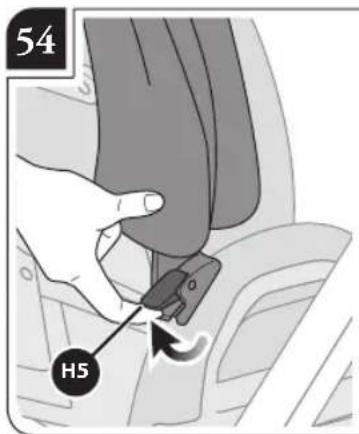
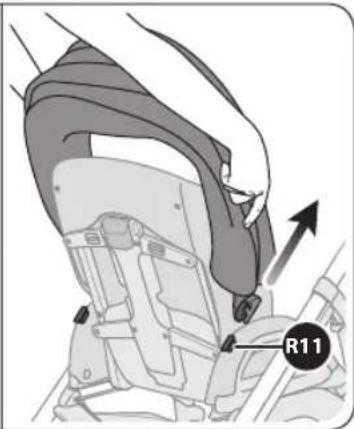
fig. 50 The hood is mounted onto the stroller by positioning it in correspondence of the 2 housings (R11) on the pushchair seat and inserting the slides (H1), pushing until they both click into place.
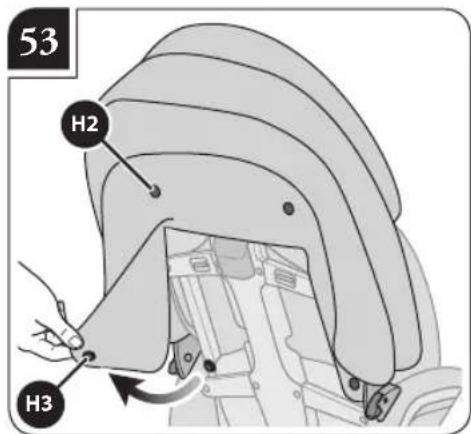
fig. 51 Fasten the press studs of the lining to the backrest, starting with the upper ones (H2) and then with the lower ones (H3).
fig. 52 To adjust the hood, simply accompany it to the desired position.
fig. 53 To remove the hood from the stroller, unfasten the press studs that secure the lining to the backrest (H2-H3).
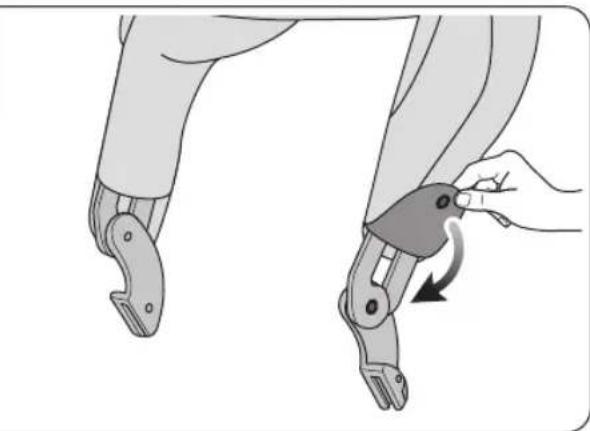
fig. 54 Then adjust the lever (H5) and simultaneously extract the hood from the housings (R11) on the pushchair seat.
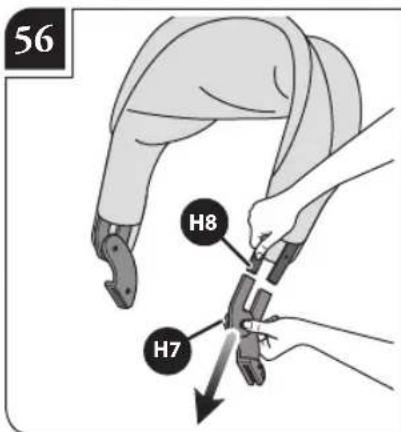
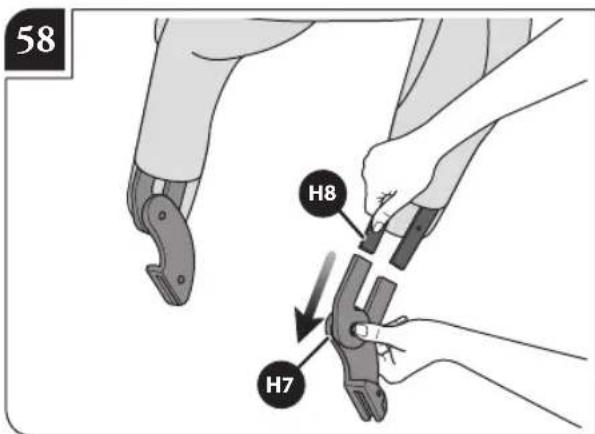
fig. 55 The hood lining can be removed to allow for its correct maintenance. Unfasten the buttons (H6) on both hood joints (H7).
fig. 56 Detach both joints (H7) from the binding (H8) and remove the lining.
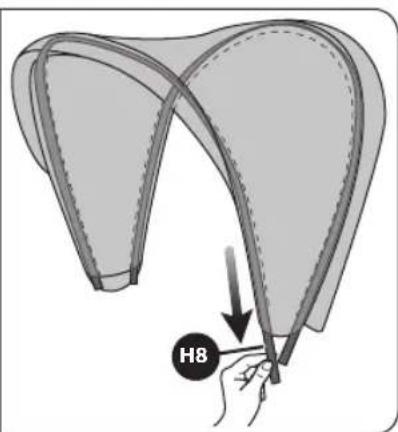
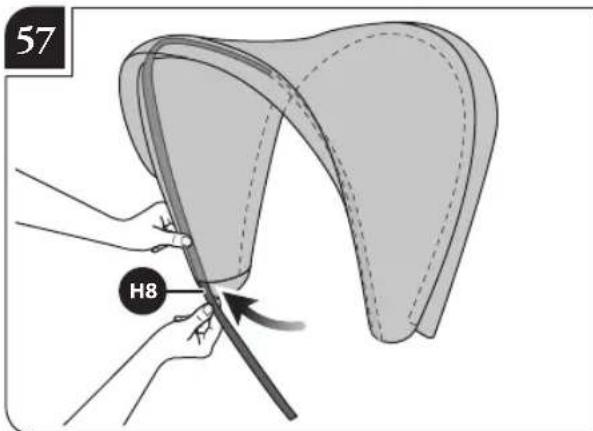
fig. 57 To remount the lining, insert both bindings (H8) in the guides on the internal lining.
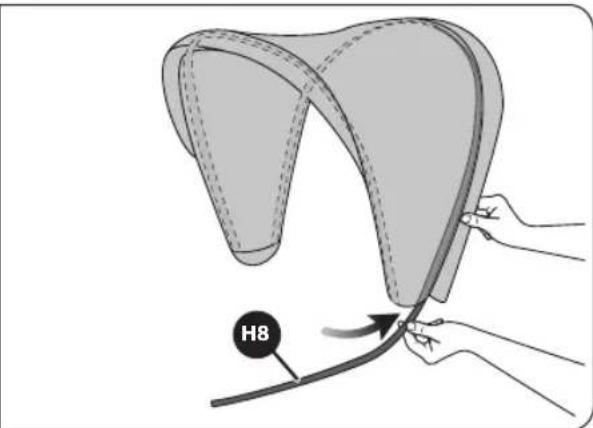
fig. 58 Insert the bindings (H8) in their housings on both joints (H7), until fully attached.
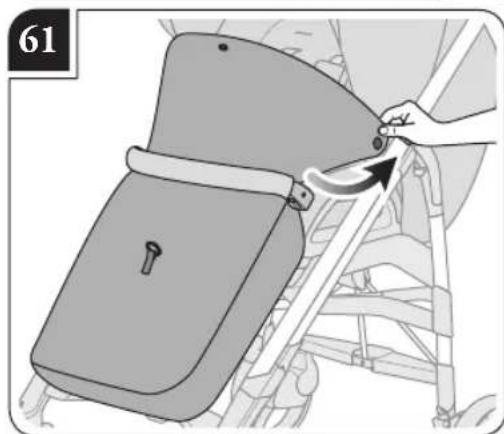
MUFF (IF AVAILABLE)
fig. 59 Place the muff (R3) making it pass under the handrail.
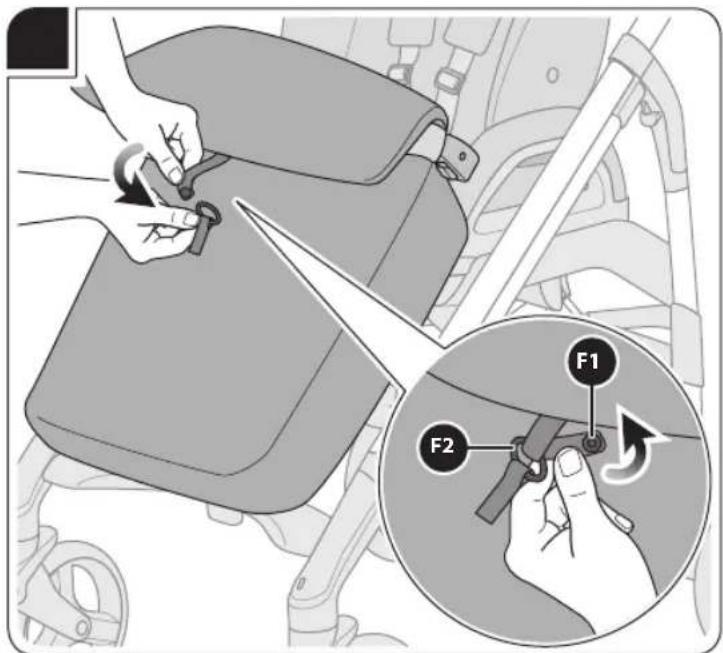
fig. 60 Button up the central binding (F1), making it pass through the ring (F2).
fig. 61 The muff reverse can also be attached in a suitable position for protecting the child against cold weather.
fig. 62 The muff can be used on both rear facing and forward facing pushchair seats.
RAIN COVER (IF AVAILABLE)
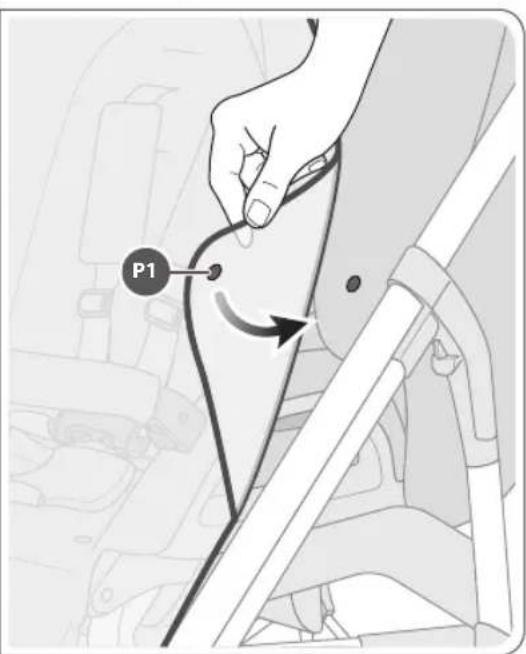
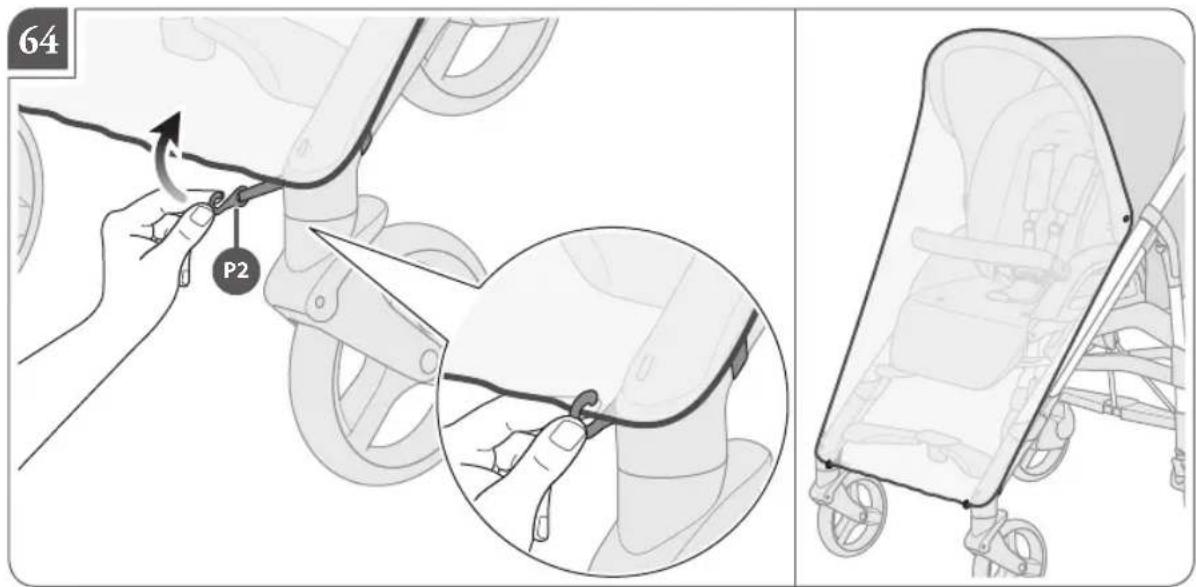
fig. 63 To mount rain cover (R4), place it on the hood and button up the snap fastners on the side (P1).
fig. 64 Fasten the elastic straps (P2) around the front tubes, in correspondence of the wheel assembly.
It is recommended to remove the lining periodically to provide for its correct maintenance.
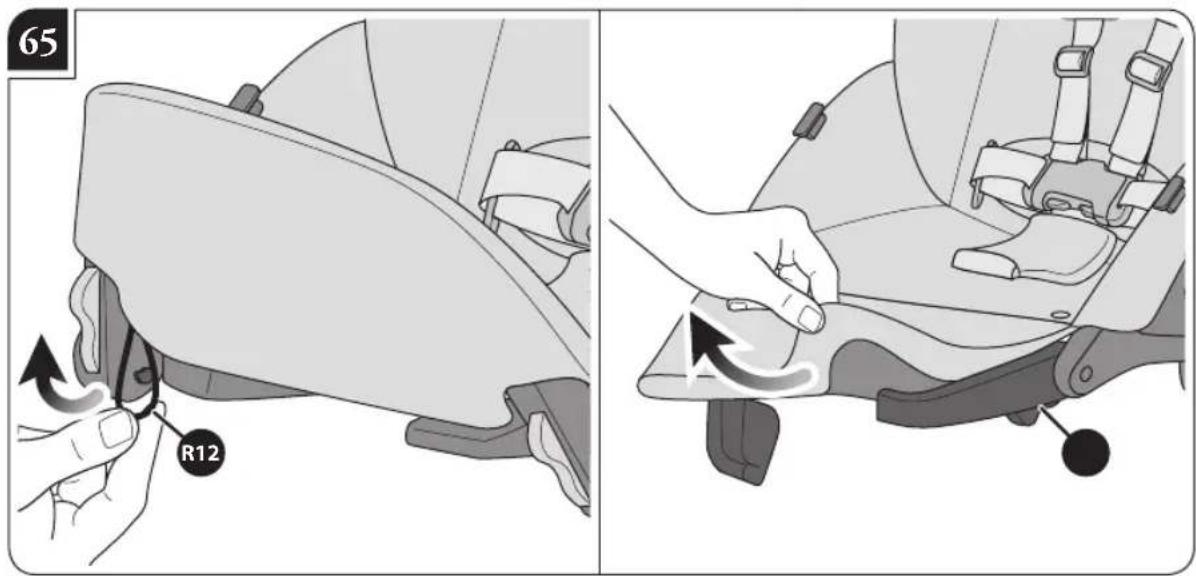
fig. 65 Detach the two lower elastic straps (R12) from the footrest, removing it from its supports (R14).
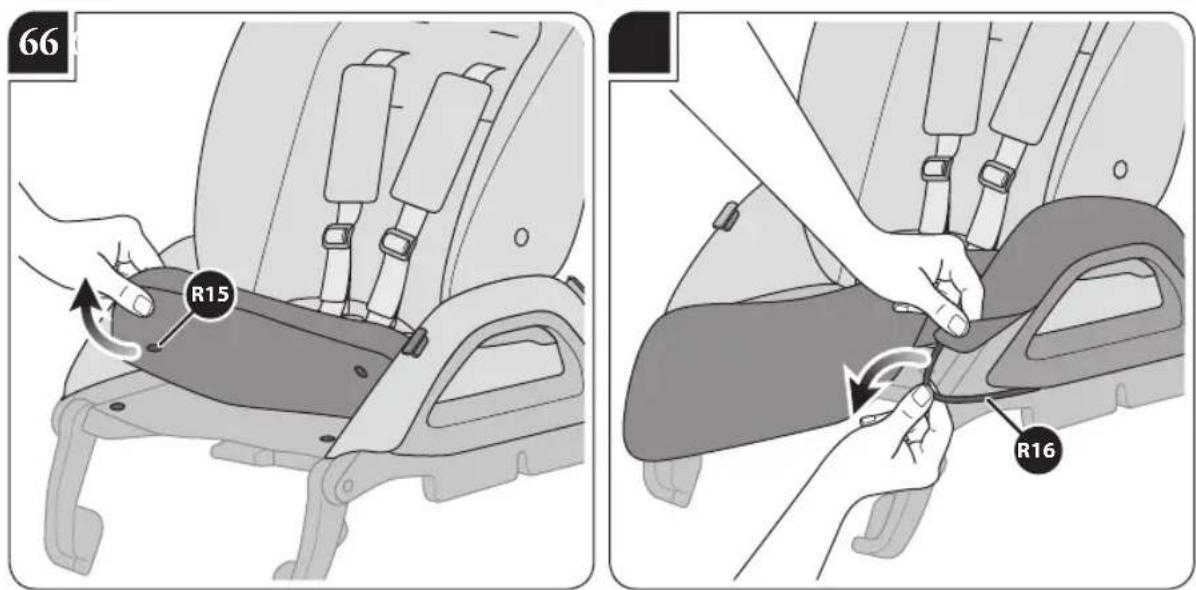
fig. 66 Unfasten the buttons on the seat (R15).
fig. 67 Remove the elastic strap (R16) and unfasten the buttons (R17) on both sides of the pushchair seat.
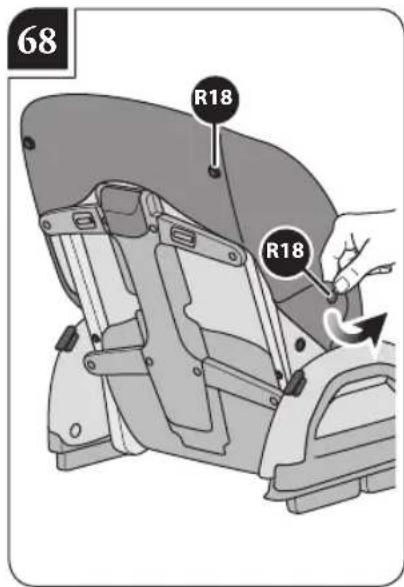
fig. 68 Unfasten the buttons on the eyelets and on the backrest (R18).
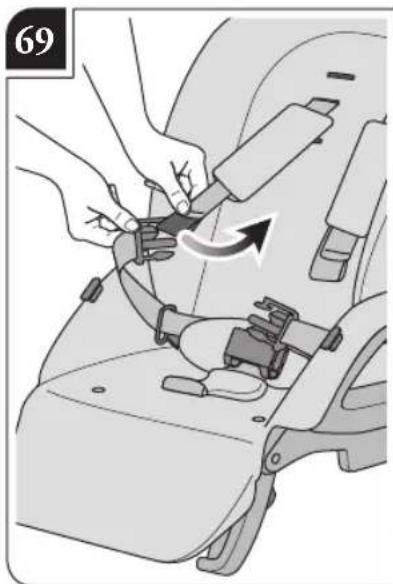
fig. 69 Extract the shoulder pads from the back straps.
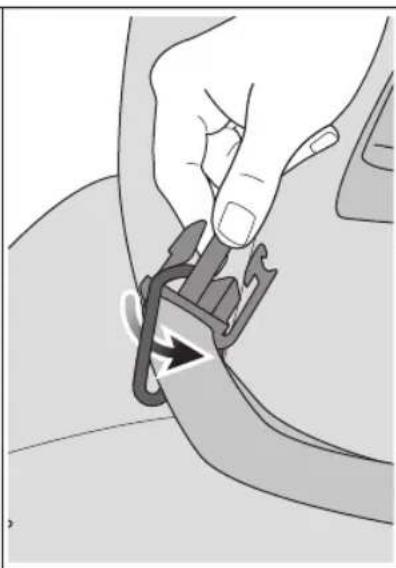
fig. 70 Remove the waist strap from the side loops (R8), taking care to make the first tooth of the central buckle pass through the side loop before removing it completely.
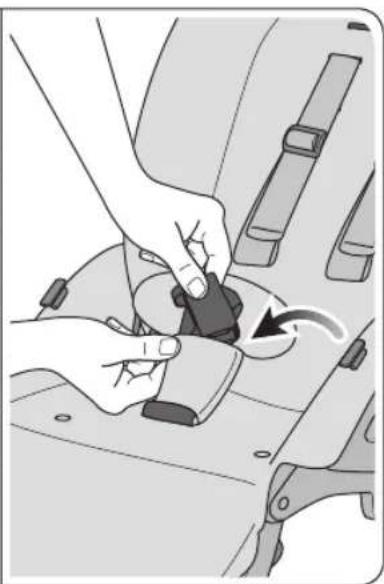
fig. 71 Remove the crotch strap from the protection built into the lining (R19).
fig. 72 Pass the shoulder straps and the crotch strap through the eyelets on the lining and remove it completely.
WARNING: make sure that the lining has been properly reassembled before use.
AVERTISSEMENTS

IMPORTANT - LIRE LES INSTRUCTIONS SUIVANTES ATTENTIVEMENT AVANT UTILISATION ET LES CONSERVER POUR LES BESOINS ULTÉRIEURS DE RÉFÉRENCE. NE PAS TENIR COMPTE DES MISES EN GARDE ET DES INSTRUCTIONS FOURNIES PEUT S'AVÉRER TRÈS DANGEREUX POUR VOTRE ENFANT.
VOUS ÊTES RESPONSABLE DE LA SÉCURITÉ DE VOTRE ENFANT. AVERTISSEMENT! NE JAMAIS LAISSER VOTRE ENFANT SANS SURVEILLANCE. FAIRE LE MAXIMUM D'ATTENTION LORSQU'ON UTILISE LE PRODUIT. POUR ÉVITER DE GRAVES DOMMAGES DUS À CHUTES ET/OU GLISSEMENTS, UTILISER TOUJOURS LES CEINTURES DE SÉCURITÉ CORRECTEMENT ACCROCHÉES ET RÉGLÉES.
NACELLE
CONDITIONS DE GARANTIE
SYSTEMY BLOKUJĄCE I ZAMYKAJĄCE SĄ PRAWIDŁOWO ZAŁOŻONE.
- ABY UNIKNĄĆ WYPADKÓW, PODCZAS ZAMYKANIA I OTWIERANIA PRODUKTU, DZIECI MUSZĄ BYĆ TRZYMANE Z DALEKA.
- NIE POZWALAĆ DZIECKU BAWIĆ SIĘ TYM PRODUKTEM.
- ZAPIĄĆ ZAWSZE DZIECKO PASAMI BEZPIECZEŃSTWA.
• TA SPACERÓWKA/WÓZEK NIE JEST PRZEZNACZONA DO UŻYCIA PODCZAS BIEGANIA LUB JEŻDŻENIA NA ROLKACH.
- PRZED UŻYCIEM NALEŻY SPRAWDZIĆ, CZY GONDOLA LUB SPACERÓWKA BĄDŹ FOTELIK SAMOCHODOWY SĄ PRAWIDŁOWO UMOCOWANE.
TRADYCYJNA GWARANCJA KLIENTA
COSULET PENTRU OBJECTE
SCAUN PENTRU MAŞINĂ HUGGY (DACĂ EXISTĂ)
FIXAREA SCAUNULUI PE \$ASIU
HUGGY م Expected Hyper Pressure
.(R8 0'19 - 46.71'X)
Ctrl will of us and.
תְקַרָה בְּרָה
.הכלה 707הכלה 28.
תְרָה בַרִי
Do it now, for your baby's safety.
It is an easy and fast operation, just visit the website inglesina.com to do it.
To register the product is IMPORTANT because it provides us with the possibility to contact you for important information about safety and functionality of your product.

Inglesina
4470258K_06-03/2023