Vittoria - Stroller Inglesina - Free user manual and instructions
Find the device manual for free Vittoria Inglesina in PDF.
| Brand | Inglesina |
| Model | Vittoria |
| Product type | Stroller / carry cot |
| Use | For one child |
| Maximum child weight (carry cot) | 9 kg |
| Maximum child weight (transport seat) | 15 kg |
| Maximum basket load | 3 kg |
| Safety | Waist and crotch safety belts, foot brake, wheel lock |
| Brake | Foot brake bar (activate/deactivate) |
| Wheels | Removable front and rear wheels with locking hook |
| Handle adjustment | Adjustable height (ERGO BIKE version) |
| Compact position | Handle folds forward for reduced footprint |
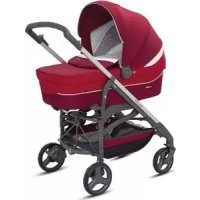
| Accessory compatibility | Carry cot, transport seat, Huggy car seat (Inglesina brand) |
| Care and cleaning | Clean with damp cloth and mild detergent; periodically lubricate moving parts; cover washable according to labels |
| Precautions | Do not use for running or skating; do not exceed specified loads; never leave child unattended |
| Materials | Plastic, metal, textile |
| Assembly | Requires an adult; wheel installation with hook |
Frequently Asked Questions - Vittoria Inglesina
User questions about Vittoria Inglesina
0 question about this device. Answer the ones you know or ask your own.
Ask a new question about this device
Download the instructions for your Stroller in PDF format for free! Find your manual Vittoria - Inglesina and take your electronic device back in hand. On this page are published all the documents necessary for the use of your device. Vittoria by Inglesina.
USER MANUAL Vittoria Inglesina
Do it now, for your baby's safety.
It is an easy and fast operation, just visit the website www.ingsina.com to do it.
To register the product is IMPORTANT because it provides us with the possibility to contact you for important information about safety and functionality of your product.
telai easy clip
easy clip frame
ITALIANO
1.1
ENGLISH
14.
FRANÇAIS
17
DEUTSCH
20
ESPANOL
23
EAAHNIKA
26
NEDERLANDS
29
ББПТAPСКИ
32
PORTUGUES
3.5
MAGYAR
3.8
PYCKN
41
CESTINA
44
SLOVENCINA
47
POLSKI
50
ROMÁNA
53


AVVERTENZE

Read these instructions carefully before use and keep them for future references. Your child's safety may be affected if
you do not follow these instructions.
A child's safety is your responsibility.
This vehicle is intended for children up to:
-9 kg if using the carrycot
- 15 kg if using the seat unit (up to 40 lbs following ASTM standard)
Children should be harnessed in at all times and should never be unattended.
Use a harness as soon as your child can sit unaided.
Always use the crotch strap in combination with the waist belt.
Avoid serious injury from falling or sliding out. Always use a seat belt.
Ensure that all locking device are correctly engaged before use.
This vehicle can be used together with the pre-arranged carry cots and seat unit by Inglesina and the Huggy car seat.
In the carry cot do not add a mattress thicker than 35mm
Always ensure that the carry cot and the car seat are correctly engaged before use.
Any load attached to the chassis affects the stability of the vehicle. Maximum weight for objects placed in basket is 3kg . Don't exceed maximum recommended weight.
This vehicle is not suitable for running on skating.
Assembly must only be carried out by adults.
Always engage the brake before fitting or releasing the additional carrying devices.
Use only with Inglesina carry cots and car seats specially designed.
Please be aware of hazards when using the vehicle on stairs.
CAUTION
Overloading, incorrect folding and the use of non approved accessories by the Producer may damage or break this vehicle. Read the instructions.
Always engage the brake during stops, during the assembly / removal of accessories and during the loading/unloading of the child.
The child should be clear of moving parts while making adjustments. Be particularly careful when performing these tasks with the child nearby.
Use only parts and accessories approved by the Manufacturer.
Pay attention to the child's safety when operating the vehicle's moving parts. Always engage the brake when performing the above operations.
Do not use a single stroller to carry more than one child.
Use it to transport one child only.
Do not leave the vehicle on a slope when a child is seated in it, even if the brake is applied. Brake performance is limited on step gradients.
Regularly inspect all locking devices to ensure perfect product maintenance. Do not use the product if breakages or damage of any kind are found. In this event contact the Retailer or the Manufacturer immediately.
Keep packaging materials, such as plastic or waterproof wrappings, away from children to avoid suffocation.
L'Inglesina Baby declines liability for any personal harm or damage to objects ensuing from the improper and/or incorrect use of the product
So as to improve its products, L'Inglesina Baby S.p.A reserves the right to update and/or modify any and all esthetic-technical details without prior warning.
CARE AND MAINTENANCE
This vehicle requires regular maintenance by the user. Never force mechanisms or moving parts. If you are not sure what to do, refer to the instructions.
Clean plastic and metal parts with a damp cloth or a light detergent.
Do not use abrasive, ammonia based, bleach based or spirit type cleaners.
WARNING
Keep the vehicle in a dry place. If wet, dry the metal parts to prevent rusting.
Excessive and prolonged exposure to sunlight and/or rain may cause the fabric or plastic to fade or change colour.
Periodically lubricate moving parts with light oil, making sure the oil penetrates the mechanisms deeply.
If the stroller has been used on the beach, clean it so as to remove sand or salt from the mechanisms and wheels.
Do not use bleach. Allow the stroller to dry completely before using or storing it.
Follow upholstery washing instructions as shown on the labels.
Pushchairs and prams should be serviced after an extended period of no use.
INSTRUCTIONS
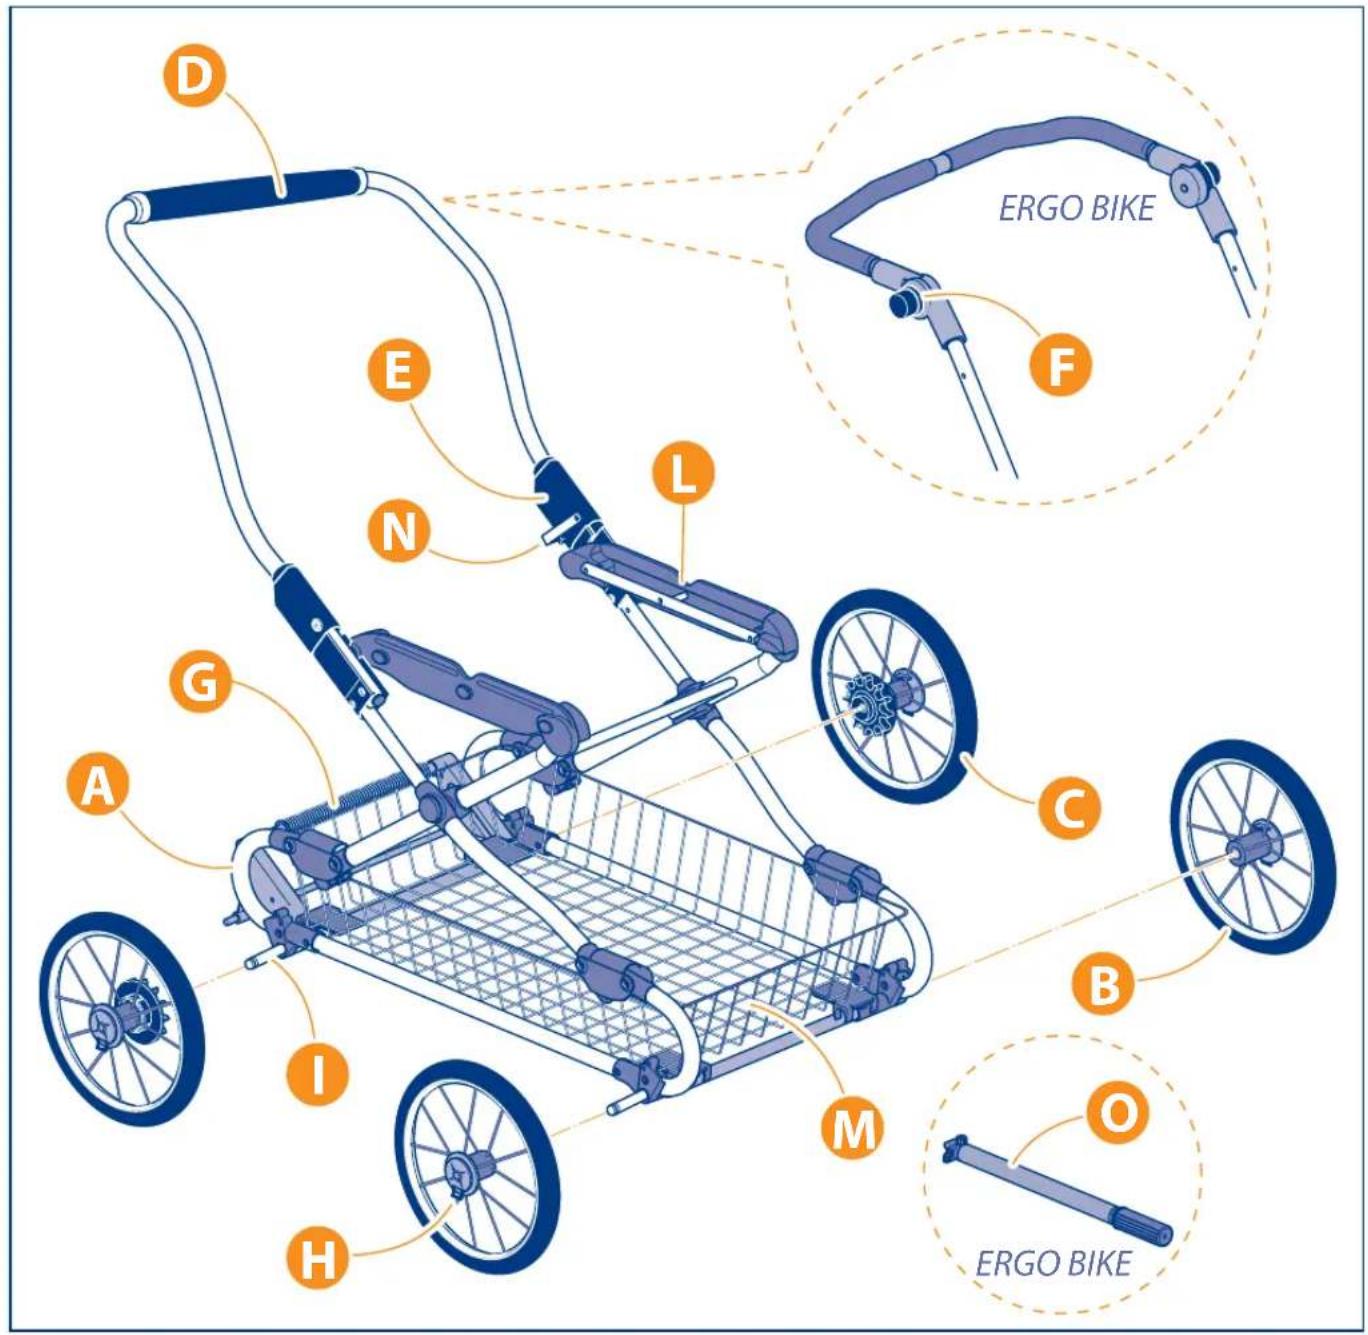
LEGEND
A Chassis base
B Front wheels
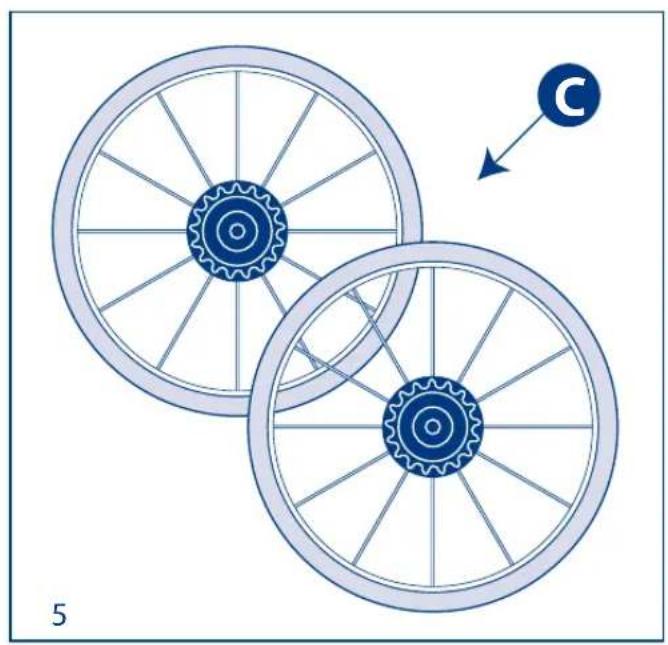
C Rear wheels with brake latch
D Handle
E Chassis closing devices
F Handle adjustment push Buttons (only for ERGO BIKE version)
G Brake bar
H Wheel closing hooks ( on all wheels)
Wheel insertion pins
Additional transport unit hooking system
M Basket
N Safety lever
Air pump (only for ERGO BIKE version)
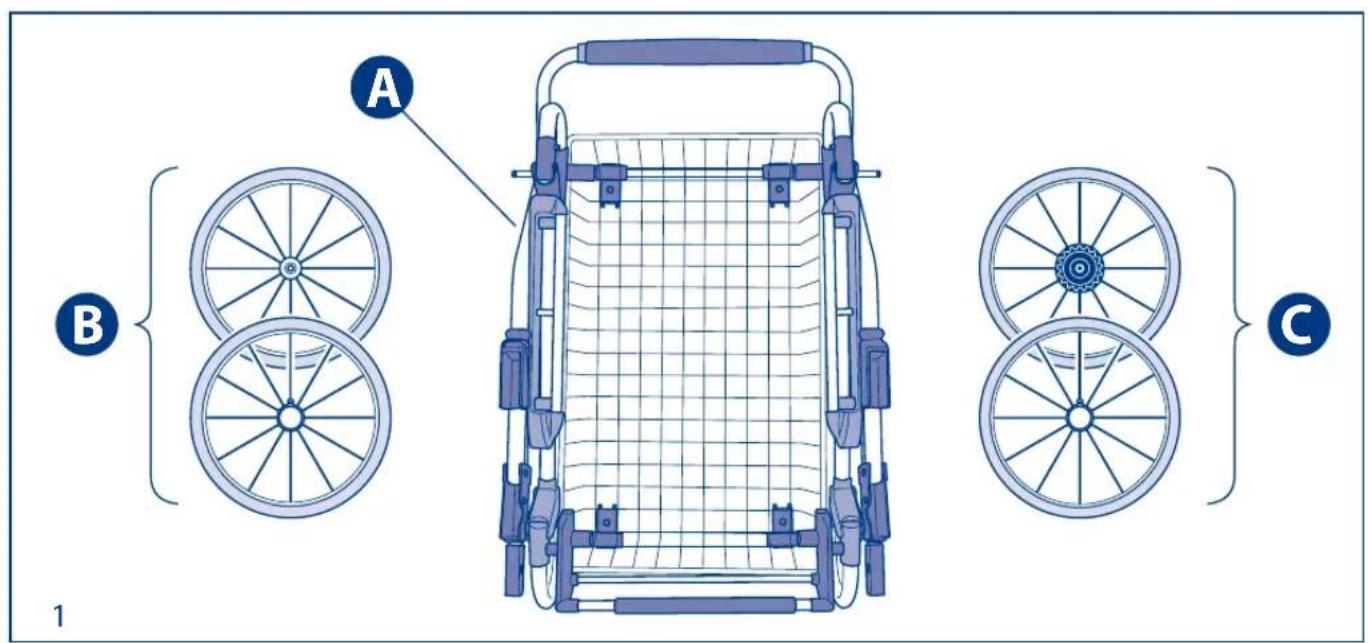
ASSEMBLY OF COMPONENTS
1 Check that all components of the chassis are present: Chassis base (A), two front wheels (B), two rear wheels (C), small air pump (only for ERGO BIKE version).
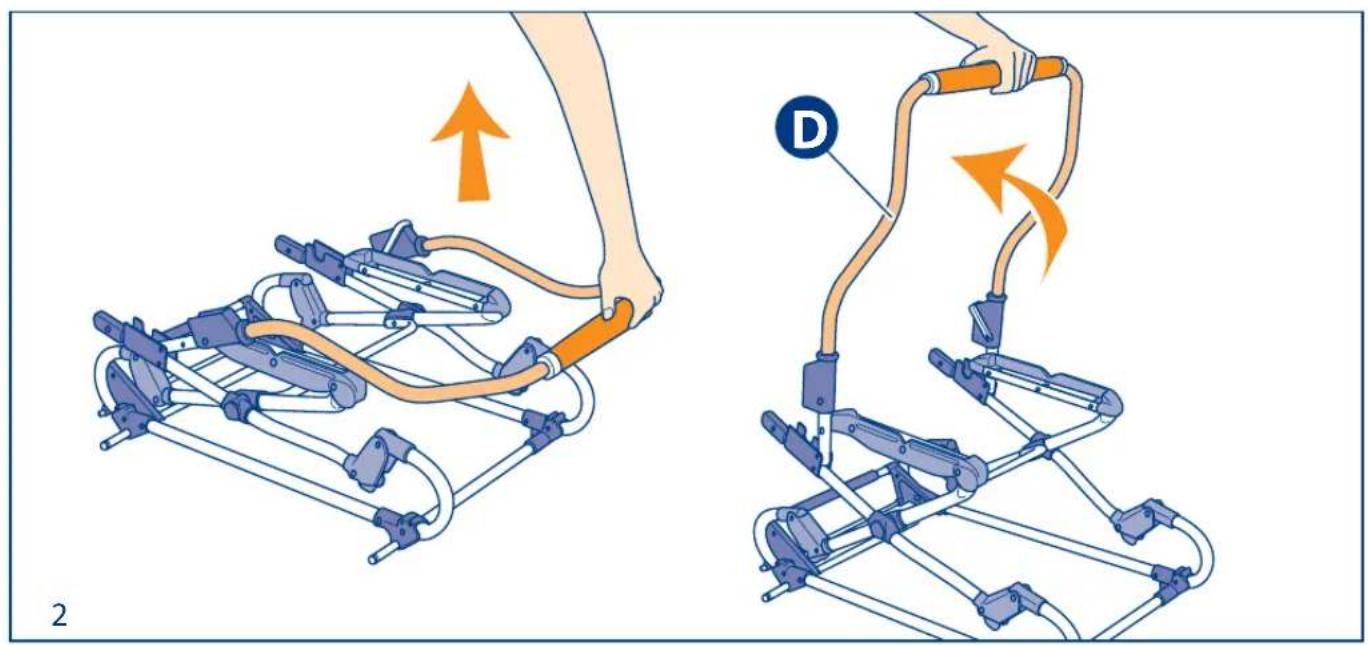
HOW TO OPEN THE CHASSIS
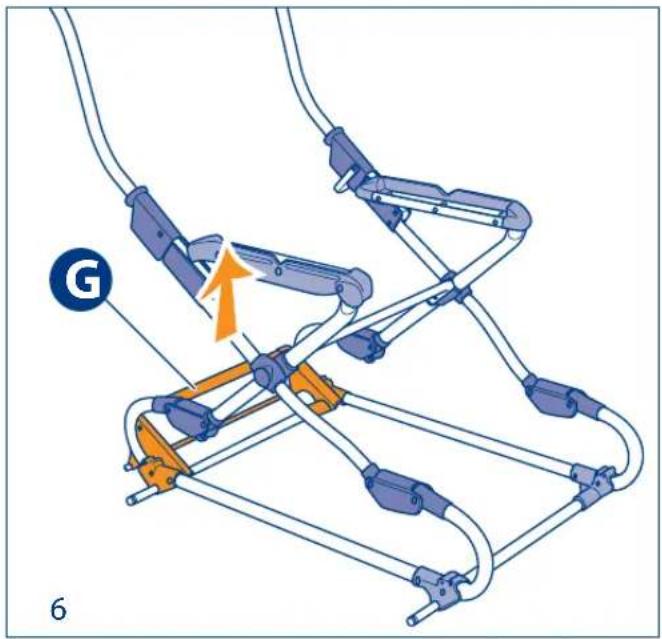
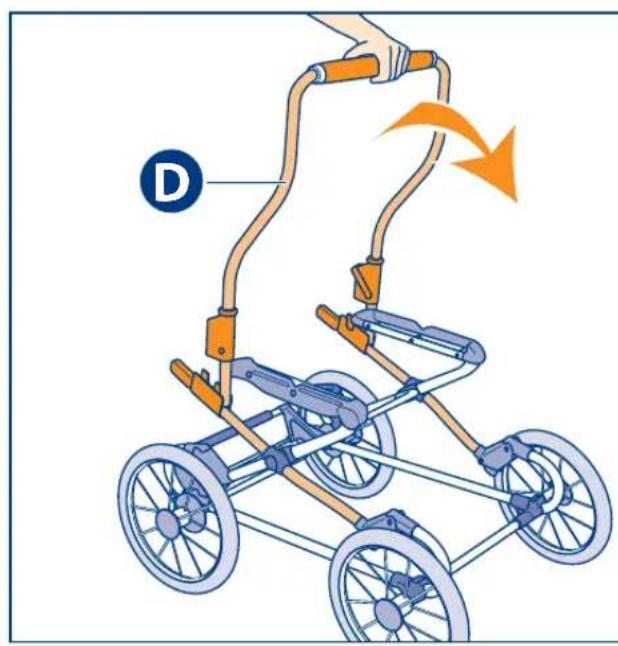
2 Open the chassis base by pulling the handle (D) upwards.
3 Press the handle (D) downwards until hearing a CLICK indicating that both closing devices (E) have been hooked.
WARNING: Make sure that the closing devices (E) are properly hooked to the central joint as shown in figure.
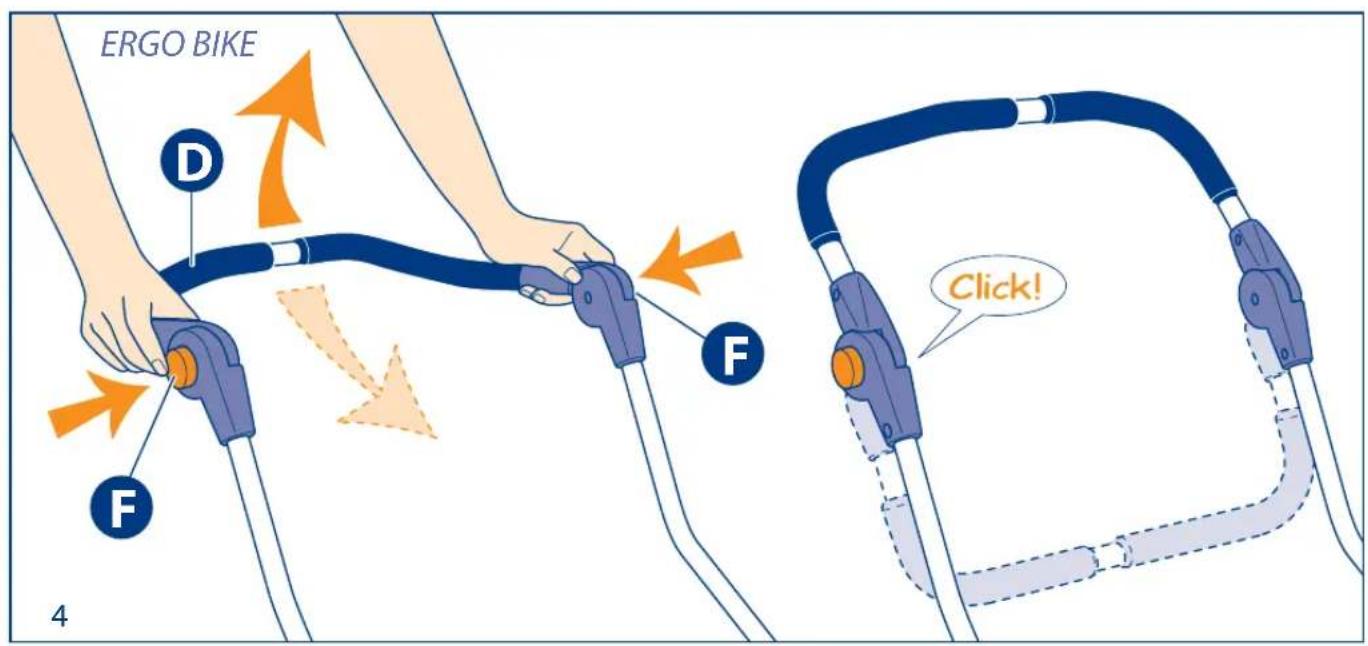
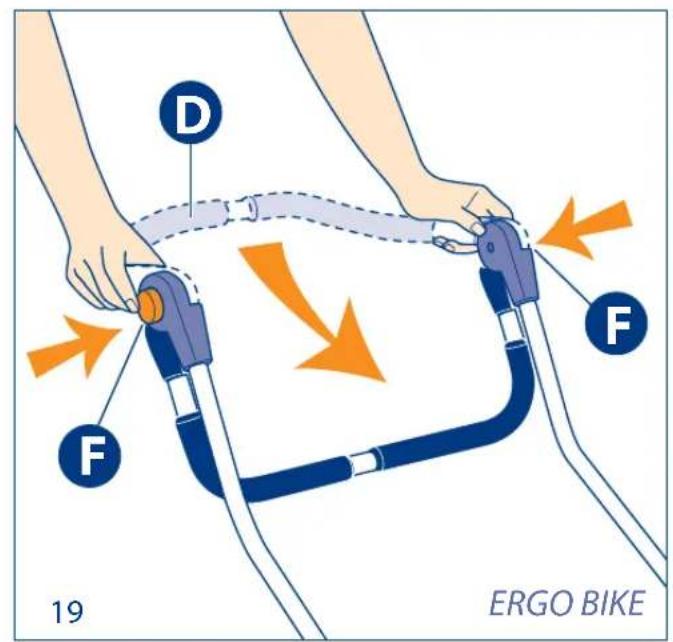
Only for chassis ERGO BIKE version: ADJUSTMENT OF THE HANDLE
4 Press the push Buttons (F), positioned on both sides of the handle, and rotate this latter upwards simultaneously.
ASSEMBLY OF THE REAR WHEELS
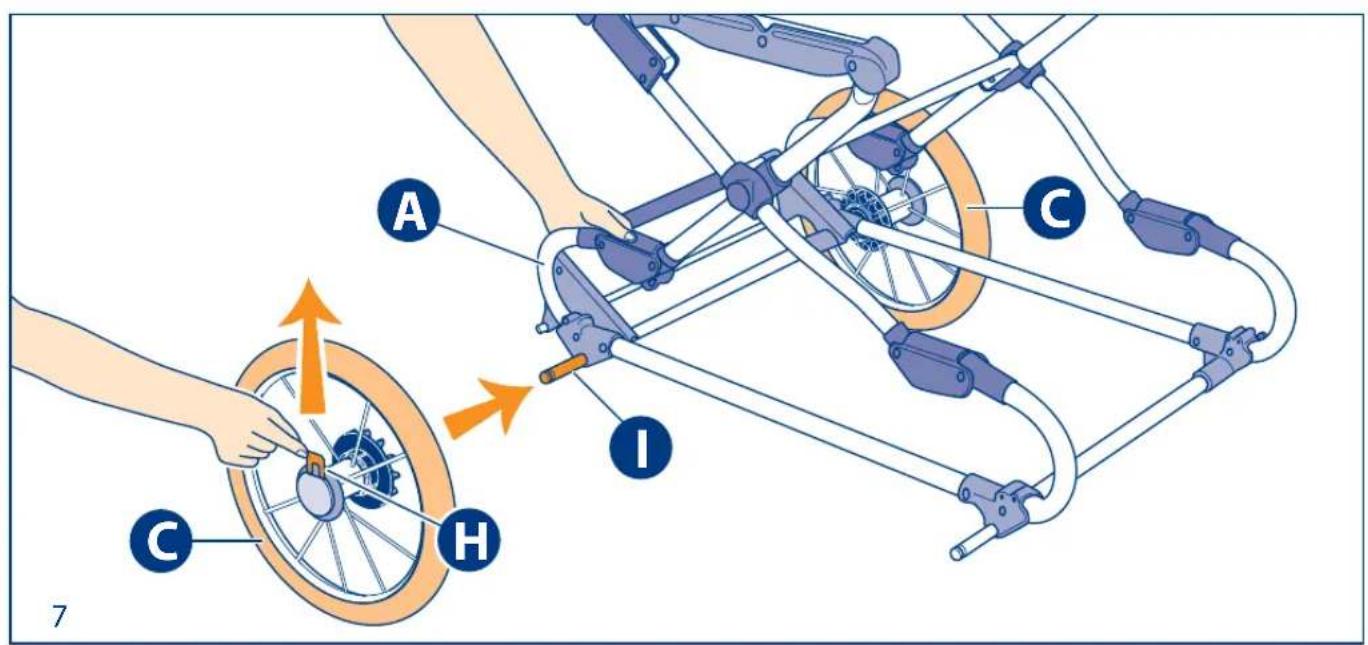
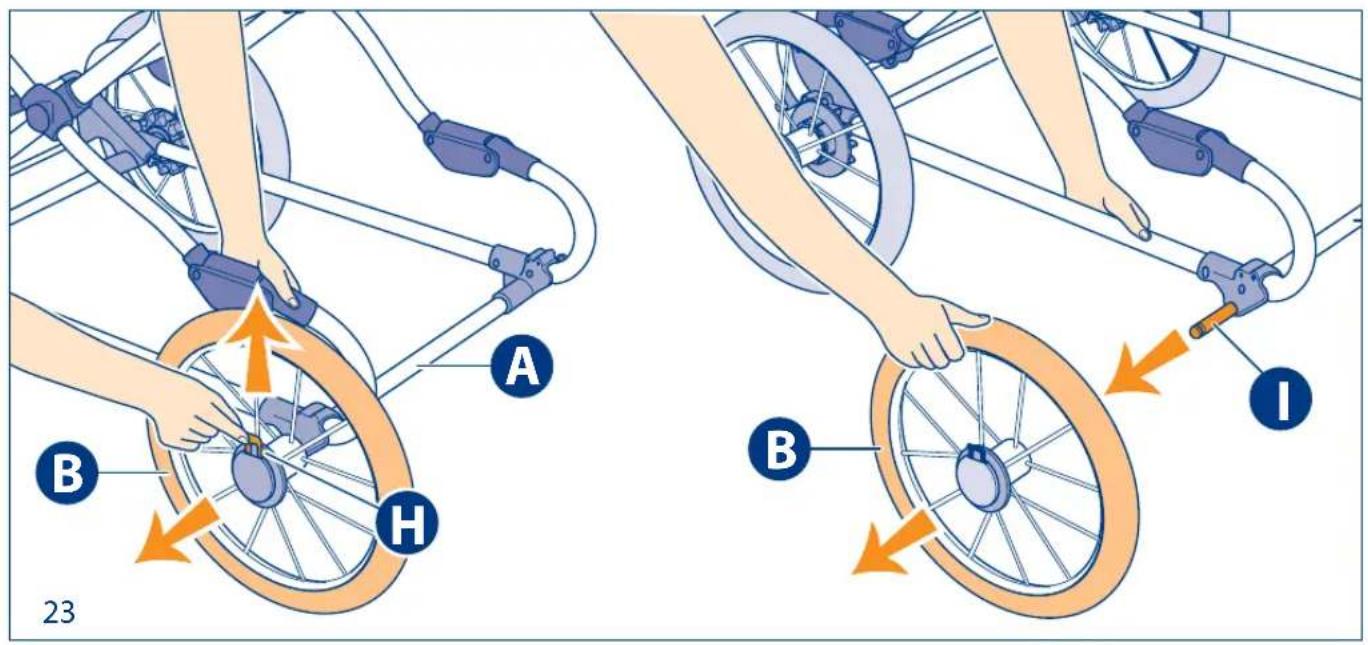
5 WARNING: Two of the wheels supplied with the chassis are equipped with a brake latch. These two wheels (C) have to be assembled on the rear axis of the chassis, near to the brake bar (G).
6 Make sure that the brake bar (G) is positioned upwards (in brake release position).
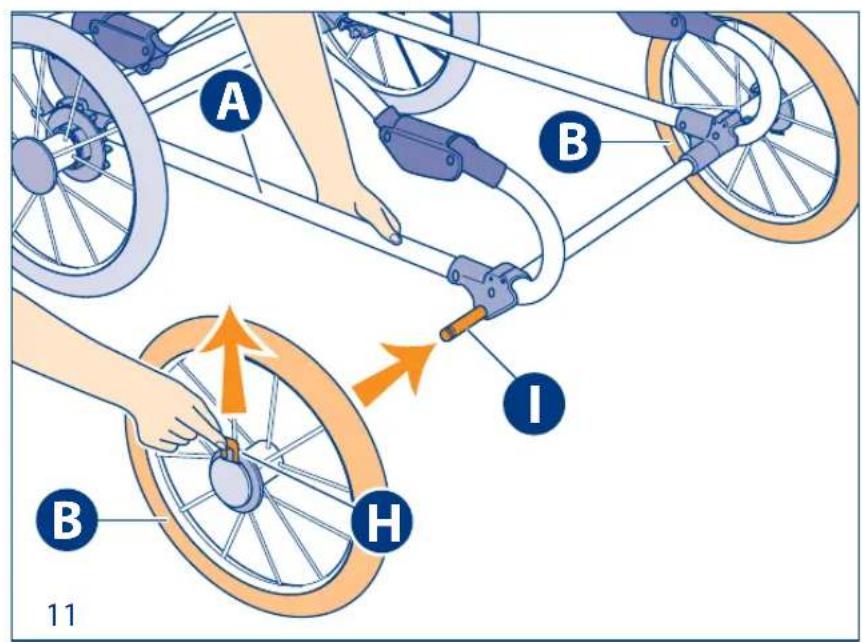
7 Lift the chassis base (A) and hold one of the rear wheels (C). Pull the hook (H) present on the wheel upwards and then insert the wheel in the pin (I).
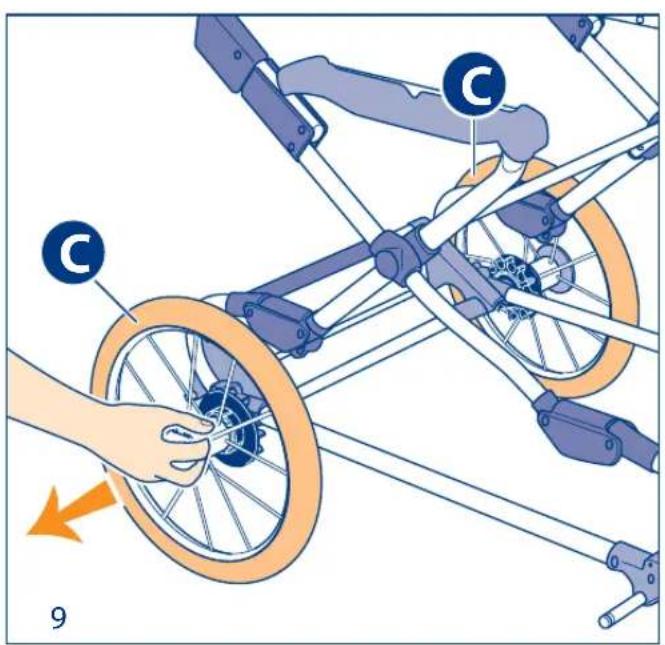
8 Push the wheel (C) towards inside and release the hook (H) until hearing a click indicating that it has hooked properly.
9 WARNING! Verify that the wheel is properly hooked pulling it towards outside. Repeat the same procedure also for the other rear wheel.
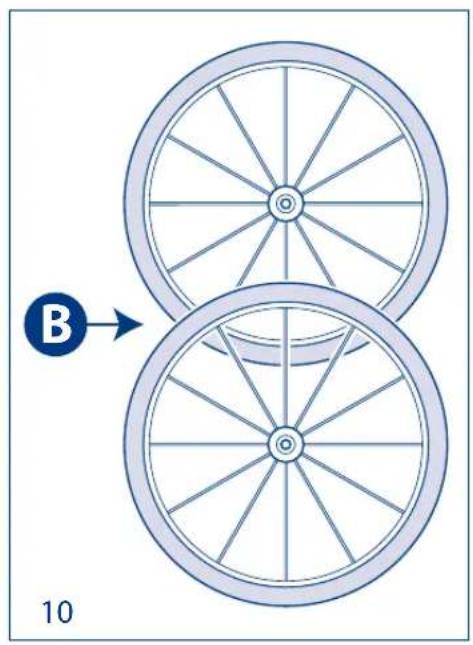
ASSEMBLY OF THE FRONT WHEELS
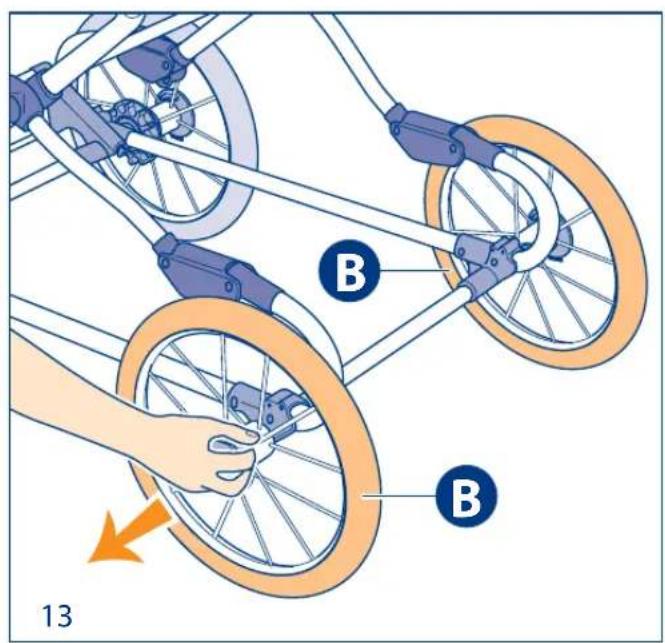
10_11 Lift the chassis base (A) and hold one of the front wheels (B). Pull the hook (H) present on the wheel upwards and insert the wheel in the pin (I).
INSTRUCTIONS
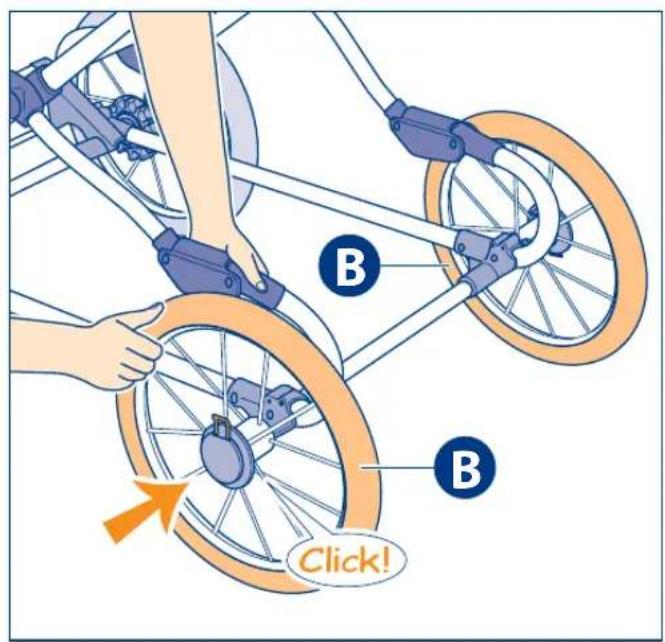
12 Push the wheel (B) towards inside and release the hook (H) until hearing a click indicating that it has hooked properly.
13 WARNING! Verify that the wheel is properly hooked pulling it towards outside. Repeat the same procedure also for the other front wheel.
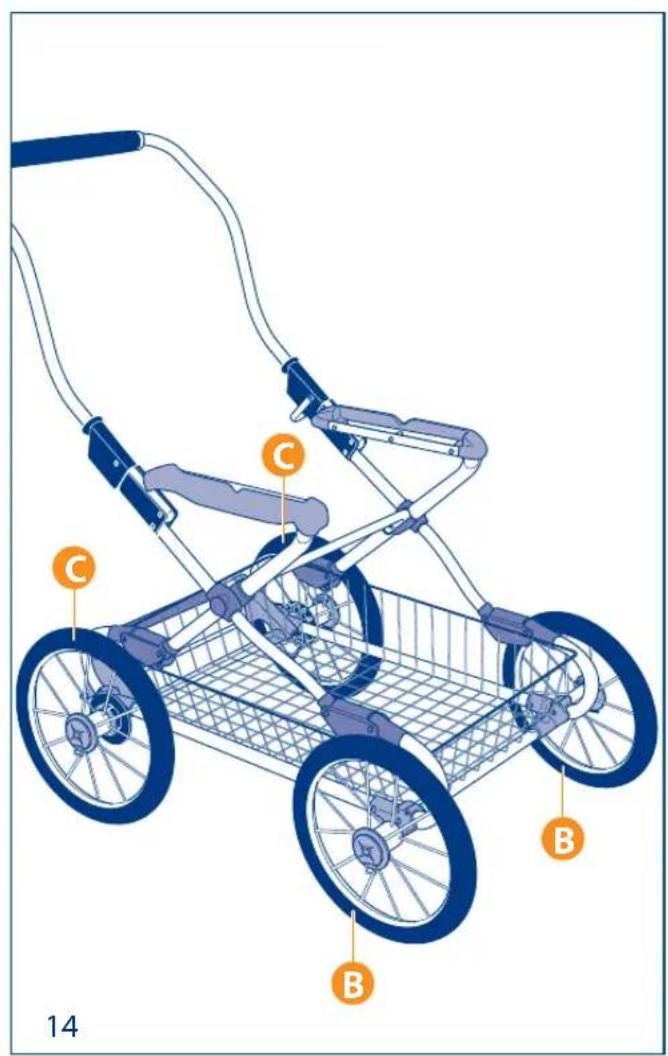
14 Make sure that the chassis has been properly assembled according to the figure.
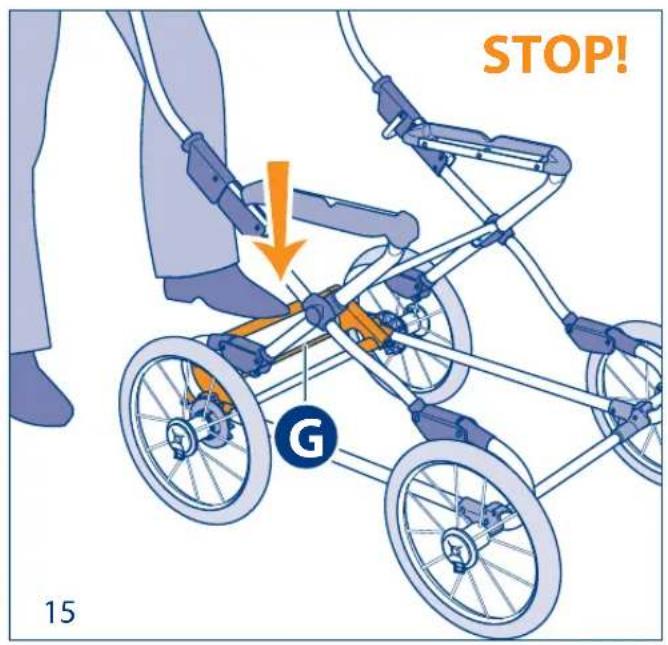
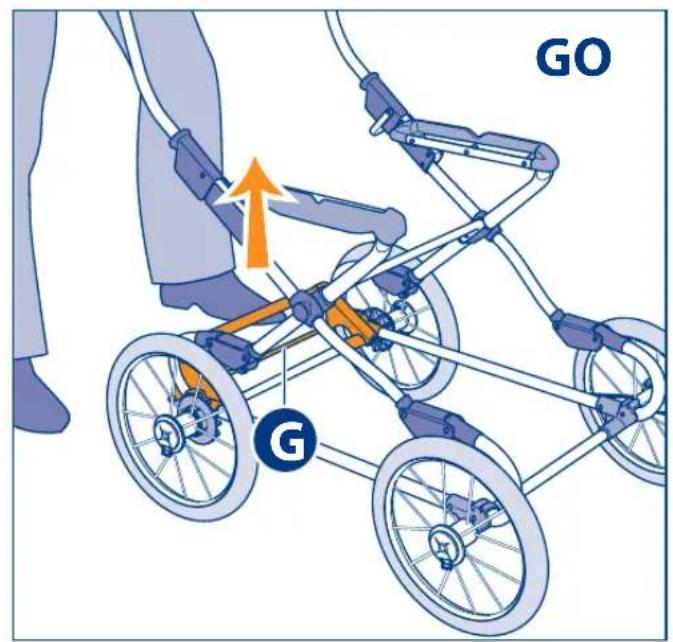
HOW TO ENABLE/DISABLE THE BRAKE
15 To enable the brake push the bar (G) downwards with the foot. To assure the safety of your child, always enable the brake during any stop, making sure the brake has actually been enabled.
16 To disable the brake lift the bar (G) pushing it upwards with the foot.
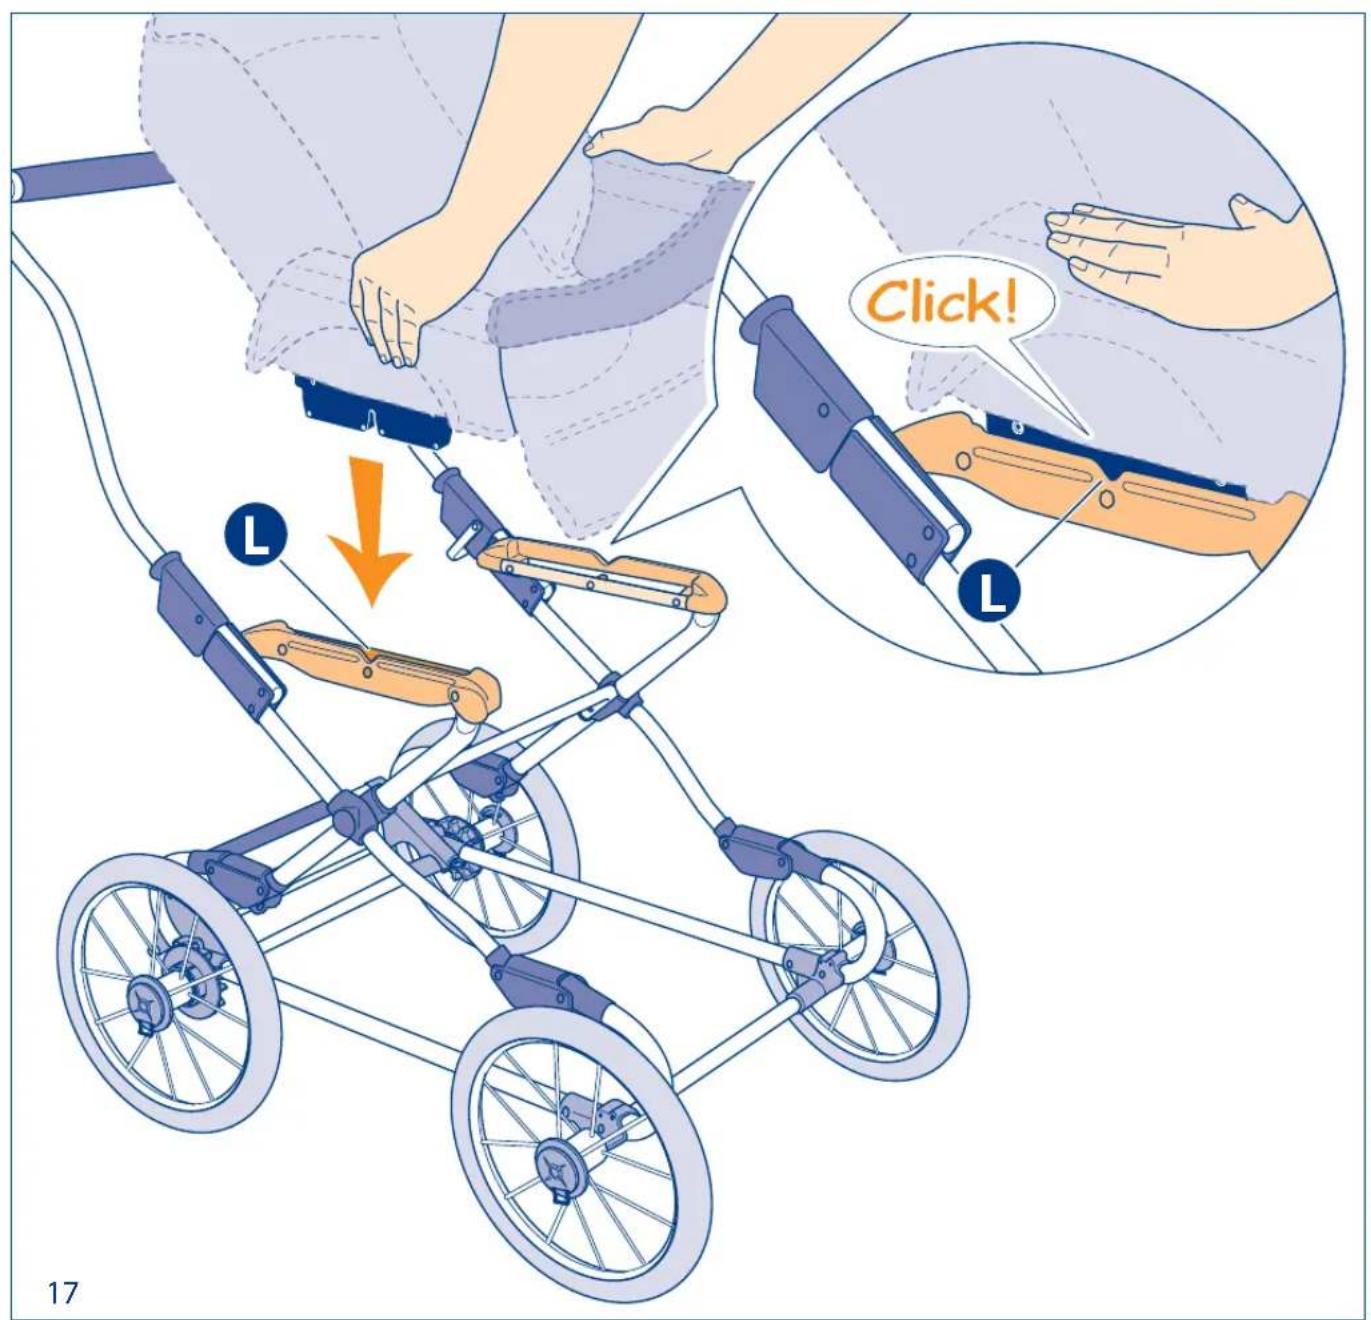
HOOKING/RELEASE OF ADDITIONAL TRANSPORT UNITS TO/FROM THE CHASSIS (CARRYCOT, TRANSPORT SEAT AND CAR SEAT)
17 It is possible to hook to the chassis the carrycot, the transport seat or the Huggy car seat. For information on the correct hooking and release operations, see the dedicated instructions manuals.
WARNING: Before proceeding with the hooking and/or release operations, make sure that the chassis is properly assembled and the brake duly enabled. Before use, always verify the correct hooking of the carrycot/transport seat/car seat to the chassis.
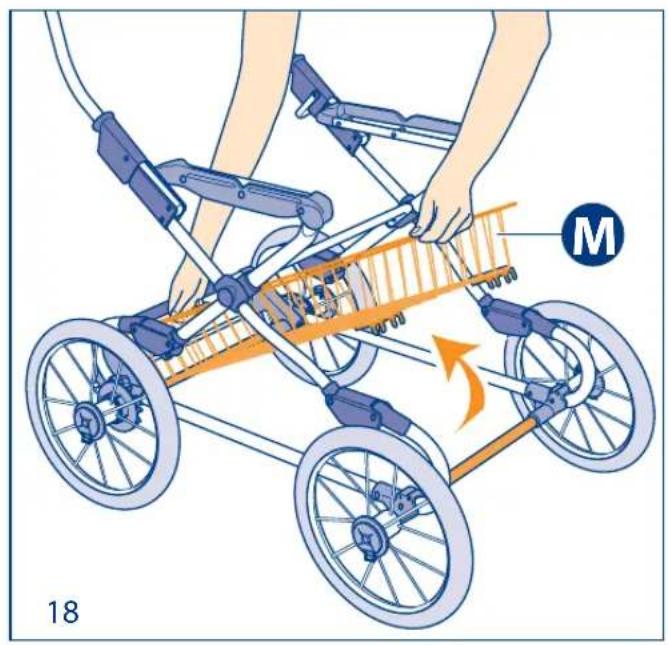
HOW TO DISASSEMBLE THE BASKET
18 Lift the basket (M) end and remove it from the chassis.
SPACE SAVING POSITION
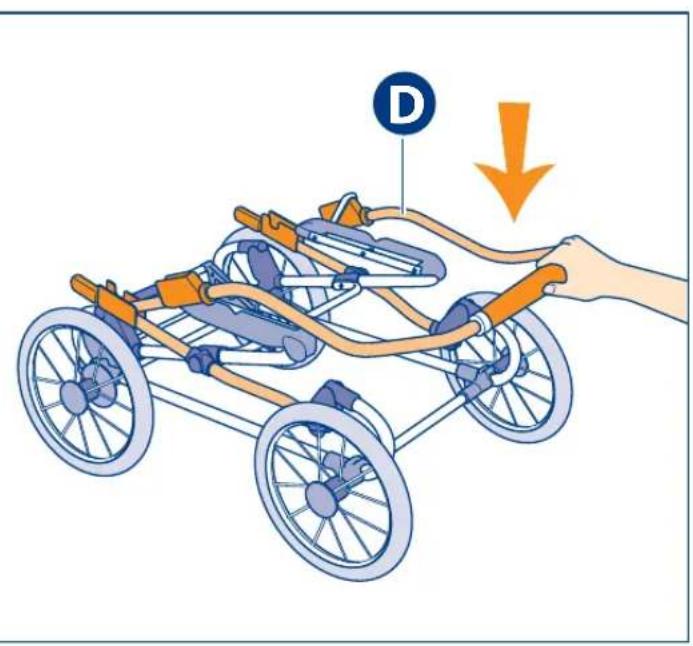
In order to reduce the overall dimensions of the chassis, the handle (D) can rotate forwards.
19 Only for ERGO BIKE version: press both pushbuttons (F) of the handle and rotate it towards inside, according to the figure.
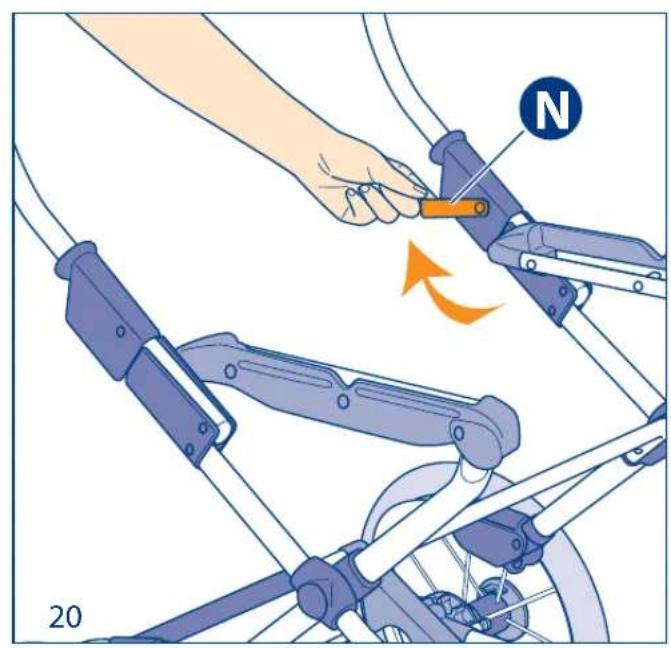
20 With braked chassis (see fig. 16), lift the safety lever (N)
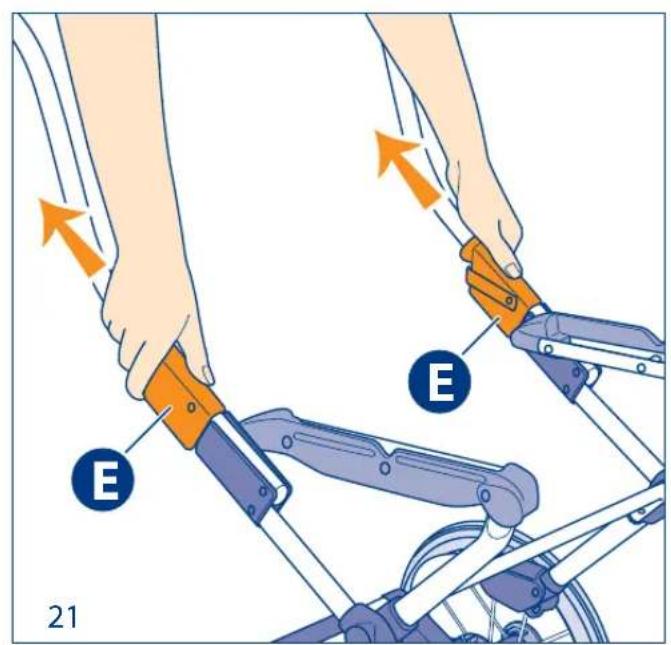
21 Pull the closing devices (E) towards outside.
22 Push the handle (D) forwards and let it rotate till it reaches the position shown in figure.
HOW TO CLOSE THE CHASSIS
With braked chassis (see fig. 15), unhook any additional transport units (see fig. 17).
23 Remove the front wheels (B) lifting the hooks (H) and extracting the wheels from the related pins (I).
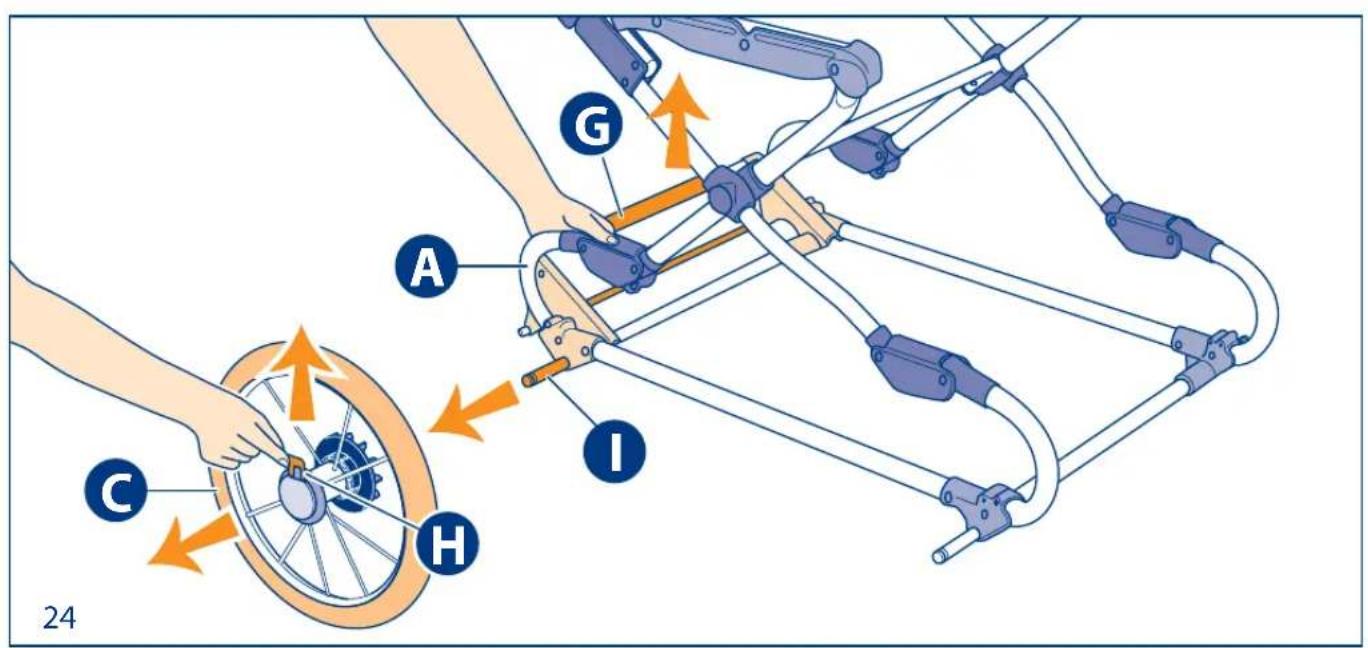
24 Lift the brake bar (G) (see fig. 15). Remove the rear wheels (C) lifting the hooks (H) and extracting the wheels from the related pins (I).
25 Close the handle rotating it as described in the previous paragraph "SPACE SAVING POSITION".
RECOMMANDATIONS

COMMENT OUVRIR LE CHASSIS
BnHa n cnaTe npedna3HnTe KOaHn N He octaBnTe DeTeTo 6e3 HaD3Op.
3aNoUHeTe Da n3nOJ3BaTe npEJa3HInTe KOJaHN OT MOMeHTa, B KOITo DeTeTO MoXe Da CeIN CaMO.
BnHa n 3nOJ3BaIte KOJaHa, KOITo Dbpxk KpaKaTa, 3aeHc T03N, KOITo npndpbka rbp6a.
3a da ce n36erHaT TeKKn yBpeKdAnHn BcIeDCTBVe naDaHe n/nnu n3Pb3BaHe, BnHaN n3POn3BaTe npedna3HnTe KOlaHn.
IpoBepTe daJIb BCnUKN 6JOKnPOBKn I 3aKJIuOvBaun MExaHn3Mn ca npaBnHOMoHTnpaHn, npeDn da n3NoJ3BaTe KOHCTpyKcnaTa.
Ta3n KOHCTpyKcIy MoKe Da Ce n3noJ3Ba B KOM6bHaCyr C npEeBnDeHnTe 3a ceJIta KoW n npEnocima cedJaIka Inglesina n cbc CTOnYe 3a aBTOMo6nH Huggy.
BnHa n npOBepaBaiTe daH N KOu bT, ceDaJIkKaTa n cToJueTo 3a aBTOMO6n ca npaBUNHO MOHTnpaHn KbM uacnTo, npeDi Da n3NoJ3BaTe KOnUcKaTa.
Bcekn DOnbHnTeJeH TOBap Bbpxu
WacnTO OKa3Ba BnnaHne Ha Cta6nHocCTTa
Ha KOHcTpyKcnra. MaKcImaHOTo
HaTOBapBaHe Ha K0sHnCaTa 3a 6araXe 3 Kr. A6coJIHTHO ce 3a6paHЯBa
HaDnBnShaBaHeto Ha DOnyCTMOTO
MaKcImaJIHo HATOBaPBAHe.
Ta3n KOM6HnHa JIaTHa/3mHa KOJIuKa He e npirodeHa 3a 6raHe nn KaPaHe Ha KbHN.
MohtaxbT Tp6Ba Da ce n3BbpwBa OT IIbIHOJETH Nua.
Bunharn HaTnckaTe cnpaKaTa, npedn da npncTbNte KbM 3aKaUBaHe nll OTkaUBaHe Ha dObnHntEnn npncnoc6JeHna (ceHHNK, cToJIe 3a aBTOMo6n).
I3noJ3BaIte KOHCTpyKUraTa cAmO cbc CneuJaHo npEHa3HaueHn CeHHuN I CTOnJuTe 3a aBTOMo6n Ha Inglesina.
O6pbuata Oco6eHO BHNMaHne Ha OnaCHOCTte npn 3PON3BaHe KaIInyKaTa nO CTbnaJa.
ПРЕДПАЗНМЕРКИ
IpeHaToBapBaHeTo, HnPaBnHOTO crbBaHe n 3NoJ3BaHe Ha akceCoapu, KOHTo He ca CneuaJIHo Odo6peHn OT npOn3BOaNTeJIa, MOraT Da DOBeJaT DO NOBpeDa IIN ChyPbAHe Ha KOHCTpyKcNJaTa. YeTeTe INHCTpyKcNInTe.
BnHaN 3aDenCTBaIte CnIpaKata, KOrATo CnIaTe NIN B3mATE DeTeO OT KOJIuKata, KOrATo KOJIuKata e B npcto, KaT0 I NO BpeMe Ha MOHTaX/JeMOHTaX Ha akcecoapnte.
He npednpemMaTe DeiCTBn, Cbbp3aHn C OTBapAHe, CbBaHe Nn DEmOHTaX Ha KOHcTpyKuYrTa, DOKaTo DetETo e B KOnuKata.
N3BbPwBaTte Te3n Oepaun C N3KIOUHTeJIHO BHMaHne, KOraTO DeTeTo e Ha6JIn3O.
He n3noJ3BaIte pe3epBHN qactn nn aKcecoapn, KOITo He ca BkIIOUeH N DOCTaBkata N/IN CBoTBETHO He ca Odo6peHOn OT npOu3BOIDNTeJI.
Oco6eHOMHOro BHIMaBaiTe 3a 6e3OnaChocTtHa DeTeTo, KOrato npaBInTe HeIIO NO NODBVHXHTe YaCTn Ha KOHCTpyKcIyTA. BuHaru 3aJeIcTBaiTe CNIPAqKaTa,
PPEyIPEXDEHNE
KOraTo N3BbPbBaTe TaKNBa OnpaCn.
KoHCTpykCnIyTa, KOrTO CTe KUnNt, TpA6Ba Da ce NOr3Ba camo 3a 6poj Deuca, 3a KOIToe npeBnDHe: da Ce N3POn3Ba 3a Bo3eHe camo Ha eHDo DeTe.
He octabrte Ta3n KOM6HnpaHa KOINuKa nO HaKIOHeH yAcTbK C DeTeTO B He, DOpN i CnIpaKaTa Da e 3aJeCTBaHa. Pn rONAM HAKIOH JeICTBNETo Ha CnIpaKaTa e OOrpaHNeHO.
PepOBHO npOBepBaIte 3aunTHnTe MExaHn3Mn, 3a Da cTe cnrgpHn B nBnHaTn 3npaBHocT Ha KOJIuKkTa. Ako ce noBRT npo6nemn /nnn HpeDnOCTn OT KaKBTO n da e xapaKTep, n3non3BaHeTo Ha KOJIuKkTa e 3a6paHeNo. He3a6abHo ce o6aTe Ha Otopn3nPaHn nnbp nn Ha npOn3BOUnteJr.
ДрьжTe onaKOBbHnMaTePnajHa KoHCTpyKcHnTa (Пл actMacobteчТи n/NiN BODoyctOnuHBMaTePnai) daney OT DeTeTO c zen npedotBpaTЯBaHe onaCHOCTTA ot 3aDywaBaHe.
Фирma Inglesina Baby S.p.A. He Hocn HNKaKBa OTROBOPHOCT 3a 7eTn, HAnceHn Ha BeuN IIN Xopa Nopadn HEnOxOJaUo N/Inn HEnpaBUNHO 3N0J3BaHe Na KOHCTpyKcIyraTa.
C uei noo6pBaHe Ha npoayknte cn Inglesina Baby S.p.A. cn 3ana3Ba npaBoto da akTuAnn3npa nnn npaBn npomEHN OT BCaKaBb TexHnuecko-eCTeTnueckn xapaKTepe3 npedBapuTeHNO yBeDOMnEHe.
PnKuI POndPbXKA
Tasn KOHCTpyKunn n3NCKBa peoOBHa noDpBxKk O TcpaHa Ha notpe6nte#.
He npeHaToBapBaIte MexaHn3MITE nIN DvNKeUITE ce yactn. Ako He cTe cnryphn B Heo, IIpbBO npOBepTe BV HCTpyKuYTA.
IOnuCTBaIte INaCTMaCOBInTe N MeTaJIHInTe YacTIN C BlnaJHa KbPna N C Jek NoUcTBAaN IpenapaT.
He n3noJ3BaIte pa3TBOpUTeJI KATO aMOHrK nn 6eH3nH.
CbxpaHraBaIte KOHCTpyKcIyTa B cyxO nomeUHeHne. Ako ce Hamokpn, POnCyuBaBnTe MeTaNHTe YacTn C Kbpna, 3a da npedOTbPaTnTe o6pa3yBaHTo Ha pBXJa.
IpekomepHOTOn IINI pOdbJIKHTeIHOTOn I3JIaHaHe Ha CbHcE N/INN INBxMD MoKe Da IpeDn3BnKa IpOMHa B CBetaHa TbKaHTa INI INI pAACTMaCaTa.
IepnoDnUHO Cma3BaIte DbIXeUITE qACTN C MaCIO, KaTO BnIMaBATE TO Do6pe Da IpoHnKHe BbTpe B MExAHn3MITE.
Cnei n3nON3BaHe Ha DeTCKaTa KOJIuKh a Ha nJaXa rgxJInBO r NOUcTBaITe, KaTO BHNMaBaTe Da OTCTpaHNTe PAcbKa IIN CoTt O T 3aKpeNBAunTe MExAHN3Mn Ha KOJIeNaTa.
He n3nol3BaIte 6eJIHa. OcTabete KoJNUKaTa Da n3cbxHeIO6peInpedn n3nOL3BaHe nnIpOdbljXuTeJIHO cbxpaHRABe Iopadn HeIN3nOL3BaHe.
CnazBaIte yka3aHnraTa 3a npaHe Ha TaNtuePnraTa, daeHn Ha CbOTBeTHnTe eTnKeTn.
CleД nbIbI r nepIOd Ha HeH3nOJ3BaHe Ha DeTcKaTa KOJIuCKa CLEdBa Da ce HApBaBv BHMMaTeNeH npeJIeD Ha BCNUK N YaCTN.
HHCTPYKUIM
JIeREHDA
A OCHOBA Ha IwacnTo
B PpeDn KoIeLa
C 3aHn KOJena cbc 3b6eH
MexaHn3bM 3a cnnpaKaTa
D 1pBxxKa
E MexaHn3Mn 3a npu6pahe Ha uacnto
F Bytoh 3a perylnpae Ha npkKaTa (camo npu modej ERGO BIKE)
G Cnpauka
H BnoknpOBKn Ha KoneJaTa (KbM BCu4ku KoneJa)
Ocn 3a MoNTax Ha KoJIeNaTa
L MexaHn3bM 3a npKauBaHe Ha DonbJIHNTeHn CbOpBXKeHna 3a TpaHCnOpTnpaHe
M Koushnua 3a 6araX
N 3aunTeHIOCT
O Bb3nyuHa nomna (camo npu moden ERGO BIKE)
MOHTAX HA YACTITE
1 PpOBepete daHn BCNUKn Yactn Ha KOHCTpykunra Ta cHaJIuIe: OCHOBa Ha 7acnto (A), DBe npedHn KOnela (B), DBe 3aHn KOnela (C), Bb3duHa nomna (cAm npu Moden Ergo Bike)
KAK CE PA3TBAPRA WACUTO
2 Pa3TbopeTe wacnTo, KaTo n3dbpNaTe npkKaTa (D) Harope.
3 HatncheTe npbkkata (D) HanoIy,doKaTo yyeTe n3uPaKbaHe, KOeTO O3Haayaba, Ye DBaTa MexaHn3Ma 3a np6upaHe (E) ca NkCupAn npabunHo.
ПЕДУПЕХДECHИЕ! Поверete далдваТамexанзma 3a пибиранe (E) ca npabnHoЗakayehn KbM OCHOBHATA KOHCTpyKuzn, KaKTo e nocoueho HaФngypata.
Camo npu moden ERGO BIKE: PEGYUNPAHE HA DpBXKATA
4 HaTnucHeTe n 3aApbXkTe 6yToHnTe (F),
MHCTPYKUN
pa3nOIOxKeH N O T DBeTe CtpaH N Ha dpbXKaTa, KaTO CbueBpeMeHHo 3aBbPtate Harope.
MOHTAX HA 3AДнITE KOJIЕЛА
5 BHMMaHHe! DBe OT KOJenata, DoCTaBeHn C Wacnto, ca 6OpydBaHn Cbc 3b6eH MexaHn3bMcNpaYka. Te3n DBe KOJena (C) ce MOHTnpat Ha 3aHaTa OC Ha Wacnto, B 6IIN3OCT DO cNpaYkata (G).
6 JeTbata Ha cnnpaqukata (G) Tpr6Ba da ce MOHTnpa BdnHaTa Harope (npu OCBO6OHeHO NOLOXeHne Ha cnnpaqukata).
7 NOBUNHHeTe OCHOBaTa Ha uacnTo (A) n npKauTe eHNO OT 3aHnTe KOJena (C).N3DbpnaTe Harope 6IOKnPOBkata (H) Ha KOJIeNoTo N BkapaTKeOJIeNoTO B OCTa (I).
8 HatncheTe KOJIeNo (C) HABbTpE, OTnycHeTe 6NOKIpOBKaTa (H), DOKaTo yyeTe UpaKBaHe, KoEtO NOKa3Ba, Ye MExaHn3MbT e OHKcnpaH.
9 BHIMAHHE! Поберете дади коленио e npabunno MOHTnpaHo, KaTo ro ApbNHete HaBbH. HanpaBete cblto n cdpyroTo 3aAnho KoliNo.
MOHTAX HA IPIEHNITE KOJEJA
10_11 Повдигнеле OCHOВаТа HaшаNTO (A)и ппкayete eEDHO OT npeДнITE KOлЕА (B).ИЗдрайтHe Harope 6nOKINPOВKaTAt (H)Ha KOLENOTOn BkapaiTe KOJIENOTO B OCTa (I).
12 HatncheTe KOJIeNo (B) HABbTpE, OTnycHeTe 6NOKIpOBKaTa (H), DOKaTo yyeTe UpaKBaHe, Koeto NOKa3Ba, Ye MExaHn3MbT e OHKcnpaH.
13 BHUMAHIE! PnoBepTe daJI KoJIeIOTe e npaBUNHO MOHTnpaHo, KaTo ro ApbNHeTe HaBbH. HanpaBeTe cBtoTo n C pyroTo npedNo KOJIeNo.
14 PpOBepTe dAn MOnTaJbT Ha WacnTo e n3nBHeH KaKTo Ha fHypata.
KAK CE 3AДЕИCTBA/OCBOБОЖДABA CПИРАЧКATA
15 3a Ддздддддддддддддддддддддддддддддддддддддддддддддддддддддддддддддддддддддддддддддддддддддддддддддддддддд徴псьгсьгсьгсьгсьгсьгсьгсьгсьгсьгсьгсьгсьгсьгсьгсьгсьгсьгсьгсьгсьгсьгсьгсьгсьгсьgнлбпсьнлбпсьнлбпсьнлбпсьнлбпсьнлбпсьнлбпсьнлбпсьнлбпсьнлбпсьнлбпсьнлбпсьнлбпсьнлбпсьнлбпсьнлбпсьнлбпсьнлбрпсьнлбпсьнлбпсьнлбпсьнлбпсьнлбпсьнлбпсьнлбпсьнлбпсьнлбпсьнлбпсьнлбпсьнлбпсьнлбпсьнлбпсьнлбпсьнлбпсьnLbBcEeTBAe TcNpaUkKaTaHaCnpaUkKaTaGnOy.3a CnpyPhocCTTaHaBaWetoDeTeBuHArnN3NoJ3BaIte CnpaUkKaTaNoBpeMeHaPpeToN INpOBepraBaIte DaJIeE3aDeyCTBaJa.
16 3a da ocbo6oJnte cnpaKaTa, noBnHHeTe JeTbata Ha cnpaKaTa (G), KaTo npemecTnte C KpaK Harope.
ПИКАУBAHE/OTKAЧВАЕHAДОПьЛНITEЛНИ ПИСПОСOBLEнЯ3A TPAHCПОТИРАЕ Кым SHACINTO(KOW,CEDAДКАИCTOLY3AKOLA)
17 KbM Iacnto Morat da ce npkaayat kow, ceaikka nnn ctonue 3a kona Huggy. 3a texnna npabuJeH MOHTax N demoHTax BxKTe CbotBeTHnte IHCTpykun.
PPEyIPEXKDEHNE! Ppeu da npuctbnte KbM etana Ha npkaaybahe n/nn OTkaaybahe Ha ropnute npncnoc6lenna, npobepete daann wacHTO e npabunHO MOHTnpaHO n cnpaKaTa - 3aedCTbHa. BnHar npobepraTepabunHOTo
3aKpenBaHe Ha KoWa, cedaIkaTa N CTOnYeTo KbM WacHTo, npedn Da H3NoJ3BaTe KOJIuKaTa.
KAK CE DEMOHTNPA KOLHNIATA 3A BAJAX
B JIOLbky He KNaCTb MaTpacIKOB, TOniHaKOTOpbIX npeBblaet 35 cm.
Heo6xoJIMO Bcerda, eue Do IcnoIb3OBaHnKoHTpOIpOBAtB, YTO6bl KOHBepT, KpeCNIe n ABTomO6nIbHOe KpeCNIe 6bln npabInbHo cenJeHbI C paMOi.
JIIO6aHarpy3Ka Ha pamy HapyuHaET CTA6nIbHocTb KOJACKN. -MaKcImaIbHaJa Harpy3Ka, BbIDepXINBaEma KOp3INKo/ cTeKo - 3 Kr. Ctporo 3anpeuaetc npEeBbIaTb MaKcImaIbHyO dOnyckaemyo Harpy3Ky.
Onepaun MOHTaKa DOLXHbI BbINOJHrTbCra TOlbKO B3PocNbIMN IINCaMn.
Heo6xoJIMO Bcerda CTaBnTb KOJACKy Ha TOPMO3 Do BbINOJIHeHn Oepaun CcpeHn npacpeHn DOIOnHITeNbHbI TpaHCnOpTHbIX cpeCTB.
CTaBbTe Bcerda KOJnCKy Ha TOPMO3 nepei pa3MeueHnem B Hei pe6eHka nIIOCTaBAHNEM pe6eHka n3 Hee, a TaKKe npN OCTaHOBkax N MOHTaKe/JeMOHTaKe KOMnJIeKTyUOuNX YacTei.
IOMHnTe 6 onaCHOCTn np nCNOb3OBaHN KOJrCKn Ha JecTHNcE.
MEPbI PPEIOCTOPOXKHOCTN
Ipeperpy3ka, nepekoc n npimHeHne He yTBePxxDeHHbIX KOMnJIeKTyUOxuX qAcTeMOryT Bbl3BaTb NOBpeKdEHNe NnN NOLOMKy KOJACKN. 3HmMaTeJbHo npoHTaTNe HHCTpyKcHIO.
CTabbTe Bcerda KOLrCKy Ha TopMo3 nepepa3MeueHnem B Hei pe6eHka NIN DOCTaBaHnempe6eHka n3 Hee, a TaKxpe npu OCTaHOBkax IN MOHTaxe/ demoHTaxe KOMJIeKTyIOUx Yacte.
He OTKpbIbAitTe, He 3aKpbIbAitTe, He DEMoHTnpyIte KOJACKy,ecnB HeH HaxOHTcpe6eHOK.6yDbTe Bcerda 6dntelhbl npN BBINONHeHH 3Tnx Oepaun,ecn pe6eHOK HaxOHTcNo6n3OCTn.
He noIb3yItec6 3aIpaCTaMn N/IN KOMJIeKTyOuIMN, He NOCTaBHeHHbIMN N/IN He yTBePKeHbIMN IN3ROTOBHTeJEM.
Cneinte 3a 6e3oNaChocbIO pe6eHka B npocece yCTaHOBKn B HxKHO e NIOXKeHne NOBnXhBix YaCTe KONACK (HaNP. CnIHKn, NOHOck, KaNToA, KO3bIPbKa). Pn BbIOnHeHN 3Tnx Oepaun BCerda CTaBbTe KONACKy HaTOPMO3.
3aKyIeHHoe Bamr TpaHcnpTHoe CpeCTBO DoJXHO NCIOB3OBaTbCra TOlbKO dNr TORO KOJIuYeCTBa DeTei, dNkOTOporo OHO 6blNO cnpoeKtupoBaHO: nnepeBO3KN ToIbKO OndHO rpe6eHa.
He octabnTe KOJACKy Ha NOKaTOn NNOCKoCTN, KOrda B HEn HaxOuNTcpebeHOK, DaJxe PnBKNIOUeHHOM
PPEyPExEHN
TOPMO3e. BhaHTeJIbHbI CKaT MOKeT orpaHHuNTb 3000EKTINBHOCTb TOPMO3OB.
IepnoDnueckn npOBepaTe yCTpoiCTBa 6e3oNaChOcTn
dIra oBecneuHna Do6pokaeeCTBeHHo CnyKbI
KOLRKn BO BpeMeHN. 3 cIyae O6hApUxKeHn Ipo6NeM
N/INn IIO6bIX OTKNOHeHn OT HOpMbI, N0JIb3OBaTbcr
KOLRcON 3aIpeuaetc. CneJyET HeMeIeHHO
CBraTbCn C OΦNuAJIbHbIM DInepom FInPmbl INn C
N3rTOBUNTelem.
XpaHnTb ynaKOBky paMbI (nJaCTMaCCOBbie n/InnHe npomokKaemble MaTePnAbl) B HeNoCTyHOM dJeDeTeMecTe,HTo6bl npedynpeDntb onaCHOctb ydysb.1Opma A L'Inglesina Baby S.p.a. He Hecet NkaKoOTBETCTBeHHOCTn 3a yuep6 npedMeTam nIn IIOJAMBCJEcTBne HnpabNtBHO rCNOJb3OBAHn KOLACKINII He No Ha3HaueHnIO.
B uejx ynyuweHn CBOe npodykunn FnpMa A Inglesina Baby S.p.a. octabnert 3a c6oB npabo 6e3 npedynpexKeHH BHOCTb TexHueckne N 3ctetueckne HOBWeCTBa H/nn MoNphiKaunn IIO6bx DeTaNen.
YXOD IN TEXOBCLJYKINBAHNE
3Ta Kojncka Tpe6yeT peyraHoro yxoJa co cToPOhBb NOIb3OBaTeJI.
He Bo3dJeCTbYnte cnIIOH MaexaHN3MbI IIN
IIOBnKhble cactn. (cnyuae comHeHn, npouHTaTe CHaHaI INCTpyKUIO.
OuHauTe PnactMaCCOBBe n MeTaJIInueCKne YaCTN BnaJxHO TpIKNo IIN CNa6bIM MOIOUcIM cpeiCTBOM.
He noJIb3yI TeCb pactBOpHTeJIeM, aMMnakOM nIN 6eH3nHOM.
XpaHnTe KOJrCKy BCyXOM MeCTe. KcN KOJrCKa MOKpa, cIeNyET BbITEpeTb ee MetaJIInueckne yactn, YTO6bl npEduPepuTb 6pbA3OBaHHe pKaBUnHbl.
Dionroe npe6bBaHne Ha coINHe u/UNn NOI DOxJDEM MOXET npNBecTN K N3MeHENIO CBeTa TKAHN NN INI NaCTMACCOBbIX DeTaN.
IepnoDnueckn Cma3bBaIe Te NODBHXHbIe Yaactn Cna6bIM Cma3OuHbIM MaCLOM, CJIeJ, YTO6bI OHO IpoHnKaJIO BRJy6b MEXaHN3MOB.
Iocne nCnoJb3OBAHnKoJIaCKn Ha neCuaHOM PIIaKe, OuNCNTte aKKypaTHO OT Necka N COJN MExaHn3Mb1 3auePJIeHnKoJIec.
He noIb3yIteCb OT6eJIuBaTeJem. 5OpOio BbICyuNTe BCE qactn, npeed Tem KaK CHOBA IOnlb3OBaTbcra KOJIACKoI.
Co6nIpaIte npabna MoKu qexna cndeHbya Kka3aHHbIe Ha COOTBeCTBHyUxN XTNKeTKax.
Iocne dInTeBHOrO nepNoa HeuCNOJb3OBaHnKOLaCKN, peKOMeHnyeTcra aKKypaTHO OCMOTpeTB BCE eeKOMNOHeHTbl.
HCTPYKUIN
CNICOK
A OchoBaHHe paMbI
B IpepeHne kOleca
C 3aHnne KoIeCa c 3y6uToT peiKoI TopMo3a
D Pyka
E UcTpoNCTBa 3aKpbITnpaMbI
F Peryu npobouhble KhoNknyoTkn (moIbko bepcua ERGO BIKE)
G TopMo3HaTЯRa
H Kpoukn 3aKpbTnKaKonec (Ha BceX KOncax)
I ttbynp BBeDeneHn Konec
L CnCTema cuenneHn Io6aBOuHOro TpaHCnOpTHoro 6noka
M Kop3nHa
N PpeoXpaHnteBhIbX pbIaKOK
O ManbH HAcOC Bo3dyxa (moIbKO bpcuERGO BIKE)
C6OPKA KOMNOHETOB
1 KoHTpOJInpOBaTb HaJIynchE BCEx KOMnOHeHToB Ha paMe: pama OCHOBaHHa (A), dBa nepeDnHex KOleca
(B),Два 3аннх колеса (C), Малы Насoc ВОзdyxa (monько версua ergo Bike).
KAKOTKPbITbPAMY
2 OtkpbItb ochOBaHne paMbI, NOTaHyB pyKoRTKy BBepx (D).
3 Haabntb Ha pykortky Bn3 (D) do IeJyKA, yTO O3Haayet BblONHeHHoe cIeJIeHne 06Ox yCTPOINCTB 3aKpbTna (E).
PNEyIPEXJEHHE: y6eNTbcra, yTO yCTpoiCTBa 3aKpbTna (E) 6bIn npabnIbHo cuenneHbI C ceHTpaIbHbIM wapHIpom, KaK noka3aHO Ha pncyHke.
Tobko pama bepcuu ERGO BIKE: PEGYUNPOBAHNE PYKOKI
4 HaKaTb KhoNk (F), paCnoJoxKeHHbIe Ha o6eHX CTOpOHax pyKoRtKn, I OndHOBpeMeHHO NOBepHyTb ee BBepx.
C6OPKA 3AADHIX KOJIEC
5 BhmuHne: Dba Koneca, nocTabHeHHbIX c paMoN, oChaueHbI 3y6yatoT TopMo3HoT TaroN.
MHCTPYKUIM
3TN DBA KOJeca (C) MOHTNpyIOTc Ha 3aJHeN OCN paMbI, pAOM C TopMO3HOJ TAgOi (G).
6 Y6eHtbcra, yTO TOPMo3Ha Tya (G) I03nIIOHnpoBaHa BBepx (B I03nIpa36loKupoBaHna TopMo3a).
7 NODHbOCHOBAHne paMbI (A) n B3aTb OJHO 3aHnX KOlec (C). NotarytB BBepx KInou (H), pacnoJoxeHHbI Ha KOlece, n HAHn3aTb KOleco Ha ocb (I).
8 ToIKNHyTb KOJIeCO (C) BO BHYTpENHem HAnpaBLeHn, OTNcyCTnTb KpOu (H) Do UeJka, KOTOpbI n O3Haayet COBepWeHHoe CuenJeHne.
9 BHUMAHHE! Поверпь, чTo6bl KoIeCo 6bIIO npaBnIbHo cUeJIeHO,NotaHyB erO Bo BHeuHem HanpaBNeHIn. NOBTOPuTb onepaunn I dIy 3aIHNx KoIec.
C6OPKA IPEPHNX KOJEC
10_11 ΠoДHЯТБ OCHOBAHHe paMbI (A) n B3rTb B pyKy OndHo n3 NepeDnHex Konec (B). IotraHyTb BBepx KpIok (H), pacNoJoxeHHbI Ha Konece, n BCTaBNTb Koneco B Ocb (I).
12 ToKHyTb Koneco (B) BHyTpB, OTnyCTNTb KpOK (H) Do UeJyka, O3HaayoJero BblOnHeHHoe CcenJIeHne.
13 BHIMAHHE! IpoBepuTb npaBnIbHoe cuenIeHne KOleca,NotaHyB erO BO BHeuHem HappaBLeHn. NobToPbOnepaunN n C nepeDnM Konecom.
14 Y6eINITbcra, cTO MOHTaK paMbI BBINOJIHeH npabInbHo, KaK NOKa3aHO Ha pucyHKe.
KAK BKJIIOUHTb / OTKJIIOUHTb TOPMO3
15ДлЯВКЛIOUeHINaTOPMO3aTOLKHyTbHOrO BHN3 pIaHKy (G).ДлЯобecneueHIN6e3oNaChocTn BaIero pe6eHka Bcerda CTaBtB Ha TOPM03 npn OCTaHOBkax, y6eINBwncb BCpa6aTbIBaHIn TOPMO3a.
16ДляpacupeHnE HTopMo3aNoHЯTb nHaHky (G),ToKHyBHorOIBBepX.
CUENJIHNE / PACUENJIHNE IOBABOHyBX TPAHCIOPTNPOUx BLOKOB PAMBI (JIOLbKA C PYKAMN, CNDHeB E KOJACKN I DETCKOE ABTOMOBINbHOE KPECIO)
17 Moxho npKpeNTb K pame IIObky c pykamn Hnn CndeHbe KOJACKN Nn aBtOMo6nbHOe KpeCNO Huggy. Jn npaBnIbHorO BbINOpHeHn Onpaun no fHKcaun n paucenJeHnO CM. COOTBeTCTByIOUne c6OpHNKn INHCTpyKcun.
PPEyIPEXDEHNE: Do BbINOnHeHnA a3 cuenneHn n/nn pacuenneHn Heo6xOaHMo y6eHTbc, 70 paMa co6paHa npaBnIbHo N BKIOUeH Topm03. Dn Hauana NcNoIb3OBaHn Bcerda KOHTPOIpOBaTb npaBnIbHOe CuenneHne DeTCKORo ABTOMO6NBHOr KpeCna IIOJbKn C pyuKaMn/CnDeHb / DetCKORo ABTOMO6NBHOr KpeCna.
KAK CHRb KOP3nHy
18 PoiHryTb 3a KpaJ KOp3nHy (M) n OTcpeNtB ee ot paMbI.
P03nB CLOXEHHOM BnDE
Дясokрашениоьших raбapntOB paMbI pyKoTka (D) MoKeT 6bITb NOBepHyTa BnpeJ.
19 TOnbKO BepCuERG0 BIKE: HaxaTb Obe KhoNk (F) pyKoRTkn n NOBepHyTb ee BO BHyTpehem Ha npabLeHn, KaYka3aHo Ha pncyHKe.
20 Pn paMe, nocTabHeHHo Ha TopMo3 (cm. pnc. 16), noDnHb npedoxpaHHTbHbI pbUaXok (N).
21 NotaHyt yctpoiCTBa 3aKpbTna (E) BO BHeuHem HappaBJeHn.
22 ToIKNHyTb pyKoTky (D) Bnpepei n nobepHyTb ee do no3uN, yKa3aHHoH Ha pucyHke.
KAK 3AKPbITb PAMY
Ipn pame Ha TopMo3e (cm. pnc. 15) paCueNTb BO3MOXHbIE DOnONHInTeNbHbIe TpaHCnOpTHbIe 6JIOKn (cm. pnc. 17).
23 ChTb nepeHnne KOleca (B), NOHnKpOuKN (H), n CHTb KOleca C COOTBeTCTByIOxN Ocei (I).
24 NopHrTb TOPMO3HyIO Tary (G) (cm. pnc. 15). ChrTb 3aHnE KOleca (C), NOpHrB KpUoyu (H) n CHraB KOleca C COOTBeCTByOuix Ocei (I).
25 3akpbItb pykoTky, noBepHyB kaK onncaHo B npdeIduyem naparpafo "P03NUIB CLOXKEHHOM".
UPOZORNÉNÍ

DBAŁOŚC I KONSERWACJA
CUM SE DESFACE STRUCTURA
2 Desfaceti baza structurii tragand in sus de
máner (D).
3 Exerciti presiune apasand in jos partea de baza a manerului (D) pana cnd auzi un CLICK ce va indica fixarea ambelor dispositive de inchidere (E).
CUM SE INCHIDE STRUCTURA
Cand dispositivul de franare al structurii este activat (a se vdea fig. 15) indeparta ti eventualele unitati de transport accesori (a se vdea fig. 17).
23 Desprindeti roile anterioare (B) ridicand carligele de prindere (H) si scotand roile din pivotii aferenti (I).
24 Ridicati bara de franare (G) (a se vedea fig. 15). Desprindeti rotile posterioare (C) ridicand carligele de prindere (H) si scotand rotile din pivotii aferenti (I).
25 Inchide ti manerul rotindu-l potrivit indicatiilor din paragraful anterior "POZITIE ECONOMIE DE SPATIU".
110
Inglesina