Silver Breadmaker XL 151941 - Bread maker PRINCESS - Free user manual and instructions
Find the device manual for free Silver Breadmaker XL 151941 PRINCESS in PDF.
Frequently Asked Questions - Silver Breadmaker XL 151941 PRINCESS
User questions about Silver Breadmaker XL 151941 PRINCESS
0 question about this device. Answer the ones you know or ask your own.
Ask a new question about this device
Download the instructions for your Bread maker in PDF format for free! Find your manual Silver Breadmaker XL 151941 - PRINCESS and take your electronic device back in hand. On this page are published all the documents necessary for the use of your device. Silver Breadmaker XL 151941 by PRINCESS.
USER MANUAL Silver Breadmaker XL 151941 PRINCESS
Instructions for use
Mode d'emploi
Anleitung
Read these instructions thoroughly first and keep them for future reference. Check that your domestic electricity supply matches that of the appliance. Only connect this appliance to an earthed socket.
This fully automatic bread maker mixes and kneads the dough, bakes the bread and then switches to the stay-warm function (to keep the bread appetisingly fresh and crispy). Fresh bread every time, just as you like it. Also suitable for special diets. Crust colour can be set to light, medium and dark.
This unique bread maker comes with 10 fixed digital programmes, timer (wake up to the aroma of freshly baked bread), large LCD screen, removable baking tin with non-stick coating and 2 mixers for the perfect results every time. With measuring cup and measuring scoop.
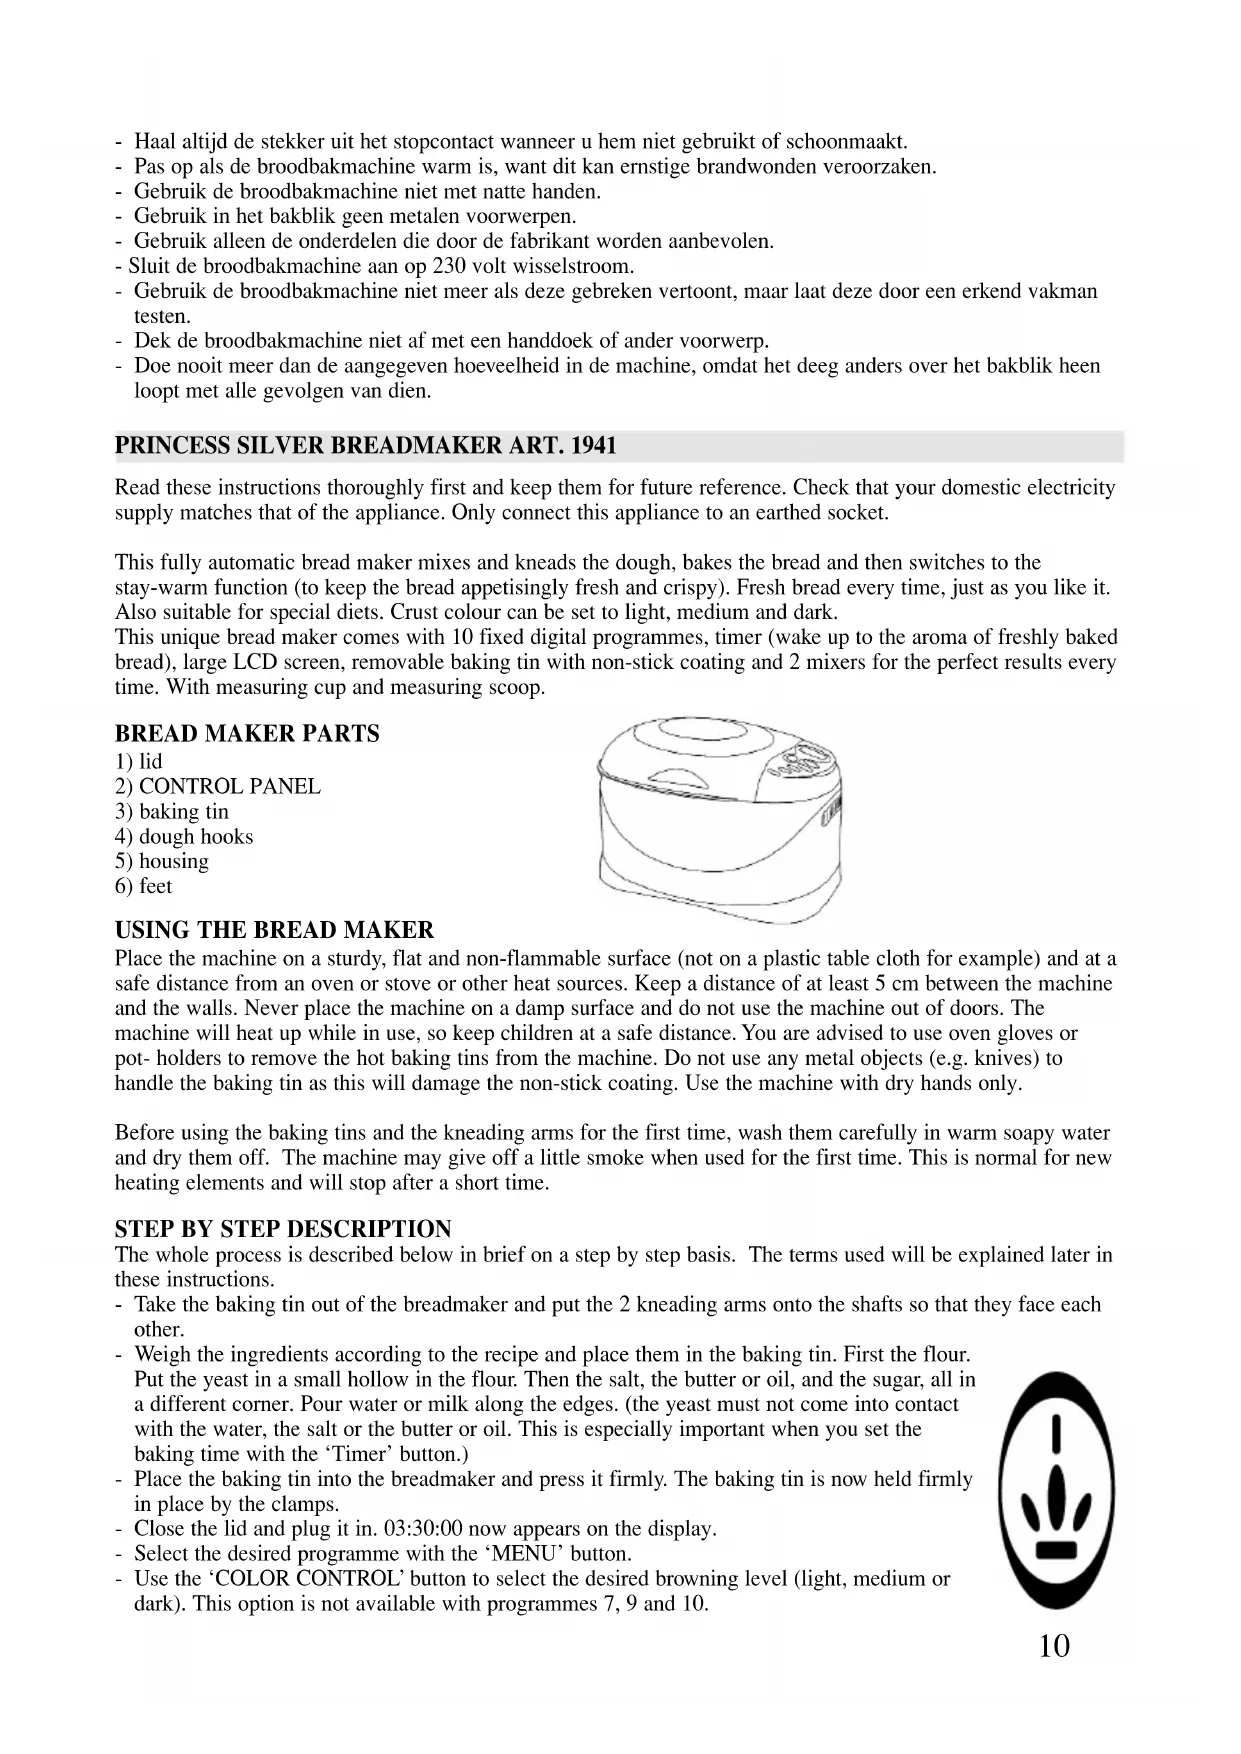
BREAD MAKER PARTS
Place the machine on a sturdy, flat and non-flammable surface (not on a plastic table cloth for example) and at a safe distance from an oven or stove or other heat sources. Keep a distance of at least 5cm between the machine and the walls. Never place the machine on a damp surface and do not use the machine out of doors. The machine will heat up while in use, so keep children at a safe distance. You are advised to use oven gloves or pot- holders to remove the hot baking tins from the machine. Do not use any metal objects (e.g. knives) to handle the baking tin as this will damage the non-stick coating. Use the machine with dry hands only.
Before using the baking tins and the kneading arms for the first time, wash them carefully in warm soapy water and dry them off. The machine may give off a little smoke when used for the first time. This is normal for new heating elements and will stop after a short time.
STEP BY STEP DESCRIPTION
The whole process is described below in brief on a step by step basis. The terms used will be explained later in these instructions.
- Take the baking tin out of the breadmaker and put the 2 kneading arms onto the shafts so that they face each other.
- Weigh the ingredients according to the recipe and place them in the baking tin. First the flour. Put the yeast in a small hollow in the flour. Then the salt, the butter or oil, and the sugar, all in a different corner. Pour water or milk along the edges. (the yeast must not come into contact with the water, the salt or the butter or oil. This is especially important when you set the baking time with the 'Timer' button.)
- Place the baking tin into the breadmaker and press it firmly. The baking tin is now held firmly in place by the clamps.
- Close the lid and plug it in. 03:30:00 now appears on the display.
- Select the desired programme with the 'MENU' button.
- Use the 'COLOR CONTROL' button to select the desired browning level (light, medium or dark). This option is not available with programmes 7, 9 and 10.

- If you want to use the TIMER function, you can now choose your setting with the 'TIME+' and 'TIME-' button. Only possible with programmes 1, 3, 5, 7, 8 and 10.
- Press the 'START' button.
- After the 1st signal extra ingredients may be added for the filling, if desired. (see the recipes at the back of these instructions)
- The second beep will sound when the baking process is finished.
- WARNING: The baking tin and the bread are hot! Use oven gloves when removing the baking tin from the breadmaker and the bread from the baking tin. Let the bread cool down on a rack.
- NOTE: The kneading arms may still be inside the bread. If this is the case, they can be carefully removed. Note that the kneading arms are hot!
- If you wish to bake another loaf, you should wait a few minutes until the appliance has sufficiently cooled off. The breadmaker will emit a peeping sound and 'HHH' will appear in the display if it has not cooled down sufficiently.
- Turn the appliance off when finished and remove the plug from the socket.
- The easiest way to cut the freshly baked bread is with the Princess electric knife ( art 2952) 2952)
CONTROL PANEL
You can switch the breadmaker on and off using the start/stop button.
To switch on: Press the start/ stop switch.
To switch off: Hold the start/stop button in, and count to 5.
NOTE: If you switch off the breadmaker while the baking process is still running the programme will not be completed, but will start from the beginning.
MENU
Select menu Control panel Description Duration Duration settings (2.5LB) (3.0LB)
| 1 Basic Basis 3:20 3:30 | |||
| 2 | Quick | Quick | |
| 3 | French: | French | |
| 4 | Rapid | Rapid | |
| 5 | Whole wheat: | Whole wheat | 3:30 3:40 |
| 6 | Cake | Cake | |
| 7 | Dough | Dough | |
| 8 | Bake Baking | 1:00 | |
| 9 | Jam | Jam | |
| 10 | Sandwich Sandwich | 3:09 3:20 | |
- I-Basic
To bake white or mixed bread. This is the most often used programme.
The breadmaker includes the following steps:
preheating - kneading - rising - baking - keeping warm
The programme takes 3 hours and 30 minutes in total. Timer function available.
2-Quick (commonly used programme)
To bake white or mixed bread. The bread will not rise as much and will therefore be more compact.
The breadmaker includes the following steps:
preheating - kneading - short rise - baking - keeping warm
The programme takes 1 hour and 58 minutes. Not in combination with the timer function.
3-French
To bake French white bread. Suitable for bread types with not much fat or sugar. The result is a light product with a crispy crust. For other types of bread as well.
The breadmaker includes the following steps:
preheating - kneading - rising - baking - keeping warm
The programme takes 3 hours and 50 minutes. Timer function may be used.

4-Rapid
To bake white or mixed bread.
The breadmaker includes the following steps:
short preheating - short kneading - short rise - baking
The programme takes 1 hour and 52 minutes. Not in combination with the timer function.
- 5-Whole wheat
Preparing the wholemeal wheat bread.
The breadmaker includes the following steps:
preheating - kneading - rising - baking - keeping warm
The programme takes 3 hours and 40 minutes. Timer function available.
- 6-Cake
For preparing cake. The breadmaker includes the following steps:
mixing - baking - rest
The programme takes 2 hours. Not in combination with the timer function.
- 7-Dough
For kneading dough for sandwiches, pizzas or any other recipe where dough is required.
The breadmaker includes the following steps:
preheating - kneading - rising
The programme takes 1 hour and 50 minutes. Timer function may be used.
-8-Bake
Only for baking. This enables you to make dough ready to use, or to extend the standard baking time if you like your bread very well done. The breadmaker includes the following steps:
baking - keeping warm
The programme takes 1 hours. Timer function available.
-9-Jam
For preparing jam. The breadmaker includes the following steps:
Heating - blending - rest
The programme takes 1 hour and 20 minutes
10-Sandwich
For preparing bread for sandwiches. This enables you to bake bread with a soft crust.
The breadmaker includes the following steps:
preheating - kneading - rising - baking at a lower temperature - keeping warm
The programme takes 3 hours and 20 minutes. Timer function may be used.
COLOR
To choose the level of browning for the crust, press the 'color' button.
- Light
- Medium
Dark
This function is not available with programmes 7, 9, and 10.
TIMER FUNCTION
With the timer you can set the breadmaker to switch on automatically a few hours later. This means you can set it to switch on at night, for example. This function is available with programmes 1, 3, 5, 9 and 10.
Example
Put all the ingredients in the bread tin, make sure the yeast does not come into contact with the liquid.
Use the menu button to select the desired programme and choose the desired browning with the 'COLOR' button.
It is 10.00pm and you would like to have fresh bread ready to take out of the breadmaker at 7.15 am the following morning. The difference between these times is 9 hours and 15 minutes. The timer should therefore be set to 9:15.

LOAF SIZE
This function allows you to determine the volume of the dough.
1.13kg stands for 2.5 pounds (suitable for baking bread of 1150 grams).
1.36kg stands for 3.0 pounds (suitable for baking bread of 1380 grams).
This option is only available with programmes 1, 5 and 10.
PRE-HEAT FUNCTION
This breadmaker is preheated as standard, in order to bring the ingredients to the same temperature. This varies from 3 to 40 minutes, depending on the selected menu.
COMMENTS CONCERNING THE RECIPES
To get the best results, be careful to keep to the correct proportions between the ingredients.
Use the enclosed measuring cup and measuring scoop, or use a weighing scales.
The measuring cup is 300ml . Ensure the water is not too cold - the best temperature is hand warm (28^ to 30^)
The large measuring scoop is 15ml and is equal to a dessert spoon. The small measuring scoop is 5ml and is equal to a teaspoon
Every recipe has fresh or dried yeast listed and you should make a choice between the two according to your preference.
Possible problems when baking bread
The bread does not rise:
- old yeast,
* not enough water, - too much salt
- incorrect amounts,
- put the yeast under the flour so that it doesn't come into contact with salt, butter or water.
The bread rises too high.
- use less yeast
- use less water
- use more salt
The bread looks like a "crater":
- too much water has been used
- use 2 more dessertspoons of flour
- The bread has been left too long in the bread mould.
The bread is too heavy:
- Use 2 more dessertspoons of water..
There are holes in the bread
- use 2 fewer dessertspoons of water
- use a little less yeast
- use more salt
CLEANING AND MAINTENANCE
Before using the breadmaker for the first time, clean it and the kneading arms with a gentle detergent. Before
cleaning and storing the appliance, always let it cool down first. After cooling down for about half an hour, the appliance is ready to be used once again for baking or making dough.
Before cleaning, always remove the plug from the wall socket and give the appliance the chance to cool down.
Never use aggressive detergents such as chemical cleaners, oven cleaner etc.
Remove all ingredients and crumbs from the lid, the housing and the pan with a damp cloth.
Never immerse the bread maker in water and never fill the appliance with water.
Clean the housing on the inside and outside with a damp cloth. Always clean and dry the appliance carefully after use. The kneading arms and shafts must be cleaned immediately after each use.

If you leave the kneading arms in position after use, it may be difficult to remove them at a later stage. If this happens, fill the baking tin with warm water and, after 30 minutes, remove the kneading arm and clean it. The baking tin and kneading arms are covered with a non-stick coating; you should therefore never use metal implements that could damage the surface. It is normal that the colour of the non-stick coating will turn dull after several baking cycles. This will not affect the functioning however. Before storing the appliance away, ensure that it is has completely cooled down and is clean and dry. Always close the lid of the appliance when storing it away.
CONVERSION TABLE
dry yeast sugar salt
1 teaspoon 4 grams 5 grams 6 grams 5ml1 / 30 cup
1 dessert spoon 10 grams 16 grams 20 grams 15ml1 / 10 cup
BASIC RECIPE
The proportions to look out for, if you do the mixing yourself, expressed as a percentage of the quantity of flour:
Ingredient Percentage Weight Measuring cup
Flour 100% 500 grams approx. 3 measuring cups *1
Salt 2% 10 grams 1.5 teaspoon
dried yeast 1% 5 grams 2 teaspoons *2
OR fresh yeast 2% 10 grams 1.5 teaspoon
Water 60-62% 300-320 gram 3-3.2dl
Bread improver 1-2% 5-10 gram 1 teaspoon
(if used)
- 1 There are different types of flour, which may vary in weight even if they have the same volume.
- 2 The quantity of yeast may be increased if the yeast is not very fresh.
At least 1 teaspoon of sugar is required as feed for the yeast.
The end result depends on the type, quality and freshness of the flour.
A FEW RECIPIES FOR BREAD
Milk bread
Programme: 1-Basic
| Recipe for: | 1150 grams | 2.5LB | 1380 grams | 3LB |
| White flour | 675 grams | 675 grams | 800 grams | 800 grams |
| Milk 280 ml | 280 ml | 320 ml | 320 ml | |
| Water | 130 ml | 130 ml | 160 ml | 160 ml |
| Butter | 24 grams | 2 dessert spoon | 30 grams | 2 1/2 tablespoons |
| Sugar | 16 grams | 1 dessert spoon | 20 grams | 4 teaspoon |
| Salt | 12 grams | 2 teaspoon | 16 grams | 3 teaspoon |
| Fresh yeastor dried yeast | 14 grams | 3 1/2 teaspoon | 16 grams | 3 1/2 teaspoon |
| dried yeast | 6 grams | 1 1/2 teaspoon | 8 grams | 1 1/2 teaspoon |
Quick White Bread
Programme: 2-Quick
| Recipe for: | 1150 grams | 2.5LB | 1380 grams | 3LB |
| White flour | 675 grams | 675 grams | 750 grams | 750 grams |
| Water | 425 ml | 425 ml | 450 ml | 425 ml |
| Milk powder | 24 grams | 2 dessert spoon | 30 grams | 2 1/2 tablespoons |
| Sunflower oil | 36 ml | 3 dessert spoon | 36 ml | 3 dessert spoon |
| Sugar | 32 grams | 2 dessert spoon | 32 grams | 2 dessert spoon |
| Salt | 12 grams | 2 teaspoon | 16 grams | 3 teaspoon |
| Fresh yeastor dried yeast | 14 grams | 3 1/2 teaspoon | 16 grams | 3 1/2 teaspoon |
| dried yeast | 8 grams | 2 teaspoon | 8 grams | 2 teaspoon |
Whole grain bread
Programme: 5 - Wholewheat
Recipe for: 1150 grams 2.5LB 1380 grams 3LB
Whole grain flour 500 grams 500 grams 550 grams 550 grams
White flour 175 grams 175 grams 200 grams 200 grams
Fresh yeast
or dried yeast 10 grams 2 1/2 teaspoon 15 grams 3 1/2 teaspoon
dried yeast 4 grams 1 teaspoon 6 grams 1 1/2 teaspoon
Salt 10 grams 1 1/2 teaspoon 15 grams 2 1/2 teaspoon
Sugar 16 grams 1 dessert spoon 18 grams 3 1/2 teaspoon
Butter 10 grams 2 1/2 teaspoon 15 grams 11/2 dessertspoon
Water 425 ml 425 ml 470 ml 470 ml
Wheat bread
Programme: 5 - Wholewheat
Recipe for: 1150 grams 2.5LB 1380 grams 3LB
Whole wheat flour 400 grams 400 grams 450 grams 450 grams
Wheat flour 275 grams 275 grams 300 grams 300 grams
Water 425 ml 425 ml 470 ml 470 ml
Butter 10 grams 2 1/2 teaspoon 15 grams 11/2 dessertspoon
Sugar 16 grams 1 dessert spoon 18 grams 3 1/2 teaspoon
Salt 10 grams 1 1/2 teaspoon 15 grams 2 1/2 teaspoon
Fresh yeast
or dried yeast 10 grams 2 1/2 teaspoon 20 grams 1 1/2 tablespoons
dried yeast 4 grams 1 teaspoon 10 grams 2 1/2 teaspoon
Try the following with "regular bread"
After the final kneading, sprinkle the dough with water and scatter sesame or moon seeds over it.
Italian white bread
Programme: 10-Sandwich
Recipe for: 1150 grams 2.5LB 1380 grams 3LB
White flour 620 grams 620 grams 700 grams 700 grams
Corn semolina 130 grams 130 grams 160 grams 160 grams
dried yeast 12 grams 3 teaspoon 12 grams 3 teaspoon
Salt 7 grams 1 1/2 teaspoon 12 grams 2 teaspoon
Sugar 24 grams 1 1/2 tablespoons 32 grams 2 dessert spoon
Sunflower oil 18 grams 1 1/2 tablespoons 12 grams 2 dessert spoon
Water 450 ml 450 ml 530 ml 530 ml
Cake
Programme: 6-Cake
Recipe for: normal large
Self-raising flour 250 grams 500 grams
Sugar 200 grams 400 grams
Butter 200 grams 400 grams
Milk 4 tablespoons 120ml
Eggs 3
Vanilla sugar 1 sachet 2 sachets
Cocoa powder as
an extra ingredient 50 grams 100 grams
for chocolate cake
When the baking process has been completed, do not take the cake out of the baking tin - allow it to cool off first!
Strawberry jam
Programme: 9-Jam
Fresh strawberries
Sugar for preserve or jam
Lemon juice
900 grams
500 grams
1 large tablespoon

PRINCESS TIPS
- Only use the appliance for the purpose outlined in the instructions.
- Improper use may be dangerous.
- Be extra careful if you use the bread maker around children.
- Never let children use the breadmaker without supervision.
- Do not immerse the bread maker, the cord or plug in water or any other liquid.
- Do not use the breadmaker outdoors.
- Do not place the breadmaker on a damp cloth.
- Put the breadmaker on a flat base.
- Do not position it on or near an oven, gas cooker or other heat source.
- Make sure the cord is not hanging over the edge of the worktop or table, as somebody may trip over it.
- Only insert the plug in an earthed socket
- Ensure the cord does not lie on or against any hot objects.
- Never open the housing of the breadmaker.
- Never use the breadmaker near flammable substances.
- If you use an extension cord, make sure that it is compatible with your bread maker.
- Always remove the plug from the socket when not in use or if you are cleaning the appliance.
- Be careful when the breadmaker is hot as it can cause serious burns.
- Do not touch the breadmaker with wet hands.
- Do not use any metal objects in the bread mould.
- Only use the parts recommended by the producer.
- Connect the bread maker to a 230 volt alternating current
- Do not continue to use the breadmaker if it is damaged; instead have it tested by a recognised specialist.
- Do not cover the breadmaker with a towel or any other object.
- Never add more than the recommended amounts to the breadmaker, as the dough will then overflow from the baking tin.
U.K. WIRING INSTRUCTIONS
The wires in the mains lead are coloured in accordance with the following code:
$$ \text {B L U E} = \text {N E U T R A L}, \text {B R O W N} = \text {L I V E}, \text {G R E E N - Y E L L O W} = \text {E A R T H} $$
As the colours of the wire in the mains lead of this appliance may not correspond with the colour markings identifying the terminals on your plug, proceed as follows:
The wire which is coloured BLUE must be connected to the terminal which is marked with the letter N or coloured black.
The wire which is coloured BROWN must be connected to the terminal which is marked with the letter L or coloured red.
The wire which is coloured GREEN-YELLOW must be connected to the earth terminal which is marked with the letter E or ± or coloured green and yellow.
With this appliance, if a 13 amp plug is used a 13 amp fuse should be fitted. If any other type of plug is used a 15 amp fuse must be fitted either in the plug or at the distribution board.
PRINCESS SILVER BREADMAKER XL ART. 1941
Whole wheat 3:30 3:40
6 Cake Cake 2:00
7 Dough Teig 1:50
8 Bake Backen 1:00
Jam 1:20
10 Sandwich 3:09 3:20
- I-Basic
3 French: Vitt brod 3:50
4 Rapid Hastig 1:52
Whole wheat: Fullkorn 3:30 3:40
6 Cake Mjuk kaka 2:00
7 Dough Deg 1:50
Recept for: normal stor
Mjol med tillsats
avjast 250 gram 500 gram
Socker 200 gram 400 gram
Smor 200 gram 400 gram
Mjolk 4 matskedar 120ml
Agg 3 6
Vaniljsocker 1 portionspase 2 portionspasar
Kakao som
extraingrediens 50 gram 100 gram
for chokladkaka
Malk 4 spsk. 120ml
Ae 3 styks 6 styks
Vanillesukker 1 brev 2 breve
Til chokoladekage
ekstraingredients: 50 gram 100 gram
kakaopulver
RENGJØRING OG VEDLIKEHOLD
A这其中, the first two of these two cases are the same.
chocolate, use cacao
comoingrediente 50gramas100gramas
adicional
For 1 year in respect of defects found to be due to faulty workmanship or material. The guarantee is only valid with a complete filled in guarantee card. There is no guarantee on appliances found to be defective due to wrongful use, disassembling or accidental breakage.