
New Classics Breadmaker 151937 - Bread maker PRINCESS - Free user manual and instructions
Find the device manual for free New Classics Breadmaker 151937 PRINCESS in PDF.
| Product type | Automatic bread machine |
| Brand | Princess |
| Model | New Classics Breadmaker 151937 |
| Power supply | 220-240 V ~ 50/60 Hz |
| Maximum capacity | 900 g (2.0 LB) |
| Number of programs | 10 programs (Basic, Basic wheat, Basic dough, Quick, Quick wheat, Quick dough, Jam, Cake, Sandwich, Home made) |
| Crust control | 3 levels: Light, Medium, Dark (programs 1, 4, 8, 10) |
| Timer | Yes, programmable (programs 1, 4, 10) |
| Baking pan | Non-stick coating, removable |
| Kneading hooks | 2 removable hooks |
| Included accessories | Measuring cup, measuring spoon, storage tray, microfiber cloth |
| Exterior material | Chrome-plated steel |
| Cleaning the pan | Dishwasher safe or wash with warm soapy water |
| Cleaning the control panel | With dry microfiber cloth |
| Automatic shut-off | Yes (power cut < 30 minutes) |
| Safety | Stop function if lid opened (beep and LID message), HOT signal in case of overheating |
| Custom program | Yes (program 10 with custom cycle and duration settings) |
| Weight | Not specified |
| Dimensions | Not specified |
Frequently Asked Questions - New Classics Breadmaker 151937 PRINCESS
User questions about New Classics Breadmaker 151937 PRINCESS
0 question about this device. Answer the ones you know or ask your own.
Ask a new question about this device
Download the instructions for your Bread maker in PDF format for free! Find your manual New Classics Breadmaker 151937 - PRINCESS and take your electronic device back in hand. On this page are published all the documents necessary for the use of your device. New Classics Breadmaker 151937 by PRINCESS.
USER MANUAL New Classics Breadmaker 151937 PRINCESS
New Classics Bread Maker Article 1937
natural_image
Illustration of a Honda air fryer with a digital display and control panel (no text or symbols)- Gebruiksaanwijzing • User's instructions • Mode d'emploi
- Bedienungsanleitung • Instrucciones de uso • Istruzioni per l'uso
- Bruksanvisning • Brugsanvisning • Bruksanvisning
• Käyttöohje • Instruções de uso • المستخدم دليل
CE
Nederlands 1
English 7
Français 13
Deutsch 19
Español 25
Italiano 31
Svenska 39
Dansk 45
Norsk 51
Suomi 57
Português 63
المملكة المتحدة 69

Algemeen
10 Home made (eigen recept)
This attractive Princess New Classics Breadmaker is one of the products in our New Classics range, all of which are finished in sturdy chrome-plated steel. This fully-automatic appliance mixes and kneads the dough, and then bakes the bread. The appliance is supplied complete with a baking tin with non-stick coating, a measuring cup and measuring spoon, and a handy storage tray that enables you to use the appliance as a breadbin once you have finished baking.
Connect the Breadmaker to a 220 - 240 V mains power supply. The Breadmaker is equipped with ten adjustable programs you can use for various types of bread, cake and jam; you can also adjust one programme to suit your personal recipe. You can use the crust control to obtain precisely the degree of crust-browning you require. The appliance is also equipped with a timer you can use to set the time at which you wish the bread to be baked – for example, delicious bread when you sit down to breakfast!

Operation and controls
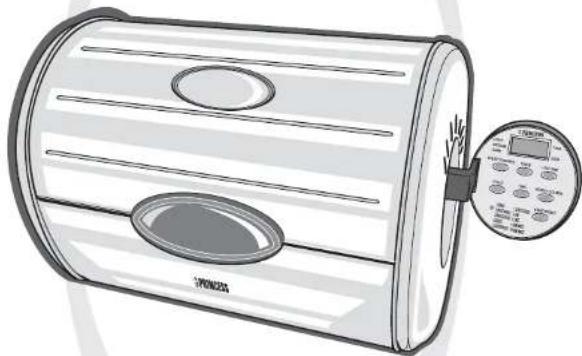
See Figure 1.
The appliance is equipped with the following features:
1 Housing
2 Clips for the baking tin
3 Rolling lid
4 Control panel
5 Baking tin
6 Kneaders
7 Storage tray base
8 Measuring cup
9 Measuring spoon
10 Power cord and plug
Before use for the first time
1 Take the appliance out of the packaging.
Use
Adding the ingredients
1 Weigh the ingredients required for the recipe.

Never fill the machine with more than the maximum quantity (a total of a maximum of 900 g (2,0 LB); otherwise the dough will spill over the baking tin.
2 Open the rolling lid.
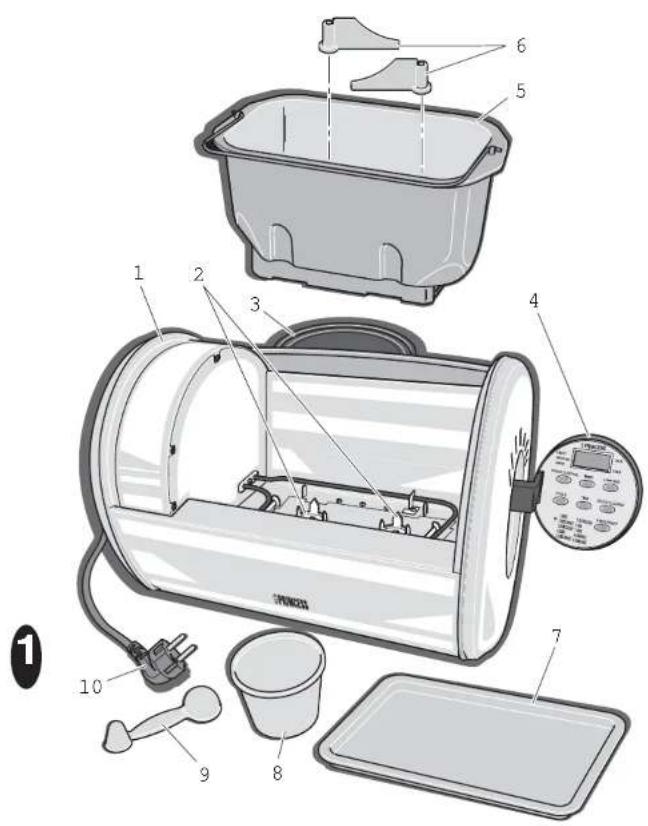
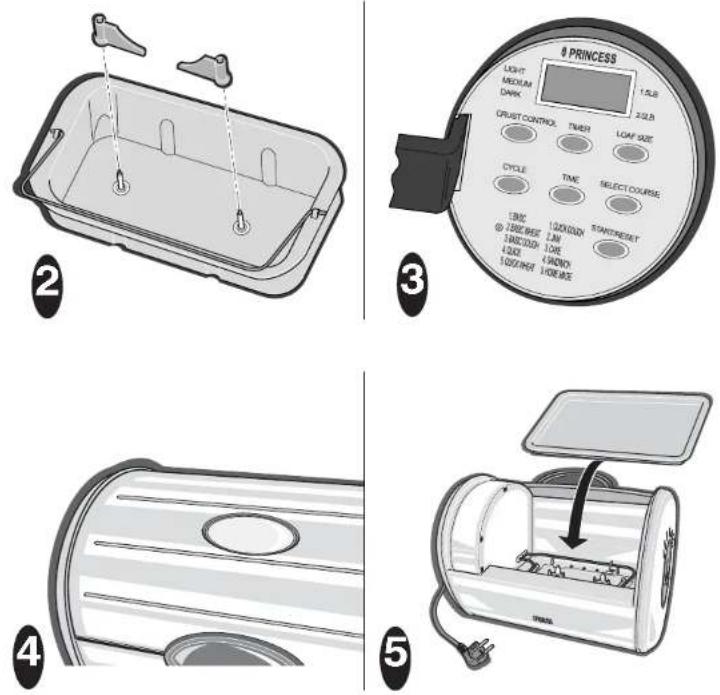
3 Remove the baking tin from the appliance, and fit the two kneaders on the shafts. Turn the two kneaders to face each other. See Figure 2.
4 Add the ingredients one by one to the baking tin. Begin by pouring in the flour. Then add the yeast (in a hollow in the flour). Next, depending on the recipe, add the salt, butter or oil, and sugar; put each of the ingredients in one corner of the baking tin (this is particularly important when using the timer).
5 Press the baking tin firmly into the clips in the interior of the appliance.
6 Close the rolling lid.
7 Put the plug into the wall socket.
Setting the program
See Figure 3.
1 Open the control panel. You will see '3:45' flashing on the display.
2 Select the required program by pressing the SELECT COURSE button. See 'Select course'.
3 Press the CRUST CONTROL button to adjust the degree of browning (solely
for programs 1, 4, 8 and 10). See ‘Crust control’.
4 If so required, you can specify the size of the loaf you wish to bake using the LOAF SIZE button (solely for programs 1, 2 and 9). See 'Loaf size'.
5 If you so wish, you can delay the time at which you wish the program to start using the TIMER button (solely for programs 1, 4 and 10). See 'Timer'.
Baking
6 Press the START/RESET button. The indicator light will now illuminate.
'PREHEAT' will appear on the display.
The preheating time depends on the program you selected.
7 If so required, you can delete the program by pressing the START/RESET button again.
- Always use the appliance with the lid closed. If you do not close the lid whilst using the appliance then you will hear a beep, and 'LID' will flash on the display. The appliance will switch on only once the lid has been closed.
- The appliance will automatically switch off in the event of a power failure whilst it is in use. The appliance will automatically switch on again if the power is restored within 30 minutes. The appliance will then complete the program.
- Use oven gloves if you need to touch the appliance during or after use. The appliance and the baking tin will become hot.
8 You can keep track of the baking process by looking through the window in the lid (see Figure 4). Once the appliance has completed the first kneading cycle you may hear a beep (depending on the program you selected). This enables you to add extra ingredients, where relevant.
End
1 The appliance will keep the bread warm once it is baked. This prevents condensation on the crust. You will hear a further beep at the end of the program. Use oven gloves to open the lid and take the baking tin out of the appliance.
2 Remove the loaf from the baking tin by turning the tin upside down and tapping it gently. If so required, you can use a wooden or plastic spatula to remove the loaf; however, take care not to damage the non-stick coating. The kneaders may remain in the loaf. Take care when removing them; they are hot. Allow the bread to cool on a rack before cutting it. (Tip: you can cut fresh bread very easily with the Princess electrical knife (Article no. 2952).
3 Allow the appliance to cool down sufficiently before using it again. If the appliance is too hot you will hear a beep, and 'HOT' will appear on the display.
4 When you have finished using the appliance remove the plug from the wall socket, and allow the appliance to cool down sufficiently before you store it. The useful storage tray also enables you to use the appliance as a breadbin.
Select course
| No. Program Time | ||
| 1 Basic 3 hr 45 min. | ||
| 2 Basic wheat 3 hr 55 min. | ||
| 3 Basic dough 2 hr 05 min. | ||
| 4 Quick 2 hr 08 min. | ||
| 5 Quick wheat 2 hr 28 min. | ||
| 6 Quick dough 0 hr 45 min. | ||
| 7 Jam 1 hr 20 min. | ||
| 8 Cake 2 hr 00 min. | ||
| 9 Sandwich 3 hr | 35 min. | |
| 10 | Home made | Personal settings |

1 Basic
Program for white or light-brown bread. This is the most frequently used program. The appliance kneads the bread in three cycles. A beep will sound after the first cycle; you can then add extra ingredients if you so wish.
2 Basic wheat
Program for wholegrain bread. The appliance kneads the bread in two cycles. Wholegrain bread requires a longer baking time.
3 Basic dough
Program used to knead dough for rolls, pizzas, and similar. You can also use this program to stir jam.
4 Quick
This is a frequently-used program. The appliance kneads the bread in two cycles. A beep will sound after the first cycle; you can then add extra ingredients if you so wish. The dough is allowed to rise for a shorter time; the baking time is also shortened.
5 Quick wheat
Program for white French bread. The appliance kneads the bread in two cycles. The dough is allowed to rise for a longer time; the baking time is also lengthened. This results in bread with a thicker crust. You can also use this program for other types of bread.
6 Quick dough
Program used to prepare dough. The program stops after kneading the dough.
7 Jam
Program used to make jam.
8 Cake
Program used to make cake. The appliance kneads the bread in two cycles.
9 Sandwich
Program used to bake sandwiches.
10 Home made
This program allows you to set the number of kneading cycles and the baking time, etc. This requires the use of the TIME and CYCLE functions. See 'Free programming'.
Crust control
Setting used to adjust the colour of the crust:
• Light;
- Medium;
- Dark.
The standard programs use the medium crust-control setting. Programs 1, 4, 8 and 10 provide for the adjustment the degree of browning using the CRUST CONTROL button.
Loaf size
This setting enables you to specify the quantity of dough you have used. The appliance will adjust the baking time accordingly:
- Press the 1.5 LB button for a 600 g loaf.
- Press the 2.0 LB button for a 900 g loaf.
Timer.
This setting enables you to specify when the appliance is to have completed the selected program (solely for programs 1, 4 and 10).
Example
1 Add all the ingredients to the baking tin. The yeast may not come into contact with liquids, salt or butter, since this would immediately start the fermentation process.
2 Select the required program.
3 It is, for example, 10 PM and you wish the freshly-baked bread to be ready at 7:15. The time difference is then
9 hours and 15 minutes. Use the TIMER to set the delay to 9:15.
Storage tray base
See Figure 5.
This tray enables you to use the appliance as a breadbin once you have baked the loaf.
1 Remove the baking tin from the appliance.
2 Fit the storage tray above the heating element.
3 Put the baked bread on the storage tray, and close the lid.

Allow the appliance to cool down completely before fitting the storage tray.
Free programming
Program 10 of the Breadmaker is comprised of a number of steps. Each step has a standard time. You can adjust these times to suit your recipe.
1 Press the SELECT COURSE button repeatedly until program 10 is displayed.
2 Press the CYCLE button until PREHEAT and the set time for this step are displayed
3 Press the TIME button to select the required time.
4 Press the CYCLE button to confirm the time.
5 Press the CYCLE button to go to the next step.
6 Continue until you have set all steps.
7 Press the START/RESET button to display the total time.
8 If so required, press the TIMER button to adjust the starting time.
9 Press the START/RESET button again to start the program.
10 If so required, you can delete the program by pressing the START/RESET button again.

Maintenance and cleaning
Always clean the appliance and the accessories after each use. This will prevent food residues from baking onto the appliance.
1 Remove the plug from the wall socket, and allow the appliance to cool down completely.
2 Clean the baking tin with a damp cloth and a few drops of washing-up liquid. Dry it thoroughly.
3 Clean the other loose parts in washing-up water or place in a dishwasher, and then dry them thoroughly.
4 Clean the control panel with the special microfibre cloth supplied with the appliance. Do not moisten the cloth.
5 Clean the exterior of the housing with the microfibre cloth.

- Make sure no moisture gets into the appliance.
- Do not immerse the appliance in water, or in other liquids. If this happens do not use the appliance any
more; for safety reasons, dispose of the appliance.
- Never use corrosive or scouring cleaning agents.

Safety
General
- Please read these instructions carefully and retain them for reference.
- Use this appliance only in accordance with the instructions.
- This appliance is intended solely for domestic use.
- Keep the appliance out of the reach of children, and of persons who may not be able to operate it safely.
- Have the appliance repaired only by a qualified electrician. Never try to repair the appliance yourself.
Electricity and heat
- Verify that the mains voltage is the same as that indicated on the type plate on the appliance before use.
- Plug the appliance into an earthed wall socket.
• Always remove the plug from the socket when the appliance is not in use. - Always remove the plug from the wall socket by pulling on the plug, not the power cord.
-
Do not use the equipment if it is damaged, or if the lead is damaged. Send it to our Service Department in order to avoid a hazard. With this type of appliance, a damaged cord should only be replaced by our Service Department using special tools.
-
Make sure that the appliance and the power cord do not come in contact with sources of heat, such as a hot hob or naked flame.
- Make sure that the appliance, the power cord and plug do not come in contact with water.
- Take care when touching the appliance and its parts. Allow the appliance to cool down first. The appliance and its parts will become hot whilst the appliance is in use. The appliance's housing will also become hot, since the housing is an excellent conductor of heat.
- The appliance needs space to allow heat to escape, thereby preventing the risk of fire. Make sure that the appliance has sufficient space around it, and does not come in contact with flammable material. The appliance must not be covered.
- Make sure the air vents are not covered or blocked.
During use
- Never use the appliance outdoors.
- Place the appliance on a flat, stable surface where it cannot fall.
- Never allow the power cord to hang over the edge of the draining board, worktop or table.
- Make sure that your hands are dry before touching the appliance, power cord or plug.
- Never use the appliance in a humid room.
- Switch off the appliance and remove the plug from the wall socket in the event of a malfunction during use, and before cleaning the appliance, fitting or removing an accessory, or storing the appliance after use.
- Never fill the machine with more than the maximum quantity (a total of a
maximum of 900 g,[2,0 LB]); otherwise the dough will spill over the baking tin.
- Always use the appliance with the lid closed. If you do not close the lid whilst using the appliance then you will hear a beep, and 'LID' will flash on the display. The appliance will switch on only once the lid has been closed.
- Use oven gloves if you need to touch the appliance during or after use. The appliance and the baking tin will become hot.
- Make sure that the appliance is outside the reach of children. The appliance and its parts can become hot whilst the appliance is in use.
- Do not pick up the appliance if it falls into water. Remove the plug from the wall socket immediately. Do not use the appliance any more.
- Clean the appliance thoroughly after use (see the ‘Cleaning and maintenance’ Section).
U.K. WIRING INSTRUCTIONS

The wires in the mains lead are coloured in accordance with the following code:
As the colours of the wire in the mains lead of this appliance may not correspond with the colour markings identifying the terminals on your plug, proceed as follows:
- The wire which is coloured BLUE must be connected to the terminal which is marked with the letter N or coloured black.
- The wire which is coloured BROWN must be connected to the terminal which is marked with the letter L or coloured red.
- The wire which is coloured GREEN/YELLOW must be connected to the terminal which is marked with the letter E or (earth symbol) and is coloured GREEN or GREEN/YELLOW
WARNING: THIS APPLIANCE MUST BE EARTHED


The Environment
Dispose of packaging material, such as plastic and boxes, in the appropriate waste containers.
You should ensure for the reuse of the appliance if you wish to dispose of it whilst it is still in good working order or needs only a minor repair.

When the appliance reaches the end of its useful life it must be disposed of in a responsible manner, thereby ensuring for the reuse of (parts of) the appliance. Do not dispose of the appliance with unsorted refuse; hand it in at the store, or take it to a recognized collection point. Contact your municipality for information about the reception and collection systems in your area.

Généralités
2 Basic wheat (pain complet simple)
5 Quick wheat (pain complet rapide)
10 Home made (recette maison)
9 Sandwich (bocadillos)
10 Home made (Receta propia)
5 Quick wheat (snabbprogram fullkorn)
10 Home made (eget recept)
10 Home made (egen opskrift)
10 Home made (egen oppskrift)
Her kan du selv innstille apparatet når det gjelder antall eltinger, steketid osv. For dette trenger du funksjonene TIME og CYCLE. Se 'Egenprogrammering').


- Algemeen
- Home made (eigen recept)
- Operation and controls
- Before use for the first time
- Use
- Adding the ingredients
- Setting the program
- Baking
- End
- Select course
- Basic
- Basic wheat
- Basic dough
- Quick
- Quick wheat
- Quick dough
- Jam
- Cake
- Sandwich
- Home made
- Crust control
- Loaf size
- Timer.
- Example
- Storage tray base
- Free programming
- Maintenance and cleaning
- Safety
- General
- Electricity and heat
- During use
- U.K. WIRING INSTRUCTIONS
- The Environment
- Généralités
- Basic wheat (pain complet simple)
- Quick wheat (pain complet rapide)
- Home made (recette maison)
- Sandwich (bocadillos)
- Home made (Receta propia)
- Quick wheat (snabbprogram fullkorn)
- Home made (eget recept)
- Home made (egen opskrift)
- Home made (egen oppskrift)
Brand : PRINCESS
Model : New Classics Breadmaker 151937
Category : Bread maker