
Silver Breadmaker 151935 - Bread maker PRINCESS - Free user manual and instructions
Find the device manual for free Silver Breadmaker 151935 PRINCESS in PDF.
| Product type | Bread maker |
| Brand | Princess |
| Model | Silver Breadmaker 151935 |
| Programs | 9 automatic programs (Basic, Basic wheat, Basic dough, Quick, Quick wheat, Quick dough, Jam, Cake, Sandwich) + 1 free program (Home made) |
| Main functions | Timer (up to 9h15), crust control (light, medium, dark), volume selection (1.5 lb / 600 g or 2.0 lb / 800 g), free programming of steps |
| Capacity | 600g or 800g loaf |
| Display | Backlit LCD screen |
| Included accessories | Removable non-stick pan, 2 kneading paddles, measuring cup (250 ml), large measuring spoon (15 ml), small measuring spoon (5 ml) |
| Power supply | 230 V ~ 50 Hz (estimated) |
| Power | Approximately 650 W (estimated) |
| Dimensions (approx.) | 30 x 25 x 30 cm (estimated) |
| Weight (approx.) | 6 kg (estimated) |
| Pan material | Non-stick steel |
| Color | Silver |
| Safety | Open lid detection (display "LID"), overheat protection (display "HOT"), automatic restart after power cut < 30 min |
| Care and cleaning | Pan and kneading paddles washable with hot water and dish soap; body cleaned with a damp cloth; never immerse the appliance |
| Spare parts and repairability | Pan, paddles and accessories available; repair by an authorized professional |
| General information | 1-year warranty on manufacturing defects; manual available in several languages |
Frequently Asked Questions - Silver Breadmaker 151935 PRINCESS
User questions about Silver Breadmaker 151935 PRINCESS
0 question about this device. Answer the ones you know or ask your own.
Ask a new question about this device
Download the instructions for your Bread maker in PDF format for free! Find your manual Silver Breadmaker 151935 - PRINCESS and take your electronic device back in hand. On this page are published all the documents necessary for the use of your device. Silver Breadmaker 151935 by PRINCESS.
USER MANUAL Silver Breadmaker 151935 PRINCESS
Instructions for use
Mode d'emploi
Anleitung
natural_image
Symbolic emblem of a crown with a vertical line above it, enclosed in an oval frame (no text or numbers present)NL Gebruiksaanwijzing 4
UK Instructions for use 12
F Mode d'emploi 21
D Anleitung 30
E Instrucciones de Uso....39
I Istruzioni d'uso 48
S Bruksanvisning 57
DK Brugsanvisning 65
N Bruksanvisning 74
SF Käyttöohje 83
P Instruções de utilização 92
GR Οδηγίες χρήσεως ...... 101
GARANTIEKAART/GUARANTEE CARD/CARTE DE GARANTIE/ GARANTIEKARTE
CERTIFICADO DI GARANTÍA/CARTOLINA DI GARANZIA/GARANTIKORT/
GARANTIBEVIS/GARANTIKORT/TAKUUTODISTUS 113-114
PRINCESS SILVER BREADMAKER ART. 1935
natural_image
Line drawing of a kitchen sink with a handle, two compartments, and a small cup (no text or symbols)natural_image
Symbolic emblem of a carrot with a vertical line above it, enclosed in an oval frame (no text or numbers present)natural_image
Symbolic icon of a croch or paw print inside an oval frame (no text or numbers)- Quick dough
natural_image
Symbolic emblem of a leaf with a trident, enclosed in an oval frame (no text or numbers)OPMERKINGEN BETREFFENDE DE RECEPTEN
natural_image
Symbolic emblem of a leaf with a vertical line inside an oval frame (no text or numbers)PROGRAMMA 10 'Home Made'
natural_image
Symbolic icon of a croch or paw print inside an oval frame (no text or numbers)CAKERECEPT
Ingrediënten:
3 eieren
4 eetlepels melk
250 gram cakemeel
Read these instructions thoroughly first and keep them for future reference. Check that your domestic electricity supply matches that of the appliance. Only connect this appliance to an earthed socket.
This fully automatic bread maker mixes and kneads the dough, bakes the bread and then switches to the stay-warm function (to keep the bread appetisingly fresh and crispy). Fresh bread every time, just as you like it. Also suitable for special diets. Crust colour can be set to light, medium and dark.

natural_image
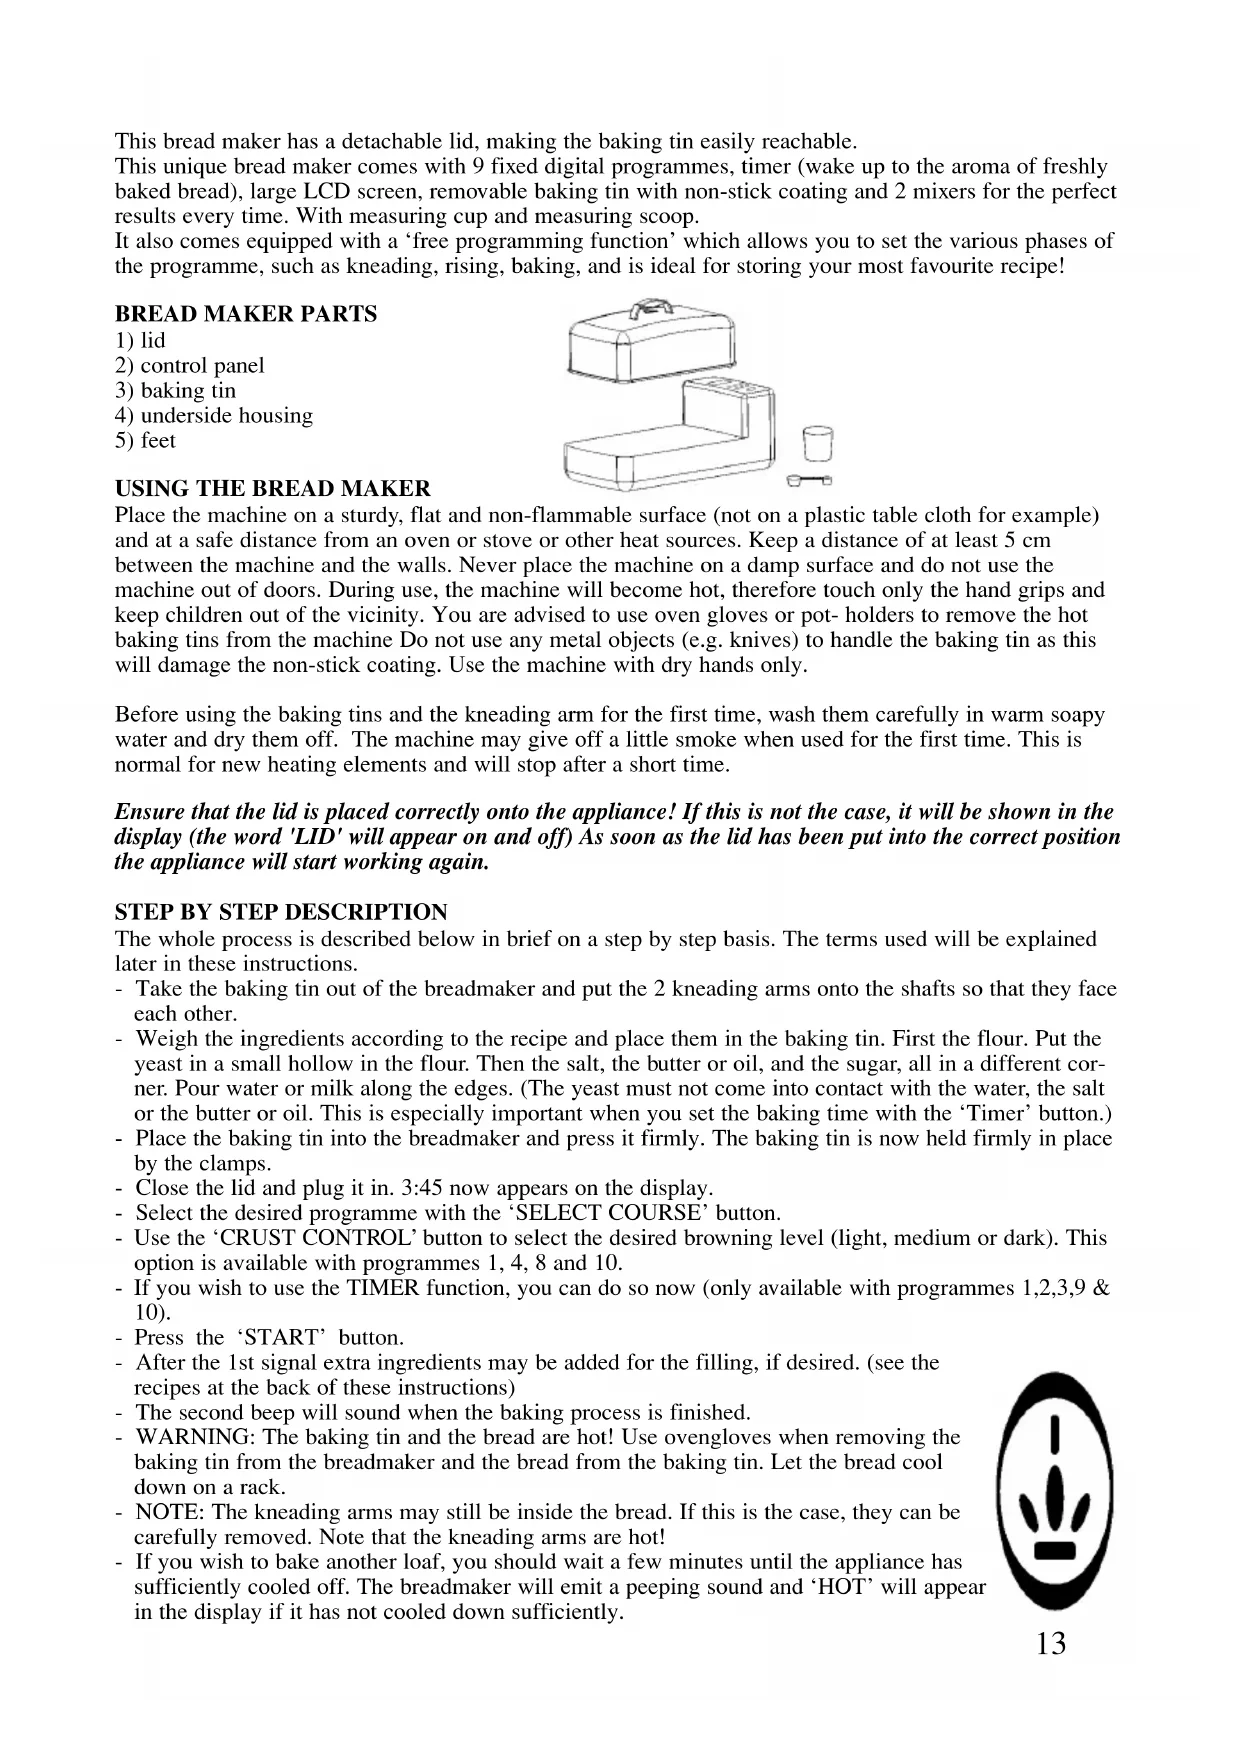
Symbolic emblem of a leaf with a trident, enclosed in an oval frame (no text or numbers)This bread maker has a detachable lid, making the baking tin easily reachable.
This unique bread maker comes with 9 fixed digital programmes, timer (wake up to the aroma of freshly baked bread), large LCD screen, removable baking tin with non-stick coating and 2 mixers for the perfect results every time. With measuring cup and measuring scoop.
It also comes equipped with a ‘free programming function’ which allows you to set the various phases of the programme, such as kneading, rising, baking, and is ideal for storing your most favourite recipe!
BREAD MAKER PARTS
1) lid
2) control panel
3) baking tin
4) underside housing
5) feet
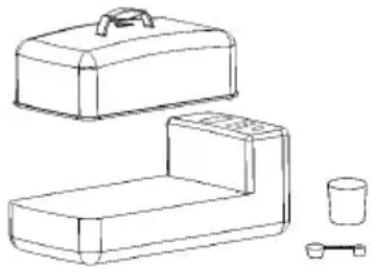
USING THE BREAD MAKER
natural_image
Line drawing of a portable kitchen sink with handle, side table, and cup (no text or symbols)Place the machine on a sturdy, flat and non-flammable surface (not on a plastic table cloth for example) and at a safe distance from an oven or stove or other heat sources. Keep a distance of at least 5 cm between the machine and the walls. Never place the machine on a damp surface and do not use the machine out of doors. During use, the machine will become hot, therefore touch only the hand grips and keep children out of the vicinity. You are advised to use oven gloves or pot- holders to remove the hot baking tins from the machine Do not use any metal objects (e.g. knives) to handle the baking tin as this will damage the non-stick coating. Use the machine with dry hands only.
Before using the baking tins and the kneading arm for the first time, wash them carefully in warm soapy water and dry them off. The machine may give off a little smoke when used for the first time. This is normal for new heating elements and will stop after a short time.
Ensure that the lid is placed correctly onto the appliance! If this is not the case, it will be shown in the display (the word 'LID' will appear on and off) As soon as the lid has been put into the correct position the appliance will start working again.
STEP BY STEP DESCRIPTION
The whole process is described below in brief on a step by step basis. The terms used will be explained later in these instructions.
- Take the baking tin out of the breadmaker and put the 2 kneading arms onto the shafts so that they face each other.
- Weigh the ingredients according to the recipe and place them in the baking tin. First the flour. Put the yeast in a small hollow in the flour. Then the salt, the butter or oil, and the sugar, all in a different corner. Pour water or milk along the edges. (The yeast must not come into contact with the water, the salt or the butter or oil. This is especially important when you set the baking time with the ‘Timer’ button.)
- Place the baking tin into the breadmaker and press it firmly. The baking tin is now held firmly in place by the clamps.
- Close the lid and plug it in. 3:45 now appears on the display.
- Select the desired programme with the 'SELECT COURSE' button.
- Use the ‘CRUST CONTROL’ button to select the desired browning level (light, medium or dark). This option is available with programmes 1, 4, 8 and 10.
- If you wish to use the TIMER function, you can do so now (only available with programmes 1,2,3,9 & 10).
- Press the 'START' button.
- After the 1st signal extra ingredients may be added for the filling, if desired. (see the recipes at the back of these instructions)
- The second beep will sound when the baking process is finished.
- WARNING: The baking tin and the bread are hot! Use oven-gloves when removing the baking tin from the breadmaker and the bread from the baking tin. Let the bread cool down on a rack.
- NOTE: The kneading arms may still be inside the bread. If this is the case, they can be carefully removed. Note that the kneading arms are hot!
- If you wish to bake another loaf, you should wait a few minutes until the appliance has sufficiently cooled off. The breadmaker will emit a peeping sound and 'HOT' will appear in the display if it has not cooled down sufficiently.

natural_image
Symbolic icon of a crocodile with a vertical line inside an oval frame (no text or numbers)- Turn the appliance off when finished and remove the plug from the socket.
- The easiest way to cut the freshly baked bread is with the Princess electrical knife (art 2952)
CONTROL PANEL
You can switch the breadmaker on and off using the start/reset button.
To switch on: Press the start/ reset switch.
To switch off: Hold the start/reset button in, and count to 5.
NOTE: If you switch off the breadmaker while the baking process is still running the programme will not be completed, but will start from the beginning.
SELECT COURSE
Select menu Control panel Description Duration settings (with medium browning)
| 1 Basic Basis 3:45 | |||
| 2 Basic wheat Basis wheat 3:55 | |||
| 3 Basic dough Basis dough | 2:05 | ||
| 4 | Quick | Quick | 2:08 |
| 5 | Quick wheat | Quick wheat | 2:28 |
| 6 Quick dough | Quick dough | 0:45 | |
| 7 | Jam | Jam | 1:20 |
| 8 | Cake | Cake | 2:00 |
| 9 | Sandwich | Sandwich | 3:35 |
| 10 Home made | Home-made recipe adjustable | ||
- Basic
To bake white or mixed bread. This is the most often used programme. The breadmaker kneads the bread 3 times. After the first time you will hear a beep. After this beeb you can add the extra ingredients. The programme takes 3 hours and 45 minutes in total.
- Basic wheat
Preparing the wholemeal wheat bread. The breadmaker kneads the dough twice, the dough rises and takes longer to bake. The programme takes 3 hours and 55 minutes
- Basic dough
With this method you can knead dough for sandwiches, pizzas, for example, or any other recipe for which you need dough. You can also use this setting to stir jam. The programme takes 2 hours and 5 minutes
- Quick (commonly used programme)
To bake white or mixed bread. The breadmaker kneads the dough twice and beeps before the second kneading session begins. You can now add the ingredients. The rising process of the dough is shortened and baking will need less time. The programme takes 2 hours and 8 minutes.
- Quick wheat
To bake French white bread. The dough is kneaded twice, the time it takes for the bread to rise is lengthened, as is the baking time. In this way, a thicker crust is achieved. The programme takes 2 hours and 28 minutes. This programme can also be used for other types of bread.
- Quick dough
Preparing the dough. The breadmaker kneads only the dough. The programme takes 45 minutes
• Jam
A programme for making jam. The programme takes 1 hours and 20 minutes
- Cake
Preparing delicious cake. The bread maker kneads twice. The programme takes 2 hours

natural_image
Symbolic icon of a croch or paw print inside an oval frame (no text or numbers)- Sandwich
The programme takes 3 hours and 35 minutes
• Home made
For this, you can adjust the appliance yourself. You must go through the entire programme: kneading, rising, kneading, baking, etc. With this function you can use the 'CYCLE' and 'TIME' buttons.
'CRUST CONTROL'
To choose the level of browning for the crust, press the button ‘crust control’
- Light
- Medium
- Dark
The times given in the overview are based on medium browning of the crust. If you want a different browning level the time will adjust itself! This option is available with programmes 1, 4, 8 and 10.
TIMER function
With the timer you can set the breadmaker to switch on automatically a few hours later. This means you can set it to switch on at night, for example. This option is available with programmes 1, 2, 3, 9 and 10.
Example
Put all the ingredients in the bread tin, make sure the yeast does not come into contact with the liquid. Use the menu button to select the desired programme and choose the desired browning with the "crust control" button.
It is 10.00 pm and you would like to have fresh bread ready to take out of the breadmaker at 7.15 am the following morning. The difference between these times is 9 hours and 15 minutes. The timer should therefore be set to 9:15.
LOAF SIZE
This function allows you to determine the volume of the dough.
1.5 lb stands for 1.5 pounds (suitable for baking bread of 600 grams).
2.0 lb stands for 2.0 pounds (suitable for baking bread of 800/900 grams).
This option is only available with programmes 1, 2 and 9.
PRE-HEAT FUNCTION
This breadmaker is preheated for a few minutes - this is standard. This varies from 5 minutes to 40 minutes. The text ‘pre-heat’ appears on the display.
FAULTS
If there is a power failure during the process, the bread maker will turn itself on again automatically if the disturbance is shorter than 30 minutes. The programme will continue from the point it where it was interrupted. If the power failure lasts longer than 30 minutes, the machine will not continue the baking process and you should start the machine up again.
COMMENTS CONCERNING THE RECIPES
To get the best results, be careful to keep to the correct proportions between the ingredients.
Use the enclosed measuring cup and measuring scoop, or use weighing scales.
The measuring cup is 250 ml Ensure the water is not too cold - the best temperature is hand warm (28°X to 30°XC)
The large measuring scoop is 15 ml and is equal to a dessert spoon. The small measuring scoop is 5 ml and is equal to a teaspoon
Every recipe has fresh or dried yeast listed and you should make a choice between the two.
Possible problems when baking bread
The bread does not rise:
* old yeast,
* not enough water,
* too much salt

natural_image
Symbolic icon of a croch or paw print inside an oval frame (no text or numbers)* incorrect amounts,
* put the yeast under the flour so that it doesn't come into contact with salt, butter or water.
The bread rises too high.
* use less yeast
* use less water
* use more salt
The bread looks like a "crater":
* too much water has been used
* use 2 more dessertspoons of flour
* The bread has been left too long in the bread mould.
The bread is too heavy:
* Use 2 more dessertspoons of water
There are holes in the bread
* use 2 dessertspoons less water
* use a little less yeast
* use more salt
CLEANING AND MAINTENANCE
Before using the breadmaker for the first time, clean it and the kneading arms with a gentle detergent.
Before cleaning and storing the appliance, always let it cool down first. After cooling down for about half an hour, the appliance is ready to be used once again for baking or making dough.
Before cleaning, always remove the plug from the wall socket and give the appliance the chance to cool down.
Never use aggressive detergents such as chemical cleaners, oven cleaner etc.
Remove all ingredients and crumbs from the lid, the housing and the pan with a damp cloth
Never immerse the bread maker in water and never fill the appliance with water.
Clean the housing on the inside and outside with a damp cloth Always clean and dry the appliance carefully after use. The kneading arms and shafts must be cleaned immediately after each use.
If you leave the kneading arms in position after use, it may be difficult to remove them at a later stage. If this happens, fill the baking tin with warm water and, after 30 minutes, remove the kneading arm and clean it. The baking tin and kneading arms are covered with a non-stick layer; you should therefore never use metal implements that could damage the surface. It is normal that the colour of the non-stick layer will turn dull after several baking cycles. This will not affect the functioning however. Before storing the appliance away, ensure that it is has completely cooled down and is clean and dry. Always close the lid of the appliance when storing it away.
PROGRAMME 10 'Home Made'
Description Standard Can be programmed to the minute from
Preheat 22 min Off - 30 min
Knead 1 20 min Off - 25 min
Rise 1 45 min Off - 120 min
Knead 2 Off - 15 min
Rise 2 85 min Off - 120 min
Rise 3 off Off -120 min
Bake 60 min Off - 60 min
Keep warm 60 min Off / 60 min
Press "SELECT COURSE" several times until programme 10 appears.
Press "CYCLE" until "preheat" appears in the display, together with a number giving the relevant time.
Press on "TIME" until you have the desired time and confirm this by pressing "CYCLE".
By pressing on "CYCLE" again you proceed to the next step in bread preparation and press on "TIME" if you wish to adjust this.

natural_image
Symbolic emblem of a leaf with a vertical line above it, enclosed in an oval frame (no text or numbers present)Do this until all the times of your choice have been programmed and press on START/RESET to see the total time.
If you wish to delay the programme, press on TIMER until the desired total time is indicated.
Press START/RESET again to start the breadmaker.
(If you keep START/RESET pressed in again, your settings will be reset.)
CONVERSION TABLE
1 teaspoon 4 grams 5 ml 1/30 cup
1 dessert spoon 12 grams 15 ml 1/10 cup
A FEW RECIPES FOR BREAD
PRINCESS bread
Programme: Basic
Recipe for: 600 grams 600 grams 800 grams 800 grams
White flour 350 grams 2 9/10 cup 500 grams 4 1/5 cup
| Water 210 ml | 210 ml | 300 ml | 300 ml | |
| Margarine | 5 grams | 1 1/2 teaspoon | 10 grams | 2 1/2 teaspoon |
| Sugar | 5 grams | 1 1/2 teaspoon | 10 grams | 2 1/2 teaspoon |
| Salt | 5 grams | 1 1/2 teaspoon | 10 grams | 2 1/2 teaspoon |
| Fresh yeast or | 10 grams | 2 1/2 teaspoon | 15 grams | 3 1/2 teaspoon |
| Dried yeast | 4 grams | 1 teaspoon | 6 grams | 1 1/2 teaspoon |
| Fennel | 1/2 teaspoon | 1/2 teaspoon | 1 teaspoon | 1 teaspoon |
| Aniseed | 1/2 teaspoon | 1/2 teaspoon | 1 teaspoon | 1 teaspoon |
(spread with cheese, ham or jam)
The PRINCESS baker's favourite bread
Programme: Basic
Recipe for: 600 grams 600 grams 800 grams 800 grams
White flour 320 grams 2 7/10 cup 450 grams 3 1/2 cup
| Water or milk | 215 ml | 215 ml | 300 ml | 300 ml |
| Butter | 5 grams | 1 1/2 teaspoon | 10 grams | 2 1/2 teaspoon |
| Sugar | 5 grams | 1 1/2 teaspoon | 10 grams | 2 1/2 teaspoon |
| Salt | 5 grams | 1 1/2 teaspoon | 10 grams | 2 1/2 teaspoon |
| Fresh yeast or dried yeast | 20 grams | 5 teaspoon 25 grams | 2 dessert spoon | |
| 5 grams | 1 1/2 teaspoon | 10 grams | 2 1/2 teaspoon | |
| Egg yolk | 1 | 1 | 2 | 2 |
| Cinnamon | 10 grams | 2 1/2 teaspoon | 10 grams | 2 1/2 teaspoon |
Filling
Grated Apple 150 grams 150 grams 250 grams 250 grams
White bread
Programme: Basic
Recipe for: 600 grams 600 grams 800 grams 800 grams
White flour 350 grams 350 grams 500 grams 500 grams
| Water 210 ml | 210 ml | 300 ml | 300 ml | ||
| Margarine | 5 grams | 1 1/2 teaspoon | 15 grams | 3 1/2 teaspoon | |
| Sugar | 5 grams | 1 1/2 teaspoon | 10 grams | 2 1/2 teaspoon | |
| Salt | 5 grams | 1 1/2 teaspoon | 10 grams | 2 1/2 teaspoon | |
| Fresh yeast or dried yeast | 10 grams | 2 1/2 teaspoon | 15 grams | 3 1/2 teaspoon | |
| 4 grams | 1 teaspoon | 6 grams | 1 1/2 teaspoon | ||
Milk bread
Programme: Basic
Recipe for: 600 grams 600 grams 800 grams 800 grams
| White flour | 350 grams | 350 grams | 500 grams | 500 grams |
| Milk | 210 ml | 210 ml | 300 ml | 300 ml |
| Margarine | 5 grams | 1 1/2 teaspoon | 10 grams | 2 1/2 teaspoon |
Sugar 5 grams 1 1/2 teaspoon 10 grams 2 1/2 teaspoon
Salt 5 grams 1 1/2 teaspoon 10 grams 2 1/2 teaspoon
Fresh yeast or 10 grams 2 1/2 teaspoon 15 grams 3 1/2 teaspoon
dried yeast 4 grams 1 teaspoon 6 grams 1 1/2 teaspoon
White cream bread
Programme: Basic
Recipe for: 600 grams 600 grams 800 grams 800 grams
White flour 350 grams 350 grams 500 grams 500 grams
Milk 210 ml 210 ml 300 ml 300 ml
Butter 5 grams 1 1/2 teaspoon 10 grams 2 1/2 teaspoon
Soft brown sugar 5 grams 1 1/2 teaspoon 10 grams 2 1/2 teaspoon
Salt 5 grams 1 1/2 teaspoon 10 grams 2 1/2 teaspoon
Fresh yeast or 10 grams 2 1/2 teaspoon 15 grams 3 1/2 teaspoon
dried yeast 4 grams 1 teaspoon 6 grams 1 1/2 teaspoon
Wheat bread
Programme: Basic
Recipe for: 600 grams 600 grams 800 grams 800 grams
Whole wheat flour 200 grams 200 grams 300 grams 300 grams
White flour 150 grams 150 grams 200 grams 200 grams
Water 230 ml 230 ml 320 ml 320 ml
Margarine 5 grams 1 1/2 teaspoon 10 grams 2 1/2 teaspoon
Sugar 5 grams 1 1/2 teaspoon 10 grams 2 1/2 teaspoon
Salt 5 grams 1 1/2 teaspoon 10 grams 2 1/2 teaspoon
Fresh yeast or 10 grams 2 1/2 teaspoon 15 grams 3 1/2 teaspoon
dried yeast 4 grams 1 teaspoon 6 grams 1 1/2 teaspoon
Whole meal bread
Programme: Basic
Recipe for: 600 grams 600 grams 800 grams 800 grams
Wholemeal flour 350 grams 350 grams 500 grams 500 grams
Water 225 ml 225 ml 325 ml 325 ml
Margarine 5 grams 1 1/2 teaspoon 10 grams 2 1/2 teaspoon
Sugar 5 grams 1 1/2 teaspoon 10 grams 2 1/2 teaspoon
Salt 5 grams 1 1/2 teaspoon 10 grams 2 1/2 teaspoon
Fresh yeast or 10 grams 2 1/2 teaspoon 15 grams 3 1/2 teaspoon
dried yeast 4 grams 1 teaspoon 6 grams 1 1/2 teaspoon
Egg bread
Programme: Basic
Recipe for: 600 grams 600 grams 800 grams 800 grams
White flour 350 grams 350 grams 500 grams 500 grams
Water 200 ml 200 ml 275 ml 275 ml
Margarine 5 grams 1 1/2 teaspoon 10 grams 2 1/2 teaspoon
Sugar 5 grams 1 1/2 teaspoon 10 grams 2 1/2 teaspoon
Salt 5 grams 1 1/2 teaspoon 10 grams 2 1/2 teaspoon
Fresh yeast or 10 grams 2 1/2 teaspoon 15 grams 3 1/2 teaspoon
dried yeast 4 grams 1 teaspoon 6 grams 1 1/2 teaspoon
Egg yolk 1 1 2 2
Country bread
Programme: Basic
Recipe for: 600 grams 600 grams 800 grams 800 grams
Country flour 350 grams 350 grams 500 grams 500 grams
Water 225 ml 225 ml 325 ml 325 ml
Margarine 5 grams 1 1/2 teaspoon 10 grams 2 1/2 teaspoon
Sugar 5 grams 1 1/2 teaspoon 10 grams 2 1/2 teaspoon
Salt 5 grams 1 1/2 teaspoon 10 grams 2 1/2 teaspoon
Fresh yeast or 10 grams 2 1/2 teaspoon 15 grams 3 1/2 teaspoon
dried yeast 4 grams 1 teaspoon 6 grams 1 1/2 teaspoon
Bran bread
Programme: Basic
Recipe for: 600 grams 600 grams 800 grams 800 grams
Wholemeal flour 300 grams 300 grams 450 grams 450 grams
Wheat bran 30 grams 1/2 cup 50 grams 1/2 cup
| Water | 250 ml | 250 ml | 375 ml | 375 ml |
| Margarine | 5 grams 1 1/2 teaspoon | 10 grams | 2 1/2 teaspoon | |
| Sugar | 5 grams 1 1/2 teaspoon | 10 grams | 2 1/2 teaspoon | |
| Salt | 5 grams 1 1/2 teaspoon | 10 grams | 2 1/2 teaspoon | |
| Fresh yeast or dried yeast 5 grams | 15 grams | 3 1/2 teaspoon | 20 grams | 1 2/3 dessertspoon |
| 1 1/2 teaspoon | 8 grams | 2 teaspoon |
Seeded bread
Programme: Basic
Recipe for: 600 grams 600 grams 800 grams 800 grams
Rye meal 150 grams 150 grams 225 grams 225 grams
White flour 150 grams 150 grams 225 grams 225 grams
| Water | 225 ml | 225 ml | 325 ml | 325 ml |
| Margarine | 5 grams 1 1/2 teaspoon 10 grams | 2 1/2 teaspoon | ||
| Sugar | 5 grams 1 1/2 teaspoon 10 grams | 2 1/2 teaspoon | ||
| Salt | 5 grams 1 1/2 teaspoon 10 grams | 2 1/2 teaspoon | ||
Fresh yeast or 10 grams 2 1/2 teaspoon 15 grams 3 1/2 teaspoon dried yeast 4 grams 1 teaspoon 6 grams 1 1/2 teaspoon
| vinegar | 1 1/2 teaspoon | 1 1/2 teaspoon | 3 teaspoon | 3 teaspoon |
| Linseed 50 grams | 1/2 cup 60 grams | 60 grams | ||
| Cumin | 1/2 teaspoon | 1/2 teaspoon | 1 teaspoon | 1 teaspoon |
Raisin bread
Programme: Basic
Recipe for: 600 grams 600 grams 800 grams 800 grams
| White flour | 320 grams | 320 grams | 450 grams | 450 grams |
| Water | 190 ml | 190 ml | 270 ml | 270 ml |
| Butter 5 grams | 1 1/2 teaspoon | 10 grams | 2 1/2 teaspoon | |
| Sugar | 5 grams | 1 1/2 teaspoon | 10 grams | 2 1/2 teaspoon |
| Salt | 5 grams | 1 1/2 teaspoon | 10 grams | 2 1/2 teaspoon |
| Fresh yeast or 20 grams | 5 teaspoon | 25 grams | 2 dessert spoon | |
| dried yeast 6 grams | 1 1/2 teaspoon | 10 grams | 2 1/2 teaspoon | |
Filling
| Raisins 200 grams | 1 2/3 cup | 250 grams 2 cups | ||
| Currants | 100 grams | 4/5 cup | 100 grams | 4/5 cup |
Mueslibread
Programme: Basic
Recipe for: 600 grams 600 grams 800 grams 800 grams
| Wholemeal flour | 200 grams | 200 grams | 250 grams | 250 grams | |
| White flour | 120 grams | 120 grams | 200 grams | 200 grams | |
| Water | 215 ml | 215 ml | 300 ml | 300 ml | |
| Margarine | 5 grams | 1 1/2 teaspoon | 10 grams | 2 1/2 teaspoon | |
| Sugar | 5 grams | 1 1/2 teaspoon | 10 grams | 2 1/2 teaspoon | |
| Salt | 5 grams | 1 1/2 teaspoon | 10 grams | 2 1/2 teaspoon | |
| Fresh yeast or dried yeast | 20 grams | 5 teaspoon | 25 grams | 2 dessert spoon | |
| 1 1/2 teaspoon | 10 grams | 2 1/2 teaspoon | |||
Filling
| Raisins | 100 grams | 1 1/2 cup | 200 grams | 1 2/3 cup |
| Muesli | 100 grams | 1 1/2 cup | 150 grams | 1 1/2 cup |
Bacon bread
Programme: Basic
Recipe for: 600 grams 600 grams 800 grams 800 grams
Wholemeal flour 200 grams 1 2/3 cup 300 grams 2 1/2 cup
White flour 150 grams 1 1/2 cup 200 grams 1 2/3 cup
Water 210 ml 210 ml 300 ml 300 ml
Margarine 5 grams 1 1/2 teaspoon 10 grams 2 1/2 teaspoon
Sugar 5 grams 1 1/2 teaspoon 10 grams 2 1/2 teaspoon
Salt 5 grams 1 1/2 teaspoon 10 grams 2 1/2 teaspoon
Fresh yeast or 10 grams 2 1/2 teaspoon 15 grams 3 1/2 teaspoon
dried yeast 4 grams 1 teaspoon 6 grams 1 1/2 teaspoon
Filling
Boiled bacon 75 grams 2/3 cup 100 grams 4/5 cup
Shallot 1/2 1/2 1 1
Whole grain bread
Programme: Basic
Recipe for: 600 grams 600 grams 800 grams 800 grams
Whole grain flour 350 grams 2 9/10 cup 500 grams 4 1/8 cup
Fresh yeast or 10 grams 2 1/2 teaspoon 15 grams 3 1/2 teaspoon
dried yeast 4 grams 1 teaspoon 6 grams 1 1/2 teaspoon
Salt 5 grams 1 1/2 teaspoon 10 grams 2 1/2 teaspoon
Sugar 5 grams 1 1/2 teaspoon 10 grams 2 1/2 teaspoon
Butter 5 grams 1 1/2 teaspoon 10 grams 2 1/2 teaspoon
Water 225 ml 225 ml 325 ml 325 ml
Try the following with "regular bread"
After the final kneading, sprinkle the dough with water and scatter sesame or moon seeds over it.
Strawberry jam
Programme: Jam
Fresh strawberries 900 grams
Sugar for preserve or jam 500 grams
Lemon juice 1 large tablespoon
CAKE RECIPE
Ingredients
3 eggs
4 tablespoons of milk
250 grams of plain flour
200 grams of butter (at room temperature)
200 grams of sugar
1 sachet of vanilla sugar
Extra ingredient for chocolate cake
50 grams of cocoa powder
This is what you do:
First, beat up the eggs and milk As soon as you have done so, put the mixture in the baking tin. Next, put half of the plain flour, and then the butter, sugar, the remainder of the plain flour, the vanilla sugar and then the cocoa powder (for chocolate cake) in the baking tin.
Set the appliance for programme 8 (cake) and the ‘crust control’ on medium.
When the baking process has been completed, do not take the cake out of the baking tin - allow it to cool off first!

natural_image
Symbolic icon of a croch or paw print inside an oval frame (no text or numbers)PRINCESS TIPS
- Only use the appliance for the purpose outlined in the instructions.
- Improper use can have hazardous consequences
- Be extra careful if you use the bread maker around children.
- Never let children use the breadmaker without supervision.
- Do not immerse the bread maker, the cord or plug in water or any other liquid.
- Do not use the breadmaker outdoors.
- Do not place the breadmaker on a damp cloth.
- Put the breadmaker on a flat base.
- Do not position it on or near an oven, gas cooker or other heat source.
- Make sure the cord is not hanging over the edge of the worktop or table, as somebody may trip over it.
- Only insert the plug in an earthed socket
- Ensure the cord does not lie on or against any hot objects.
- Never open the housing of the breadmaker.
- Never use the breadmaker near flammable substances.
- If you use an extension cord, make sure that it is compatible with your bread maker.
- Always remove the plug from the socket when not in use or if you are cleaning the appliance.
- Be careful when the breadmaker is hot as it can cause serious burns.
- Do not touch the breadmaker with wet hands.
- Do not use any metal objects in the bread mould.
- Only use the parts recommended by the producer.
- Connect the bread maker to a 230 volt alternating current
- Do not continue to use the breadmaker if it is damaged; instead have it tested by a recognised specialist.
- Do not cover the breadmaker with a towel or any other object.
- Never add more than the recommended amounts to the breadmaker, as the dough will then overflow from the baking tin.
U.K. WIRING INSTRUCTIONS
The wires in the mains lead are coloured in accordance with the following code:
BLUE = NEUTRAL, BROWN = LIVE, GREEN-YELLOW = EARTH
As the colours of the wire in the mains lead of this appliance may not correspond with the colour markings identifying the terminals on your plug, proceed as follows:
The wire which is coloured BLUE must be connected to the terminal which is marked with the letter N or coloured black.
The wire which is coloured BROWN must be connected to the terminal which is marked with the letter L or coloured red.
The wire which is coloured GREEN-YELLOW must be connected to the earth terminal which is marked with the letter E or or coloured green and yellow.
With this appliance, if a 13 amp plug is used a 13 amp fuse should be fitted. If any other type of plug is used a 15 amp fuse must be fitted either in the plug or at the distribution board.
MACHINE À CUIRE LE PAIN PRINCESS SILVER ART. 1935
natural_image
Symbolic icon of a leaf with a central dot, enclosed in an oval frame (no text or numbers)DESCRIPTIF DE LA MACHINE :
natural_image
Line drawing of a kitchen appliance with a tray, cup, and handle (no text or symbols)UTILISATION DE LA MACHINE À CUIRE LE PAIN
- Basic wheat (Base froment)
- Quick Wheat (Rapide froment)
natural_image
Symbolic emblem of a leaf with a stem, enclosed in an oval frame (no text or numbers)• Home made (Recette maison)
natural_image
Symbolic icon of a croch or paw print inside an oval frame (no text or numbers)Le pain lève trop :
Préchauffer 22 minutes Off - 30 minutes
Pétrissage 1 20 minutes Off - 25 minutes
Levage 1 45 minutes Off - 120 minutes
Pétrissage 2 Off - 15 minutes
Levage 2 85 minutes Off - 120 minutes
Levage 3 off Off -120 minutes
Cuisson 60 minutes Off - 60 minutes
Conserver chaud 60 minutes Off / 60 minutes
natural_image
Symbolic emblem of a leaf with a trident, enclosed in an oval frame (no text or numbers)natural_image
Symbolic icon of a croch or paw print inside an oval frame (no text or numbers)natural_image
Symbolic emblem of a leaf with a trident, enclosed in an oval frame (no text or numbers)ELEMENTE DER BROTBACKMASCHINE
natural_image
Line drawing of a kitchen sink with a handle, side table, and small cup (no text or symbols)natural_image
Symbolic emblem of a crown inside an oval frame (no text or numbers)BEDIENUNGSPANEEEL
natural_image
Symbolic icon of a leaf with a trident, enclosed in an oval frame (no text or numbers)- Sandwich
natural_image
Symbolic emblem of a leaf with a stem, enclosed in an oval frame (no text or numbers)natural_image
Symbolic icon of a croch or paw print inside an oval frame (no text or numbers)natural_image
Symbolic emblem of a leaf with a stem, enclosed in an oval frame (no text or numbers)Wie folgt vorgehen:
natural_image
Symbolic emblem of a leaf with a vertical line inside an oval frame (no text or numbers)natural_image
Line drawing of a portable kitchen sink with a handle, side table, and cup (no text or symbols)natural_image
Symbolic icon of a paw print with a vertical line above it, enclosed in an oval frame (no text or numbers present)- Basic wheat (trigo base)
- Basic dough (masa base)
• Home made (receta casera)
natural_image
Symbolic emblem of a leaf with a vertical line inside an oval frame (no text or numbers)'CRUST CONTROL' (CONTROL DE TUESTE)
natural_image
Symbolic icon of a croch or paw print inside an oval frame (no text or numbers)natural_image
Symbolic emblem of a leaf with a trident, enclosed in an oval frame (no text or numbers)natural_image
Symbolic emblem of a leaf with a trident, enclosed in an oval frame (no text or numbers)SUGERENCIAS PRINCESS
natural_image
Line drawing of a kitchen sink with a handle, side table, and cup (no text or symbols)
natural_image
Symbolic icon of a crown with a vertical line above it, enclosed in an oval frame (no text or numbers present)natural_image
Symbolic icon of a croch or paw print inside an oval frame (no text or numbers)SELECT COURSE
natural_image
Symbolic icon of a leaf with a stem, enclosed in an oval frame (no text or numbers)CRUST CONTROL
natural_image
Symbolic emblem of a leaf with a trident, enclosed in an oval frame (no text or numbers)PROGRAMMA 10 'Home Made'
natural_image
Symbolic emblem of a leaf with a vertical line inside an oval frame (no text or numbers)natural_image
Symbolic emblem of a leaf with a trident, enclosed in an oval frame (no text or numbers)SUGGERIMENTI PRINCESS
natural_image
Line drawing of a kitchen sink and toilet with a cup (no text or symbols)natural_image
Symbolic icon of a leaf with a diagonal line inside an oval frame (no text or numbers)natural_image
Symbolic emblem of a leaf with a stem, enclosed in an oval frame (no text or numbers)natural_image
Symbolic emblem of a leaf with a stem, enclosed in an oval frame (no text or numbers)natural_image
Symbolic emblem of a leaf with a trident, enclosed in an oval frame (no text or numbers)natural_image
Line drawing of two different portable containers with handles and a small cup (no text or symbols)BRUG AF BAGEMASKINEN
natural_image
Symbolic emblem of a leaf with a vertical line inside an oval frame (no text or numbers)natural_image
Symbolic emblem of a leaf with a trident, enclosed in an oval frame (no text or numbers)• Syltetøj
natural_image
Symbolic emblem of a leaf with a trident, enclosed in an oval frame (no text or numbers)natural_image
Symbolic emblem of a leaf with a trident, enclosed in an oval frame (no text or numbers)OPSKRIFT PÅ SANDKAGE
Ingredienser:
3 æg
4 spsk. mælk
250 gram hvedemel
200 gram smør (stuetemperatur)
200 gram sukker
1 pose vanillesukker
EKSTRA ingrediens til chokoladekage
50 gram kakao
Tilberedning:
natural_image
Symbolic emblem of a leaf with a trident, enclosed in an oval frame (no text or numbers)natural_image
Line drawing of a portable kitchen sink with handle, side table, and cup (no text or symbols)BRUKE BR∅DBAKEMASKINEN
Sett maskinen på en stødig, jevn og ikke-brannfarlig overflate (altså ikke på en bordduk av plast) og ikke i nærheten av en ovn, en komfyr eller lignende. Hold en avstand på minst 5 cm mellom maskinen og veggene. Sett ikke maskinen på et fuktig sted og bruk ikke maskinen utendørs. Maskinen blir varm mens den er i bruk, ta den altså bare i håndtakene og hold barn på avstand. Vi anbefaler at du bruker grytekluter eller grytevotter når du tar den varme stekeplaten ut av maskinen. Bruk ikke metallredskap (kniv o.l.) i stekeplaten, da disse kan skade anti -klebebelegget. Maskinen skal alltid håndteres med tørre hender.
natural_image
Symbolic emblem of a crown with a vertical line above it, enclosed in an oval frame (no text or numbers present)KONTROLLPANEL
natural_image
Symbolic emblem of a leaf with a vertical line inside an oval frame (no text or numbers)- Home made
natural_image
Symbolic emblem of a leaf with a stem, enclosed in an oval frame (no text or numbers)Fullkornsmel 350 gram 350 gram 500 gram 500 gram
Vann 225 ml 225 ml 325 ml 325 ml
Margarin 5 gram 1 1/2 teskje 10 gram 2 1/2 teskje
Sukker 5 gram 1 1/2 teskje 10 gram 2 1/2 teskje
Salt 5 gram 1 1/2 teskje 10 gram 2 1/2 teskje
natural_image
Symbolic icon of a croch or paw print inside an oval frame (no text or numbers)Ekstra ingrediens for sjokoladekake
200 gram kakaopulver
Gjør følgende:
Visp først eggene og melken. Så snart du har vispet ferdig, kan du ha blandingen på stekeplaten. Ha halvparten av melet, og deretter smøret, sukkeret, resten av melet, vaniljesukkeret og til slutt kakaopulveret (for sjokoladekake) på stekeplaten. Still inn maskinen på program 8 (cake) og 'crust control' på medium.
Når bakeprosessen er ferdig, skal du ikke ta kaken av stekeplaten med en gang, men la den avkjøles et øyeblikk!
TIPS FRA PRINCESS
natural_image
Symbolic emblem of a leaf with a trident, enclosed in an oval frame (no text or numbers)LEIPÄKONEEN OSAT
natural_image
Line drawing of two different kitchen fixtures with a handle, one rectangular and one rectangular, accompanied by a small cup and a tool (no text or symbols)LEIPÄKONEEN KÄYTTÖ
natural_image
Symbolic emblem of a crown with a vertical line above it, enclosed in an oval frame (no text or numbers present)natural_image
Symbolic emblem of a leaf with a vertical line inside an oval frame (no text or numbers)CRUST CONTROL
natural_image
Symbolic emblem of a leaf with a trident, enclosed in an oval frame (no text or numbers)natural_image
Symbolic emblem of a leaf with a trident, enclosed in an oval frame (no text or numbers)natural_image
Symbolic icon of a leaf with a trident, enclosed in an oval frame (no text or numbers)PRINCESS-OHJEITA
natural_image
Line drawing of a kitchen sink and toilet with a cup (no text or symbols)COMO UTILIZAR A MÁQUINA DE FAZER PÃO
natural_image
Symbolic emblem of a crown with a vertical line above it, enclosed in an oval frame (no text or numbers present)natural_image
Symbolic emblem of a leaf with a stem, enclosed in an oval frame (no text or numbers)SELECT COURSE
natural_image
Symbolic emblem of a leaf with a trident, enclosed in an oval frame (no text or numbers)CRUST CONTROL
natural_image
Symbolic emblem of a leaf with a stem, enclosed in an oval frame (no text or numbers)natural_image
Symbolic emblem of a leaf with a trident, enclosed in an oval frame (no text or numbers)natural_image
Symbolic emblem of a leaf with a trident, enclosed in an oval frame (no text or numbers)SUGESTÕES DA PRINCESS
natural_image
Symbolic emblem of a leaf with a stem, enclosed in an oval frame (no text or numbers)natural_image
Line drawing of a portable kitchen appliance with a handle, side table, and small cup (no text or symbols)natural_image
Symbolic icon of a crown with a vertical line above it, enclosed in an oval frame (no text or numbers present)natural_image
Symbolic icon of a croch or paw print inside an oval frame (no text or numbers)natural_image
Symbolic icon of a croch or paw print inside an oval frame (no text or numbers)natural_image
Symbolic emblem of a leaf with a stem, enclosed in an oval frame (no text or numbers)natural_image
Symbolic icon of a croch or paw print inside an oval frame (no text or numbers)natural_image
Symbolic emblem of a leaf with a trident, enclosed in an oval frame (no text or numbers)natural_image
Symbolic icon of a croch or paw print inside an oval frame (no text or numbers)
natural_image
Symbolic icon of a leaf with a vertical line inside an oval frame (no text or numbers)GARANTIEKAART GUARANTEE CARD CARTE DE GARANTIE GARANTIEKARTE GARANTIE CERTIFICADO DE GARANTÍA TARJA DE GARANTIA CARTOLINA DI GARANZIA GARANTIKORT GARANTIBEVIS GARANTIKORT TAKUUTODISTUS GARANCIJSKI LIST ÁBYGADARSKÍRTEINI ZÁRU/NÍ LIST Κάξτα εγγύησης
PRINCESS®
Datum van aankoop
Date of Purchase
Date d'achat
Kaufdatum
Fecha de compra
Data de compra
Data di acquisto
Inköpsdatum
Købs-dato
Innkjøpsdato
Ostopäivä
Datum nakupa
Hvenær keypt
Datum nákupu
Ημερομηνια αγορας
Dealer Revendeur Händler Haendler/commercant Vendedor Comprador Rivenditore Återförsäljare Forhandler Jälleenmyyjä Zastopnik Söluadili Προμηθευτης

TYPE

Koper
Buyer
Acheteur
Käufer
Kaeufer
Comprador
Comerç
Acquirente
Köpare
Køber
Kjøper
Ostaja
Kupec
Kaupandi
Kupuji ,
Αγοθ αστης
NEDERLANDS: GARANTIEVOORWAARDEN
For 1 year in respect of defects found to be due to faulty workmanship or material. The guarantee is only valid with a complete filled in guarantee card. There is no guarantee on appliances found to be defective due to wrongful use, disassembling or accidental breakage.
FRANÇAIS: CONDITIONS DE LA GARANTIE
natural_image
Symbolic icon of a boot with a vertical line and three leaf-like shapes inside an oval frame (no text or numbers)


- PRINCESS SILVER BREADMAKER ART. 1935
- - Quick dough
- OPMERKINGEN BETREFFENDE DE RECEPTEN
- PROGRAMMA 10 'Home Made'
- CAKERECEPT
- BREAD MAKER PARTS
- USING THE BREAD MAKER
- STEP BY STEP DESCRIPTION
- CONTROL PANEL
- SELECT COURSE
- - Basic
- - Basic wheat
- - Basic dough
- - Quick (commonly used programme)
- - Quick wheat
- • Jam
- - Cake
- - Sandwich
- • Home made
- 'CRUST CONTROL'
- TIMER function
- Example
- LOAF SIZE
- PRE-HEAT FUNCTION
- FAULTS
- COMMENTS CONCERNING THE RECIPES
- CLEANING AND MAINTENANCE
- PROGRAMME 10 'Home Made'
- Description Standard Can be programmed to the minute from
- CONVERSION TABLE
- A FEW RECIPES FOR BREAD
- PRINCESS bread
- Programme: Basic
- The PRINCESS baker's favourite bread
- Filling
- White bread
- Milk bread
- White cream bread
- Wheat bread
- Whole meal bread
- Egg bread
- Country bread
- Bran bread
- Seeded bread
- Raisin bread
- Mueslibread
- Bacon bread
- Whole grain bread
- Strawberry jam
- Programme: Jam
- CAKE RECIPE
- PRINCESS TIPS
- U.K. WIRING INSTRUCTIONS
- MACHINE À CUIRE LE PAIN PRINCESS SILVER ART. 1935
- DESCRIPTIF DE LA MACHINE :
- UTILISATION DE LA MACHINE À CUIRE LE PAIN
- ELEMENTE DER BROTBACKMASCHINE
- BEDIENUNGSPANEEEL
- - Basic wheat (trigo base)
- - Basic dough (masa base)
- • Home made (receta casera)
- 'CRUST CONTROL' (CONTROL DE TUESTE)
- SUGERENCIAS PRINCESS
- CRUST CONTROL
- SUGGERIMENTI PRINCESS
- BRUG AF BAGEMASKINEN
- • Syltetøj
- OPSKRIFT PÅ SANDKAGE
- BRUKE BR∅DBAKEMASKINEN
- KONTROLLPANEL
- - Home made
- Gjør følgende:
- TIPS FRA PRINCESS
- LEIPÄKONEEN OSAT
- LEIPÄKONEEN KÄYTTÖ
- PRINCESS-OHJEITA
- COMO UTILIZAR A MÁQUINA DE FAZER PÃO
- SUGESTÕES DA PRINCESS
- PRINCESS®
- NEDERLANDS: GARANTIEVOORWAARDEN
- FRANÇAIS: CONDITIONS DE LA GARANTIE
Brand : PRINCESS
Model : Silver Breadmaker 151935
Category : Bread maker