
VDR07L - Tumble dryer Ardo - Free user manual and instructions
Find the device manual for free VDR07L Ardo in PDF.
| Product type | Tumble dryer |
| Brand | Ardo |
| Model | VDR07L |
| Dimensions (W x H x D) | 59.5 x 85.0 x 60.4 cm |
| Maximum capacity | 7 kg (dry laundry) |
| Electrical supply | See rating plate (230 V typical) |
| Rated power | See rating plate |
| Control type | Electronic and manual programs (timer) |
| Available programs | Cotton, synthetics, delicates, wool, timer (cotton, synthetics, cool down) |
| Functions | Drying with electronic humidity control (Extra dry, Ready to store, Ready to iron, Very damp), delayed start up to 16 h, anti-crease (60 min), audible alarm, duration selection for manual programs |
| Door opening | Porthole with push-to-open, door opening direction reversible (by technician) |
| Adjustable feet | Yes, for leveling |
| Drain connection | Drain hose supplied, to be connected at the back |
| Maintenance and cleaning | Clean the filter after each cycle, when cold |
| Safety | Automatic stop when door opened, mandatory grounding, do not use extension cord |
| Spare parts and repairability | Repairs by authorized personnel, original parts available from after-sales service |
| General information | For domestic use only; compliant with WEEE directive (2002/96/EC) |
Frequently Asked Questions - VDR07L Ardo
User questions about VDR07L Ardo
0 question about this device. Answer the ones you know or ask your own.
Ask a new question about this device
Download the instructions for your Tumble dryer in PDF format for free! Find your manual VDR07L - Ardo and take your electronic device back in hand. On this page are published all the documents necessary for the use of your device. VDR07L by Ardo.
USER MANUAL VDR07L Ardo
Thank you for choosing our product.
Please read these instructions carefully before connecting and using the appliance. Knowledge of the operating principles will help guarantee correct and safe use of the appliance.
This instruction booklet contains the technical characteristics of the drier and is full of useful information regarding its operation, all designed to help you get the best out of your appliance.
If the appliance is sold or handed over for use by others, remember to give the new user the instruction booklet.
CONTENTS


NOTES AND ADVICE FOR THE USER 13-14
Technical information 13

DESCRIPTION OF THE APPLIANCE 15

STALLING THE APPLIANCE 15-17
Installation 15-16
- Levelling the drier 16
- Connecting the air exhaust tube 16
-
Electrical connection 17
-
Opening the door and changing the opening direction 17

SING THE DRIER
Description of the control panel 18
- Drying the washing correctly
Program table 19
Precautions for fabrics types 20
- Weights of washing 20
19
20
20

AINTENANCE
- Cleaning the filter
- Fault fi nding
- Resolving problems
- Optional accessories
18-20
20-21
20
21
21
21

NOTES AND ADVICE FOR THE USER
TECHNICAL DATA
| Dimensions: | Width cm.: | 59.5 |
| Height cm.: | 85.0 | |
| Depth cm.: | 60.4 | |
| Max. capacity | 7 kg dry | |
| Power rating | see characteristics plate | |
| Voltage | see characteristics plate | |
MODEL:
SERIAL NUMBER:
DATE OF PURCHASE:
This appliance has been designed for use as a domestic drier. Any other use is to be considered as improper and therefore dangerous.
- Keep this instruction book near to the appliance at all times, so that it can be easily consulted when necessary.
Any modifications or attempts to interfere with the appliance can be dangerous for the user and may damage the product.
On delivery of the appliance, check that it has not been damaged during transport. If any damage is discovered, report the matter to the retailer immediately.
Do not cover the drier with washing or any other items.
When positioning the appliance, ensure that the power supply cable is not kinked or squashed and is accessible.
Always close the door after using the drier.
This will prevent children from leaning on the door and possibly overturning the drier.
Remember that the exhaust tube will heat up during a drying cycle and can reach temperatures of up to 60^ . Do not touch this part before the cooling cycle has been completed.
Do not use the drier for drying dirty clothes.
Never dry items that have been soiled with substances such as cooking oil, petroleum, acetone, alcohol, petrol, kerosene, stain remove comma after turpentine, and wax.
Remove these substances in a hot wash using an additional quantity of detergent prior to loading the items in the drier.
Do not dry items such as foam rubber, latex, raincoats, waterproof fabrics, rubber mats, preformed items, clothes or cushions with foam rubber inserts, as these may melt and damage other items or even the appliance itself.
Fabric softeners, or similar products, must be used respecting the manufacturer's instructions on the packaging.
If the appliance is sold or given away, remember to hand over this instruction book with it. This will help the new owner use the drier both correctly and safely.
Do not attempt to repair any appliance faults alone, repairs carried out by a non-professional may cause serious damage and will invalidate any rights to repairs under guarantee.
Repairs to the appliance can only be carried out by personnel authorised by the customer service centres. All repairs must make use of
original spare parts only.
Spin dry or wring the washing well before loading it into the drier. Spun dry washing will dry quicker.
Clean the filter thoroughly each time the drier is used in order to guarantee perfect air circulation.
Never insert or remove the plug from the mains socket with wet hands.
The drier must be connected to a mains socket fitted with an effi cients earth complying with current safety standards.
Do not use extension leads or multiple plug adapters to connect the appliance to the mains supply.
Do not expose the appliance to atmospheric agents.
When servicing or cleaning the appliance, remember to disconnect it from the mains supply. Do not pull the power supply cable to unplug the appliance from the mains supply. Pull the plug only.
This appliance is marked as complying with European Directive 2002/96/EC, Waste Electrical and Electronic Equipment (WEEE). Make sure that the product is disposed of in a correct manner. The user is obliged to contribute towards preventing any negative consequences for health and the environment.
The symbol
affixed to the product
or accompanying documents signifi es that the product must not be treated as normal domestic refuse, but must be delivered to an authorised collection centre to enable the electric and electronic equipment to be recycled.
When dispc
local waste disposal regulations. For further information on the treatment, recovery and recycling of this product, refer to the appropriate offies, local domestic waste collection service or the retailer from where the appliance was purchased.
THE MANUFACTURER WILL NOT BE HELD RESPONSIBLE FOR ANY INCIDENTS RESULTING FROM NON-COMPLIANCE WITH SAFETY STANDARDS OR THE REQUIREMENTS OF THIS INSTRUCTION BOOK.
DESCRIPTION OF THE APPLIANCE
The drier is a domestic appliance capable of drying any type of fabric at any time.
The drier has been constructed in steel panels, which have been treated and painted to guarantee that its aesthetic qualities remain unaltered over time.
The motor and all moving parts have been designed and manufactured to guarantee the minimum possible noise levels
The control panel has been designed to enable the user to run the desired drying program without difficulty.
The wide door makes loading and unloading the washing much easier.
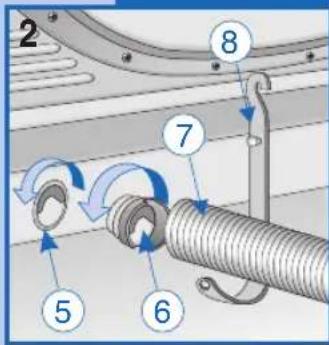
1 - Door
2 - Filter
3 - Adjustable feet
4 - Rating plate
5 - Exhaust outlet
6 - Connector piece
7 - Exhaust tube
8 - Tube support
INSTALLING THE APPLIANCE

INSTALLATION
Installation must be carried out by qualified personnel in line with the instructions supplied by the manufacturer. Incorrect installation may result in damage and injury.
Install the drier near to a window to facilitate the evacuation of the damp air from the drier.
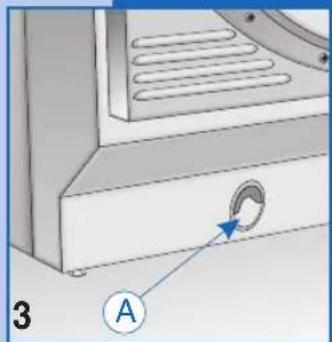
The exhaust tube must be used to prevent condensation, and must be inserted in hole A at the bottom of the back panel of the appliance (fig. 3).
INSTALLATION
Never cover the air intake on the back of the appliance.
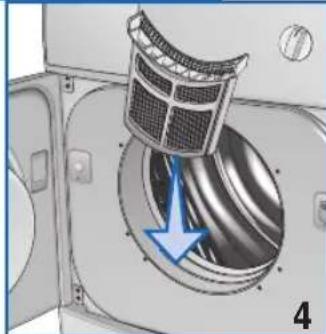
Place the fi iter in its normal position as shown (fi g. 4).
Clean the inside of the drum using a damp cloth to remove any dust deposits.

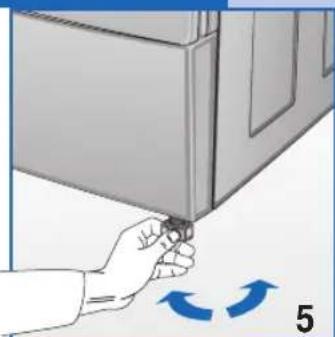
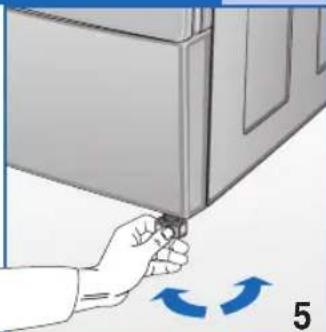
LEVELLING THE DRIER
Adjustable feet. Place the drier upright so that it rests firmly on all four feet. Level the drier by adjusting the feet as follows:
Lift the drier slightly.
Adjust the feet to the correct height (fi g. 5). (Do not unscrew the feet too much and do not use a screwdriver).
Lower the drier.
A badly levelled machine may cause damage to the bearings and lead to their premature wear. This drier does not need to be anchored to the floor.
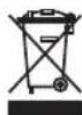
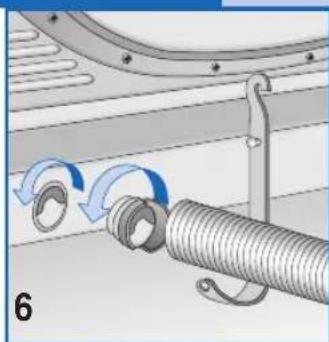
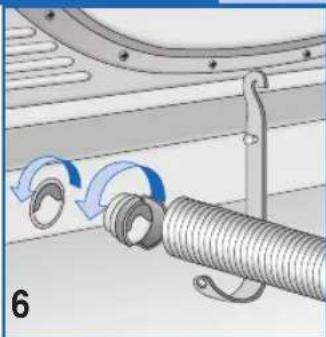
CONNECTING THE AIR EXHAUST TUBE
Connect the exhaust tube to the outlet on the back of the drier (fi g.6), as follows:
Connect one end of the tube to the connecting piece supplied.
- Rotate the connecting piece (together with the tube) anticlockwise in the drier outlet.
Feed the tube away from the back of the drier to the left or right through the recess at the bottom of the drier body.
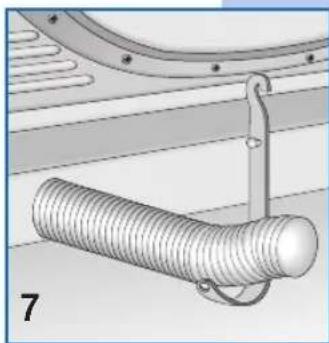
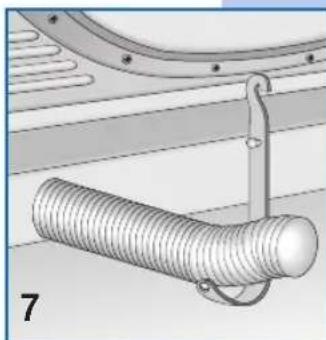
Position the other end of the tube near a window or a ventilation aperture on an external wall. If this is not possible, make sure that the room is well ventilated when the drier is being used. Use the support supplied to anchor the tube (fi g. 7).
Important: The air exhaust tube must be connected even if the air is not discharged outdoors, otherwise the drier will re-absorb the discharged damp air and thus prolong the drying time.
Damp air can also damage the drier. Although the air discharged from the exhaust tube is only warm and damp and does not constitute a danger, it must never be directed towards people, animals or plants.
Important: The exhaust air must not be conveyed to a chimney discharging fumes generated by gas or other fuel burning appliances.
ELECTRICAL CONNECTION
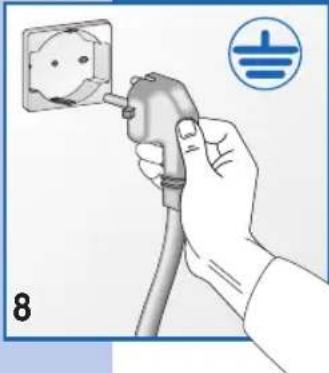
Make sure that the voltage indicated on the identification plate attached to the back of the appliance corresponds to that of the mains supply.
On completion of the installation, the appliance must be connected to the mains supply through a two-pole switch.
All cutouts, electric wiring and mains sockets must have a rating such that enables them to support the maximum load indicated on the identifi cation plate.
The mains supply to which the appliance is connected must be fi tted with an earthing system. If this is not the case, the manufacturer will not be held liable for any incidents that may occur (fi g. 8).
If the power supply cable is damaged in any way, contact the nearest customer service centre.
The drier must not be connected to the mains supply using indirect methods such as extension leads or multiple adapters.
Position the appliance so that the power supply cable is easily accessible for disconnection when the need arises.
Important: On completion of the drying cycle, disconnect the appliance from the mains supply to prevent young children from operating the drier.
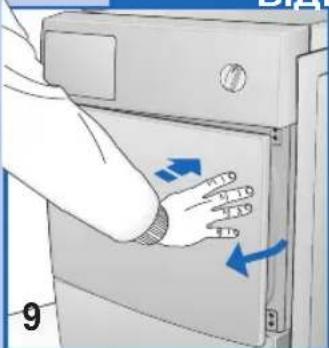
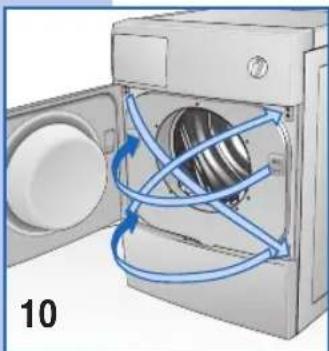
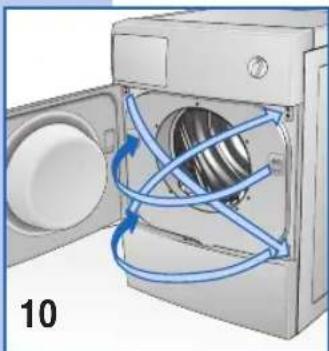
OPENING THE DOOR AND CHANGING THE OPENING DIRECTION
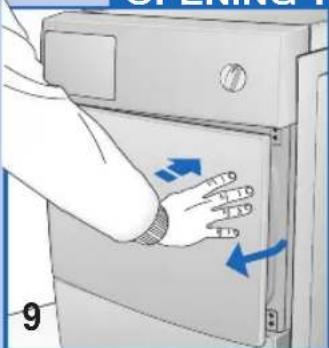
Press on the right side of the door (fi g. 9) to open it. If the direction of the door opening has been changed, press the left side.

The opening direction of the door opening can be modified according to needs (fi g. 10).
N.B.: This operation must only be carried out by a quali ed technician. Contact the customer service centre.
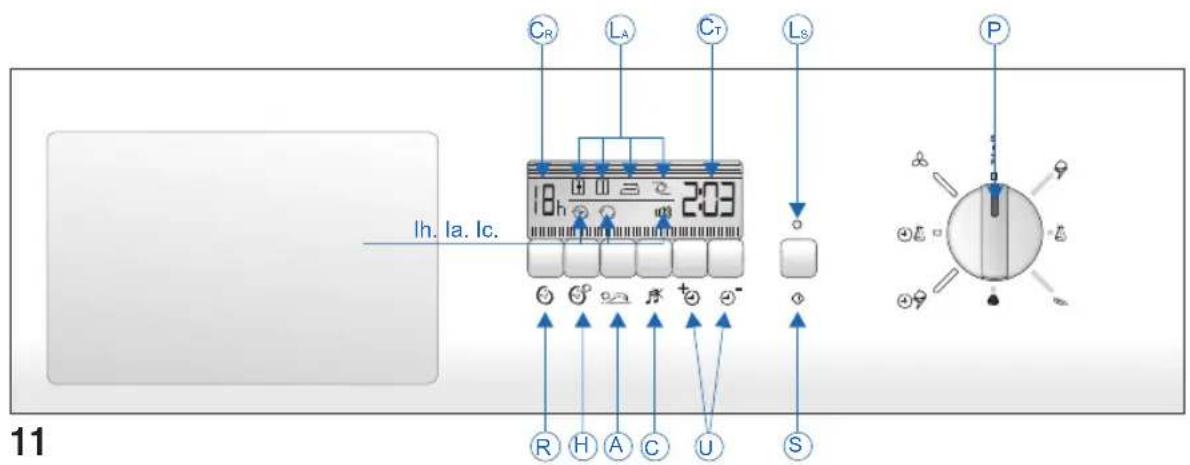
DESCRIPTION OF THE CONTROL PANEL
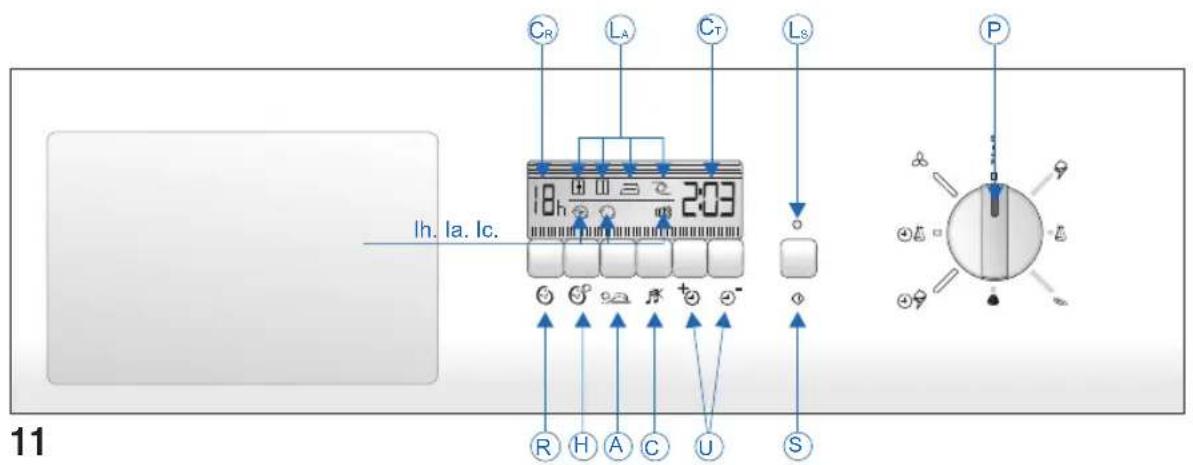
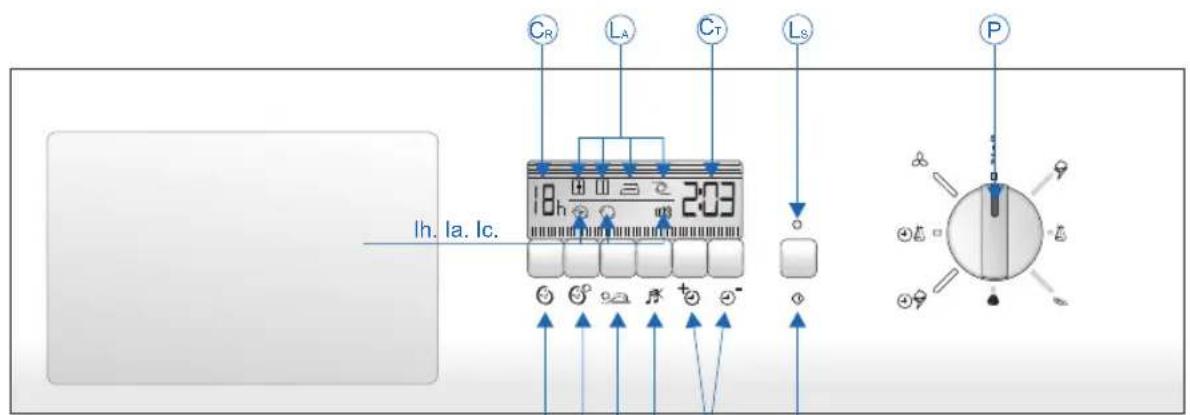
P. Programmer Knob. Used to select the required programmes according to the type of fabric and drying needs. In addition to switching off the display, the STOP button also resets the appliance. If, for any reason, you want to change the programme or add more washing to the load, simply place the programmer knob in the "STOP" position. Then re-position the knob on the required program and press the "START" button.
NB. Warning!! only use this function if strictly necessary and then only if the programme to reset has not been running for more than 3 minutes.
N.B. On some models fitted with a Delay function, when the function is enabled or at the end of the cycle, the backlit display will switch off after a few minutes. Pressing any button will switch the display light on again.
S. Start Button. Press this button to start the programmed drying cycle.
Ls. Start LED. Off indicates the "STOP" position. On fixed indicates the programme is running. Fast fl ashing indicates the set programme is ready to start. Slow fl ashing indicates the end of the drying programme.
U. Drying selector buttons (+ / - ) . These are used to select the degree of dampness on electronically controlled programmes and the time on manual programmes. Not all the options are available for all programmes.(see: "PROGRAMMETABLE")
LA. There are 4 icons for the electronically controlled drying programme. The selected icon will flash while the other 3 remain lit. When the cycle starts, only the selected icon remains lit.
CT. Drier timer. Displays the set time in steps of 20 minutes, up to a maximum of 2 hours and 40 minutes for the cotton programme and 2 hours for the synthetics programme.
C. Beep silencer button. Enables the beep function, which would otherwise be permanently enabled. The selection remains memorised even when the appliance is switched off.
The beeps signal as follows:
1 long beep (cycle started)
4 long beeps (cycle completed)
4 short beeps (drum rotating for anti-crease function)
A. Anti-crease button. Activates a function that, at the end of the drying cycle, rotates the drum and the washing loaded in it in one direction then in the other for a further sixty minutes to reduce creasing. Each rotation is signalled by short beeps.
H. Drying delay anti-crease button. This rotates the washing in the drum during the delayed start in order to reduce creasing.
Ih. Ia. Ic. The beeper, anti-crease and delayed start icons appearing on the display indicate that the functions are active.
R. Delayed start button. Used to delay drier start-up for up to a maximum of 16 hours. Each time the button is pressed, the start is delayed for one hour. When the START button is pressed, the letter h will flash on the display signalling that the function has been activated. The machine will wait for the number of hours set to elapse and then start the drying cycle automatically. If the power supply is interrupted while the delayed start function is active, the function itself will be annulled. Pressing the START button will start the drying cycle immediately.
CR. Delayed start counter. Displays the delay time set in steps of one hour up to a maximum of 16 hours.
IN ORDER TO DRY THE WASHING IN THE CORRECT MANNER
Proceed as follows:
A
Spin the washing.
B
Sort the items into fabric types.
Close all zips, fasten buttons and remember to empty all the pockets.
Turn jumpers inside out.
C
Open the door.
Load the washing in the drum and remember to load sheets from a corner first.
It is advisable to load small and large items together.
D
Close the door.
Dry hands (never touch electric appliances with wet hands).
Insert the plug in the mains socket.
E
Position the programmer knob on Stop to reset
any previously set programmes. Then rotate the knob to the most suitable programme for the type of fabric loaded.
Use the drying selector buttons (+ / - ) to select the degree of dampness required (see *PROGRAMME TABLE).
F
To stop the drier during a drying cycle, simply open the door and the drum will slow down then stop.
(Remember that when the door is opened, the internal parts of the drier may be very hot).
To start the drying cycle, press the "Start" button.
At the end of the drying cycle, signalled by the fl ashing start led and beeper, return the selector to the STOP position.
Open the drum door and remove the washing.
Close the door.
With dry hands, remove the plug from the mains socket.
PROGRAMMETABLE
| ELECTRONIC DAMPNESS CONTROL PROGRAMMES | |||||
| FABRIC | MAX. WASHING LOAD | EXTRA DRY | WARDROBE DRY | IRON DAMP | VERY DAMP |
| COTTON | 7.0 kg. | a | |||
| SYNTHETICS | 3.5 kg. | a | |||
| DELICATES | 3.5 kg. | — | a | ||
| WOOL | 1.5 kg. | — | a | — | |
| TIMED PROGRAMMES | |||||
| COTTON | 7.0 kg. | 160-140 min | 140-120 min | 120-100 min | 100-80 min |
| SYNTHETICS | 3.5 kg. | 120-100 min | 80-60 min | 60-40 min | 40-20 min |
| COOLING | 20 min | ||||
Important: The drying depends on a number of factors: weight, size of the items, type of fabric, degree of dampness. Well wrung/spun items dry quicker. To prevent items from creasing, do not overload the drier.
PRECAUTIONS FOR FABRIC TYPES
In the case of doubt as to the type of fabric, read the label on the item itself.
Almost all items that can be machine dried have this information specified on the label.
To avoid static electricity being generated in the items, add a conditioner to the rinse cycle of the washing machine.
Remove synthetic materials from the drum immediately to prevent them from creasing.
WASHING WEIGHTS THE MANUFACTURER
The indicated weights are approximate and may vary according to their manufacturer, quality and finish.
Bedding
Quilt 700g
Bottom sheet 550 g
Top sheet 600 g
Pillowcase 180g
Household linen
Tea towel (dishes) 90 g
Tea towel (glasses) 70 g
Flannel 20 g
Hand towel 200 g
Other linen items
Bath robe 1200 g
Bath towel 800 g
Woman's blouse 300 g
Man's shirt 600 g
Blouse/shirt in synthetic material 300 g
Table linen
Tablecloth 250g
Large tablecloth 1000 g
Napkin 80g
Men's clothing
Wash'n wear shirt 250g
Vest (sleeveless) 120 g
Briefs 80g
Long johns 250 g
Pyjamas 480g
Nightshirt 400 g
Handkerchief 25g
Women's clothing
Blouse 100 g
Jumper 100 g
Miniskirt 80g
Briefs 80g
Nightdress 180g
Pyjamas 450g
Handkerchief 15g

MAINTENANCE
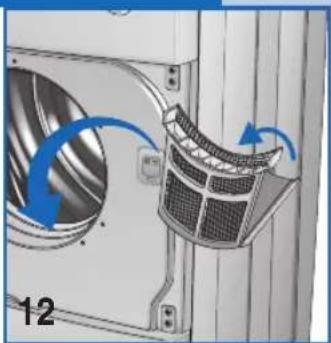
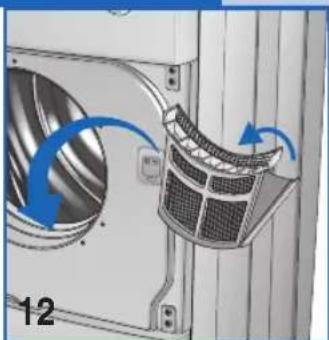
CLEANING THE FILTER
In order to guarantee optimum drying results under all circumstances, remember that the fi iter must be cleaned regularly. Remember to check and clean the fi iter after each drying cycle.
Important:
The fi iter must only be cleaned when the appliance is cold! Clean the fi iter following the procedure described below:
Open the door.
Grasp the filter in both hands and push it upwards to remove it.
Carefully widen the top edge and open the fi iter.
Remove the fabric particles.
Close the filter, making sure that the catch closes at the correct position.
Clean the filter slide guides on the appliance, using a vacuum cleaner if necessary.
Reposition the fi Iter in the slide guides (fi g. 17).
FAULT FINDING
All electric appliances may breakdown at some point.
Remember to call a qualified electrician in these cases. However, many problems can be resolved without the need for external intervention.
Important: If a fault occurs, disconnect the appliance from the mains supply immediately.
Before calling the customer service centre, check the points listed below.
TROUBLESHOOTING IS ONE WORD
If the drier doesn't start
Check that:
1) The appliance is plugged into the mains supply.
2) The mains socket is working correctly:
2a) The fuse has not blown. (Check by plu in another appliance such as a table lamp).
2b) All the instructions in the manual have been followed.
If the drier doesn't start
Check that:
1) The door is closed properly.
2) The "START" button has been pressed.
The washing does not dry
If, after all these checks have been carried out, the appliance still does not work, inform the nearest customer service centre.
When contacting the service centre, inform them of the appliance model, serial number and type of fault.
This information will help the service centre operator in procuring the necessary spare parts, thus guaranteeing a speedy and efficient repair service.
OPTIONAL ACCESSORIES
To save space, the retailer can supply an accessory to enable the drier to be mounted on top of a front-loading washing machine.
The installer can provide the information on the model of appliance on which this accessory can be fitted.
NOTES

Verehrter Kunde,
ACCESSIONS EN OPTION
Seque as mados (nunca toque aparelhos elec. tricos com as mados molhadas).
Introduza a ficha na tomada de corrente.
E
FESCHRIJVING VAN HET APPARAAT 65

INSTALLATIE VAN HET APPARAAT
Installatie
BESCHRIJVING VAN HET APPARAAT

INSTALLATIE VAN HET APPARAAT

INSTALLATIE

BnABHeHH HeCnpaBHOCTe
14
UcyHeHH npo6Jem
141
-DoataKobi cyHKuii
141
ПРИМITКИТАЗCTEPEXKEHHДЛКОПUCTYBAU

TEXHIUHIDAHI
| Габаши: | Широча, см.: | 59.5 |
| Висota, см.: | 85.0 | |
| Глобина, см.: | 60.4 | |
| Мakсимальна εмнICTь | 7 К. СУХОΙ БILПИЗни | |
| HomінальнаnotuyнICTь | ДИВ. ТАБЛЧКУ ТЕСИЧНИХ данIX | |
| Нарpyra eilektroproстуmy | ДИВ. ТАБЛCHKU TЕСИCHNI X dANIX | |
MODEJIb:
CEPIHNI HOMEP:
DATA KYNIBNI:
HaWe 06NaHnHHc cyuINbHOIO MaunHOIO DnI DOMaunHbOro KOpNCyBaHH. ByNb-Ke iHwe 3AcTOcYBaHHo6NaDHaHHIOBnHNOBBaKaTnC HEBnACTNBIM, a OTKe He6e3neuHM.
36epiraTe DaHy IHctpyKuio 3aBxNn nopAid 3 cyHbHM MoHaHaHHM, UObY BnAkyIOTpeBn II MOKHsO bNo WbNIO pOKOHcyNbTyBaTN.
ByIbIa3MIHn a6o cnp6a nOuKoNDTu O6NaDHaHHaMOKyTb 6Ty HHe63NeuHHM dJa KOpNCyBaHa iUkiDNBIMM dJa CamRo O6NaDHaHHa.
V MOMENTIOCTABKNENEKTPoPnPnAaY3aNEBHITcB, LIO6BIHNHe6yBNOUKOJKeHNIiQacNepeBe3EHN. Y BnIaIKYBCTaHOBJIeHHMOJKINBHXNOUKOJKeHb HERaHIO 3BepHtCBdoPiOJaBua.
He BkpuBaIte cyuHbHy MaunHy 6iIn3HOU n iHmnn npedmetam.
PiIyacpo3MIeEHHO6JIaHHaHH3aneBHTbC,IO eEKeKtpoUHyp He 6By 3irHyTu IN npuAabneHn a TAKOX I0 BIn JERKOIOCTynHn.
Nicn BnKOpncTahH eNeKtpoPnPna3aBXn 3aKnBaIe DBepuTa.
Takm HnHom Bu nepeuKOJnte dITram Bnla3nTu Ha Hx, 0o MoKe npBecTe DO nepeKndaHHa CywnbHOI MaunHn.
He moxha KopnctyBaTncs ObnHaHHaM dITAM,IO He nepe6ybaIbTiHARJADOM.
He 3abyaTe, oio nIac uKny cyuHHn BunyckHa Tpy6a HarpiBaTbcra I moKe DocarHytn TemnepaTypn, BuOoi 60^ . He TopkaTecr ci ci yactHn ObnaDHaHHn Do 3aBepWeHHN LKny OxJIOxKeHH.
He cyuHTn B cyuINbHi MaunHi 6pydHn OJr.
He cyuHTn OJry, kyn 6yB 3a6pydHEnn TaKIMN pO3HNAMN kX xpUOBa ONI, HAcTa, aTeoH, aIKORONb, 6eH3NH, KepocnH, piINH dIra OHueHH NIAm, CKINNDap, BICK.
Ipeed TmM,AK 3aBaHTaxKNTn NOi6Hy 6iln3Hy B CyuINbHy MaunHy, yCyHyTn ci peOBNH 3a DonOMORIO npAHy rapHy BOi 3doaBAHHAM NEBHOI KInbKOCTI npAIBHOr PO3Hy.
He cyuHTnMaunHi Bnpo6ib 3ry6batoi pe3HH, KayykoBOro NaTeKcy, BODoHepOnHKnX Bnpo6ib,TKaHH, 0o He npOnycKaIOt b BoHy,pe3HHOBnx MatpaicIB, ppeMTeiB 3 WtAmNoBaHMN KOJbOpamN, OJrty TaNoDyWok, HabTnx KayykoBm NaTEKCOM, OCKInbKn BOHNMOxTyb Po3nnabUTnc i NOxKOJNTnIHuy 6bn3Hy i cam eEkeTpOnobTyOBn npna.
POM'AKUByBaJIbHI PO3UHN IJI TKAHN a60 NOIi6Hi IM peOBOHN IOBUNH IBXINBAITCA 3riHO IHCTpyKuJ, Aki 3HAxoJrTbcn yixyNAKOJI.
YBnnaKny npoJaxy abo nepeaui nobyTOBOrO eNeKtpponpaNy y KopncTyBaHnIHsMM NIOdbMn Nam'rtaIte npo Te, IIO pa3OM 3 Hm NOTpi6Ho nepeaTu TakoX i daHy texHiCy IHCTpyKciio, kA donomOxhe HactynHomy BlnachNky KOpncTyBaTnCc CyuINbHO MaunHOIO npabInbHO iHaDiHO.
He HamarauTecra camoctiHou ycyHytn HecnpabHocti Ha obnaHaHHI, TOMy 0peMOHT, BIKOHAHn HecneuianictAMN, MOXe
CpHnHHTCA Do cepno3Hnx N0xKoJXeHb i No36aBnE npaba Ha rapaTInnHn peMOHT.
PemOH T6nHaHH MoKe 3iINCHOBaTNC BKNIOHO yNOBHOBaKeHmnpaICIBHKAMU cHTpB TexHOrO 0cNpyROyBaHH. IpeMOHTy NOBHHi BNKOpCTOByBaTNC TiIbKn OpiHHaJIbHI 3anachYacTHH.
IpeTm, k3aBaHTaxkntn 6iin3Hy B cywnbHy MaunHy, Heo6xIDHO nponyctntn II uepe3 ceHtpny a60 dope BiXkaTn. Do6pe BiXkata 6iin3Ha BnCOxHe WbnDwe.
IicnKoXHOrO BnKOpNCTaHH CyuMbHOi MaunHn akypathO ouHCTiB pInbTp, u6 rapaHTyBaTn 6e3nepekoDHy UkpkyJauIO NOBITpR.
He niklouaHTe i He BnMaTe wTeNCJIb 3 po3eTK eNEkTpOmepeXi MOKpIMN pyKAMN.
CywnbHaMaunHaNoBNHnPiNcHyBaTncr do 3a3emHeoi eNeKtpopo3eTKn, Ka BiINObiac yim BmOram 6e3neKn.
He nIeNHyTe MaunHy Do eNeKtpopo3etkn 3a DOnOMOrO npoDobKyBaiv a60 po3raNyKeHX BnIOK.
He 3aInwaTe 06NaHaHHn iD iieo aTMocpepHnx ABN.
IpeedTM,AK3diCHNTI TexOrJIaOblaHaHHaHn HIOrO MTTT,He 3a6yBaHTe Ioro BiDKHOHTN3 PO3ETKN eNEKTPuHORO cTpyM,yoB BiDnyHTN OblaDaHHaHHa 3PO3eTKn eNEKTPuHORO cTpyM, He TAHHtB 3a eNEKTPponpOBI,a 3a wTeNCJIb.
LcEo6nHaHHNo3HaueHe CmB0JAmu 3riHOBnMOr CBpOeNCbKOI DnpeKtNBn Ipo BiXoDnEeKtpNCHoro Ta eNeKtpOHoro O6NaHaHH2002/96/EC Waste Electrical and Electronic Equipment (WEEE).3aneBHTbcr y Tomy, zu npOpykui Byna npabunbHO yTNIi3ObaHa.CnoxNBau NobuHEn CnpTu NonepeJKeHNIO MoKNIBNX HeraTNBHX HacNiIDKIB Iy 3OpOB' i HabKoJIuHbTO CepeOBOUa.

3nak Ha Bnpo6i Hn Ha cynpoBdoxyuoyin noIOKyMeHTaui Bka3ye Ha Te, 0o Cei Bnip6 He BBaxKaTbC3BnuayHm DomauHim BiXoJOM,a NOBHeH 3daBaTNCy BiNPOBIDHn nyHKT 36opy dny yTuNl3aui eNeKtpuHoi Ta eNeKtpoHoi anapatyp.
Bupio nobHHe nepepo6nTcra 3iDHO Micuebux HOpM dIa nepepo6Kn BiXoIDIB. Dna OepKaHHdOatKOBoi iHOpMaui npo 6xOJKeHH, peKyepauio Ta peuKl3aio Iboro Bnpo6y 3BepTaNTecy y BiNobIHm Micuebni BIdin, cnyk6y 3bOpy BiXoIDIOMaunBoRo KOpncTyBaHH a60 y MaraHN, y Akomy Bn npnDbani daHn eNeKTponpnuad.
IINPNCMCTBO-BNPO6HVK BIXNJHE Byb-RAKY BIDIOBIAJbHICTb 3A MOJKINBI HEUACHIBNADKN, BNKJINKAHI HEDOTPMAHHMR HOPM BE3NEKN TA BUMOR, BKA3AHNX Y CII INCTPYKJI.
ONICOBJIADHAHHA

CywnbHa MaunHa -e npnaIaI dIa IOMaunHbOro KOpNCTyBaHHraKn MOKe cyuHTn yci BNIN TKaHH.
CTpykTypa 06naHaHHcKlaJaTaBc3 BIDNObHO 6pO6nHex Ta nONaKOBaHx CTaIbHnx NaHeJe, Aki 3aIIuAOTbcr HEnoIKoJKeHMn IpOTAROM DOBROR Yacy.
BnHy Ta pyxomi YacTHH 6yJN CNPOeKTOBaHI Ta Bnpo6NeHi TaKIM YHOM,063a6e3neHTM MaKcImaJIbHO MOXJIbE O6MeKeHHa WMy.
NanheIb ynpabnHHaD03BONHe KOpNCyBaCy 6e3nepeWkoJHO BnKOHyBaTN yci nepeDbayehi nporpamc cyuHHa.
▼ BéniKi DBepTa 3HaUHO nOerUyIb IpoIec 3aBaHTaKeHH Ta BmMaHH 6iIN3Hn.
1 -Дверцета 6apabha
2 -ΦinbTp
3 - Hixk, 00 perynioTbcn
4 - Tablmyka 3 TexHiHmM XapaKepnCTnKaMn
5 - OTbip Bnnycky napu
6-3'cHbBnHn
7 - CnyckHa Tpy6a
8 - CynnopTtpy6n

IHCTAJLACIOOBJADHAHH
IHCTAJIARLIJA

Ihctanuia NOBnHa 3diuchOBaTucra KBaJIphiKOBaHmN npaizBHnKaMn 3riHNO Bka3iBOK, HadaHnx Bnpo6HnKom. NOMILKOBA IHCTaJauia MoKe 3aBdaTu WKOIN JIOdAM Ta IpeDMeTaM.
BcTaHOBiTb cyuHbHy MaunHy Henoanik BiD BIKHa, 0o6 cnpyTN BnBOy BOnororo nobitrpa.
V 乌yHnKHyTN fOpMyBaHH KOHeHcAty, KopNCTyTEcB BnBiHO Tpy6O, nIeHaHO DO OTbOPy A, po3MiueHOro BH3y Ha 3aHni NaHeni O6naHaHH (pnc. 3).
IHCTAJIARJIA
He 3akpmbaTe doctyn nobitprdo 3aHb0i actHn O6laHaHHA.
BcTaHOBIb cInbTp y noJoxeHHn, nepe6aueHe 3riHNO Bka3iBOK Ha pnc.4.
OuHuaTe BHyTpHi npocTip cyunIbHoro 6apabaha 3a donomoroo BONOROI mAtKn, uo6 ycHyTu nn.
BnPIBHIOBAHHY CYUINJIbHOI MAUNHNI
Hixk, 0 peryIIOOTbcA. BctahOBiB cyuINbHy MaunHy y BepTKaJIbHe NOJIOXeHH TaKIM YINOM, 06 BOHa MiUHO CTOHnHa Ha ycIX YoTIPbOx HIXKax. 3roDom BupIBHnTe MaunHy, 3akPINNBUn HiKK, k ONICAHO HIXKye:
3nerka nDhimiTb 06naHaHHa
BidipeyHIOte HIXKN Ha Heo6XiHn Bucoti (pnc.5) (He BnKpyuYTe HaMipHO HIXKN Ta He KopNCTuTEcra 3aKpyTKOIO);
onyctitb 6nlaHaHH Ha niDnory.
IoroHO BnpiBnHa cyuINbHa MaunHa MoKe NooKOHTN niDunHKn i CnpuHHITcR DO HATo WBNDKORO 3HOWeHHa MExaHiHx qactH. Lc cyuINbHa MaUNHa He NOBnHa KpInNTcR Do NiJIOrN.
ПД'ЕДHAHHB NVBIDHOIT TPYБN
Пи'сднaite BnBiDHy Tpy6y Do OTbOpy,po3TaWOBaHOrO 3 3aHbOrO 60ky cyuHbHOI MaunHn (pnc.6), BnKOHyIOH NactynHi onepaui:
IiD'cHaHTe OINH KHeCb Tpy6n Do 3'cHbBbHoro fnaHc3 HAKOHeHHKOM.
Nobephi3'EnHyBaIbHn enemeHT (pa3OM 3 Tpy6o) npOTn roHNHKOBOI cTpiKN BCEpeDNIH BNBIDHOrO OTBOPY.
BnBeiItb Tpy6y 3aAnhbo 60ky cyuHbHOI MaunHn BnIO a6o BnpaBO uepe3 OTBip, po3aWOBAHn y HxHHi YactnHi KopnyCy MaunHn.
BctahOBiB iHwI KHeCb Tpy6n nopA3 BIKHom a6o BEHTNJUciHMM IOKOM. RaKIO CE HEMOXJINBO, 3aneBHITbcR, IO npMlueHHN iId Yac pObotu cywnJBHOI MaunHn Do6pe npoBIrpoetbcR. KopncTyntecr cynnopTOM (pnc.7) dna 3akpinneHHra ty6n.
YBara: Tpy6a Bnnycky nobITpr noBHHa nID'edHyBaTncr TaKoX i y BnnaDky, KOH nobITpr BnnyckaTbcra Ha3OBHI; y npotnIeJxHOMy BnnaDky BnnyeHe BONore nobITpr MoKe NOBepHyTncr y MaunHy, 3aTaraOuH qac cyuHHa.
BoIore nobITp moKe taKoX noXKOHTn cyuHbHy MaunHy. He3BaXaOCh Ha Te, 10 NobITp, 10 BHXODITb 3 BnYCKHO Tpy6n, Ine rapAye i BOIore i He e Hebe3neHMM, BOHO HIKON He NOBHHo HapBaNATNCHa IIODei, TBAPIN YI PocNIHN.
YBara: Nobitpa 3 Bunyckhoi Tpy6n HikoN He NOBHHO BNBODHTUCy y Dmoxi, AKN BHKOPNCTOBycBcA DnRA BNVBOy dmy, Oo Bnpo6nctbcra 0bnaHaHHAM, AKe BHKOPNCTOByc ra3 nn IHwi BVn nanbHorO.
ПИД'ЕДHAHHАdo ENEKTPNUHoi MEPEXI

3aneBHITbcra, 0e eNEKtpnHa HAnpyra, kA BkA3aHa y Ta6nHcI 3TexHiHMM daHMM, BCTaHOBHeHn Ha 3aHn CTHU cOlaHaHHa, BiINObIdae Hanpy3i eNEKtpnHoMepexki.
IicnaIcTaaIciObnHaHHIOCTyn Do MepeXeJKeKTPoXnBHeHH NOBnHe3a6e3neYBaTnC3araIbHMM NepemKaayem.
Yci nepemikayi, ekeKtpnHi uHypn, a taKoX po3eTKu eKeKtpomepeXi NOBHHI BiIOBIAATN TaKIM NOKa3HnKaAM, RKi DO3BOJlOITb BHTpMaTn MaKCmMaJIbHe HabaHTaKeHHRAka3aHe y Ta6nui.
EneKtpomepeka,doAkoi nDcHaHa cyuHbHa MaunHa, noBnHa 6ytn 3a3emHeHa. Y npOTnEnXHomBy BnnaKy, BnpO6nK BiXnIe 6yDb-ky BiNObiDaJIbHicTb 3a MoKnBi HeaChi BnnaKn (pnc.8).
Kkpo eNeKtpoWHyp 6yB NowKOJxHn, 3BepHtbcy HaN6Jnxu Cneuiian30BaHn ueHTp TexHiHoro oCnyroByaHHa KnieHTiB.
He nid'cndhyte cyunnbHy maunHy do eeneKtpomepexi 3a donomoroto TAKNX Hnnpmnx enemeHTIB, Rk npoobxbyu ch nepexiHi 6araTOKaHaJIbHI p03eTKN.
BcTaHOBIb 6bIaIHaHH TaKIM YHOM, 0o6 WHyp eNEKtpnHoro KMBHeHH 6yB IerKOIOCTynHnn DnA WBNDKORO BiD'EDHaHH y BUNaIKy NOTpe6n.
Cae BaXnBO! Nicna 3aBepueHHNcKny cyuHHBmMiTb eJektpoohyp 3 eJekTpomepeki, 06nepeWKoNDtN dITAM BnnaADKOBO BKIOHTN O6laHaHH.
BIDKPTTTA DBEPAT TA 3MIHA NOTO HANPAMY
▼HaTnchyTuHa npabu 6ik DBepuT (pnc.9), 0o6 ix BiDkpTu. RaKuo HanpAM BiDkPnTTA DBepuT 6yB 3mHeHn, HATnCHiTh Ha NiBn 6ik.
Hanpam BiDkpuTTa DBepuT MoKe MiHTuCA 3riIDHO Notpe6 (PNC.10).
PnIMTKA: L'onepaui nOBHHa BnKOHyBaTcH TJIbKn CneuaJI3OBAHm npauiBHKOM.
3BepTaTeCayuHTpTexHiHoro 06cIyROByBaHHa6oDo npOdaBua.
ONNC NAHENI YNPABJIHHRA
11
P. Pyka nporpamyBaHH Cnykntb InB6opy 6axaHnx nporpam B 3aIeXHOCTi BiT TNY TKaHHN i BlaCHNX notpe6. II nepeBeDeHH B NOXKeHH STOP He IInwe BmNKAc Dncnne, aNe TaKoK BnKOHy cFyHKUIO nepenporpamyBaHH MaunHN. Ako 3 6yb-akoro MOTBy BN 3abKaAcTe 3MiHTn nporpamy a6o doatn iHwy 6iIN3Hy, oocTaTHbO BcTaHOBtN pyky nporpamyBaHH y NOnOKeHH STOP, nCra YOrO O6paTH HOBy nporpamy I HATNCHYTN KhoNky START.
PpIM. Ybara!! paIIMO BnKOpNCOTByBatu cIO yHKcIIO Imse 3a yMOBn HaRaJIbHOI nOITpe6n i He Ni3Hlwe HIX 3a 3 XBNIHHN NICJNA NOaTKy nporpaMn, Aky BN 6axkacte 3minHTn.
PnM. Y DeKnx MoJEnx NiDcBtKa DnCnIeO racheYepe3 DeKInbKa XBnHn NicnBCTaHOBHeHH nporpamn Delay a6o 3aBePseHHuKny. Jn II BMnKaHH DOCTaTHbO HATNCHTu 6yDb-ky KhoNkY.
S. KhoNka Start: NicnHaTncHeHHuiei KhoNkCyuHbHaMaHnHa po3noHc 3anporpamOBaHnUKN cyuIHn.
Ls. INdkaTopHa lamnoouKa Start He roputb -Bka3ye Ha noJIOxKeHHN "STOP"; 6e3nepePBHO roputb - Bka3ye Ha BnKoHaHH nporpamn; WBNko 6nMaE - Bka3ye Ha Heo6XiHicTb 3anycky 06paHO nporpamn; nobJIbHO 6nMae - Bka3ye Ha 3aBepueHH nporpamn.
U.KhONKn Bu6opy (+ / - ) pexkmy cyuiHHcnyKaTb Dnra 06paHHeo6XiHOro piBHa BOnorOCTi npu BnKoHaHHI nporpam 3 eJKeKtpoHHm ynpabNlHHMa i acy BnKoHaHH nporpam B pyHOMy pexkmi.
He Bci nporpamn nepe6aayoTB MOXkNBIcTB 06paHHB CIX no3u (INB.: TABJNUIO PPOPGAM)
LA.MaHnHaMa4IKOHKnIporpamCyHH3 eNkTPOHHM ynpaBllHHM.ObpaHa IKHKa Mrrae,aIHsi 36e3nepepbHO CbITbCra.
Iicn3anycky uKny npoobkye ropiTn nIuope 6paHa iKoHka.
CT. TaHmep cyiHHn oka3ye 3anporpamOBaHn Yac 320-xBnHHNIM iHTepBaJAMM kMCMyM Do 2 roDnH 40 xBnIH nI nporpaM cyiHHn
6aOBHN Ta 2roDnI JIINCTHTNKN.
C. KhoNka BnKJIoueHHa 3ymepa BmMnKa cФyHKciHO 3ymepa, kIn y npOTnEkhOMy BnIaKy e 3aBxDn BBIMKHeHm. LcE BnBip 3aIIuAeTbCra y nam'HTi nporpaMn TaKoX y BnIaKy BmMKHeHHa.
CnHaH 3ymepy:
1doBnCnHaI(3anyckunKny)
4doBnx CnHaHa (3aBepWeHHnKny)
4 KopoTKnx CnHann (KpyTinH 6apabahny npi Dii cyHKui IpOTn 3MHaHHa
A. Khonka Ipotn 3MHHHBAHKAc FyHKIO, Aka HapNKIHcI cKky cywiHb 6iIN3HN B MaunHi npoOBxye KpyTtN 6apa6aB ODHomy iHwOmy HapRMky npOTAROM DoaTKOBHX WeCTnDecATN XBUNH DnA 3anobiraHH 3MNHaHH 6iIN3HN. KoxHe oBeptahHb 6apabAH cynpoBOJxyeTbcn KOPOTKNM CnHAnAm 3ymepa.
H. Khonka Ppotn 3MHHHn np 3aTpmuCywHnCnykntb nJn KpyTINHn 6inn3nB 6apabhi niJ yac oikyBaHHn dNn 3anobirHHn ii 3MHHHaHn.
Ih. Ia. Ic. IorBa Ha ducnne iIOHOK 3yMeP, "IpoTn 3MHaHHra Ta 3aTpUmka CTapTy CBiDHTb npo BBIMKHeHHOdHie 3 uX cyHKui.
R. Khonka «3atpimka cTapTy » Do3BONHe 3aTpimatn noqatok cyuHHMAKcIMyM Ha 16 roHn. 3a KOxHORo HAtncHEHH KHOKN NOATOK 3aTpmyEbCnHa OHy rOHNy. Pn HATNCHEHHI KHONK START nicna BBIMKHeHH 3aTpmyBaHa dncnei 3'BAITbc MRAIOH nmbOn h. LcN MOMENT e NOATKOM OIKYBaHH MaunHOO 3anporpaMOBaHOI KINbKOCTI rOHN, nicn 3abepweHHA koro BOHa ABTomuHOPo3noue He cUKN cyuHHn.
Y BnnaKky BmKHeHH nI yac 3aTpumKn NOCTaHaHH eNEkTpoeHeprii 3aDaHy nporpamy 6yde BiDmiHo, a HATNCHeHH KHOKN START PnN3BeDe Do HeraHOrO NoVaTKy LNKny.
CR. TaMep 3atpumkn cTapTy noka3e 3anporpamOBaHn Yac 3 1-roHHm IHTepBaJOM MaKcMym Do 16 roHH.
ДЛРAPABUNbHOrO CyUHHB BJIIN3HN
BukohaiTe HactynHii
A
PpokpyTb 6in3Hy BueHTnpdy3i npalhoMauHHI.
B
Po3c0ptnpyIte 6iIN3Hy 3a TINOM a6o 3a TkaHHIO.
3acte6HtB 3amkn-6nCKaBKn, ryni i He 3a6yblte NOBnBeptatn Bci KneHi.
NobuBepTaIe CBETn.
C
BidHnHbDBepuTa.
V TomictiB 6JIn3Hy y 6apa6aH, noUHaOuN 3 3abaHTaxeHH npocTnpaDn 3 KyTy.
PaIIMO 3aBaHTaJyBaTn pa30m 6iIn3Hy pi3Hnx po3MipiB.
D
3aunHITbDBepuTa.
BntpiB pyKn (HikoN He TopkaTecn eNeKtponpuaIb BOIOrIMu pyKaMn).
BCTABTE BUNKy do eJektpuHoi po3eTKN.
E
BctahOBiB pyky nporpamyBaHHA
B noIoxeHH Stop IJI BImiH paHiwe BCTaHOBHeHX nporpaM,notIM BCTaHOBiTb II Ha HainpndaTHiuy dN Tnny TKAHHH nporpaM.
3a donomoroo Khoonok Bn60py pekmy cyuHH (+ / - ) o6epitb baxaHni pIBeHb Bonorocti (INB. "TABNIUIO IPOI PAM").
F
VДЯЗУПЕСHAМAUSHINIДЧACBUNKOHANUKNY cyuHHNDOCTaTHBO BiDkPHTN DBepuTa.Le npn3BeDe IO NOBInbHorO 3yUnHeHH6apabHy. (Pam'rTaIe,IO NID YAc BIDHNHEHHNDBepurT BHYTpIshI DeTani CyuINbHOI MaunHIMoKyTb 6ytu dyxke rapaumn).
ДлпpoODBKeHHaikny cyuHHa 3akpnte DBepaTia HATNCHTb KhONKy "Start".
Nicra 3aBepweHH cywHn 3a6nmae iHdkatopHa lamnoquka start i npolyha cHrHan 3ymepy. BcTaHObitb pyky nporpam y noJoxehn STOP.
BiiDHiTb DBePraTa 6apa6aHy Ta BnTARHITb 3 HbOrO 6iIN3Hy.
3aunHITbDBepuTa.
Cyxum pykamn BntarHItb BNky cyuunbHOI Maunn 3 eJektpnuho p03ETKn.
TABJIINZI INPOITPAM
| ПОГРМИ 3ЕLEKТPOHHIM KOHTPOJEM BOJOFOCTI | |||||
| TKAHINHA | ДУЖЕ СУХА БЛПИЗHA | СУХА БILIN3HA ДЛЯ SCКЛДАння ДО SHАФИ | BOJOГA БILIN3HA ДЛЯ ПРACYBAH住房 | ДУЖЕ BOJOГA БЛПИЗHA | ЧАСОВΙ ПОГРAMи |
| БАВОВHA | 7.0 кг. | a | |||
| СИНТETИ ЧИТКАПИИ | 3.5 кг. | a | |||
| ДЕЛΙΚA THITKAПИИ | 3.5 кг. | — | a | ||
| ШEPСТь | 1.5 кг. | — | a | — | |
| MAKСИМAJБHE 3ABAHTAXGEHHЯ BILIN3HN | |||||
| БАВОВHA | 7.0 кг. | 160-140 xB. | 140-120 xB. | 120-100 xB. | 100-80 xB. |
| СИНТETИ ЧИТКАПИИ | 3.5 кг. | 120-100 xB. | 80-60 xB. | 60-40 xB. | 40-20 xB. |
| ОХOLДЖЕHHЯ | 20 xB. | ||||
YBara: Yac cyuHn 3aJexntb BiD pndy fakTopiB: Bar, po3mipB 6iIN3Hn, BNDy TkaHHN, CTyneh BONorocti. Do6pe BiXkati Ta ceHTpnFyroBaHI TKAHHN COxHyTB WBNIe. So6 yHnKHyTTO, 0o 6iIN3Ha NOMHeTBcH, He nepeBaHTaxyIte cyuInbHy MaunHy.
3ACTEPEXKEHHI OODO TKAHIN
Y BnnaKy cyMHIBIb 10oDn BnDy TKAHNH nepeBipTe eTNKeTky, Ra 3haxOuNTbcra Ha Bnpobax. MaJxe yci BnDn Ondry, Aki MOkyTb CyuNTncr y CyuNbHi MaunHi, MaOTb BiIDNObiDhe No3HaueHHa etNkeTci.
IINrTO, 06yHKHTn eKtpr3yBaHH OJARy, iD Yacix NOLOCKAHN y npalbHi MaunHIOaTe NOM'kUByaH. HeraHb BnIMtB 3 6apabahy OJAR 3 CInTeuHHX TkaHH, 6oB BiH He NOM'ABCA.
BAGA BIIIN3HN
Bka3aHa Bara np6n3Ha i Moke 3mHIOBaTncB 3anexKHOCTi BID Bnpo6nKa, KOCti Ta 06pO6Kn.
NoctiNbHa 6iJn3Ha
Kobpa 700 rp.
HnXHe npocTnpaINo 550 rp.
Bepxhe npoctpa.dio 600 rp.
Habolouka 180
Kyxonha 6iinn3Ha
PyuHnK (dIa Tapinok) 90 rp.
PyuHnK (dna cTaKaHIB) 70 rp.
山MaTka 20rp.
PyuHnHcOK nnpyk 200 rp.
IHsi BnDn 6iinn3H
Xanat 1200 rp.
PyuHnK BeJnKn 800 rp.
Copouka xinova 300 rp.
Copouka Yonobu 600 rp.
CopoHKn Yonobii xiKHOi 3 CHTETMHNX TkaHH 300 np.
CTOJ0BA6iIN3Ha
CkateptnHa 250 rp.
CkaTeptnHa BeJnKa 1000 rp.
CepBetKa 80 rp.
HonobivniOdIa
Copouka JERKa 250 rp.
Maika (6e3 pykaBIB) 120 rp.
Uoptn 150 rp.
Tpycn doBri 250 rp.
Пижama 480р.
Copouka hiHa 400 rp.
XycToUKN 25rp.
Xinocnyo
Copouka 100 rp.
KoepTa 100 rp.
Kopotka cniDnua 80 rp.
Tpycn 150 rp.
Copouka hiHa 180 rp.
Пижama 450р.
XycToUka 15rp.

TEXHlUHE OBCJnyTOBYBAHHa
CHNTKAΦIJIbTPY
Toro, 3abx3a6e3neuTH BiIMHc cyHHa 6iIN3H, He 3abYBaTe peyraHPO uCTHTn pInbTp. He 3a6yBaTe nepeBiprnt i, kuo Heo6XiHO, uCTHTn pInbTp nicra KOKHOrO cKny cyHHa.
ybara:
YnCTKa pInbtpy nobHHBaKoHyBaTncra nicIa TORO,AK O6JaHaHHOxOJHOHyNo!
IIy nCTKn pInbtpy KopNCTyTEcH HXKYe HabeJeHMn Bka3iBkAmn:
BikpnTe DBepuTa.
3axonitb pInbTp DbOMa pykAm Ta NotarHItb NOro BnpeD, Oo6 BuHrT.
▼ Deiikato po3wnpte Bepxhi Kpaianbtpy Ta BiKpnTe Noro.
BnIMtBoBOJIOKHATKaHH.
3aknTe pInbTp, 3aneBHBWncb, 10 3auiKa 3haxoNTbcr y npabnlbHomy noJoxeHHi.
OuHCTb HnpaBnaHoui fInbTpHa o6NaHaHHI 3a DOnOMoIO NIOOCcy, AKU Oe Heo6xIDHO.
3HOBy BCTaHOBITb fIbTp Ha HApBaJIyOci (pnc. 17).
BnABJIeHHH HECIINPABHOCTEY
Yci BnIeNtpoo6naHaHnHa Yac BiI yacy MoKyTB BHXOHTn 3 naNy. U cx BnIaKax 3BepTaNTecA do KBanipikobahoro eNcTpika.
Tm He MeHwe, YncJeHHI npo6Jemn MOKyTB 6yt NyHeHi 63 BtpyHaHH CneuiJanictiB.
YBara: Y BnnaKy HecnpabHocTi HeraHb BiD'edHaTe 0bnadHaHH BiE eneKtpomepeXi. Nepu, hix 3BepHyTuCA Do ueHTpy Texo6cnyroByBaHH, nepeBipTe 0bnadHaHH 3riHOb BKa3aHO HXXue.
UCYHEHHIPOBJIEM
CywnlbHa MaunHa He npaioc
- IpepebiTe, u:
1) O6naHaHHa 6yno do6pe niKIOueHe do eNeKTpOmepexi.
2) UTeNceJIb, yBIMKHyTm y eJeKTpOMepExy, cnpaBHn:
2a) 3an06iXnK He neperopib (Ipebipte Noro, Ni'dEHaBwN Do eJeKtpomepexi iHwe oBlaDHaHHa; HapnKnaD, HactiNbHy lamny).
2b) Byn BkoHaHi yci Bka3iBKn, Bka3aHi y iHCTpyKuII.
CywnlbHa MaunHa He npaioe
- Ipepebipte, u:
1)DbepraTa6ynndo6pe3akpnti.
2) Byna Hatachnyta Khojka "START".
CyuNbHa MaunHa He cyuWntb
- Ipepebipte, u:
1) BvBiHa Tpy6a DnI NOBITpH He 6yNa npndaBHeHa YI nepeKpyeHa.
2)Фиьтг He 6yB 3a6nTn (nam'raTaine,po nID Yac BiKpNbAHHЯ DBepe BHyTpIuHi YactTHN CyuINbHOI MaunHIMoKyTb 6yTu DyXe rapYHMN).
Akuo nicn BnKohannn BnueBka3aHnx fynkui 06naHaHH 3aHnWaeTbCnHeCnpaBHm, NOIOMTe npo HecnpabHicTh y Ha6nnxu n cHTp texHIOHO6cnyroByaHH.
Ppocmo y ubomy BnnaKy Bka3aTm MoeIb, cepHm Homep i Bn HecnpaBHOcti.
LHOpmaia DonOMOKe npaizBnky ueHTpy texHOro 6cLyROyBaHH OChactNTNCA Heo6xIDHMn 3anHaCTnHaMn, 06 rapaHTyBaTn WbUdkn Ta eEeKTHBn peMOHT.
DOATKOBIΦYHKUII
Lio63eKOHOMHTn npoctip, npoDaBeMb MOKe 3aIpOHOyBaTN Bam DoaTkoBn npncptpi, kNIOLOMOXe BCTaHOBTu Cyunlhy MaunHy Ha npalbHi MaunHi 3 DBepuMn nepeHbOrO 3aBAHTaKeHHra.
MOHTAXHnK IopaIbBAM,HaKy MoJeIb OblaJaHaHHMoXe 6yTb BCTaHOBJIeHn Cei npucTpI.
ПРИМITКИ

Stimate client,
NIVELAREA USCATORULUI
Picioruse reglabile. Puneti uscatorul in positie verticala astfel incat sa se sprijine bine pe toate cele patru picioruse, iar apoi puneti-l la nivel regland piciorusele dupa cum urmeaz:
Ridicatiusoruscatorul
Reglati piciorusele la inaltimea potrivita (fig. 5). (Nu insurubati prea strans piciorusele si nu utilizati o masina de insurubat).
Lasati in jos uscatorul.
PENTRU O CORECTA USCARE A RUFELOR
YTo6bOtKpbITb,HaxMnTe Ha npaByIO CTOpOHy Dbepn (pnc.9).Ecnn HAnpaBHeHne packPbITnI DBepn N3MeHeHO,HaxMnTe Ha JEByIO CTOpOHy.
▼ HanpaBHeHne packpbITnA DBepn MOKeT 6bITb N3MeHeHO B CnJy Baunx notpe6HoCTe (pnc. 10).
PnM.:3TaonepaunIdoJXHa6bITb BbINOJIHeHaTOLbKOcneuaJIHn3IpOBAHHbIM nepcoHaIOM.
O6paTnTeCb B 06cnyKBAIOU# n ceHTp DnIepa.
ONICAHNE NAHEJIYNPABLEHNA
P. Pyka nporpamm cnyknt dna Bb6opa hyxhbx nporpammm nxcOaI n3 Tnna TKAHN Ha 6a3e co6CTBeHHbIX Hxj; pyka B noJoxehnn STOP oTKJIIOyaeT DnCnneN BblONHReT yHKUIO yCTAHOBKMaunHb IBxCOXHOeNoJoxeHne.EcNI NO kAKoJ-Ni6o npuHHe BbXOTNE N3MeHNT nporpammy nn DoabuTB MaunHy BeUN, DocTaTOH0 yCTAHOBNTb pyky B noJoxeHne STOP, Bb6paTb HObyIO nporpammy HaxKaTb KOnKy START.
PnM. BnMaHne! PekomeHydyeTcNcNoJb3OaTbDaHHy0 yHKUHO, TOnbKO eCm 3TO COBepueHHeo6xOaMo, n ecn DeiCTByuuaa nporpaMaMyxpepaTaet He 6oJee 3 MInHyT.
PnM.: B HeKOTOpbIX MoDEnI X MaunH C HacTpoEHHO pOrpAMMoI Delay nnn Kx E KOnue uKNa cyuKn NODCBETKa DnCnJen RaChet Upe3 HeCKoJIbKO MmHyT. DocTaTOUHO HaxaTb IIO6yO KhoNky, TTo6bl NOcCBeTKa BHOB 3aropenacb.
S. Khonka Start - npn HakaTn Ha Hee cyuNbHa MaunHa NaHhaET LkNl HAcTpoEHNOI pOprpMaMbCyuKn.
Ls. INHdkatop Start - ecn He ropnt, yka3bIbae Ha noJoxKeHne "STOP"; ecn ropnt poBbIM CBeTOM, yka3bIbae Ha Tekyu nporpaMMy cyuK; ecn MIRaet YactO, yka3bIbaeHa HAcTpoEHHy nporpaMMy, KOtopaDonjXHa 6blb BKIOHe; ecn MIRaet peKo, yka3bIbaeHa 3abepueHne nporpaMMbl.
U.KhONKn nepeKnHoueHn (+/-) cyuKn cnIyKaT dnn BbIbopa HyxHOn CTeneHn BnaJXHOCTn B nporpaMMax C 3JIeKTPOHHbIM ynpaBJeHEm n BpeMeHn CyuKn B nporpaMMax C pyHbIM ynpaBJeHEm. He BCE cyuHKun IOCTyHbI BO BCex nporpaMMax (cm. "TABNIUY PPOPAMM").
LA. IMeOTc4 3HaUka nporpaMMbI cyuKn C 3JIeKTPOHHbIM ynpaBHeHEm; Bbl6paHHbI 3HaOK MIRaET, a OCTaJIbHbIe 3 rOpT pOBHbIM CBETOM. Iocne Nycka Ukla npoDOnJaet ropetb ToJbKO Bbl6paHHbI 3HaOK.
CT. CHTyHK cyuK BbBOJNT Ha DCNNeHACTPOEHHOe BPemKaKDbie 20 MHyT B TeueHne MaKcMym 2
YacOB 40 MNHyT DnI npOrpAmMb cyuKn XlonKa n 2 YacOB -DnI CNHTeTnecknx Beuei.
C. Khonka OKKIOUeHn 3yMMepa OKKIOUoAet cyHKIIO 3yMMepa, KOTOpBb B npOTNBOM Cnyae BCerda BKIOueH. HAcTPOKa COxpaHaETcB nAMrN DaKe npN OKKIOUeHn MaunHbI. Tnbl CnIHANOB:
1dHHbIcHrHaI (UKNBkBKnIOueH)
4dHHbixCirHana(uKJ3aBepweH)
4 KopoTKnx CnHana (BpaueHne 6apa6aHa B cyHKmHecMmHaHn)
A. Khonka HecmHaHnna npBouNT B DeNCTBne cyHKnHO, KOtOpaNo 3aBepWeHN cNKNa CyuKb Beuee npOOnKaet BpaaTaB Nx B O60nx HanpaBHeHNx B TeueHne eue WectnDecATM MHyT, yMeHbWae CTeneHb nx CMaTn. KaKdbI NOBOPOT 6apabHa CnHaInn3npyETc KpaTKM CNHaJOM 3ymMepa.
H. Khonka HecmHaHn - 3aepKcN cyuKc Cnyxnt dna BpaueHHBceuB6apabane BO BpeMa OXnDaHn, YTObI yMeHbWntb IN CMRTne.
Ih. Ia. Ic. OTo6paXeHHbHe Ha dncnnee 3HaKu 3yMMepa, fYHKUIN HecMNHaHnN 3aJepKKn Nycka yKa3bIBAHOT Ha TO, KaKaA fYHKUN BKNIOueHa.
R. Khonka 3aepkKn Nycka No3BOJReT 3aepkTaB BKNIOUeHHe NcKNa cyuKn MaKcMMym Do 16 YacOB. Pn KaXDom HaxaTN Ha KONkny NcK 3aepkNBAeTcHa OOnH Yac. Pn HaxaTN KONkN START BKNIOUeHHa FyHKpN 3aepkKn BBIONTcHa DnCnIe MNraIOUsm CmBOLom h; C 3TOrO MOMENTa MaINHa, BbIXdAB HAcTPOeHHoe KOINueCTBO YacOB 3aepkKn, ABOTMaTHueCKn HAINHaET cNkC cyuKn. B Cnyae npepbIBaHn NOaun 3JeKTPo3Heprn IN TeueHne BpeMeHN 3aepkKn, HAcTPOKa OTMeHHeTcH HaxaTNem KONkN START cNkN npNXoIT HeMeDNeHHO B DeiCTBne.
CR.CeTcHK 3aepKKn NcyKa BbIBOHT HaIcnPJIe HAcTpoEHHO BpemKa KaJbI YacB TeueHne MaKcMym 16 YacOB.
KAK PABINbHO Cywntb BEJIbE
DeiCTByIte, KaK OINcAHO HNXe:
A
OTOXMITE6eJIbe.
B
Paccoptpyte Bese no Tnny nn no MaTePnany, n3 KOTOPORO OHn CdeHaHbI.
3akponTe 3acteKKN-MoHnH, 3acterHnTe nyROBnCbI ONOPOKHNTE KapMaHbI.
BbIbePHTeCBNTepaHaun3HaHky.
C
OTKpoTe DBepb.
3arpy3nte BeunB 6apaban;chayana NOJIOXNTe 3a YrOJ PPOCTbHn.
PekomeHdyETcKnaCTbMaunHy Kpynblte NMeIKNBeBmBmecte.
D
3aKpOte DBeB.
Bbtpnte pykn (HnKOrda He Tporaute 3neKtpueeckn np6opbl MOKpbIMpykam).
BCTaBbTe BnIKy B 3JIeKtpnueckyio po3eTKy.
E
YctahOBHTe pykny nporpaMMnpOBaHnB nIOXKeHHeStop,TO6bIOTKNIHOHTbHaCtPOeHHbIe paHee nporpaMMbl,3aTEM NOBepHNTe ee B
NIOJXeHnIpOpaMMbI, KOtOpa HAn6oJIe NOxOHTnTtnaMaTePnana.
KhoNkamn nepeKluoyehn (+/-) cyuKn BbIePeNTe HxKyU CTeneHb BnaXHOCTn Beuei (cm. "TABJNUy IPOPGPAMM").
F
YTO6bIOCTaHOBnTb MaunHy BO BpeMa
UKNla CyWK,IOCTaTOuHO OTKpbITb DBepb,
N bapabAH MeDJIeHNO OCTaHOBnTcR.
(NoMHnte, YTO npn packpbltn N DBepn
BHYTpEHnE qACTn CyuINbHOJ MaunHbI
MOrTy 6bITb OueHb TOpAHHM).
YTo6bI npOoJnxTb cIKn cyuKn, 3aKpOnte DBepb HaxMITE KHOKy "Start".
No 3aBepeHn CyuKn, O yem CnHnHaN3npyET MURAHHe HndKaTopa CTapT n CnHn 3ymMepa, - npBeNTe nepeKlOHTeJIb B NOLOXKeHne STOP.
OTKpoTe DBebp 6apabaHa n BbInbTe Beu.
3akpoTe DBepb.
CyXIMn pykAmn BbHbTe BUNKy CyuINbHO mAHINHbI N3 3JIeKTPnueckOoi PO3ETKn.
TABJIINLA NPOIPTPAMM
| ПОГРAMMbI 3ЛЕКТPOHHOTO уравлиейся CTENEHBIO | |||||
| TKAHь | MAKC. ЗАгУЗКA | СУПЕР СУХИЕ | СУХИЕ,ЧTOБИ УБРАТь HA MECTО | ВЛAJХьIE ДЛЯТДЖКИ | ОчEHь ВЛAJХьIE |
| XЛОПOK | 7.0 kg. | a | |||
| СИНТЕТИKA | 3.5 kg. | a | |||
| ДЕЛКATHБE | 3.5 kg. | — | a | ||
| ШEPCTь | 1.5 kg. | — | a | — | |
| ПОГРAMMbI C HACTPOДКОВ ВPEMEHIN | |||||
| хлОпOK | 7.0 kg. | 160-140 min | 140-120 min 120-100 min 100-80 min | ||
| СИNTЕТИKA | 3.5 kg. | 120-100 min | 80-60 min 60-40 min 40-20 min | ||
| ОХЛАХДЕHINE | 20 min | ||||
Baxho: Bpem cyk 3aBnCt OT ueon cepnn paKTopoB: Beca, pa3mepOB oexdbI, Tna MaepnaJa, CTeneHn BlaxHoCTn. XopoOo OTkaTbIe Beun BbcUynBaOTcB MaunHe 6bictpe. YTo6bl Beu He MAnScb, He neperpykaTe MM MaunHy.
IPEIOCTOPOXHOCTN IPNOBPAUeHnC PA3HBIMNTINAMTKAHEI
PnHaJIuHm COMHeHn OTHOCInTeNbHO TnA TKAHN NOCMOTpTE 3TNKeTKy Ha OJExJe. PpaKTneckn IIO6aOJExJa, KOtOpYIO MOXHO CyUHTB MaUNHe, IMeETo6 3Tom yKa3aHHe Ha 3TNKeTKe.
InpnpeDpynpexKDeHIN BO3HNKHOBeHHN CTaTneCKORO 3NeKTPnueCTBa HA ODeXJe BO Bpemr cIKNOB NOIOCKAHIN B CTnpaJIbHOIN MaUNHe NCNoB3yInTe KOHdUncnoHep. Cpa3y Xe BbIHbTe N3 6apa6aHa CNHTeTneCKne Beu, YTObbl OH He NOMAINCb.
BECBEUEN
Bec Beuee yka3bIbaETc np6n3ntelhblm, TaK KaOH MOKe T MeHATbcr B 3aBNCIMOCtN OT npOn3BOIDTeH, KaeeCTBa N OTdEKN Beuee.
NocteJbHoe 6JIbe
CTeraHoe OeAero 700r
HnKnH npoctbHa 550
BepxHn npocTbH 600r
Habolouka 180
CTonoboe6eJIbe
KyxohHoe noIOTHe (TnTapeIOK) 90r
Kyxohhoe nonoTeHue (dIra pHOMOK) 70r
Ponotenue nny pyk 20r
Tpanka 200
PpOee 6JIbe
BaHHbXanat 1200r
BaHHoe noJToHue 800r
XeHcka 6ny3ka 300r
Myxckay py6aoka 600r
Bny3kn/py6awkn n3 cnHTeTnKn 300r
CTonoboe6eJIbe
Ckateptb 250r
Болшая скатерь 1000r
CanpeTka 80r
MxckKaOeKda
Pybaika "noctnapn oJeHb" 250r
Maika (6e3 pykaBOB) 120r
Tpycb1 150r
KaIbcoHbI 250r
Пижама 480r
Houha py6aoka 400r
Hocobbie nlaTkn 25r
XeHcka oEeKa
Блузka 100 r
Maika 100r
MnHn-106ka 80r
Tpucn 80r
Houha py6aoka 180r
Пижама 450r
Hocoboi nlaTOK 15r

TEXHnueCKOE OBCJyXnBAHne
OuNCTKAΦNJIbTPA
ДяdoctnxkeHnXopoWero pe3yIbTaTc cyuKn BJIIO6bIX yCJIOBnIX He 3a6bIBaItepeRyIaRHO OUYIaTbФINbTp MaunHbl. PpOBepaTe N B Clyuae HEO6xOIMOCTN OUYIaIteФINbTp nocne KaKDoTO uNKla cyuKn.
BaXHo:
OuNTKa QnBtpa DOJIXHa BbINONHrTbcra B NOHOCtBIO OCTbIBWeMaunHe! DnA ONUCTKn QnBtpa npNepxNBaITecb npNBeDEHHbIX HNXe yKa3AHm.
OTKpoTeDbepb.
Bo3bMntecb 3aФиЛьТР O6eIMN pyKaMn N HaJaBNTe Ha Hero, YTO6bl BbIHyTb n3 MaunHbl.
OcToPoxKHO pa3BeUTe BepXHn KpaN OTKpoTte qnlTp.
YdaIte n3 Hero qactuKTKaHei.
3akpoTe pfntp npOBepbTe noIOxKeHne cTOnopa.
Ecni Hyxho, npocntte HnpaBnaoune nepemeueHnA pB npnbope acnpaTopoM.
YcTaHOBtTe pInbTp Ha HappaBnIoune nepemseHn (pnc. 17).

PONCK HENCINPABHOCTEN
JIIO6bIe 3NEKTPnueckne npnbopbl Bpemr OT BpeMeH NOrMaTbcR. B TaKnx CnyaHx ObaaTeCb K ONBTHOMy 3NEKTPnky.
Mhorne npo6JIembl, OHaKO, MoXHO peuHTb camm 6e3 NOCTOpOHHe NOMOUI.
Baxho:B cnyae HncnpabHocTN HeMeDJIeHNO OTcoEHHnTe np6op OT 3neKtpueckoCetN.
IpeKJe cHem ObaTbCn B O6cLyXnBaIOuN nEHTp, BbINOJIHnTe nepeUncJIeHHbIe HHXKe npOBepKn.
PEUHEHNE IPOBJIEM
CyuHbHaMaunHa He BKJIOuHaetcA
- Поберпг:
1)TO6bI np6op 6bl npabnIbHO NOKIOueH K cETN NITAHIA;
2)ДиEcTBnE 3JNeKtpnueckOu po3eTkn:
2a) TTo6bI He npeperopnpeoxpaHnteInb (DnA 3TOrO nOdkNIOUHTe K HEn dpyroJ 3JIeKTPuuecko npBOp, HApPmep, HAcTOlbHyIO NaMny);
2b) yTO6bl 6bJIN BbIIOJIHeHb BCE NHCTpyKUIn pyKOBOdCTBaNo 3KcNJIyatauN.
CynbHaMaHnHa He BKIOuOaETcA
- PpOBepbTe:
1) TTo6bI DBeBb 6bIa XopoOo 3akpbIa;
2) TTo6bI 6blnHaKaTa KhONka "START".
CyunnbHMaunHa He cyuHT
- PpOBepbTe:
1) TTo6bI BbInyckHaT py6Ka BO3dyXa He 6blna nepexkaTa nn cKpyeHa;
2) YTO6bI He 6bl 3a6nt fNJIbTp (nOMHHTe, YTO npu packpbITIN DBePn BHYTpEHHe. yactn cyuINbHOJ MaunHbI MOrTy 6blTb OueHb rOpAUM).
Ecnn nocne BbINOJIHeHHy Ka3aHHbIX npOBepOK, np6Op BCE He pa6OtaET, o6paTntecb B 6Jnxkuio6cIyKINBaIOUuN ueHtp.
Co06uTe nepcoHaIy ceHTpa Moelb N 3aBODcKoH Omepe np6opa n Tn NOBpeXeHna. TaKaI INΦOpMaunr No3BOJNT OepaTOpY ceHTpa TexHnueCKoro 06CnyXnBaHn HaHTN Heo6xOdMblE 3aNaChbIe qactn, YTO6bl 6bICTpo N 3ΦΦeKTNBHO pOn3BeCTn peMOHT MaunHbl.
DONOJIHNTIELbHbIE PnHaIeXHOCTN
ДяЗКОHOMN CBO6OДHOrO MecTaДинep MOKET NpeIIOXnTb Bam CneIaNbHyO npHa,IeJxHOCTb, KOtOpAЯ NO3BONIT yCTaHOBnT cyuINbHyO MaunHy Ha CTnpaJIbHyO, OTKpbBaIOUyIOc CnepeDi.
MOHTaXHnK MoXeT COo6uNTb Bam MoJeB MaunHbI, C KOToPoi MOxHO NcNoJb3OBaTb TaKyIO npHa,dNeXHoCTb.
ПРИМЕЧАНЕ

ITALIANO 3-12
GB ENGLISH 13-22
DE DEUTSCH 23-32
PNAIS 33-42
BESANOL 43-52
PORUGUES 53-62
NEDERLANDS 63-72
PL POLSKI 73-82
CZ CESKY 83-92
BVOENSKY 93-102
HAR 103-112
UVIŠKA 113-122
SR CPnCKN 123-132
UA YKPAIHcbsKA 133-142
RO ROMANA 143-152
Rusckn 153-162


- CONTENTS
- NOTES AND ADVICE FOR THE USER 13-14
- DESCRIPTION OF THE APPLIANCE 15
- STALLING THE APPLIANCE 15-17
- SING THE DRIER
- AINTENANCE
- 18-20
- 20-21
- NOTES AND ADVICE FOR THE USER
- DESCRIPTION OF THE APPLIANCE
- INSTALLING THE APPLIANCE
- INSTALLATION
- LEVELLING THE DRIER
- CONNECTING THE AIR EXHAUST TUBE
- ELECTRICAL CONNECTION
- OPENING THE DOOR AND CHANGING THE OPENING DIRECTION
- DESCRIPTION OF THE CONTROL PANEL
- IN ORDER TO DRY THE WASHING IN THE CORRECT MANNER
- Proceed as follows:
- F
- PRECAUTIONS FOR FABRIC TYPES
- WASHING WEIGHTS THE MANUFACTURER
- Bedding
- Household linen
- Other linen items
- Table linen
- Men's clothing
- Women's clothing
- MAINTENANCE
- CLEANING THE FILTER
- Important:
- FAULT FINDING
- TROUBLESHOOTING IS ONE WORD
- If the drier doesn't start
- The washing does not dry
- OPTIONAL ACCESSORIES
- NOTES
- Verehrter Kunde,
- ACCESSIONS EN OPTION
- FESCHRIJVING VAN HET APPARAAT 65
- INSTALLATIE VAN HET APPARAAT
- BESCHRIJVING VAN HET APPARAAT
- INSTALLATIE
- ПРИМITКИТАЗCTEPEXKEHHДЛКОПUCTYBAU
- ONICOBJIADHAHHA
- IHCTAJLACIOOBJADHAHH
- IHCTAJIARLIJA
- IHCTAJIARJIA
- BnPIBHIOBAHHY CYUINJIbHOI MAUNHNI
- ПД'ЕДHAHHB NVBIDHOIT TPYБN
- ПИД'ЕДHAHHАdo ENEKTPNUHoi MEPEXI
- BIDKPTTTA DBEPAT TA 3MIHA NOTO HANPAMY
- ONNC NAHENI YNPABJIHHRA
- 11
- ДЛРAPABUNbHOrO CyUHHB BJIIN3HN
- BukohaiTe HactynHii
- TABJIINZI INPOITPAM
- 3ACTEPEXKEHHI OODO TKAHIN
- BAGA BIIIN3HN
- NoctiNbHa 6iJn3Ha
- Kyxonha 6iinn3Ha
- IHsi BnDn 6iinn3H
- CTOJ0BA6iIN3Ha
- HonobivniOdIa
- Xinocnyo
- TEXHlUHE OBCJnyTOBYBAHHa
- CHNTKAΦIJIbTPY
- ybara:
- BnABJIeHHH HECIINPABHOCTEY
- UCYHEHHIPOBJIEM
- CywnlbHa MaunHa He npaioc
- CywnlbHa MaunHa He npaioe
- CyuNbHa MaunHa He cyuWntb
- DOATKOBIΦYHKUII
- ПРИМITКИ
- Stimate client,
- NIVELAREA USCATORULUI
- PENTRU O CORECTA USCARE A RUFELOR
- ONICAHNE NAHEJIYNPABLEHNA
- KAK PABINbHO Cywntb BEJIbE
- DeiCTByIte, KaK OINcAHO HNXe:
- IPEIOCTOPOXHOCTN IPNOBPAUeHnC PA3HBIMNTINAMTKAHEI
- BECBEUEN
- NocteJbHoe 6JIbe
- CTonoboe6eJIbe
- PpOee 6JIbe
- MxckKaOeKda
- XeHcka oEeKa
- TEXHnueCKOE OBCJyXnBAHne
- OuNCTKAΦNJIbTPA
- BaXHo:
- PONCK HENCINPABHOCTEN
- PEUHEHNE IPOBJIEM
- CyuHbHaMaunHa He BKJIOuHaetcA
- CynbHaMaHnHa He BKIOuOaETcA
- CyunnbHMaunHa He cyuHT
- DONOJIHNTIELbHbIE PnHaIeXHOCTN
- ПРИМЕЧАНЕ
Brand : Ardo
Model : VDR07L
Category : Tumble dryer