DOLMAR PM5175 S1 - Lawn mower

PM5175 S1 - Lawn mower DOLMAR - Free user manual and instructions

Find the device manual for free PM5175 S1 DOLMAR in PDF.

📄 132 pages English EN 💬 AI Question
Notice DOLMAR PM5175 S1 - page 22
Manual assistant
Powered by ChatGPT
Waiting for your message
Product information

Brand : DOLMAR

Model : PM5175 S1

Category : Lawn mower

Download the instructions for your Lawn mower in PDF format for free! Find your manual PM5175 S1 - DOLMAR and take your electronic device back in hand. On this page are published all the documents necessary for the use of your device. PM5175 S1 by DOLMAR.

USER MANUAL PM5175 S1 DOLMAR

1. Acoustic power level according to EEC directive

2. Conformity mark according to directive 2006/42/EC

3. Year of manufacture

6. Name and address of Manufacturer

8. Engine power and speed

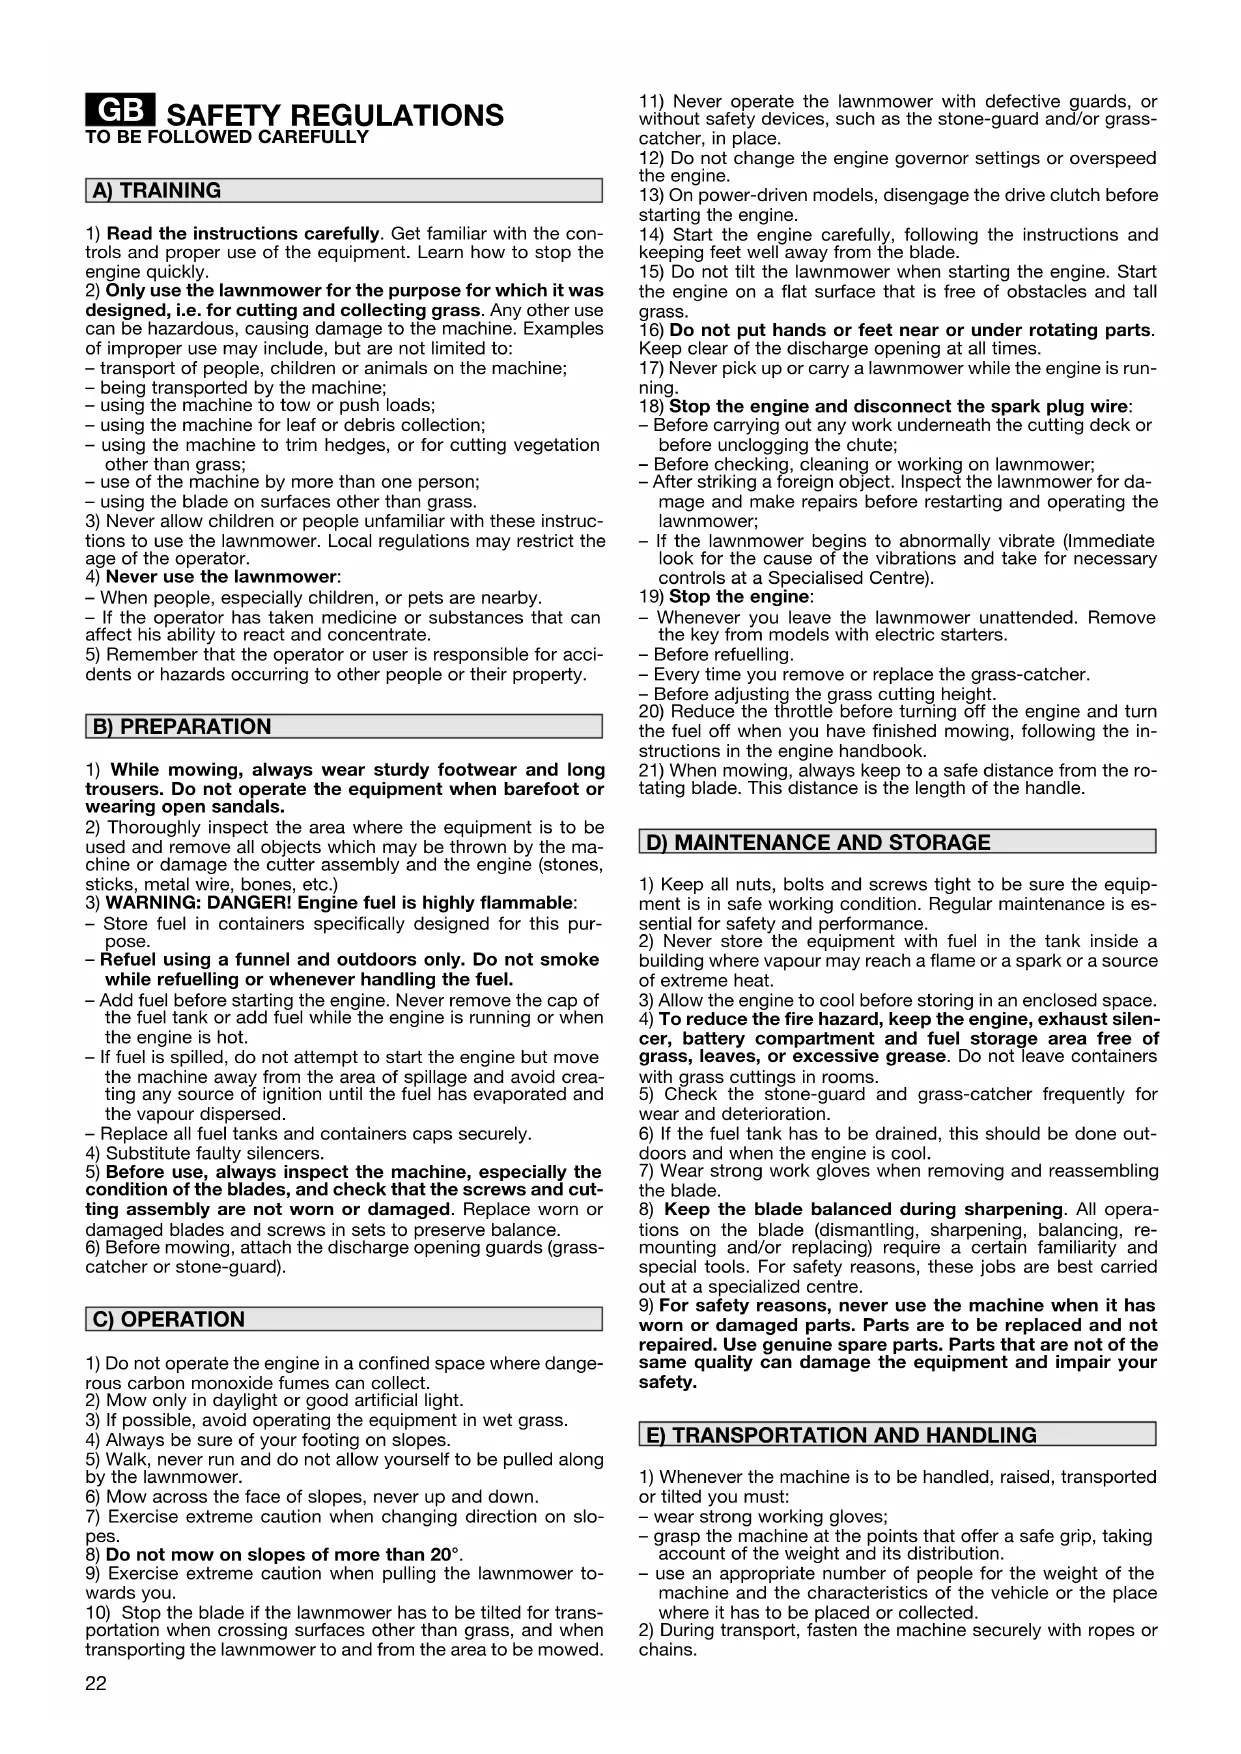
SAFETY REQUIREMENTS - Your lawnmower should be used with due care and attention. Symbols have therefore been placed on various parts of the machine to remind you of the main precautions to be taken. Their full meanings are explained later on. You are also asked to carefully read the safety regula- tions in the applicable chapter of this handbook.

42. Danger of thrown objects. Keep other people at a safe

distance whilst working.

43. Danger of cutting. Blades in movement. Do not put hands

or feet near the blades. Remove the spark plug lead and read instructions before carrying out any repair or mainte- nance.

2. Marcă de conformitate cf. directivei 2006/42/CE

1) Read the instructions carefully. Get familiar with the con-

trols and proper use of the equipment. Learn how to stop the engine quickly.

2) Only use the lawnmower for the purpose for which it was

designed, i.e. for cutting and collecting grass. Any other use can be hazardous, causing damage to the machine. Examples of improper use may include, but are not limited to: – transport of people, children or animals on the machine; – being transported by the machine; – using the machine to tow or push loads; – using the machine for leaf or debris collection; – using the machine to trim hedges, or for cutting vegetation other than grass; – use of the machine by more than one person; – using the blade on surfaces other than grass.

3) Never allow children or people unfamiliar with these instruc-

tions to use the lawnmower. Local regulations may restrict the age of the operator.

4) Never use the lawnmower:

– When people, especially children, or pets are nearby. – If the operator has taken medicine or substances that can affect his ability to react and concentrate.

5) Remember that the operator or user is responsible for acci-

dents or hazards occurring to other people or their property.

1) While mowing, always wear sturdy footwear and long

trousers. Do not operate the equipment when barefoot or wearing open sandals.

2) Thoroughly inspect the area where the equipment is to be

used and remove all objects which may be thrown by the ma- chine or damage the cutter assembly and the engine (stones, sticks, metal wire, bones, etc.)

3) WARNING: DANGER! Engine fuel is highly flammable:

– Store fuel in containers specifically designed for this pur- pose. – Refuel using a funnel and outdoors only. Do not smoke while refuelling or whenever handling the fuel. – Add fuel before starting the engine. Never remove the cap of the fuel tank or add fuel while the engine is running or when the engine is hot. – If fuel is spilled, do not attempt to start the engine but move the machine away from the area of spillage and avoid crea- ting any source of ignition until the fuel has evaporated and the vapour dispersed. – Replace all fuel tanks and containers caps securely.

4) Substitute faulty silencers.

5) Before use, always inspect the machine, especially the

condition of the blades, and check that the screws and cut- ting assembly are not worn or damaged. Replace worn or damaged blades and screws in sets to preserve balance.

6) Before mowing, attach the discharge opening guards (grass-

catcher or stone-guard).

1) Do not operate the engine in a confined space where dange-

rous carbon monoxide fumes can collect.

2) Mow only in daylight or good artificial light.

3) If possible, avoid operating the equipment in wet grass.

4) Always be sure of your footing on slopes.

5) Walk, never run and do not allow yourself to be pulled along

6) Mow across the face of slopes, never up and down.

7) Exercise extreme caution when changing direction on slo-

8) Do not mow on slopes of more than 20°.

10) Stop the blade if the lawnmower has to be tilted for trans-

portation when crossing surfaces other than grass, and when transporting the lawnmower to and from the area to be mowed. C) OPERATION B) PREPARATION A) TRAINING

11) Never operate the lawnmower with defective guards, or

without safety devices, such as the stone-guard and/or grass- catcher, in place.

12) Do not change the engine governor settings or overspeed

13) On power-driven models, disengage the drive clutch before

starting the engine.

14) Start the engine carefully, following the instructions and

keeping feet well away from the blade.

15) Do not tilt the lawnmower when starting the engine. Start

the engine on a flat surface that is free of obstacles and tall grass.

16) Do not put hands or feet near or under rotating parts.

Keep clear of the discharge opening at all times.

17) Never pick up or carry a lawnmower while the engine is run-

18) Stop the engine and disconnect the spark plug wire:

– Before carrying out any work underneath the cutting deck or before unclogging the chute; – Before checking, cleaning or working on lawnmower; – After striking a foreign object. Inspect the lawnmower for da- mage and make repairs before restarting and operating the lawnmower; – If the lawnmower begins to abnormally vibrate (Immediate look for the cause of the vibrations and take for necessary controls at a Specialised Centre).

19) Stop the engine:

– Whenever you leave the lawnmower unattended. Remove the key from models with electric starters. – Before refuelling. – Every time you remove or replace the grass-catcher. – Before adjusting the grass cutting height.

20) Reduce the throttle before turning off the engine and turn

the fuel off when you have finished mowing, following the in- structions in the engine handbook.

21) When mowing, always keep to a safe distance from the ro-

tating blade. This distance is the length of the handle.

1) Keep all nuts, bolts and screws tight to be sure the equip-

ment is in safe working condition. Regular maintenance is es- sential for safety and performance.

2) Never store the equipment with fuel in the tank inside a

building where vapour may reach a flame or a spark or a source of extreme heat.

3) Allow the engine to cool before storing in an enclosed space.

4) To reduce the fire hazard, keep the engine, exhaust silen-

cer, battery compartment and fuel storage area free of grass, leaves, or excessive grease. Do not leave containers with grass cuttings in rooms.

5) Check the stone-guard and grass-catcher frequently for

wear and deterioration.

6) If the fuel tank has to be drained, this should be done out-

doors and when the engine is cool.

7) Wear strong work gloves when removing and reassembling

8) Keep the blade balanced during sharpening. All opera-

tions on the blade (dismantling, sharpening, balancing, re- mounting and/or replacing) require a certain familiarity and special tools. For safety reasons, these jobs are best carried out at a specialized centre.

9) For safety reasons, never use the machine when it has

worn or damaged parts. Parts are to be replaced and not repaired. Use genuine spare parts. Parts that are not of the same quality can damage the equipment and impair your safety.

1) Whenever the machine is to be handled, raised, transported

or tilted you must: – wear strong working gloves; – grasp the machine at the points that offer a safe grip, taking account of the weight and its distribution. – use an appropriate number of people for the weight of the machine and the characteristics of the vehicle or the place where it has to be placed or collected.

2) During transport, fasten the machine securely with ropes or

E) TRANSPORTATION AND HANDLING

For instructions regarding the engine and the battery (if supplied), read the relevant manuals. NOTE - The number which precedes each paragraph links the references in the text to the respective figures (listed on the pages 2 - 3). NOTE - The machine can be supplied with some parts already assembled. WARNING - Unpacking and completing the assembly should be done on a flat and stable surface, with enough space for machine handling and its packaging, always making use of suitable equipment. Disposal of the packaging should be done in accor- dance with the local regulations in force. Return the handle (1) to the work position and secure it to the side chassis supports using the supplied nuts and bolts (2) as illustrated. The handle (1) can be height-adjusted in three different positions by inserting the pins (3) in one of the three pairs of holes on the brackets. The washers (4) on the clamps (5) must be mounted so they keep the handle (1) firmly fixed without too much effort required to tighten or release them. Tighten the clamps (5) after adjusting. Insert the starter cable (6) in the guide spiral (7). Tighten the nut (8) to secure the spiral (7). Insert the frame (11) into the sack (12) and attach the plastic bars (13) using a screwdriver, as shown in the drawing. The throttle is controlled by the lever (1) and posi- tioned as shown on the relative plate. The blade brake is controlled by the lever (1), which should be held against the handle when starting and using the lawnmower. The engine stops when the lever is released. In power-driven models, draw the lever (1) towards the handle for forward movement. The lawnmower stops moving forward when the lever is released. The speed change (if present) is controlled by the lever (1), whose positions are shown on the plate. The cutting height is adjusted by releasing the lever (1) and lifting or lowering the chassis to the required posi- tion which can be seen through the special opening. MAKE THIS ADJUSTMENT ONLY WHEN THE BLADE HAS STOPPED MOVING. Lift the stone-guard and attach the grass-catcher (1) correctly as shown in the drawing.

To start, follow the instructions in the engine manu- al, pull the blade brake lever (1) against the handle and firmly pull the starter cable knob (2). The lawn will look better if it is always cut to the same height and in alternate directions.

LAWN CARE RECOMENDATIONS

Each type of grass has different features and may thus require different ways to care for the lawn; always read the instructions on seed boxes for mowing height for the growth conditions in the work area. Keep in mind that most grass is made up of a stem and one or more leaves. If leaves are fully cut, the lawn is damaged and growth is more difficult. The following indications generally apply: – too low a cut causes grass tears and uprooting, with a “spotted” aspect; – in the summer, cutting must be higher to avoid the ground from drying; – do not cut wet grass; this could reduce blade efficiency due to sticky grass and tear the lawn; – for particularly high grass, initially mow at maximum admitted machine height followed by a second mow after two or three days. When you have finishing mowing, release the brake lever (1) and disconnect the spark plug cap (2). WAIT FOR THE BLADE TO STOP before carrying out any type of work on the machine. IMPORTANT – Regular, careful maintenance is essen- tial for keeping the safety level and original perform- ance of the machine unchanged in time. Store the lawnmower in a dry place.

1) Wear strong working gloves during any cleaning, main-

tenance or adjustment operation on the machine.

2) Carefully clean the machines with water after each cut;

remove the grass debris and mud accumulated inside the chassis to avoid their drying and thus making the next start-up difficult.

3) Should it be necessary to access the lower part, only tilt

the machine from the side shown in the engine hand- book; following the relative instructions.

4) Do not drip petrol onto the plastic parts of the motor or

the machine to prevent damaging them and remove all traces of spilt petrol immediately. The warranty does not cover damage to plastic parts caused by petrol. Each intervention on the blade is best if conducted at a specialised Centre that has the most appropriate tools. Only blades with the following codes must be used on this machine: 81004381/1 Blades must always be marked . Given the product evo- lution, the above mentioned blade may be replaced in time by others, with similar interchangeable and operating safe- ty characteristics. Reassemble the blade (2) with the code and markings fac- ing the ground, following the order indicated in the illustra- tion. Tighten the central screw (1) using a torque wrench set to 35-40 Nm. On models with drive units, adjust the tension of the belt with the nut (1) to get the right measurement (6 mm).

To clean inside the machine, use the hosepipe con- nector (1) provided. Always stand behind the machine's handle when cleaning. Environmental protection should be a priority of consider- able importance when using the machine, for the benefit of both social coexistence and the environment in which we live. – Try not to cause any disturbance to the surrounding area. – Scrupulously comply with local regulations and provi- sions for the disposal of waste materials after cutting. – Scrupulously comply with local regulations and provi- sions for the disposal of pakagings, oils, petrol, batteries, filters, damaged parts or any elements which have a strong impact on the environment; this waste must not be disposed of as normal waste, it must be separated and taken to specified waste disposal centres where the material will be recycled. – At the time of decommissioning, do not pollute the envi- ronment with the machine, hand it over to a disposal centre, in accordance with the local laws in force. Should you have any doubts or problems, do not hesitate to contact the nearest Service Centre or your Sales outlet.

  • Détériorations provenant de conditions d’utilisation du magasin de location. Les travaux de nettoyage, d’entretien et de réglage ne sont pas reconnus comme prestations de garantie. Tout travail au titre de la garantie est à effectuer par le vendeur spé- cialiste DOLMAR.91 Service, spare parts and guarantee Maintenance and repair The maintenance and repair of modern machines, as well as all safety devices, require qualified technical training and a special workshop equipped with special tools and testing devices. All work not described in this Instruction Manual may be done only by a properly qualified workshop or authorised service centre. The DOLMAR service centres have all the necessary equip- ment and skilled and experienced personnel, who can work out cost-effective solutions and advise you in all matters. Repair attempts by third parties or unauthorized persons will void all warranty claims. Responsibility On tools with engines by Briggs&Stratton, Honda, Tecumseh or Robin Subaru, the engine manufacturer or their authorised service centre is responsible for the engine only. DOLMAR is responsible for the rest of the tool (excluding the engine). This does not apply to electrical generators and all other tools or equipment not containing engines of the above brands. Only DOLMAR is responsible for these tools and equip- ment. Spare parts Reliable long-term operation, as well as the safety of your machine, depend among other things on the quality of the spare parts used. Use only original DOLMAR parts. Only original spare parts and accessories guarantee the highest quality in material, dimensions, function and safety. Original spare parts and accessories can be obtained from your local dealer. He will also have the spare part lists to determine the required spare part numbers, and will be constantly informed about the latest improvements and spare part innovations. Please note that the use of non-original parts renders the warranty void. Guarantee DOLMAR guarantees the highest quality and will therefore reimburse all costs for repair by replacement of damaged parts resulting from material or production faults occurring within the guarantee period after purchase. Please note that in some countries particular guarantee conditions may exist. If you have any questions, please contact your sales- man, who is responsible for the guarantee of the product.

Please note that we cannot accept any responsibility for damage caused by:

  • Disregard of the instruction manual.
  • Non-performance of the required maintenance and cleaning.
  • Incorrect carburetor adjustment.
  • Normal wear and tear.
  • Obvious overloading due to permanent exceeding of the upper performance limits.
  • Use of force, improper use, misuse or accidents.
  • Damage from overheating due to dirt on the fan housing.
  • Work on the machine by unskilled persons or inappropri- ate repairs.
  • Use of unsuitable spare parts or parts which are not orig- inal DOLMAR parts, insofar as they have caused the damage.
  • Use of unsuitable or old oil.

➊ “Mulching” – Chopping and depositing grass on the lawn ➋ Cutting and collecting grass cuttings ➌ Cutting and ejecting grass cuttings SAFETY REGULATIONS A) Introduction

1) This instruction sheet adds to the information con-

tained in the machine instruction manual and becomes an integral part when the “mulching” accessory is used.

2) The application of the “mulching” accessory modi-

fies the traditional system already fitted on the machine for mowing, collecting and ejecting grass cuttings.

3) The application of the accessory and the use of the

machine equipped for “mulching” must fully comply with the safety regulations given in the machine instruc- tion manual and with the instructions regarding different situations of use and maintenance. B) Standards of use

1) Always fit and dismantle the accessory with the

engine off, after removing the ignition key (if supplied), or after disconnecting the cap from the engine spark plug.

2) Apply the “mulching” accessory and check that the

fitted parts have been fastened correctly and securely.

3) You always need to work with the grass-catcher or

stone-guard fitted properly even when using the “mulching” accessory.

4) Always avoid removing a large quantity of grass, to

avoid blocking the cutting deck or overloading the engine and the cutting parts. Regulate the forward speed depending on the lawn conditions and the quan- tity of grass removed.

POKYNY PRE MONTÁŽ A DEMONTÁŽ