SBM10 - Hi-fi system TOSHIBA - Free user manual and instructions
Find the device manual for free SBM10 TOSHIBA in PDF.
| Product Type | 3D soundbar with subwoofer (model SBM10) |
| Dimensions (soundbar) | 290 x 72 x 100 mm (W x H x D) |
| Dimensions (subwoofer) | 220 x 246 x 220 mm (W x H x D) |
| Weight (soundbar) | Approximately 0.85 kg |
| Weight (subwoofer) | Approximately 2.83 kg |
| Power supply | 19 V DC, 3.42 A, AC adapter included |
| Output power (soundbar) | 4 x 10 W (4 ohms, 1 kHz, THD 10%) |
| Output power (subwoofer) | 20 W (8 ohms, 100 Hz, THD 10%) |
| Frequency response (soundbar) | 95 Hz to 19 kHz |
| Frequency response (total) | 38 Hz to 19 kHz |
| Impedance (soundbar) | 4 ohms |
| Impedance (subwoofer) | 8 ohms |
| Total harmonic distortion | Less than 10% |
| Connectivity | Auxiliary input (3.5 mm RCA), line input, optical, coaxial, Bluetooth |
| Audio modes | Movies, Music, Game, 3D Sound |
| Sound technology | Sonic Emotion® Absolute 3D |
| Included accessories | AC adapter, 3.5 mm RCA audio cable, remote control with CR2025 battery, user manual |
| Power consumption | 40 W |
| Remote control range | Approximately 5 m, 30° angle |
| Care and cleaning | Use a soft dry cloth. Do not use liquids or aerosols. |
| Safety | Do not open the casing, avoid moisture, do not cover during operation, use the supplied adapter. |
| Batteries and recycling | CR2025 battery included. Do not dispose of with household waste. Follow recycling guidelines. |
Frequently Asked Questions - SBM10 TOSHIBA
User questions about SBM10 TOSHIBA
0 question about this device. Answer the ones you know or ask your own.
Ask a new question about this device
Download the instructions for your Hi-fi system in PDF format for free! Find your manual SBM10 - TOSHIBA and take your electronic device back in hand. On this page are published all the documents necessary for the use of your device. SBM10 by TOSHIBA.
USER MANUAL SBM10 TOSHIBA
This manual is for three models below:
1) Mini 3D Sound Bar + Subwoofer (SBM1W)
2) Mini 3D Sound Bar (SBM10)
3) Subwoofer for Toshiba Mini 3D Sound Bar (SBW10)
EN GR PT
CZ HR RS
DE HU SE
DK IT SK
ES NL SL
FI NO TR
FR PL
Contents
Introduction. 2
Package Content. 2
Safety Instructions. 2
Quick Tour. 3
Mini 3D Sound Bar 4
Subwoofer 6
Remote control 6
Getting Started 8
4 Connecting the power adaptor 83
Connecting the subwoofer. 9
Using the remote control 9
Mini 3D Sound Bar and subwoofer placement 10
Connecting to the audio device 11
3D Sound 14
Playback via Bluetooth®-enabled devices 14
Frequently Asked Questions (FAQ) 15
Specifications 16
Trademarks 17
TOSHIBA Support. 17
Regulatory Information 18
REACH. 19
Following information is only valid for EU-member States: 19
Additional Information 20
Introduction
Welcome and thank you for choosing a TOSHIBA product.
We recommend to reading this manual carefully and keep it with your product documentation for future reference.
NOTE
This manual covers both of the using of the Mini 3D Sound Bar and the subwoofer. You can purchase the Mini 3D Sound Bar and the subwoofer as a set, or any one of them separately as you like.
In this manual, the word "sound bar" refers to the Mini 3D Sound Bar for short.
Package Content
Check to make sure you have all of the following items:
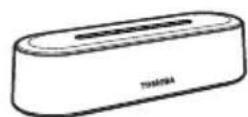
Mini 3D Sound Bar
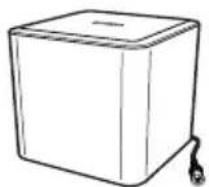
Subwoofer (if applicable)
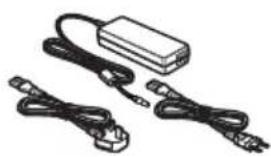
AC adaptor
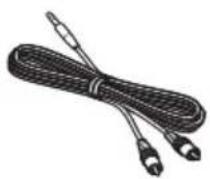
3.5mm - RCA audio cable
Remote control with battery

User's Manual & Warranty Leaflet
Safety Instructions
In order to avoid malfunction or damage of the product, please carefully follow the precautions listed below.
Do not
open the enclosure or product
disassemble the product or parts of it
place liquids near or on the product, as it may damage the product, cause personal injury or may result in an electrical shock or fire
■ bump, drop or jar the product
move the product while operating, as data damage may happen
use other AC/DC adaptors than the one bundled with your device, as otherwise your device may be damaged
disconnect cables while operating
expose the product to temperatures outside the range of 5^ - 35^ while operating, and temperatures of -20^ - 60^ while switched off
expose the product to wet or damp conditions
cover the product during operation, as it may become overheated
place the product close to hot appliances
- throw the battery of the remote control (provided with the Mini 3D Sound Bar) into a fire, as it may cause the battery to explode
leave the battery of the remote control within the reach of children, as the button cell battery could be ingested by children
-
Immediately disconnect the product if
-
smoke or an unusual smell is coming from the product enclosure
water has entered the product enclosure or if it becomes wet
an object has entered the product enclosure
the cable has been damaged (in such case replace the cable with a new one)
The Mini 3D Sound Bar contains magnets for the loudspeakers. Magnets can erase data from magnetic storage media such as video tapes, hard drives and credit cards. Therefore, keep the sound bar away from those products.
If the product behaves not as expected or you have doubts about the electrical safety, please contact immediately the TOSHIBA hotline or an authorized reseller!
Quick Tour
This section identifies the various components of the Mini 3D Sound Bar and the subwoofer. For a description of each component, please refer to the table beneath each illustration.
NOTE
Depending on your purchase, you may not have both of the Mini 3D Sound Bar and the subwoofer.
Mini 3D Sound Bar
Front view
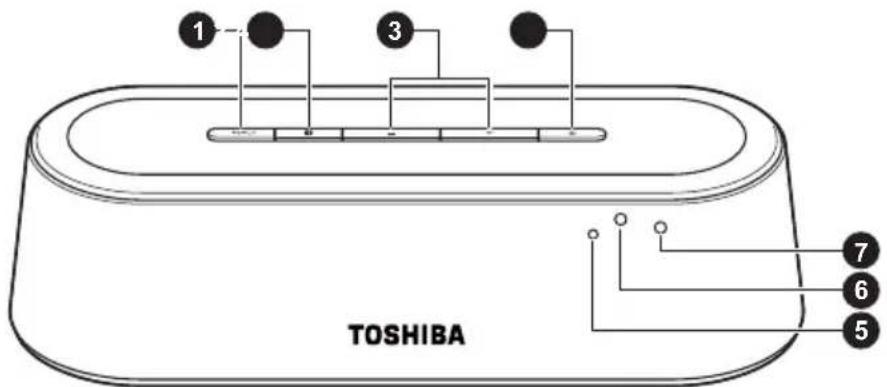
(Sample Illustration) The front view of the Mini 3D Sound Bar
Item Component Description
1 INPUT Selects the source (in the sequence of Aux-in,
Line-in, Optical, Coaxial and then back to Aux-in).
The sound bar is set to Aux-in mode by default.
NOTE
The sound bar will restore from your last selected input when it is back from the standby mode with the AC adaptor connected. But if you disconnect the AC adaptor and connect it again, the sound bar will start with Aux-in input by default.
Item Component Description
2
Bluetooth®
Selects Bluetooth® mode.
3
/volume +/- Increases/decreases the volume.
4
Power Turns the sound bar on or puts it into the standby mode.
5
note
Receives the remote control's signals.
sensor
6
Bluetooth®
Glows blue while the sound bar is paired and flashes blue while pairing.
7
P 0
Grows green while the sound bar is ON and red while it is OFF or in the standby mode
Rear view
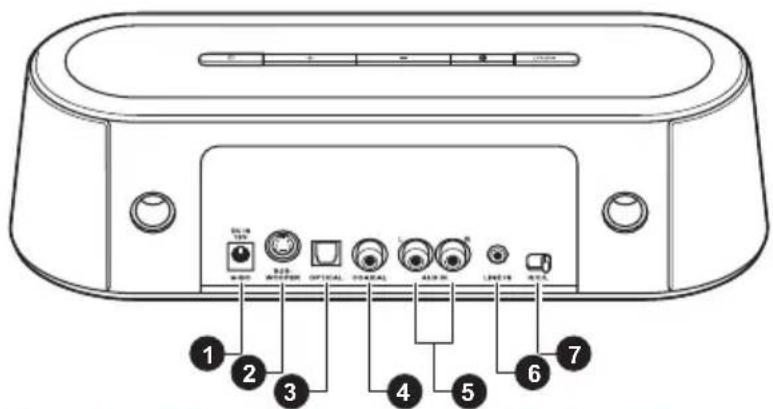
(Sample Illustration) The back view of the Mini 3D Sound Bar
Item Component Description
1 DC IN jack Connection for the provided AC adaptor (provided with the Mini 3D Sound Bar).
2 S U B Connection for the subwoofer. R jack
3 OPTICAL jack Connection for an optical audio output device using an optical audio cable (not provided).
4 COAXIAL jack Connection for a coaxial audio output device using a coaxial digital audio cable (not provided).
5 AUX IN jacks Connection for an audio output device using a 3.5mm - RCA audio cable (provided with the Mini 3D Sound Bar).
6 LINE IN jack Connection for an audio output device using a 3.5mm - RCA audio cable (provided with the Mini 3D Sound Bar).
7 R/C/L balance Selects the audio channel (right/center/left). slide switch Adjusts the sound to center when the sound bar is placed to the right/left side of the audio/video device.
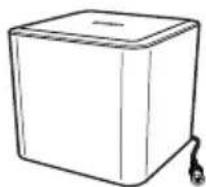
Subwoofer
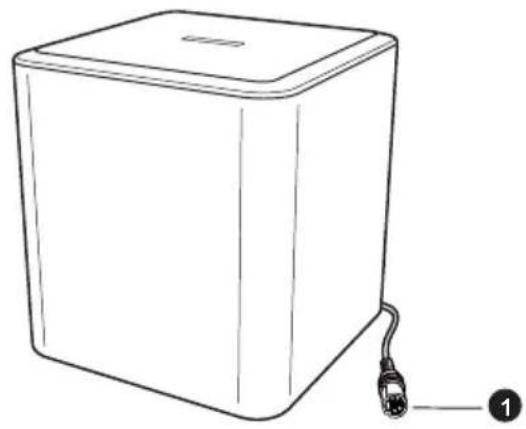
(Sample Illustration) The subwoofer view
Item Component Description
1 Subwoofer plug
Connection to the SUBWOOFER jack.
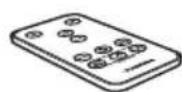
Remote control
The Mini 3D Sound Bar is provided with a remote control.
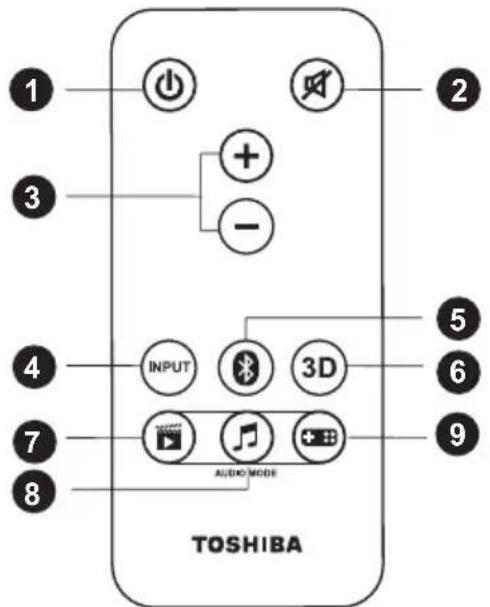
(Sample Illustration) The remote control
Item Button nan
Function
1 POWER Press to turn the sound bar ON or put it into the standby mode.
2 MUTE Press to turn the sound on/off.
| Item Button name | Function |
| 3 VOLUME +/- Press to increase/decrease the volume. | |
| 4 INPUT Press to select the source (in the sequence of Aux-in, Line-in, Optical, Coaxial and then back to Aux-in). The sound bar is set to Aux-in mode by default. | |
| 5 Bluetooth® | Press to select Bluetooth® mode. It functions the same as the Bluetooth® button on the sound bar. |
| 6 3D Press to toggle 3D mode ON/OFF. The 3D mode is set to enable by default. The 3D sound feature creates an immersive listening experience by adding depth and spaciousness to the sounds when using the 3D sound button. Please refer to the “3D Sound” section for more details. | |
| 7 MOVIE Press to select the MOVIE audio mode (the default mode). The Movie mode has been optimized for the vocal frequency bands by increasing the impact of clearness in speech while brightening the overall sound. The vocals become more precise, crisp, and well-defined, accentuated by outstanding sound clarity. | |
| 8 MUSIC Press to select the MUSIC audio mode. The Music mode has been optimized for creating a balanced, yet wide ambient soundscape to enrich the musical composition. | |
| 9 GAME Press to select the GAME audio mode. The Game mode has been optimized to deliver an immersive listening experience with an increase of bass and treble for impactful effects that give a sense of movement of sound surrounding the listeners. | |
| The sound bar will restore from your last selected audio mode when it is back from the standby mode with the AC adaptor connected. But if you disconnect the AC adaptor and connect it again, the sound bar will start with movie audio mode by default. | |
NOTE
The sound bar will restore from your last selected audio mode when it is back from the standby mode with the AC adaptor connected. But if you disconnect the AC adaptor and connect it again, the sound bar will start with movie audio mode by default.
Getting Started
Check the illustrations below to setup your device properly.
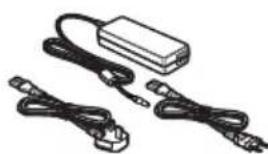
Connecting the power adaptor
Choose the proper plug to attach to an AC adaptor. Plug one end of the AC adaptor cord/cable into the DC IN jack on the back of the sound bar, and the other end to a live electrical outlet. The power indicator on the front panel glows green when the sound bar is powered on.
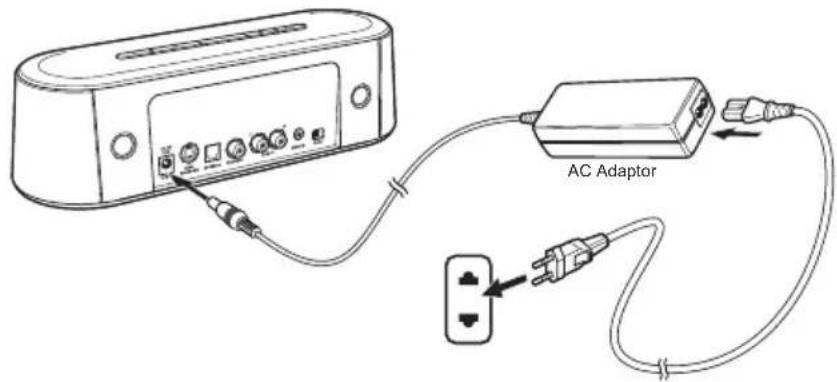
(Sample Illustration) Connecting the power cord to the AC adaptor (2-pin plug)
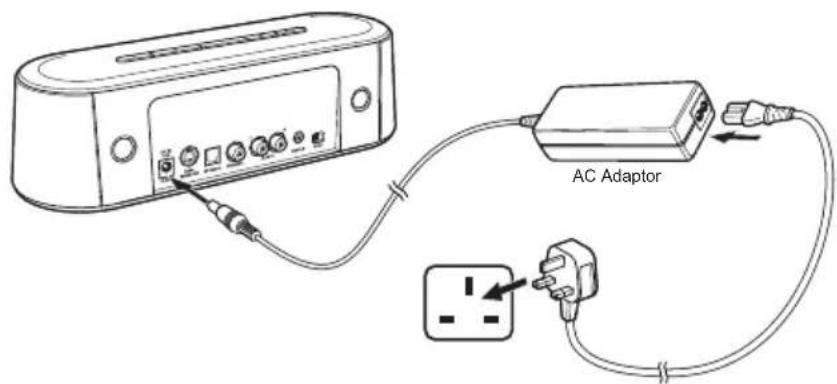
(Sample Illustration) Connecting the power cord to the AC adaptor (3-pin plug)
NOTE
The sound bar will automatically go to the standby mode in 10 minutes if no audio output.
Connecting the subwoofer
Connect the subwoofer to the SUBWOOFER jack (if applicable) on the back of the sound bar.
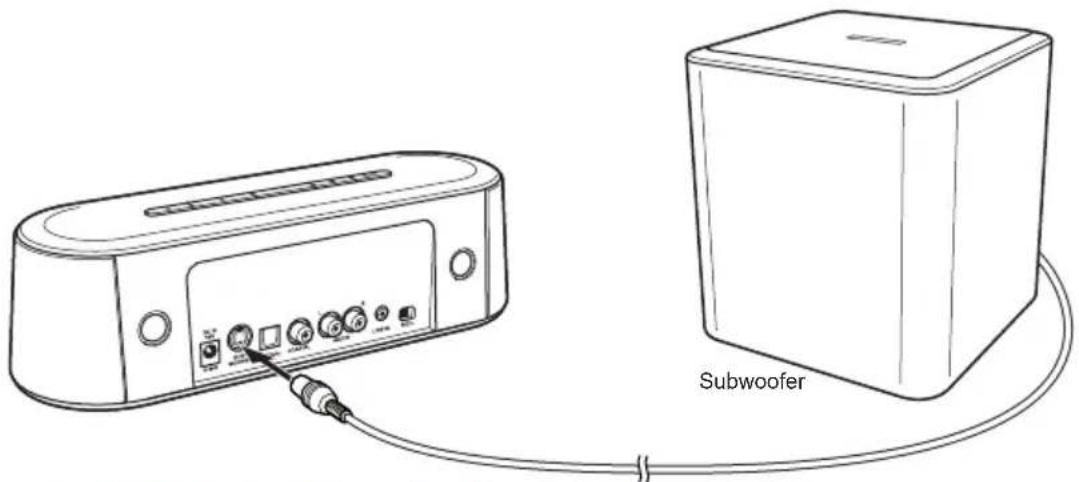
(Sample Illustration) Connecting the subwoofer
NOTE
Please do not connect or disconnect the subwoofer when the sound bar is powered up.
This subwoofer is compatible with Toshiba Mini 3D Sound Bar only.
Using the remote control
Remove the plastic sheet before operating the remote control for the first time.

(Sample Illustration) Remove the plastic sheet before operating the remote control
While using the remote control, please follow the instructions below:
Point the remote control at the remote sensor and press the buttons.
Distance: Approximately 5m from the front of the remote sensor.
Angle: About 30^ in each direction from the front of the remote sensor.
Replacing the battery
The remote control is provided with one CR2025 (3V) battery. To replace the battery, please follow the instructions below.
- Open the battery door.
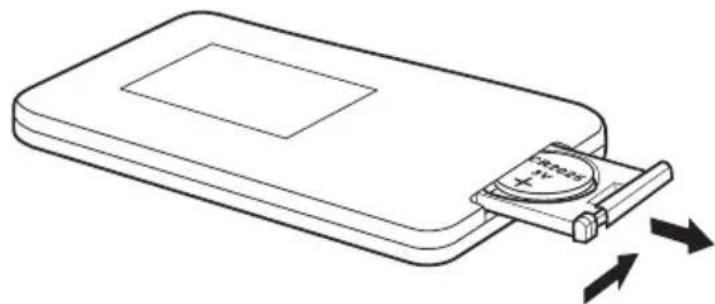
(Sample Illustration) Open the battery door
- Remove the exhausted battery and insert the new battery.
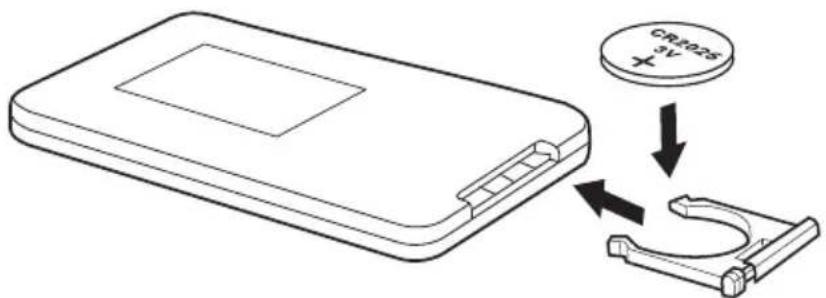
(Sample Illustration) Insert the new battery
NOTE
If the remote control does not operate correctly, or if the operating range is reduced, replace the battery with a new one.
Press the remote control buttons at intervals of approximately one second to ensure correct operation.
Mini 3D Sound Bar and subwoofer placement
The sound bar can be placed freestanding on a table with at least 30cm away from the TV. For the best surround sound experience, it is recommend to place your subwoofer directly below the sound bar, or at the corner of the room (with 5~10cm away from the wall).

(Sample Illustration) Mini 3D Sound Bar and subwoofer placement
Using the R/C/L balance slide switch
If the sound bar is placed to the right (left) side of the TV or other device, you can slide the R/C/L balance switch on the back of the sound bar to offset the sound to the center.
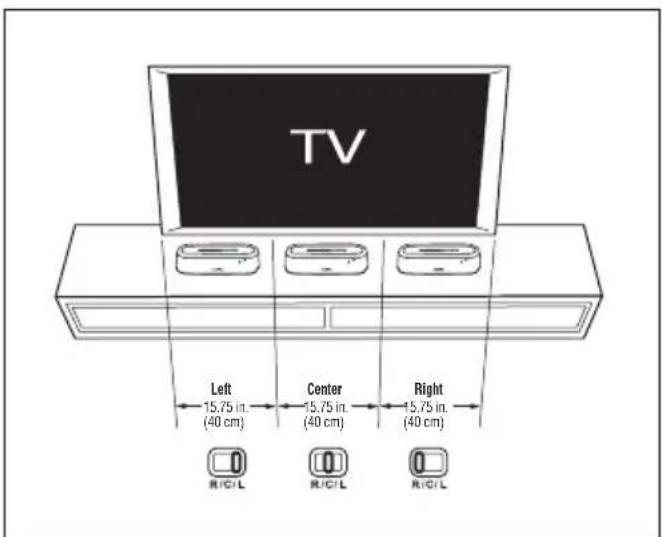
(Sample Illustration) Using the R / C / L balance slide switch
Connecting to the audio device
Follow these instructions to route external audio signals from devices such as a TV to the sound bar via the AUX IN, LINE IN, OPTICAL and COAXIAL jacks.
NOTE
For best performance with a TV, we recommend using with a digital optical cable (available separately).
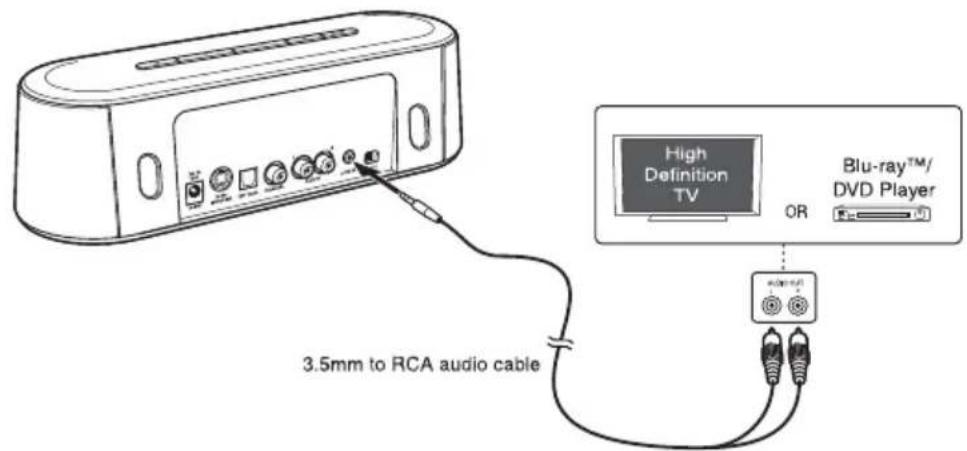
Using the AUX IN jacks
- Connect a 3.5mm - RCA audio cable (provided with the sound bar) from the L/R AUX IN jacks on the sound bar to the AUDIO OUT jacks on a TV, DVD or other audio device.
(Sample Illustration) Analog audio cable connection
NOTE
You can connect to the TV by using one of the cables below:
3.5mm - RCA audio cable (provided with the sound bar)
RCA - RCA cable (not provided)
2 Press the INPUT button on the sound bar or the remote control to switch to the AUX IN input.
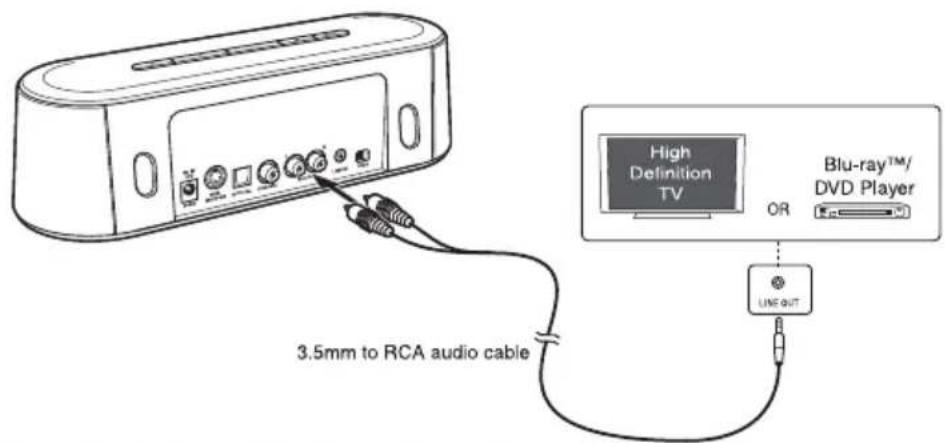
Using the LINE IN jack
- Connect a 3.5mm - RCA audio cable (provided with the sound bar) from the LINE IN jack on the sound bar to the LINE OUT jack on an audio device.
(Sample Illustration) 3.5mm audio cable connection
NOTE
You can connect to the TV by using one of the cables below:
3.5mm - RCA audio cable (provided with the sound bar)
3.5mm - 3.5mm audio cable (not provided)
2 Press the INPUT button on the sound bar or the remote control to switch to the LINE IN input.
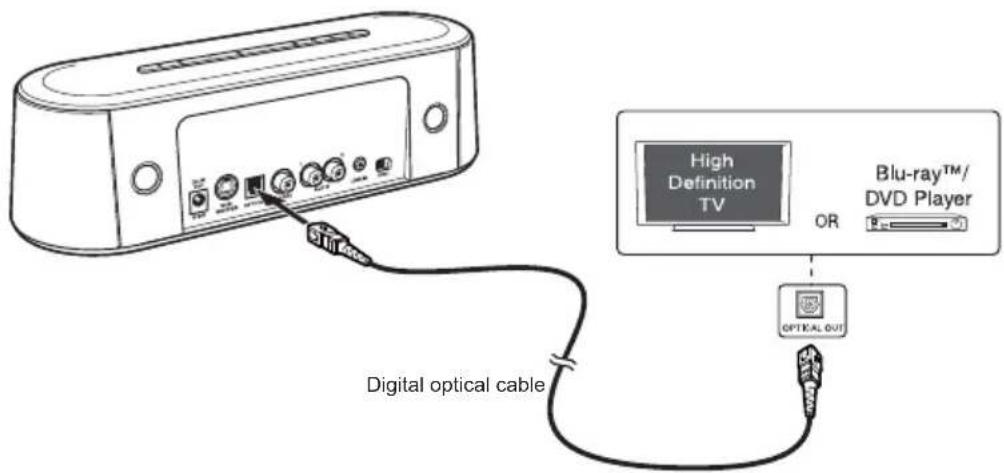
Using the OPTICAL jack
- Connect an optical cable (not provided) from the OPTICAL jack on the sound bar to the OPTICAL OUT jack on a TV, DVD or other audio device.

(Sample Illustration) Optical cable connection
2 Press the INPUT button on the sound bar or the remote control to switch to the OPTICAL input.
NOTE
The sound bar is designed to support PCM (Pulse-code modulation) digital signal only. To set the audio signal from external sources (e.g. Blu-ray™ and DVD player), please do not select "DTS" or "Dolby Digital". Otherwise, there will be no sound from the sound bar.
Using the COAXIAL jack
- Connect a digital audio coaxial cable (not provided) from the COAXIAL jack on the sound bar to the COAXIAL OUT jack on a TV, DVD or other audio device.
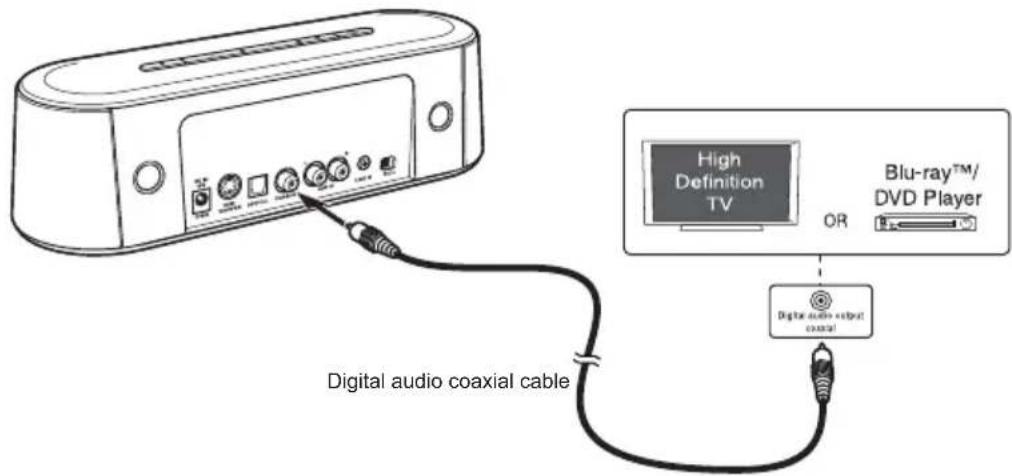
(Sample Illustration) Digital audio coaxial cable connection
2 Press the INPUT button on the sound bar or the remote control to switch to the COAXIAL input.
NOTE
The sound bar is designed to support PCM (Pulse-code modulation) digital signal only. To set the audio signal from external sources (e.g. Blu-ray™ and DVD player), please do not select "DTS" or "Dolby Digital". Otherwise, there will be no sound from the sound bar.
3D Sound
The sound bar features Sonic Emotion® Absolute 3D sound technology that delivers the ultimate listening experience from a single compact device, without the clutter of additional cabling. Its plug and play device creates a multi-use capability which attributes to the high-quality sound.
You can select from three different sound modes (Movie, Music, or Game), depending on the type of sources you want to experience. Select a Sound Mode based on the source material and your personal taste.
About Sonic Emotion® 3D Sound
Sonic Emotion® Absolute 3D is the listening experience. Absolute 3D uses sound field control to transform the listener's room to a virtually created natural sound field.
With wave field synthesis being the foundation of sound field control, sound waves are produced and dispersed throughout the entire listening area ensuring all listeners to be amazed in an all enveloping room filled with high quality sounds regardless of the listeners' position. Exactly as in a natural environment, sounds are heard from all around regardless of the device location.
Playback via Bluetooth®-enabled devices
To play files via Bluetooth®-enabled devices:
- Turn on the sound bar.
- Press the Bluetooth button on the sound bar to enable Bluetooth mode.
The blue indicator will be flashing, meaning that it is searching for available Bluetooth®-enabled devices.
- Turn on the Bluetooth mode of your other Bluetooth-enabled device. Your other device will search the available Bluetooth around it.
If your device does not automatically start searching, you may have to enable the search feature on your device.
- Once the sound bar is detected, select "Toshiba Mini 3D Sound Bar" on your device for pairing.
| 5. Once the two devices are paired successfully, “connected” will be shown on your device and the blue indicator on the sound bar will stop flashing. 6. Then the devices have been paired, you can play music/video files on your other device and enjoy the sound from the sound bar. Once disconnected, you need to repeat the above steps 4~6 for re-connection. | |
| NOTE | When pairing a new Bluetooth® enabled device, use the Bluetooth® button on the sound bar speaker and not on the remote control. The remote control can only be used to reconnect a previously paired device. |
| Pairing the sound bar with another Bluetooth® device | |
| 1. Disconnect your Bluetooth® device from the sound bar. 2. Press the Bluetooth® button on the sound bar until the blue indicator flashes. 3. Turn on the Bluetooth® mode of your other device, and select “Toshiba Mini 3D Sound Bar” on it for pairing. | |
| NOTE | For details, please refer to the user's manual of your Bluetooth® device. The sound bar can only be paired with one Bluetooth® device at a time. If the sound bar is already paired with one Bluetooth® device, you will not be able to pair it with another Bluetooth® device, even though it may display the name “Toshiba Mini 3D Sound Bar”. |
Frequently Asked Questions (FAQ)
Question 1:
The sound bar cannot be turned on.
Answer:
Make sure that the AC adapter is connected to the sound bar, and that it is plugged into a wall socket correctly.
Press the power button on the top of the sound bar and check whether the power indicator is glowing green.
Question 2:
There is no sound from the sound bar.
Answer:
This problem may have several causes. Check the following items:
Press the Volume + / - buttons of the sound bar.
Make sure that the source you have selected is sending audio. If you are connected to your TV, please make sure that your TV is configured to output audio.
Make sure that there are no loose audio connections.
Make sure that you have selected the correct source (input).
Press the MUTE button on the remote control to make sure that the sound bar is not muted.
Question 3:
There is no sound from the subwoofer.
Answer:
Make sure that the subwoofer is connected properly.
Question 4:
The remote control does not work properly.
Answer:
This problem may have several causes. Check the following items:
Make sure that the plastic sheet is removed before operating the remote control.
The remote control is pointed directly at the remote sensor of the sound bar.
The remote control is not being used from too far a distance from sound bar.
Nothing is obstructing the remote sensor (located in the front of the sound bar).
Others
Accessories of this series of products may vary depending on the model.
Please refer to the packaging, packing list or contact your agent for information.
Please understand no advance notice for further product improvement, appearance design and specification update.
The illustration may be a little different from the real product.
Specifications
Mini 3D Sound Bar
| General Information Description | |
| Power requirements 19V DC, 3.42A | |
| Power output 10 watts x 4 (per channel at 4ohms, 1 KHz / THD 10%) | |
| Power consumption 40W | |
| Impedance 4 ohms | |
| Dimension (width x height x depth) | 11.4" x 2.8" x 3.9" (290 x 72 x 100mm) |
General Information Description
Weight About 1.87 lbs (0.85kg)
Frequency Response 95Hz - 19kHz
Distortion < 10%
Subwoofer
General Information Description
Power output 20 watts at 8 ohms, 100Hz / THD 10%
Impedance 8 ohms
Dimension (width x height x depth) 8.6" x 9.6" x 8.6" (220 x 246 x 220mm)
Weight About 6.24 lbs (2.83kg)
Frequency Response 38Hz - 19kHz (Mini 3D Sound Bar and Subwoofer)
NOTE
Appearance and specification may vary and can be changed without notice.
Trademarks
The Bluetooth word mark and logos are registered trademarks owned by Bluetooth SIG, Inc, and any use of such marks by TOSHIBA Corporation is under license.
Sonic Emotion is a registered trademark of sonic emotion ag.
Other trademarks and registered trademarks not listed above may be used in this manual.
TOSHIBA Support
Need help?
For the latest driver updates, User's Manuals & FAQs please have a look at the TOSHIBA options & services support page:
http://computers.toshiba.eu/options-support
Please see http://computers.toshiba.eu/options-warranty for the TOSHIBA hotline numbers.
Regulatory Information
CE compliance
C E
This product is CE marked in compliance with the essential requirements and other relevant provisions of Directive 1999/5/EC. Responsible for CE marking is Toshiba Europe GmbH, Hammfelddamm 8, 41460 Neuss, Germany. A copy of the official Declaration of Conformity can be obtained from following website: http://epps.toshiba-teq.com.
This product and the original options are designed to observe the related EMC (Electromagnetic Compatibility) and safety standards. However, TOSHIBA cannot guarantee that this product still observes these EMC standards if other units or cables not produced by TOSHIBA are connected. In this case the persons who have connected those other units/cables have to provide assurance that the system (sound bar plus options/cables) still fulfills the required standards. To avoid general EMC problems, the following guidance should be noted:
Only CE marked options should be connected/implemented
Only best shielded cables should be connected
Working Environment
The Electromagnetic Compliance (EMC) of this product has been verified typically for this product category. Your product is not intended for industrial use, but for personal use only. Any other working environment has not been verified by TOSHIBA and the use of this product in these working environments is maybe restricted or cannot be recommended. Possible consequences of the use of this product in non verified working environments can be:
Disturbances of other products or of this product in the nearby surrounding area with temporarily malfunction or data loss/corruption as result.
Example of non verified working environments and related advices:
Industrial environment (e.g. where 3-phase 380V mains is being used mainly): Danger of disturbances of this product due to possible strong electromagnetic fields especially near to big machinery or power units.
Medical environment: The compliance to the Medical Product Directive has not been verified by Toshiba, therefore this product cannot be used as a medical product without further verification. The use in usual office environments e.g. in hospitals should be no problem if there is no restriction by the responsible administration.
REACH
Following information is only valid for EU-member States: REACH - Compliance Statement
The new European Union (EU) chemical regulation, REACH (Registration, Evaluation, Authorization and Restriction of Chemicals), entered into force on 1 June 2007.
Toshiba will meet all REACH requirements and is committed to provide our customers with information about the chemical substances in our products according to REACH regulation.
Please consult the following website
www.toshiba-europe.com/computers/info/reach for information about the presence in our articles of substances included on the candidate list according to article 59(1) of Regulation (EC) No 1907/2006 ("REACH") in a concentration above 0.1% weight by weight.
Following information is only valid for EU-member States:
Disposal of products
The crossed out wheeled dust bin symbol indicates that products must be collected and disposed of separately from household waste. Integrated batteries and accumulators can be disposed of with the product. They will be separated at the recycling centres.
The black bar indicates that the product was placed on the market after August 13, 2005.
By participating in separate collection of products and batteries, you will help to assure the proper disposal of products and batteries and thus help to prevent potential negative consequences for the environment and human health.
For more detailed information about the collection and recycling programmes available in your country, please visit our website (http://eu.computers.toshiba-europe.com) or contact your local city office or the shop where you purchased the product.
Disposal of batteries and/or accumulators

The crossed out wheeled dust bin symbol indicates that batteries and/or accumulators must be collected and disposed of separately from household waste.
If the battery or accumulator contains more than the specified values of lead (Pb), mercury (Hg), and/or cadmium (Cd) defined in the Battery Directive (2006/66/EC), then the chemical symbols for lead (Pb), mercury (Hg) and/or cadmium (Cd) will appear below the crossed out wheeled dust bin symbol.
By participating in separate collection of batteries, you will help to assure the proper disposal of products and batteries and thus help to prevent potential negative consequences for the environment and human health.
For more detailed information about the collection and recycling programmes available in your country, please visit our website (http://eu.computers.toshiba-europe.com) or contact your local city office or the shop where you purchased the product.
Additional Information
© 2012 TOSHIBA Europe GmbH. All rights reserved.
TOSHIBA reserves the right to make technical changes. TOSHIBA assumes no liability for damages incurred directly or indirectly from errors, omissions or discrepancies between this product and the documentation.
Tato príručka je určena pro tri modely uvedeni nǐze:
1) Mini 3D Sound Bar + Subwoofer (SBM1W)
2) Mini 3D Sound Bar (SBM10)
3) Subwoofer pro Toshiba Mini 3D Sound Bar (SBW10)
Obsah
Uvod. 2
Obsah baleni. 2
El aspecto y la asignaciónSEOSEOSEOSEOSEOSEOSEOSEOSEOSEOSEOSEOSEOSEOSEOSEOSEOSEOSEOSEOSEOSEOSEOSEOSEOSEOSEOSEOSEOSEOSEOSEOSEOSEOSEOSEOSEOSEOSEOSEOSEOSEOSEOSEOSEOSEOSEOSEOSEOSEOSEOSEOSEOSEOSEOSEOSEOSEOSEOSEOSEOSEOSEOSEOSEOSEOSEOSEOSEOSEOSEOSEOSEOSEOSEOSEOSEOSEOSEOSEOSEOSEOSEOSEOSEOSEOSEOSEOSEOSEOSEOSEOSEOSEOSEOSEOSEOSEOSEOSEO SEO previo aviso.
Marcas commerciales
XpnoTuw utofoxaw AUX IN
(Eikova) Suvdelta on otniokou kawdiou
Subwoofer (se applicable)
Adattatore CA

Cavo audio RCA - 3,5 mm
Utilizar as fichas AUX IN
- Ligue o cabo de audio 3,5mm - RCA (fornecido com o sound bar) entre as fichas L/R AUX IN do sound bar e as fichas de saida de audio (AUDIO OUT) na TV, DVD ou除外 dispositivo de audio.