Babytalker 1020 - Baby monitors TOPCOM - Free user manual and instructions
Find the device manual for free Babytalker 1020 TOPCOM in PDF.
User questions about Babytalker 1020 TOPCOM
0 question about this device. Answer the ones you know or ask your own.
Ask a new question about this device
Download the instructions for your Baby monitors in PDF format for free! Find your manual Babytalker 1020 - TOPCOM and take your electronic device back in hand. On this page are published all the documents necessary for the use of your device. Babytalker 1020 by TOPCOM.
USER MANUAL Babytalker 1020 TOPCOM
This instruction manual is part of the Babtalker 1020 (hereinafter referred to as "the device"). It contains important information about setting up the monitor, safety aspects, correct use and looking after the monitor.
The instruction manual must always be kept close by the device.
It must be read and followed by anyone responsible for operating the device, resolving faults and/or cleaning it.
Keep this instruction manual safely and if you sell the device please give it to the next owner.
1.1 Copyright
This documentation is protected by copyright.
All rights, including those of total or partial photo mechanical reproduction, duplication and distribution by means of particular processes (such as data processing, data carriers and data networks), and substantive and technical changes, are reserved.
1.2 Warning signals
DANGER
A warning sign of this hazard level indicates an imminent hazardous situation. If the hazardous situation is not prevented, this could lead to death or serious injury.
WARNING
A warning signal of this hazard level indicates a possible hazardous situation. If the hazardous situation is not prevented, this could lead to injury and/or material damage.

A note indicates additional information that will make using the device easier.
1.3 Use as directed
This device is designed only for non-commercial use in monitoring babies in enclosed spaces.
Any use that differs from this or goes beyond the specified use is regarded as incorrect.
WARNING
Incorrect use of the device, or using it for purposes for which it was not designed, can lead to danger.
- Follow the instructions for use given in this manual.
Claims for damages of whatever kind as a result of incorrect use will not be accepted.
The user bears the sole risk.
2 Safety
This chapter contains important safety information regarding the use of the device.
This device meets the safety requirements laid down. However, inappropriate use can cause injury and material damage.
2.1 Danger due to electrical current
DANGER
Contact with live cables or components can cause danger to life!
Follow the safety instructions given below in order to avoid danger due to electrical current:
Use only the power supply components included in the pack, as otherwise devices could be damaged.
- Do not use the device if the power supply unit, cable or plug are damaged.
- Never open the power supply unit housing. There is a risk of electric shock if live connections are touched or the electrical and mechanical structure of the device are altered.
- Protect devices from humidity, penetration by liquids and dust. Unplug the power supply unit immediately if the device comes into contact with liquid.
Unplug the power supply unit if a fault occurs, during a storm and before cleaning the device.
- Protect cables from hot surfaces or other hazards and do not constrict them.
2.2 Use of batteries
WARNING
The incorrect use of batteries can be dangerous.
- Only use batteries of the same type.
- Ensure that you observe the correct polarity when inserting batteries. Incorrect polarity will damage the batteries and the device.
- Never throw batteries in the fire as they may explode.
The ends of batteries must never be accidentally or deliberately place in contact with each other or allowed to touch metal objects. This leads to overheating, explosion or fire.
- Keep batteries out of the reach of children. Seek medical advice immediately if batteries are swallowed.
- Leaking battery acid can cause lasting harm to the device.
Be very careful when handling damaged or leaking batteries. Danger of chemical burns! Wear protective gloves.
- Remove the batteries if the device is to remain unused for an extended period.
2.3 Basic safety instructions
Follow the safety instructions given below in order to use the device safely:
- The device must be assembled by an adult. Keep small parts out of the reach of children during assembly.
- Do not allow children to play with the device or its parts.
- Make sure that the device and the cables are always out of the baby's reach.
- Never cover the device with a towel, blanket etc.
- Any defective components must be replaced using original spare parts. Only these parts are certain to meet the safety requirements.
- Shut off your device in all places where posted information requires you to do so. Hospitals and healthcare facilities may use devices which react sensitively to external high frequencies.
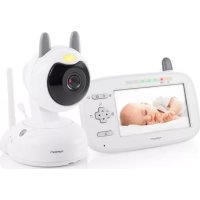
3 Construction and function
This babyphone comprises a parent's unit and a baby unit, connected by radio according to the PMR 446 standard. The baby unit starts to broadcast as soon as the microphone picks up a sound. These sounds are transmitted by the parents' unit. Users can set the sensitivity of the microphone (see page 7).
i
- The device is not a replacement for responsible and correct adult supervision, it is only an accessory.
4 Components on the parents' unit (see figure on the fold-out page).
1 Display
7 Speaker
2 LED light
8 Volume up button
3 Channel up button
9 On/off button
- Select the next channel
10 Set button
4 Channel down button
11 Belt clip
- Select the previous channel
12 Power adapter jack
5 LED light button
13 Battery compartment cover
6 Volume down button
4.1 Components on the baby unit (see figure on the fold-out page).
14 Display
19 Microphone
15 Channel up button
20 LED Night light button
Select the next channel
21 LED Night light
16 Channel down button
22 Power adapter jack
- Select the previous channel
23 Battery compartment cover
17 Set button
24 VOX sensitivity control
18 On/off button
4.2 Display icons (see figure on the fold-out page)
Parent's unit
25 Receive signal icon
26 Audio volume indicator
27 Channel number
28 Battery level indicator shows the charge state of the battery:
battery almost empty
29 Privacy mode icon
30 Feeding timer icon
31 Feeding interval time
Baby unit
32 Transmission icon
33 Channel number
34 Battery level indicator shows the charge state of the battery:

Battery
full
- Symbol flashing: Battery almost empty
35 Power adapter connected icon
36 Privacy mode icon
5 Preparing the device for use
5.1 Safety instructions

WARNING
Injury and material damage can occur when preparing the device for use! Children must not be allowed to play with packaging material. There is a risk of choking.
5.2 Where to set up your device
The device must be set up in a location that meets the following requirements in order to ensure safe and proper operation:
- Power sockets must be easily accessible so that the mains cable can be easily removed if necessary.
- The device must be set up in a dry place.
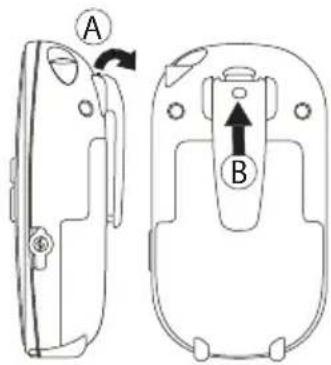
5.3 Removing / Installing the belt clip from the parents unit
- To remove the belt clip from the unit, push the belt clip (B) upwards, while pulling the belt clip tab away from the unit (A).
- When re-installing the belt clip, click indicates that it locked into position.
5.4 Power supply
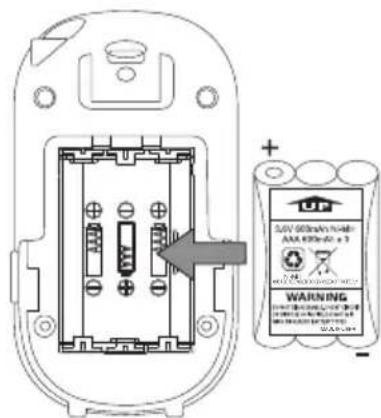
5.4.1 Inserting batteries into the baby unit

The baby unit can be operated using three AAA Alkaline batteries or via the power supply provided.
- The baby unit has no charging function.
- We advise inserting batteries even if you intend to run the unit from the mains. This means that the batteries can automatically power the unit if there is a power cut.
- Do not use empty and new batteries together.
- Open the battery compartment.
- Insert the three AAA Alkaline batteries (LR03). Make sure that you observe the correct polarity.
- Close the battery compartment.

5.4.2 Connecting the baby unit to the mains
- Plug the small connector of the power adapter into the power adapter jack 22n the side of the baby unit. A click indicates, the jack is locked into position.
- Connect the power adapter (7,5V DC / 300mA) to a mains socket (230-240V~ 50Hz).
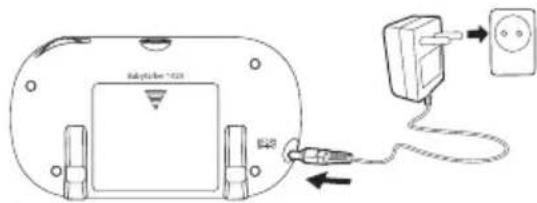

- Only use the enclosed power adapter.
5.4.3 Inserting batteries into the parents' unit
WARNING
Injury and material damage can be caused by using non-rechargeable batteries in the parents' unit!
- Only use the Ni-MH battery pack supplied with the product.

-
The parent unit can only be used with the enclosed a Ni-MH battery pack. It cannot be used with single cell Ni-MH batteries!
-
Remove the belt clip.
- Push the battery cover and slide it downwards.
- Install the rechargeable battery pack following the polarity as illustrated.
- Re-install the battery cover and belt clip.
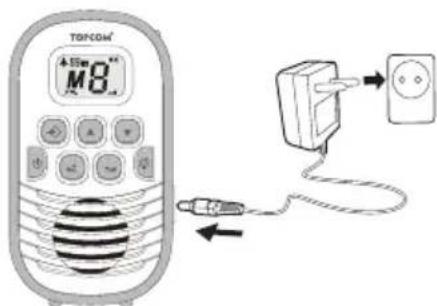
5.4.4 Charging batteries in the parents' unit
- Connect the power adapter (7,5V DC / 300mA) to a main socket (230-240V~ 50Hz).
- The flashing battery charge indicator in the display shows that the batteries are being charged:

The batteries take about 12 hours to charge.
- The batteries are charged continuously. Therefore the flashing battery charge indicator in the display is still visible even when the batteries are fully charged.
6 Operating the device
6.1 Switching the parents' unit and baby unit on and off
- Press the on/off button to g witch on the parents' unit. The display illuminates.
- To switch on the baby unit, press the on/off button. The display illustrates.
- To switch off the parents' unit, press and hold the on/off button un9 the display goes out
- To switch off the baby unit, press and hold the on/off button until the display goes out.
6.2 Setting the channel
To have communication between the baby unit and the parents' unit they need to be set both on the same channel.
- Press the channel up 3 or channel down 4 button on the parent to select the channel of the parent unit.
- Press the channel up on channel down butt on the baby unit to select the same channel of the parent unit.
Once both units have the same channel, the parents' unit can receive the signal from the baby unit.
When M on one or both units is displayed, the privacy mode is activated. Check chapter "Activating privacy mode" on page 7
i
IMPORTANT:
When the baby unit is transmitting (TX 32n the display), the channel cannot be set. The channel up 15r channel down button will not respond.
Make sure that the VOX sensitivity switch 24 set to minimum (Counter clockwise) and make no excessive sounds while setting the channel of the baby unit.
6.3 Activating privacy mode
The Babbalker 1020 operates on free frequencies (PMR - 446Mhz). Any other PMR device in range, on the same channel can hear the transmitted babyphone signal. This means also that the parents' unit can receive the signal from other PMR devices.
To avoid disturbance from other PMR devices, privacy mode must be activated on both parents' and baby unit.
Once the channel on the parents' unit and baby unit is the same,
- Press the set button once to activate privacy mode on the parent unit.
- Press the set button to activate privacy mode on the baby unit.
i
- When privacy mode is activated, is played.
6.4 Setting the transmission volume of the parents' unit
There are 8 volume levels.
- Press the button 8 increase the volume.
- Press the button 6 decrease the volume.
6.5 Setting microphone sensitivity (VOX)
The baby unit operates on VOX mode. This means that the baby unit starts sending as soon as the microphone detects sound. The sensitivity of the sound detection can be changed by the user.
When you increase the sensitivity, the baby unit picks up quieter sounds
The VOX sensitivity can be adjusted by turning the VOX sensitivity switch 24
- Clockwise to the highest VOX sensitivity position
- Counter clockwise to the lowest VOX sensitivity position
6.6 Feeding timer
The feeding timer is a count down timer that can be used for generating an alarm sound to remind you of the next feeding or medicine time.
To turn on the count down timer and set the timer.
- Press and hold the set button 10r 5 seconds. The feeding timer icon and feeding time interval is displayed.
- Press the channel up button to select the hour.
- Press the channel up 4 button to select the minutes.
- Press the set button 10 confirm.
Once the alarm is audible, press any button (except the On/Off button) to deactivate.
i
- To deactivate the feeding timer during the countdown, enter this menu function again and reset the hour and minutes to zero.
6.7 Night light on the baby unit
- Press the night light button 20 activate the LED night light.
- Press the night light button 20 again to deactivate the LED night light.
6.8 LED light on the parents' unit
- Press the LED light button 5 activate the LED light. 2
- Press the LED light button 5 gain to deactivate the LED light. 2
7 Technical data
| Channels | 8 |
| Sub-code | DCS |
| Frequency | 446.00625MHz - 446.09375 MHz |
| Range | Up to 2 Km (Open field) |
| Transmission Power | =< 500mW ERP |
| Modulation Type | FM - F3E |
| Channel spacing | 12,5 kHz |
| Batteries | Baby Unit: 3 x AAA 'LR03' Alkaline batteries Parent Unit: Battery pack (3 x AAA Ni-MH batteries) |
| Power Adapter | Baby Unit: Input: 230-240V~ 50Hz / Output: DC 7,5V/300mA Parent Unit: Input: 230-240V~ 50Hz / Output: DC 7,5V/300mA |
8 Cleaning and maintenance
This chapter contains important information about cleaning and maintaining the device.
Follow the instructions in order to avoid damage due to incorrect cleaning of the device and to ensure that it continues to work properly.
8.1 Safety instructions
DANGER
Danger to life due to electrical current!
- Switch off the device and unplug it from the mains before cleaning.
WARNING
Danger due to leaking battery acid!
If the batteries are leaking, the fluid that emerges can cause injury (skin irritation) or can damage the device.
- Wear protective gloves.
WARNING
- Do not use cleaning agents or solvents. These can damage the case and leak inside, causing permanent damage.
8.2 Cleaning
- Use a soft, damp cloth to clean the device.
- Use a soft brush to clean dirty connections and contacts.
- Use a dry, lint-free cloth to clean battery contacts and the battery compartment.
- If the device becomes wet, switch it off and remove the batteries immediately.
Dry the battery compartment with a soft cloth to minimise potential water damage.
Leave the cover off the battery compartment overnight or until completely dry.
Wait until the device is completely dry before using it again.
8.3 Maintenance
- Check and replace the batteries in the device regularly.
- Check connections and cables to make sure they are working.
DANGER
Danger to life due to electrical current!
- Unplug the device from the mains before starting to deal with problems.
WARNING
Repairs that are not carried out properly can be dangerous and can damage the device.!.
- Do not attempt to adjust or repair the device.
- The device or cables should only be repaired by a specialist in the service centre.
If you suspect that the device is damaged (for instance, if someone has dropped it), take it to a specialist to be checked before using it again.
8.4 Storage
Remove the batteries from the parents' unit and the baby unit. Place the device in a dry place.
8.5 Disposal (environmental protection)

Dispos of the device in accordance with EC Directive 2002/96/EC-WEEE (Waste Electrical and Electronic Equipment). If you have any queries, please contact your local body responsible for waste disposal.
Batteries should be disposed of in an environmentally friendly manner in accordance with local regulations.
9 EC declaration of conformity
Hereby, TOPCOM EUROPE N.V., declares that this device is in compliance with the essential requirements and other relevant provisions of Directive 1999/5/EC.
The Declaration of conformity can be found on: http://www.topcom.net/cedeclarations.asp
10 Topcom Warranty
10.1 Warranty period
The Topcom units have a 24-month warranty period. The warranty period starts on the day the new unit is purchased. There is no warranty on standard or rechargeable batteries (AA/AAA type).
Consumables or defects causing a negligible effect on operation or value of the equipment are not covered.
The warranty has to be proven by presentation of the original or copy of the purchase receipt, on which the date of purchase and the unit-model are indicated.
10.2 Warranty exclusions
Damage or defects caused by incorrect treatment or operation and damage resulting from use of non-original parts or accessories are not covered by the warranty.
The warranty does not cover damage caused by outside factors, such as lightning, water and fire, nor any damage caused during transportation.
No warranty can be claimed if the serial number on the units has been changed, removed or rendered illegible. Any warranty claims will be invalid if the unit has been repaired, altered or modified by the buyer.
29 Symbol for privat modus
30 Symbol for matepaminnelse
31 Intervalltid for mating
Babyenhet
32 Overføringssymbol
33 Kanalnummer
34 Batteriindikator
35 Symbol for tilkoblet strömadapter
36 Symbol for privat modus
18 o on/off