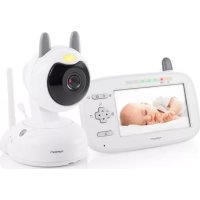
Babytalker 2000 V2 - Baby monitors TOPCOM - Free user manual and instructions
Find the device manual for free Babytalker 2000 V2 TOPCOM in PDF.
User questions about Babytalker 2000 V2 TOPCOM
0 question about this device. Answer the ones you know or ask your own.
Ask a new question about this device
Download the instructions for your Baby monitors in PDF format for free! Find your manual Babytalker 2000 V2 - TOPCOM and take your electronic device back in hand. On this page are published all the documents necessary for the use of your device. Babytalker 2000 V2 by TOPCOM.
USER MANUAL Babytalker 2000 V2 TOPCOM
Thanks for purchasing the Babytalker 2000. This Babyphone with digital communication ensures that you can hear your baby clearly without any distracting noise or interference.
2 Safety Instructions

WARNING:
- This baby monitor is compliant to all relevant standards regarding electromagnetic fields and is, when handled as described in the user guide, safe to use. Therefore, always read the user guide instructions carefully before using the device.
- Adult assembly required. Keep small parts away from children when assembling.
- This product is not a toy. Do not allow children to play with it.
- This baby monitor is not a substitute for responsible adult supervision.
- Keep this User's Manual for future reference.
- Do not place the baby unit or cables in the crib or within the arm re- ach of the baby (at least 1 meter away).
- Secure the cords away from babies reach.
- Do not cover the baby monitor with a towel or blanket.
- Never use extension cords with the enclosed AC adapters.
- Test the monitor before use. Get familia r with the functionality.
- Do not use the monitor near water.
- Do not install the monitor on heat sources.
- Only use the chargers and power adapters suppplied. Do not use other chargers or power adapters, as this may damage the device and battery cells.
- Only insert batteries of the same type. Never use ordinary, non-rechargeable batteries, in the parent unit. Insert batteries so they connect to the right poles (indicated in the battery compartment).
- Do not touch the charger or plug contacts with sharp or metal objects.
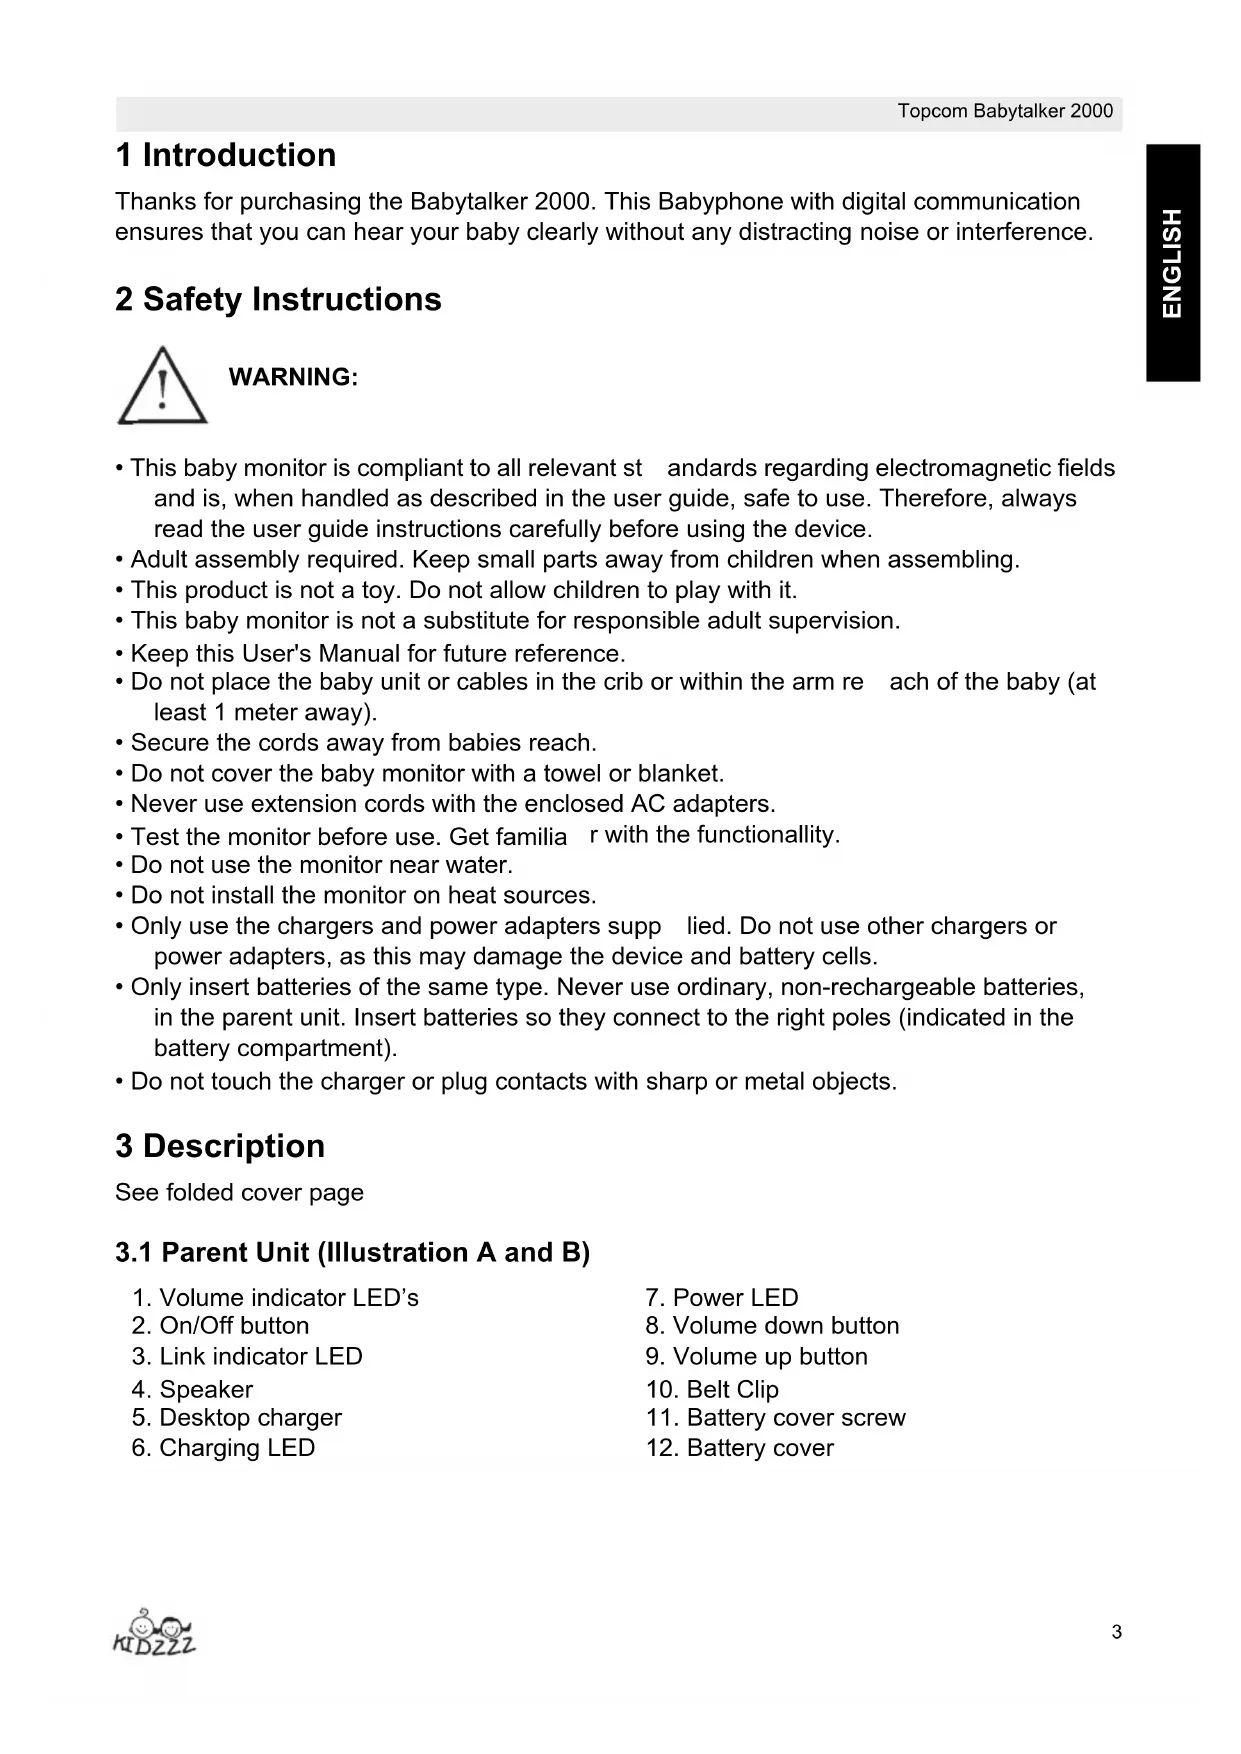
3 Description
See folded cover page
3.1 Parent Unit (Illustration A and B)
- Volume indicator LED's
- On/Off button
- Link indicator LED
- Speaker
- Desktop charger
-
Charging LED
-
Power LED
- Volume down button
- Volume up button
- Belt Clip
- Battery cover screw
- Battery cover
3.2 Baby unit (Illustrations C and D)
-
Night Light button
-
Microphone
-
On/Off button
-
Hang handle
-
Paging button
-
Battery cover screw
-
Power LED
-
Battery cover
-
Night Light
4 Getting started
4.1 Baby unit battery Installation
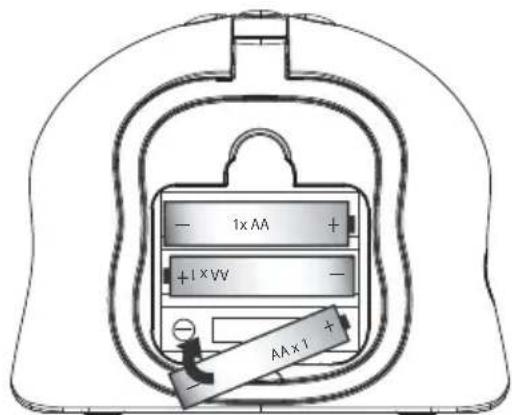
The baby unit can be used either with 3 AA - Size batteries (alkaline batteries recommended) or the household AC current. The Baby unit has no charging function!
It is recommended to add the batteries. It will automatic backup when there is a main power interruption.
-
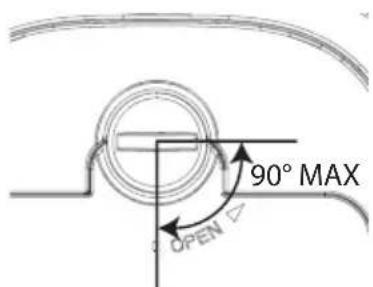
Turn the screw 90^ of the battery cover (20) on the backside of the baby unit in a counter clockwise direction using a screw driver. Remove the battery cover (21). Do not try to rotate the screw further than the position 'open'.
-
Install 3 AA alkaline batteries following the polarity as shown.
- Close the battery compartment.
- Press the On/Off button (14). The power (16) LED will illuminate.
- Press and hold the On/Off button (14) to switch off the baby unit.

Do not mix old batteries with new ones.
Keep batteries away from small children
Do not short-circuit & dispose of in fire.
Remove the batteries if this device is not going to be used for a long period.
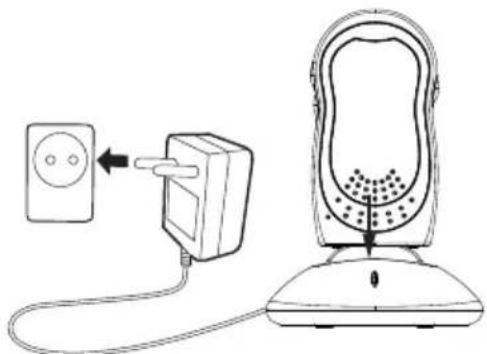
4.2 Baby unit power supply
-
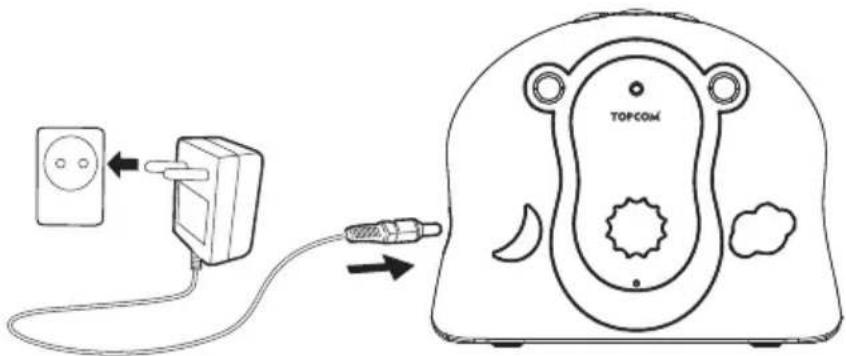
Connect the small plug of the AC adaptor to the power connector of the baby unit and the other end of the adapter cable to the electric socket (230V/50Hz). Only use the enclosed adapter (6V DC / 500mA).
-
Press the On/Off button (14). The power (16) LED will illuminate.
- Press and hold the On/Off button (14) to switch off the baby unit.
4.3 Parent unit battery Installation
- Turn the belt clip facing upwards.
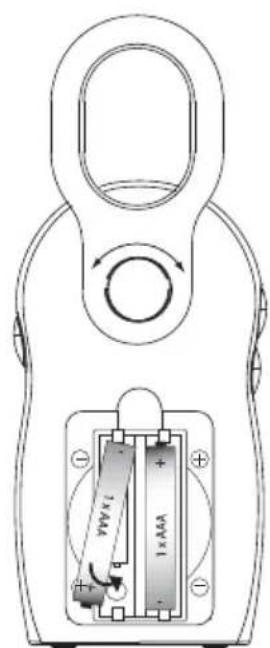
- Turn the screw 90^ of the battery cover (11) on the backside of the parent unit in a counter clockwise direction using a screw driver. Remove the battery cover (12). Do not try to rotate the screw further than the position 'open'.
- Install the enclosed 2 AAA rechargeable batteries following the polarity as shown. Do not install alkaline batteries!
- Close the battery compartment.
- Press the On/Off button (2). The power LED (7) will illuminate.
- Press and hold the On/Off button (2) to switch off the parent unit.
4.4 Parent unit power supply
- Connect the power adapter cable to the main power socket (230V/50Hz). Only use the enclosed adapter (7V DC / 420mA).
- Slide the Parent Unit into the charger. The red charging light illuminates.
- It takes about 13 hours to charge the unit.
- Press the On/Off button (2). The power LED (7) will illuminate.
- Press and hold the On/Off button (2) to switch off the patent unit.
When the battery level is low, the power LED (7) will blink.
4.5 Link
Do not place the baby unit or cables in the crib or within the arm reach of the baby (at least 1 meter away).
When using the Babytalker the first time, it is advised to test the connection.
- Install the parent unit in the same room as the baby unit, but have at least 1 meter between the 2 units.
- When both units are switched on, the parent unit will search for the baby unit.
- The green link LED on Parent Units will flash until they communicate. Once the link is established, the LED will light continuously.
- The voice captured by the microphone will be audible on the parent unit.
The level of the detected speech is represented by the LED's on top of the parent unit. - When the speech reached the maximum level, a beep will be audible.
- When the connection is established, move the parent unit to the monitor room, but within the operation range.
- When there is no connection, an alert signal (double beep) will be audible (out of range warning) and the green connection LED will blink.
- Move the parent unit closer until the link is re-established.
5 Using the Babytalker 2000
5.1 Volume adjustment
There are 5 volume levels on the parent unit.
- Press the volume up button to increase the volume level.
- Press the volume down button to decrease the volume level.
5.2 Night Light
- Press the Night Light button on the baby unit. The night light (17) will illuminate.
- Press the Night Light button again to switch the light off.
5.3 Sound alert
The babies voice detection level is indicated by the number of volume indicator LED's (1) on top of the display.
Only when the volume of the parent unit is set to 'Off', a beep can inform you when the voice level reached the red led zone.
5.4 Paging
When your parent unit is lost, you can track it by pressing the paging button on the baby unit for 2 seconds.
The parent unit will emit a high beep tone for 30 seconds which helps you to find it very easily.
Press the on/off button briefly to stop the beep.
6 Registration
When the baby unit night lights are flashing and/or no communication can be established between the baby- and parent unit (the green link LED on the parent unit will flash), the parent unit needs to be registered to the baby unit.
6.1 Registration
- When baby unit is in power off state, press and hold the On/Off button on the baby unit, while connecting the power adaptor.
- The baby unit will power on and enter registration mode.
- Release the On/Off button. Under baby unit registration mode, the night light will flash for 60 seconds.
- During registration mode, press and hold the On/Off button on the parent unit while inserting charged batteries.
- The parent unit will power on and 3 red volume indicator LED's will flash.
- If the registration is success, the baby unit night light will stop flashing and exit registration mode.
- The 3 red volume indicator LED's on the parent unit will go out and exit registration mode with confirmation tone (1 long beep).
- If the registration is unsuccessful or the registration mode time is elapsed, the baby unit night light will stop flashing and exit registration mode.
- The 3 red volume indicator LED's on the parent unit indication will go out and exit registration mode with an error tone (3 short beeps).
- Retry the procedure.
To verify the linkage between parent unit and baby unit:
- Pressing the paging button on the baby unit for 2 seconds.
- The parent unit will emit a high beep tone for 30 seconds.
- Press any button on the parent unit briefly to stop the beep.
7 Disposal of the device (environment)
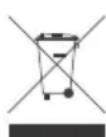
At the end of the product lifecycle, you should not throw this product into the normal household garbage but bring the product to a collection point for the recycling of electrical and electronic equipments. The symbol on the product, user guide and/or box indicate this.
Some of the product materials can be re-used if you bring them to a recycling point. By reusing some parts or raw materials from used products you make an important contribution to the protection of the environment.
Please contact your local authorities in case you need more information on the collection points in your area.
8 Cleaning
Clean the babysalker with a slightly damp cloth or with an anti-static cloth. Never use cleaning agents or abrasive solvents.

This product is in compliance with the essential requirements and other relevant provisions of the R&TTE directive. The Declaration of conformity can be found on: http://www.topcom.net/cedeclarations.php
9 Specifications
Frequency
1.880 GHz -to 1.900 Ghz
Maximum range
Outdoor : up to 300 m - Indoor : up to 50 m
Power supply
Parent unit charger :7V / 420mA DC
Batteries
Baby unit : 6V / 500mA DC
Parent unit: 1,2V x 2 AAA rechargeable batteries
Baby unit: 3 x AA Alkaline batteries (no charging function)
10 Topcom warranty
10.1 Warranty period
The Topcom units have a 24-month warranty period. The warranty period starts on the day the new unit is purchased. The warranty on batteries is limited to 6 months after purchase. Consumables or defects causing a negligible effect on operation or value of the equipment are not covered.
The warranty has to be proven by presentation of the original purchase receipt, on which the date of purchase and the unit-model are indicated.
10.2 Warranty handling
A faulty unit needs to be returned to a Topcom service centre including a valid purchase note. If the unit develops a fault during the warranty period, Topcom or its officially appointed service centre will repair any defects caused by material or manufacturing faults free of charge. Topcom will at its discretion fulfil its warranty obligations by either repairing or exchanging the faulty units or parts of the faulty units. In case of replacement, colour and model can be different from the original purchased unit. The initial purchase date shall determine the start of the warranty period. The warranty period is not extended if the unit is exchanged or repaired by Topcom or its appointed service centres.
10.3 Warranty exclusions
Damage or defects caused by incorrect treatment or operation and damage resulting from use of non-original parts or accessories not recommended by Topcom are not covered by the warranty.
Topcom cordless phones are designed to work with rechargeable batteries only. The damage caused by the use of non-rechargeable batteries is not covered under warranty.
The warranty does not cover damage caused by outside factors, such as lightning, water and fire, nor any damage caused during transportation. No warranty can be claimed if the serial number on the units has been changed, removed or rendered illegible.
Any warranty claims will be invalid if the unit has been repaired, altered or modified by the buyer or by unqualified, non-officially appointed Topcom service centres.
1 Inleiding
http://www.topcom.net/cdeclarations.php
9 Technische Daten
Frequenz
http://www.topcom.net/cdeclarations.php
9 Specifikationer
Frekvens
1,880 GHz till 1,900 GHz
Maximal räckvidd
http://www.topcom.net/cdeclarations.php
9 Specifikace
Frekvence
Maximánlí dosah
1,880 GHz až 1,900 GHz
Venku: až do 300 m
Vevnit: až do 50 m
Napájení:
http://www.topcom.net/cdeclarations.php
9 Špecifikacja
Frekvencia
1,880 GHz -až 1,900 GHz
Maximálny rozsah
Vonku: až do 300 m
Vnútri: až do 50 m
Napájanie