Babyviewer KS4246 - Baby monitors TOPCOM - Free user manual and instructions
Find the device manual for free Babyviewer KS4246 TOPCOM in PDF.
User questions about Babyviewer KS4246 TOPCOM
0 question about this device. Answer the ones you know or ask your own.
Ask a new question about this device
Download the instructions for your Baby monitors in PDF format for free! Find your manual Babyviewer KS4246 - TOPCOM and take your electronic device back in hand. On this page are published all the documents necessary for the use of your device. Babyviewer KS4246 by TOPCOM.
USER MANUAL Babyviewer KS4246 TOPCOM
natural_image
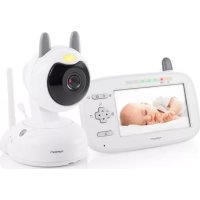
Two modern televisions: one displaying a baby's screen, the other a white digital camera with a smiling face (no text or symbols visible on devices)BABYVIEWER KS-4246
USER GUIDE / HANDLEIDING / MANUEL D'UTILISATEUR / BEDIENUNGSANLEITUNG / MANUAL DE USUARIO / BRUKSANVISNING / BRUGERVEJLEDNING / ANVÄNDARHANDBOK / KÄYTTÖOHJE / MANUALE D'USOMANUAL DO UTILIZADOR / UŽIVATELSKÁ PŘÍRUČKA / ODHΓIEΣ XPHΣΗΣ / HASZNÁLATI ÚTMUTATÓ / INSTRUKCJA OBSŁUGI / UŽÍVATEL'SKÝ MANUÁL
V 1 - 3/13
CE
UK The features described in this manual are published with reservation to modifications.
We request that you read this information in order to quickly become familiar with this equipment and learn how to use its functions.
2 Information regarding this user guide
This user guide contains information on the Babyviewer KS-4246 babyphone (referred to as 'the equipment' in the following) and provides important instructions on the initial use, safety, proper use and maintenance of this equipment. Always keep the user guide available near the equipment. Every person responsible for operating, repairing or cleaning the equipment must read and/or consult the user guide. Keep this user guide in a safe place and give it to the next owner of the equipment.
3 Copyright
This document is protected by copyright legislation.
All rights are reserved, including rights of photo mechanical reproduction, copying or distribution using specific means such as data processing, data storage media or data networks, either in full or in part, as well as technical changes and changes to the contents.
4 W a r n i n g s
! DANGER
This warning points out an imminent hazardous situation.
Death or severe injuries may result if the hazardous situation cannot be avoided.
CAUTION
This warning points out a potentially hazardous situation.
Injuries and/or material damage may result if the hazardous situation cannot be avoided.
i
- This symbol points out information that makes it easier to use the equipment.
5 Proper use
This equipment is exclusively intended for private (non-professional) use in closed rooms for monitoring babies. All other forms of use are improper and can lead to hazards. Always follow the instructions provided in this user guide. No liability is accepted for any loss or damage resulting from improper use. The user of the equipment is exclusively responsible for all risks.
6 Safety
6.1 Risk of electric shock
! DANGER
Contact with conductors or components under electrical tension can be lethal.
Observe the following safety instructions in order to avoid the risk of electric shock:
- To avoid the risk of damage to the equipment, use only the AC mains adapter supplied with the equipment.
- Do not use the equipment if the AC mains adapter, the power cable or the plug is damaged.
- Never open the enclosure of the AC mains adapter. There is a risk of electric shock if you touch any contacts or connections under electrical tension or if you modify the electrical or mechanical construction.
-
Protect the equipment against moisture and moisture penetration, and keep it free of dust. Unplug the AC mains adapter immediately in case of contact with moisture.
-
Unplug the AC mains adapter in case of malfunctions, during thunderstorms, and when cleaning the equipment.
- Protect the cable against contact with hot surfaces or other sources of hazard, and do not allow it to be pinched.
6.2 Using batteries (regular or rechargeable)
CAUTION
Failure to use batteries according to instructions can be hazardous.
- Always use batteries (regular or rechargeable) of the same type.
- Ensure that batteries are installed with correct polarity. Damage to the batteries and the equipment can result from installation with incorrect polarity.
- Never toss batteries into a fire, due to the risk of explosion.
- Never allow battery terminals to come into contact with each other or with metal objects, either intentionally or accidentally. This can cause overheating, fire or explosion.
- Keep batteries out of the reach of children. Consult a doctor immediately in case of swallowing.
- Fluid from leaking batteries can cause permanent damage to the equipment. Take particular care when handling damaged or leaking batteries, due to the risk of corrosion. Wear safety gloves.
- Remove the batteries if the equipment will not be used for an extended period.
6.3 General rules for safe use
To ensure safe use of the equipment, always observe the following safety instructions:
- The equipment must always be assembled by an adult. During assembly, keep small parts out of the reach of children.
- Do not allow children to play with the equipment or parts of the equipment.
- Ensure that the babyphone and power cable are always out of the reach of the baby.
– Never cover the babyphone with a towel, blanket etc. - Defective components must always be replaced by original replacement parts, as other components may not fulfil the safety standards.
- Switch off your babyphone whenever this is requested by a sign, poster, or other message. The equipment used in hospitals and other health care facilities may be sensitive to high-frequency signals from external sources.
7 Operation
The babyphone consists of two units: one for the parents and one for the baby. They are connected by a wireless link compliant with the 2,4 GHz FHSS standard.
Thanks this digital technology, this equipment is protected against eavesdropping and immune to interference from other equipment. The baby unit starts transmitting as soon as the microphone picks up a sound. The sound is reproduced by the parent unit. The microphone sensitivity can be adjusted by the user (see "10.13 Voice activated transmission (VOX)").
i
The babyphone can never replace proper supervision by an adult; it only provides support.
7.1 Baby unit components
See Figure ☐ on the fold-out page.
1 On/off LED
2 Night light LED
3 Infrared LED for night vision
4 On/off switch
5 L e n s
6 Microphone
7 Wall mounting cavity
8 Crib connector nut
9 Light sensor
10 Pair button
11 Speaker
12 Connector for AC mains adapter
13 Room temperature sensor
7.2 Parent unit components
See Figure ☐ on the fold-out page.
14 Volume LED
15 Microphone
16 Increase volume / Next menu item
17 Decrease volume / Previous menu item
18 Music button
19 Camera button
20 3,5" (8,8cm) colour display
21 Link LED
22 Power on/off LED
23 Menu button =
24 Push to Talk button
25 On/off button
26 Belt clip
27 Speaker
28 Connector for AC mains adapter
29 Battery cover with screw
7.3 Display description

Out of range or no connection

LCD display brightness icon

Volume icon Temperature unit
icon

Melody icon Night light icon

8 l n i t i a l u s e
8.1 Package content
The equipment is supplied as standard with the following items:
- 1 baby unit
- 1 user guide
- 1 parent unit
- 1 Li-ion rechargeable battery pack
- 2 AC mains adapters
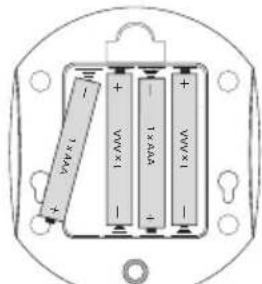
8.2 Installing batteries in the baby unit

- You can operate the baby unit with 4 AAA cells (LR03; we recommend alkaline cells) or the included AC mains adapter.
• The baby unit cannot recharge batteries.
- It is recommended to always leave the batteries in the unit, even if you use the AC mains adapter. The unit will automatically switch to battery power in case of a mains power interruption.
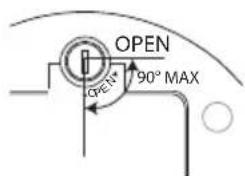
- Turn the screw on the cover of the battery compartment at the back of the baby unit 90^ counter clockwise and remove the battery compartment cover.
text_image
OPEN 90° MAX
Do not turn the screw past the "OPEN" point.
- Fit four AAA alkaline cells (LR03) in the battery compartment. Ensure that the polarity is correct.
- Close the battery compartment.
text_image
1×V +V -1×V +V -1×V +V -1×V +V -1×V
Never mix used cells with fresh cells.
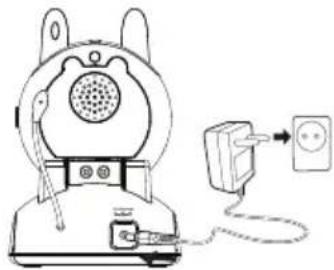
8.3 Connecting the baby unit to the AC mains
Insert the small plug of the AC mains adapter in the mains power connector of the baby unit 12nd plug the AC mains adapter into a mains connector (100\~240 V - 50/60 Hz).
natural_image
Line drawing of a rabbit-shaped device connected to an electrical outlet (no text or symbols)
CAUTION
- The mains connector must be within easy reach so you can quickly unplug the power cable in an emergency.
- Use only the supplied AC mains adapter (6 V DC / 800 mA).
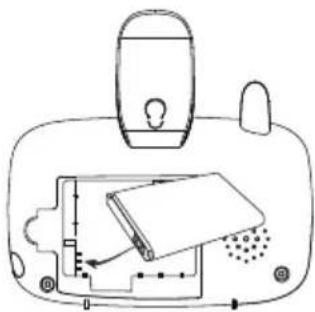
8.4 Installing the rechargeable battery pack in the parent unit
See Figure ☐ on the fold-out page.

CAUTION
- Use only the supplied Li-ion battery pack in the parent unit.
- Rotate the belt clip 26 upward. - Turn the screw on the cover 25 of the battery compartment at the back of the parent unit 90^ counter clockwise and remove the battery compartment cover.
natural_image
Line drawing of a device with internal components and no visible text or symbols
Do not turn the screw past the "OPEN" point.
- Place the Li-ion battery pack in the battery compartment. Ensure that the battery contacts do make contact with the charge contacts as illustrated.
- Carefully close the battery compartment and rotate the belt clip back downwards.
8.5 Connecting the parent unit to the AC mains
- Insert the small plug of the AC mains adapter in the mains power connector 28d plug the AC mains adapter into a mains connector (100\~240 V - 50/60 Hz).

It takes around 10 hours to fully charge the batteries.
9 Installing the Babyviewer KS-4246
9.1 Fine tuning
- Place the camera in a convenient location, point the lens of the camera to the observation area.
- Adjust the angle by rotation the camera.
CAUTION
Do not place the camera and wires within the baby's reach! Fix the camera at least 1 meter away from the baby.
10 Operation and use
10.1 Switching the baby unit and parent unit on and off
- Press the on/off button unit. The display 20a
to s25th on the parent tivated. - Slide the on/off switch unit. The on/off LED
up 4 switch on the baby activated.
i
The parent unit will try to establish a connection with the baby unit. If captured image from the camera is displayed, a connection has been established.
- Press the on/off button unit (press and hold u
to s25ch off the parent til the display goes blank). - Slide the on/off switch baby unit.
dow4 to switch off the
10.2 Baby phone mode.
The Babyviewer can also be used as a audio babyphone, this is an option to save energy. Follow the procedure below.
- Make sure the VOX mode is off, see the VOX paragraph for instructions (See "10.13 Voice activated transmission (VOX)").
- Press the on/off button babyphone modus.
to g25 to audio - Press the on/off button display again.
aga25 to turn on the
10.3 Checking the connection between the parent unit and the baby unit
You should always check the wireless connection when you use the babyphone for the first time.
- Put the parent unit in the same room as the baby unit, separated by at least two meters.
- Switch on both devices. The parent unit will try to establish a connection with the baby unit.
- The display of the parent unit will show the captured image from the baby unit after the connection has been established (monitor mode).
– The sounds picked up by the microphone reproduced by the parent unit. - The volume of the reproduced sound is indicated by the volume LED's 14 the top of the parent unit. The higher the volume, the more LED's are on.
- If no connection is established, "OUT OF RANGE" is displayed.

10.4 Out of range indication
The maximum range between the parent- and baby unit is 300 meter in open area. Different factors, such as bricks and plaster walls, will reduce the range. Moreover, reinforced concrete floors will influence the range tremendously.
In a residence, normal operating range is up to 50 meters and 2 floors.
- If the connection is interrupted, "OUT OF RANGE" is displayed.
- Reduce the distance between the parent and baby units until a new connection is established.
10.5 Setting the reproduction volume of the parent unit
There are 5 volume levels.
- Press button to increase the volume.
- Press button to d17ease the volume.
10.6 Setting the parent unit display brightness
When the display in on.
- Press the menu button once23 The Brightness icon is displayed.
- Press the up and 16n button to select the desired brightness (5 steps).
- Press the menu button to co3 firm.
- After 10 seconds the parent unit will switch back to monitor mode.
10.7 Temperature indication
When the display is on, the baby's room temperature is displayed in the right lower corner.
To set the temperature unit:
- Press the menu button twc23 The temperature icon is displayed.
- Press the up or d16n button to °C (Celsius), °F (Fahrenheit) or "OFF", to switch the temperature indication off.
- Press the menu button to c23 firm
- After 10 seconds the parent unit will switch back to monitor mode.
10.8 Temperature alert
You can set a high/low temperature alert, the unit will give beep when the temperate will go beyond the preset range.
- Press the menu button 3 mm25s to set the highest temperature between 25^ and 35^ .
- Press the menu button 4 times to set the lowest temperature between 15^ and 24^
- You can change the temperature by pressing the up ▲ 16 or down button ▼ 17
- To turn off the temperature alert, select OFF in both modes.
10.9 Zoom function
The parent unit has X2 zoom digital view function.
- When parent unit in X1 viewing mode, press and hold the menu button 1023 seconds,
- The live viewing area will change to X2 zoom mode immediately. At the same time, four direction arrows are displayed at the middle of the screen.
- Press the up button or d16n button to move the screen up and down.
- Press the camera button to mgre the screen to left
- Press the music button to move the screen to right
- Press the menu button key 23 go back to the monitor mode.
Switch back to X1 viewing mode
- When parent unit is in X2 zoom mode, press and hold the menu button for 3 seconds.
– X1 magnification icon appears and the screen becomes X1 viewing mode.
- Press the menu button to 923 back to monitor mode
10.10 Talking with your baby
You can use the parent unit to talk with your baby.
i
Allow your baby to get used to the talk function before you use it in practice.
- Press the Talk button on tl24parent unit and hold it pressed.
- Hold the parent unit vertical with the microphone approximately 10 cm from your mouth, and speak into the microphone.
- Release button whe24ou have finished talking.
10.11 Playing a lullaby
There are 5 pre-programmed lullabies that you can play on the baby unit.
- To play the currently selected lullaby or stop playback, press the music button on 18e baby unit.
- To select a different lullaby, repeatedly press the up button until the desired lullaby is selected. The lullaby icon will display the selected lullaby (1 to 5).
- Press the on/off button ② the desired lullaby is selected.
10.12 Switching the night light on and off
- Press the menu button 5 in23s. The night light icon is displayed.
- Press the up on d16n button to switch the night light "ON" (night light 2 is on) or "OFF".
- Press the menu button to co23firm.
- After 10 seconds the parent unit will switch back to monitor mode.
10.13 Voice activated transmission (VOX)
During night and to save energy, the KS-4246 can be set in VOX mode.
In VOX mode, the display will be activated as soon as the microphone of the baby unit will capture sound.
You can set the sound detection sensitivity (VOX) of the babyphone. If the sensitivity is set to high, the baby unit will pick up weaker sounds.
- Press button 6m23. "VOX" is displayed.
- Repeatedly press button or ▲ to 16 et the 17 VOX sensitivity.
i
The VOX sensitivity is indicated by a black bar on the display:

- To switch off VOX mode, select "OFF".
- Press the menu button to co23firm.
10.14 Night vision
The camera has 6 high-intensity LED's for picking up clear images in the dark. When the build in light sensor 9 measures the ambient light level as low, the LED's will automatically activate.
i
The image changes automatically into black and white mode under the night vision mode.
10.15 Registering the parent unit with the baby unit or register a new camera.
Up to 4 baby units can be registered to one parent unit.
To re-register your baby unit, or register a new baby unit, follow the procedure below:
- Switch on the parent unit
- On monitor mode, press and hold camera button for 5 seconds, it will go to registration mode.
- After registration icon comes out, pthe up button 16 or down button to 17ect the camera channel [C1] or [C2] or [C3] or [C4] that you want the baby unit to pair with.
- Press and release the menu button to co23firm which camera number to be registered.
- The Link LED t21n flashes rapidly for 10 seconds.
- Switch the baby unit ON. Press the pair button ☐ (at the back of the camera).
- If registration is completed, camera video appears on LCD screen and return to normal mode. Baby unit will return to normal mode too.
- If the registration time is expired or registration is failed, "Out of Range" appears on LCD.
NOTE: If a particular channel had been registered already, register this particular channel again will over-write the old registration.
10.16 Selecting the camera
When more than 1 camera is registered.
On monitor mode:
- Press the camera button number is displayed.
brief 9 The camera
- Press the camera button camera or select 'SCAN image will be displayed
again go select another. In scan mode, each camera sequentially.
If only one camera registered, a short press on the camera button @ 19 will have no response!
11 Cleaning and maintenance
This section contains important instructions for cleaning and maintaining the equipment.
Follow these instructions to ensure trouble-free use and prevent damage to the equipment due to improper maintenance.
11.1 Safety Instructions
DANGER
Risk of fatal injury due to electric shock!
- Before cleaning the equipment, switch it off and unplug the power cable from the mains receptacle.
CAUTION
Risk due to leaking battery fluid
Fluid from leaking batteries (regular or rechargeable) can cause injuries (skin irritation) or damage to the equipment. Wear safety gloves.
CAUTION
- Do not use cleaning products or solvents. They can damage the case or seep into the equipment and cause permanent damage.
11.2 Cleaning
– Clean the equipment with a soft, slightly dampened cloth.
– Clean soiled connectors and contacts with a soft brush.
– Clean the battery contacts and battery compartment with a dry, lint-free cloth.
- If the equipment gets wet, switch it off and remove the batteries immediately. Wipe the battery compartment dry with a soft cloth in order to minimize potential water damage. Leave the battery compartment open until it is completely dry. Do not use the equipment before it is completely dry.
11.3 Maintenance
- Check the batteries (regular or rechargeable) in the equipment regularly and replace them when necessary.
- Check the connectors and cables for defects.
CAUTION
- If you suspect that the equipment is damaged, always have it checked by an expert before using it again.
12 Troubleshooting
This section provides important instructions for localising and correcting problems.
Follow these instructions in order to avoid hazards and damage.
12.1 Safety Instructions
! DANGER
Risk of fatal injury due to electric shock!
- Unplug the power cable before attempting to correct a problem.

CAUTION
Risk of hazard due to incorrect repairs
Incorrect repairs can expose users to serious hazards and cause damage to the equipment.
- Never attempt to modify or repair the equipment.
• Always have repairs to equipment or cables performed by a specialist or the service centre. - If you suspect that the equipment is damaged (for example, if it has fallen on the floor), have it checked by a specialist before you use it again.
12.2 Problem causes and solutions
The following table is intended to help you localise and solve minor problems.
| Problem | Possible cause | Solution |
| The rechargeable battery pack of the parent unit does not charge | Charging station plug not connected | Connect plug |
| Dirty contacts Clean | the battery terminals and charging station contacts with a soft cloth | |
| The rechargeable battery pack is defective | Replace the battery pack | |
| Parent unit does not switch on (display remains black) | The rechargeable battery pack is not charged | Charge the battery pack |
| Equipment defective | Contact customer service | |
| The ‘ouange’ icon appears on the parent unit display t of r | Baby unit not switched on | Switch on the baby unit |
| The parent unit and baby unit are too far apart | Reduce the distance between the parent unit and the baby unit | |
| The parent unit is not registered with the baby unit | Register the parent unit with the baby unit (see “10.15 Registering the parent unit with the baby unit or register a new camera.” | |
| The wrong camera is selected. | See “10.16 Selecting the camera” | |
| The parent unit does not reproduce the sounds picked up by the baby unit | The volume setting of the parent unit may be too low. | Increase the volume setting of the parent unit |
| The microphone sensitivity of the baby unit may be set too low. | Check the VOX sensitivity and the volume setting of the parent unit and increase if necessary. | |
| Limited range and interference during transmission | The range of the equipment depends on the surroundings. Steel structures and concrete walls can impair transmission. | Avoid obstacles as much as possible. |
| The equipment emits a high-pitched whistle | The parent unit and baby unit are too close together | Increase the distance to at least 2 metres |
13 Storage and disposal instructions

We recommend that you keep the box and packing materials so you can use them to transport the equipment in the future if necessary.
13.1 Storage
Remove the batteries (regular or rechargeable) from the parent unit and the baby unit.
Store the equipment in a dry location.
13.2 Waste disposal of package materials

The package materials are environmentally friendly materials that can be given to your local waste collector for recycling.
13.3 Waste disposal (environmental protection)
Dispose of the equipment in accordance with the provisions of European Directive 2002/96/EC, Waste Electrical and Electronic Equipment (WEEE), regarding discarded electrical and electronic equipment. Contact your municipal waste disposal
department for information.
Dispose of batteries (regular or rechargeable) in an environmentally friendly manner in accordance with local regulations.
14 Technical data
| [zzgw]ncy 2,4GHz | |
| Range Outdoors: up to 300 m (Line of sight)Indoors: up to 50 m | |
| Video frame rate 25 fps | |
| Operating temperature 0°C to 40°C20% to 75% relative humidity | |
| Parent unit | |
| Display 3,5" (8,8 cm) TFT LCD | |
| Rechargeable batteries Included battery pack:- J H B L - 5 0 C- Li - ion- 3,7V 1050 mAh | |
| AC mains adapter Manufacturer: 5ESPModel: 5E-AD060080-EInput: 100~240V AC, 50/60Hz, 0,15A MaxOutput: 6 V DC / 800 mA | |
| Dimensions | approx. 137 x 84 x 60 mm |
| Weight | 168 g (without rechargeable batteries) |
| Baby unit | |
| Image sensor | Colour CMOS |
| Lens | f 2.8mm, F 2.0 |
| Night vision | 6 Infrared LED |
| Batteries | 4 Alkaline cells (LR03/AAA) (not included) |
| AC mains adapter Manufacturer: 5ESPModel: 5E-AD060080-EInput: 100~240V AC, 50/60Hz, 0,15A MaxOutput: 6 V DC / 800 mA | |
| Dimensions | approx. 86 x 100 x 125 mm |
| Weight | 164 g (without batteries) |
15 EC conformity declaration
Tristar hereby declares that this device is in compliance with the essential requirements and other relevant provisions of Directive 1999/5/EC.
The declaration of conformity can be found at www.tristar.eu
16 Tristar warranty
16.1 Warranty period
The Tristar units have a 24-month warranty period. The warranty period starts on the day the new unit is purchased. There is no warranty on standard or rechargeable batteries (AA/AAA type). Consumable or defects causing a negligible effect on operation or value of the equipment are not covered. The warranty has to be proven by presentation of the original or copy of the purchase receipt, on which the date of purchase and the unit-model are indicated.
16.2 Warranty exclusions
Damage or defects caused by incorrect treatment or operation and damage resulting from use of non-original parts or accessories are not covered by the warranty. The warranty does not cover damage caused by outside factors, such as lightning, water and fire, nor any damage caused during transportation. No warranty can be claimed if the serial number on the units has been changed, removed or rendered illegible. Any warranty claims will be invalid if the unit has been repaired, altered or modified by the buyer.
16.3 LCD defect policy
Despite the highest possible standards, the intricate manufacturing of liquid crystal display (LCD) screens may still produce slight visual imperfections. However, there will be provided a warranty service for your Babyviewer LCD screen if there are:
- 3 bright dots or 5 dark dots or 8 bright and/or dark dots in total; or
- 2 adjacent bright dots or 2 adjacent dark dots; or
- 3 bright and/or dark dots inside an area of 15mm diameter These TFT LCD screen warranty conditions are offered by the LCD manufacturers. Therefore, at its option, the product will be repaired or replaced.
Please note: A bright dot is a white or sub-pixel that is always on. A dark dot is a black or sub-pixel that is always off.
1 Algemeen
Beste klant,
text_image
OPEN 90° MAX
natural_image
Line drawing of a vintage rabbit-shaped device connected to an electrical outlet (no text or symbols)
VOORZICHTIG
natural_image
Diagram of a device interior with labeled components and internal structure (no readable text or symbols)
text_image
OPEN 90° MAX OPENi
natural_image
Line drawing of a rabbit-shaped device connected to an electrical outlet (no text or symbols)A
ATTENTION!
natural_image
Diagram of a device with internal components and a lid, no visible text or symbolsi
text_image
OPEN 108° 90° MAXnatural_image
Line drawing of a vintage rabbit-shaped device connected to a power outlet (no text or symbols)! VORSICHT
natural_image
Diagram of a device with internal components and no visible text or symbols
natural_image
Line drawing of a rabbit-shaped device connected to an electrical outlet with a power plug (no text or symbols)
PRECAUCIÓN
natural_image
Diagram of a device with internal components and a lid, no visible text or symbols
text_image
OPEN 90° MAX
natural_image
Line drawing of a rabbit-shaped device connected to a power outlet with a plug (no text or symbols)
OBS!
natural_image
Diagram of a device with internal components and measurement indicators (no text or symbols)
natural_image
Line drawing of a vintage rotary device connected to a power outlet (no text or symbols)▲ FORSIGTIG
natural_image
Diagram of a device interior with labeled components and no readable text or symbols
Undlad at dreje skruen forbi "OPEN"-punktet.
Volumikon Symbol for

text_image
OPEN 90° MAX
- Ikke drei skruen forbi punktet merket "OPEN".
natural_image
Line drawing of a vintage rabbit-shaped device connected to an electrical outlet (no text or symbols)FORSIKTIG
natural_image
Diagram of a device with internal components and no visible text or symbols
Ikke drei skruen forbi punktet merket "OPEN".
10.8 Temperaturealarm
text_image
OPEN 90° MAX
natural_image
Line drawing of a vintage mouse with earbuds connected to a power outlet (no text or symbols)
VARO
natural_image
Line drawing of a device with internal components and no visible text or symbols
text_image
OPEN 90° MAXi
natural_image
Illustration of a medical device with a plug inserted into a socket connected to a power outlet (no text or symbols present)A
ATTENZIONE
natural_image
Diagram of a device with internal components and a lid, showing no text or symbolsi
text_image
OPEN 90° MAXi
natural_image
Line drawing of a vintage rotary device connected to a power outlet (no text or symbols)
ATENÇÃO
natural_image
Diagram of a device interior with labeled components and internal structure (no text or symbols)
text_image
OPEN OPEN 90° MAX
natural_image
Line drawing of a vintage-style ear-shaped device connected to an electrical outlet (no text or symbols)POZOR
natural_image
Diagram of a device with internal components and no visible text or symbols
text_image
OPEN OPEN 90° MAX
natural_image
Line drawing of a vintage ear-shaped device connected to an electrical outlet with a power plug (no text or symbols)
ΠΡΟΣΟΧΗ
natural_image
Diagram of a device with internal components and no visible text or symbols
text_image
OPEN 90° MAXi
natural_image
Line drawing of a vintage rabbit-shaped device connected to a power outlet (no text or symbols)VIGYÁZAT
natural_image
Diagram of a device with internal components and no visible text or symbolstext_image
OPEN 90° MAX
natural_image
Line drawing of a cartoon character with earbuds connected to an electrical outlet (no text or symbols)
UWAGA
natural_image
Diagram of a device with internal components and a lid, showing no text or symbols
text_image
OPEN OPEN 90° MAXi
natural_image
Line drawing of a vintage rabbit-shaped device connected to an electrical outlet (no text or symbols)