DPW1850 - Pressure washer Defort - Free user manual and instructions
Find the device manual for free DPW1850 Defort in PDF.
User questions about DPW1850 Defort
0 question about this device. Answer the ones you know or ask your own.
Ask a new question about this device
Download the instructions for your Pressure washer in PDF format for free! Find your manual DPW1850 - Defort and take your electronic device back in hand. On this page are published all the documents necessary for the use of your device. DPW1850 by Defort.
USER MANUAL DPW1850 Defort
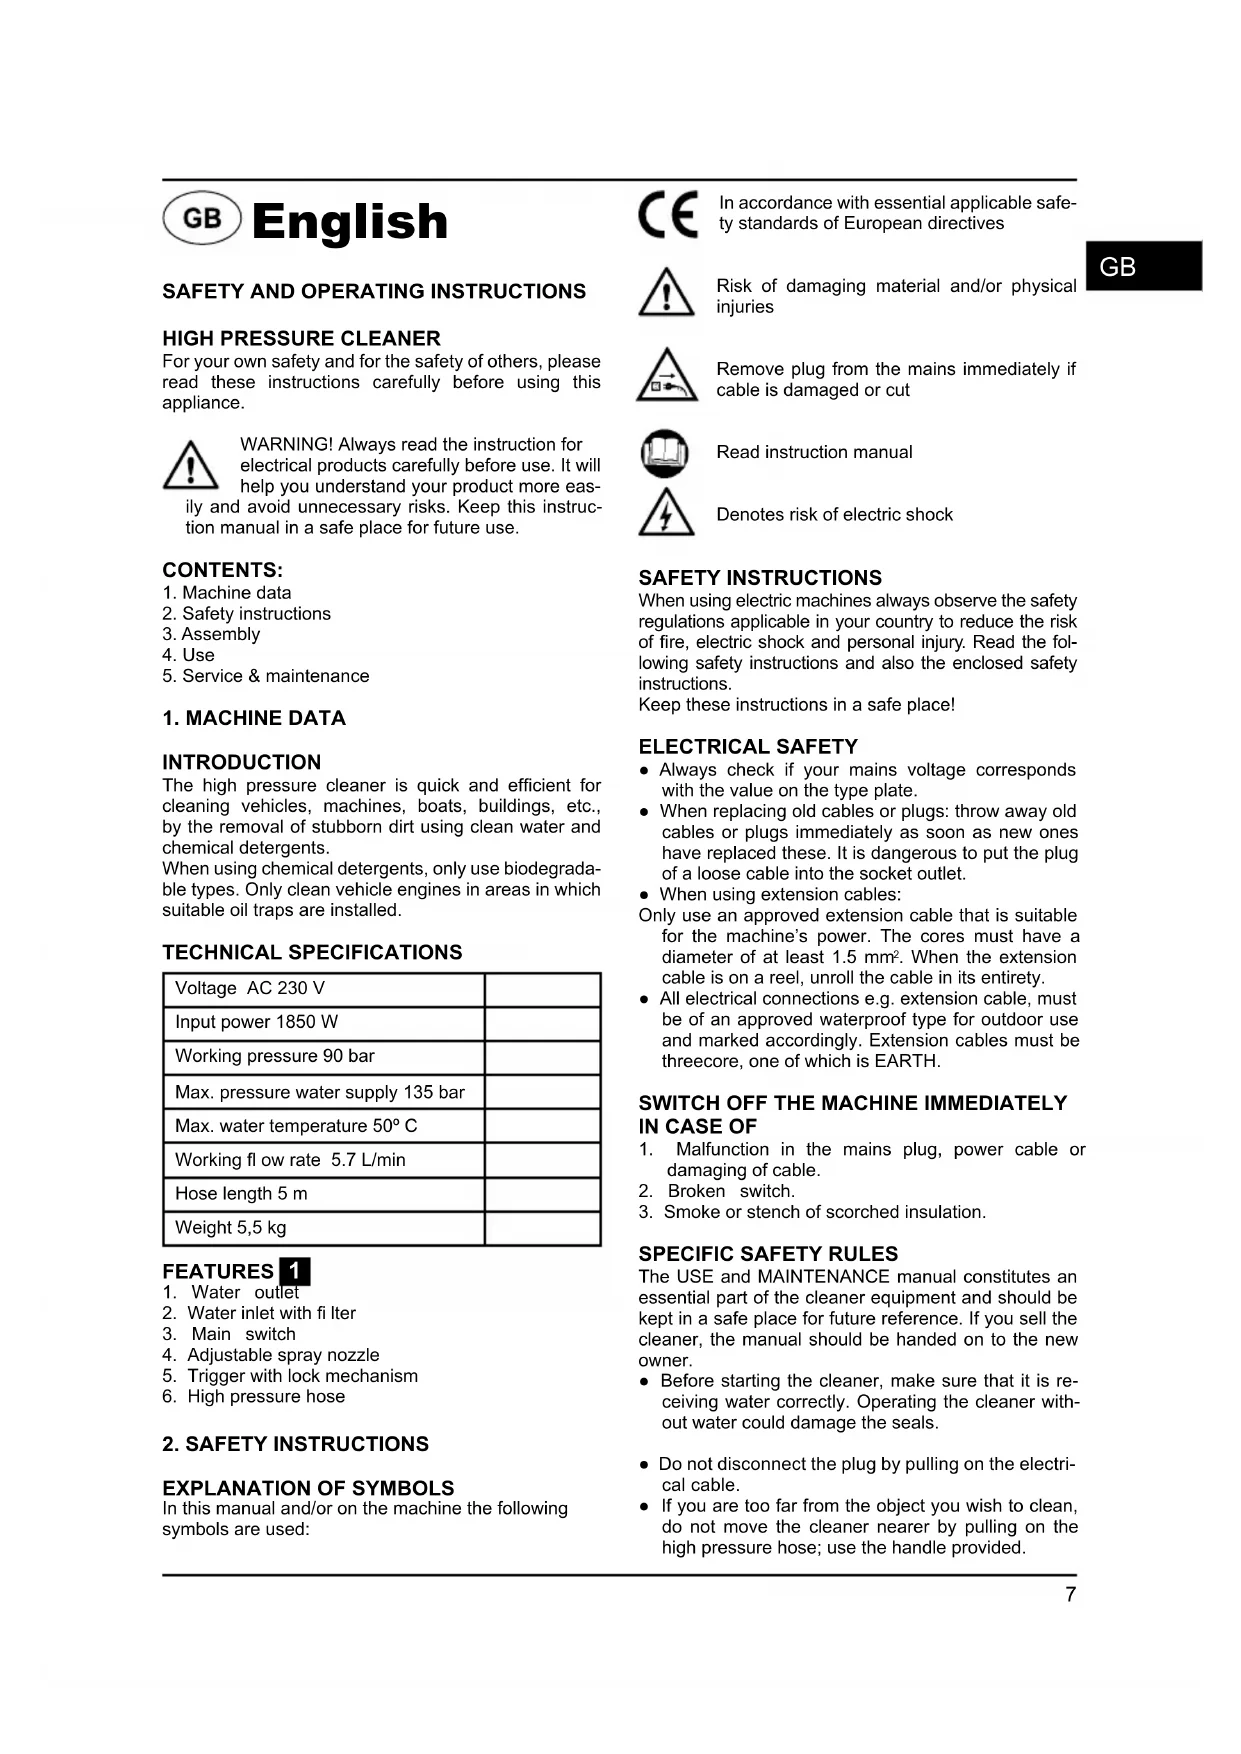
SAFETY AND OPERATING INSTRUCTIONS
HIGH PRESSURE CLEANER
For your own safety and for the safety of others, please read these instructions carefully before using this appliance.

WARNING! Always read the instruction for electrical products carefully before use. It will help you understand your product more eas
ily and avoid unnecessary risks. Keep this instruction manual in a safe place for future use.
CONTENTS:
- Machine data
- Safety instructions
- Assembly
4.Use - Service & maintenance
1. MACHINE DATA
INTRODUCTION
The high pressure cleaner is quick and efficient for cleaning vehicles, machines, boats, buildings, etc., by the removal of stubborn dirt using clean water and chemical detergents.
When using chemical detergents, only use biodegradable types. Only clean vehicle engines in areas in which suitable oil traps are installed.
TECHNICAL SPECIFICATIONS
| Voltage AC 230 V | |
| Input power 1850 W | |
| Working pressure 90 bar | |
| Max. pressure water supply 135 bar | |
| Max. water temperature 50°C | |
| Working flow rate 5.7 L/min | |
| Hose length 5 m | |
| Weight 5,5 kg |
FEATURES 1
- Water outlet
- Water inlet with filter
- Main switch
- Adjustable spray nozzle
- Trigger with lock mechanism
- High pressure hose
2. SAFETY INSTRUCTIONS
EXPLANATION OF SYMBOLS
In this manual and/or on the machine the following symbols are used:

In accordance with essential applicable safety standards of European directives

Risk of damaging material and/or physical injuries

Remove plug from the mains immediately if cable is damaged or cut

Read instruction manual

Denotes risk of electric shock
SAFETY INSTRUCTIONS
When using electric machines always observe the safety regulations applicable in your country to reduce the risk of fire, electric shock and personal injury. Read the following safety instructions and also the enclosed safety instructions.
Keep these instructions in a safe place!
ELECTRICAL SAFETY
- Always check if your mains voltage corresponds with the value on the type plate.
- When replacing old cables or plugs: throw away old cables or plugs immediately as soon as new ones have replaced these. It is dangerous to put the plug of a loose cable into the socket outlet.
- When using extension cables:
Only use an approved extension cable that is suitable for the machine's power. The cores must have a diameter of at least 1.5mm^2 . When the extension cable is on a reel, unroll the cable in its entirety.
- All electrical connections e.g. extension cable, must be of an approved waterproof type for outdoor use and marked accordingly. Extension cables must be threecore, one of which is EARTH.
SWITCH OFF THE MACHINE IMMEDIATELY IN CASE OF
- Malfunction in the mains plug, power cable or damaging of cable.
- Broken switch.
- Smoke or stench of scorched insulation.
SPECIFIC SAFETY RULES
The USE and MAINTENANCE manual constitutes an essential part of the cleaner equipment and should be kept in a safe place for future reference. If you sell the cleaner, the manual should be handed on to the new owner.
- Before starting the cleaner, make sure that it is receiving water correctly. Operating the cleaner without water could damage the seals.
- Do not disconnect the plug by pulling on the electrical cable.
-
If you are too far from the object you wish to clean, do not move the cleaner nearer by pulling on the high pressure hose; use the handle provided.
-
In versions not equipped with TSS device, do not operate the cleaner for more than 1-2 minutes with the gun closed as this could damage the seals.
- Protect the cleaner from freezing during the winter.
- Do not obstruct the ventilation grilles during operation.
- The cross-section of any extension cables used must be proportional to their length, i.e. the longer the extension cable, the greater the cross-section; cables with a protection level of "IPX5" must be used.
- Position the cleaner AS NEAR POSSIBLE to the water supply.
- The packaging is easily recyclable, and must be disposed of in compliance with the regulations in force in the country of installation.
- Use the cleaner only with accessories and replacement parts authorized by the manufacturer. The use of original accessories and replacement parts will ensure safe, trouble-free operation.
- The cleaner must be used standing on a secure, stable surface.
- Avoid unintentional firing of the trigger. Do not carry the lance/ trigger assembly with your hand over the trigger. Always use the trigger lock mechanism.
- Ensure that the safety lock on the trigger is used, when you have stopped using the pressure washer to prevent accidental operation. (fig 5)
SAFETY "MUST NOTES"
- EXPLOSION OR POISONING.
DO NOT use the cleaner with inflammable or toxic liquids, or any products which are not compatible with the correct operation of the cleaner. - INJURY HAZARD.
DO NOT direct the water jet towards people or animals. - ELECTRIC SHOCK HAZARD.
DO NOT direct the water jet towards the unit itself, electrical parts or towards other electrical equipment. - SHORT CIRCUIT HAZARD.
DO NOT use the cleaner outdoors in case of rain. - INJURY HAZARD.
DO NOT allow children or incompetent persons to use the cleaner. - ELECTRIC SHOCK HAZARD.
DO NOT touch the plug and/or socket with wet hands. - ELECTRIC SHOCK AND SHORT CIRCUIT HAZARD.
DO NOT use the cleaner if the electrical cable is damaged. - EXPLOSION HAZARD.
DO NOT use the cleaner if the high pressure hose is damaged. - ACCIDENT HAZARD.
DO NOT jam the trigger in the operating position. -
ACCIDENT HAZARD.
Check that the data plates are affixed to the cleaner, if not, inform your dealer. Cleaners without plates must NOT be used as they are unidentifiable and potentially dangerous. -
EXPLOSION HAZARD.
DO NOT tamper with or alter the calibration of the safety valve.
- HAZARDOUS ALTERATION OF OPERATING PERFORMANCE.
DO NOT alter the original diameter of the spray head nozzle.
- ACCIDENT HAZARD.
DO NOT leave the cleaner unattended. - SHORT CIRCUIT HAZARD.
DO NOT move the cleaner by pulling on the electrical cable.
SAFETY "MUSTS"
- SHORT CIRCUIT HAZARD.
All electrical conductors MUST BE PROTECTED against the water jet.
- ELECTRIC SHOCK HAZARD.
The cleaner MUST ONLY BE CONNECTED to a correctly earthed power supply.
-
Use a Residual Current Device (RCD) of not more than 30mA , at the plug socket when using this appliance.
-
INJURY HAZARD.
The high pressure may cause materials to bounce off surfaces at speed; therefore protective clothing and safety goggles MUST BE WORN.
- ACCIDENTAL START-UP HAZARD.
Before doing work on the cleaner, REMOVE the plug.
- INJURY HAZARD
Before pressing the trigger, GRIP the gun firmly to counteract the recoil.
- CONTAMINATION HAZARD.
COMPLY WITH the requirements of the local water supply company. According to DIN 1988, power-jet cleaners may only be connected to the mains drinking water supply if a backflow preventer valve with drain facility is installed in the supply hose.
- ACCIDENT HAZARD.
Maintenance and/or repair of electrical components
MUST be carried out by qualified staff.
- INJURY HAZARD.
DISCHARGE residual pressure before
disconnecting the cleaner hose.
- ACCIDENT HAZARD.
Before using the cleaner, CHECK every time that the screws are fully tightened and that there are no broken or worn parts.
- EXPLOSION AND ELECTRIC SHOCK HAZARD.
Only USE detergents which will not corrode the coating materials of the high pressure hose/electrical cable.
- INJURY HAZARD
ENSURE that all people or animals keep a minimum distance of 16 yd. (15m) away.
SAFETY VALVE
The safety valve also functions as a pressure limiting valve. When the gun trigger is released, the safety valve opens and the water recirculates through the pump inlet.
3. ASSEMBLY
CONNECTING THE HOSE AND TRIGGER ASSEMBLY 1 2
- Before connecting any hoses or trigger/ lance assembly fi rst check all connections to ensure they are free from any blockage.
- Screw the outlet pressure hose (6) onto the machine and ensure a good hand tight fit.
- Connect the spray lance (4) to the trigger (5) by means of the push in and twist bayonet fitting (fig 2). Ensure that this connection has been performed positively and the bayonet has located correctly. Ensure the hose has no kinks in it.
4. USE
WATER SUPPLY
- Ensure that you have a suitable water supply to feed
the pressure washer. Check that all connections are tight and there are no leaks in the hose.
- The supply tap should be fully open (do not turn on the pressure washer yet).
- Now depress the trigger (unlock trigger lock first) to let water pass through the unit and expel any air.

WARNING! This unit is to be used with a coldwater source only!
ELECTRICAL CABLES
Ensure that all cables are damage free before connecting to the power supply.
The electric supply connection shall be made by a qualified electrician. It is recommended that the electric supply to this appliance should include either a residual current device that will interrupt the supply if the leakage current to earth exceeds 30mA for 30ms or a device which will prove the earth circuit.

CAUTION! The machine may cause electrical disturbances when starting. If the motor stops and fails to restart, wait 10-30 minutes
before restarting. THERMAL CUTOUT TRIPPED

CAUTION! The cleaner must only be used with clean water; use of unfi itered water or corrosive chemicals will damage the cleaner.
- Turn the motor switch to the "0" position.
- Check that the electrical supply voltage and frequency (Volts/Hz) correspond to those specified on the cleaner data plate.
- Plug in the pressure washer and turn the unit on with the main switch (3).
ADJUSTING THE NOZZLE 3
Water may be sprayed out of the nozzle either linearly or in a fan shape. Turn on the pressure fi rst, and then adjust the nozzle.
The water inlet filter must be inspected regularly, so as to avoid blockage and restriction of the water supply to the pump. (fi g 4)
USING THE DETERGENT BOTTLE
To enable supply of detergent from the bottle, remove nozzle of the spray lance according to the arrow on the Fig. 3a.
The detergent nozzle and tank attaches to the end of the trigger assembly in the same way as the lance does. Fill the detergent tank with liquid detergent. When the trigger is now pressed with the machine running, detergent will spray out with the water.
RECOMMENDED CLEANING PROCEDURE
Dissolve dirt by applying detergent with the fan jet to the dry surface. On vertical surfaces, work from the bottom upwards. Leave the detergent to act for 1 to 2 minutes, but do not allow to dry out. Apply the high pressure jet, keeping the nozzle at least 30~cm (10 in.) from the surface, working from the bottom upwards. Avoid allowing the rinsing water to run on to unwashed surfaces.
SHUTTING DOWN THE PRESSURE WASHER

CAUTION! Never disconnect the high-pressure hose from the machine while the system is still pressurized.
Follow the correct procedure:
- Turn off the pressure washer by using the switch on the machine.
- Unplug the unit from the power source.
- Turn off the water supply at the tap.
- Press the trigger of the gun to depressurize the system.
- Disconnect the supply hose to the machine
- Wipe all surfaces of the unit with a damp clean cloth.
- Engage the safety lock.
TROUBLESHOOTING
-
When switched on, the machine will not start working.
-
Plug is not well connected or electric socket is faulty.
- Check plug, socket and fuse.
- The mains voltage is lower than the minimum requirement for start up.
Check that the mains voltage is adequate.
The pump is stuck.
- Refer to after storage instructions. Switch off the unit and let the motor cool.
- Thermal safety has tripped.
- Leave the lance open with water coming through.
-
Fluctuating pressure
-
Pump sucking air
- Check that hoses and connections are airtight
- Valves dirty, worn out or stuck. Pump seals worn.
-
Clean and replace or refer to dealer.
-
Water leaking from the pump
Seals worn out
- Check and replace, or refer to dealer
4. The motor stops suddenly
-
Thermal safety switch has tripped due to overheating.
-
Check that the mains voltage corresponds to specific cations. An extension cable, which is too thin, and tool long can cause a voltage drop and cause the motor to overheat. Leave to cool down. Use heavy duty extension cables.
5. The pump does not reach the necessary pressure.
Water inlet, filter is clogged
- Clean the water inlet fi Iter
- Pump sucking air from connections or hoses
- Check that all supply connections are tight
- Suction/ delivery valves are clogged or worn out.
- Check that the water feedinghose is not leaking
- Unloadervalue is stuck
- Clear or respire valves
-
Lance nozzle incorrect or worn out
-
Loosen and re-tighten regulation screw.
Check and/or replace.
5. SERVICE & MAINTENANCE

WARNING! Unplug the electric cable (power source) prior to any maintenance or preparatory storage operations.
Make sure that the machine is not live when carrying out maintenance work on the motor.
- To ensure good performance, check and clean the suction and detergent filters after every 50 hours of operation.
- Long periods of disuse may lead to the formation of lime scale deposits. Working through the hole on the rear, RELEASE the motor using a screwdriver (for models with this feature).
Then remove the screwdriver and proceed with the restart operations.
CLEANING
Keep the ventilation slots of the machine clean to prevent overheating of the engine. Clean the housing regularly with a soft cloth, preferably every time it is used. Keep the air vents free from dust and dirt. Remove stubborn dirt with a soft rag moistened in soapy water. Do not use any solvents such as petrol, alcohol, ammonia, etc. as such substances can damage the plastic parts.
LUBRICATION
The appliance does not need any extra lubrication.
STORAGE AND TRANSPORTATION
Keep the high pressure washer in well-ventilated dry premises with temperature not going below +5^ . Operate the cleaner with non-corrosive/non-toxic antifreeze before storing for the winter.
FAULTS
If a fault arises through wear in an element, please contact the service address shown on the warranty card. A drawing of the spare parts that may be obtained is included at the end of these operating instructions.
ENVIRONMENT
To prevent damage during transport, the appliance is delivered in a solid packaging which consists largely of reusable material. Therefore please make use of options for recycling the packaging.

Français
MANUEL D'INSTRUCTION ET CONSIGNES DE SECURITE
NETTOYEUR HAUTE PRESSION
- FARA FÖR KORTSLUTNING.
JUSTERING AV DYSEN 3
5. SERVICE OG VEDLIKEHOLD

TAIENDAVAD OHUTUSJUHISED
TEHNISKÁ APKALPOSÁNA UN APKOPE:

Pirms tehniskas apkalposanas atvienojiet instrumentu no barosanas tikla.
Apkope
Katru reizi beidzot darbu rekomendejams attirit instrumenta korpusu un ventilacijas atverumus no neti-rumiem un putekliem ar miksto auduma gabalu vai salveti.
Ir nepielaujami izmantot piesarnojumu noversanai skidinatajus: benzins, spirts, amonjaka skidumi un n.l. Skidinataju pieliotojums var atvest pie darbgalda korpusa plastmasu detalu bojajuma.
Filtraparaudeau
Regulari apskatiet un pec nepieiesamibas parbaudiet iepludes iscaurules filtru, laizvairities no ta piesarosanas un udens padeves sukni pasliktinasanas (zim.4).
Ellośana
Instrumentam nav nepiecsama papildus elo'sana.
Glabăšana
Glabajiet iekartu labi ventilijamas telpas ar temperaturu ne zemak par +5^ . Aparata ilgas dikstaves var novest pie kalkmens nogulsnveidoesan.
Bojajumi
IpeepHaayanompa6oTbI:
- Y6eIHTecb B TOM, QTO BOda NoCTynaET B MOKY DOJKNHbIM O6pa3OM. 3KcNpyaTuaM ROKK 6e3 BOdBi MoKet PnBecTu K ee NOBpeXDeHHIO.
- PpOBeBpTe HaJExKHOCTb BCEx CoeUHHeHn n OTCyTCTBnE NOBpeKdEHHbIX INN IN3HOWeHHbIX DeTaJIeN.
06uyeyka3aHHno 6e3oNaCHOCn
- EcIn Bbl HaxoIndTeCb CnIuKOM DaIeKO OT npEaMeTa, KOtOpBb coBpaTeCb BbIMbTb, He nepemeuaTe annapat NyTcM nepemeueHra ero 3a WlaHr BbcOko TdABHeHn IIN 3a WHyp NITaHn; nCNoB3yIte DnA 3TO R CneuaNbHyO pyKoRKy.
Дя moDEne, He OCHaJIeHHbIX (aBTOcTOnOM), 3a- npeHcHO NcONb3OBAHnE MoKN B TeHeHnE 60Jee yem 1-2 MInHT npn 3akpytOM nIcToJeTe, TAK KAK 3TO MOKeT BBIECTn Annapat n3 CTPOr.
B 3UMHNX yCIOBnIX xpaHnTe aannapat B TEnlOM mecte. - Ppi pa6ote annapata BeHTnnaHIOHHbIe OTBepCTN aONKHbI 6bITb OTKpbITbl.
PacnojaraTe annapaT KaK MoXHo 6nXKe K nCToHnKy BDOChA6xHeHH. - Ncnoj3ynte TOnbKO Te npHaJNeKHOCTn 3a-nacHbIe YAcTn, KOtOpBle peKOMeHNoBaHbl IpON3BO-dntenem. PpIMHeHne oprHaNbHbIX npHaJNeKHOCTeN 3anaChbIX Yacte N obecneHT HaedKHyIO N 6e3onachyio pa60ty.
- YctaHabnBaIte MoKy B yCTOuBOM IIOXKeHN, Ha poBHOI NOBepxHOCTN.
He donyckaTe HenpeHaMepeHHoro HaxaTna Ha Kypok nctoTe-pacbInTeIe. He nepeHocTe MoKyB cbope c nctoTeOM, depka naeneu Ha Kypke. - InpneDopBpaueHn CnyauHoro BkIoueHn no OKOHuaHn pa60bC moKoN y6eNTecb, YTO KypOK nCTOneta 3a6nokpObaH (PNC.5).
Bo n36exkane B3pbBa nJn OTPaBneHn 3anpeuaetcnaonb30BaT npn pa6ote C moKoI neKOBocnIamehHOUncEa Nn TOKcnHbIe KJNKOCTn JIN6O INhIE cpeCTBa, HecOBmectMble C npabInbHo np6oto MoKn.
He HanpaBnIe CTpyo BOIbHa IIOJe n XINBOTHbIX: 3TO TpaBMOOnaCHO. NocToPOHHne JIOJN IN XINBOTHbie DOJIKNbI HAXOINTbcra Ha pacCToAHn He MeHee 10 METPOB OT MecTa pa6Otbl.
HeIOBepaTe NcNoJIb3OBAHne annapata Detam Heo6yehHHbIM NuaM.
He qncpyte Kypok nctoJeTa B noJIOKeHn «BkIoueHo».
He npnyckaetc n3MeHrTb opnHaHbHbI dnaMetp paNblntelbHO rIOBKn fOpcyHKn.

He octabJrTe moKy 6e3 npncmToPa.
CTpy BoBbIO60JIbUIM DaBHeHnEM, nonaJaHa nppeMeTb, MoKET C cINIOI OT6paCbIBaTb IN, NO3ToMy npi pa6ote Heo6xOuMo HAeBaTb cneOdoJy H 3aunTHbIe OQKn.
- Npeed HaxaTneM Kypka NCTOJeta KpeNko COXMnTe NCTOJET, YTO6bI ERO He BbIbIIO n3 pyKn npn OTdaue.
Bo n36eKaHne 3aqr3HeHncoBIOdaTe Tpe6oBaHnmeCTHOI opraHn3aun BOIOCh6KeHn. B COOTBeTCTBn CO cTaHApTOM DIN 1988,MOeHbIe annapaTbIpa6OtaHOpune I npHHuY BOJHOH CTpyn BBICOKOrO daJIeHn, pa3peUHeNO NQKJIouyATb K CETN NITbeBOBODOnpOBoA,ecIn Ha NOBDOJUeM WJNaHRe IMeETcRc O6paTHbI KJIanaH C DpeHaXhBM yCTpoiCTBOM.
Bo n36ekaHne TpaBM nepeoOTcoeHNHeHnEM ⅢnaHa oT annapaTa CneJyET c6pocntb OCTaTOHoe DaBHeHne.
3KCNJNYATAUHA
YctaHObKa nuctoJe-t-pacnbIInTeTn 12
- HabnHTte IinaHr BbICOKO rDaBJIeHn (6) Ha naTpy60k MoiKn.
HacaKa (4) qKcpyetcB nctonee (5) 3acet 6aiohEHoro 3aTbopa. BCTabte HacaKy B nctOlet n npOBepHnTe ee BOKpy ee OCN DO HaJeXHOI oHKcaun (PNC.2). CHImaeTcHacaKa BOpaTHOM npAKe: BHaHane HaxMITE Ha Hee, YTo6bl Cnerka BdaNTb BrJy6 nCToneta, 3aTe m npOBepHnTe BOkpye ee OCN I Nocne 3TORBOBHeTE INNCTOneta.
BkIIOUeHne
IO BKHIOHEHMOI HEO6XOIMO BbIYCTITb I3 CNTEmbl BO3DyX NdoBcA, YTO6b BOa DOwla Do CONa Hacaikn.
BHIMAHHe!
KoHCTpykun MOKn He DoNYCKaET NcNOJb3OBAHne BObl, HarpeToI Do BbICOKO TemNepaTpybl (CM. TexHNuecknexapakTepeNCTkn).
- PnpcoeHnHTe IJNaH DJI NODaH BODbI K BXOHDMy naTpy6ky MoKn. Y6eHNTecb, yTO IJNaHr He nMeet nepern6ob.
- OTKpOTe BeHTnIb IJI NaH BOnBb (Noka eUe He CneDyET BKIOuAtb annapat). PIOBepBe THaEeK-HoCTb BCEx CoEINHeHm N y6eInTEcb B OTCyTCTBn NpoTeeK n3 WJNaHra.
- Tenepb HadaBnTe Ha Kypok nuctoneta-pacbInnten (chayana cneDyET CHrTB erO 6IOKIpOBky), UTO6bl BOda npoJna Ype3 yCTpOINCTBO N BbITeCHnla BECb BO3dyX.
- Y6eIntecb, yTo BblKnIohateB 3neKtpoDburatela (3) HaxoIHTcB NOIOKeHmN «BblKnIohoeHo'. NODKlnOHTe MoKy K Cetn NiTahnN IN BkIIIOHTe yCTpoICTBO npn NOMOUs BBkNIOHaTeLa (3).
- Ecnn DniratEnb BO Bpemra p6oBtbi octaHOBnIcN He nepe3anyckaetra, 3TO MOKeT CBnTeBCTBOBaTb O cpabTBaHmN TepMO3aunTbI. CneDyET DoXJaTbcr OCTbIBAHn DniratEn N Bo3Bpata yCTpoNCTBa TepMO3aunTbI B NCxOxDHe COCTOHNHe.
PeryIinpoBkaΦopcyHkn 3
Boa moKet paCnblIbTbcN 300pcyHKn IIOo y3koHa npabHeHcN Oe, IIOo Beepoo6pa3Ho. Chayana noaTe BOy, 3aTEMOTpepynpyIte opcyHKy.
PpimHeHne emKocTn dna MOUoTe cpeCTBa
TtobI oecneuHb NOaMy MOUeO cpeCTBa n3 EMKoCTn, nepeBnHbTe 06My paCbInTeJrNo cTpeJIke, KaK NOKa3aHO Ha pncyHKe 3a.
EmkoctbIgmoUeOcpeCTBa npncoeHnreTcK nntoTey-pacblnteNoTakKe, KaN pacblnteHb-Ha HacaKa.3anOnHte EMKOCTb XnDkIM MOUIm cpeCTBOM.Tenep npn Haxatm Ha Kypok paCblnteI npn pa6toAouem annapate MoUoee cpeCTBO 6ydt pa36pb3rNBAtcb Bmecte C BOdoi.
Pekomehnyemb cinoc6 pa6oTbi
Pra3b CneDyET pactBoprTb, HnpaBnRA Beepo06pa3HyO CTpyIO C MOIOUM CpeIcTBOM Ha cyxyIO NOBepxHocTb. OTMbIBaTb BepTKaJIbHbIe NOBepxHOCTN CneDyET, NpeMeMaJ cTpyIO CHn3y BBepX.
OctaBte HaHeccHHbI pactBop MOIOUero CpeCTBa Ha 1-2 MNHyTbI, HO He N03BOJnTe EMy BBICOXHYt. 3aTEM NOaIe CTpyIO BOIbI NOd BbICOKIM DaBJIeHNEM, DePka cOnNo HA pacCTOAHN OKoNo 30 CM OT nobepxHOCTn IN pepeMaJ erO CHN3y BBepx.
BbIKIOueHne
- OTKIIOHTe MoKy npi NOMOUI BBKIIIOUaTeTn (3).
- OTKHouTe annapat OT cETn HtAHnA.
- OTKIIOHTe IODaCy BObI npN NMOOUIBENTINIA.
- 063aTeNbHO HaxMnte Kypok nuctoTa, TTo6bl c6pocntb daBneHne B cnCTeme!
- OToeHNHTe noaOuNn IuaHr ot annapata.
- IpoTpTe BCE NOBepxHocT MOnKIN BnaXHO, YI-CTOJ TKAHbIO.
- 3a6nokpyte kypok nctoJe-t-pacbnntenra.
TEXHNUECKOE OBCJNYKUBAHNE I YXOD
IpeedTexHnueckmO6cnyKbAHemOTKnHouaTe yCTpOeCTBO OT cETn NHTAHJ.
yxo
KaKdbpa3noOKOHuaHnnpa60tbpekomeHyetycnpoTnpaBkopnycycTPOIcTBnBEHTNIAHOHHbIEOTBepCTNMAIKOBNAJXHOTKAHbIOINCaFETKO.
Heonycnmo nCnoJb3ObaT bIy ycTpahHna 3aqr3- HeHH pactbopnteIN: 6eH3NH, cNPT, amMaHhble pactbOpbl n.t.I. PpImeHHepe pactbOpTeJe moKet npBecTN K NOBpeKeHIO KOpNyca yCTpoNCTBa.
PpOBePkФnIbTpA
PeryIaHPOOCMaTPnBaIteN npn Heo6xOdMocTn IpouH ⅢaIte pInbTp BnYckHOrO nAtpy6ka, YTO6b I36exKaTb erO 3acOpEny N yXuDHeHnnoDaun BoBb Hacoc. (Pnc.4)
Cma3ka
AnnapaT He HyxdaetcB DOnoJIHnTeIbHoN Cm3Ke.
XpaHeHne
XpaHnTe MoNky B XopoO BoENTnInpyEmbIX NOMEueHnIc X TeMnepaTpyo HnKe +5^ .IINTeBhIe nepNoDbl npocTo aannapaTa Mory T npuBecTu K o6pa3OBAHIO n3BecTKOBbIX OTNOKeHNI.
YcTpaHeHne HeucnPaBHOCTe
B cnyuae HencnpaHocTei o6paTntecb Cnyk6y cepBnca SBM Group.
3AUHTA OKPYKAIOUEN CPEbl
HehykHbIe Bam 60nee INHCTpyMeHT, npHaJnEHXoCTn U (nn) ynaKOBky npoc6ba cdaBaTb B 6nJaWyo opraHn3aUIO, 3aHmHaOuOcB TOpuHOn nepepa60Ko.
KZ Ka3aKa7a
3JEKTPJIK XOFAPfbl KblcblIMdbI Kyfbll
KoJDAHbIybl
OcbI Kpyblfbl ABTOMOBnIbepdi MaWHaIapbl, KaBkTAPdbI, FImapattapbl XHe 6ackanapbl Ta3a Cyblx He TypakTbI NaCTAHynapbl XIO YUHIN XMnJIbIK Kyy KpaIapbln naJaIaNbHIn TImDi XHe Te3 KyaHaFApHaIHaN. XmNnblK Kyy KpaIapblN KOJdaHaHaDa, 6NoONrnaBlk BIdbIpayFa YUbipaTbH IN KpyIapblfaHa KOJdaHbIbI3.
ABTOMO6nJIbIbI KO3FaNTKbIUtapDbI TEK MaJ YCTaFbIUtapMeH Xa6DbIKTaIHaOpbIHApda FaHa KybIbI3.
TEXHNIKAJIbIK CINATTAMAJIAP
| Kephey, B 230 | |
| Тьыныларын Куат, В T 1850 | |
| Альстын Кысимы, бар (КПа) | 90 (9000) |
| Су бердін сін жorары Кысимы, бар (КПа) | 135 (13500) |
| Сydын сін жorары Temnéратурасы, °C | 50 |
| ΘΗΜДΙΝΙΚ, Π/MΗ 5.7 | |
| Шангын Уздыгы, М 5 | |
| Салмагы, кг | 5,5 |
KYPbINFbl 1
- Cy wbfapaTbIH Tecik
- Cy cy3riwi 6ap kipic tytiri
- Axbipatkbilw
- Cantama
- Waaibpaatkbiw nctoNET
- KorapbI KbICbIMDaftbI WnHaH
KAYINC13IK TEXHNKAcbIhBih EPEXJELEPI
Opt TyTaHy, 3NeKtp TOrbHa yPbHy MeH XapakaTbI
6oJIbIpMaY yWIn 3NeKtpnIK Xa6DbkTamaHbIOcbI
HyCKayIbIKbIH TaanTapBaHa ca naiDanahy KepeK.
3JneKtpnik-TexHnKaIbIK Kayinci3dIK
KocydbH anDbIHda KopekTeHy Jeicihderi KepHey KjYbIu 3JNEKTPK03FaTkbIuTbH KepHeyiHe caN KeNTiHdiirHe Ke3iHi3Di JXeTKi3iyH3 KepeK.
- Tek bɪnfānʌbɪktah Kɒpfaɪnfaɪy ʒaɪpʌkʌiːnneɪ naiɪdʌnʌhɪbɪ. Aca y3bɪH y3apʌkʌiːtəpʌbɪ Kɔnʌdʌyfa 6oɪmʌdɪ. y3apʌkʌiːn Wɔnʌdʌhɪfən Ke3eɒn opam-Haŋ Tɒnbɪk wɛuɪny kepek. y3apʌkʌiːn cblɪmʌpaɪbɪhɪn KənndeHeN Kecɪnɪdi ciɪn aɪyaɪəhɪ 1,5 MM² a3 6oɪmʌy kepek.
KyftbIHTbl KopraHbIC axbipaTy Kypblntbcbl (MaKcImaIdbI 6oc KeTKeH TOK-30 mA) apKbIbnkocy KEPEK.
AshaHbI po3eTKaJaHa axbIpaTkaH Ke3Je, KopeKTeHdipy 6aybHaH TaPtnaHb3.
Kbicka TynbikTanydbi 60bnbipMay yuH cy afbihn annapaattbH e3i Meh 6acka 3neKtpnik Jka6bikTamaFa
6afttamaHb3. KaHbIpyKHyIxyfbiUdb6JImeDeh TBICKepeKoJaHaBbI3.
Cy KonblHb36eH aHaFa XaHe (Hemece) KopeKTeHdipy JeNiciHH po3eTKacbHa TImeHi3.
KeNeci KaIaIaIapJa KBybIbTb Te3 oWipiH3:
- AwaHbIH Hemece KopeKeTepHy 6aydbIH akaynbIFbl Hemece 3aKbIMdaHybl.
- AxbipataTbIWBtHcbIHbI.
- TyTinHHH Hemece XaHfAH Okwayn iicHiPiJa 6onybl.
- Xofapbl KbcibmdafbI WJahHTIH 3aKbIMdaJybl.
Xymbic aandbIHda:
Cy Kyfbkka KaxketTI Typde Kipin TypfahbHa Ke3iH3di JxekTki3iH3. Kyfbltb CycbI naJaIaHy OHbIH 3akbIMdAynbHa aKJIn COKtbpMymKiH.
Bapblk Kocblfah Jepnepin ceHimdiirih XaHe 3aKbIMdaIraH HeMece eckepren Detanbap XOK 60nybH Tekcepipi3.
Kayinciik 6oibua kajnbl epexeep
Erep ci 3xyatbH 3aTTah TbIM anbicta 60ncaHBi3, annapaTbI KOFbIpbI KbICbIM IuaRbICbIHan XaHe KopekTeHdipy 6aybIHAN yCTan, XblNkblTnaHBi3; ON YuH apHaBbl TyTKaHb naJaIaNbHbHbI3.
«ABTOCTONNEH»JapakTaHdIbIpBImaHaYnTinepUyIH nuctoneri Ka6bIK Kynde 1-2 MNHyTTaH apTbIK yaKbit KeJIeMIHde KfYbIITbI naJaIaNHyFa TbIM CaNbHaDbI, 6yJXaFdaannapaTbI kaTapdaH WbIFapaDbI.
Kbicta annapaattbXbJIbXepe daKaTahbI3.
AnnapaattbIH KMybcI 6apbcIHna JKeIeTeCaHbIaynapbl aBbIK 6onyi KepeK.
AnnapaTbI MymKihDirHne CymeH KaMTamacbl3 ety Ke3iHe XaKbH YCTAhbl3.
- ΘHπiyi Hcykay 6epreh KypaIap MeH KocankbI 6eIweKtepinaiDanaHaHb3. TynHyckanbl KypaIap MeH KocankbI 6eIweKtepdi KOndAhy ceHimDi XaHe Kayinci3 KymbICTbi KaMTamacbi3 etedi.
KyblIbI teric 6eTTe, TypaKTbI Kynde opHaJaactbIpbHbI3.
-NCITOT-WaBipatKbIUtBihMakCatcb36acblmaybiH KdaFanaHb3. KyfblUItb1 CaycaTb1 NCTOJET WypinnecHde yctan Tybpin, KyfblUItb1 XblnKbIITNaHb3.
KyIbIuHEn KMyBlc aAraTaNrHaHHa KeiH Ke3deCOK KocblNybl6oNdbIpMay yuiH NnCToner WypinnecinH 6NoKTahFaHaHa Ke3iHi3iJxKetK3iHi3 (5 cypert).
KapbyMeH ynaHyb6oNdbipMay yuiH xyfbluNe HxMyBc6apbcbiHaJyFbIuNEH dypbic xMyBc icTeyme cbibcnaiTbIH Te3 TyTaHaTbIH HeMece ybl cybIKbIKTapbH HeMece 6aca Da KypaIapdbi KOJaYFa TnIM CaJIbHaDbI.
Cy afblicih aadamap Meh XaHyapnapfa kapa 6abftTamaHb3: Onap kapaKaAT anybi Mymkin. Berde aadamap Meh XaHyapnap XyMbIC opHbHaH 10 metpeH KEM 6oJMaTbIH KaWbIKTbIKTa TypbI KepeK.
AnnapaattbKoIaNahybl6aIanap MeH OkItbJIMFaHa aamdapfaceHin TancbipMaHb3.
-ПистOneTInIshурпинecIH«KocnyIbI»KyIHNe6keITnH3.
-OpcyHKaHbIH ⅢaMbipAtKbIb6acbHbH TynHycka 1eH6epiH e3repyTreNbIM caJIbHaBl.
KyfbIUtBtI KapayCbI3 KaIdbIpMaHbI3.
Abyip Kbcimcb cydbIH aBbHb 3aTapra TureHe Kywneh onapdbI ayapbi Tactaybl MymkiH, COHbIKTaH KMybIC 6apbcihda apHaBI KNIM MeH KopFaHbc Kezilipirih KIREh ab3an.
KOPUJAFAH OPTAHBI KOPFAY
C3re eHdi KaKET 60JMaHTbIH KypaNDbI XHe/Hemecope opamdbi KaTAt EHeyMeH aHaJIbCaTbIH YbIMfaETki3YiH3Di CypaMbI3.

ykpaiHcbka
EMHICTbIaMnHoro3ac06y
AanTep
YCTPII

- BnynckHm OTBip DnB ODN
- Bnyckn natapy6ok 3 pfjltpom dna BOH
- BIMUKaY
- HacaKa
5.ПICTOTET-розиновач
6.卍naHr BnCOKOrO TnCKy
INPABUNIa TEXHIKn BE3NEKN
Ira 3anobirHHaorapHHo, ypaKeHHno eneKtpnHIM CTpyMOM i TpaBMvBaHHo, eNeKtpOyCTaTKyBaHHcNiE KcnnyatByBatN BiINOBiHO Do BmOr daHOI hCTpykui.
EneKtpoTeXHiHa 6e3neKa
- Npeep BBimKHeHHm CnIe nepecbiunTncs, 0o Ha npyra B Mepeksi KInBneHn BiiNobidae Hanpy3i enekTpOdBnHyHa MmKn.
KopunctyTecra TINbKN BOJIOrO3axNueHMM NOOBKyBaem. He peKOMeHNdyEcbc BnKOpNCtOByBatn HaDmipHO DOBri NOOBKyBaHi. PnBnKOpNCtAHHI NOOBKyBaHa KaOTuUzBiH Ma6 ByTN NobHCTo p03MOTAHNI. INoUa nonepueHoro nepepi3a npoBOID INOBKyBaHa Ma6 ByTN He MeHwe 1,5 MM2.
Mnky Heo6xioH no iKnHouatuYepe3 npicptpi 3axHcHoro BiKIOUeHHa (MaKc. CTpym BNTOKy - 30 mA).
BnMaOuN BuNKy 3 po3eTKn, He TargHITb 3a shHyp XNBHeHH.
- 506 yHnKHyTN KopoTkoT O3AMnKaHH He HapabJnIe CTPyMIHb BOn Ha cAm anapat Ta iHwe enekTpOyCTaTKBaHH. He KopNcTyNTecr MmKOIO npocTo He6aBdoOBOy nOrOy.
He TopkaTecMOKpIMm pykAmn DO BUNK Ta (a6o) po3eTKMpekxi KMBJIeHHr.
HeraHOBuMKHiB MMky npn:
- HecnpabHocTi a6o yukdoKeHHi BnKn a6o shhpa XNBHeHHa.
2.Поломци Вимикая. - ПяWI ду a6o 3anaxy ropinoi izonuaii.
4.YuKoJKeHHI JHaHra BnCOKOrTo TnCKy.
Ipeep nooyatkompo6oTu:
- PepecbiDHTbcra B Tomy, 10o BOa HAnxOuNTb y Mmky HanexKHM YHOM. EKnnyataui MmKn 6e3 BoMnMOKe npnsBecTu Do ii yWkoDkeHHJ.
- PepebiTe HaIiHicTb ycix 3'EnHaHb i BiCyTHicTb yuKOJxHeHXx a60 3HOWeHXx Detanei.
3araJIbHI nHCTpyKuii 3 texhIKn 6e3neKn
- RaKIO Bn nepe6yBaTe 3aHaTRO dAneKO BiD npEiMeta, kNn 36bnpaTeC8 BmNTn, He nepeCybaTe anapat wJnxOM, CMNKaOHy NOro 3a WNaHr BnCOKOro TnCKy, afo 3a Whyp KINBHeHH; BnKOpNCToByNe Dnra UBOrO CneuaIbHy pyKoRTky.
-Дяmaодел,在ki He yctaTkoBahi“abTOcTOnOM”,BNKOpuctaHn MmKn 6InbWe HIX 1-2 XbUInHn npu 3aKpntomy nicToIe 3a6OpOHeO,ocklbKn ue moKe BnBeCTn anapat 3 naHy.
B 3nMOBnx yMOBax 36epiraTne anapat B Tennomy MiCi. - Ppi po6oTi anapata BeHTnIaI Hi OTbOpN MaHOb 6ytn BiKpTuMn.
- Po3TaIbOByte anapat kHaIbIckye do Ixepena BOIOIOCTaayHRA.
BukopncToByTe Tlkbn Ti npnaadny 3anaChi qactHH, kpi peKomeHDoaHi Bnpo6HnKOM. BnkocTaHH opriHaJIbHnx KOMNKeTkyOuNx i 3anaChnx qactIN 3a6e3neHTb Haidiny 6e3neHy po60Ty.
BctaHOBNIHOte Mmky B CTiKOMy NOIOKeHHi,Ha pIBHI NOBepxHi.
He donyckaTe HeHaBMnCHOro HATnCKaHnHa Kypok nicToeta-po3nnIObHa. He nepeCybaTe Mmky 3 nicToNETOM y 3'edHaHomy BND, TPMAOHN naeue Ha Kpyk.
-ДязлбогиьнадкOBОВ BBIMKHeHH nicra 3akihehnpo60tn 3 MmKOIO nepecbidiybcra,у кypok nicToJeta 3a6NOKOBAHM (MaI.5).
U6 yHnKHyTN B6xy a6o OtpyEHHa 3a60pOHeTb CBAKOpNCTOByBAtn npn p60ti 3 MmKOHO JERKO3aMnCTi a6o TOKcNHi piDnHn a6o IHwi 3acO6n, HeCymichi 3 npabNJbHO p60tOHO MnKn.
He HanpaBnIe CTpyMInb BOnn Ha IIOJe i TBapHn: 3arpoXy TpaBMamn. CToPOHHI JIOHN TBAPHn MaIOb nepe6yBaTu Ha BiDCTaHI He MeHwe 10 MeTpIB BiMicra po6OtN.
He doBipraTe BnKOpncTahHna npapaTa dIITa m a6o HeHaBueHm oO6aM.
He pikcyte kypok nictoneta b noJoxeHHi "BbimKheHe"
He donyckaTbcra 3mHOBaTHOpnirHaJIbHNI diametpo3nnIOBaJIbHOI rONIBKn fOpcyHKN.
He 3aIIwaIte Mmky 6e3 Harny.
CTpymHb BOINiB BeINKIM TCKOM,NOTpannIouH Na npedMeTNMOKe i3 CInIOB BIDKnDAtN IX, TOMy
np npo60ti Heo6xioHO OJraTn CneOJaI 3axnci OKyJrpN.
- Ipeep HaTnCKaHHa KypKa NiCToJIeTa MiHc HITb NiCTOJIe, 06 NOro He Bn6NNo 3 pyKn npn BiJaqi.
Uo6 yHKnHyTN 3a6pydHeHHn HABKOnmHbOro CepeOBuua BnKOHyTe BmOrn MicueBoi opraHiaui BODonocTaayHH. Y BiNobIDHOCTi 3i CTaNapTOM DIN 1988, MnnHi anapaTn, 0 npauIOyB 3a npHInOM BoJrHO TcPymHe BnCOKOrTO TCKy, Do3BOJeHO NiKNoHTaN Do MepeXi NTHoro BOOnpOBOy, RaHo Ha WNaHry Noaui, e 3BOpOHn Knaan i3 DpeHaXHM pNCTPOeM. - 506 yHnKHyTn TpaMbYBaHHn, nepei BiD'edHaHHM Wnahra BiD anapata cnid cKnHyTn 3aNiuKOBn TnCK.
EKCINNYATAUIA
YcTaHObKa nictOJe-t-po3nIIOBaHa 12
- Hakpyitb wnaHr BucOKoro TnCKy (6)Ha naTpy6ok MmKu.
HacaKa (4) fikcytcbn B nictoJti (5) 6aioHeTHMM 3aTBOPOM. BCTABTe hacaKy B nictoTe i npOBepHtB ii HABKIO o cO Ho HAIHOIoi fikcauii (MaJ.2).3HimaTbCra hacaKa y 3BOPOTHomy NopAky: CnoaAtky HaTNCHTb Ha He, Uo6 3nerKa BdaBn BrJn6 nictoJeta, Notim npOBepHtB HABKOIO o cI niCna zuBoR BuIMtB i3 nictoJeta.
BbIMKHeHHa
Ipeep BBIMKHeHHM MmKN Heo6xIDHO BnNycHTn NO-BiTPr i3 CnCTeMn 3a6e3neHTn NtpanJHn BOd n DO conJa HacaKn.
Ybara! KOHCTpyKzIa MNKn He donyckae BnKOpNCtaHHB OBD, HarpitoI Do BnCOKOI Tempepatypn (INB. TexHiHIXapaKTepeNCTkn).
Piikniouitb wnaHr nnaI noaHi BOIN Do BxIHoro naTpy6ka MmKn. IpeecbiuHcra, 0o Wnahr He Mae neperHHiB.
Bikpnite BeHTnIb Inpaui BoN (nOKn BMkata n anapat He notpi6Ho).Ipebeipte HaiiHictb ycix 3'edHaHb i nepecBidiitbcra y BiDCyTHOcTI BNTOKIB 3i shnaHry.
- Tenep HATNCHITb Ha Kypok nicToJeta-po3nnIIOBaua (CnoaTky CnID 3HrTN Noro 3 6NkOyBaHH), 0o6 Boga npouwna Upee3 npucptpi i BVNTCHyna BCE nobitpr.
- PepecbiDitbcra, 100 BmMkaue EneKtpoDburyHa (3) nepe6yBaB nOJoxeHHI "BmMKHeHO".PiKIOHITb MMky Do MepeXj XnBnEHHN BBIMKHITb npNCptpi 3a donomoro HBMkaca (3).
- RaKIO DnBryH nID Yac pOBoTn 3yINHHBCr N He nepe3anyckAcTbcra, ue MoKe CbiDHTn npo CnpaBobyBaHH TepMo3axNCTy. CnI dOueKaTnc OCTnraHH DnBryHa I NOBepHeHH npICTpO IO TepMo3axNCTy y BxixiHm CTah.
HanaaHTyBaHHaΦopcyHKn 3
Boa moKe po3nnHOBaTnca 3 fOpcyKn By3bKocnpraMoBaHm cTpymeHem, a6o BiJnoNoiioHo. CnoVaTkNoaIte Boy, NotIM BiDperyIIOte fOpcyHky.
3actocybaHHMHOCTI DnMNIHORO 3ac06y
Lio6 3a6e3neuHT NaXoJKeHHa MIOOHO 3ac06y 3 EMHocTI, nepeCyHbTe o6oMy po3nIIOBaua 3riHO 3i cTpiIKoIO, kNOKa3aHO Ha MaIHOky 3a.
EMHICTb DnMHHoro 3ac06y npneDHyetbCdo nictoJeta-po3nnIOBauTy Tak cmo, kipo3nnIOBaJb
Ha HacaKa. 3aONBHtB cMHiCTb piKMM MmHMM 3ac06om.Tenep npn HATNcKaHHi Ha Kypok po3nnHOBaHa npn npauIOHOOMy anapaTI MMHN 3ac6 6ye po3npnCKyBaTncpa30M 3 BOIOI.
PekomeHDoBaHn cnoci6 po60Tu
5pyd cnid po3HHaTn, cnpraMObYIOH BIAIonoDioHm CTpyMiNb 3 MnnHMM 3acobom Ha cyxHy nobepxHIO. BiIMBaTH BePTNkAJIbHI NOBEXHi BapTO, nepecyBaOH CTpyMih 3HN3y Haropy. 3aNNiHTb HaeceHNI PO3HH MmHOrO 3ac06y Ha 1-2 XBNHn, ane He Do3BOJrTe IOMy BnCOXHyTN. Notim NDAITE CTpyMiNb BOIN iID BNcOKM TnCKOM, TpMaIOH CONHO HA BIDCTAHI 6NIm3bKO 30 cm BiN NOBExH NipecyBaOH Noro 3HN3y Haropy.
BmKHeHH
- BiDknHouitb Mmky 3a donomoroTO BmMkaa (3).
- BiDkiHouitb anapat BiD mepeksi XnBJeHHa.
- BiDkIIOHcybnoaCyBOn 3a DonomoroIO BENTnJIa.
4.ObOB'3KOBO HATNCHIb KypOK nICToIeTa,IO6 cKNHYTN TnCKY CnCTemI! - Bic'edhaite wnaHr noaChi Bi anapata.
6.Протриb yci NOBepxHi MmIKN BONOrIO, YnCTOIO TkaHnHOIO. - 3a6nokynte kypok nictoIeta-po3nnIOBaHa.
TEXHlUHE OBCnyROyBAHHaI IOrJaI

IpeedTexHcHMMOcbNyROByBaHHMaBdKJIou- qaHTe npucTpiB Bd MepeXi KMBHeHH.
Dorna
Lop3ynic3aikHcHnpo60tn peKomeHdyeTbcnnpatn Kopnyc npncptoio BeHTnlauiHi OTBOpm'MKOBOIIO TOAHHOIO a6o cepBetkoIO. HenpnuCTMO BkOpNCTOByBatn dIra yCyHeHH 3a6pydHeb po3HHKn: 6eH3N, cInPT, amiaHi pO3HHn T.iH. 3actocyBaHHPO3HHNKIB MOKe npnsBeCTn Do yWkoDxKeHH KOpNyca npncptoIO.
Ipebeipka pfibtpa
Perynpho ornae Ta, B pasi Heo6xHnocti, npounaTe cibtp Bnyckhoratpy6ka, 06 yHnKHytn Ioro 3acmiueHHN noripweHHNoaHbOIN B Hacoc. (Man.4)
3maueHHra
Anapat He nontpe6yecdoataKOBoro 3MaueHnra.
36epiraHHa
36epiraTe Mnyk B Do6pe BeHTnIbOaHnx npmiiueHHx 3 TeMnepaTpyo He HxKue +5^ . TpBani nepioDi npocToIO anapaTa MoKyTB np3BeCTn Do yTBopeHHa BanHHX BiDKlaDeHb.
YcyHeHH HeCnpaBHOCTe
Y BnnaKky BnHnKHeHH HeCnpaBHOCTe 3BepTaNTecB CepbiCy cnx6y SBM Group.
3AXICT HABKOJIINHbOFO CEPEIOBUNA
Будлackа,Здаваite HeNotpi6Hn Bam 6iNbwe iNCTpymENT,пинадя ta/a6o ynakOBky B haN6nKHy oprahi3auiO, lo 3aImaetbca nepepo6koBTOpInHoiC npobHH.

Polski
INSTRUKCJE DOTYCZACE BEZPIECZENSTWA I OBSLUGI
OCZYSZCZARKA WYSOKOÇİNSNIENIOWA
TEXNIKEI NPOAIAIPAΦE
Ise baslamadan once:
jilll jn jll lal lal jll lal 0. 00000000000000000000000000000000000000000000000000000000000000
124 50000000000000000000000000000000000000000000000000000000000
jS yI jai jie i jy j SBM Group
y 1j 1 j 1 j 1 j 1 j 1 j 1 j 1 j 1 j 1 j 1 j 1 j 1 j 1 j 1 j 1 j 1 j 1 j 1 j 1 j 1 j 1 j 1 j 1 j 1 j 1 j 1 j 1 j 1 j 1 j 1 j 1 j 1 j 1 j 1 j
y
1
1
1
1
1
1
1
1
1
1
1
1
1
1
1
1
1
1
1
1
1
1
1
1
1
1
1
1
(1,2,3,4)
all c. 1
all c. 2
all c. 3
all c. 4
all c. 5
all b. 6
ylllclll 1 ylll qil
4
UybaTe OBA ynyTCTBa Ha 6e3eHOM MeCTy!
ELEKTPNUHA CINYPHOCT
- YBek npOBepnte da IIN HAnOH HanajaHa oJroBaPa BpeHocTn Ha TInCKoJ PNOUHn.
- PpNJIKOM 3aMeHe cTapNX Ka6NoBn ININ PpNKJbYcN: 6aUNTe cTape Ka6NoBn ININ PpNKJbYcN ODMax YIM HOBe 3aMeHInOBO.To je onaCHO da CTABN yTuKay naababy Ka6Na yYTNUHcUy.
- Kaia kopncntte npodyxhe ka6noBe:
Kopuncte camo Odo6peHy npOdyxHn Ka6J koJ je noroan 3a HanajaHe MaunHe. Je3rpo Mopa da IMa npueHHK od HajMahe 1,5 MM². KaJape npOdyxHn Ka6n Ha KoTpy, ODBHTN Ka6n y CENoCTn.
CBe eEeKtpnue He BeHe Hnp. IpOdyxHOr Ka6na, MOpajy 6ntu Oo6peHOr Tuna BOODTnOPHor 3a CnoJbHy yNoTpe6y u oBeIeKeHa y cKnady ca Tm. PpOdyxHn Ka6IOBn Mopajy 6ntu TxpeeUope, od KoJnx je 3emJba.
KoHkpTeTHx 6e36jeHOOHcx npabnla
Kopuhebe n Ondjkaaba 3a Kopuchke npedctabba cyuTHCN deo onpe me uCTnje mOpajy ce yBaTu Ha be36eHOM MeCy 3a 6dyHy yNoTpeby.Ako npodaje 3a YhuHe, yNyTCBO Tpe6a da 6yde npedat Ha HOBBlaChika.
-
Ppe noeTka uuhebe, npOBepnte da Jn je ncpaBHo npMa Body. PyKoBaHe 3a uuHHebe 6e3 BoDe MoKe Da oWTeTH neaTe.
He n3BnauHTe yTnKaU NOBnaueHbEm Ha eJeKTpnuHOM Ka6Jy. -
Ako cTe cyBnwe daJeKO od objekTa koJn XeJInte da OunCTnte, He nomepajte YnWheHe 6nKn noBnaueHem Ha UpeBa BnCOKOr npNTnCKa, KopNCtnte dpNkY do6nIn.
- Y Bep3njama HnCy onpemBehn TCC ypehajem, HeMoJTe KOpNCtNTn 3a NUnHeBe DyXe O1-2 MInHyTa ca NnWToBEm 3aTbOpeH jep 6n To MOrIIO OWTeTNTn 3aNTNBHE.
3aHTTE YnCTnju Od CMP3aBaHaTb TOKOM 3mE.
- HemojTe npeKpNBaTN peWetKe 3a BeHTnlaunjy y ToKy pana.
- npecek 6nno Koje npodykeHe Ka6NoBa Kojn ce Kocncte Mopajy 6ntn nponopuohaHa HxOBoj DyknH, ODHcHOnDyXKe npdyXHor Ka6na,BehnnonpeHn npecek; Ka6NoBn ca 3aHTnTHm HnBOOM « INk5 « Mopa da ce Kopunctn.
N P03njuaynctau 6nke moryhe BOOM. - Y naKOBaHbCe nako peuKnnpaTn, a Tpe6a Ondaratyn y cKnady ca npOnncMa KoJn cy Ha Cha3n y 3emJbn HnCTanaJIne.
- Kopnnte camo cpectBa 3a uHHebe ca np60pom n pe3epBHM DeIOBbMa OBaunHea od cTpaHe npou3BoJau. YnOte6a opuHaHm np60pom n pe3epBHM DeIOBbMa he oBe36eHTn CnrypHo, pad 6e3 np6Jema.
3a Ynshhe Mopa da ce Kopucntn ctojn Ha cnpyhOM, cta6nHny nobpunHy. - 136erabajte HeHamepho OTnyuTaHa oKnDaay. HeMoJTe HocHTn JaHue / OKnDauch CKlon ca pykOM npeKO Oknaya. YBek Kopuncte MexaHn3am OKnDaay 6Jokade.
- YBepnte ce da je cnryphocha 6paBa ha obapayc ce KopnCTn, KaDa cTe npctaAn Da KopnCTnte 3a npaBe KaKo 6n ce cnpeHnO cnuyajHo aKTNBpuAhe Heke onepaunje. (Cnka 5)
БЕЗБЕДНСТ «Мора НИWIТА»
-Ekcnno3nje nn TpObaHa.
He KopnCTnte cpeCTBO 3a YnHHeBe ca 3anaBnBm nIN TOKCnHr TeHOCrN, INN 6nNo KaKBe npOn3BoDe KOJn HnCy KOMNaTn6nHn Ca nCnpBaH pad 3a YnHHeBe.
-IOBPEDEonachoctn.
HnkaJa He ycmepaBajTe Mna3 BoJe npema JbUHaMa HJIN XNBOTNbama.
- CtpyjHOr ydapa.
HnkaJa He ycmepabajte Mna3 Boe npema camo je nn Hnui, EneKtpnuHn DeIOBn nnn npema dpyrom enektpnuHOM ONpemom.
-KpaTak cnoj ONACHOCT.
He Kopncntte Hnctne OTBopeHOM y cnhyajy Knwe.
-IOBPEDE onachoctn.
HemojTe Oo3BOJNTn Deu NJIu HEKOMNTeHTHn Iua da KaopncTe 3a YnWhebe.
- CtpyjHOr yapa.
He do npjteytnka u / n nn npkkbyaK mokpum pykaMa.
- EneKtpnHOr yDapa n KpaTkoR cnoja ONACHOCT.
He KopnCTnte cpeDCTBa 3a YuWhebe aKoEneKtpuHn Ka6J je ouTeheH.
- EKCNIO3NJA.
He KopnCTnTe CpeCTBO 3a YnUHeheUepeBa BnCOKOr npNTnCKa je OUsTeHena.
- OnachocT od ydeca.
HE ueM okndauy paHOM noIoxkajy.
- OnachocT od ydeca.
PpOBePnTe Da Ly cy NODaun nIOna npNvBpuHHeHa 3a YuShHe, aKo He, oBaBeCTnTe CBor npOdaBu.
CpeCTBa 3a uHHeBe 6e3 TaBnIaMa He Mopajy da ce KopncTe jep cy yHnDeHTnФna6ne n noTeHnJaanHO onacaH.
- EKCNIO3NJA.
He npajte nnn n3meHnTn kaH6paunjy cnryphocnOr BeHTuna.
- OПАСHA ИЗМЕHA onepaTиВнХпрфopMaHсN.
HemojTe MehbaTn npBo6uTHn npeHHNK dN3He DN3He.
-OnachocToydeca.
He octabbajte63 ha30pa nctnju.
-KpataK cnoj ONACHOCT.
He nomepajte yuushene noblauehem Ha eNeKtpnHOM Ka6ny.
Camo Kopncntte DeTepeHTe KoJn He npoy3pOkyj KOp03ny MaTepnjane 6bIory UpeBa BnCOKor npITnCKa / eJIeKtpuHn Ka6J.
- NOBPEDE onachoctn.
06e36eHTn da cBn lydynn nnXNBOTnbe dpxe hajMaHy pa3daBnHy od 16 M. (15M) roCTnma.
CINYPHOCHN BEHTNJ
CnryphoCHN BeHTn Takohe fynKUHOHnue Kao PeyKTOp npTnCKa. KaanuToB Oknau OTnyCTn, CnrypHOCHN BeHTn ce OTbapA INbOda peunpuNaTec Kpo3 nymny.
3. CKYNIHTNHA
IOBE3NBAHbE UpeBO
U n3a3oBy MOHTAKA 12
-
Ipe cnajaHa 6nlo upeBa nnu AKTNBnpaJy / cKnIona KONJIbe npBO npOBepnte CBe BeSe KaKo 6n ce ocNpyapAo Da cy cNo6OOnH Od 6nIO KoJE 6nOKaJe.
-
3abjte uepebno 3nna3HOr npntncka (6)Ha MaunHy nocnpya do6py pyky YBpCTO 3aTeHyTN.
-
Повекитабпскаве (4) на okнаду (5) nytemприпсоком увити у бajонет onpenmaha (слиka 2).
YBepnte ce da je OBA Be3a je N03NTNBHO 06abJa 16ajohet je nCnpaBHO louipan. PpOBepnteuepeBO HeMa KnHc y Hemy.
4. YNOTPEBA
BOIOBOO
- PpOBepTe Da Jn CTeNoRoAn BOe 3a NcXpaHy npNTucK npAhe. PpOBepTe Da Jn cy CBe Be3e CBPCTO Hema UpeHb a UpeBy.
-Cha6BeBaHe cnaBnHa Tpe6a Da 6yJe notnyHO OTBOpeH ( He yKbYum npaHa nOid npTuCKOM jow yBeK). - Caça npntncHytn Oknda (Tprirrep otKbbyabahe6paBa npBO )Да nycTN BDO npohe kpo3 jeuHnuy n36aun Ba3dyx.

YNO3OPEHbE! Oba jeiHHua Tpe6a da ce Kopnca XnaIHOBOHNIX N3Bopa cAmo!
eJektpnHnxKa6Ioba
YBepnte Ce da cy CBN Ka6NoBn WTeTa Cno6oDn npe NOBe3NBAHa Ha eNEKtpuHy MpeKy.
PnPKbUyak 3a eNEKTPuHn BpHn KBaINΦKOBaHn ENEKTPuHap. Ppenopyyje ce da ceeNekTPuHn cHa6DeBaHe obaj ypehaj YKbUyn IIn ce ypehaj DnΦepeHunjaHne CTpyje Kojn he npeKnHytn Cha6DeBaHbe AOKCTpyja UyeBa Ka 3emBn npena3n 30 mA 3a 30 Mc Hn Ha HeKn ypehaj Kojn He DOKa3ATn KOLO 3EmBy.

ONPE3! Maunha Moke n3a3BaTu nopeMehaje eEnKtpuHe npJInkOM NOKpTaHa. YKoJIHKOMOTOP CTHe H He ycNeBa Da NoHO
BO,cayeKaTu 10-30 MNHyTa npe noHOBHor NOKpeTaHa. TEPMO Hspe3 cnoTaKaO

ONPE3! UcTay Ce MoXe KOpNCTnCa mo ca YICTOM BOOM, KopHwHebe HeFpNtPpaH BOe INK OPO3NBHe XemKaIne he
OwTeNTn YnWheHe.
- YKbuynte npeknadau motopay nojonaj «0».
- Поберпесда ще щелктуни наюн и phpeквенцяа (ВОТТ / X3) одrobapajу онIMA koи cy п徳ынн Ha ч'tи te Ta'bupу noda-taka.
- Pπρικλγυγnte npaHa noД npntučkom u yкλγυчnte ypehaj npeko rnaBHor npekndaça (3).
PEYJINCAHbEMJa3Hnua 3
Boda moke da ce npcka n3 mna3nue nnnnneapHo nyn y o6nky BEHTnlaTopa. YkbyuTe npntncka npBOR, a 3aTMM NODECnTE MNA3HNUy.
IobO Bode fntep Mopa da ce peoBno npereeta, kako 6n ce n36erna 6noka, a orpaHuehe BoDocHa6DeBaHa Ha ymnn. (Cnka 4)
KOPNUHTHEEΦnawa daTepeuenta
Ia 6n ce omoryhno cnaebabahe detepeenta n3 60- uie, n3BaNTe n3 Mna3Hua 3a npckahe y ckna dy ca CTpeNlamaHa cnui. 3a.
DeTepeHT Mna3Hnua n pe3epBoap ce noCTabHa Ha Kpaj Oknda Cha CkyIuTHe Ha NCTn HauHH Kao IKoJIbe paDi. Hanynite pe3epBoap 3a DeTepeHT ca TeuHm DeTepeHTOM. KaDa cenPITcHe OKdau je caDa ca MaunHa paDi, DeTepeHT he ce nonpckatn Ca BODom. IPNOPUeyHn Noctynak uHheBa
Pactbopnt npJbawtHy npmehom Detepent ca mna3OM BeHTnAtopa Ha cyby nobpwnhy. Ha beptnkaHIM NOBpwnHama, pad od dHa Harope. OctaNTe da denyje detepent 3a 1 do 2 MNHyta, an He donycTte da ce ocynu. HaheCNTe Mna3 BnCOKor npTnCKA, dpkeh mna3HnUy Hajmahe 30 um (10 nHca) ca nobpwnHe, paDe oD nHa Harope. N36erabjTe omoryhabanCnnpaBe BODOM da paDi Ha HeonpanHex NobpwnHama.
3ATBAPAJY 3A IPAHE

ONPE3! Hnkaad He nckbvyje BncoKn npTuNcak upeBO n3 MaunHe, acnTeM je jow yBek NOd pNTnCKOM.
Ppatte nCnpaBaH noctynak:
- Nckbvynte MaunHy 3a npaHbe noD npHTnCKOM noMohy npeKnDaHa Ha MaunHn.
2.ИckbyuHTe ypehaj m3 cTpyje.
3.ИckbyHTe IOBOD BODe Ha cIaBnH.
4.ПиТИСНITE OKIДАЧ ПИWIТОБа 3a OTNYCTHTN CNTTEM.
5.ИЗBYUNTEцревоза chабдеване мшине
6.ОБпшITE cBE NOBPSHHe y jeINHnC ca BnaJHOM YNCTOM KPNOM.
7.AHraKOBaTn 6paBy 3a 6e36eHnocT.
PEUABAJIe IPOBJEMA
- KaJa ce yKbByu, MaunHa Hehe noeTn ca paDoom.
-
YTNkaHnje Do6po NObe3aH INN yTNHHua HencnpaBAH.
-
PpOBePte yTnKaU, yTnHnUy n OcNpypa.
MpeKHN HANOH je MaHbN OJ MHHMaJIHO Ntpe6HOr 3a CTapT yN.
IpoBepnte da nJe eJekTpHn HanoH je aKeKBaTHa.
-Пумna je 3aŋnaBbenaHa.
- Iornejte noce yBaHa. Nckbnyte ypehaj n nyCTIeTMOTOP xnaDaH.
- TepMaHa 6e36eHocT je canneo.
- Octabite NaHue OTbOpn ca BOdom LOMHHxpoyrx.
2. Bapupahe npntucak
- Пулma сиca Ba3dnyx
-Проверптудацраисноевсухерmetчкн - BeHTnI npJaB, DOpajaJIe IIN 3aRnAbN. NeaTIn Nymne HocE.
- Ouchntte n 3aemeHnte nn noPnEajte dnepepa.
3. Boda lypn n3 nymne
-Пechати Дотраја
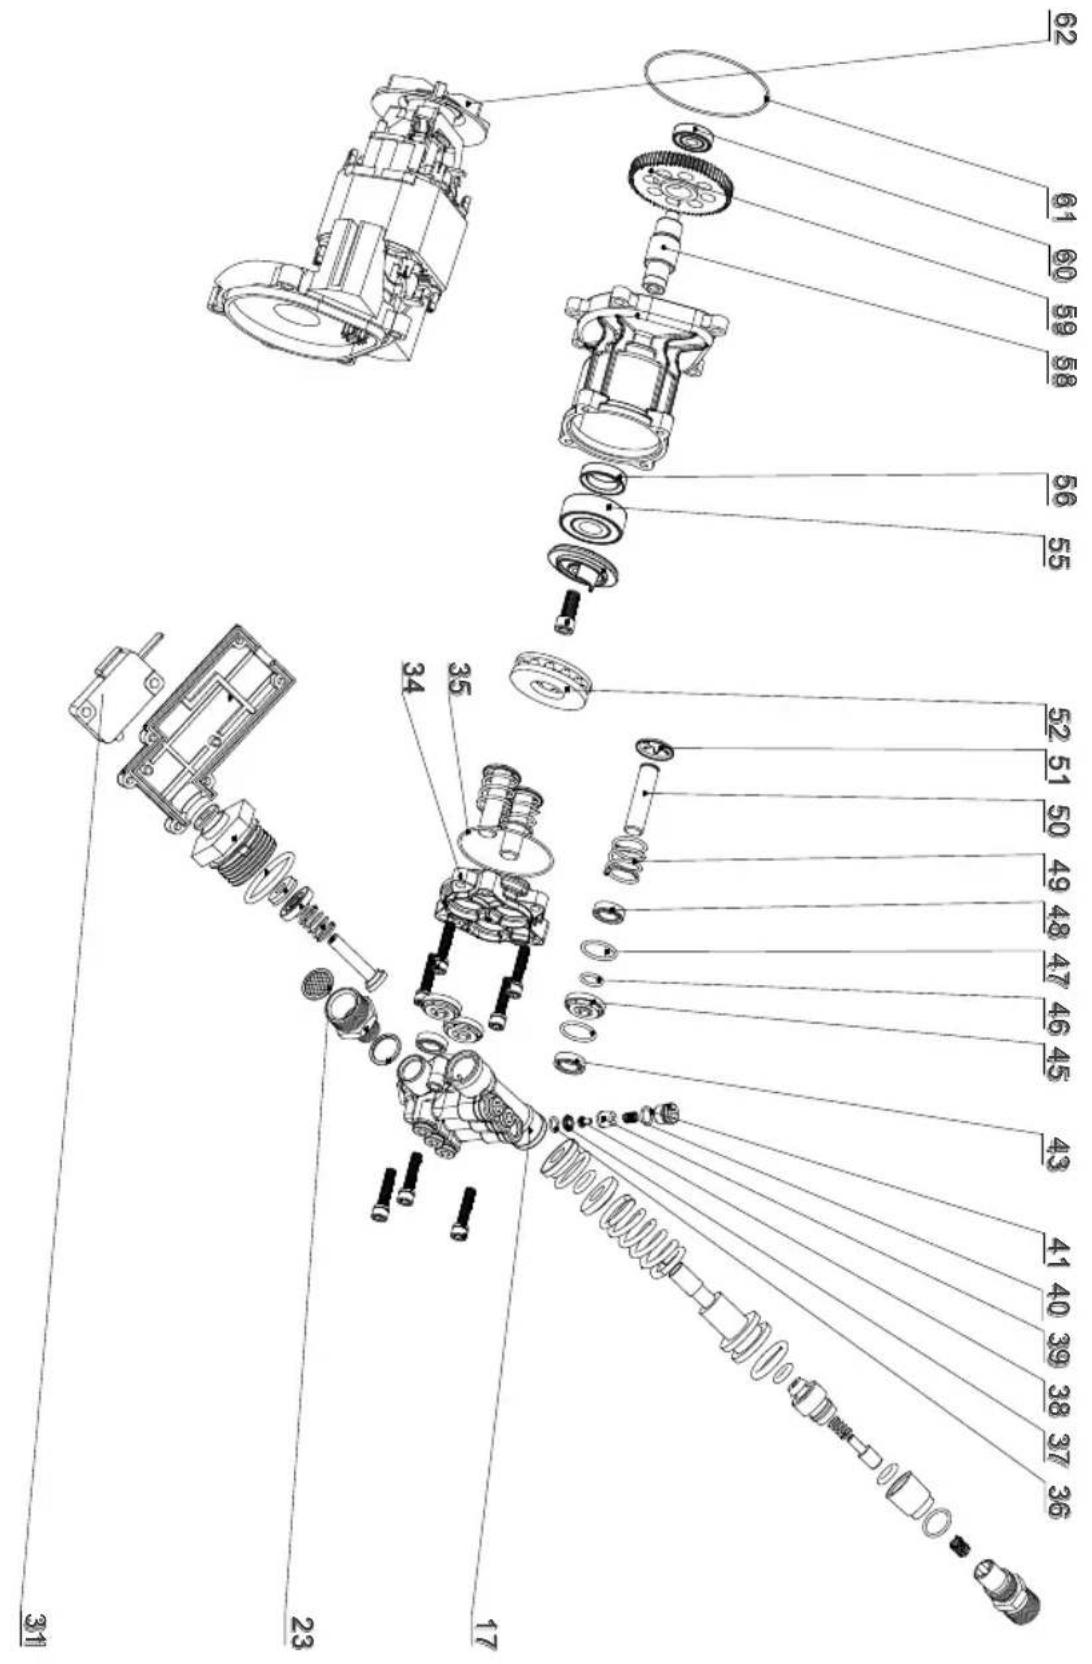
Exploded view DPW-1850
Spare parts list DPW-1850
No. Part Name
17 Pump head
(23) Strainer
31 Micro switch
34 Pump
35 O-ring 58x2,65
36 O-ring 10x1,5
37 Inlet and outlet valve seat
38 Inlet and outlet valve core
39 Inlet and outlet valve
40 Inlet and outlet valve spring
(41) O-ring 12x1,9
43 Y-ring 20x12x5
45 Middle sets
46 O-ring 16x1,9
No. Part Name
47 In the Interval sets
48 Skeleton seal
49 Plunger spring
(50) Plunger
(51) Plunger circlip
(52) Thrust ball bearings 51107B
55 Bearings 6302
56 Seal
58 Gear shaft
59 Gear
60 Bearings 629
(61) O-ring 88x1,9
62 Motor
GB DECLARATION OF CONFORMITY C
We declare under our sole responsibility that this product is in conformity with the following standards or standardized documents: EN55014-1:2006+A1; EN61000-3-2:2006+A1+A2;EN61000-3-3:2008;EN55014-2: 1997+A1+A2 in accordance with the regulations 2006/42/EEC, 2006/95/EEC, 2004/108/EEC.
NOISE/VIBRATION Measured in accordance with EN 60745 the sound pressure level of this tool is < 75dB(A) and the sound power level is < 90dB(A) (standard deviation: 3 dB).
FR DÉCLARATION DE CONFORMITÉ (C)
10719 Berlin, Germany

DK KONFORMITSETERKLÄERING
Vi erklærer under alminderigt ansvar, at detteprodukter i overensstemmelse med folgende normer eller normative dokumenter: EN55014-1:2006+A1; EN61000-3-2:2006+A1+A2;EN61000-3-3:2008;EN55014-2:1997+A1+A2 i henhold til bestemmelsene i direktiverne 2006/42/EØF, 2006/95/EØF, 2004/108/EØF.
10719 Berlin, Germany

RU 3AABJIEHNE O COOTBETCTBUN
MbICNOJIHOIOTBECTBHeHHOCTbIO3aABJREM,TOHAcTOrA
UeN3DeJIne COOTBeTCTByET CNe dyUoIIM CTaHApTaM
HOpMaTINHBiM DOKyMeHTAm: EN55014-1:2006+A1;EN61000-3-2:2006+A1+A2;EN61000-3-3:2008;EN55014-2:
1997+A1+A2 - corJaCHO npaBnJaM: 2006/42/EEC,
2006/95/EEC, 2004/108/EEC.
UYM I BN5PAUJNo pe3yIbTaTAM n3MepeHn B coOTBETCTBN C EN60745 ypOBeH 3ByKOBOrO daBneHn DaHHoro yCTpoiCTBa COCTABnIeR<75 dB(A), ypOBeH uymcoCTaBnIeR<90 dB(A).
KZ CÖHKECTIJK XÖHIHE ΕTIHI
OcbI 6yHbIM KeJIeCI cTaNdapTTap MeH HOpMaTnBtIKyKaTAPra CcNKeCTiri XeHInDe TOnbIK XayanKepiJiKNeH MAnImdeMIs: EN55014-1:2006+A1; EN61000-3-2:2006+A1+A2;EN61000-3-3:2008;EN55014-2:1997+A1+A2 - epexenepeine cKeec 2006/42/EEC, 2006/95/EEC, 2004/108/EEC.
Uy MEH DIPIEN60745 enweynepe HtNkeiC eKecocbkypbIfblbIHdbIbICkbIcMbIHbIH deHre i < 75 dA Kpaanbl, yu deHre i < 90 dA Kpaanbl.
CZ STRVZUJICI PROHLASENI

10719 Berlin, Germany

RO DECLARATIE DE CONFORMITATE
Declaram pe proprie raspundere ca acest product este conform cu urmatoarele standarde sau docume standardizate: EN55014-1:2006+A1; EN610003-2:2006+A1+A2;EN61000-3-3:2008;EN55014-2: 1997+A1+A2 in conformitate cu regulile 2006/42/EEC, 2006/95/EEC, 2004/108/EEC.
10719 Berlin, Germany

Discarded electric appliances are recyclable and should not be discarded in the domestic waste! Please actively support us in conserving resources and protecting the environment by returning this appliance to the collection centres (if available).