
X Master Plus - Beard trimmer VALERA - Free user manual and instructions
Find the device manual for free X Master Plus VALERA in PDF.
| Product Type | Beard Trimmer |
| Brand | Valera |
| Model | X Master Plus |
| Available Types | 652.02 and 652.03 |
| Power Supply | Mains and rechargeable NiMH battery |
| Cordless Runtime | 100 minutes (max) after full charge |
| Initial Charging Time | 3 h (type 652.02) or 3.5 h (type 652.03) |
| Standard Charging Time | 2.5 h (type 652.02) or 3 h (type 652.03) |
| Cutting Adjustment System | Vario-Cut System |
| Number of Lengths | 5 (via selector) + guides |
| Cutting Range with Guides | 4 to 20 mm |
| Charge Indicator | 4-level LED (type 652.02) or red light (type 652.03) |
| Cutting Head | Blades 46 mm |
| Included Accessories | Transformer, base, cutting guides, cleaning brush, oil bottle |
| Optional Accessories | Beard and mustache blade set, sculpting blade set |
| Cordless Function | Yes |
| Mains Operation | Yes, even with discharged battery (after 5 min of charging) |
| Cleaning and Maintenance | Brush, oil, remove cutting head |
| Auto Shut-off | Yes, when battery is depleted |
| Warranty | 24 months domestic use, 12 months professional |
| Standards and Directives | CE, 2004/108/EC, 2006/95/EC, 2009/125/EC |
Frequently Asked Questions - X Master Plus VALERA
User questions about X Master Plus VALERA
0 question about this device. Answer the ones you know or ask your own.
Ask a new question about this device
Download the instructions for your Beard trimmer in PDF format for free! Find your manual X Master Plus - VALERA and take your electronic device back in hand. On this page are published all the documents necessary for the use of your device. X Master Plus by VALERA.
USER MANUAL X Master Plus VALERA
Reverse Intensive Repogass
T
经批准的项目
1
0000687.07/14
Valera
PROFESSIONAL
X-MASTER
Type 652..
INSTRUCTION FOR USE
Distributed by Ligo Electric SA - 6853 Ugarneto / Mendrisio - Switzerland
Voloria is a registered trademark of Ligo Electric S.A. - Switzerland
EN Professional hair clippers Set
Translalion from original insturtioom
DE Professionelles Haarschneide-Set 10
Set paraURTcabo professional 20
IpoepciHnHa6ip nna ndpuraHn Bonoc
Rnepnag 6 opnnnncn nrcnyin 82
RU TIOPOEeOHANHnHnHOoB n 86
1
AR 90
中
专业连友容套装 94
车
101
1
1

English
OPERATING INSTRUCTIONS - Type 652.02 - Type 652.03
Read these instructions carefully before using the applicaiton. Available also on www.apple.com
WARNING.
- For additional protection, the installation of a residual current device (RCD) having a rated residual operating current not exceeding 30mA is advisable in the electrical circuit supplying the bathroom. Ask your installer for advice.
Make sure the unit is perfectly dry before using it.
WARNING: Do not use this appliance near bathtubs, showers, basins or other vessels containing water. - This appliance can be used by children from 8 years of age and over, and by persons with limited physical, sensory or mental abilities or who lack the relevant experience and knowledge, if they are suitably supervised or have been educated to use the appliance safely and made aware of the associated risks.
Do not allow children to play with the appliance.
Children must not perform cleaning and maintenance procedures unless supervised. - Do not use your unit if it is not working properly. Do not try to repair this electrical unit yourself, rather contact an authorized technician. If the supply cord is damaged, it must be replaced by the manufacturer, its service agent or similarly qualified person in order to avoid a hazard.
- When the appliance is used in a bathroom, unplug it after use since the proximity of water presents a hazard even when the appliance is switched off.
-Only connect this unit to alternating current and check that the mains supply voltage corresponds to that indicated on the unit. - Always switch off the appliance after use and disconnect the plug from the mains power socket. Do not remove the plug from the mains power socket by pulling the cable.
- Do not pull the plug out of the power supply socket when your hands are wet.
- Before switching on the appliance always check its conditions and also control the transformer and power cable.
- The elements used to pack the unit (plastic bags, cardboard box, etc.) must be kept out of reach of children as they are a potential danger to them.
This unit must only be used for the purposes for which it is expressly intended. Any other use is to be considered
Valera
PROFESSIONAL
| As of December 31, | ||
| 2017 | 2016 | |
| (In thousands) | ||
| Amounts Payable and Commitments: | ||
| Amounts payable to NagraStar | 1,485,934 | 1,485,934 |
improper and therefore dangerous. The manufacturer accepts no responsibility for damage caused by improper or erroneous use.
- Do not expose the appliance to temperatures below 0^ or above 40^ . Avoid exposing the appliance to direct and prolonged sunlight.
- Do not leave the appliance on charge in wet places and do not recharge the appliance when it is wet.
- The appliance comes equipped with a NiMH battery. To help protect the environment, the batteries should not be included with ordinary domestic waste, but should be taken to a special collection point instead.
- Have the battery removed by qualified technical personnel or by the treatment and recycling centre.
- Do not expose the battery to liquid, moisture or high humidity
- Keep the battery away from magnetic fields, sources of heat and naked flames.
- Danger of scratches or cuts. Do not use a comb or a set of blades if they are damaged. Replace them immediately, as they may cause injury.
- Take care not to scratch the skin when handling the appliance with the set of blades without combs.
USE
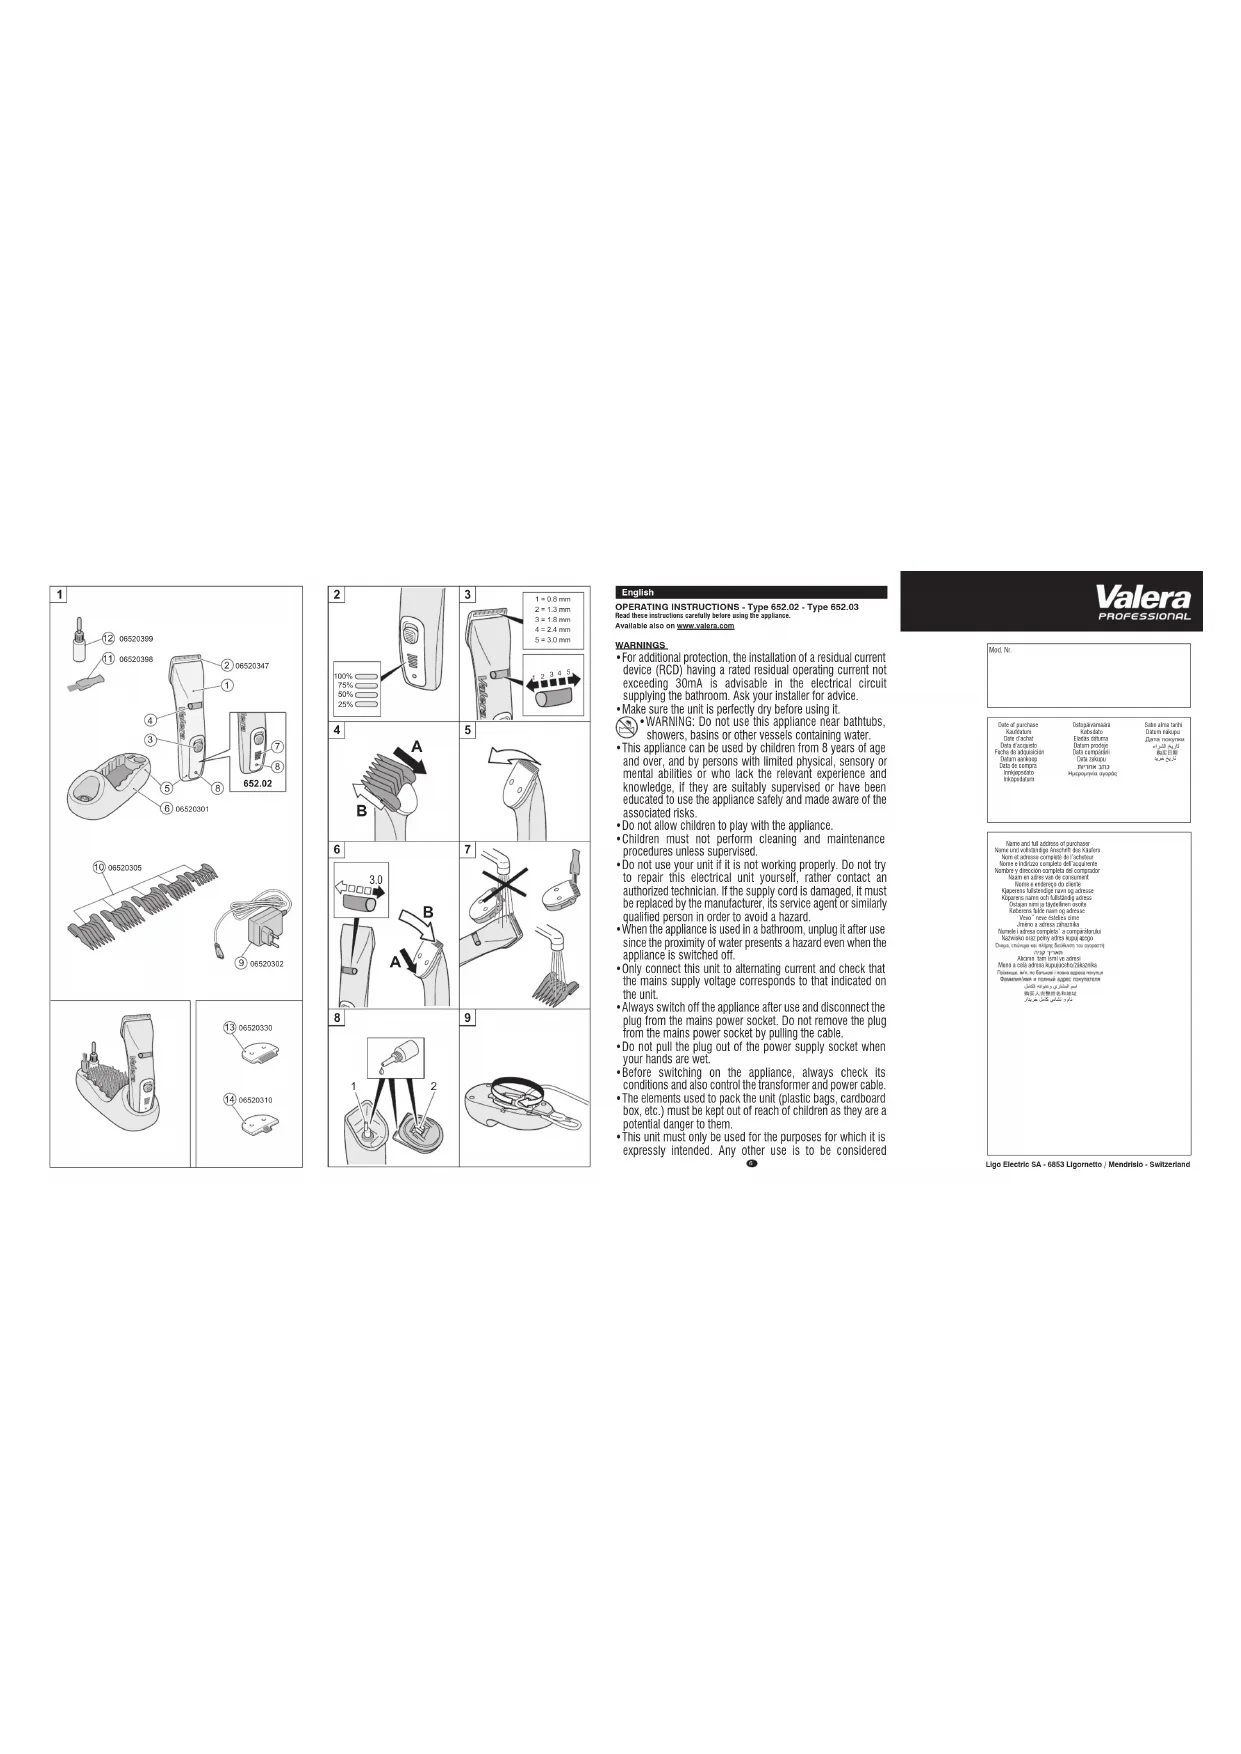
COMPONENTS
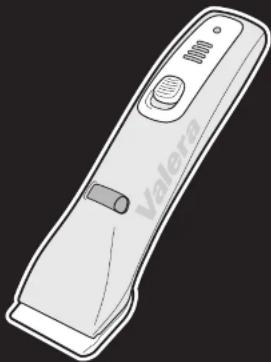
1 Clipper
2 Set of blades for hair, 46 mm
3 On/off switch
4 Cutting length selector
5 Socket for transformer
6 Base
7 Battery charge indicator (Type 652.02 only)
8 LED charge control
9 Charger
10 Guide combs
11 Cleaning brush
12 Lubricating oil
13 Beard and moustache blade set (optional; not supplied with the appliance)
14 Sculpting blade set (optional; not supplied with the appliance
The appliance can operate either using mains power or in cordless mode, as it has a rechargeable battery.
MAINS POWER SUPPLY
Connect the transformer the (fig.1 - ref. 9) by inserting the plug into the appliance socket (fig.1 - ref.5). Plug the transformer into the mains.
Warning: if the appliance does not work with mains power when the battery charge has run down completely, switch it off, recharge the battery for about five minutes and then switch back on again, running on mains power.
BATTERY OPERATION
Type 652.02
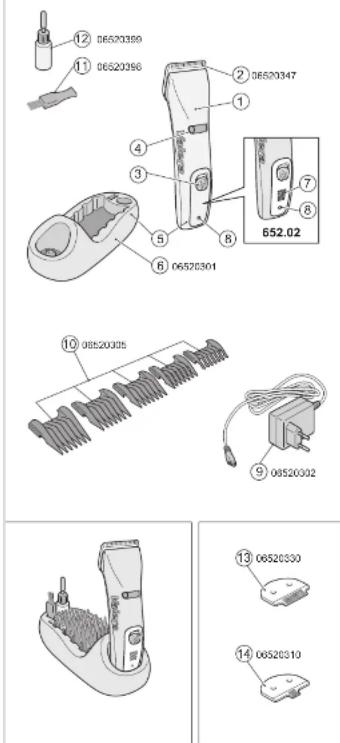
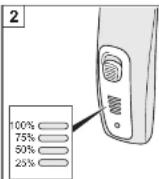
The appliance has a LED charge indicator (fig. 2).
4 LEDs lit = 100% charge
3 LEDs lit = 75% charge
2 LEDs lit = 50% charge
1 LEDs lit = 25% charge
The LED charge indicator (fig. 1 - ref. 8) blinks when the battery is below the level of 25% charge.
- Only recharge the battery when you note a clear reduction in appliance power.
- When the battery is fully discharged, the appliance automatically switches off.
Type 652.03
- Only recharge the battery when you note a clear reduction in appliance power.
- When the battery is fully discharged, the appliance automatically switches off.
RECHARGING THE BATTERY
- Before using the appliance for the first time, charge the battery for 3 hours (Type 652.02) or 3,5 hours (Type 652.03). For subsequent charges, allow the appliance to charge for at least 2,5 hours (Type 652.02) or 3 hours (Type 652.03).
- Switch off the appliance using the switch (fig.1 - ref.3). The battery can only be charged when the appliance is switched off.
- Connect the transformer (fig.1 - ref.9) by inserting the plug into the appliance socket (fig.1 - ref.5). Or connect the transformer to the base (fig.1 - ref.6) by inserting the plug into the base plug (fig.1 -ref.5), then place the appliance on the base.
- Plug the transformer into the mains.
- During battery charging the red light comes on (fig. 1 - ref. 8).
- Type 652.02: while charging the battery, the 4 green LEDs indicate the charge level reached. When 3 LEDs are steady on (after approx. 90 min. recharging), the appliance is ready to operate in cordless mode up to 60 min.
- Type 652.03: after approx. 90 min. recharging, the red light (fig. 1 - ref. 8) begins to flash. When reaching this charge level, the appliance is ready to operate in cordless mode up to 60 min.
- When fully recharged, the red light (fig. 1 - ref. 8) switches off.
- When the battery is fully charged, the appliance can be used up to 100 minutes without connection to the mains.
- After a certain number of operating hours, charge duration in cordless mode may decrease significantly.
The maximum charge level is reached after 4 - 5 recharging procedures.
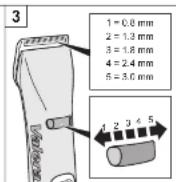
ADJUSTING THE CUTTING LENGTH
The appliance is equipped with the VARIO-CUT SYSTEM, which allows the selection of 5 different cutting lengths (fig. 3) using the proper selector (fig. 1 - ref. 4).
CUTTING WITH GUIDE COMBS
Depending on the type of cut desired, the appliance can be used with or without a guide comb (fig. 1 - ref. 10). Guide combs are used to achieve different cutting lengths ranging from 4 to 20mm
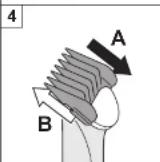
FITTING AND REMOVING THE GUIDE COMB
- Switch off the appliance.
- To fit the guide comb, slide and push it into place (fig. 4, A).
To remove it, do the reverse operation (fig. 4, B).
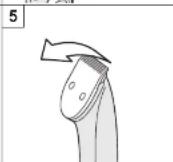
CHANGING BLADES
- Switch off the appliance.
- To remove the blades, push them out of their slot from underneath (fig. 5).
- IMPORTANT: to replace the blades, set the selector (fig. 1 - ref. 4) to "3.0" (fig. 6); first insert the rear part into the slot (fig. 6, A), then push the front to close it (fig. 6, B).
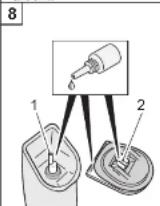
- IMPORTANT: before fitting the blade, make sure that the motor pin (fig. 8 - ref. 1) is adjusted so that it can slot into the space on the inner side of the blade (fig. 8 - ref. 2).
CABLE REEL
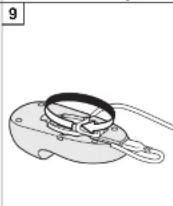
The base (fig. 1 - ref. 6) has a compartment where part of the cable can be wrapped if the full length is not required (fig. 9).
CARE AND MAINTENANCE
The cleaning and maintenance procedure must be carried out after every use.
- Switch OFF the appliance and disconnect it from the mains supply before performing any maintenance or changing any parts.
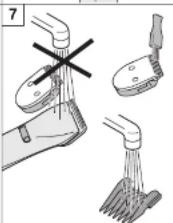
- Never immerse the appliance in water!
After every use, remove the guide comb then use the small brush to eliminate any hair from the cutting head and its seat.
- Clean the outside of the appliance with a soft cloth (slightly damp if necessary). Never use solvents or abrasive detergents!
- Remove the cutting head (fig.5) and evenly oil the blades and the seat of the motor pin which is located on the inside (fig. 8).
- If after prolonged use, and despite regular cleaning and lubrication, the cutting ability of the appliance appears to be diminished, the cutting head must be replaced.
DISPOSAL
The appliance must be disposed of in compliance with applicable environmental standards.
This appliance conforms to European Directives 2004/108/EC, 2006/95/EC, 2009/125/EC and Regulation (EC) No. 278/2009.

GUARANTEE
VALERA guarantees the appliance you have bought at following conditions:
- The guarantee conditions for this appliance are as defined by our dealer in the country of sale. In Switzerland and in the countries subject to the European directive 44/99/CE the guarantee period is 24 months for domestic use and 12 months for professional or similar use. The guarantee period starts from the date of purchase as stated on the present guarantee card regularly filled out and stamped by the dealer or on the sale's invoice.
- The guarantee is applicable only against submission of the present guarantee card or the sale's invoice.
- The guarantee covers the elimination of all defects arisen during the guarantee period resulting from proven faults in material or workmanship. The elimination of the defects will be made either by repairing the appliance or exchanging it. The guarantee does not cover any damage arising from incorrect connection to the power supply, improper use, breakage, normal wear and noncompliance with the Instructions for Use.
- All other claims of any nature, including those for eventual damages outside of the appliance, are excluded, unless our liability is legally mandatory.
- The guarantee service is carried out free of charge; it does not affect the expiry date of the guarantee.
- The guarantee becomes void if repairs are undertaken by unauthorized persons.
For UK only: this guarantee in no way affects your rights under statutory law.
In case of defect, please return the appliance well packed and together with the guarantee card regularly dated and stamped to one of our Valera Service Centres or to the dealer who will send it to the official importer for the guarantee service.

The symbol on the product or on its packaging indicates that this product may not be treated as household waste. Instead it shall be handed over to the applicable collection point for the recycling of electrical and electronic equipment. By ensuring this product is disposed of correctly, you will help prevent potential negative consequences for the environment and human health, which could otherwise be caused by inappropriate waste handling of this product. For more detailed information about recycling of this product, please contact your local city office, your household waste disposal service or the shop where you purchased the product.
WERKING MET BATTERIJ
Type 652.02
RENGJØRING OG VEDLIKEHOLD
KLIPPNING MED STYRKAMMAR
X7 WnW 7y DnW 7y XN X
ninn nnnn nn nn nn nn .15
nyn 407yn ix oioyn nyn O-n
ywnn nnynn7 nynn .010x
.
IX,0IOJNINIINJYONNJX|yOnjX.16
.
n 17
.7 tyinn nn n97x
,nn ninnn ,n nn nion nx qun7 18
17nIN IN D'oo nn,na
IX DIU nnnnn 1X nnnn 19
.7n nn7 7N
wnwnn nn nwn ny nnn 20
n nn nnnnnnnnnnnnnnnnnnnnnnnnnnnnnnnnnnnnnnnnnnnnnnnnnnnnnnnnnnnnnnnnnnnnnnnnnnnnnnnnnnnnnnnnnnnnn
nix yo7 w nion nnynnn 97.21
.nivw 8wn7
nwn nn nnn nn 22
D'YiJn nnnn n7 nnX nn7 nn
.
yannnnnnn nn n nn nnnn 23
.
,IN ,n nn nnn nn nn nn nn .24
.
#
.1
n46, yy 2
.3
.1nnnnn 4
.5
.6
.652.02 xio) nion nuu nn .7
.8
μun .9
()0.10
.11
.1nW .12
yann nn on nn nnn noon nn noon noon
nennny
INX D'ann nn Tn Xn nnn nnn nnn nn nn nn nn nn nn nn nn nn nn nn nn nn nn nn nn nn nn nn nn nn nn nn nn nn nn nn nn nn nn nn nn nn nn nn nn nn nn nn nn nn nn nn nn nn nn nn nn nn nn nn nn nn nn nn nn nn nn nn nn nn nn nn nn nn nn nn nn nn nn nn nn nn nn nn nn nn nn nn nn nn nn nn nn nn nn nn nn nn nn nn nn nn nn nn nn nn nn nn
wnn n 5 nnnn nn nnnn nnnn
.70
nhi0 nhy:
(652.02)
(2) (1) (1) (1) (1)
100/0 = 4
75/1nTn3
50/ n 2
25/ n1n1
25/ ynnn nn nnnn nn nn nn nn nn nn
n nn nnnnnnnnnnnnnnnnnnnnnnnnnnnnnnnnnnnnnnnnnnnnnnnnnnnnnnnnnnnnnnnnnnnnnnnnnnnnnnnnnnnnnnnnnnnnnnnnnnnnnnn
100101111111111111111111111
nionnyon
ix (652.02 xio) nww 3 ywnn nn np, wnnn nn
2-5 nin7 nuh won hyn ,nirn nn yyn (652.03 1io) nyw 3-5
(652.03 xio) nivw 3 iX (652.02 xio) nivw
n nn nnnnnnnnnnnnnnnnnnnnnnnnnnnnnnnnnnnnnnnnnnnnnnnnnnnnnnnnnnnnnnnnnnnnnnnnnnnnnnnnnnnnnnnnn
wnn nn nnnn nn noannnnnnnn
- yon nn nn nn nn nn nn nn nn
n nn nnn nn nn nn
yon nn ynnn nnn 4, hion ny 652.02 xo
y 90- n 3
607 01n
7 90-652.03
n 60 ty y winx xynn pynnn
.
100 100
Tn nn nynn,nnnynnnnnnnnnnnnnnnnnnnnnnnnnnnnnnnnnnnnnnnnnnnnnnnnnnnnnnnnnnnnnnnnnnnnnnnnnnnnnnnnnnnnnnnnnnnnnnnn
:nnn nn n
Dywn nn nn nn nn nn nn nn nn nn nn nn nn nn nn nn nn nn nn nn nn nn nn nn nn nn nn nn nn nn nn nn nn nn nn nn nn nn nn nn nn nn nn nn nn nn nn nn nn nn nn nn nn nn nn nn nn nn nn nn nn nn nn nn nn nn nn nn nn nn nn nn nn nn nn nn nn nn nn nn nn nn nn nn nn nn nn nn nn nn nn nn nn nn nn nn nn
4-20 1
:on nnnnn
.
iin nnnn nn nnnn
.1n nn nn nn nn nn nn nn nn nn nn nn nn nn nn nn nn nn nn nn nn nn nn nn nn nn nn nn nn nn nn nn nn nn nn nn nn nn nn nn nn nn nn nn nn nn nn nn nn nn nn nn nn nn nn nn nn nn nn nn nn nn nn nn nn nn nn nn nn nn nn nn nn nn nn nn nn nn nn nn nn nn nn nn nn nn nn nn nn nn nn nn nn nn nn nn nn nn nn nn nn
:nnn
2
nyn nyn nn nnnn nn nnnn nn nnnn nn
n nn nnnnnnnnnnnnnnnnnnnnnnnnnnnnnnnnnnnnnnnnnnnnnnnnnnnnnnnnnnnnnnnnnnnnnnnnnnnnnnnnnnnnnnnnnnnnnnnnnnnnnnn
"177"ynwnynnTn
n nn nnnnnnnnnnnnnnnnnnnnnnnnnnnnnnnnnnnnnnnnnnnnnnnnnnnnnnnnnnnnnnnnnnnnnnnnnnnnnnnnnnnnnnnnnnnnnnnnnnnnnnnnnnnnnnnnn
.
:wnn
n nn nnnnnnnnnnnnnnnnnnnnnnnnnnnnnnnnnnnnnnnnnnnnnnnnnnnnnnnnnnnnnnnnnnnnnnnnnnnnnnnnnnnnnnnnnnnnnnnnnnnnnnnnnnn
.
#
y
*
nnn.
1
nynn nn nnnnnnnnnnnnnnnnnnnnnnnnnnnnnnnnnnn
1.11111111111111
*
*
*
*
*
1
nnn no nn nnnn nn nn nn nn nn
n nn nnnn nn nnnn nn nnnn nn nnnn nn
.100
nynnnnnnnnnnnnnnnnnnnnnnnnnnnnnnnnn
#
VALERA
nna nnnn nn nnnn nn nnnn nn nnnn nnnn nn nnnn nn nnnn nn nnnn nn nnnn nn nnnn nn nnnn nn nnnn nn nnnn nn nnnn nn nnnn nn nnnn nn nnnn nn nnnn nn nnnn nn nnnn nn nnnn nn nnnn nn nnnn nn nnnn nn nnnn nn nnnn nn nnnn nn nnnn nn nnnn nn nnnn
121 1 24 nnnn nn nnnn nnnn nnnn
nwnnnnnnnnnn nnnn nn nnnn nn nnnnnnnnnnnnnnnnnnnnnnnnnnnnnnnnnnnnnnnnnnnnnnnnnnnnnnnnnnnnnnnnnnnnnnnnnnnnnnnnnnnnnnnnnnnnnnnnnnnnnnnnnnn
n nn nn nn nn nn nn nn nn nn nn nn nn nn nn nn nn nn nn nn nn nn nn nn nn nn nn nn nn nn nn nn nn nn nn nn nn nn nn nn nn nn nn nn nn nn nn nn nn nn nn nn nn nn nn nn nn nn nn nn nn nn nn nn nn nn nn nn nn nn nn nn nn nn nn nn nn nn nn nn nn nn nn nn nn nn nn nn nn nn
.2
3
n nn nnnnnnnnnnn
197nnn nn nnnnnnnnnnnnnnnnnnnnnnnnnnnnnnnnnnnnnnnnnnn
y,wnn nn nnn nn nn nn
x7wny7nni
ywn nn yin, nnnn 17x nnt won nn nn nn nn nn nn nn nn nn nn nn nn nn nn nn nn nn nn nn nn nn nn nn nn nn nn nn nn nn nn nn nn nn nn nn nn nn nn nn nn nn nn nn nn nn nn nn nn nn nn nn nn nn nn nn nn nn nn nn nn nn nn nn nn nn nn nn nn nn nn nn nn nn nn nn nn nn nn nn nn nn nn nn nn nn nn nn nn nn nn nn nn
ywn nn nnnn nn
n nn nnnn nn nn nn nn nn nn nn nn nn nn nn nn nn nn nn nn nn nn nn nn nn nn nn nn nn nn nn nn nn nn nn nn nn nn nn nn nn nn nn nn nn nn nn nn nn nn nn nn nn nn nn nn nn nn nn nn nn nn nn nn nn nn nn nn nn nn nn nn nn nn nn nn nn nn nn nn nn nn nn nn nn nn nn nn nn nn
nannnn nnnnnnnnnnnnnnnnnnnnnnnnnnnnnnnnnnnnnnnnnnnnnnnnnnnnnnnnnnnnnnnnnnnnnnnnnnnnnnnnnnnnnnnnnnn

177n. nnnn nn nnnn nn nnnn nn nnnn nn nnnn nn nnnn nn
n nn nnnn nn nnnnnnnnnnnnnnnnnnnnnnnnnnnnnnnnnnnnnnnnnnnnnnnnnnnnnnnnnnnnnnnnnnnnnnnnnnnnnnnnnnnnnnnnnnnnnnnnnnnnnnnnnnnnnnnnnnnnnnn
nynnnnnnnnnnnnnnnnnnnnnnnnnnnnnnnnnnnnnnnnnnnnnnnnnnnnnnnnnnnnnnnnnnnnnnnnnnnnnnnnnnnnnnnnnnnnnnnnnnnnnnnnnnnnnnnnnnn
n nnnn nn nnnnnnnnnnnnnnnnnnnnnnnnnnnnnnnnnnnnnnnnnnnnnnnnnnnnnnnnnnnnnnnnnnnnnnnnnnnnnnnnnnnnnnnnnnnnnnnnn
n nnnn nn nnnn nn nnnn nn nnnn nn nnnn
y
pio,ynn Tny nyyn n9nn, noon nn7 7ywn nn nx - TINn
JNNNINDNTYIN
n nn nnnnnnnnnnnnnnnnnnnnnnnnnnnnnnnnnnnnnnnnnnnnnnnnnnnnnnnnnnnnnnnnnnnnnnnnnnnnnnnnnnnnnnnnnnnnnnnnnnnnnnnnnnn
Eλnviikα
OΔHΓIEΣ XPHΞHΣ - MovT. 652.02 - MovT. 652.03
AiaaboTe TPOoEeTKIaTc obnyieC autc spnpoipotnoeTe tn oukeun.
Ta npoiovta eivai etrioc diaheoiua otnv ioioeiaa www.valera.com
NPOEIAOIOIHSEI

DoctynHi TakoK Ha caTti www.valera.com
NONEPEDXEHNA
Baxnbo: Ira rapaHTi dOaTKoBo i 6e3neKn peKomeHdoBaHO BCTaHOBTu B OCHOBH i eKeTpOMepexi, Do koi nikUoyeho npictpi, npepeHcHne pele-3anobixhNk, po3paxoBaHe ha pobouh ctpym do 30 mA. 3a DOKnaHIOIO IHopmaieo 3BepHITbcrdo KBaIioKOBaHOro eKeTpika.
- Ipeed BnKOpNCtAHnHm nepeBipTe, qn nobHicTIO cyxni npnilad.

YBAGA: He BnKOpNCToByTe uei npiaD 6iJa BaHH, DyuobNX Ka6iHOK, pe3epByapib Ta iHux eMHocTei 3 BOHO.
-ДiTи BIKOM BiD 8 pOKiB Ta OcO6n 3 ObMeJKeHIMN φi3NCHIMN, NCxIXHIMN Ta CEHCOPHMN MOXJIINBOCTaMn a6o HeIOCTaTHIM DOCBiIDom Ta 3HaHHaMn, MoKyTb KOpNCyBaTncr ZIM npIaIOM, 3a yMOBn IIO BOH N 3HaxOJaTBcR PiI BIDIOBiIDHm HarIaIOM a6o 6yIn nPoIHcTpkykTOBaHi 0oDo 6e3NeuHOI EKCIIpyaUITI npIaNy iYCBiIDOMIOTb HArBn PN3NK.
He do3boJrTe dITm rpaTnCra 3 npnaDom.
- UnueHn Ta DOrJ3a npuJaOM He NOBHHI BIKOHyBaTnCn DaTbMn 6e3 HaJny.
He KopnctyItecb HecnpaBnHm npnaDom. He HamaraiTece camocTiHNO nolaroHTn eJeKtpponpnaad, 3BepHITbcr do ynoBHOBaXeHoro axiBzra. 3 MeTOO 3anobirAHn rN3NKam 3amHy HecnpaBHorO shhpy XNBJIeHHMaE BnKOHyBaTn Bnpo6Hnk, axiBci 3 noRo cepBicHoro ceHTpy a6o axiBci 3 BiINOBiHO KBAJIqkaicio.
- RaKuo npuHaBnKOpNCTOByETbCay BaHHi KIMHaTi, Heo6XiHOnicna KopnCTyBaHHaBID'EDHaTNIoro BIDpo3eTKNeIeKtpOmepeXi, TOMU 6n3bKiCTb BOIN CTaHOBTbHe6e3neKy HabITb ToDi, KOJI npuHaBnMKHeHo.
BmkaTe npnlaT iNbKn B Mepexy 3MiHoro ctpmy Ta nepeBipraTe, u6 Hanpyra B Mepexi cnibnadaJa 3 Hanpyroo, Bka3aHOu Ha npnadi.
-Пися кожного Користувангь Вимкайт eprnilad Ta BnIMaIte MepeЖHy BnIky 3 po3eTK n eJektpnHoro cTpyMy. BnIMaIOuN BnIky 3 eJektpnHoi' pO3eTK n He TЯrhHtB 3a shHyp.
He BnMaTe BNkY BOJOrmPyKaMn.
- Першних увимки прлад, обов'язково поpebipte Нор CTан, a takож спразнICTь 6лOKу кИВлЕнгЯ та Heушковские Кабелю.
- Elenementn NakyBaHn npnilady (PnaCTNKoBi KylbKn, KapToHn KaOp6ka TOnO) Heo6xIDHO 36epirATn B HeoCTynHnx DnA DiteMicx, TaK Jk BOHn HecTyb NoteHnHy He6e3neKy DnA Hnx.
-Дани пилад MaE ВИКОРИСТОВУВАТИСь 3a пиЗHAчЕНЯМ.Будь-яke iHwe ВИКОРИСТАнHA BBаЖа€ТбСЯ He npaВиЛьнIM TaHe6e3пeунм.ВирOBнK He Hece BiДПОВiДЯЛьНоCTI 3aNoJOMKN, lo MaIOTb MicGe B pe3yЛьТаTi He npaВиЛьНOrO YN NOMUKNBOORO KOPINCTUBAHнЯ пиладOM.
He nidaabaTe npiaB BnInBy temepaTy pHxue 0^ ab6iNbwe 40^ . He 3aIIwaTe npiaD iD npraMMN COHyaHMMnpOMeHmnpOTyROM DOBfRO yacy.
He 3aIIuAte npIaI, kIn 3apJkaeTbcra, y BOIOnx Micux Ta He 3apJkaIte BOIOnn npIaI. - Пилад мас akумлготop NiMH. 3meto10 36epirahня doBkillma PaHMo He BnKndaTn BiDnpaCboBaHi batapei y no6yTOBI BiXOHy; cnid BiDBe3TN iX y cneuaIbHi ceHTpn dIepeHcHOrO 36Opy BiXoDiB.
He nidaabaTe 6atapeo BnInBy hAmipHOI BOlorocTi Ta 3anobiraTe ii KOHTaKTy 3 piHAMN.
TpmaTe 6atapeo Ha DoCTaTHi BIDCTaHI BiD eIeKtpomarHITnIX nOJIb, Dxepel Tena Ta BiDKpntoro NOJyM'
He6e3neKa npDpRnH a6o 3IaMIB. He BnKOpNCToBvYTe 6Iok-Ne3o a6o HacaDN, kUo BOH nOwKOJxEHI. HeraHIO ix 3amHITb, u6 yHNKHyTN TpaBM.
-Будыоберекhi,иоб He noopЯпTN uKipy,BnKOpNCTOBuOHy npnilad 3 6IOK-Je3OM,doяKOrO He npueHaHa HacaIka.
BNUKOPNUCTAHH
CKIAAOBI YACTINH
1Пиладдястпжь BOLOCs,6oPoДЯВсIB.
2HabipIe3IyBOJoc846MM
3Bumukau/Bumukau
4 Nepemukay DOBXHn nIDCTpnaHH
5 P03'EM DJIr TpaHcDopMaTopa
6 Ba3a.
7IndkaTOp pIBH3ap4y6batae.i (tINbKn DnmaMoDei 652.02)
8KoHTpoIbHm iHnKaTOp 3apAyD
Ppnaad MoKe npaObaTn k 3 NiKIIIOueHHm Do XkepeJa KINBHeHH, TAK I B aBOHOMHMy (6e3npoBIDHomy) peXmuI, TOMy oio noro OCHaueHo 3apAHN m AkyMnTOpom.
JKNBJIENHBAIDMEPEKJI
PpueHaHte TpaHcfoMTop (Ma1.1 - no3.9) Do npuJaIy IJnxOM npueHannr po3'Emy do rhi3da npuaNy (Ma1.1 - no3.5).
PiikniouHt TpaHcfoPMatOp do po3eTKN.
Baxnbo: npnnaed n pauoe BiMpexi, KOJN akymyIaTOp nobHicTIO po3pndxehn, BIMKHITb npnla, 3apdkaTe akymnyAToP 6n3bKO 5 XBnIH, a NOTIM 3HOBy BBIMKHITb i npauoTe BiD mepeki.
KINBJIeHHA KymyIaTOPA
Modenb 652.02
-ПиладОсашениCBITIOIOIDHIMiDnKATOPOMpiH3apAry(MaI.2).
CBITb64CBITIOJIOI = 3 apn 100%
CBITATb3 CBITNOIOU = 3ap7d 75%
CBITbca 2 cBtioiOu=3apd50%
CBITITb8c1CBITIOID=3ap2D 25%
Pn6op moKet pa6oTaB kaK OT cETN, TAK N OT nepe3apXaEMOn aKKyMnyTOpHoi 6atapei (cordless).
ПОДКЛЮЧЕНЕ K ЗЛЕКТPOCETN
IopocnHHe TpaHcOpMaTOp (pnc.1 - no3.9), BCTaBb BNky B pa3bem np6opa (pnc.1 - no3.5). BknUHTe TpaHcOpMaTOp B po3ETky 3neKtpuecko Cetn.
BHHMaHHe:ecn6aTape np6bopa nonHoCTbIO pa3paKeHa nOH He pa6oTaET O cTeH,nepe3apAHTe 6aTapeIO (B TeueHHe npMepHO 5 MmH.) IN CHOba BKIOUHTe np6bOP B cTeB.
PABOTA HA AKKUMYJATOPE
Modenb 652.02
-ПибборОСнашенCBETODINODHBIMИнДИКATOPOMурВЯ ПОДЗAPRДК(pIc.2).
Tognt4cBetoDnOda=3apraKa 100%
Tognt 3 CBeToIOnoJa = 3apJka 75%
Tognt 2 cBeToIOnOJa =3apJka 50%
Togun1 CBeToDIOuO = 3apAka 25%
MiraHne KOHTpOJIbHOro INHdNkAtOpa nO3aprAn (pnc. 1 - no3.8) O3HaayeT, yTo ypoBeHb 3aprAn 6baTape coCTabJIaTe Hnke 25%
- Pene3apjkaTe 6atapeToTbkoB Cnyaee CyueCTBeHHoro CHNKeHn MOUHOCT npu60pa.
- Ppi nonno pa3pndke 6aTape np6op BbIKHouaETcA bTOMaueckn.
Modenb 652.03
- Pene3apjaKe Te 6aTaapeIO TOnbKO B CInyae cyIeCTBeHHOrO CHINKeHn MOUHOCTn npu60pa.
- Pn nOHH pa3pIke 6aTapei np6op BbIKHouaETcA bTOMaTueckn.
NEPE3APRAKABATAPEN
- IpeepnepBbIM nCnoB3OBAHHeM, noCTaBte aKKMyJrTOp 3apKAtbCra Ha 3 yaca (MoJe652.02) HnHa 3,5 yaca (MoEe652.03). DnI noCneDyUxN xoDzapAdoK Heo6xoDmO MHHym2,5 yaca (MoEe652.02) HnI 3 yaca (MoEe652.03).
- BbIKIOueHne np60pa npo3BOuNTcnopeCTBOM BbIKIOUaTeTg (pnc.1 - no3.3). 3apraKa baTape npo3BOuNTcToIbKO npn BbIKIOUeHHOM np6Ope.
- PioaCoeHInTe TpaHcOpMaTOp (pnc.1 - no3.9), BCTaBnB BuIKy B COOTBeTCTByUOuN pa3bEm np60pa (pnc.1 - no3.5).
- IINI NOIDCOEINHITETPAnHCFOPMATOPK6a3e(pnc.1-n03.6),BCTABNB BUNKy Bpo3eTKyHa Hei (pnc.1-n03.5),a 3aTeM yCTAHOBnBa Hb6a3y npu6op.
BKnIOuHTe TpaHcfoPMatOp B po3ETky 3JIeKTPnuecko CetN.
BoBpeM3apAkn3aKnIaeTcKpachbIuHdkaTOp(pnc.1-no3.8). - Mojelb 652.02: BO Bpem 3apn 6atapen 4 3eIeHbIX CBeToNDa yKa3bIAOT Ha ypoBeHb IOCTnHyTOI CTENHIO3APn. PpN 3 ropnix CBtoNDaX (no 90 MNHT NO3apnKHa KaJdb) np6Op yKe moKET pa6oTaB BA TOHOOMHom pexmme do 60 MNHT.
- Moenb 652.03: npimepno uepe9 90 mHyT nO3apAkn KpaChbInnHnKAtop (pnc. 1 - no3.8) NaHnHaet mRaTb. Pn TAKoN CTeNEH 3apAkn Pnp6Op yKe MOxET pa6OTaTB B ABTOHOMHom peKmte do 60 mHyT.
-ПО OKOHuaHnnoJ3apJkn KpaChbI INHdkaTOp (pnc.1-n03.8) racHeT. - Pnp nOIOHcTbO 3apJxehHO 6aTapeN, np6op moKet HnpepbBHO pa60Ta1b 100 MNHT.
- Upe3 onpeIeHHeO uCnlo paOuyx YacOB dNITeBHOCTb pa60tbnp6opa B aBOHOMHO pEXKIMe MOKeT OUYTMo yMeHbWHTbcra.
- MakmambblbmypoBeH3apRKnDocTnraetcyepe34-5no3aprdoK.
PERYJATOPIINHBICTPNUKKN
Pnp6op ochaen cnCTeMoN VARIO-CUT SYSTEM, no3BOJIOUeBbIbnpaTbOHy 5 pa3JIuHbIX dINH cpe3a BOIOc (pnc. 3) c nOMoIbIO CNEuaIbHO rpeKIOUaTeTn (pnc. 1 - no3.4).
CTPNUKCA HACADKAMN
B 3aBnCIMOCTN OT BnDa CtpnKKn, Pnp6op MoKET NcNoB3ObaTbC Kc C hAcKaMn TaK N 6e3 HNx (pnc.1- no3.10). NcNoB3OBAHne HnPaBJIouXrpe6HeI No3BOJrE TOnyHaTb pa3NnHbIe DnHbI cpe3a BONOC B npedeNaX O4 Do 20 MM.
YCTAHOBKA I CHRTNE HACADKIN
- BbIKJIOUHTe npB6op
-Дя yctahOBKN HanpaBnHOo rpe6HЯ npOdBnHbTe erO cKoJIbKeHNem BnepeI Do nocaKn BrHe3do (pnc. 4A).
-ДЯСТЯРгбнВБИПОПНHTe ONEpaLIOK BO6PbATHOM NopRdke (pnc.4B).
CMEHA JIe3Bn
- BbIKJIOUHTe npu6op
-ДЯСНТЯЛЕЗВИ BБITOLKHITE INI 3I He3Ia HaxKaTHeM CHN3Y (DnC.5).
BHIMAHHE: yctahOBKn Ie3Bn npBedeNte nepeKJIIOUaTeJb (pnc. 1 - no3. 4) B NOIOXKeHne "3.0" (pnc. 6); BCTaBbTe ChauAna 3aDHIOU qAcTb B COOTBetCTByIOUee rHe3do (pnc. 6A), a 3aTEM HadaBNTe Ha BepxHOU qAcTb DnI NOcAKn Ie3Bn Ha MecTo (pnc. 6B).
BHIMAHHE: neped yctaHOBKOJIe3BnYy6eINTEcB TOM, YTO OCB DBNrAteJN (pnc. 8 - no3.1) opneHTnpoBaHa TaKMM o6pa3OM, YTO NOnaJaET B rHe3DO, paCNOLOKeHHoe C BHyTpEHHe CTOpOHbI ne3BnR (pnc. 8 - no3.2).
MECTOДЯHAMOTKNABEN
Ha 6a3e (pnc.1- no3.6) IMeTcMecTo, npedha3HaueHHoe dHnHAMOTKn cactn Ka6eB B cnuyae, ecHn Ht Heo6xOIMOCTN B nONb3OBAHm erO nonHO nnHbI (pnc.9).
YnCTKA N yXoI
YnCTka DOnKHa 6bItb npOBeHa NocJe KaXDoRo HcNoJb3OBAHn.
- IIO6a onepaunno yxOdy nnn 3aMeHe hacaDok DOnkHa npoBOHbCnBa BbIKIOUeHHOM npu6ope,OTcoeHNHeHHom OTpHaHcOpMaTopa.
- He onyckaIte npi6op B BodY!
- Pocne kaojdoRo nCnoJb3ObaHn npnbopa cHmnte pauecky u eTKo ydaNTe OCTaTKn BOLOC peKyuJe TNOBKn C ee NocadoOHoro NOLOXKeHn.
OuHCTNE NOBEPXHOCTb Pn6opa MRAKO BnaKHO TpAIOKo. He nCNOJb3yIe pactBOPHTEN MOUue CpeDCTBA - ChmMaTepexyuTo roIOBky (pnc.5) n peryIaHPO Cma3bBaIe HeKepaMueckne ne3Bn r Ihe3do BAJa MoTopa, paCnoIOXeHHoro N3HyTpN (pnc.8).
- Ecn nocne dntenbHoro nCnOJIb3OBaHHa peKyuza crIOcO6HOCTb rOIOBKN yMeHbIHTcra, HeCMOTpHa perynapHyu uNCTky u CMA3ky, peKyuUyro rOIOBky Heo6xoJIMo CMeHNTb
YTNIN3AUIN
Pnp6opdoJxKeH BbI6paCbIBaTbcra (yHnTuToXaTbcra) npn co6JIIOeHN npaBn 3auNTbOkpykaOuSei Cpebl.
Данньй пиббор COOTBeTCTByeT eВPoneиCKIM ДИрекТиВам 2004/108/CE, 2006/95/CE, 2009/125/CE и стандару (CE) N. 278/2009.

「APAHTIN
VALERA rapaHTnpyET npno6peTeHHb Bamn np6op npCneDyoUnx ycIOBnX:
- RapaHTnIeNCTByET Ha yCIOBnIX, yCTaHABINBaEMbIX HAaIM OOpuuaJIbHbIM INCTpN6bHOTepOM Ha TeppITopm cTpaHbI, Ige bI npo6peTeH np6Op. B UBeIcApm n B cTpaHax, B KOTOpbIX DeNCTByET eBpOeNCKa dIpuKtNbA 44/99/CE, rapaHTnHbI cPOK COCTaBnIeT 24 Mecua npn DomaHem NcNoIb3OBAHn np6Opa n 12 MecaeB npn erO npocceCNOHaHBOM nnnoobHom npocceCNOHaHOMy npimeHeHH. RapaHTnHbI cPOK BCTynaE T Cnly C MOMeTA NOkynKn np6Opa. DaToi NOKynKn np6Opa ABJareTc DaTa HAcTOAeRr papaTHNHorO CBnTeJIbCTBA, HAdNeXaUIM 0bpazom 3aONHeHHoro n 3aWTEMNEBaHHORnpOdaBcOUM, nnJe daTdoDOKymTA NOKynK.
- RapaHTmHoe 6cIyKbAHnne npedocTABnEeTc TOnbKO npn npedbBHeHHn HAcToaero rapaHTmHO CBNDETeJbCTBa JIN DOKymeHTa NOKyKN.
- RapaHTNnIpeDyCMaTpNAeTycTaPAHeHne BcEx DeEeKTOB MaTePnAJIu NIN N3ROTOBHeHn, BbYBaJIeHHbIX B TeueHne rapaHTmHOro nepNoJa. YCTpaHHeNe DeEeKToB MOKeT OcyUeCTBnTbCnIyTEM peMOHTa np60 3ameHbI erO. RapaHTnR He NOKpbBaET DeEeKtBn IIN NOBpeXJDeHn, BO3HNkUne B pe3yNbTaTe NoKnIOeHn Pnp6op K 3NEKTPnueckOn CeTu, He OTBeVauOe Tpe6oBaHnM DeIcTByIOxHOPM; HEnpABInbHOrO nCnONb3OBaHn np60pa, a TaKke HecobJIoJeHn npabn NOnb3OBaHn.
- B OTHOHeHn rapaHTm He npHHMaIOCTppeH3m JIO6o Ro pOa, B qactHOCT npeTeH3m Ha BO3MeueHne y6bITKOB, PnUHNHeHHbIX 3a IpeIeIaMn Pnp6opa, C NCKJIOUeHEm HeBByCMBICNEHHO YCTaHOJIeHHbIX DeIcTByUcIMM 3aKOHAM CNYaEB BO3MOKHO OTBETCTBEHHOCTN.
- rapaHTnHoe 06cnyKbAHue npedocTabnEeTc8e3B03Me3dHO. PpN 3TOM OHO He daet npaBO Ha npoDHe rapaHTnHoro cpoKa, a TAKKe Ha Hauano HOBO rapaHTmHoro nepnoJa.
- RapaHTN TepaET CnIy B CnIyae HapUWeHNA KOHCTpyKcIM NIN peMOHTa npbopa HeynoHOMOeHHbIM nepcoHaJOM.
B cnyae Bo3HKnHOBeHHa KaKoJ-Ni60 HeNCpabHocn BepHnte HaNHexaMIM o6pa3OM yNaKOBaHHbI np6op BmecTe C rapaTHnHbIM O83ateNbCTBOM, HecyuIM DaTy N neaTb npOaBua, B OINH n3 HauNX CeHTPOB cepBnCHORO 06cLyKNBaHn IIN BaHEMy npOaBuy, KOtOpbI nepeAdct erO ofuHaNBHomY mNOPtepy DnB bInOnHeHHraPahTNHorO peMOHTa.

CnMBOH Ha n3dennn HnHa eero ynaKOBKe yka3bIaET, YTO daHHoe n3dene He noNneKHT yTNIN3aun B KaueCTBe 6bTobbIX OTXODOB. BmecTo 3TORo eero cneyet CdaTb B COOTBeTCTBHyOuN PNYKT npneMKn 3NEKTPOHORO n3NEKTPOObOpdyOBaHnra Ira NocNeDyUoSeY TynIN3aun. Co6NJDA npabnA yTNIN3aun n3dennr, Bbl pnoKTe PpeDTBpaNTb npuHHeHne NOteHuaNbHO rO uep6a OkpyKaIOuE CpeDe n 3IDOPbBOIIOe, KOtOBy BO3MOKeH BCNECTBm HEnoOboAUe ObaaHnC NoOboHBM NTXDAMN. 3a 60one noPpObHn INfopMaune o6 yTNIN3aun DaHHoro n3dennr npocb6a ObaaTbcR K MecTHbIM Bnactm, B cnjx6y nOBbO3y n yTNIN3aun OTXoOB nII B Mara3MH B KOTOPOM Bbl npno6peHN daHHoe n3dennie.
652.03-652.02
j 1
VnnnVttepeo
y
S APQ = S AQP + S_ PQR
Jai Jai Lai jia jia jia jia
Jppll 1000
aaii i 1
J 1 J
8
1234567890
1 1
Jlaiy jIjIg jIJI JIJI
jlll jll 1
a 2
.
Jglj Y. cij jbc g jg jj
- 1
a 1
i j 1
jbs
jglg j 1 jkcll jn
Lb
a
jg 1
Jill ssao no slll Jg jgl 1bly p Joo
JSSS
J 1
aJ 1
a
()
J 1
g.
J 1
0 0
40 jgl
.
jglg jy g y b jn jn jn jn jn jn jn
.
pGgI .NiMH. 1j
g j 1111111111111111
aaiiie
J 1
/
A
aaiiie aal yall no aiol alwos lc ayjlll 1c b
glll g jrnnn
y 1
-
- .
pab jgl Jlaaiil 112
aal j
Juejinyi jieji
Lgai
11
46 2
().13 1
(jz)
Jg:1.14 5
(j) 6
A. j 1111 jS sI 7
(652.02
J.8
4.4.1.1.10
a 1
y
(5gj-1psj) jzj (9gj-1psj)
Jusss
jglal 1 jll 1 jll 1 jll 1 jll 1 jll 1 jll 1 jll 1
JyI JyIyIyIyIyIyIyIyIyIyIyIy
y
652.02
(2 w) g s j 1j 1s
% 100=4
a111%75=aaaaaaaa30
品 1 2 % 5 0 = 品 1 2 品 1 2 品 1 2 品 1 2 品 1 2 品 1 2
a25 = a11111111111111111111
25 1 (8 1-1)
12 < 1x ≤ 102 ,即 1 < 1x ≤ 1
jglal jolilal loie jlll
Lgljgl jll gbiy ayjll aiae gai laie
iJb
(652.02Type) 33d jall jll
3 (652.02Type) 2,5 a j j j j j j j j j j j j j j j j j j j j j j j j j j j j j j j j j j j j j j j j j j j
(652.03)
(3eall-1sll) aallll allll llll
.(5j-1)j(9-1)
(6)J-1(j)
(5
Jyjy jyjy
(8gjall-1awll) jaiy
3 4.4.1000000000000000000000000000000000000000000000000000000000000000000000000000000
60 60 90
8 90652.03
j00gol (8 1-1) j00g1
4 100 100
S OBC = S COD + S_ BOC
4-5 12
sla jgab
ALyR (3 5 VARIO-CUT SYSTEM
juaa j(4w)-1J)
laia jlaaillie
j-1 j 200 g laai j l aol i j oalil j k o
J 1 J 1 J 1 J 1 J 1 J 1 J 1
y
Jr
1
jglg 1 j
a1 = 2,an + 1 = n1 + an
1 1
1
0laolog
1
j 8 ij j001
J9 4y y000000000000002
10 46. j1j1
11
12 4
()山 13
()
14 7
(652.02g
y 1
.
左向右异
j 1 j
15
30 j 245
421 4
1 = 2
i 1
8 8
River International S.A.
C/Beethoven 15,Atico
08021-BARCELONA
Tel: +34 93 201 3777
Fax: +34 93 202 3804
www.riverint.com
- Valera
- PROFESSIONAL
- X-MASTER
- INSTRUCTION FOR USE
- WARNING.
- USE
- COMPONENTS
- MAINS POWER SUPPLY
- BATTERY OPERATION
- Type 652.02
- Type 652.03
- RECHARGING THE BATTERY
- ADJUSTING THE CUTTING LENGTH
- CUTTING WITH GUIDE COMBS
- FITTING AND REMOVING THE GUIDE COMB
- CHANGING BLADES
- CABLE REEL
- CARE AND MAINTENANCE
- DISPOSAL
- GUARANTEE
- WERKING MET BATTERIJ
- RENGJØRING OG VEDLIKEHOLD
- KLIPPNING MED STYRKAMMAR
- #
- nhi0 nhy:
- nionnyon
- :on nnnnn
- :nnn
- Eλnviikα
- OΔHΓIEΣ XPHΞHΣ - MovT. 652.02 - MovT. 652.03
- NPOEIAOIOIHSEI
- NONEPEDXEHNA
- BNUKOPNUCTAHH
- CKIAAOBI YACTINH
- JKNBJIENHBAIDMEPEKJI
- KINBJIeHHA KymyIaTOPA
- Modenb 652.02
- ПОДКЛЮЧЕНЕ K ЗЛЕКТPOCETN
- PABOTA HA AKKUMYJATOPE
- Modenb 652.03
- NEPE3APRAKABATAPEN
- PERYJATOPIINHBICTPNUKKN
- CTPNUKCA HACADKAMN
- YCTAHOBKA I CHRTNE HACADKIN
- CMEHA JIe3Bn
- MECTOДЯHAMOTKNABEN
- YnCTKA N yXoI
- YTNIN3AUIN
- 「APAHTIN
- iJb
- 左向右异
- = 2
Brand : VALERA
Model : X Master Plus
Category : Beard trimmer