
Caffeo Varianza CSP - Coffee machine MELITTA - Free user manual and instructions
Find the device manual for free Caffeo Varianza CSP MELITTA in PDF.
| Product type | Automatic coffee machine with grinder |
| Brand | Melitta |
| Model | Caffeo Varianza CSP |
| Dimensions (W x H x D) | 253 x 405 x 380 mm |
| Weight (empty) | 8.6 kg |
| Power supply | 220-240 V, 50 Hz, 1450 W |
| Pump pressure | Up to 15 bar (static) |
| Water tank capacity | 1.2 liters |
| Bean hopper capacity | 125 g |
| Beverage functions | Espresso, long coffee, cappuccino, latte macchiato, milk foam, hot milk, hot water; additional recipes (ristretto, lungo, americano, etc.) |
| My Bean Select function | Allows using a second type of coffee for one cup |
| Two-cup preparation | Yes, for milk-free beverages |
| Customizable settings | Coffee strength (5 levels), beverage quantity (25-220 ml), extraction temperature (3 levels) |
| Adjustable grind | Yes, by lever (fine to coarse) |
| Spout | Height-adjustable, with cup lighting |
| Automatic shut-off | Yes (adjustable up to 8 h) |
| Energy saving mode | Yes (adjustable) |
| Maintenance programs | Rinse, Easy Cleaning (milk system), milk system cleaning, coffee system cleaning, descaling |
| Compatible water filter | Yes (Melitta ANTI CALC) |
| Recommended cleaning agents | Melitta PERFECT CLEAN tablets (coffee), milk cleaning tablets, Melitta ANTI CALC liquid descaling agent |
| Safety | Automatic shut-off, burn protection, electrical safety |
| Included accessories | Milk container, milk hose (short and long), cleaning brush, filter key, water hardness test strip |
Frequently Asked Questions - Caffeo Varianza CSP MELITTA
User questions about Caffeo Varianza CSP MELITTA
0 question about this device. Answer the ones you know or ask your own.
Ask a new question about this device
Download the instructions for your Coffee machine in PDF format for free! Find your manual Caffeo Varianza CSP - MELITTA and take your electronic device back in hand. On this page are published all the documents necessary for the use of your device. Caffeo Varianza CSP by MELITTA.
USER MANUAL Caffeo Varianza CSP MELITTA
natural_image
Black and white photo of a VARIANZA CSE coffee machine with glass cup and coffee beans, no visible text or symbols on the device itself.Inhaltsverzeichnis
natural_image
Technical line drawing of a sewing machine with base panel and clasp (no text or symbols)natural_image
Technical line drawing of a mechanical device with internal components and a labeled part (38), no readable text or symbols beyond the label.1 For your safety ....53
1.1 Proper use....53
1.2 Danger from electric current 54
1.3 Risk of burns and scalds....54
1.4 General safety....55
2 Overview of the appliance....56
2.1 Appliance at a glance....56
2.2 Overview of the control panel 58
3 First steps....59
3.1 Unpacking the appliance....59
3.2 Checking the delivery contents....59
3.3 Installing the appliance 60
3.4 Connecting the appliance 60
3.5 Switching on the appliance for the first time 60
4 Basic operation....62
4.1 Switching the appliance on and off....62
4.2 Using the control panel....63
4.3 Navigating in the menu....63
4.4 Filling coffee beans into the bean container 65
4.5 Filling with water....66
4.6 Adjusting the outlet....67
4.7 Using milk 68
4.8 Emptying the drip tray and coffee grounds container....70
5 Using the My Bean Select® function....71
5.1 Filling coffee beans for the My Bean Select® function....71
6 Preparing beverages 73
6.1 Preparing Espresso and Café Crème 73
6.2 Preparing cappuccino....74
6.3 Preparing latte macchiato 74
6.4 Preparing milk froth or warm milk....75
6.5 Preparing hot water 75
6.6 Preparing further beverage specialities with recipes....75
6.7 Changing beverage settings before and during preparation .....77
6.8 Stopping beverage preparation....78
6.9 Preparing two beverages simultaneously 78
7 Permanently changing beverage settings....79
7.1 Changing default settings....79
8 Changing basic settings....80
8.1 Setting the language....80
8.2 Setting Auto OFF....80
8.3 Setting energy save mode....81
8.4 Deactivating the My Bean Select® function 82
8.5 Resetting the appliance to the factory settings....82
8.6 Information on the appliance status 83
8.7 Setting the grinding fineness....84
9 Care and maintenance....85
9.1 General cleaning 85
9.2 Rinsing the coffee system....85
9.3 Removing and cleaning the brewing unit....86
9.4 Using the "Easy Cleaning" programme....87
9.5 Using the "Cleaning milk system" programme 88
9.6 Using the "Cleaning coffee system" programme 89
9.7 Using the "Descaling" programme....90
9.8 Setting the water hardness....91
9.9 Using a water filter....92
10 Troubleshooting....95
11 Transport, storage and disposal....96
11.1 Venting the appliance....96
11.2 Transporting the appliance....96
11.3 Disposing of the appliance....97
12 Technical data 97
Dear Customer,
Thank you for purchasing the Melitta® Varianza® CSP fully automatic coffee maker.
The operating instructions will help you discover the diverse options offered by the appliance and enjoy your coffee to the full.
Read through the operating instructions carefully. This helps avoid personal injury and material damage. Store the operating instructions carefully. If you pass on the appliance, include the operating instructions with it.
Melitta accepts no liability for damage caused by failure to observe the operating instructions.
If you require further information or have any questions on the appliance, contact Melitta or visit our website at: www.international.melitta.de/
We hope you enjoy using your appliance.
1 For your safety
CE The appliance conforms to the relevant European directives and has been built using the latest technology. Nevertheless, some residual dangers remain.
Observe the safety instructions to avoid dangers. Melitta accepts no liability for damage caused by failure to observe the safety instructions.
1.1 Proper use
The appliance is used to prepare beverages made from coffee beans, and to heat milk and water.
The appliance is intended for use in private households.
Any other use is regarded as improper and may lead to personal injury and material damage. Melitta accepts no liability for damage that arises due to improper use of the appliance.
1.2 Danger from electric current
If the appliance or the power cable is damaged, there is a risk of fatal electric shock.
Observe the following safety instructions to avoid danger from electric current:
ū Do not use a damaged power cable.
ū A damaged power cable may only be replaced by the manufacturer or its customer service or service partner.
ū Do not open any covers firmly screwed onto the appliance housing.
ū Only use the appliance when it is in a technically flawless condition.
ū A defective appliance may only be repaired by an authorised workshop. Do not repair the appliance yourself.
ū Do not make any changes to the appliance, its components or its accessories.
ū Do not immerse the appliance in water.
ū Do not let the power cable come into contact with water.
1.3 Risk of burns and scalds
Escaping fluids and steam may be very hot. Parts of the appliance can also become very hot.
Observe the following safety instructions to avoid scalds and burns:
ū Avoid escaping fluids and steam coming into contact with the skin.
ū Do not touch the nozzles on the outlet during and immediately after dispensing a beverage. Wait until the components have cooled down.
1.4 General safety
Observe the following safety instructions to avoid personal injury and material damage:
ū Do not operate the appliance in a cabinet or similar.
ū Do not reach into the interior of the appliance during operation.
ū Keep the appliance and its power cable out of the reach of children under 8 years of age.
ū This appliance may be used by children over 8 years of age and by persons with reduced physical, sensory or mental capabilities or a lack of experience and knowledge if they are supervised or have been instructed in using the appliance safely and understand the resulting risks.
ū Children must not play with the appliance. Cleaning and maintenance must not be undertaken by children younger than 8 years of age. Children over 8 years of age must be supervised during cleaning and maintenance.
ū Disconnect the appliance from the power supply when left unsupervised for a long time.
ū The appliance must not be operated at altitudes over 2000 m.
ū Please observe the instructions in the corresponding section when cleaning the appliance and its components (Care and maintenance on page 85).

2 Overview of the appliance
2.1 Appliance at a glance
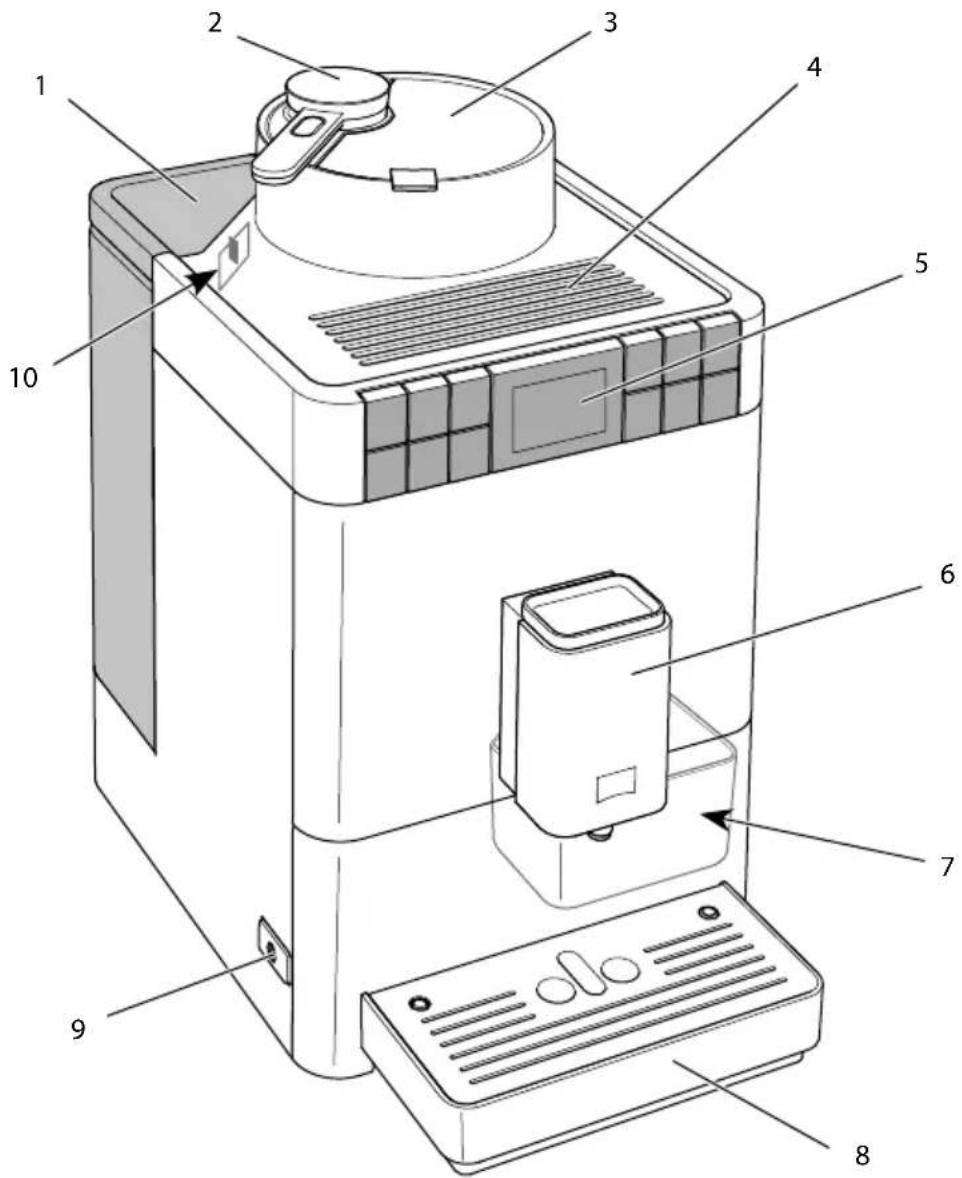
Fig. 1: Front left of the appliance
1 Water tank with lid 6 Height-adjustable outlet with 2 coffee
nozzles, 1 milk nozzle,
1 hot water nozzle, cup illumination
2 Measuring spoon* for the
7 Coffee grounds container (inner)
My Bean Select® function
3 Bean container with lid 8 Drip tray
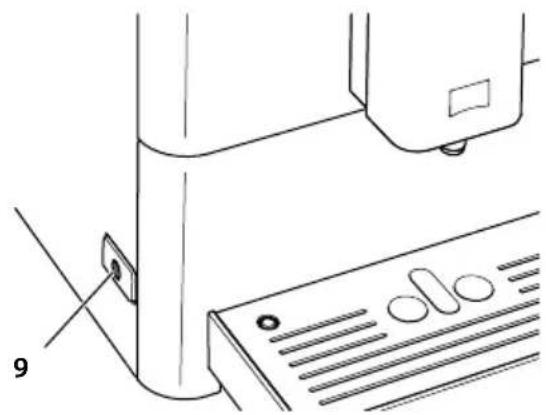
4 Cup rest 9 ON/OFF button
5 Control panel 10 "Grinding fineness adjustment" lever
(inner)

Fig. 2: Front right of the appliance
11 Cover 14 Milk hose connection at the drip tray
12 Brewing unit (inner) 15 Cup plate
13 Milk hose connection at the outlet
16 Float

2.2 Overview of the control panel
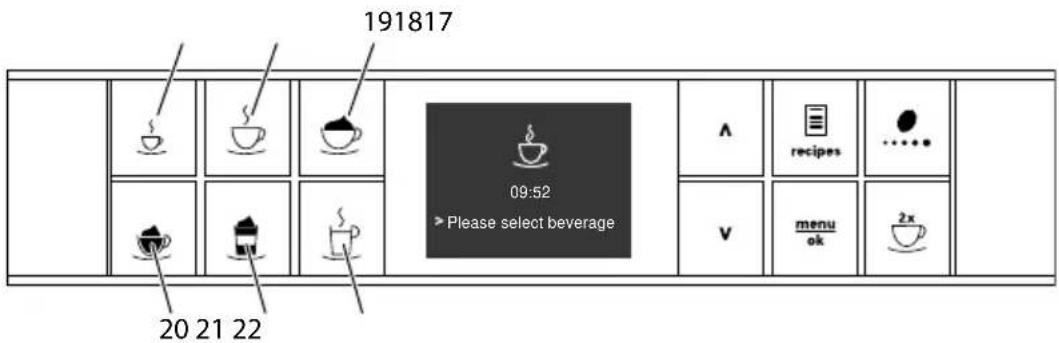
Fig. 3: Direct keys
Item Designation Function
17 Espresso Preparing espresso
18 Café crème Preparing café crème
19 Cappuccino Preparing cappuccino
20 Milk foam/Warm milk Preparing milk froth and warm milk
21 Latte macchiato Preparing latte macchiato
22 Hot water Preparing hot water
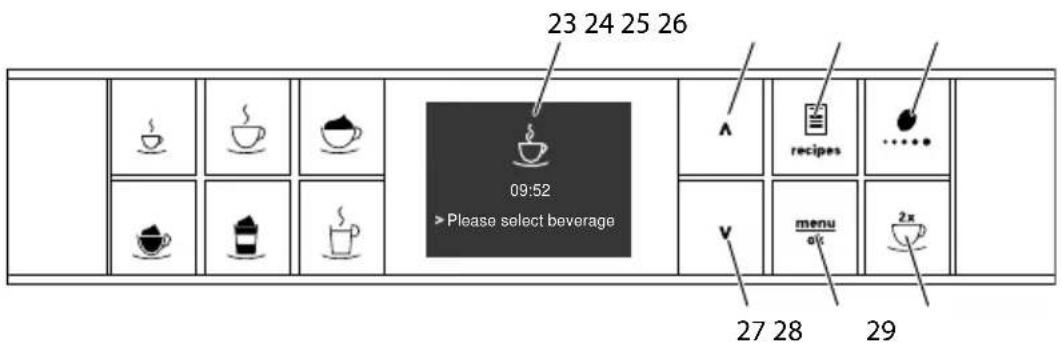
Fig. 4: Display and buttons
Item Designation Function
23 Display Display of current menus and messages Example: Ready symbol
24 Up arrow button Navigating up in the menu or increasing the quantity
25 Recipes Selecting and preparing recipes
26 Coffee strength Setting the coffee strength
27 Down arrow button Navigating down in the menu or reducing amount
28 menu/ok Calling up the menu or confirming inputs
29 Two cups Two-cup dispensing
3 First steps
This chapter describes how to prepare your appliance for use.
3.1 Unpacking the appliance
- Unpack the appliance. Remove the packaging material, the adhesive strips and the protective films from the appliance.
- Keep the packaging material for transport and any return shipments.
i Information
The appliance may contain traces of coffee and water. The appliance has been tested in the factory to ensure that it functions perfectly.
3.2 Checking the delivery contents
Check the completeness of delivery using the following list. If parts are missing, contact your retailer.
ū Milk container with short milk hose
ū Long milk hose
ū Cleaning brush
ū Screw-in aid for the water filter
ū Test strip for determining the water hardness.
3.3 Installing the appliance
Observe the following instructions:
ū Do not install the appliance in damp rooms.
ū Install the appliance on a stable, flat and dry surface.
ū Do not install the appliance in the vicinity of sinks or the like.
ū Do not install the appliance on hot surfaces.
ū Install the appliance at a sufficient distance (approx. 10 cm) from the wall and other objects. The space above the appliance should be at least 20 cm.
ū Route the power cable so it cannot be damaged by edges or hot surfaces.
3.4 Connecting the appliance
Observe the following instructions:
ū Make sure that the supply voltage matches the operating voltage specified in the technical data (see the Technical data on page 97 table).
ū Only connect the appliance to a properly installed earthing contact socket. If in doubt, consult a specialist electrician.
ū The earthing contact socket must have a fuse of at least 10 A.
3.5 Switching on the appliance for the first time
During initial start-up, the language, the time and the water hardness can be set. The settings can be changed at a later point in time (see chapter 8 Changing basic settings on page 80 and section 9.8 Setting the water hardness on page 91).
Use the enclosed test strips to determine the water hardness. Observe the instructions on the test strip packaging and in the table Water hardness range on page 97.
i Information
ū We recommend pouring away the first two cups of coffee after initial start-up.
ū If you want to use a water filter, only insert this after starting up for the first time.
natural_image
Technical line drawing of a sewing machine with base panel and clasp (no text or symbols)Fig. 5: ON/OFF button
Requirement: The appliance has been installed and connected.
- Place a vessel beneath the outlet.
-
Press the ON/OFF button.
» The welcome display appears on the appliance.
» The request to carry out the setup appears: Please set up the machine. -
Confirm with "menu/ok".
» The Language menu appears.
- Select your language with the arrow buttons. Confirm with "menu/ok".
» The Water hardness menu appears.
- Select the determined water hardness range with the arrow buttons or confirm the default value with "menu/ok".
» The request Please refill and insert water tank appears.
- Remove the water tank. Rinse out the water tank with clean water. Fill the water tank with fresh water and insert it.
» The appliance heats up and performs automatic rinsing.
» The ready symbol appears on the display.
» The appliance heats up and performs automatic rinsing. » The ready symbol appears on the display.
- Fill coffee beans into the bean container. To do this, read section 4.4 Filling coffee beans into the bean container on page 65.
» If required, a water filter can now be inserted (see section 9.9 Using a water filter on page 92).
4 Basic operation
This chapter describes basic operating steps for using the appliance on a daily basis.
4.1 Switching the appliance on and off
Before switching on after starting up the appliance for the first time, read section 3.5 Switching on the appliance for the first time on page 60.
i Information
ū When switched on and off, the appliance performs automatic rinsing.
ū During rinsing, rinsing water is also conducted into the drip tray.
Switching on the appliance
- Place a vessel beneath the outlet.
- Press the ON/OFF button (9).
» The welcome display appears on the appliance.
» The appliance heats up and performs automatic rinsing.
» The ready symbol appears on the display.
i Information
If the appliance was only switched off briefly, there is no automatic rinsing after switching on.
Switching off the appliance
- Place a vessel beneath the outlet.
- Press the ON/OFF button (9).
» The appliance performs automatic rinsing.
» The appliance switches off.
i Information
ū The appliance switches off automatically when it is not operated for a long time. Automatic rinsing is also carried out in this case.
ū The off time can be set in the Auto OFF menu, see section 8.2 Setting Auto OFF on page 80.
ū If no beverage has been prepared since switching on or if the water tank is empty, no rinsing takes place.
4.2 Using the control panel
The essential programmes can be accessed using the control panel.
Press the required button. Use the following actions to operate the buttons:

Brief press
Briefly press a button to select a programme.

Long press
Press a button for longer than 2 seconds to select a second programme that may be available.
4.3 Navigating in the menu
To set individual beverages and for maintenance and care, call up the menu on the display and navigate in the menu.
Observe the instructions on the display.

Fig. 6: Display (example) and buttons for navigation
Use the following options to navigate in the menu:
Calling up the menu and confirming the selection

Press the "menu/ok" button for longer than 2 seconds to call up the menu.
Briefly press the "menu/ok" button to confirm your selection.
Navigating in the menu or changing a numerical value

Press the arrow buttons to navigate down or up in the menu.
Press the arrow buttons to increase or decrease a numerical value. Press and hold an arrow button to quickly reach the required position or numerical value.
Exiting a menu

Select the Exit command with the arrow buttons and confirm with "menu/ok" to exit a menu.
Exit submenus that only display information and where no settings are made with "menu/ok".
Calling up submenus
Some appliance programmes can be reached by calling up several sub-menus in succession.
Submenus are always called up in a similar way. Navigation to the Descaling programme is described here as an example.

Fig. 7: Navigating to the Descaling programme
- Press the "menu/ok" button for 2 seconds.
» The menu appears on the display. - Use the arrow buttons to select Care and confirm with "menu/ok".
- Use the arrow buttons to select Descaling and confirm with "menu/ok".
The selection of a programme is always shown in shortened form in these operating instructions:
- Navigate to the Care > Descaling menu.
4.4 Filling coffee beans into the bean container
Roasted coffee beans lose their aroma. Only fill the bean container with as many coffee beans as you will consume over the next 3 to 4 days.
ATTENTION
The use of unsuitable types of coffee can lead to clogging of the grinder.
- Do not use freeze-dried or caramelised coffee beans.
- Do not use any coffee powder or instant products.
i Information
ū The grinder is emptied during each grinding process. Nevertheless, minimal coffee type mixing may occur.
ū Grinding when empty causes a different type of noise and is normal.
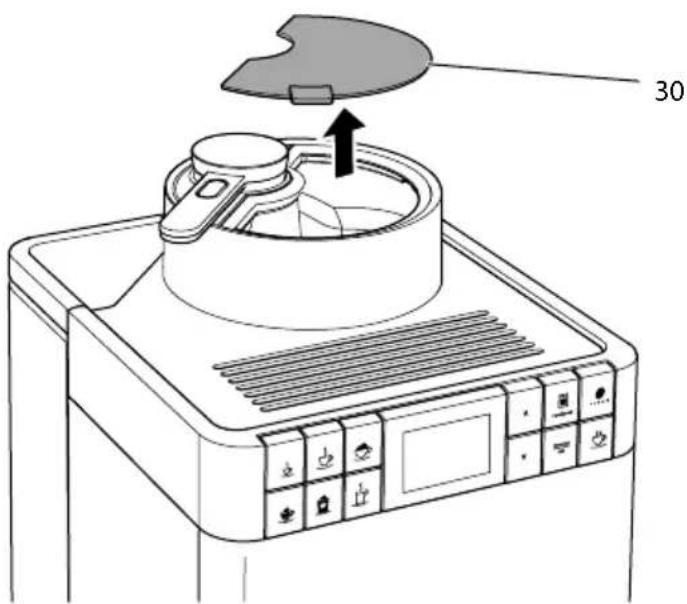
Fig. 8: Opening the lid of the bean container.
- Open the lid (30) of the bean container.
- Fill coffee beans into the bean container.
- Close the lid of the bean container.

4.5 Filling with water
Only use fresh, cold water without carbon dioxide for optimum coffee enjoyment. Change the water daily.
i Information
The quality of the water largely determines the flavour of the coffee. Therefore, use a water filter (see section 9.8 Setting the water hardness on page 91 and section 9.9 Using a water filter on page 92).
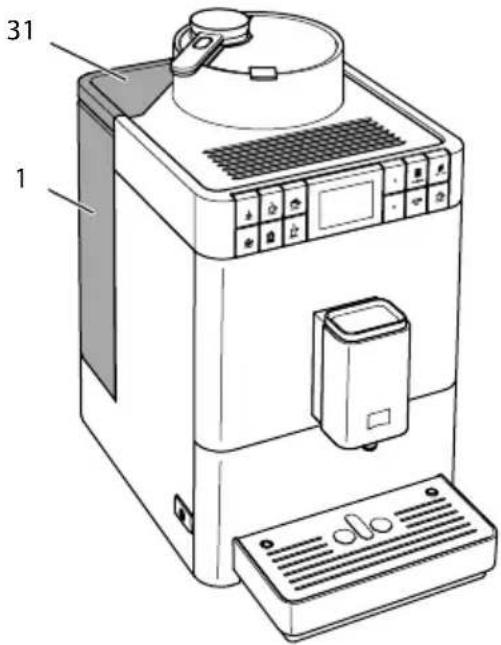
Fig. 9: Water tank
- Open the lid of the water tank (31) and pull the water tank (1) upwards out of the appliance by the handle.
- Fill the water tank with water.
- Insert the water tank into the appliance from above and close the lid.
4.6 Adjusting the outlet
The outlet (6) is height-adjustable. Set the greatest possible distance between the outlet and the vessel. Depending on the vessel, push the outlet up or down.
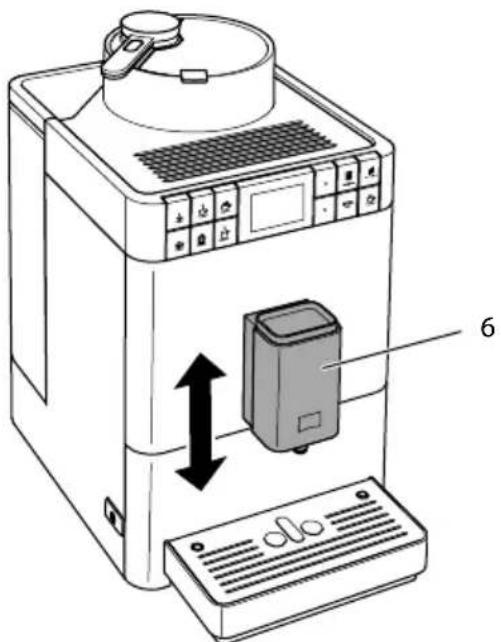
Fig. 10: Adjusting the outlet

4.7 Using milk
Use cooled milk for optimum coffee enjoyment. Depending on the version of the appliance, use the long milk hose supplied or the milk container supplied.
Connecting the milk container

Fig. 11: Connected milk container
- Connect the milk hose (32) to the connection at the outlet (13).
- Connect the free end of the milk hose to the milk container (33).
Information
Store the filled milk container in the refrigerator.
Connecting the milk pack
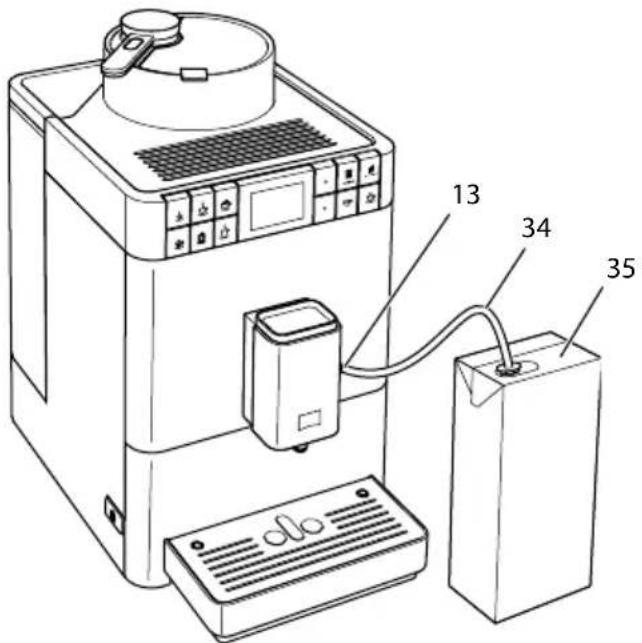
Fig. 12: Connected commercial milk pack
- Connect the long milk hose (34) to the connection at the outlet (13).
- Insert the free end of the milk hose into a commercial milk pack (35).

4.8 Emptying the drip tray and coffee grounds container
After dispensing several beverages, the drip tray (8) and the coffee grounds container (7) can become full. The projecting float (16) indicates the current filling level of the drip tray.
After a specified number of beverages have been dispensed, the appliance also shows that the drip tray and coffee grounds container are full.
Always empty the drip tray and coffee grounds container.
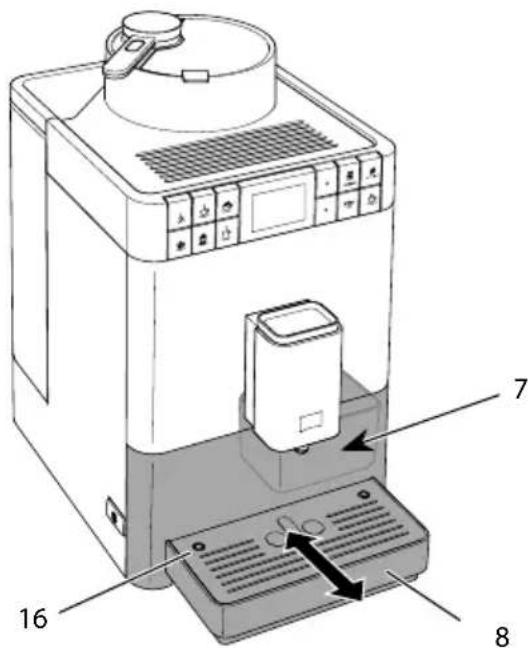
Fig. 13: Emptying the drip tray and coffee grounds container
- Pull the drip tray (8) forwards out of the appliance.
- Remove the coffee grounds container (7) and empty it.
- Empty the drip tray.
- Insert the coffee grounds container.
- Push the drip tray into the appliance until fully inserted.
i Information
If you empty the drip tray and the coffee grounds container while the appliance is switched off, the appliance does not register this process. Therefore, it is possible that you are requested to empty the containers although the drip tray and the coffee grounds container are not yet full.
5 Using the My Bean Select® function
With the My Bean Select® function, a single coffee beverage can be prepared from a different type of coffee. Separately fill a single portion of coffee beans to prepare the coffee.
While the bean container is full with lightly roasted coffee beans, for example, the My Bean Select® function can be used to prepare a coffee beverage from a single portion of darkly roasted coffee beans.
5.1 Filling coffee beans for the My Bean Select® function
ATTENTION
The use of unsuitable types of coffee can lead to clogging of the grinder.
- Do not use freeze-dried or caramelised coffee beans.
The use of coffee powder or instant products is not permitted.
i Information
ū The grinder is emptied during each grinding process. Nevertheless, minimal coffee type mixing may occur.
ū Grinding when empty causes a different type of noise and is normal.

Fig. 14: Removing the measuring spoon

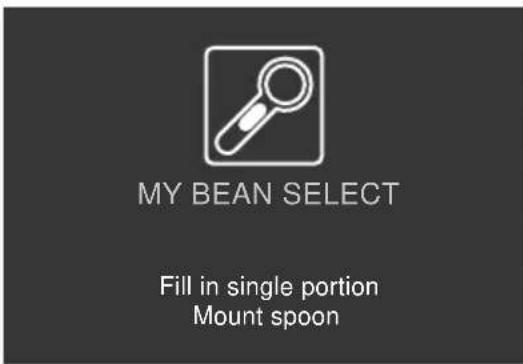
Fig. 15: Filling coffee beans for the My Bean Select® function
- Remove the measuring spoon (2) from the bean chute (36).
» The My Bean Select message appears on the display with the requests Fill with single portion of beans, put back in the spoon. - Use the measuring spoon to fill a single portion of coffee beans into the bean chute (36).
- Place the measuring spoon back onto the bean chute.
» The My Bean Select ready symbol with the Select beverage request appears on the display. - Prepare any coffee beverage.
i Information
The measuring spoon is intended to help in filling the correct amount of coffee beans into the bean chute.
A full measuring spoon contains approx. 10 to 11 g of coffee beans. Depending on the desired coffee strength, fewer coffee beans can also be filled.
If there are less than approx. 8 g coffee beans in the bean chute, the My Bean Select® function is not activated. The My Bean Select ready symbol does not appear on the display. The next time a coffee is dispensed, the coffee beans from the bean chute are mixed with the coffee beans from the bean container.
6 Preparing beverages
There are two options for preparing beverages:
ū Standard dispensing as described below,
ū Selection and preparation of a recipe (see section 6.6 Preparing further beverage specialities with recipes on page 75).
Information
ū A single coffee beverage can be prepared from an alternative type of coffee (see section 5 Using the My Bean Select® function on page 71).
ū The default settings for standard dispensing or for a recipe can be permanently changed (see section 7.1 Changing default settings on page 79).
Please note:
ū There should always be sufficient water in the water tank. If the fill level is too low, the appliance requests you to refill it.
ū There should always also be sufficient coffee beans in the bean container. If there are no longer any coffee beans present, the appliance stops the preparation of a coffee beverage.
ū The appliance does not detect the level of milk.
ū The vessels for the beverages should be sufficiently large (see table Factory settings on page 97).
6.1 Preparing Espresso and Café Crème

requirement: The ready symbol appears on the display.
- Place a vessel beneath the outlet.
-
Press the "Espresso" or "Café Crème" button.
» The grinding process and beverage dispensing start.
» Beverage dispensing ends automatically. -
Remove the vessel.
» The ready symbol appears on the display.

6.2 Preparing cappuccino

Requirement: The display shows the ready symbol and milk is connected.
- Place a vessel beneath the outlet.
- Press the "Cappuccino" direct key.
» The grinding process and coffee dispensing start.
» Coffee dispensing is ended automatically.
» Milk dispensing begins.
» Beverage dispensing ends automatically.
- Remove the vessel.
» The display shows: Easy Cleaning? (OK for start).
- You can execute the Easy Cleaning programme or prepare further beverages.
a) Execute the Easy Cleaning programme. To do so, follow the instructions on the display. Information on this is available in section 9.4 Using the "Easy Cleaning" programme on page 87.
b) Prepare further beverages and execute the Easy Cleaning programme later.
» The ready symbol appears on the display.
uirements: The ready symbol appears on the display and milk is connected.
- Place a vessel beneath the outlet.
- Press the "Latte Macchiato" direct key.
» Milk dispensing begins.
» Milk dispensing is ended automatically.
» The grinding process and coffee dispensing start.
» Beverage dispensing ends automatically.
- Remove the vessel.
» The display shows: Easy Cleaning? (OK for start).
- You can execute the Easy Cleaning programme or prepare further beverages.
a) Execute the Easy Cleaning programme. To do so, follow the instructions on the display. Information on this is available in section 9.4 Using the "Easy Cleaning" programme on page 87.
b) Prepare further beverages and execute the Easy Cleaning programme later.
» The ready symbol appears on the display.
6.4 Preparing milk froth or warm milk

The preparation of milk froth and warm milk is similar.
Requirement: The ready symbol appears on the display and milk is connected.
-
Place a vessel beneath the outlet.
-
Press the "Milk foam/Warm milk" direct key.
a) Milk froth = briefly press button
b) Warm milk = press the button for longer (2 seconds)
» Milk dispensing begins.
» Beverage dispensing ends automatically.
- Remove the vessel.
» The display shows: Easy Cleaning? (OK for start).
- You can execute the Easy Cleaning programme or prepare further beverages.
a) Execute the Easy Cleaning programme. To do so, follow the instructions on the display. Information on this is available in section 9.4 Using the "Easy Cleaning" programme on page 87.
b) Prepare further beverages and execute the Easy Cleaning programme later.
» The ready symbol appears on the display.
6.5 Preparing hot water

Requirement: The ready symbol appears on the display.
- Place a vessel beneath the outlet.
-
Press the "Hot water" direct key.
» Hot water dispensing begins.
» Beverage dispensing ends automatically. -
Remove the vessel.
» The ready symbol appears on the display.
6.6 Preparing further beverage specialities with recipes

In addition to standard dispensing, you can select Recipes for further beverage specialities in the menu. The following beverage specialities are available here:
Beverage specialities without milk:
ū Ristretto
ū Lungo
ū Americano
Beverage specialities with milk:
The preparation of Ristretto, Lungo und Americano is similar. The selection of a Ristretto is described as an example.
Requirement: The ready symbol appears on the display.
- Place a vessel beneath the outlet.
- Press the "Recipes" button.
» The Recipes menu appears on the display.
- Use the arrow buttons to select Ristretto.
- Confirm your selection with "menu/ok".
» The grinding process and beverage dispensing start.
» Beverage dispensing ends automatically.
- Remove the vessel.
» The ready symbol appears on the display.
Preparing Espresso Macchiato, Caffè Latte or Café au Lait
The preparation of Espresso Macchiato, Caffè Latte and Café au Lait is similar. The preparation of an Espresso Macchiato is described as an example.
Requirement: The ready symbol appears on the display and milk is connected.
- Place a vessel beneath the outlet.
- Press the "Recipes" button.
» The Recipes menu appears on the display.
- Use the arrow buttons to select Espresso Macchiato.
- Confirm your selection with "menu/ok".
» The grinding process and coffee dispensing start.
» Coffee dispensing is ended automatically.
» Milk dispensing begins.
» Beverage dispensing ends automatically.
- Remove the vessel.
» The display shows: Easy Cleaning? (OK for start).
- You can execute the Easy Cleaning programme or prepare further beverages.
a) Execute the Easy Cleaning programme. To do so, follow the instructions on the display. Information on this is available in section 9.4 Using the "Easy Cleaning" programme on page 87.
b) Prepare further beverages and execute the Easy Cleaning programme later.
» The ready symbol appears on the display.
6.7 Changing beverage settings before and during preparation
Beverage settings can be changed before and during beverage preparation.
Information
The following settings only apply to the current beverage preparation.
Changing beverage settings before preparation
The total beverage amount and the coffee strength can be changed before selecting a beverage.


■ Before selecting a beverage, use the arrow buttons to set a beverage amount.
Before selecting a beverage, use the "Coffee strength" button to set the coffee strength.
i Information
ū When preparing mixed beverages, the total beverage amount is subdivided according to a specified ratio. This applies to mixed beverages made from coffee with milk or hot water.
ū If a beverage is not prepared within 1 minute, the appliance switches to the default settings.

Changing beverage settings during preparation
The beverage quantity and the coffee strength can be changed during beverage preparation.

During beverage dispensing, use the arrow buttons to set the relevant beverage amount.
During the grinding process, use the "Coffee strength" button to set the coffee strength.
6.8 Stopping beverage preparation
To stop beverage preparation prematurely, press any direct key.
6.9 Preparing two beverages simultaneously

The "Two cups" button is used to prepare two beverages simultaneously. Two-cup dispensing is only possible with pure coffee dispensing, such as Espresso, Café Crème, Ristretto. Two-cup dispensing is not possible with the preparation of hot water, hot milk and all mixed beverages.
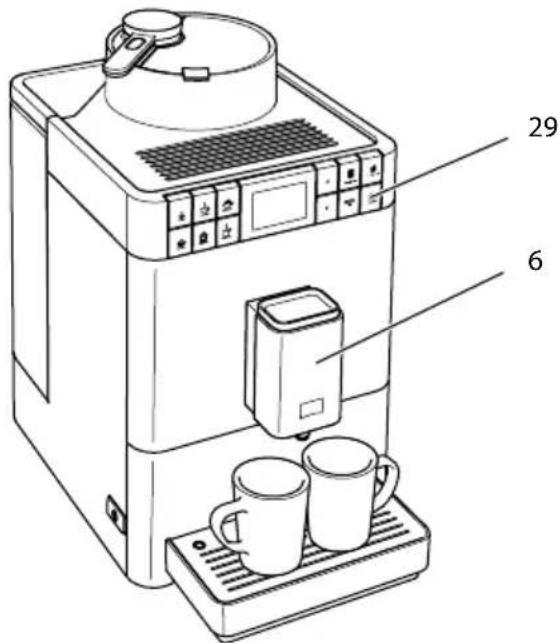
Fig. 16: Two-cup dispensing
- Place two vessels beneath the outlet (6).
- Press the "Two cups" button (29).
- Continue as described for the relevant beverage preparation.
Information
ū The setting only applies to the single beverage that is prepared.
ū If a beverage is not prepared within 1 minute, the appliance switches to single-cup dispensing.
7 Permanently changing beverage settings
The appliance offers further options for preparing coffee specialities. Default recipes can be used or the beverage settings can be permanently changed.
7.1 Changing default settings
Depending on the beverage, the following default settings can be changed:
ü Coffee amount: 25 ml to 220 ml
ū Milk amount or milk froth amount: 25 ml to 220 ml
ü Hot water amount: 25 ml to 220 ml
ü Coffee strength: Very mild, mild, normal, strong, very strong
ü Temperature: Low, normal, high
i Information
Changed default settings remain valid until they are changed again.
Changing the beverage settings is similar for all beverages. Changing the coffee strength for an Espresso is described here as an example.
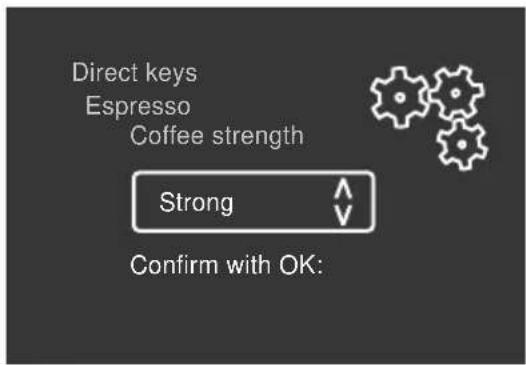
Fig. 17: Setting the coffee strength
Requirement: The ready symbol appears on the display.
- Press the "menu/ok" button for longer than 2 seconds.
» The menu appears on the display.
-
Navigate to the Direct keys > Espresso > Coffee strength menu.
-
Use the arrow buttons to select the desired coffee strength and confirm with "menu/ok".
-
Repeatedly select the Exit command to exit the menu.
» The ready symbol appears on the display.
» The newly selected coffee strength is used the next time an Espresso is prepared.
8 Changing basic settings
Operating steps that change the appliance's basic settings are described in this chapter.
8.1 Setting the language
The display text language can be set.
Requirement: The ready symbol appears on the display.
- Press the "menu/ok" button for longer than 2 seconds.
» The menu appears on the display.
-
Navigate to the Language menu.
-
Use the arrow buttons to select a language and confirm with "menu/ok".
-
Exit the menu with the Exit command.
» The ready symbol appears on the display.
8.2 Setting Auto OFF
If the appliance is not operated for a long time, it switches off automatically after a specified time. This time can be set in the Auto Off menu.
Setting the duration for Auto OFF
Requirement: The ready symbol appears on the display.
- Press the "menu/ok" button for longer than 2 seconds.
» The menu appears on the display.
-
Navigate to the Auto OFF menu.
-
Use the arrow buttons to select a time and confirm with "menu/ok".
-
Exit the menu with the Exit command.
» The ready symbol appears on the display.
Information
Auto OFF cannot be deactivated completely. After 8 hours without being operated at the latest, the appliance switches off.
8.3 Setting energy save mode
Energy save mode lowers the heating temperature.
If the appliance is not operated for a long time, it automatically switches to energy save mode after a specified time. The Press any button prompt then appears on the display. As soon as you follow the request, the energy save mode ends.
The period of time until energy save mode is activated is set in the Energy save mode menu.
Requirement: The ready symbol appears on the display.
- Press the "menu/ok" button for longer than 2 seconds.
» The menu appears on the display. - Navigate to the Energy save mode menu.
- Use the arrow buttons to select a period of time and confirm with "menu/ok".
- Exit the menu with the Exit command.
» The ready symbol appears on the display.
i Information
Energy save mode cannot be deactivated completely. After 4 hours without being operated at the latest, the appliance switches to energy save mode.
8.4 Deactivating the My Bean Select® function
The My Bean Select® function can be deactivated or also only partially deactivated. In the System > My Bean Select menu, you can select:
■ deactivated
If the My Bean Select® function is deactivated, the emptying of the grinder is also omitted in addition to the function. This shortens the grinding process for all coffee beverages.
■ De-registering the spoon
To partially deactivate the My Bean Select ^® function, e.g. if the measuring spoon is lost, the function can also be used without a measuring spoon. The My Bean Select ^® function is then activated by filling coffee beans into the bean chute.
Requirement: The ready symbol appears on the display.
- Press the "menu/ok" button for longer than 2 seconds.
» The menu appears on the display. - Navigate to the System > My Bean Select menu.
- Use the arrow buttons to select the desired setting and confirm with "menu/ok".
- Exit the menu with the Exit command.
» The ready symbol appears on the display.
8.5 Resetting the appliance to the factory settings
The appliance can be reset to the factory settings.
i Information
If the appliance is reset to the factory settings, all personal settings are lost.
Requirement: The ready symbol appears on the display.
- Press the "menu/ok" button for longer than 2 seconds.
» The menu appears on the display. - Navigate to the System > Factory settings menu.
- Use the arrow buttons to select Reset and confirm with "menu/ok".
» The ready symbol appears on the display.
8.6 Information on the appliance status
Information on the appliance status can be accessed via the System > Statistics menu. Press the "menu/ok" button to exit the menu.
The following table provides an overview of the meaning of the information.
| Information Meaning |
| Beverages Number of beverages prepared since starting up. |
| Descaled Number of descaling processes performed. |
| Coffee system cleaned Number of cleaning processes performed. |
| Milk system cleaned Number of cleaning processes performed. |
| Filter changed Number of filter changes performed |
The progress bars show the number of beverages that can still be prepared until the appliance requests you to perform cleaning, descaling or to change the filter.
Software version
Information on the installed software version is obtained via the System > SW Version menu. Press the "menu/ok" button to exit the menu.
8.7 Setting the grinding fineness
The grinding fineness of the coffee powder influences the flavour of the coffee. The grinding fineness has been optimally set prior to delivery. We recommend adjusting the grinding fineness after around 1,000 beverages have been dispensed (after around 1 year) at the earliest.
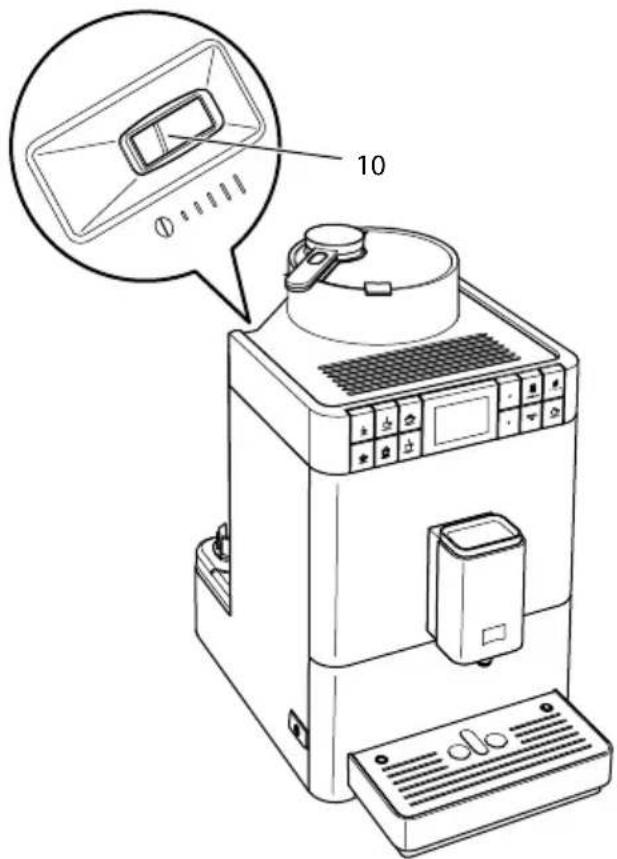
Fig. 18: Lever for setting the grinding fineness
- Remove the water tank.
» The "Grinding fineness adjustment" lever (10) is visible on the housing.
- Move the lever to the left or right, as shown on Fig. 18.
ū To the left = grinding fineness finer
ū To the right = grinding fineness coarser
- Insert the water tank again.
i Information
ū If the grinding fineness is set finer, the coffee flavour is stronger.
ū The grinding fineness is optimally set when the coffee flows evenly out of the outlet and a fine, dense crema appears.
9 Care and maintenance
Regular care and maintenance of the appliance ensure the consistent high quality of your beverages.
9.1 General cleaning
Clean the appliance regularly. Immediately remove external soiling caused by milk and coffee.
ATTENTION
The use of unsuitable cleaning agents can lead to scratched surfaces.
- Do not use any abrasive cloths, sponges or cleaning agents.
Requirement: The appliance is switched off.
- Clean the outside of the appliance with a soft, damp cloth and normal washing-up liquid.
- Rinse off the drip tray and the coffee grounds container. Use a soft, damp cloth and normal washing up liquid for this.
■ Clean the bean container with a soft, dry cloth.
The coffee grounds container (7), the cup plate (15) and the milk container (without lid, milk hose and riser pipe) can be washed in a dish-washer.
9.2 Rinsing the coffee system
During rinsing, the nozzles at the outlet and the internal parts of the coffee system are rinsed. As a result, rinsing water from the interior enters the drip tray.
When switched on and off, the appliance performs automatic rinsing.
Rinsing can also be carried out manually:
Requirement: The ready symbol appears on the display.
- Place a vessel beneath the outlet.
- Press the "menu/ok" button for longer than 2 seconds.
» The menu appears on the display. - Navigate to the Care > Rinsing menu.
» The appliance performs automatic rinsing.
» The ready symbol appears on the display.

9.3 Removing and cleaning the brewing unit
To avoid damage to the appliance, we recommend cleaning the brewing unit once a week.
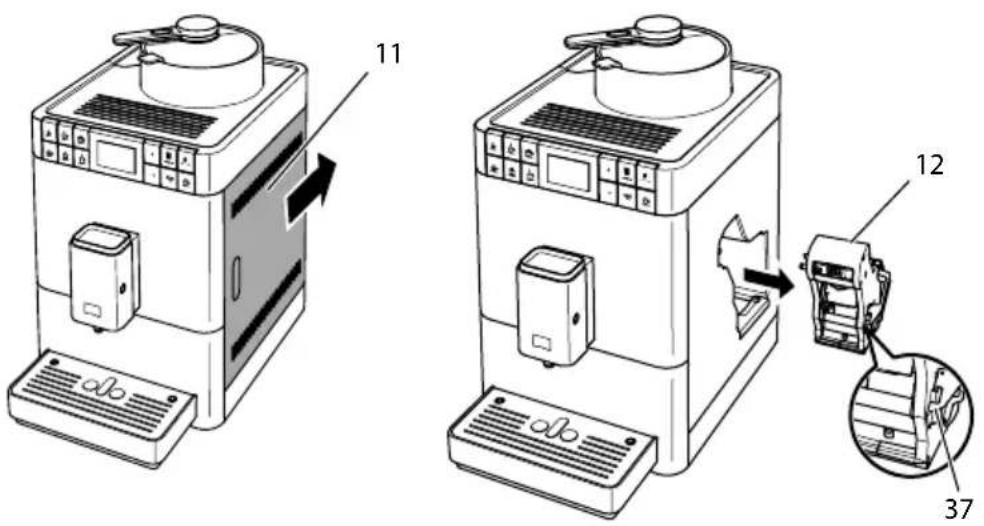
Fig. 19: Removing the brewing unit
Requirement: The appliance is switched off.
- Open the cover (11). To do this, reach into the recess on the right of the appliance and push the cover off backwards. Take off the cover.
-
Press and hold the red lever (37) on the brewing unit handle (12) and turn the handle clockwise until it engages at the stop.
-
Pull the brewing unit out of the appliance by the handle.
natural_image
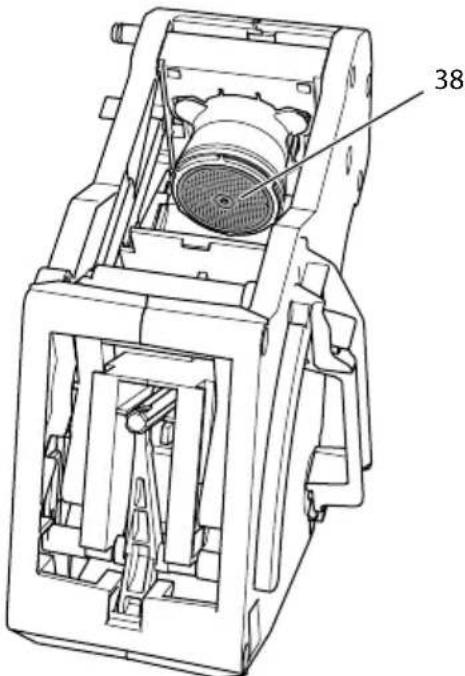
Technical line drawing of a mechanical device with internal components and labeled part '38' (no text or symbols beyond label)Fig. 20: Cleaning the brewing unit
-
Rinse the brewing unit thoroughly from all sides under running water. » The brewing unit and the sieve (38) are free of coffee remains.
-
Allow the brewing unit to drip dry.
-
Use a soft, dry cloth to remove coffee residues from the surfaces inside the appliance.
-
Insert the brewing unit into the appliance. Press and hold the red lever on the handle of the brewing unit and turn the handle counter anticlockwise until it engages at the stop.
-
Close the cover. To do this, insert the cover and move the cover forwards until it engages.
9.4 Using the "Easy Cleaning" programme
The milk system is rinsed using the "Easy Cleaning" programme.
Each time after a beverage has been prepared with milk, the appliance requests you to execute the "Easy Cleaning" programme.
The "Easy Cleaning" programme can also be run manually.
Requirement: The ready symbol appears on the display.
- Place a vessel beneath the outlet.
-
Press the "menu/ok" button for longer than 2 seconds.
» The menu appears on the display. -
Navigate to the Care > Easy Cleaning menu.
- Select Start using the arrow buttons and confirm with "menu/ok".
- Follow the further instructions on the display up to the end of the Easy Cleaning programme.
» The ready symbol appears on the display.
9.5 Using the "Cleaning milk system" programme
A milk system cleaning agent is required for cleaning the milk system.
To maintain hygiene and avoid damage to the appliance, we recommend carrying out the cleaning programme once a week.
The cleaning programme takes approximately 3 minutes and should not be interrupted.
ATTENTION
Use of unsuitable milk system cleaning agents and failure to observe the processing instructions may damage the appliance.
- Only use Melitta® PERFECT CLEAN milk system cleaning agent for fully automatic coffee makers.
- Observe the processing instructions on the packaging of the milk system cleaning agent.
Requirement: The ready symbol appears on the display.
- Place the coffee grounds container (7) or a vessel with a capacity of at least 0.7 litres beneath the outlet.
- Press the "menu/ok" button for longer than 2 seconds.
» The menu appears on the display. - Navigate to the Care > Cleaning milk system menu.
- Select Start using the arrow buttons and confirm with "menu/ok".
- Follow the further instructions on the display up to the end of the cleaning programme.
» The ready symbol appears on the display.
Cleaning the milk unit
In addition, we recommend cleaning the milk unit, the milk hose and the milk container regularly (depending on the model).
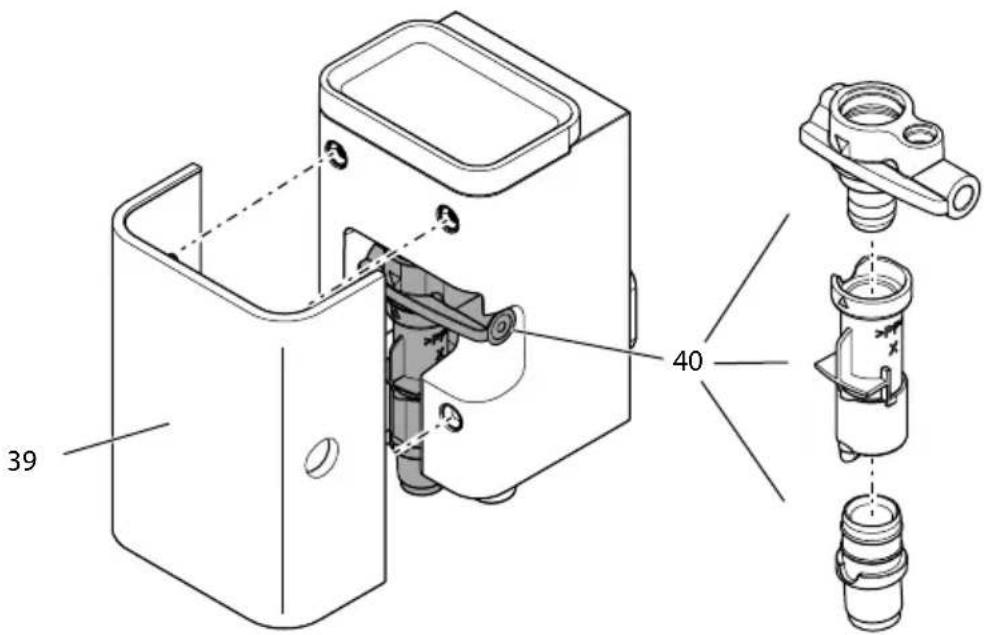
Fig. 21: Removing the milk unit
Proceed as follows to remove the milk unit:
Requirement: The milk hose is removed from the appliance.
- Pull off the cover (39) forwards from the outlet.
- Press the milk unit (40) downwards and remove it.
- Dismantle the milk unit into three parts as shown above.
- Clean the individual parts with warm water. Use the enclosed cleaning brush, a soft, damp cloth and normal washing-up liquid.
Installation is carried out as described in reverse order.
9.6 Using the "Cleaning coffee system" programme
The "Cleaning coffee system" programme is used to remove residues and coffee oil residues using fully automatic coffee maker cleaning agents.
To avoid damage to the appliance, we recommend running the cleaning programme every 2 months or as requested by the appliance.
The cleaning programme takes approximately 10 minutes and should not be interrupted.
CAUTION
Contact with fully automatic coffee maker cleaning agent may lead to eye and skin irritation.
- Observe the processing instructions on the packaging of the fully automatic coffee maker cleaning agent.
ATTENTION
The use of unsuitable fully automatic coffee maker cleaning agent can damage the appliance.
- Only use Melitta® PERFECT CLEAN cleaning tabs for fully automatic coffee makers.
Requirement: The ready symbol appears on the display.
- Press the "menu/ok" button for longer than 2 seconds.
» The menu appears on the display. - Navigate to the Care > Cleaning coffee system menu.
- Select Start using the arrow buttons and confirm with "menu/ok".
- Follow the further instructions on the display up to the end of the cleaning programme.
» The ready symbol appears on the display.
9.7 Using the "Descaling" programme
The descaling programme is used to remove limescale deposits in the interior of the appliance with fully automatic coffee maker descaling agents.
To avoid damage to the appliance, we recommend carrying out the descaling programme every 3 months or as requested by the appliance.
The descaling programme takes approximately 25 minutes and should not be interrupted.
CAUTION
Contact with fully automatic coffee maker descaling agent may lead to eye and skin irritation.
- Observe the processing instructions on the packaging of the fully automatic coffee maker descaling agent.
ATTENTION
Use of unsuitable descaling agents and failure to observe the processing instructions may damage the appliance.
- Only use Melitta® ANTI CALC liquid descaling agent for fully automatic coffee makers.
- Observe the processing instructions on the packaging of the descaling agent.
ATTENTION
A water filter may be damaged if it is screwed in during the descaling programme.
■ Remove the water filter when the appliance requests you to do so.
- Place the water filter into a vessel filled with tap water during the descaling programme.
- The water filter can be reinserted and reused when the descaling programme is complete.
Requirement: The ready symbol appears on the display.
- Press the "menu/ok" button for longer than 2 seconds.
» The menu appears on the display. - Navigate to the Care > Descaling menu.
- Select Start using the arrow buttons and confirm with "menu/ok".
- Follow the further instructions on the display up to the end of the descaling programme.
» The ready symbol appears on the display.
9.8 Setting the water hardness
Setting the water hardness regulates how frequently you are requested to descale the appliance. The harder the water, the more frequently the appliance has to be descaled.
i Information
The water hardness cannot be set if you use a water filter. The water hardness is automatically set to 1 = soft (see section 9.9 Using a water filter on page 92).
Determine the water hardness with the enclosed test strip. Observe the instructions on the test strip packaging and in the table Item on page 58.

Requirement: The ready symbol appears on the display.
- Press the "menu/ok" button for longer than 2 seconds.
» The menu appears on the display.
-
Navigate to the Water hardness menu using the arrow buttons.
-
Use the arrow buttons to select the water hardness range and confirm with "menu/ok".
-
Exit the menu with the Exit command.
» The ready symbol appears on the display.
9.9 Using a water filter
The use of a water filter extends the service life of the appliance and the appliance has to be descaled less frequently. The water filter filters calcium and other pollutants out of the water.
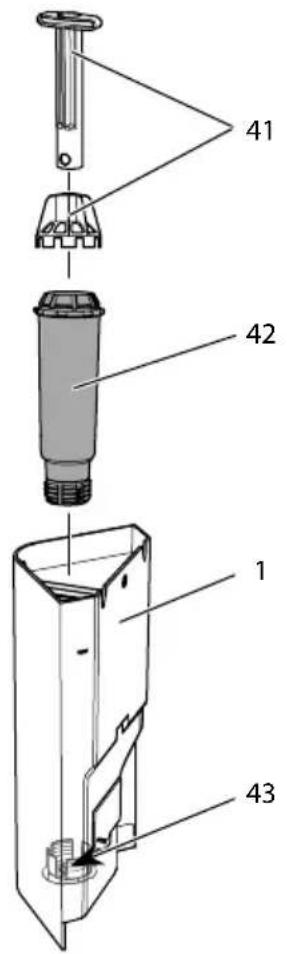
Fig. 22: Screwing/Unscrewing the water filter
The water filter (42) is screwed in and unscrewed from the thread (43) on the base of the water tank (1) using the screwing aid (41).
Inserting the water filter
i Information
Place the water filter into a vessel filled with fresh tap water for a few minutes before inserting it.
Requirement: The ready symbol appears on the display.
- Press the "menu/ok" button for longer than 2 seconds.
» The menu appears on the display. - Navigate to the Care > Filter > Insert filter menu.
- Select Start using the arrow buttons and confirm with "menu/ok".
- Follow the further instructions on the display.
» The water hardness is automatically set to Soft.
» The ready symbol appears on the display.
Changing the water filter
Change the water filter when the appliance requests you to do so.
Requirement: The ready symbol appears on the display.
- Press the "menu/ok" button for longer than 2 seconds.
» The menu appears on the display. - Navigate to the Care > Filter > Change filter menu.
- Select Start using the arrow buttons and confirm with "menu/ok".
- Follow the further instructions on the display.
» The ready symbol appears on the display.
Removing the water filter
The water filter should not be left standing dry for a long period of time. When it is not used for a long time, we recommend storing the water filter in a vessel filled with tap water in the refrigerator.
Remove the water filter as follows:
Requirement: The ready symbol appears on the display.
- Press the "menu/ok" button for longer than 2 seconds.
» The menu appears on the display. - Navigate to the Care > Filter > Remove filter menu.
- Select Start using the arrow buttons and confirm with "menu/ok".
-
Follow the further instructions on the display.
» The water hardness is automatically reset to the previous setting.
» The ready symbol appears on the display. -
Re-adjust the water hardness if necessary, (see section 9.8 Setting the water hardness on page 91).
10 Troubleshooting
If the actions listed below fail to rectify the problems or other problems not listed here occur, contact our hotline (local rate).
The service number can be found behind the side cover (10) or in the Service area of our website.
| ProblemCauseAction | ||
| Coffee only emerges from the outlet in drips. | Grinding fineness too fine. | ■ Set a coarser grinding fineness (see section 8.7 on page 84). |
| Appliance soiled. | ■ Clean the brewing unit (see section 9.3 on page 86).■ Run the cleaning programme (see section 9.6 on page 89). | |
| Appliance is covered inside with limescale. | ■ Descale the appliance (see section 9.7 on page 90). | |
| Coffee does not flow. | Water tank not filled or inserted incorrectly. | ■ Fill the water tank and ensure it is positioned correctly (see section 4.5 on page 66). |
| Brewing unit clogged. | ■ Clean the brewing unit (see section 9.3 on page 86). | |
| The My Bean Select display goes out when the measuring spoon is put back on. | There are less than 8 g of coffee beans in the bean chute. | ■ Top up coffee beans (see section 5.1 on page 71). |
| Fill beans appears on the display although the bean container is full. | Coffee beans do not drop into the grinder. | ■ Press a direct key.■ Tap lightly on the bean container.■ Clean the bean container.■ Coffee beans too oily. Use different coffee beans. |
| Loud grinder noise. Foreign object in the grinder. | ■ Contact the hotline. | |
| Brewing unit cannot be inserted after removing. | Handle for the locking mechanism of the brewing unit is not in the correct position. | ■ Check that the handle for the locking mechanism is correctly engaged (see section 9.3 on page 86). |
| Drive is not in the correct position. | ■ Press and hold the "Coffee strength" button. Also press the ON/OFF button. The appliance initialises. Release buttons again. | |
| System error appears on the display. | Software problem. | ■ Switch the appliance off and on again (see section 4.1 on page 62).■ Contact the hotline. |
11 Transport, storage and disposal
11.1 Venting the appliance
We recommend venting the appliance when it is not used for a long period, prior to transport and when there is a risk of frost.
During venting, residual water is removed from the appliance.
Requirement: The ready symbol appears on the display.
- Place a vessel beneath the outlet.
- Press the "menu/ok" button for longer than 2 seconds.
» The menu appears on the display. - Navigate to the System > Venting menu.
- Select Start using the arrow buttons and confirm with "menu/ok".
- Follow the further instructions on the display.
» The appliance switches off.
11.2 Transporting the appliance
ATTENTION
Freezing residual water can damage the appliance.
■ Prevent the appliance from being exposed to temperatures below 0 °C.
i Information
Transport the appliance in the original packaging. This avoids damage in transit.
Before transporting the appliance, carry out the following activities:
- Vent the appliance (see section 11.1 Venting the appliance on page 96).
- Empty the drip tray and the coffee grounds container.
- Empty the water tank.
- Empty the bean container.
- Clean the appliance (see section 9.1 General cleaning on page 85).
- Secure loose parts (cup plate, etc.) with suitable adhesive tape.
- Package the appliance.
11.3 Disposing of the appliance
Appliances marked with this symbol are subject to the European Directive 2002 / 96 / EC for WEEE (Waste Electrical and Electronic Equipment).
Electrical appliances do not belong in domestic waste.
- Dispose of the appliance in an environmentally friendly manner via suitable collection systems.
12 Technical data
| Technical data | |
| Operating voltage | 220 V to 240 V, 50 Hz |
| Power consumption Maximum 1450 W | |
| Pump pressure Static, max. 15 bar | |
| Dimensions | |
| Width | 253 mm |
| Height | 405 mm |
| Depth | 380 mm |
| Capacity | |
| Bean container | 125 g |
| Measuring spoon | 10 g to 11 g (depending on coffee type) |
| Water tank | 1.2 l |
| Quantity of beverage dispensed | 25 ml to 220 ml |
| Weight (empty) | 8.6 kg |
| Ambient conditions | |
| Temperature | 10 °C to 32 °C |
| Relative humidity | 30 % to 80 % (non-condensing) |
| Water hardness range °d °e °f | |||
| Soft 0 to 10 0 to 13 0 to 18 | |||
| Medium | 10 to 15 | 13 to 19 | 18 to 27 |
| Hard | 15 to 20 | 19 to 25 | 27 to 36 |
| Very hard | <20 | >25 | >36 |
| Factory settings | ||
| Espresso | Beverage amount | 40 ml |
| Coffee strength | Strong | |
| Brewing temperature | Normal | |
| Café crème | Beverage amount | 120 ml |
| Coffee strength | Strong | |
| Brewing temperature | Normal | |

| Factory settings | |
| Cappuccino Beverage amount 130 ml | |
| Coffee strength Strong | |
| Brewing temperature Normal | |
| Latte macchiato Beverage amount 190 ml | |
| Coffee strength Strong | |
| Brewing temperature Normal | |
| Milk Foam amount 180 ml | |
| Milk amount 180 ml | |
| Hot water Beverage amount 180 ml | |
Sommaire
Cher cliente, cher client,
natural_image
Technical line drawing of a sewing machine with base panel and clasp (no text or symbols)natural_image
Technical line drawing of a mechanical device with internal components and a labeled part (38), no readable text or symbols present.natural_image
Technical line drawing of a sewing machine with base panel and clasp (no text or symbols)Afb. 13: Lekbakje en residubak legen
natural_image
Technical line drawing of a mechanical device with internal components and labeled part '38' (no text or symbols beyond label)natural_image
Technical line drawing of a sewing machine with base panel and clasp (no text or symbols)Fig. 5: Tasto "ON/OFF"
Fig. 11: Serbatoio del latte collegato
natural_image
Technical line drawing of a mechanical device with internal components and labeled part '38' (no text or symbols beyond label)natural_image
Technical line drawing of a sewing machine with base panel and clasp (no text or symbols)Fig. 10: Ajustar la salida

4.7 Utilizar leche
natural_image
Technical line drawing of a mechanical device with internal components and labeled part '38' (no text or symbols beyond label)Fig. 1: Maskinen set forfra, venstre side
natural_image
Technical line drawing of a sewing machine with base panel and clasp (no text or symbols)Åbning af undermenuer
» I displayet vises Easy Cleaning? (OK for start).
» I displayet vises Easy Cleaning? (OK for start).
» I displayet vises Easy Cleaning? (OK for start).
natural_image
Technical line drawing of a mechanical device with internal components and labeled part '38' (no text or symbols beyond label)natural_image
Technical line drawing of a sewing machine with base panel and clasp (no text or symbols)Bild 5: PÅ/AV-knapp
natural_image
Technical line drawing of a mechanical device with internal components and a labeled part (38), no readable text or symbols beyond the label.natural_image
Technical line drawing of a sewing machine with base panel and clasp (no text or symbols)Bilde 5: "På-/Av"-knapp
Bilde 11: Tilkoplet melkebeholder
Bilde 12: Tilkoplet vanlig melkepakke
Bilde 13: Tømme dryppskål og kaffegrutbeholder
- Trekk dryppskålen (8) framover og ut av apparatet.
- Ta ut og tøm kaffegrutbeholderen (7).
- Tøm dryppskålen.
- Sett kaffegrutbeholderen inn.
- Skyv dryppskålen inn i apparatet til anslaget.
i Informasjon
» i displayet vises Easy Cleaning? (OK for start).
» i displayet vises Easy Cleaning? (OK for start).
» i displayet vises Easy Cleaning? (OK for start).
» i displayet vises Easy Cleaning? (OK for start).
Bilde 19: Ta ut kokegruppe
natural_image
Technical line drawing of a mechanical device with internal components and labeled part '38' (no text or symbols beyond label)Sette inn vannfilter
i Informasjon
natural_image
Technical line drawing of a sewing machine with base panel and clasp (no text or symbols)natural_image
Technical line drawing of a mechanical device with internal components and labeled part '38' (no text or symbols beyond label)natural_image
Technical line drawing of a sewing machine with base panel and clasp (no text or symbols)Рис. 5: Кнопка "Вкл./Выкл."
natural_image
Technical line drawing of a mechanical device with internal components and labeled part '38' (no text or symbols beyond label)natural_image
Technical line drawing of a sewing machine with base panel and clasp (no text or symbols)natural_image
Technical line drawing of a mechanical device with internal components and labeled part '38' (no readable text or symbols beyond label)natural_image
Technical line drawing of a sewing machine with base panel and clasp (no text or symbols)natural_image
Technical line drawing of a mechanical device with internal components and labeled part '38' (no text or symbols beyond label)natural_image
Technical line drawing of a sewing machine with base panel and clasp (no text or symbols)Pav. 5: Pagrindinis jungiklis
Pav. 10: Piltuvélio reguliavimas

Pav. 11: Prijungta pieno talpykla
natural_image
Technical line drawing of a mechanical device with internal components and a labeled part (38), no readable text or symbols beyond the label.natural_image
Technical line drawing of a sewing machine with base panel and clasp (no text or symbols)Pav. 5: „SISSE/VÄLJA“ nupp
Pav. 10: Tila reguleerimine

natural_image
Technical line drawing of a mechanical device with internal components and a labeled part (38), no readable text or symbols beyond the label.natural_image
Technical line drawing of a sewing machine with base panel and clasp (no text or symbols)Att. 5: Taustiņš "lesl./lzsl."
Att. 11: Pieslēgta piena tvertne
natural_image
Technical line drawing of a mechanical device with internal components and labeled part '38' (no text or symbols beyond label)natural_image
Technical line drawing of a sewing machine with base panel and clasp (no text or symbols)natural_image
Technical line drawing of a mechanical device with internal components and labeled part '38' (no text or symbols beyond label)图 1: 左前侧视图
图 2: 右前侧视图
natural_image
Technical line drawing of a sewing machine with base and clasp (no text or symbols)图 5: 开关键
图 10: 调整咖啡出口高度
4.7 4.7 使用牛奶使用牛奶
图 11: 连接好的奶缸
图 12: 连接好的盒装牛奶
图 13: 清空接水盘和咖啡粉盛接盒
图 16: 双杯制备
向左 = 研磨度变细
向右 = 研磨度变粗
3. 重新装入水箱。
i 信息
natural_image
Technical line drawing of a mechanical device with internal components and a labeled part (38), no readable text or symbols beyond the label.图 20: 清洗滤煮器
- 用自来水将滤煮器彻底冲洗干净。
The People's Republic of China released a regulation called „Management Methods for the Restriction of the Use of Hazardous Substances in Electrical and Electronic Products" or commonly referred to as China RoHS. All products which are produced and sold for China market have to meet this regulation.
名称和产品中有害物质的含量
Name and content of hazardous substances in products
| 组件名称Component Name | 有害物质Hazardous substance | |||||
| 铅Lead (Pb) | 汞Mercury (Hg) | 镉Cadmium (Cd) | 六价铬Hexavalent chromium (Cr (VI)) | 多溴联苯Polybrominated biphenyls (PBB) | 多溴二苯醚Polybrominated diphenyl ethers (PBDE) | |
| 塑料外壳和底盘Plastic enclosure and chassis | ○○○○○○ | |||||
| 印刷电路板组装Printed Circuit Board Assembly | ×○○○○○ | |||||
| 电机、阀门Motors, valves | ×○○○○○ | |||||
| 电缆和电线Cable and wiring | ×○○○○○ | |||||
| 金属零件Metall parts | ×○○○○○ | |||||
| 此表编制 SJ/T 11364 年规定。This table is prepared in accordance with the provisions of SJ/T 11364.O: 中所有均质材料中的这类组件这种有害物质的含量是下文要求 GB/T 26572 的极限值。O: The content of such hazardous substance in all homogeneous materials of such component is below the limit required by GB/T 26572.X: 这种有害物质在某些均质材料中这种组件的内容是超出 GB/T 26572 要求的极限值。X: The content of such hazardous substance in a certain homogeneous material of such component is beyond the limit required by GB/T 26572. | ||||||
此产品的环境友好使用期是:
The Environment Friendly Using Period for this product is:
록차목차
1 안전 수칙....869
그림.1:커피 머신의 전면 왼쪽
그림.2:커피 머신의 전면 오른쪽
natural_image
Technical line drawing of a sewing machine with base panel and clasp (no text or symbols)그림. 5: 켜짐/꺼짐 버튼
그림.10:배출구 조정하기
4.7 밀크 사용하기
그림. 11: 연결된 밀크통
그림. 12: 연결된 일반 밀크 팩
그림. 16: 2잔 만들기
그림. 19: 추출장치 꺼내기
natural_image
Technical line drawing of a mechanical device with internal components and a labeled part (38), no readable text or symbols present.그림. 20: 추출장치 세척하기
Division Household Products
Ringstr. 99
D-32427 Minden
Germany
www.melitta.de
Editorial department:
ZINDEL AG
www.zindel.de

- Inhaltsverzeichnis
- For your safety ....53
- Overview of the appliance....56
- First steps....59
- Basic operation....62
- Using the My Bean Select® function....71
- Preparing beverages 73
- Permanently changing beverage settings....79
- Changing basic settings....80
- Care and maintenance....85
- Troubleshooting....95
- Transport, storage and disposal....96
- Technical data 97
- Dear Customer,
- For your safety
- Proper use
- Danger from electric current
- Risk of burns and scalds
- General safety
- Overview of the appliance
- Appliance at a glance
- Overview of the control panel
- Item Designation Function
- First steps
- Unpacking the appliance
- i Information
- Checking the delivery contents
- Installing the appliance
- Connecting the appliance
- Switching on the appliance for the first time
- Basic operation
- Switching the appliance on and off
- Switching on the appliance
- Switching off the appliance
- Using the control panel
- Brief press
- Long press
- Navigating in the menu
- Navigating in the menu or changing a numerical value
- Exiting a menu
- Calling up submenus
- Filling coffee beans into the bean container
- ATTENTION
- The use of unsuitable types of coffee can lead to clogging of the grinder.
- Filling with water
- Adjusting the outlet
- Using milk
- Information
- Emptying the drip tray and coffee grounds container
- Using the My Bean Select® function
- Filling coffee beans for the My Bean Select® function
- Preparing beverages
- Please note:
- Preparing Espresso and Café Crème
- Preparing cappuccino
- Preparing milk froth or warm milk
- Preparing hot water
- Preparing further beverage specialities with recipes
- Preparing Espresso Macchiato, Caffè Latte or Café au Lait
- Changing beverage settings before and during preparation
- Changing beverage settings before preparation
- Changing beverage settings during preparation
- Stopping beverage preparation
- Preparing two beverages simultaneously
- Permanently changing beverage settings
- Changing default settings
- Changing basic settings
- Setting the language
- Setting Auto OFF
- Setting the duration for Auto OFF
- Setting energy save mode
- Deactivating the My Bean Select® function
- Resetting the appliance to the factory settings
- Information on the appliance status
- Software version
- Setting the grinding fineness
- Care and maintenance
- General cleaning
- Rinsing the coffee system
- Removing and cleaning the brewing unit
- Using the "Easy Cleaning" programme
- Using the "Cleaning milk system" programme
- Cleaning the milk unit
- Using the "Cleaning coffee system" programme
- CAUTION
- Using the "Descaling" programme
- Setting the water hardness
- Using a water filter
- Inserting the water filter
- Changing the water filter
- Removing the water filter
- Troubleshooting
- Transport, storage and disposal
- Venting the appliance
- Transporting the appliance
- Freezing residual water can damage the appliance.
- Disposing of the appliance
- Technical data
- Sommaire
- Cher cliente, cher client,
- Utilizar leche
- Åbning af undermenuer
- i Informasjon
- Sette inn vannfilter
- 4.7 使用牛奶使用牛奶
- 重新装入水箱。
- i 信息
- 名称和产品中有害物质的含量
- 록차목차
- 안전 수칙....869
- 밀크 사용하기
Brand : MELITTA
Model : Caffeo Varianza CSP
Category : Coffee machine