
HW 601 - Water pump AL-KO - Free user manual and instructions
Find the device manual for free HW 601 AL-KO in PDF.
| Product type | Booster pump (automatic water pump) |
| Brand | AL-KO |
| Model | HW 601 |
| Power supply | 230 V ~ 50 Hz |
| Rated current | 10 A |
| Recommended residual current protection | Residual current circuit breaker 10 A / 30 mA |
| Control type | Automatic (pressure switch) |
| Start pressure | Approx. 2.0 bar |
| Stop pressure | Adjustable (see manual) |
| Diaphragm pressure (tank) | 1.5 bar (check before use) |
| Pump body material | Cast iron (standard model) |
| Max liquid temperature | 35 °C |
| Compatible liquids | Clear water, rainwater |
| Prohibited liquids | Salt water, wastewater, corrosive, flammable, abrasive liquids |
| Intended uses | Garden watering, domestic supply, pressure boosting |
| Thermal protection | Yes (thermal switch, automatic restart after cooling) |
| Frost protection | Drain completely before frost |
| Noise level | 74 dB(A) measured |
| Maintenance | Rinse with clear water after using chlorinated water; check diaphragm pressure |
| Included accessories | Power cable with Schuko plug, pressure switch, pressure gauge |
| Warranty | Statutory according to country (wear parts excluded) |
Frequently Asked Questions - HW 601 AL-KO
User questions about HW 601 AL-KO
0 question about this device. Answer the ones you know or ask your own.
Ask a new question about this device
Download the instructions for your Water pump in PDF format for free! Find your manual HW 601 - AL-KO and take your electronic device back in hand. On this page are published all the documents necessary for the use of your device. HW 601 by AL-KO.
USER MANUAL HW 601 AL-KO
INFORMATION I maNuaIs I SerVice
HW 601 / 802 HW 601 INOX / 802 INOX HW 1002 INOX

| i | HW 601 | HW 601 INOX | HW 802 | HW 802 INOX | HW 1002 INOX |
| Art. Nr. 112 372 | Art. Nr. 112 371 | Art. Nr. 112 449 | Art. Nr. 112 459 | Art. Nr. 112 458 | |
| 600 W 800 W | 1000 W | ||||
| 230 V AC, 50 Hz 230 | V AC, 50 Hz 230 V AC | 50 Hz | |||
| IP | X4 | X4 | X4 | ||
| 76 dB (A) 77 dB (A) 86 dB (A) | |||||
| 9 m 9 m 9 m | |||||
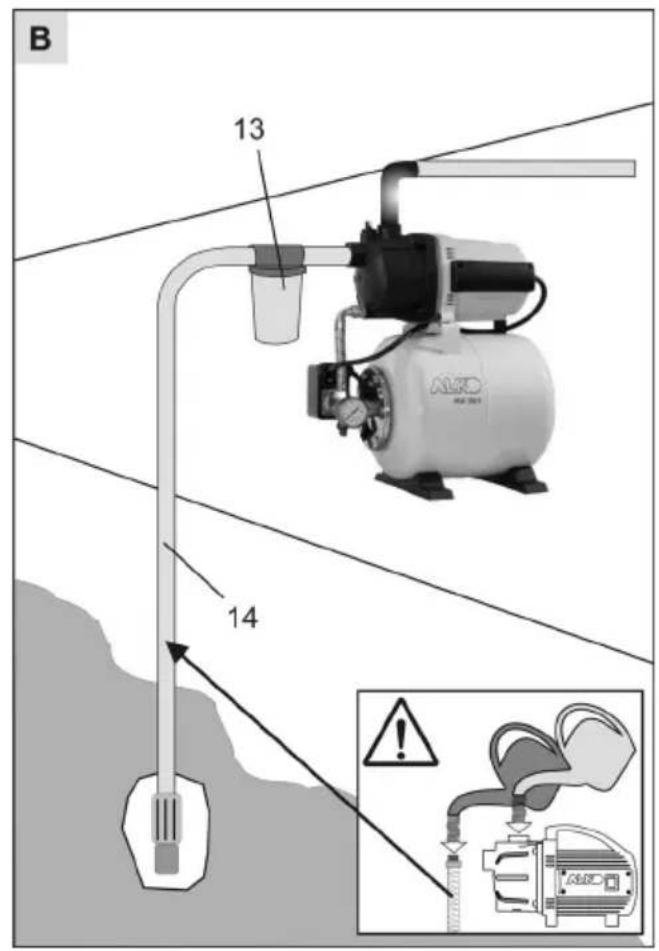
| max | 35 m/3,5 bar 38 m/3,8 bar | 48 m 4,8 bar | |||
| max | 3100 l/h 3400 l/h | 3800 l/h | |||
| 35 °C 35 °C 35 °C | |||||
| 1,5/2,8 bar 2,0/3,0 | bar 2,0/3,5 bar | ||||
| 1 | 1 | 1 | |||
| out in | 1" | 1" | 1" | ||
| 20 I | 20 I | 20 I | |||
| kg | 11,3 kg netto | 11,2 kg netto | 11,3 kg netto | 11,2 kg netto | 16,0 kg netto |
Einleitung
Please read the operating instructions carefully before you use the domestic water system to prevent accidents and ensure the trouble-free operation of the system. Make sure you keep the instructions at hand for quick reference. If you resell your pump or give it to another user, please include these instructions in the sale or the gift. The following symbols are used in the instructions:

DANGER
This symbol draws your attention to work processes or operating procedures that have to be carefully observed in order to prevent serious injury to the user or another person.

CAUTION
This symbol draws your attention to information you need to ensure that your system is not damaged due to improper or careless use.

PLEASE NOTE
The information symbol draws your attention to essential technical requirements.
For your safety

The domestic water system may only be connected to an electrical device which is compliant with DIN/VDE 0100, Parts 737, 738 and 702 (swimming pools). Make sure that fuse protection in the form of a 10A automatic cut-out and a fault current guard circuit with a nominal fault current of 10/30mA is installed.

The supply voltage and current specified on the type plate must be identical with the voltage and current of your electrical system.

If you need to connect your domestic water system to an extension cord, make sure that the cable is 3 × 1.5 ~mm_2 that it corresponds to type H07RN-F and is compliant with DIN 57282/57245. The connector must be splash-proof. Cable drums must be completely unwound.

Please make sure that the system is not operated by anyone
who has not read or does not fully understand the operating instructions or
is under the age of 16.

The domestic water system may not be used for any other than its designated use. Before putting the system into operation, make sure that
the pump, reservoir, the electric cable and the plug are not worn or damaged.

Do not operate the system if it is damaged. Necessary repairs must be carried out in a qualified AL-KO service centre.

Never use the electric cable to lift, carry or attach the system to another object. Do not pull on the cable when unplugging the system.

Make sure that the system is unplugged before beginning any maintenance, repair or cleaning work. In the event of a malfunction, immediately unplug the system. Make sure that the plug does not get wet.

Do not attempt to make any changes or modifications to the device by yourself. You may endanger your life or invalidate the warranty.

Risk of injury due to hot water!
The water in the pump can heat up significantly, during longer periods of operation (>10min) against closed outlet side.
This hazard can occur due to:
side under compression closed
- lack of water in the suction pipe
-improperinstallation
-faulty pressure switch
In this case:
- isolate the pump from the mains
- allow the pump and water to cool down
- check water level on inlet side
- check pipes for water-tightness
- check installation
- check pressure switch
- only restart pump after rectifying the cause of the fault
Use
Designated use
The domestic water system is designed for home use in your house or garden. Please observe the technical data given in the instructions before putting the system into operation. Your domestic water system has been designed for use in the following applications:
- irrigation and watering, e.g. of your lawn or flower and vegetable gardens
domestic water supply
increasing pressure in the domestic water supply.
Please observe the regulations issued by your local water works. If necessary, ask a plumber. The system is designed to pump only the following liquids:
clear water
- rain water
Prohibited use
Your domestic water system is not intended for permanent operation. The system may not be used to pump the following liquids:
saltwater
- beverages or liquid foods
corrosives or chemicals
- acids or combustible, explosive or gas-forming liquids
liquids with a temperature above 35^
- sandy water or water containing abrasives
Description of the system
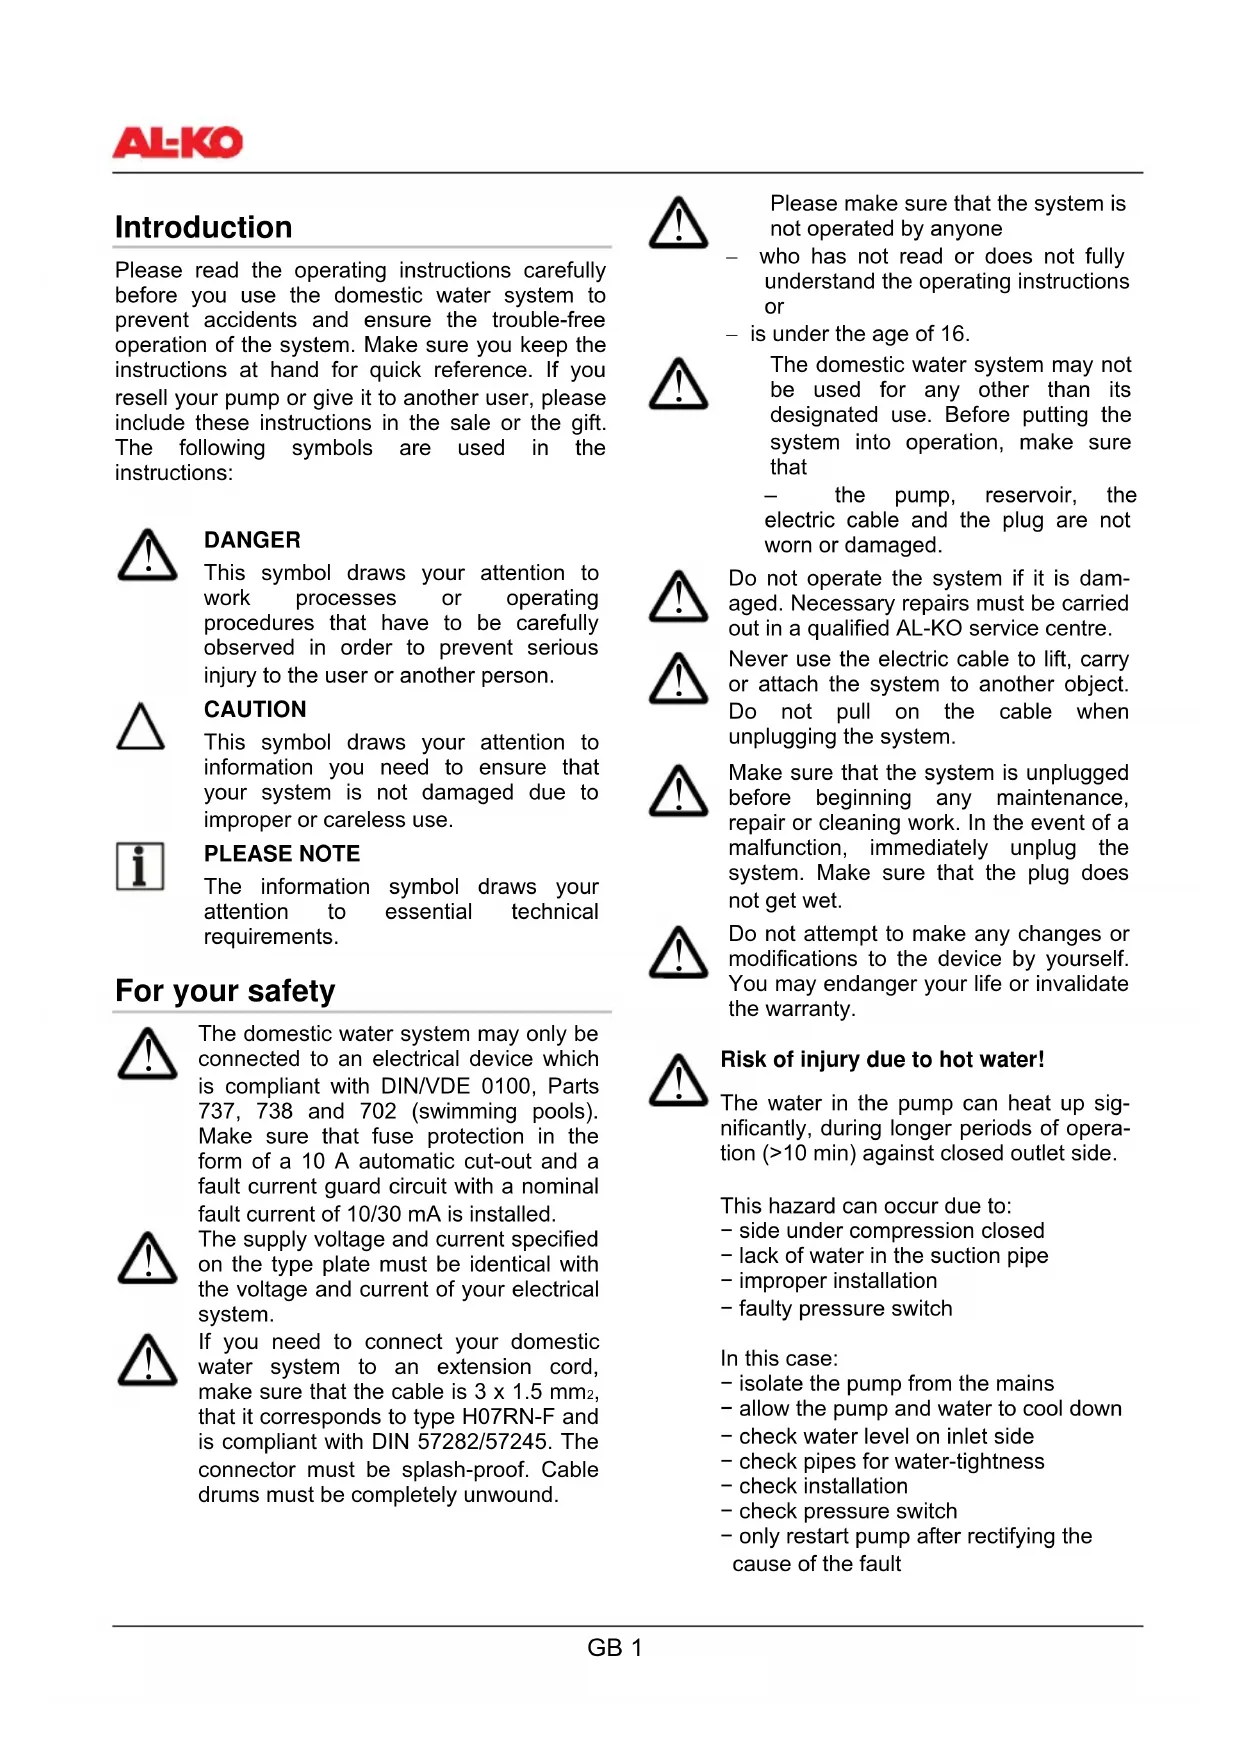
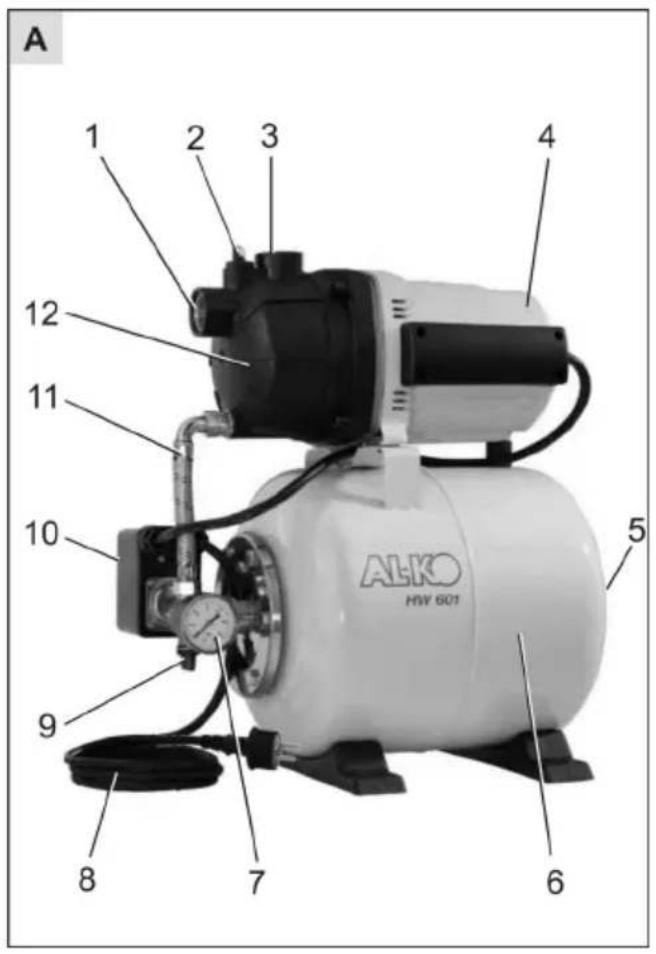
Domestic water system/accessories (Figs. A, B)
1 Pump inlet/suction hose connector
2 Filler screw
3 Pump outlet/pressure hose connector
4 Motor housing
5 Valve
6 Reservoir
7 Pressure gauge
8 Electric cable
9 Draining screw
10 Pressure switch
11 Compensating hose
12 Pump chamber
13 Filter (accessories)
14 AL-KO suction kit (accessories)
Scope of supply
Your domestic water system comes equipped with a pressure switch, a pressure gauge and an electric cable with an earthing-contact type plug.
Function
The domestic water system works automatically. The pump automatically switches on or off depending on the pressure set (see technical data).
The system sucks the liquid to be pumped through the suction hose (1) and lets it out into the reservoir (6). Upon reaching the set cut-out pressure (reservoir is full), the system automatically switches off.
As soon as the pressure falls to below 2,0 bar (water is drained from the reservoir), the system automatically switches back on and continues pumping the liquid until either the reservoir is full or any draining process running has been completed and the reservoir is full.
Thermal protection
Your domestic water system is equipped with a thermal protection switch, which switches the pump off if it overheats. The pump will remain off until it has cooled down. After about 15 - 20 minutes, the pump will automatically switch on.
Setting up and operating the system
Before putting your domestic water system into operation, check the inlet pressure at the diaphragm which can be read out from the valve (5) on the reservoir. Make sure that the pressure is approx. 1.5 bar and correct if required (see Checking the Inlet Pressure).
- Place the device onto a hard, flat surface so that it cannot tip over and so that it will not be near the flow of water.
- Make sure that the device is protected from rain and any direct exposure to water.
When attaching the suction and pressure hoses, make sure that they do not exert a tension on the device. We recommend the use of flexible hoses at the pump inlet (1) and outlet (3). If you have any questions, ask your retailer.
When operating the system (automatic operation), take appropriate measures to ensure that damage due to flooding cannot occur if the system should malfunction.
Attaching the suction hose

Choose a hose which is long enough so that the device will not suck in air and run dry. The hose should be at least 30cm under the surface of the liquid to be pumped while the pump is in operation.
Mount a non-return valve in the suction hose to prevent the liquid from running back out of the pump.
- Attach the suction hose. Make sure to screw it in tightly, but take care not to damage the threads.

If the liquid to be pumped is deeper than 4 m, you should use a suction hose which is larger than 1^ in diameter for the best performance. We recommend our AL-KO suction set (14), which consists of a suction hose, strainer and non-return valve. The suction set is available at your local retailer's.

Before pumping sandy water, you must insert a filter (13) between the suction hose and the pump inlet or you will damage your domestic water system. The filter is available at your local retailer's.
- When laying the suction hose, make sure that it is lower than the system.

If the suction hose is laid so that it is higher than the device, bubbles will become trapped in the line and the pump will suck air.
Attaching the pressure hose
- Attach the pressure hose. Make sure to screw it in tightly, but take care not to damage the threads.
Filling the pump

Before putting your domestic water system into operation, you must fill the pump chamber with water until it overflows to achieve full suction power. Do not operate the pump while it is dry because this will cause serious damage to the pump.
- Remove the filler screw (2).
- Pour water into the opening until the chamber of the pump (12) is full.
- Replace the filler screw (2) and tighten it.
Switching on the system
-
Open the pressure line (open valve, sprayer, tap, etc.).
-
Plug the electric cable into the socket. The pump will automatically begin to run.
- As soon as the flow of water is cleared of air bubbles trapped in the line, close the pressure line. When the pressure has fallen and the reservoir is full, the pump will automatically switch off. Your domestic water system is now ready for operation.
Switching off the system
- Switch the system off by unplugging the electric cable from the socket.
Maintenance and Cleaning

Before beginning any maintenance or cleaning work, make sure that the device has been unplugged and take precautions to ensure that it cannot be switched on during work!
Cleaning the system
If you have used your domestic water system to pump chlorine water (swimming pool water) or liquids which leave a residue, flush your pump out with clear water after use.
Clearing blockages
If your domestic water system should become blocked so that it does not suction or pump out liquid, remove the obstruction as follows:
- Remove the suction hose from the pump inlet (1).
- Attach the pressure hose to the water tap and spray water into the pump chamber until the blockage is flushed out.
- Check to see that the obstruction has been cleared entirely by switching on the pump for a short time. Do not let the pump suck air.
- If the pump runs trouble-free, put it into operation as described in the instructions.
Frost protection
Your domestic water system is susceptible to low temperatures. Make sure to empty the device of residual liquid (hoses, pump and reservoir) and store it so that it is protected from frost.
- Empty the suction and pressure hoses.
- Remove the draining screw (9) and drain all water from the pump chamber. The water contained in the reservoir will be pressed out by the air bellows.
- Replace the draining screw and store the device so that it is protected from frost.
Setting the pressure switch Disposal
The cut-in and cut-out pressures at which the sys- tem starts and stops operating have been set in the factory (see technical data). However, if desired, you can adjust the setting as desired at the pressure switch (10), also see Figure C.
- Unplug the electric cable from the socket.
- Remove the protective cover from the pressure switch.
- Use a screwdriver to set the desired pressure:
A= Cut-in pressure
B= Cut-out pressure
Increase pressure = +
Decrease pressure = -
- Close the pressure switch by replacing the cover.
- Put the system into operation and check the changed pressures.

Please observe the max. permissible pumping height and pressure; see technical data.
Checking the inlet pressure
- Unplug the electric cable from the socket.
- Open the pressure line and drain the water off until the pump is completely empty.
- Check the inlet pressure at the diaphragm (5). The pressure should be approx. 1.5 bar. Correct the pressure if needed.
- Put the domestic water system into operation as set out in the instructions.

RL 2002/96 EG
Do not dispose of worn-out units through the household garbage!
The appliance, its packaging and accessories are all produced from recyclable materials and must be disposed of accordingly.
Malfunctions

Before you attempt to remedy any malfunction of your domestic water system, pull the plug to prevent injury or death due to electrocution!
| What is wrong? | What is the possible reason? | What to do: |
| Motor does not run. | Impeller is blocked. | Clean the pump. |
| Thermal switch has switched off. | Wait until the thermal | switch has automatically switched the pump on again. Check the temperature of the liquid. Have the pump checked. |
| No power. | Have the power supply checked by a qualified electrician. | |
| System runs but does not pump out liquid. | Suction hose is not immersed in the liquid to be pumped. | Make sure that the suction hose is at least 30 cm beneath the surface. |
| Pressure line is blocked. | DANGER! | Risk of injury due to hot water! Clear blockage in suction hose. |
| Pressure line is blocked. | DANGER! | Risk of injury due to hot water! Clear blockage in pressure line. |
| Suction height is too great. | Lower suction height. | |
| Air is trapped in the suction hose. | Check for leaks in the suction hose. | |
| Pump is dry. | Fill the pump with water. | |
| System is only pumping out liquid very slowly or weakly. | Suction hose is blocked. | Clear the blockage. |
| Suction height is too great. | Lower suction height. | |
| Pressure hose diameter is too small. | Attach a pressure hose with a larger diameter. | |
| Pumping height is too great. | Lower pumping height. | |
| Pump does not run reliably. | Air pressure in reservoir is too low. | Check the air pressure in the reservoir at the valve (5) and correct to about 1.5 bar if necessary. |
| Pump fails to switch off automatically | Water shortage inlet side, Pump sucks in air | Unplug the pump, allow to cool down if necessary |

If you are unable to remedy a malfunction, please call the AL-KO service centre nearest you.
Introduction
Beveiling against vorst
- born ogunge under 16 ar

MoHTaX HanopHoro WJahra
- Hanopnblu IaHr DOJXeH 6bIb npBnHueh HEnocpeDCTBeHHo K Hacocy. Pe3b60BbIe COeINHeHra DOJXHbI 6bITb nnotbIMn. BaxHo He nobpeDHT pe3b6y.
HanoJIHeHne Hacoca
Ipei KaKdbim NycOM B 3KcPiyatauio CneNyET HANOHNb HAcOC BODo DO IpePOnHeHn, YTO6bl HAcOC MoC p43y Kaatb BoY. Pa6ota BCxyUo npNBOHT K cepB3HbIM NOBpeXdEHNm Hacoca.
- OtkpbbTb npo6ky 3aunBHOJ roPNOBnHbl (2).
HaHTb BODy yepe3 3aINBHyIO rOpNOBHy, yTo6bl Kopnyc Hacocca (12) 6bln NOJHOCTbH O HAONHeH BOOn. - 3akpyntnb npo6ky 3aunBHOJ ropnoBnHbI (2).
NyckB3KcnnyatauH
OTKpbITb B HAnOpHcETN BCE cdepknBaIOUne NOTOK BOdbI yCTpOInCTBa (BeHTINb,ΦOpcyHka,KpaH).
BCTaBnTb cTeByIO BnIKy CoeINHInTeIbHOrO Ka6eN B WTeNCeNbHyO po3eTKy. Hacoc HauHHaet Ka4aTB BODY.
3akpbItb kpan Ha HAnOpHcetn, nocJe NOCTyIpHeNn BOdbI (6e3 BO3dyuHbIX ny3blpei) n3 BOdOpPoBOda. Hacoc aBTOMaTnueckn OTKlHuOaETcra NocJe BO3HNKHOBeHnna DabJIeHnna HanoJHHeHnpe3epByapa. YcTaHOBka BODOCha6XeHnra rTOBa K 3KcPnyataun.
OTKIIoueHne Hacoca
- DocTaToUHO BbIHyTb CTeByIO BNJky COeINHHTeJIbHorO Ka6eIa n3 po3eTKN.
06cIyXnBaHne n npoΦnJaKTnKa

Ipepe npoBeHnem IIObix pa60nt no
OBCnyKuBaHHIO n npoФnJaKTnke
Haocca Heo6xOaHMo OTKJIouHTb erO OT
CetNI n npHraTb MepbI NO
PpeDToBpAaHcHIO CAMOBKnUoyehnra
Haocca.
UHCTka Hacoca
Iocne nepekaunBaHnXlopnpoBaHHoBdbl, Hanp. n3 baccenHa, Heo6xOJMo npombItb Hacoc uCToBdoi.
YctpaHHe 3acOpEnn
3acopenhna HacocaycTpaHHTcCJeDyUOUM o6pa3oM:
- OTcoeINHtB BCacbIBaIOuN IJNaHr OT BXOJa Hacoca (1).
- PpncoeHnHTb HAnOpHbI WJaHr K KpaHy I npOnyCTnTb BODy Chepe3 Kopnyc Hacoca Do yctpaHEnra 3acopenia.
- PpexKe, Yem BKJIOUHTb CHOBA HAcOC B NOCTOHHbI peKIM pa6oTbI, HyXHO npOBepNTb, CBO6OHNbI XoJ pa6oTbI HAcoca, BKJIOUHNB BBIKIOUH N Ha KOpOTKoe BpeMn HeCKONbKO pa3 (Ha 3-4 cek.).
BkHIOuHTb cHOBa HAcOC, KaK OINcaHO BbIe.
3aunta ot 3amep3aHnna
Ecnn Oxuandaetc Mopo3, CneIyET NOHOCbO cnTb BOdy n3 Hacoca, pe3epByapa n WlaHROB.
- OnopoxHntb BCacbIBaIOuI HnHaHHeTaTeJIbHbI uHaHn.
OTBnHTb npo6ky cInBHOJ rOpNoBHbI (9) n CnITb BODy n3 Hacoca. B To Xe BpeM BA, KOtopra HaxoINTcB pe3epByape, 6ydet BblTEcheHa HApKy NToKOM Bo3dyxa.
3akpyntb cHOBa npo6ky CnIBHOI rOpIOBnHbI XpaHTb yCTaHOBky BOOCHa6KeHnBA MeCTe, 3aUNuEHHom OT MOp03a.
PerynpoBka pene-peryTopa daBHeHn
ДаВлЕнe BКЛЮЧЕНЯ n OTКЛЮЧЕНЯ yCTaHOBKn BOJOCHa6XeHnY yCTaHOBNeHo 3aBODOM- n3rOToBnTeIeM (cM. TexHnueckne xapaKTePncTnKn).Пр n Heo6xOJnMoCt n 3TN 3NaUeHnЯ moKHo OTperyNIpObaTb Ha pepepyraTope, daBHeHnA (10),cm. pnc.
- BbHyTb ceTeByIO BNJIKy n3 po3eTKN.
- ChЯть зашиптую крblшу pele-perулетopa.
- YcTaHOBnTB Heo6xOJIMoe 3HaueHne DaBJIeHnC NOMOuIO OTBePTKn.
A=daBneHne BkIIOueHnra
B=daBneHne OTKJIIOUeHnA
- IOBbIWeHne DaBJIeHnR = +
- NOHIXeHne DaBHeHnI = -
3akpbItb kpbIuKy peJe-peryraTopa.
BknHcyntb Hacoc n npokoHTpoJnipoBaTb 3MeHeHHoe DaBHeHne.

Heo6xOJIMO co6IIOaTb MaKc, noIbEeM npn MaKc, pa6oyem DaBneHn,(cm. tex.xapaKTepuCTnKn).
KoHTpoJIb DaBJIeHnHa MeM6paHe
- BbHyTb ceTeByHO BNJky n3 po3eTKn.
- OTKpbIb 3acNoHky HanopHOJ NHHN IN BblnyCTnTb BOy n3 HAcOca Do ero NOJIHOr OOnopoXHeHn
- Поберпь Давлени Ha Мьбане чрзknanan (5).Давлени Должно сoctаьтв ok.1,5 6ap.В сnyаe Heo6xOIMOCTNдавлени спедует OTkoppeKTHIpOBaTb.
BkIIOuHTb cHOBa HAcOC, KaK OINcaHO BbIe.
YTNJIIN3aUN

RL 2002/96 EG
OtcnyxNBune cpoK npnbopbI He Bbl6paCbIBaTb C 6bITOBbIM Mycopom!
YnakOBka, np6op n npHaJnxHocTH H3rTOBHeHbI N3 MaTePnaIOB, npurohIX dIy BTOpHOrO hCNOJIb3OBaHnI, I NO3TOMy DOJXHbI yTNIN3nPoBaTbcra COOTBeTCTByIOUIM O6pa3OM.
HencnpaBHOCTb

Ipeed npoBeHnem IIObIX pa6OT no yCTpaHEnIO HeuCnpaBHOcte HEO6xOIMO OTKJIOHTb HaOCOT cETN.
3a6bOpOHeNo BnKOpNCToBvBaTn npJna y TpNbAtonMy pexmI.BoHa He np3NaYeHa dny IoDaHHaHAcTyHNx piINH:
- COJIOHa BOJa
- npOdykTN xapUyBaHHa
-6pydHa BOda 3 TEKCTnIbHIMn a6o napepOBmN yactOyKaMn - arpecnBHI cepeoBnua, ximikatN
- iDki, ropuhi, Bn6yxobi a6o ra3onooi6Hi piHNI
-pidHnTeNJIiwe 35^ - BOda 3 nickom i ucnctayn piinHn
Onc npoodykTy
Домашня hacocha cTaHciI/NpnilaIaIa (maI.A Ta B)
1 BxiB Hacoc / 3'eHaHHa YCMOKTyBaIbHoro Tpy6onpoBody
2 PpO6Ka HAnNBHOro OTBOpy
3 Buxi 3 Hacocy / 3'EDHaHHaHn HaipHoro Tpy6onpoBody
4 Kopnyc dBvryHa
5 Klaanah
6 HarpomadkyBaIbHa emHicTb
7 MaHOMeTp
8 3'εdHyBaIbHnJxNlBHNK
9 PpO6ka 3nHBHoro OTBOPy
10 Khonkobin Bmmkaay
11BupibHnIpbObiD
12 Kopnyc Hacoca
13 ΦπbTp nonepedhboro ouuueHHn (npua
14 KomnneKT dЯ BCMOKtyBaHHA AL-KO (npnilaand)
KOMNJIeKT NOCTaBKn
Домашну Hacocha CTaHcIЯобладнанa KHONKOBIM BIMNKaueM, MaHOMeTpom, a TAKOX Мерекевим KaBeJem 3i UTenCeJIbHUMn pIXKamN i3 3axICHM KOHTaKTOM.
ФункционуВанн.
DomaHna HacOHa cTaHui npaioe aBtOMaTnUHO. Haoc BMkaetbca Ta Bmkaetbc 3aJexHo BiT NCKy (DnBncb TexHiHi daHI).
Hacoc BCMOKTyE BODy uepe3 yCMOKTyBaIbHn Tpy60npoBid (1) Ta nOdae ii do HarpomAdKyBaIbHOi emHicTi (6).Ppi DoCraHHeHi TnCKy BMKHeHHa (HarpomAdKyBaIbHa emHicTb 3aIOBHeHa) HACOC ABTomATuHOBmUKKaETbcr.
Nicra naiHHa Tncky Ha np6bl. 2,0 6ap (BidbpaHnBaOn) HACOC aBTOMaTHNO BROPy BMkaetbc Ta HAnOBHIOE HarpMaJxKyBaJIbHy EMHICTb abo nOaEc BOy Do ToUci 3abOpn BOOn. YCbomy BnAky HarpMaJxKyBaJIbHa EMHICTb 3anOBHIOeTbc TINbKn NiCna 3aBepWeHHa BiDbpaHHa BOIn.
TennoBn 3axnCT
PpnaO OchaueHn TepIOBm 3axnCTOM, kIn Bmkae Hacoc y pa3i neperpiBaHH. Picna p3n OxIoJxKeHH npotrrom 15 - 20 XBnIH Hacoc 3HOBy caMOCTIHO BMkAcTbcra.
YcTaHOBJIeHnI npIaNy, BBedeHn B eKcnnyataciIO

Ipeed BMKKaHHaM Tpe6a nepeBipuTn NOaTKOBNI TnCK MembpaHn B HarpomadKyBaJIbHiEMHOCTi Ha Knaapani (5). TnCK NOBHeN CKaDaTn np6n. 1,5 6ap, RaIIO nOtpi6Ho, BNpabNTb Noro (INB. "IpeBipka NoaTKOBOro TnCKy MembpaHn").
- NocTaBTe npnlaHa rJaKy, TBepy Ta roPn3oHTaIbHy NOBepxHIO, 3axuheHy BiD 3aTOnJIeHHra.
BneBHTbcra, 1o HacOHa cTaHcIg 3axuHeBaBIDdoUy Ta npMOro BODHOCTpyMy.
PiДЧAC MOHTaЖу BCMOKtYBaJIbHnX Ta HanipHnx TpyboNPOBODIB 3BepTaIte yBary Ha Te, uO6 npuJaH He nIddaBABcR mexaHCHOMy TnCKy a6o Ta3i. Mn peKOMeHdUeMo BCTaHOBJIeHHra THyckx TpyboNPOBODIB Ha BXoDi (1) B Hacoc Ta Ha BHXoDi (3) 3 Hacocy. 3BepHITbcr TaKoKdo CBORO DInpepa.

Ipn 0oJHHi ekCnnyataui (aBTOMaTHNpexm) 3a DOnOMorO BIDNOBIDHX 3axoDIB Bu NOBHHI BKNIOHTN NOBy NOBTOPHNX NOWKOJXeHb np HecnpaBHOCTx B npnadi yepe3 aToJIeHHaBicIKiB.
BcTaHOBJIeHHaYCMOKTyBaIbHOro Tpy6OpPoBdy

ObepiB yCMOKTyBaIbHn TpyboNpOBId TaKoi DOBXHH, 106 Hacoc He npaIOBaH hacyxo. YCMOKTyBaIbHn IJNAH NOBHeH 3aBXD 3HaXoDITncr Ha 30 cm HxKYe BOHOI NOBepxHi.
BMOHTyIe y BCMOKTyBaJIbHn Tpy6OpPoBI 3BOPOTnKlaNaH DnA 3anobirHH BNTiKaHHNoDaBaHOi pIDINH i3 npInaNy.
BctaHOItb yCMOKTyBaIbHn Tpy6oNpOBI. 3BepHITb yBary Ha repMeTuHicTb 3'EDHaHH, He NOuKOJxUOu pi3b6y.

KIO BNCOTA BCMOKTyBaHH 6Ibue 4 M,
Diametp yCMOKTyBaHBO 7nHaHra
NOBHeH 6ytu 6Ibue 1".Mn
peKOMeHNyEMO BNKOPNCTOByBaTu
KOMJIeKT IJRA BCMOKTyBaHHAAL-KO (14)
3 yCMOKTyBaJIbHM 7nAROM,
PnIMMaNbHO CITKOHO Ta CTOnOpOM
3BOPOTHO NOTOKY.
TJr cboRo 3BepHITbcr DO CBOr Odnepa.

Kaio B0da MICTb nicok, Tpe6a BCTaHOBHT pINbTp nonepedHbOro OunueHH (13) mix ycmOKTyBaIbHnM Tpy6oPBODOM Ta BXODOM y Hacoc. Ira 3BepHITbcrdoCBOr dnepa.
- 3aBxdi npoknaadte yCMOKTyBaIbHn TpyboPobiD 3 HaxINOM Bropy.

Y pa3i npoknaaHnnoHaB BncoToHacocay Tpy6oPbOBoi yTbOpIOJBcNobITpHi 6yNb6aAkn.
BcTaHOBJIeHHa HanipHoro Tpy6oPoBoy
BcTaHOBIb HanipHn Tpy6oNpOBI. Ppi cboMy 3BepHiY yBary Ha repMeTuHicTb 3'edHaHH, He NowkoJxUOnPi3b6y.
HanoBHeHHaHoccy

Ipeed KOxHMM OMTaXeM/BBeDeHHaM B Eeknnyatauio Hacoc nOTpi6Ho HAnOBHIOBaTN BOOIO Do pIBHa nepeJIbBy IJr TORo, 06 Bin Mir oDpa3y BCMOKTyBaTN. Po6ota Hacyxo 3pyHyc Hacoc.
-
BiДкриTe npoБky haJIиВHOrO oTbOpy (2).
-
HanobHITb BOIOU yepe3 HANIBHNI OTBIP, NOKI He 3anOBHITbcra Kamepa Hacoca (12).
- YrBnHTb np6ky HaJIINBHOrO OTbOpy (2).
Iepwe BBeDeHHB eKcnIyatauio Haocca
Bikpnite 3anop HanipHoro Tpy6onpoBoby (kanaHn, po3nnHOBaNbHe conNo, kpaH).
BCTaBTe MepeXeBn 1TKeep 3'EdHyBaIbHoro KINbHnka y po3Etky. Hacoc nouHae noDaBaTu.
3akpiTe 3anop B HanipHomy Tpy6oNpOBoi nicra TORO, k BOda 6e3 6yIb6aUOK Cteue 3 Tpy6oNpOBOy. Hacoc aBTOMaTHHO BIMNKaETbcr nicra CTBOpEHnT NCKy Ta 3anOBHeHH HarpomAdKyBaJIbHiemHOCTI. DomaHnaHacOCHA cTaHcI rTOBA Do eKCIlyataii.
BmKHeHHHaCocy
BHTaHITb MepexeBn uTekep i3 uTeNceIbHOIO pO3eTKI.
Texhichne obcnyrobyBaHHaI DOrJaD

Ipea noatkom 6yIb-koipo60tn 3 texhiHoro 06cnyrobyBaHH npnaHeo6xIDHO BIDOKpemTN BiMepexi Ta 3anobirn BiNIOBTOPHORBMKAHH.
MUTTA
Iicna noaHn XnopobHo BOy y nlaBbHomy baceHi abo piDHH, kka 3aNwac ocad, Tpe6a npomTu HAcoc YcCTOIO BDOIO.
UcyHeHHa 3aKynOpKn
3aKynopky Hacocy Tpe6a ycyHyBaTu HaCTyINHM YHOM:
3a60pOHaTbC yTHnI3yBaTu iHCTpyMeHTN, 1o CTaHn HEnpndaTHMn, pa3OM i3 nO6yTOBmN BiXoJam!
YnakoBka, cam npictpi Ta noor npnilaDn BnKoHaHi 3 MaTepiAinib, 0 MoKyTb 6yTu BNkOpNCTaHI NOBTOHO, TOMy BOH NiIJaRAOTb BiINOBiHN yTNlI3aui.
Henolada

IpeepnBnKoHaHHm yCyHeHHn HeNoJIaOK 3aBXKn BtTgAraTe WTeKeP 3 MepeXj KInBJeHH!
Pumpa nods. "I'm sure you're still in bed, but I'm not sure you're ready to go to sleep."
A=Pressao deactivation
B=Pressao de desactivacao
-Aumentar pressao = +
- Diminui r pressao = -
Antonio De Filippo, Managing Director
Garantie
Antonio De Filippo, Managing Director
Garanti
EC declaration of conformity
We hereby declare that this product, in the form in which it is marketed, meets the requirements of the harmonised EU guidelines,
EU safety standards, and the product-specific standards.
Product
Domestic water system
Serial number
G3043045
Model
HW601, HW601 INOX
HW802, HW802 INOX
HW1002 INOX
Sound power level
measured / guaranteed
HW601, HW601 INOX 74/76 dB(A)
HW802, HW802 INOX 74/77 dB(A)
HW1002 INOX 83/86 dB(A)
Manufacturer
AL-KO Geräte GmbH
Ichenhauser Str. 14
89359 KOETZ
DEUTSCHLAND
EU directives
2006/95/EG
2004/108/EG
2000/14/EG (13)
Conformity evaluation
2000/14/EG
Appendix V
Executive Officer
Anton Eberle
Ichenhauser Str. 14
89359 KOETZ
DEUTSCHLAND
Harmonised standards
EN 60335-1; VDE 0700-1:2007-02
EN 60335-2-41; VDE 0700-41:2004-12
EN 60335-2-41/A2; VDE 0700-41/A2:2009-02
EN 55014-1;VDE 0875-14-1:2007-06
EN 55014-1/A1;VDE 0875-14-1/A1:2008-12
EN 55014-2;VDE 0875-14-2:2009-06
EN 61000-3-2; VDE 0838-2:2006-10
EN 61000-3-2/A1; VDE 0838-2/A1:2007-05
EN 61000-3-2/A7; VDE0838-2/A7:2007-06
EN 61000-3-2/A4; VDE 0838-2/A4:2007-06
EN 61000-3-3; VDE 0838-3:2009-06
Kotz, 2010-07-20
Antonio De Filippo, Managing Director
Warranty
If any material or manufacturing defects are found during the statutory customer protection period, we will either repair or replace the equipment, whichever we consider the more appropriate. This statutory period may vary according to the legislation in force in the country where the equipment was purchased.
Our warranty is valid only if: The warranty is no longer valid if:
The equipment has been used properly
The operating instructions have been followed
Genuine replacement parts have been used
The equipment has been tampered with
Technical modifications have been made
The trimmer was not used for its intended purpose (for example, used for commercial or communal applications)
The following are not covered by warranty:
Paint damage due to normal wear
Wear parts identified by a border XXXXX (X) on the spare parts list
Combustion motors - these are covered by a separate warranty from the manufacturer concerned
To make a claim under warranty, please take this statement of warranty and proof of purchase to the nearest authorised customer service centre. This warranty does not affect the usual statutory rights of the customer relative to the seller.
EG-forsakran om overensstammelse
Antonio De Filippo, Managing Director
Garanti
Eventuella material-ller tillverkarfel pa maskinen ansvarar vi for under garantin inom den lagstadgade preskrictionstiden antingen genom reparation ell utbyte av del/delar. Preskrictionstiden galler after respektive lands lag, dar maskinen inforskaffades.
Antonio De Filippo, Managing Director
Garantie
Antonio De Filippo, Managing Director
Garantie
Antonio De Filippo, Managing Director
Takuu
Antonio De Filippo, Managing Director
Garantía
Antonio De Filippo, Managing Director
Garanzia
Antonio De Filippo, Managing Director
Garancija
Antonio De Filippo, Managing Director
TapaNTna
Mbl roTObI yCTpaHHTb HeKOTOpBle nOgpeWHOCT MATEpnaIa IIN N3ROTOBHeH B TeueHne YCTaHOBHeHORo 3aKOHOM cPoka daBHocTn npedbAeHnnpTeH3nn no KaueCTBy (nytem peMOHTa IIN 3ameHb - no Haewmy yCMOTpeHHIO). Cpok daBHocTn onpeJeETcra 3aKOHODaTeJIbCTBOM CTpaHb, rDe 6bl KUIIEN HNCTpyMeHT.
Haun rapaHTnHbIe 06a3aTeNbCTBa DeiCTBNTeHBtToJIbKOB CneDyUoX CNyuaX:
TapaHTnT TepaTeC nny B CneIyUOux CnyAax:
Pn Hndexaem obaeHn c nHCTpyMeHTom
Pn co6JIIODeHmpyKOBoIDCTBa nO 3KcIyatauHm
Pn nCnoJIb3OBAHmOpunHaJIbHbIX 3aNaChbIX qacteI
Pn nonbITke nouHHTb INCTpyMeHT
PnBHeCENm3MeHEnB KOHCTpyKUIO HNCTpyMeHTa
■IpnHeHaJnEkaeM NcNoJIb3OBAHm INHCTpyMeHTA (HaNPIMep,B npOMbIWeHbIX INN KOMMyHaJIbHbIX UeJIAX)
TapaHTnHe pacnpoctpaHareTcHa:
■ NobpekdeHnnaKOBOro nokpbItnra, Bo3HNKUne no npuHHe HopMaJIbHOro n3HOca
3HaWnBaemble DeTaN,OTMeueHbIe paMKcN XXXXX (X)Ha KapTe 3aNaChbIX YacteY
BniratEn BHytpenHero CropaHa-Ha Hux pacnpocpaHOTc OTeIbHbIE rapaHTnHbIE 63ateJIbCTBa COOTBeTCTByUoero npOn3BOuNTeIaBnirTeNe
B clyuae, tpe6yioe m npedoctablenra rapaHTn, nokayncta, obaTneCb C daHbIM rapaHTnHBIM nncbMOM uekom, noTbePjdaoum noknyk, K Baewmy dInepy nn B 6nKaiu anBTOBaHHb CEpBnchbI ceHtp. DaHbIe rapaHTnHbIe o63aTeNbCTBa He pacnpocpaHIOcTc H oppeJeHHb3 aKoHOM nopAOK npedbRNeHn NOKyNaTeMe npTeH3n no KaueCTBy K npOdaBu.
EZ izjava o sukladnosti
Antonio De Filippo, Managing Director
Jamstvo
Eventualne greške na materijalu ili greške pri proizvodnji koje se pojave na urečaju otklanjamo za vrijeme zakonskog jamstvenog roka za zahtjeve u slučaju nedostatak po našem izboru u vidu popravke ili zamjenske isporuke. Jamstveni rok odreduje se prema zakonu zemplje u kojoj je urečaj kuplejen.
Naše jamstvo vrijijiésmo u slučaju:Pravo na jamstvo gubi se u slučaju:
Antonio De Filippo, Managing Director
Tapaantia
IpoTAROM BCTAHOBJIeHORO 3aKHOHaBCTBOM CTPOKY daBHOCTI npTeH3i IooDo JKOcTi npNCrPoM MN ycHyemO DeRi JepeKTIMaTePIany abo Bnpo6HnHi 6paK IJXOM peMOHTy abo 3amHn (3a HsIM Po3cydOM). CToPK daBHocTi BN3HaHaetbcra npabOBmH HopMaMn TiE i MicceBOcTi, De byno KynneHo npNCTpii.
HaI rapaHTiHi 306OB'ra3aHHa DiiChi IINe B TaKnx BNpaKaX:
TapaHTiaBtpaHae CIny B TaKx BNpaIkaX:
HaIeKHa eKcnnyatai npntpoIO
Ypaiaichehnna cnpo6n noIarOHTn IHCTpymENT
DopummaHHIHCtpyKcii3ekcnnyataa
TexHiYi 3MiHn pncTpoH
BnKOpNCtAHnOpuHHaNbHnx3aNaChNX
Y pa3i HeHaleXHoR BnKOpncTaHH iHcTpymeHTa (HapnKnad, y npomncNoBnx a6o KomyHaIbHnx ciJx)
TapaHTI He po3NOBcIOJxJyETbcHa Taaki BnnaKn:
Ha noIkoJxehn naKOBaHOI NOBepXHi, kki yTBOpNJncb yHacniDOK 3BNUAHORO 3HOuBaHH
I Etani, 3o 3HOuyIObCra (no3HaueHi paMKoTO XXXXX (X) Ha KapTi 3anaChnx YactnH)
Ha DnBryHn BHytpiHbOro 3ropHHa - Ha Hnx po3noBcIqKyHObCg OkpeMi rapaHTiHi HopMn BiNobIdHoro Bnpo6Hnka DnBryHIB
Y BnnaKy, 10 notpe6ye HadaHnra rapaHTi, 3BepTaIeTcB 3uM rapaHTiHm JInCTOM Ta DOkymeHTOM, knnPiTBePdKyE aKt KyniLi, do BaWoRo dInepa a6o Do hai6nXyOro ABTOH3OBAHO cepBICHoro ceHTpy. Li rapaTHi 306ob'3aHH He po3noBcIOxkyIbCer Ha npaboi npTeH3i KnieHa Do npOdaUca CTOCBOH KoKti npOdaHOro pncToio.
Antonio De Filippo, Managing Director
Gwarancja
Antonio De Filippo, Managing Director
Záruka
Antonio De Filippo, Managing Director
Záruka
Antonio De Filippo, Managing Director
Garancia
Antonio De Filippo, Managing Director
Garanti
Antonio De Filippo, Managing Director
Garantia
Country Company Telephone Fax
| A | AL-KO Kober Ges.m.b.H. | (+43) 3578/2515227 | (+43) 3578/251538 |
| AUS | AL-KO International PTY. LTD | (+61) 3/9767-3700 | (+61) 3/9767-3799 |
| B/L | Eurogarden NV | (+32) 16/805427 | (+32) 16/805425 |
| BG | Valerii S&M Group SJ | (+359) 2 942 34 02 | (+359) 2 942 34 10 |
| CH | AL-KO Kober AG | (+41) 56/4183150 | (+41) 56/4183160 |
| CZ | AL-KO Kober Spol.sr.o. | (+420) 382/210381 | (+420) 382/212782 |
| D | AL-KO Geräte GmbH | (+49) 8221/203-0 | (+49) 82 21/203-138 |
| DK | AL-KO Ginge A/S | (+45) 9882 1000 | (+45) 98825454 |
| EST/LT/LV | AL-KO Kober SIA | (+371) 67409330 | (+371) 67807018 |
| F | AL-KO S.A.S. | (+33) 3/85-763540 | (+33) 3/85-763588 |
| GB | Rochford Garden Machinery Ltd. | (+44) 1963/828050 | (+44) 1963/828052 |
| H | AL-KO KFT | (+36) 29/537050 | (+36) 29/537051 |
| HR | Brun.ko.-prom d.o.o. | (+385) 1 3096 567 | (+385) 1 3096 567 |
| I | AL-KO Kober GmbH / SRL | (+39) 039/9329311 | (+39) 039/9329390 |
| IN | AGRO-COMMERCIAL | (+91) 3322874206 | (+91) 3322874139 |
| IQ | Gulistan Com | (+946) 750 450 80 64 | |
| IRL | Cyril Johnston & Co. Ltd. | (+44) 2890813121 | (+44) 2890914220 |
| LY | ASHOFAN FOR AGRICULT. ACC. | (+218) 512660209 | (+218) 512660209 |
| MA | BADRA Sarl | (+212) 022447128 | (+212) 022447130 |
| MK | Techno Geneks | (+389) 2 2551801 | (+389) 2 2520175 |
| N | AL-KO GINGE A/S | (+47) 64862550 | (+47) 64862554 |
| NL | O.DE LEEUW GROENTECHNIK | (+31) 38/444 6160 | (+31) 38/444 6358 |
| PL | AL-KO Kober z.o.o. | (+48) 61/816 1925 | (+48) 61/816 1980 |
| RO | OMNITECH Technology SRL | (+4) 021 326 36 72 | (+4) 021 326 36 79 |
| RUS | OOO AL-KO Kober | (+7) 499/1688718 | (+7) 499/96600-00 |
| RUS | AL-KO St. Petersburg GmbH | (+7) 812/446 1075 | (+7) 812/446 1075 |
| S | AL-KO Ginge Svenska AB | (+46) (0) 3157 3580 | (+46) (0) 3157 5620 |
| SK | AL-KO Kober Slovakia Spol.s.r.o. | (+421) 2/4599 41 12 | (+421) 2/456481 17 |
| SLO | DARKO OPARA S.P. | (+386) 17225858 | (+386) 17225851 |
| SRB | Agromarket doo | (+381) 34/300765 | (+381) 34/354327 |
| TR | ZIMAS A.S. | (+90) 232 4580586 | (+90) 232 4572697 |
| UA | TOV AL-KO Kober | (+380) 44/492 33 96 | (+380) 44/492 33 97 |

- Einleitung
- DANGER
- CAUTION
- PLEASE NOTE
- For your safety
- Risk of injury due to hot water!
- Use
- Designated use
- Prohibited use
- Description of the system
- Domestic water system/accessories (Figs. A, B)
- Scope of supply
- Function
- Thermal protection
- Setting up and operating the system
- Attaching the suction hose
- Attaching the pressure hose
- Filling the pump
- Switching on the system
- Switching off the system
- Maintenance and Cleaning
- Cleaning the system
- Clearing blockages
- Frost protection
- Setting the pressure switch Disposal
- Checking the inlet pressure
- Malfunctions
- Introduction
- Beveiling against vorst
- MoHTaX HanopHoro WJahra
- HanoJIHeHne Hacoca
- NyckB3KcnnyatauH
- OTKIIoueHne Hacoca
- 06cIyXnBaHne n npoΦnJaKTnKa
- UHCTka Hacoca
- YctpaHHe 3acOpEnn
- 3aunta ot 3amep3aHnna
- PerynpoBka pene-peryTopa daBHeHn
- A=daBneHne BkIIOueHnra
- B=daBneHne OTKJIIOUeHnA
- KoHTpoJIb DaBJIeHnHa MeM6paHe
- YTNJIIN3aUN
- OtcnyxNBune cpoK npnbopbI He Bbl6paCbIBaTb C 6bITOBbIM Mycopom!
- HencnpaBHOCTb
- Onc npoodykTy
- Домашня hacocha cTaHciI/NpnilaIaIa (maI.A Ta B)
- KOMNJIeKT NOCTaBKn
- ФункционуВанн.
- TennoBn 3axnCT
- YcTaHOBJIeHnI npIaNy, BBedeHn B eKcnnyataciIO
- BcTaHOBJIeHHaYCMOKTyBaIbHOro Tpy6OpPoBdy
- BcTaHOBJIeHHa HanipHoro Tpy6oPoBoy
- HanoBHeHHaHoccy
- Iepwe BBeDeHHB eKcnIyatauio Haocca
- BmKHeHHHaCocy
- Texhichne obcnyrobyBaHHaI DOrJaD
- MUTTA
- UcyHeHHa 3aKynOpKn
- Henolada
- Garantie
- Garanti
- EC declaration of conformity
- Product
- Serial number
- Model
- Sound power level
- Manufacturer
- EU directives
- Conformity evaluation
- Executive Officer
- Harmonised standards
- Warranty
- EG-forsakran om overensstammelse
- Takuu
- Garantía
- Garanzia
- Garancija
- TapaNTna
- EZ izjava o sukladnosti
- Jamstvo
- Tapaantia
- Gwarancja
- Záruka
- Garancia
- Garantia
Brand : AL-KO
Model : HW 601
Category : Water pump