
SL 3230T - Monitor FUJITSU - Free user manual and instructions
Find the device manual for free SL 3230T FUJITSU in PDF.
| Brand | Fujitsu |
| Model | SL 3230T |
| Product type | LCD Monitor |
| Connectors | D-SUB, HDMI (x2), Audio, Kensington Lock |
| Power supply | 100-240 V AC, 50/60 Hz |
| Tilt | Adjustable forward and backward |
| OSD functions | On Screen Display (OSD) |
| Energy saving | Yes, standby mode (yellow LED) |
| Power indicator | Green/blue (on), yellow (standby), off (power off) |
| Standards | CE compliant (2004/108/EC, 73/23/EEC) |
| Cleaning | Soft cloth slightly damp, avoid solvents |
| Safety | Do not block ventilation, landscape use only |
| Package contents | Monitor, data cable, power cable, warranty booklet, manual |
| Screen type | LCD (Liquid Crystal Display) |
| Backlight | CCFL (contains mercury) |
| Usage position | Landscape only (0°) |
| Manual languages | FR, CS, DA, DE, EN, ES, ET, FI, HU, IT, LT, NL, NO, PL, PT, RO, SK, SV, TR, etc. |
| Number of manual pages | 312 |
| Repairability | Repair by qualified personnel only |
Frequently Asked Questions - SL 3230T FUJITSU
User questions about SL 3230T FUJITSU
0 question about this device. Answer the ones you know or ask your own.
Ask a new question about this device
Download the instructions for your Monitor in PDF format for free! Find your manual SL 3230T - FUJITSU and take your electronic device back in hand. On this page are published all the documents necessary for the use of your device. SL 3230T by FUJITSU.
USER MANUAL SL 3230T FUJITSU
23" wide LCD Monitor

We make sure
FUJITSU COMPUTERS SIEMENS
Are there ...
... any technical problems or other questions you need clarified?
Please contact
our Help Desk (see Warranty Booklet).
The latest information on our products, tips, updates, etc., can be found on the Internet under:
http://www.fujitsu-siemens.com
OSD-Description
| Icon Functions Detail | ||
 | AUTO ADJUSTMENT | * Optimize the picture performance automatically. |
 | THEME MODE | * Activate the built-in color engine to enhance the graphic effects according to the different situations of the display. contents |
 | BRIGHTNESS | * Adjust the luminance level of the screen. |
 | CONTRAST | * Adjust the contrast level of the screen. |
 | INPUT SIGNAL SELECT | * Select the input signal from Analog, or Digital (HDMI1,HDMI2) Inputs. |
 | OSD MENU LANGUAGE | * Select your own preference of language of OSD menu. |
 | DISPLAY RATIO | * Select the display ratio from Native, and Full Screen* Full Screen: adjust and enlarge the display screen to full screen size (16:10)* Native: keep the display format as the input signal (4:3, 5:4, etc), and enlarge the display screen to the maximum w/o losing any content (part of the screen may be blank) |
 | COLOR TEMPERATURE | * Select the setting of screen color-Cool, Warm or User.* Cool: Select the setting of screen color to be bluish white.* Warm: Select the setting of screen color to be reddish white. |
 | SYSTEM | * Adjust the mechanical specifications regarding the display.(Power Saving Mode, White Balance, Clock, Phase, Horizontal Position, Vertical Position, Information) |
 | POWER SAVINGMODE | * Select between Standard and Advanced power saving modes. See addendum for details.* Standard: Fulfill EPA Energy Star power management requirement* Advanced: Activate monitor Life-Extension function |
 | FULLSCREEN | * Full Screen: adjust and enlarge the display screen to full screen size. |
 | NATIVE SCREEN | * Display equality screen according to the original ratio. |
 | WHITE BALANCE | * Adjust the balance of the input signal. |
 | HORIZONTAL POSITION | * Shift the screen left or right |
 | VERTICAL POSITION | * Shift the screen up or down |
 | PHASE | * Adjust the monitor internal signal phase |
 | CLOCK | * Adjust the monitor internal sampling clock rate |
 | DDC/CI | * Select turn on or turn off DDC/CI function |
 | ACR | * Select turn on or turn off ACR function-Advanced-Contrast.Regulation(dynamic) |
 | DEMO | * 2 seconds after activation of this function, some of the menus will stimulate feature-grading effects 2 times over. |
 | INFORMATION | * Show the frequency, resolution, input interface and other operating details about this display. |
 | ||
 | RECALL | * Reset monitor parameters back to factory preset values. |
Technical data
Dimensions and weight (LCD monitor)
Visible diagonals: 58.42 cm (23" wide)
Screen size : 533.2mm x 312mm
Dimensions (W x H x D) incl. monitor base : 543.2 mm x 412.0 mm x 214.9mm
Dimensions box (W x H x D): 588 mm x 415 mm x 116 mm
Weight : 4.6 kg/5.9kg
Dot pitch : 0.266 mm
Maximal resolution : 1920 x 1080 pixels
Electrical data
Video: analogue, positive, 0.7 Vpp, 75 Ohm, 2 HDMIs,
Synchronisation : Separate H/V-sync
Horizontal frequency: 28kHz .... 82kHz
Refresh rate: 56 Hz ....75 Hz
Maximum pixel rate: 205 MHz
Power supply: 100 VAC - 240VAC, 50Hz - 60Hz, 1.2 A max.
Total power consumption: < 50 W (active)
< 1 W (stand by)
Environmental conditions
Environment class 3K2, IEC 721
Operating range: 5 °C .... 35 °C
Humidity:
15% ... 85%
Condensation must be avoided.
Preset operating modes
The picture position and size have been set set to optimum values at the factory for the operating modes listed above.
| Display resolution | Refresh rate | Horizontal frequency |
| 640 x 480 | 60 Hz | 31.5 kHz |
| 640 x 480 | 75 Hz | 37.5 kHz |
| 720 x 400 | 70 Hz | 31.5 kHz |
| 800 x 600 | 60 Hz | 37.9 kHz |
| 800 x 600 | 75 Hz | 46.9 kHz |
| 1024 x768 | 60 Hz | 48.4 kHz |
| 1024 x 768 | 75 Hz | 60 kHz |
| 1280x1024 | 60 Hz | 64 kHz |
| 1440 x 900 | 60 Hz | 59.9 kHz |
| 1680x1050 | 60Hz | 64.7 kHz |
| 1920x1080 | 60Hz | 67.2 kHz |
23" wide LCD Monitor
Getting Started
| DeutschMagyar | |
| Русский | |
| EnglishБългарски | |
| Norsk | |
| FrançaisRomână | |
| Eesti keeles | |
| EspañolTürkçe | |
| Ελληνικά | |
| Portuguêsالعربيya | |
| Lietuviškas | |
| ItalianoWEEE | |
| Latviski | |
| Svenska | |
| Polski | |
| Nederlands | |
| Slovensko | |
| Dansk | |
| Slovenský | |
| Suomi | |
| Česky |
August 2007 edition
Copyright © Fujitsu Siemens Computers GmbH 2007
VESA, DDC and DPMS are registered trademarks of Video Electronics Standards Association.
All rights, including rights of translation, reproduction by printing, copying or similar methods, even of parts are reserved.
Offenders will be liable for damages.
All rights, including rights created by patent grant or registration of a utility model or design, are reserved.
Delivery subject to availability. Right of technical modification reserved.
Inhalt
Einleitung....1
Contents
Introduction....1
Additional information....1
Important notes....2
Safety notes....2
Power cable 3
Transport 3
Cleaning 4
CE marking....4
FCC Class B Compliance Statement 4
Checking the contents of the consignment....5
Connecting the monitor 6
Operation of the monitor....7
Troubleshooting....8
Assembling the monitor base 10
Introduction
This manual contains important information for correct set-up of your LCD monitor.
A screen controller with VGA interface is required to control the LCD monitor. The monitor processes the data supplied to it by the screen controller. The screen controller/the associated driver software is responsible for setting the modes (resolution and refresh rate).
When putting the monitor into operation for the first time, the screen display should be optimally adapted to the screen controller used and adjusted in accordance with your needs.
Target group
You don't need to be an "expert" to perform the operations described here. However, please observe the safety information given in the operating instructions of the computer and in this manual!
In the event of any problems occurring, please contact your sales outlet or our help desk.
Notational conventions
The meanings of the symbols and fonts used in this manual are as follows:

Pay particular attention to text marked with this symbol. Failure to observe this warning endangers your life, destroys the device, or may lead to loss of data.

Supplementary information, remarks, and tips follow this symbol.
▶ Text which follows this symbol describes activities that must be performed in the order shown.
"Quotation marks" indicate names of chapters or terms.
This font indicates filenames and menu items.
This font indicates screen outputs.
Additional information
Details of how you set the resolution and refresh rate are provided in the documentation on your screen controller/the associated driver software.

Important notes

In this chapter you will find information regarding safety which is essential to take note of with your monitor.
Safety notes
This device complies with the relevant safety regulations for data processing equipment, including electronic office machines for use in an office environment. If you have any questions, contact your sales outlet or our help desk.
- The display surface of the LCD monitor is sensitive to pressure and scratches. You should therefore be careful with the display surface so as to avoid lasting damage (Newton rings, scratches).
- If the device is brought into the installation site from a cold environment, condensation can form. Before operating the device, wait until it is absolutely dry and has reached approximately the same temperature as the installation site.
- To ensure sufficient ventilation, the intake and exhaust air openings of the monitor must never be blocked.
- The monitor automatically sets itself to a mains voltage in the range of 100 V to 240 V. Ensure that the local mains voltage lies within these limits.
- Ensure that the power socket on the device or the grounded mains outlet is freely accessible.
- The ON/OFF switch does not disconnect the device from the mains voltage. To completely disconnect the mains voltage, remove the power plug from the socket.
- The monitor is equipped with a power cable that complies with safety standards.
- Lay all cables so that nobody can stand on them or trip over them. When attaching the device, observe the relevant notes in the "Connecting the monitor" chapter.
- If you use a different data cable from the one supplied, ensure that it is adequately shielded. CE conformance and optimum picture quality are guaranteed only if you use the data cable supplied.
- No data transfer cables should be connected or disconnected during a thunderstorm.
- Make sure that no objects (e.g. jewellery chains, paper clips, etc.) or liquids get inside the device (danger of electric shock, short circuit).
- The device is not waterproof! Never immerse the device in water and protect it from spray water (rain, sea water).
-
In emergencies (e.g. damaged casing, elements or cables, penetration of liquids or foreign matter), switch off the unit, disconnect the power plug and contact your sales outlet or our help desk.
-
The monitor must be disposed of in accordance with the local regulations for disposal of special waste. The screen background lighting contains mercury. You must observe the applicable handling and disposal safety regulations for fluorescent tubes.
- Only qualified technicians should repair the device. Unauthorised opening and incorrect repair may greatly endanger the user (electric shock, fire risk).
- Use a screen saver with moving images and activate the power management for your monitor to prevent still images from "burning in".
- The screen may only be operated in the wide format ( 0^ landscape mode). Turning with a swivel arm or wall bracket mounted is not permitted.
- Store this manual close to the device. If you pass the device on to third parties, you should pass this manual on with it.
- We recommend that you place your device on a durable, non-slip surface. In view of the many different surface coatings and finishes used on furniture, it is possible that the feet of the device could mark the surface they stand on.
Power cable
To guarantee safe operation, use the cable supplied. Use the following guidelines if it is necessary to replace the original cable set.
- The female/male receptacles of the cord set must meet IEC60320/CEE-22 requirements.
- The cable has to be HAR-certified or VDE-certified. The mark HAR or VDE will appear on the outer sheath.
- For devices which are mounted on a desk or table, type SVT or SJT cable sets may be used.
- The cable set must be selected according to the rated current for your device.
- If necessary, replace the original power cable with a regular grounded 3-core mains lead.
Transport
- Transport the monitor with care and only in its original packaging or another corresponding packaging fit to protect it against knocks and jolts.
- Never drop the LCD monitor (danger of glass breakage).
Cleaning
- Always pull out the power plug before you clean the monitor.
- Do not clean any interior parts yourself, leave this job to a service technician.
- Do not use any cleaning agents that contain abrasives or may corrode plastic.
- Ensure that no liquid will run into the system.
- Ensure that the ventilation areas of the monitor are free.
- The display surface of the LCD monitor is sensitive to pressure and scratches. Clean it only using a soft, slightly moistened cloth.
Wipe the monitor casing with a dry cloth. If the monitor is particularly dirty, use a cloth which has been moistened in mild domestic detergent and then carefully wrung out.
CE marking

The shipped version of this device complies with the requirements of the EC directives 2004/108/EC "Electromagnetic compatibility" and 73/23/EEC "Low voltage directive".
FCC Class B Compliance Statement
The following statement applies to the products covered in this manual, unless otherwise specified herein. The statement for other products will appear in the accompanying documentation.
NOTE:
This equipment has been tested and found to comply with the limits for a "Class B" digital device, pursuant to Part 15 of the FCC rules and meets all requirements of the Canadian Interference-Causing Equipment Standard ICES-003 for digital apparatus. These limits are designed to provide reasonable protection against harmful interference in a residential installation. This equipment generates, uses and can radiate radio frequency energy and, if not installed and used in strict accordance with the instructions, may cause harmful interference to radio communications. However, there is no guarantee that interference will not occur in a particular installation. If this equipment does cause harmful interference to radio or television reception, which can be determined by turning the equipment off and on, the user is encouraged to try to correct the interference by one or more of the following measures:
- Reorient or relocate the receiving antenna.
- Increase the separation between equipment and the receiver.
- Connect the equipment into an outlet on a circuit different from that to which the receiver is connected.
- Consult the dealer or an experienced radio/TV technician for help.
Fujitsu Siemens Computers GmbH is not responsible for any radio or television interference caused by unauthorised modifications of this equipment or the substitution or attachment of connecting cables and equipment other than those specified by Fujitsu Siemens Computers GmbH. The correction of interferences caused by such unauthorised modification, substitution or attachment will be the responsibility of the user.
Checking the contents of the consignment

The display surface of the LCD monitor is sensitive to pressure and scratches. Always hold the device by the casing!
▶ Unpack all the individual parts.
▶ Check the delivery for damage incurred during transportation.
▶ Check whether the delivery agrees with the details in the delivery note. The complete LCD monitor package includes:
- one monitor
- data cable
- one power cable
- one Warranty Booklet
– this "Getting Started" manual
Should you discover that the delivery does not correspond to the delivery note, notify your local sales outlet immediately.

We recommend that you keep the original packaging material. You may need the packaging in the future if you need to transport your device.
Connecting the monitor

Please take note of the safety information in the "Important notes" chapter.
CE conformance and optimum picture quality are guaranteed only if you use the data cable supplied.
Do not cover the ventilation openings of the monitor.
The computer power plug must be pulled out!
▶ Be sure that the monitor and the computer are switched off.
Connecting cables to the monitor
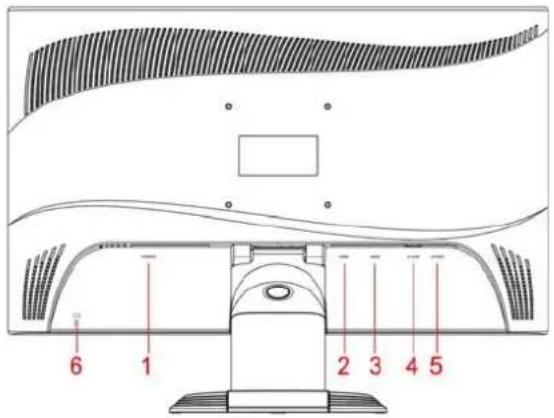
1=POWER CONNECTOR
2=HDMI1 CONNECTOR
3=HDMI2 CONNECTOR
4= D-SUB CONNECTOR
5=AUDIO CONNECTOR
6=Kensington Lock
▶ If the data cable is not firmly connected to the monitor:
Connect one of the connectors of the data cable to the D-SUB connector on the monitor and secure the plug-in connection by tightening the locking screws.
▶ Plug the power cable supplied into the power connector of the monitor.
Connecting cables to the computer
Information on the computer connections and interfaces is contained in the operating manual for your computer.

If your computer has two monitor ports ("onboard" screen controller and separate graphics card), the monitor port for the separate graphics card is usually active.
Connect the data cable to the (active) monitor port on the computer and secure the plug-in connection by tightening the safety screws.
Connect the connector of the power cable supplied into a properly earthed mains outlet and ensure a secure connection.
6 - English Edition 2
▶ Plug the power connector of the computer into a properly grounded mains outlet.

When you start working with your monitor for the first time you should install the appropriate graphics drivers for your application software. Details of how to do this are provided in the documentation on your screen controller/the associated driver software.
Operation of the monitor
Adjusting rake
The rake of the monitor can be adjusted forward and back from its vertical position.
▶ Grasp the monitor with both hands on the right and left edge of the casing and adjust it to the desired rake.
Switching the monitor on/off
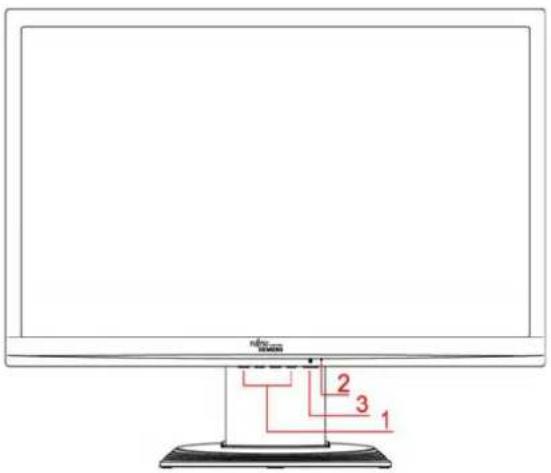
1 = Buttons for the OSD menu (On-Screen-display)
2 = Power indicator
3 = ON/OFF switch
The ON/OFF switch is used for switching the monitor on and off.
The power indicator glows green or blue when the monitor and computer are switched on. The power indicator lights up yellow when the monitor does not receive a video signal or is in the energy saving mode. The power indicator goes off when the monitor is switched off.
When you switch the computer system on, you must proceed in the following order:
▶ First switch the LCD monitor on with the ON/OFF switch.
▶ Then switch on the computer.
Troubleshooting
Should an error occur, first check the following points. If the distortion is still not eliminated, the monitor should, if possible, be checked on another computer.
If you are unable to solve the problem, please inform our help desk.
| Having this problem? Check the following points: | |
| No screen display(power indicator does not light) | ▶ Check whether the monitor is switched on.▶ Check whether the power cable on the monitor is connected correctly.▶ Check whether the computer is switched on. |
| No screen display(power indicator lights) | ▶ Check whether the computer is switched on.▶ Check whether the data cable for the monitor is correctly attached to the monitor port on the computer.▶ Press any key on the computer keyboard - the computer may be in energy saving mode.▶ Alter the brightness and/or contrast until you get a picture. |
| Message:No Video InputOrNo Signal | ▶ Check whether the data cable for the monitor is correctly attached to the monitor port on the computer.▶ Check whether the computer is switched on. |
| Message:e.g.This is 85 Hz overdrive.Change computer display input to ..... x ..... at 60 Hz.orFrequency out of rangePlease change the display mode to ...... | The input signal (horizontal frequency and refresh rate) does not correspond to the technical monitor data.▶ Adjust the video frequency range using the computer software (see documentation for your computer or your graphics card).▶ Adjust a different screen resolution using the computer software (see documentation for your computer or your screen controller). |
| Picture position not correct The monitor recognises an undefined mode. | ▶ Carry out the auto-adjustment of the monitor (with the AUTO button - if present - or via the OSD menu).▶ Set the picture position with the OSD menu. |
| Picture is shaking | ▶ Check whether the data cable for the monitor is correctly attached to the monitor port on the computer. ▶ Carry out the auto-adjustment of the monitor (with the AUTO button - if present - or via the OSD menu). |
Picture disturbances (vertical lines)  | ▶ Carry out the auto-adjustment of the monitor (with the AUTO button - if present - or via the OSD menu). |
Picture disturbances (horizontal lines, picture noise)  | ▶ Carry out the auto-adjustment of the monitor (with the AUTO button - if present - or via the OSD menu). |
| Picture too light or too dark | ▶ Carry out the auto-adjustment of the monitor (with the AUTO button - if present - or via the OSD menu). ▶ Correctly set the contrast and brightness with the OSD menu if the auto-adjustment function does not supply satisfactory results. |
Permanently unlit or lit pixels
The standard of production techniques today cannot guarantee an absolutely fault-free screen display. A few isolated constant lit or unlit pixels may be present. The maximum permitted number of pixels faults is stipulated in the stringent international standard ISO 13406-2 (Class II).
Example: A 17"/19" flat-screen monitor with a resolution of 1280 x 1024 has 1280 x 1024 = 1310720 pixels. Each pixel consists of three subpixels (red, green and blue), so there are almost 4 million subpixels (or dots) in total. According to ISO 13406-2 (Class II), a maximum of 6 pixels and 7 subpixels may be defective, i. e. a total of 25 defective dots.
A 22" wide flat-screen monitor with a resolution of 1680 x 1050 has 1680 x 1050 = 1764000 pixels. Each pixel consists of three subpixels (red, green and blue), so there are almost 5 million subpixels (or dots) in total. In accordance with ISO 13406-2 (Class II), a maximum of 8 pixels and an additional 10 subpixels may be defective.
LCD monitor
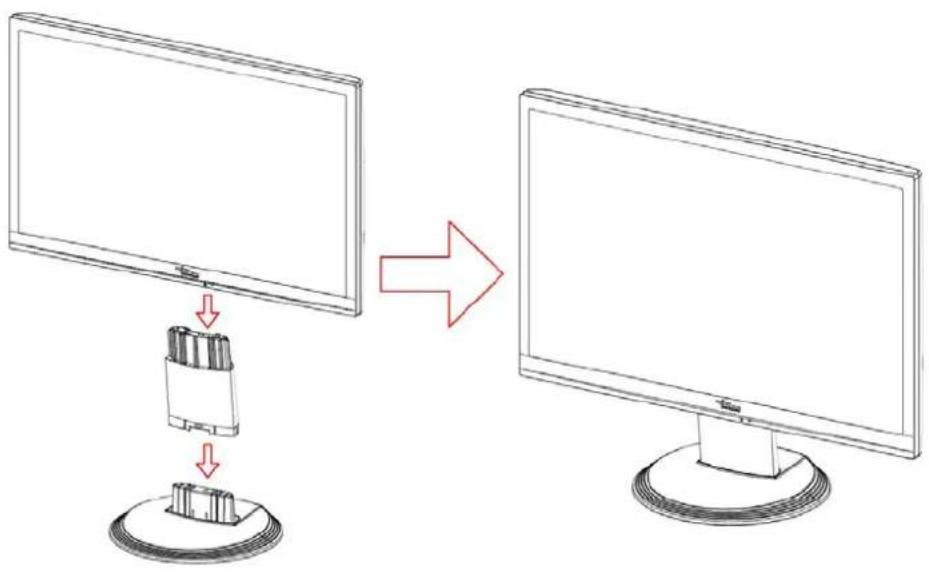
Assembling the monitor base

The display surface of the LCD monitor is sensitive to pressure and scratches. Therefore, lay the monitor on a soft surface when mounting or removing the monitor base.
Sommaire
Introduction....1
Autres informations .... 1
Remarques importantes 2
Contenido
Introducción 1
Índice
Introdução....1
3 = Interruptor ON/OFF
O interruptor on/off permite ligar e desligar o monitor.

Contenuto
Introduzione 1
Innehåll
Inledning....1
Ytterligare informationer....1
Viktigt att veta 2
▶ Schakel dan de computer in.
Udgave 2 Dansk - 9
Sisällys
Johdanto 1
Muita tietoja....1
Tärkeitä ohjeita 2
Содержание
Введение 1
Innhold
Innledning....1
1 = Taster for OSD-menyen (On-Screen-Display)
2 = Lysnettindikator
3 = PÅ-/AV-bryter
Utgave 2 Norsk - 9
Sisu
Sissejuhatus 1

Περιεχόμενα
Εισαγωγή......1

Saturs
levads 1
Spis treści
Wprowadzenie....1
1 = Przyciski menu OSD (On-Screen Display
Vsebina
Uvod 1
Druge informacije 1
Važni napotki....2
Varnostna navodila....2
Priključni kabel 3
Transport 3
Čiščenje 4
flowchart
graph TD
    A["Monitor 1"] -->|Down Arrow| B["Device with USB port"]
    B --> C["Central Device"]
Obsah
Úvod 1
flowchart
graph TD
    A["Monitor 1"] --> B["Port"]
    B --> C["Monitor 2"]
Obsah
Návod 1
Dalši informace 1
Důležité pokyny 2
Съдържание
Увод 1
Cuprins
Introducere 1
Alte informatii....1
Instructiuni importante 2
flowchart
graph TD
    A["Monitor 1"] --> B["Port"]
    B --> C["Monitor 2"]

İçindekiler
Giriş 1
Diğer bilgiler 1


المحتوى

Deutsch

The Ground Truth image displays a single, solid horizontal line. According to Rule 2 (UNDERSCORE & LINE RULES), this is a stylistic or background line, not a placeholder underscore. Therefore, the OCR result must ignore it and output nothing or only meaningful text. The provided OCR content is "____", which consists of four underscores. This is an incorrect interpretation of the line as a placeholder, violating the rule that stylistic lines must be ignored. The OCR has hallucinated underscores where none should exist based on the GT's visual context. Hence, the OCR result is inconsistent with the Ground Truth.

The Ground Truth image displays a single, solid horizontal line. According to Rule 2 (UNDERSCORE & LINE RULES), this is a stylistic or background line, not a placeholder underscore. Therefore, the OCR result must ignore it and output nothing or only meaningful text. The provided OCR content is "____", which consists of four underscores. This is an incorrect interpretation of the line as a placeholder, violating the rule that stylistic lines must be ignored. The OCR has hallucinated underscores where none should exist based on the GT's visual context. Hence, the OCR result is inconsistent with the Ground Truth.
The device may not be disposed of with household rubbish. This appliance is labelled in accordance with European Directive 2002/96/EG concerning used electrical and electronic appliances (waste electrical and electronic equipment - WEEE). The guideline determines the framework for the return and recycling of used appliances as applicable throughout the EU. To return your used device, please use the return and collection systems available to you. You will find further information on this at www.fujitsu-siemens.com/recycling
Français

The Ground Truth image displays a single, solid horizontal line. According to Rule 2 (UNDERSCORE & LINE RULES), this is a stylistic or background line, not a placeholder underscore. Therefore, the OCR result must ignore it and output nothing or only meaningful text. The provided OCR content is "____", which consists of four underscores. This is an incorrect interpretation of the line as a placeholder, violating the rule that stylistic lines must be ignored. The OCR has hallucinated underscores where none should exist based on the GT's visual context. Hence, the OCR result is inconsistent with the Ground Truth.

The Ground Truth image displays a single, solid horizontal line. According to Rule 2 (UNDERSCORE & LINE RULES), this is a stylistic or background line, not a placeholder underscore. Therefore, the OCR result must ignore it and output nothing or only meaningful text. The provided OCR content is "____", which consists of four underscores. This is an incorrect interpretation of the line as a placeholder, violating the rule that stylistic lines must be ignored. The OCR has hallucinated underscores where none should exist based on the GT's visual context. Hence, the OCR result is inconsistent with the Ground Truth.

The Ground Truth image displays a single, solid horizontal line. According to Rule 2 (UNDERSCORE & LINE RULES), this is a stylistic or background line, not a placeholder underscore. Therefore, the OCR result must ignore it and output nothing or only meaningful text. The provided OCR content is "____", which consists of four underscores. This is an incorrect interpretation of the line as a placeholder, violating the rule that stylistic lines must be ignored. The OCR has hallucinated underscores where none should exist based on the GT's visual context. Hence, the OCR result is inconsistent with the Ground Truth.

The Ground Truth image displays a single, solid horizontal line. According to Rule 2 (UNDERSCORE & LINE RULES), this is a stylistic or background line, not a placeholder underscore. Therefore, the OCR result must ignore it and output nothing or only meaningful text. The provided OCR content is "____", which consists of four underscores. This is an incorrect interpretation of the line as a placeholder, violating the rule that stylistic lines must be ignored. The OCR has hallucinated underscores where none should exist based on the GT's visual context. Hence, the OCR result is inconsistent with the Ground Truth.
This manual was produced by
Xerox Global Services
Published by
Fujitsu Siemens Computers GmbH
AG 08/07
Edition 2