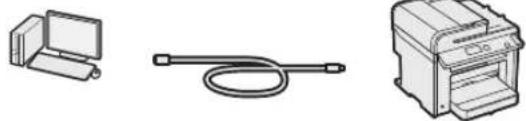
USER MANUAL iSensys MF4750 CANON
Installing the Handset (Option)
About the Supplied Manuals. 10
Navigating the Menu and Text Input
Method 10
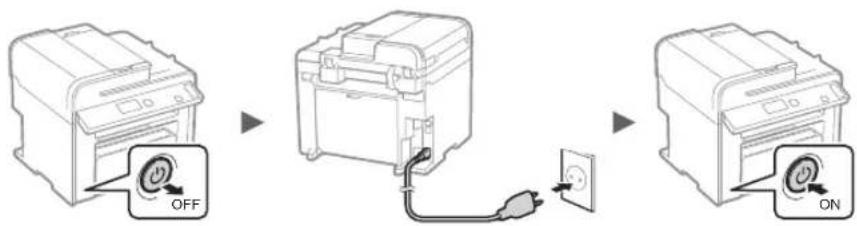
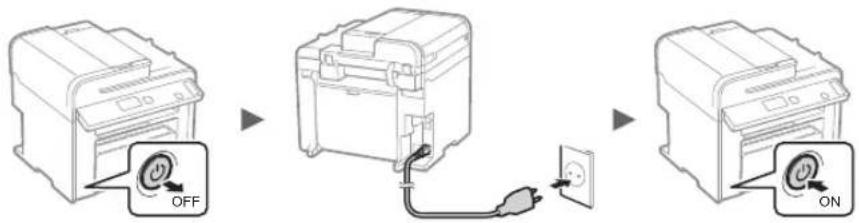
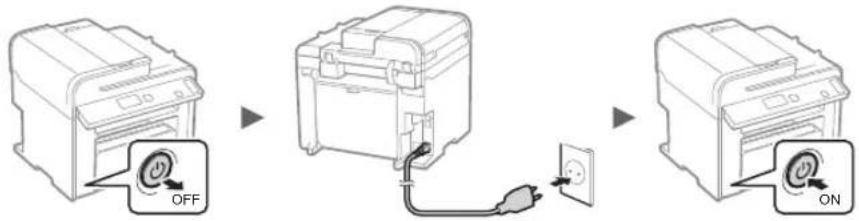
Connecting the Power Cord and
Turning ON the Power 11
Specifying the Initial Settings 11
Choosing the Method to Connect
the Machine to the Computer 12
Connecting via a Wired LAN
(MF4890dw/MF4870dn/MF4780w Only) 12
Connecting via a USB Cable. 12
Setting a Paper Size and Type 13
Specifying Initial Fax Settings and
Connecting a Telephone Cable
(MF4890dw/MF4870dn/MF4780w/MF4750 Only) 13
Perform Useful Tasks 14
Clearing Paper Jams. 15
Replacing Toner Cartridge 16
Procedures utilities 24
IopcoeHHe He Ka6JI nHTaHH
N BkIIOUeHHe annapaTa 131
Yka3aHHe HauaIbHbIX npaMeTpOB. 131
Bb6op MeToDa noHNoeHn annapata
K ROMNBIOTepy 132
TIOKIOUOHeH No npOBaHOcTeH LAN
(ToJIbKO JnI MoJeIeM F4890dw)
MF4870dn/MF4780w)
TnKUeHne c nOoBko KaBJI USB.....132
UCTAHOBKaΦOpMaTuTHa6ymarN 133
Bb6op HauaJIbHbIX npaMeTpOB paKaH
noCoeDHeHne TelefoHHoro KaBeIa
(Tonbno nla MopeJeM F4890dw/MF4870dn/
MF4780w/MF4750) 133
HcnoB3OBAHnne noIe3hIx yHKu1 134
Ta yBIMHHH H XHBHeHH 141
BcTaHOBJeHHNoaTkoBnNnapameTpib.....141
Bn6ip cnocoby ndnHouenna anapata
doKOMn'KoTepa 142
PiiknoueHHape3 ApoToBy LAN
BbBeKdaHe Ha TeKCT 250
Cbpb3BaHe Ha 3axpaHbuaaKa6eI N
BHKIOUBAHE Ha 3axpaHbAHeTo 251
Yka3BaHe Ha nbpBOHaayaHnHTe
HacTpoNk 251
1360pHaMeToa3aCbbp3BaHeHaMaunHata
KbM KOMNIOTp 252
Cbpb3BaHe ype3 LAN ha6eJ
(camo 3a MF4890dw/MF4870dn/MF4780w) 252
Cbpb3BaHe ype3 USB ka6e1 252
3aabaHe Ha foPMaTa n Tnna
Ha xaptna 253
Yka3BaHe Ha nbpBOHaayaHnTe HAcTpoKHa
fKaCa N CbBp3BaHe Ha TeIefoHcKabeJ
(camo 3a MF4890dw/MF4870dn/MF4780w/MF4750)...253
H3nblHeHHe Ha nOle3Hn 3a4a..254
OTcpaHbAHe Ha 3aceDHaIaTa xapTna ....255
PoiMaHa Ha ToHep Kaceta 256
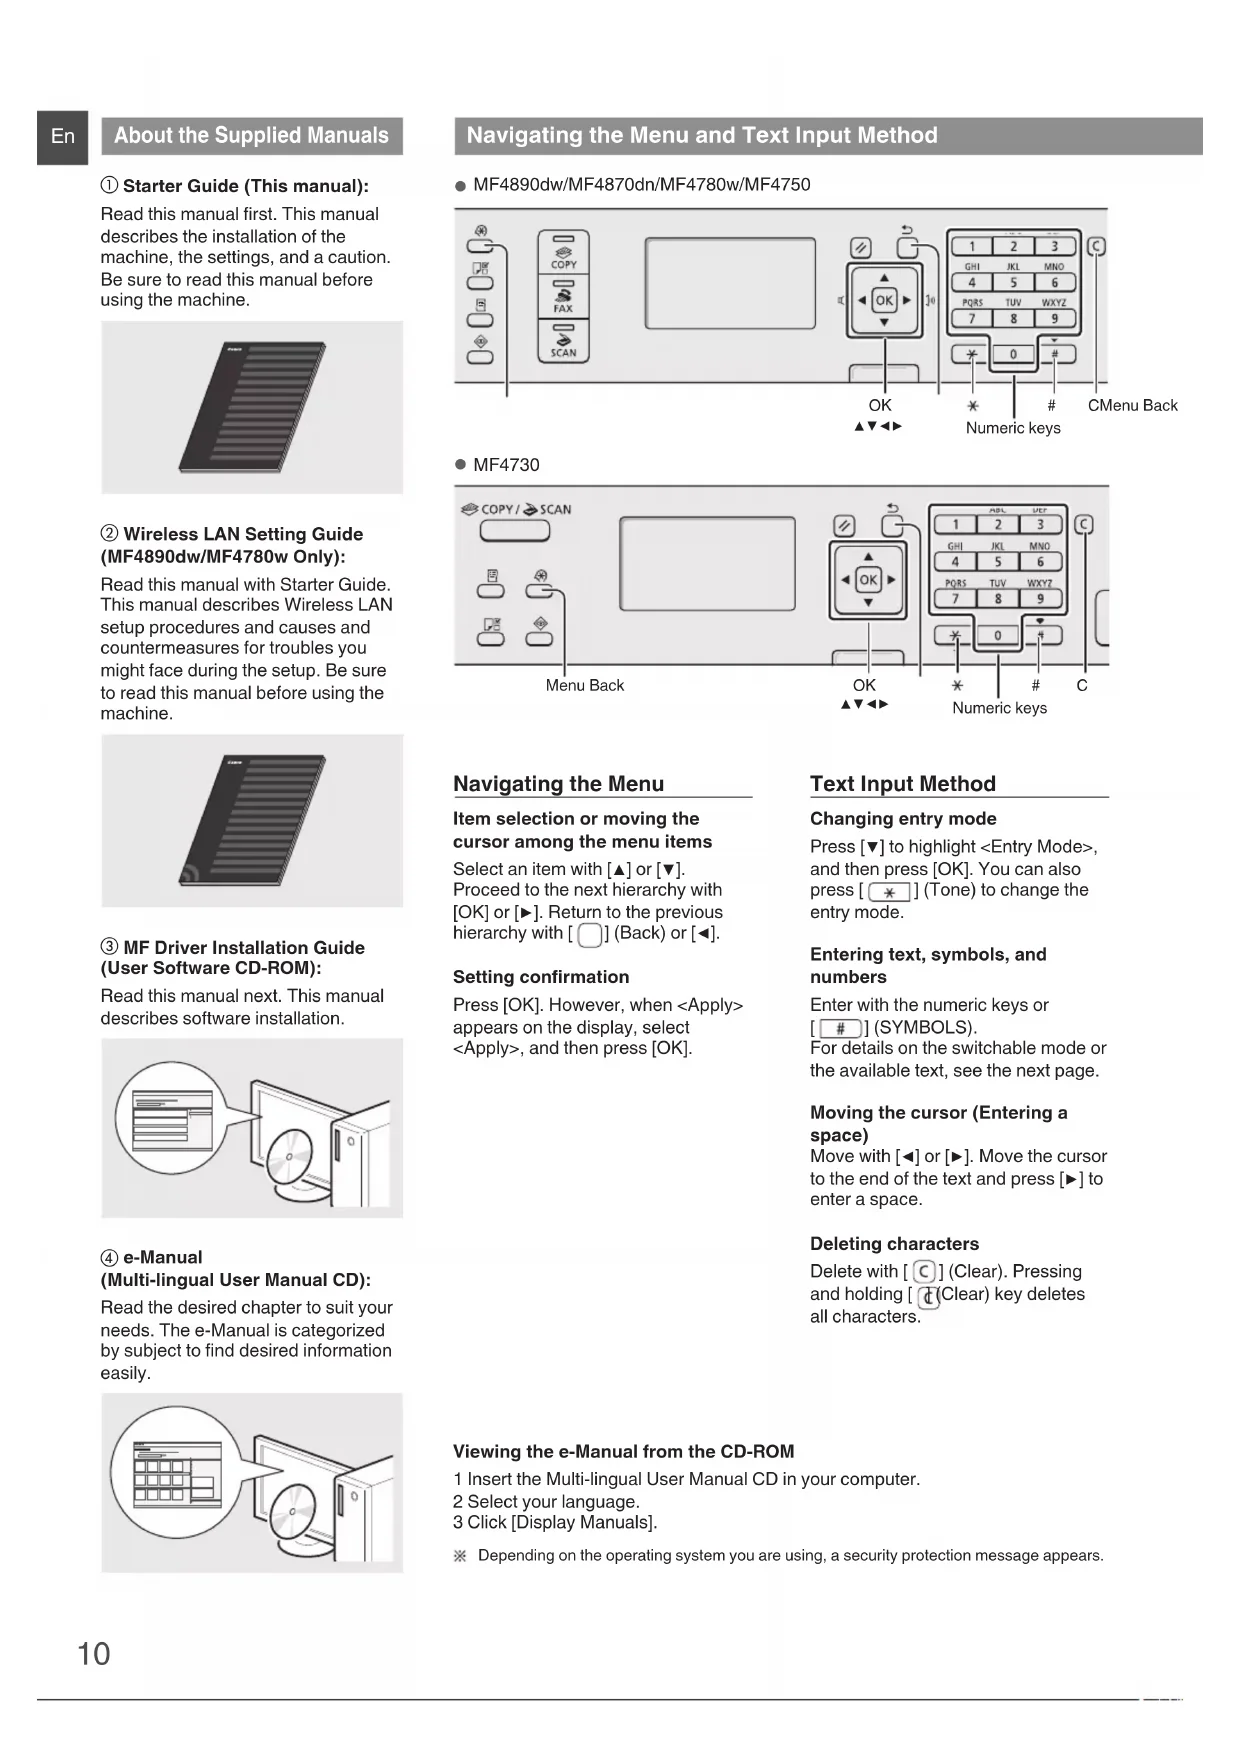
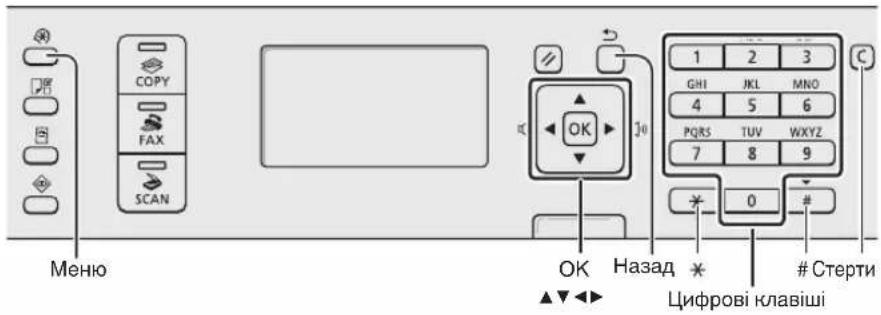
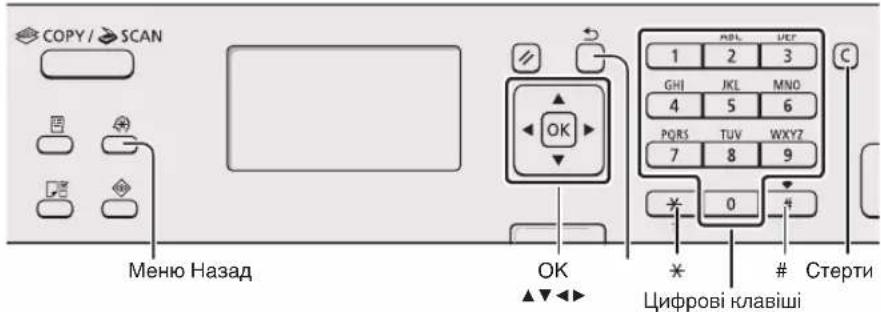
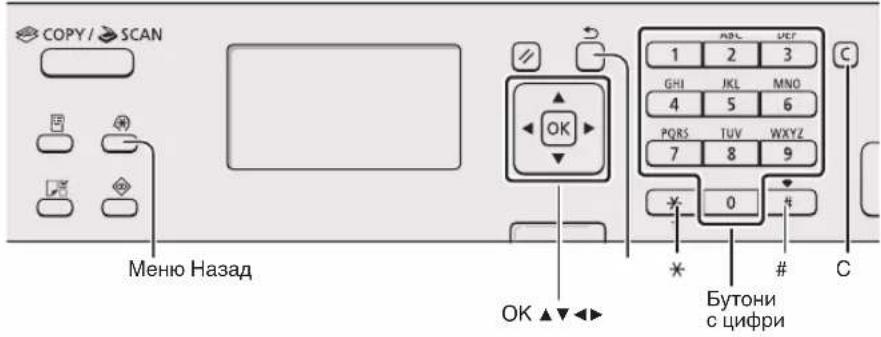
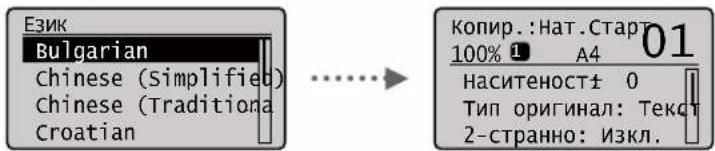
Navigating the Menu and Text Input Method
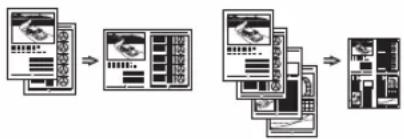
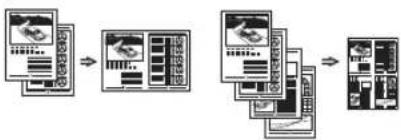
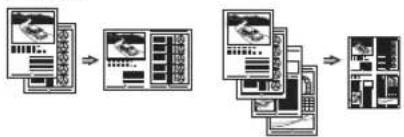
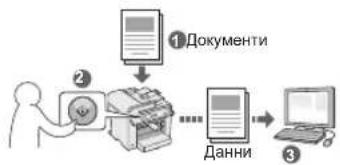
① Starter Guide (This manual): Read this manual first. This manual describes the installation of the machine, the settings, and a caution. Be sure to read this manual before using the machine.
② Wireless LAN Setting Guide (MF4890dw/MF4780w Only):
Read this manual with Starter Guide. This manual describes Wireless LAN setup procedures and causes and countermeasures for troubles you might face during the setup. Be sure to read this manual before using the machine.
③ MF Driver Installation Guide (User Software CD-ROM):
Read this manual next. This manual describes software installation.
④ e-Manual (Multi-lingual User Manual CD):
Read the desired chapter to suit your needs. The e-Manual is categorized by subject to find desired information easily.
MF4890dw/MF4870dn/MF4780w/MF4750
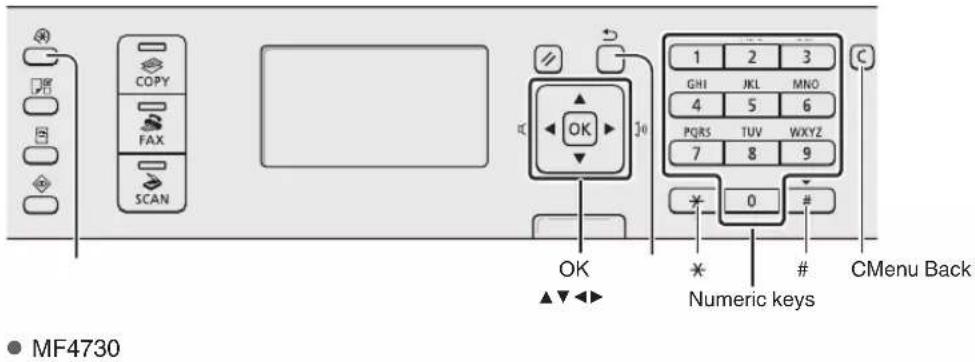
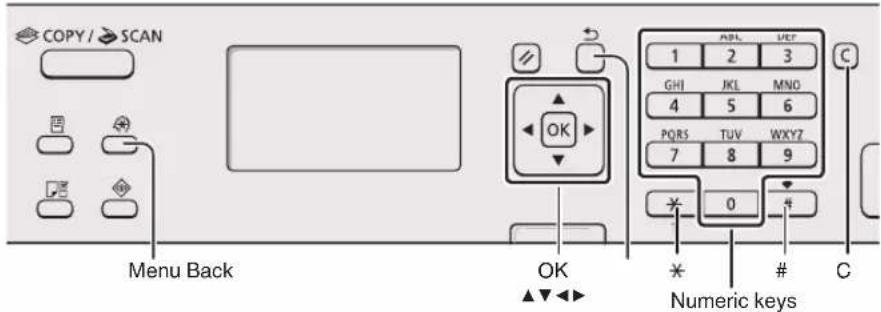
Item selection or moving the cursor among the menu items
Select an item with [▲] or [▼]. Proceed to the next hierarchy with [OK] or [▶]. Return to the previous hierarchy with [Back) or [
Setting confirmation
Press [OK]. However, when appears on the display, select , and then press [OK].
Text Input Method
Changing entry mode
Press [▼] to highlight , and then press [OK]. You can also press [ * ] (Tone) to change the entry mode.
Entering text, symbols, and numbers
Enter with the numeric keys on [#] (SYMBOLS).
For details on the switchable mode or the available text, see the next page.
Moving the cursor (Entering a space)
Move with [<] or [>. Move the cursor to the end of the text and press [>] to enter a space.
Deleting characters
Delete with [C] (Clear). Pressing and holding [C] (Clear) key deletes all characters.
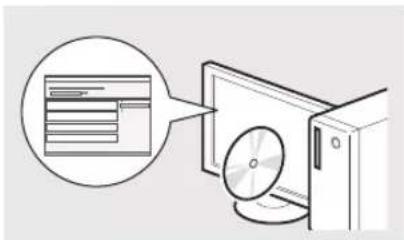
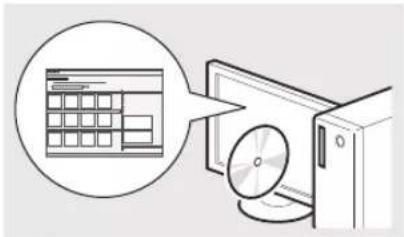
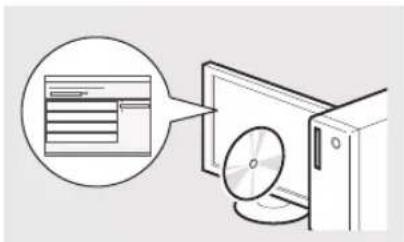
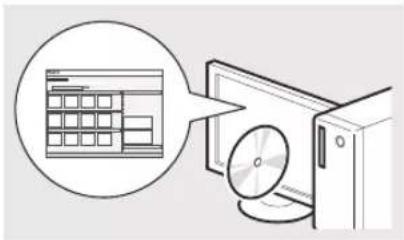
Viewing the e-Manual from the CD-ROM
1 Insert the Multi-lingual User Manual CD in your computer.
2 Select your language.
3 Click [Display Manuals].
Depending on the operating system you are using, a security protection message appears.
Entering text, symbols, and numbers
| Entry mode: <aA> | Entry mode: <12> |
| 1 | @ . - / 1 | |
| 2 | ABCabc 2 | |
| 3 | DEFdef 3 | |
| 4 | GHligi 4 | |
| 5 | JKLijkl 5 | |
| 6 | MNOmno 6 | |
| 7 | PQRSpqrs 7 | |
| 8 | TUVtuv 8 | |
| 9 | WXYZwxyz 9 | |
| 0 | (Not available) 0 | |
| # | @ ./- !? & $ %
#() []{}<> "+
= " ; ' ' ' ' ' |' | (Not available) |
Changing entry mode
| Entry mode Available text |
| <aA> | Alphabet (capital and small letters) and symbols |
| <12> Numbers |
Do not connect the USB cable at this time. Connect it when installing software.
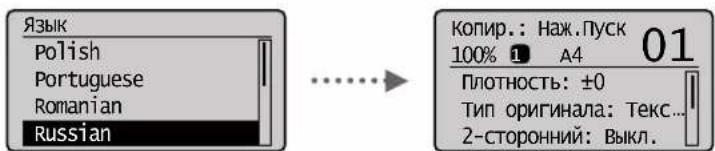
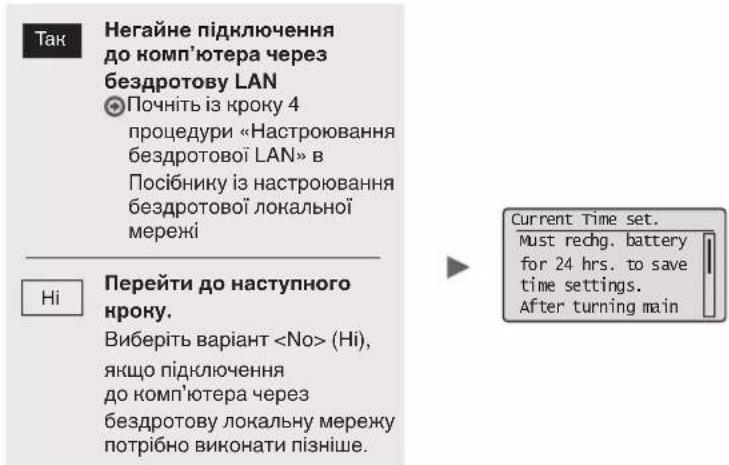
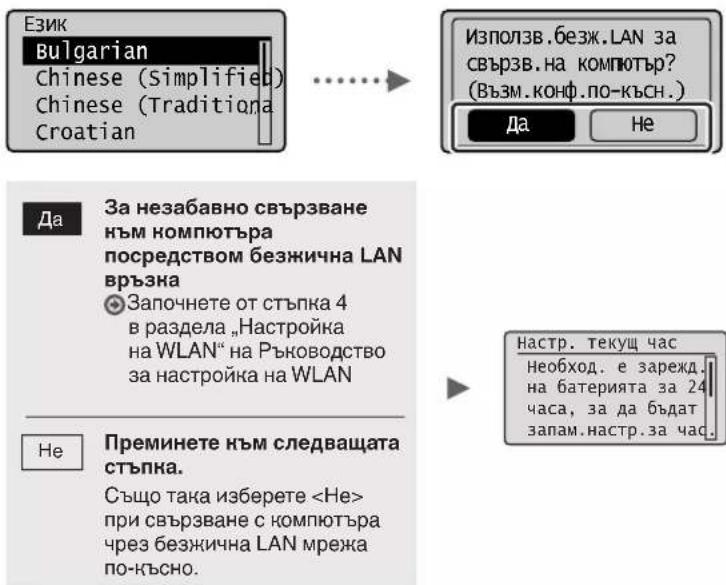
Specifying the Initial Settings
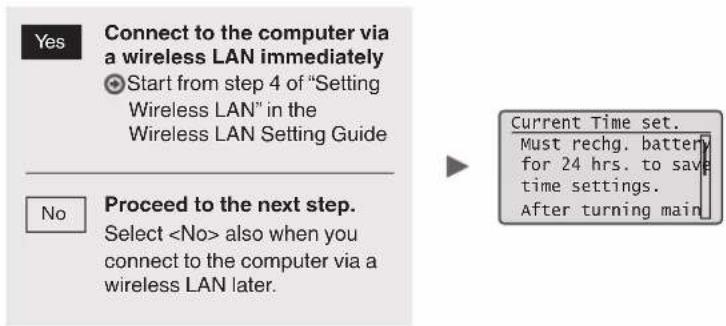
Follow the instructions on the screen, set the language and time. For details on navigating the menu and how to input the numbers, see "Navigating the Menu and Text Input Method" (P.10).
MF4890dw/MAF4780w

- Connect to the computer via a wired LAN
Proceed to "Connecting via a Wired LAN (MF4890dw/MF4870dn/MF4780w Only)" (P.12).
- Connect to the computer via a USB cable
Proceed to "Connecting via a USB Cable" (P.12).
Proceed to "Specifying Initial Fax Settings and Connecting a Telephone Cable (MF4890dw/MF4870dn/MF4780w/MF4750 Only)" (P.13).
MF4870dn/MF4750/MF4730

En
Choosing the Method to Connect the Machine to the Computer
- Connecting via a Wired LAN
(MF4890dw/MF4870dn/MF4780w Only)
See "Connecting via a Wired LAN"
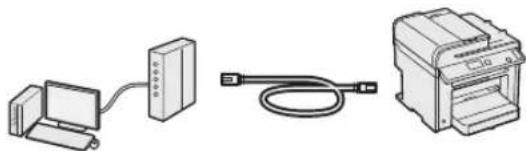
You can connect the machine to the computer through a wired router. Use the LAN cables to connect the machine to the wired router (access point).
※ Make sure that there is an available port in the router to connect the machine and the computer.
Have a LAN Cable of Category 5 twisted-pair cable or higher ready.
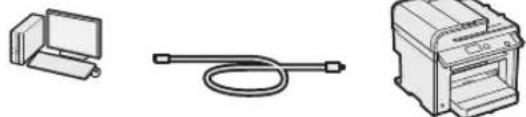
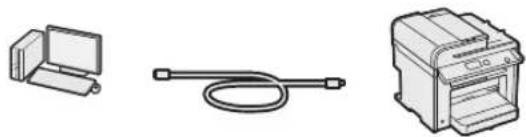
- Connecting via a USB cable
See "Connecting via a USB Cable"
You can connect the machine to the computer using a USB cable.
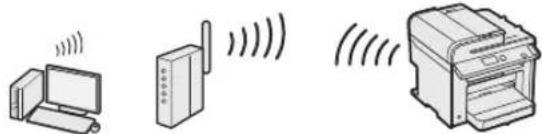
- Connection via a Wireless LAN (MF4890dw/MF4780w Only)
See the Wireless LAN Setting Guide.
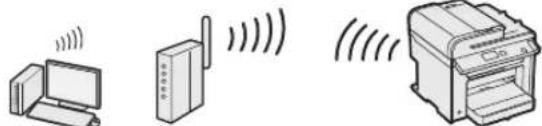
You can connect the machine to the computer through a wireless router*. Since it is connected to wireless, no LAN cables are needed.
- A wireless router (or access point), which supports IEEE802.11b/g/n, is required.
If you do not sure whether your router is wireless or wired:
See the instruction manual provided with your network device, or contact the manufacturer.
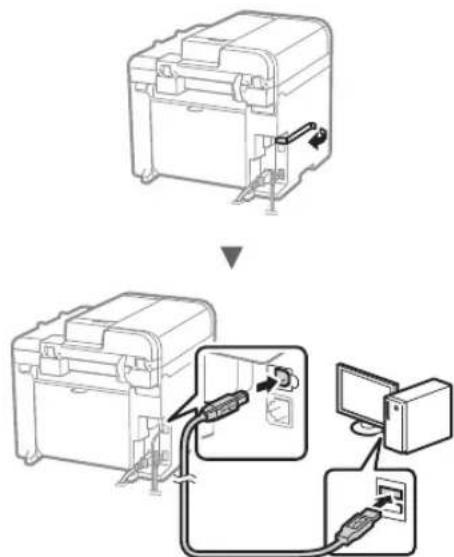
Connecting via a Wired LAN (MF4890dw/MF4870dn/MF4780w Only)
1 Connect the LAN cable.
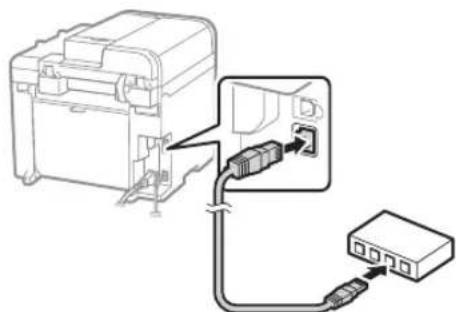
The IP address will be automatically configured in 2 minutes. If you want to set the IP address manually, see the following items.
e-Manual "Network Settings" "Basic Network Settings" "Setting the IP Address"
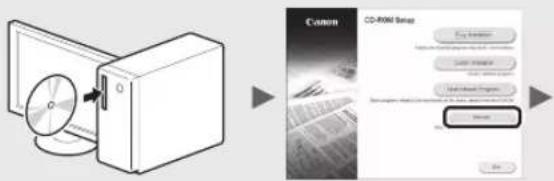
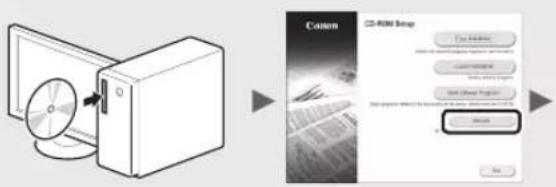
2 Install the driver and software using the User Software CD-ROM.
Proceed to "Setting a Paper Size and Type" (P.13).
Connecting via a USB Cable
Connect the USB cable after installing the MF Drivers and the MF Toolbox.
1 Install the driver and software using the User Software CD-ROM.
2 Connect the USB cable.

Proceed to "Setting a Paper Size and Type" (P.13).
For details on the installation procedures:

See the MF Driver Installation Guide

- We ask for the user's cooperation for the Product Extended Survey Program. For details, see the descriptions on the screen.
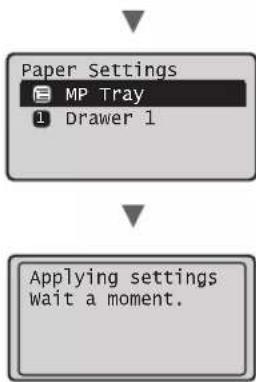
Setting a Paper Size and Type
Follow the instructions on the screen, set the paper size and type.
MF4890dw/MF4870dn/ MF4780w/MF4750
MF4730
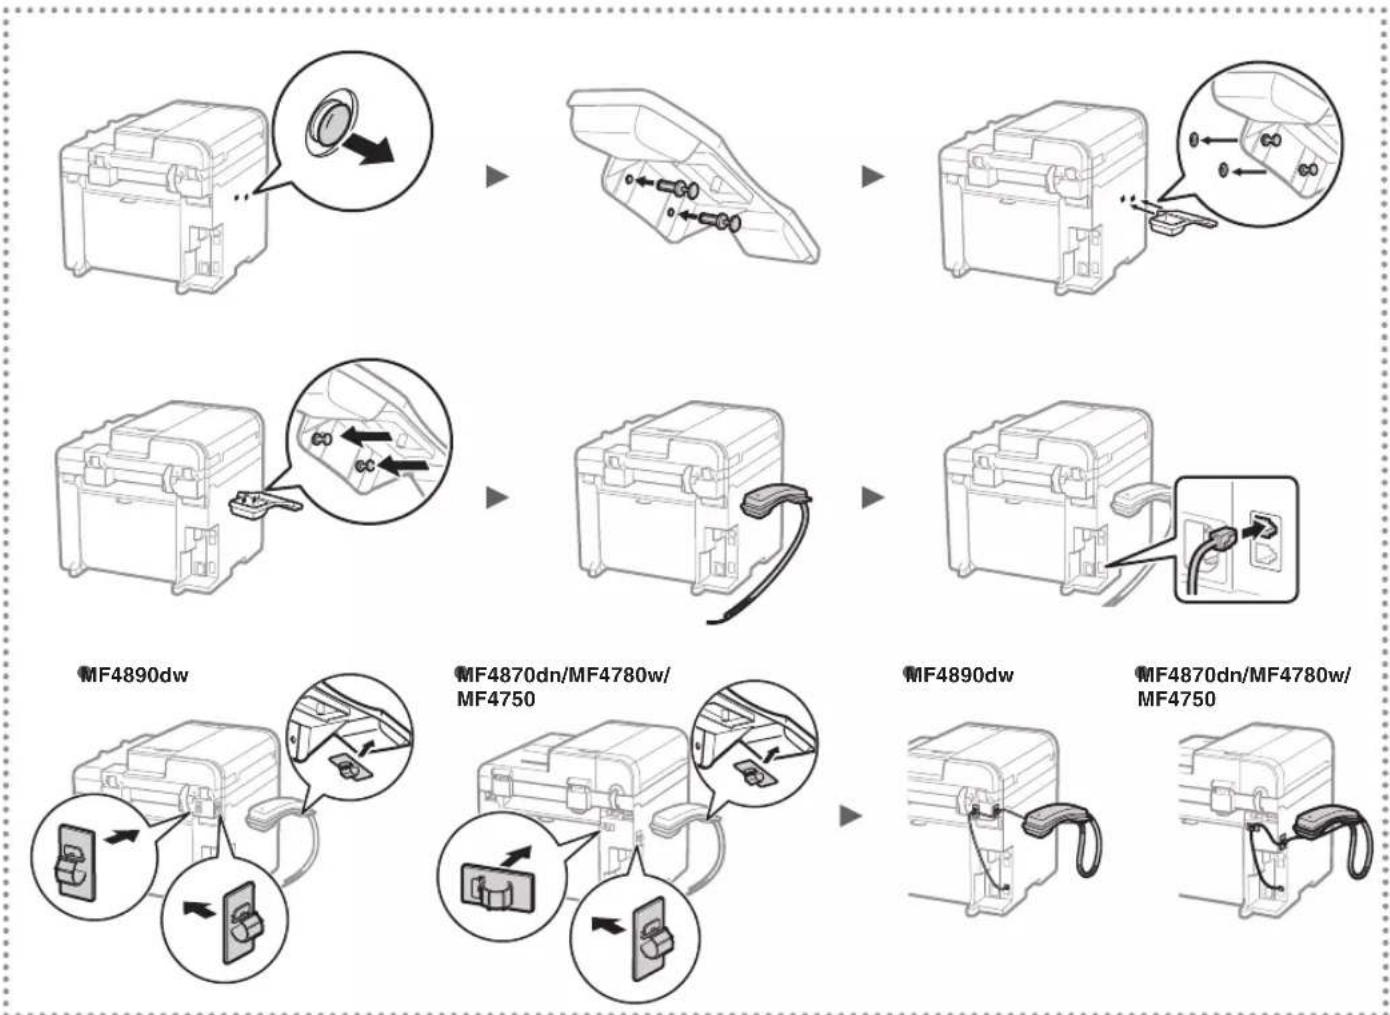
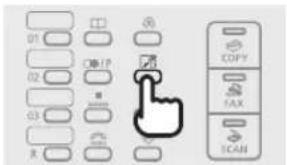
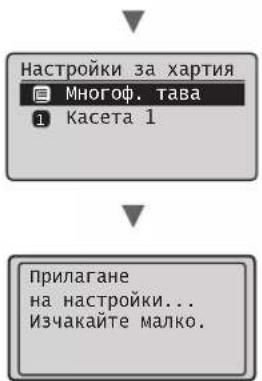
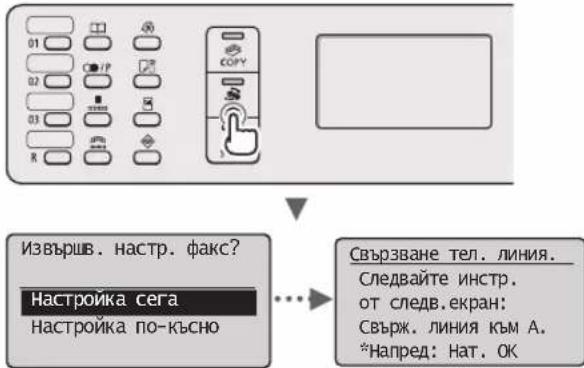
Specifying Initial Fax Settings and Connecting a Telephone Cable (MF4890dw/MF4870dn/MF4780w/MF4750 Only)
1 Specify the initial fax settings.
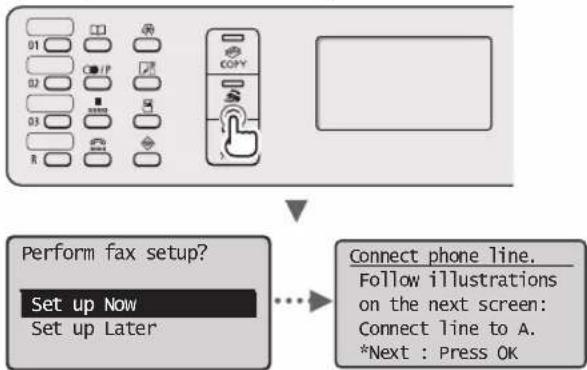
Follow the "Fax Setup Guide" to specify a fax number, a unit name, and a receive mode. For more details on the receive mode, see the e-Manual.
e-Manual "Fax" "Using the Fax Functions" Receiving Faxes" RX Mode
How to use a username
When you send a document, the sender information that you registered is printed on the recipient's paper.
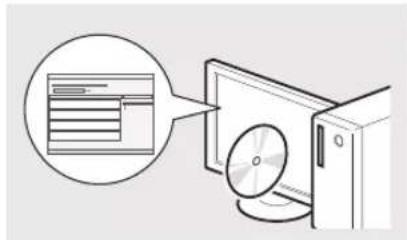
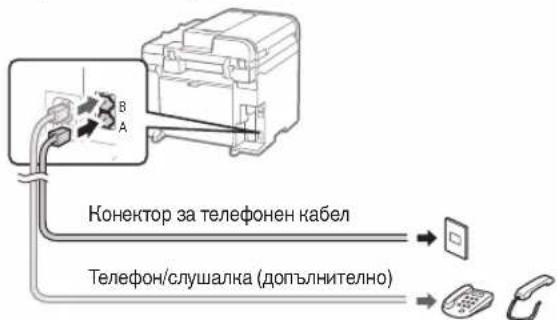
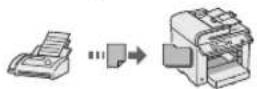
2 Connect a telephone cable.
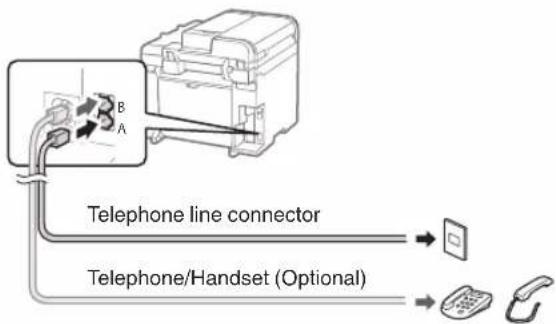
When appears on the display, connect the telephone cable by referring to the illustration.
When installing the optional handset:
For more details, see the supplied manual with the handset.
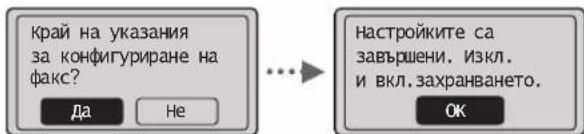
3 Exit the Fax Setup Guide, and then restart the machine.
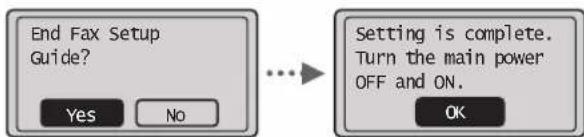
Turn OFF the machine and wait for at least 10 seconds before turning it ON again. The telephone line types are not detected automatically. See the e-Manual and set a telephone line manually.
e-Manual "Fax" "Using the Fax Functions" Changing Fax Settings (Settings that Can Be Specified Using the [Menu] Button) "Configuring Send Settings" "Select Line Type
You can use various functions in this machine. Following functions are the overview of the main functions that you can use routinely.
Copy
Enlarged/Reduced Copies
You can enlarge or reduce standard size documents to copy on standard size paper or specify the copy ratio in percentage.
2-Sided Copying*
You can copy 1-sided documents on both sides of paper.
Collating
You can sort copies into sets arranged in page order.
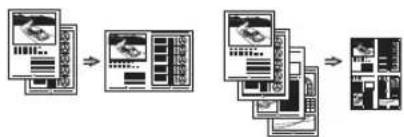
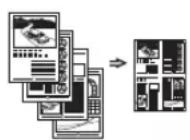
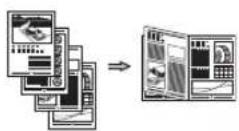
Reduced Layout
You can reduce multiple documents to copy them onto one sheet.
2 on 14 on 1
Copying ID Card
You can make a copy of a 2-sided card onto one side of paper.
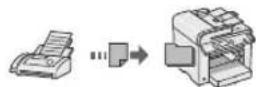
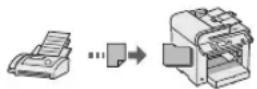
Fax**
Sending a Document Directly from a Computer (PC Fax)
In addition to the normal sending and receiving taxes, you can use the PC fax.
Sending
You can register fax destinations in the address book. You can specify the destinations using various methods, enabling you to send documents quickly and easily.
- Destination search
One-touch keys
Coded dialing
- Destination Group
- Specifying from the sending history
- Sequential broadcast
- Delayed sending
Receiving
- Receiving in the memory
You can store the received documents in the memory. You can print the stored documents at any time, and if you do not need them, you can delete them.
Remote Receiving
If an external telephone is connected, you can switch to the fax receiving mode immediately by dialing the ID number for fax receiving using the dial buttons of the telephone during a phone call.
- Polling Receiving
You can retrieve pre-loaded documents from a sender's fax machine when you want to receive the fax.
Print
Enlarged/Reduced Printing
2-Sided Printing*
Reduced Layout
You can reduce multiple documents to print them onto one sheet.
2 on 14 on 1
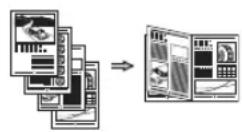
Booklet Printing*

Poster Printing
Watermark Printing
Displaying a Preview before
Printing
Selecting a "Profile"
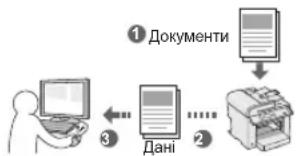
Scan
Saving the Documents Using the Operation Panel of the Machine
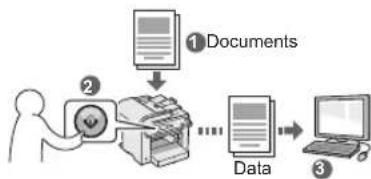
Saving the Documents Using Operations from a Computer
- Scanning with the MF Toolbox

- Scanning from an Application
- Scanning with the WIA Driver***
Network Settings\*\*\*
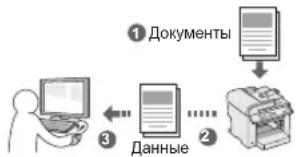
This machine comes equipped with a network interface that you can construct a network environment easily. You can print a document, use the PC fax, and use the network scan from all computers which are connected with the machine. The machine supports to increase work efficiency as a shared machine in the office.
Remote UI\*\*\*
You can understand the condition of the machine from the computers on the network. You can access the machine and manage jobs or specify various settings via network.
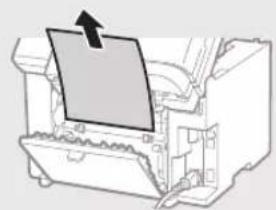
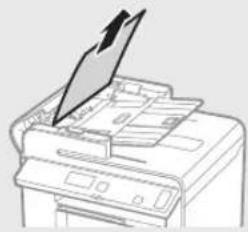
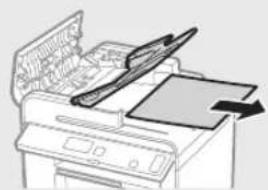
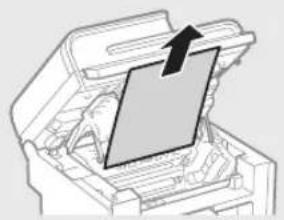
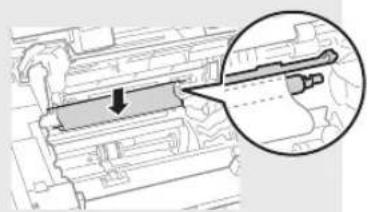
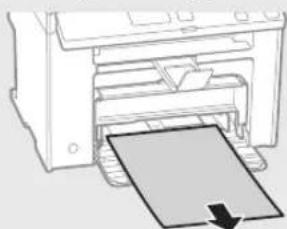
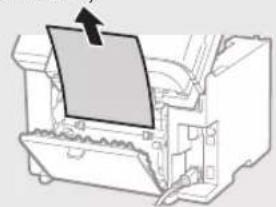
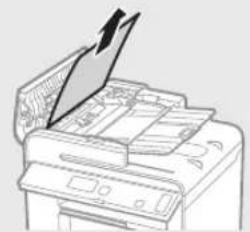
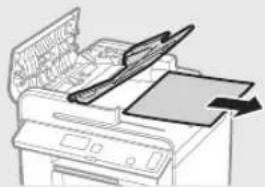
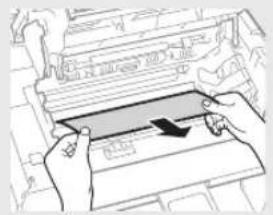
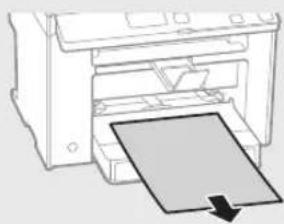
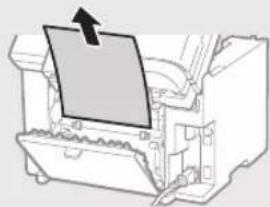
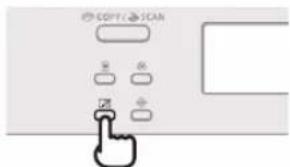
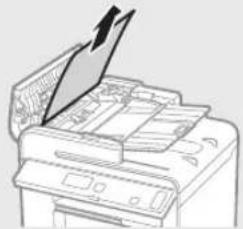
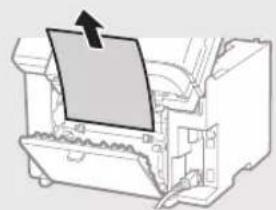
Clearing Paper Jams
En
If the following screen appears, a paper jam has occurred in the feeder or inside the machine. Follow the procedure displayed on the screen to remove the jammed document or paper. This manual indicates only areas where paper jams occur. For details on each function, see the e-Manual.
Paper jam.
Press [ ] to
display steps.
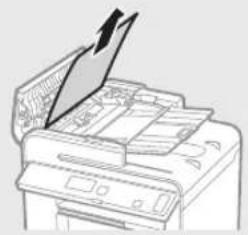
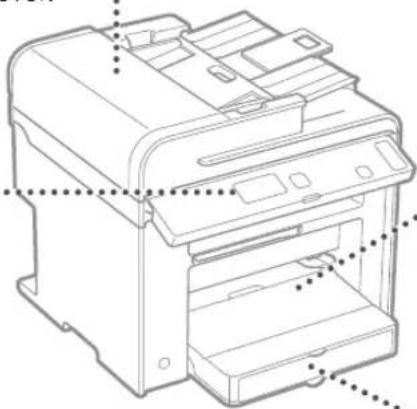
Feeder
MF4890dw


MF4870dn/MF4780w/MF4750/MF4730
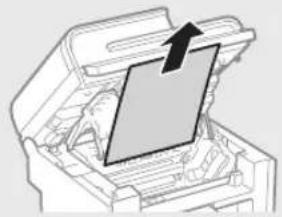
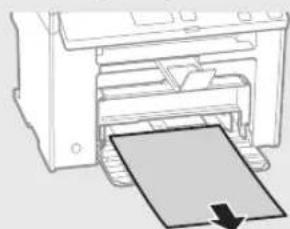
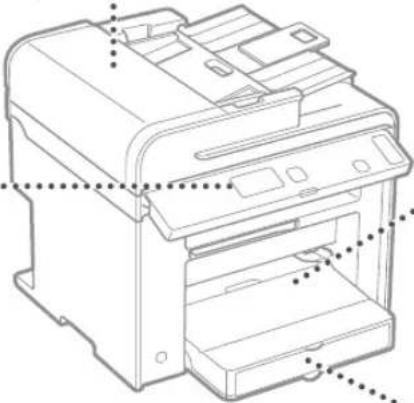
Inside the machine Multi-purpose tray


Paper Cassette
Back cover
(MF4890dw/MF4870dn only)
Toner cartridges are consumables. When the toner becomes nearly empty or has run out completely in the middle of a job run, a message appears on the screen, or the following problems may occur. Take the appropriate action accordingly.
When a Message Appears
When the toner becomes nearly empty in the middle of a job run, a message appears on the screen.
| Message | When the message is displayed on the screen | Description and Solutions |
| <Prepare toner cartridge.> | When the toner cartridge needs a replacement soon. | Shake the toner cartridge to evenly distribute the toner inside the cartridge.
e-Manual "Before Replacing the Toner Cartridge"
We recommend that the toner cartridge be replaced before printing high-volume documents.
e-Manual "Replacing the Toner Cartridge" |
| <Toner is nearly out.> | When the toner cartridge has reached the end of its life. | Shake the toner cartridge to evenly distribute the toner inside the cartridge.
e-Manual "Before Replacing the Toner Cartridge"
If this message does not disappear, replace the toner cartridge.
e-Manual "Replacing the Toner Cartridge"
If this message is displayed, the incoming fax will be stored in the memory without being printed. Also, reports may not be printed, even if they are set to be printed automatically.
If <Continue Print. When Toner Is Nearly Out> in <RX Print Settings> is set to <On>, however, printing will be continued, but white streaks or smudges may appear on printouts.
e-Manual "Printing the Report Automatically"
e-Manual "Continue Print. When Toner Is Nearly Out" |
When white streaks appear on the output, or the output is partially faded:
When white streaks appear on the output or the output is partially faded, the toner cartridge has almost reached the end of its life, even if no message appears on the screen. When the print quality becomes unacceptable, see the following to fix the problem.
When White Streaks Appear on the Output or the Output Is Partially Faded
When the toner nearly runs out, white streaks appear on the output, or the output is partially faded.


No message appears on the screen, if the toner nearly runs out. Replace the toner cartridge when white streaks appear on the output, or the output is partially faded.
When this problem occurs:
Follow the steps in the procedure below before replacing the toner cartridge. The machine continues printing until the toner runs out completely.
e-Manual "Before Replacing the Toner Cartridge"
When the print quality is still unacceptable:
If the problem persists after you have followed the steps in the procedure below, replace the toner cartridge.
e-Manual "Replacing the Toner Cartridge"
Memo

En
En
Symbols Used in This Manual

WARNING
Indicates a warning concerning operations that may lead to death or injury to persons if not performed correctly. To use the machine safely, always pay attention to these warnings.

CAUTION
Indicates a caution concerning operations that may lead to injury to persons if not performed correctly. To use the machine safely, always pay attention to these cautions.
The following symbols and key names are a few examples of how keys to be pressed are expressed in this manual.
Operation panel keys: [Key icon] + (Key name) Example: [O] (Stop)
- Display:
- Buttons and items on the computer display: [Preferences]
Illustrations and Displays Used in This Manual
Illustrations and displays used in this manual are which of MF4890dw unless specified.

WARNING
To avoid the risk of personal injury or damage to the equipment and for legal information, read the Legal Notice and Important Safety Information in Multi-lingual User Manual CD that is included with the product.
Important Safety Instructions
Please read the "Important Safety Instructions" in this manual and in the e-Manual thoroughly before operating the machine.
As these instructions are intended to prevent injury to the user and other persons or to prevent destruction of property, always pay attention to these instructions and operational requirements.
Please note that you are responsible for all damages caused by failure to follow the directions provided herein, using the device for any purpose for which it was not intended, or repairs or alterations made by anyone other than a Canon-approved technician.
Installation

WARNING
- Do not install the machine near flammable substances such as alcohol-based products or paint thinners. If these substances come in contact to the electrical parts inside the machine could ignite these substances and cause a fire or increase your risk of electric shock.
- Do not place necklaces and other metal objects or containers filled with liquid on the machine. If foreign substances come into contact with electrical parts inside the machine, this may result in a fire or electrical shock.
If any of these substances falls into the machine, turn off the power to the machine immediately and contact your local Canon dealer.
- Do not use near any medical equipment. Radio wave emitted from this machine may interfere with medical equipments, which may result in serious accidents.

CAUTION
- Do not install the machine in the following locations. Doing so may result in personal injury, fire or electrical shock.
Unstable location
- A location subject to excessive vibrations
- A location where block the ventilation slots (too close to walls, bed, shaggy rug, and other similar objects)
A damp or dusty location
-
A location exposed to direct sunlight or an outside place
A location subject to high temperatures
A location near open flames
A location with poor ventilation system
-
Although ozone is generated from the machine during operation, it does not have any affect on the human body. However, if you intend to use the machine for long periods of time, ensure that the installation location is well ventilated.
- Do not connect unapproved cables to this machine. Doing so may result in a fire or an electric shock.
- Machines with a hard disk may not operate properly when used at high altitudes of about 3,000 meters above sea level, or higher.
Power Supply

WARNING
- Do not use power cords other than the one provided, as this can result in a fire or electrical shock.
- Do not modify or bend the power cord and do not pull on it with great force. Do not place heavy objects on the power cord. Damaging the power cord may result in a fire or an electric shock.
- Do not plug or unplug the power plug with wet hands, as this can result in electrical shock.
- Do not use extension cords or multi-plug power strips with this machine. Doing so may result in a fire or electric shock.
- Do not bundle up or tie up the power cord in a knot, as this can result in a fire or electrical shock.
- Insert the power plug completely into the AC power outlet. Failure to do so can result in a fire or electrical shock.
- Remove the power plug completely from the power outlet during a thunder storm. Failure to do may result in a fire, electric shock, or malfunction.

CAUTION
- Use only a power supply that meets the voltage requirements listed herein. Failure to do so may result in a fire or electric shock.
- Do not obstruct the power outlet where this machine is connected, so that you can unplug the power cord easily in an emergency.
Handling

WARNING
- Do not disassemble or modify the machine. There are high-temperature and high-voltage components inside the machine which may result in a fire or electrical shock.
- Do not allow children to touch or play with the power cord and cables or internal or electrical parts. Doing so may result in serious personal injury.
- Please contact an authorized Canon dealer if the machine makes an unusual noise, emits an unusual smell, or emits smoke or excessive heat. Continued use may result in a fire or electric shock.
- Do not use flammable sprays near the machine. If flammable substances come into contact with electrical parts inside the machine, this may result in a fire or electric shock.

CAUTION
- For your safety, please unplug the power cord if the machine will not be used for a long period of time.
- Use caution when opening and closing covers to avoid injury to your hands.
- Keep hands and clothing away from the rollers in the output area. If the rollers catch your hands or clothing, this may result in personal injury.
- The inside of the machine and the output slot is very hot during and immediately after use. Avoid contact with these areas to prevent burns. Also, printed paper may be hot immediately after being output, so use caution when handling it. Failure to do so may result in burns.
Maintenance and Inspections

WARNING
- Turn off the machine and unplug the power cord from the outlet before cleaning. Failure to do so may result in a fire or an electric shock.
- Unplug the power plug from the power outlet periodically and clean the area around the base of the power plug's metal pins and the power outlet with a dry cloth to remove dust and grime. When damp, accumulated dust may cause short circuiting or fires.
- Use a damp, well wrung-out cloth to clean the machine. Dampen cleaning cloths with water only. Do not use alcohol, benzenes, paint thinkers, or other flammable substances. If these substances come into contact with electrical parts inside the machine, this may result in a fire or electric shock.
- Check the power cord and plug regularly for damage. Check the machine for rust, dents, scratches, cracks, or excessive heat generation. Use of poorly-maintained equipment may result in a fire or electric shock.
Consumables

WARNING
- Do not dispose of used toner cartridges in open flames. This may cause an ignition, and result in burns or fire.
- If you accidentally spill or scatter toner, carefully wipe up the loose toner with a damp, soft cloth and avoid inhaling any toner dust. Never use a vacuum cleaner to clean up loose toner. Doing so may cause a malfunction in the vacuum cleaner or result in a dust explosion due to static discharge.

CAUTION
- Keep the toner cartridges and other consumables out of the reach of small children. If toner is ingested, consult a physician or poison control center immediately.
- Do not attempt to disassemble the toner cartridge. The toner may scatter and get into your eyes or mouth. If toner gets into your eyes or mouth, wash them immediately with cold water and consult a physician.
- If toner spills from the toner cartridge, avoid inhaling it or allowing it to come into contact with your skin. If the toner comes into contact with your skin, wash immediately with soap. If you inhale the toner or your skin becomes irritated due to contact with the toner, consult a physician or poison control center immediately.
Others

WARNING
- If you are using a cardiac pacemaker: This machine generates a low level magnetic field. If you feel any abnormalities in your body while using this machine, please move away from the machine and consult your physician immediately.
Legal Notices
En
Legal Limitations on Usage of Your Product and the Use of Images
Using your product to scan, print or otherwise reproduce certain documents, and the use of such images as scanned, printed or otherwise reproduced by your product, may be prohibited by law and may result in criminal and/or civil liability. A non-exhaustive list of these documents is set forth below. This list is intended to be a guide only. If you are uncertain about the legality of using your product to scan, print or otherwise reproduce any particular document, and/or of the use of the images scanned, printed or otherwise reproduced, you should consult in advance with your legal advisor for guidance.
- Paper Money
-Traveler's Checks
Money Orders
Food Stamps
Certificates of Deposit
Passports
Postage Stamps (canceled or uncanceled)
- Immigration Papers
- Identifying Badges or Insignias
- Internal Revenue Stamps (canceled or uncanceled)
- Selective Service or Draft Papers
Bonds or Other Certificates of Indebtedness
- Checks or Drafts Issued by Governmental Agencies
Stock Certificates
Motor Vehicle Licenses and Certificates of Title
Copyrighted Works/Works of Art without Permission of Copyright Owner
Considerable effort has been made to make sure that the manuals for the machine are free of inaccuracies and omissions. However, as we are constantly improving our products if you need an exact specification, please contact Canon.
CLASS 1 LASER PRODUCT
LASER KLASSE 1
APPAREL A LASER DE CLASSE 1
APPARECCHIO LASER DI CLASSE 1
PRODUCTO LÁSER DE CLASE 1
APARELHO A LASER DE CLASSE 1
LUOKAN 1 LASER-TUOTE
LASERPRODUKT KCLASS 1
Euvtnpnon kal eithewnpnoeic
IPOEIAOIOIHEN
Anevpyoioane Tn oukeun kai byale To kaawdoe uato aTo npia npotou kaapoe Tn oukeun. SeavitBETn nepiTTwn, mnpel va npokanbei npkayia n aeKtponlEia.
Na anouvse to fic tou kalwlou peuatoa ano th npia peuatoac e TAKtika xovika siaotnata kai va kathetapeTnv Tepoxnyupawnt nbaon tuwetaikw akidow tou fic tou kalwiou peuatoc kai ntpia peuatoe eva steynoavi, npokeievou v a daapeo 0an n oknovn kai n bpua. Eav elvai wto, nuykevtpwovn knovn mopoei va npokalae bi paxukkwa ma npukayia
Xpnouoioane eva vwno, kaad otumuevo navi yia va kathetae Tn ouakeun. Na ouokeveTc to navi mvo oe vpoe.M npauoantoieit oivonveuaevzivn, dialutko moyiac n aalec eufakteocuoec.Eav ta nekpikapnepn stno eawetepnc ouakeun epoovn e tneatacne autec tic ouaeic, umoei va npokanepn npkayid n kertponla
ELeyExe TAKIka To kalwio peuatoc kai To fic Tou yia 0epoc. ELeyEt n oukeun yia ooupiia, Baouwmuata, ypatouviie, pwyue n utepboikn ektonm thepoTntac. Tuxov ouvexion nC xonnoEgoianou e fo0boc mpoei va npokalaei npkayia n naekponlanEia.
Avaawoua
IPOEIAOIOIH2H
Mny aoppiTETc TIC XPOIOIOINIEVEc KAOTc YPAfItn 8YUVMEC FOyec. ZE AVITeRn NEPIITWOn MTOpei va POKANthei avaFAnOdywrtac 8Ykauata n TUPKayia.
Eav xoete n diaakopniace kata laaoc ypafttn, ookoutate tov eva vno, atao nai ka anooyete va eiovtuee t n okovn ypafttn. Note un npoiouote i nektpkn okaoutia va kaapoe t toypafttn tou exi diaakopniutei. Eav kave tkteto, evsextai va npoknthe duolaeupyla otnynektpkn okaouta va npoknthe ekpnEn okvnc loyw anofoptionc otatikou nektpiaou.
IPOZOxH
Kpatate Tc Kaotec ypaifn kai ta aaaa avaalwauma oe onueia Ota onoia dev exouv npooaon naidia uikpnc nukiac.Eav yivekataoon tou ypaifn, ouuouleuteite aoeowc yiatpo n To Kevtro dnnnpiaeew.
Mny npoatae va anouuvapmooyote tyn kaeta ypaftn O ypaftns mtopei va diaokopniotei kai va eoxwpneoi taia n oTo otoua oac. Eav npiypaftnc sta maia n to otoua oac, Pauve ta aoeos me Kpu vepo kai oumboualeute ev av iatpo.
Eav o ypafttnc xuvete ano tvn kaoetya ypafttn, anofoyete va tov eiovtveoete nva epei OE enaonmu To depma oac.Avo ypaftnc epoe OE anafn mTo depma oac, Eenluvete Tov aoeowc oe sanovui. Eav eiovtveoete To ypaftim npepthetai To depma oac lowy enaonfmc Te to ypaftin, ououlueuteite aoeowc yatpo n To kevtpo 8nntnpiaoeuw.
Aa
IPOEIADONIOIHSH
Eav xpoaiouoieite kapdiak o hmuatoodm H oukeun dnouoyel eva maayntko nso xamnEvtaon. Eav vioe tke aiaiaeia kata tn diapkeia nC xpncn Tn oukeun, anaqkpuveitre antn oukeun kai ououauetire auocw ecav yiatp.
Noikec npatnpnoic
③ MF Driver Installation Guide (User Software CD (Brukerprogramvare-CD)):
Lesdennehandbokenetterpa. Dennehandboken beskriver programvareinstallasjon.
④ Elektroniskhandbok (Multi-lingual User Manual CD (Flerspraklig brukerhandbok-CD)):
③ MF Driver Installation Guide (User Software CD (Ohjelmisto-CD)-levy):
BbOaTeKCTa, CmMbOJOB uHcEi
He noDknHouTaBcK KOMnBiTepey
Peréynte K pa3dny "Bb6op HaalhBix npaMeTpoB fka c n oDcoeHHeHne TenefoHHoro Ka6ela (ToIbko Ira MoJeNei MF4890dw/MF4870dn/MF4780w/ MF4750") (Ctp. 133).
MF4870dn/MF4750/MF4730
BbI6Op MeToDa IODHJIoueHnA annapaTa K KOMNbIOTepy
- Poiokluoyehne no npoBoHOH cetn LAN
(TOJbHO DnH MoJeN MF4890dw/MF4870dn/MF4780w)
Cm. pa3dien «Пондлочен no npoBoDhoN ceTn LAN»

AnnapaT MoKHO NOdHIOUHTb K KOMMbOTepy C NOMOsbIO MappyTHaTopa npoBOJHO CEtn.ДЯ NOdKIOUeHn annapata K MappyTHaTOpY npoBOJHO CEtn (HIN TOcKe DoCTyna) Heo6xOIMO NcNoIb3OBA Tb Ka6eJI LAN.
※Y6eNTecb,HToHaMapwpyTu3aTopeecbCBO6OHyn nopT JIPOKJIQUHEnAannapataN KOMNbOTepa.
IIOJROTOBbTe Ka6eNb LAN Tnna «Bnta napa» Kateropnn 5 nn Bblue.
- PoiKluHoyeHne C nOmoUb Ka6eJIa USB
Cm. pa3dien «ПонлIoUeHne c nOmouIbIO Ka6eJIa USB»
AnnapaT MoKHO NOdKIOUHTb K KOMNbOtepy C NOMoUbKa6eIa USB.
Bo3MOHHOCTb KOINPOBaHnA 2-CTOpOHHe KApTOUKN Ha OJHOI CTOpOHe JNCTa.
ΦaKc**
OTnpabHa DOHYMeHToB HENOCpeDCTBeHHO C KOMNbIOTepa (aKCHMnblHbA CB83b
C NOMOUsbIO HOMNbIOTepa)
POMM0CTaHapThbIX CnOCo6OB OTnpaBKNI pNema KaCob MOKHOHCNoJIb3OBA Tb CyHKUIO KaCNMIJIbHO CB3N C NOMOJIbIO KOMJIbIOTepa.
Otnpabha
MoKHO 3apeHnCTpnpoBaTb aDpeCaTbIΦaKOB B aDpeCHO KHNRE. CyueCTByET HeCKOJIbKO cnOCO6OB yKa3aHnA aDpeCAToB, N03BOJIOxN 6bICTPO I npocTo OTnpaBHTb DOKyMeHTbl.
-ПоньадресаТa
-нлавиши бiocтPORHa6opa
- KoДированньи habop
- Frpynna aDpecaTob
- YkaaHne n3 HpyhnaOtnpabKn
-Последователовапесдауа
- Otnpabha no pacncaHHIO
Pnem
- Pnem B namrB
PnHrTbe DOKymeHTb MOxHO
COxpaHrTB B namrN. CoxpaHeHHbIe DOKymeHTb MOxHO B IIO6oe BpeMra
pacNeaTaTB uIN ydaJIuNTb, eCIn OHN 6Olee He Tpe6yIOTcR.
UdaJIeHHbI npHem
Pn HAIChN IOKIIIOueHHORO
BHeuHrTO TeJepHOaMOxHO
HEMeJeHHO nepeKIOHHTbcR B
peKIM npHema qakOB BO BpEm
TeJEOHHOro Bb3OBA NyTEM BBOda
IeHTnHkAToPA npHema qakCa
C NOMObIO cHPObIX KHOIOK
TeJepHa.
- Pnem no 3anpocy
IpynnHnTn PhaKc MoH0
N3BHeb npedBaPteHbHO
3aRpyKeHHbIe DOkymeHTbl C
paKCNMBHO annapaTa
OTnpaBNTeJI.
NeyaTb
YMeHbWeHem
2-ctopoHHn neaTb\*
YMeHbWeHHbIMaKeT
MOxHOMyMeHbWHTbHeCKOJIbKO DOKyMeHToB,HTo6blHaNeuTaTbNX Ha ODHOM JNCTe.
2Ha14Ha1
Teuatb 6poohop
NepaTb nJaKaTOB
NeuTaB BOaRbIx 3HaHOB
Ppocmtp npedbapnteHoro n3o6paXeHnnepeD neaTbIO
Bb6op「pOphiIa
Сканнроване
CoxpaHeHne DOhymeHTOB c NOMOsbIO NaHeJIynpaBLeHHa annapata

CoxpaHHeNc DOKymeHTOB c NOMOuBIO Oepaun Ha KOMNbIOTpe
- ChaHPOBaHnE C NOMOuBIO
- nporpamMbI MF Toolbox
CkaHnpoBaHne n3 npInIOKeHHN
CkaHnpoBaHne CnOJIb3OBAHHeM dpaBepa WIA***
Hactpoynncetn\*\*\*
AnHbI annapaT obopydOBaH CEtEBIM INHTepfeIcOM, C NOMOuBIO KOTOPORo MOxHO 6bICTPO CO3DaTb CeTEBOE OKpyKeHHe.3OT
INHTePfEic NO3BOJAEr TneaTaTB DOHyMeHTbl, IcNoJIb3OBA Tb FyHKUIO fAHCmMnIbHOJ CBa3N C NOMOuBIO KOMNbIbOTepa H BbINOJIHrTb CEteBOE cKaHIpOBaHne CO BCEX KOMNbIbOTepoB, NODJIIOueHHbIX K DAHHOMy annapaTy. Bo3MOxHOCTb INCNoJIb3OBAHry DaHHoro annapaTa B KaueCTBe OΦnCHOrO annapaTa C O6zIM DoCTynOM NOMORAET IOBbICNTb 3ΦΦeKTHNBHOCTb pa60TbI.
YdaJIeHnHi NPi\*\*\*
Teneb Bbl MoKeTe npOBepaBcOCToHHe annapaTa c KOMNbToTePOB B CeTH. Kpome TOrO,Yepe3 CeTB MOHO BblIOJIHrTa DocTyn K annpaTy, ynpaBIArTa 3aDaHnAMyN Yka3bIbTaB pa3LIuHhBe HaCTpoiKn.
*Tolbno DnM oMeIeMF4890dw/MF4870dn **TolbNo DnM oMeIeMF4890dw/MF4870dn/MF4780w/MF4750 TolbNo BOCWindowsXP/Vista/7/B TolbNo DnM oMeIeMF4890dw/MF4870dn/MF4780w
YcTpaHHe 3aM7n6ymarH
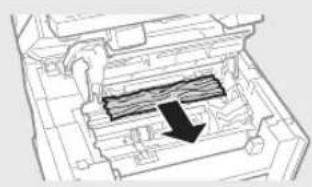
Ecnno OTo6paKaHaTcra 3OT 3KpaH,ByCTPOINCTBE NOaHN HByTpna annapata npOn3oWIO 3aMaTne 6yMaHn.YdaJIte CmTAbI DOhymeHT NNI 6yMaRy,CJeDy npOueType,OTo6paKaHaemOn Ha 3KpaHe.B 3OM pyKOBOdCTBe ONUcaHBt TOJbKO 06laCTN,B KOTOpbIX MOKeT BO3HNKHyTb 3aMaTne 6yMaHn. POpO6Hee O KaHdoi FyHKuIM CM.B DOKyMeTe «3NeKTPOHoe pyKOBOdCTBO NOJIb3OBaTeJI”.
3amTne 6ymaru.
HaxMnTe ]JnA
0To6paKeHHaTOB.

PoaTnK
MF4890dw

MF4870dn/MF4780w/MF4750/MF4730

BHyTpni annapaTa YHnBepcaIbHbI JIoTOK


HaccetaIy6ymaru


3aHnHa KpbIiHa
(TOJIbKO DnRA MoDneNeI
MF4890dw/MF4870dn)
3aMeHa KapTpndJa c ToHepom
Kaptnndn c Tohepom ABHOTc pacxOdbim MaTepeaam. EcnToHe pOnTu NIN NoNHOCTbO 3aOKHnICB npocece BblIOJIeHHa 3aHa, Ha 3kpaHe NOBILETc COo6eHne INM MOrTy BO3HnKaTb CNeDyUoJe nPo6IeMbI. PnIMNTe COOTBeTcByIOUme MepbI.
Pn noBHeHH coo6eHna
EcnI ToheP NoTH 3aKOHHINcB IpoceCE BbINOJIHeHn 3aHaHn, Ha 3KpaH NOABJIeTc COO6uHHe.
TexHHueckoe 06cIyHnBaHne n OcmOTpbI

IPEyIpyEHEHNE
- BbIIOUaHTe annapat n OTOcEINHnTe UHyp nITaHnO Tpo3eTKn neped oUHCTKo. HeBbINOJIHeHne 3Toro npAByNA MoHET cTaTB npuHHo BO3ROPaHNr HnnpaKeHNr 3JNEKTpueckm TOKOM.
- PepnoDnueckn n3BleKeAte wTeCenb shHypa nHTaHnN 13 po3eTHn npOuHuaIte 3OHy BOHpyr OCHOBAHm METaJIInuecknx KONTAKTOB wTeCenl nPo3eTKn CyXoI KTHaHbQ, YTO6bI NOJHOCTbO ydaJIbTb NpIpbN rP3b. PbIb, oCEbUa HBaJHKHO NobEPXHOCTn MOKET cTaTb pnnHoo HOPOKTKO 3AmbKaHnN IIN NOKapa.
ДлгочNTкн annapaразиocnoьуte BnaJHkyO xopoIo OTHkaTyK TkaHb.CmaNbaTb TkaHbДлгочNTkn Heo6xOdmoToIbHO B OBe. He nCnoB3yTe CNPT, 6eH3OJIbHbIe BeUeCTBa, pactBopnTeIN KpackиИpyrHe IerKOBcPiMaHKeHIOuHecBeUeCTBa. HoTaNtK 3TNX BeUeCTB C 3NeKTpUneCKIMKOMNoHEHTAMN BHyTpN annapaTMOKET CTaTb pnuHNo BO3RopaHn NIn NopaKeHn 3NeKTpUneCKIM TOKOM.
Perynno npOBepnTe OTCyTCTBne NOpeKdennuHypa nHTAHn uTENCEJI. PpOBepnTe OTCyTCTBne Koppo3nn, mexAHueckOn deOpmaun, uapanHH, Tpeunn Hn Upe3mepHoro HarpBaHN annapata. NcNoIb3ObaHne obOpdyobHaN, KOtOpoe He o6CnyKBaETcN DoJNKHBIM O6p3OM, MOKET npNBecTN K nokapny nnnpaKeHNIO 3NEKTPnueCKHM TOKOM.
PacxoDhbIe MaTePnaJIbI

IPEyIpyEHEHNE
He 6pocaIte Otpa6oTaHHbIe KapTpndKn C ToHepom B OTHpbItbI orOHb.3TO MOKeT IpiNBecTn K INX BOCIIaMeHENIO H, KaC cIeDCTBVE, K NOJUeyEHNI OOKOrB ININ BO3HKNHOHBOHNO HOkapa.
- PnCnyaHOMpacbinaHnTOhepaOCTOPoHHoBbITPteTOhep MraKoBlaXHO TkaHbIO,He BdbxAerEro.HeNCnoIb3yIe NblIEcOCDnOCHTKPiocbinaHnHO TOhepa.BipOTNBHom Cnyae BO3MOxHNOOBpeKdHneNbIeCOcaNNB3pbIBNbIIN,BbI3BaHHbI CTaTHueckm pa3pIaDM.

BHIMAHHE
XpaHnTe KapTpndKn C ToHepom Npyrne pacxOhbIe MATEpnaJIb IMecTax, HeoctynbIX nIeTeB. Bcnyae nporlanbHaNr Tohepa HEmedJeHNO 6bpaNTecb K bpay NIN B TOOKKOLOrueckn ceHTp.
He nbTaIteb pa36npaTb KapTpndK c ToHepom.ToHep MoKeT npocBInatcbN nonactb B rna3a nn pot. Pn nnonadaHn ToHepa B rna3a nn pot HeMeDJIeHHo IpomOte Hx XoJIoHoi BOoH n 6baTne TcB K bpaY.
- Ecnn n3 KaptndHa npocbinaIc ToHep, cTapaNTecb He BbixaTbe eo n36beraTe ero KOtAkaC kOKeH. Pnp nonadHnToHEpa HaKOxy cp3y Je CMOte ero BOdoC MbIOm. B cnyae BbixaHnaTOhepa nn Bo3NHOBeHnKOHoro pa3paKeHn H3-3aKOHTaCTa C TOHEpOM HeMeDJIeHNO 06paTITcB K BpaCy INB TOCHINOLrNCckn CEHTp.
Apyroe

PNEyIpyEHEHIE
- EcIn HcNoIb3yETc KApDIOCTMmYJATop: 3TOT annapat co3aet cnaoe marHnTHoe nOe. EcnB bbl yBCTByTe DnCHOMΦOpT BO BpEma pa6oTbI C annapatom, oToiNtne NpaJIbwe OT annapata H HeMeDHeHHo npOKOHcybTpyntpyTEcb C bpAHO.
OpnduuecknHΦopmaun
Opndnueckne orpaHnueHna HcnoIb3OBAHne n3dEInn n 3o6paHexn
IcnoIb3OBAHHe npNo6peTeHHORo BAMn I3dJIINr dIa
CKAHNPOBAHn, neaTHn IIN BOCpON3BedeHn OnPpeJeHHbIX
DOHyMeHTOB INhIMn CNOcO6aMn, a TaIOKe IcNoIb3OBAHHe
IH06paKeHn, NOyHeHbX B pe3yIbTaTe cKaHnpOBAHn,
NEaTHn IIN BOCpON3BedeHn DpyrIM CNOCOBm Prn NOMOuIN
PnpNo6peTHeHHORo BAMn I3dJIINr, MOKeT 6bIT 3aNpeUeHO 3aKOHOM
IMoKET NOBLeYb 3a COBoY yROLOBHyIO n/II rPaJDAchkyIO
OTBeTCTBeHHocTb. HEnoHbI CNcoK TAKxDOKyMeHTOB pInBeHn
HNKe. 3ToT cNtCOk PpeHa3HaueH dIra IcNoIb3OBAHBO TOnbKO
B KaueCTBeOpENTmu. PnB BO3HKnHOBeHn COMHeHn B
3aKHOHOctn IcNoIb3OBAHn DAHHoro I3dJIINr DcKaHnpOBAHn,
NEaTHn IIN BOCpON3BedeHn IHbIM CNOCOB KAcoro-ⅡINO
DOHyMeHTa I/II INCNoIb3OBAHn I3O6paKeHn, NOyueHHbIX B
pe3yIbTaTe cKaHnpOBAHn, NeaTHn IIN BOCpON3BedeHn DpyrIM
CNOCOBm, 3apaHee ObpaTItecb 3a KOHCsyIbTaunei K UpiNcty.
-ByMaHHbIe DeHbI
-Дорожные чеки
-ⅡaTeKHbIe npuyehn
- PpOdoBOJIbCTBeHHbIe TaIOHbI
-ДeNo3HTbIe cepTnФиKaHtbl
- Naacnopta
- NouToBbIe MapKn (noraeeHHbe HnH enoraeeHHbe)
-IMMmrrpaunOHbIe DOHyMeHTbl
-ⅠeHTnФиKaunHbIe KapTochN nn 3HaKn OTJInyIa
-BHytpenHHe Mapn rep6oBoro c6opa (noraeHHbIe HENORAeHHBe)
-HeKOTOpBIE DOkymeHTbI Ha o6cIyKINBaHne IIN IpeBoDhble BEKCEJIa
-06nraunnnnpnyne dojroBbie ceptnnKahtbl
-YeKnIINIpeBEOHbIEBeKcEJIy,BbIaHHbIe TocydapCTBeHHbIMUyPeKeJdEHNAMN
-AKUN
- ABTomo6nIbHbIe npaba NdoKymeHTbl, yDocTobepaHoune npaba co6cTBehHOCTN
-ПОНЗBEDEHЯ,ОХРАнгьМьЗаКОHAМИOBaBTOPСКOM npaBe/ПОНЗBEDEHЯИСЧУСТВa,ЗANPEUHьEДЯ BOCnpon3BEDEHЯ6e3pa3peHЯOBlaJaTeIaABTOPcKHX npaB
Pn pa3pa6oTke pykoOCTB dIaHnro aannapata 6bln npnoHebI 3NaHTeJIbHbIe ycInna IINKIOUeHn HToOHcTe n yuueHH. TeM He MeHee, HauNnI3dEInna NOCToRHH O6HOBLJOTc. DnI NOlyeHn TOHOn INΦOpMaunn ObaaAITecb B Kopnpaunu Canon.
Noci6HnK3 KOMnIeHTy NOCTaBKn
IpepeiueHHMn nyHtamm MeHTo Ta cnoci6 BBeDeHHa TeKcty
① NocatoKpo60tn(cei DOkymENT) CnoaTky npouHTaIte uei noci6HNK. U cybOMy noci6HNY onncaHa npOeDpya BCTaHOBLeHHa anapata, HalaWtYBaHH npaMeTpIB i nonepedHeHH. OoB'3KOBO npouHTaIte uei noci6HNK nepei BHKOpNCtAHm anapata.
② Noci6HnK i3 HacToPOBAnH 6e3dpoTOBoI IokaJIbHOI MepeXi (JHne dIy moIeI MF4890dw/MF4780w): npOHTaIte ueN noci6HnK nICra O3HaOMJIeHHN 3 Noc6HnOM «NoTaOK pOboITH, Y cBOMy noci6HnHy oNcAHO npOceDpyn HAcTPOBaHnH 6e3dpoTOBoI IokaJIbHOI MepeXI, a TAOKH npUHN NOBn Ta 3acO6 BiPJIeHHN npOBeM, JKI MOHYTB BINHHYTN NiD hAc HAcToPOBaHnH O6OB'3KOBO npOHTaIte ueN noci6HnK nepeBnKOpNCtAHNM anapata.
③ MF Driver Installation Guide (User Software CD (KomnakT-Dnch 3 nporpamHm 3a6e3neueHHm KopncTybaa))
Dani O3HaHOMTEcR 3 UIM Noci6HNOM. Ucbomy noci6Hky onncaHa npoceDypa BCTahOBHeHH nporpamHoro 3abe3neueHH.
④ ElenktpoHHn noci6HnK (Multi-lingual User Manual CD (HomnakT-dnck 3 noci6HHam HjlbHoma MOAMN)) npouHTaTe po3di i3 notpi6HOIO IHΦopMaicio. ElenktpoHHn noci6HnK po3diJeHHn Ha KaTeOpiI dJa IerKOrO nowky noTpio6HoI IHΦopMaicii.
MF4890dw/MF4870dn/MF4780w/MF4750
MF4730
Po60Ta 3 MeHIO
Bn6ip nyHKTIb a6o nepemiueneHH Hycpopa mH nyHKTamM MeHIO
BnIyTe nyHKn 3a donomoroh KnaBiui [ ] a6o [ ].Uo6 nepeiTu Do HacTyHoro po3iny,HaTnciTB KhoNHy [OK] a6o [ ].Uo6 nepeiTu Do nonepedhbo rO p03iny,HaTnciTB KnaBiuy [ ] (Ha3a) a6o [ ]
HactpoioBAHHn iDTHBepKHeHH
HaTnCHiB KhONKy [OK].OdHaK
KaHsO Ha DnCnIe 3'ABnEbCra
NoBIOMLeHHRAy>
(3aCTocyBaTu), Bn6epiB
(3aCTocyBaTu), NOTIM HaTnCHiB
KhONKy [OK].
Cnoci6 BBeEHHa TeKcty
3MiHa peKIMy BBeDEHHA
HaTnCHiB [V], 106 BnDiInTH (PeknM BBeDeHH), BiTak HaTnCHiB KhoNky [OK]. PeknM BBeDEHH MoKHa TaHOK 3MiHHTN 3a DOnOMoHO KJIaBiWi [ *] (ToH).
BBeHnTeKCTy,3HaHbI uHp
BnKoHyTe BBeDeHHaNΦpOBmH KJIaBIaAMn a6o KJIaBIaIeHO [#](CNMBOJIH). DOKlaNDhy iHΦopMaJIO npo nepeKIOUeHHaPEKIMIB I DOCTynH DJIY BBeDEHHaCNMBOniNb.Ha HAcTyNH CTOpIHci.
IpeemieeHHKypcpy (BBeEHH np6iny)
BnKOpncTObyIte dIJI nepeMiuEHHN KnaBiyu [a6o [].IJI BBeDeHHN npObiNy nepemictb KypcOp y KineCb TeKCTy HATNCHTb KnaBiyu [].
BudaeHHcMBOJIb
BndaIyTe CmBOJN KHOHKOIO [C] (CTepTN).LIO6 BndaJIHTN BCI BBedeHi CmBOJN,HaTNCiThb iYTpMMyTe KnaBiWiy [CTepTN).
Ipeperlae eJENTPOHHORO noci6HnKa 3 KOMnAHT-dncha
1 BCTABTe Multi-lingual User Manual CD (KOMnKaT-DIcK 3 noci6HnHAMN KJIbHOMa MOBAMU) y KOMn'IOTeP.
2 Bn6epitb MoBy.
3 Hlaunitb [Display Manuals] (Bido6pa3nTn noci6HHN).
3aJIeHNO BID ONEpauiHoi CnCTeM, IO BHKOpHCTOByETbC, BiO6pa3NTbCnOBiDMHeHH npo 3abe3neueHH 3axNcTy.
BBeHnHaTeKCTy,3HaKiB i nΦp
| Рек imm
ВveDEXHЯ:
<A> | Рек imm
ВveDEXHЯ:
<a> | Рек imm
ВveDEXHЯ:
<12> |
| 1 | @.-/1 | |
| 2 | ABC abc | 2 | |
| 3 | DEF def 3 | |
| 4 | GHI ghi 4 | |
| 5 | JKL jkl 5 | |
| 6 | MNO mno 6 | |
| 7 | PQRS pqrs 7 | |
| 8 | TUV tuv 8 | |
| 9 | WXYZWXYZ 9 | |
| 0 | (He doctynho) 0 | |
| # | -,"#,",...^ =/?"$@
%&+(.)[()] | (He doctynho) |
| * | (Зма на рожиму ВveDEXHЯ) [A]→[a]→[12] |
3miHa peKIMy BBeDeHHA
IiKJIIOUeHHa SHHpa XINBJIeHHa Ta yBIMKHeHHA XINBJIeHHA
He niknouaTe Ka6eB USB y uei MOMeHT. NIKHIOUITb Ioro niq Yac BCTAHOBJIeHHN nporpaMHorO 3ae3neueHH.
BctaHOBJIeHH noyatKOBHX napaMeTpib
BnKohyIe iHcTpykui, 10o BiO6paKaHIObCra Ha eKpaHi, 10o BCTaHOBTN MOBy Ta Yac. DOKlaHy IHOpMaIIO npo pOboTy 3 MeHIO Ta cNoCIO BBeDEHHA UpdoHO B po3di I «IpeMeiueHH MIX NyHKTaMIMeHIO Ta CNoCIO BBeDEHHA TeKcty" (O CTop. 140).
MF4890dw/MF4780w

KuO Bn He neBHi, Knn y Bac MapwpyTN3aTOp: DpOTOBH N6e3DpOTOBH
IpeerJIHbTe cynpObiHn noci6HnK 3 ekCnlyaTaui MepeKeBOrnpCTpo1 a6o 3BepHtbcra do Bnpo6HnKa.
Remote Receiving (BiДале He
OTPIMaHHH)
KIOI PIKIOUeHO 3OBHIIH H TeLEFOH, MOHHa BIDpa3y nepemHHyTH anapaT Ha peHKM OTpIMAHH H aKcy, H6paBbH iENTnFikaiH N HOMep OTpIMAHH FakCy 3a DOnOMORO KHOHOK H6bOpY nJacOTpIMAHH d3BInKa.
- OTPMaHHHa 3aNT
YBaC 3Mora BnDObTy NonepeHbO 3aBaHTaKeHi DOKyMeHTN 3ΦaKcMlBHO anapata BiInpaBnHa came Toi, KOJI BAM nOTpi6Ho OTPMaTHn ΦaKc.
Друн
Apyk 3i 36iIbueHHa m a6o 3MeHweHHaM
ДвoctopoHHIpyH*
3MeHueHn MaKeT
MOKHa 3MeHUnTH KIlbKa
DOKyMeHTiB,IO DO3BOJNTb
po3dpyKByaTH iX Ha OJHOMy apKyU.
2Ha14Ha1
Dpyk 6poosypn*
Apyk nlaHaTIB
ApK BOARHx 3HaHIB
PonepeHni neperIaI nepeI npykom
Bn6ip «npoΦiIO»
ChahyBaHHa
36epexehn DOhymeHTIB 3a donomoroio nanei kepybaHH anapata

36epenHHn DOKymeHtIB 3a donomoroH KOMI'OTepa
- CkaHyBaHHa 3a DOnOMOrIO nporpamM FTOolbox
CkaHyBaHHa i3 npKlaHoi npoPamn
- CkaHyBaHHa 3a DOnOMOrOIO
- dpaBepa WIA***
Hactpoynmepexi\*\*\*
LcH anapat o6naHaHm MepKHM
iHTepfcom, RnN Do3BOLAe
WBnKO HAcTpoITMpeKHe
cepeoBnue. MoKHa DpyKyBaTN
DOKyMeHTN, BnKOpNCTOByaTN
fakCmIbHn 38'30k 3a
DONOMOIO KOMn'OTepa Ta
cKaHyBaHHa Ype3 MepeKy 3ycix
KOMn'OTepiB, 10 NiDhUoyehi do
anapata.CnilbHe BnKOpNCtAHn
anapata B Ofici cnpiRe nIDBnueHHo
eFekTHBHOCTi p6oTI.
Remote UI (Intepfeic BidaheHoro HopncTybau)****
DiHaTnC npoCTaH anapaTa MoXHa 3KOMnIOTepiB,IO NiDKIIOUeHi Do MepeKi. YpeE3 MepeKu MoXHa OTPMaTH IOCTyn DO anapaTa Ta NOrO 3aBdaHb, a TAKoK BCTaHOBJIIOBaTu pi3Hi napaMeTpN.
YcyHeHHaMHaHHnanepy
KIO 3'ABBC HabeHn HNKe eKpaH, y npCTpoI noDaAHHa a6o B anapati cTALOc 3MHaHHn panepy. BIKOHUYOn BiObpaHexHi ha eKpHi BkAsIBKN, BIMiTB 3IM'THn DOkymeHT a60 nanip. YcbOMy NociBnky 3aHaueHi TiMbKn Oblacti, de TpanJIeTbC3MHNaHHn panepy. DOKlaHy IHOpMaJIO npo KxHy FyHKUIO NOdaHO B EJeKTPoHOMy NociBnky.
W Paper jam.
Press [ ] to
display steps.

Pnpctpi noaBaHHA
MF4890dw

MF4870dn/MF4780w/MF4750/MF4730
BHytpiHni yactnHn anapata BaratozioBovn JOTOK


Haceta nanepey

3aHnKpnKa
(mne moeJI MF4890dw/
MF4870dn)
3amHa KapTpndJa 3 ToHepom
Kaptpnki 3 ToHepom - ce BHTpaTHi MaTepiA. RaIIO pIac DpyHy 3aBdAHHr TOHeP NOBHCtIO qMmaJHe 3aKiHcyTbC, Ha ekpaHI BiO6paKaEhCBaNOIDOMLeHHra 60 BHNHaOTb ONCAHI HNNe NOMINKN. Y TAKOMy pa3i CIId BKHITN BiDNOBIDHX 3axoDiB.
y pa3i noBn nobidomleHHA
Kiio nid yac npky 3aBdAHH ToHep MaHke 3aKiHyETbC, Ha ekpaHI 3'ABJIeTBcNIOBIDOMHeHH.
| Повidiомлени | Коли на ekрani
Вidiображаettingа
повidiомлени | Опс поебли差别iodу воришени |
| <Prepare toner
cartridge.>(Підготуйтě
kaptrindь i3
tohepom.) | Ноли карtripидь i3
Тонером по triбно
Замину нашлкчим
чacm. | Стусни Карtripидь i3 tohepom对于我们 pibnomip Horo розnodileну tohepa
Всяrelini Kaptrindka.
Еlektroponnii nosicbik, «Пereed замioю карtripидь 3 tohepom» |
| Пеед дуkom Великою обаяу дokу мenteв рекомendobaoю замину
tohep i3 karpindkem.
Еlektroponnii nosicbik, «Замina Kaptrindka 3 tohepom» |
| <Toner is
nearly out.>(Tohep майке
зakinчевя.> | Ноли вчeurpano pecурс
kaptrindka 3 tohepom. | Стусни Карtripидь i3 tohepom对于我们 pibnomip Horo розnodileну tohepa
Всяrelini Kaptrindka.
Еlektroponnii nosicbik, «Пereed замioю карtripидь 3 tohepom» |
| Як soo ce nobiodomлени He 3nHKe, Заминь Kaptrindь i3 tohepom.
Еlektroponnii nosicbik, «Замina Kaptrindka 3 tohepom» |
| Як soo bideobapkaetbcry ec nobiodomlenny, Вixdni phakc byle 3bepeJKeHo
В пam'Ят i6e BvkoHaHnA dpyky. 3BiTn takox MOnyIb He dpykyBaTnCn,
habiBЯк so BCTaNoBLeNo napametp abTomatuHoro dpyky 3BiTb.
Як soo专门为 napametpa <Continue Print. When Toner Is Nearly Out>
(ПробожиВати дук, КOLи tohep Майke заikinuBcay) у MeHIO <RX
Print Settings> (HAc troponnii dpyky otprimanix daHIX) NaCTpoeHo
ЗанeHЯн <On> (YbIMK.), dpyk nopodobjHtbcry, aJe ha po3dpyNivhax
Залшатум'tься bili liHii abO ПлЯМи.
Еlektroponnii nosicbik, «АВтOMaTHuNiy dpyk 3bity» |
| Еlektroponnii nosicbik, «ПoproDobjEHHa Dpyk, КOLи tohep Майke
Зakinчевя» |
HoiHa npyhoaHx apHyax BnHO 6iNi NiHii a6o yactHOe 3he6apBHeHH
Ha pO3dpKbX BnHO 6iCytn a6o yactKOBe 3he6apBHeHH, e BkazYe Ha Te, 10 ToHep y KapTpndH MaJHe 3aKiHcBc, HabIt YaKIO Ha ekpahi He BiOobpaKaetbcra BiNObiHne Nobidme NOBIDMeHH. RaIoo RaICTb DpyHy HEnPnynctMa, DVB. HabeDeHi HnKHe po3dIn, De onncAo cnoocb BnpiWeHH np6lemn.
HoiHa pykoBAnx apKuax BnIi li nii a6o yactHOe 3He6apBHeHHA
HoiToheMaJHe 3aKiHbCBA,HaDpyKOBaHx apHywax BnDHO 6iCi MyrA 0o aactKOBe 3He6apBHeHH.

Haekpani He BiioobpaKaTbcra NobiOmIeHHa, RaIO ToHep MaJke ckiHcBcR. 3aMHiTb KapTpNdk i3 ToHepOM, KOJI Ha HApPyKOBaHnx apKywax BnDHO bili Cmyr n a6o YactKOBe 3he6apBleHHa.
KoHn BHHNae TaHa npo6Jema
Ipeed 3amio Haptpnndka 3 TohepOM BHKoHaTe KpOKn OINcaHOI HNKe npOeDpyN. AnapaT npOobKye DpyK, DOHn ToHe pOBHCTIO He 3aKinHHTbcra.
EeKtpOnHHn Noc6HnK, «Ipeed 3amHIO KapTpndka 3 TohePOM»
Hnio hictb npHy Bce H He3aobinbHa
Aku npo6leMa He 3HnKHe HabiTb nCIA BnKOHHaHH HaBeDeHOi HNKeI npOeDpyn, 3aMInTb KapTpndk i3 TohepOM.
ELeKtpoHHn Noci6HnK, «3aMiHa KaTpPnDka 3 ToHepOm
CNMBOJI,IO BHKOPNCTOBYIOTbCBA bOMy noci6Hnky

TONEPEDHEHHA
I03haae nonepeJxehnHCTOCOBHO onepauiy, kki MOxyb npni3BcTn do TpaBMvBaHH B pa3i ix HnepaBnHoro BVHOHaHH. 3 MeTOO be3neHORO KOpNCYBaHH anapatom 3aBKnD 3BaKaaiTe Ha ci nonepeJxehnH.

YBATA
I03Hauae 3actepeKehnra CTOCOBHO Onerapuiy, kMOKHTb PnN3BecTNO DtpaBMByAHn B pazi ix HnpeBaINbHoro BNKOHaHH. 3 MToIO 6e3NeuHOROKopNCTyBaHH anapaTOM 3aBXdIN 3BaKaInTe Ha zI 3actepeKehnra.
KnaiTi Ka KhoNn, 0o 3raDyIObCBA bOmy noci6Hky
CIMBOHnTaHa3BnKJIaIiB, BnKOpHCTOByBaHi BcBOMy nociHnHy, no3Haehi TaKIM YHOM.
- Knaiui nanei kepyBaHHa: [Tiktorpama klaibi] + (Ha3ba klaibi) HanpnKlaad: [CtOn)
- Dicnne: (YkaHitb Mice npnsHaenHHa.)
KhoHKn Ta eIeMeHTn Ha dncnnei KOMN'IoTepa: [Preferences] (HaCtpoKN)
IIOCTpaqii Ta 3o6paKeHH eKpaHa, BHKOpncTahi B cboMy noci6Hnky
Hkno He 3a3haeHo iHne, iNIOCTpaJIi Ta 3O6paKeHHa ekpHa B cybomy noc6nky BiNDOBIAOTb MoEJI MF4890dw.

NONEPEDHEHHA
Lio6 yHnKHytn p3nHy tIeChnx TpABMa 60yHKoJKeHHN
OblaHaHHa, a TaKoH 5oo OTPMaTH NOpDmHi BiDomocTi,
npOHtaTe HaEeKHi npabOi NobiDOMHeHHraTa BAnBi
BIDOMcTi npToTexHky 6e3neKn> Ha Multi-lingual User Manual CD (HomnaKT-dnck 3 nocihknam KJIbKoma MoBaM), AKN
BXODHTy KOMPiKeT NoCTaHaHH BInpo6y.
Baxnbi iHctpykui 3 texhiK 6e3neK
Ipeep po60too 3 anapaTom yBaKHO npOHTaTe «BaxKnBi iHctpyKuii 3TexhiKb63neKn» B cIbOMy nociBHy Ta EEnkToPHHomy nociBHy.
3aBKn 3eptaTe yBaIy Ha ci IHCTpyKuT Ta BmOrn Do EKcIlyatau; ix DToPImaHHa DonOMarae 3anO6iTrn TpaBMyBaHHo KOpNCtByaBaTa iHxocic, a TAKOH NsKOJKeHHo MaHa.
MaIte Ha yBa3i, 10 Bu HeceTe BiDnOBiDaJIbHICTb 3a Bci 36nTKn
BHaCNIIOK HEDOTPMAMHH HabeDEHNX TYT YKa3IBOK, 6yDb-RAKO
BHKOPCTAHN INPcTPOHe 3a Pn3HaeHHM, a TAKOH BIKOHaHH
peMOHTy MOnDiKiai GbYb-KHM, KpIM TexHiHOro CneuaIAcTa 3
NOBHOBaKeHHMaM BiKOMnAHI Canon.
YCTaHOBJIeHHI

NONEPEDKEHH
He BCTaHOBJe anapat no6n3yJeKo3aMmCTnxpeOBHH Ha 3pa3OK CNPTOBMICHN BIP06IB a6oP3HNNHKB. KOHTaKT TaIKX peOBHN 3 eEKeTPnuHMn DeTalIMN BCEpEnHi anapata MoKe np3BcETNo 3aMaHnn Ta IONeHk a6oPiNJbUHTn dI KOpNCtBuHa pN3NK ypaKeHH eEKeTPnuHM CTpyMM.
He KlaIbTaHa anapat HamcTa, IHwi MetaJIeBi npEIMTeN a6o MicKIOCTi 3 pINHO. KOHTAcrT CTOpOHHX peOBOH 3 eEKeTPnHMM DeTALMn BCEpeHNi anapata MoKe np3BecrTo NONoHEKi a6o ypaKeHHra EKeTPnHM CTpyMOM.
RkIo Kaacb 3 TaKnx peOBOH Bnade B anapata, HeraHo BVMMHtB NOrO JKNBLEHHa Ta 3BepHITbCn DO MlueBOrO DnIePa Canon.
He BHKOPHCTOByIte anapataNo6m3y MeuHoro 0blaHaHH.BIH BnPOMiHOpeaIOXBnI, IO MOKytB CTBOTNt NpeHKO nDJI MEuHoro 0blaHaHH N pIN3BcTNO DO BAHXN HeuaChNX BNnAdKn.

YBAGA
HnKHe OINCAHO MUC, HeBIDNOIBIDI Ia BCTAHOJIeHHAnapata. Po3aUyBaHH anapata B TaKOHY MUCI MoKe np3BeHcTdo TIECHHX TPABM, NOKEHI aBO ypaehHH eNEHTPMHIM CTpyMOM.
-HeBIDNOBIDHemicue
-Micue, BYKOMYMOHINBI CINbHI BIBpaui
-YMICxJ,De6bOkyTOBcBAHTNIAJIHIO TBOPn(HaT06NI3bKO Do CTIN,LIHKKa,NYXHAcTOrO KUNIMTaIINHX NODi6HINpEaMeTIB)
- Y BOLORnx a6o 3aannneHnx Micx
-HaBbopi a6o nipnPmM COHcHm npOMHH
- Y Micux i3 BnCOKIO TEMpepatpoio
-BiBbIKpntoroBOHIO
- y Micuaix i3 noraHO BOHTnlauiHO CNTeMOIO
Xo4aBpe3yIbTaTIpo6OHTanapataYTBOpioTeBCrO3OH,BIH 3OBcIM He BnIbAe Ha IIOcbKbOPraH3M.Ta HIO anapatMac BIVOKpocTOByBaTHNCPOTAROMTPBBAHIX nepioIDIB,NO6BaITne pno D06py BEHTNLIUO MICJHOBOCTAOBHeHH.
He nkiKJIIOUaHMeIe do IbOro anapata HepeKOMeHNoBaHI Ka6eni. Lc MoKe npN3BecTn Do NoKHeKl a60 ypaKaHnE eJeKTHpNCHM CTyPMOM.
JHKUO anapatn 3 HOPCTHM DNCKOM BHKOPCTOBYBAHT Ha BNCOTI noHaD 3000 MeptB HaD pIBHE MOPA, BOHMOHYb npaIOBATN He HALEKHHM YHOM.
HKepeNo HnBJIeHHA

NONEPEDHEHH
He KopriyTneI hUHMH uHypamn 3aMCTb UHpya HNBLeHHa 3 KOMJIeKHTY NocTabKN, OCHJIbKn Ie MOKe PnH3BcETN DO NIOHeKi a6o ypaKaHHeE eJeKTHPNHUM CTyPOM.
He MoNphiKyIe N He 3rHaHae Te Wyp KHNBLeHH, He TargHtB Noro 3 npKlaDAnHHM 3aHuOHO CINn. He cTaBe Ha WHyp KHNBLeHH BaxKi npEpmTe. NpOkDKeHH Whypa KHNBLeHH MOKe Pn3BecTn Do NOHeH iabo ypaKeHH eJeKTPNHMM CTpyMOM.
He BCTaJIaIe Ta He BnIMaIte LITeNCJIb 1hHpya XINBJIeHHM OMOHIMPyAM, OCKJIbN Ic MoKHe pN3BecTNo ypaKeHHr EJekTPuHm CTpYMOM.
He BHNOPICOBYTe 3 UNAMATOM HUNyHPONoDBOYBaCHI pOraTAYKByaHi KINBLeHHN 3 KJIbKOma PO3eTHAmi. Lc MoKe npn3BeCTn do NOKeXi a60 ypaXeHHN eJekTPuHHM CTyPMo
He 3mOtIe Ta He 3ab'3yIte IwHpy By3oI, OckInbKn ce MoKe npn3BecTn DO NOKeKJI ABO YpaKeHH eJekTpUHM CTpyMOM.
PbHCTIO BCTABJINTE UHTENCEJIb HUpya JHHBILNEHH B PO3eTHy MEPEKJI 3MHHORO CTpyM. JHKU cTO BOHO He 3pO6HTN, MOKe cTATNCa NOHexa abo YPAHEHH EJENKTPhYHN CTHPYOM.
PiaCuaRPO3N NOBHCIO BHMMAIe WHTENCeB JHypa XHBLEHN 3 P03eTKH.NHeDToPMaHHZbOFO npabnMoKe pNt3BcTn DoNoXeHi, ypaKHeHH eJbEHTpMH CTPymoA a60 HecnpbaHcOHTi anApata.

YBAGA
BnKOpNCTOByIte NJIeJe DKepeJIO HINBHeHHa, Hanpyra KHOBIbINOiBaHaeDeHmY TUTBOMar. IkuO cTOBO He 3pO6THM,MOKe CTaTHcN NOEJeka a60 ypaKeHHe ENEkTPNHUMC TCPYMOM
3a6e3neTBeBbHnDcTyndoP03eTKn,doRKOiNIOuAcTebC anapat,io6ypa1HaralbHOINotpe6bBya3MoraJeRHO BnHATU WtencenbShhpyaXHHJHeHN.
NoBODKeHHa

NONEPEDHEHH
He MoHnIHyIe anapat I he po3bpaIte Horo. YcepeHHI anapata eTani, hki nepe6yBaOT nb INBCOKOHNAPYROTo Ta pO3irpTi do BNCOKNX TEMnepaty; BOH NMOyTb npN3BcTe Do noJHexi abo ypaXeHHN EENKTPnHIM CTpyMOM.
HeD03B0JIaIeTJITaRmTOPKaTHcHbHpyaKbNBeHnHa,KabEJIb, BHTPIuHIXMexAH3MIBTa eJeKTPnHHxDeTaneiAbOgPtaHcH 3 HmN.HeoTpImaHnHa bOTo npBaBnaMoKe npn3BecTn DO BaHKnx TineCHNX TpaBM.
- POMITINHnHaMipHe HarpibAHnAnapaTa a6o He3BnHnIyM 3anaxuDmBIDhBOrO,3eBHITbCdo BNOBHOaKeHOrO dInepa Canon. IopalbWe BnKOpNCTaHHnMoKe np3BcTn Do NooKeXi abo ypaKeHNHeJekTPNHNCTyMOM.
He KopnctyTeaIerKo3aMmCTMn aePo3oJMaN no6Jn3y anapata. HoTaNKT JeKo3aMmCTnx peOBoH 3 eJeKTPnuHMn deTajMN BCEpeiHi anapata MoKe npu3BecTu Do nOHexi a60 ypaKeHHNeEKeTPnuHM CTpyMOM.

YBAGA
3 MipkyBaHb 6e3neKn BnMaTte WTeNceJIb HHypa JxNBHeHHa anapaTa, RaIcO Bin He BnKOpNCToByBaTHMeTbcra npOTrrom TpNbAloro Yacy.
-ObepexHo BiDkPnBaIe Ta 3aKpNBaIe KpnuKn, uOb He TpaBMyBaTH pyKn.
TpmaTe pyuN OJr noaJI BiD polnKIB B oJbacti BvBeDeHHa. IoppanHnpyk abo odary B polnKMOe np3Bectn do tilechx TpaBM.
BHytpiHniYacTHNn anapata N BvBIDHNI JToK dyKe po3irpiTi nI dac BNHOpNCCTAHNA Ta BIDpa3y nicra Hboro. Uo6 yHHHTyn onikIB, yHkAte KOHTaTy 3 cmm AcTnHAM. Kpim TOrO, Opaayc NiCIA BNBedeHNHPO3dpyHKINMOHYb 6ytn rapHi, ToK NOBoBtEc 3 HmM o6eepKHO. Heo6epExHichtb MoNe npn3BeCtn Do onIKIB.
Texhue 06cnyrobyBaHnTa orJa

NONEPEDHEHHA
- Pénéd yuueHHa BmHKHb anapat i BnMItb wTenceIb shypa HnBHeHH 3 po3eKn. RaKo cboRo He 3pO6TH, MoKe CTaTHc nOKExa a60 ypaKeHH eEeKTPnHHM CTpyOM.
- Yac BiD yacy BnHmaiTe 1tTencIb i3 po3eTHN Ta BNTnpaIte cyXIO THAHHOIO nII i6pyd i3 po3eTHN Ta 3 OCHOBn METAEBHX TtIPB tTcENe. BolOrn nn moKe npu3BecTN do KOpOTKOrO 3amKaHnA ao noKeHi
OuHuaTe anapat BOIoroIO do6pe BHKpyeHOIO TKAHNHOIO. 3BOnoKnyTe 10 KTHaHHy NIIue BOIOHO. He BnHOPNCTOByIte cNPT, 6EH30JI, POzHHNHNr Ta iINi IERHO3aIMNCtI peOBOHNr. KOHTAKT TAKHX peOBOHN 3 eJekTPnHmN DeTaJIaM N BCEpENH apapaTo MoJe npz3EeCTN Do NoXeKJI a60 ypaJHexHn eJekTPnHm CTrpymOM.
Perynpho nepebipreTe hyp hNBeHH Ta tTencelb Ha HABHCTb NookkDHe. NepeBiprte anapat Ha HABBHCTb ipxki, 3a3y6bnH, noPpnnH, TpiuH aoHaMpH eHaRpaHn. BHKOpCTAHn OBlaHaHH B noraHOMy CTaHI Moe np3BcTn DO noKeKi aO bypaeHHeJeKTPnuHm Ctpymom
BntpaTHi MaTepiAn

NONEPEDHEHHA
He KdaIte BInkopnctaHI KapTpndk3 TohepOM y BiDkpHTN BOHOb. Lc MOKe CnpuHHnTn 3aMaHnR npn3BeCTn Do oNikB a6o nokeki.
- RaKIO TOHEp BnnaHKOBO pO3cHnabcB, o6epeHHo 3iTpItb pO3cHnAHN NopouWOK BOJROK M'HOO TKaHNHO; CTpeHtbcS, Uo6 He BdHXHTy NiYO. HikOIe He npu6paIte PO3cHnAHN ToHEp NINOOCOM. Ce MoNe Ipu3BcETNo Do HecnPbaHocTi NINOCoca a60 BV6xy NiNy B pe3yblTati CTAtnHOrO pO3prdy.

YBAGA
36epiraTe KaptpnDki 3 Tohepom Ta iHwi BHTpaTHi MaTepiAnB Micax, HeoocTyHnx Dnla DiTei. Li pazi KObTaHHa TohepaHeraiHo 3BepHiTbcrdo liKapra abo TokCNKONorIChoro ceHTpy.
He HamaraTeCe p036paTu KapTpIaH i3 ToHepOM.ToHep MoKe po3cnatncr IOTpaNTn B Oci a6o pot. RaIO TOHep NotpaNTb B Oci a6o pot, HeraHNO Ipomnte ix XOIOHO BOIO TO 3BepHITbcrdo likapra.
- JHKUToHE BVCINNABC 3 KAPTpNDHa, CtapaTecn He BdNxAuH NOro Ta cIkyute, U6b BIn He NotpAnHB Ha shkpY. JHKUToHE notpanntb Ha shkpY, HeraHBO BmHnTe II 3 MlNoM. JHKUToB BVDHN ToHE a60 shkpap nopa3Hea BHacIIOK KOHTy 3 Hm, HeraHNO 3BepHITbcra Do Iikapar a60 TOCKOJorIHORo ueHTpy.
Inhe

NONEPEDHEHHA
KIO Bn BnKOpNCToByeTe KApDioCTMMyIaTOp LcH anapat yTBopHe cna6Ke marHIThe noJe. BiDuYBUN B opraH3Mi RkICb NopyWeHHN iD uac po6OTn 3 UIM anapaTom, BiIDiNbBi Dn HbOrO HeaHNO pOKoHcyIbTyIteC3 NiKApem.
HaJIeHHI npaBOBIO nobIDOMJIeHHA
IOpndnHi 6mKeHHeNHa 0oDo BnKOpncTaHHBnpo6y Ta 306paHexeHb
BnKOpNCaHnIybOro BnOByDnCKaHyBaHHN,dpKy a60 KOniIOBAHH 6yb-RAHM IHINUM YINOM NEBHx DOkymeHTIB Ta BnKOpNCaHnH TAnX BiDcKaHOBAHH,HaDPYKBaHHx a60 CKOniIOBAHH 6yb-RAHM IHINUM 3o6paJHe bMOKe 6yt N3abOpOHeNo 3aKoHOM Ta CTAIn PpNHIOHO pNtTgHHeHH O KpIMIHALbHOI abO rPMAJHCBHOI BIDNOIBaJIbHOCTI. HenOBHN CnCOK TaNX DOKyMeHIT HabeDeHO HnKYe. LcE CnCOK CTBopeHNI liwe dJa DoBIDHI. RaIO BuHNkaIOb CymHIBN IOdo 3aKoHHocTI BnKOpNCaHnH BnO6y I Da cKaHYBaHH,dpKy a60 KOniIOBAHH 6yb-RAHM IHINUM YINOM NEBHx DOkymeHTIB Ta/a60 BnKOpNCaHnH TaNX BiDcKaHOBAHH,HaDPYKBaHHx a60 BybAkm HINUM YINOM ChONiIOBAHH 3o6paJHeB, cIid 3BePhUTnc 3a Po3'ACHEHHM Do padHnka 3 KpNDHnX NITAHb.
- Panepoiri pomega
-DoopKHIyekn
-Платдндоруенн.
-Прдовьчталони
-ДeнoзHTi cepTnФikatN
-Паснорtn
-Поштovi марки (noraшениaboногашeni)
-ImmigrpauiHIOKymeHTN
- IdENTnΦiKauiHi KapTKn a60 3HaKn p03pi3HeHHr
-BHytpiuHiMapn rep6oBoro 36opy (noraehi a60 HenorataeHi)
-OKyMeHTN ODO BiCbKOBoIO NOBHHOCTI
-06niraai a6o iHwi DOKyMeHTn npo 6oproBti 3o6ob'raHHa
- Yekn a6o KBNTaHcii, BnDaHi yprAIOBIMN areHcIyMI
-AkiohepHi cepTnphiKATN
-Посвдченивовяпа серtnфikatн Ha npabo Blnachocti
-TBOpN,IOO OxopOHJIObC3aKOHAMn Ipo aBTOpcbKi npaba/BNTBOPN MICTeTBA 6e3 OTpIMaHH3rOy BlaACHnKa aBTOpcbKnX npab
Paper jam. Press[] to display steps.
Padevëjs
MF4890dw

MF4870dn/MF4780w/MF4750/MF4730

Iekartas iekspuse Daudzfunckiju papirturis


Papira kase

Aizmugurejaisvaks
(tikai MF4890dw/MF4870dn)
Tonera kasetnes nomaina
Kahepoolne printimine*
PnDnBnKBaHe B MeHOTOn MToTn Ha BbBeKdAne Ha TEkCT
MF4890dw/MF4870dn/MF4780w/MF4750

MF4730
PnDvHbAe B MeHIOTo
H36npaHe Ha eIeMeHTn HIN npemecTbaHe Ha Kypcopa MeKdy eIeMeHTte Ha MeHOTO
H36peTe eIeMeHT C NOMOuTa Ha [▲] nnn [▼].PpemnHeTe KbM cIeBaIooTo HepapxNHO HNO B [OK] nIn [▶].BbPheTe ce Ha npednHOTo HepapxNHO HNO C NOMOuTa Ha [] (Hasad) nn [<].
NotBbPckdaBaHeHaHacTpoKnTe
HaTnCHete [OK].Korato o6ahe Ha nCnIeCe noBn cbo6eHneTo ,n36epTe , CneJ KoEto HATnCHete [OK].
MetoHaBbBeHdaHeHaTeKCT
CmHa Ha peHMa Ha BbBekDaHe
HaTnCHete [▼], 3a Da ocBeTne
, CNeI KoETo
HaTnCHete [OK]. MoKHe TcBIO
da HaTnCHete [×] (ToHaJIHo) 3a
IpomHa Ha peHMa Ha BbBekDaHe.
BbBeHdahe TeKCT, CnMbOJI nUΦpN
BbBeJaTe C 6yToHnTe C uΦpn
nIN [ # ] (CIMBOJN).
3a nOdpo6HOCTn 3a peKmNTe,
Ha KOInTO MOKe Da ce npeBKnIOHN,
nIN TEKCTa, KOInTO MOKe Da ce
BbBeKa, BHK. cNeBaUcaTa CTpaHnua.
PpeMeCTBaHe Ha Kypcopa (BbBeHdaHe Ha HHTepBan)
PpemectBaHToCe n3BbpWbC NOMOHTa Ha[4]NIN [>.PpemctTe Hypcopa do KpaHa TEKCTa NHATNCHEt [4],3a Da BBeTe HHTepBaI.
N3tpBaHe Ha 3Ha
N3tpBaTe C nOmoTa Ha [C] (N3HCTBaHe).Ako 3aIbpxnTe KlaBnHa [C] (N3HCTBaHe) HATNCaT,ue N3Tpne TBcUKN 3Haun.
IperJeHdaHe Ha e-Manual (EeHTpoHH pboHObOCTBO) OT HOMnAHT DnCKa
1 NocTabeTe Multi-lingual User Manual CD (KOMnAaT DnCK C MHOoe3uHOp bkoBOcTO 3a Notpe6ntela) B KOMnHbpa.
2 N36epeTe e3iK.
3 UpaHHe Te Bbpxy [Display Manuals] (PokaHn pbHOBoCTBaTa).
B 3aBnCmOCT OT nIIOJIbHaHTa OepauHHa CnCTema Ce noka3Ba Cbo6eHHe 3a 3aunTa Ha cnrypHocTtA.
BbBeHdaHe TeKCT, CmBOLn n uΦpH
| Рек imm на
БъECHданe:
<A> | Рек imm на
БъECHданe:
<a> | Рек imm на
БъECHданe:
<12> |
| 1 | @.-/1 | |
| 2 | ABC abc | 2 | |
| 3 | DEF def 3 | |
| 4 | GHI ghi 4 | |
| 5 | JKL jkl 5 | |
| 6 | MNO mno 6 | |
| 7 | PQRS pqrs 7 | |
| 8 | TUV tuv 8 | |
| 9 | WXYZ wxyz 9 | |
| 0 | (He e doctbneH) 0 | |
| # | -.*!";^_="?$@
%&+(')[0]<> | (He e doctbneH) |
| * | (Cмнна на рожима на БъECHданe)
[A]→[a]→[12] |
CmHa Ha peHHa Ha BbBHeKaHae
| Рек imm ha
въеведанe | Текл за въеведанe |
| <A> | Главни бухиот a36укatinga
и симboлн |
| <a> | МалкиSBYнВОТ a36укatinga
и симboлн |
| <12> | Цфри |
Cbbp3BaHe ha 3axpaHbaunha6eN BKHIOUCAHE Ha 3axpaHbaHeto
He cbbp3BaTe USB ka6eHa Ha To3n eTan. CbpxTe ro no BpeMe Ha HnCTaInpaHc coΦTyepa.
Yka3BaHe Ha nbpBOHaayHInTe HAcTpoHH
Kato cIeBate INHCTpyKuNTe Ha eKpaHa, 3aJaTe Yaca n e3nKa. 3a noBeue HhOpMaun OTHOCHO npDvBxBaHeTO B MeHTo N HaHnHa 3a BbBeJdaHe Ha zHpN Bk. "PnpDvBxBaHe B MeHTo N MeTOn Ha BbBeJdaHe Ha TeKCT" (cTp.250).
MF4890dw/MF4780w
3a Cbbp3BaHe KbM KOMnHObpa nocpecdTbom LAN Ka6eJ
IpemHeTcBmCbbp3BaHeye3 LAN Ka6eJ
(camo 3a MF4890dw/MF4870dn/MF4780w)(ctp.252).
3a cBbP3BaHe KbM KOMNIObpa NocpeDcTBom USB Ka6eJ
PpemHHeTcKbM,CBpb3BaHeypeeUSBKa6eJ(cTp.252).
3a da npoDbIHHTe, 6e3 da Cbbp3BaTe MaunHaTa KbM KOMnIOBp
PpemnHeTe KbM, Ya3BaHe Ha TbpBOHaJIHIne HAcTPOKn Ha paKca n CbBp3BaHe Ha TelefoHEn Ka6eI (cAmO 3a MF4890dw/MF4870dn/MF4780w/ MF4750) (ctp.253)
MF4870dn/MF4750/MF4730
H36op Ha MeToa 3a CBbP3BaHe Ha MaunHaTa KbM HOMNtbp
Cbbp3BaHe uee3 LAN ka6eJ (cama 3a MF4890dw/MF4870dn/MF4780w)
Bx. Cbpb3BaHe ue3 LAN Ka6eI"

MoKeTe Da CbPKeTe MaunHaTa KbM KomHOTbp NocpeCTBOM MapwpyTu3aTOp CnXoJn 3a MpeKOBn Ka6eJIi. CbPKeTe MaunHaTa KbM MapwpyTu3aTopa (NIn ToKhata 3a Doctbn) c nomouTa ha LAN Ka6eJInte.
※ YBepete ce, ye MapuTy3aTOpbT pa3noIara cbc Cbo6oJeH nopT 3a Cbbp3BaHe Ha MaunHaTa KbM KOMNtbpa.
Ocnrypete LAN ka6en c ycykHn DOBHN OT Kateropn5 nnn no-BNCOKA.
Cbbp3BaHeype3USBKa6eBx.CBp3BaHepe3USBKa6e
MoKeTe Da CbPKeTe MauHaTa KbM KOMnHtbp nOpeCTBOM USB ka6eJ.
Cbbp3BaHepe36e3KnHaLANBp3Ka (camo 3a MF4890dw/MF4780w)
Bx. PbkoBOdCTBO 3a HactpoiKa Ha WLAN.
MoKeTe Da CbPKeTe MaunHaTa KbM KOMnHtbp NocpeCTBOM 6e3KHeH MapuPyTHaTOp*. TbI KaTO CBp3BaHTo CTaBa No 6e3KHeH PbT, He ca Heo6xOdMn LAN Ka6eJI.
*H3NCKBaCeMapuPyTu3aTOp(nINTOUka3aDOCTb)CnoDpBkaHa cTaHApTne IEEE802.11b/g/n.
Ako He cte cnryphn daJI mapwpytnaTOpbT BN noDbpka 6e3HnUHO nn Ka6enHO CBbp3BaHe:
Bx. pkoBDCTBOTo KbM cAmTo MpeKoBO yCTpoCTBO HnCe CbPKeTe C npOn3BODHTeJI My.
Cbbp3BaHe qpe3 LAN ha6en (camo 3a MF4890dw/MF4870dn/MF4780w)
1 CbBypKeTe LAN ka6eJa.

IP aDpeCbT ue CE KOHcHpynpa ABOTMATNoHO BpaMHTE Ha 2 MNHyTH.AKO NcKaTe da 3aJaTe IP aDpeca pBuHO, Bk. eIeMeHTte no-dOly.
e-Manual (EneKtpoHPObKOBOdCTBO),Network Settings" (MpeXOBn HacTpoHn) ,Basic Network Settings" (OChOBn MpeXOBn HacTpoHn) ,Setting the IP Address" (3aDaBaHe Ha IP aDpeca)
2 HcTaIpaTe dpaBepa n coΦTyepa ot User Software CD (HcMnAHT DNCK C nOTpe6NTEJckn coΦTyep).
IpemHeTe KbM,3aJaBaHe HaΦopMaTa N TnHa XapTnTa" (CTp. 253).
Cbpb3BaHe ype3 USB ka6eJ
Cbpxte USB ka6ena, cJeI KaTo INHCTaIIpaTe MF dpaBepnte mMF Toolbox.
1 HnctaInpaTe dpaBepa n coΦTyepa ot User Software CD (KoMaHT DNCK C nOTpe6nteLckn coΦTyep).
2 CbbpkeTe USB ka6eJa.
PpemHeTKeBm,3aabaHeHaΦopMaTaNtNa HaXapTnTa" (CTp.253).
3a noBue npDpo6HocTn OTHOCHO HCTaNaOHHnTe npOeUpn:

BHKpHOBOCTBOTo MF Driver Installation Guide

Molnnotpe6nteIte da oHaKaTcdeICTBne 3a nporpamata Product Extended Survey Program. 3a noBce neopno6HCTBk. onncanraTa ha ekpaHa.
3aabahe Ha foOpMaTa n Tnna Ha xapTnra
Kato cIeBate HNCTpykunTe Ha ekpaHa, 3aJaTe fOpMaTa n TnHa Ha xapTnTa.
MF4890dw/MF4870dn/ MF4780w/MF4750
MF4730
YKa3BaHe Ha NpBPOHauaHHTe HaCTPOnHHa PhaHcN CBbp3BaHe Ha TeJeΦoHEn Ka6eJ (camo 3a MF4890dw/ MF4870dn/MF4780w/MF4750)
1 YkaKeTe nbpBOHaJIHnTe HAcTpoKn Ha paKca.
CneBaIte HNCTpyKunHBe B PbKOBOcTBo 3a HacTpoBaHe HaΦKaCa, 3a Da3aJaTe HOMe HaΦaKaCa, IMe Ha yCTpoCTBOTo I peKIM HaNoJyBaHe.3a NoBuepeNoDPOBHOCTNO THOCHO PeKIMHe HANoJyBaHaBe Bx. e-Manual (ELeKtPOHnO PbKOBOcTBo).
e-Manual (EJektpoHNO pKOBODCTBO), Fax" (FaKa) Using the Fax Functions" (N3noJ3BaHe Ha yHnnte Ha fAnca)Receiving Faxes" (NoIyabaHe Ha fAncoBe) RX Mode" (PeKIM Ha noIyabaHe)
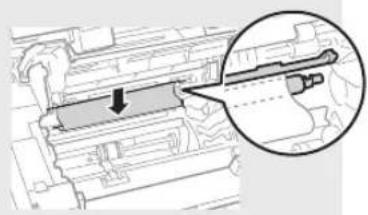
Kan ce n3no3Ba noTpe6nteJcHTo HMe Horato n3npaate DoKymeHT, INHOpMaunraTa 3a n3npaaua, KOHTo CTe peNCTpnpaIN, ce OTneuATBa Ha DOKymeHTa Ha noLyatela.
2 CbbpKHeTe TneloHnKa6eJ.
Korato Ha dincnne Ce noKaHe < < CbpbBaHe TeI. HnHra.>, CbPKeTe TeneoHHna Ka6en, KaTO n3noi3BaTe 3a cnpaBka fHyypata.
Pn HnctaHnpe Ha donbHnTeHnHa cnywAnHa: 3a noBee HnΦopMaui Bk. pBkoBOcTBOTO, npeoCTaBeHo Cbc cnlywAnKaTa.
3 N3ne3Te OT PbKOBoDCTBO 3a HAcTpoBbHe Ha KaKa, CLeD KOeTo pecTapTpAaTe MaunHaTa.
N3KIOUETE yctpoCTBOTo H3aKaIte NOHE 10ceHyHn, npedn da ro BKLIOHTE OTHOB.To nBt Ha TelefoHHata liHHn He ce OTkPbBa aTOMaTHNo. Bx. e-Manual (EJeKtpoHHo pkoBDcTBo) nHaCtpoTe TnefoHHata liHHn pBuHO.
e-Manual (EneKToHNO pKOBoDCTBO),Fax" (FaHO) Using the Fax Functions"(N3noI3BaHe Ha yHKnHnTe Ha fAnca) Changing Fax Settings (Settings that Can Be Specified Using the [Menu] Button)" (PpOmaHa Ha HAcTpoHNte Ha fAnca (HAcTpoHNte, KOHTo MoHe da ce YkAnatype36yToHa [MeHo])Configuring Send Settings" (KOnfHypmpaHe Ha HAcTpoHNte 3a N3npaUaHe) "Select Line Type"(N3bOp Ha TnN LInn)
MoKeTe da n3noJI3BaTe pa3nHn FyHKuHH Ha ycTpoiCTBOTo. CJeIbA o63Op Ha OCHOBHTe FyHKuHH, KOHTo MoKeTe da n3noJI3BaTe B eKedHeBHATA cn npaKTnka.
Konupahe
YBeJIuHHeH/HaMaJIeHN KOJIa
MoKeTe Da yBEnuBaTe nn HaMaJIaBaTe DOKymeHTn CbC CTaNapTeH fOpMaT, TaKa Ye da Tn KOIpaTe Ha XapTna CbC CTaNapTeH fOpMaT. MoKeTe Da 3adaTe CbOTHOseHe Ha KOIpaHe B npoeHTN.
2-ctpaHHo KONnpaHep
Mokete da konnpate eHoctpaHHn DOhyMeHTN OT DBete cTpaHn Ha JInCT xapTna.
HomnkeTyBaHe
MoKeTe Da copTnpaTe KOnnraTa B KOMnJIeKTHNo HOmeP Ha cTpaHnua.
Hamaheo oΦopMneHne
MokheTe da HamaJIaBaTe MHOKeCTBO DOKMyeHTN,3a Da rN KOINpaTe Ha eHN JnCT.
2B14B1
KoHpaHe HaJIuHn DOkymeHTN
Mokete da konipate DByctpaehnueh DOkymeHT OT eHaTa CtpaHa Ha JICT XAPTNA.
ΦaKc**
HnpeKTHo n3npauneHa DOhymeHT OT KOMNIOTpB (aHcOT KOMNIOTpB)
Ocben HOpMaJIHOTo 3nIpaUaHe
HIOJIyBaHa He KaICObE,
MOKeTe Da N3NOJ3BaTe FyHKuYrTa
"fAHC OT KOMNHTbP".
H3npaapane
Mokete da 3anametraBe phaKc MeTOHa3HaeHHB aDpeChata KnHa. MoKeTe Da 3aDaTe MeToHa3HaeHHeTO ype3 pa3NCHMeToDi, KOEt BOA DABa Bb3MOxHOCT Da H3npaate 6bp30 n IeCHO DOkymeHTN.
TbpcHe Ha MeToHa3HaueHne
- ByToHn 3a cBkpaTeHo Ha6npaHe
- Hαδιραη ζυεπού Κοιθου
- rpyaHa MeCTOHa3HaueHHe
3aDabaHeOTxpoHOnIgTnHaN3npaAhe
Последователноразпашие
3a6abeHo n3npaune
IonyaBaHe
- PnyaBaHe B NaMeTTa PnyeHnTe DOKymEnTn MoKe Da ce CbXpaHbAT B NaMeTTa Ha MaunHaTa. MoKeTe NO BCaKO BpeMe Da pa3neuatae CbXpaHeHnTe B NaMeTTa DOkymEtN IIN Da rN H3TpneTe, aKO He ca BN Heo6xOdMn.
OTdaJeHNOJyBaHae AKe cBbP3aH BbHWeH TeJeFOH, MoKeTe Da IpeBKnIOHTe BeHaRa Ha peKIM Ha NOJyBaHa He fakCOBe, KaTO No Bpeme Ha pa3roBop HabepeTe INeHTnΦnKaUHOHHn Homep 3a NOJyBaHa He fakCOBe Upe3 6yToHIne 3a HApHaHe Ha TelefoHa.
-ПОИСКВАЕ 3а NOЛУЧАВЕ
Можete Да ИЗВLEЧЕТе ПпEDВAPИТЕННО
З apeДЕНИ ДOKУМЕNTH OT ФАКСА
норадел, KORATO ИСКATE ДА NOЛУЧТЕ
фakca.
NeuT
OtneaytaBaHe cyBEnuYabaHe/ HamaJraBaHe
2-ctpaHEn neyat\*
Hamaheo oΦopMneHne
MoKeTe Da HamaJIaBaTe MHOKeCTBO DOKMyeHTN,3a Da rN OTNeHaTaTe Ha eINH JIcT.
2B14B1
NepaT Ha KHHHn
OTneyatBaHe Ha IlaKaTu
Otneaytahe Ha BOdE h3nA
Ioka3BaHe Ha Bn3yaJIn3aun npde nepat
H36npaHHe Ha, npoΦn"
CkaHnpaHe
3aHcBaHe Ha DOhymeHTn OT pa60THHaHeI Ha yCTpoiCTBOTO
3aHcBaHe Ha DOKMeHTN OT HOMIOIbpa
- Schanepahe uepe3 MF Toolbox

CkaHnpaHe oT npJIoJeHne
-Сандахе WIA дайевера***
MpeKOBH HacTpoHn\*\*\*
ToBa yctpoiCTBO e o6opuyBaHO C mpeKOB INTEpEneC, qpe3 KOITO MOKeTe IeCHO Da Cb3daIeTe MpeKOBa CpeDa. MoKeTe Da OTneuataTe DOkymeHT, Da n3NoJ3BATE fYHKUraT a "fAHCOT KOMNtbp" N MpeKOB O cAHnpaHe OT BCnHKn KOMNtPn, KOITo Ca CBpb3AH N kBm YcTPOiCTBOTO. POnDbpHaHeTO Ha Te3n FyHKUnn daBa Bb3MOHOCHT Ha yCTPOiCTBOTO da pa60TN NO-efKeHTNBHO KATO CNOdeJeHO yctpoiCTBO 3a CEJIIN OΦIC.
Remote UI (ПOTpe6nteJcHn nHTepfec3a OTdaneyeHo ynpaBHeH)****
MoKeTe Da noJyUHTe HnHOpMaunr 3a CbCToRHHeTO Ha yCTpOietBOTO OT KOMNIOPTPHTe B MPeKaTa.
Imate DoCTbI Do yCTpOietCBTO
mOKeTe Da ynpabJIbAte 3aDaHn
HIN Da 3aJaBaTe pa3JIuHn HAcTPOHN
no MPeKaTa.
OTCTpaHbAHe Ha 3aceDHaIaTa xapTnA
Ako ce noBnTo3n ekpaH, ToBa O3HaayBa, Ye HMa 3aceHaJaXapTna B NoDaBaUOyCTPOIcTBo Ha MaunHata. CneDbaiTe npoueDypaTa, Noka3aHa Ha ekpHa, 3a Da OTcPahete 3aceHaJInr DOkymeHT nn XapTna. ToBa pKOBODCTBO Yka3Ba cAmO MeCTaTa, KbTeO 3acJaXapTna. 3a NoDpo6Ha INHOpMaunr 3a BCra KaOT fYHKUNTE Bx. e-Manual (EleKTPoHNO pKOBODCTBO).
3aceH. xapT.
HaTnch.[],3a
da n3BedeTe
CTbNkNTe.
Iopabaio yctpoiCTBO
MF4890dw


MF4870dn/MF4780w/MF4750/MF4730
BbtpewhoCT Ha MaunHaTa MHorOfoyHKnHOHaJaHa TaBa


Haceta xaptna


3aENkanak
(camo 3a MF4890dw/MF4870dn)
IopmHa Ha ToHep Kaceta
ToheKacTeTHe ca KOHCymaTHBn. Korato ToHepbTe ha npBbPbBaHe nn CbPshn HaBnHO,doKaTO ce n3nBnHaDaHeHa 3aJaA,Ha ekpaHa ce NOKa3Ba cbo6eHne nn E B3MOKHO da Bb3HnKHe HAKO OT CJIeDnTe npo6IeMn. PpeIprnMeTe cBoTBETHTe DeiCTBna Cnped cnuya.
Pn noBaHa cbo6eHne
Korato Tohept 3anouhe da npnbpbwba,dokaTo ce n3nblnha daeHa 3aada,ce noka3Ba cbo6eHne Ha ekpana.
| Съоб Shedne | Кога на ekрана
се пokedва това
съоб Shedne | Описане и рeshеня |
| <Приготвete
Тонер касета.> | Korato skopo
ше се наложи
дa се сmedи тонер
касета. | РазнлATEte toHep kaseta, за дa ce pa3npedelen toHepbT paBHomepeHо
Вьв ВьтpeShocTTa.
e-Manual (Еlementронно ръковodctBO), Before Replacing the Toner
Cartridge" (Поредсмяната на toHep kaseta)
ПрелорьчITEлho e da поименite toHep kaseta подваритelHo,
ако щe пechа差别 obemnstn dokumentn.
e-Manual (Еlementронно ръковodctBO), Replacing the Toner Cartridge" (Смана на toHep kaseta) |
| <Tнр. e поту-
ичэрп.> | Korato toHep kaseta
e доCTIHнала Края
нa ekspлоаразцioHHNЯ
СИЖВOT. | РазнлATEte toHep kaseta, за дa ce pa3npedelen toHepbT paBHomepeHо
Вьв ВьтpeShocTTa.
e-Manual (Еlementронно ръковodctBO), Before Replacing the Toner
Cartridge" (Поредсмяната на toHep kaseta)
Ако тOBа съоб Shedne He ИЗчeзne, сmedeTe toHep kaseta.
e-Manual (Еlementронно ръковodctBO), Replacing the Toner Cartridge" (Смана на toHep kaseta)
Ако тOBа съоб Shedne He ПOKAZHe, постит�ашитfe phakcove щe se
съхсанват в пametTA, бezd da ce пechаТ. Вьзможно e OTchETITE cьшо
да He se OTpeYATВAT Дори ако e Зададени Doа ce peYaTAT ABTomatuHNo.
Ако обache onciYATA <Пordьлжаванe OTnep. по ИЗчрпан toHep>
В <Hactr.p.nechat полу>. e Зададени Na <Вьл.>, пechаТанeto Na
Мaterиалу лшпюдьлін, Но e Вьзможно Doа ce poluyat Белу ИВци
илпетнab Vьрху ТяХ.
e-Manual (Еlementронно ръковodctBO), Printing the Report Automatically"
(AВtomatУно OTpeYATBaHne Na OTchETN)
e-Manual (Еlementронно ръковodctBO), Continue Print. When Toner Is Nearly
Out" (Дa ce neчata dopri korato toHepbT e Na priВьршваи) |
Korato matepnaHnte ce neyataT hepabHomepno nIc 6eIIN HbIuNo T8X:
Korato MaTePnaJIte Ce OTneuTaBt HepaBHomepHo Nn C 6eNn NbUc n PO Tx, DOpN Ha EkpHa Da Hma CbOSeHne, Tohep KaceTata e DoCTnHaIa Kpar Ha EKCnloaTaunOHnra cn nepno. Korato KaueCTBOTo Ha neaT cTaHe He npneMInBO, Bk. No-dony Ka da OTCpaHnte npo6lema.
Horato matepnaIte ce neyataT hepaBHomepeH OIN C 6eHN HBNI NO TAX
Horato Tohe KaceTa e Ha npBpBaHe, MaTePnaIHTe ce neaTaT HepaBHomepNo IIn C 6eN INBnIO TAn.

He ce noka3Ba cbo6eHne Ha ekpaHa, aHO TOhepBT e Ha npNBbPwBaHe. 3aMeHeTe ToHEp KaceTaT, KOrato MaTePnuJIte Ce neyataT HepaBHomepHo NnC 6eHN VBnI NO TAX.
Horato Bb3HnKHe To3n npo6Jem:
CneBbIe CTbnKHe B donyonncHaTa npouedypa, npedn da 3ameHte Tohep KaceTata. MaunHaT npoDbJIkaBa da nehaT, DOKATO TOHEPbCT CBpwn DoKpaN.
e-Manual (ElenktpnoHpo bkoBoDCTBO),Before Replacing the Toner Cartridge" (Ppei cHaTa Ha Tohep KaceTaTa)
Horato KaeeCTBOTO Ha neaT npOdbJIHbAba da e HnpeHmNBO HnCHO:
Ako npo6lembT He ce OTCpaHn, cIe KaTo I3BbPwHte CTbNHTe B DOHaTa npOeDpya, 3ameHeTe TOHep KaceTaTa.
e-Manual (EneKtpnoHp bkoOdcTBo),Replacing the Toner Cartridge" (CmHa Ha Tohe p KaceTa)
N3NoJ3BaHn CnMBOJN B HAcTOJUcOTOpbKOBoDCTBO
I PENEYUNPEKDEHNEI
IpeDynpexdHHe, CbP3aHO C onepaunn, KOITNO pni Hnnpabnlo n3pbHHeMe MoT Da DOBeDaT Do HapaHBAhe Nm Cmpt. 3a da n3no13BaTe 6e3oNaCHO MaunHa, BnHaN Cb6IOdaBaiTe Te3n IpeDynpexdHHe.
BHIMAHHE!
PpeynpeKHe 3a BHMHHe, BBB Bp3Ka C onepaun, KOITOn npn HnpabNHO n3TbHHeHne MOrat Da DOBeDaT Do HapaHraBaHe. 3a da n3no3BaTe 6e3oNaCHO MaunHaTa, BnHar c6bIIOaBaIte Te3n PpeynpeKHeHn.
KnaBnH 6yToHN, H3noJ3BaHN B TOBa pKOBoDCTBO
CIMBOHNTe HAnMeHOBaHnraHa 6yToHn, NocOeHN NO-DoIy, ca npImep 3a NaHnHa, No-KoHTo Ce O3HaUbAT B TOBa pBkoBoDCTBO 6yToHnTe, KOINTOPra6Ba Da n3NoJ3BaTe.
- BytoHn Ha pa6oTHnaHn: [NkoHa Ha KlaBnHa] + (Ime Ha KlaBnHa) IpnMep:[O](Cton)
-Диспл徳:<3ада専Тедстунauця.>
- ByToHn n eIeMeHTn Ha dncnner Ha KOMNIObpa: [Preferences] (PpeNoCHTaHn)
NIOCTpaunn H3o6paXeHna DnCnIeTe, H3NOJ3BaHH B TOBa pKOBODCTBO
Ocben ako n3pHNO He yka3aHO dpyro, n3noI3BaHnTe B HactoAto pBkoBOcTBO NIOCTpaunu N 3o6paKeHHa DaCnien ca 3a MoeJl MF4890dw.
I PEPDyPENKDEHNEI
3a da n36eHHe pncKa O T HapaHbAhe Nn NobpeHa Na 06OpyDbaHeto, KaTko N 3a HopMaTHBHa INΦOpMaŋu, npOHTe Te npaHbATA 6eJIeKb A Multi-lingual User Manual CD (HomnakT DnCK C MHOrOeUHPO PbHOBoDCTBO 3a NoTpeBntTeJ), npEOCTaBeH C npOdyKTa.
BaxHH yha3aHna 3a 6e3oNaCHOCT
Пелдднзллбатe Малинота,БИМATEЛNO npoутete pa3дпа
"ВakknHуkaЗаньа 3a 6ezonachocTe'OT NaHCTOуTO pBkoBOdCTBO,
КAKTOи B e-Manual(ЕлктponHO npoBkoBOdCTBO).
TbKaTo cIeTa Ha Te3n yka3aHn e Da Ce npedotBpaTAY HapaHbAHaHa Na Notpe6bTeJn Ha DpyrN Lna Cn da Ce n36berHe HhaCraHETo Ha MaTePnAJIH NcETn, BnHarn CnA3BaHTe yka3aHnTA nH3NCBbAHnTa 3a pa60Ta.
ImaTe npEbnD,Ye BHe HocnTe OTROBOpHocTtA 3a BCNUKuIeTN, npNHNb B CNeCTBnE HeCnA3BaHETo Ha DaJeHnTe B HAcTOU pKOBoDCTBO YKa3aHnH, N3NOJ3BaHETo HA yCTPOINCTBOTo 3a cENI, pa3NIuHOTaHa3NaHeuHc, KaKTo N B CNeCTBnE NonpaKn IIn MoNnFkHauN, IN3BpUeHTo NTKeTo N da JInCe, KOeTo He e OTOPIAN TexnIK Ha Canon.
MOHTAK
PNEyPENKDEHNEI
He IlaacpaIte MaunHaTa B 6n3OcT Do 3anaJIMn BeuecTBa KaTO HApNMeP npOdyHTN, CbDpHauNi anKIOXoJI, INI pa3peiTeJn 3a BoN. AKO TaKINBa BeuecTBA Bn3at B KOHTaKT C eN. Yactnte BBB BtpeuHOCTTa Ha MaunHaTa, E Bb3MOxHO Da ce 3aJalr T Na pInHHrT NoKap Nn da yBeJIuHaT onaCHOCTTA TO KOB Ydap.
He NoctabHrte 6nHyTa n Dpyr MeTaN pEmTH, HnTO cbDoBe C TeuHcNt BpXy MaHnHaTa. Ako YKdTea Bn3aT B KOHTAe C eEkeTrpuChne TaeCTbTO, TOBa MoKeJa PpeHnBnKa NOpAp Nm ToKOB UyAp. AHO B MaHnHaTa NonaDHe BbHHo TlNo, He3a6abHRe Ra NkHIOHTe N ce CbPxHe C MeCTHn PpeCTaBnHa Canon.
He 3n0n3BaIte MaunHata Ta B6n3OCT Do MeuHcHcO 6OBpyDbaHe. PaIOBbIhTe, H3NbHbHaN OT Ta3H MaunHa, MoKe Da HInePepaT C MeUHINCHOTo O6OpyDbaHe N TOBa Da PpeINsBnKa HeuaactHn Cnyau.
BHIMAHHE!
He IlnacnpaTe MaunHaTa Ha CJIeHNrTe MecTa. Hecna3BaHepTo HA TOBa Yka3aHMe MOKe Da DOBcE Do ΦH3Nueckn HapaHbAHH, NOKAP INI TOKOB yUpd.
-Hecta6nHa OCHOBA
-MrCTO CbC CNHIN TpeNTeHn.
- Macto,Ha KoeTo Ce 3a 6JokHpa Doctbnt Do BeHTnlaIauIOHHte OTBOpN (PpeKaJIeHO 6JIH3O do CTHe,JeTNa, Mbxectu KUIMNI uDpyr IIOdo6HI)
-Влжн Ип npaшн MRCTO
-MrCTO,IM3NOJKeHOHaIINpeKTHaCtBHyEBACBETJIHa, IIN HAOTKPNTO
-МяСTo,ПОДLOЖЕНHA BИСOKN TemпераТуРи
-MrCTO,6JN30doOTKpHTn3TOHnKHaOrbH-Heo6peBENTINIPAHO MrCTO
Bbnpekn 9e no Bpeme Ha pa6oTa MaunHaTa reHepnpa O3OH, TOBa HE OKa3Ba BInHne BByXy OBeKa. Ako 06aue Bb3HaempBaTe Da N3IOJ3BaTe MaunHaTApOdoBnKHTeNHO, OcnrypeTe Do6pa BeHTINaua HA MCTOTO 3a pa6oTa.
He CbP3BaTHeOIOBpeHN Ka6eIN KbM Ta3H Ma7nHa. HecnBa3BaHeTo Ha TOBA yKa3aHne MoKe da DObeE do noKap nI IN TOKOB yAp.
Bb3MOHHO e MaHINHe T C bPd NCH Da He pa6OTr npaUNHO, aKo Ce 3nO13Ba Hat MeCTa C HAmOPcHa BnCOUnHa OT OKOIO 3000 MetpaNn NOBeHe NaMOPcKO pabNHue.
Elentpnuecko 3axpaHbaHe
PNEpyPENHEHNEI
He nnoJ3BaIte 3axpaHbaun Ka6eIN, pa3nHnN OT To3n, KoITo e npOCTaBEN, 3auoTO TOBA MOKe da npEdu3BnKa noHap IINI TOKOB yUpd.
He MoDnHnpuHne He OByaHte 3axpaHbAunna KaBn H He To DbpnaiTe npKaIeHo CInHO. He NoctabRrTe TeKKn PnpdmETn BByx3axpaHbAunna KaBn. NOpBeKdAnETo Ha 3axpaHbAunna KaBn MoKeJa Do BoDee Do NoKap Nm TKO8 yUap.
He BkIOuBaIe Hn H3KIOUBaIte Uencela C MOKpn pBue, TbH KaTO MOKe Da npEaN3BHaTe TOKOB yAp.
He BkIIOuBaIte MaunHaTa B yDbJIHKITeIN Nn pa3KIOHHTeIN. Hecna3BaHeTo Ha ToBa yKa3aHne MoKe da DoBeDe do noKap nI IN TOKOB ydap.
He 3aBp3BaIte Ha Bb3eI 3axpaHbAun Ka6eI, TbN KATO TOBa MOKe Da npEiIN3BnKa IIOKap INI TOKOB yIap.
- Nocetabete uenceeta,doKpaB eJeHTnueckata mpeHa. B npotnbEN cnyaM oKe da npedn3bNkAte nokap nn eneHTnueckynapd.
IIO Bpeme Ha rpbMOTeBvHn 6bpyn H3KlOuBaYte uenCeLa OT KOHTaKTHa. HeCna3BaHTo Ha TOBa yKa3aHHe MOKe Da DOBepe Do noHap, TOKOB yDAP nn NOBpeHa Ha cAMOTO yCTpoiCTBO.
BHIMAHHE!
BKnIOUcBaIte MaunHATA cMO B eI. MpeKn, KOnTO nOKpNBaT eI. N3NCKBaHnra, NOCOeHN B HAcToHJIoTO. HeCna3BaHeTO Ha TOBa yKa3aHne MoKe Da DoBeDe Do NoKap nn TOKOB yDap.
He npenpeybaTe Doctbna Do en. KOtakTa, B KOITo BKIOUbaTe MaunHaT, 3a Da MoKeTe 6bp30 Da n3KIOUHTe IeNcena N B ClyuH na Ha abapn.
Pa60Ta C MaunHaTa
ANPEyIpyEKeHDeHHeI
He pa3rIb6BaBte HnMoNfHpaTMe MaHNHaTa. MaHNHaTa CbDpJx HA 3IIOJHEn Ha BnCOHa TEMepaTypa nBnCOKHO HanpeHcHEn KOMTOHEHTN, KOITOMaT da npuHHaT IOkap Nn TOKOB yApd.
He no3b0laBaIte Ha da Ta nnaT Hn Da cHnrpaT Cbc 3axpaHaBauNJa6eJ, dpyrnte Ka6eJN, HnO t C BtpeWnHTe eEETPNuecknTe YacTH. Hecna3BaHeTo Ha ToBa YkAa3aHHe MoKe Da DOBeJe Do CePno3Hn Fn3Hneckn HapaHaBaHn.
BcnyaYe MaunHata N3daBa cTpaHH 3Byu,OTdeJn HeeeCTeBHeN MInp3Mn,PyueK nnPpeKoMEpHa TOnJIHa, Ce CbPKeTe C OTOp3napn PpeDctaBnten Ha Canon. HNoI3BaHeTo H MaunHata B TaKaBa C Lyuya MoKe Da DoBeDe do Noxapnn ToKOB ydap.
He n3no3BaIte IecHO3anaIMn CnpeIObe 6JIn3o Do yCTpoiCTBOTO.AKO 3anaJIIMN BeIeCTBa BINr3aT B KOHTC cEJIeKTPnueCKITe Yactn B yCTpoiCTBOTO,TOBA MOKe Da npedn3Bnka noHap nnTOKOB ydap.
BHIMAHHE!
- Ot cbo6paKeHnna 3a 6e3oNaChOCT nKJIouBaHTe 3axpaHbauJa Ka6eJ, KOrato Hma Da nI3NoI3BaTe MaunHaTa dIbIro BpeMe.
- OTBAPRnTe n 3aTbAPRnTe KanaaNTe BHNMaTeIHO, 3a da H36ErHete HapaHbAHe Ha pBcTe CN.
- PanaTe pBcTeI npExnTe cN OT BbPTaunTe ycTpoiCTBa B neaThata o6laCT. Ako pBcTe IIN dpexnTe BN 6bDat 3axBaHaTH O T BpTaunTe ycTpoiCTBa, MOKe Da NOnyUHe HapaHBAhe.
BbtpseHocCTHa Ha MaunHaTa N3XoDnHrT OTbOp ca cNlHO HarpeTn NO Bpeme Ha pa60Ta n MaIHO CneT TOBA. H36RBaHTe DOnInp Do Te3u Yactn, 3a Da npedToBpaTHe T3rapHnA. Pa3neYataHata XapTrn MoKe da e ropeua HenocpeDCTBeHo CneHd N3N3aHETo CNOT pInTHepa, TaKa Ye BHIMabaTe, KOrato R B3emate. B npotHBn Cnyau moKe da ce N3ropnte.
IopdpbKa n npoHnAaKTnHa
I PENEYI INEHNIE!
ИЗкючete MaunHaTaи n3BaTe YeIe CeJa IOT KOHTaKtA, npEiДЯ NOHcTBaTe. Hecna3BaHeTo Ha TOBa yKa3aHne MOKe Da DOBeDe Do NOKap NIN TOKOB YdAp.
ИЗклочаиTe OT bpeMe Ha bpeMe 3axpaHbuaЯн KaobIOT eEkeTpmyeckata MpeJN IIONUCTBaIte MRCTOO OKIo OCHOBaHa MaMetaJIHnTE UINΦTOBE N KOHTaKtA CbC CyXa Kbpna, 3a Da OTCpAHnTe npaxa N MpbCoTnTa. Ппн HablaanHnBaHe CB6paHnTnpax nobuShaBaOnaCHOCTTAOT KbCO CbeDInHeHne INI NOxap.
Почистваима Мшина Т с вален, Н doобр nizсень napцал. Habлakногьампарала 3а почstbahe ca mo C boda. He n3noI3BaTte aIkoXoI, БзEHcHOBn npOyTuN, pa3peHnteIN 3a 60Я ИИ npугЗлелamm BWeecTeBA. Ako noDobHn BeueCTBa Bln3at B KOHTAKT C eJeKTHpUeCHTe YactN B yctpoIcTBOTO, TOBA MOKHe DA npedinBnka NOKap INI TOKOB yapd.
- PpOBePbAaTe peoBHO n3npaBnOCTT ha 3axpaHbaunKa6eI n ceNcEA. PpOBePbAaTe MaunHata 3a pJHa, BdJIb6HaTnH, OpaKbAHn, pyKHaTnH nn IpeKoMePHo HarpBaHe. N3pOJ3BaHeto HeOpBe nopDtpKaHoO bOpUdBaHe MoHe da DoBeDe do noXap nn ToKOB yAp.
KohcymaTHBn
I PENEYUNPEKDEHNE!
He Xbplte yntpe6eHnTe Tohe Kacetn BOrbN. Toba Moke da doBege do 3anaIbaHe n pecneKTINBO - H3rapaHnHn noXap.
Ako HeBoHn pa3neTe nn pa3cnTe Tohepa, BnHMaTeJHo ro nonnre cbc cyx, MeN napaI n 36raBte BnUbaHeTo Ha n3napeHnOT tohepa.B HnKaBcnyuHne H3no3BaTe npaxocMkaKHa Ka 3a nouchTaHeTo ha pa3JIr Tohep. B npotnbEn Cnuay e Bb3MOXHO npaxocMkaKHaTata Da ce Nobpei nn Da Bb3HNKe npaxoBA eKnlo3nna nopadn eEeKtpocTaTHNo paspekdaHe.
BHIMAHHE!
CbXpaHbBaIte KacETnTe CTOHeP N dpyrInTe KOHCymaTHB daJeYOT DOCTbNa HA MaHN Dea. B CnyaH Na NorTbUaHe Ha ToHePa He3a6abHO Ce CBpHexe TLekap Hc CEHTbpa 3a KOHTpOHa OTPBABHnTa.
He ce onnTbaIte da pa3rIIO6BaTe ToHep HaceITe. ToHepbT MoKeJa capea3npbCne NactnOn OT Hero Da nonaHaB T OOHTE HJyCTATA.AKO AcTuNtOn OT HePA pONaHaT B OHTE HJyCTATA.He3a6abHO Hn I3MmIte Cbc CtydeHa BOda n NotbpcTe MeMHINHcKa NOMOU.
Ako TOhepbT ce pa3nee OT haceTa, n36raBnTe BnuBaHeto My,KaKTo N KOHTaHTa My C KOHaTa BN Ako ToHEpBT Bne3e B KOHTaKT C KOKaTa, He3a6abHO rN 3MnIte CbC canyH. Ako BnIaTe TOHepa Hnn KOKaTa BN Ce Bb3nAIN B cIeIcTBnE Ha KOHTaKT C TOHepa, He3a6abHO ce CBpKeTe C Jekap nn C ceHTbpa 3a KOHTPO HA OTPaBHHra.
Дугн
PNEyPENKDEHNE!
Ako n3no3BaTe cbpdeueH CTMyIaTOp (neMcmKbP): ToBa yctpoiCTBO c3daaba Cnao MaHHTHO nOJe. Ako YyBCTBaTe KaBHnTO n Da 6nlo aHOMaIIIN B TAnIo TO CNp Ra6Ota C Ta3n MaIIHa, He3a6abHOb Ce OTdaneyeTe OT HeN CE KOHCytnpaTe CJIekaprCn.
3aHOOBn orpaHnueHn
IpaBn orpaHnueHn 3a n3noJ3BaHeTo Ha npOdyKta n Ha n3o6paKeHn
H3no3BaHTo Ha npOyKTa 3a cKaHnpaHe, pa3neuTbaHe nIbB3npo3BExJaHe No pByr HauHH HA onpeJeHn DOkyMeHTN H3no3BaHTo Ha TaKbHa N3o6paKeHn KATO cKaHnpaHn, pa3neYaTaHn IIN B3npo3BeDeHn NO pByr HauHH C BaWnI npOyKT MoNe Da e 3a6pHaNo OT 3aKaHO H M oKe J da OboDee Do HAc3aTeHa H/nn rpaKaDaHcKa OTROBOpHoc. No-dJy E daE HEn3HePNaTeHn CnCbH Ha Te3n DOkyMeHTn. To3n CnCbH e PpeHa3HaueHd a6bDe caMo opHeNTpoBChen. AKe He cTe CNpyHN B 3aKOHNoCTTa Ha N3no3BaHTo Ha BaWn I npOyKT 3a CaHnPaHe, pa3neuTaBaHe HIN B3npo3BeJxJaHe No pPyr HauHH Ha HkaKbB KOKePeTeH DOkyMeHT N/nn N3no3BaHTo Hc KaHnpaHn, pa3neuTaHH N/nn B3npo3BeDeHn No dpyr HaHH H3o6paKeHn, Tp4bBA da Ce KOHCytNaPate npeDbapntHo C BaWnI kOpCKoHcyJT.
- BaHHKHOtN
-Пьтнчесн.YeKOBe
-ПлATEЖИн HapeЖданя
- KynoHn 3a xpaHa
- CeptnnKaTH 3a DeNo3NT
-Паснорtn
-Пошенсн Марки (Валдни Илп Невалдни)
-IMMrgpaunOHN DOKyMeHTN
-ⅠeHTnΦnUpaa3HaayKn NmE6IeMn
-Mapk3a daHbU(BaIINHn Hn HeBaIINHn)
-OKymeHTn Ha BOEHOClyjKeuN HABOpHnU
-Obnuraunnn npyn npyn ydoctobepenna 3a dbln
-YeKOBe HnPiTaTeKHn 3aNoBEdn, n3daDeHn OT dbpKaBn areHcHn
- YdOCTOBepeHn3aaknn
-OKyMeHTnHa aBtOMO6uIN HOTapnaHn AKTOBe
-TBop6n 3aunTeHc aBTOPcKO npBO/IpOn3BeDeHnHa n3KycTBoTO 6e3 pa3peSeHne O T npTEkataEnHa aBTOpCKOTO npABO
IIOJKeHN Ca 3HaunTeJIHn ycINr pKOBODCTBaT a 3a yctpoNCTBOTO da 6bDat 6e3 HeTOUHOCTn n npOyCN. BbnpEKN TOBA, Tb kato Hne NOCToHHo NIOO6PbAme HaHTe npOdyKTn, AOK Bn e Heo6XoDmTaOHa CNEuΦKaUa, Ce CbprHeTe c Canon.
③ MF Driver Installation Guide (User Software CD (Kullanici Yazilimi CD'si)):
aalalalalalalalalalalal alalal alalal alalal alalal alalal alalal alalal alalal alalal alalal alalal alalal alalal alalal alalal alalal alalal alalal alalal alalal alalal alalal alalal alalal alalal alalal alalal alalal alalal
gaiu jn (yjui y) e-Manual
.
()[DisplayManuals]
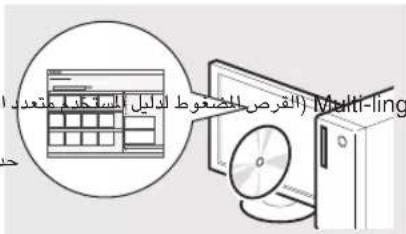
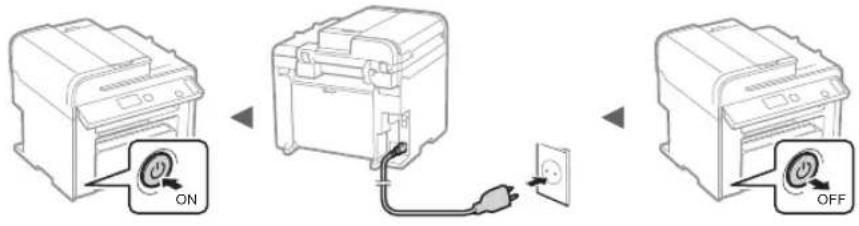
J 1
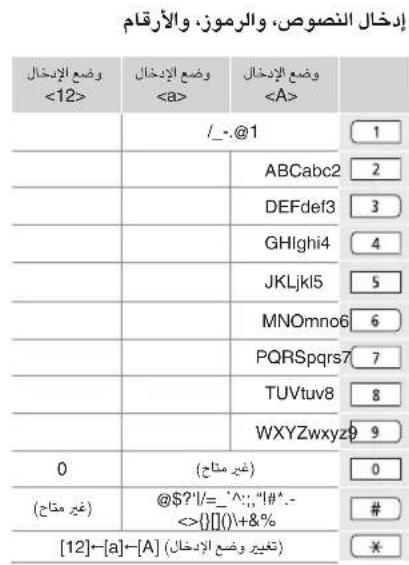
a
aag aaln ae Jaa Jauai Jauai Jauai aai Jauai Jauai Jauai Jauai Jauai Jauai Jauai Jauai Jauai Jauai Jauai Jauai Jauai Jauai Jauai Jauai Jauai
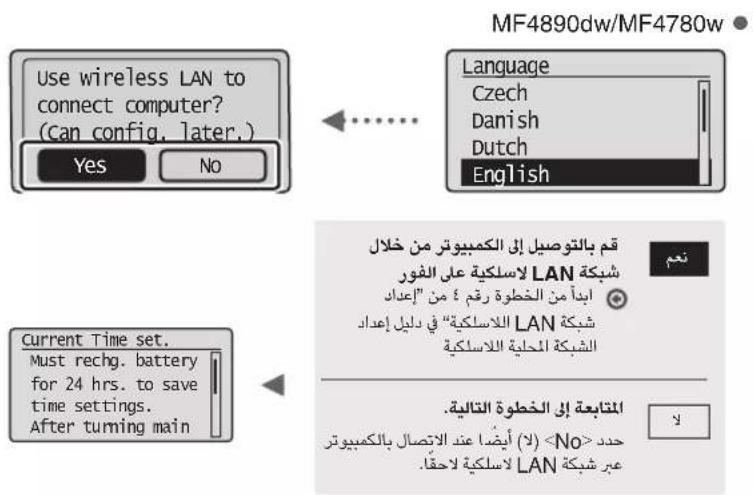
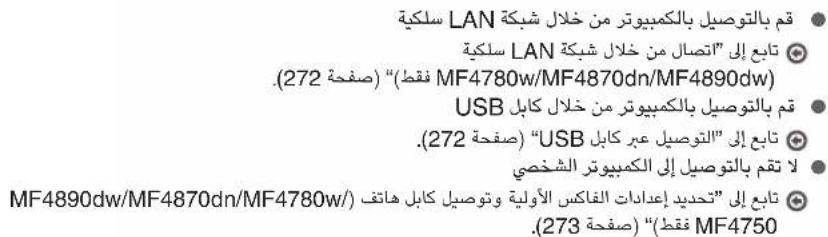
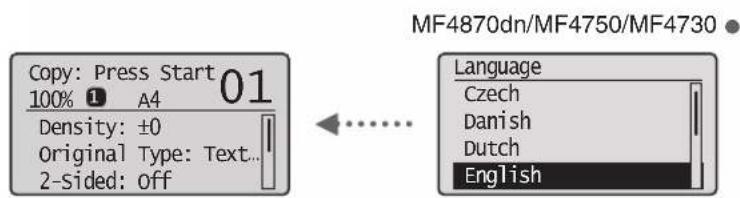
Ji
| 131111111111111111111111111111111111111111111111111111111111111111111111111111111111111111111111111111 | |
| < A> |
| < a> |
| < 12> |
LAN 1
"Basic Network Settings" (a)
"Setting the IP Address" (a)
()
User plssiolo jolal alil
. (a) (a) Software CD
(273a)"gglgglalao"
USB
.MFToolbox,MF USB
User
(S) Software CD
.USBU5S
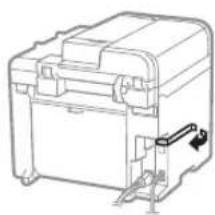
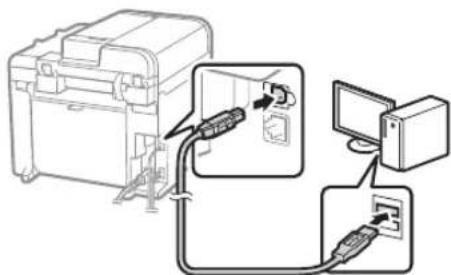
(273a)"gjg jia
juaaJlal Jauai aayb Jia
LAN
"SLAN LAN 5uJ uJuJuJuJbJ

25.10.14.15.16.17.18.19.20.21.22.23.24.25.26.27.28.29.30.31.32.33.34.35.36.37.38.39.40.41.42.43.44.45.46.47.48.49.50.51.52.53.54.55.56.57.58.59.60.61.62.63.64.65.66.67.68.69.70.71.72.73.74.75.76.77.78.79.80.81.82.83.84.85.86.87.88.89.90.91.92.93.94.95.96.97.98.99.
(1gaaai)SLgayjglalLAN
jssll jgall ggl 1gll jg iie o gao
a 10 aai jao gao LAN Jgai
USB
"USB山Kg
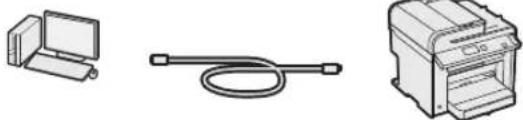
USB 15
15Lw 15Lw a8y j0s 8tll pae all
aaii 45 jll lal g 45 hll jq g qil
JLJLJUUGGgaguuluslll (MF4750/MF4780w/MF4870dn/MF4890dw)
a
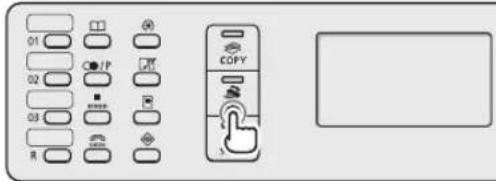
Connect phone line.
Follow illustrations
on the next screen:
Connect line to A.
*Next : Press OK
aaii i 1
e-Manual
(gSJJUJU)
(sll) "Fax" (gjyJl) e-Manual
"Using the Fax Functions
(RXg)RX Mode" (Lulie L)Receiving Faxes
puiiui piui puiiuai
-1gusuususususususususususususususususususususususususususususususususususususususususususususus
p^a + 1 x^b + 1 ,即 p^x x^b + 1 ,即 x^c x^b + 1
JU
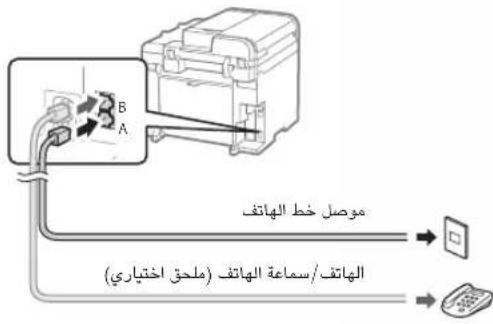
y
aJisllall alaw jie
aalaa aaii jlll lll bll
Jgall Jaaas
Setting is complete.
Turn the main power
OFF and ON.
OK

End Fax Setup
Guide?
Yes
No
.5j 1 j 1 j 1 j 1 j 1 j 1 j 1
e-Manual jai. 1i iai ai bai gai gai
1gdy 1gdy
(ωS)“Fax"(gJyL山)e-Manual
Using the Fax Functions
Changing Fax Settings (Settings that Can Be)
SpecifiedUsing the [Menu] Button
((aftal)[Menu]jlll
(JwJ) "Configuring Send Settings"
()“SelectLineType"
cuii 1Jg Jg
MF Driver Installation Guide


Product Ext
Jalil jai jai jai jai jai jai Jai Jai Jai Jai Jai Jai Jai Jai Jai Jai Jai Jai Jai Jai Jai Jai Jai Jai Jai Jai Jai Jai Jai Jai Jai Jai Jai Jai
gssgssgss
4gjg jyj 10000000000000000000000000000000000000
MF4730
/MF4870dn/MF4890dw
MF4750/MF4780w

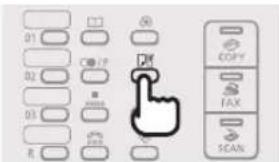

Paper Settings
MP Tray
Drawer 1
Applying settings wait a moment.
piai jgoljai diy jll aygl jie rale a jbi aglgl jin jgll gssal jilgl plai
gulll
jglai jia 20g1 pla 1uull l
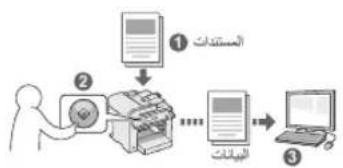
Jusuulucpuiuuiuuiuui
juaa
MF Toolbox aolipjwll wswll
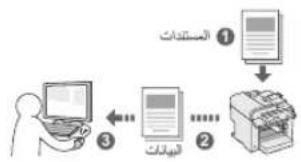
aill 10
Golny plzlygolny
***WIA
\*\*\*\*
j 100000000000000000000000000000000000000000000000000000000000000000000000000
\*\*\*\*\*\*\*\*\*\*\*\*\*\*\*\*\*\*\*\*\*\*\*\*\*\*\*\*\*\*\*\*\*\*\*\*\*\*\*\*\*\*\*\*\*\*\*\*\*\*\*\*\*\*\*\*\*\*\*\*\*\*\*\*\*\*\*\*\*\*\*\*\*\*\*\*\*\*\*\*\*\*\*\*\*\*\*\*\*\*\*\*\*\*\*\*\*\*\*\*\*
jglal jglal lla Jgall diay jglal Jgall daiy 2k11 Jgall gll 2k11 ne agill 11
P
aJ111 3
dis ay slll 3 aell llll jyss dis ay 3 yslp11g cagf 3 zjiall alilal 1. gai dai
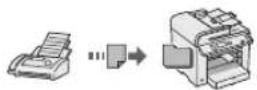
11 11 11 11 11 11 11 11 11 11 11 11 11 11 11 11 11 11 11 11 11 11 11 11 11 11 11 11 1
JLWALW L WIL
aC
jooo/soa
juaa bokai
jieieiei 1111111111111111
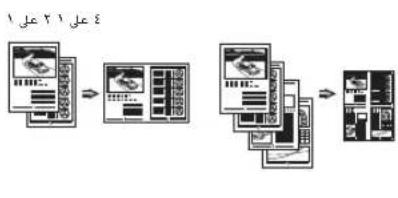
( 1,2) ( 1,2)
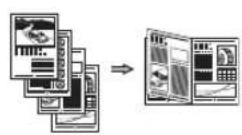
SLUULI acLb
auioloyuul acubi
aellal jaiiueo
“dlo”
#
aJuao/oo
gullll 111111111111111111111111111
*
Paper jam. Press ] to display steps.
3gll jssssj 1jglal jla gaiiaaii iag aeglll lll d y aaiil aaiil aaiil aie

aill JSLl l a 1 aal LJI e aL r g b. aagll 1r 1 1 1 1 1 1 1 1 1 1 1 1 1 1 1 1 1 1 1 1
aIwJygds
aLJIJe aIw jgki. aagl eJ gll Jgll IeJ Lgloie
| الإستعمال الحرفية | الإستعمال الحرفية |
| . Before Replacing the Toner Cartridge" (الإستعمال الحرفية) e-Manual®(الإستعمال الحرفية) | Prepare toner> <cartridge>(عزر合法性) | |
| . Before Replacing the Toner Cartridge" (الإستعمال الحرفية) e-Manual®(الإستعمال الحرفية) | Toner is> <nearly out>. (الإستعمال الحرفية) | |
| . Before Replacing the Toner Cartridge" (ال,enGLISH) e-Manual®(ال,enGLISH) | Toner is> <nearly out>. (ال,enGLISH) | |
| . Before Replacing the Toner Cartridge" (ال,enGLISH) e-Manual®(ال,enGLISH) | Toner is> <nearly out>. (ال,enGLISH) | |
| . Before Replacing the Toner Cartridge" (ال,enGLISH) e-Manual®(ال,enGLISH) | Toner is> <nearly out>. (ال,enGLISH) | |
| . Before Replacing the Toner Carriage" (ال,enGLISH) e-Manual®(ال,enGLISH) | Toner is> <nearly out>. (ال,enGLISH) | |
| . Before Replacing the Toner Carriage" (ال,enGLISH) e-Manual®(ال,enGLISH) | Toner is> <nearly out>. (ال,enGLISH) | |
| . Before Replacing the Toner Carriage" (ال,enGLISH) e-Manual®(ال,enlish) | Toner is> <nearly out>. (ال,enlish) | |
| . Before Replacing the Toner Carriage" (ال,enGLISH) e-Manual®(ال,enlish) | Toner is> <nearly out>. (ال,enlish) | |
| . Before Replacing the Toner Carriage" (ال,enGLISH) e-Manual®(ال,enlish) | Toner is> <nearly out>. (ال,enlish) | |
| . Before Replacing the Toner Carage" (ال,enGLISH) e-Manual®(ال,enlish) | Toner is> <nearly out>. (ال,enlish) | |
| . Before Replacing the Toner Carage" (ال,enGLISH) e-Manual®(ال,enlish) | Toner is> <nearly out>. (ال,enlish) | |
| . Before Replacing the Toner Carage" (ال,enGLISH) e-Manual®(ال,enlsh) | Toner is> <nearly out>. (ال,enlsh) | |
| . Before Replacing the Toner Carage" (ال,enGLISH) e-Manual®(ال,enlsh) | Toner is> <nearly out>. (ال,enlsh) | |
| . Before Replacing the Toner Carage" (ال,enGLISH) e-Manual®(ال,enlsh) | Toner is> <nearly out>. (ال,enlsh) | |
| . Before Replacing The Toner Carriage" (ال,enGLISH) e- Manual®(ال,enlsh) | Toner is> <nearly out>. (ال,enlsh) | |
| . Before Replacing The Toner Carriage" (ال,enGLISH) e- Manual®(ال,enlsh) | Toner is> <nearly out>. (ال,enlsh) | |
| . Before Replacing The Toner Carage" (ال,enGLISH) e- Manual®(ال,enlsh) | Toner is> <nearly out>. (ال,enlsh) | |
| . Before Replacing The Toner Carage" (ال,enGLISH) e- Manual®(ال,enlsh) | Toner is> <nearly out>. (ال,enlsh) | |
| . Before Replacing The Toner Carage" (ال,enGLISH) e- Manual@ (ال,enlsh) | Toner is> <nearly out>. (ال,enlsh) | |
g 1
g aaiy ggi y iay aalblln ggi. aalbllg g ggl
gaiy jyj yaiy caiy jgi yaiy bgy jbi jaii jaiy loie
Juiu Jiuil de xll dgy Loeie aill de all yjbi 1
elall g jie alalallogbail jybi ic nall agby
eall yjbjg lde ayaiy elall ciis li


a1k 1101 aia gusie
Jollll jll l 100000000000000000000000000000000000000000000000000000000000000000000000
alalg jy aagaae bpaas yj gns lae 1
gall plaiu w gill plaiw l aigall gail
gaii 1 gaii 1 gaii gaii gaii gaii gaii gaii gaii gaii gaii gaii gaii gaii gaii gaii gaii gaii gaii gaii gaii gaii gaii gaii gaii gaii gaii gaii gaii gaii gaii gaii gaii gaii gaii gaii
1
aall
1
zuygduai duiu
1
jallolj
()
32 > 31 ②
aagssllg jyssll
(aJdlgslld)aaalglb
yssllgolaoailllglg
()
aall aagll jyj ylaal 1
a
1111 1
jall valo jno jn jnnn gabll gag aal Jlae /Jae
aal aal alal alal alal alal alal alal alal alal alal alal alal alal alal alal alal alal alal alal alal alal alal alal alal alal alal alal alal alal alal alal alal alal alal alal alal alal alal alal alal alal alal alal alal

3.2.1.5.2.1.1
121234567890
.山
j山
a
j 12 j 13 14 15 16 17 18 19 20 21 22 23 24 25 26 27 28 29 30 31 32 33 34 35 36 37 38 39 40 41 42 43 44 45 46 47 48 49 50 51 52 53 54 55 56 57 58 59 60
aaiy

在 Rt ABD 中:
aknuaiabi
PQ = AQ = 23
y
a a a a a a a a a a a a a a a a a a a a a a a a a a a a
y
j 1 j 1 j 1 j 1 j 1 j 1 j 1 j 1 j 1 j 1 j 1 j 1 j 1 j 1 j 1 j 1 j 1 j 1 j 1 j 1 j 1 j 1 j 1 j 1 j 1 j 1 j 1 j 1 j 1 j 1 j 1 j 1 j 1 j 1 j
a#
aai 1
a≤g<1g≥1

1 1
pIaIauy
aiklll 1100 puiu u. qai jiluiu uuiu uuiu uuiu uuiu uuiu uuiu uuiu uuiu uuiu uuiu uuiu uuiu uuiu uuiu uuiu uuiu uuiu uuiu uuiu uuiu uuiu uuiu uuiu uuiu uuiu uuiu uuiu uuiu uuiu uuiu uuiu uuiu uuiu uuu

-1
-1
3.
1 1
gall gaaal aal y jy jlll 0jaiw
aalg yjy jgcl clj
gill gall glaall al 3. gall jg yually lglal, d
gall 1p gannal jol s jol jol bll ojol w jol aouu oj


:
4.25 201g 1,201g 201g
1 1
Ld 10000000000000000000000000000000000000
(aIaS S y Jrs Jg) laJ sO Jn Jc
JgSg 1jai jglgai jS
Lalil [B] LolSjus
Lao g
julu 100 ()[C]L
4()[C]K
iS go do 1, lo auy gi
gao juy
aai jai lai kcs kss y aai jai
gao
A#[▼]L[▲]L
JraalwU [▶] U (Jz) [OK]
4 [A]L(=)[ ]L
a
JgJyJyJyJyJyJyJyJy[OK]
SuiLai (S) (Ucl) 4.5
111(Jlaol)
JU 1 (J) [OK]

MF Driver Installation Guide ③ User Software CD)
:((y≤j)
(∑j≤j≤j≤j≤j≤j≤j≤j≤j≤j≤j≤j≤j≤j≤j≤j≤j≤j≤j≤j≤j≤j≤j≤j≤j≤j≤j≤j≤j≤j≤j≤j≤j≤j≤j≤j≤j≤j≤j≤j≤j≤j≤j≤j≤j≤j≤j≤j≤j≤j≤j ≤ j ≤ j ≤ j ≤ j ≤ j ≤ j ≤ j ≤ j ≤ j ≤ j ≤ j ≤ j ≤ j ≤ j ≤ j ≤ j ≤ j ≤ j ≤ j ≤ j ≤ j ≤ j ≤ j ≤ j ≤ j ≤ j ≤ j ≤ j ≤ j ≤ j ≤ j ≤ j ≤ j ≤ j ≤ j ≤ j ≤ j ≤ j ≤ j ≤ j ≤ j ≤ j ≤ j ≤ j ≤ j ≤ j ≤ j ≤ j ≤ j ≤ j ≤
:((jLglaol)aij jaa jss
aalb01jssj0000000000000000000000000000000000000000000000000000000000000000000000000
| x^ | = 1| x| · | r1^2 + r2^2 + r_3^2| ≤ 34| x| ^2
(gjgj(g)e-Manual
a
1
S (Lal) 1
1 (j)
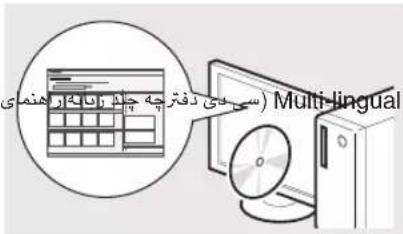
a

L 1
#
gio gss s 1s 1s j 1s j 1s j 1s j 1s j 1s j 1s j 1s j 1s j 1s j 1s j 1s j 1s j 1s j 1s j 1s j 1s j 1s j 1s j 1s j 1s j 1s j 1s j 1s j 1s j 1s
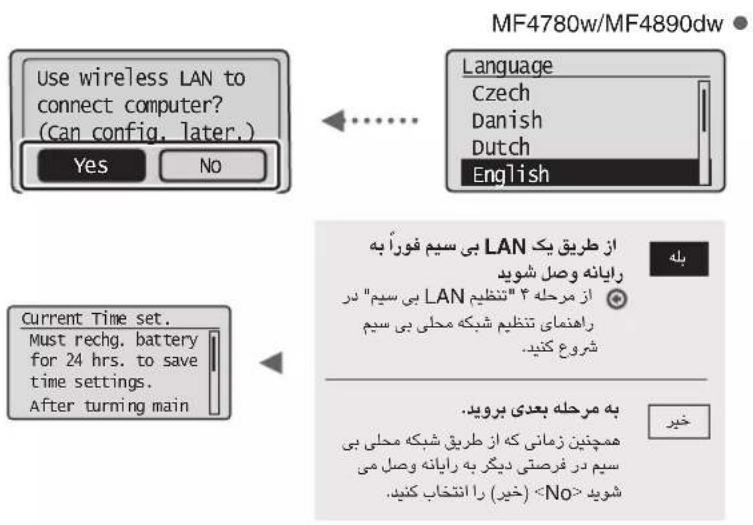
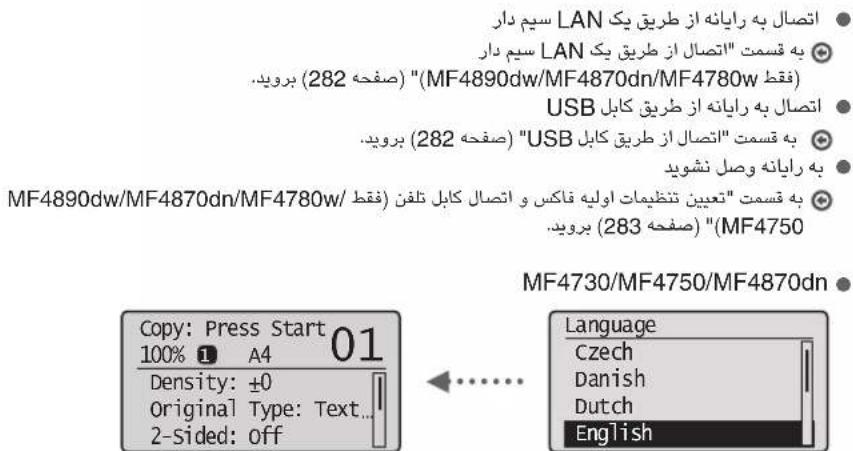
JglgJalai jia juyjg Jg
| <12> | <12> | <12> |
| /-.@1 |
| | ABCabc2 |
| | DEFdef3 |
| | GHghi4 |
| | JKLjki5 |
| | MNOmno6 |
| | PQRSpqrs7 |
| | TUVtuv8 |
| 9 | WXYZwxyz |
| 0 | (###) |
| ### | @$?"/=^...:"#.*. |
| (###) | <>{}())+&% |
| [12]+[a]←[A](###) |
s
"Network Settings" (e-Manual "Basic Network Settings" (k)
"Setting the IP Address" (u)
(IP
User Software CD
Press ] to display steps
1 1 1 1 1 1 1 1 1 1 1 1 1 1 1 1 1 1 1 1 1 1 1 1 1 1 1 1 1 1 1 1 1 1
e-Manual
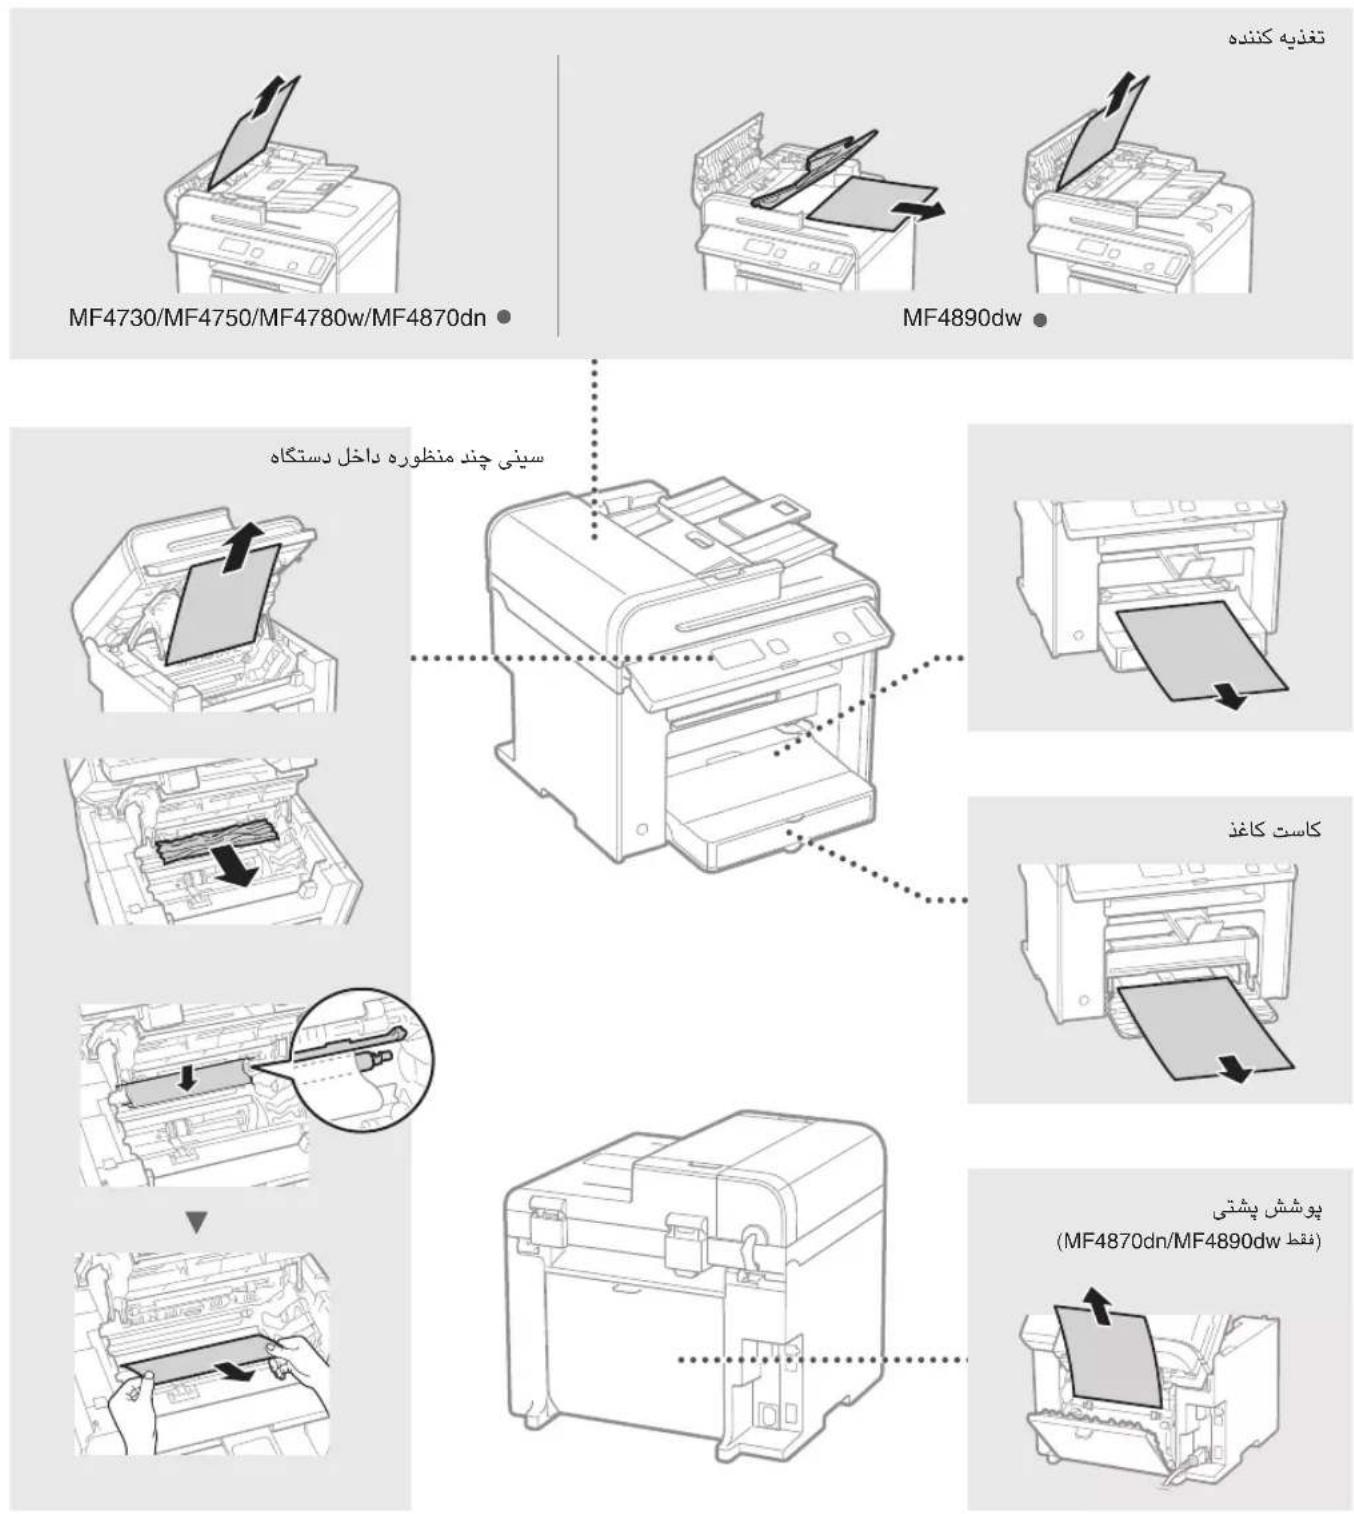
y j 150
golgoalgsalgs
gao gao 500
| الإستعمال وrivails | الإستعمال | الإستعمال |
| "Before Replacing the Toner Cartridge"(الإستعمال) e-Manual (الإستعمال) | "Before Replacing the Toner Cartridge"(الإستعمال) e-Manual (الإستعمال) | "Before Replacing the Toner Cartridge"(ال,enGLISH) |
| "Before Replacing the Toner Cartridge"(ال,enGLISH) e-Manual (ال,enGLISH) | "Before Replacing the Toner Cartridge"(ال,enGLISH) e-Manual (ENGLISH) | "Before Replacing the Toner Cartridge"(ENGLISH) |
| "Before Replacing the Toner Cartridge"(ال,enGLISH) e-Manual (ENGLISH) | "Before Replacing the Toner Cartridge"(ENGLISH) e-Manual (ENGLISH) | "Before Replacing the Toner Cartridge"(ENGLISH) |
| "Before Replacing the Toner Cartridge"(ال,enGLISH) e-Manual (ENGLISH) | "Before Replacing the Toner Cartridge"(ENGLISH) e-Manual (ENGLISH) | "Before Replacing the Toner Cartridge"(ENGLISH) |
| "Before Replacing the Toner Cartridge"(ال,enGLISH) | "Before Replacing the Toner Cartridge"(ENGLISH) | "Before Replacing the Toner Cartridge"(ENGLISH) |
| "Before Replacing the Toner Cartridge"(ال,enGLISH) e-Manual (ENGLISH) | "Before Replacing the Toner Cartridge"(ENGLISH) e-Manual (ENGLISH) | "Before Replacing the Toner Cartridge"(ENGLISH) |
| "Before Replacing the Toner Cartridge"(ال,enGLISH) e-Manual (ENGLISH)
(ال,enGLISH) | "Before Replacing the Toner Cartridge"(ENGLISH) e-Manual (ENGLISH) | "Before Replacing the Toner Cartridge"(ENGLISH) |
| "Before Replacing the Toner Cartridge"(ال,enGLISH) e-Manual (ENGLISH) | "Before Replacing the Toner Cartridge"(ENGLISH) e-Manual (ENGLISH) | "Before Replacing the Toner Cartridge"(ENGLISH) |
| "Bleve" (RX Print Settings) | "Before Replacing the Toner Cartridge"(ENGLISH) | "Before Replacing the Toner Cartridge"(ENGLISH) |
| "Printed the Report Automatically"(ال,enGLISH) e-Manual (ENGLISH) | "Printed the Report Automatically"(ENGLISH) e-Manual (ENGLISH) | "Printed the Report Automatically"(ENGLISH) e-Manual (ENGLISH) |
| "Continue Print. When Toner Is Nearly Out"(ال,enGLISH) e-Manual (ENGLISH) | "Continue Print. When Toner Is Nearly Out"(ENGLISH) e-Manual (ENGLISH) | "Continue Print. When Toner Is Nearly Out"(ENGLISH) e-Manual (ENGLISH) |
s s 15 4 4 4 4 4 4 4 4 4 4 4 4 4 4 4 4 4
g j 100000000000000000000000000000000000000000000000
cui si p 1i y aaiy i y gao yalb aygaaagabas
m = 311
111 1
aaii
()+
()[0]:J
()
-(1)[Prefer
4.2.10
山
cui 100 12 13 14 15 16 17 18 19 20 21 22 23 24 25 26 27 28 29 30 31 32 33 34 35 36 37 38 39 40
s#
paaa aaaaaaaaaaaaaaaaaaaaaaaaaaaaaaaaaaaaaaaaaaaaaaaaaaaaaaaaaaaaaaaaaaaaaaaaaaaaaaaaaaaaaaaaaaaaaaaaaaaaaaaaaaaaaaaaaaaaaaaaaaaaaaaaaaaaaaaaaaaaaaaaa aa
y 1 y
30-2, Shimomaruko 3-chome, Ohta-ku, Tokyo 146-8501, Japan
One Canon Park, Melville, NY 11747, U.S.A.
CANON EUROPA N.V.
Bovenkerwerweg 59, 1185 XB Amstelveen, The Netherlands
15F Jinbao Building No.89, Jinbao Street, Dongcheng District, Beijing 100005, PRC
CANON SINGAPORE PTE LTD
1 HarbourFront Avenue, #04-01 Keppel Bay Tower, Singapore 098632
CANON AUSTRALIA PTY LTD
1 Thomas Holt Drive, North Ryde, Sydney NSW 2113, Australia
CANON GLOBAL WORLDWIDE SITES
http://www.canon.com/
Printed on non-chlorine bleached paper.