CORTINA - Portable air conditioner WOODS - Free user manual and instructions
Find the device manual for free CORTINA WOODS in PDF.
User questions about CORTINA WOODS
0 question about this device. Answer the ones you know or ask your own.
Ask a new question about this device
Download the instructions for your Portable air conditioner in PDF format for free! Find your manual CORTINA - WOODS and take your electronic device back in hand. On this page are published all the documents necessary for the use of your device. CORTINA by WOODS.
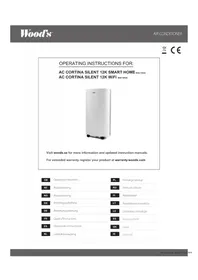
USER MANUAL CORTINA WOODS
AC Cortina 12K AirSwitch
(WAC1205G)

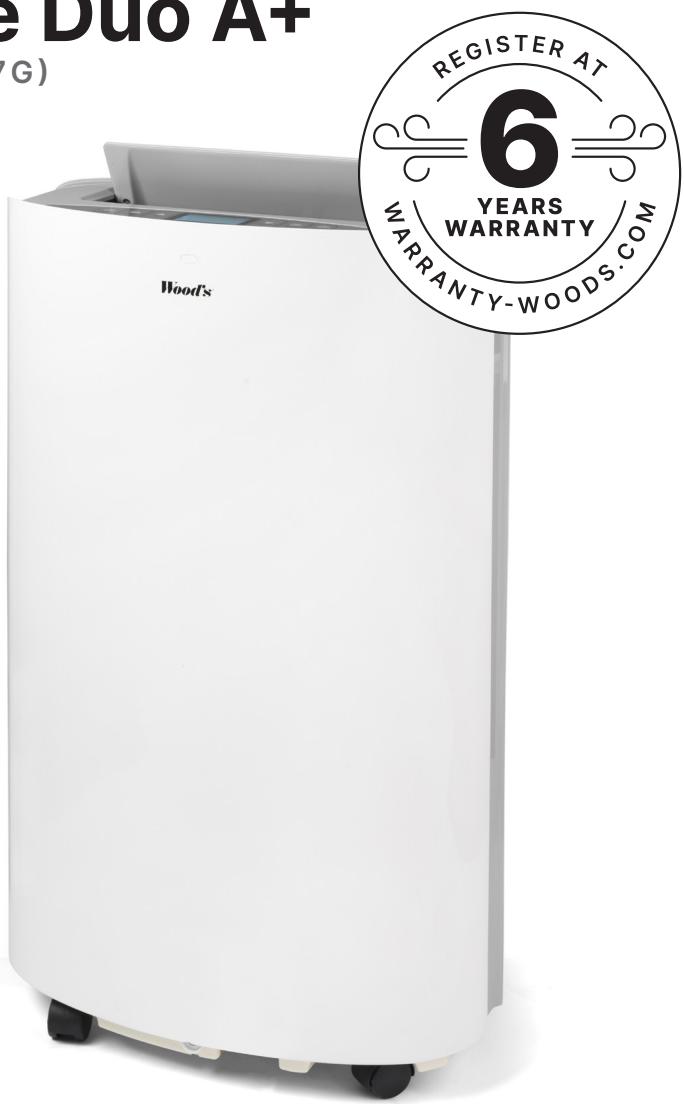
AC Cortina 12K AirSwitch Smart Home Duo A+
(WAC1207G)
| GB | Instructions for use | 6-13 |
| SE | Bruksanvisning | 14-21 |
| NO | Bruksanvisning | 22-29 |
| DK | Betjeningsvejledning | 30-37 |
| FI | Käyttöohjeet | 38-45 |
| FR | Guide d'instructions | 46-53 |
| DE | Bedienungsanleitung | 54-61 |
| ES | Manual de instrucciones | 62-69 |
| NL | Gebruiksaanwijzing | 70-77 |
| RO | Manual utilizare | 78-85 |
| PL | Instrukcja obsługi | 86-93 |
| LT | Naudojimosi instrukcija | 48-101 |
| LV | Lietošanas instrukcija | 102-109 |
| EE | Kasutusjuhend | 110-117 |
| GR | Oδηγίες λειτουργίας | 118-125 |
| CZ | Uživatelská príručka | 126-133 |
| SK | Používatel'ská príručka | 134-141 |
| HU | Felhasználói kézikönyv | 142-149 |
text_image
e Duo A+ (G) WOOD's REGISTER AT 6 YEARS WARRANTY-WOODS.COM
WATCH INSTRUCTIONAL VIDEO
Scan to watch the AC Cortina AirSwitch instructional video.

GET EXTENDED WARRANTY
Scan and get a 6-year Warranty by Registering at warranty-woods.com and replacing the filter annually.

SEE LATEST UPDATED USER MANUAL
Scan the QR-code or visit woods.se
Revision date: 20-03-2024
A
text_image
1 2 3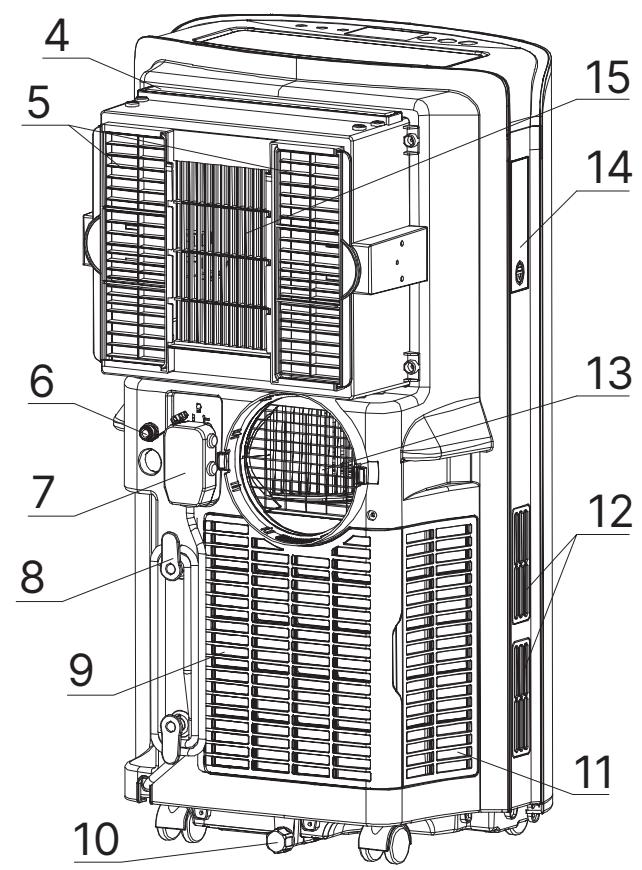
text_image
Technical diagram of an air conditioning unit with numbered components for identificationC
text_image
AIR SWITCH SPEED UP SET TEMP. °E 88:88 DOWN MODE POWER 1 2 3 4 5 6 7 8 9 10 11 12 13 14 15 16 17 18 88:88 88 SET TEMP. °CB
text_image
16 17 18 19 20 21 23 22D
text_image
4 6 9 5 8 TEMP FAN POWER TIMER Steep Air Switch MODE Auto Swing 1 2 7 3
natural_image
Technical line drawing of a battery pack assembly with components and parts (no text or symbols)E
natural_image
Line drawing of a large industrial air purifier or refrigerant unit with cooling fins and wheels (no text or symbols)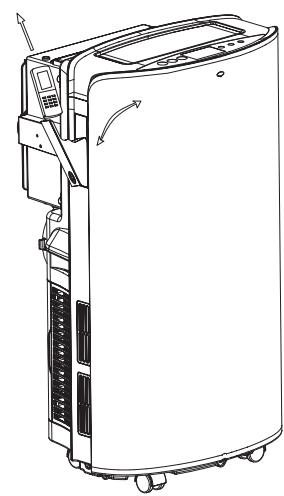
natural_image
Line drawing of a large industrial air purifier or refrigerant unit with cooling fans and control panel (no text or symbols)F
text_image
1 2 3G
natural_image
Diagram showing two mechanical components with arrows indicating rotation or assembly (no text or symbols)H
natural_image
Technical line drawing of two air conditioning machines with cooling fans and heat sinks (no text or symbols)M
natural_image
Technical line drawing of a dual-panel HVAC unit with internal components and piping (no text or symbols)N
natural_image
Line drawing showing two room layouts: one with a double door opening, the other with a cabinet and ventilation system (no text or symbols)I
natural_image
Technical diagram showing a cylindrical component being processed by a mechanical assembly (no text or symbols present)J
text_image
Technical diagram showing assembly steps of a mechanical device with labeled components and directional arrows indicating motion.0
natural_image
Technical line drawing of a cylindrical device with 50cm height dimension and 30cm base width (no text or symbols)K
natural_image
Technical line drawings of two industrial air purifiers with labeled components (no text or symbols present)P
text_image
Technical diagram showing three-step assembly of a heat exchanger or fan device with labeled components and directional arrows.Q
text_image
Technical diagram of an air conditioning unit with labeled components A, B, C, D and internal grid structuresL
natural_image
Technical line drawing of an industrial air conditioning unit with internal components and a close-up view (no text or symbols)
FLAMMABLE MATERIAL.
This appliance contains R290/Propane, a flammable refrigerant.

Refer operator's manual.

Read technical manual.

Read the operator's manual.
SAFETY INFORMATION
Before installing and using the appliance, carefully read the supplied instructions. The manufacturer is not responsible if an incorrect installation and use cause injuries and damages. Always keep the instructions with the appliance for future reference.
CHILDREN AND VULNERABLE PEOPLE'S SAFETY
WARNING ⚠️!
Risk of injury or permanent disability.
This appliance can be used by children aged eight years and above, persons with reduced physical, sensory or mental capabilities, or lack of experience and knowledge if they have been given supervision or instruction concerning the use of the appliance safely and understand the hazards involved. Do not let children play with the appliance.
Children of less than three years should be kept away unless continuously supervised.
Keep all packaging away from children. Cleaning and user maintenance shall not be done by children without supervision.
GENERAL SAFETY
This appliance is intended to be
used in households and similar environments such as shops, offices, and other working environments. The rating plate is located at the side or back of the appliance. Keep ventilation openings clear of obstruction.
Other than those recommended by the manufacturer, do not use mechanical devices or other means to accelerate the defrosting process. The appliance shall not be stored in a room where ignition sources are operating continuously (open flames, working gas appliance, operation electric heater, etc.). Do not pierce or burn. Be aware that refrigerants may not have an odour. Do not use water spray and steam to clean the appliance. Clean the appliance with a moist, soft cloth. Only use neutral detergents. Do not use abrasive products, abrasive cleaning pads, solvents or metal objects. If the power cord is damaged, it must be replaced by the manufacturer, its authorized Service Centre or similarly qualified persons to avoid a hazard.
SAFETY INSTRUCTIONS
WARNING
Only a qualified person can install this appliance.
Remove all packaging material. Do not install or use a damaged appliance. The appliance shall be installed, operated and stored in a room with a floor area larger than 12,5 m ^2 . Strictly follow the installation instruction supplied with the appliance. Always be careful when you move the appliance because it is heavy. Always wear safety gloves.
Make sure air can circulate around the appliance. Wait at least 4 hours before connecting the appliance to the power outlet. This is to allow the oil to flow back into the compressor. Do not install the appliance close to radiators or other heat sources. Do not install the appliance in direct sunlight.
ELECTRICAL CONNECTION
WARNING ⚠️
Risk of fire and electrical shock.
The appliance must be connected to a grounded outlet. Ensure that the electrical information on the rating label is in accordance with the power supply. If not, contact an electrician. Always use a correctly
installed shockproof socket. Do not use multi-plug adapters and extension cables. Make sure not to cause damage to the electrical components (e.g. plug, cable). Contact the authorized Service Centre or an electrician to change the electrical components. The cable must stay below the level of the plug. Connect the plug to the power socket only at the end of the installation. Make sure that there is access to the plug after the installation. Do not pull the power cable to disconnect the appliance. Always unplug the power cable from the plug only.
USE
WARNING ⚠️
Risk of injury, burns, electrical shock or fire.
Do not change the specification of this appliance. Be careful not to cause damage to the refrigerant circuit. It contains propane (R290), a natural gas with a high level of environmental compatibility. This gas is flammable. If damage occurs to the refrigerant circuit, make sure that there are no flames and sources of ignition in the room. Ventilate the room. Do not put flammable products or wet items with flammable products near or on the appliance.
DISPOSAL
WARNING ⚠️
Risk of injury.
Disconnect the appliance from the mains supply. Cut off the mains cable and discard it. The refrigerant circuit of this appliance is ozone-friendly. Contact your local authority for information on how to discard the appliance correctly. Do not cause damage to the part of the cooling unit that is near the heat exchanger.
text_image
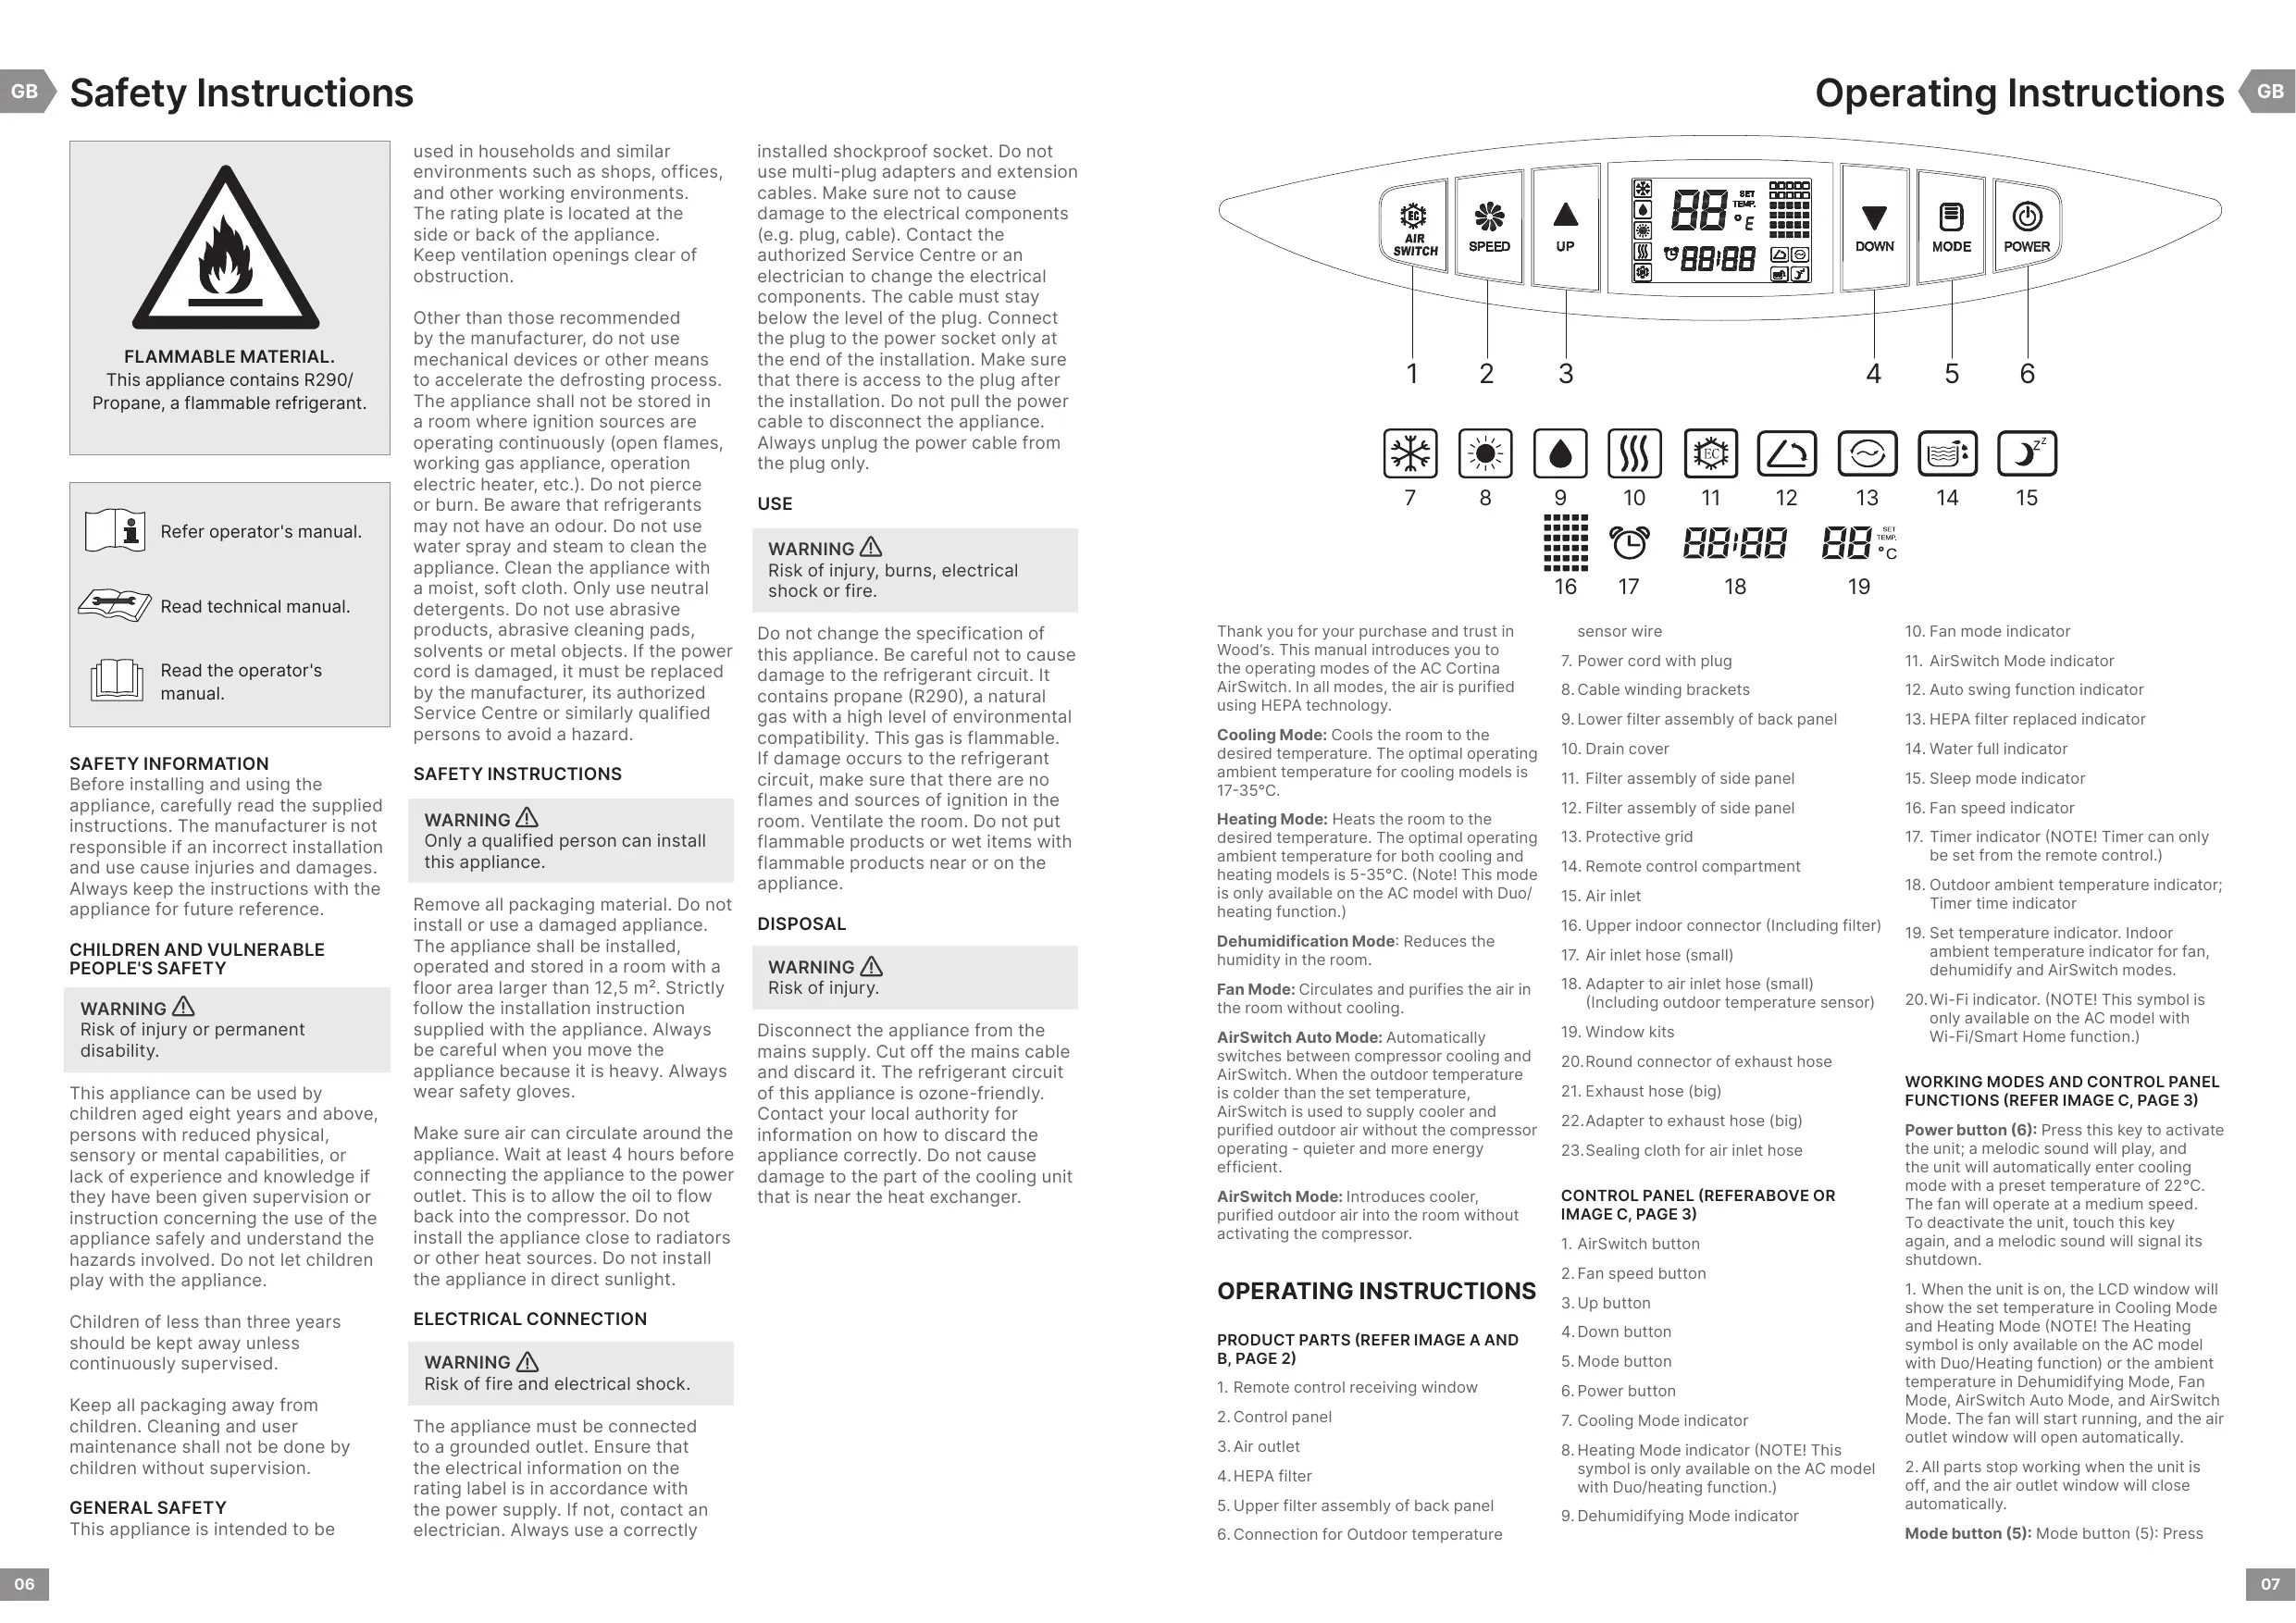
AIR SWITCH SPEED UP SET TEMP. 88:88 DOWN MODE POWER 1 2 3 4 5 6 7 8 9 10 11 12 13 14 15 16 17 18 19Thank you for your purchase and trust in Wood's. This manual introduces you to the operating modes of the AC Cortina AirSwitch. In all modes, the air is purified using HEPA technology.
Cooling Mode: Cools the room to the desired temperature. The optimal operating ambient temperature for cooling models is 17-35°C.
Heating Mode: Heats the room to the desired temperature. The optimal operating ambient temperature for both cooling and heating models is 5-35°C. (Note! This mode is only available on the AC model with Duo/heating function.)
Dehumidification Mode: Reduces the humidity in the room.
Fan Mode: Circulates and purifies the air in the room without cooling.
AirSwitch Auto Mode: Automatically switches between compressor cooling and AirSwitch. When the outdoor temperature is colder than the set temperature, AirSwitch is used to supply cooler and purified outdoor air without the compressor operating - quieter and more energy efficient.
AirSwitch Mode: Introduces cooler, purified outdoor air into the room without activating the compressor.
OPERATING INSTRUCTIONS
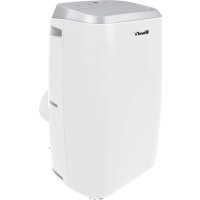
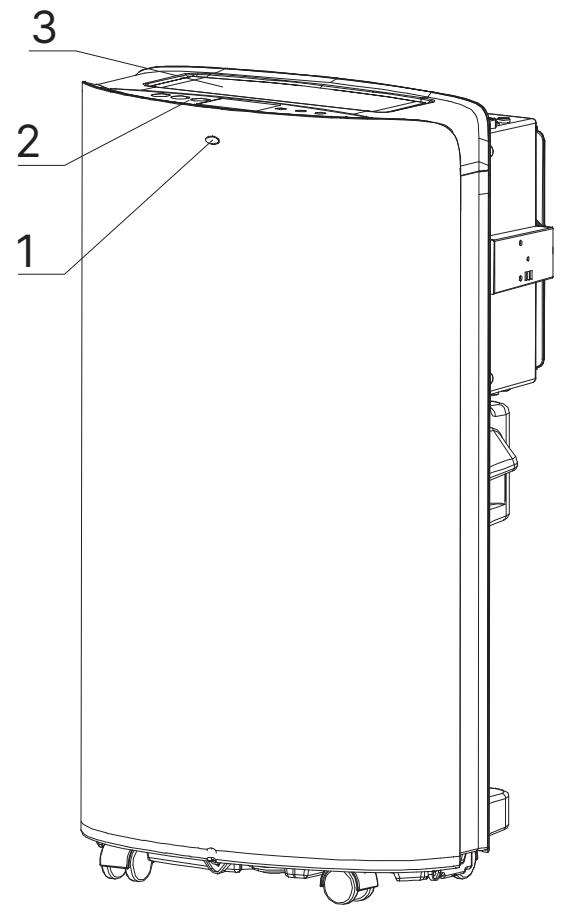
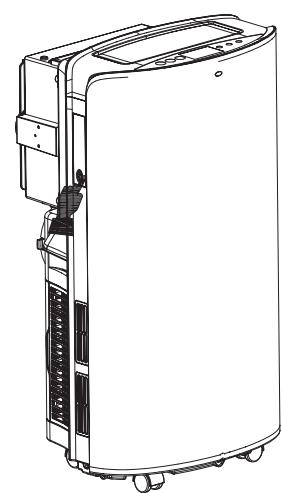
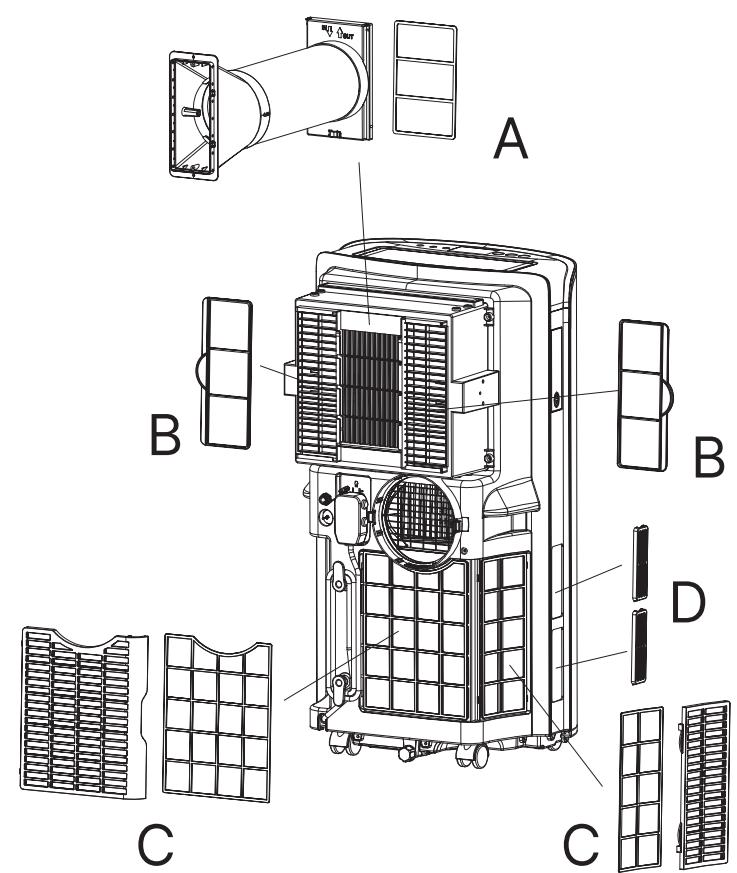
PRODUCT PARTS (REFER IMAGE A AND B, PAGE 2)
- Remote control receiving window
- Control panel
- Air outlet
- HEPA filter
- Upper filter assembly of back panel
- Connection for Outdoor temperature
sensor wire
- Power cord with plug
- Cable winding brackets
- Lower filter assembly of back panel
- Drain cover
- Filter assembly of side panel
- Filter assembly of side panel
- Protective grid
- Remote control compartment
- Air inlet
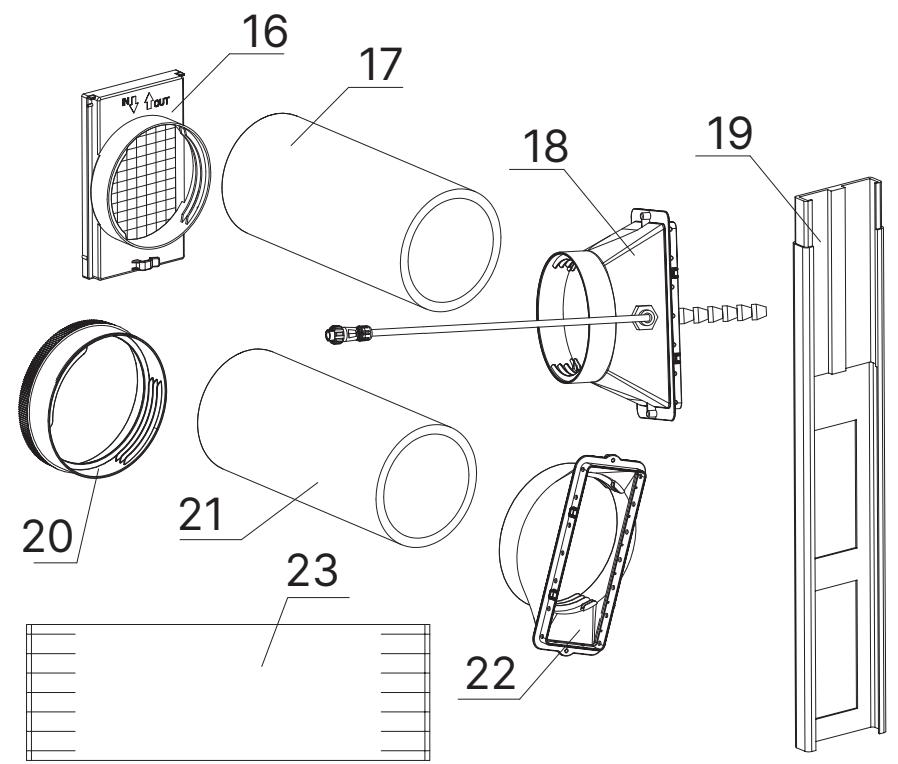
- Upper indoor connector (Including filter)
- Air inlet hose (small)
- Adapter to air inlet hose (small) (Including outdoor temperature sensor)
- Window kits
- Round connector of exhaust hose
- Exhaust hose (big)
- Adapter to exhaust hose (big)
- Sealing cloth for air inlet hose
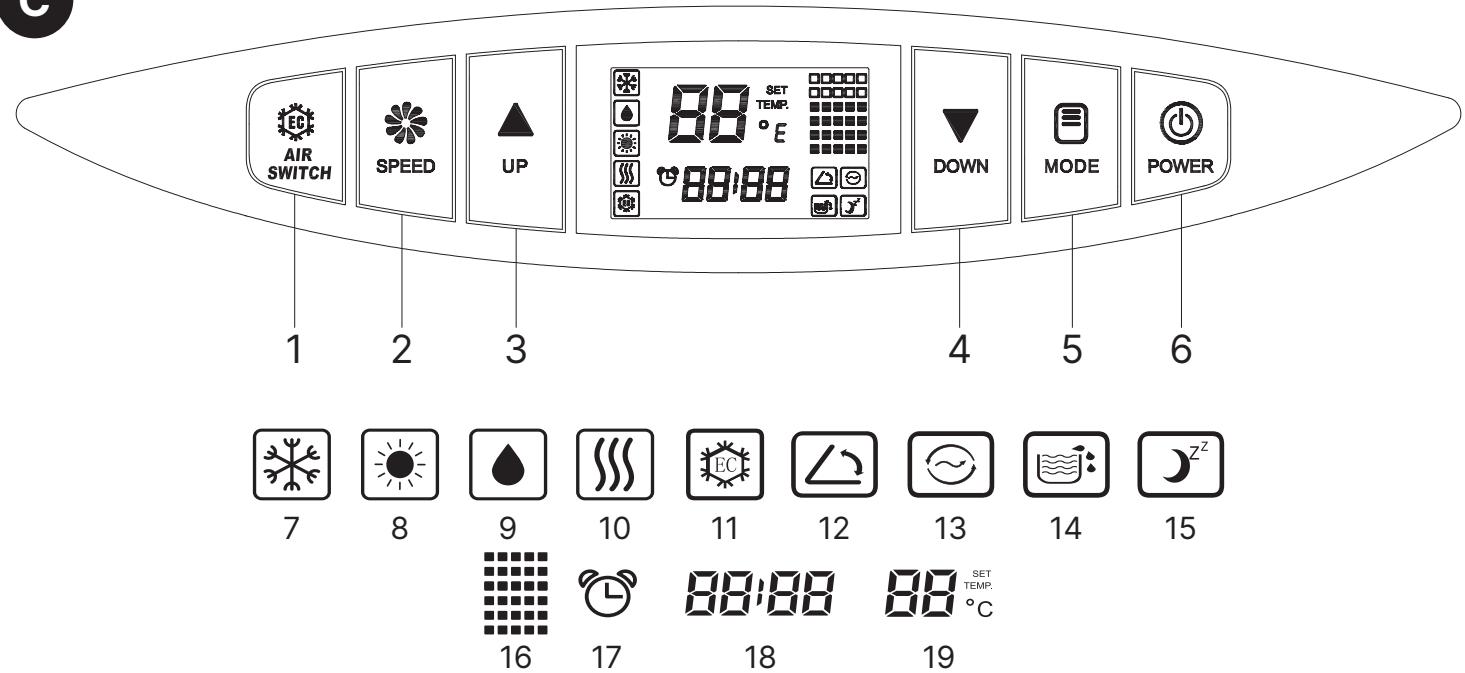
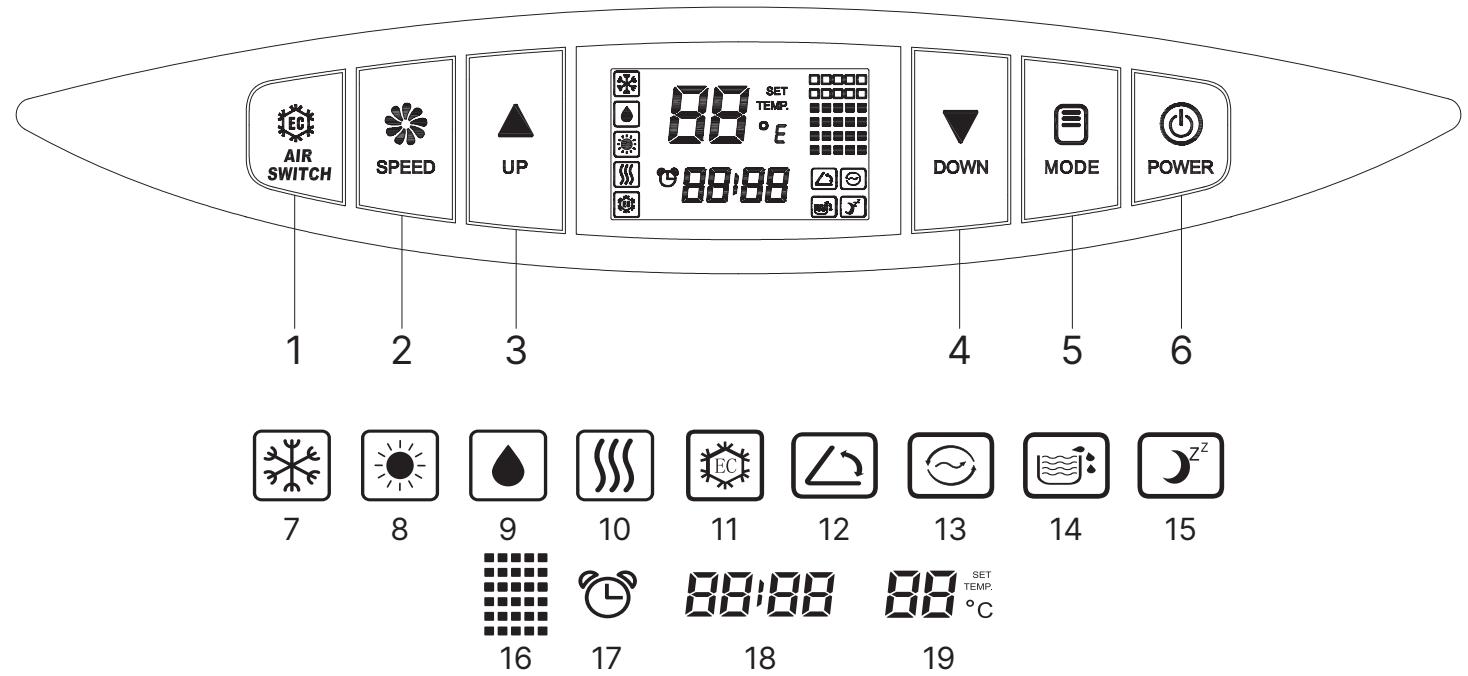
CONTROL PANEL (REFERABOVE OR IMAGE C, PAGE 3)
- AirSwitch button
- Fan speed button
- Up button
- Down button
- Mode button
- Power button
- Cooling Mode indicator
- Heating Mode indicator (NOTE! This symbol is only available on the AC model with Duo/heating function.)
-
Dehumidifying Mode indicator
-
Fan mode indicator
- AirSwitch Mode indicator
- Auto swing function indicator
- HEPA filter replaced indicator
- Water full indicator
- Sleep mode indicator
- Fan speed indicator
- Timer indicator (NOTE! Timer can only be set from the remote control.)
- Outdoor ambient temperature indicator; Timer time indicator
- Set temperature indicator. Indoor ambient temperature indicator for fan, dehumidify and AirSwitch modes.
- Wi-Fi indicator. (NOTE! This symbol is only available on the AC model with Wi-Fi/Smart Home function.)
WORKING MODES AND CONTROL PANEL FUNCTIONS (REFER IMAGE C, PAGE 3)
Power button (6): Press this key to activate the unit; a melodic sound will play, and the unit will automatically enter cooling mode with a preset temperature of 22^ C. The fan will operate at a medium speed. To deactivate the unit, touch this key again, and a melodic sound will signal its shutdown.
-
When the unit is on, the LCD window will show the set temperature in Cooling Mode and Heating Mode (NOTE! The Heating symbol is only available on the AC model with Duo/Heating function) or the ambient temperature in Dehumidifying Mode, Fan Mode, AirSwitch Auto Mode, and AirSwitch Mode. The fan will start running, and the air outlet window will open automatically.
-
All parts stop working when the unit is off, and the air outlet window will close automatically.
Mode button (5): Mode button (5): Press
Operating Instructions
Operating Instructions
the "Mode" button to cycle through the available modes for confirmation.
- Cooling Mode (7): Cools the room to the set temperature (17–35°C).
- Heating Mode (8): Heats the room to the set temperature (5–35°C). (NOTE! This mode is only available on the AC model with Duo/heating function.)
- Dehumidification Mode (9): Reduces the humidity in the room.
- Fan Mode (10): Circulates and purifies the air in the room without cooling.
NOTE! For AirSwitch Auto Mode and AirSwitch Mode, see separate section for "AirSwitch button (1)".
Down button (4): Click to decrease the set temperature or adjust the downwards.
Up button (3): Click the button to adjust the set temperature upwards.
NOTE! Press the Down button (4) or Up button (3) over 2 seconds to continuously increase or decrease the temperature number by 0.5-degree intervals. The temperature setting range is 17\~30°C.
Fan speed button (2): Press the fan speed button to select the fan speed to high, medium, or low speed.
NOTE! The fan speed cannot be adjusted under the Dehumidify and Sleep modes.
AirSwitch button (1): Press the AirSwitch button once to enter AirSwitch Auto Mode, indicated by the flashing AirSwitch indicator (11) on the LCD. Press the AirSwitch button again to enter AirSwitch Mode, indicated by the lit but non-flashing AirSwitch indicator (11). Press the AirSwitch button for the third time to exit the AirSwitch function and return to Cooling mode by default.
DEFINITION OF AIRSWITCH "AUTO" MODE AND AIRSWITCH MODE
AirSwitch Auto Mode: While cooling the room in AirSwitch Auto Mode, the unit will automatically alternate between compressor cooling and AirSwitch operation.
When the outdoor temperature is 2^ C or lower than the set temperature, the air conditioner automatically transitions from compressor Cooling Mode to the AirSwitch working state, drawing in cooler outdoor air for quieter and more energy-efficient cooling. Once the room temperature reaches the set temperature, the air conditioner enters ventilation operation.
AirSwitch Mode: While cooling the room in AirSwitch Mode, the unit automatically switches between the AirSwitch working state and ventilation operation.
When the outdoor temperature is 2^ C or lower than the room temperature, the air conditioner automatically transitions from ventilation operation to the AirSwitch working state, ensuring a continually quiet and more energy-efficient operation. Once the room temperature reaches the set
temperature, the air conditioner returns to ventilation operation. Notably, the compressor remains inactive in this mode.
DISCLAIMER AIR SWITCH AUTO MODE AND AIRSWITCH MODE
The temperature sensor for the AirSwitch is positioned within the hose that brings outdoor air into the unit. Certain circumstances may occasionally impact the accuracy and function of the sensor during Auto Mode.
Factors Affecting Sensor Accuracy:
- Heating by Room Air: Proximity to warm air sources within the room can influence sensor readings.
- Plastic Housing: On rare occasions, the plastic housing of the sensor may absorb heat, affecting its performance.
- External Environmental Elements: Sunlight and Winds: Exposure to direct sunlight or winds transferring heat may impact sensor accuracy. Reflective Surfaces: Nearby walls that reflect or absorb heat can disrupt the automatic function. In such cases, manual mode is recommended.
- Crossing Air Streams: Wind or airflow may cause temperature variations, especially if the output hose interferes with the input hose.
Recommendations:
- Manual Mode Usage: In challenging conditions, using the manual mode is advised for precise control.
- Preventing Sensor Overheating: Avoid exposing the sensor to direct heat to ensure accurate temperature detection.
- Reflective Surfaces Awareness: Consider activating manual mode if you have reflective surfaces, such as a nearby brick wall, or other potential disturbances.
- Optimal Operating Time: Consider turning on the AirSwitch in manual mode for consistent performance, especially during bedtime.
FUNCTIONS WHEN COMBINING BUTTONS (REFER IMAGE C, PAGE 3)
Sleep function (15): Initiate or cancel the SLEEP function by simultaneously pressing the AirSwitch button (1) and the Up button (3). Please note that the fan speed is not adjustable in Sleep function.
- If the Sleep function is activated in Cooling Mode, it raises the set temperature by 1^ after 2 hours and then increases it by an additional 1^ after another 2 hours, maintaining operation at this temperature.
- If the Sleep function is activated in Heating Mode (only available on the AC model with Duo/heating function), it lowers the set temperature by 1^ after 2 hours. Then it decreases it by an additional 1^ after another 2 hours, operating at this temperature thereafter. NOTE! Sleep function will be ineffective under Fan
Mode, Dehumidification Mode, AirSwitch Auto Mode, and AirSwitch Mode.
Auto Swing function (12): Activate or deactivate Auto-Swing by simultaneously touching the AirSwitch button (1) and the Fan speed button (2).
OTHER CONTROL PANEL FUNCTIONS (REFER IMAGE C, PAGE 3)
HEPA filter replaced indicator (13): When the air conditioner operates for more than 500 hours, the corresponding icon will appear on the LCD, indicating that the HEPA filter requires replacement. To reset the timer and remove the icon, press, and hold the fan speed button for 6 seconds. This action will cancel the icon display and restart the time calculation. See replaceable HEPA filter section for information how to change your filter.
Outdoor ambient temperature indicator and Time of timer indicator (18): The outdoor ambient temperature is shown during regular operation. When the unit's timing function is activated, the outdoor temperature and timer duration will alternate on the display.
Please note: A fault code will be displayed in the event of an outdoor temperature sensor failure or issues with the damper on the rear side of the unit opening or closing.
WIFI FUNCTION (20)
(Only applicable to the AC model with WiFi/Smart Home functionality.)


- Download the Wood's Connect app from App Store or Google Play.
- Register and follow the instructions. Accept all steps. (Carefully read the Privacy Policy and if you approve the agreements, tap the agree bottom to continue.)
- Open Wood's Connect app and on the home screen, press "add device".
- To enter pairing mode press and hold the AirSwitch button on the unit for 5 seconds to see that the Wi-Fi icon on the display will flash rapidly.
- When you discover the device on the screen press add. You can also choose the model manually.
- Fill in your Wi-Fi settings and password and press next.
-
Press + to add the unit.
-
Wait until the unit is added, then press done.
To disconnect the Wi-Fi function, press the AirSwitch button on the unit for 5 seconds.
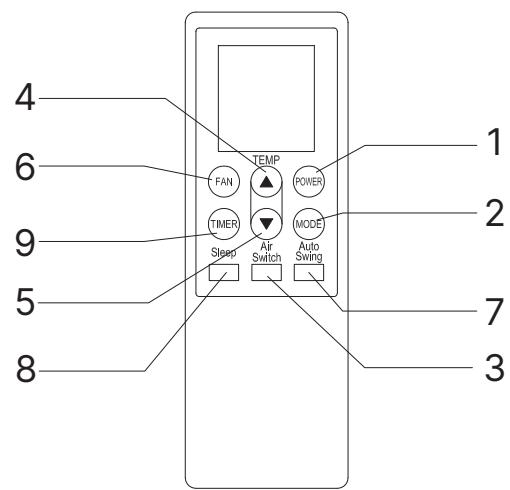
REMOTE CONTROL OPERATION MODES (REFER IMAGE D, PAGE 3)
Power (1): Press this button to start the unit when it is energized or stop the unit when it is in operation.
Mode button (2): Press this button to select operation mode.
AirSwitch button (3): Press this button to set or cancel AirSwitch mode.
-
Press the AirSwitch button once to enter AirSwitch Auto Mode, indicated by the flashing "ENERGY SAVER" symbol on the LCD display.
-
Press the AirSwitch button again to enter AirSwitch Mode. The "ENERGY SAVER" symbol will be illuminated but not flashing.
-
Press the AirSwitch button for the third time to exit the AirSwitch function and return to Cooling Mode by default.
Up button (4): Press the up button to increase the room temperature and timer setting.
Down button (5): Press the down button to decrease the room temperature and timer setting.
Fan button (6): Press this button to select fan speed in sequence: Low, Medium, High.
Auto Swing button (7): Press this button to turn on or turn off auto-swing function.
Sleep button (8): Press this button to select or cancel sleep mode (only effective under cooling or heating operation)
Timer button (9): Set AUTO-ON function in stand by state and AUTO-OFF when the unit is operating. The Time can be adjusted between 1-24 hours. To turn off the timer, press the timer button and set the timer on "0".
Before using the remote control, install the AAA batteries following these steps: (REFER IMAGE D, PAGE 3)
- Slide and gently remove the battery cover located on the back of the remote control.
- Insert two new alkaline AAA batteries into the designated battery compartment, ensuring correct polarity.
- Reattach the battery cover, ensuring the locking tab securely clicks into place.
NOTE!
- Use alkaline batteries only. Do not use rechargeable batteries.
• Always replace both batteries with new ones; do not mix old and new ones. - Remove the batteries from the remote control if the air conditioner will not be used for an extended period.
REMOTE CONTROL STORAGE (REFER IMAGE E, PAGE 3)
- Insert the remote control into a built-in compartment on the left side of the unit and push it gently for closure.
- Press the lower part of the built-in compartment gently to open it and take out the remote control.
NOTE! To avoid losing the remote control, please put it inside the storage place when you are not using it.
WARNING: In the event of battery leakage onto your skin or clothing, promptly wash the affected area thoroughly with clean water. Refrain from using the remote control if there is any evidence of battery leakage. In the case of ingesting battery liquid, immediately seek medical attention. The chemicals present in batteries can pose risks such as burns and other health hazards.
INSTALLATION
BEFORE FIRST USE
Allow the unit to stand upright for 4 hours before operation.
This Air Conditioner is designed for convenient indoor relocation. Ensure the unit remains upright while moving. Place the Air Conditioner on a flat surface. Do not install or operate this air conditioner in bathrooms or other wet environments.
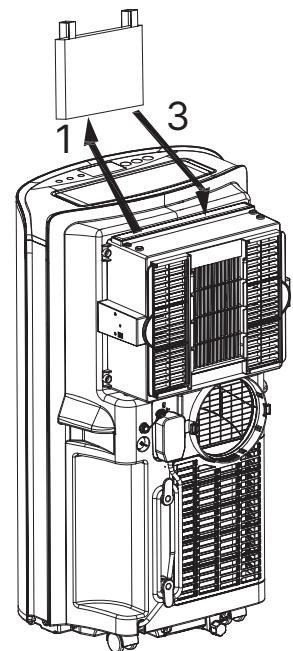
INSTALL HEPA FILTER (REFER IMAGE F, PAGE 3)
- Lift the HEPA filter package upward.
- Remove the packaging bag from the HEPA filter. (NOTE! The removed packaging bag must be placed away from children)
- Install the HEPA filter by aligning it with the screen frame slot and pressing it firmly into it. The HEPA-filter should be pressed down to the bottom.
This Wood's H11 HEPA filter serves a role in air purification. It effectively captures and removes particles such as dust, pollen, mould spores, bacteria, and even small smoke particles from the air, ensuring a cleaner and healthier indoor environment.
NOTE! Change the HEPA filter at least once a year. Register at warranty-woods.com and change the HEPA filter once a year for 6 years warranty. Only valid with a Wood's branded filter. See woods.se for retailers. SAVE YOUR RECEIPTS!
IMPORTANT INFORMATION BEFORE INSTALLING AIR HOSES
During operation, maintain the hoses as short and with as few bends as possible to minimize pressure drop and capacity loss. The exhaust hose must remain smooth to prevent overheating and potential damage to the air conditioner. The hoses have a length of 280 mm-1500 mm. Avoid
extending the hoses or replacing it with a different hose, which may affect the operation.
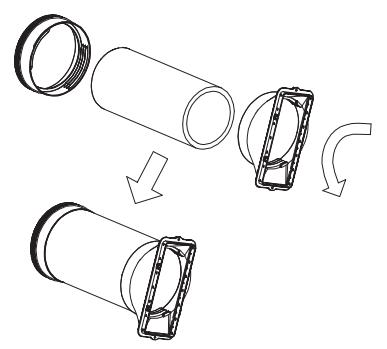
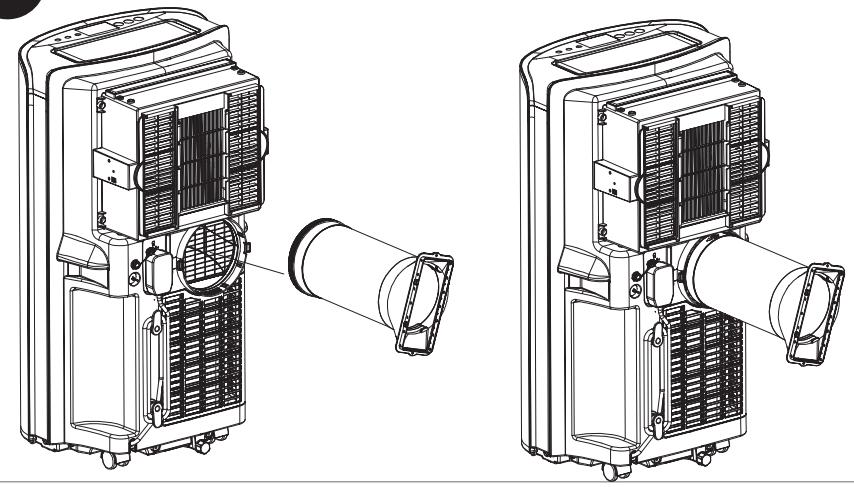
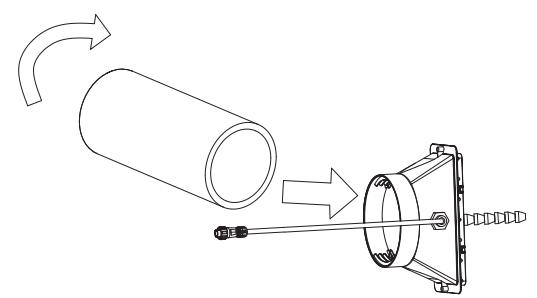
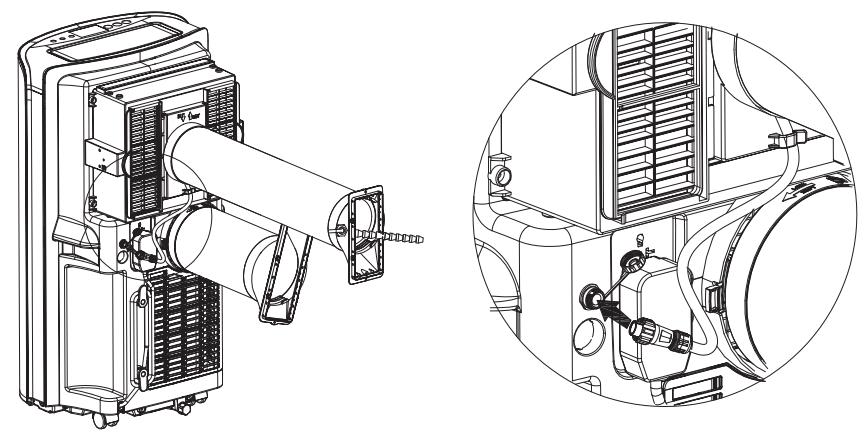
INSTALLATION OF EXHAUST HOSE ASSEMBLY AND ITS ADAPTER. (REFER IMAGE G AND H, PAGE 4)
- Remove the plastic bag by extracting the exhaust hose (big), its connector, and adapter from the packaging.
- Extend one end of the exhaust hose and attach the round connector by turning it in an anticlockwise direction for a minimum of three rotations.
- Extend the other end of the exhaust hose and affix the adapter by turning it in an anticlockwise direction for at least three rotations.
- Place the front end of the exhaust hose assembly onto the designated notch of the exhaust air outlet located on the back panel. The fasteners will securely lock the exhaust hose assembly in place.
- Install the air exhaust hose onto the unit.
NOTE! Ensure the correct orientation of the slanted side of the adapter for easy installation of the window-seal plate. Maintain a secure and well-positioned connection of the exhaust hose.
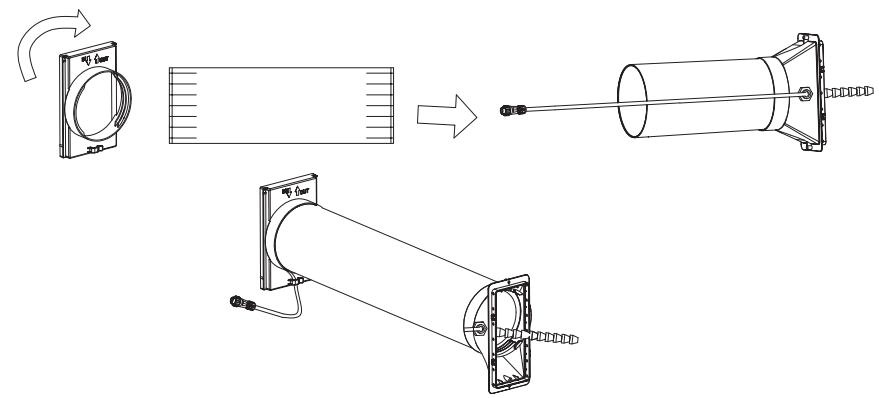
INSTALL THE AIR INLET HOSE (REFER IMAGE I, J, K, PAGE 4)
- Remove the plastic bag by extracting the air inlet hose (the smaller one), its connector, and adapter from the packaging.
- Extend one end of the air inlet hose and connect it to the connector containing a sensor by rotating it counterclockwise for a minimum of three rotations.
- Place the sealing cloth around the air inlet hose, ensuring the temperature sensing wire is also enclosed within the sealing cloth. Extend the other end of the air inlet hose and connect it to the connector by rotating it counterclockwise (three rotations). Finally, extend the sealing cloth to cover the round connector.
- Install the air inlet hose onto the unit, ensuring the arrow "IN" points downwards.
FIXED TEMPERATURE SENSING LINE (REFER IMAGE L, PAGE 4)
Insert the temperature sensing wire connector into the connector of the unit. There is a white mark dot on the connector. When plugging, the two white dots should be aligned with each other, and then tighten the plug clockwise.
It should hang freely in the air.
NOTE! The voltage of the temperature sensing wire connector is a safe voltage, not greater than DC 5V.
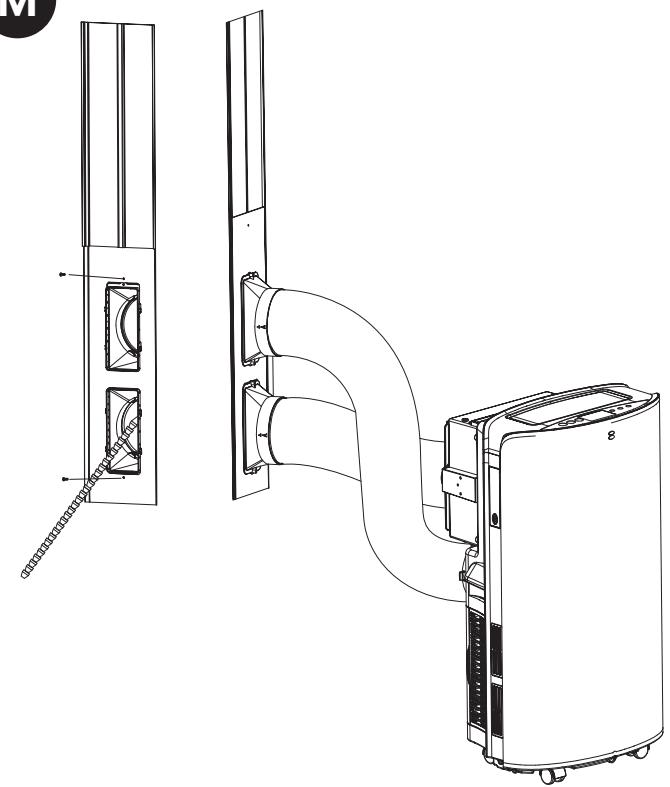
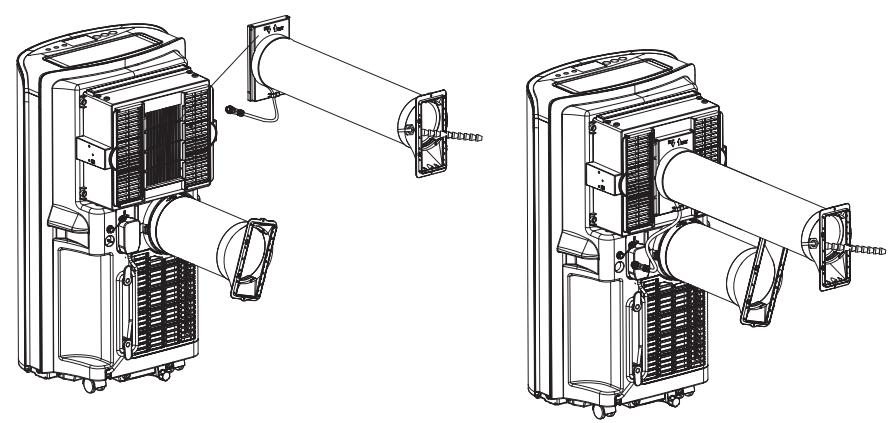
INSTALLATION OF WINDOW SEAL-PLATE (REFER IMAGE M, N, O, PAGE 5)
Operating Instructions
- Install the rectangle end of hoses assembly into the corresponding rectangle holes in window seal-plate assembly, fix it with a screw.
NOTE!
- Slide the adapters downwards, ensuring it is securely installed.
- Confirm that the slanted panel direction aligns with the seal-plate direction.
- Make sure the hoses are as straight as possible to ensure adequate ventilation.
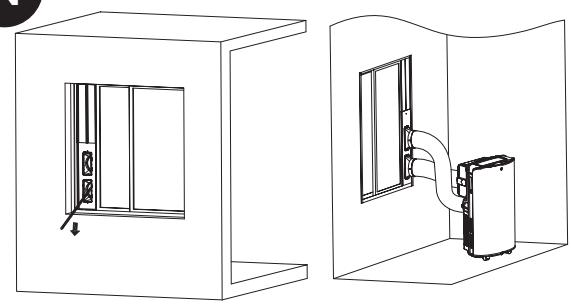
- Open the window halfway and insert the seal plate into the window, positioning it either vertically or horizontally. For vertical installation, place the exhaust hose at the top so that the warm outgoing air does not interfere with the sensor on the air intake hose.
- Extend the seal plate parts and adjust them to match the length of the window. Ensure both ends meet the window edges and secure it in place using screws.
NOTE! Confirm that both ends of the window-seal plate meet the window edges effectively for a proper seal.
Ensure the screws are tightened securely in the correct position.
- Adjust the position of the outdoor temperature sensing head and lower the adjustment rod to the lower part of the wall step under the window.
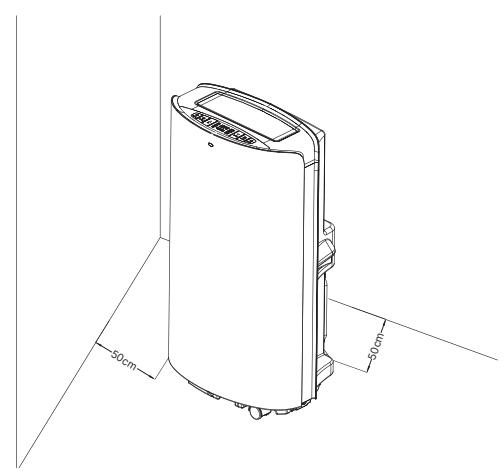
NOTE! The sensor should hang freely in the air and as far as possible from the warm air of the exhaust hose. - Move the unit with the hoses mounted in front of window and keep the unit at least 50 cm away from the walls or other objects.
ENERGIZE THE UNIT
To power the unit, plug it in. All icons in the LCD window will illuminate for 2 seconds accompanied by a brief reminder sound. Following this, the LCD window will show the indoor ambient temperature within the range of 5°C to 35°C and the outdoor ambient temperature within the range of -9°C to 65°C. The unit will then be in standby mode and ready for operation.
The unit is now ready for use!
MAINTENANCE
NOTE! Turn off the unit and pull out the plug before maintenance.
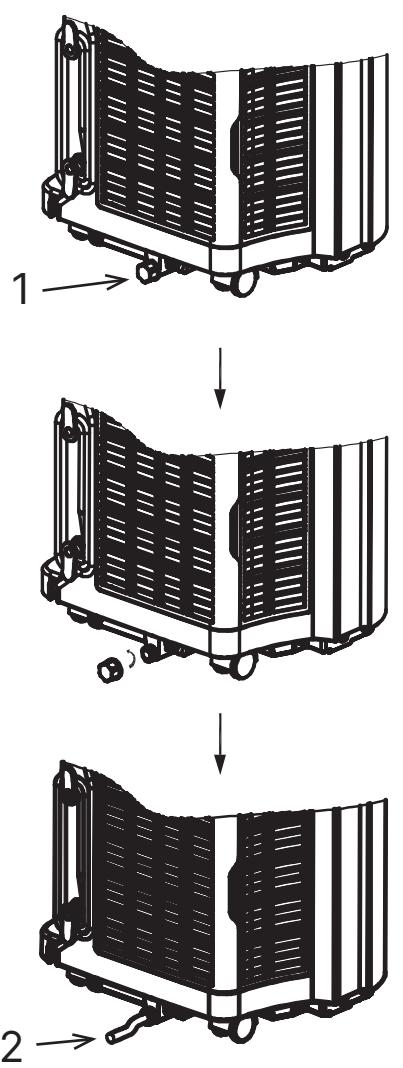
DRAINAGE INSTRUCTION (REFER IMAGE P, PAGE 5)
Most of the water will be led out naturally through the exhaust hose with the hot air. If you need to empty the tank the unit will notify you. (REFER IMAGE C, PAGE 3, nr 14)
To empty the water tank: Unscrew the drain cover and unplug the water plug to allow the water to flow into the tray. NOTE: Exercise caution to prevent leakage if the unit needs to be moved. Tilt the unit slightly
backwards during draining. If the tray cannot contain all the water from the unit, promptly block the drain hole to prevent water leakage and avoid wetting the floor or carpet. Ensure the water plug and drain cover are tightly installed to prevent new condensed water from wetting the floor or carpet when the unit restarts.
Connecting a water hose for continuous drainage: Unscrew the drain cover and remove the water plug. Attach a 12 mm inner diameter water hose to the pipe on the unit. (Water hose not included). Lead the other end of the water hose to a drain. Make sure that the water can be drained downwards. NOTE: A drain hose must be installed when there is no water in the tray. It is recommended not to use continuous drainage when the unit is in Cooling mode to ensure sufficient water is recycled within the unit to enhance the cooling effects of the system. Place the drain hose in an inaccessible location, ensuring it is not positioned higher than the drainage hole, and keep the drain hose straight without any bends. Ensure the drain cover and its stopper are properly secured when continuous drainage is utilized.
MULTIPLE PROTECTION FUNCTIONS
Automatic defrost: The unit will automatically defrost when needed. In defrost mode, the display shows E4 and no buttons except the POWER button are active.
Compressor protection: The unit has a compressor protection function causing a 3-minute start delay after the unit is restarted.
Water-full safety alarm and shut-off protection function: When the water volume surpasses the designated alarm level within the unit's chassis, an automatic warning alert is triggered, accompanied by the illumination of the water-full icon on the LCD. In this event, it is necessary to drain the condensed water following the instructions provided in the "Drainage Instruction" section. If the unit is not manually shut down, it will automatically return to its original operating status once the condensed water is completely drained. Alternatively, reconnect the power to restart the unit.
SURFACE CLEANING
- Clean the unit surface with a wet, soft cloth, and do not use chemical solvents such as alcohol and gasoline to avoid any damage.
- Clean the dirty air outlet or louvres with a damp soft cloth and mild detergent.
- Any chemical solvent is prohibited from being used for unit cleaning or putting such things near the unit for a long time.
- Any thinner, alcohol-glazer or similar solvents are prohibited for unit cleaning.
WASHABLE FILTER CLEANING (REFER IMAGE Q, PAGE 5)
It is essential to clean the filter once every two weeks to prevent the unit's performance from being impacted by dust accumulation. Immerse and wash the filter gently in warm water (approximately 40°C) mixed with a neutral cleaner. After cleaning, reinstall it back onto the unit.
Clean the filter of the air inlet hose (A): Lift up the connector, then remove the filter frame in the connector and clean it.
Clean the left and right upper intake air filter frames (B): Pull the left and right upper intake air filter frames towards their respective sides. Clean the frame thoroughly.
Clean the lower filters (C): Pull out the lower filters, then remove the rear filter and clean it.
Clean the side filters (D): Pull out the side filters, then and clean them.
NOTE! Gently pull out the filter, prioritizing the removal of the back panel filter before the side panel filter to prevent any twisting or damage. Exercise caution not to squash the mesh and avoid hitting the mesh with sharp objects or brushes.
NOTE! Ensure that the filter is installed on the side panel before installing the filter on the back panel.
Install the filter in the opposite direction of removal.
REPLACEABLE HEPA-FILTER (REFER IMAGE F, PAGE 3)
This unit purifies the air with HEPA technology. The filter must be changed regularly and at least once a year.
- Lift the HEPA filter upward.
- Install the HEPA filter, align it with the screen frame slot, and press it down into the screen frame. The HEPA filter needs to be pressed to the bottom.
NOTE! Ensure to use a Wood's original HEPA filter to maintain warranty coverage. Visit woods.se for more information and to locate retailers.
END-OF-SEASON STORAGE
- Unscrew the drain cover and remove the water plug to drain the condensed water completely. NOTE: The tilt angle of the unit must be ≤ 30 degrees.
- Operate the unit in fan mode for half a day to thoroughly dry the interior and prevent mould growth.
- Turn off the unit, unplug it, wrap the power cord around the wire-winding pillar, insert the plug into the universal fixing hole at the back panel, and reinstall the water stopper and drain cover.
- Remove the heat exhaust hose assembly, clean it, and store it properly. NOTE: Hold the exhaust hose assembly with both hands when removing.
- Push aside the fasteners on the exhaust air outlet using your thumbs, then pull out
the exhaust hose assembly.
- Pack the air conditioner securely in a soft plastic bag, place it in a dry location with appropriate dust-proof measures, and keep it out of reach of children.
- Remove the batteries from the remote control and store them properly.
NOTE: Ensure the unit is stored in a dry environment. Safeguard all unit accessories collectively to prevent damage or deterioration.
GUARANTEES
Two years guarantee against faults in manufacturing. Please note that the guarantee is only valid upon a purchase receipt's presentation. SAVE YOUR RECEIPTS! Receipts will be required for any warranty claim during the period.
GET EXTENDED WARRANTY
Get a 6-year Warranty by Registering at warranty-woods.com. Ensure the longevity of your guarantee by replacing the Woods original HEPA filter annually. Please note that the warranty is valid under specific conditions: timely product registration within 90 days, annual HEPA filter replacement, and the retention of receipts for both filters and the unit. SAVE YOUR RECEIPTS! All receipts will be required for any warranty claim during the period.

text_image
REGISTER AT 6 YEARS WARRANTY- WARRANTY-WOODS.COMTROUBLE SHOOTING
Please check the unit and follow the suggestions below before requesting professional service. However, never attempt to dismantle or repair the unit yourself, as it may cause harm to you and your property. If problems not listed in the table occur or recommended solutions do not work, please contact a professional service organization.
| TROUBLE | CAUSE | REMEDY |
| The unit fails to start up. | Power supply failure. | Connect the unit to a live socket and turn it on. |
| Water tank full with corresponding illuminated icon. | Drain the water stored in the unit. | |
| The room temperature is lower than the set temperature in Cooling Mode or higher temperature in Heating Mode. | Ensure the unit operates within the recommended temperature range of 8-35°C. Adjust the set temperature. | |
| Insufficient cooling. | There is direct sunlight. | Close the window curtain. |
| The doors and windows are open, the room is crowded or there are other heat sources. | Close doors and windows, remove other heat sources and consider adding additional air conditioners. | |
| Dirty filter. | Clean or replace the filter mesh. | |
| Air inlet or air outlet clogged. | Remove any obstructions. | |
| High noise level. | The unit is being placed at uneven surface. | Put the unit at a flat and firm place (may reduce noise) |
| The compressor does not work. | Initiation of overheat protection. | Wait until the temperature decreases, the unit will restart automatically |
| The remote control does not work. | Distance between unit and remote control too long. | Bring the remote control close to the air-conditioner and ensure air at signal receptor on unit. |
| Remote control not aimed at signal receptor on unit. | ||
| Batteries depleted. | Replace the batteries | |
| “CH01” code displays. | Room temperature sensor failure. | Check the room temperature sensor and related circuits. |
| “CH02” code displays. | Evaporator temperature sensor sensor failure. | Check the evaporator temperature sensor sensor and circuits. |
| “E4” code displays. | Anti-freeze protection. | Functions will restore automatically once anti-freeze protection is over. |
| “E5” code displays. | Outdoor temperature sensor failure. | Check the outdoor temperature sensor and related circuits. |
| Verify whether the outdoor temperature sensor cable interface is plugged in properly. | ||
| “E6” code displays. | Door opening failure. | Check if the air switch damper is fully open in Cooling Mode and inspect related circuits. |
| “E7” code displays. | Door closing failure. | In AirSwitch mode, ensure that the damper meets the closing conditions and that the air switch damper is fully closed; inspect related circuits. |
| “FL” code displays. | Water tank in chassis is full. | Drain the condensate and re-start the unit. |
TECHNICAL SPECIFICATIONS
| WOOD'S MODEL NO. | AC CORTINA 12K AIRSWITCH | AC COTINA 12K AIRSWITCH SMART HOME DUO A+ |
| Cooling capacity | 3,520 W | 3,500 W |
| Heating capacity | N/A | 2,900 W |
| Power consumption (Cooling) | 1,350 W | 1,120W |
| Power consumption (Heating) | N/A | 960 W |
| Power consumption (AirSwitch Mode) | 56W | 32W |
| Airflow | 220-320 ( m^3/h ) | 220-320 ( m^3/h ) |
| Energy class | A | A+ |
| Dehumidification | 33,6 L / 24h | 33,6 L / 24h |
| Temperature setting | 17-30°C | 17-30°C |
| Working temperature | 17-43°C | 5-43°C |
| EER in cooling mode | 2,6 | 3,1 |
| EER in AirSwitch mode | 5 | 8 |
| Hose lengths | 1,5 m | 1,5 m |
| Refrigerant gas | R290/260g | R290/250g |
| Sound level in Cooling mode (LWA) (dB(A)) | 60-64 dB | 60-64 dB |
| Sound level in Cooling mode (LPA) (dB(A)) | 49-52 dB | 49-52 dB |
| Sound level in AirSwitch mode (LWA)(dB(A)) | 49,5-51 dB | 49,5-51 dB |
| Sound level in AirSwitch mode (LPA) (dB(A)) | 35-38 dB | 35-38 dB |
| Net Weight | 30kg | 31kg |
| Device Dimensions (H×W×D) | 850×471×400mm | 850×471×400mm |
| Technical changes and improvements may occur. All values are approximate and may vary depending on external circumstances such as temperature, ventilation and humidity. | ||

This marking indicates that this product should not be disposed with other household wastes throughout the UK and the EU. To prevent possible harm to the environment or human health from uncontrolled waste disposal, recycle it responsibly to promote the sustainable reuse of material resources. To return your us device, please use the return and collection systems or contact the retailer where the product was purchased. They can take this product for environmental safe recycling.
Used batteries must not be disposed of through household garbage, since they might contain toxic elements and heavy metals that can be harmful to the environment and human health. Return empty batteries to an appropriate recycling facility.


BRÄNNBART ÄMNE.
VAIHDETTAVA HEPA-SUODATIN (KATSO KUVA F, SIVU 3)
PARTIES DU PRODUIT (VOIR IMAGES A ET B, PAGE 2)
[Non-Text]
[Non-Text]
[Non-Text]
[Non-Text]
AFVOERINSTRUCTIE (ZIE AFBEELDING P, PAGINA 5)
"WI-FI" FUNKCIJA (20)
(Taikoma tik AC modeliui su "WiFi" / "Smart Home" funkcija.)
Wood's


TOOTE OSAD (VT PILT A JA B, LK 2)
JUHTPANEEL (VT PILT C, LK 3)
PAIGALDADA HEPA-FILTER (VT PILT F, LK 3)
DRENAAŽIJUHEND (VT PILT P, LK 5)
Risk of injury or permanent disability.
Register and find the latest updated user manual, usage advice, updated brochures, troubleshooting, and service information at woods.se
CUSTOMER CARE AND SERVICE
Always use original spare parts. When contacting our authorized service centre, ensure that you have the following data available: Model number, receipt, and serial number.
Warning / Caution-Safety information. General information and tips. Environmental information. Subject to change without notice.
Wood's®