USER MANUAL home Projecteur solaire à LED avec détecteur de mouvement LIVARNO
Operating and safety information
IT MT CH FARO A LED AD ENERGIA SOLARE CON RILEVATORE DI MOVIMENTO
Introduction 46
Explanation of symbols 46
Intended use 46
Specifications supplied 47
Description of parts 47
Technical data 47
Safety instructions 48
Risk of leakage from batteries/
rechargeable batteries 48
Assembly and installation 49
Mounting the Spotlight 49
Positioning the Spotlight/ solar panel 49
Charging the battery 50
Operation 50
Troubleshooting 51
Cleaning and storage 51
Disposal 51
Warranty 52
Service 53
HU
ca. 122~cm^2
Projektsfläche:
(Model 1262-B)
ca 104~cm^2
(Model 1262-S)
Gewicht:
ca. 250g
(Model 1262-B)
ca. 260g
(Model 1262-S mit
Distanzhalter)
Emballage of FSC-certificeret blandingstrae

Med CE-maerkningen bekrafter producenten, at dette produit overholder de geldende europaeiske direktiver.
ca. 119~cm^2
(model 1262-B)
ca. 118~cm^2
(model 1262-S)
ca. 250 g (model 1262-B)
ca. 260 g (model)
1262-S med
vægholder)
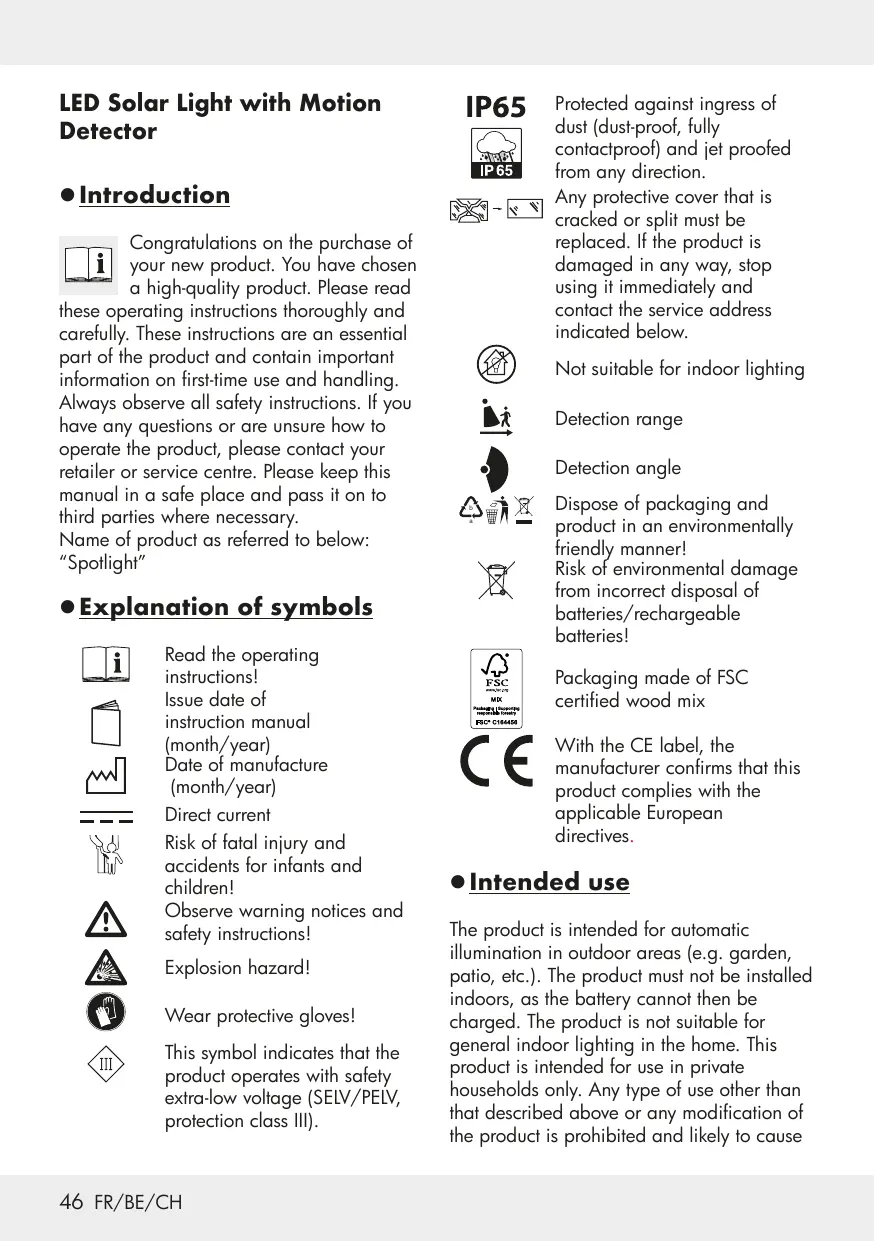
LED Solar Light with Motion Detector
Introduction

Congratulations on the purchase of your new product. You have chosen a high-quality product. Please read
these operating instructions thoroughly and carefully. These instructions are an essential part of the product and contain important information on first-time use and handling. Always observe all safety instructions. If you have any questions or are unsure how to operate the product, please contact your retailer or service centre. Please keep this manual in a safe place and pass it on to third parties where necessary. Name of product as referred to below: "Spotlight"
- Explanation of symbols

Read the operating instructions!
Issue date of instruction manual (month/year)
Date of manufacture (month/year)
Direct current
Risk of fatal injury and accidents for infants and children!
Observe warning notices and safety instructions!
Explosion hazard!


Wear protective gloves!
This symbol indicates that the product operates with safety extra-low voltage (SELV/PELV, protection class III).
IP65

Protected against ingress of dust (dust-proof, fully contactproof) and jet proofed from any direction.
Any protective cover that is cracked or split must be replaced. If the product is damaged in any way, stop using it immediately and contact the service address indicated below.

Not suitable for indoor lighting

Detection range

Detection angle

Dispose of packaging and product in an environmentally friendly manner!
Risk of environmental damage from incorrect disposal of batteries/rechargeable batteries!

Packaging made of FSC certified wood mix

With the CE label, the manufacturer confirms that this product complies with the applicable European directives.
- Intended use
The product is intended for automatic illumination in outdoor areas (e.g. garden, patio, etc.). The product must not be installed indoors, as the battery cannot then be charged. The product is not suitable for general indoor lighting in the home. This product is intended for use in private households only. Any type of use other than that described above or any modification of the product is prohibited and likely to cause
damage or even personal injury. The manufacturer or retailer accepts no liability for loss or damage that occurs as a result of use other than intended or incorrect use.
- Specifications supplied
Model 1262-B
1 x LED solar floodlight with motion sensor
1 x Set of fixings (2 wall plugs and 2 screws)
1 x Instruction manual
Model 1262-S
1 x LED solar floodlight with motion sensor
1 x Spacer
1 x Set of fixings (2 wall plugs and 5 screws)
1 x Instruction manual
Description of parts
LED module
Solar panel
3 Guide holes
4 Motion sensor
Switch
6 Floodlight star knob
7 Screw
8 Wall plug
9 Spacer (1262-S)
10 Spacer star knob (1262-S)
Screw (1262-S)
12 Spacer guide holes (1262-S)
- Technical data
Model number: 1262-B/1262-S
Input voltage (spotlight):
Solar panel:
Li-ion battery (18650):
Light source:
Motion sensor:
Luminous power:
Colour temperature:
Recommended installation height:
Dimensions of floodlight (including wall bracket):
Max. projection area:
Weight:
3,7V- - - ,5W
300mA, max. 1.5W
3,7V-
1500 mAh
(replaceable by
specialised personnel)
56 LEDs
(non-replaceable)
Detection range: max. 10m
Field of view:
approx. 120^
max. 450 lm
6500K (cold white)
approx. 2-4m
approx. 20 × 14 ×
4 cm (Model 1262-B)
approx. 33 × 11 × 4 cm (Model 1262-S)
approx. 122~cm^2
(Model 1262-B)
approx. 104~cm^2
(Model 1262-S)
approx. 250g
(Model 1262-B)
approx. 260 g (Model
1262-S with spacer)
- Safety instructions

Safety instructions

WARNING!
RISK OF FATAL INJURY AND ACCIDENTS FOR INFANTS AND
CHILDREN! Never leave children unsupervised with the packaging material. There is a danger of suffocation from the packaging material. Children often underestimate the dangers. Always keep children away from the product.
This product can be used by children aged 8 years and over, as well as by persons with limited physical, sensory or mental abilities or lacking in experience and knowledge if they have been supervised and instructed as to the safe use of the product and understand the resulting hazards. Do not let children play with the product. Cleaning and maintenance may not be carried out by children without proper supervision.
- Do not use the product if you notice any damage.
The manufacturer/distributor of this product accepts no responsibility whatsoever for personal injury or damage resulting from incorrect installation or use.
- Do not immerse the product in water or any other liquids.
- Keep the product away from naked flames and hot surfaces.
The LED module 1 is not replaceable.
The LEDs are not replaceable. Once the light source reaches the end of its service life, the product must be replaced.
■ RISK OF FATAL INJURY! Keep children away from the work area during installation. The product as supplied includes a number of screws and other small parts. These can be fatal if they are swallowed or inhaled.

Safety instructions for batteries/rechargeable batteries
■ RISK OF FATAL INJURY! Keep batteries/ rechargeable batteries out of the reach of children. If swallowed, seek medical advice immediately!
■ PLEASE NOTE! The battery can be replaced by specialised personnel.

EXPLOSION HAZARD! Never recharge non-rechargeable batteries. Do not short-circuit and/
or open up batteries/rechargeable batteries. They could overheat, cause a fire or explode.
- Never throw batteries/rechargeable batteries into fire or water.
- Do not expose the batteries/rechargeable batteries to mechanical stress.
- Risk of leakage from batteries/rechargeable batteries
- Avoid exposing (rechargeable) batteries to extreme conditions and temperatures, e.g. radiators or direct sunlight.
- Avoid contact with skin, eyes and mucous membranes! In the event of skin contact with battery acid, rinse the affected area immediately with plenty of clean water and seek medical advice immediately!

WEAR PROTECTIVE GLOVES!
Leaking or damaged batteries/ rechargeable batteries can cause chemical burns if they come into contact with the skin. Therefore, wear suitable protective gloves in such cases.
In the event that a battery leaks, remove it from the product immediately to avoid damage.
Assembly and installation
Please note: remove all packaging material from the product. Decide prior to mounting where the product is to be mounted. Before drilling the fixing holes, satisfy yourself that there is no danger of drilling into or damaging gas or water pipes or electricity cables in the position where you are about to drill the holes. Use a drill to drill the holes into the masonry. Observe all safety instructions provided in the operation and safety manual for your drill. Otherwise there is a risk of serious or fatal injury from electric shock.
Please note: the fixings included are suitable for conventional solid masonry. You should check independently what kind of fixings are best suited for the surface on which you intend to mount the light. If necessary, you should seek the advice of an expert.
When deciding where to mount the light, pay attention to the following:
□ Ensure the product illuminates the desired area. Make sure that the motion sensor 4 covers the desired area.
The motion sensor has a maximum detection range of 10m with a field of view of approx. 120^
□ Ensure that the motion sensor 4 is not in a position where street lighting will shine on it at night. This may impair the function.
The recommended installation height is 2 to 4m. If possible, mount the Spotlight in a position where it will not be exposed to dirt or dust and is protected from rain (e.g. under a roof overhang) and other weathering effects.
Please note: the solar panel ② should be positioned where it will be exposed to as much direct sunlight as possible. Even partial shade during the day can significantly impair the charging process.
Orientation:
The optimum alignment is facing south. Choose an orientation facing slightly to the west rather than slightly to the east.
- Mounting the Spotlight
Transfer the positions of the guide holes 3 to the mounting point on the wall (see Fig. A).
Drill two holes (dia. 6mm) and insert the matching wall plugs [8] (see Figs. C and G).
Screw the screws into the wall plugs, leaving a gap of approx. 3mm between the screw head and the wall (see Fig. C).
Slot the guide holes over the screws and then slide the Spotlight along the guides to fix it in place (see Fig. C).
□ If necessary, adjust the gap between the screw heads and the mounting surface to provide a firm seating for the Spotlight.
Mounting Model 1262-S with a spacer
You have the option of mounting the Model 1262-S with a spacer (see Fig. E) (see above for mounting without a spacer).
Screw the spacer 9 securely onto the floodlight using the screws 11 (see Fig. F).
Screw the spacer 9 securely in place by inserting the screws 7 through the guide holes 12 into the wall plugs 8 and firmly tightening them (see Fig. G).
- Positioning the Spotlight/ solar panel
The Spotlight can be adjusted horizontally (top/bottom) to an angle of up to 180^ (see Fig. D).
Loosen the two Spotlight star knobs to adjust the Spotlight (see Fig. B).
□ When the desired position is obtained, tighten the star knobs again. If necessary, use a screwdriver to hold the screw while tightening the star knob (due to the design, we recommend using an offset screwdriver).
Positioning model 1262-S with a spacer
The Spotlight can be adjusted horizontally (top/bottom) to an angle of up to 180^ (see Fig. H).
Loosen the spacer star knob to adjust the height of the floodlight (see Fig. H).
□ When the desired position is obtained, tighten the star knob again.
Loosen the Spotlight star knob 6 to adjust the angle (see Fig. H).
□ When the desired position is obtained, tighten the star knob again. If necessary, use a screwdriver to hold the screw while tightening the star knob (due to the design, we recommend using an offset screwdriver).
Please note: the motion sensor has a field of view of up to 120^ . Make sure that the motion sensor faces directly towards the desired detection zone.
Please note: to ensure the solar panel functions as effectively as possible, make sure that the surface of the solar panel 2 is not dirty.
- Charging the battery
The battery is charged in all operating modes. To optimise initial charging, charge the product while it is turned off.
Please note: the battery is fully charged after it has been well exposed to sunlight for 7 to 8 hours. The duration of the charging process depends on the battery's charge level and the quality of the sunlight.
Operation
The product can be operated in three different modes. The operating mode is set by means of the switch [5].
Please note: the solar panel will turn on the product in twilight or darkness in the mode you have set.
Please note: battery charging via the solar
panel does not depend on which mode is selected. The battery is charged continuously at all times.
Mode 1
Press and hold the switch 5 for 3 seconds to switch to "Mode 1".
The floodlight will light up once and remain lit at low brightness.
□ If the motion sensor detects movement within its range, the Spotlight will light up at maximum brightness.
□ After approx. 15 seconds, the floodlight will light up again at low brightness.
Mode 2
Press the switch 5 again to switch to "Mode 2".
The light will flicker twice and then switch off.
□ If the motion sensor detects movement within its range, the Spotlight will light up at maximum brightness.
□ After approx. 15 seconds, it will switch off again.
Mode 3
Press the switch 5 again to switch to "Mode 3".
The light will flicker 3 times. The floodlight will light up with low brightness. The motion sensor is inactive in this mode.
Switching off the Spotlight
To switch off the Spotlight, press the switch 5 for a fourth time.
- Troubleshooting
= Fault
Cause
= Solution
= The product fails to switch on.
= The product is switched off.
= Press the switch [5] to turn on the product (see section "Operation").
= The light is flickering.
= The battery is almost fully discharged.
= Charge the battery (see section "Charging the battery").
- Cleaning and storage
Switch the product off if you want to stop using it, store it away and/or clean it.
Regularly inspect the motion sensor 4 and the solar panel 2 to make sure they are not dirty. Remove any dirt to ensure the product works correctly.
- Keep the product and especially the solar panel free of snow and ice in winter.
Use only a dry, lint-free cloth for cleaning. If the product is very dirty, dampen the cloth slightly.
Disposal

Note the labels on the packaging materials when sorting the waste; they are marked with abbreviations (a) and numbers (b) with the following meanings:
1-7: Plastics
20-22: Paper and cardboard
80-98: Composite materials

You can find out how to dispose of the used product by contacting your local district or city council.

The product and packaging materials are recyclable. Please dispose of them separately for

better treatment of waste.The Triman logo is only applicable to France.
In the interest of environmental protection, when the product has reached the end of its useful life, do not dispose of it as general household waste but have it properly recycled. For information on recycling centres and their opening times, please contact your local council.
Faulty or used batteries must be recycled in accordance with Directive 2006/66/EC and its amendments. Return batteries and/or the product to the local recycling facilities provided.

Risk of environmental damage from incorrect disposal of rechargeable batteries!
Batteries must not be disposed of as general household waste. They may contain toxic heavy metals* and are subject to special waste treatment. Batteries and rechargeable batteries that are not permanently fixed inside the product must be removed before disposal of the product and disposed of separately. Please ensure batteries/rechargeable batteries are fully discharged when disposed of! Wherever possible, use rechargeable batteries rather than single-use batteries.
*) Marked as followed: Cd = cadmium, Hg = mercury, Pb = lead
Warranty
Dear customer, This product comes with a 3-year warranty from the date of purchase. In the event that this product is faulty, you have legal rights against the seller of the product. These statutory rights are not restricted by our warranty as set out below.
Warranty terms
The warranty period begins with the date of purchase. Please keep the original receipt in a safe place. It is required as proof of purchase. If a material or manufacturing defect occurs within three years of the date of purchase, we will repair or replace the product for you free of charge, or refund the purchase price, at our discretion. This warranty service is granted provided that the faulty device and the proof of purchase (receipt) are presented within three years, along with a brief written description of the fault and of when it occurred. If the fault is covered by our warranty, we will return the fixed product or send you a new one. No new warranty period shall begin upon repair or replacement of the product.
Warranty period and statutory warranty claims
The warranty period is not renewed after a warranty service has been granted. This rule shall also apply for any replaced or repaired parts. Any damage or faults that already existed when buying the product must be reported immediately upon unpacking the product. A fee is charged for any repairs that are carried out after the end of the warranty period.
Warranty scope
The device was carefully manufactured according to the strictest quality guidelines and thoroughly tested before delivery. The warranty covers material and manufacturing defects as well as the battery. This warranty
does not apply to product parts that are subject to normal wear and tear and can thus be regarded as wearing parts; nor does it cover damage to fragile parts, such as switches or parts made of glass. This warranty is void if the product has been damaged, improperly used or serviced. To ensure proper use, all instructions included in the manual must be followed carefully. All uses and actions that users are discouraged from or warned of in the manual must be avoided under all circumstances. The product is intended for private household use only, and not for commercial activities. The warranty is void, if the product is treated inappropriately, if force is applied, and in the case of any manipulation that is not carried out by our authorised service branch.
Warranty processing
To ensure your request is handled swiftly, please observe the following Notes:
Please have the receipt and the article number (e.g. IAN 123456) ready as proof of purchase for all enquiries.
Please refer to the type plate on the product, an engraving on the product, the cover of the manual (bottom left) or the sticker on the back or base of the product to find out the product number.
In the case of any malfunctions or other defects, please call or email the service department indicated below as a first step.
□ After your product has been registered as faulty, you can send it to the specified service address, free of charge. Please include the proof of purchase (receipt) and information about the defect and about when it occurred.
Service
GB
Service Great Britain
Tel.: 00800 80040044
E-Mail: administration@mynetsend.de
IE NI
Service Ireland
Tel.: 00800 80040044
E-Mail: administration@mynetsend.de
C
Σερβις Kūnpoc
Tel.: 00800 80040044
E-Mail: administration@mynetsend.de
MT
Service Malta
Tel.: 00800 80040044
E-Mail: administration@mynetsend.de
IAN 459049_2401
Please have the receipt and the article number (e.g. IAN 123456) ready as proof of purchase for all enquiries.
You can find an up-to-date version of the operating instructions at:
www.citygate24.de
You can download this and many other manuals, product videos and installation software at www.lidl-service.com.
Scanning the QR code on the front page will take you directly to the Lidl Service web page (www.lidl-service.com) where you can access the user instructions by entering the item number (IAN) 123456_7890.
ca. 122~cm^2
stralingsoppervlak:
(model 1262-B)
ca. 104 cm²
(model 1262-S)
Gewicht:
ca. 250 g
(model 1262-B)
ca. 260 g (model
1262-S met
afstandhouser)