Panneau à LED, 10,5 W - Consumer product LIVARNO - Free user manual and instructions
Find the device manual for free Panneau à LED, 10,5 W LIVARNO in PDF.
| Type de produit | LED panel / LED ceiling light |
| Marque | LIVARNO |
| Référence | 56198 / 56199 |
| Puissance | 10.5 W |
| Tension d'alimentation | 220-240 V~, 50/60 Hz |
| Classe de protection | II |
| Classe d'efficacité énergétique | D |
| Utilisation | Interior, dry rooms only |
| Montage | Ceiling |
| Compatibilité avec variateur | No |
| Source lumineuse | Integrated LED |
| Remplaçabilité de la LED | Not replaceable by user, only by specialist |
| Certifications | CE, TÜV SÜD/GS |
| Garantie | 3 years |
| Contenu de la livraison | 1 luminaire, mounting kit (2 wall plugs, 2 screws), instructions |
| Entretien | Clean with a dry cloth after disconnecting power |
| Sécurité | Do not use with dimmer or electronic switch |
Frequently Asked Questions - Panneau à LED, 10,5 W LIVARNO
User questions about Panneau à LED, 10,5 W LIVARNO
0 question about this device. Answer the ones you know or ask your own.
Ask a new question about this device
Download the instructions for your Consumer product in PDF format for free! Find your manual Panneau à LED, 10,5 W - LIVARNO and take your electronic device back in hand. On this page are published all the documents necessary for the use of your device. Panneau à LED, 10,5 W by LIVARNO.
USER MANUAL Panneau à LED, 10,5 W LIVARNO
User manual and safety information
FR
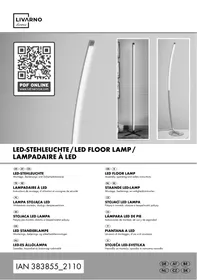
PLAFONNIERS ALED
Before reading, unfold the two pages with the illustrations and then familiarise yourself with all the functions of the unit.
IT MT
Description of parts . Page 7
Technical data Page 7
Safety . Page 7
Safety information Page 7
Installation Page 8
First use . Page 8
Tools and materials needed.. Page 8
Installing the light.. Page 9
Maintenance and cleaning.. Page 9
Disposal
Declaration of Conformity. Page 10
Warranty and service
Warranty Page 10
Service addresses.. Page 11
Warranty card.. Page 11
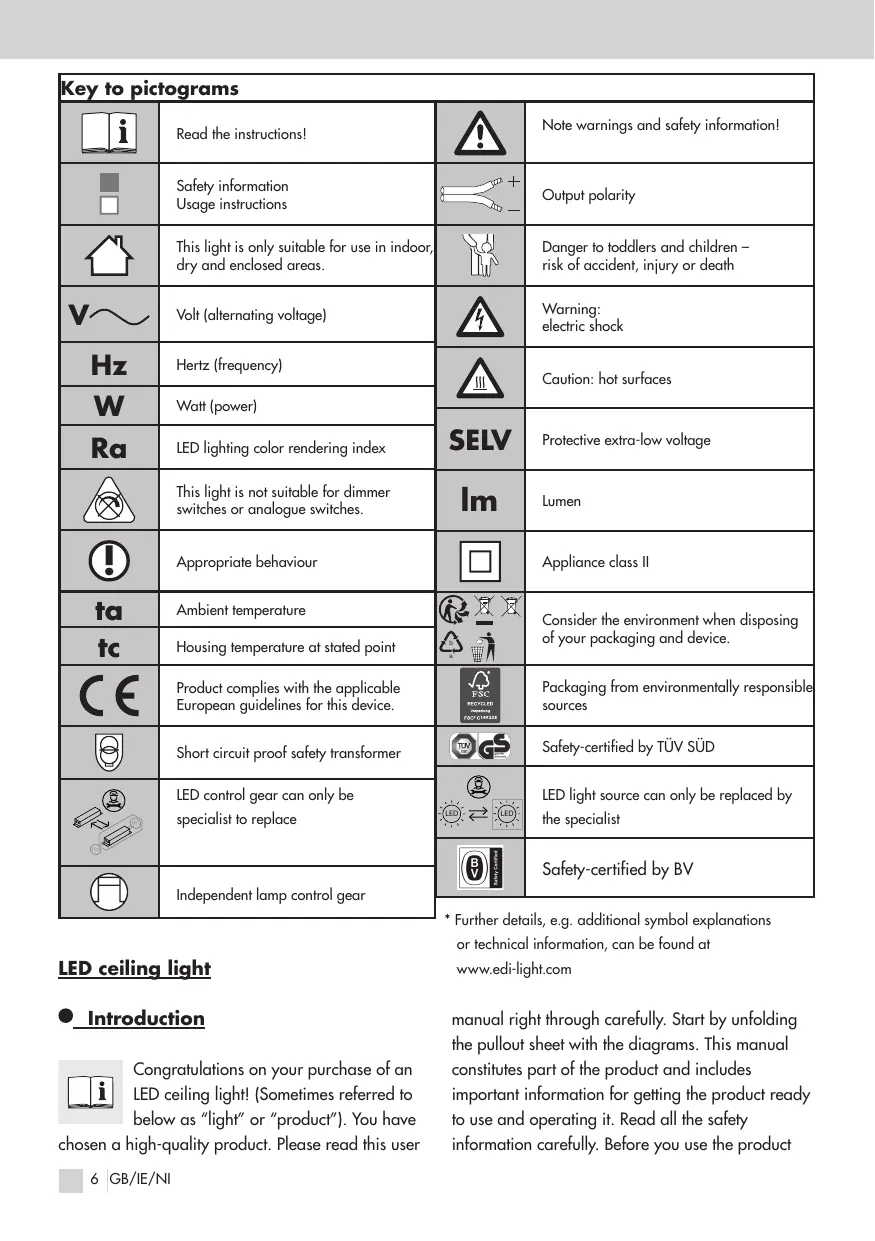
| Key to pictograms | |||
| i | Read the instructions! | ! | Note warnings and safety information! |
| Safety information Usage instructions | + | Output polarity | |
| This light is only suitable for use in indoor, dry and enclosed areas. | Danger to toddlers and children - risk of accident, injury or death | ||
| V~ | Volt (alternating voltage) | 4 | Warning: electric shock |
| Hz | Hertz (frequency) | III | Caution: hot surfaces |
| W | Watt (power) | SELV | Protective extra-low voltage |
| Ra | LED lighting color rendering index | ||
| This light is not suitable for dimmer switches or analogue switches. | lm | Lumen | |
| Appropriate behaviour | Appliance class II | ||
| ta | Ambient temperature | Consider the environment when disposing of your packaging and device. | |
| tc | Housing temperature at stated point | ||
| CE | Product complies with the applicable European guidelines for this device. | FSC REVISED VOCATION FDC C149028 | Packaging from environmentally responsible sources |
| Short circuit proof safety transformer | TUV GS | Safety-certified by TÜV SüD | |
| LED control gear can only be specialist to replace | LED ← LED | LED light source can only be replaced by the specialist | |
| Independent lamp control gear | Safety-certified by BV | ||
LED ceiling light
Introduction

Congratulations on your purchase of an LED ceiling light! (Sometimes referred to below as "light" or "product"). You have
chosen a high-quality product. Please read this user
- Further details, e.g. additional symbol explanations or technical information, can be found at www.edi-light.com
manual right through carefully. Start by unfolding the pullout sheet with the diagrams. This manual constitutes part of the product and includes important information for getting the product ready to use and operating it. Read all the safety information carefully. Before you use the product
for the first time, make sure that the voltage is correct and all parts are correctly installed. If you have any questions or are unsure about using the product, please get in touch with your retailer or service centre. Store this manual carefully and pass it on to third parties if necessary.
Intended use

This product is only suitable for use in indoor, dry and enclosed areas. This product is only intended for private
household use.
- Contents included
When you unpack the product, check straight away that no parts are missing or defective.
1 LED ceiling light
1 set installation material
(2 wall plugs, 2 Philips screws)
1 installation + usage manual
Description of parts
1 Mounting bracket
2 Mounting screws for the light (x2)
3 Wall plugs (x2)
4 Terminal block with installation box
5 LED ceiling light
Technical data
Item number: 56198 56199
Operating voltage: 220-240 V~50/60 Hz
Total output: 12 W
Appliance class: II /
LED light source: 10,5 W, 1600lm(360°), 4000K
Dimensions: 56198 (Ø 295mm) 56199 (288 × 288mm)

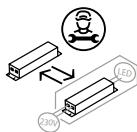
The LED light sources and the LED control gear can only be replaced by a specialist.
Marketed by:
EDI Light GmbH
Heiligkreuz 22, 6136 Pill
AUSTRIA
www.edi-light.com
Safety

Safety information
Damage resulting from failure to observe this manual invalidates the warranty. No liability is accepted for consequential damage. No liability is accepted for property damage or injury resulting from improper use or failure to observe the safety information.

A WARNING! DANGER TO TODDLERS AND CHILDREN - RISK OF ACCIDENTS AND
DEATH
- Never leave children unattended with the packaging material – they can suffocate themselves. Children often underestimate the risks. The packaging material is not a toy.
The product is not a toy and should not be given to children. Children are not capable of recognising the dangers associated with the product.
This product can be used by children aged 8 years and over and by people with limited mental, sensory or intellectual capacities, or by people without relevant experience and knowledge, provided they understand or have
been briefed about safe use of the product and the associated risks. Children may not play with the product. Children may not carry out cleaning and maintenance activities without supervision.

Avoid death by electric shock
- Appliance class II / ☑. This light has protective insulation and does not need to be connected to a grounding conductor. No liability is accepted for property damage or injury resulting from improper use or failure to observe the safety information.
- Arrange for a trained electrician or electrically instructed person to carry out the electrical installation.
- Never use your light if you notice any damage or defects.
Before installation, remove the fuse or switch off the circuit breaker in the fuse box (0 position) - Never bring the light into contact with water or other liquids.
Before installing the light, make sure that the supply voltage matches the required operating voltage for the light (220-240 V~, 50/60 Hz).
Ensure that no cables are damaged during installation. - Never open up the light housing or insert objects into it - this carries a risk of death from electric shock.
- Replace damaged lamp parts immediately with new ones. Contact the service center for this purpose.
Only use the parts recommended by the manufacturer. - Do not install the light on damp or conductive ground.

This light is not suitable for dimmer switches or analogue switches.

Avoid fire and injury

CAUTION: HOT SURFACES - RISK OF BURNING To avoid burns, make sure that the light is switched off and has
cooled down before you touch it. Lamps can get very hot.
Never look directly at the light source. Never look at the light source through an optical instrument (such as a magnifying glass).

Appropriate behaviour
Install the light in a place where it is protected from damp and dirt.
Always be alert! Work carefully and think about what you are doing.
Do not install the light if you are not concentrating or feel unwell.
Installation
First use
- Take all the parts of the light out of the box and unpack them.
- Check all the parts for visible damage. If you find any damage, do not start installing the light! Get in touch with our service centre.
Tools and materials needed
The tools and materials listed are not included with the light. The specifications and values are provided as a guide and are not binding. The characteristics required of the materials depend on the particular situation at the location.
- Pencil/marking tool
- Two-pole voltage tester
- Philips screwdriver
- Drill
-
Drill bit (approx. diameter 6 mm)
-
Wire cutter
- Ladder

ELECTRIC SHOCK The electrical connection must be established by a trained electrician or electrically
instructed person. This person must be familiar with the characteristics of the light and connection conditions. Before installation, remove the fuse or switch off the circuit breaker in the fuse box (0 position) (see Fig. A).
Installing the light
Note: remove the packaging from the product.
Loosen the screws visible at the side of the mounting bracket 1 and remove the mounting bracket (see Fig. A).
Mark the drill holes using the holes in the mounting bracket (see Fig. B).
Drill the mounting holes to a depth of approximately 30mm . Make sure that no cables are damaged in the process. (see Fig. C).
Insert the wall plugs into the drill holes and fasten the mounting bracket into place with the screws provided (see Fig. D).
Connect the power cable (external) to the light via the terminal block 4 (see Fig. E).
Make sure that the individual wires in the power cable (external) are all connected correctly: live wire, black or brown = symbol L, neutral wire, blue/white markings = symbol N (see Fig. E).
Position the LED ceiling light 5 to the mounting bracket 1 using the screws at the side of the mounting bracket (see Fig. F)
Re-insert the fuse or switch on the circuit breaker in the fuse box (1 position) (see Fig. G).
Your LED ceiling light is now ready to use.
- Maintenance and cleaning

CAUTION: ELECTRIC SHOCK
Disconnect the power before you clean the light. Before installation, remove the
fuse or switch off the circuit breaker in the fuse box (0 position).
Disposal
The packaging consists of environmentally friendly materials that you can dispose of in your local recycling facilities.

Check the marking on the packaging when separating your waste. Packaging materials are marked with abbreviations
(a) and numbers (b) as follows: 1-7:
plastics/20-22: paper and cardboard/80-98: composites.

The product and packaging materials are recyclable. Please separate them so they can be processed properly by the
waste disposal company. The Triman logo only applies in France.

Ask your local administrative council or waste disposal facility about how to dispose of the product at the end of its
life.

When your product reaches the end of its life, please consider the environment and do not throw it into your general
waste: instead, dispose of it properly.
You can find out about disposal facilities and their opening times from your local council or administration.

The adjacent symbol of a crossed-out wheeled garbage can indicates that this device is subject to Directive 2012/19/
EU. This directive states that you must not dispose of this device with normal household waste at the end of its service life, but must take it to specially set up collection points, recycling centers or disposal companies. This disposal is free of charge for you. Protect the environment and dispose of it properly.
The following applies to the German market. When purchasing a new device, you have the right to return the corresponding old device to your dealer. Dealers of electrical and electronic equipment with a sales area of at least 400 square meters and grocery stores with a sales area of at least 800 square meters that regularly sell electrical and electronic equipment are also obligated to take back old equipment free of charge, even without purchasing a new device, if the old equipment does not exceed 25~cm in any dimension. LIDL offers take-back options directly in its stores and markets. Please also contact your retailer for information about local take-back options.
If your old device contains personal data, you are responsible for deleting it yourself before returning it. If this is possible without destroying the old device, remove the old batteries or rechargeable batteries as well as lamps before returning the old device for disposal and take them to a separate collection. In the case of permanently installed rechargeable batteries, indicate that the device contains a rechargeable battery when disposing of it. For more ways to dispose of the discarded product, contact your local or city government office.
Declaration of Conformity
C E
This product complies with the requirements of the applicable national and European directives. Declarations
and documentation to this effect are available with the manufacturer. The product complies with the requirements of German safety legislation for equipment and products.
We reserve the right to make technical changes and modifications to the appearance of the item in the course of our product improvement process. Typing errors and misprints reserved.
This product contains a light source of energy class D.
Warranty and service
Warranty
We offer a three-year warranty from the date of purchase. Our products are manufactured according to the latest production techniques and undergo detailed quality checks. We guarantee that the article is in perfect condition. During the warranty period, we will repair material or manufacturing defects free of charge. If, contrary to all expectations, the item exhibits any defects, please pack it up carefully and send it to the service address provided. The warranty excludes damage resulting from improper use and all wear parts or consumable materials. You can order replacement wear parts and consumables at your own cost by telephoning the number provided. You can likewise arrange repairs that are not included in the warranty (e.g. lamps) by contacting the service address provided; these will be billed to you at cost price.
The item will be repaired at the service address provided. To ensure it can be handled and sent back to you promptly, please send it directly to this address.
If you require additional product information, want to order accessories, or have any questions about our service, please telephone our customer service line on the number provided. Please include the item number when you submit your query (see "Technical details").
IAN 420099_2201
When you submit your query, please have the receipt and item number (e.g. IAN 123456_7890) ready as proof of purchase.
Great Britain & Ireland
EGLO UK LTD.
Unit 12 Cirrus Park, Lower Farm Road, Moulton
Park
Industrial Estate, NORTHAMPTON NN3 6UR
T: +44 1604 790 986
E: info-greatbritain@eglo.com
Warranty card
Sender:
Full name:
Country/Postcode/Town/Street address:
Telephone number:
Item number/item name:
Date and place of purchase:
Details of the defect:
Date /signature:
If the warranty does not apply:

Please return the unrepaired item at my own cost.
Please inform me of the cost and repair the item at my own cost.
Land/Postnummer/By/Gade:
Telefonnummer:
Varenummer/Betegnelse:
Kobsdata/Kobssted
Angivelse af fejl:
Dato/Underskrift:
Pooblasceni serviser:
Slovenia
EGLO RASVJETA D.O.O.
Jadranska avenija 9a
HR-10000 ZAGREB
T: +386 158 093 18
E: info-slovenia@eglo.com
Garancijski list
Hungary - Production & Logistics
EGLO MAGYARORSZAG KFT.
Fó ut. 155
H-3060 PASZTO
T: +36 32 560 050
E: info-hungary@eglo.com