USER MANUAL Projecteur solaire à LED LIVARNO
LED SOLAR FLOODLIGHT
Assembly, operating and safety instructions
NL BE
LED-SOLARSCHIJNWERPER
EXPLOSIONSGEFAHR! Laden
SCHUTZHANDSCHUHE TRA
List of pictograms used
Introduction.
Intended use Page 16
Parts description.. Page 16
Technical data.. Page 16
Scope of delivery.. Page 17
Safety instructions
General safety notes.. Page 17
Safety instructions for batteries/rechargeable batteries . Page 17
Functionality. Page 18
Charging the rechargeable battery. Page 18
Installation Page 18
Mounting the spotlight.. Page 19
Mounting the solar panel. Page 19
Prior to first use. Page 20
Configuring the lighting duration.. Page 21
Configuring the daylight level.. Page 21
Configuring the sensitivity of the sensor.. Page 21
Cleaning and care.. Page 21
Troubleshooting
Disposal
Warranty
Warranty claim procedure.. Page 22
Service Page 23
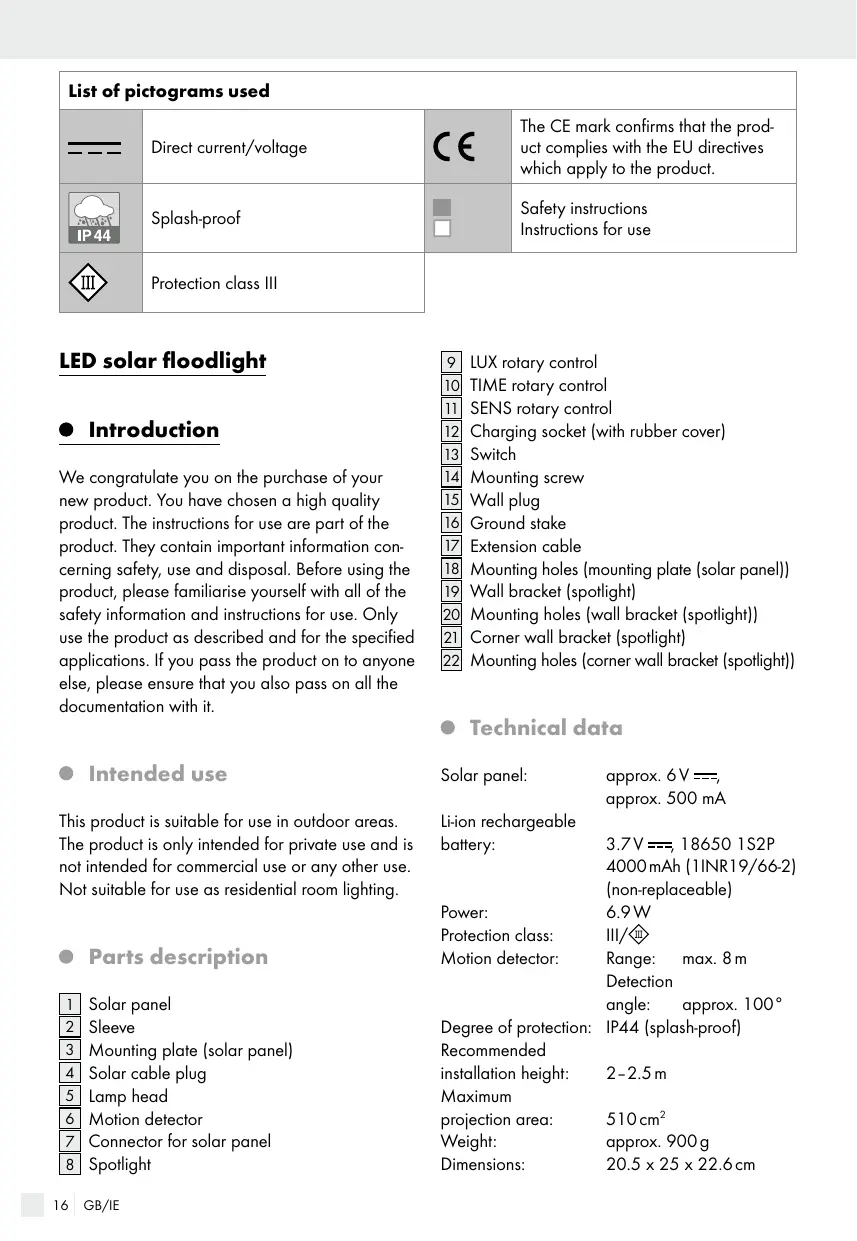
| List of pictograms used |
| --- | Direct current/voltage | CE | The CE mark confirms that the product complies with the EU directives which apply to the product. |
| IP 44 | Splash-proof | ■□ | Safety instructions
Instructions for use |
| III | Protection class III | |
LED solar floodlight
Introduction
We congratulate you on the purchase of your new product. You have chosen a high quality product. The instructions for use are part of the product. They contain important information concerning safety, use and disposal. Before using the product, please familiarise yourself with all of the safety information and instructions for use. Only use the product as described and for the specified applications. If you pass the product on to anyone else, please ensure that you also pass on all the documentation with it.
Intended use
This product is suitable for use in outdoor areas. The product is only intended for private use and is not intended for commercial use or any other use. Not suitable for use as residential room lighting.
Parts description
Solar panel
2 Sleeve
3 Mounting plate (solar panel)
4 Solar cable plug
5 Lamp head
6 Motion detector
7 Connector for solar panel
8 Spotlight
LUX rotary control
10 TIME rotary control
11] SENS rotary control
12 Charging socket (with rubber cover)
[13] Switch
14 Mounting screw
15 Wall plug
16| Ground stake
17 Extension cable
18 Mounting holes (mounting plate (solar panel))
[19] Wall bracket (spotlight)
20 Mounting holes (wall bracket (spotlight))
21 Corner wall bracket (spotlight)
[22] Mounting holes (corner wall bracket (spotlight))
Technical data
Solar panel: approx. 6V = - approx. 500~mA
Li-ion rechargeable
battery: 3.7V = 186501S2P 4000mAh (1INR19/66-2) (non-replaceable)
Power: 6.9W
Protection class: III/
Motion detector: Range: max. 8 m Detection angle: approx. 100^
Degree of protection: IP44 (splash-proof)
Recommended
installation height: 2-2.5m
Maximum
projection area: 510cm^2
Weight: approx. 900 g
Dimensions: 20.5 × 25 × 22.6 ~cm
- Scope of delivery
Always check that all the parts are present and that the product is in perfect condition immediately after unpacking.
1 LED solar floodlight
1 solar panel
1 mounting plate (solar panel)
1 corner wall bracket (spotlight)
1 ground stake
1 extension cable (loose)
6 mounting screws ( 4× 30mm)
6 wall plugs (0 6 mm)
1 assembly, operating and safety instructions
- Safety instructions

General safety notes

A WARNING! DANGER TO LIFE AND RISK OF ACCI- DENTS FOR INFANTS AND
CHILDREN!
Never leave children unsupervised with the packaging material. The packaging material poses a suffocation hazard. Children frequently underestimate the dangers. Always keep children away from the product.
DANGER TO LIFE! During installation keep children away from the area in which you are working. A large number of screws and other small parts are included with delivery. These may prove life-threatening if swallowed or inhaled.
This product may be used by children aged 8 years and above and persons with reduced physical, sensory or mental impairments or lacking experience and knowledge if supervised or instructed in the safe use of the product and if they understand the associated risks. Do not allow children to play with the product. Cleaning and user maintenance must not be performed by children without supervision.
- Do not use the product if you detect any kind of damage.
The LEDs are non-replaceable.
If the LEDs fail at the end of their life, the entire product must be replaced.
RISK OF INJURY! Make sure that when the light is removed, the ground stake is also removed, so that it cannot pose any risk (e.g. stumbling over it).
STUMBLING HAZARD! Ensure that the cable is laid so that it does not present a trip hazard.
Note: The LED solar spotlight (HG11558A/ HG11558B) can only be connected to the solar panel (HG11558S). Do not connect the LED solar spotlight (HG11558A/HG11558B) to another power source or solar panel. The solar panel (HG11558S) is only designed for the LED solar spotlight (HG11558A/ HG11558B). Do not connect the solar panel (HG11558S) to another product.
To reduce the risk of strangulation the flexible wiring connected to this luminaire shall be effectively fixed to the wall if the wiring is within arm's reach.

Safety instructions for batteries/rechargeable batteries
DANGER TO LIFE! Keep batteries/re-chargeable batteries out of reach of children. If accidentally swallowed seek immediate medical attention.
- Swallowing may lead to burns, perforation of soft tissue, and death. Severe burns can occur within 2 hours of ingestion.

DANGER OF EXPLOSION!
Never recharge non-rechargeable batteries. Do not short-circuit bat
teries / rechargeable batteries and/or open them. Overheating, fire or bursting can be the result.
- Never throw batteries/rechargeable batteries into fire or water.
- Do not exert mechanical loads to batteries/rechargeable batteries.
Risk of leakage of batteries/rechargeable batteries
- Avoid extreme environmental conditions and temperatures, which could affect batteries/ rechargeable batteries, e.g. radiators/direct sunlight.
If batteries/rechargeable batteries have leaked, avoid contact with skin, eyes and mucous membranes with the chemicals! Flush immediately the affected areas with fresh water and seek medical attention!

WEAR PROTECTIVE GLOVES!
Leaked or damaged batteries/ rechargeable batteries can cause
burns on contact with the skin. Wear suitable protective gloves at all times if such an event occurs.
This product has a built-in rechargeable battery which cannot be replaced by the user. The removal or replacement of the rechargeable battery may only be carried out by the manufacturer or his customer service or by a similarly qualified person in order to avoid hazards. When disposing of the product, it should be noted that this product contains a rechargeable battery.
- Functionality
When exposed to sunlight, the solar panel 1 converts the light into electrical energy and via the connection to spotlight, stores the electricity in the built-in rechargeable battery. After 6 - 8 hours charging time, it can deliver continuous light for approx. 40 hours. Before first use, the rechargeable battery must be fully charged (see chapter "Charging the rechargeable battery").
- Charging the rechargeable battery
Charge the rechargeable battery completely before first use.
Charging the rechargeable battery with the solar panel
The battery is charged in all operating modes. Switch on the product before charging. Open the rubber cover on the charging socket 12
Insert the solar cable plug 4 (see Fig. A) directly into the charging socket 12 or use an extension cable 17 (see Fig. D) to connect the charging socket 12 of the spotlight 8. Position the solar panel 1 as described in section "Mounting the solar panel".
Note: With steady exposure to sunlight, a completely empty rechargeable battery is fully charged after 6 to 10 days. The duration of the charging process depends on the charge state of the rechargeable battery as well as the quality of the exposure to sunlight.
Note: The product cannot be charged at temperatures below 0^ C and above 45^ C according to the battery protection.
Note: Fully charge the battery before storage. If you want to store the product for longer than 3 months, fully charge the battery every 3 months.
Note: Recommend using the product within 3 months after purchase.
- Installation
Note: Remove all packaging material from the product.
Note: Fold out the spotlight 8 for first time use (see Fig. B).
Before installing, decide where you want to mount the solar panel 1 and the spotlight 8. The solar panel 1 and the spotlight 8 can be installed independently of each other, or be directly connected to each other via the approx. 20cm long cable on the solar panel 1. If the solar panel 1 and the spotlight 8 are installed independently of each other, then they must be connected to each other after installation, via the approx. 5m long extension cable 17.
After installing, lay the cable so it is not subject to any mechanical stresses. Use typical
installation material such as cable clamps or conduits to fasten the cable, to prevent damage to the insulation.
Note: The included installation material is suitable for ordinary solid concrete or masonry construction. Other wall substrates may require other fastening materials. Seek specialist advice if necessary.
- Mounting the spotlight
Please be sure not to drill into any electrical wiring, gas or water lines inside the wall. Use a power drill to drill holes into brick walls. Always observe all safety instructions for the power drill in the manual for the power drill. Failure to follow this advice may result in death or injuries due to electric shock.
When deciding where to install the spotlight 8, pay attention to the following:
Make sure that the spotlight 8 is not directly illuminated by sunlight. This could impair the charging function.
Make sure that the spotlight 8 illuminates the desired area. You can move the spotlight 8.
Make sure the motion detector 6 covers the desired area. The motion detector 6 has a maximum coverage range of 8m with a coverage angle of about 100^ (depending on the installation height - a height of 2.00 - 2.50m is ideal).
Make sure the motion detector 6 is not illuminated at night by street lighting. This can influence its functioning.
Mounting the spotlight to the wall
Remove the wall bracket 19 from the spotlight 8 by loosening the screw on the base.
Use the mounting holes [18] (see Fig. F) to mark out the positions on the wall for the drill holes.
Then drill these holes and mount the wall bracket using the wall plugs and mounting screws provided (see Fig. G).
Set the switch [13] to position I or II to operate the spotlight [8].
- Attach the spotlight to the wall bracket and fix it in place using the screw on the base that had been removed beforehand (see Fig. H).
□ After installing, check that the spotlight 8 is fitted securely.
Mounting the spotlight to the corner of the wall
The spotlight 8 can also be mounted to the corner of a wall.
Use the mounting holes (see Fig. F) to mark out the positions on the corner of the wall for the drill holes.
Then drill these holes and fasten the corner wall bracket using the wall plugs and mounting screws provided.
Note: You can choose to install on the left side or right side wall corner to obtain different view angle by the design of the mounting holes 22 of the corner wall bracket 21 (see Fig. G).
Remove the spotlight 8 from the wall bracket 19.
- Attach the spotlight [8] to the corner wall bracket [21] and fix it in place using the screw on the base that had been removed before-hand (see Fig. H).
□ After installing, check that the spotlight 8 is fitted securely.
Aligning the lamp head
The lamp head 5 can be individually adjusted at a specific angle both vertically or horizontally as desired direction (see Fig. 1). Now align the motion detector 6 and make sure that this is aligned exactly to the range you wish to cover.
- Mounting the solar panel
There is an option to either directly mount the solar panel 1 to the spotlight 8, install it on a level mounting surface (wall/roof), or to use the ground stake 16 provided (see Fig. D) to install it on the lawn.
When deciding where to install the solar panel 1, pay attention to the following:
The solar panel requires direct sunlight where possible. Even partial shading of the solar panel during the day can have a significant influence on charging.
Note: The solar panel 1 can be set to a specific angle to ensure greater exposure to sunlight (see Fig. J).
Cardinal direction:
Orientation towards the south is optimum. Orientations with slight deviations towards the west are preferable to those with slight deviations towards the east.
Mounting the solar panel to the spotlight
Connect the solar panel 1 to the connector 7 on the spotlight 8 using the sleeve 2 (see Fig. J). Be sure that they are secured tightly.
Remove the rubber cover from the charging socket [12] and then insert the solar cable plug [4] into the charging socket [12] to use it (see Fig. C).
Installing the solar panel to the wall/on the roof
Please be sure not to drill into any electrical wiring, gas or water lines inside the wall. Use a power drill to drill holes into brick walls. Always observe all safety instructions for the power drill in the manual for the power drill. Failure to follow this advice may result in death or injuries due to electric shock.
Use the mounting holes (see Fig. F) to mark out the positions on the wall for the drill holes.
Then drill these holes and secure the mounting plate 3 using the wall plugs 15 and mounting screws provided.
Then attach the solar panel 1 onto the mounting plate 3 with using the sleeve 2 and be sure that they are secured tightly (see Fig. J).
Remove the rubber cover from the charging socket [12] and then insert the solar cable plug [4] into the socket on the extension cable [17] (see Fig. D). Afterwards, connect the
plug on the extension cable 17 to the charging socket 12 on the spotlight 8.
Now adjust the spotlight [8] as desired.
Mounting the solar panel to the ground stake
Connect the solar panel 1 to the ground stake using the sleeve 2. Ensure that they are secured tightly.
Push the solar panel 1 with the ground stake 16 into the ground (lawn, soil, etc.) so that it is stable. Make sure you keep proper footing and balance at all times. Do not use force when installing or setting up the solar panel 1, e.g. hammer blows. This leads to damage to the solar panel 1.
Now connect the solar cable plug 4 to the socket on the extension cable 17 (see Fig. D), then connect the plug on the extension cable 17 with the charging socket 12 on the spotlight 8.
The product is now ready to use.
Prior to first use
The switch 13 on the product has the following functions:
"OFF" position:
The motion detector 6 and the product are switched off.
Position "I" (orientation light mode with motion detector):
Regardless of the daylight settings, the product enables the orientation light to provide a steady light whether in daylight or in the dark (see chapter "Configuring the daylight level"). As soon as the motion detector 6 detects a movement, the product will switch to extra bright light. The product is operated at full power when the extra-bright light is switched on. The product returns to its primary function as an orientation light, providing a steady light, following a period from 10 to 60 seconds after the last movement was detected.
Position "II" (mode with motion detector):
The product only switches into a mode with motion detector function. The product only activates extra-bright light if the motion detector 6 recognises movement in darkness or daylight, regardless of the daylight level setting. The light goes out following a period from 10 to 60 seconds after the last movement was detected.
- Configuring the lighting duration
Turn the TIME rotary control 10 on the bottom of the motion detector 6 clockwise to increase the duration of illumination (see Fig. E). The lighting duration can be adjusted within a time window of approx. 10-60 seconds.
- Configuring the daylight level
Turn the rotary control LUX 9 on the bottom of the motion detector 6 clockwise to increase the daylight level. In position, the motion detector only responds at pitch-black night (approx. 5 lx). In position, the motion detector also responds at daylight levels, as long as about 50,000 lx are not exceeded (Fig. E).
- Configuring the sensitivity of the sensor
Turn the SENS rotary control 11 on the bottom of the motion detector 6 clockwise to increase the sensitivity of the motion detector 6 (see Fig. E). When at its most sensitive, the motion detector 6 can detect movement at ranges of up to 8m
Note: The motion detector 6 responds to heat radiation. When outdoor temperatures are low, it is more sensitive to body heat than when outdoor temperatures are high. Be sure to regulate the sensitivity of the sensor over the course of the year.
- Cleaning and care
Switch off the product before cleaning.
Check the motion detector 6 and the solar panel 1 regularly to ensure that they are not dirty. Clean all dirt so that the product works properly.
- Keep the product free of snow and ice in winter.
Clean the product with a lint-free, lightly moistened cloth and a mild cleaning agent.
- Troubleshooting
| Fault | Cause | Solution |
| The product does not switch on. | The switch 13 is in the OFF position. | Set the switch 13 to position "I" or "II". |
| The rechargeable battery is empty. | Charge the rechargeable battery. |
| The light flickers. | The rechargeable battery is almost empty. | Charge the rechargeable battery. |
| The re-chargeable battery is discharged within a short period. | The solar panel 1 is dirty. | Clean the solar panel 1. |
| The solar panel 1 is incorrectly aligned. | Realign the solar panel 1. |
Disposal
The packaging is made entirely of recyclable materials, which you may dispose of at local recycling facilities.

Observe the marking of the packaging materials for waste separation, which are marked with abbreviations (a) and numbers (b) with following meaning: 1-7: plastics/20-22: paper and fibreboard/80-98: composite materials.

Contact your local refuse disposal authority for more details of how to dispose of your worn-out product.

To help protect the environment, please dispose of the product properly when it has reached the end of its useful life and not in the household waste. Information on collection points and their opening hours can be obtained from your local authority.


The product incl. accessories and packaging materials are recyclable and are subject to extended producer responsibility. Dispose them separately, following the illustrated Info-tri (sorting information), for better waste treatment. The Triman logo is valid in France only.
Faulty or used batteries/rechargeable batteries must be recycled in accordance with Directive 2006/66/EC and its amendments. Please return the batteries/rechargeable batteries and/or the product to the available collection points.

Environmental damage through incorrect disposal of the batteries/rechargeable batteries!
Batteries/rechargeable batteries may not be disposed of with the usual domestic waste. They may contain toxic heavy metals and are subject to hazardous waste treatment rules and regulations. The chemical symbols for heavy metals are as follows: Cd = cadmium, Hg = mercury, Pb = lead. That is why you should dispose of used batteries/re-chargeable batteries at a local collection point.
Warranty
The product has been manufactured to strict quality guidelines and meticulously examined before delivery. In the event of material or manufacturing defects you have legal rights against the retailer of this product. Your legal rights are not limited in any way by our warranty detailed below.
The warranty for this product is 3 years from the date of purchase. The warranty period begins on the date of purchase. Keep the original sales receipt in a safe location as this document is required as proof of purchase.
Any damage or defects already present at the time of purchase must be reported without delay after unpacking the product.
Should the product show any fault in materials or manufacture within 3 years from the date of purchase, we will repair or replace it - at our choice - free of charge to you. The warranty period is not extended as a result of a claim being granted. This also applies to replaced and repaired parts.
This warranty becomes void if the product has been damaged, or used or maintained improperly.
The warranty covers material or manufacturing defects. This warranty does not cover product parts subject to normal wear and tear, thus considered consumables (e.g. batteries, tubes, cartridges), nor damage to fragile parts, e.g. switches or glass parts.
For this product, the rechargeable battery is also covered by its warranty period.
Warranty claim procedure
To ensure quick processing of your case, please observe the following instructions:
Please have the till receipt and the item number (IAN 452569_2310) available as proof of purchase.
You will find the item number on the rating plate, an engraving on the front page of the instructions for use (bottom left), or as a sticker on the rear or bottom of the product.
If functional or other defects occur, please contact the service department listed either by telephone or by e-mail.
You can return a defective product to us free of charge to the service address that will be provided to you. Ensure that you enclose the proof of purchase (till receipt) and information about what the defect is and when it occurred.
Service
GB Service Great Britain
Tel.: 0800 0569216
E-Mail: owim@lidl.co.uk
IE Service Ireland
Tel.: 1800200736
E-Mail: owim@lidl.ie
C∈IP44
= 0
= 0
= 0
= 0
= 0
= 0
= 0
= 0
= 0
= 0
= 0
= 0
= 0
= 0
= 0
= 0
= 0
= 0
= 0
= 0
= 0
= 0
= 0
= 0
= 0
= 0
NOSTE OCHRANNÉ RUKA-
VICE! Vyteklé i poskozené baterie nebo akumulatory mohou pri kon-
NOSTE OCHRANNÉ RUKA-
VICE! Vytečné alebo poškodené
bátérié/akumulátorové bátérié možu
Montering of spot . 82
Montering af solpanel. Side 83
Ibrugtagning Side 84