
AD2 - Pressure washer KARCHER - Free user manual and instructions
Find the device manual for free AD2 KARCHER in PDF.
| Product type | High-pressure cleaner |
| Brand | KÄRCHER |
| Model | AD2 |
| Dimensions (L x W x H) | 279 x 275 x 803 mm |
| Weight (in operation with accessories) | 7.0 kg |
| Power supply | 220-240 V, 1~50-60 Hz |
| Power input | 1.6 kW |
| Protection degree | IP X5 |
| Protection class | II |
| Working pressure | 10 MPa |
| Maximum allowable pressure | 12 MPa |
| Water flow rate | 5.5 l/min |
| Maximum flow rate | 6.3 l/min |
| Detergent flow rate | 0.3 l/min |
| Max. inlet temperature | 40 °C |
| Sound pressure level LpA | 74 dB(A) |
| Sound power level LWA | 90 dB(A) |
| Scope of delivery | Vario Power lance, rotary nozzle lance, high-pressure hose, spray gun, detergent tank, suction hose, etc. |
| Main functions | High-pressure cleaning, detergent operation, continuous pressure adjustment (Vario Power), automatic shut-off |
| Safety devices | Main switch, spray gun lock, pressure relief valve with pressure switch |
| Maintenance | Cleaning of water inlet filter, cleaning of detergent filter, frost protection |
| Spare parts | Use only KÄRCHER parts |
| Warranty | According to dealer's terms, free repair for material or manufacturing defects |
Frequently Asked Questions - AD2 KARCHER
User questions about AD2 KARCHER
0 question about this device. Answer the ones you know or ask your own.
Ask a new question about this device
Download the instructions for your Pressure washer in PDF format for free! Find your manual AD2 - KARCHER and take your electronic device back in hand. On this page are published all the documents necessary for the use of your device. AD2 by KARCHER.
USER MANUAL AD2 KARCHER
www.kaercher.com/dealersearch
Technische Daten

S. Reiser
Head of Approbation
71364 Winnenden (Germany)
Tel.: +49 7195 14-0
Fax: +49 7195 14-2212
Winnenden, 2014/09/01
Contents
Scope of delivery. EN 5
Proper use. EN 5
Environmental protection. EN 5
Safety EN 5
Description of the Appliance EN 6
Assembly. EN 6
Start up EN 6
Operation. EN 7
Transport. EN 7
Storage EN 8
Care and maintenance EN 8
Troubleshooting EN 8
Spare parts EN 8
Warranty EN 9
Technical specifications EN 9
EC Declaration of Conformity EN 9

Please read and comply with these original operating instructions and the enclosed safety instructions. Proceed ac
cordingly. Keep both booklets for future reference or subsequent owners.
Scope of delivery
The scope of delivery of your appliance is illustrated on the packaging. Check the contents of the appliance for completeness when unpacking.
In the event of missing accessories or any transport damage, please contact your dealer.
Additionally required
Fabric-reinforced water hose with commercially available coupling.
Minimum diameter, 1/2 inches (13 mm).
Minimum length 7.5m
Proper use
This high pressure cleaner is designed for domestic use only.
for cleaning machines, vehicles, buildings, tools, facades, terraces, gardening tools, etc. by means of a high-pressure water jet (if necessary, with additional cleaning agents).
with accessories, replacement parts and cleaning agents approved by KARCHER. Please observe the information accompanying the cleaning agents.
Environmental protection
Notes about the ingredients (REACH)
You will find current information about the ingredients at:
www.kaercher.com/REACH

The packaging material can be recycled. Please arrange for the environmentally appropriate disposal of the packaging.

Old appliances contain valuable recyclable materials that should be recycled properly. Please arrange for the environmentally appropriate disposal of the old devices.

Cleaning operations which produce oily waste water, e.g. engine washes, underbody washes, may only be carried out using washing stations equipped with an oil separator.

Work with detergents must only be performed on liquid-tight work surfaces with a connection to the sewer system. Do not let release detergent into waters or earth.
Safety
Safety instructions
Prior to the first use of this device, the accompanying "Safety instructions for high-pressure cleaners" must be read.
Hazard levels

DANGER
Pointer to immediate danger, which leads to severe injuries or death.

WARNING
Pointer to a possibly dangerous situation, which can lead to severe injuries or death.

CAUTION
Pointer to a possibly dangerous situation, which can lead to minor injuries.
ATTENTION
Pointer to a possibly dangerous situation, which can lead to property damage.
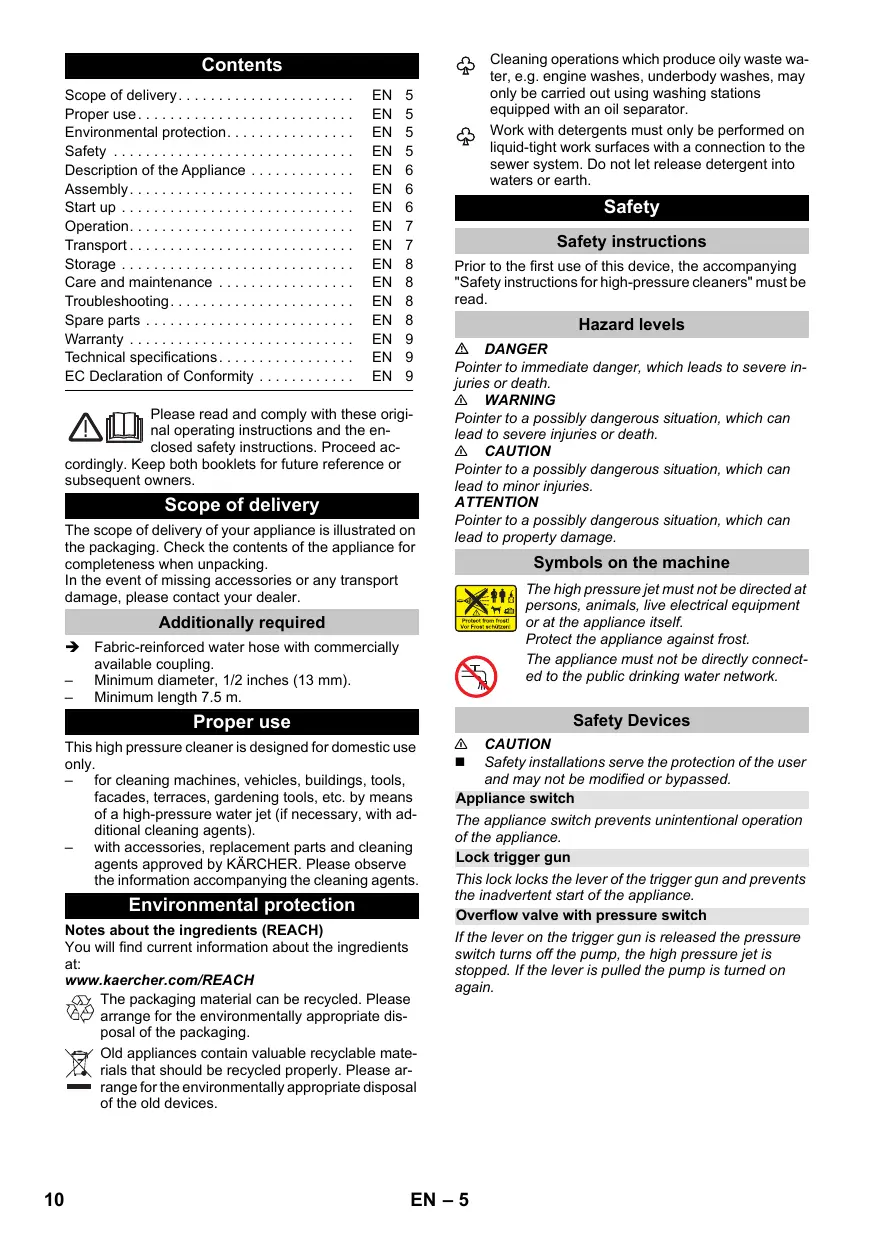
Symbols on the machine

The high pressure jet must not be directed at persons, animals, live electrical equipment or at the appliance itself.
Protect the appliance against frost.
The appliance must not be directly connected to the public drinking water network.
Safety Devices

CAUTION
Safety installations serve the protection of the user and may not be modified or bypassed.
Appliance switch
The appliance switch prevents unintentional operation of the appliance.
Lock trigger gun
This lock locks the lever of the trigger gun and prevents the inadvertent start of the appliance.
Overflow valve with pressure switch
If the lever on the trigger gun is released the pressure switch turns off the pump, the high pressure jet is stopped. If the lever is pulled the pump is turned on again.
Description of the Appliance
These operating instructions describe the maximum equipment. Depending on the model, there are differences in the scopes of delivery (see packaging).
Illustrations on fold-out page!
1 Quick coupling for high pressure hose
2 High pressure connection
3 Appliance switch "0/OFF"/,I/ON"
4 Storage hook for mains connection cable
5 Storage for high pressure hose
6 Transport handle
7 Water connection with integrated sieve
8 Detergent suction hose with detergent filter and lid
9 Detergent Tank
10 Coupling element for water connection
11 Storage for spray lance
12 Storage for trigger gun
13 Mains cable with mains plug
14 Bearing wheel
15 Trigger gun
16 Lock trigger gun
17 Key to detach the high pressure hose from the trigger gun
18 High pressure hose
19 Spray lance with pressure regulation (Vario Power) Carrying out the most common cleaning tasks. The work pressure can be stagelessly regulated between "Min" and "Max". You can add detergent when "Mix" is selected.
In order to adjust the working pressure, release the lever of the trigger gun and turn the spray lance to the desired position.
20 Spray lance with Dirtblaster
For strong contaminations
* Optional accessories
21 Washing brush
22 Rotary washing brush
Especially suitable for cleaning cars.
23 Foam nozzle with detergent container
With powerful foam for effortless cleaning.
** not included in the scope of delivery
24 Water supply hose
Special accessories
Special accessories expand the possibilities of using your appliance. Please contact your KARCHER dealer for further information.
Assembly
Mount loose parts delivered with appliance prior to startup.
Illustrations on fold-out page!
Illustration A

Push the wheels into the intake.
Secure the wheels using the included plug. Align the plug properly!
Illustration B
Insert the transport handle and screw in.
Illustration C
Screw the coupling element to the water connection on the appliance.
Illustration D
Fasten the quick coupling for the high pressure hose to the high pressure connection.
Illustration E
Push the high pressure hose into the trigger gun until it locks audibly.
Note: Make sure the connection nipple is aligned correctly.
Check the secure connection by pulling on the high pressure hose.
Start up
Park the appliance on an even surface.
Illustration F
Push the high pressure hose into the quick coupling until it locks audibly.
Note: Make sure the connection nipple is aligned correctly.
Check the secure connection by pulling on the high pressure hose.
Insert the mains plug into the socket.
Water supply from mains
For connection values, see type plate/technical data.
Observe regulations of water supplier.
ATTENTION
Impurities in the water can damage the high-pressure pump and the accessories. For protection, the use of the KARCHER water filter (optional accessory, order no. 4.730-059) is recommended.
Attach the water supply hose to the coupling on the water connection.
Connect the water supply hose to the water supply.
Completely open the water tap.
Operation
ATTENTION
Dry running of more than 2 minutes leads to damage of the high-pressure pump. If the appliance does not build up pressure within 2 minutes, switch the appliance off and proceed in accordance with the instructions in Chapter "Troubleshooting".
High pressure operation
CAUTION
Keep a distance of at least 30~cm when using the jet for cleaning painted surfaces to avoid damage.
ATTENTION
Car tyres, paint or sensitive surfaces such as wood should not be cleaned with the dirt blaster, as there is a risk of damage.
Illustration 6
Push the spray lance into the trigger gun and fasten it by turning it through 90^ .
Turn on the appliance "I/ON".
Unlock the lever on the trigger gun.
Pull on the lever of the trigger gun; the device will switch on.
Note: Release the lever of the trigger gun; the device will switch off again. High pressure remains in the system.
Operation with washing brush
ATTENTION
Risk of damage to the paintwork
When working with the washing brush, it must be free of dirt or other particles.
Push the washing brush into the trigger gun and fasten it by a 90^ turn.
Note: If required, the washing brushes can be used to work with detergent.
Operation with detergent
Note: Detergent can only be added when the device is operated in low pressure mode.
DANGER
When using detergents, the material data safety sheet issued by the detergent manufacturer must be adhered to, especially the instructions regarding personal protective equipment.
Illustration H
Fill the detergent solution in the detergent tank (observe dosage instructions on the packaging of the detergent).
Illustration
Close the detergent tank with the lid.
Lock the detergent tank in place on the appliance.
Illustration J
Use spray lance with pressure regulation (Vario Power).
Turn the spray lance to "Mix" position.
Note: This will mix the detergent with the water stream.
Recommended cleaning method
Spray the detergent sparingly on the dry surface and allow it to react, but not to dry.
Spray off loosened dirt with the high pressure jet.
Optional
Fill the detergent solution in the detergent tank of the foam nozzle (observe dosage instructions on the packaging of the detergent).
Connect the detergent tank to the foam nozzle.
Connect the foam nozzle to the trigger gun.
Interrupting operation
Release the lever on the trigger gun.
Lock the lever on the trigger gun.
Insert the trigger gun in its holder.
During longer breaks (more than 5 minutes), also turn the appliance off using the "0/OFF" switch.
Finish operation
CAUTION
Only separate the high-pressure hose from the hand spray gun or the appliance when there is no pressure in the system.
After operation with detergent: Run the machine for approximately 1 minute for a clear rinse.
Release the lever on the trigger gun.
Turn off the appliance "0/OFF".
Disconnect the mains plug from the socket.
Turn off tap.
Press the lever on the trigger gun to release any remaining pressure in the system.
Lock the lever on the trigger gun.
Detach the appliance from the water supply.
Transport
CAUTION
Risk of personal injury or damage!
Mind the weight of the appliance during transport.
When transporting by hand
Pull the appliance by its transport handle.
When transporting in vehicles
Empty detergent tank.
Secure the appliance against shifting and tipping over.
Storage
CAUTION
Risk of personal injury or damage!
Consider the weight of the appliance when storing it.
Storing the Appliance
Prior to extended storage periods, as during the winter, also observe the instructions in the Care section.
Park the machine on an even surface.
Push the casing of the quick coupling for the high pressure hose toward the rear and disconnect the high pressure hose from the appliance.
Press the disconnect on the trigger gun and remove the high pressure hose from the trigger gun.
Insert the trigger gun in its holder.
Engage the spray lance in its compartment.
Stow away the mains cable, the high-pressure hose and accessory on the appliance.
Frost protection
ATTENTION
Appliances and accessories that are not completely drained can be destroyed by frost. Completely drain appliance and accessories and protect them against frost. To avoid damage:
Completely drain all water from the appliance: Switch the appliance on with detached high pressure hose and detached water supply (max. 1 minute) and wait, until no more water exits at the high pressure connection. Turn off the appliance.
Store the appliance and the entire accessories in a frost free room.
Care and maintenance
DANGER
Risk of electric shock.
Prior to all work on the appliance, switch off the appliance and pull the power plug.
Clean the sieve in the water connection
Clean the sieve in the water connection regularly.
Remove coupling from the water connection.
Illustration K
ATTENTION
The sieve must not be damaged.
Pull the sieve out using flat pliers.
Clean the sieve under running water.
Reinsert the sieve into the water connection.
Cleaning the detergent filter
Prior to longer periods of storage, e.g. in the winter:
Remove filter from suction hose for detergent and clean under running water.
Troubleshooting
You can rectify minor faults yourself with the help of the following overview.
If in doubt, please consult the authorized customer service.
DANGER
Risk of electric shock.
Prior to all work on the appliance, switch off the appliance and pull the power plug.
Appliance is not running
Pull on the lever of the trigger gun; the device will switch on.
Check whether the voltage indicated on the type plate corresponds to the voltage of the mains supply.
Check the mains connection cable for damages.
Pressure does not build up in the appliance
Check setting at the spray lance.
Check water supply for adequate delivery rate.
Pull out the sieve in the water connection using flat-nose pliers and clean under running water.
Appliance ventilation: Switch the appliance on with the high-pressure hose detached and operate (max. 2 minutes) until the water exits the high-pressure connection without bubbles. Switch off appliance and reconnect high-pressure hose.
Strong pressure fluctuations
Clean high-pressure nozzle: Remove dirt and debris from the nozzle bore, using a needle and rinse through with water from the front.
Check water flow quantity.
Appliance is leaking
Slight leakage from the appliance pump is normal. If the leakage increases contact the authorized customer service.
No detergent infeed
Use spray lance with pressure regulation (Vario Power).
Turn the spray lance to "Mix" position.
Clean the detergent suction hose filter.
Check the detergent suction hose for kinks.
Spare parts
Use only original KARCHER spare parts. You will find a list of spare parts at the end of these operating instructions.
Warranty
The warranty terms published by the relevant sales company are applicable in each country. We will repair potential failures of your appliance within the warranty period free of charge, provided that such failure is caused by faulty material or defects in manufacturing. In the event of a warranty claim please contact your dealer or the nearest authorized Customer Service centre. Please submit the proof of purchase. Addresses can be found under: www.kaercher.com/dealersearch
Technical specifications
| Electrical connection | |
| Voltage | 220-240 V 1~50-60 Hz |
| Connected load | 1,6 kW |
| Protection class | IP X5 |
| Protective class | II ☑ |
| Mains fuse (slow-blow) | 10 A |
| Water connection | |
| Max. feed pressure | 1,2 MPa |
| Max. feed temperature | 40 °C |
| Min. feed volume | 8 l/min |
| Performance data | |
| Working pressure | 10 MPa |
| Max. permissible pressure | 12 MPa |
| Water flow rate | 5,5 l/min |
| Max. flow rate | 6,3 l/min |
| Detergent flow rate | 0,3 l/min |
| Recoil force of trigger gun | 11 N |
| Dimensions and weights | |
| Length | 279 mm |
| Width | 275 mm |
| Height | 803 mm |
| Weight, ready to operate with acces-sories | 7,0 kg |
| Values determined as per EN 60335-2-79 | |
| Hand-arm vibration value | <2,5 m/s² |
| Uncertainty K | 0,3 m/s² |
| Sound pressure level LpA | 74 dB(A) |
| Uncertainty KpA | 3 dB(A) |
| Sound power level LWA + Uncertainty KWA | 90 dB(A) |
Subject to technical changes.
EC Declaration of Conformity
We hereby declare that the machine described below complies with the relevant basic safety and health requirements of the EU Directives, both in its basic design and construction as well as in the version put into circulation by us. This declaration shall cease to be valid if the machine is modified without our prior approval.
Product: High pressure cleaner
Type: 1.601-xxx
Relevant EU Directives
2000/14/EC
2004/108/EC
2006/42/EC (+2009/127/EC)
2011/65/EU
Applied harmonized standards
EN 50581
EN 55014-1: 2006+A1: 2009+A2: 2011
EN 55014-2: 1997+A1: 2001+A2: 2008
EN 60335-1
EN 60335-2-79
EN 61000-3-2: 2006+A1: 2009+A2: 2009
EN 61000-3-3: 2013
EN 62233: 2008
Applied conformity evaluation method
2000/14/EC: Appendix V
Sound power level dB(A)
Measured: 87
Guaranteed: 90
The undersigned act on behalf and under the power of attorney of the company management.


Authorised Documentation Representative S. Reiser
71364 Winnenden (Germany)
Phone: +49 7195 14-0
Fax: +49 7195 14-2212
Winnenden, 2014/09/01
Table des matieres
Instructions relatives aux Ingredients (REACH)
www.kaercher.com/REACH

www.kaercher.com/dealersearch
2006/42/CE (+2009/127/CE)
2011/65/UE
71364 Winnenden (Germany)
Telephone: +49 7195 14-0
Winnenden, 2014/09/01
Indices
Fornitura 1T 5
www.kaercher.com/REACH

www.kaercher.com/dealersearch
Dati tecnici
2006/42/CE (+2009/127/CE)
2011/65/UE
71364 Winnenden (Germany)
Tel.: +49 7195 14-0
Fax: +49 7195 14-2212
Winnenden, 2014/09/01
Inhoud
www.kaercher.com/dealersearch
Technische gegevens
71364 Winnenden (Germany)
Tel.: +49 7195 14-0
Fax: +49 7195 14-2212
Winnenden, 2014/09/01
www.kaercher.com/REACH

www.kaercher.com/dealersearch
Datasétécnicos
71364 Winnenden (Germany)
Tele.: +49 7195 14-0
Fax: +49 7195 14-2212
Winnenden, 2014/09/01
Indices
Volume do fornecimento PT 5
www.kaercher.com/REACH

A boa nao atinge a pressao de service
www.kaercher.com/dealersearch
Dados&Tecnicos
2006/42/CE (+2009/127/CE)
2011/65/UE

S. Reiser
Head of Approbation
71364 Winnenden (Germany)
Tel.: +49 7195 14-0
Fax: +49 7195 14-2212
Winnenden, 2014/09/01
Indholdsfortegnelse
Leveringsomfang. DA 5
Bestemmelsesmaessig anvendelse. DA 5
2006/42/EF (+2009/127/EF)
2011/65/EU
71364 Winnenden (Germany)
TIf.: +49 7195 14-0
Fax: +49 7195 14-2212
Winnenden, 2014/09/01
Innholdsfortegnelse
Leveringsomfang. NO 5
www.kaercher.com/REACH

Materiali i emballasjen kan resirkuleres. Kvitt deg med emballasjen på miljøvenlig mæte.

2006/42/EF (+2009/127/EF)
2011/65/EU
Anvende overensstemmende normer
EN 50581
EN 55014-1: 2006+A1: 2009+A2: 2011
EN 55014-2: 1997+A1: 2001+A2: 2008
EN 60335-1
EN 60335-2-79
EN 61000-3-2: 2006+A1: 2009+A2: 2009
EN 61000-3-3: 2013
EN 62233: 2008
Anvendt metode for samsvarsvurdering
2000/14/EF:Vedlegg V
Lydeffektnivá dB(A)
Malt: 87
Garantert: 90
71364 Winnenden (Germany)
TIf: +49 7195 14-0
Winnenden, 2014/09/01
www.kaercher.com/dealersearch
Tekniska data
71364 Winnenden (Germany)
Tel.: +49 7195 14-0
Fax: +49 7195 14-2212
Winnenden, 2014/09/01
Sisallysluettelo
Toimitus F1 5
www.kaercher.com/REACH

www.kaercher.com/dealersearch
Tekniset tiedot
71364 Winnenden (Germany)
Puh.: +49 7195 14-0
Winnenden, 2014/09/01
Nivakac Tepiexouevw
Σuokεuaσia EL 5
www.kaercher.com/REACH

Ta ulika ouokekuaiai civai avakukwaija. Atnopipiye Tn ouokekuaiae oikoloyko tpTO.

OIIaIcS OuaKeueS TpeIeXouV IOAUtua avakukuKwaiua UIkA, ta OTIoA tha tipTei va DiATBeVTaYia avakUkwan. ATOoUPETe TIG IIaIcS OuaKeueSc EIOAOKAOYIO KTOIO.

Oi epyaioic kaabipiaou, kata tis otoieic pokouttouv atovepa Tou TEPeixou v adia, T. x. tauio iKivntnpv, tauioou Tou kTu wepousTwv oxnauv, EITIPETOVtai mvo e Tauvtipia Tou dia- theouv diaxwpiatn laiwv.

Oepyaies e atopputavtko mtopoovvaekteauvtao oe uatooteveic etniapaeic eypaoiac e ouuoveneo sto ouottnia atopponc bpwukouvepou. To atopputavtiko vtpette va katalnyeota utyoeia udata n 0to edapoc.
Aσφαλει
YtObeEeIeIaOpaaleiaS
Pniv ato Tnv tnwnxpnan ts ouakeunus aurnc diaBa-ote OTwoohntote tns ouvodetikec YITnoideiec aqpaaleiac yia oukeuekKaahapaiou uynnlsTreons).
Eππεδασφαλειας
KINAYNO
YtObeEiEIG yia aEeaa EaTnAeIauEvo KIVsUvo, o otIOIo npoeiva exi wos ouvTeia oBapo ngavaoio rpauaio
IPOEIAONOIHsH
YtOdEiEic yia uia duvtikad etikivouv kataaan, n oToia mTopei va exei wosuveTeia oBapo havaoipo taupaiquo.
IPOESXH
YrOeIyia iuaEvOxOeVwC EITIKivDuvN KaraTaan, n OTOIA mPoepi va oOnynoei eAappTopaumaiu.
PPOOxH
Yrnoe1n yia uia duvnikac tnikivnu n kaataan, n oia mnpoe ia exei wouvntia ulikes cnmuies.
Σμβολα σην Σωκεύ

H eaeun uynlns nieans dev npentei va kaTeuubvetai ravw oe atoqa, cwa, eveyotoinuevo nAekptikO EoTIAoM o TnV iia t oukeun.
PpoataeEETnoukeun ano tov ayetó.
H ouakeun 6ev npetEi va ouv0eEi aTeuEia cT OTo 8nOaio 6iktuo T0aou Vepou.
Mnxaviopoiaoopaaleias
IPOESXH
Olaiaeic aapaleiac atoakotouv atnyipotaia tou xphnt kai 6v npette va tpoTIOIOuVTa n va npaeitovta.
Diaokottns ouokeun
O diakottns tou nXavnatoa anotpeTtN tvxiae evpyoioiOn Tou nXavnatoC.
Aopaleia mIoToletou Xeipoc
H aopaleia kAieBwei to loxlo tou mIoTeou xieipoc KAI aotpente iynruxaia evyotoiOnn Tou nXavnaToC.
www.kaercher.com/dealersearch
Texvika xapaktnpiotika
Head of Appropriation
YTEUbvoC TEKunpiwns
S. Reiser
71364 Winnenden (Germany)
Tnλ.: +49 7195 14-0
Φαξ: +49 7195 14-2212
Winnenden, 2014/09/01
icindekiler
Teslimat kapsami. TR 5
www.kaercher.com/REACH

Ambalaj malzemeleri geridonusturulebilr. Lufen ambalajlircevreye zarar vermeden tasfiye edin.

71364 Winnenden (Germany)
Tel.: +49 7195 14-0
Winnenden, 2014/09/01
OrnabneHne
KOMJIeKT NocTaBKn. RU 5
IcnoJIb3ObaHne no Ha3NaYeHHIO. RU 5
3aunTaOkpykaIooe cpebl RU 5
Be30nacchoctb RU 5
Oncanhe np6opa. RU 6
MoHTax 6
Haiaipoafobl. RU 7
3Kcnpnyataua RU 7
TpaHcnpTnpoBka RU 8
XpaHeHne RU 8
YxOndTexHnueckoe 6cbnyKnbAHne. RU 8
Pomoub B cnyae Henoiaok RU 9
3anaChbIe yacTn RU 9
TapaNTna RU 9
Texnueckne daHhble RU 10
3aBHeHoe o COOTBeTCTBmE C RU 10

Perepe nepBbIM hncnlo3boAHmern yctpoiCTBa HeoXoHmIO npOceTb HactoIaUyOpInrHaJIbHyN IOHCTpyKlMIO NO KcIPlNa
Taunnpnaraembye yka3aHnno no 6e3oNaChOCTn. Da-nee DeIeTBOBaT b COOTBeTCTBm C HmN. CoxpaHrTb o6 bpoUkpbl dAnDaJIhNeIbero nIb3OBAHNn IIN dIcNeDuYIOero BnaDeIbua.
KOMNJIeKT NOCTABKN
Komplteaun npnbopa yka3ana Ha ynakobke. Pn paacnakobke npnbopa npOBepntb Komplteauno.
PnObHApUxKeHHN HeoctaOuXn PnHaNDIeXHOCTe HnnIOBpeXdEHn, NOnyHeHHbX BO BpEma TpAHCnOpTnPOBKM,CneJeYET YBeDoMnTb ToproByo OprAHn3aunHO, npDabuynoPi6Op.
DOnonHnTeIbHo Tpe6yETc
→ ApMnpoBaHHbI BOJHOr UJIaHr CO CTaHdapTHoMyΦToI
MHHMaIbHbI dHaMeTp 1/2 DIOHa (13 MM)
MHHMaIbHaJaNHa7,5M.
IcnoJIb3ObaHne nHa3HaueHnIO
Даньи моechьи annapat北京市OKOTOдавеняпед-надананчен толъко дгл NGTOBJ3OBAHINВ ДомашимхОЗИCTBE.
KARCHER. Yukazama, npriJooeeHbIe KcHTaIIM cpeCTdN, noJIeXaT co6IIODeHnI.
3aunta okpyxauoewcpebl
www.kaercher.com/REACH

YnakoobuHbIe MaepnablIpoNdaTcR BTOpUH Hnepepa6Ote. YnakoBky Heo6xOnIMU yTNIm3P0BaTb 6e3 uyepeBa IJIN oKpyXaUoEi cpebl.

OTcnykBwne yctpoiCTBa cOepKata npiroDhbIe nIbT BTOPUNHO IcNpIb3OBAHnA CEHNbIe MaTePnAbI, KOTOpBie DOJKNbI NpepaBaTbCnHa nepepaBoTky. OTCnykBwne yctpoiCTBa Heo6xOdmoYtNiN3rpoBaTb 6e3 yuep6a Idn OkpykaUoien Cpebl.

PaBoTbNoOuHCTKe,Bpe3yIbTaTeKOToPbIXoBpa- 3aETcOxTOJMaUaBODa,CODEPxAuaaMacna, HApnMpE, pOmbiBkA DnIgAteNl,MoKlaDnIuza, DOJIKNbI PpON3BOJITCbR TObKHaMOeYbIx PnOIIaDkax C McNOOTdEnITNeM.

PaObTb C MOUzIMN CpeDCTBaMn DOJXKbI npoB OaHTbCAY TOnbKO Ha paObox NOBepXHOCTx, He npOHuaeMbIX DnA JxuKcTeS, C noKDJIyueHneM K 6bTOB0 KAnAHImaZm. MoUzne CpeDCTBa H DoJXKbI NOpaTaB B VOdoMebl NIN NOyB.
Be3onachoctb
Yka3aHnnoTexHnke6e3OnacHOCTN
Ipeed nepBbIM NcONb3ObaHm EaHnoro yctpoCTBa o6a3aTeNbHO npOeCT bpInnaRaemble «Uka3aHn no 6e3oNaCHOCTn DnA BcICOKHaOpHOro MOIOJero anpaTAPA".
CTeneHb onaCHOCTN
ONACHOCTb
YkaaHue omHocumenbHo henoepdceMHo 2p03yue onachocmu, komopar npuobodum K mjaKeblmyeuebam unu K cmepmu.
PENPYNPEXDEHNE
Ykaaahue omhocumbHOb 603MOXHO nOmeuuaantbHO onaCHO cumyaauu, komopar moxem npueecmu K mjaekblm yeeybam unu cMepmu.
OCTOPOXHO
Yka3aHne Hn omeHuaJIbHO onaChyU cUmyaIuO, KOMopar moKem npueecMu K nOnyuHtu IeKuxmpaEM.
BHIMAHHE
Ykaaahue omohocumelbHO 603MOXHOb nomehuantbHO onaCHO cumyaauu, komopar moKem noBneb MamepuanbHu yuepe.
CnmbonblHa npnbope

He hanaenmb cmpy0eobi nod ebicokum Hanopom Ha IIOdeu, XUOBHbIX, EKNIOeHHOe 3neKmpueckoe o6Opdyoeae Hua camo ycmpoucmeo.

3auiuamnb npu6op om mopo3a.
3aPpeuaemcnaHapmyo nodknoyamb ycmpoicmeo Kmpyobonpoeoyc numbeoeo eoo
3aunthbyeyctpoicTba
OCTOPOXHO
3aumhble ycmpoucmea cnykam dna 3aumbl nolb0aemeneu. Buou3mehneue 3aumhbx ycmpoucme uuu nphebpekenue ume he donyckaemc.
Pnp6OpHbI BbIKNoaTeIb
TnaeHb bkiyamel npemmcmyem Hnpou3- 0bn o pa6ome annapama.
Pexm C MOUoJe TeKoJ
BHIMAHHE
Puck noepekdehui naokpacoohoe nokpbimur Ipeo pa6omou c mooue uemko cneoyem y6dumbc8 m om, qmo oHa ouuhea om ap3u un npdyaux nosmopohnux qacmu.
→ MoIyUO ⅢeKbCTaBnTb BpyHOn paCbJIInTeJIb n3aФmKcnpoBaTb,IOBepHyBaHa 90^
YkaaHne: B Cnyuaye HeoOxOJIMOCNTN MOUJIne UETKIN TAKKE MOKHO INCIOB3OBAbT DnI paObTOb CMOUHM CpeCTBOM.
Pexim pa60tbc MOIOUcIM cpeCTBOM
PpmeaHne:MoOuee cpeCTBO MOKET do6abJIbTc TToIbKO pN Hn3KOM daBHeHH.
ONACHOCTb
Pru npumehenu yucmuaux cpecmte cneyem co6blioammbpe6oahucaepmu6zaoa 6e0nacHocmu npou3oobumela, oco6hno yka3aunu omHocumelho npumehue cpecmte uduuoyauhbo 3auumby.
PncyHok H
→ 3aHtB pactBop MOUeTo cpeCTBa B pe3epByap
дЯ MOUeTo cpeCTBa (co6JIIOJa yka3aIIN NO
dOIIPOBKe EAMKoCTN IЯ MOUeTo cpeCTBa).
PncyHok
3aKpbItbpe3epByapIJIaMOIOJeroCpeIcTBA KpbIUSKOI.
3aDbHnHyTb pe3epByap dIy MoIooero cpeIcTBa B annapaT.
PncyHok J
→ BbITaHytbcTeKy nIOCKOry6aAMN.
→ Cetky ouuatab noi npoTOUHO BOIO.
CHOBA BCTaBNTb CeTKy B NOIBOD BObl.
OuicTkfa hJbTpda Jn MOoJero cpeDCTBa
IpeepdIInTeJIbHbIMXpaHeHHEm,HanpImep,3IMoN:
CHIMMTEΦnIbTp IN3 BcAsbIbAOJero OJIaHra,ДЯ MOIOJERO CpeDCTBa I NpOMOITe ERO pOTOCHNOB OBOID,
Pomoub B cnyuae HenoJaok
He6oJIbIuH HeNcnpaBHOCTM MoXHO yCtpaHITb CaMOCTOATEJbHO C NOMOUsbIO CNeDyUoEro ONCAHnA.
B clyae comHeHnCneIyet opaaatbcs B ynoHoMooehnyo clyk6by cepBVCCHOrO 6cIyKmbaHn.
ONACHOCTb
Onachocmb npaxeHua 3neKmpueeckum mokom.
→ Ptepe npoeedeHEm nIO6bix pabom no 06cbnyu bauHyo ycmpoucmeo cneyem bkiNtuumb u 3eneuy umencenbHy oenuky u3 po3emku.
Ppnbop He pa6oTaET
→ BbItIaHyTb pIyar pyHoro nIcToIeta-pacNbJIInTe- I, npIbOp BKIOuHTcI.
→Поверъ Te COOTBETCTBNE Hnряжehи,уkaаанHo罗ВзавcodКоТ tablнчke,нанряжehиИсточикэнektPO3HeprIn.
→Пюверпь сеев Кабел ha nobpeкденя.
DabJIeHHe B pnp6ope He yBeJIuYBaTeTcA
→Поверпьн Habсточу CTpyHOn Tpy6Kn.
→ IpoBepntb DoCTaTOUHOCTb ObEma NODaCh BOdbl.
BbHbTe c nMOUcIbIO pNOCKOgYbEeB cTeEBo ΦnIbTp I3 3JIeMeHTa DnBOChA6KeHnI npOMoTBe erpoTOuHOBdoD.
YdaIeHne Bo3Dyxa n3 np6opa: BkIOuHTb annapar 6e3 noKIOUeHOrO BbICOKHOAnOpHOrO uHaRa nnoOxDaT (he 60nee 2 MnHyT), noka n3 BbCOKHOAnOpHOrO uHaRa He NaHET BbXoNDt Boga 6e3 np3bPkOB Bo3Dyxa. BbIKIOuHT np6op n3aHOBO NOcEOHNTHB BbICOKHOAnOpHbI ShaHr.
CunbHbIe nepaAbI daBJeHnA
Ouchntb foocyHky BblcOKO rabNeHHn. IroKo ydaan3aqrHaHeHne n3OTBepCTn foocyHKn npOmbTb ee cnepeDn BODD.
→ PpOBepeTe KOJIueCTBO NOJaBaEMoB BOJbl.
Pp6op HerepMeTneH
→ He3nauHntelbna HerepMeTNUHOCt b annapata 06yCNoBHeNA TeXnHuCEKIMN Oo6eHNoCTMn. PIn CnblHoH HerepMeTNUHOcObPAnTeB B ABTOPI3OBaHHUcLy6By cepBICHO RObCyJbBAHHa.
Ynctraee cpeDCTBO He BCacbIbaeTc
IcnoIb3ObaTb ctpyHny Tpy6ky c peryIaTOpom DabJIeHnA (Vario Power).
Повернъструйню Трубку в поожене „Mix".
OuCTnTbΦIJIbTp BO BCaCbIbAIouIeM UJNaHRe MOIOUeO CpeDCTBa.
→ PpOBepnTb BCaBbAIOUm IJNAH rIa MOIOeO cpeCTBaHa nepern6bl.
3aachbteyactn
Icnpb3yte ToIbKO opnHnaHbIe 3anaChbte aactiФmpMbKARCHER.ONICAHme 3anaChbIX cachTe haoDITCB KOHJIe daHHIO IHCTpyKIMIO NO kCpNpyTAaUM.
Fapantna
B KaKdoI CTpaNe DeiCTbYOT COoTBeTCTBEHNO rapaHTnHbIe ycNobria, n3aDaHHbIe yNoHOMOeHHo OraHaHzAaMeI c6bIta HaSeI npDoKuIN B DaHHO CTpaNE.
Bo3MOKHbIe HEnCnPabBHOCTn npi6opa B TeueHne ra- aHTNHIoC pOka Mbl yUcTpaHREM 6ecnPaTHO,ecn npuHnHa 3aKJIouaTecR B DeEkeFkTaMeprAnoB nIN OosNHCK npri NtROTOBHeHn. B cnyae Bo3NKHOBeHn npTeH3n B TeueHne rapaHTNHIo CpOK npoc6ba o6paatbca,IMeprnpce6e HeK O POKynke,B TropBOyO orpaHn3aucIO, npOdaBlyO Bam npi6Op nIN B 6nnKaJhSyO yOnNHomOeHHyO cnyk6by cepBncHOrO 6cbNyKBAHn.
ДаТа Выlnуca OTo6paKaaETcHa 3aBoDcKo TблчkeВЗakoДирОВaHнOM BИдe.
Pn3OMOTdIbHbIeUΦpblNMeHOT CneDyIOOee 3NaHeHNE::
Празмер: 30190
3 roD BvInycka
0 cToJeTHe BbInycka
1 DecTnIeTne BbInycka
9 BTOPAIuPpaMecaaBbInycka
0 nepBra zpa Mecaa BbInycka
Takim 6pb30m, B daHHOM npIMpe KoI 30190 03HaaeT DaTy BbInycka 09 /(2)013.
aDpeca Bbl CMOXeTe HauTn Ha Be6-CTpaHnue: www.kaercher.com/dealersearch
TexHnueckne daHHbIe
3Jektpnueckoe nodknoyehne
OCHOBHbIe DnapeKTHBbI EC
2000/14/EC
2004/108/EC
2006/42/EC (+2009/127/EC)
2011/65/EC
PpIMHeHHbIe rapMOH3nPoBaHHbIe HopMbI
EN 50581
EN 55014-1: 2006+A1: 2009+A2: 2011
EN 55014-2: 1997+A1: 2001+A2: 2008
EN 60335-1
EN 60335-2-79
EN 61000-3-2: 2006+A1: 2009+A2: 2009
EN 61000-3-3: 2013
EN 62233: 2008
PpIMeHHbI NopAOK OueHKN COOTBETCTBn
2000/14/EC:Прложене V
YpOBeH MoUHocTn 3Byka dB(A)
U3mepeHo: 87
TapaantnpoBaHO: 90
HnkeoDnncabwneceaLinaeDeiCTbYHTno npoyehnIO nIO doBepenHOCTny pRKOoDCTBa npednpTna.

H.Jenner
CEO

S. Reiser
Head of Approbation
yNIOJHOMOeHHbI NO DOKymeHTaUN:
S. Reiser
71364 Winnenden (Germany)
Ten.: +49 7195 14-0
ΦaKc: +49 7195 14-2212
Winnenden, 2014/09/01
Tartalomjegyzék
www.kaercher.com/REACH

71364 Winnenden (Germany)
Tel.: +49 7195 14-0
Fax: +49 7195 14-2212
Winnenden, 2014/09/01
Obsah
Obsah dodávky CS 5
www.kaercher.com/REACH

www.kaercher.com/dealersearch
Technické udaje
2006/42/ES (+2009/127/ES)
2011/65/EU
2000/14/ES: Priloha V

S. Reiser
Head of Approbation
71364 Winnenden (Germany)
Tel.: +49 7195 14-0
Fax: +49 7195 14-2212
Winnenden, 2014/09/01
Vsebinsko kazalo
Dobavni obseg 5
Namenska uporaba. 5
Varstvo okolja 5
Varnost 5
Opis naprave. 6
Montaža. 6
Zagon 6
Obratovanje. 7
Transport. 7
Skladišcenje SL 8
www.kaercher.com/REACH

Embalazni materiali so primerni za reciklaranje.
Embalazo zavrzite okolju prijazno.

Stare naprave vsebujejo dragocene za reciklaranje primerne materiale, ki jih je treba odvesti za po-novno uporabo. Stare naprave zavrzite okolju pri-jazno.

2006/42/ES (+2009/127/ES)
2011/65/EU
71364 Winnenden (Germany)
Tel.: +49 7195 14-0
Winnenden, 2014/09/01
Splistresci
Zakres dostawy PL 5
www.kaercher.com/REACH

Adresy podano pod: www.kaercher.com/dealersearch
Dane techniczne
2006/42/WE (+2009/127/WE)
2011/65/UE
71364 Winnenden (Germany)
tel.: +49 7195 14-0
faks: +49 7195 14-2212
Winnenden, 2014/09/01
Cuprins
Articolele livrate. RO 5
www.kaercher.com/REACH

Transportul in vehicule
Goliti rezervorul cu solutie de curatat.
Asigurataparatulcontralunecariisrastumarii.
Depozitarea
PRECAUTIE
www.kaearcher.com/dealersearch
Date tehnice
Directive EG respectate:
2000/14/CE
2004/108/CE
2006/42/CE (+2009/127/CE)
2011/65/UE
Norme armonizate utilizezate:
EN 50581
EN 55014-1: 2006+A1: 2009+A2: 2011
EN 55014-2: 1997+A1: 2001+A2: 2008
EN 60335-1
EN 60335-2-79
EN 61000-3-2: 2006+A1: 2009+A2: 2009
EN 61000-3-3:2013
EN 62233: 2008
71364 Winnenden (Germany)
Tel.: +49 7195 14-0
Fax: +49 7195 14-2212
Winnenden, 2014/09/01
Obsah
Rozsah dodávky SK 5
www.kaercher.com/REACH

2006/42/ES (+2009/127/ES)
2011/65/EU
Uplatnované harmonizovane normy:
EN 50581
EN 55014-1: 2006+A1: 2009+A2: 2011
EN 55014-2: 1997+A1: 2001+A2: 2008
EN 60335-1
EN 60335-2-79
EN 61000-3-2: 2006+A1: 2009+A2: 2009
EN 61000-3-3: 2013
EN 62233: 2008
2000/14/ES: Priloha V
71364 Winnenden (Germany)
Tel: +49 7195 14-0
Fax: +49 7195 14-2212
Winnenden, 2014/09/01
Pregled sadrzaja
Opseg isporuke HR 5
Namjensko korišenje HR 5
Zašita okoliša HR 5
Sigurnost HR 5
Opis uredaJ 6
Montaza. HR 6
Stavljanje u pigeon. HR 6
U radu HR 7
Transport HR 7
Skladištenje HR 8
Otklanjanesmetnji HR 8
www.kaercher.com/REACH

Materijali ambalaze se mogu recikirati. Ambalažu odložite na optrad u skladu s propisima o ochuvanju okolisa.

Stari uredaji sadrze vrijedne materijale koji se mogu reciklari te bi ih stoga trebalo predati kao sekurdarne sirovine. Stare uredeaje odlozite na oppad u skladu s propisima o ocuvanju okoliša.

2006/42/EZ (+2009/127/EZ)
2011/65/EU
Primijenjene uskladene norme:
EN 50581
EN 55014-1: 2006+A1: 2009+A2: 2011
EN 55014-2: 1997+A1: 2001+A2: 2008
EN 60335-1
EN 60335-2-79
EN 61000-3-2: 2006+A1: 2009+A2: 2009
EN 61000-3-3: 2013
EN 62233: 2008
71364 Winnenden (Germany)
Tel.: +49 7195 14-0
Winnenden, 2014/09/01
Pregled sadrzaja
Obim isporuke SR 5
Namensko korijscenje SR 5
Zašitaživotne sredine SR 5
Sigurnost. SR 5
Opis uredaJ 6
Montaža. SR 6
Stavljanje u pogon. SR 6
Rad SR 7
Transport. SR 7
Skladištenje SR 8
Nega i održavanje SR 8
Otklananjeme smetnji SR 8
Rezervni delovi SR 8
Garancija. SR 9
Tehnicki podaci SR 9
Izjava o usklaedenosti sa propisima EZ . . . . SR 9

Pre prve upotrebe Va 設 ureja procijtaje ovo originalno upstvo za rad i prilozene sigurnosne napomene i
www.kaercher.com/REACH

Ambalaža se moze ponovo preraditi. Ambalažu odložite u otpad ekoloski primereno.

Stari ureddaji sadrzej vredne materijale sa sposobnoscu recikliranja i treba ih dostaviti na pohonnu preradu. Stare ureddaje odlozite u opad ekoloski przymereno.

Radovi na cisćenju kod kojih nastaju uljne otpadne vode, kao što su pranje motora, pranje donjeg dela vozila, smeju da se izvodu samu u perionicela sa separatorom ulja.

S deterdžentima se sme raditi samo na vodonepropusnim radnim povrsinama koje su prikljucene na kanalizacionystem. Ne dozvolite da deterdženti prodru u povrsinsce vode ili tlo.
Sigurnost
Sigurnosne napomene
Pre prvog korišćenja ovo uredaja obavezno pročitajte priložene „Sigurnosne napomene za visokopritisne uredaje za Čišćenje".
Stepeni opasnosti

OPASNOST
Napomena koja ukazuje na neposredno pretecu
napostno koja dovodi do teških telesnih povreda ili smtri.

UPOZORENJE
Napomena koja ukazije na eventualno opasnu situaciju koja moze dovesti do teških telesnih povreda ili smrti.

OPREZ
Napomena koja ukazujne na eventualno opasnu situaciju, koja moze izazvati lakse telesne povrede.
PAZNJA
Napomena koja ukazije na eventualno opasnu situaciju koja moze izazvati materijalne stete.
Simboli na uredaju

2006/42/EZ (+2009/127/EZ)
2011/65/EU
Primenjene uskladene norme:
EN 50581
EN 55014-1: 2006+A1: 2009+A2: 2011
EN 55014-2: 1997+A1: 2001+A2: 2008
EN 60335-1
EN 60335-2-79
EN 61000-3-2: 2006+A1: 2009+A2: 2009
EN 61000-3-3: 2013
EN 62233: 2008
71364 Winnenden (Germany)
Tel.: +49 7195 14-0
Winnenden, 2014/09/01
CbDbpxxHne
Obem Ha doctBaKaTa. BG 5
YnoTpe6a no npedna3nueHne BG 5
ONa3BaHe Ha OKoHaTa CpeDa BG 5
CnryphocT BG 5
OncanneHa ypea BG 6
MOnTaxB
Ipyckahe B eKcnIIOaTaUra BG 6
Eknpnoataua BG 7
TpaHcnpT. BG 7
CbxaheHne BG 8
PnKn nnoDpBxKa BG 8
POMOUIIHNHn3npaBHOCTN BG 8
Pe3epBn yactn BG 8
TapaHcHg. BG 9
TexHHueckn daHHN BG 9
PpenopbunTeH MeToD Ha NoocCTBaHe
HanpckaTe cyxata noBpXHOCT C MANKO npenapat 3a noCHCTBaHE nOCTBeT da noDeEiCTBa (HO da He IIOcXBA).
→ Pa3TBopeHata MpbCoTnJa Da ce n3nJaKHe CbCCTpyr NOB BWCOKO HAnraHe.
OnuHaHNo
→ HanbJIHeTe pa3TbOp ot NOYnCTBaU npenapat B p3eepBOa4a 3noNCTBaU npenapat Ha DIO3aTa 3a IraHa (Cna3BaIe DAHHTE 3a DO3nPaH e H BaPena H noNCTBuaA npenapat)
→ CbpxkTe IIO3aTa 3a pHa c pe3epBoapa 3a no- uCTBaU npenapat.
PocTaBeTe H03aTa 3a PnHa B NtOte Ta 3a PbHOnPbCKaHe I a PmKcPaIe TcB 3aBbPtaHe Ha 90^
PpeKbcBaHeHa pa60Ta
OTnycheTe Nocta Ha NICTOJeTa 3a npbckaHe Ha pKa.
→Блokираite locta ha nictoeta 3a pbuho npb-ckaHe.
NocTaBeTe NtCTOte3a pBHyNO npbCKaHe B MRCTOTo 3a CbXpaHEHHe HNtCTOte3a pBHyNO npbCKaHe.
→ PnipnpeKbcaHe Ha p6oTa 3a No-npOdbPknHTenHO BpeMe (Ha5 MmHtN), N3KJIIOHTe DoONbHInTeHNO ypeDa ,0/OFF".
Kpaŋ ha pa6oTata
△ PPEIa3JIbBOCT
Omdenlme Mapkya 3a paboma nod Hnraaane om nucmonema 3a bpHno pbcKe anu om ypea cmoaasa, Koamo e cuscemama HMa Hnlae.
→ Cnépa6oTa c nouCtBaunna npenapat: Pa6oTe c ypeDa OKoI0 1 MNHyTa, 3a da ce n3nnakHe.
OTnycheTe Nocta Ha NICTOJeTa 3a npbckaHe Ha pka.
→ IzhKJIIOUeTe ypeJa,0/OFF".
→ 3BaTeE uencena OT KOHTaTa.
3aTBopeTe KpaHa 3a BOdaTa.
→ PnntncheTe NocTa Ha NiCtOneta 3a npbckaHe Ha pbka, 3a da OCBOODITE CNTeMaTa OT OCTaTbHOTO HANJRAHe.
BlokupaTe IocTa Ha nictoIeta 3a pbyHo npbCKaHe.
→ Otdeene Te ypea ot 3axpaHbHeTo C B0da.
TpaHcnopt
PPEJNA3JIINBOCT
Onachocm om HapaHaahe u noepeda!
Ppu mpaHcnpmupane umaime nped eud meanomo Ha ypeda.
PbueH TpaHcnpT
Terneyepea3atpaHcnopThatadpbXka.
TpaHcnpoT B npeBo3Hn cpeDCTBa
→ Μπρα3HETe pe3ερBoapa 3a noHCTBaU npena-paT.
OcinypeTe ypeDa npOTnB n3nTb3BaHe n ppeo6pb- uan.
CbXpaHHeHne
PPEI43JNBOCT
Onachocm om hapaHReaHe u noepeda!
Ipu cbxpanehue umaime nped bud meenomo ha ype da.
CbxaheHneHaypeda
Ppein no-npoDbIKNKTeHNO cbxpaHEnHe, HAnp. npE3 3mATA cna3BaTe DoJIbIHNTeHNO yka3aHnTAta B rInaba PoIpdBkKa.
YpeBt ce noCTaBbBpxy paBa nIOCKOCT.
→ PnntncheTe Kopnyca Ha npncnocO6JIeHneTo 3a 6bp3o npncBeINHBAHe 3a MapKyu7a 3a pa60Ta noD hAraHaE HnBaTe Me pKyu7a pa60Ta noD hAraHaE.
→ HaTnCHeTe pa3dEInTeHnIe 6byToH naNtOteTa 3a pTuHO npbSkaHe n OTdeneTe Mapkyua 3a pa6oTa POn HaJIraHe OT NtOteTa 3a pBuHo npbcka-He.
→ Μισαβετη πικόTONETA 3a ρbνHo πρbκαHε ΜΜΚΤΟΤΟ 3a ΧχραHΕ ένιπόTONETA 3a ρbνHo πρbκαHε.
→ Φικυραητε Πβδατa 3a pa3πρβκBAHE B MЯCTOTO n 3a cbxρaHEH.
→ Пиберетахранвашиякавел,маркуда заразота понлаяген и пинадпжноctе Вурада.
3aunta ot 3ampb3BaHe
BHIMAHHE
He HanbIHO u3npa3HeHume ypeu u npuaadnHexHocmu Moaam da odoedam do 3ampb3eae. I3npa3Heme ypea u npuaadnHexHocmume HanbIHO u e 3aunume-me npomue u3mpb3eae.
3a n368BaHe Ha 5eTn:
N3npa3Hete ypeDa haNbIHO OT BODaT:aBKnIOHeTe ypeDa 6e3 noDbBp3AH mapKy 3a pa6Ota noD haJaRaHe i 6e3 noDByP3aHO 3axpaHbaHe C BDA (MaKc.1 MIn) n3uKaAte,doKaTO OT N3BOda 3a BVcOKo HaJraHe cPte Da n3n3a BDA.N3KnIOHeTe ypeDa.
YpeaN BCNUKn pInHaJIeXHIOCTNa Ce CbXpaHBAt B 3aUHTeHOOT 3aMPb3BaHE MRCTO.
PnJnn noDpBxka
ONACHOCT
Onachocm om mokoe yap.
Ipedu ecuku deHocmu no ypea moa da ce u3-KnIOU u da ce u3eado uencena.
YpeDbT He DoCTnHaIraHe
→Пюверетен actpoikataHa Tpb6ata 3a pa3npbc-KbaHe.
→Поверетe,далл подаьеTo Ha Boda e cdocta-TbUHO KOLNUeCTBO.
→ N3terneTe uezkata O TBp3kata 3a KpaHa 3a BODAc NOMOHTa Ha PLOCKN KNEUIN I NOHCTETe NODEtuaua BOZA.
0e3Bb3dUshaBaHe Ha ypeDa: BkIIOHe Te ypeDa 6e3 MapKyu 3a pa6oTa nOu HAIraHe N u3auKaIte (MaKc.2 MInHyTu), DOKATO BOda 3aONOHe Da N3-1n3a 6e3 MEXyPcTe O NTbOda 3a BnCOKO HAIraHe. N3KIOHe YpeDa N oTHOB NO pBpXeTe MapKyua 3a pa6oTa nOu HAIraHe.
CnHn KOle6aHnB HaJraHaTeO
www.kaercher.com/dealersearch
Texhnuecken daHHN
71364 Winnenden (Germany)
Ten.: +49 7195 14-0
ΦaKc: +49 7195 14-2212
Winnenden, 2014/09/01
Sisukord
Tarnekomplekt. ET 5
www.kaercher.com/dealersearch
Tehnilised andmed
Toode: Korgsurvepesur
Tüüp: 1.601-xxx
71364 Winnenden (Germany)
Tel: +49 7195 14-0
Winnenden, 2014/09/01
Satura rādītājs
Piegades komplektsv 5
www.kaercher.com/REACH

lepakojuma materiulus ir iespejams pastradat atkartoti. Utilizejiet iepadokumus videi draudzigavidence.

www.kaercher.com/dealersearch
Tehniskie datum
71364 Winnenden (Germany)
Tār.: +49 7195 14-0
Fakss: +49 7195 14-2212
Winnenden, 2014/09/01
Turinys
Komplektacija LT 5
www.kaercher.com/REACH

Pakuotës medziagos gali buti perdirbamos. Pa-kuotës atliekas sutvarkykite tausodami aplinka.

www.kaearcher.com/dealersearch
Techninial duomenys
71364 Winnenden (Germany)
Tel.: +49 7195 14-0
Faksas: +49 7195 14-2212
Winnenden, 2014/09/01
3mict
KOMJIeKT NocTaaHn. UK 5
IpaBnJIbHe 3aCTocyBaHHra. UK 5
3axnCT hABKOIIHbOro cepeIOBua. UK 5
Be3neka. UK 5
Onc npictpoU. UK 6
YctaHOBka UK 6
BveeHnB Eeknnyataio UK 6
Ekcnnyataucj. UK 7
TpaHcnpTyBaHHa UK 7
36epirannn UK 8
Dorra Ta texhihe ocbnyrobyaHHa UK 8
ДономогауВипадкУнелладOK. UK 8
3anachi yactHHU UK 8
TapaHTia UK 9
TexhihixapaKTepeNTIKU UK 9
3aBaB npn BiDIOBIDHicTB CbPoneCbKoro cnIBTOBapNCTBA. UK 9

PereD nepiHIM BIKOPNCTAHHHM npi-CTPOHO heo6xidno npouHTaTn daHy opriHAnbHy ICHyPKUIO 3 ekCNyatauIra do
dani Bka3iBkn 3 63eNeK. HadaJI dIaTIy y BiDnOBiHNOCTO do hnx. 36epirAtm obuDbI boOpuyn I naDaIbIwOr BBNOPICHTAHNBA OBI dAnHaCTynHO BRaJHcNA.
KOMJIeKT noCTaHaHHr
KomJIeKtaiig npicrpo 3a3nueHa na ynakobci. Ipn pO3nakyBaHHi npicrpo nepeBipTu KOMJIeKtaiio.
Y paazi Hectaqui DoadaKOBOro 6bnaHann a6o yukok-keHe,OTPIMAHIX NID cAC TpAHCNOpTyBaHNr, cnI NOBIOMTe npO CE B ToproBebHy oprahi3auiO,ra npodaIana anapat.
IodatkoBO 3HaIo6bTbcra
→ ApMOBaHn BOJaHn ⅢJHaH 3i cTaHdapTHOIO MyΦ-TOIO.
MiHimaihBnI diametp 1/2IOIma (13 MM)
MiHimalbHa DOBXnHa 7,5M
PpaBnIbHe 3aCTocyBaHHa
Ley OunuBauch BVCOKOTo TnCKy npni3HaenH TiNbKn DnBVKOpCTaHHB DOMaUHbOMy RocnoapCTBi.
Длг Oчишени Машин, abTomobigib, bdyibeNB, iHCTPMEHTIB, facaIb, Tepac, npcaIaM6HNxnpaIaIB ta iH. CTPMeHem BOi NiD TNCOM (pN He-06XIDHOCTI, 3doDaBAAHHAM 3ac6OBi Dny ChuNEHn).
Ipnu bOmy 3aCTOCyBaHHIO nIDnraIOTb DOnOMixHe oBnaDHaHn, 3aNCACTHnTa 3ac6oB nDN YmUeHN, Do3BONHe I nBnKOpNCtAHn FipMOU KARCHER. Byb NaCkA, cIyIte BkAzIBkAM do 3ac6oIB dny UmEHNH.
3axnCT HABKOJIuHbOTo cepeOBuHa
Ihctpykuii 3aactocybaHHa KOMnoHentib (REACH)
AkrtyaIbHI BiOIMOcTI npo KOMNoHEnTn HabeJeHi Ha Be6-By3JI 3a aDpecoJIO:
www.kaercher.com/REACH

PakybanbH MATEpian NiaaioBcB BTOPINHH nepepo6ui. YnakOBky Heo6XiHo yTuNl3yBatm 6e3 shokd nra DOBkInJha.

Pnctpo, 0o BiDnpaObaNn, MictBt cHnH MaTeepian, Aki nOtpi6ho nepeDaBatn Ha BToPnHHy Nepepo6k. Ctapi npcTpo Heo6xHDo yTuIn3yBaTn 6e3 uKoOn dIra DOBkIIa.

Pobotn 3 OChuHHe, B kXn X'ABnE'TbcBiDnpaCzboBaHa BOda 3 BMCTOM MaTnHa, HApPKnAd, NpOMBaHHn DnHyHa, MTTN DAHnHa, NOBHn BiKOHyBatncb TiNbKn HA MnHnx MaJdaHnKax 3 BiD6ipHnikom MaCTnla.

Pobotn 3 MmHmM 3acobam NoBHnHi BNOKHyBaTNCb TiIbKn Ha pOboQHx PIOUHnx, He npOHKnHX dI pyINH, 3 BxOdom y nobyTOy KaHani3aIio. MnHi 3acobn He nobHHHnI nOtpanltny bOdoMnA o6rpyHT.
Be3neka
PpabNla 6e3neK
Ipeep nepuim BnKOpHCTaHnAM daHO npCtpoo noTpiBHO npOHTaTb《Bka3ibK 3 63eNeKn dIy BnCOkOHnipHO MmHIOR anapTaY),UOdoAoiTBc.
PibeHb He6e3neKu
HEBE3NEKA
Bkaizska uo do Hebe3neku, kka 6e3nocepedHb o 3aapoKy e ma npu3eodum do mxxkux mpaem ycmepmi.
△ NONEPEDXEHN
Bka3iBa zuo do nomeuuiho moxnuoei Hebe3neHoi cumyauii, uo moke npuzecmu do mkaKux mpaem 4c mepmr.
OBEPEXHO
Bkaiaea zo do nomenuiHo He63neuHOI cumyaui,
yKa Moke cnpuunmu oMpumAHn IeKux mpaBM.
YBAFA
Bkasiika zo do moxneoi nomeuio He6e3neuHc cumyaui, zo moke cnpuunmu mamepiabhi 3bumku.
CmboJnHa npncTpoi

He cnprmoeyama cmpyminb oodu nio eenukum hanoPOM Ha IIOdeu, meapun, yeIMKHe neekmpuue OhnaDHaHnHa ha cam npucmpiu.
CniD 3axuamu npunad eid mopo3y.
Ppucmpri He moxHa nioKnIOUamu 6e3nocepdeHb o mpyboIpo8oOy 3 numHOoEOOO.
3axnchi 3acobn
OBEPEXHO
3auxchi npucpoi cyayomb nra 3axcmykopcymaeue. BuOo3mHa 3axuchux npcspoie yu Hexmyeahn HUMU he donyckaemcb.
Bmkaq npnctroo
TOnoBHu Eumukay 3anobiaae camoeinbhiu pobomi anapamy.
Bnokybannypuyoro nictoTeTy-po3nnIObau
Blokoyaehn6bnokye baxinb pyuHzo nicmonemy-03-nulnoea ma 3axuuae iD camoeiIbHOo 3anycky ana-pama.
Pponyckn Knaan3 nHeMaTuHm BmNkaeM
Kaioe aekilb pyuhoo nicmonema-po3nuiouea aiednyckaemc,MAHOMempuhui eumukay eiklnoue Haoc, noada cmpymenb oodu nio bucokum muckom npunhaemcb. Ppu haumckanhi ha aekilh hacoc 3hoey eknoyaemcb.
Onc npuctpo
YcBomynocioHky3ekcnnyatauHabeJeHOOnnc npnCTPOO3MAKcHMaIbHOUoKOMNKeTAtieIO.KOMNKeTAtiBIDpi3HReTcbaJeHXoBIdMoJI(DINy.nayKaByAH-H)
PncyHKn DnB. Ha apkywi-Bknaudi!

1 WbIDKOp03HIMe 3'EdHaHHa DnI pIknIO-HennH BMCOKOHAnipHO rOuHaHa
2 3'EDHaHHBVCOKO TnCKy
3 TOnOBHnBvIMKaU ,0/OFF" / ,I/ON" (O/BIMK. / I/YBIMK.)
4 TaKn Ia 36epirAHHa MepeXHoro Uhypa
5 36epirahnnaHry Bucokoro TnCKy
6 Puyka dIra TpaHcnpTyBaHHa
7ПдБЕДНЯ BODI 3I BCTAHOBJIeHIM citYACTMФльТРOM
8 BCMOKTyBaIbHn IJIaHr MmHOro 3acO6y 3 pInb-TPOM MmHOrO 3acO6y Ta KpUshkoHO.
9 Pe3epByap dIy MmHoro 3ac06y
10 YactnHa 3'EdHannIyPiDBeHHeBODN
11 36epirahnCTpyMNHOI Tpy6kn
12 36epirahnny pyuHoro nictoIeTy-po3nnIOBaHa
13 MepexeBn Ka6eJb 3i WTeNceJbHOIO BUNKOHO
14 TpaHcnpTHe KOJIeCO
15 PyuHn nictoJeT-p03nnIIOBaY
16 BliokyBaHnry pyHoro nictolety-po3nIIOBaua
17 KhonkaДяВд'EDнанньшалну Всokoro Тиcky BIDpyuHoro nICTOleTy-p03nHIOBaua
18 Pykab BnCOKOro TnCKy
19 CtrpyMeHeBa Tpy6ka 3 peRyJIIOBaHnHrM TnCKy (Vario Power)
Длгшрокорocneктузадч3ишени.РбоунчTNCKПАВНО ретуновсIMKMin"taMaX."B noLOXeHHi"Mix"MOxNBo doJabatm MmHi 3ac6uN.
PekomehdoBaHMeToOnOuHHeHH
→ P03nnnTn HeBeNkUy KInbKcTb 3ac06y dny UH-ueHHa Cyxu NoBepxHTo Ta 3aJIuWHTn diTt (He BmCuXATn).
→ 3MnTe po3uHHeHn 6pyd CtpyMeHem BucOKOro TCKY.
DokaTkoBO
→ 3aunTNI MmHnI 3ac6Ib 8eepByap InnMmHoro 3ac06y (DontpmyIOuChb Bka3IBOK uOdo Oo3yBaHNHa EMHOCTI DnMIHORo 3ac06y).
→ PπeɪdHaɪn Hacaɪkʌŋ ἀπη ΚιμεHENHŋ πiHoʊ dɔ bɑka dɪŋ MɪŋHOrO 3aʊəbʊ.
→ HajiHbTe Ha puHHn NiCToNET-po3nIIOBau hacAdKy dnyuHeHHN niHOTo Ta 3a4iKcyte II, nobepHyBbN ha 90^
Ppnnnntn ekcnnyatazio
3BilbHItb Baxkijb 3 pyuHm p03nIIOBaayem
3a6bokybaTn baxinb puHoro nictoTey-po3nnIOBaua.
BCTaBHTn puHn niCToJeT-PO3nIIOBaU y TpImaU.
→Пьдчас trпвалих поерву робсты (noHa5 5xbuINH) anapat сд ВIMKATN ,0/OFF" (0/BMVK.).
3aikyuHnpo60Tu
OBEPEXHO
UlaHa bucoKoO mucky eDeyamu eD pyHooP o3nuiuea 60 npucmpo mo, konu 8 cUmem iEcdmHmuck.
→Пися роботи 3 мійнім засбόм:Сmetою ппоскань datи поразсьати піліду пітог罗Бінько 1xBVIHINH.
→ 3bijbHt baxjib 3pyuHm po3nJIObaueM
BumKhytn anapaT "0/OFF" (O/BUMK.).
→ BntarHtB MepeXHHn wTekep 3i wTeencelhoI po-3eTKn.
→ 3akpnTn BOOpOBiDHN KpaH.
→ HATNCHTN ha pyuKy po3nIIOBau, 06 3MeHUN- T NCKY CNTeMI.
3abokybaTn baxiIb pyHoro nicToJeTy-po3nnIOBa4a.
Biodokpemtn anapat BiD BOJOnocTaaHnA.
TpaHcnoptyBaHHa
OBEPEXHO
HebeIeKa mpaem ma nookodKeH!
Ipu mpaHcnpmyaHHi cnio 3eehymu yeaa hy aeaay
pncmpoio.
TpaHcnpOpTyBaHHbBpyHy
Ppncpii He npaioe ntd Tnckom
→ IpepeBipNTn HAcTpoIOBaHHa CtpymHHOI Tpy6Kn.
→ IpebeBipuTn DoCTaTHicThb 6E'My NODaUcI BOUN.
→ BtIaHITb 3 donOMoTOO InpocKry6uB MEpeXeBNIΦIbTp 3 enEMeHTy Inla BOIOONOTauAHNHa Ta npOMInTe INOY o pTOOTHIN BOiD.
→ BvdaneHnnaobitpi3 npncTroHO: BBmKHytn npn-ctri 6e3 niklnohcero Hor BmCOkOHanipHOro wHaHaTa nopeKaTu (He 6blse 2 xBnIH), NOKI 3 BmCOkOHanipHOro 6nHaRa He noNe BxOndTu BOda 6e3 6yIb6aok nobitpR. BmKHytn npncTpi Ta 3aHOBO npnEHaTHn 6nAhr BmCOKOrTo Tncky.
Béniuki nepenadaɪn Túcky
OChNTnHΦopCyHky BVCOKO rTOCKy: TJIKOHO npH6paTN 6pyd 3 OTbOpYΦopCyHN Ta npOMTu I CpeDy BOIOHO.
→ IpepeBipTe KJIbKICtB NOdaBaHOI BOH.
Anapat HEREPMeTnHn
→ He3nauHy herepMeTnHicb anapaty 3ymoBneHo texiHmMIO6OBTOBCTMNI. PnI CNbHi HerepMeTnHocTI 3BepHtCBaO abTopn3oBaHOI cnyk6c nepBCiHORO 06CNYROBYAHN.
OuChn3acioHeBCMOKtYETbcra
BnOKoNtOByBAtn CTpyMeHbY Tpy6y3 perynIOBaHNm TnCKy (Vario Power) NobepHTn CTpyMNHy Tpy6y B nIoJooHeHHa "Mix".
→ПочИСТИТиФiЛьТуВСМОКТУВаЛьHOMушlaHry MIMHOrO 3acOБy.
PiepeBipuTN BCMOKTyBaJbHn ⅢJNaHr DnIaMmHOrO 3ac06y Ha nepeHHN.
3anachi YactHH
BukopntOByTe TbJbKnOpnIbHaJIbHbI 3anaChi YacTIN HipMn KARCHER. Onm 3anaNcx Tachn HapnKiU daHOI hCTpykui 3 ekCnnyataaII.
Rapantria
YKOxHII KpaHII DIIOTb YMBOI rapaHTII, HadaHOI BIDNoBIDHOO fipMOIO-npOadAbeM. HenoJAnkIM BpoBOTnPCTPOIO MN yCyBaEMoBe3nAtoHO npOTAROM TepMHy DII rapaHTI, RIAO BOHN BnKINKANHI 6pAKOM MATEPIANY NOMNIKAMMI BRIOTOBNEHH. Y BnAPdky UHHOCTI rapaHTI 3BepTITcBc DO npOABu CHN B HAJIbONKCHN ABTOPI3OBAHNI CEPBICHN CEHTP3 DOKUMeHTaIBHM NiD TBepDKJEHNM NOKYNK.
aIpeCN Bn 3MOXKeTe 3NaHTn Ha Be6-CTOpIHU:
www.kaercher.com/dealersearch
TexhiHi xapakTepnCTnK
71364 Winnenden (Germany)
Ten.: +49 7195 14-0
ΦaKc: +49 7195 14-2212
Winnenden, 2014/09/01
aJll
J 1 J 1 J 1 J 1 J 1 J 1 J 1 J 1 J 1 J 1 J 1 J 1 J 1 J 1 J 1 J 1 J 1 J 1 J 1 J 1 J 1 J 1 J 1 J 1 J 1 J 1 J 1 J 1 J 1 J 1 J 1 J 1 J 1 J 1 J
laiaai
JL JIJI IJIJIJIJIJIJIJIJIJIJIJIJIJIJIJIJIJIJIJIJIJIJIJIJIJIJIJIJIJIJIJIJIJIJIJIJIJIJIJIJIJIJIJIJIJIJIJIJIJIJIJIJIJIJIJIJIJIJIJIJIJIJIJIJIJIJIJIJIJIJIJIJIJIJIJIJIJIJIJIJIJIJIJIJIJIJIJIJIJIJIJIJIJIJIJIJIJIJIJIJIJ
www.kaearcher.com/dealersearch
j_a + 2y j z\
p 1sJgJU JUJU JUJU
JGdJgJgJgJgJgJgJgJgJgJgJgJgJgJgJgJgJgJgJgJgJgJgJgJgJgJgJgJgJgJgJgJgJgJgJgJgJgJgJgJgJgJgJgJgJgJgJgJgJgJgJ
.
eJU 10000000000000000000000000000000000000000000
clll alog yosgol all oal wI
lgabig aiaa a jydswly J
sJlcl
J 1
J
J
J
J
J
J
J
J
J
J
J
J
J
J
J
J
J
J
J
J
J
J
J
J
J
J
J
J
J
J
J
J
ogai biaial
aIj p:JlJIbIaI Ieio JIe 0r! pIaIy, ciaIaI aIg no oIrgal Jusll ng sclla Jaa Jua Jauo .AolAL A>UJU .cll qS aos no gaxll P
jlln
J 1
J> a>11
J
J>J
J>J
J>J
J>J
J>J
alog 0g>gol all oal all b
alog 0g>gal olaaol bai
aabii a, clll
.
Koo
4
. ( x,y) = ( ab + 1,2)
aJpOoWl oal all
.
.
alog oIaaiJyoo
.claJI
aBulldgoljcbu
Jll Jsw jc alg a
:cllJ
aalglll lall baaal g
jL>JU
aJzJlJyJlaJL
4
pJlll lalgl oj>lll j
1Jrrr 1Jrrrrrrrrrrrrrrrrrrrrrrrrrrrrrrrrrrrrrrrrrrrrrrrrrrrrrrrrrrrrrrrrrrrrrrrrrrrrrrrrrrrrrrrrrrrrrrrrrrrrrrrrrrrrrrrrrrrrrrrrrrrrrrrrrrrrrrrrrrrrrrrrrrrrrrrrrrrrrrrrrrrrrrrrrrrrrrrrrrrrrrrrrrrrrrrrrrrrr
jLJI
aI 1 aIg b JjJ j J 1 1 1 1 1 1 1 1 1 1 1 1 1 1 1 1 1 1 1 1 1 1
aagaa aolj jgjjlglb
aejll alogll ale lc lbsio
gwlolj jlllbaiaa ggbj .Jelllaiaa ggbjwgl
jll jai jia jia jia jia jia
Jll bai jgbr Jg 5gJd .s9
s y 1y
b>UkOgEeWllBb>1 .EeWll
s
ogjll aagagabuill osoI jzJol
pJU) abuill oso JgJzQ
clcg Jc ogs>gall aqill aas Ll
.(aBul 1go
aBulooj jgoggJg
•
Ws mo gGgJl aog JIaJp 4gJbLgJLgSgJI JL 90 aR
Jzssllg
. 5gJ J J J J J J J J J J J J J J J J J J J J J J J J J J J J J J J J J J
•
s 1
•
jJJI JgJgJgJgJgJgJgJgJgJgJgJgJgJgJgJgJgJgJgJgJgJgJgJgJgJgJgJgJgJgJgJgJgJgJgJgJgJgJgJgJgJgJgJgJgJgJgJgJgJgJg
Jzullclj

yI IJIJI b2aII IgBbR Jd yI 1yI jIgJgJgJgJgJgJgJgJgJgJgJgJgJgJgJgJgJgJgJgJgJgJgJgJgJgJgJgJgJgJgJgJgJgJgJgJgJgJgJgJgJgJg
p:abllgpo12sLJzI 0. alwsl aQd> oal jgeJI J
.Sy
Jc b2aJI jgeJI J
. "O/OFF,
Jgll sss m o a kll w l 2w1 oall gss glc
sJwJswSdsJzJbJp 1.1J JJJJJJJJJJJJJJJJJJJJJJJJJJJJJJJJJ
.
WwJwJwJwJwJwJw
aJgj aBb Cw gSgJll
.901
Jusc wj rplsswla jka:abgalo
sic 1jg a bll olo pdo wJosell
a > b > 1
aoboo12xwJz
y|a|g a|a|y:
jiaxio bao
jbs
olcJooJoo>IaiaaiI aiaiiaiaia
aJRRJJ0oOJLJAAoJLJIaIJIa
aJlJI JI JI I JI JI JI JI JI JI JI JI JI JI JI JI JI JI JI JI JI JI JI JI JI JI JI JI JI JI JI JI JI JI JI JI JI JI JI JI JI JI JI
Jc0g>gall aaiill aos 1
(a,b,c)lllgo o,g,c
0
aIbI I Ola Uj> g
.1
a 100
jIgJl
Joo
Iaio piao go elwll wip
.(Vario Power)
Jll) "Mix, gogll g
(20 1
S_ OBC = 12 · OB · BC = 12 × CD × 5
Jzll xie elg lI
LgJy
10
gagaaagagagagagagagagagagagagagagagagagagagagagagagagagagagagagagagagagagagagagagagagagagagagagagagagagagagagagagag
(ooJ)
Iaillgawssaiallgwlj
JlJI
J
4
a
[1] Jellal al bafal al aiaa a jol
Jg jglj 100
J 00000000000000000000000000000000000000
《LJ1
Jell Jeaill Jeeill
4gii
Jaiy Jaiy aalbaj bawj jia
30 30 2g 1
.
4
g 1234567890101123456789010112345678901011234567890101123456789010112345678901011234567890101123456789010112345678
aal jzj 1
Goo
J
aaj aaiy sgsjlls
°90 1
ZlalalJc JJI JgJJI Jz
"I/ON,"
s g jw jw wdo qj
jgljjwpu9.1j1w
gjg 12x0 gJl jll xic:abg
JlalbdoJI Jb. sJ oJlg
pIbll 1gio
Jwll oI 1oI Jwll
4
a
Jusell olwro plaxwl Jaae
a|g| a|Lw| g|n o a|y| y|o|
.
30
Jllb2aillgbsjLds
Egauo gua: aio go
aall bll ocl y:abgalo
Jgill Jal
yBnGJUaI Joo
JellbdoIgobjoo
J
aagaao jlejgeg
F0
Jllb2aillpbr Jldy
a2o90g> a2rJll alogll
.Egaio Gg
aall baiol oclor y:abgalo
Jgill Jal
yB 2g Jogill noJoo
Jellal balaol gbsjoo
J
clll alog no clll sbd
lll/1gall a>gl jzil -jogill
.
aay aay aal al 0e e e
.
4
a2aaolal 0g>gaglllglll
Lgio a Lgog. .Lgolg Jll
KARCHER oloo
(4.730-059 11111111111111111111111111111)
Jc oJy Jdy jg b
.1alal alog 1c g>gal jai
120yI ygaa: clal ggbj Jggi
clJl
Jraol olall jg 20
Iasiall pblio go elaww wuj 19
.(Vario Power)
aill pao oall
JbI bia 1a a
JJI) "Max, g (JJI JJI) "Min,
()
aJ 5 J "Mix"
.
P J 100
ggllll jllssss
aagaaagagagagagagagagagagagagagagagagagagagagagagagagagagagagagagagagagagagagagagagagagagagagag

g jaijai jai jai jai jai
abssyol
4
g jaijai jai jai jai jai
aJolur
jgljllc o2g2gall jgo
Bzllgwhgjpcy jy UulglgJl

1c gai alalai jLgJgJygi
auijIJI
aJgJU JUGI U

JLKw aogosall o
a
aLlJr

a> 100
Jyj Jgaaa aegpaaall
IgaiIgog ocieiWglgic
jgljzli
jglJl jgJl Jzhi Jo
jLgUJaaaiJ 1
sSd jll sss sgl pla
wJU Wsuaagjz jz JgJLpO
Jj jgJg 20 g 99
Jaoio j
laiaJIaIaaaagajlljlllpa
J 1
a aaii aiee eae eae eae
100
.5jio aiaaill Jasi .gJil
auiyla
aLgJgJgJgJgJgJgJgJgJgJgJgJgJgJgJgJgJgJgJgJgJgJgJgJgJgJgJgJgJgJgJgJgJgJgJgJgJgJgJgJgJgJgJgJgJgJgJgJgJgJg

J 100000000000000000000000000000000000000000000000000000000000000000000000000000000000000000
aLwJ
a a
aaii aaiiaaaaii iaiy" oclg j 1 g jgljglgo aaerall "lll lal
1,2 , 2,3 , 3,4\

J 100000000000000000000000000000000000000000000000000000000000000

gJlalIg> Jg|gJolwJ 1 gJ aJyJyJyJyJyJyJyJyJy