USER MANUAL RHT2660DA RYOBI
PRODUCT SPECIFICATIONS
Displacement 26cc
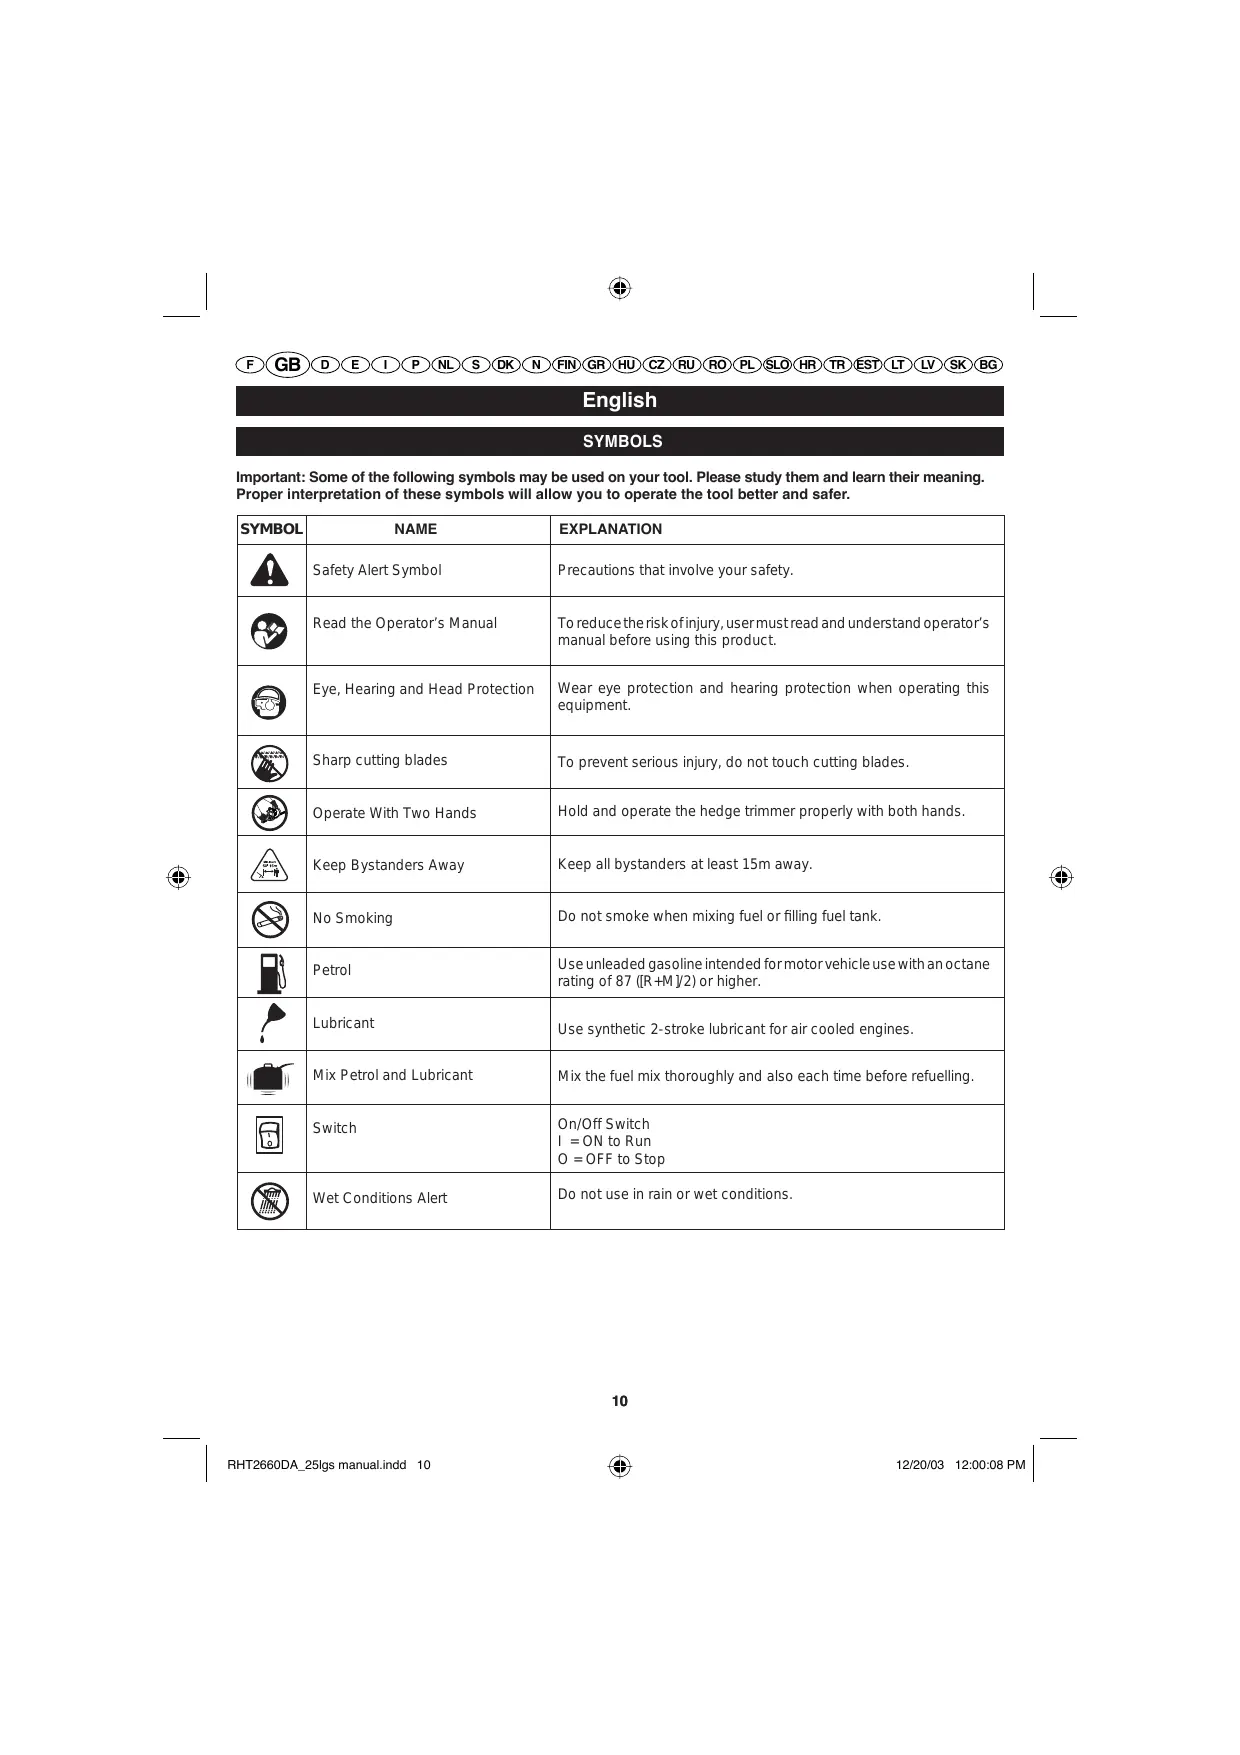
Important: Some of the following symbols may be used on your tool. Please study them and learn their meaning.
Proper interpretation of these symbols will allow you to operate the tool better and safer.
| SYMBOL | NAME | EXPLANATION |
| Safety Alert Symbol | Precautions that involve your safety. |
| Read the Operator's Manual | To reduce the risk of injury, user must read and understand operator's manual before using this product. |
| Eye, Hearing and Head Protection | Wear eye protection and hearing protection when operating this equipment. |
| Sharp cutting blades | To prevent serious injury, do not touch cutting blades. |
| Operate With Two Hands | Hold and operate the hedge trimmer properly with both hands. |
| Keep Bystanders Away | Keep all bystanders at least 15m away. |
| No Smoking | Do not smoke when mixing fuel or filling fuel tank. |
| Petrol | Use unleaded gasoline intended for motor vehicle use with an octane rating of 87 ([R+M]/2) or higher. |
| Lubricant | Use synthetic 2-stroke lubricant for air cooled engines. |
| Mix Petrol and Lubricant | Mix the fuel mix thoroughly and also each time before refuelling. |
| Switch | On/Off Switch
I = ON to Run
O = OFF to Stop |
| Wet Conditions Alert | Do not use in rain or wet conditions. |
English
SYMBOLS
The following signal words and meanings are intended to explain the levels of risk associated with this product.
| SYMBOL | SIGNAL | MEANING |
| DANGER | Indicates an imminently hazardous situation, which, if not avoided, will result in death or serious injury. |
| WARNING | Indicates a potentially hazardous situation, which, if not avoided, could result in death or serious injury. |
| CAUTION | Indicates a potentially hazardous situation, which, if not avoided, may result in minor or moderate injury. |
| CAUTION | (Without Safety Alert Symbol) Indicates a situation that may result in property damage. |
SERVICE
Servicing requires extreme care and knowledge and should be performed only by a qualified service technician. For service we suggest you return the product to your nearest AUTHORIZED SERVICE CENTER for repair. When servicing, use only identical replacement parts.

WARNING
To avoid serious personal injury, do not attempt to use this product until you read thoroughly and understand completely the operator's manual. Save this operator's manual and review frequently for continuing safe operation and instructing others who may use this product.
SAVE THESE INSTRUCTIONS

WARNING
Read and understand all instructions. Failure to follow all instructions listed below, may result in electric shock, fire and/or carbon monoxide poisoning which will cause death or serious personal injury.
GENERAL SAFETY RULES
READ ALL INSTRUCTIONS BEFORE USING THIS PRODUCT
DO NOT ALLOW CHILDREN OR UNTRAINED INDIVIDUALS TO USE THIS UNIT. KNOW YOUR MACHINE. Read the operator's manual carefully. Learn the machine's applications and limitations as well as the specific potential hazards related to this machine. KEEP GUARDS IN PLACE and in working order. Never operate the machine with any guard or cover removed. Make sure all guards are operating properly before each use.
- REMOVE ADJUSTING KEYS AND WRENCHES. Form habit of checking to see that keys and adjusting wrenches are removed from machine before turning it on. TO REDUCE THE RISK OF INJURY, keep children and visitors away. All visitors should wear safety glasses and be kept a safe distance from work area.
- KEEP THE AREA OF OPERATION CLEAR OF ALL PERSONS, particularly small children, and pets. DO NOT OPERATE THE ENGINE IN A CONFINED SPACE where dangerous carbon monoxide fumes can collect. Carbon monoxide is a colourless, odorless and an extremely dangerous gas and can cause unconsciousness or death. USE RIGHT MACHINE. Don't force machine or attachment to do a job it was not designed for. Don't use it for a purpose not intended. DRESS PROPERLY. Do not wear loose clothing, gloves, neckties, or jewelry. They can get caught and draw you into moving parts. Rubber gloves and nonskid footwear are recommended when working outdoors. Also wear protective hair covering to contain long hair. DO NOT OPERATE THE EQUIPMENT WHILE BARE-FOOT OR WHEN WEARING SANDALS OR SIMILAR LIGHTWEIGHT FOOTWEAR. Wear protective footwear that will protect your feet and improve your footing on slippery surfaces. EXERCISE CAUTION TO AVOID SLIPPING OR FALLING.
- ALWAYS WEAR SAFETY GLASSES WITH SIDE SHIELDS. Everyday eyeglasses have only impact-resistant lenses; they are NOT safety glasses. DO NOT OVERREACH OR STAND ON UNSTABLE SUPPORT. Keep proper footing and balance at all times. USE ONLY RECOMMENDED ACCESSORIES. The use of improper accessories may cause risk of injury.
- CHECK DAMAGED PARTS. Before further use of the
machine, a guard or other part that is damaged should be carefully checked to determine that it will operate properly and perform its intended function. Check for alignment of moving parts, binding of moving parts, breakage of parts, mounting and any other conditions that may affect its operation. A guard or other part that is damaged must be properly repaired or replaced by an authorized service center to avoid risk of personal injury.
NEVER LEAVE MACHINE RUNNING UNATTENDED. TURN POWER OFF. Don't leave machine until it comes to a complete stop. - KEEP THE ENGINE FREE OF GRASS, LEAVES, OR GREASE to reduce the chance of a fire hazard. - KEEP THE EXHAUST PIPE FREE OF FOREIGN OBJECTS. FOLLOW MANUFACTURER'S RECOMMENDATIONS FOR SAFE LOADING, UNLOADING, TRANSPORT, AND STORAGE OF MACHINE. - KEEP MACHINE DRY, CLEAN, AND FREE FROM LUBRICANT AND GREASE. Always use a clean cloth when cleaning. Never use brake fluids, petrol, petroleum-based products, or any solvents to clean machine. STAY ALERT AND EXERCISE CONTROL. Watch what you are doing and use common sense. Do not operate tool when you are tired. Do not rush. DO NOT OPERATE THE PRODUCT WHILE UNDER THE INFLUENCE OF DRUGS, ALCOHOL, OR ANY MEDICATION. - CHECK THE WORK AREA BEFORE EACH USE. Remove all objects such as rocks, broken glass, nails, wire, or string which can be thrown or become entangled in the machine. - DO NOT USE MACHINE IF SWITCH DOES NOT TURN IT ON AND OFF. Have defective switches replaced by an authorized service center. BEFORE CLEANING, REPAIRING, OR INSPECTING, shut off the engine and make certain all moving parts have stopped. Disconnect the spark plug wire, and keep the wire away from the plug to prevent accidental starting. AVOID DANGEROUS ENVIRONMENT. Don't use in damp or wet locations or expose to rain. Keep work area well lit. NEVER USE IN AN EXPLOSIVE ATMOSPHERE. Normal sparking of the motor could ignite fumes. DO NOT OPERATE WHILE SMOKING OR NEAR AN OPEN FLAME. DO NOT OPERATE at night, at times of heavy fog, or at any other times when your field of vision might be limited and it would be difficult to gain a clear view of area. - Be familiar with all controls and the proper use of the machine. Beware of overhead power lines. The cutting mechanism strikes any foreign object or the
machine should start making any unusual noise or vibration, shut off the power source and allow the machine to stop. Disconnect the spark plug wire from the spark plug and take the following steps:
- inspect for damage;
- check for and tighten any loose parts;
- have any damaged parts replaced or repaired with parts having equivalent specifications.
- Stop the engine and disconnect the spark plug wire from the spark plug before
- when adjusting the working position of the cutting device;
- cleaning or clearing a blockage;
- checking, maintenance or working on the machine.
- Do not inhale fuel fumes as they are toxic.
SPECIFIC SAFETY RULES
- OPERATE THE UNIT BY BOTH HANDS. DO NOT OPERATE AROUND dry brush, twigs, cloth rags, or other flammable materials. NEVER START THE MACHINE if ice has formed in any part of the equipment. DO NOT USE ACIDS, ALKALINES, SOLVENTS, FLAMMABLE MATERIAL, OR INDUSTRIAL GRADE SOLUTIONS in this product. These products can cause physical injuries to the operator and irreversible damage to the machine. NEVER ATTEMPT TO MAKE ANY ADJUSTMENTS WHILE THE ENGINE (MOTOR) IS RUNNING (except where specifically recommended by the manufacturer). PROTECTIVE COVERS MUST ALWAYS COVER ROTATING PARTS WHEN THE ENGINE IS RUNNING.
- KEEP COOLING AIR INTAKE (recoil starter area) and muffler side of the engine at least 1m away from buildings, obstructions, and other burnable objects.
- KEEP THE ENGINE AWAY FROM FLAMMABLES AND OTHER HAZARDOUS MATERIALS.
- KEEP AWAY FROM HOT PARTS. The muffler and other engine parts become very hot, use caution. DO NOT TOUCH THE SPARK PLUG AND IGNITION CABLE when starting and operating the engine.
- CHECK FUEL HOSES AND JOINTS for looseness and fuel leakage before each use.
- CHECK BOLTS AND NUTS for looseness before each use. A loose bolt or nut may cause serious engine problems.
USE EYE AND HEARING PROTECTION DEVICES. ALWAYS REFUEL OUTDOORS. Never refuel indoors or in a poorly ventilated area. NEVER STORE THE MACHINE WITH FUEL IN THE FUEL TANK INSIDE A BUILDING where ignition sources are present, such as hot water and space heaters, clothes dryers, and the like. IF THE FUEL TANK HAS TO BE DRAINED, DO THIS OUTDOORS. TO REDUCE THE RISK OF FIRE AND BURN INJURY, handle fuel with care. It is highly flammable. DO NOT SMOKE WHILE HANDLING FUEL. - ADD FUEL BEFORE STARTING THE ENGINE. Never remove the cap of the fuel tank or add fuel while the engine is running or when the engine is hot. - LOOSEN FUEL CAP SLOWLY to release pressure and to keep fuel from escaping around the cap. - REPLACE ALL FUEL TANK AND CONTAINER CAPS SECURELY. WIPE SPILLED FUEL FROM THE UNIT. Move 9m away from refueling site before starting engine. IF FUEL IS SPILLED, do not attempt to start the engine but move the machine away from the area of spillage and avoid creating any source of ignition until fuel vapors have dissipated. NEVER ATTEMPT TO BURN OFF SPILLED FUEL UNDER ANY CIRCUMSTANCES. BEFORE STORING, ALLOW THE ENGINE TO COOL. STORE FUEL IN A COOL, WELL-VENTILATED AREA, safely away from spark and/or flame-producing equipment. STORE FUEL IN CONTAINERS specifically designed for this purpose. - EMPTY FUEL TANK AND RESTRAIN THE UNIT FROM MOVING before transporting in a vehicle. - WHEN SERVICING USE ONLY IDENTICAL REPLACEMENT PARTS. Use of any other parts may create a hazard or cause product damage. MAKE SURE MINIMUM CLEARANCE of 1m is maintained from combustible materials. SAVE THESE INSTRUCTIONS. Refer to them frequently and use them to instruct other users. If you loan someone this tool, loan them these instructions also. - Never operate the product without the safety guard in place and in good condition. - Keep the working area free from wires, nails, metallic
cable, glass, stones and debris.
- Do not cut against hard objects, this could cause injury or damage the trimmer.
- Do not cross roads or gravel paths with the trimmer still running. As equipment user, you are responsible for third parties in the working area. While operating the tool, always hold it firmly with both hands by the two handles and ensure a firm footing, especially if steps or ladders are used. Don't touch the blades! Make sure you hold the tool firmly with both handles and that you are well balanced with your weight evenly distributed on both feet.
- Keep the cutting system below level of your waist.
- Keep your fingers and other body parts away from the cutting blade.

CAUTION:
Certain parts of the machine may become hot in use.
Familiarise yourself with your surroundings and be on the alert for possible hazards which you may not notice because of the noise from the machine. Never grasp the tool by the blade. Large variation in temperature can lead to condensation inside the tool. Before use, give the machine time to adjust to the temperature of work area. Let the tool work at its own pace. Do not overload. - Never attempt to use an incomplete machine or one fitted with an unauthorised modification. - When transporting, disconnect the spark plug wire. During transport or storage always cover the with the scabbard. - Do not attempt to repair the machine unless you are qualified to do so. - Do not operate the machine with a damaged or excessively worn cutting device. To reduce fire hazard keep engine and silencer free of debris, leaves, or excessive lubricant. Always ensure all handles are fitted when using the machine. - Know how to stop the machine quickly in an emergency.
SPECIFICATION
PRODUCT DUAL RECIPROCATING
Engine Displacement 26 cc
Max Engine Performance (in Accordance with ISO 8893) .0.67 kW
Fuel Consumption (in Accordance with ISO 8893) at Max Engine Performance. 0.51 L/h
Specific Fuel Consumption (in Accordance with ISO 8893) at Max Engine Performance. 0.76 L/kW.h Fuel Tank Capacity .0.3 L
Blade Type. Dual Reciprocating
Blade Length 60 cm
Max Cutting Capacity 28 mm
Dry Weight. 5.34 kg
Vibration Level (in accordance with Annex C of EN 774:1996+A1+A2+A3/prEN 10517:2003)
- Front Handle 13.5 m/s²
- Rear Handle 21.0 m/s²
Sound Pressure Level at Operator's Position (in accordance with Annex D of EN 774:1996 +A1+A2+A3/prEN 10517:2003): 96.5 dB (A)
Measured Sound Power Level (in accordance with EN ISO 3744:1995 and
Guaranteed Sound Power Level: 113 dB (A)
DESCRIPTION
- Scabbard
- Guard
- Front handle
- Knob
- Fuel cap
- Primer bulb
- Rear handle
- Trigger lock
- On/Off switch
- Trigger
- Starter grip
- Blade
- Choke lever
- Latch
ASSEMBLY

WARNING
If any parts are missing do not operate this tool until the missing parts are replaced. Failure to do so could result in possible serious personal injury.

WARNING
Do not attempt to modify this tool or create accessories not recommended for use with this tool. Any such alteration or modification is misuse and could result in a hazardous condition leading to possible serious personal injury.

WARNING
To prevent accidental starting that could cause serious personal injury, always disconnect the engine spark plug wire from the spark plug when assembling parts.
CAUTION
Any attempt to start the engine without adding lubricant will result in engine failure.

WARNING
Petrol and its vapors are highly flammable and explosive. To prevent serious personal injury and property damage, handle petrol with care. Keep away from ignition sources, handle outdoors only, do not smoke while adding fuel, and wipe up spills immediately.
OPERATION

WARNING
Do not allow familiarity with this product to make you careless. Remember that a careless fraction of a second is sufficient to inflict serious injury.

WARNING
Always wear safety goggles or safety glasses with side shields when operating power tools. Failure to do so could result in objects being thrown into your eyes, resulting in possible serious injury.

WARNING
Do not use any attachments or accessories not recommended by the manufacturer of this product. The use of attachments or accessories not recommended can result in serious personal injury.
MIXING THE FUEL (Fig. 2)
This product is powered by a 2-stroke engine and requires pre-mixing petrol and 2-stroke lubricant. Pre-mix unleaded petrol and 2-stroke engine lubricant in a clean container approved for petrol.
English
This engine is certified to operate on unleaded petrol intended for automotive use with an octane rating of 87 ([R + M] / 2) or higher. - Do not use any type of pre-mixed petrol / lubricant from fuel service stations, this includes the pre-mixed petrol / lubricant intended for use in mopeds, motorcycles, etc. Use synthetic 2-stroke lubricant only. Do not use automotive lubricant or 2-stroke outboard lubricant. Mix 2% synthetic 2-stroke lubricant into the petrol. This is a 50:1 ratio. Mix the fuel thoroughly and also each time before fueling. - Mix in small quantities. Do not mix quantities larger than usable in a 30 day period. Synthetic 2-stroke lubricant containing a fuel stabilizer is recommended.

FILLING THE TANK
Position the hedge trimmer on its side with the fuel cap pointing upward. Clean surface around fuel cap to prevent contamination. - Loosen fuel cap slowly to release pressure and to keep fuel from escaping around the cap. Clean and inspect the gasket. - Carefully pour fuel mixture into the tank. Avoid spillage. - Immediately replace fuel cap and hand tighten. Wipe up any fuel spillage. Move 9 m away from refueling site before starting engine.
Note: It is normal for smoke to be emitted from a new engine during and after first use.

WARNING
Always shut off engine before fueling. Never add fuel to a machine with a running or hot engine. Move at least 9 m from refueling site before starting engine. Do not smoke!

When the engine starts with the trigger locked, the blades will move. Keep body, objects, and obstructions away from blades. Failure to keep away from the blades can result in serious injury.
ROTATING HANDLE (Fig. 4)
The handle can be rotated 45° or 90° to the left or to the right.
To rotate handle:
- Shut off the hedge trimmer. Disengage the throttle trigger. Pull back on the rotating handle knob. Turn handle to the right or to the left.
- Release rotating handle knob.
- Keep turning handle until it locks into place in one of the 45° or 90° positions.
NOTE: The trimmer will only operate at one of these locked positions. The handle is locked when the rotating handle knob is securely into place, is not extended, and the handle will no longer move to either side.
Read the safety information for safe operation using the blade. Extreme care must be taken when using blades to ensure safe operation. Refer to Specific Safety Rules.

WARNING
Always keep both hands on the hedge trimmer handles. Never hold shrubs with one hand and operate hedge trimmer with the other. Failure to heed this warning can result in serious injury.

WARNING
Clear the area to be cut before each use. Remove all objects such as cords, lights, wire, or loose string which can become entangled in the cutting blade and create a risk of serious personal injury.
MAINTENANCE

WARNING
When servicing, use only identical replacement parts. Use of any other parts may create a hazard or cause product damage.

WARNING
Always wear safety goggles or safety glasses with side shields during product operation. If operation is dusty, also wear a dust mask.

WARNING
Before inspecting, cleaning, or servicing the machine, shut off engine, wait for all moving parts to stop, and disconnect spark plug wire and move it away from spark plug. Failure to follow these instructions can result in serious personal injury or property damage.
GENERAL MAINTENANCE
Avoid using solvents when cleaning plastic parts. Most plastics are susceptible to damage from various types of commercial solvents and may be damaged by their use. Use clean cloths to remove dirt, dust, lubricant, grease, etc.

WARNING
Do not at any time let brake fluids, gasoline, petroleum-based products, penetrating lubricant, etc., come in contact with plastic parts. Chemicals can damage, weaken or destroy plastic which may result in serious personal injury.

WARNING
Blades are sharp. When handling the blade assembly, wear non-slip, heavy-duty protective gloves. Do not place your hand or fingers between blades or in any position where they could get pinched or cut. NEVER touch blades or service unit with the spark plug wire connected.
REPLACING BLADES (FIG. 6)
LUBRICATING THE BLADE (FIG. 7)
NOTE: Do not lubricate while the hedge trimmer is running.
CLEANING THE AIR FILTER SCREEN (Fig. 8)
- Remove the air filter cover by pushing down on the latch with your thumb while gently pulling on the cover. Brush the air filter screen lightly to clean.
- Replace the air filter cover by inserting the tabs on the bottom of the cover into the slots on the air filter base; push the cover up until it latches securely in place.
FUEL CAP

WARNING
A leaking fuel cap is a fire hazard and must be replaced immediately. Failure to do so could result in a fire that could cause serious personal injury.
SPARK PLUG (FIG. 9)
This engine uses a Champion RCJ-6Y or equivalent with 0.63 mm (0.025 in.) electrode gap. Use an exact replacement and replace annually.

WARNING
Be careful not to cross-thread the spark plug. Cross-threading will seriously damage the product.
CLEANING THE EXHAUST PORT AND MUFFLER
Depending on the type of fuel used, the type and amount of lubricant used, and/or your operating conditions, the exhaust port and muffler may become blocked with carbon deposits. If you notice a power loss with your gas powered tool, you may need to remove these deposits to restore performance. We highly recommend that only qualified service technicians perform this service.
SPARK ARRESTOR
The muffler is equipped with a spark arrestor screen inside the muffler body. After extended use, the screen can become dirty and may need to have the muffler replaced by an authorized servicing dealer.
STORAGE (1 MONTH OR LONGER) (FIG. 10)
- Drain all fuel from the tank into a container approved for gasoline. Run the engine until it stops. Clean all foreign material from the hedge trimmer. Store it in a well-ventilated place that is inaccessible to children. Keep away from corrosive agents such as garden chemicals and de-icing salts.
- Abide by all federal and local regulations for the safe storage and handling of gasoline. Always place the scabbard on the cutting blades before transporting or storing the unit.
English
TROUBLESHOOTING
IF THESE SOLUTIONS DO NOT SOLVE THE PROBLEM, CONTACT YOUR AUTHORIZED SERVICE DEALER.
| PROBLEM | POSSIBLE CAUSE | SOLUTION |
| Engine will not start. | No spark. | Check spark. Remove spark plug. Reattach the spark plug cap and lay spark plug on metal cylinder. Pull the starter rope and watch for spark at spark plug tip. If there is no spark, repeat test with a new spark plug. |
| No fuel. | Push primer bulb until bulb is full of fuel. If bulb does not fill, primary fuel delivery system is blocked. Contact a servicing dealer. If primer bulb fills, engine may be flooded, proceed to next item. |
| Engine is flooded. | Pull starter three times with choke lever at “R”. If engine does not start, move choke lever to “I-I” and repeat normal starting procedure. If engine still fails to start, repeat procedure with a new spark plug. |
| Starter rope pulls harder now than when new. | Contact a servicing dealer. |
| Engine starts but will not accelerate. | Engine requires approximately three minutes to warm up. | Allow engine to completely warm up. If engine does not accelerate after three minutes, contact a servicing dealer. |
| Engine starts but will only run at high speed at half choke. | Carburetor requires adjustment. | Contact a servicing dealer. |
| Engine does not reach full speed and emits excessive smoke. | 1. Check lubricant fuel mixture. | 1. Use fresh fuel and the correct 2-stroke lubricant mix. |
| 2. Air filter is dirty. | 2. Clean air filter. Refer to Cleaning the Air Filter Screen earlier in this manual. |
| 3. Spark arrester screen is dirty. | 3. Contact a servicing dealer. |
| Engine starts, runs, and accelerates but will not idle. | Idle speed screw on carburetor requires adjustment | Turn idle speed screw clockwise to increase idle speed. (Fig. 11) |
NOTE: If your unit exhibits specific performance problem(s) where the Troubleshooting section recommends a clockwise screw adjustment on the carburetor and no adjustments have been made since original purchase, the unit should be taken to an authorized service center for repair. In most cases, the needed adjustment is a simple task for the trained service representative.
German
SYMBOL
- Check whether the device is not damaged;
- Check whether any parts have become loose. If necessary, reattach them.
1 liter + 20 ml = 2 liters + 40 ml = 3 liters + 60 ml = 4 liters + 80 ml = 5 liters + 100 ml =
TURNING THE HEDGE TRIMMER ON AND OFF (FIG. 3)

WARNING
ROTATING HANDLE (Fig. 4)
FILLING THE TANK
MAINTENANCE OF THE BLADES (Fig. 6)
LUBRICATION OF THE BLADES (Fig. 7)
NOTE! Never lubricate the blades while the hedge trimmer is running.
Norwegian
CLEANING THE AIR FILTER (Fig. 8)
PRODUCT TECHNICAL DATA
Displacement 26 cc
KEEP THE HEDGE TRIMMER AWAY FROM YOUR BODY. Do not use this tool near
bushes, branches, twigs, or any other flammable material.
It may cause a fire.
Net weight: 5.34 kg
1 liter 2 liters 3 liters 4 liters 5 liters
- 20 ml
- 40 ml
- 60 ml
- 80 ml
- 100 ml


STARTING / STOPPING THE PETROL TRIMMER (fig. 3)

WARNING
PROBLEMS AND THEIR SOLUTIONS
IF THE OFFERED SOLUTIONS DO NOT SOLVE THE PROBLEM, CONTACT ONE OF THE AUTHORIZED HOMELITE SERVICE CENTERS.
Do not start the engine before filling it with oil, otherwise it will be damaged.

WARNING
Fuel and its vapors are extremely flammable and explosive. To avoid injury and material damage, handle fuel with great care. Keep away from sources of ignition, work with fuel only outdoors, never smoke when handling fuel, and immediately wipe up any spilled fuel.
WORK

WARNING
When operating the trimmer, do not be careless. Remember that a moment of inattention is enough to cause serious injury.

WARNING: To reduce the risk of injury, always wear safety glasses and a protective helmet. Follow the safety rules. Foreign objects may get into the eyes and cause serious eye injuries.

WARNING
Use only the recommended manufacturer's parts and accessories. Use of other parts and accessories may lead to serious injury.
FUEL MIXTURE (Fig. 2)
The engine of the tool is a two-stroke engine, it runs on a mixture of gasoline and synthetic oil for two-stroke engines. Mix unleaded gasoline with synthetic oil for two-stroke engines in a clean standard container. The engine runs on automotive unleaded gasoline with an octane rating of 102/90. Do not use fuel mixtures with oil that are sold at gas stations, especially for chainsaws, models, etc. Use only synthetic oil for two-stroke engines. Do not use automotive motor oil or oil for two-stroke outboard motors. Mix gasoline with synthetic oil for two-stroke engines in a ratio of 50:2 (2%). Mix the fuel well before each refueling. Mix fuel in small quantities: no more than for one month of use. It is also recommended to use synthetic oil for two-stroke engines containing a gasoline stabilizer.
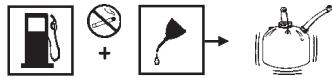
REFUELING THE TANK
Place the trimmer on its side, with the fuel tank cap facing up. To avoid clogging, wipe the tank around the cap. Slowly unscrew the cap to release pressure and to prevent fuel from spilling out. Check the gasket and its condition. Carefully pour the fuel mixture into the tank. Try not to spill it. Immediately put the cap on the filler neck and tighten it firmly. Wipe up any spilled fuel. After refueling, move at least 9 meters away from the refueling area before starting the engine.
Note: The first few times you use a new tool, it may emit smoke. This is normal.

WARNING
Before refueling, always stop the engine. Never refuel the tool while the engine is running or hot. After refueling, move at least 9 meters away from the refueling area before starting the engine. Do not smoke!
STARTING AND STOPPING THE TRIMMER (Fig. 3)

WARNING
Pull the trigger and lock it with the lock button. Check the area around the trimmer for foreign objects. This will help avoid personal injury.
ROTATING HANDLE (Fig. 4)
The handle can be turned 45° or 90° to the right or left.
To turn the handle:
Stop the trimmer.
Release the trigger. Pull the rotating handle outward. Turn it to the right or left. Release the handle. Turn the handle until it locks at an angle of 45° or 90°.
Release the trigger. Pull the rotating handle outward. Turn it to the right or left. Release the handle. Turn the handle until it locks at an angle of 45° or 90°.
Note: The trimmer will only operate after the handle is locked in one of these positions. The handle is locked when it cannot be pulled outward and does not move to either side.
OPERATING THE TRIMMER (Fig. 5)

WARNING
Before operating, read the safety rules. When working with the trimmer, be extremely careful. See "Specific Safety Rules".

WARNING
Always hold the trimmer with both hands during operation. Never operate the trimmer with one hand, holding the trimmer by the shaft. Failure to follow this warning can result in serious injury.

WARNING
Clear the work area before operating. Remove stones, nails, electrical wires, and branches. They may be thrown by the cutting head and cause serious injury.

WARNING: For repair, use only genuine spare parts. The use of any other spare parts may present a danger or damage the instrument.

WARNING
When working with the instrument, always use protective glasses and protective goggles. For dusty work, also use a protective mask or respirator.

WARNING
Before inspection, cleaning, or maintenance of the miter saw, stop the motor, wait until all moving parts have stopped, remove the plug from the socket, and disconnect the tool from it. Failure to follow these safety rules can lead to serious injury or
material damage.
GENERAL MAINTENANCE
Never use solvents to clean plastic parts. Most plastics can be damaged by common solvents. To remove dirt, oil, grease, etc., use a clean cloth.

WARNING
Plastic parts must never come into contact with brake fluid, gasoline, petroleum products, penetrating oils, etc. These substances can damage, weaken, or destroy plastic.

WARNING
The saw teeth are very sharp. When handling the saw, use thick non-slip gloves. When adjusting the saw, never put your fingers in the teeth and avoid working positions where fingers or hands could come into contact with them. Never touch the saw if the power cord is connected to the socket.
SAW MAINTENANCE (Fig. 6)
LUBRICATION (Fig. 7)
Note: Never lubricate the blades of a working hedge trimmer.
CLEANING THE AIR FILTER (Fig. 8)
Press the latch with your thumb and remove the air filter cover. Clean the air filter with a soft brush. Replace the cover, inserting the tabs into the holes in the filter base. Press on the cover until it snaps into place.
FUEL TANK CAP
WARNING
A damaged fuel tank cap can cause a fire. It must be replaced immediately. Failure to follow these instructions can result in serious injury.
SPARK PLUG (Fig. 9)
The engine uses a Champion RCJ-6Y spark plug with a gap of 0.63 mm between the electrodes. Use only this model of spark plug and tighten it to 7/8 turn.
WARNING
Be careful not to short-circuit the spark plug contacts: this could seriously damage the tool.
Russian
CLEANING THE EXHAUST PORT AND MUFFLER
Depending on the fuel used, the type of oil, and the operating conditions, carbon deposits may accumulate in the exhaust port and muffler. If the tool loses power, remove the accumulated carbon. It is recommended to have this done by a qualified specialist.
SPARK ARRESTER
The device has an exhaust grid. After prolonged use, this grid may become clogged, and the exhaust pipe will need to be replaced at an authorized service center.
STORAGE (MONTHS AND YEARS) (Fig. 10)
Drain all fuel from the tank into an approved gasoline container. Then let the engine run until it stops by itself. Carefully clean the spark plug. Store the tool in a well-ventilated room, away from heat sources. Do not store the tool near chemicals such as fertilizers or de-icing salt. Follow local and national storage regulations. Before transporting or storing the tool, always put on the protective guard.
Maintenance.
Russian
TROUBLESHOOTING
If the suggested solutions below do not fix the problem, contact the Homelite service center.
| HEIQUIAKA | IIPIUHINHA | PEIIIEHNE |
| MOTOP He 3aIyckaetc. | 1. Het nckpb. | 1. IIpOBePbTe cBeyu. ChmHnTe cBeyu. HaidenbTe ha cBeyu npOBoi n pRncIIOHnTe ee K metaJIInHeCKOMU ΒIiIiNlpy. IotYnHite 3a cTAPTeR h IocMOTPrte, eCt b Ii MekJy aIeKToDAMn cBeyu Nckpa. Ecln HcKpbI het, IpoJeIaIte Tu Jx e OIepaIoo C HOBo CbeUoy. |
| 2. Het ropioyeo. | 2. HaxHMaiTe Ha rpyu cTAPTeRa, Ioka OHa He HapOLHnTc rOpIOvM. Ecln rpyua He HapOLHnEETc, 3Nauch TcStema IIOaunr rOpIOeTO zAcOpena. O6paHTte B IeHTr TexNHueCKOrO o6cIyJHBAHN. Ecln rpyua HApOLHnEETc, MoKet 6bItb, MOTOP "3aXle6HyJc" (CM. JaJIbIe). |
| 3. Motop "3aXle6HyJc". | 3. IepHnTe Tpr pa3a pyuKu cTAPTeRa cPbuaar mIoCeJIa B IIOLOKeHNI " " . Ecln MOTOP He 3aBOIITc, IIOCTABTe Pbyaag cTAPTeRa B IIOLOKeHNI " " , I 3aYnCKaiTe MOTOP KAK O6bUHO. Ecln H IOSe 3ToTOrO MOTOP He 3aBeJIc, IIOTpOHTe BCE 3TH OIepaIuu C HOBo CbeUoy. |
| 4. StapTe ra6bTaet TuJke, Yem KOrJa OH 6bI IHObI. | 4. O6paHTteB I CeHTr TexNHueCKOrO o6cIyJHBAHN. |
| MOTOP 3aBOIITcR Ho He pazrHaeTc. | MOTOP Neob6xoIIMo OKIo 3 MnHyT, YTObI NaHarpTeBc. | ДаITE MOTOPу IIOIIOCTbU HapTeBc. Ecln Upe3 Trn MHNUTbI MOTOP He yckopoeTc, O6paHTteB K IINJIepy IIOLeIPOJAZHOrO o6cIyJHBAHN. |
| MOTOP 3aBOITcR Ho p6oTaet Ha IIOIHo MOIIOCTH TOJIbKO B IIOUYokPbItom IIOLOKeHNI. | Heob6xOIMo OTrpeYIlnPoBaTb Kap6oIopatop. | O6paHTteB I CeHTr TexNHueCKOrO o6cIyJHBAHN. |
| MOTOP He pazrOHaTcR do IIOIHORo pexHMa, ИЗ Hero №Ie TmHOr OlbMa. | 1. IIpOBePbTe ToIIOIBNVU cMeB. 2. Bo3dUnbIhФIbI trzacOpJIc. 3. CTeKa IcKpOoTPaJxAteJIa 3acOpJIaIb. | 1. IcNoIb3yIte HOVUc cMeBc I pRabIbHoi IIOIpOuIe H MaIa IdЯ IZbYtAkrTHbIX IZbIgATEJIe. 2. IpOChTReΦIbItp. CM. pa3dJI YuIcSTka BO3dUHOrO ΦIbIbTa RbIe. |
| MOTOP 3aBOITcR Ho yckopAEcTc, Ho He ChnJaet peKHM pa6ObI. | BInr XoIOCTOrO XoJa Na Ka6bIpaTope Tpe6yEt HAcTPOKn. | IIpOBeHnTE BInr peryIIOBKNx XoIOCTOrO XoJa IIOcAoboi cTpeJIke, YTObIbYIeHbIckOpOcTB XoIOCTOrO XoJa (Pnc. 11). |
NOTE: If the tool becomes difficult to start, when in the Troubleshooting section it is recommended to check the spark plug and fuel, but since no adjustment has been made since purchase, the tool should be repaired at an authorized service center. In most cases, a simple adjustment is not difficult for experienced technicians.
Romanian
SYMBOLS
1 liter + 20 ml = 2 liters + 40 ml = 3 liters + 60 ml = 4 liters + 80 ml = 5 liters + 100 ml =
STARTING AND STOPPING THE HEDGE TRIMMER (Fig. 3)

WARNING
The following symbols and their meanings are used to indicate various risk levels associated with the use of this tool.
FUEL TANK CAP

WARNING
KEEP THESE INSTRUCTIONS!

WARNING
1 liter + 20 ml = 2 liters + 40 ml = 3 liters + 60 ml = 4 liters + 80 ml = 5 liters + 100 ml =
In Lithuanian
TURNING THE HEDGE TRIMMER ON AND OFF (Fig. 3)

WARNING
If you start the engine while the starter is locked, the blades will still move. Stay away from the blades and make sure there are no objects near them. This will avoid the risk of serious injury.
ROTATING HANDLE (Fig. 4)
The handle can be turned to the right or left at a 45 or 90 degree angle.
To turn the handle:
KEEP THESE INSTRUCTIONS.

WARNING
READ ALL INSTRUCTIONS CAREFULLY AND MAKE SURE YOU UNDERSTAND THEM CORRECTLY. Failure to follow the instructions below may cause electric shock, fire, or carbon monoxide poisoning, which can cause death or serious injury.
BEFORE USING THIS PRODUCT, READ ALL INSTRUCTIONS.
READ ALL INSTRUCTIONS
DO NOT ALLOW CHILDREN OR PERSONS WITHOUT EXPERIENCE IN USING THIS MACHINE TO USE IT.
Maximum engine power
(according to ISO 8893) .0.67 kW
Fuel consumption (according to ISO 8893) at
max. engine power 0.51 l/
Specific fuel consumption (according to ISO 8893)
at max. engine power 0.76 l/kW.
Fuel tank capacity .0.3 l
Cutting blade length. Effective cutting length of the blade. 60 cm
Maximum cutting capacity 28 mm
Vibration (according to Annex C of standard EN 774:1996+A1+A2+A3/prEN 10517:2003)
-Front handle 23.8 m/s² -Rear handle 25.6 m/s²
Noise level (according to Annex
of standard EN 774:1996+A1+A2+
A3/prEN 10517:2003) .105.1 dB(A)
Sound power level measured (according to
the requirements of standard EN ISO 3744:1995 and
ISO 11094:1991) 112.1 dB(A)
Guaranteed sound power level: 113 dB(A)
DESCRIPTION
- Carburetor
- Precise adjustment device
- Front handle
- Screw for fixing
- Fuel tank cap
- Starter handle
- Rear handle
- Trigger lock button
- Start/stop switch
- Gasket for the inlet valve
- Locking plate
INSTALLATION

WARNING
If there is a damaged part, do not work with the machine until you have replaced the damaged part. Failure to follow this instruction may result in serious personal injury.

WARNING
Do not attempt to modify the machine or to install accessories that are not approved for use. Any such modification may result in incorrect use and may create hazards that could cause serious personal injury.

WARNING
Always disconnect the starter battery before working on parts. Failure to follow this instruction may cause the machine to be unintentionally started and cause serious personal injury.
CAUTION
If you attempt to start the engine without first adding oil, you will damage the engine.

WARNING: Fuel vapors are flammable and explosive. To avoid danger of fire or injury to persons or property, handle fuel carefully. Keep away from sources of ignition. Always handle fuel outdoors, never smoke while working with fuel, and always wipe up spilled fuel.
OPERATING INSTRUCTIONS

WARNING
When you work with the machine, do not get distracted. Remember that inattention can cause serious injury.

WARNING
During operation with a gasoline or electric tool, always wear protective goggles or safety glasses with side shields or a face shield. Failure to follow this instruction may result in eye injury if the safety glasses are not worn.

WARNING
Do not use parts and accessories other than those recommended by the manufacturer for this machine. Use of unapproved parts and accessories may cause serious injury.
MIXING FUEL (Fig. 2)
The machine is equipped with a two-stroke engine, which requires a mixture of gasoline and synthetic oil. Mix unleaded gasoline with synthetic oil for two-stroke engines in a clean container intended for storing gasoline. The engine runs on unleaded automotive gasoline with an octane number of 87 ([R + M] / 2) or higher. Do not use fuel mixtures sold at gas stations that are intended exclusively for mopeds, motorcycles, etc. Use only synthetic oil for two-stroke engines. Do not use automotive oil or any oil for two-stroke engines. Mix the synthetic oil for
two-stroke engines with gasoline in a ratio of 50:1.
Before refueling the tank, always shake the fuel mixture thoroughly. Mix only small quantities of fuel: do not mix more than one month's supply. We also recommend using synthetic oil for two-stroke engines that contains a fuel stabilizer.
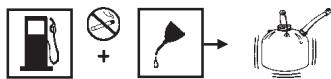
REFUELING THE TANK
Place the trimmer on a flat surface with the fuel tank cap facing up. Clean the area around the cap to prevent fuel from getting dirty. Slowly loosen the cap to release pressure and prevent fuel from spilling. Check and inspect the condition of the filter. Carefully pour the fuel mixture into the tank, being careful not to spill. Replace the cap and tighten securely. Wipe up any spilled fuel. Stay at least 9 meters away from the area where you refueled before starting the engine.
Warning: The engine may start when the machine is first started, and then it will stop.

WARNING
Before filling the fuel tank, stop the engine. Never fill the machine if the engine is still running or if it is hot. Wait at least 9 minutes after stopping, before filling the fuel tank. Do not smoke!

1 liter + 20 ml = 2 liters + 40 ml = 3 liters + 60 ml = 4 liters + 80 ml = 5 liters + 100 ml =
STARTING AND STOPPING THE TRIMMER (Fig.3)
Bulgarian

WARNING
The engine is stopped while the trigger is blocked, the cutting attachment may still be rotating. Keep the cutting attachment away from your body and make sure there are no objects near the cutting head. This will avoid the risk of serious injury.
TURNING THE HANDLE (Fig.4)
The handle can be turned 45° or 90° to the left and to the right.
To turn the handle:
Stop the engine. Release the trigger. Pull the handle upward. Turn the handle to the left or right. Release the handle. Continue turning the handle until it locks in the 45° or 90° position.
Warning: The handle will only work if the handle is locked in one of these two positions. The handle locks when it is pulled upward and when it is turned to one side or the other.
WORKING WITH THE TRIMMER (Fig.5)

WARNING
Read the safety instructions before using the trimmer. Read all instructions carefully before using the tool. Read also the "Special Safety Instructions".

WARNING
When working with the trimmer, hold it with both hands. Never work with the trimmer holding it with only one hand, but with the other hand holding the trimmer. Failure to follow these instructions may result in serious personal injury.

WARNING
Before working with the tool, clear the work area. Remove all objects such as stones, electric cables or wires that could be caught in the blade and cause serious personal injury.
MAINTENANCE

WARNING
Use only original spare parts. If you use other parts, this may cause damage or lead to injury to the product.

WARNING
When working, always wear safety glasses or a face shield with side shields. If dust is generated during work, wear a dust mask.

WARNING
Before inspecting, cleaning or repairing the trimmer, turn off the engine, remove all moving parts, disconnect the spark plug wire and keep it away from the spark plug. Failure to follow these instructions may result in serious personal injury and serious material damage.
GENERAL MAINTENANCE
Do not clean plastic parts with solvents. Plastic parts may be damaged by solvents, which are available in the trade. Remove dirt, dust, oil, grease, etc. with a clean cloth.

WARNING
Do not allow the plastic parts to come into contact with brake fluid, gasoline, petroleum-based products, penetrating oils, etc. These chemical products are substances that can damage, stain, or destroy the plastic.

WARNING
The blades of the knife are very sharp. When you need to grab the knife, grasp the working handle, which is covered and not bare. When working with the knife, never place your hands or fingers between the blades and do not put yourself in a position where you risk pinching or cutting your fingers. Never swing the knife and never apply any force to the support, if the candle is on.
KNIFE SUPPORT (fig.6)
LUBRICATION OF THE KNIFE (fig.7)
Note: Never lubricate the knife while it is working.
Bulgarian
CLEANING THE AIR FILTER (fig.8)
Remove the air filter cover by pressing the latch with your finger and gently pulling the cover. Clean the air filter with a soft brush. Replace the cover of the filter by placing the plastic tab into the slot on the base of the air filter. Press the latch until it clicks.
SPARK PLUG

WARNING
If the spark plug is not tightly closed, a dangerous situation is created. It must be replaced immediately. Failure to follow the instructions can lead to serious injury.
SPARK PLUG (fig. 9)
Use only the recommended spark plug Champion RCJ-6Y with an electrode gap of 0.63 mm. Use only the recommended plug and replace the spark plug with a new one.

WARNING
WARNING: Read the operator's manual before using the machine. The machine can cause serious injury.
CLEANING THE FUEL TANK AND THE FUEL FILTER
Depending on the type of fuel used and the amount of oil and/or the operating conditions, the fuel filter and the fuel tank may become clogged. If you notice a decrease in the power of the instrument, you may need to clean the fuel tank and the fuel filter. We strongly recommend that you have this done by a qualified technician.
SPARK ARRESTER
The fuel tank has a spark arrester mesh. After prolonged use, the mesh may become clogged. The fuel tank must be replaced by an authorized service center.
STORAGE (FOR MORE THAN 1 MONTH)
Drain the remaining fuel from the fuel tank. Run the engine until it stops. Clean the main filter. Store the machine in a well-ventilated area away from heat. Do not store the machine near flammable materials such as gasoline, chemicals, or salt.
Check the local regulations for the disposal of fuel and fuel containers. Follow the instructions for storage and handling of fuel. Do not dispose of fuel in the trash, down the drain, or near the machine.
Bulgarian
TROUBLESHOOTING
If these suggestions do not help you solve the problem, contact your authorized Homelite service center.
| ПИОБЛЕМ | BEPOЯTHA ПИРУПИHA | РАЗPEИЕНЕ |
| Диогателов не трува. | 1. Нма Искра. | 1. Поберете заразална с蜱ц. Извашие с蜱цота.Выретe калaka и на място и поставете с蜱цотаВырхуmetаленшлинльг. Дпьлпетe желюто за заразалва и с蜱цетe дalmо от e lektropondа Излиза Искра.Ако не с佩ави Искра, посторе теса с hoа всеви. |
| 2. Нма Горно. | 2. 3адействаite пухковая балон, ложато с haитьлнис Горно. Ако saюньт не с haитьлни, заочи сисемата за пioлалане на Горно e задишеа.Одьретe с Кьм сэрпз. Ако saюньт с haитьлни, Вьз金融机构 e Двогатулг Да се e zadabил (Внжты садвацда точka). |
| 3. Диогателов се e заалны. | 3. Дпьноге Трн пьтун рычatable на пухкового усточьс с lost на ссторе вырху“”. Ако Дьогатулг He TрьгHe, поставете лостьт на ссторе вырху“”и се опигайтдд Замал�песу поHopmaлнин hayin. Ако Дьогатулг OTново He TрьгHe, посторе теши разлчни ETалпс с hoа сөви. |
| 4. ХilOTO за пьалвае се дрпа по-тулden, отколково 휞огато Тримерът e зал nob. | |
| Диогателов трува, ho ho hyckорява. | 3a загравае на Диогатуla са необхочима okol'd 3 минун. | Изчakайе Дьогатулг на пьлно дд заг pee. Ако Дьогатулг He усокая селд 3 минунс се obьр themselves кьм сэрпз. |
| Диогателов трува, ho ho paobotи с пьлна мошноct в пolyotbrocopeho пolyoke�п. | Kapбуаторьт трубая се рergлар. | Оььр themselves се Кьм сэрпз. |
| Диогателов не достга макимална мошноct и ИзпUCSKA ТВьрд Мною дим. | 1. Поберете горьнatable сmerc. | 1. Изплзайе пясяно сmercно горьн с правлно сбoting�нения на масло зд дүүйтөн Дьогатулд. |
| 2. Вьздүйнгий Филььр e заьрсen. | 2. Почистетe вьздүйнгий Филььр. Вьнгетe раддд. |
| 3. Искрогасецлatura peшETКа e заьрсea. | "Посmarна и поочstвае на вьздүйнгий Филььр". |
| 3. Oььр themselves с Кьм сэрпз. | |
| Диогателов трува, paobotи ho усокая, ho не пьльржа прадан hoiod. | Винтул за пазенхODа на karбуатора се hyжддд от рergларанe. | 3авьретe Винтул за пазенхODа на пазенхOD, за ѳа уveлочITEСКОСТТАprin пазенхOD(фиг.11). |
Warning: If you find a fault that is not covered in the "Troubleshooting" section, and if the product was not dismantled or modified in any way, contact your authorized service center. In this case, the necessary repairs may be carried out by qualified technicians.
All Ryobi products are guaranteed against manufacturing defects and defective parts for a period of twenty four (24) months from the date stated on the original invoice drawn up by the retailer and given to the end user.
Deterioration caused by normal wear and tear, unauthorised or improper use or maintenance, or overload are excluded from this guarantee as are accessories such as battery packs, light bulbs, blades, fittings, bags, etc.
In the event of malfunction during the warranty period, please take the NON-DISMANTLED product, along with the proof of purchase, to your retailer or nearest Authorised Ryobi Service Centre.
This warranty in no way affects your legal rights concerning defective products.
The above warranty is valid in the UK, the European Union, and Australia only. Outside these regions, a different warranty may apply. Please see your local dealer for warranty details.

We declare in sole responsibility that the product, to which this certificate applies, conforms to the basic health and safety requirements of the Machinery Directive 98/37/EC and other relevant directives, like EMC Directive 2004/108/EEC and Directive 2004/14/EC with amendment 2005/88/EC.
To effect correct application of the health and safety requirements stated in the EEC directives, the following European and/or national standards and/or technical specifications were consulted:
EN 774:1996+A1+A2+A3/prEN 10517:2003, EN ISO 3744:1995, ISO 11094:1991, EN ISO 12100-1:2003, EN ISO 12100-2:2003, EN 563:1994, EN 294:1992, ISO 3864-1:2002, ISO 3864-2:2004.
We declare this product complies to the requirements of the Directive 2004/14/EC with amendment 2005/88/EC.
This product has been assessed to conform to the Directive 2004/14/EC with amendment 2005/88/EC by means of unit verification by TUV Rheinland Product Safety GmbH.
Measured sound power level [dB (A)]: 112,1
Guaranteed sound power level [dB (A)]: 113
Date of issuance: 12/2007
Technical documents are kept by Homelite Far East Co., Ltd. 24/F, 388 Castle Peak Road, Tsuen Wan, N.T., Hong Kong.
Declared in 12/2007 by Homelite Far East Co., Ltd.
D
Δλωω or the original Greek text is not clear. This passage appears to be garbled OCR. Removing.
Guaranteed acoustic power level [dB(A)]: 113
Date: 12/2007
Technical documentation is kept at Homelite Far East Co., Ltd. 24/F, 388 Castle Peak Road, Tsuen Wan, N. T., Hong Kong.
Declaration issued in September 12/2007 by Homelite Far East Co., Ltd.

We declare under our own responsibility that the product to which this declaration relates is in conformity with the essential health and safety requirements of the Machinery Directive 98/37/EC and of other applicable directives, such as the EMC Directive 2004/108/EC and the Directive 2000/14/EC, as amended by Amendment 2005/88/EC.
Technical documentation is kept at Homelite Far East Co., Ltd. 24/F, 388 Castle Peak Road, Tsuen Wan, N. T., Hong Kong.
Declared in 12/2007, by Homelite Far East Co., Ltd.
We declare under our own responsibility that the product to which this declaration relates is in conformity with the essential health and safety requirements of the Machinery Directive 98/37/EC and of other applicable directives, such as the EMC Directive 2004/108/EC and the Directive 2000/14/EC, as amended by Amendment 2005/88/EC.
The following European and/or national standards and/or technical specifications have been consulted in order to meet the health and safety requirements formulated in the Community directives:
EN 774:1996+A1+A2+A3/prEN 10517:2003, EN ISO 3744:1995, ISO 11094:1991, EN ISO 12100-1:2003, EN ISO 12100-2:2003, EN 563:1994, EN 294:1992, ISO 3864-1:2002, ISO 3864-2:2004.
This product has been assessed for conformity with the Noise Emission Directive 2000/14/EC, as amended by Amendment 2005/88/EC, after the notified body TÜV Rheinland Product Safety GmbH performed the conformity assessment.
Measured acoustic power level [dB(A)]: 112.1
Guaranteed acoustic power level [dB(A)]: 113
Issue date 12/2007
Technical documentation is kept at Homelite Far East Co., Ltd./4/F, 388 Castle Peak Road, Tsuen Wan, N. T., Hong Kong.
Declaration of conformity issued in December 2007 by Homelite Far East Co., Ltd.

CE DECLARATION OF CONFORMITY
Guaranteed sound power [dB(A)]: 113
Technical documentation is kept at Homelite Far East Co., Ltd. 24/F, 388 Castle Peak Road, Tsuen Wan, N. T, Hong Kong.
Declaration of conformity issued in November 2007 by Homelite Far East Co., Ltd.
RYOBI TECHNOLOGIES (UK) LIMITED.
Medina House,
Fieldhouse Lane, Marlow,
Buckinghamshire,
SL7 1TB,
UNITED KINGDOM
Tel: +44 (0) 1628 894400
Fax: +44 (0) 1628 894401
Technical Helpline: +44 (0) 800 389 0305
RYOBI TECHNOLOGIES SAS
388 Castle Peak Road,
Tsuen Wan, Hong Kong.
Tel: +852 2402 6888
Machine: 26cc Hedge Trimmer
Name of company: Homelite Far East Co., Ltd.
Address:
24/F, CDW Building,
388 Castle Peak Road,
Tsuen Wan, Hong Kong.
RYOBI TECHNOLOGIES GMBH
litterpark 4
D-40724 Hilden
DEUTSCHLAND
Tel: +49 (0) 2103 2958-0
Fax: +49 (0) 2103 2958-29
RYOBI TECHNOLOGIES GMBH
Building B, Rosehill Industrial Estate,
3 Shirley Street,
Rosehill NSW 2142
AUSTRALIA
Tel: (02) 8892 1800 or 1300 361 505
Fax: 1800 807 993
TECHTRONIC INDUSTRIES (NZ) LIMITED.
27Clemow Drive, Mt Wellington
PO Box 12-806, Penrose, Auckland
NEW ZEALAND
Tel: +64 (0) 9573 0230 Free Call: +64 0800 279 624
Fax: +64 (0) 9573 0231
A&M MIDDLE EAST FZCO
P.O. Box 61254
Jebel Ali, Dubai,
UNITED ARAB EMIRATES
Tel.: +971 48861399
Fax: +971 48861400
Type: RLT2660DA
Name/Title: Andrew Eyre
Vice President, Engineering
Signature: