
COMET 130 S - Cement mixer ATIKA - Free user manual and instructions
Find the device manual for free COMET 130 S ATIKA in PDF.

| Product type | Concrete mixer |
| Brand | ATIKA |
| Model | COMET 130 S |
| Drum capacity | 130 litres |
| Power supply | 230 V or 400 V, 10 A protection, class II (protective insulation) |
| Maximum extension cable length | 25 m with 1.5 mm² cross-section; >25 m with 2.5 mm² cross-section |
| Motor type | Motor with thermal overload protection sensor |
| Rotation direction | Counterclockwise (viewed from drum opening) |
| Intended use | Mixing concrete and mortar, non-professional and professional use |
| Safety devices | Automatic shutdown in case of overload; fully closed enclosure required; unplug before maintenance |
| Protection type | Protection class II |
| Start/stop | Main switch under motor housing |
| Tilting system | Positioning lever or handwheel (depending on version); pedal brake on some models |
| Recommended maintenance | Clean inside and outside after use; spray ecological oil on tilting device for extended storage |
| Drum cleaning | Run with gravel and water; do not hit with hard objects |
| Lubrication | Sealed ball bearings; never grease the gear ring |
| Spare parts | Use only original parts |
| Warranty | 2 years from delivery date |
| Approximate weight | About 90 kg |
| Approximate dimensions (L x W x H) | 110 x 70 x 120 cm |
Frequently Asked Questions - COMET 130 S ATIKA
User questions about COMET 130 S ATIKA
0 question about this device. Answer the ones you know or ask your own.
Ask a new question about this device
Download the instructions for your Cement mixer in PDF format for free! Find your manual COMET 130 S - ATIKA and take your electronic device back in hand. On this page are published all the documents necessary for the use of your device. COMET 130 S by ATIKA.
USER MANUAL COMET 130 S ATIKA
Operating instructions for concrete mixers (Page 1-3 and 8-11)
Warning! Read operating instructions before starting!
By purchasing this mixer, you have acquired a high-quality, perfected and efficient machine.
Please pay careful attention to the following items in order to be sure that the machine will serve you well for many, many years. Keep these instructions in a safe place for later reference.

Be sure that you have carefully read and fully understood these instructions before you start the machine, and adhere to all of them.
Proper use
- This concrete mixer can be used for mixing concrete and mortar both professionally and non-professionally.
-
Proper use includes adherence to the operating, maintenance and repair instructions of the manufacturer and observance of the safety instructions they contain.
-
Any other utilisation counts as improper use, especially mixing combustible or explosive materials ( fire and explosion hazard) and use with foodstuffs. The manufacturer is not liable for damages resulting from improper use, the user alone shall bear the risk
Acceptable risks
Even when properly used, there are still acceptable risks to be borne, despite the observance of all pertinent safety instructions, owing to the design, which is determined by the intended purpose:
- Danger resulting from electric current, if improper connecting wires are used.
- Touching live parts when electric components are open.
- Furthermore, there may be acceptable risks which are not readily obvious, despite all precautions. Providing protection against the danger of getting caught in the rotating stirring grating would not be practicable (please refer to prEN 12151).
- Acceptable risks can be minimised if the operating instructions, the "safety instructions" and "proper use" are observed.
Contents
| Safety instructions | page 8 |
| Start-up | page 9 |
| - setting up the machine | page 9 |
| - switching on and off | page 9 |
| Mixing | page 10 |
| Transport | page 10 |
| Storage | page 10 |
| Cleaning | page 10 |
| Maintenance | page 11 |
| Repair | page 11 |
| Guarantee | page 11 |
| Equipment failures | page 11 |

Safety instructions

Take note of the following instructions to protect yourself and others from hazards and injuries.
-
Observe local accident prevention and safety regulations in the work area.
-
Do not touch, inhale (dust development) or eat the cement or additives. Wear personal, protective clothing (gloves, goggles and a dust mask) when filling and emptying the mixing drum.
-
Set up and run the concrete mixer on a solid, level base only (where it will not tip over).
-
Make sure that there is no danger of tripping near the mixer.
-
Be sure that there is enough light.
-
The operator is responsible for third parties in the work area.
-
Keep children away from mixer.
-
Persons younger than 16 years of age are not allowed to operate the mixer.
-
Only use the mixer for the functions listed in "Proper use".
-
Do not alter the machine or any of its parts.
-
Replace defective or damaged parts on the machine immediately.
-
Only start up the mixer if the protective devices are complete and undamaged.
-
Do not reach into mixer when it is running (rotating mixing apparatus).
-
Fill or empty the mixing drum only when the motor is running.
-
Observe the mixer's direction of rotation.
Concrete mixers which the manufacturer has not intended for towed vehicle operation may only be run by means of a hand wire pull.
- Be absolutely sure to pull the plug before:

- moving or transport
- cleaning, maintenance or repair work
- leaving unattended (even during short interruptions)

Shockproof concrete mixers (Protection Class II)
- Thanks to its protective insulation, the concrete mixer can be hooked up directly to a house-hold socket (230 V or 400 V; 10A fuse) with-out any additional protective measures (for example, building site main cabinet) insofar as it is run as a single piece of equipment. If several pieces of equipment are used, a special feed point is required.
This does not work in Switzerland, where the following applies:
Only hook up locomotive units used outdoors by means of a fault-current circuit breaker.
- Only start the machine when the panelling is complete and fully closed.
- Protection Class II applies only if original insulating material is used for repairs and insulation clearances are not altered.

Electrical safety
Danger to life and limb if not observed!
- Connecting attachments must be designed in conformance with IEC 60245-4:1980 (DIN 57 282) and marked H 07 RN-F, or comparable models. Cross section of wires at least 3 × 1.5 ~mm^2 up to a maximum length of 25 ~m . Wire cross-section at least 2.5 ~mm^2 for lengths of more than 25 ~m .
- Use only connecting attachments with a rubber plug device for severe requirements that is protected against spraying water.
- Check connecting attachments for defects or ageing before using them.
- Never use defective connecting attachments.
- When laying the connecting attachments, be sure that they do get crushed or bent, and that the plug-and-socket connection does not get wet.
- Do not use any provisional electrical connections.
- Never bridge over protective devices or put them out of operation.
- Observe the following instruction in Switzerland: Only hook up locomotive units used outdoors by means of a fault-current circuit breaker.
A licensed professional electrician must make all electrical connections and repairs, and observe local regulations in doing so, especially those regarding protective measures.
The manufacturer or a company designated by the manufacturer must attend to the repair of all electrical parts on the machine.
Start-up

Observe all safety instructions.
Setting up the machine:
- Set the machine on a solid, level base.
- Keep the machine from sinking into the ground or floor. Adhere to accident prevention regulations (danger of tipping).
- When setting up the machine, make sure that the mixing drum can be emptied without obstruction.
Switching on and off
Be sure that
- all protective devices are on the mixer and properly mounted.
- all safety instructions are adhered to.
- The on/off switch is located beneath the motor housing. Switch the motor on and off only at the switch.
- In the event of a power failure, the machine will switch off automatically. Press the switch again to restart the machine.
Motor protection
The motor is equipped with a thermostat. The thermostat switches the motor off automatically in the event of overload (overheating). The machine can be restarted after a cooling-off period.
Concrete mixer with threephase motor
After switching on the machine, you must check the mixing drum's direction of rotation. When you look into the mixing drum, it must turn to the left (counter-clockwise).
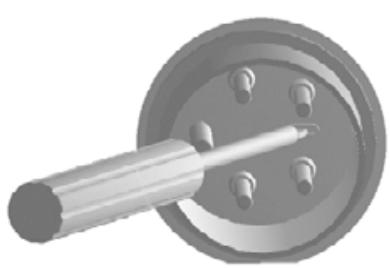
(Observe directional arrow on the mixing drum.). If the mixing drum turns in the opposite direction from the arrow, the rotating direction can be changed by inderting a screwdriver for this purpose and turn left or
right while exerting a light pressure to adjust the correct rotating direction.
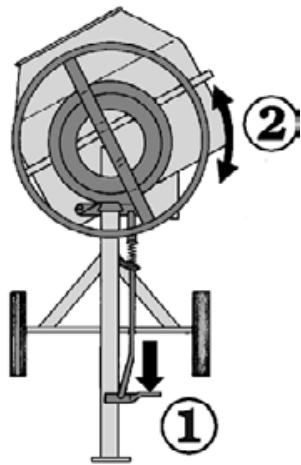
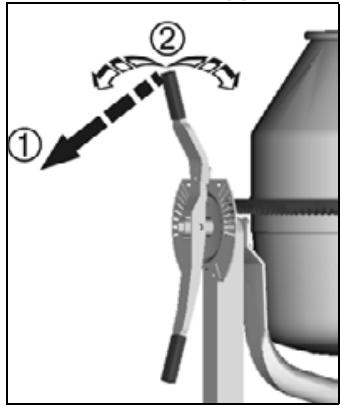
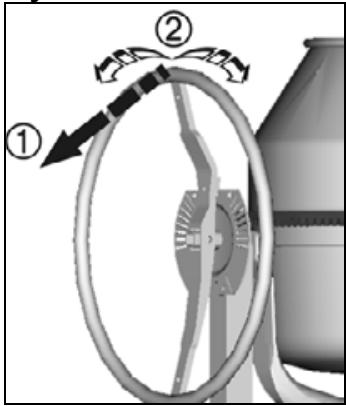
Mixing
Mixer setting:
To make concrete or mortar, the mixing drum must be locked in a specific position. Only the proper mixer setting ensures optimal mixing results and smooth operation.
Concrete mixer with adjusting disc

Rotating level
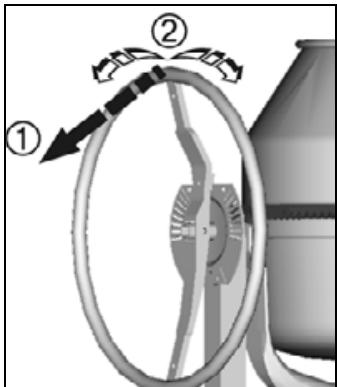
Handwheel

Hold rotating lever or handwheel tightly while rotating.
(1)
loosen the rotating mechanism.
(2) rotate the mixing drum up to the appropriate recess for the material you are mixing.
allow rotating mechanism to lock into place.

Concrete mixer with brake

Hold handwheel tightly while rotating.
(1) Step on the brake
(2) Rotate the mixing drum up to the marking appropriate for the material you are mixing
release brake

Additional safety instructions.
- Only fill or empty the mixing drum when the motor is running.
- Check the stability of the mixer.
Preparing material for mixing:
- Pour in water and few shovels full of aggregate (sand, gravel, ...).
- Add a few shovels full of binding agent (cement, lye, ...).
- Repeat steps 1 and 2 until you reach the proportions required for mixing.
- Allow material to mix thoroughly.
Have a professional advise you regarding the composition and quality of the material being mixed.
Emptying the mixing drum:

Hold the rotating lever or handwheel tightly
- Unlock rotating mechanism or step on brake
- Slowly tilt mixing drum
Transport


Pull plug each time before transport.
- Point the opening of the mixing drum downwards during transport or storage.
Storage
- In order to increase the service life of the concrete mixer and operate it without glitches, the rotating mechanism should be treated with an environmentally compatible spray oil before the mixer is put into storage for unusually long periods.
Cleaning
Additional safety instructions


Pull plug each time before cleaning.
- Switch off machine and pull plug if you have to touch the machine (with hand, brush, scraper, rag, etc.) while cleaning it.
- Protective devices removed for cleaning must be properly remounted before starting the machine.
- Do not spray water directly on the motor or the switch, nor on the ventilation apertures in the motor housing.
Notes on cleaning:
- Before taking a break and after finishing work, clean the concrete mixer inside and out.
- Do not pound on the mixing drum with hard objects (hammer, shovel, etc.). A dented mixing drum impairs mixing operations and is difficult to clean, besides.
- To clean the inside of the drum, put in some water and a few shovels full of gravel and set the drum to revolving.
- Remove any concrete or mortar left sticking to the teeth of the axle-drive bevel gear or the crown gear segments immediately.
Maintenance
The concrete mixer requires practically no maintenance. The mixing drum and drive shaft are bedded on ball bearings with permanent lubrication.

Never grease the ring gear!
To preserve the value of the mixer and increase its service life, handle it as described in "Transport and storage". Furthermore, the concrete mixer should be checked regularly for signs of wear and tear or functional deficiencies. This applies especially to moving parts, screw connections, protective devices and electrical parts.
Repair

Pull plug each time before doing repair work.
- Switch off machine and pull plug if repair work should be necessary. Do not start machine during repair work.
- Protective devices removed for repairs must be properly remounted before starting the machine.
- Only the manufacturer or companies authorised by the manufacturer may perform repair work on electrical parts or on parts which affect the space needed to mount electrical equipment.
- Use only unaltered original spare parts. Otherwise, the manufacturer will assume no liability.
Guarantee
- We undertake a 2 year guarantee, starting from ex-stock delivery of the equipment by the dealer. This warranty covers faults which are caused by defective materials or production.
- The dated invoice counts as evidence for guarantee claims.
- Warranty claims, even during the warranty period, will not be accepted for damages due to incorrect handling or inadequate packaging during return of the devices or to a non-observation of the operating instructions.
- We shall attend to any necessary warranty work. Our express approval is required if another company is intended to eliminate the damage.
- The guarantee does not cover normal wear to bevel gear, ring gear segments, driving belt, ball-bearing, mixing drum, impellers, as well as the respectively associated fasteners
- Defective parts must be sent to our plant carriage paid or postage paid. We reserve the right to decide whether to provide spare parts free of charge.
- The guarantee only applies if original spare parts are used.
- We reserve the right to make alterations on the grounds of technical advances.
Equipment failures
| Malfunction | Possible cause | Remedy |
| Motor does not start up | → no mains voltage → defective cable → thermostat is triggered → reason: - motor overload - motor not getting enough air owing to clogged ventilation apertures | → check fuse protection → have checked or replaced (electrician) → allow motor to cool and then find and eliminate whatever caused the thermostat to respond |
| Motor hums but does not start up | → blocked crown gear → defective condenser | → switch off machine, pull plug and clean or replace the crown gear segments → send machine to manufacturer or a company designated by the manufacturer for repairs |
| Machine starts up, but becomes blocked at low load and may switch off automatically | → extension cord is too long or its cross-section is too small → socket is too far from mains connection and the connecting wire's cross section is too small | → extension cord must be at least 1.5 mm² for a maximum length of 25 m; the cross-section of longer cables must be at least 2.5 mm² |
Aún en el caso de un uso de acuerdo con los fines previstos,SEO,SEO,SEO,SEO,SEO,SEO,SEO,SEO,SEO,SEO,SEO,SEO,SEO,SEO,SEO,SEO,SEO,SEO,SEO,SEO,SEO,SEO,SEO,SEO,SEO,SEO,SEO,SEO,SEO,SEO,SEO,SEO,SEO,SEO,SEO,SEO,SEO,SEO,SEO,SEO,SEO,SEO,SEO,SEO,SEO,SEO,SEO,SEO,SEO,SEO, SEO, SEO, SEO, SEO, SEO, SEO, SEO, SEO, SEO, SEO, SEO, SEO, SEO, SEO, SEO, SEO, SEO, SEO, SEO, SEO, SEO, SEO, SEO, SEO, SEO, SEO, SEO, SEO, SEO, SEO, SEO, SEO, SEO, SEO, SEO, SEO, SEO, SEO, SEO, SEO, SEO, SEO, SEO, SEO, SEO, SEO, SEO, SEO, SEO, SEO,
HencckJIIOUeHHbIe pNcKn
SemoHomeaJaKa c ycmaHo8OuHbIM duckom
YctaHOBOUHbI INCK
PyjleBoe
! Dépréxcatb KpeNko yctaHOBOHbI JnCK nJn pyJeBoe KOJIeCo (pyIb) npn HAKJIOnHeHH 6apabaha.
Ipeed KaKdoi YnCTKO Heo6xOIMOBbIePhyTb CeTeByIO BnIKy.
-
BbIKJIOUHTb MaUNHy n BbldePhyTb BNJKy, ecn pa60TbI NO OChTKe HEnOcpeIcTBeHHOrO PrNKoCHOBENH K UcETKo, cKpe6Kom, TpAknKoN T.d.). He MaUNHy BO BpEMa BblONHeHn TaKNX
-
ChЯтBLE ДлЯ чИСТКИ 3aциTHBLE yCTPОДСТВИnpincnOCOБЛЕнгу Heo6xODIMO NO 3aBepшENIPABOT TsaTeJIbHO yCTaHOBITb Ha MecTo.
He HaprabTb BOdanyo CtpyIO npraMo Ha MOTOp N BbIKNoaTeJIb, a TaKKe Ha OTBepCTnДпЯ npTuHOH IN BbITJXHOH BeHTnJIaCmN MOTOPHOOTcKa.
Yka3aHnnoOuNCTKe
- Ipeed dIInTeJbHoi pa6oey nay30n no OKOHuaHn pa6oTbI Heo6xOdmo OcNCTNTb 6eTOHomeaJIky BHyTpni n ChapyKn.
He obctyknBaTb CMEcHTeJhBbI 6apabAH TBepdbIMn npedMetamn (MOJOTKOM, JonoAtoN T.D.). POrHytBu CMEcHTeJbHbI 6apabAH OTPncaTeJbHO BnIaET Ha npocecc CMeSeHnra TjXkeNo OUnuzaeTc. - Дя ouinctkn BHytpenHne NOBepxHOCTn 6apabha npOKpyTITb HeCKOJIbKO JIOnaT rpaBna C BOdoJ.
Cpa3y ydaJbOCTaTKI 6eTOHHbIX n paCTBOpHbIX Cmecen c 3y6beB npIBoDHorO KOHNueCKOrO KOJIeca N cerMeHTOB 3y6UaTOrO oOba.
TexHnueckoe 6cJyKnBaHne
- Proper use
- Acceptable risks
- Contents
- Safety instructions
- Shockproof concrete mixers (Protection Class II)
- Electrical safety
- Danger to life and limb if not observed!
- Start-up
- Observe all safety instructions.
- Setting up the machine:
- Switching on and off
- Be sure that
- Motor protection
- Concrete mixer with threephase motor
- Mixing
- Mixer setting:
- Concrete mixer with adjusting disc
- Concrete mixer with brake
- Hold handwheel tightly while rotating.
- Additional safety instructions.
- Preparing material for mixing:
- Emptying the mixing drum:
- Hold the rotating lever or handwheel tightly
- Transport
- Pull plug each time before transport.
- Storage
- Cleaning
- Additional safety instructions
- Pull plug each time before cleaning.
- Notes on cleaning:
- Maintenance
- Repair
- Pull plug each time before doing repair work.
- Guarantee
- HencckJIIOUeHHbIe pNcKn
- SemoHomeaJaKa c ycmaHo8OuHbIM duckom
- Ipeed KaKdoi YnCTKO Heo6xOIMOBbIePhyTb CeTeByIO BnIKy.
- Yka3aHnnoOuNCTKe
- TexHnueckoe 6cJyKnBaHne
Brand : ATIKA
Model : COMET 130 S
Category : Cement mixer