
FLEX DESIGN TABLET - Graphic tablet TRUST - Free user manual and instructions
Find the device manual for free FLEX DESIGN TABLET TRUST in PDF.
| Product type | Graphics tablet |
| Brand | TRUST |
| Model | FLEX DESIGN TABLET |
| Interface | USB |
| Stylus | With 2 programmable buttons and pressure detection (2048 levels) |
| Workspace | Active surface with programmable area (dimensions not specified) |
| Programmable buttons | Hot cells on the tablet (number not specified) |
| Package contents | Tablet, stylus, USB cable, tip extraction tool, 2 replacement nibs, CD-ROM (driver and ArtWeaver) |
| Power supply | Tablet: via USB; Stylus: battery (type not specified) |
| Compatible operating systems | Windows 8, 7, Vista, XP SP3 or later |
| Included software | ArtWeaver |
| Main functions | Drawing, handwriting, clicks, double-click, drag and drop, Pen Flicks |
| Maintenance and cleaning | Clean with a dry cloth; do not wet the tablet or stylus |
| Stylus storage | Do not place on the tip; use the provided holder |
| Replacement nib | 2 nibs provided; extraction tool included |
| Configuration utility | Icon in notification area to adjust sensitivity, buttons and mapping |
Frequently Asked Questions - FLEX DESIGN TABLET TRUST
User questions about FLEX DESIGN TABLET TRUST
0 question about this device. Answer the ones you know or ask your own.
Ask a new question about this device
Download the instructions for your Graphic tablet in PDF format for free! Find your manual FLEX DESIGN TABLET - TRUST and take your electronic device back in hand. On this page are published all the documents necessary for the use of your device. FLEX DESIGN TABLET by TRUST.
USER MANUAL FLEX DESIGN TABLET TRUST
Frequently asked questions
www.trust.com/16937/faq

Quick Installation Guide
Flex Design Tablet
Package contents
Install tablet

Draw
Write


Navigate
Advanced configuration


Index
| Language | Page |
| English | 3 |
| Deutsch | 8 |
| Français | 14 |
| Italieno | 20 |
| Español | 26 |
| Português | 32 |
| Nederlands | 38 |
| Dansk | 44 |
| Suomi | 49 |
| Norsk | 54 |
| Svenska | 59 |
| Polski | 64 |
| Česky | 69 |
| Slovenčina | 74 |
| Magyar | 79 |
| Română | 84 |
| Бulgariatsk | 89 |
| Pyccskiy | 94 |
| Еλληνικá | 99 |
| Türkce | 105 |
| Hrvatski | 110 |
| Slovenski | 115 |
| српскii | 120 |
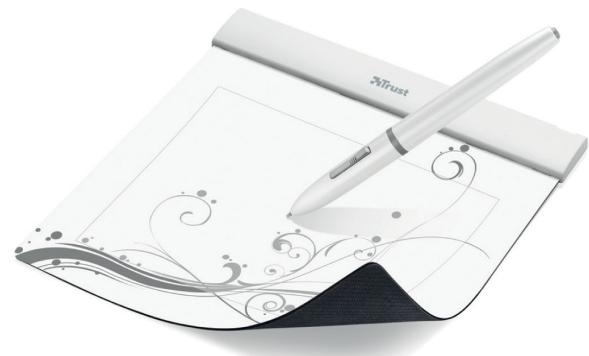
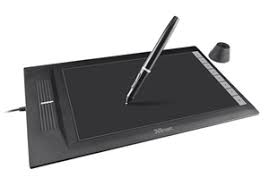
Package contents (Package contents)
| 1 | Tablet: | USB Cable |
| Working area | ||
| Hot cells (programmable) | ||
| 2 | Pen: | Lower pen button |
| Upper pen button | ||
| Battery holder | ||
| 3 | Pen-tip removal tool | |
| 2x Spare pen-tips |
Screw the pen open and place the battery in the pen
Cleaning: Clean the tablet with a dry cloth. Do not use or spill water on the tablet, or its pen.
Storage: Store the pen so that it does not rest on its tip, preferably in its holder. Do not store the pen on the tablet.
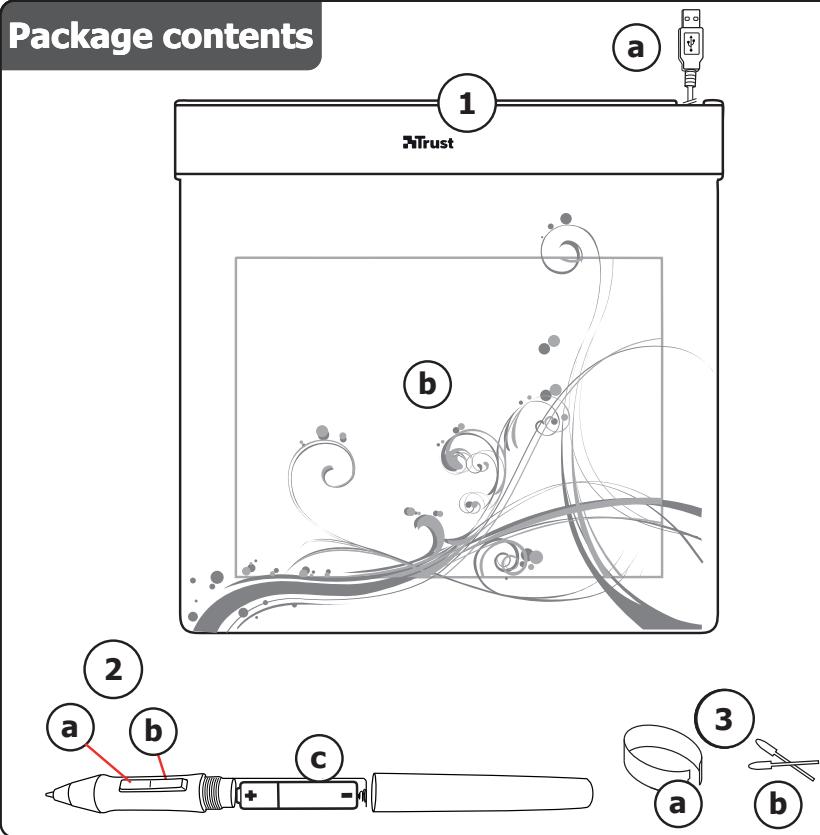
Install tablet (Install tablet)
It might be necessary to restart your computer at the end of the driver's installation. It is therefore preferable that you save and close all open documents and applications before starting the installation.
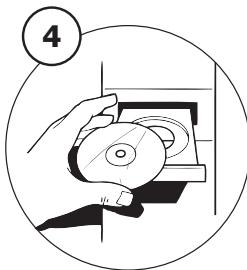
| 4 | Insert the Trust CD-ROM into your CD drive. |
| 5 | Windows 8: click the "Tab to choose" message window in the right top corner of the screen Click "Run Setup.exe - Published by Trust International BV" Click "Install driver" |
| Trust Tablet driver installation: To continue, Click "OK" | |
| Trust Tablet driver was successfully installed: Click "OK" | |
| You must restart your computer: Click "OK" to restart your computer. (If you have unsaved documents and files, select "Cancel" to restart your computer later) | |
| 6 | Once your computer has restarted, the tablet can be connected to a USB port. After the driver has been successfully installed (this may take some time), and the message "USB device ready to use" appears, the tablet can be used. |
Draw (Draw)
| Open a drawing program (For example, Artweaver is available on the Trust CD-ROM: select "Install ArtWeaver" from the menu to install it.) | |
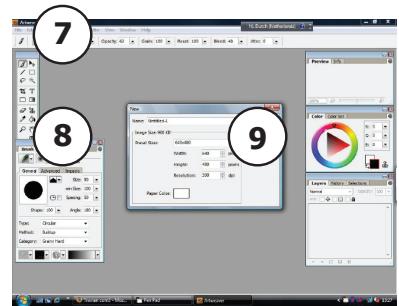
| 7 | Create a new document (File > New) |
| 8 | Set the attributes of your new document, press OK |
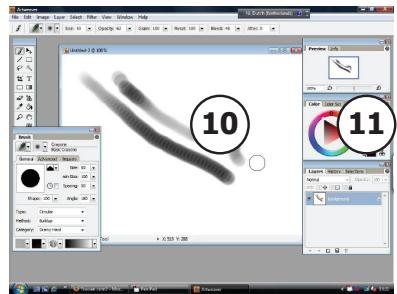
| 9 | Select a tool that supports Pen Pressure Sensitivity (Ex: in Artweaver: default brush) |
- With the pen's pressure levels, you can use your brush the way you would use a real pencil and draw the thickness and opacity you desire.
The pen can detect 2048 levels of pressure, and use the variation in levels to automatically change the size, the color, or various settings of the tool you are currently using.
This allows for flexibility and gives a very intuitive feeling to your graphic work.
Move the pen in the tablet's working area: the cursor will follow the movements. Hovering the pen tip at about 5mm from the surface will allow you to move the cursor on your screen. When you touch the tablet's surface, your brush will start drawing on the new document.
11 The color panel allows you to select different colors.
By default in most drawing programs, the color your brush is applying is black. Depending on the pressure you exert with the pen on the tablet's surface, your brush will paint in nuances going from white (no pressure) to black (full pressure).
Write (Write)
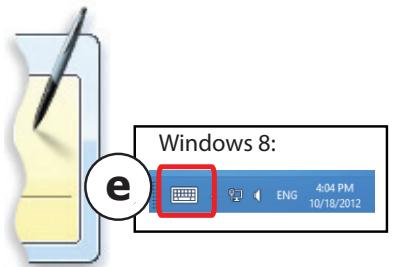
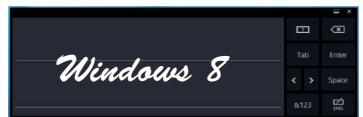
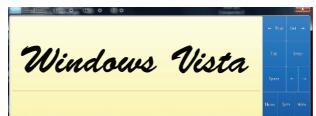
Windows 8: click the keyboard icon in the system tray.
Open the Input Panel (tap the docked input panel () ), on the side of the screen, or tap the text input floating bar () .
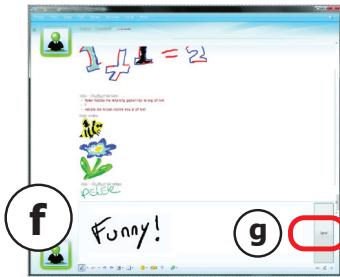
12 Your handwriting will be converted into text (f). You can correct, erase or modify the proposed conversion.
Then click or tap Insert to have the text you handwrote entered into the active document / text input field.
- Handwriting recognition is a feature of Windows Vista and Windows 7/8 that converts what you write into text you can then format like any other text. The Handwriting Input Panel appears automatically when you start using the tablet. If it does not show, or only appears as a virtual keyboard, please consult trust.com/18469/FAQ.
In Windows XP or Mac OS, a third-party software is required, to convert your handwriting into text.
After installing and connecting your tablet, the handwriting feature of Live Messenger is activated.
It can be accessed, while in Live conversation, by clicking the corresponding button: (g)
You can then draw and send messages in your own handwriting, and use the six formatting buttons that appear in the conversation window to personalize your messages.
To send handwritten messages you must have Windows 7/8, Windows Vista, or Windows XP with Service Pack 3 or later installed. The latest version of Live Messenger is also required.
Navigate (Navigate)
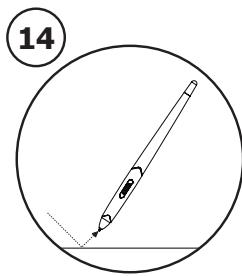
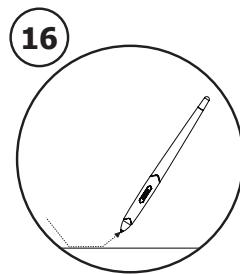
| 14 | Clicking: You can use the pen to click, by simply tapping the tablet's surface. |
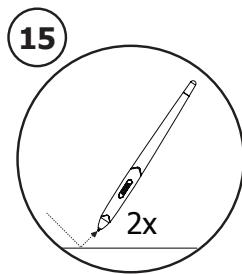
| 15 | Double clicking: You can use the pen to double-click, by simply tapping the tablet's surface twice. |
| Double click: By default, the upper button (b) of the pen is configured to act as a double-click | |
| 16 | Dragging: To drag and drop an object, you need to select it (touch the tablet's surface), move it (move the pen across the tablet's surface), and release it (lift the pen from the surface). |
Pen Flicks:
Pen Flicks are a feature of Windows Vista and Windows 7/8 that associates the movement of your pen with actions. For example, performing a pen flick downward produces the same result as pressing the PAGE UP key on your keyboard.
To activate and start using Pen Flicks, double click the Pen Flicks icon ( ) in your System Tray (next to your computer's clock) and follow the animated tutorial to learn how to use Pen Flicks.
If the Pen Flicks icon is not visible, click the "Show hidden icons" button first.
(Windows 7/8: / Windows Vista:
Advanced configuration (Advanced configuration)
The illustrations for the following instructions are located at the end of this manual
Click on the Trust icon in your Windows system tray to open the tablet configuration utility.
( next to your computer's clock)
17 If the Trust-Icon is not visible, click the "Show hidden icons" button first.
(Windows 7/8: / Windows Vista:
With the driver installed, the Trust tray utility will load automatically when you connect the tablet to your computer.
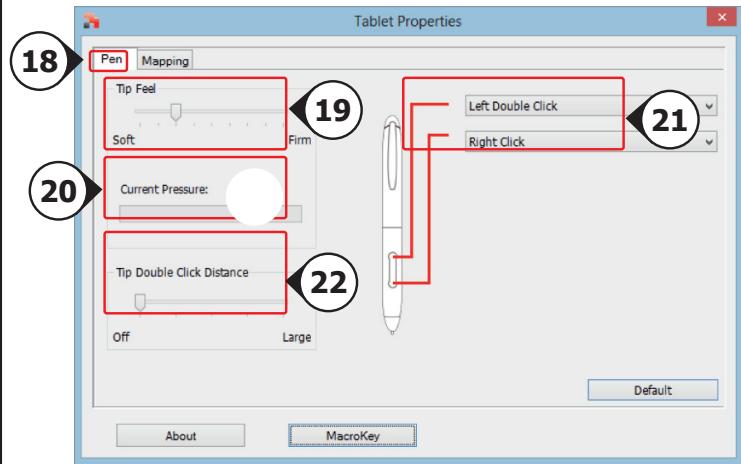
Tablet properties
This utility consists in 2 tabs (Pen, Mapping)
In each tab, the "Default" button allows you to restore the default settings, and the "About" button displays information about the tablet and its driver.
The "Option" button allows to save (Export) and load (Import) settings, and to assure compatibility with applications that do not support 2048 pen pressure levels (the compatibility mode is enabled by default).
18 Pen
| 19 Tip feel | (9 steps setting: from Soft to Firm) How much pressure is needed for the pen to detect a change. Soft= very few pressure required Firm= lots of pressure required |
| 20 Current pressure gauge | Shows how hard you are currently pressing the pen against the tablet's surface. |
| 21 Pen Buttons settings | Assign one of the following functions to one of the two pen buttons: • None (disable this button) • Left click • Left double click • Right click • Right double click • Scroll (pressing the button starts the "easy scroll" mode. When the cursor changes into a scrolling cursor, move the pen up/down to scroll up/down through the document). |
| 22 Tip Double Click Distance | (5 steps setting: from Off to Large) Sets the accuracy needed to double-click ("how much movement you are allowed between the two clicks of a double click") Off: the 2 clicks of a double click need to be almost at the same spot. Large: you need to be less accurate for a double click to be detected. |
| 23 Mapping | |
| 24 Mode: Pen (Absolute) |
In this mode, when you touch the tablet's surface, the cursor will jump to the corresponding on-screen zone.
For example:
- Tap the upper right corner: the cursor goes to the screen's upper right corner
- Lift the pen
- Tap the lower left corner: the cursor goes to the screen's lower left corner

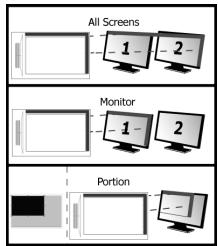
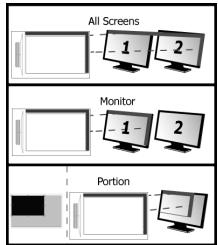
25 Monitor area
- When "All Screens" is selected, the working area of the tablet covers your system's entire display.
- The "Monitor" setting allows you to select which display the tablet's working area covers (this option is only accessible when multiple displays are connected to the system).
- With the "Portion" setting, you may decide what part of your monitor(s) the working area of the tablet is covering.
When enabling "Force proportion", in Portion mode, the part of your screen covered by the tablet's working area will always have a 5:3 ratio, regardless of the ratio of the zone you selected.
26 Mode: Mouse (Relative)
In this mode, the cursor remains where it is when you lift the pen.
For example:
- Tap the upper right corner: the cursor goes to the screen's upper right corner
- Lift the pen
- Tap the lower left corner: the cursor is still in the upper right corner
The speed and acceleration of the cursor can be adjusted, just like for a standard mouse.
Lieferumfang (Package contents)
Navigation (Navigate)
Configuration avancée (Advanced configuration)
24 Mode ("Modalitya"): Pen (Absolute) ("Penna (modalitya assolata)"
25 Monitor area ("Area del monitor"):
26 Mode ("Modalitya"); Mouse (Relative) ("Mouse (modalitya relativa)"
Instalar a mesa graphical (Install tablet)
24 Mode: Pen (Absolute)
(Modus: pen, absolut)
Pakkens indhold (Package contents)
Pakkens innhold (Package contents)
USB-Kabel
1 Tablet:
Arbeidsomrade
(6) Vermeceller (programmberbare)
a Nedre penneknapp
b Ovre penneknapp
Batterholder
24 Mode: Pen (Absolute)
I donne modus hopper markeren til korrespondenderende modus på skjermen nár du bererer overflaten pa tegnebrettet.
Eksempe:
25 Monitor area (Oblast monitoru):

- Je-liVybrano, "All Screens" (Vsechny obrazovky), pracovni plocha tabletuPokrye cely dispeiIe systemu.
- Nastaveni, Monitor" (Monitor) umožnjue zvolit, ktery displeje má pracovni plocha tabletu koptyt (tatoMZnost je prifstupnaupe poudek je k systemu připojeno vice monitoru).
- Pomoci nasteni "Portion" (Căst abrozovky) muzete urcit, jakou ĸast pracovni plochy vaseho monitoru (ci monitoru) ma tablet prokryvat.
26 Mode: Mouse (Rezim: Mys) (relativny)
V tomo rezime kurzor zostava tam, kde bol pri zdvihnuti para. Napriklad:
1. Poklepte v pravom hornom rohu: kurzor prejde do praveho horného rohu obrazovky.
2. Zdvihnite pero.
3. Poklete v favom dolnom rohu: kurzor nadalej zostava v pravom hornom rohu.
Rychlost' a zhrchlenie kurzora mozno nastavit rovnako ak v tripadeš standardnej myš.
A csomag tartalma (Package contents)
25 Monitor area (Monitored)
25 Monitor area: (30ha ot MOHITOPA)
ПииЗббНоА.【СьндКИ ecPkAni pa6OHTa 30Ha Na Ta6Neta nokPbna ZeHnIcNJIHnA nCtCTemTa.
Hactpoikata,Monitor" (Monitot) BN no3oBnIba da 36bipate koi cnneJe da nokpna paobHTaTa 30Ha na Tabeta (OnuIrae e dcTbna cAmO pRn CbP3BaHe MA HMOECTBO CNIOEN KbM CNCTeMA).
C Naonopnnte KAKBa TcO mOnHToPA(NTe) Bn o npoHTa 0ha Ha tabneTa. nA kTbnpHahe na "Force proportion" (PnhyuDInTeHa nponopnurB PekxM
"Portion" (Пор既可以), часту оEkрань В, порпота о pa60THATA 3OHa ha Tabeeta, виharе sizecke OTOHSeHHe 5:3 He3aBcIMO OT OTOHSeHMeTo Ha 36bpaHata O T BAC 3OHa.
26 Mode (Pekm):
Mouse (Relative)
(Mnka (OTHOCT)
B To3n pexm KycpObT He npomeHr NIOXeHneTO cN, KOraTo BdHHeTe
NicaJaKaTa.
Hanpimep:
- YukeyteBbpyrOropnIeDeceh bIbn: KypocbIte ce pemeCTN B rOpHnJe Deceh bIbn Ha EkoHa
2.Повдигнелпсалкata
3.учкete bckpydo nongnna nBbI: kypocpBt BCE oue e B rOpHn deCeh bblc CkopocTla u KycpcenHeNoTa H Kycpcpa Morat da 6bDat peryUnpaHn TOUHO KaKTo npri cTahdapTha MMuKa.
Copejkmoe ynakobkn (Package contents)
| 1 | Планшет: | ⑧Кабел USB |
| ⑨Равочая обл actb | ||
| ⑩Тороне ячени (пограмніруемы) | ||
| 2 | Перо: | ⑪Нжняй к Honika nepa |
| ⑫Верхяй К Honika nepa | ||
| ⑬Держател 6Барен | ||
| 3 | ⑭Инсту мент Дд Стгия Накосянka nepa | |
| ⑮Запасьх Накосянka nepa |
Pakpynte nepo n nomctne 6atapeo BHTps.
OuCTka. IpoTnpaTe nnauWet cyxoi TpAkoH. He nCnoB3yIte BoDy H ne npoJIbaiTe ee Ha nnauWet nn nepo.
XpaHHeH. XpAHMe He npO bO HnO He nnpAIOB HnAOHeNnK, npEIOHTeBHO - BepkATEe npa. He xpaHHe npHaIauHtete.
YctahOBka nlaHweta (Install tablet)
PONcIyCTAHOBKINpAaIEBOPMOKETNtPOE6oBbTaPepe3aRy3aKaOMbIOTepa.103OTMyXeJATEbHOpeENHADHaONyCTAHOBKCOxAPHnBn3AK3kPbTBeCtOKpBbTeDOKMeyHbNprHNOXEHJI.
PacunpeHHaH NaCTPOka (Advanced configuration)
NIIIOCTpaunn IaHNNbIX INHCTpyKm npedctabNeHb B KOHc He HAcToIe O pyKOBoDCTBa
Haxmte Ha 3NaOcK DoBepn B BaWem CnCTeMHom Tpee Windows, yTo6bI 3aNCTbYtNlnty
17 KOHNFMYpaaHn PAAHeTc(pAOMC qacamn). ECNI NKTOKOrPAMMA Trust He BmDHa, HxMkMtE KHObOpaKaTbCKpbItbe 3aHKnv
(Windows 7/8: Windows Vista:
Ecn npaBepyctahOBlen, nocne npoknouenra pnaHeta KOMbIepey ABOTMaueckn 3aarpynTcnporpaMMA hantpkrN Trust.
Tablet properties
Nthoiynon (Navigate)
Aiaoppwoi yia npoxwpnEvouc (Advanced configuration)
Oi EIOVc Vt cakolouce obnyec Bpikovta oTo TELoc autou Tou Evxieipoiu KAVTE KIK OTO EIKOVIOI Tc Trust OTn ypaunEpyaonwTw Windows via va avoileTe to BoNtiko
17 npoypa ma diaoppwaon tou diakou. ( dinla oTo poIou Tou unoloyoiTn oac) Edv dev eviai oto eikovlid Trust, kVTE npwTA kIK oTK coujini "Show hidden icons" (Ekpovian kupovkiv Ekiovlidov).
(Windows 7/8: / Windows Vista:
O'Ativ Ekyateotnmo To npovpaumoaohynonc,To BOnthma Trust nC nepioxic eDonoiooeuv foortwetai autoumata olicu uovdeae Tnv taunlambda otov unoloyiotn.
Tablet properties
AutoToBoiOnjuaTepiaaBaeV2KapTeLec:Pen(IIva)kaiMapping(Avntoioxan)).
EeKaTeKapTeA,toKoumi"Defaull"osDiveiTuvatoTnvaETAAVAOTAEVEcpuOmuicEevw To koumi"About"EupavciIaNpopoepieYcaTVNAUTMaTLeAoiToPoypaJmaObnyonCns.
To koumi"Option"(EtiyoEv)aceDiveiTuvatoTnvaATObnKeuOe(Export)kaivaOpotwae(Import)pUthetaic, Kaohs kaVa diaaqalAteTe n oubetaatnTa MEepaoyEs oTOIOeSdVtOToNPizouv 2048 EtnTeDaPiocv (n Kataotaao uoubaatotnacivalevepyE opioju).
18 Pen
24 Mode: Pen (ATrδλuTη)
Gelismis yapilandirma (Advanced configuration)
5 Kliknite na "Run Setup.exe - Published by Trust International BV"
Kliknite na "Install driver" (InstalirajPokretacki program).
InstalaciejPokretackogprograma za Trust Tablet:Zanastavak,klikneta na"U redu".
Navigiranje (Navigate)


- Package contents (Package contents)
- Install tablet (Install tablet)
- Draw (Draw)
- Write (Write)
- Navigate (Navigate)
- Pen Flicks:
- Advanced configuration (Advanced configuration)
- Tablet properties
- Lieferumfang (Package contents)
- Navigation (Navigate)
- Configuration avancée (Advanced configuration)
- Instalar a mesa graphical (Install tablet)
- Pakkens indhold (Package contents)
- A csomag tartalma (Package contents)
- Copejkmoe ynakobkn (Package contents)
- YctahOBka nlaHweta (Install tablet)
- PacunpeHHaH NaCTPOka (Advanced configuration)
- Nthoiynon (Navigate)
- Aiaoppwoi yia npoxwpnEvouc (Advanced configuration)
- Gelismis yapilandirma (Advanced configuration)
- Navigiranje (Navigate)
Brand : TRUST
Model : FLEX DESIGN TABLET
Category : Graphic tablet