
eBrush - Graphic tablet TRUST - Free user manual and instructions
Find the device manual for free eBrush TRUST in PDF.


| Product type | Graphics tablet |
| Brand | Trust |
| Model | eBrush |
| Dimensions (approx.) | 30 cm × 20 cm |
| Weight | Approximately 500 g |
| Interface | Wired USB |
| Power | Via USB port (or batteries for some models) |
| Main function | Digital drawing and writing |
| Included stylus | Yes, battery-free |
| Pressure levels | 2048 (estimated) |
| Active area | Approximately 20 cm × 13 cm |
| Compatible operating systems | Windows, macOS, Linux (depending on drivers) |
| Maintenance and cleaning | Wipe with a soft, dry cloth |
| Safety precautions | Do not expose to moisture or extreme temperatures |
| Spare parts and repairability | Replacement stylus nibs available |
| General information | Use with drawing software (e.g. Adobe Photoshop) |
Frequently Asked Questions - eBrush TRUST
User questions about eBrush TRUST
0 question about this device. Answer the ones you know or ask your own.
Ask a new question about this device
Download the instructions for your Graphic tablet in PDF format for free! Find your manual eBrush - TRUST and take your electronic device back in hand. On this page are published all the documents necessary for the use of your device. eBrush by TRUST.
USER MANUAL eBrush TRUST
natural_image
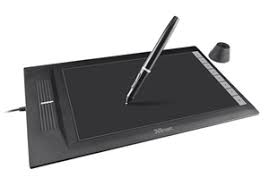
Black digital drawing tablet with a stylus, shown against white background (no text or symbols)

natural_image
Black digital tablet with a stylus and a small screen, no visible text or symbols on the device itself.User's Manual version 1.0 eBrush Widescreen Tablet 17939
flowchart
graph TD
    A["Install tablet"] --> B["Step 7: Screen capture"]
    B --> C["Step 8: Screen capture with color palette"]
    C --> D["Step 9: Screen capture with color palette"]
    D --> E["Draw"]
    E --> F["Step 10: Screen capture with color palette"]
    F --> G["Step 11: Screen capture with color palette"]
    G --> H["Step 12: Screen capture with color palette"]
    H --> I["Step 13: Screen capture with color palette"]
    I --> J["Step 14: Screen capture with color palette"]

Tablet - User's Manual
Trust
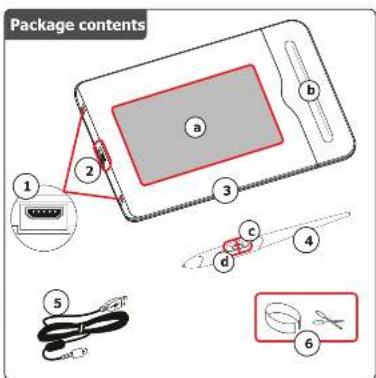
Package contents (Package contents)
① USB Connections
② USB Connection Selector
Working area
Tablet: Pen holder
● Upper pen button
④ Pen: Copper pen button ① Lower pen button
⑤ USB Cable
Pen-tip removal tool and 2x Spare pen-tips
▶ Cleaning: Clean the tablet with a dry cloth. Do not use or spill water on the tablet, or its pen.
Storage: Store the pen so that it does not rest on its tip, preferably in its holder. Do not store the pen on the tablet.
USB Connection Selector
Thanks to its USB Selector (2) and two USB connections (1), the Aeroo tablet is designed for right-handed users as well as left-handed users.
Prior to connecting it to your computer, once software installation is complete, use the USB Selector, on the tablet's side, to select the USB connection that suits you the best.
Only one of the two USB connections can be accessed at a time.
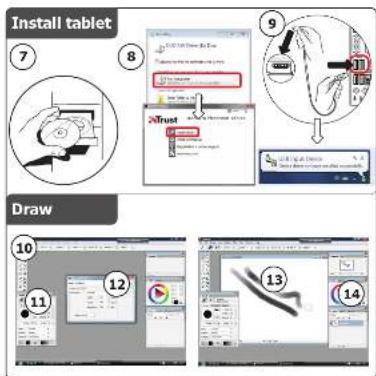
Install tablet (Install tablet)
It might be necessary to restart your computer at the end of the driver's installation. It is therefore preferable that you save and close all opened documents and applications before starting the installation.
⑦ Insert the Trust CD-ROM into your CD drive.
Click "Run Setup.exe – Published by Trust International BV"
Click "Install driver"
Trust Tablet driver installation: To continue, Click "OK"
Trust Tablet driver was successfully installed: Click "OK"
You must restart your computer: Click "Restart now" to restart your computer. (If you have unsaved documents and files, select "Restart later" to restart your computer later)
Once your computer has restarted, the tablet can be connected to a USB port. After the driver has been successfully installed (this may take some time), and the message "USB input device ready to use" appears, the tablet can be used.
Tablet - User's Manual
Trust
Draw (Draw)
Open a drawing program (For example, Artweaver is available on the Trust CD-ROM: select "Install ArtWeaver" from the menu to install it.)
10
65
若
(1)
With the pen's pressure levels, you can use your brush the way you would use a real pencil and draw the thickness and opacity you desire.
The pen can detect 2048 levels of pressure, and use the variation in levels to automatically change the size, the color, or various settings of the tool you are currently using.
This allows for flexibility and gives a very intuitive feeling to your graphic work.
Move the pen in the tablet's working area: the cursor will follow the movements. Hovering the pen tip at about 5 mm from the surface will allow you to move the cursor on your screen. When you touch the tablet's surface, your brush will start drawing on the new document.
14
By default in most drawing programs, the color your brush is applying is black. Depending on the pressure you exert with the pen on the tablet's surface, your brush will paint in nuances going from white (no pressure) to black (full pressure).
Write (Write)
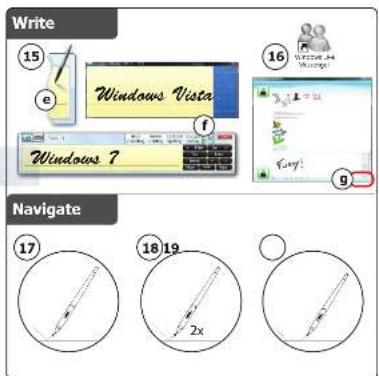
Open the Input Panel (tap the docked input panel (●), on the side of the screen, or tap the text input floating bar ≈).
1
Your handwriting will be converted into text (①). You can correct, erase or modify the proposed conversion. Then click or tap Insert to have the text you handwrote entered into the active document / text input field.
▶ Handwriting recognition is a feature of Windows Vista and Windows 7 that converts what you write into text you can then format like any other text. The Handwriting Input Panel appears automatically when you start using the tablet. If it does not show, or only appears as a virtual keyboard, please consult trust.com/17939/FAQ. After installing and connecting your tablet, the handwriting feature of Live Messenger is activated.
1
It can be accessed, while in Live conversation, by clicking the corresponding button: 📄 (💡) You can then draw and send messages in your own handwriting, and use the six formatting buttons that appear in the conversation window to personalize your messages.
To send handwritten messages you must have Windows 7, Windows Vista, or Windows XP with Service Pack 3 or later installed. The latest version of Live Messenger is also required.
Tablet - User's Manual
Trust
Navigate (Navigate)
Clicking:
You can use the pen to click, by simply tapping the tablet's surface.
Double clicking: You can use the pen to double-click, by simply tapping the tablet's surface twice.
▶ Double click: By default, the upper button (c) of the pen is configured to act as a double-click
Dragging:
To drag and drop an object, you need to select it (touch the tablet's surface), move it (move the pen across the tablet's surface), and release it (lift the pen from the surface).
Pen Flicks:
Pen Flicks are a feature of Windows Vista and Windows 7 that associates the movement of your pen with actions. For example, performing a pen flick downward produces the same result as pressing the PAGE UP key on your keyboard.
To activate and start using Pen Flicks, double click the Pen Flicks icon ( ) in your System Tray (next to your computer's clock) and follow the animated tutorial to learn how to use Pen Flicks.
If the Pen Flicks icon is not visible, click the "Show hidden icons" button first.
(Windows 7: / Windows Vista: )
Advanced configuration (Advanced configuration)
The illustrations for the following instructions are located at the end of this manual
To access the tablet's configuration utilities, click on the Trust icon in your System Tray (next to your computer's clock) If the Pen Flicks icon is not visible, click the "Show hidden icons" button first. (Windows 7: Windows Vista: )
With the driver installed, the Trust tray utility will load automatically when you connect the tablet to your computer.
Tablet - User's Manual
Trust
Tablet properties
This utility consists in 2 tabs (Pen, Mapping).
In each tab, the "Default" button allows you to restore the default settings, and the "About" button displays information about the tablet and its driver.
The "Option" button allows to save (Export) and load (Import) settings, and to assure compatibility with applications that do not support 2048 pen pressure levels (the compatibility mode is enabled by default).
Pen
| Tilt sensitivity | (3 steps setting: Normal/medium/high)How fast the tablet determines the pen's inclination/tilt. |
| Tilt detection allows you to control opacity, color intensity, and other brush settings by varying the angle formed by the pen with the tablet.In programs that explicitly support pen-tilt (for instance, Photoshop), you can assign "Pen tilt" to "Color Dynamics" (in "Brush Properties"), in order to vary the color intensity with the pen's inclination. | |
| Tip feel | (10 steps setting: from Soft to Firm)How much pressure is needed for the pen to detect a change.Soft= very few pressure requiredFirm= lots of pressure required |
| Click "Details" to obtain a graphic representation of this setting (😊) and a test sandbox (💡: "Try here"). | |
| Click Threshold | (10 steps setting: from Low to High)How "hard" the contact between the pen and the tablet needs to be for a click tobe detectedThe higher this setting, the harder you need to press the pen against the tablet toclick. |
| Current pressure gauge | Shows how hard you are currently pressing the pen against the tablet's surface. |
| Pen Buttons settings | Assign one of the following functions to one of the two pen buttons:- None (disable this button)- Left click- Left double click- Right click- Right double click- Scroll (pressing the button starts the "easy scroll" mode. When the cursorchanges into a scrolling cursor, move the pen up/down to scroll up/downthrough the document). |
| Tip Double Click Distance | (5 steps setting: from Off to Large)Sets the accuracy needed to double-click ("how much movement you areallowed between the two clicks of a double click")Off: the 2 clicks of a double click need to be almost at the same spot.Large: you need to be less accurate for a double click to be detected. |
Mapping
In this mode, when you touch the tablet's surface, the cursor will jump to the corresponding on-screen zone.
For example:
- Tap the upper right corner: the cursor goes to the screen's upper right corner
- Lift the pen
- Tap the lower left corner: the cursor goes to the screen's lower left corner

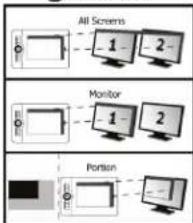
Monitor area:
flowchart
graph TD
    A["All Screens"] --> B["1"]
    A --> C["2"]
    D["Monitor"] --> E["1"]
    D --> F["2"]
    G["Portion"] --> H["1"]
    G --> I["2"]
Mode: Pen (Absolute)
- When "All Screens" is selected, the working area of the tablet covers your system's entire display.
- The "Monitor" setting allows you to select which display the tablet's working area covers (this option is only accessible when multiple displays are connected to the system).
- With the "Portion" setting, you may decide what part of your monitor(s) the working area of the tablet is covering.
When enabling "Force proportion", in Portion mode, the part of your screen covered by the tablet's working area will always have a 5:3 ratio, regardless of the ratio of the zone you selected.
Mode: Mouse (Relative)
In this mode, the cursor remains where it is when you lift the pen.
For example:
-
Tap the upper right corner: the cursor goes to the screen's upper right corner
-
Lift the pen
-
Tap the lower left corner: the cursor is still in the upper right corner
The speed and acceleration of the cursor can be adjusted, just like for a
standard mouse.
Tablet - User's Manual
Trust
Lieferumfang (Package contents)
① USB-Anschlüsse
② USB-Schalter
Crafik
Tablet - User's Manual
Trust
Navigieren (Navigate)
Klicken:
Tablet - User's Manual
Trust
„Mode" (Modus): „Pen (Absolute)" (Stift [absolut])
Tablet - User's Manual
Trust
Tablet - User's Manual
Trust
Cliquez sur "Run Setup.exe – Published by Trust International BV".
Cliquez sur "Install driver" (Installer le pilote).
Tablet - User's Manual
Trust
Dessiner (Draw)
Tablet - User's Manual
Trust
Navigation (Navigate)
Cliquer
Configuration avancée (Advanced configuration)
Tablet - User's Manual
Trust
Mode : Pen (Absolute) (Stylet - absolu)
Tablet - User's Manual
Trust
Tablet - User's Manual
Trust
messaggi.
Tablet - User's Manual
Trust
Tablet - User's Manual
Trust
Tablet - User's Manual
Trust
Dibujar (Draw)
Tablet - User's Manual
Trust
Tablet - User's Manual
Trust
Pen
Tablet - User's Manual
Trust
Mapping
Tablet - User's Manual
Trust
Tablet - User's Manual
Trust
Desenhar (Draw)
m = 311
14
Tablet - User's Manual
Trust
Navegar (Navigate)
Clicar:
Tablet - User's Manual
Trust
Mode: Pen (Absoluto)
Monitor area:

Tablet - User's Manual
Trust
Tablet - User's Manual
Trust
gebruik.
Tekenen (Draw)
Tablet - User's Manual
Trust
(instelling in 3 stappen: Normal/Medium/High (Normaal/Medium/Hoog))
The Ground Truth image displays a single, solid horizontal line. According to Rule 2 (UNDERSCORE & LINE RULES), this is a stylistic or background line, not a placeholder underscore. Therefore, the OCR result must ignore it and output nothing.
(no text)
(instelling in 10 stappen: van Low (Laag) tot High (Hoog))
Meter Current Pressure
Tablet - User's Manual
Trust
Mapping
Tablet - User's Manual
Trust
Pakkens indhold (Package contents)
① Usb-porte
② Usb-port-vælger
Arbejdsområde
Tablet: Penneholder
© Overste penneknap
Tablet - User's Manual
Trust
Tegne (Draw)
Tablet - User's Manual
Trust
Navigere (Navigate)
Klik på:
Tablet - User's Manual
Trust
Tablet properties
Tablet - User's Manual
Trust
Valitse "Suorita Setup.exe – Published by Trust International BV"
Valitse "Install driver"
Tablet - User's Manual
Trust
Piirtäminen (Draw)
Tablet - User's Manual
Trust
Navigointi ( Navigate)
Napsautus:
Tablet - User's Manual
Trust
Tablet properties
Tablet - User's Manual
Trust
Pakkens innhold (Package contents)
① USB-porter
② USB-tilkoblingsvelger
Tablet - User's Manual
Trust
Navigere (Navigate)
12 Klikke:
Tablet - User's Manual
Trust
Tablet properties
Mode: Pen (Absolute)
Mode: Mouse (Relative)
Tablet - User's Manual
Trust
Klicka på "Run Setup.exe – Published by Trust International BV"
Tablet - User's Manual
Trust
Navigera (Navigate)
12 Klicka:
Tablet - User's Manual
Trust
Läge: Penna (absolut)
Tablet - User's Manual
Trust
Tablet - User's Manual
Trust
Rysowanie (Draw)
Tablet - User's Manual
Trust
Tablet - User's Manual
Trust
Pen
Mode (tryb): Pen - pióro (absolutny)
Tablet - User's Manual
Trust
Tablet - User's Manual
Trust
Navigace (Navigate)
Kliknuti:
Tablet - User's Manual
Trust
Pen
Tilt Sensitivity (Citlivost sklonu)
Monitor area (Oblast monitoru):

Tablet - User's Manual
Trust
Obsah balenia (Package contents)
① Rozhrania USB
② Volič rozhrania USB
Pracovná oblast
Tablet: Držiak pera
Vrchné tlačidlo pera
Tablet - User's Manual
Trust
Kreslenie (Draw)
Tablet - User's Manual
Trust
Navigácia (Navigate)
Kliknutie:
Tablet - User's Manual
Trust
Pokročilá konfigurácia (Advanced configuration)
Tablet - User's Manual
Trust
Pen
Mode: Pen (Režim: Pero) (absolutny)
Tablet - User's Manual
Trust
A csomag tartalma (Package contents)
① USB-csatlakozó
Tablet - User's Manual
Trust
Rajz (Draw)
Tablet - User's Manual
Trust
Tablet - User's Manual
Trust
Mapping:
Tablet - User's Manual
Trust
Tablet - User's Manual
Trust
10 Creati un document nou (File > New)
Tablet - User's Manual
Trust
Tablet - User's Manual
Trust
Mod: Stilou (Absolut)
Tablet - User's Manual
Trust
Tablet - User's Manual
Trust
Tablet - User's Manual
Trust
Mapping
Tablet - User's Manual
Trust
Tablet - User's Manual
Trust
Рисование (Draw)
Tablet - User's Manual
Trust
Tablet - User's Manual
Trust
Pen
Tilt sensitivity
Tablet - User's Manual
Trust
Tablet - User's Manual
Trust
Tablet - User's Manual
Trust
Mode: Pen (Απόλυτη)
Tablet - User's Manual
Trust
Tablet - User's Manual
Trust
Tablet - User's Manual
Trust
Gezinme (Navigate)
Tiklama:
Tablet - User's Manual
Trust
Tablet properties
Tablet - User's Manual
Trust
Sadržaj pakiranja (Package contents)
① USB priključci
② Selektor USB priključka
Tablava Radno područie
Kliknite na "Run Setup.exe – Published by Trust International BV"
Kliknite na "Install driver" (Instaliraj pokretački program).
Instalaciaj pokretačkog programa za Trust Tablet: Za nastavak, kliknite na "U redu".
Tablet - User's Manual
Trust
Navigacija (Navigate)
17 Klikanje:
Možete koristiti olovku za klikanje, jednostavno dodirujući površinu tableta.
Dvostruki klik
Možete koristiti olovku za dvostruki klik, jednostavno dodirujući površinu tableta.
Dvostruki klik: Kao zadano, gornja tipka (c) olovke je podešena da djeluje kao dvostruki klik
Povlačenje:
Da biste prevukli objekt, morate ga odabrati (dodirnite površinu tableta), pomaknuti (pomaknite olovku preko površine tableta), i spustiti (podignite olovku s površine).
▶ Nagli pokreti olovkom:
Tablet - User's Manual
Trust
Tablet properties
Ovaj pomoćni program se sastoji od 2 trake (olovka i mapiranje).
Na svakoj pločici, Iraka "Zadano" vam omogućava vraćanje zadanih postavki, a tipka "O programu" prikazuje informacije o tabletu i njegovom pokretačkom programu.
Tipka "Opcija" vam omogućava da spremite (Export = izvoz) i učitate (Import = uvoz) postavke i da osigurate kompatibilnost s aplikacijama koje ne podržavaju 2048 razina pritiska olovke (režim kompatibilnosti je omogućen kao zadan).
Pen
Režim: olovka (apsolutni)

- Package contents (Package contents)
- USB Connection Selector
- Install tablet (Install tablet)
- Draw (Draw)
- Write (Write)
- Navigate (Navigate)
- Advanced configuration (Advanced configuration)
- Tablet properties
- Mapping
- Mode: Pen (Absolute)
- Mode: Mouse (Relative)
- Lieferumfang (Package contents)
- Navigieren (Navigate)
- Dessiner (Draw)
- Navigation (Navigate)
- Configuration avancée (Advanced configuration)
- Dibujar (Draw)
- Tablet - User's Manual
- Trust
- Pen
- Desenhar (Draw)
- Navegar (Navigate)
- Mode: Pen (Absoluto)
- Tekenen (Draw)
- Pakkens indhold (Package contents)
- Tegne (Draw)
- Navigere (Navigate)
- Piirtäminen (Draw)
- Navigointi ( Navigate)
- Pakkens innhold (Package contents)
- Navigera (Navigate)
- Läge: Penna (absolut)
- Rysowanie (Draw)
- Navigace (Navigate)
- Obsah balenia (Package contents)
- Kreslenie (Draw)
- Navigácia (Navigate)
- Pokročilá konfigurácia (Advanced configuration)
- A csomag tartalma (Package contents)
- Rajz (Draw)
- Mapping:
- Mod: Stilou (Absolut)
- Рисование (Draw)
- Mode: Pen (Απόλυτη)
- Gezinme (Navigate)
- Sadržaj pakiranja (Package contents)
- Navigacija (Navigate)
- Režim: olovka (apsolutni)
Brand : TRUST
Model : eBrush
Category : Graphic tablet