SLIZE ULTRA-SLIM - Graphic tablet TRUST - Free user manual and instructions
Find the device manual for free SLIZE ULTRA-SLIM TRUST in PDF.

| Product type | Graphics tablet |
| Brand | TRUST |
| Model | SLIZE ULTRA-SLIM |
| Stylus pressure levels | 2048 levels |
| Connection | USB |
| Tablet power supply | Via computer USB port |
| Stylus power supply | Battery (to insert into stylus, not included) |
| Stylus buttons | 2 programmable buttons (top and bottom) |
| Main functions | Drawing, handwriting, click, double-click, drag and drop, Pen Flicks |
| Hot Cells | 8 programmable cells for shortcuts or application launch |
| System compatibility | Windows 7, Windows 8, Windows Vista, Windows XP SP3 |
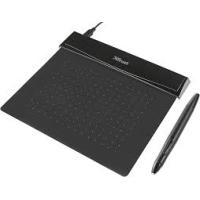
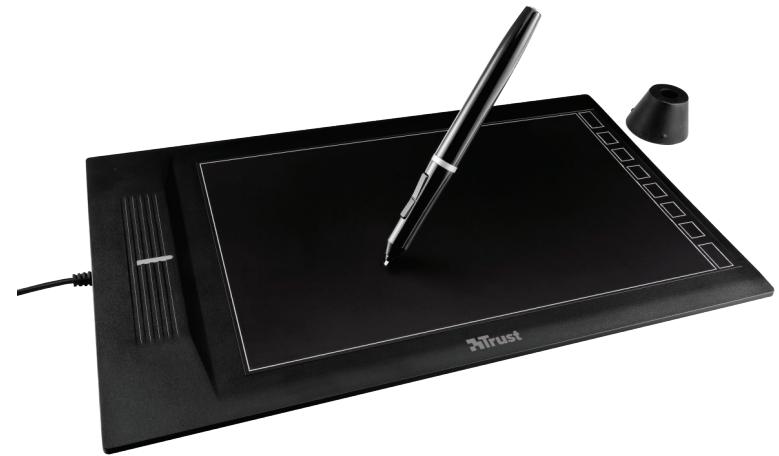
| Package contents | Tablet, USB cable, stylus, stylus holder, tip removal tool, 2 replacement tips, CD-ROM (driver and ArtWeaver software) |
| Maintenance and cleaning | Clean with a dry cloth; do not wet the tablet or stylus |
| Spare parts and repairability | Replacement tips included; extraction tool provided |
| General information | Ultra-slim tablet with wireless stylus (battery-powered); intuitive drawing and writing |
Frequently Asked Questions - SLIZE ULTRA-SLIM TRUST
User questions about SLIZE ULTRA-SLIM TRUST
0 question about this device. Answer the ones you know or ask your own.
Ask a new question about this device
Download the instructions for your Graphic tablet in PDF format for free! Find your manual SLIZE ULTRA-SLIM - TRUST and take your electronic device back in hand. On this page are published all the documents necessary for the use of your device. SLIZE ULTRA-SLIM by TRUST.
USER MANUAL SLIZE ULTRA-SLIM TRUST
Frequently asked questions
www.trust.com/18469/faq

Quick Installation Guide
Slize Ultrathin Graphics Tablet
Package contents
Install tablet

Draw

Write

Navigate

Advanced configuration


Index
| Language | Page |
| English | 3 |
| Deutsch | 9 |
| Français | 15 |
| Italieno | 21 |
| Español | 27 |
| Português | 33 |
| Nederlands | 39 |
| Dansk | 45 |
| Suomi | 51 |
| Norsk | 57 |
| Svenska | 63 |
| Polski | 69 |
| Česky | 75 |
| Slovenčina | 81 |
| Magyar | 87 |
| Română | 93 |
| Бulgária | 99 |
| Руccкий | 105 |
| Еλληνικᾶ | 111 |
| Türkce | 117 |
| Hrvatski | 123 |
| Slovenski | 129 |
| српски | 135 |
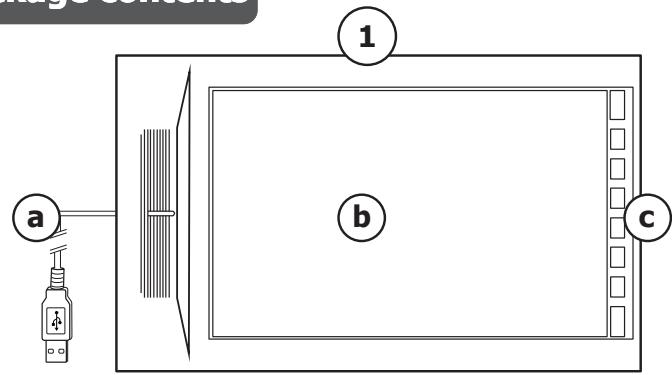
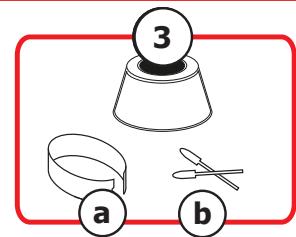
Package contents (Package contents)
| 1 | Tablet: | USB Cable |
| Working area | ||
| Hot cells (programmable) | ||
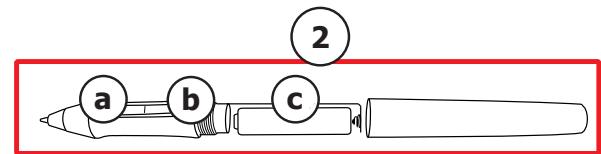
| 2 | Pen: | Lower pen button |
| Upper pen button | ||
| Battery holder | ||
| 3 | Pen holder: | Pen-tip removal tool |
| 2x Spare pen-tips |
Screw the pen open and place the battery in the pen
Cleaning: Clean the tablet with a dry cloth. Do not use or spill water on the tablet, or its pen.
Storage: Store the pen so that it does not rest on its tip, preferably in its holder. Do not store the pen on the tablet.
Install tablet (Install tablet)
It might be necessary to restart your computer at the end of the driver's installation. It is therefore preferable that you save and close all opened documents and applications before starting the installation.
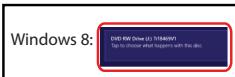
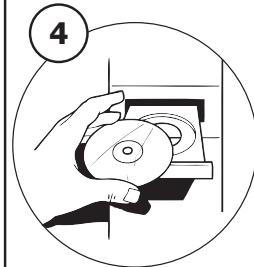
| 4 | Insert the Trust CD-ROM into your CD drive. |
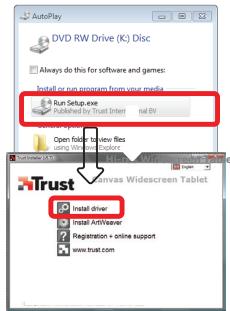
| 5 | Windows 8: click the "Tab to choose" message window in the right top corner of the screen Click "Run Setup.exe - Published by Trust International BV" Click "Install driver" |
| Trust Tablet driver installation: To continue, Click "OK" | |
| Trust Tablet driver was successfully installed: Click "OK" | |
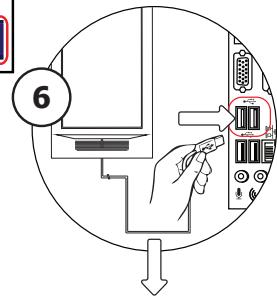
| You must restart your computer: Click "OK" to restart your computer. (If you have unsaved documents and files, select "Cancel" to restart your computer later) | |
| 6 | Once your computer has restarted, the tablet can be connected to a USB port. After the driver has been successfully installed (this may take some time), and the message "USB device ready to use" appears, the tablet can be used. |
Draw (Draw)
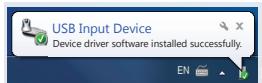
| Open a drawing program (For example, Artweaver is available on the Trust CD-ROM: select "Install ArtWeaver" from the menu to install it.) | |
| 7 | Create a new document (File > New) |
| 8 | Set the attributes of your new document, press OK |
| 9 | Select a tool that supports Pen Pressure Sensitivity (Ex: in Artweaver: default brush) |
- With the pen's pressure levels, you can use your brush the way you would use a real pencil and draw the thickness and opacity you desire.
The pen can detect 2048 levels of pressure, and use the variation in levels to automatically change the size, the color, or various settings of the tool you are currently using.
This allows for flexibility and gives a very intuitive feeling to your graphic work.
Move the pen in the tablet's working area: the cursor will follow the movements. Hovering the pen tip at about 5mm from the surface will allow you to move the cursor on your screen. When you touch the tablet's surface, your brush will start drawing on the new document.
11 The color panel allows you to select different colors.
By default in most drawing programs, the color your brush is applying is black. Depending on the pressure you exert with the pen on the tablet's surface, your brush will paint in nuances going from white (no pressure) to black (full pressure).
Write (Write)
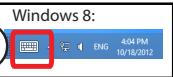
Windows 8: click the keyboard icon in the system tray.
Open the Input Panel (tap the docked input panel () ), on the side of the screen, or tap the text input floating bar () .
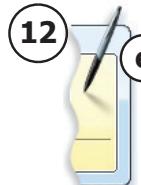
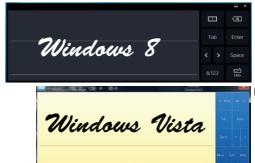
12 Your handwriting will be converted into text (f). You can correct, erase or modify the proposed conversion.
Then click or tap Insert to have the text you handwrote entered into the active document / text input field.
- Handwriting recognition is a feature of Windows Vista and Windows 7/8 that converts what you write into text you can then format like any other text. The Handwriting Input Panel appears automatically when you start using the tablet. If it does not show, or only appears as a virtual keyboard, please consult trust.com/18469/FAQ.
In Windows XP or Mac OS, a third-party software is required, to convert your handwriting into text.
After installing and connecting your tablet, the handwriting feature of Live Messenger is activated.
It can be accessed, while in Live conversation, by clicking the corresponding button: (g)
You can then draw and send messages in your own handwriting, and use the six formatting buttons that appear in the conversation window to personalize your messages.
To send handwritten messages you must have Windows 7/8, Windows Vista, or Windows XP with Service Pack 3 or later installed. The latest version of Live Messenger is also required.
Navigate (Navigate)
| 14 | Clicking: You can use the pen to click, by simply tapping the tablet's surface. |
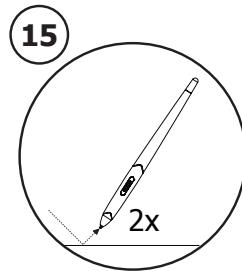
| 15 | Double clicking: You can use the pen to double-click, by simply tapping the tablet's surface twice. |
| Double click: By default, the upper button (b) of the pen is configured to act as a double-click | |
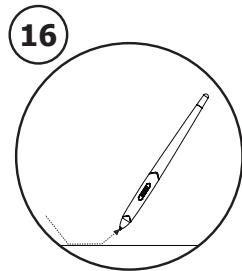
| 16 | Dragging: To drag and drop an object, you need to select it (touch the tablet's surface), move it (move the pen across the tablet's surface), and release it (lift the pen from the surface). |
Pen Flicks:
Pen Flicks are a feature of Windows Vista and Windows 7/8 that associates the movement of your pen with actions. For example, performing a pen flick downward produces the same result as pressing the PAGE UP key on your keyboard.
To activate and start using Pen Flicks, double click the Pen Flicks icon ( ) in your System Tray (next to your computer's clock) and follow the animated tutorial to learn how to use Pen Flicks.
If the Pen Flicks icon is not visible, click the "Show hidden icons" button first.
(Windows 7/8: / Windows Vista:
Advanced configuration (Advanced configuration)
The illustrations for the following instructions are located at the end of this manual
Click on the Trust icon in your Windows system tray to open the tablet configuration utility.
next to your computer's clock)
17 If the Trust-Icon is not visible, click the "Show hidden icons" button first.
(Windows 7/8: / Windows Vista:
With the driver installed, the Trust tray utility will load automatically when you connect the tablet to your computer.
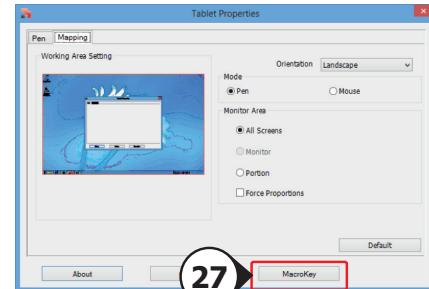
Tablet properties
This utility consists in 2 tabs (Pen, Mapping)
In each tab, the "Default" button allows you to restore the default settings, and the "About" button displays information about the tablet and its driver.
The "Option" button allows to save (Export) and load (Import) settings, and to assure compatibility with applications that do not support 2048 pen pressure levels (the compatibility mode is enabled by default).
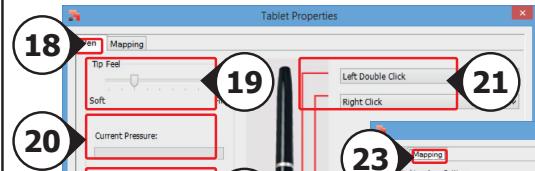
18 Pen
| 19 Tip feel | (9 steps setting: from Soft to Firm) How much pressure is needed for the pen to detect a change. Soft= very few pressure required Firm= lots of pressure required |
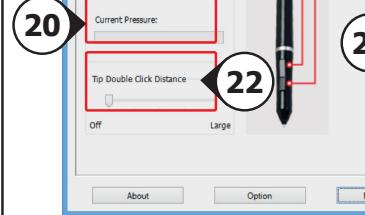
| 20 Current pressure gauge | Shows how hard you are currently pressing the pen against the tablet's surface. |
| 21 Pen Buttons settings | Assign one of the following functions to one of the two pen buttons: · None (disable this button) · Left click · Left double click · Right click · Right double click · Scroll (pressing the button starts the "easy scroll" mode. When the cursor changes into a scrolling cursor, move the pen up/down to scroll up/down through the document). |
| 22 Tip Double Click Distance | (5 steps setting: from Off to Large) Sets the accuracy needed to double-click ("how much movement you are allowed between the two clicks of a double click") Off: the 2 clicks of a double click need to be almost at the same spot. Large: you need to be less accurate for a double click to be detected. |
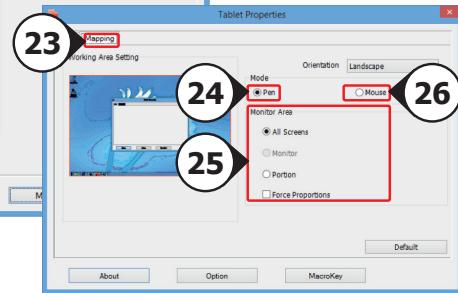
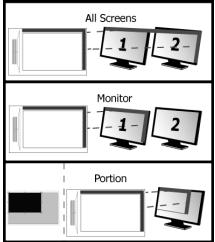
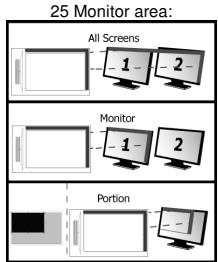
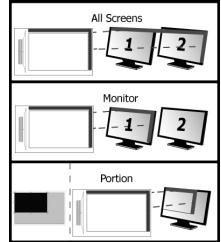
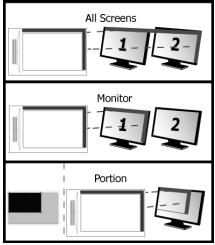
| 23 Mapping | In this mode, when you touch the tablet's surface, the cursor will jump to the corresponding on-screen zone. For example: 1. Tap the upper right corner: the cursor goes to the screen's upper right corner 2. Lift the pen 3. Tap the lower left corner: the cursor goes to the screen's lower left corner |
| 24 Mode: Pen (Absolute) | |
| 25 Monitor area: | |
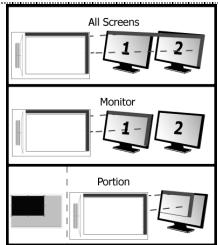
- When "All Screens" is selected, the working area of the tablet covers your system's entire display.
- The "Monitor" setting allows you to select which display the tablet's working area covers (this option is only accessible when multiple displays are connected to the system).
- With the "Portion" setting, you may decide what part of your monitor(s) the working area of the tablet is covering.
When enabling "Force proportion", in Portion mode, the part of your screen covered by the tablet's working area will always have a 5:3 ratio, regardless of the ratio of the zone you selected.
26 Mode: Mouse (Relative)
In this mode, the cursor remains where it is when you lift the pen.
For example:
-
Tap the upper right corner: the cursor goes to the screen's upper right corner
-
Lift the pen
-
Tap the lower left corner: the cursor is still in the upper right corner
The speed and acceleration of the cursor can be adjusted, just like for a standard mouse.
Hot Cells (Hot Cells)
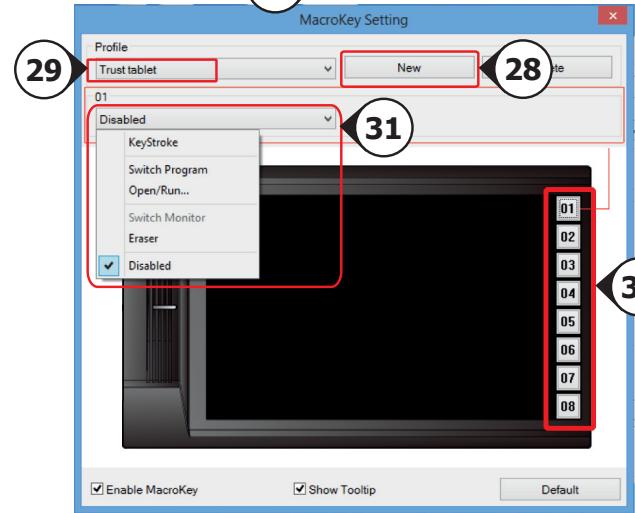
27 Click on "macrokey" button to program the "hot cell" software Buttons.
You can assign different functions to each one of the eight Hot Cells
Linking Start a specified program.
Hot Key Assign a specified modifier ^+ key combination to the Hot cell
28 To create a new profile press 'New'
29. Provide a name for the new profile, press OK to confirm
30 Select the Hot cell to which you want to assign a function. Click on the hot cell or select the cell in the drop down me
31 Define a function for the selected "hot cell" software-button
Lieferumfang (Package contents)
Navigation (Navigate)
Configuration avancée (Advanced configuration)
24 Mode: Pen (Absolute)
(Stylet - absolu)
Instalar a mesa graphical (Install tablet)
24 Mode: Pen (Absolute)
(Modus: pen, absolut)
25 Monitorgebied:
26 Mode: Mouse (Relative)
(Modus: muis, relatief)
Pakkens indhold (Package contents)
USB-Kabel
1 Tablet:
Arbejdomsråde
Hot cells (programmerbare)
Nedre penneknap
2 Pen:
b vre penneknap
Batterholder
3 Penneholder:
27 Klik pã "macrokey" knappen for at programmere de " hot cell " software-knapper.
Pakkens innhold (Package contents)
USB-Kabel
1 Tablet:
Arbeidsomrade
C Varmeceller (programmberbare)
a Nedre penneknapp
b ovre penneknapp
Batterholder
24 Mode: Pen (Absolute)
När "All Screens" er valgt, dekker arbeidsomrädet på tegnebrettet—hele dataskjermen.
- Du kan bruke "Monitor"-innstillingen til á velge hvilkken skjerm tegnebrettets arbeidsområde skal dekke (dette alternativ er kun tilgengelig nár du har flere dataskjörmer tilkoblet).
- Du kan bruke alternativet "Portion" til angi hvilken del av skjermen(e) tegnebrettets arbeidsomrade skal dekke.
Knapp for ovre penna
Batterihallare
Borttagningsverktyg for pennspets
2x reservennspetsar
5 Klicka pa "Run Setup.exe - Published by Trust International BV"
25 Monitor area (Oblast monitoru):
7 Cb3daiTe HOB DOKyMeHT (File > New) (PhiJ > HOB)
8 3aatae atpmbytnte Ha HOBn DOKyMeHT n HATNCHEt OK
9 Ia6peTe HtCPTMEny, KOTo NpOabPjXa YCbETBmTeIHOCTra Ha HATnK Ha NcAknKaTa (HAnPmep: B Artweaver: HcTka No npOda3bpanHe)
HNBATA ha HNTCK h NtCNKATB Kn 03OBJBAe Ia N3ON3BATE YETKA Taka KaKTO 6HXTE N3ON3BAIn NCTHKNc MOINB, n da PNCYBate c JENAHATA deEJIHHa and HENP03APHCHT Na HINNHTA.
25 Monitor area: (3oha OT MOHITOPA)
24 Mode (Pexm): Pen
(Absolute) (Писанка
(A6coJIIOTHOCT)
ПиузбогиН.АлСcreens"(Вснки ecpanи)pa60ната зона на tabлета nokрпва сдпени на счtemета.
Hactrojikata,Monitor" (Monitot) BN no3oBnBaJa 3a 36bipate KoJcIe Jda nokpna ba paoTHata 30Ha NaTeJa (OnuRtA e DocTbHa cAmO pRn CbP3BaHe MAHOXECTBO CINPNEN KbM CNCTeMA).
C Tactopokata,Portion" (Ptozni) MoKTe a Na onpeDentKe kAKBa cAchT oMOnHToPA(nte) BV e NKpOHTa oPbOHTa H0a HA TabEtna.
PnA kTbBpAne Ha,Force proportion" (PnHyDntenHa npOpou) B pexmM "Portion"(Ploprna), qacTtA to ekpaHn Bn, nokpIta to paOthata 30Ha Ha tabneTa, BnHarnIe 6Be d C OTHoEHe N5:3 He3aBNCIMO OT OTHoEHeMTo H na6bpaHATAOTBAC30Ha.
26 Mode (Pekim):
Mouse (Relative)
(MnUka (OTHOCTJIHOCCT)
B To3n pexm KypocbT He npoMeHn NOJoxeHnTo Cn, KOrTO BnuHnTe HnCnAKATA.
Hanpimep:
1. YuKhete BbPxy ropnir y decen bIbn: Kypocbt ue ce pemectn B ropnir decen bIbn Ha ekpana
2.ПовдигнелпсалкаТа
- YyKHeTe Bbpyx DoJIHHa JIaB bIJI: KypCpObT BCE OJe E B rOpHna DeceH bIJI
CkopoctTa n yckopeneTo Ha kycpcopa moraT da 6bdaT peylnpaHn TOHc KaKTo
PnCTaHdapTHa MUska.
Hot Cells
27 KlnkheTe Bbpyx 6ytoHa "macrokey" nporpaMnpaTe " hot cell " cofTyepHn 6ytoHn.
Moxete da ha3naHTe pa3nHn HyHKn 3a BCEKn eINOT OCMeTe Hot Cells
Linking [ɪnblneHne] Stapt ha cneuФина nporpaMa.
Hot Key [b6p3 knaBn] HanaHeTe onpeIeHa KOM6HnauaI MoHmKNaTOp+ kNaBn KbM 6bp3 kNaBn
28 3a da c63daede HeOB npoDIn,HaTncheTe New" [Hob]
29 3aJaTe Ime 3a HOBn npoФm, NaTCHeTe "OK", 3a da NOTBbPdnte
30 N36epeTe aKTHBHaTa KJIeTka, KbM KOrTo NcKaTe da Ha3HaChTe ΦyHKnIa.
UppakheTe AKTNBHATA KNETKA NIN M36peTe KLETKaTa OT NaadaIOTMeHIO.
31. DeΦHnHaPe Ha ΦyHKZa 3a n36paHnra " hot cell " coΦTyep 6byToHa
CoepeKHMoe ynakOBKn (Package contents)
PacunpeHHaH NaCTPOka (Advanced configuration)
NIIIOCTpaunn IaHNNbIX INHCTpyKm npedctabNeHb B KOHc He HAcToIe O pyKOBoDCTBa
Haxmte Ha 3NaOcK DoBepn B BaWem CnCTeMHom Tpee Windows, yTo6bI 3aNCTbYtNlnty
17 KOHNFMYpaunn HNAHTe. (pDAMC qcAsamn) ECNI NKTOrPGAMRA Trust He BUNDA, HAXMITE KHOKNY (OTo6bpaKaTbCKpbTbe 3aHKnv).
(Windows 7/8: Windows Vista:
Ecn npaBepyctahOBlen, nocne npoknouenra pnaHeta KOMbIepey ABOTMaueckn 3aarpynTcnporpaMMA hantpkrN Trust.
Tablet properties
Dannha nporpamma codepjnt 2 akrnAkn (Pen (nepo) n Mapping (otobpaexHne))
B kackdoi zaklaide ect b KHONKa *Default yctAHOBKn no yMOUanHIO), KOtpora no3BOJnE r BOCCTAHOBnTB hauaIbHbIe
HaCtPOKn, H KNONKa *About" (o nporpamme), KOTpora no3BOJnE npocMaTprBaT IHΦOpMaunIO o PAnHeTe I erO
DpaIBepe.
KhONKa *Option" (Onzua) no3BOJnE coxpanrB (kCIOptnpoBaT) n 3arpykTa (mMnoptnpoBaT), a takoze o6ceNeHTb
COBMeCTIMocTb C npINOKeHnEMn, KOtporb He noDdePknBAoi 2048 ypOBn haxatna Ha nepo (peXHM COBMeCTIMocTb
BKNUOHe NO mOOnaHnIO).
18 Pen
26 Mode (pezhM):Mouse MbUbI) (OTHOCTENBnI)
B Danhomop xekmme npri npdhrtnn nepa c pnahueta kypcop octaetca na mecte. Hanpimep:
1. NaHMMTe Ha npabbl BepxHn yIor: Kypoc nepemecTcB n paBbI bepxHn yIor
2.ПоднIMITEпero
3. HaxMMte Ha IeBbI NHXHNI yrO! KypcOp ocTaHeTcB B EbpXHE m npabOM yrNy
CKOPOCTb N YCKOPEHHe KYPCOPa MOxHO N3MeHrTa aHaIOMUHO HAcTPOJKAM
CTaHdapTHOIMbIiIN.
Hot Cells
27 Haxmnte Ha KhoNky "macrokey" KhoNky, YTOb6I npOrpamma «hot cell» npOrpamMHOrO KhoNki.
Bb moKTe npCBOHTb pa3JIuHbIe 0HKUIN KAKDoI n3 BOCbMn 0KcPecC-KHONOK Hot Cells
Linking [3anyck] 3anyck onpepehenHn nporpamMb.
HotKey[CooyanheKnabnu] PnncboNTb onpeelenHHb MoDnOkaTOp + coyehane KnaBnsh 3Kcnpecc
[10] HONKE.
28ДЯ COZDAHNA HOBOrO npoФиЯ HaxMnte«New»[«Hobby]
29 BBeNTe HmHOBOrnpodnla,3aTeIraero noTBePxxDeHnHaKMTe OK [OK]
30 BbIePHTe INHTepaKTINBHyIO ryeiKy,ДЯ KOTOpOJ XOTHTE pncBOITbФyHKUHO.
Haxmnte INHTepaKTbHyIO ryeKy IIN BbIbepTe ryeKy n3packpbBaIOoeroCa MeHO.
31 OnpeIbTyHKUIOIyBb6paHNoI 念 hot cell》PporpamMHOe o6ceueHne KhoKo
IepiexoEvuaoukeuaoiac(Package contents)
Kaλωδio USB
1 TaunAeTa:
B NepioxN EpyaoiaC
Evépya keia (npoypaumizouva)
a KAtw nAiktpo nEvac
2 Néva:
Enawu nAiktpo nEvoc
CΦopéac unatapiac
3 o p E a c nEvac;
EpyaIeio apaipeoC uTnC nEvac
b 2avtaalakntkecmuetcnveac
EeBOWTE Tnv nEv, avolte Tnv kai tonoetne Tnv unatapia meoa otnv neva.
Kaiapiao; Kaapiotv taunlae a eva oeyvo navi. Mny xpanonoiae kai mnu xoe vepo otny taunlae atnv neva tnc.
AnoTheeun: duTne Tnve nTe vNe OTe va uNv akounede nVn oT mTn TnC, kAr npotjnan eea otov opoea nC, Mnu palaTe ne nve tonetobntvacn Tnv enavn Tnv tarniaeta.
EykaTaOaON TaunLeTaC (Install tablet)
Mnopei va anaiThei enavekkivon tou unoloyoiT oac oTo TEoC TcE ykataaToc tou npoypaumot odynonC. I' auto, kaI idea eivai va anOthkeuOe ta kai va KAEIOE Ola Ta aOVIKT Ayypapa KaI TC EAPPOYEC NIV EKIVIOETE TIV Eykaratoan.
Aipoppwon yia npoxwpnEvouc (Advanced configuration)
Oi Eikovc yia Tc akolouce odyic bcipokovtai ot To tloc autou Touyeyepidou KAVTE KIK OTO EIKOVIO Tc Trust OTn ypaunEpyaow Tov Windows ia va avoIETe to Boŋθntiko
17 npovpmaia diaopopwaoTou diokiou. ( 0iA oTo poIou unooyoiotn oac) Eav dev iiva opato To ekovio Trust, kavTe npTa kAIK OTo koumi "Show hidden icons" (Eupavion kpuovikovoi).
(Windows 7/8: / Windows Vista:
O'Ativ Ekyateotnmo To npovpaumoaohynonc,To BOnthma Trust nC nepioxic eDonoiooeuv foortwetai autoumata olicu uovdeae Tnv taunlambda otov unoloyiotn.
Tablet properties
AutoToBoiOnjuaTepiaaBaeV2KapTeLec:Pen(IIva)kaiMapping(Avntoioxan)).
EeKaTeKapTeA,toKoumi"Defaull"osDiveiTuvatoTnvaETAAVAOTAEVEcpuOmuicEevw To koumi"About"EupavciIaNpopoepieYcaTVNAUTMaTLeAoiToPoypaJmaObnyonCns.
To koumi"Option"(EtiyoEv)aceDiveiTuvatoTnvaATObnKeuOe(Export)kaivaOpotwae(Import)pUthetaic, Kaohs kaVa diaaqalAteTe n oubetaatnTa MEeapayocEs oTOIOeSdVtOToNPizouv 2048 EtnTeDaPiNcNtveac (n KaataoanaoubaatotnAcivalevpeyEopoiou).
18 Pen