MPX 200 THO256193400W - Tire MICHELIN - Free user manual and instructions
Find the device manual for free MPX 200 THO256193400W MICHELIN in PDF.
| Product type | High pressure cleaner |
| Brand | MICHELIN |
| Model | MPX 200 THO256193400W (equivalent MPX 200 HDK) |
| Intended use | Washing vehicles, facades, boats, etc. |
| Maximum pressure | 20 MPa (200 bar) |
| Water flow | 15 L/min |
| Power consumption | 7.4 kW |
| Power supply | 400 V / 50 Hz, three-phase |
| Weight | 61.6 kg |
| Max water supply temperature | 60 °C |
| Max supply pressure | 1 MPa |
| Sound pressure level (LWA) | 90 dB(A) |
| Motor protection | IPX5 |
| Motor insulation | Class F |
| Safety devices | Safety valve, gun safety, thermal protection |
| TSS system | Automatic motor shut-off when gun is closed |
| Detergent tank | Yes, integrated |
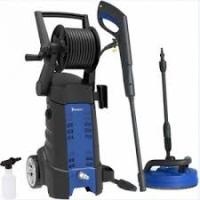
| Included accessories | Lance, gun, high pressure hose, adjustable head |
| Routine maintenance | Filter cleaning, motor unblocking, tank draining |
| Winter storage | Use non-aggressive antifreeze, store dry |
| Warranty | According to applicable standards, covers manufacturing defects |
| Repairability | Spare parts available at authorized centers |
| Compliance | EN 60335-2-79, CE |
Frequently Asked Questions - MPX 200 THO256193400W MICHELIN
User questions about MPX 200 THO256193400W MICHELIN
0 question about this device. Answer the ones you know or ask your own.
Ask a new question about this device
Download the instructions for your Tire in PDF format for free! Find your manual MPX 200 THO256193400W - MICHELIN and take your electronic device back in hand. On this page are published all the documents necessary for the use of your device. MPX 200 THO256193400W by MICHELIN.
USER MANUAL MPX 200 THO256193400W MICHELIN
MPX 150 HDC MPX 170 HDC MPX 200 HDK


High pressure cleaner user guide Please read this guide carefully before use
5 INSTALLATION (FIG.2)/PAGE.4
5.1 Montage

Attention - danger!
2006/42/CE, 2006/95/CE, 2002/95/CE, 2002/96/CE, 2004/108/CE, 2000/14/CE
Stefano Reverberi / AR Managing Director - Via ML King, 3
1 SAFETY INSTRUCTIONS
1.1 The appliance you have purchased is a technologically advanced product designed by one of the leading European manufacturers of high pressure pumps. To obtain the best performance from your unit, read this booklet carefully and follow the instructions each time you use it. During connection, use and servicing of the appliance, take all possible precautions to protect your own safety and that of the people in the immediate vicinity. Read the safety regulations carefully and comply with them on all occasions; failure to do so may put health and safety at risk or cause expensive damage.
2 SAFETY RULES/RESIDUAL RISKS
2.1 SAFETY "MUST NOTS"
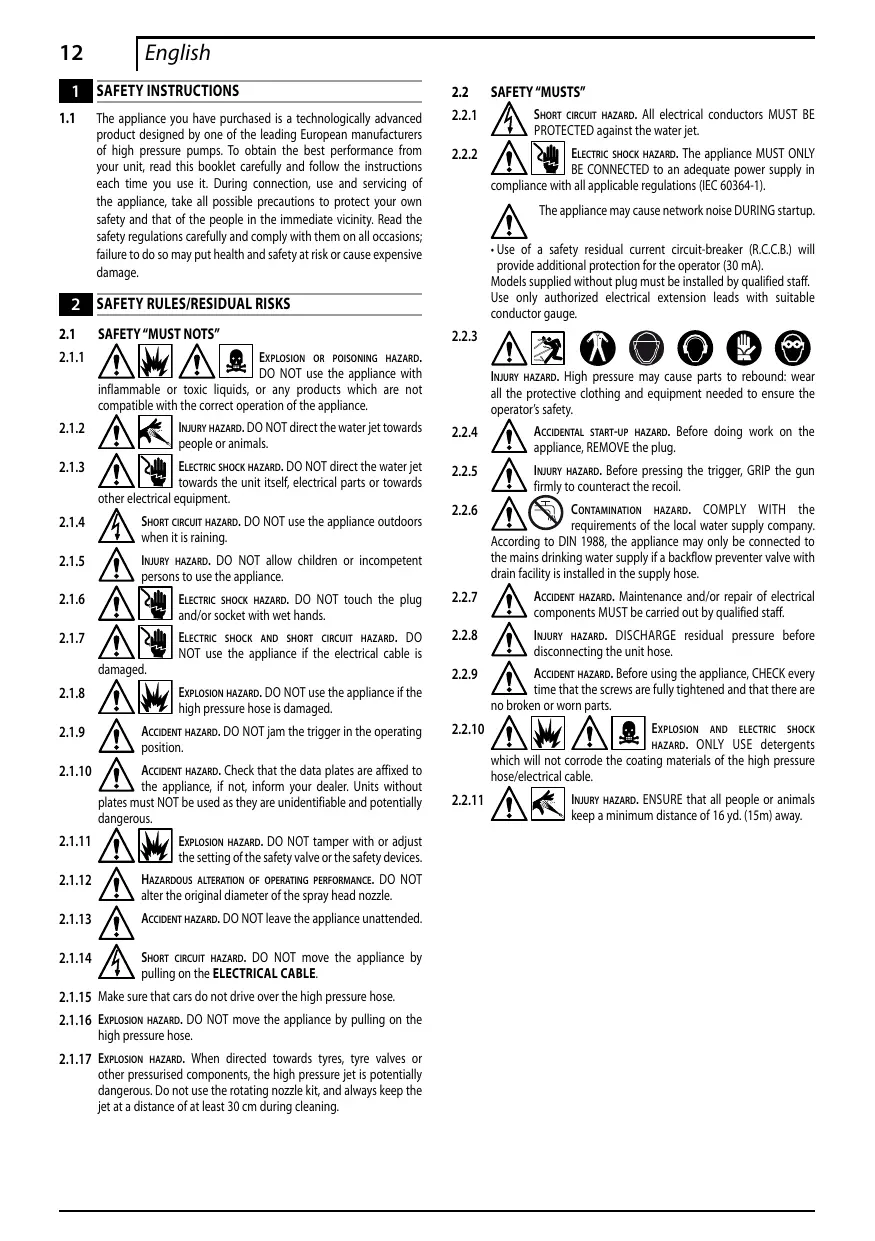
2.1.1 EXPLOSION OR POISONING HAZARD. DO NOT use the appliance with inflammable or toxic liquids, or any products which are not compatible with the correct operation of the appliance.
2.1.2 INJURY HAZARD. DO NOT direct the water jet towards people or animals.
2.1.3 ELECTRIC SHOCK HAZARD, DO NOT direct the water jet towards the unit itself, electrical parts or towards other electrical equipment.
2.1.4 SHORT CIRCUIT HAZARD. DO NOT use the appliance outdoors when it is raining.
2.1.5 INJURY HAZARD. DO NOT allow children or incompetent persons to use the appliance.
2.1.6 ELECTRIC SHOCK HAZARD. DO NOT touch the plug and/or socket with wet hands.
2.1.7 ELECTRIC SHOCK AND SHORT CIRCUIT HAZARD. DO NOT use the appliance if the electrical cable is damaged.
2.1.8 EXPLOSION HAZARD. DO NOT use the appliance if the high pressure hose is damaged.
2.1.9 ACCIDENT HAZARD. DO NOT jam the trigger in the operating position.
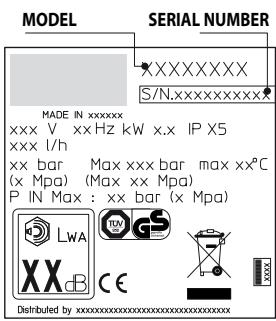
2.1.10 ACCIDENT HAZARD. Check that the data plates are affixed to the appliance, if not, inform your dealer. Units without plates must NOT be used as they are unidentifiable and potentially dangerous.
2.1.11 EXPLOSION HAZARD, DO NOT tamper with or adjust the setting of the safety valve or the safety devices.
2.1.12 HAZARDOUS ALTERATION OF OPERATING PERFORMANCE. DO NOT alter the original diameter of the spray head nozzle.
2.1.13 ACCIDENT HAZARD. DO NOT leave the appliance unattended.
2.1.14 SHORT CIRCUIT HAZARD. DO NOT move the appliance by pulling on the ELECTRICAL CABLE.
2.1.15 Make sure that cars do not drive over the high pressure hose.
2.1.16 EXPLOSION HAZARD. DO NOT move the appliance by pulling on the high pressure hose.
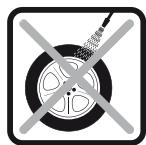
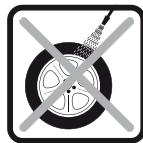
2.1.17 EXPLOSION HAZARD. When directed towards tyres, tyre valves or other pressurised components, the high pressure jet is potentially dangerous. Do not use the rotating nozzle kit, and always keep the jet at a distance of at least 30~cm during cleaning.
2.2 SAFETY "MUSTS"
2.2.1 SHORT CIRCUIT HAZARD. All electrical conductors MUST BE PROTECTED against the water jet.
2.2.2 ELECTRIC SHOCK HAZARD. The appliance MUST ONLY BE CONNECTED to an adequate power supply in compliance with all applicable regulations (IEC 60364-1).

The appliance may cause network noise DURING startup.
- Use of a safety residual current circuit-breaker (R.C.C.B.) will provide additional protection for the operator (30mA) Models supplied without plug must be installed by qualified staff. Use only authorized electrical extension leads with suitable conductor gauge.
2.2.3
INJURY HAZARD. High pressure may cause parts to rebound: wea all the protective clothing and equipment needed to ensure the operator's safety.
2.2.4 ACCIDENTAL START-UP HAZARD. Before doing work on the appliance, REMOVE the plug.
2.2.5 INJURY HAZARD. Before pressing the trigger, GRIP the gun firmly to counteract the recoil.
2.2.6 CONTAMINATION HAZARD. COMPLY WITH the requirements of the local water supply company. According to DIN 1988, the appliance may only be connected to the mains drinking water supply if a backflow preventer valve with drain facility is installed in the supply hose.
2.2.7 ACCIDENT HAZARD. Maintenance and/or repair of electrical components MUST be carried out by qualified staff.
2.2.8 INJURY HAZARD. DISCHARGE residual pressure before disconnecting the unit hose.
2.2.9 ACCIDENT HAZARD. Before using the appliance, CHECK every time that the screws are fully tightened and that there are no broken or worn parts.
2.2.10 EXPLOSION AND ELECTRIC SHOCK HAZARD. ONLY USE detergents which will not corrode the coating materials of the high pressure hose/electrical cable.
2.2.11 INJURY HAZARD. ENSURE that all people or animals keep a minimum distance of 16 yd. (15m) away.
3 GENERAL INFORMATION (FIG.1)/PAGE.3
3.1 Use of the manual
This manual forms an integral part of the appliance and should be kept for future reference. Please read it carefully before installing/ using the unit. If the appliance is sold, the Seller must pass on this manual to the new owner along with the appliance.
3.2 Delivery
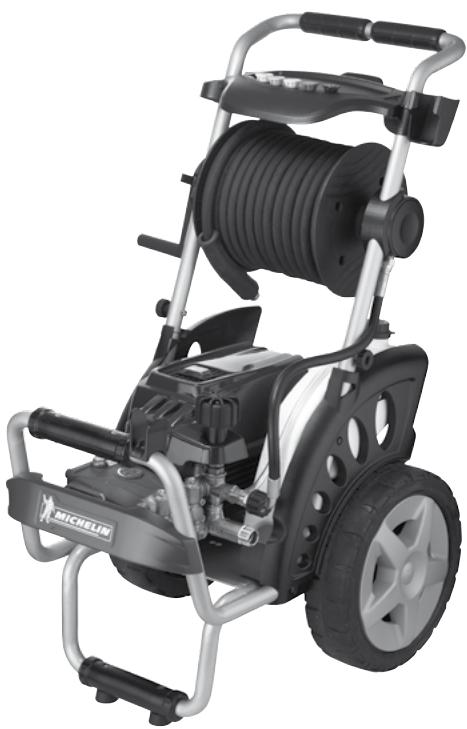
The appliance is delivered partially assembled in a cardboard box. The supply package is illustrated in fig.1.
3.2.1 Documentation supplied with the appliance
A1 Use and maintenance manual
A2 Safety instructions
A3 Declaration of conformity
A4 Warranty regulations
3.3 Disposing of packaging
The packaging materials are not environmental pollutants but must still be recycled or disposed of in compliance with the relevant legislation in the country of use.
3.4 Safety signs
Comply with the instructions provided by the safety signs fitted to the appliance.
Check that they are present and legible; otherwise, fit replacements in the original positions.

E1 symbol - Indicates that the appliance must not be disposed of as municipal waste; it may be handed in to the
dealer on purchase of a new appliance. The appliance's electrical and electronic parts must not be reused for improper uses since they contain substances which constitute health hazards.

E2 symbol - Indicates that the appliance is intended for professional use, i.e. for experienced people informed
about the relative technical, regulatory and legislative aspects and capable of performing the operations necessary for the use and maintenance of the appliance.

E3 symbol - Indicates that the appliance is intended for non-professional (domestic) use.
4 TECHNICAL INFORMATION (FIG.1)/PAGE.3
4.1 Envisaged use
This appliance has been designed for individual use for the cleaning of vehicles, machines, boats, masonry, etc, to remove stubborn dirt using clean water and biodegradable chemical detergents.
Vehicle engines may be washed only if the dirty water is disposed of as per regulations in force.
- Intake water temperature: see data plate on the appliance.
- Intake water pressure: min. 0,1MPa-max 1MPa.
- Operating ambient temperature: above 0^ .
The appliance is compliant with the EN 60335-2-79/A1 standard.
4.2 Operator
The symbol on the front cover identifies the appliance's intended operator (professional or non-professional).
4.3 Improper use
Use by unskilled persons or those who have not read and understood the instructions in the manual is forbidden.
The introduction of inflammable, explosive and toxic liquids into the appliance is prohibited.
Use of the appliance in a potentially inflammable or explosive atmosphere is forbidden.
The use of non-original spare parts and any other spare parts not specifically intended for the model in question is prohibited.
All modifications to the appliance are prohibited. Any modifications made to the appliance shall render the Declaration of Conformity null and void and relieve the manufacturer of all liability under civil and criminal law.
4.4 Main components
B1 Adjustable spray nozzle
B2 Lance
B3 Gun with safety catch
B4 Power supply cable with plug (on models with this feature)
B5 High pressure hose
B6 Detergent tank (on models with this feature)
4.4.1 Accessories (if included in the supply package - see fig.1).
C1 Nozzle cleaning tool
C6 Water suction kit
C2 Rotating nozzle kit
C7 Pipe drain kit
C3 Handle
C8 Large surface
C4 Brush
cleaning tool
C5 Hose reel
C9 Adapter
4.5 Safety devices
Caution - Danger!
! Do not tamper with or adjust the safety valve setting.
- Safety valve and/or pressure limiting valve.
The safety valve is also a pressure limiting valve.
When the gun trigger is released, the valve opens and the water recirculates through the pump inlet or is discharged onto the ground.
- Thermostat valve (D1 where fitted)
If the water temperature exceeds the temperature set by the manufacturer, the thermostat valve discharges the hot water and draws in an amount of cold water equal to the amount of water discharged, until the correct temperature is restored. - Safety catch (D): prevents accidental spraying of water.
5 INSTALLATION (FIG.2)/PAGE.4
5.1 Assembly
Caution -Danger! All installation and
All installation and assembly operations must be performed with the appliance disconnected from the mains power supply.
The assembly sequence is illustrated in fig.2.
5.2 Assembling the rotating nozzle
(For models with this feature)
The rotating nozzle kit delivers greater washing power.
Use of the rotating nozzle may cause reduction in pressure of 25% compared to the pressure obtained with the adjustable nozzle.
However, the rotating nozzle kit delivers greater washing power due to the rotation of the water jet.
5.3 Electrical connection
Caution - Danger!
Check that the electrical supply voltage and frequency (V-Hz) correspond to those specified on the appliance data plate (fig.2). The appliance should only be connected to a mains power supply equipped with an adequate earth connection and a differential security breaker (30mA) to cut off the electricity supply in the instance of a short circuit.
5.3.1 Use of extension cables
Use cables and plugs featuring "IPX5" protection level.
The cross-section of the extension cable should be proportionate to its length; the longer it is, the greater its cross-section should be. See table I/PAGE 6.
5.4 Water supply connection
Caution - Danger!
Only clean or filtered water should be used for intake. The delivery of the water intake tap should be equal to that of pump capacity.
Place the appliance as close to the water supply system as possible.
5.4.1 Connection points
Water outlet (OUTLET)
Water inlet with filter (INLET)
5.4.2 Connection to the mains water supply
The appliance can be connected directly to the mains drinking water supply only if the supply hose is fitted with a backflow pre
venter valve as per current regulations in force. Make sure that the hose is at least 0.13mm and that it is reinforced.
6 ADJUSTMENT INFORMATION (FIG.3)/PAGE.5
6.1 Adjusting the spray nozzle (for models with this feature) Water flow is adjusted by regulating the nozzle (E).
6.2 Adjusting the detergent (on models with this feature) Detergent flow is adjusted using the regulator (F).
6.3 Adjusting the detergent pressure Set the adjustable nozzle (E) on " " to deliver detergent at the correct pressure (on models with this feature).
6.4 Adjusting the pressure (on models with this feature) The regulator (G) is used to adjust the working pressure. The pressure is shown on the pressure gauge (where fitted).
7 INFORMATION ON USE OF THE APPLIANCE (FIG.4)/PAGE.5
7.1 Controls
- Starter device (H).
Set the starter switch on (ON/1) to:
a) start the motor (in models without TSS device);
b) set the motor ready to start (in models with TSS device).
If there is a pilot light on the starter device, it should light up.
If the "low/high" settings are available, use them as follows:
Low: low pressure washing
High: high pressure washing
Set the starter device switch on (OFF/0) to shut down the appliance.
If there is a pilot light on the starter device, it should go out.
Water jet control lever (I).
Caution - Danger! During operation the appliance must be positioned as shown in fig. 4 on a sturdy, stable surface.
7.2 Start-up
1) Turn on the water supply tap fully.
2) Release the safety catch (D).
3) Depress the gun trigger for a few seconds and start up the appliance using the starter device (ON/1).
Caution - Danger! Before starting up the appliance check that the water supply hose is connected properly; use of the appliance without water will damage it; do not cover the ventilation grilles when the appliance is in use.
TSS models - In TSS models with automatic delivery flow cut-off system:
- when the gun trigger is released the dynamic pressure automatically cuts out the motor (see fig.4);
- when the gun trigger is depressed the automatic drop in pressure starts the motor and the pressure is restored after a very slight delay;
- if the TSS is to function correctly all gun releasing and depressing operations must be performed at intervals of less than 4-5 seconds.
On three-phase models for professional use: at first use, start the appliance for a very short time to check that the motor is running in the correct direction. If the motor fan is turning anti-clockwise, exchange two of the three phase wires (L1, L2, L3) in the electrical plug.
To prevent damage to the appliance, do not allow it to operate dry and when running do not stop the water jet for more than 10 minutes at a time (for models without TSS device).
7.3 Stopping the appliance
1) Set the starter device switch on (OFF/0).
2) Depress the gun trigger and discharge the residual pressure inside the hoses.
3) Engage the gun safety catch (D).
7.4 Restarting
1) Release the safety catch (D).
2) Depress the gun trigger and discharge the residual air inside the hoses.
3) Set the starter device on (ON/1).
7.5 Storage
1) Switch the appliance off (OFF/0).
2) Remove the plug from the socket.
3) Turn off the water supply tap.
4) Discharge the residual pressure from the gun until all the water has come out of the nozzle.
5) Drain and wash out the detergent tank at the end of the working session. To wash out the tank, use clean water instead of the detergent.
6) Engage the gun safety catch (D).
7.6 Refilling and using detergent
When using detergent, the adjustable nozzle must be set on "■" (on models with this feature).
Use of a high pressure hose longer than the one originally supplied with the cleaner, or the use of an additional hose extension, may reduce or completely halt the intake of detergent.
Fill the tank with highly degradable detergent.
7.7 Recommended cleaning procedure
Dissolve dirt by applying the detergent mixed with water to the surface while still dry.
When dealing with vertical surfaces work from the bottom upwards. Leave the detergent to act for 1-2 minutes but do not allow the surface to dry. Starting from the bottom, use the high pressure jet at a minimum distance of 30~cm . Do not allow the rinse water to run onto unwashed surfaces.
In some cases, scrubbing with brushes is needed to remove dirt.
High pressure is not always the best solution for good washing results, since it may damage some surfaces. The finest adjustable nozzle jet setting or the rotopower nozzle should not be used on delicate or painted parts, or on pressurised components (e.g. tyres, inflation valves, etc.).
Effective washing depends on both the pressure and volume of the water used, to the same degree.
8 MAINTENANCE (FIG.5)/PAGE.6
Any maintenance operations not covered by this chapter should be carried out by an Authorized Sales and Service Centre.
Caution - Danger!
Always disconnect the plug from the power socket to carry out any work on the appliance.
8.1 Cleaning the nozzle
1) Disconnect the lance from the nozzle.
2) Remove any dirt deposits from the nozzle hole using the tool (C1).
8.2 Cleaning the filter
Inspect the intake filter (L) and detergent filter (if fitted) before each use, and clean in accordance with the instructions if necessary.
8.3 Unjamming the motor (on models with this feature)
In case of lengthy stoppages, limescale sediments may cause the motor to seize. To unjam the motor, turn the drive shaft with a tool (M).
8.4 End-of-season storage
Treat the appliance with non-corrosive, non-toxic antifreeze before storing it away for winter.
Put the appliance in a dry place, protected from frost.
9 TROUBLESHOOTING
| Problem | Possible causes | Remedy |
| Pump does not reach working pressure | Nozzle worn | Replace nozzle |
| Water filter fouled | Clean filter (L) (fig.5) | |
| Water supply pressure low | Turn on water supply tap fully | |
| Air being sucked into system | Check tightness of hose fittings | |
| Air in pump | Switch off the appliance and keep depressing and releas-ing the gun trigger until the water comes out in a steady flow. Switch the appliance back on again. | |
| Adjustable nozzle not positioned correctly | Turn the adjustable nozzle (E) (+) (fig.3) | |
| Thermostatic valve tripped | Wait for correct water temperature to be restored | |
| Pressure drops during use | Water intake from external tank | Connect appliance to the mains water supply |
| Intake water too hot | Reduce temperature | |
| Nozzle clogged | Clean nozzle (fig.5) | |
| Intake filter (L) dirty | Clean filter (L) (fig.5) | |
| Motor "sounds" but fails to start | Insufficient power supply | Check that the voltage of the mains power supply line is the same as that on the plate (fig.2) |
| Voltage loss due to use of extension cable | Check characteristics of extension cable | |
| Appliance not used for a long period of time | Contact your nearest Authorized Service Centre | |
| Problems with TSS device | Contact your nearest Authorized Service Centre | |
| Motor fails to start | No electrical power | Check that the plug is firmly in the socket and that the mains voltage supply is present (*) |
| Problems with TSS device | Contact your nearest Authorized Service Centre | |
| Appliance not used for a long period of time | Using the tool (M) unjam the motor from the hole at the rear of the appliance (in models with this feature) (fig.5) | |
| Water leakage | Seals worn | Have the seals replaced at your nearest Authorized Service Centre |
| Safety valve tripped and discharging | Contact an Authorized Service Centre | |
| Appliance noisy | Water too hot | Reduce temperature (see technical data |
| Oil leakage | Seals worn | Contact your nearest Authorized Service Centre |
| TSS versions only: motor starts even with gun trigger is released | High pressure system or pump hydraulic circuit not watertight | Contact your nearest Authorized Service Centre |
| TSS versions only: no water deliv-ery when gun trigger is depressed (with supply hose connected) | Nozzle clogged | Clean nozzle (fig.5) |
| No detergent taken in | Adjustable nozzle on high pressure setting | Set nozzle on " " setting (fig.3) |
| Detergent too dense | Dilute with water | |
| High pressure hose extension being used | Fit original hose | |
| Deposits or restriction in detergent circuit | Flush with clean water and eliminate any restrictions. If the problem persists, contact an Authorized Service Centre |
(*) If the motor starts and does not restart during operation, wait 2-3 minutes before repeating the start-up procedure (overload cutout has been tripped). If the problem recurs more than once, contact your nearest Authorized Service Centre.
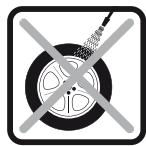
10 HOW TO AVOID DAMAGING SURFACES


WARNING / CAUTION
10.1 Washing tyres with a high pressure washer can cause damage to the tyre and be dangerous.
10.2 Never direct high pressure jets directly at the tyre.
10.3 Always use the pressure washer at the lowest pressure setting when cleaning around the wheels and tyres.
10.4 Never use the "Turbo Lance" for washing any part of the vehicle.
10.5 For further informations read section: "7.7 Recommended cleaning procedure".
EN EC Declaration of conformity
We Annovi Reverberi S.p.A., Bomporto (Mo), Italy declare that the following Michelin Machine(s):
Designation of Machine High Pressure Washer
Model No / Type
MPX 150 HDC
MPX 170 HDC
MPX 200 HDK
Input power
3 kW
7,4 kW
Conforms to the following European Directives:
2006/42/EC, 2006/95/EC, 2002/95/EC, 2002/96/EC, 2004/108/EC
2000/14/EC
And are manufactured in accordance to the following standards or
standardised documents: EN 60335-1; EN 60335-2-79; EN 55014-1; EN
55014-2; EN 61000-3-2; EN 61000-3-3; EN 61000-3-11; EN 60704-1
Name and address of the person in charge to give the technical file:
Stefano Reverberi / AR Managing Director
Via M. L. King, 3 - 41122 Modena, Italy
The conformity assessment procedure required by Directive 2000/14/EC was in accordance with annex V
MPX 150 HDC MPX 170 HDC MPX 200 HDK
Measured Sound
Power Level:
85 dB (A)
88 dB (A)
89 dB (A)
Guaranteed Sound
Power Level:
86 dB (A)
89 dB (A)
90 dB (A)
Date: 25.10.2011
MODENA (I)
Stefano Reverberi

Technical Data
| Technical Data (EN) | Unit | MPX 150 HDC | MPX 170 HDC | MPX 200 HDK |
| Output | l/min | 10,5 | 13 | 15 |
| Pressure | MPa | 12 | 17 | 20 |
| Maximum pressure | MPa | 15 | 17 | 20 |
| Power | kW | 3 | 5 | 7,4 |
| T° input | °C | 60 | 60 | 60 |
| Maximum input pressure | MPa | 1 | 1 | 1 |
| Repulsive force of the gun to the maximum pressure | N | 27,55 | 37,1 | 49,36 |
| Motor Insulation | - | Class F | Class F | Class F |
| Motor Protection | - | IPX5 | IPX5 | IPX5 |
| Voltage | V/Hz | 230/50 | 400/50 | 400/50 |
| Maximum allowed net impedance | Ω | - | - | - |
| Sound level K = 3 dB(A): | ||||
| L-PA (EN 60704-1) | dB (A) | 78,4 | 81 | 82,3 |
| L-WA (EN 60704-1) | dB (A) | 86 | 89 | 90 |
| Unit vibrations K = 1,5 m/s2: | m/s2 | 1,5 | 1,5 | 1,4 |
| Weight | kg | 47 | 49,6 | 61,6 |
Subject to technical modifications!
(EN) WARRANTY
The duration of the warranty is in accordance with the relevant legislation in the country where the product is sold (unless otherwise stated by the producer).
The warranty covers materials, construction and conformity defects during the warranty period, during which time the manufacturer will replace defective parts and repair or replace the product if excessively worn in normal use.
The warranty does not cover components subject to normal wear (valves, pistons, water gasket, oil gasket, springs, O-rings, accessories such as hoses, guns, brushes, wheels, etc.).
The warranty does not cover defects caused by or resulting from:
- incorrect use, abuse or neglect,
- trade, professional or hire use,
- failure to service and maintain the unit as specified in the user's manual,
- unauthorised repairs,
- use of non-original accessories/spare parts,
- damage incurred during shipping or due to foreign objects or substances and accidental damage,
- warehousehousing and stock keeping problems.
To register the warranty, the customer must provide proof of purchase.
For service, contact the dealership where the machine was purchased
2 SICHERHEITSVORSCHRIFTEN/RESTGEFAHREN
2.1 WARNHINWEISE: UNZULÄSSIG
2006/42/CE, 2006/95/CE, 2002/95/CE, 2002/96/CE, 2004/108/CE, 2000/14/CE
Stefano Reverberi / AR Managing Director
Via ML King, 3 - 41122 Modena, Italia
85 dB (A) 88 dB (A) 89 dB (A)
Livello di potenza
86 dB (A) 89 dB (A) 90 dB (A)
Data:25.10.2011

Dati Tecnici
8 MANUTENÇA (FIG.5)/PÁGINA.6
Stefano Reverberi / AR Managing Director - Via ML King, 3 - 41122
Modena, Itália.
8 SYNTHPHESH (EIK.5)/EEIAA.6
OAc, oTEIeBaeic, auVTipnOnc, nou DE pEiAoiBauovTt OTo npov KepAiaoPienei vivovTt oEv EVCouioobotnevo KvTePo NiAonC Kai TeVkiNc YNootriPecNc.
PiopoOxH-KivduVoc!
17 Pniv ano onoiaohne tenebaon oto nunva hna bVale to icn anynipnupehatao.
2006/42/EK, 2006/95/EK, 2002/95/EK, 2002/96/EK, 2004/108/EK,
2000/14/EK
Kai npayetai(ovta) oumuwa me ta akolouba npotuna t aakolouba
Tuntooinueva eyypaa: EN 60335-1; EN 60335-2-79; EN 55014-1; EN
55014-2; EN 61000-3-2; EN 61000-3-3; EN 61000-3-11; EN 60704-1
Ovopa Ka iEeOuvon Tou UeOuvou yia TxOpynon Tou TeXVKoU
φακέλου: Stefano Reverberi / AR Managing Director - Via ML King, 3 -
41122 Modena, Italia
H diadikasia aiofoynoTc noumuopwoN no oia anateiata ano tvn obnyia 2000/14/EK eXeE kTeAeTei oupwa u To Pooapntma V
MeTnV emipuαeη Teuxikwαalayovx!
(EL) EΓΥHΞH
H 1oXuc TNC 3eYyunOnC puOeiTai OuMPovu ME tou kavoviaouc nou 1oXouv OTn Xwpa OTnv Oonoia diaKiveiTai Emuopia Tou PioiovTOC (EKTcE av oipTei diaOpetik ano tv napayyo).
EAV to npioov evai eattuatikto loyw tnc noiotntac tuv ulikw, loywa katakeunc n loywn oumopawonc katn vnpiodo ioxuc, tnc eyyunoc o kataokeauotc eyyuatai tvv atikataoan tvv elatwutakuw mepw, npovoei yia tnvy eniokneuv tvpioovtwyev a ng pohpa evai loykn h yia tvv atikataotaon touc.
H euyunon dev Kauntei eapntmuata nou unokeviatn oe uovn gn oepa (Baalida, eboAo, taioxa taiouxa vepo, taiouxa laiou, elatnpiaor atamoi OR, eapntmuata onwoc oualvac, to piofotao o buoptoe, o tpoxo, kAn. H euyunon dev Kauntei eattwmuata no exou npoknthe npokpseanto:
5 INSTALLATIE (FIG.2)/PAGINA.4
5.1 Montage
Let op - gevaar!
5 INSTALLATION (FIG.2)
5.1 Montering

Advarsel - fare!
Maskinen skal vare frakoblet i forbindelse med-lation og montering.
8.4 Opbevaring for winter
2006/42/EF, 2006/95/EF, 2002/95/EF, 2002/96/EF, 2004/108/EF, 2000/14/EF
og er producerdet med overholdelse af kravene i ffolgende standarder uller i folgende standardiserede dokumente: EN 60335-1; EN 60335-2-79; EN 55014-1; EN 55014-2; EN 61000-3-2; EN 61000-3-3; EN 61000-3-11; EN 60704-1
8 VEDLIKEHOLD (FIG. 5)/SIDE.6
2006/42/EF, 2006/95/EF, 2002/95/EF, 2002/96/EF, 2004/108/EF, 2000/14/EF
og er produsert i samsvar med ffolgende standarder erller standardiserte dokumenter: EN 60335-1; EN 60335-2-79; EN 55014-1; EN 55014-2; EN 61000-3-2; EN 61000-3-3; EN 61000-3-11; EN 60704-1
Navn og adresse på den personen som har fullmakt til ä utferdige den tekniske dokumentasjorden: Stefano Reverberi / AR Daglig leder - Via M.L. King 3 - 41122 Modena, Italia
4 TEKNISET TIEDOT (KUVA 1)/SIVU.3
4.1 Käytötarkoitus
HUOLTO (KUVA 5)/SIVU.6
2006/42/EY, 2006/95/EY, 2002/95/EY, 2002/96/EY, 2004/108/EY,
2000/14/EY
2.1 ZAKAZANE CINNOSTI
2.1.1 NEPOUZIVEJTE pristroj ve spojeni s hoilavymi nebo jedovatymi kapalinami, nebo s vyrobky, tefer nejsu slucitelne se spravnou funkci pristroje. HROZI NEBEZPEC YVBUCHU NEBO TORY
2.1.2 NESMÉRÜJTE proud vody na osoby nebo zviřata. HROZÍ NEBEZPEČI ZRANÉNI
2.1.3 NESMÉRUJE proud vody smérém k samotnému prístroi, elektrický soucástem nebo jiným elektrickým zařidením. HROZI NEBZPEÇÍ URAZU ELEKTRICKY M PROUDEM
2.1.4 NEPOUZIVEJEPTrostjve venkovnim prostedi, pokud prs.HROZI NEBEZPECI ZKRTU
2.1.5 ZABRAÑTEPOUZITi pristroje detmi nebo nekompetențniomi osobami. HROZI NEBZEPEČI ZRANÉNI
2.1.6 NEDOTYEKEJTE se zastroky a/nebo zasuvky mokryma rukama. Hrozi NEBZPECI URAZU ELEKTRICKYM
PRODEM
2.1.7 NEPOUZ'IVEJTE pristroj v pripadé, ze je poskozený elektrický kabel. Hrozi NEBEZPECI URAZU ELEKTRICKYM PROUDEM A ZKRATU
2.1.8 NEPOUZIVEJTE pristroj v pripadje, ze je poskozena yvsoklotlakhadice.HROZI NEBZEPECVIYBUCHU
2.1.9 NEBLOKUJTE spoust v pracovni poloze. HROZI NEBEZPECI NEHODY
2.1.10 Zkontrolujte typovy stitek pripevneny k pistroji;Pokud zde nenin, informujte svhe dovideatele. Pistroje neopatfené typovym stitkem NESMI byt pouzivany, protoze je neninmaybe identifikovat a jsut proto potenciáne nebepezné. Hrozi NEBEZPECI NEODY
2.1.11 NEMANIPULUJE ani nemeinte nastaveni pojstneho ventilu ci bepezcnostnich zaizeni. HROZI NEBZEPCI YBUCHU
2.1.12 NEMÉNTE puvodni prümér hlavové rozbíkovaci trysky. HROZÍ NEBZEPEÇI ZMÉNY PROVOZNICH VYKONU
2.1.13 NEPONECHÁVEJTE pristroj bez dozoru. HROZI NEBEZPECI NEHODY
2.1.14 NEPRESOUVEJTE pristroj taZenim za elektricky kabel. HROZI NEBEZPECI ZKRTATU
2.1.15 Zajistete,aby vozidla NEPREJIZDELA priesvysokotlake hadice.
2.1.16 Nepremistujte pristroj tahem za yvsokotlakou hadici. HROZINEBZEPECI VYBUCHU
2.1.17 Vodni papsek nesmi dopadat primo na pneumatiky, vently pneumatik ani jine dily, ktere jsou pod tskam, protoze by je mohl poskodit. Nepouziveje soupavru s rostači tryskau a pri Čisteni neustale dokdžuţe vzdălenost min. 30 cm. Hrozi NEBEZPEV BUCHU
2.2 POVINNE CINNOSTI
2.2.1 Vsechny elektrické vodic MUSI BYT CHRANENY préd proudem vody. HROZI NEBZEPECI ZKRTU
2.2.2 Přistroj MÜZE BYT PRIPOJEN POUZE k odopvidajicimu zdroji napajeni, ktery je v souladu se všemi platnymi prédpisovymi požadavky. HROZI NEBZPEČI URAZU ELEKTRICKYM PROUDEM (IEC 60364-1)

5 INSTALACE (OBR.2)/STRANA.4
5.1 Montáz
Upozorneni-Nebezpeci!
Vsechnj instačni a montážni prace musi byt provaděny na pristroji odopojem od sitoveho napajeni.
6 INFORMACE O NASTAVENI (OBR.3)/STRANA.5
2006/42/ES, 2006/95/ES, 2002/95/ES, 2002/96/ES, 2004/108/ES, 2000/14/ES
5 INSTALACJA (RYS.2)/STRONA.4
5.1 Montaz
2006/42/WE, 2006/95/WE, 2002/95/WE, 2002/96/WE, 2004/108/WE, 2000/14/WE
2006/42/ES, 2006/95/ES, 2002/95/ES, 2002/96/ES, 2004/108/ES, 2000/14/ES
in je (so) izdelan(i) v skladu z naslednjimi standardi oziroma normativnimi dokumenti: EN 60335-1; EN 60335-2-79; EN 55014-1; EN 55014-2; EN 61000-3-2; EN 61000-3-3; EN 61000-3-11; EN 60704-1
Ime in naslov osebe, odgovorne za izdajo tehnicne dokumentacione: Stefano Reverberi, izvrsni direktor AR - Via ML King, 3 - 41122 Modena, Italia
6 INFORMACIE O NASTAVENI (OBR. 3)/STRANA.5
6.1 Nastavenie Rozprašovacej trysky (pre modely s toutofunkciou)
Prud vody sa reguluje nestavenim trysky (E).
6.2 Nastavenie Čistaceho prostriedku (pre modely s toutofunkciou)
Prud cistiaceho prostriedku sa nestavi pomocou regulatora (F).
6.3 Nastavenie tlaku cistiaceho prostriedku
9 RIESENIE PROBLEMOV
2006/42/ES, 2006/95/ES, 2002/95/ES, 2002/96/ES, 2004/108/ES, 2000/14/ES
A vyraba sa v sulade s nasledujucimi normami alebo normativnymidokumentmi:EN 60335-1;EN 60335-2-79;EN 55014-1;EN 55014-2;EN 61000-3-2;EN 61000-3-3;EN 61000-3-11;EN 60704-1
Meno aresha osoby zodpovednej za vydavanie technickej Dokumentacia: Stefano Reverberi / AR Managing Director - Via ML King, 3 - 41122 Modena, Taliansko
2.1.1 OJACHOCTb B3PbIBA
OTPABJIENH. HE nCnOJb3yITe
C npri6bopom BOCINAMEHIOUIEcN, TOKCNHHe JIKKOCTHI INJX MEIJIIOXe XapAKTePNCTKN, HECOBMECTMble C NcnpaBHOJ paboTOn npiBoPA.
2.1.2 ONaCHOCTb HAHECEHNAOBPEXDEHNI. HE
HapabnTe Ctpy BObl Ha IIOeNnn
XNBOTHbIX.
2.13 OJACHOCTb NOPAXEHN 3JEKTPMUECKM TOKOM
HE HanpaBnaIte CtpyIO BODI Ha cAm npu6Op,
3neKtpnueckne qactn n Ha dpyrme 3neKtpnueckne npnbopbl.
214 ONaCHOCTb KOPOTKOrO 3AMNKAHnHE PONb3yntecb
4 npibopom nojdoxjm.
2.1.5 ONACHOCTb HECYACTHBIX CJYAEB. HE donyckaiTe
! NcnoIb3OBAHn np6opa DeTbMn nn HeCnocO6hBMn
JIIOAbMn.
216
IMM
DyKaMn.
2.1.7 OJACHOCTb IOPAJAeHIM JNEKTPMueCKHM TOKOM N
KOPOTKORO 3AMbIKAHIN. HE NCnOJIb3yIte pN6Op C
NOBpeXeHbIM 3JneKTpUneCKnM UHypOM.
2.1.8 0NACHOCTbB3PbBA,HENCNOJb3yIte np6oDc
IOBpeXeHbIMIaHROMBbOCKOrO DaBHeHn.
2.1.9 OnaCHOCTb HECHACTbIX CUYAEB,HE 6IOKUPYte Dbyar
! nuctoetaBpa6oyemnoloxehnn.
2.1.10 ONACHOCTb HECHACTbIX CUYAEB, Y6eIANTec, YTO PIM6OB
CHa6xhen TaBnUckoC XapaKTePncTnKaMn, B Cnyae
ee OTCYCTBnA O6paTInTeCb K NcIcTpN6bHToTy. YcTpoIcTbA 6e3
DaHHbIX Ta6JIuYeK HE DOJXHbI NCNOJb3OBAtbcR, TAK KaK OHI
YBIAIOTCAHOHIMMbIMN I NOTEHcuaJIbHO ONaCHbIMN.
2111 0A
HCTPOKV DEPVNPOBOUHOK KNAHA
pnpdoxpanHtBnHbXUCYTOPICTB
2.1.12 OJACHOE M3MEHEHNE PABOTb, HE N3MEHJEte NCXOHNbI
! DnAmETp CTpyr NOJOKM.
2.1.13 ONACHOCTb HECYACTbIX CUYAEB. HE OCTABJRAITE PND6OP
763 npmCmTopa.
2114 ONACHOCTb KOPOTKORA 3AMNKAHMA. HE nepenBnraJte
npi6op 3a 3JIeKTPWUECKM IHHy npni6opa.
2.1.15 HE donyckaite DnJxHEnIraPcnpTbIX cpeCTB no 7nlaHram
BbCOKOTo DaBHeHnA.
2.1.16 OnaHocTb B3pIbA. He nepemeuaiTe MaunHy, noTgRvBa ee 3a IuaHr BbICoKOrO DaBHeHnA.
2.1.17 OIaCHOCTB B3PbBA.CTpYBaIbCOKOro DaJIbHnHa HApBaJIeHHa Ha IINbI, KIIaIaNbI bIN INI dpyrNe KOIMNoHEtBI NOd DAJIbENHeM, npEcTAbIeT co60N oTeHnuaJIbHyO onaCHOCTb. N36eRaIte NcIbn3OBaHne KOMPiKeTA BpaAIOUeC4 φOpCyHNu I NDepKkBaiTe pAcTOHnE do φOpCyHN He MeHee 30 cm BO BPEMaHCTKn.
2.2 IPEyIpyKDEHnBbIIOJIHTb
2.2.1 OIACHOCTb KOPOTKORO 3AMbIKAHIN.Bce TOKONPBODAHIMUe chaTn DIOJIKHbI bIbTb 3AUWIIUEHbI ot nonaDaHNB OBDI.
2.2.2 ONACHOCTb yDAPATOKOM.IOДКЛIOUAYITE npH6Op mIuB ToJIbKO K pIMrOJDHM MCTOUYHKAM
3NEKTPRNCHKORO NITAHNO, COOTBETCTBYQUOMM DeIeCTBYQUOMH HOPMAM (IEC 60364-1).
BO BPEM3aIpycka MaIHHa MOxET co3daBaTb NOMEXN B 3JIeKTPocTeN.
- Pa607a C NcPbIb3OBAHmEM DnDfpeHuaNbHoro 3auNTHORo BbKIOuATENoE6CneYBaTe DOnONHInTeBHyU INdINBduAInbHyO 3auHTy (30 mA).
MoDeni, He 6OporDyBaHbIe BnIKoN, DOnJXbI YcTaHbINBaTbCRAKInIcHIOPABHHbIM PecnoHONAM.
IcnoIb3yIe NtIbN ToBko PazepHeHbIe NteKPTmuEChMe YdIHNHTe C HeOx6DImMbCEHcEHnEM pOBoDNIKoK.
2.2.3
ANOCHOTb HAHECEHNI NOBPEKJHBNI. BcIOKOE DAJIENHE MOKET BV3BaTb OTCKO KaTeH. IcNoIb3yIte OeKeJyN cpeCTBa 3aunTb, KOtporb o6eCneuat Be03nAChoCTb onepatoPA.
2.2.4
OAnchOCTb CnUaHnOro BkNIOUeHnE. IpePeBblNOIHeHnEM pa60T ha np6oBe BblHe Tnky u3 po3eKm.
2.2.5
ANOCHOTB HAECHHENI NOPEKHEINI. BvHyD cNbIaOy dAnya KpenKO DEPKITE INCTONET BO bPMAHKAHTNA bHuAra.
2.2.6
ONACHOCTb 3APAXEHHN.COBJIIOAITTE Tpe6oBaHn
Hoprme DIN 1988 npi6op MOKET NOkIIOUaBcH enoCpeDCTBeHHO KTOPOCKO BODONPOBOHOH CETNI TnBEOB BOBb TOnbK O TOM CNYae,ecnHa NITaIOuEe Tpybe yctahOBHe nPraMO Knaan H COnOPQHXHEM.
2.2.7
OnachOCTb HecACThblx CJyAEB. O6cJyKuBaHne n/
nnpemOH3neKtpnuecknx KOMIOHEHTOB DONJXEH
TbCA KBaIINHpOBaHHbIM NepcoHaJIOM.
2.2.8
OnachOCTb HAHECEHIN IOBPEKDEHIN. CBPOCbTE
OCTaTOHoe DaBHeHne nepeo OTKIOUeHnem 7NaHra
!
OnachOCTb HecuACThBIX CnyAEB. Pepe KaXdbIM
HcNoIb3OBAHNem np6opa IPOBEPRNTE 3aTJkKy
I COXPAHHOCTb KOMNHOENTOB npn6opa, npoBepaTe
BNE CLOMAHHbIX IN N3HOWeHHbIX YaCTeI.
2.2.10
!
ONACHOCTb B3PbIBA INIOPAXEHIN
C. 6ObluOBOUHbIMM MaTePuaJAMM UHaRa BbICOKOrO DaBHeHnA
JnHypa.
2.2.11
Onachoctb HAHECEHIN NOBPEKHEHIN. DEPXHTE
JIIODeI H JXIBOTbIX Ha MUNHMaJIbHOM
pacctoHm15M.
3 OBUNCE CBEDEHNA (PNC.1)/CTPAHNUA.3
3.1 Nolb3oBaHne pykoBOdCTBOM
PykoobdTBO no 3KcNlYATAUIM N 05CJYKINBAHNIIO - 3TO coctabnAa TaBbAero npN6Oba; COxPAnIte erO for nIbn3oBaONHn B 6yduem. Neped yCTAHOBKO INM NCIIOBtAHmE YCTOpCTBA BHNMaTeNbHO pOnuHTaTe Ero. B cyueae nepexdo c6bCTBeHNCTNa npN6Oba, CTapBn BlaIeNeu o83an nepedat pykoobdTBO HOBMO BlaIeNBtu.
3.2 IocTAbka
Pnboop noctablaetcB kaptOnHHy yNtakOBke, BuactHNO pa3o6paHOM coCTOHNM. CoCTAB noCTABKN pIeDCTABLN ha pnc.1
3.2.1 PocmaBnemamdoKymenmauua
A1 RykoOCTBO no 3KcIpyataunn n 06cIyJbAHNO
A2 INchtpyKmno 6e3oNaCHOCTM
A3 Deknapaunca COOTBETCTBNA
A4 TapaHTnHbYe yCNoBnA
5 YCTAHOBKA (PNC.2)/CTPAHUNLA.4
5.1 MoThax

Bhumahue, onachocmb!
Bce onepaun Ho tyaohobek MoHTAKy DoNkBbI BInOnHbTaCnKIOHNHOHMOT OAnETKNEPrueCKO Cetn NPiOpoe.
TocneIOBATEJIbHOCTb MOHTaKa CM. Ha pnc.2.
5.2 YctahOBka BpaauooueCFOpcyHKN
Tem Me MeHee, ee MCNoIb3ObaHne NOBbIaTe NOJyauTb 60nee BmCOKyU MoIOHCTb MOIKI 6IaIgOrapr aOeKTeY BrpaIeHnI, pNpIaBaEOMy CTye BOIly.
5.3 ΘeKtpnueckoe noDknHouenHe

Bhumahue, onachocmb!
Y6eHNTecb, yTO 3NeKTPueckc aetb coOTBctByET naphxehnIO uactote (B - I), yka3aHHbIM hA ndENTHnKnaUHOH Tabnue pnp60pa (Pnc.2).IodKnOHTe pnp6o K 3NeKTPueCKcTe cTc mCnPABHO CmCTeOM 3aEMeHNu N dHooepenuaHbHO 3auHTO (30 M), kotopra 6dET oTKNUOATb 3NeKTPueCKoe pntAHne B cnyae KOPOTKHX 3AMbKAHIN.
5.3.1 McnoJIb3OaHue yOdunUmHeMeIbHbIXKa6eNeI
IcnoJIb3yIte Ka6eNn BvIKn Co teneHbO 3aunTb "IPX5".
CeyHHe yIyHHHTenBbX KabeBen DjonKHO 6bTb nponopuOnHbNo IH nnHe: cem dnnHHee Ka6bEn, TEm 6bnWe dnKHO 6bTb CEeyHMe, C tabNIU.
5.4 IopKnIoueHne BoDbl

Bhumahue, onachocmb!
Hcnpbn3yte Nnmb Tnbo KhoNbtpoBAnHyo HmNchTyOoKpnA dna npoKnoucenbyo BdoJOnken o6cnepuBaTbOBOHTBbOCT,paBNy npnoBDOIeBHOCT HAocAO.
PacnooxnTe np6op KaK MoXHo 6nIXe K BoOIpOBoHoi cetN.
5.4.1 CoedunumelbHbe nampy6ku
BbIXoJ Bovbl (OUTLET)
BxOa B0bCΦnIbTpOM (INLET)
5.4.2 IopKIOUeHue K zoPocckoB oOOpOBoHOcemu
PnIbOp MoKet 6bItb NpokJIIOeH HENoCpeCTBeHHO K rPoDcKoB DBOIPOBDOHN CETNIITbEBoB BOIDN TOLIKOB TO TOM CJYae, ECIN HA NITaIOJIeN TpyBEyCTAOHBN PnIMO KnaAN C OONOPKHeHMe, COOTBCTBQUOMI DEYCTBQUMOH MOPHM. Y6eJIteBc, YTO TpyBa IMeET dAMETR He MeHEE 13 MM, I YTO OHa YcUNHeA.
6 PEGYUNIOBKA (CTP.3)/CTPAHNUA.5
6.1 PerynnoBkra roNoBkn (ecnn npedymatprBaetc)
7!Pn6bOp D0JxHcYtAHabNtBcBaHa npOuyu H yctOuHyo noBepxHOCTb,KaK nok3aHO Ha (pnc.4).
7.2 BkJIIOUeHnE
1)Полноctью OTKpoite Кран ВОдпорвОдн сетM.
2) CHIMITE nICTOJET c npedoxpaHNTeRA (D).
3) YdepKmbaIte nTCTOnet OTKpbTbMm HEckOblkco cekyHd, noceJeero BkLIOHTe Pn6BOp C nOMoUbI yNcKOBOrO yCTpoiCTBa (ON/1).

Bhumahue, onachocmb!
Peped BknouhenHm Pnp60a y6eHntcB, Yo OH npablnbHO nokKnoueh KnTAHNO BOoJ. Pa60a "Bcyxio" MoKet NOpeHntpnp60.Bo BpemA pa60tHe Nk3kpMBAITE BENTNIAIOHNHBE peWETKn.
MoJIeTI TSS - B MoJIeJIaX TSS cA bTOMaTmUeCKIM OTKIbUeHHeM HAnopa:
-
3aKpbIbIaJIHCTOJIeT,ДИнAMUHcECKOДАБЛЕNHЯВТOMaTbECKN BbIKIQUaET 3JIeKTpMueCKMДBvIgATeINb (CM.PIC.4);
-
OTKpbBIA NtIOCTON, naHEme NDAHNEHAA bOTMAHTNcCKNa 3aNYCAET BdAtratene nNBADHEO B04eTcR eCNbSOJIaIaIaIaIaIKPOK?
ДИАИСПAPBAHоя haboTb TSS 3aKpbTHe N OTKpbTHe NtCtOTe He DoJIINHO BByIOJIHnTcBc C INTEPBoAM MeHee 4-5 cekyHd.
Pn npepbom 3ayncke tpxfoa3hBx moeden nI pyofoecchoanbHoro cnboh3obauha BKNIOUHTpe np60b H KOPOTKOE BPEM dI npObepKHNapBaHEny BPAoueBnA DBMATEE. EcnI BEHTmIATOP DBMATEAE BpaAeTcER pOITIN BACOBW CTpeKN,TO NOMEHNIte MecAMI DBe I3r pxf a3 (L1,L2,L3) BNEKTpuCckoN BNKe.
ДлпразоватаяноржеденmaшимьдуонрсайдрауOTBcxуюи И порьваite BO вретма рботmmaшимьсструю Bodунba Вретм,прөвluэоц致电 10MHNT (дул мдени 63 утостачы TSS).
7.3 OctaHOBka
9 BO3MOXHbIE HENCTPABHOCTN INX YCTPAHEHNE
| HéncnPabHoctb | BoZmOxHnA priUHnA | CNooc6 uctpaHnHnA |
| Hacoc He doctiraet yctahOBnEHnO daBnEHHa | Izhoc φOpCyHnK | 3amEnHt b φOpCyHnK |
| 3arPzHnHeHnΦilbTpBa VbDy | OuchTite ΦilbTp (L) (pinc. 5) | |
| HeodctatoCHoe pItanHe Me BDOi | PoiHoc7bTo OTKpbItb Kpan | |
| BcAsbAHnne Bo3dYxa | PipOBepHt b coedInHnEA | |
| Bo3dYnx B HACo6 | BbKIOuHTb prNbOpB n BkIOuHTb NcSToTe Ido noLyuHnENHepeBbHnO CTpyu. BHOb BkIOuHTb prNbOpB. | |
| HepaBnHnAe PergyIpOBeKra TOLOBKn | PiOBepHt b TOLOBK (E) (+) (pinc. 3) | |
| Cpa6aBbAHnne TepMocStaTneUckSoKo KlaNaHa | DokJitteB BOCsCTaONBHeNHnPAmpaBILhON TEMpepatpyb BDOi | |
| Hacoc o6HapUxHnBaet cKaChn daBnEHHa | 3a6ob OBOdi I3 NeuHnEro p3eRbVayRa | PoiKIOuHTb prNbOpB K BODopOBoDnCotn |
| CNIuKOM BvICoKAn TEmpETAPyRa BOdy Ha BxOde | PoiHnHtB TEmpePATpy | |
| 3acOpEnHe φOpCyHnK | OuchTite ΦOpCyHnK (pinc. 5) | |
| BcAsbAousi Μe TpM (L) rpa3HnB | OuchTite ΦIbTp (L) (pinc. 5) | |
| Дыгать Гудт, Ио He zayuKaetc | HeodctatoCHoe hApRAgHeHnB CSeti | U6eDITteB, YO To hApRAgHeHnB Cseti COOTBETCTByET Uka3AHHomy Ha naIopntHNO TAbNInke (pinc. 5) |
| ПОнIGHnE HnE NaPRAgHeHnB, Bv3BaBHnOe UyDInHnITEm | PipOBepbTe XapakTePICTNkUyDInHnTEr | |
| ДпITeBbHb IproSTcI prNbIbOPa | O6pATiteB C OphiUaJIbHb CEpBICbH b CEntH TExO6ClyXHbANH | |
| Ipro6LbMe C UcTPOBCTBM TSS | O6pATiteB C OphiUaJIbHb CEpBICbH b CEntH TExO6ClyXHbANH | |
| ЗлкtrpoDAbratel He zayuKaetc | OtsytCTBn HApRAgHeHnA | PipOBepbTe HnLIeHnue hApRAgHeHnB Cseti Uy6eDITcB, YO To BIVnK npaBINbNO PodKIOuHema (*) |
| Ipro6LbMe C UcTPOBCTBM TSS | O6pATiteB C OphiUaJIbHb CEpBICbH b CEntH TExO6ClyXHbANH | |
| ДпITeBbHb IproSTcI prNbIbOPa | Ppi NpOmoi INcTpyMeNTa (M) pa3bIoKpuyte Dmigratel uep3 OTeBcTne B 3adNe Chactn (dЯLoMepeN, B KOtpbIX Oho pyncMaTpBIAeTcS) (pinc. 5) | |
| YteuKa Bovl | Izhoc yIplOTnHtBbHb IproKlndok | 3AmENHe yUplOTnHtBbHb IproKlndokn B OphiUaJIbHb OCEpinHcHOM CEntPe TExO6ClyXHbANH |
| Cpa6aTbBAHnne PpeOxoPAnHtBbHcKlanaHa Co SObOxDbMb C6pOcm | O6pATiteB C OphiUaJIbHb CEpBICbH b CEntH | |
| IbOuBhenHn bIympn prObte prNbIbopa | CNIuKOM BvICoKAn TEmpePATypa BDOi | PoiHnIbTe TEmpePATypy (CM. TexHnueceKne DaHNbIe) |
| YteuKa MaCna | Izhoc yIplOTnHtBbHb IproKlndok | O6pATiteB C OphiUaJIbHb CEpBICbH b CEntH TExO6ClyXHbANH |
| Tolbko d7a TSS: prNbOp BvKIIuHaETC, HecMOTPr h a ZAKpblbTb NcTcIbNET | IdeФeKtBu reMpEtMuaHCTOn CStcTeMb b BcOkoTOr DaBnEHnIиIe B KOthype HAcOSa | O6pATiteB C OphiUaJIbHb CEpBICbH b CEntH TExO6ClyXHbANH |
| Tolbko d7a TSS: hauMaa H a pyUaig NcTcIbTe, BODa He bYteKaET (prnI pOdkIouHemK K BODopOBoDy shaHRe | 3acOpEnHe φOpCyHnK | OuchTiteB φOpCyHnK (pinc. 5) |
| He BCasbAeTcR MoOuSee crepdTbo | IplOuHnE HpErNpuEMy OTOBOKn Prn BcOcKOM DaBnEHn | PereVeDITe TOLOBK B TOLOeHnE " " (pinc. 3) |
| CNIuKOM rGCTOE MOnUepe CpeCDTBo | Pa36abBe TBOdB | |
| IcIplObZoBaHnE yUdINHtEne ShaHa BcOkoTOr DaBnEHnE | UCTaONoBite OprinHnAIbHb ShaHnT | |
| KOnTpR MOUeTo CpeCDTa B acOpEn lIe nepeKat | PpOmOeY cIcTstB VbODon I yCTpaHnTe nepeKathe yUcTcKt Ecln I pO6Lema He yUcTpaHnAcB, obpATiteB B OphiUaJIbHb CEpBICbH b CEntH |
(^*) EcnI BvBPEMpa60TbDnVatetbOCTaHbAMBAETcNHe 3nyCAETc,TO nOIOxJnte 2-3 MHyTb nepei TEM, KaK 3anyCTMb erO (cpa6aTbBaHMe TENNOB 3aunMb). EcnI 3TO JyBHeHMe O6hApXmBAeTc HeccklboKp a3, O6pauiateCb CepBnCHy cyn6y.
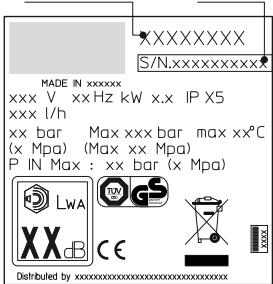
MODEJIb
3ABOДСКОД HOMEP
10 KAK HE NOBPEIHTb NOBEPXHOCTN


BHIMAHHE
10.1 IcnoIb3OBAHHe MOeHNO MaunHbI DnI MOIKu mN MoKet HaeCTn yuep6 uHNHAM n CTaTb ONaCHbIM.
10.2 He HanpaBnTe CtpyO BbICOKoRo daBleHn HENOCpeDCTBeHHo Ha SHNHy.
10.3 IcnoIb3yIte MoeCHyU MaSHInu C 6OJIee Hn3KIM DabLeHneM, KOrJa MOJka BbINOHNHeTc PRAOM C KOJIeCAmU NShINAMu.
10.4 HnKoRda He nCpOJIb3yIte "PaCnblInTeIbHyIO Tpy6ky Tpy6o"ДЯ MOkN KaKnx-Jin6 OaCTeynTpaHcnpTO HorO cpeDCTBa.
10.5 BoIee noIopO6HyIO IHoOpMaUIO uHTaIe T B pa3Je: "7.7 PekomeHdaUIN no npabunbHOJ MOKe".
RU DekaapuacooTBcTbA CE
Mby, Kompania Annovi Reverberi S.p.A., Bomporto (Mo), Italy 3aabnem, TTO cneyuuaa(he) mawina(bi) Michelin:
HannmehOBaHme Maunnbl MoeHaHa MaunHa BbICOKO daBHeHHa
N° moèni MPX 150 HDC MPX 170 HDC MPX 200 HDK
IopTe6JIeMaM MoUHocTb 3kW 5kW 7,4kW
COOTBETCTBYET(OT) CLENDUOIM EM EBPOENCKM DnpeKTHBaM:
2006/42/CE, 2006/95/CE, 2002/95/CE, 2002/96/CE, 2004/108/CE,
2000/14/CE
N BbIyNcKaTcraTcCobIIODeHMeCNeDyUOxHOPM HIN
cneyuuxnCTaHaptnuOpBaHbIXdoKymeTOB:EN60335-1;EN
60335-2-79; EN 55014-1; EN 55014-2; EN 61000-3-2; EN 61000-3-3; EN
61000-3-11; EN 60704-1
IIMn aDpec nua, ynOJIHOMOueHHoro BbIaBaTb TexHnueckyio
DOKUMENTAQUHO: CtefoHo PeBep6epn / DInpeKTop- paoTneIb AR - Via
ML King, 3-41122 Moena Itaia
Ipoueyupa ouenknooTBeCTBnA,Trepeyma DnapeKtmb0 2000/14/CE
6bIa BbINONHeHa C cOsbIOJeHEm PpIIOJKeHHa V
MPX 150 HDC MPX 170 HDC MPX 200 HDK
TapaHTnIOBaHbHbIyPOBeHb
3ByKOBoM MoUHOCTH: 85 dB (A) 88 dB (A) 89 dB (A)
TapaHTnIOBaHbHbIyPOBeHb
3BKYOBMOUHOCTN: 86 dB (A) 89 dB (A) 90 dB (A)
Unpablaioi DuplekTop
Texnueckne DaHhble
2006/42/EK, 2006/95/EK, 2002/95/EK, 2002/96/EK, 2004/108/EK, 2000/14/EK
Igazoljuk tovabba, hogy a berendezes a kovetkez szabvanyok szerint keriult legartyasra: EN 60335-1; EN 60335-2-79; EN 55014-1; EN 55014-2; EN 61000-3-2; EN 61000-3-3; EN 61000-3-11; EN 60704-1
2006/42/CE, 2006/95/CE, 2002/95/CE, 2002/96/CE, 2004/108/CE, 2000/14/CE
Sj sunt fabricate in conformitate cu urmatoarele standarde sau documente standardize: EN 60335-1; EN 60335-2-79; EN 55014-1; EN 55014-2; EN 61000-3-2; EN 61000-3-3; EN 61000-3-11; EN 60704-1
6 AYARLAMALAR (RES.3)/SAYFA.5
6.1 Kafanin ayarlanmasi (ongorulmuse)
Su piskurtmesini ayarlamak icin kafa (E) uzerinde mudahalede bulun.
6.2 Deterjan ayari (ongorulmuse)
Verilece deterjan miktarini ayarlamak icin regulator (F) uzerinde muddahede bulunun.
6.3 Deterjan verilmesinin ayarlanmasi
Aryaranabilari kafay (E), deterjani dokr gubin cile vermek icin " - posyzionuna yeleristirn (ongorulm ise).
8 BAKIM (RES.5)/SAYFA.6
Saliksanas process paradits 2.attila
2006/42/EK, 2006/95/EK, 2002/95/EK, 2002/96/EK, 2004/108/EK, 2000/14/EK
Ta ir razota saskaṇa ar sadiem standartiem vai Standarta dokumentiem: EN 60335-1; EN 60335-2-79; EN 55014-1; EN 55014-2; EN 61000-3-2; EN 61000-3-3; EN 61000-3-11; EN 60704-1
Par tehniskas lietas izdevumu atbildigas personas vards un adrese: Stefano Reverberi / AR rikotajdirektors - Via ML King, 3 - 41122 Modena, Italija
Atbilstibas novertéjuma procedura, kā to nosaka Direktiva 2000/14/EK, tika veikta saskaanā ar V pielikumu.
| MPX 150 HDC | MPX 170 HDC | MPX 200 HDC | |
| Trokşnu limenis: | 85 dB (A) | 88 dB (A) | 89 dB (A) |
| Trokşnu limena garantija: | 86 dB (A) | 89 dB (A) | 90 dB (A) |
Dates: 25.10.2011
MODENA (I)
Stefano Reverberi

Tehniskie Dati
| Tehniskie dati (LV) | Vieniba | MPX 150 HDC | MPX 170 HDC | MPX 200 HDK |
| Izplūdes apjoms | l/min | 10,5 | 13 | 15 |
| Spiediens | MPa | 12 | 17 | 20 |
| Maks. spiediens | MPa | 15 | 17 | 20 |
| Jauda | kW | 3 | 5 | 7,4 |
| Ieplūdes T° | °C | 60 | 60 | 60 |
| Maks. ieplūdes spiediens | MPa | 1 | 1 | 1 |
| Sprauslas atgrūdiena spēks maksiimalajā spiiedenia | N | 27,55 | 37,1 | 49,36 |
| Motora izolācija | - | F kategor. | F kategor. | F kategor. |
| Motora aizsardziba | - | IPX5 | IPX5 | IPX5 |
| Spiregums | V/Hz | 230/50 | 400/50 | 400/50 |
| Maksimāli pielaujamā tikla pretestiba | Ω | - | - | - |
| Skanjas limeni (K = 3 dB(A)): | ||||
| L-PA (EN 60704-1) | dB (A) | 78,4 | 81 | 82,3 |
| dB (A) | 86 | 89 | 90 | |
| L-MA (EN 60704-1) | ||||
| Vibracijas (K = 1,5 m/s2): | m/s2 | 1,5 | 1,5 | 1,4 |
| Masa | kg | 47 | 49,6 | 61,6 |
Gamintojas pasilieka teise keisti techninius duomenis!
(LV) GARANTIJA
3 3AΓΑΙbHA IHΦOPMALIδ (MAJI.1)/CTOPIHKA.3
3.1 BnKOpNCTaHHNoC6HnKa
LcHn oNocIbHK HeBID'EMHOU cAHTHOU cTO bIO npCtPOO, TOMy 36epiraiTe IHO nro IIOaJIbUoHO BIKOPICCTAHNA. PIOpUaIte IIO rYbXAnu NpeI dTMM, JK BCTAOHNBOHATu/BNKOPICCTOBVByAMnpCTRI, Y BuNAdky npOdaJyN pIcTPOO, PIOpaDeBueh NOBIIHEN NEpeDAtu CE NocIbHbNK HOBOM BYAChNHy
3.2 IocTAbka
Pnctpi Noctaaybca y kaptonHHy ynakobui yactkofo 36paHm. Ynakokba 3o6paxeha ha man.1.
3.2.1 Okymemtu, uo nocmaayombca pa3om i3 npucmpoem
A1 Noci6HmK 3 BnKOpNCTa Hn Ta Eeknnyatau
A2 IHctpyKu3 363neKeN
A3 Deknapaia BIDNOBIDHOCTI
A4 TapahtiHi 3o60'3aHaHH
3.3 Ytniiazaia nkyBaIbHnx Matepiab
TakbanybnHt mepaian He uokdpnI pyhakonuHbOro cepeodobua, oJnak ix cnid nepeatnHa noBortpn Nepeop6ky 8o ytni3ybatm BIDnoBIO do YNHINX HOPM KpAHA BKKOPNCTAHNA.
3.4 Ponepejxbybhi 3nakn
DtoPmmyTecbIhCTpykui,IO3a3naueHbIbIPOBIDHMN POnepdxyBaIbHMN 3NaAMnHa npIcTpoI.
Ipebeipte, 06o BOHn 6yIn HA MUCi Ta IX MOxHA NERKO npOuHTaN; IHAKue, BCTAHOBIT 3AMHHI 3AKn HAI XMCUE.

CMMBON E1-Bka3ye Ha te, 10 npmtcpiH Me MoKHa ytnis3yBaTHA NKo7yTOBE CMITRA; Ioro MOKHa nepeatn Haa3d Jo Maar3HHY naac
NOKNYK HOBORO NIPCTPOKO.EEKEPTHNI Ta ENEKTOPHHIa TCHTHI NIPCTPOHO MEOKHA BHKOPICTOByBATn 3 INIO MOETO,60 BOHN MCTTb WKIDNBd IDAZDOPO8 JIOJIMIN YEOBHHOI.

CMMBON E2 - Bka3ye Ha te, 10 npnctpi npni3hauhenm dny npoepeciohaIbHOrO BHKOpNCTAHNA, TO6To dny IIOJei, Kki MaKoTb
Ocbdiobotn 3 HMM TaIOHFOPMOBAI IPO bIOIbNDIH TEXHUIH, IOPINHNI
Ta peYITNBIHcAeNTKMI TOHO3cTOCBVAHHA, a TAKOK B M303I BVKOVBaTH
onepaii, neo61hJI dAR BVOKPOTAHNtBa OcbNJyBOvBAHHn PRCIOPO.

CmBbON E3 - Bka3ye Ha te, 10 npnctpi npni3nauehen nIa HnpofoeciohAblHoro (noyTOBoro) BkOpmCTAHHa.
4 TEXHIUHA IHΦOPMALIJA (MAJI.1)/CTOPIHKA.3
4.1 Ppeed6auehe BnKOpncTaNHH
Ie npnctpr npn3hauhe NO npe npcoaHbHoro MNTT RA TpHcNtphTHNX 3ac0B, Bepcati, YOBHIB, KAM HHOI KNAKIO TUO TOA nIy DIIJAEHHRA CTIKOKO 6bpdy 3a donOMORO IO CHTOI BOIN TA XIMIHIX MMOHIX 3ac0B, Rki MOKytb 6biOnHIO p03KnadITAC.
Дыгуну traphonotrochix MakoMH NTINIJISEYMOBUN,IOO 6pDnya BODA yTNI3yBC7cR 3rHNO YHHINX HOPM.
-Temepatypa BODHn HxOdi: DHB. Ta6NIuO 3 TexHcHMN DaHMM Ha npHCTpoi.
-TnCK BOnHa BxOJI:Min.0,1MNa-makc.1MNa.
- Poboia TeMnepaTypa HabKoNlHbOro cepeOboMa: BInze 0^
PnCtpi nD BvOCKIM TmCKOM BiNObiAde CTAndapTy EN 60335-2-79/A1.
4.2 Onepatop
CmBbON Ha nepeHn Kpmu Bn3nae nepe6aByBaHO onepatop npnctpo (npopecioHan abo henpocicnoan).
4.3 HenpaBnIbHe BkOpNCTaHH
3aBOpOHBeTbA BIKOPACTAHN PnIcTOO HENJIOTOBINHMIOJAM aO bTM, XTO He pOPIHTaB THe oZp3MYN BkAIBKIN B NOCHIKY.
3a6o0haTbca 3aONBHOBAtn pInCTpi BOrHHe6e3neuHHMn, BV6yXOBMM TaTOKCHHMPiDINHAM.
3a6o0haTbca BnKOpNTaHHI pNtCpO b Micux, de icHcy 3arpo3a BnHKHeHHI NOxekj a6o BVbxy.
3a6oPONETBCB NIKOPCTOBYBATNI HeOpRITAHbHI a6o 6yIb-IAki iHsi He npri3hauheni dna doHO moeni detani.
3a6op0n8b7cb 6ydb-kaMH OMMOHMOKiyBAtN pRnCTpR. BHEcEHHa Bydb- kXmI Dn POPICTPOO AHyIOE Keknauo BIOJNOBIOHcTO t 3BbHIOE BBOHIOHA BID ydb-kyhA cMUBHINbX BOOJIpaNHNX IOOBINX 3aBH.
4.4 OCHOBHI KOMTOHETN
B1 Hacadka-po3nnIOBaU 3 moJNIBCTIOpeyIIOBaHH
B2 Tpy6ka
B3 IicToNET-po3nHIOBau 3aNo6iHKOM
B4 KaBeIb JmBnEHHa I3 WTeNceJIbHOIO BmKIOU(Ha MoDJIeX 3 Ucio fHyKJIeIO)
B5 ⅢNaHR BVCOKOROTCKY
B6 EMHICTbIgMNIQUHX3acO6IB (HaMOJeIAX 3IeIO fHyHKJIeIO)
4.4.1 Doadamkoi KomnoheHmu (KuO 6xOaMtb do KOMnIeKmy - duB. man.1)
C1 IHTpymENTIINHueHHaHacakn
C2 KomIIeKTI NOBOPOTHOHaCaJKN
C3 Pyka
C4 LiTiKa
C5 Kotyuka nlaaHa
C6 KomnIeKt IJN BCMOKTyBaHHA BOIN
C7 Kit pulizia tubazioni
C8 Komnnekt zitkn 3 npokoio nobepxheo
C9 KomnJIeKr nepexiDnKiB
4.5 Pnucptoi6e3neek
Y8a2a:He6e3ne4Ho!
He npuyyute i He 3miHoiTe HalaawtyBaHb 3anobixhoro Klanana.
3a06kHmKnaanTa/a6oKnaanObMxekHHTuCKy.
3anobixhnn KnanaH nykntb TAKOX i nA BNO MekenHH TCKY. KaIOB bINCTyTN NcKOBN BAXINb NcIOTeta-Po3nIMNoBaHa, KnaHAN BIDPKBaTbcra, I BOda peuMpkymoe Ype3 BxIHm KANAH HACOc aBOV BMInBaTbcHa naINDory.
-Knahan mepmocmama (D1, kUIO BCTaHOBNEHO)
Kyuio Tempepatyura Bodin nepebniuye Tempepatyupy, nepebdacyeH BmboNkhKom, klanan Tepmoctata Binnyckae rapaury BoD IBCMOTYE 06EM XoJNOHOI Bo, uOpoBDHIOE 06EM ByNUyeHOI Bo, dOKn He bdy BIDHOBNEHOHNMOPALHY TEMpepaty.
-3anobixnHK(D):3anobiraeBnauKOBOMByNTiKaHHO BOI.
5 YCTAHOBKA (MAJI.2)/CTOPIHKA.4
5.1 36mpaHn
YBa2a:He6e3ne4Ho!
Пд ус BCSTAHOBLENHЯ та 3биранн ппстрий NOBHN 6уTN RAHIM BID MEPEKIXI XIBLENH.
PocnilodOBHCTb 36paHHa HabeHa Ha Man.2.
5.2 BctaHOBJHnIOBOPOTHOHaCaJKN
(ДЯ модени,ию obnaDHani Liειн haackoI)
KOMPNEKT NOBOPTOHoi Hacakn 3a6e3neuey eibb nOtuyknn CTpyminb niq ac mTTA.
BWKOPKATAHNA NOBOTPOTHI HACdIK MOKE CIPMHUN THJHXENHA TCKY HA 25% nopIBHANO 3 TOKMO,DCORHYTMM 3A DOMONTOIO HAcADKN-PO3NIJIOBAa 3 MOKHINBCTO perYGNIBOHAA.
Pntoe KOMNIeKTI NOOBOTHOI HauaKaHn 3a6e3neueyE 6InbUy NOTyXHICTb MNTTAR 3aBdKNoOeptAHNIO CTpyMeHr BOuN.
5.3 PII'EDaHHaDo oJeKtPomepekei
YBa2a:He6e3ne4Ho!
Ipepeipte, YH anpyra ta qactota (B-fu) enektpomepeki B1noidiiaotb bka3aHHM y tabniuq TeKTHHx dAHHx HA npiCTpO (man.2).PiCtprk moKhna ndyBAtn NHe 0epeke KHNBeHHN 3 B1noidiHaMM 3a3eMeHHaM Ta dupepeuaJIbHM 3ano6iHKHMo (30 MA), kHm y BuNDaKKPOTKO 3AMKaHHa ABOMATNUHO BiKKnOuae noctaehnn Eektpoeheptri.
5.3.1 BukopucmaHHa Ka6eHn noDobKeHHa
BmKOpMCTobyIte Ka6eniTaIeTcebnHbINBnK 3 pIBHE m3xHcyTIPX5". PnoaIOnnepeHOro nepeRi3y Ka6enIONoDBeKHeNOBnIHbA 6ytI npOnopuHa I noRo DObXnHi - YmO DBnUk Ka6enB, TMI b6IbHM Ma6 ytnI NnoaI OnoNepeHOro nepeRi3y. DvB. Ta6nIuI.0
5.4 PII'EDHNNB BOJONOCTaAHN
YBa2a:He6e3ne4Ho!
Bukopncrobyte nme cycty a6o fiibtpobany Body. Kpan
noaui BoiMa 3abe3neueyBatn npodykTbHcIb,ka dopibHo npodykTbHocI t Hacoca.
Po3auyyTe npicrpi kHaH6mJxue do CnCTeMn BODOnOCTaAHN.
5.4.1 Touku nii'deHaHnHa
BmxdoN (OUTLET)
YkpaHcKa
BxidBoD3ΦinbTpOM(INLET)
5.4.2 Pio'd'ehanHn do noaui bOdu 3 boDOnpoBody
PnucptiM MoKHa PnueDnATn Do BOOpnpOBOy 3 mTHoO BOIOO
mIue y TOMBnADky, KONI zriHO uHHNX HOPM IuaHr nOaadi
oblaHaHO KlnaHOM, 30 zanO6irae 3bOpTOMHy xOdy BOuN.
Tepebiye, Tnu HAIR Mae noCNIHny OboLOHKy i Joro diaMetp
CTaOHOBt npIHnMI 13MM.
6 IHΦOPMALIJI PTOPEYJIOBAHNR (MAJ.3)/CTOPIKA.5
6.1 PeryiobHnHa cAaKm-po3nnIOBau (Ipy MoenE 3 HacaoKIO) HanaotobyuOuHcAaKy-po3nnIOBau,MOJHa peryiOBaT nOTIK BODI(E).
6.2 PerynIOBaHNy NpOaJI MmOChOro 3aoc6y (Ha MoIeJIax 3 cIeIO yHkUJIeIO) PIoJaA MmOChOro 3aoc6y peryIIOCTbca 3a DonIpOMrO peryIaToppa (F).
6.3 Peryiobnna Tckmy Mioyoro 3acoby BCTAHOBIT hACdky, zo peryiocbTa (E),B noJIOKeHHra " 一 ^ 一 ,uo6 noaHa MMIOOry 3acoby 3diHCHOBanaCb 3 HaneKHM TcKOM (Ha moDJIeXs 3 iE0 MOKNIbICTo).
6.4 Perynombahna Tcky (Mo mojEeX 3 liEIO yHkuieO) IaIpepynombahna pooTOOHO YKINOPOTOBeycBpaYnnrTop (G).TckNOKa3yctbHa NAMOHETPI (RkUO BII BCTAHOBHEIN).
7 IHHOPMAUJIIPIO BINKOPUCTAHNJIPINCPTPOI (MAJI.4/)//CTOPIHKA.5
7.1 3ac6b nperynIOBaHnn
-Пускови пристри(H).Востановьп Урскови посямочу поожени (ON/1) за торо,лб6:
a) 3aynctmtn MToP (ДЯМоDeн, як He o6nlaHAni MoDyJem 63eNeku TSS).
b) p306kooyatmOpT (IaM MOeJeN, ObnadhanHx MoyEnM 6beNkem TSS).
JaIOHa NcKOBOMy PnIcTPOI cMIHaNbHa NMAba, NOBa BOHNHIA zarOpITNC.
JaIOcO ePeyrIopTowlhigh), BnOKiPCTOByTe IHO kACTYNHM YIHOM:
LOW: MNTTIIHn3bKMM TCKOM
High: MUTTA NID BUCOKM TNCKOM
BCTAHOBITyNcKOBNIpeMmKau y nonoKeHHa (OFF/0) IaI toro, 0o6 BMMKHyTI npICtpi.
JaKoHa NyckOBomy npnCTpoI e CnHbHa lamna, BOHa NOBHHa NOTyXHTN.
-BaxjinberpyunIOBaHHCTpymHIOBODI(I).
YBa2a:He6e3neuH!
7!Piudacpo6to3npnctpoemmoeroeooxioho po3aowbattnak noka3anoHa(man.4)HaTbepr,ciiKni nobepxhi。
7.2 PtoaToKpO60Tu
1)ПовпICTIOВIDКРИТЕ КРAN NOДАС ВОДN.
2) 3eBilbHItb 3an06ixHHK (D).
3) hematite pyckobmi baxib nictoleta-po3nnioubaa h naekibka cekynd i ybimkhit npncrtpr 3a donomorio nyckoboro nepemikaua (ON/1).
YBa2a:He6e3ne4H!
11 PeneT TMN, JY yBIMKHYTH npnCTPII, nepeBiPte, YN npaBnIbHO nIDcHAno HJNAH noDau CBOi. BHKOpNTAHN npnCTPOO 63 Beq Bodn noIKoNDtB MOrO. PII qac BVOKOPCTAHN npnCTPOI He 3akPBBAITE BEHTNIJIUII PEWITKM.
Moden, o6naaHani CnCTeMO 63neKu TSS -PnMooJe TSS iCnCTeMO abTOMATUHOro BIDKNIOENHa NOdauNOTOK:
- KAKBO DIBYNCTWY NUCOBXN BAXJIb NICTOLETA-PO3NIHNOBAA, DAHNMIHN HTKB ONATMUYHO BIVMNKOTE (IMAN, Ma.);
- JAKIO HATNCHYTN IYCKOBH BAXJIb NICTOJETA-P03NIMNOBAA, 3MEHSEHHA TINCKY ABTomTnHO YBMKHe MOTOP i TICK BIDHOBNtBCa 3 HE3HAHOKO 3ATPMNKOKO;
- danso, tioo 6cntema TSS yHKNUOHybana HaneKHM UHOM. yci onepaui 3aKpBnHaT Ta BIDKpBnHaN NICToIeta He CnD 3d iINCHOBATM 3 ihePBNAM MHeH Hk4-5 cekyHJ.
Pnpo60ti 3 ptnpfa3HMMM MOdenRMn Dn npopecioaHbHorO BWNOPCTAHN Pnpi nepwomy yBIMKHHENI CNOATKY 3anycttb Npncptri Nmie HA KOpOTKNI cac,IO6 nepebpInTN,CHB nPpABINbHOMy HAprrMKy o6eptaTcBcA MOTOP. Rkso BENTNIATOP MToPOA o6eptaTeCBn npTO rOdoHNHKOBIOT CPINK, NOMIHNE Ta 3 Tbox fa3OBNX dpoTIB (L1,L2,L3) B eNEKTPNUHOMY 3EHyBaYi.
OBCLNYTOBYBAHHA (MAJI.5)/CTOPIHKA.6
Yci onepaui 6cnlyrobyabHn, He zadani y bomy po3dini, noBHHi 3diNCHOBATNCYNBOHBAXeHIM LcHTPOM npOdaxy Ta 6cnlyrobyabHn.
Yaba:heGesEnHou! Neped BOKHOAHHAM
Peped BmKoHannM 6yIaKx Po6t i3 o6cNpyBvAHn npHctpo 06ob'3kOBO BmMaIte wTeCenb Ka6eNo KnBLeHn3 pOsetKn.
8.1 YnueHna hacaKn-po3nnIObaya
1) Bij'cEiHaIte HacaIky-po3nIIIOBau b iD tpy6Kn.
2)ПочntтьТВОВРирознлівачаВidбудздпогюинсгүмэн(C1).
8.2 YmueHHa fInbtpa
Perek DOKHMI BIKOPICTAHMIM BIKOHYJIte ORIAD BCMOKTYQUHOFO fIIbTPA (L) iΦilbTa MPKMOHx 3aocBIB (RAKIO BCTAOHBNOHE) Ta OHINTiB ix BIINOBIDHO DO IHCTyPKU, y pazi HEo6XIDHOCT.
8.3 Po36nokyBaHnHa MoTpa (HaMoJeIaX 3JiEIO fHyKJIeIO)
y p3ai TpBnHx 3ynHIOK y p60ti TBYOpeHHA BANHINX BkJNaDeHB MOpKe np3IbCTeNo 3akNIOHOBAA HMOtpa.1o6 pO3bNOkyBatmTOpO, npOpeBNtB BeDyUH BAn 3a DonOMTOHO IcHTpyMeHa (M).
8.4 36epirannnpiicxoxoJOnOHoroe30Hy
Ipeed TMM,AK NOMICTMNI pIcTPIH 3MIOBE 36epiagHNA, obooItb IHO 3 BIKOPMCtAHHHN EKOpO3NBHOI HETOKCNHOrO aHTNΦpH3Y.
36epiraite npnilad y cyxomy Micci, 3axnuehomy BiD MOp03y.
9 YCYHEHHA HECNPAHBOCTEI
10 AYHKNHYTN OISHKOJXEHN HIOBEPXOHb


YBATA! / OBEPEXHO!
10.1 MttTt sHnPiD BvCOKM TnCKOM MoKe NpWKoDnTu Hny i CTAHOBnTu He6e3NeKy.
10.2 He cnpmaOByIe CTpyMeHi BOiPiB VBCOKM TnCKOM 6e3nocepEnbHO Ha SHNHy.
10.3 KopcIyTeKa HAIHINKuHM perYJIIOBaHNHM TNCKY MmIKu BUCOKOTo TNCKY NiD YAC MHTTR HABKOLO KICcI iJHH
10.4 He Kopnctyntecra Tpy6oHaKoHeuHnKom dIa MMTTb 6yDb-koJt cactHHMaunHH.
10.5ДлгOTPIMAHHДODaTkoBoI iHΦOpMaUii DB.pO3iIN,7.7 PeKOMeHDoBaHa npOeDpya MTTT".
UK Dekaapuaia BiNobiAdocti NpeKtBi EC
Mn, komnania Annoni Reverberi S.p.A., Bomporto (Mo), Itania d3a8bIeMo, 10o nHxue3a3auhenm npictpi Michelin:
Distributed under licence by
MICHELIN and/or the Michelin Man Device and/or BIBENDUM are trademark(s) owned by, and used with the permission of, the Michelin Group. © 2012 Michelin
www.michelin.com