
TOPCLEAN 1800PRO+ - Washing machine Ulsonix - Free user manual and instructions
Find the device manual for free TOPCLEAN 1800PRO+ Ulsonix in PDF.


| Product type | Scrubber dryer |
| Brand | Ulsonix |
| Model | TOPCLEAN 1800PRO+ |
| Supply voltage | 220-240 V ~ 50 Hz |
| Nominal power | 1200 W |
| Brush diameter | 432 mm |
| Brush speed | 175 rpm |
| Clean water tank capacity | 5 L |
| Protection rating | IPX4 |
| Shipping dimensions (L x W x H) | 265 x 162 x 92 cm |
| Weight | 38.5 kg |
| Intended use | Wet cleaning of hard floors |
| Compatible floors | Concrete, epoxy, tile |
| Commercial use | Hotels, schools, hospitals, factories, shops, offices |
| Hard bristle brush | Included |
| Soft bristle brush | Included |
| Pad holder | Included |
| Handle adjustment | Adjustment lever |
| Safety | Safety switch |
| Start | Right and left start buttons |
| Fluid adjustment | Adjustment knob |
| Daily maintenance | Draining and rinsing the tank, cleaning the brush, winding the cable |
| Motor maintenance | Switch on every 15 days |
| Recycling | Recyclable appliance, do not dispose of with household waste |
Frequently Asked Questions - TOPCLEAN 1800PRO+ Ulsonix
User questions about TOPCLEAN 1800PRO+ Ulsonix
0 question about this device. Answer the ones you know or ask your own.
Ask a new question about this device
Download the instructions for your Washing machine in PDF format for free! Find your manual TOPCLEAN 1800PRO+ - Ulsonix and take your electronic device back in hand. On this page are published all the documents necessary for the use of your device. TOPCLEAN 1800PRO+ by Ulsonix.
USER MANUAL TOPCLEAN 1800PRO+ Ulsonix

A – Lochplatte
B – Mutter
C – Klemmhalterung
3) Bürstenmontage/-demontage
This User Manual has been translated for your convenience using machine translation. Reasonable efforts have been made to provide an accurate translation; however, no automated translation is perfect nor is it intended to replace human translators. The official User Manual is the English version. Any discrepancies or differences created in the translation are not binding and have no legal effect for compliance or enforcement purposes. If any questions arise related to the accuracy of the information contained in the User Manual, please refer to the English version of those contents which is the official version.
Technical data
| Parameter description | Parameter value |
| Product name | Scrubbing machine |
| Model | TOPCLEAN 1800PRO + |
| Supply voltage [V~] / frequency [Hz] | 220-240/50 |
| Rated power [W] | 1200 |
| Brush diameter [mm] | 432 |
| Brush speed [rpm] | 175 |
| Clean water container capacity [l] | 5 |
| IP protection class | IPX4 |
| Shipping dimensions (LxWxH) [cm] | 265 x 162 x 92 |
| Weight [kg] | 38.5 |
1. General Description
The manual is intended to assist in safe and reliable use. The product is designed and manufactured strictly according to technical specifications using the latest technology and components and maintaining the highest quality standards.
CAREFULLY READ AND UNDERSTAND THIS MANUAL BEFORE STARTING THE WORK.
To ensure the long and reliable operation of the device, make sure to operate and maintain it properly following the guidelines in this instruction manual. The technical data and specifications in this manual are up-to-date. The manufacturer reserves the
right to make changes to improve the quality. Taking the technical progress and the possibility of reducing noise into account, the unit is designed and built in such a way that risks resulting from noise emissions are reduced to the lowest possible level.
Explanation of symbols
| CE | The product complies with applicable safety standards. |
 | Read the manual before use. |
 | Recyclable product. |
 | CAUTION! or WARNING! or REMEMBER! A general warning sign that describes a given situation. |
 | Wear ear protection. Exposure to noise may cause hearing loss. |
 | Wear protective goggles. |
 | Wear a dusk mask (protecting the respiratory tract). |
 | Wear protective gloves. |
 | Wear protective footwear. |
 | Wear a protective suit. |
 | CAUTION! Spinning elements! |
 | For indoor use only. |

CAUTION! The figures in this manual are illustrative only and may vary in some details from the actual appearance of the product.
2. Safety of use

CAUTION!
Read all safety warnings and instructions. Failure to follow the warnings and instructions may result in electric shock, fire, and/or serious injury or death.
The term "device" or "product" in the warnings and the description of the instructions refers to:
Scrubbing machine
2.1. Electrical safety
a) The plug of this device must fit into the outlet. Do not modify the plug in any way. Original plugs and matching outlets reduce the risk of electric shock.
b) Avoid touching grounded parts, such as pipes, heaters, ovens, and refrigerators. There is an increased risk of electric shock if your body is grounded and touches the device while exposed to direct rain, wet pavement, or while working in a damp environment. If water enters the device, there is an increased risk of damage to the unit and electric shock.
c) Do not touch the device with wet or damp hands.
d) Do not use the cord in an unintended manner. Never use it to carry the device or to pull the plug out of the socket. Keep the cord away from heat sources, oil, sharp edges, or moving parts. Damaged or tangled cords increase the risk of electric shock.
e) If you cannot avoid using the product in a wet environment, use a residual current device (RCD) to connect it to electrical mains. Using an RCD reduces the risk of electric shock.
f) Do not use the appliance if the power cord is damaged or shows signs of wear. A damaged power cord should be replaced by a qualified electrician or the manufacturer's service department.
g) Take special care that the power cords are not caught by the rotating components of the device.
2.2. Safety in the workplace
a) Keep the work area tidy and well-lit. Disorder or poor lighting can lead to accidents. Be foresighted, watch what you are doing, and use common sense when using the unit.
b) Do not use the unit in an explosive area, for example in the presence of flammable liquids, gases, or dust. The unit produces sparks that can ignite dust or fumes.
c) If you find any damage or irregularities in the operation of the product, immediately turn it off and report it to an authorized person.
d) If in doubt as to whether the device is working, contact the manufacturer's technical service.
e) Repairs to the device may only be carried out by the manufacturer's service. Do not attempt to repair the product on your own!
f) In case of open flames or fire, use only dry powder or snow (CO2) fire extinguishers to extinguish the live equipment.
g) No children or unauthorized persons are allowed in the work area. (Inattention may result in loss of control of the unit.)
h) Use the unit in a well-ventilated area.
i) Check the condition of the safety stickers regularly. Replace them if they are illegible.
j) Keep these instructions for use for future reference. If the product is to be handed over to a third party, hand it over with this user manual.
k) Keep packaging components and small installation parts out of the reach of children.
I) Keep the device away from children and animals.

Remember! Keep children and other bystanders safe while operating the appliance.
2.3. Personal safety
a) Do not operate this device if you are tired, ill, or under the influence of alcohol, drugs, or medication that could impair your ability to operate the device.
b) The unit may be operated by persons who are physically fit, capable of operating it, and appropriately trained, and who have read this instruction manual and have been trained in occupational safety and health.
c) The machine may be used by children over 8 years of age and persons with limited mental, sensory, and intellectual functions or lack of experience and/or knowledge if they are supervised by or have been instructed by a person
responsible for their safety on how to operate the machine safely and understand the risks involved.
d) Use caution and common sense when operating this unit. A moment's inattention during the operation may result in serious personal injury.
e) Use personal protective equipment as required when operating the unit as specified in Section 1 of the explanation of symbols. The use of appropriate, approved personal protective equipment reduces the risk of injury.
f) To prevent accidental start-up, make sure the switch is in the off position before connecting to a power source.
g) Do not overestimate your capabilities. Maintain body balance and equilibrium at all times during operation. This allows for better control of the machine in unexpected situations.
h) Do not wear loose clothing or jewelry. Keep hair, clothing, and gloves away from moving parts. Loose clothing, jewelry, or long hair can be caught in moving parts.
i) The product is not a toy. Children should be watched to ensure that they do not play with the appliance.
2.4. Safe use of the product
a) Do not use the device if the control switches do not function properly. Devices that cannot be controlled by switches are unsafe, cannot work, and must be repaired.
b) Disconnect the device from the power supply before adjusting, cleaning, or servicing. This precaution reduces the risk of accidental start-up.
c) Keep unused product out of the reach of children and anyone unfamiliar with the device or this manual. Products are dangerous when used by inexperienced users.
d) Keep the product in good working order. Check before each use for general damage or damage to moving parts (cracks in parts and components or any other condition that may affect the safe operation of the device). If damaged, return the device for repair before use.
e) Keep the product out of the reach of children.
f) Repairs and maintenance should be carried out by qualified personnel using only original spare parts. This will ensure the safety of use.
g) To ensure the designed operational integrity of the device, do not remove factory-installed covers or loosen screws.
h) When transporting or moving the device from storage to the place of use, observe the health and safety rules for manual handling applicable in the country where the device is used.
i) Avoid situations in which the device stops under heavy loads during operation. This can cause overheating of the drive elements and consequent damage to the equipment.
j) Do not touch any moving parts or accessories unless the device is unplugged.
k) Do not leave the device switched on unattended.
I) Clean the device regularly to prevent permanent dirt build-up.
m) The product is not a toy. Cleaning and maintenance must not be performed by children without adult supervision.
n) Keep the unit away from sources of fire and heat.
o) It is forbidden to use the machine "dry", i.e. with an empty clean water tank.
p) Before any work with the device, check the correct installation of the brushes and the tank.
q) The cleaned surface should be free from hazardous elements. Always ensure that there are no metal objects or other materials in the work area that, if thrown back by the rotating elements, could cause property damage or injury.
r) It is prohibited to clean surfaces soiled with toxic, corrosive, explosive, etc. substances.
s) When working, hold the handle of the machine with both hands.
t) Caution! Before the cleaning process, moisten the carpet with water to reduce friction between the surfaces!
u) Clean the entire device and the brushes after each use of the device. Secure the power cord.
v) During a prolonged break in the use of the device, carry out a test run every 15 days.
w) If a characteristic odor or smoke appears while using the device, turn off the device immediately!
x) When using the device, move slowly and steadily. It is not allowed to run with the device.
y) The brushes of the device should not rotate clockwise!
z) It is forbidden to use the device outdoors in the rain! It can be damaged!
aa) Caution! The device should be stored in a dry, well-ventilated room!
bb) Note: Use only the brushes supplied with the device or offered by the manufacturer. The use of other brushes may reduce the safety of the machine.

CAUTION! Although the product has been designed to be safe, with adequate safeguards, and despite the additional safety features provided to the user, there is still a slight risk of accident or injury when handling the unit. Caution and common sense are advised when using the product.
3. Instructions for use
The device is designed for wet cleaning of concrete, epoxy, tiled floors, etc. The machine is designed for commercial use, such as in hotels, schools, hospitals, factories, stores, offices, and rental stores.
The operator is responsible for any damage caused by misuse.
3.1. Product overview
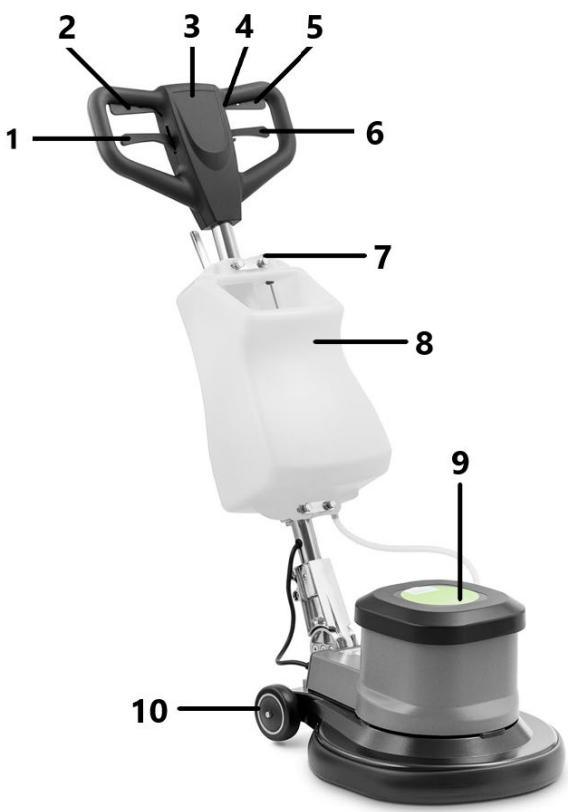

1 - Handle adjustment lever
2 - Start button
3 - Handle
4 - Safety switch
5 - Start button
6 - Water tank lever
7 - Fluid adjustment knob
8 - Water tank
9 - Engine
10 - Wheel
11 - Hard bristle brush
12 - Brush with soft bristles
13 - Holder pad
3.2. Preparation for operation
1) Installation of the control lever
Place the base of the control handle on the back of the device body. Align the screw holes of both parts. Screw the used parts together with the countersunk head screws.

A - Countersunk cross-head screws
B - Base of the control handle
C - The body of the device
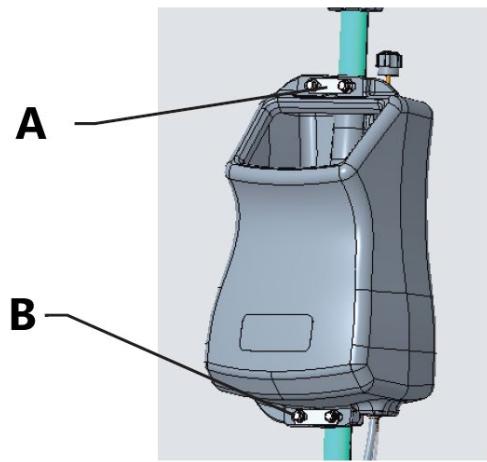
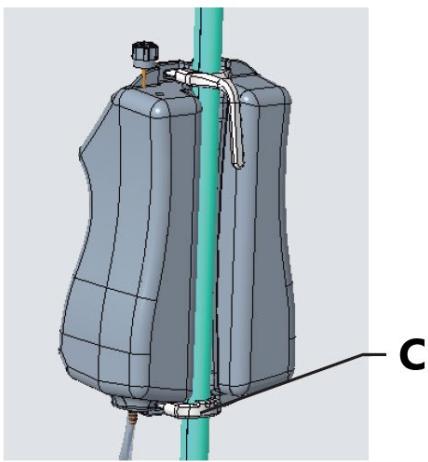
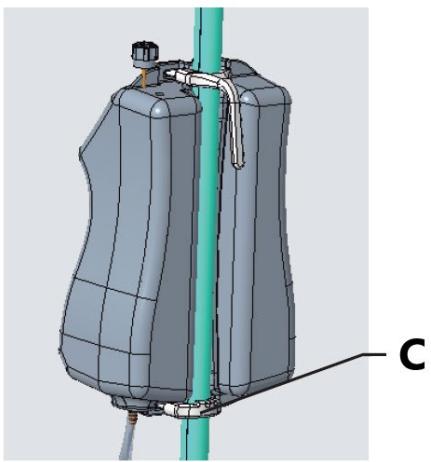
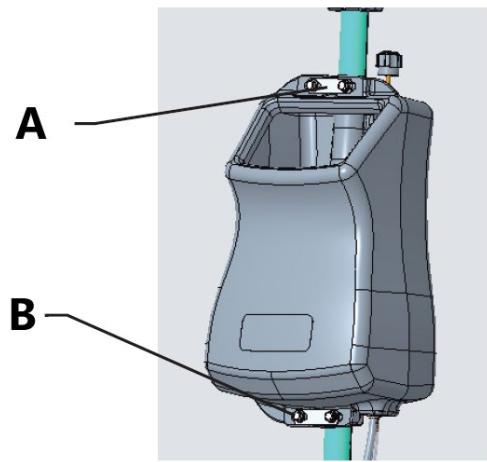
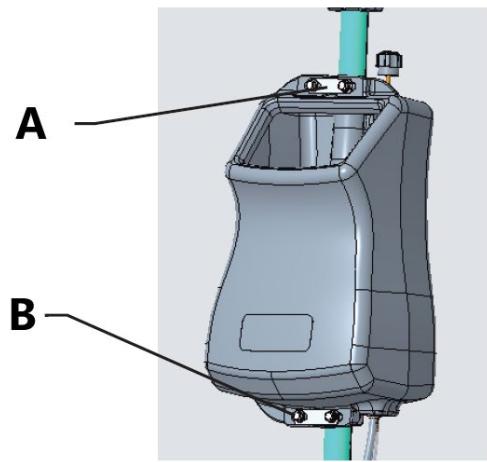
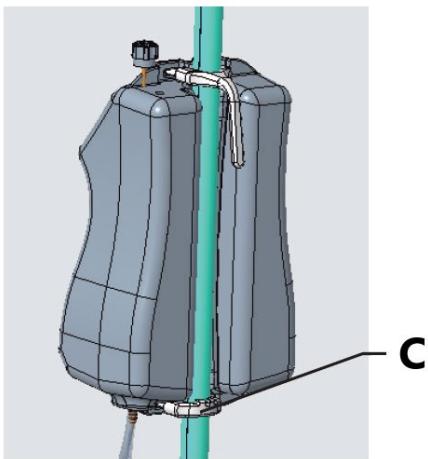
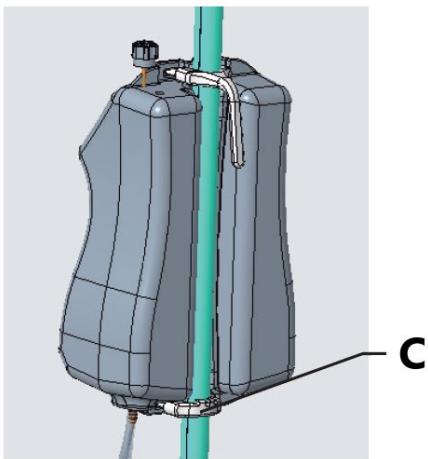
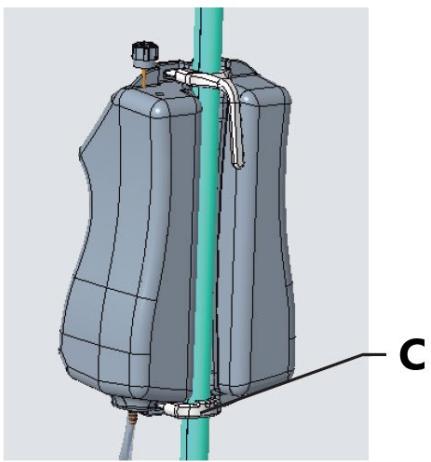
2) Installation of the tank
a) Place the tank on the control handle tube.
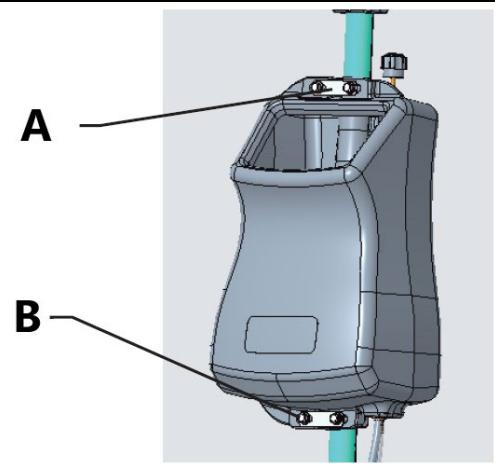
b) Use two clamps to attach the tank to the tube of the control handle. Then install the hole plate and tighten the nuts on the threads of the clamping bracket.
c) Connect the water pipe to the water outlet connector.


A - Plate with holes
B - Nut
C - Clamping bracket
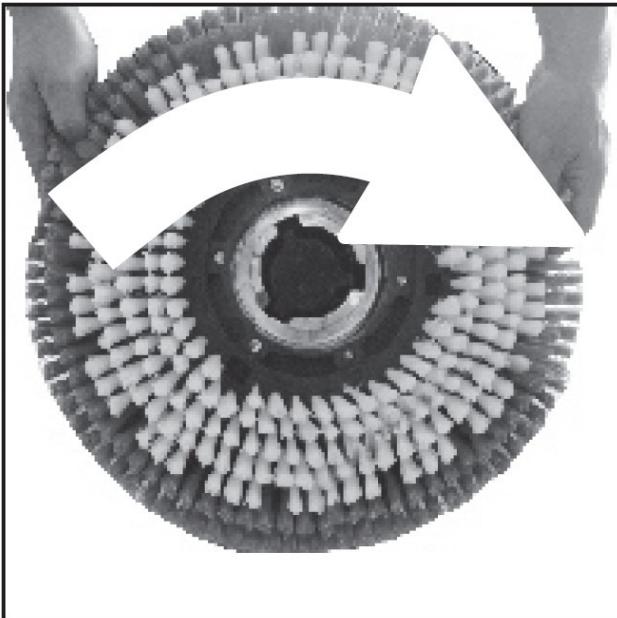
3) Brush assembly/disassembly
a) Make sure that the device is turned off and disconnected from the power supply.
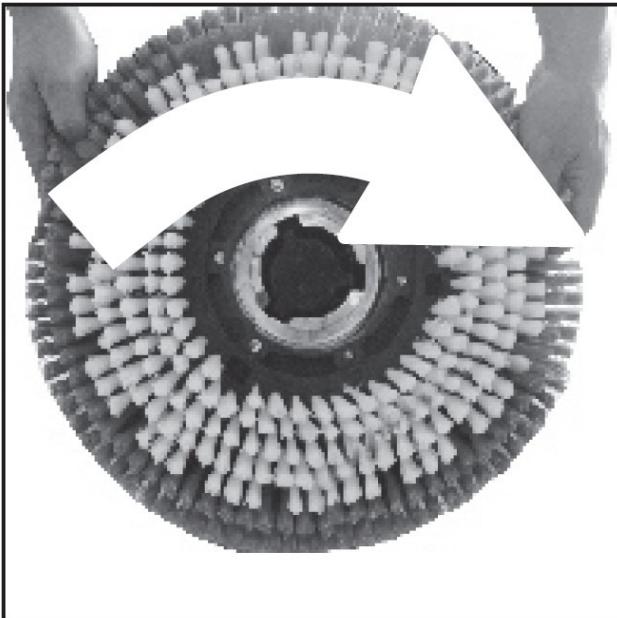
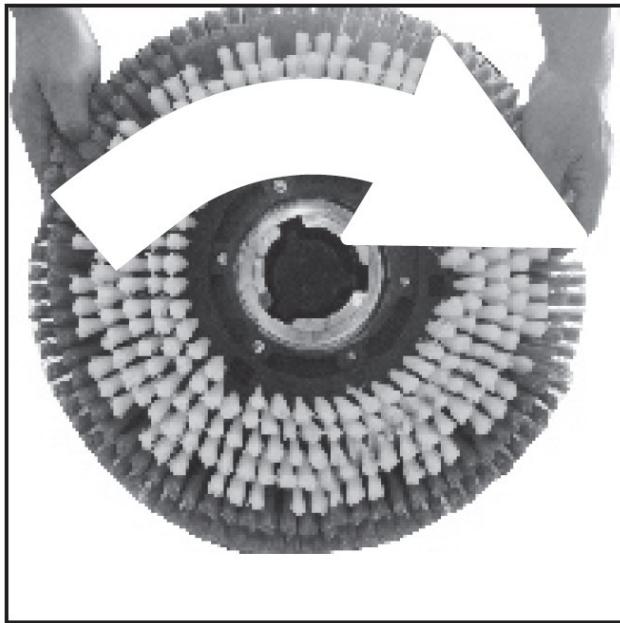
b) Turn the engine 90°, align the brush with the hook and connect them.

c) Rotate the brush 30° counterclockwise to complete the brush assembly.

d) When disassembling the brush, rotate it 30° to the right, then the brush can be removed.
4) Pour water into the tank
Fill the tank with the correct amount of water and detergent according to the conditions of the task.
3.3. Working with the device
Adjust the handle of the machine so that the operator can stand upright and both hands are slightly bent while working. Shake the control handle vertically to check that it is properly mounted. Press the safety button and then press the start buttons to start cleaning. When the machine is running, slightly lift or press the control lever, then the machine can move to the right or left.

A - Right start button
B - Handle adjustment lever
C - Safety button
D - Left start button
E - Fluid adjustment knob
• Before cleaning, put up appropriate warning signs.
- When cleaning the surface, do not stop, so that the intensity of the brush does not damage the floor material.
- The speed of the device should be adjusted to the type of surface and its cleanliness.
3.4. Cleaning and maintenance
a) Pull the mains plug and let the unit cool down completely before cleaning, adjusting or replacing accessories and when the unit is not in use. Wait until the rotating parts stop.
b) Use only non-corrosive cleaning agents for cleaning surfaces.
c) After each cleaning, all parts should be thoroughly dried before the device is reused.
d) Store the unit in a dry and cool place protected from moisture and direct sunlight.
e) Do not spray the unit with a stream of water or immerse it in water.
f) Make sure that no water enters through the ventilation openings in the casing.
g) Clean the ventilation openings with a brush and compressed air.
h) Perform regular inspections of the unit checking technical fitness and any damages.
i) Use a soft cloth for cleaning.
Daily maintenance
When you have finished working with the appliance:
1) Drain the dirty water from the tank and rinse it with clean water.
2) Remove and clean the brush.
3) Roll up the power cord and hang it on the handle.
Maintenance of the engine
If the machine is not going to be used for a long time, it is recommended to start it every 15 days so that the engine starts working. This will avoid soggy parts and damage to the engine.
Disposal of used devices
At the end of its useful life, this product should not be disposed of with normal household waste but should be taken to a collection point for the recycling of electrical and electronic equipment. This is indicated by the symbol on the product, operating instructions, or packaging. The materials used in this appliance are recyclable according to their marking. By reusing, recycling, or applying other forms of use of waste machines, you make a significant contribution to the protection of our environment.
Your local administration will provide you with information about the appropriate disposal point for used appliances.
3.5. Assembly drawings
Engine
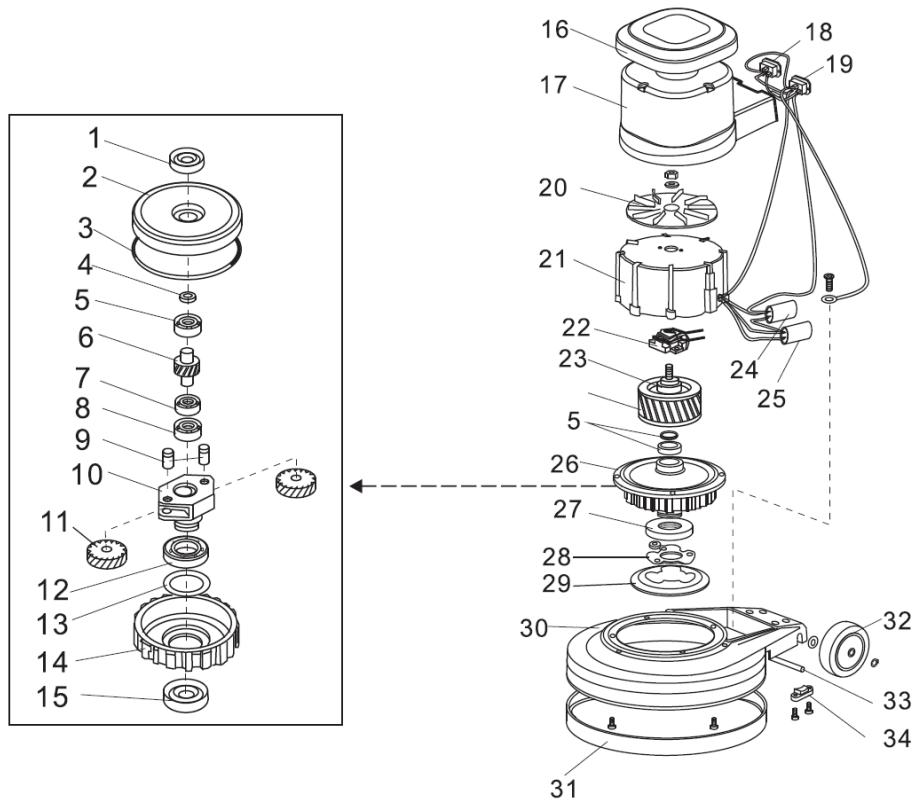
1 - Oil seal
2 - Top cover
3 - Sealing ring
4 - Gasket
5 - Bearing E20
6 - Intermediate shaft
7 - Bearing 16004
8 - Bearing E15
9 - Gear shaft
10 - Gear holder
11 - Gear wheel
12 - Bearing 16011
13 - Gasket
14 - Planetary gear
15 - Oil seal
16 - Top cover
17 - Motor housing
18 - Angled socket
19 - Inlet socket
20 - Cooling fan
21 - Stator housing
22 - Starter switch
23 - Rotor
24 - Capacitor
25 - Capacitor
26 - Gearbox
27 - Drive hub
28 - Drive hub plate
29 - Drive plate
30 - Appliance body
31 - Rubber buffer
32 - Wheel
33 - Wheel axle
34 - Axle lock
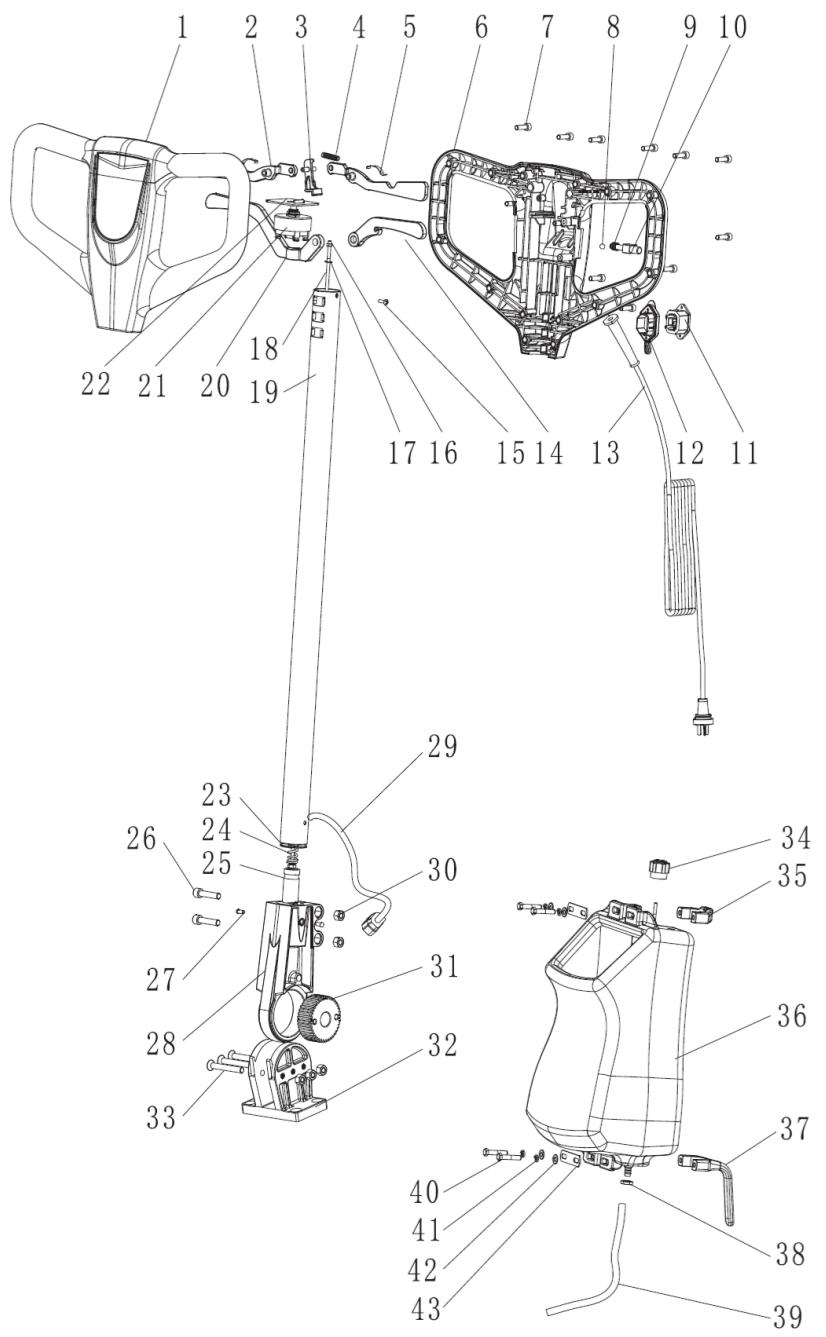
Control system

1 - Front cover of the handle
2 - Start button
3 - Switch
4 - Spring
5 - Spring washer
6 - Rear handle cover
7 - Hexagon socket screw
8 - Steel ball
9 - Spring
10 - Protective switch
11 - Three-hole socket
12 - Slot cover
13 - Cable
14 - Water tank holder
15 - Cross-socket screws
16 - Locknut
17 - Gasket
18 - Inner bar (154/175)
19 - Control stick
20 - Hinge holder
21 - Switch
22 - Switch handle
23 - Flat washer
24 - Movable hinge spring
25 - Small gear wheel
26 - Hexagon socket screw
27 - One-side closed rivet
28 - Movable hinge
29 - Cable
30 - Locknut
31 - Large gear wheel
32 - Hinge body
33 - Flat head screw with hexagon socket
34 - Knob
35 - Clamping bracket
36 - Water tank assembly
37 - Cable holder
38 - Nut
39 - Hose
40 - Hexagonal head screw
41 - Spring washer
42 - Flat washer
43 - Clamping plate
Electrical diagram

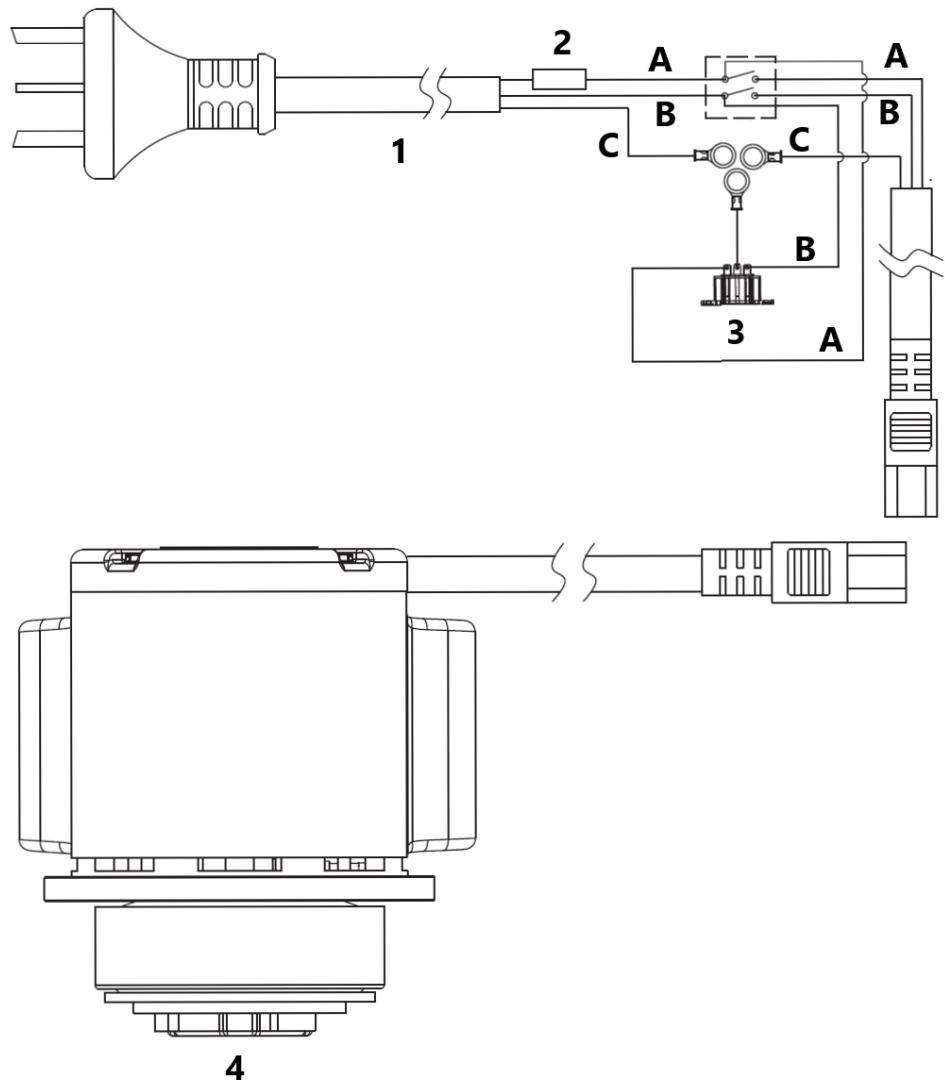
1 - Power cord
2 - Fuse
3 - External connector
4 - Engine
A - Brown
B - Blue
C - Yellow and green

UWAGA! The figures in this manual are illustrative only and may vary in some details from the actual appearance of the product.






A - Plade med huller
B - Møtrik
C - Klemmebeslag


A - Plate med hull
B - Mutter
C - Klemmebrakett
4) Hell vann i tanken
1 - Oljepakning
2 - ∅vre deksel
3 - Tetningsring
4 - Pakning
5 - Lager E20
6 - Mellomaksel
7 - Lager 16004
8 - Lager E15
9 - Giraksel
10 - Girholder
11 - Girhjul
12 - Lager 16011
13 - Pakning
14 - Planetgir
15 - Oljepakning
16 - ∅vre deksel
17 - Motorhus
18 - Vinklet muffe
19 - Innløpsmuffe
20 - Kjølevifte
21 - Statorhus
22 - Startbryter
23 - Rotor
24 - Kondensator
25 - Kondensator
26 - Transmisjon
27 - Drivnav
28 - Drivnavplate
29 - Drivplate
30 - Apparathus
31 - Gummipuffer
32 - Hjul
33 - Hjulaksel
34 - Aksellås
Styringssystem
1 - Frontdeksel på håndtaket
2 - Startknapp
3 - Bryter
4 - Fjær
5 - Fjærskive
6 - Deksel til bakre håndtak
7 - Sekskantskrue
8 - Stålkule
9 - Fjær
10 - Beskyttelsesbryter
11 - Trehulls hylse
12 - Spordeksel
13 - Kabel
14 - Vanntankholder
15 - Kryssskruer
16 - Låsemutter
17 - Pakning
18 - Innvendig stang (154/175)
19 - Kontrollspak
20 - Hengselholder
21 - Bryter
22 - Bryterhåndtak
23 - Flat skive
24 - Bevegelig hengselfjær
25 - Lite tannhjul
26 - Sekskantskrue
27 - Lukket nagle på én side
28 - Bevegelig hengsel
29 - Kabel
30 - Låsemutter
31 - Stort tannhjul
32 - Hengselhus
33 - Flathodeskrue med sekskantskrue
34 - Knott
35 - Klemmebrakett
36 - Vanntankenhet
37 - Kabelholder
38 - Mutter
39 - Slange
40 - Sekskantskrue
41 - Fjærskive
42 - Flat skive
43 - Klemmeplate
Elektrisk skjema

1 - Strømledning
2 - Sikring
3 - Ekstern kontakt
4 - Motor



A - Doska s otvormi
B - Matica
C - Upínacia konzola
1 - Tesniaci krúžok
2 - Horný kryt
3 - Tesniaci krúžok
4 - Tesnenie
5 - Ložisko E20
6 - Medzihriadel'
7 - Ložisko 16004
8 - Ložisko E15
9 - Ozubený hriadel'
10 - Držiak prevodu
11 - Ozubené koleso
12 - Ložisko 16011
13 - Tesnenie
14 - Planétová prevodovka
15 - Tesniaci krúžok
16 - Horný kryt
17 - Skriňa motora
18 - Uhlová objímka
19 - Vstupná objímka
20 - Chladiaci ventilátor
21 - Skriňa statora
22 - Spínač štartéra
23 - Rotor
24 - Kondenzátor
25 - Kondenzátor
26 - Prevodovka
27 - Náboj pohonu
28 - Doska náboja pohonu
29 - Doska pohonu
30 - Telo spotrebiča
31 - Gumový tlmič
32 - Koleso
33 - Náprava kolesa
34 - Zaistenie nápravy
Riadiaci systém



A - Ploča s rupama
B - Matica
C - Stezni nosač
3) Sastavljanje/rastavljanje četke
d) Prilikom rastavljanja četke, okrenite je za 30° udesno, tada se četka može ukloniti.
4) Ulijte vodu u spremnik
1 - Uljna brtva
2 - Gornji poklopac
3 - Brtveni prsten
4 - Brtva
5 - Ležaj E20
6 - Međuvratilo
7 - Ležaj 16004
8 - Ležaj E15
9 - Osovina zupčanika
10 - Držač zupčanika
11 - Zupčanik
12 - Ležaj 16011
13 - Brtva
14 - Planetarni zupčanik
15 - Uljna brtva
16 - Gornji poklopac
17 - Kućište motora
18 - Kutna utičnica
19 - Ulazna utičnica
20 - Ventilator za hlađenje
21 - Kućište statora
22 - Prekidač pokretača
23 - Rotor
24 - Kondenzator
25 - Kondenzator
26 - Mjenjač
27 - Glavčina pogona
28 - Ploča glavčine pogona
29 - Pogonska ploča
30 - Kućište uređaja
31 - Gumeni odbojnik
32 - Kotač
33 - Osovina kotača
34 - Blokada osovine
Upravljački sustav

1 - Prednji poklopac ručke
2 - Tipka za pokretanje
3 - Prekidač
4 - Opruga
5 - Opružna podloška
6 - Stražnji poklopac ručke
7 - Šesterokutni vijak
8 - Čelična kuglica
9 - Opruga
10 - Zaštitni prekidač
11 - Utičnica s tri rupe
12 - Poklopac utora
13 - Kabel
14 - Držač spremnika za vodu
15 - Vijci s križnim utorom
16 - Kontramatica
17 - Brtva
18 - Unutarnja šipka (154/175)
19 - Upravljačka palica
20 - Držač šarke
21 - Prekidač
22 - Ručka prekidača
23 - Ravna podloška
24 - Pomična opruga šarke
25 - Mali zupčanik
26 - Šesterokutni vijak
27 - Jednostrano zatvorena zakovica
28 - Pomična šarka
29 - Kabel
30 - Kontramatica
31 - Veliki zupčanik
32 - Tijelo šarke
33 - Vijak s ravnom glavom i šesterokutnim utorom
34 - Gumb
35 - Stezni nosač
36 - Sklop spremnika za vodu
37 - Držač kabela
38 - Matica
39 - Crijevo
40 - Vijak sa šesterokutnom glavom
41 - Opružna podloška
42 - Ravna podloška
43 - Stezna ploča
Električna shema
1 - Kabel za napajanje
2 - Osigurač
3 - Vanjski konektor
4 - Motor
A - Smeđa
B - Plava
C - Žuta i zelena

d) Išardydami šepetj, pasukite jj 30° j dešinę, tada šepetj bus galima nuimti.


4) Nalijte vodo v rezervoar
1 - Tesnilo olja
2 - Zgornji pokrov
3 - Tesnilni obroč
4 - Tesnilo
5 - Ležaj E20
6 - Vmesna gred
7 - Ležaj 16004
8 - Ležaj E15
9 - Zobniška gred
10 - Nosilec zobnika
11 - Zobnik
12 - Ležaj 16011
13 - Tesnilo
14 - Planetni zobnik
15 - Tesnilo olja
16 - Zgornji pokrov
For the disposal of the device please consider and act according to the national and local rules and regulations.
CONTACT
expondo Polska sp. z o.o. sp. k.





- BÜRSTENMONTAGE/-DEMONTAGE
- GENERAL DESCRIPTION
- CAUTION! THE FIGURES IN THIS MANUAL ARE ILLUSTRATIVE ONLY AND MAY VARY IN SOME DETAILS FROM THE ACTUAL APPEARANCE OF THE PRODUCT
- SAFETY OF USE
- CAUTION
- ELECTRICAL SAFETY
- SAFETY IN THE WORKPLACE
- PERSONAL SAFETY
- SAFE USE OF THE PRODUCT
- INSTRUCTIONS FOR USE
- PRODUCT OVERVIEW
- PREPARATION FOR OPERATION
- INSTALLATION OF THE CONTROL LEVER
- INSTALLATION OF THE TANK
- BRUSH ASSEMBLY/DISASSEMBLY
- POUR WATER INTO THE TANK
- WORKING WITH THE DEVICE
- CLEANING AND MAINTENANCE
- DAILY MAINTENANCE
- MAINTENANCE OF THE ENGINE
- DISPOSAL OF USED DEVICES
- ASSEMBLY DRAWINGS
- ELECTRICAL DIAGRAM
- HELL VANN I TANKEN
- ELEKTRISK SKJEMA
- ULIJTE VODU U SPREMNIK
- ELEKTRIČNA SHEMA
- NALIJTE VODO V REZERVOAR
- CONTACT
Brand : Ulsonix
Model : TOPCLEAN 1800PRO+
Category : Washing machine