
TOPCLEAN BATA 2200 - Washing machine Ulsonix - Free user manual and instructions
Find the device manual for free TOPCLEAN BATA 2200 Ulsonix in PDF.


| Product type | Scrubber dryer |
| Brand | Ulsonix |
| Model | TOPCLEAN BATA 2200 |
| Voltage | 24 V |
| Battery | 12 V / 52 Ah maintenance-free |
| Cleaning performance | 2200 m²/h |
| Brush diameter | 400 mm |
| Squeegee width | 580 mm |
| Clean water tank capacity | 25 L |
| Dirty water tank capacity | 35 L |
| Brush motor power | 500 W |
| Suction motor power | 550 W |
| Protection rating | IPX3 |
| Dimensions (L x W x H) | 130.5 x 58 x 115 cm |
| Weight | 82.2 kg |
| Suitable surfaces | Floors made of epoxy resin, painted, concrete, ceramic tile |
| Suitable environments | Restaurants, hotels, cafés, cinemas, gyms, offices |
| Features | ECO mode, handle height adjustment, indicator lights |
| Maintenance | Draining and cleaning the tanks after each use, cleaning the squeegee |
| Safety | Protection against moisture, battery handling instructions |
| Spare parts | Available from the manufacturer, parts diagram provided in the manual |
| Repairability | Repairs by an authorized technician, replacement of carbon brushes possible |
Frequently Asked Questions - TOPCLEAN BATA 2200 Ulsonix
User questions about TOPCLEAN BATA 2200 Ulsonix
0 question about this device. Answer the ones you know or ask your own.
Ask a new question about this device
Download the instructions for your Washing machine in PDF format for free! Find your manual TOPCLEAN BATA 2200 - Ulsonix and take your electronic device back in hand. On this page are published all the documents necessary for the use of your device. TOPCLEAN BATA 2200 by Ulsonix.
USER MANUAL TOPCLEAN BATA 2200 Ulsonix
Abbildung 1
A- Batterieanzeige
B- Schlüsselschalter

This User Manual has been translated using machine translation. We have made every effort to ensure the translation is accurate, but please note that automated translations are not perfect and are not meant to replace human translators. The official version of the User Manual is in English. Any differences between the translated version and the original English are not legally binding. If you have any questions about the accuracy of the translation, please refer to the English version, which is the official reference. More language versions are available upon request via info@expondo.com.
Technical data
| Parameter description | Parameter value |
| Product name | Floor scrubber |
| Model | TOPCLEAN BATA 2200 |
| Voltage [V] | 24 |
| Battery type | 12 V / 52 Ah |
| Cleaning efficiency [m2/h] | 2200 |
| Brush diameter [mm] | 400 |
| Squeegee width [mm] | 580 |
| Clean water tank [L] | 25 |
| Dirty water tank [L] | 35 |
| Brush motor [W] | 500 |
| Sucker motor [W] | 550 |
| IP protection class | IPX3 |
| Dimensions (LxWxH) | 130.5 x 58 x 115 cm |
| Weight [kg] | 82.2 |
Description

The product is designed for use on various commercial floors, including epoxy resin, painted, concrete, and ceramic tile surfaces. It is suitable for a range of settings such as restaurants, hotels, cafes, cinemas, leisure clubs, gyms, and office buildings.
The user is liable for any damage resulting from unintended use of the device.
Operation
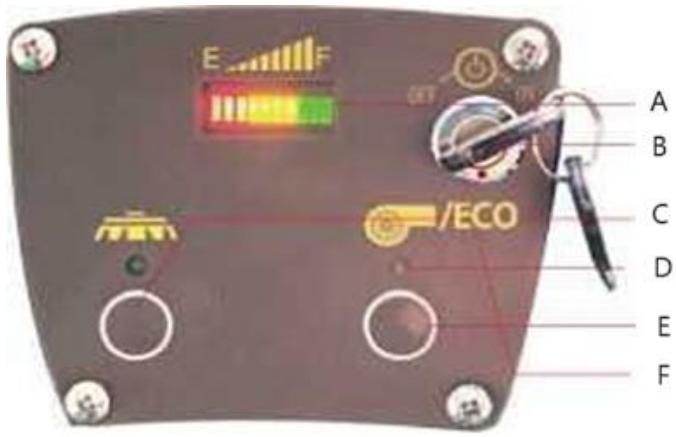
Figure 1
A- Battery indicator
B- Key switch
C- Brush switch button
D- Indicator light
E- Suction switch button, long press for 3 seconds
F- Enter silent energy saving
- Unpack the machine, remove it from the tray, place it on the ground, and install the cleaning brush and squeegee.
- Lift the angle adjustment handle to approximately 90° 120° , remove the recovery tank, locate the battery's terminal connectors, attach the red wire to the positive terminal and the black wire to the negative terminal (as shown in Figure 2), and secure them with screws.

Figure 2
A- Battery connection diagram
B- Black wire
C- Red wire
- Install the sewage tank, connect the suction pipe, and fill the clean water tank with a suitable detergent solution.
- Familiarize yourself with the functions and purposes of each component and the control handle buttons as shown in Figure 1.
- Secure the squeegee in place, ensuring it lies flat on the ground. Pull the angle adjustment handle to set it at a comfortable height for the operator, then release it.
- Before starting the machine, grip the control handle firmly with both hands, ensuring no one is standing near the machine to prevent potential injury if the scrubber moves suddenly. Activate the main switch, suction motor, and drainage switch on the control handle panel; the indicator lights will illuminate, and the machine will begin operating.
- Long press the suction switch button for 3 seconds to enter the ECO mode, which reduces noise and saves energy.
Cleaning and maintenance
Basic instructions
- Although the machine is designed to be moisture-proof, under normal use, ensure that no water enters the electrical components to prevent short circuits or electric shocks. Avoid allowing water or detergent to contact the power plug or body circuits.
- Do not attempt to disassemble the machine by yourself. If the motor or circuit is faulty, contact us or an authorized dealer for repairs.
- Do not use excessive force. Use the plastic handles, levers, and control buttons gently to prevent unnecessary damage.
- After each use, drain the clean and sewage water tanks, and clean the sewage tank and pipelines to prevent blockages.
- Clean the squeegee after each use and dry it with a soft cloth.
- If the machine is stored for an extended period, charge the battery regularly to maintain battery life.
Battery maintenance
- Avoid placing the battery in a completely enclosed area; it should be in a ventilated space.
- To extend battery life, recharge the battery promptly when it is low. Avoid storing the battery at a low or zero charge for prolonged periods, as this can lead to damage.
- The allowable operating temperature range for the battery is -15°C to 50°C , with optimal lifespan achieved at 20°C to 25°C .
- This is a maintenance-free sealed battery, requiring minimal upkeep. For batteries in a floating charge system, it is recommended to log the system's floating charge voltage and ambient temperature monthly. Record the floating charge voltage of each battery every six months, and, if there are significant discrepancies, perform a yearly balanced charge. Additionally, conduct a capacity discharge test without exceeding 50% of the rated capacity.
- Recharge discharged batteries as soon as possible, as delays may make recharging difficult. For batteries in long-term storage, recharge at least once a year.
- If the battery shows abnormal signs, such as a cracked casing, damage, or leakage, inspect it thoroughly, and replace the battery if necessary.
Battery precautions
- Keep the battery away from sparks and flames to prevent the risk of explosion.
- Clean the battery with a damp cloth; using a dry or synthetic cloth may create static electricity, potentially leading to an explosion.
- Avoid using solvents like incense, coke water, perfume, gasoline, diesel, or other soluble organic cleaners, as they can damage the battery cover and may cause leaks, fire, or smoke.
- Do not dismantle the battery. If sulfuric acid contacts skin or clothing, rinse immediately with water. For eye contact, flush with water and seek medical attention promptly.
- When inspecting or maintaining batteries, wear rubber gloves, boots, and other protective gear to prevent electric shock.
- Avoid installing the battery near any heat sources.
Disposing of used devices
Do not dispose of this device in municipal waste systems. Hand it over to an electric and electrical device recycling and collection point. Check the symbol on the product, instruction manual, and packaging. The plastics used to construct the device can be recycled following their markings. By choosing to recycle you are making a significant contribution to the protection of our environment.
Contact local authorities for information on your local recycling facility.
Troubleshooting
| Problem | Possible cause | Solution |
| The motor starts slowly. | Poor contact of carbon brushes in the motor. | Check clean or replace carbon brush. |
| The motor does not rotate. | The power switch is damaged, or the power cord is not connected well or there is no power. | Replace the switch and check if there is electricity. |
| Slow power when the motor is working. | The carbon brushes in the motor are severely worn and have poor contact. | Replace the carbon brush. |
| The suction motor works but cannot absorb water. | Check whether the pipe is blocked.Check whether the suction pipe is connected. | Clean the sewage tank and pipeline, reconnect the suction pipe, and seal it. |
| The motor rotates but the brush does not move. | The rotor and gear joints are worn out and the contact is poor. | Replace the motor rotor or gear. |
| When the power supply voltage is normal, turn on the drain switch but cannot drain the water. | The drain switch is damaged, the drain valve is burned out, and the water outlet of the clean water tank is blocked. | Replace the drain switch, replace the solenoid valve, and clean up the debris in the clean water tank. |
| The control handle cannot be adjusted. | Rusty tines. | Whether the adjusting rod is loose, please replace or repair it if necessary. |
Parts diagram
1. The main structure

| Part number | Description |
| 1 | Base frame |
| 2 | Squeegee assembly |
| 3 | Brush motor |
| 4 | Handle assembly |
| 5 | 400 clean water tank |
| 6 | 400 dirty water tank |
| 7 | 400 water tank cover |
2. Base frame

| Part number | Description |
| 1 | Base frame |
| 2 | Bearing caster Φ200X50 |
| 3 | 2.5 inch universal wheel |
| 4 | Water absorption motor 24V 500W 2 layers |
| 5 | Water absorption motor fixing plate |
3. Squeegee assembly

| Part number | Description |
| 1 | Suction on the stand |
| 2 | Suction connecting rod |
| 3 | Suction down stand |
| 4 | 1.5 inch universal wheel |
| 5 | Suck |
4. Brush motor

| Part number | Description |
| 1 | Nose connecting rod |
| 2 | Motor fixing plate |
| 3 | Brush motor 24v 400W |
| 4 | 16 inch brush plate |
| 5 | Brush disc lock |
| 6 | Brush cover |
| 7 | Pull plate |
5. Dirty water tank

| Part number | Description |
| 1 | Dirty water tank |
| 2 | Sewage pipe |
| 3 | Sewage suction pipe |
6. Battery connection instructions
Remark!!! Before using for the first time, connect the batteries. Follow the instructions below:
- First, you need to lift the water tank. It is not attached to the device in any way.

- Set the tank aside.
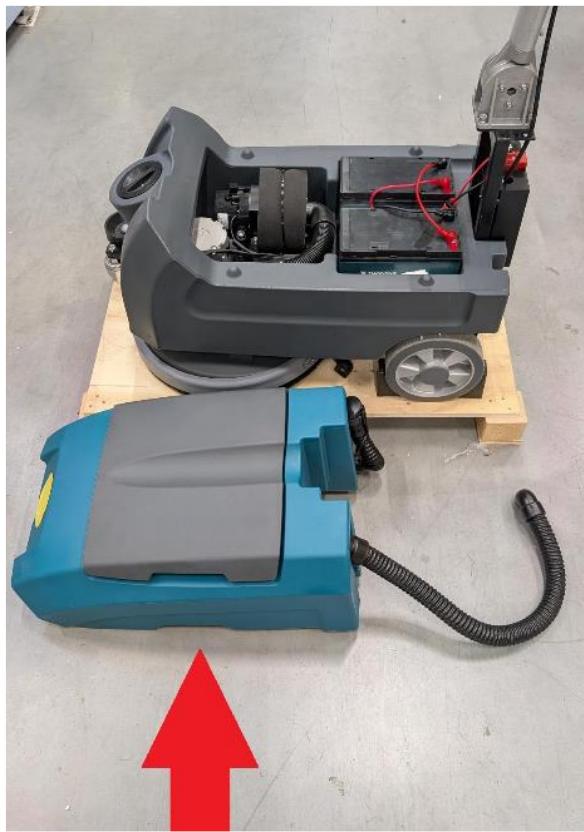
- Next, you need to find two connectors.

- Then you need to connect these two connectors and close everything in reverse order.


Rysunek 1

Obrázek 1
A- Indikátor stavu baterie
B- Klíčový spínač

Figure 1

Figura 1

Figura 1

- ábra

Figur 1
A- Batteriindikator
B- Nøgleafbryder
| Delnummer | Beskrivelse af apparatet |
| 1 | Sugning på stativet |
| 2 | Sugestang |
| 3 | Sugning ned ad stativet |
| 4 | 1,5 tommer universalhjul |
| 5 | Sugning |
4. Børstemotor


Kuva 1
A- Akun merkkivalo
B- Avainkytkin
C- Harjakytkimen painike
D- Merkkivalo

Afbeelding 1
A- Accu-indicator
- Zet de tank opzij.


Figur 1
A- Batteriindikator
B- Nøkkelbryter
| Artikkelnummer | Beskrivelse |
| 1 | Basisramme |
| 2 | Skrapesammenstilling |
| 3 | Børstemotor |
| 4 | Håndtaksammenstilling |
| 5 | 400 rentvannstank |
| 6 | 400 skittenvannstank |
| 7 | 400 vanntankdeksel |
2. Basisramme

| Artikkelnummer | Beskrivelse |
| 1 | Basisramme |
| 2 | Lagret hjul Φ200X50 |
| 3 | 2,5 tommers universalhjul |
| 4 | Vannabsorpsjonsmotor 24V 500W 2 lag |
| 5 | Festplate for vannabsorpsjonsmotor |
3. Skrapesammenstilling

| Artikkelnummer | Beskrivelse |
| 1 | Sugefeste øvre del |
| 2 | Sugeforbindelsesstang |
| 3 | Sugefeste nedre del |
| 4 | 1,5 tommers universalhjul |
| 5 | Sug |
4. Børstemotor


Figur 1
A- Batteriindikator
B- Nyckelbrytare
C- Knapp för borstfunktion
D- Indikatorlampa
- Ställ undan tanken.
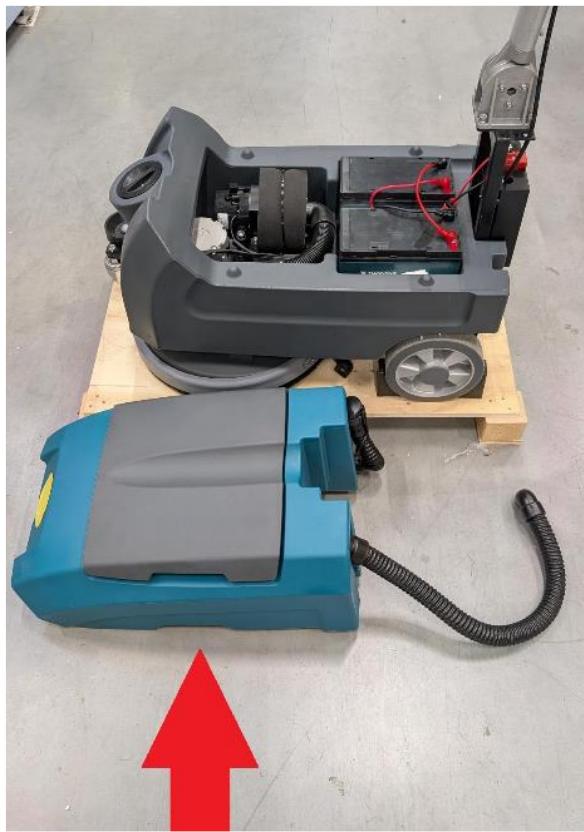

Figura 1
A- Indicador da bateria
B- Interruptor de chave

Obrázok 1
| Diel č. | Popis |
| 1 | Nádrž na špinavú vodu |
| 2 | Odpadové potrubie |
| 3 | Sací potrubie na odpadovú vodu |
6. Pokyny na pripojenie batérií

Фигура 1
| Номер на частта | Описание |
| 1 | Основна рамка |
| 2 | Ролка с лагер Ф200X50 |
| 3 | 2,5-инчово универсално колело |
| 4 | Мотор за всмукване на вода 24V 500W, 2 слоя |
| 5 | Пластина за закрепване на мотора за всмукване на вода |
- Оставете резервоара настрана.


Εικόνα 1

Proizvod je namijenjen za upotrebu na različitim komercijalnim podovima, uključujući površine od epoksidne smole, bojane, betonske i keramičke pločice. Prikladan je za razna okruženja kao što su restorani, hoteli, kafići, kina, rekreacijski klubovi, teretane i uredske zgrade.
Korisnik je odgovoran za svaku štetu nastalu nenamjenskom upotrebom uređaja.
Rukovanje

Slika 1
A- Indikator baterije
B- Ključna sklopka
| Broj dijela | Opis |
| 1 | Osnovna rama |
| 2 | Sklop brisača |
| 3 | Motor četke |
| 4 | Sklop ručke |
| 5 | Spremnik čiste vode 400 |
| 6 | Spremnik prljave vode 400 |
| 7 | Poklopac spremnika vode 400 |
2. Osnovna rama

| Broj dijela | Opis |
| 1 | Osnovna rama |
| 2 | Kotačić s ležajem Φ200X50 |
| 3 | Univerzalni kotačić 2,5 inča |
| 4 | Motor za usisavanje vode 24V 500W 2 sloja |
| 5 | Pločica za pričvršćivanje motora za usisavanje vode |
3. Sklop brisača

| Broj dijela | Opis |
| 1 | Usisni nosač (gornji) |
| 2 | Usisna spojnica |
| 3 | Usisni nosač (donji) |
| 4 | Univerzalni kotačić 1,5 inča |
| 5 | Usisavanje |
4. Motor četke

- Odložite spremnik na stranu.

- Zatim morate pronaći dva priključka.


1 paveikslas
A- Akumuliatoriaus indikatorius
B- Raktinis jungiklis
- Toliau reikia surasti du jungiklius.


Figura 1
A- Indicator de baterie
B- Comutator cu cheie

Slika 1
A- Kazalnik stanja baterije
B- Ključ za vklop
C- Gumb za vklop krtače
D- Kontrolna lučka
E- Gumb za vklop sesanja, pritisnite in držite 3 sekunde
| Številka dela | Opis |
| 1 | Osnovni okvir |
| 2 | Sklop brisalca |
| 3 | Motor krtače |
| 4 | Sklop ročaja |
| 5 | Rezervoar za čisto vodo 400 |
| 6 | Rezervoar za umazano vodo 400 |
| 7 | Pokrov rezervoarja za vodo 400 |
2. Osnovni okvir

| Številka dela | Opis |
| 1 | Rezervoar za umazano vodo |
| 2 | Odtočna cev |
| 3 | Sesalna cev za odpadno vodo |
- Posodo odložite na stran.

For the disposal of the device please consider and act according to the national and local rules and regulations.
CONTACT
expondo Polska sp. z o.o. sp. k.




- OPERATION
- CLEANING AND MAINTENANCE
- BASIC INSTRUCTIONS
- BATTERY MAINTENANCE
- BATTERY PRECAUTIONS
- DISPOSING OF USED DEVICES
- PARTS DIAGRAM
- THE MAIN STRUCTURE
- BASE FRAME
- SQUEEGEE ASSEMBLY
- BRUSH MOTOR
- DIRTY WATER TANK
- BATTERY CONNECTION INSTRUCTIONS
- BØRSTEMOTOR
- BASISRAMME
- SKRAPESAMMENSTILLING
- POKYNY NA PRIPOJENIE BATÉRIÍ
- RUKOVANJE
- OSNOVNA RAMA
- SKLOP BRISAČA
- MOTOR ČETKE
- OSNOVNI OKVIR
- CONTACT
Brand : Ulsonix
Model : TOPCLEAN BATA 2200
Category : Washing machine