USER MANUAL LM60R-128 CHAMBERLAIN
| de | Anleitungen | - | Garagentorantriebe Modell LM60K, LM60R-128 |
| fr | Instructions | - | Modèle LM60K, LM60R-128 de ouvre-porte de garage |
| en | Instructions | - | Garage Door Operator Model LM60K, LM60R-128 |
| da | Instruktioner | - | Model LM60K, LM60R-128 Garageportsäbner |
| es | Instrucciones | - | Abridor de la puerta de garage, Modelo LM60K, LM60R-128 |
| el | Oëŋyíç§ | - | Mŋχavioμóç Avoiúμaτος Γκαραζόπορτας, Movτέλo LM60K, LM60R-128 |
| it | Istruzioni | - | Apriorta per garage ModelloLM60K, LM60R-128 |
| no | Instruksjonene | - | Garasjeportåpner, Modell LM60K, LM60R-128 |
| nl | Instrukties | - | Model LM60K, LM60R-128 Garagedeuropeaner |
| pt | Instruções | - | Operador automatico de porta, Modelo LM60K, LM60R-128 |
| sv | Instruktioner | - | Garageportöppnare Modell LM60K, LM60R-128 |
| fi | Ohjeet | - | Autotallin ovenavaaja, Malli LM60K, LM60R-128 |
| bg | Инструкции | - | Устroyстwo за уравлике на rapajхна вара Тмдел LM60K, LM60R-128 |
| cs | Návody | - | Pohon garážovych vrat model LM60K, LM60R-128 |
| hu | Átmutatók | - | A LM60K, LM60R-128, K700-as modell: garázsajtok hajtószerkeze |
| hr | Upute | - | Uredaj za otvaranje garañnih vrata Model LM60K, LM60R-128 |
| pl | Instrukcje | - | napęd drzwi garañowych model LM60K, LM60R-128 |
| ro | Instruktiuni | - | Dispozitiv de beschis uşa garajului modelul LM60K, LM60R-128 |
| ru | Инструкция | - | Пробот rapajхныворот, м做完ь LM60K, LM60R-128 |
| sl | Pogonska | - | enota garañnih vrat model LM60K, LM60R-128 |
| sk | Obrázky | - | Otvárač garážovych vrat model, LM60K, LM60R-128 |
| tr | Talmatlar | - | Garaj Kapisi Operatörü Model LM60K, LM60R-128 |
| sr | У数字货币 | - | Уреşaj за руковые вразима rapajxe Модал LM60K, LM60R-128 |
Manager, Regulatory Affairs
Chamberlain GmbH
D-66793 Saarwellingen
February, 2008
VEUILLEZ TOUT D'ABORD LIRE CES REGLES DE SECURITE IMPORTANTES


Manager, Regulatory Affairs
Chamberlain GmbH
D-66793 Saarwellingen
February, 2008
Start by Reading These Important Safety Instructions


Failure to comply with the following instructions may result in serious personal injury or property damage.
- Read these instructions carefully
- The garage door opener is designed and tested to offer reasonable safe service provided it is installed and operated in strict accordance with the instructions in this manual.
These safety alert symbols mean Warning - a personal safety or property damage instruction. Read these instructions carefully.
Warning: If your garage has no service entrance door, Model 1702E Outside Quick Release must be installed. This accessory allows manual operation of the garage door from outside in case of power failure.

Keep garage door balanced. Do not let the garage door opener compensate for a binding or sticking garage door. Sticking or binding doors must be repaired. Garage doors, door springs, cables, pulleys, brackets and their hardware are under extreme tension and can cause serious personal injury. Do not attempt to loose, move or adjust them. Call for garage door service.
Do not wear rings, watches or loose clothing while installing or servicing a garage door opener.
To avoid serious personal injury from entanglement, remove all ropes connected to the garage door before installing the door opener.
Installation and wiring must be in compliance with your local building and electrical codes. This is a class 2 double insulated product, connection to earth is not required or provided.
Lightweight doors of fiberglass, aluminum or steel must be substantially reinforced to avoid door damage. (See page 3.) The best solution is to check with your garage door manufacturer for an opener installation reinforcement kit.
The safety reverse system test is very important. Your garage door MUST reverse on contact with a 40mm obstacle placed on the floor. Failure to properly adjust the opener may result in serious personal injury from a closing garage door. Repeat the test once a month and make any needed adjustments.
This unit should not be installed in a damp or wet space.
Door must not extend over public byway during operation.

The Protector System must be installed when the force at the edge of the closing door force exceeds 400N (40kg). Excessive force will interfere with the proper operation of the Safety Reverse System or damage the garage door.
Permanently fasten the caution label adjacent to the wall-mounted door control control button as a reminder of safe operating procedures.

Disengage all existing garage door locks to avoid damage to garage door.

Install the lighted door control button (or any additional push buttons) in a location where the garage door is visible, at a height of at least 1.5m and out of the reach of children. Do not allow children to operate push button(s) or remote control(s). Serious personal injury from a closing garage door may result from misuse of the opener.

Activate opener only when the door is in full view, free of obstructions and opener is properly adjusted. No one should enter or leave the garage while the door is in motion. Do not allow children to play near the door.

Use manual release only to disengage the trolley and, if possible, only when the door is closed. Do not use the red handle to pull the door open or closed.

Disconnect electric power to the garage door opener before making repairs or removing covers.

This product is provided with a power supply cord of special design which, if damaged, must be replaced by a power supply cord of the same type; such a power supply cord may be obtained and fitted by a specialist.
| Contents | Page | Illustration |
| Safety Rules | 1 | |
| Before you Begin | 1 | |
| Door Types | 1 | 1 |
| Tools Required | 2 | 2 |
| Hardware Provided | 2 | 3 |
| Completed Installation | 2 | 4 |
| Assembly | 2 | 5-11 |
| Installation | 2-4 | 12-21 |
| Programming your Opener & Remote | 4 | 22 |
| Programming your Keyless Entry | 5 | 23 |
| Using the Wall-Mounted Door Control | 5 | 24 |
| Adjustment | 5 | 25-26 |
| Test the Safety Reversal System | 5 | .27 |
| Install the Protector SystemTM | | |
| (Optional) | 6 | 28 |
| Special Features of the LM60 | 6 | 29 |
| Accessories | 6 | 30 |
| Replacement Parts | 6 | 31-32 |
| Having a Problem? | 6-7 | |
| Care of your Opener | 7 | |
| Maintenance of your Operator | 7 | |
| Operation of your Opener | 8 | |
| Specifications | 8 | |
Before You Begin
- Look at the wall or ceiling above the garage door. The header bracket must be securely fastened to structural supports.
- Do you have a finished ceiling in your garage? If so, a support bracket and additional fastening hardware (not supplied) may be required.
- Depending on your door's construction, you might need a special door arm. See your dealer.
- Do you have an access door in addition to the garage door? If not, Model 1702E Outside Quick Release Accessory is required.
1 Door Types
A. One-Piece Door with Horizontal Track Only.
B. One-Piece Door with Horizontal and Vertical Track - Special door arm (E, The Chamberlain Arm™) and The Protector System™ (30(8)) required. See your dealer.
C. Sectional Door with Curved Track - See 20B - connect door arm. The Protector System™ (30(8)) is required for doors that are over 2.5m in height.
D. Canopy door - Special door arm (E, The Chamberlain Arm™) and The Protector System™ (30(8)) required. See your dealer.
E. The Chamberlain Arm™ for use on door types B and D.
3 Hardware Provided
(1) Hex Bolt (12) Lock Washer
(2) Clevis Pin (13) Hex Nut
(3) 8mm Carriage Bolt (14) Ring Fastener
(4) Wood Screws (15) Metric Tapping Screw
(5) Sheet Metal Screws (16) Hex Screw
(6) Clevis Pin (17) Stop Bolt
(7) Rope (18) Spring
(8) Handle (19) Flat Washer
(9) Insulated Staples
(10)Anchor (21)RailGreaseFlat
(11) Concrete Anchor
4 Completed Installation
As you proceed with the assembly, installation and adjustment procedures in this manual, you may find it helpful to refer back to this illustration of a completed installation.
(1)Header Sleeve (9)Light Lens
(2) Idler Pulley Bracket (10) Manual Release
(3) Trolley Rope & Handle
(4) Rail (11) Curved Door Arm
(5) Chain/Belt (12) Straight Door Arm
(6) Hanging Bracket (13) Door Bracket & Plate
(7) Power Cord (14) Header Bracket
(8) Opener (15) Trolley Release Arm
ASSEMBLY SECTION
IMPORTANT: If you have a canopy door, you need to use the instructions packed with The Chamberlain Arm™ Accessory in conjunction with this Owner's Manual when assembling the rail.
5 Assemble the Rail
Grease inside edges of rail sections using grease (1). Place rail pieces (2) on flat surface for assembly. All four rail sections are interchangeable. Slide rail brace (3) onto rail section. Connect rail by sliding rail brace onto next rail section. Tap rail assembly (4) on piece of wood (5) until rail sections are flush. Repeat with remaining rail sections.
6 Install the Chain/Belt
Remove chain/belt from carton and lay chain out on floor (do not allow chain/belt to twist).
A. Chain: Push pins of master link bar (3) through chain link (4) and hole in trolley (5). (see picture) Push cap (2) over pins and onto notches. Slide clip-on spring (1) over cap and onto pin notches until both pins are securely locked in place.
B. Belt: Hook the trolley connector (6) into the slot (7) on the trolley (8).
7 Insert Trolley & Idler Pulley Bracket into Rail
Slide idler pulley bracket (1) and inner trolley (2) into back (opener) end of rail assembly (3), be sure to insert idler pulley bracket as shown. Arrow on trolley (7) must face toward front (header) end of rail (4). Push idler pulley bracket toward front (header) end of rail (4). Insert carriage bolt (5) into bolt cut out in the idler pulley bracket (6).
8 Attach Trolley to Rail
Slide outer trolley (1) into back (opener) end of the rail assembly (2), be sure end with trolley release arm (3) is heading in direction of opener. Slide outer trolley down rail until it engages with inner trolley.
9 Fasten Rail to Opener and Install Chain/Belt
Remove four washeder bolts (1) from top of opener. Place rail (2) on opener, flush with stop (3) on top of opener. Wrap chain/belt (4) over sprocket (5). Push idler pulley bracket assembly toward front of the rail to eliminate excess slack in chain/belt. Align bolt holes on brackets (6) with bolt holes on opener. Secure brackets to opener with previously removed bolts. Tighten bolts securely. The opener sprocket teeth must engage the chain/belt.
CAUTION: Use only those bolts mounted in the top of opener. Use of any other bolts will cause serious damage to opener.
10 Attach Sprocket Cover
Place sprocket cover (1) on top of the opener (2), secure with screws (3). Insert bolt (4) into trolley stop hole (5), secure with washer (6) and nut (7).
11 Assemble Header Sleeve and Tighten Chain/Belt
Slide header sleeve (1) onto rail (5). Slide flat washer (3), spring (2) and washer (3) onto carriage bolt (4). Thread nut (6) onto carriage bolt until finger tight. Use an open end wrench (7) to tighten nut until the chain/belt is approximately 2mm above the base of the rail at its midpoint. DO NOT OVER TIGHTEN THE CHAIN OR BELT. See image (8).
INSTALLATION SECTION
Wear protective goggles when working overhead to protect your eyes from injury.
Disengage all existing garage door locks to avoid damage to the garage door.
To avoid serious personal injury from entanglement, remove all ropes connected to the garage door before installing the opener. It is recommended that the opener be installed 2,1m (7 feet) or more above the floor where space permits.
The header bracket must be rigidly fastened to a structural support of the garage. Reinforce the wall or ceiling with a 40mm (1-1/2") board if necessary. Failure to comply may result in improper operation of safety reverse system.
You can attach the header bracket either to the header wall (1) or to the ceiling (3). Follow the instructions which will work best for your particular requirements.
With the door closed, mark the vertical centerline (2) of the garage door. Extend line onto header wall above the door.
Open door to highest point of travel. Draw an intersecting horizontal line (4) on header wall 5cm(2^ ) above high point to provide travel clearance for top edge of door.
NOTE: Refer to vertical center and horizontal lines created in step 12 for proper placement of header bracket.
A. Wall Mount: Center the header bracket (1) on the vertical center line (2) with the bottom edge of the header bracket on the horizontal line (4) (with the arrow pointing toward the ceiling). Mark all of the header bracket holes (5). Drill 4,5 ~mm (3/16") pilot holes and fasten the header bracket with wood screws (3).
B. Ceiling Mount: Extend vertical center line (2) onto the ceiling. Center the header bracket (1) on the vertical mark no more than 150 mm (6") from the wall. Make sure the arrow is pointing toward the opener. Mark all of the header bracket holes (5). Drill 4,5 mm (3/16") pilot holes and fasten the header bracket with wood screws (3). For concrete ceiling mount, use concrete anchors (6) provided.
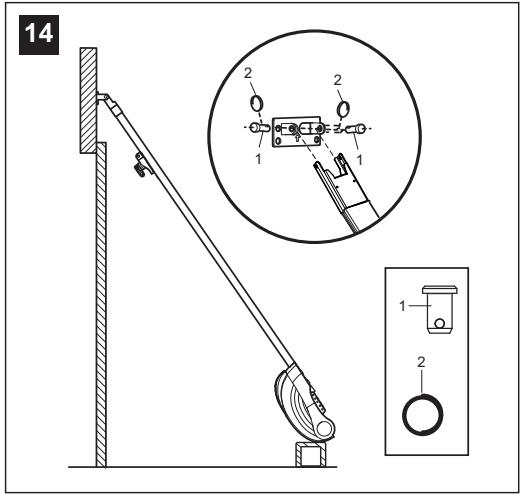
Position opener on garage floor below the header bracket. Use packing material to protect the cover. Raise rail until holes in the header sleeve and holes in the header bracket align. Join with clevis pin (1). Insert ring fastener (2) to secure.
NOTE: To enable the rail to clear sectional door springs, it may be necessary to lift opener onto a temporary support. The opener must either be secured to a support or held firmly in place by another person.
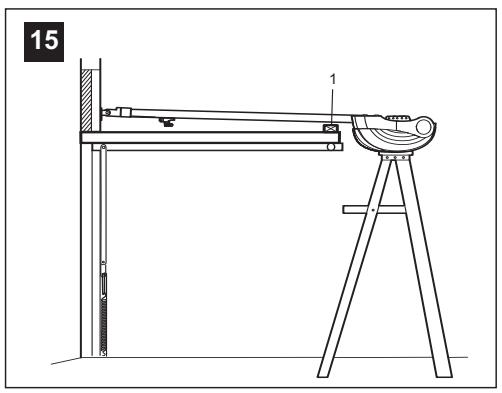
15 Position the Opener
NOTE: A 25mm (1") board (1) is convenient for setting an ideal door-to-rail distance (unless headroom is not sufficient).
Raise the opener onto a stepladder. Open garage door. Place a 25mm (1") board (1) laid flat on the top section of door near the centerline as shown. Rest the rail on the board.
If the raised door hits the trolley, pull down on the trolley release arm to disconnect the inner and outer trolley sections. The trolley can remain disconnected until connecting door arm to trolley is completed.
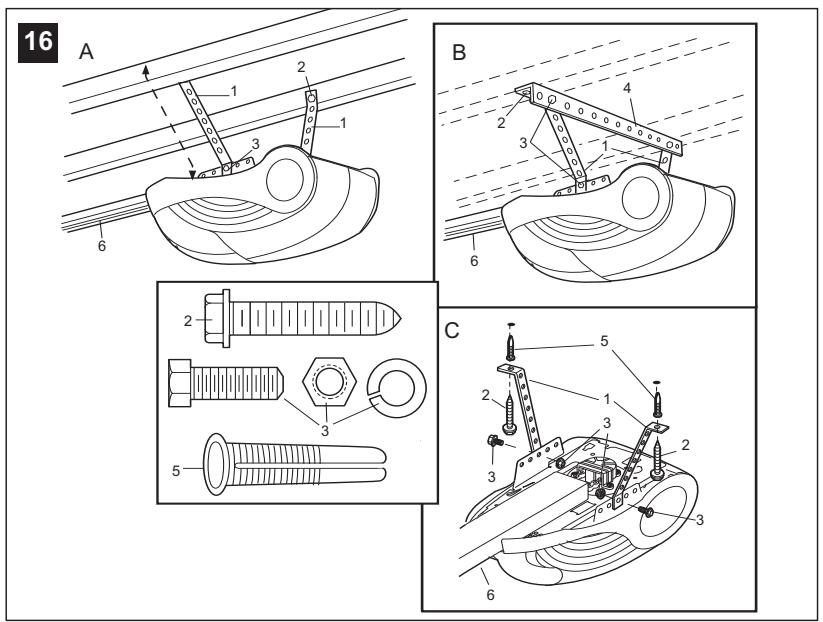
16 Hang the Opener
The opener must be securely fastened to a structural support of the garage.
Three representative installations are shown. Yours may be different. Hanging brackets (1) should be angled (Figure A) to provide rigid support. On finished ceilings, (Figure B) attach a sturdy metal bracket (not supplied) (4) to a structural support before installing the opener. For concrete ceiling mount, (Figure C), use concrete anchors (5) provided.
On each side of opener measure the distance from the opener to the structural support (or ceiling).
Cut both pieces of the hanging bracket to required lengths. Flatten one end of each bracket and bend or twist to fit the fastening angles. Do not bend at the bracket holes. Drill 4,5mm (3/16") pilot holes in the structural supports (or ceiling). Attach brackets to supports with wood screws (2).
Lift opener and fasten to hanging brackets with screw, lock washer and nut (3). Check to make sure rail is centered over the door.
REMOVE 25mm (1") board. Operate door manually. If door hits the rail, raise header bracket. Use rail grease and lubricate bottom surface of rail (6).
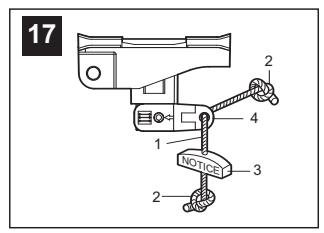
17 Attach Emergency Release Rope & Handle
Thread one end of rope (1) through hole in top of red handle so "NOTICE" reads right side up as shown (3). Secure with an overhand knot (2). Knot should be at least 25mm (1") from end of the rope to prevent slipping.
Thread other end of rope through hole in release arm of the outer trolley (4). Adjust rope length so that handle is 1,8m (6 feet) above the floor. Secure with an overhand knot.
NOTE: If it is necessary to cut rope, heat seal cut end with a match or lighter to prevent fraying.
Connect Electric Power
TO AVOID INSTALLATION DIFFICULTIES, DO NOT RUN THE GARAGE DOOR OPENER UNTIL INSTRUCTED TO DO SO.
Connect the door opener only to an outlet controlled by a double pole switch.
18 Install Light
Gently pull lens (2) downward until the lens hinge is in the fully open position. Do not remove the lens. Install a 24V/21W maximum light bulb (1) in the socket as shown. The light will turn on and remain lit for 2-1/2 minutes when power is connected. After 2-1/2 minutes it will turn off. Reverse the procedure to close the lens.
Replace burned out bulbs with rough service light bulbs.
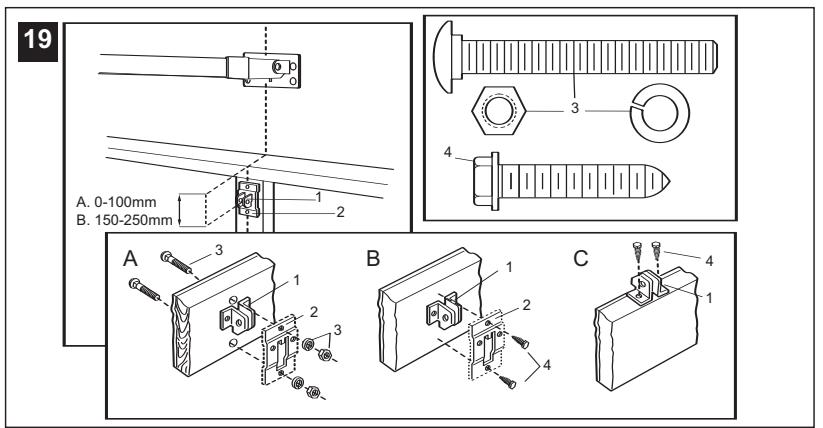
19 Fasten Door Bracket
If you have a canopy garage door, a door arm conversion kit is required. Follow the installation instructions included with the replacement door arm. Exercise care in removing and assembling arm conversion kit. Keep fingers away from the sliding parts.
NOTE: Horizontal and vertical reinforcement is needed for lightweight garage doors.
Sectional and One-Piece Door Installation Procedure:
Door bracket (1) has left and right side fastening holes. If your installation requires top and bottom fastening holes use both the door bracket and door bracket plate (2) as shown.
- Center door bracket (with or without door bracket plate, as required) at the top inside face of door as shown. Mark holes.
A.Standard Sectional or One-piece doors: locate bracket at inside face of the door.
B. Sectional doors with two horizontal roller channels: 150 - 250mm below the top of the door.
- A. Wooden doors
Drill 8mm holes (5/16") and fasten the door bracket with nut, lock washer, and carriage bolt (3).
B. Sheet metal doors
Fasten with wood screws (4)
C. One-piece door optional
Fasten with wood screws (4)
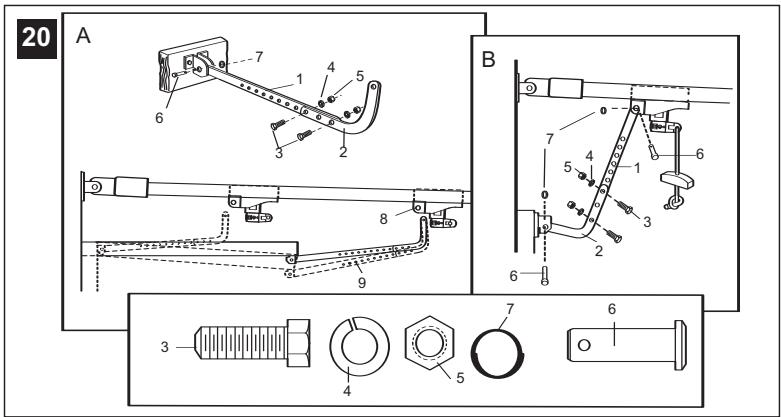
20 Assemble Door Arm
A. ONE-PIECE DOOR INSTALLATION:
Fasten the straight (1) and curved (2) door arm sections together to the longest possible length (with a 2 or 3 hole overlap) using hardware (3,4 and 5). With the door closed connect the straight door arm section (1) to the door bracket with clevis pin (6). Secure with ring fastener (7). Disconnect the inner and outer trolley. Slide the outer trolley back toward the opener and join the curved arm (2) to the connector hole in the trolley (8) with clevis pin (6). It may be necessary to lift the door slightly to make the connection. Secure with ring fastener (7).
NOTE: When setting the up limit, the door should not have a "backward" slant when fully open. A slight backward slant (9) will cause unnecessary bucking and/or jerking operation as the door is bing opened or closed from the fully open position.
B. SECTIONAL DOOR INSTALLATION:
Connect according to Figure B, then proceed to Step 21.
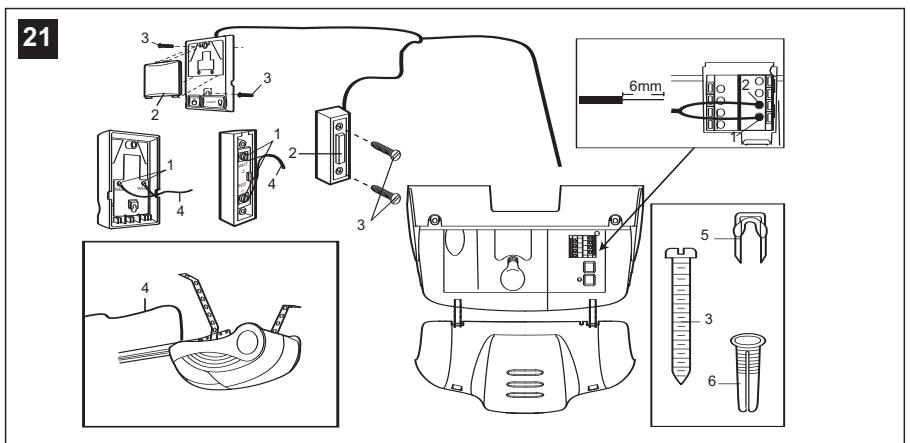
21 Install Door Control
Locate door control where the garage door is visible, away from door and door hardware and out of the reach of children. Mount at least 1,5m (5 feet) above the floor
Serious personal injury from a moving garage door may result from misuse of opener. Do not allow children to operate the door control or remote control transmitter.
Permanently fasten the caution label permanently to the wall near the door control as a reminder of safe operating procedures.
There are 2 terminals (1) on the back of the door control (2). Strip about 6mm (1/4^ ) of insulation from bell wire (4). Separate wires enough to connect the white/red wire to RED terminal screw 1 and the white wire to WHT terminal screw 2.
Fasten the door control to an inside garage wall with sheet metal screws (3) provided. Drill 4mm (5/32") holes and use anchors (6) if installing into drywall. A convenient place is beside the service door and out of reach of children.
Run the bell wire up the wall and across the ceiling to the garage door opener. Use insulated staples (5) to secure wire. The receiver quick connect terminals are located behind the light lens of the opener. Connect the bell wire to the terminals as follows: white/red to red (1) and white to white (2).
Operation of the Door Control
Press to open or close the door. Press again to stop the door while moving.
Multi-function Door Control (78LM Optional Accessory): Press the white square to open or close the door. Press again to stop the door while it is moving.
Light Feature: Press the Light button to turn the opener light on or off. If you turn it on and then activate the opener, the light will remain on for 2-1/2 minutes. Press again to turn it off sooner. The Light button will not control the opener lights when the door is in motion.
Lock Feature: Prevents operation of the door from portable remote controls. However, the door will open and close from the Door Control push button, the Outside Keylock and the Keyless Entry Accessories.
- To activate: Press and hold the Lock button for 2 seconds. The push button light will flash as long as the Lock feature is on.
- To turn off: Press and hold the Lock button again for 2 seconds. The push button light will stop flashing. The Lock feature will also turn off whenever the "LEARN" button on the control panel is activated.
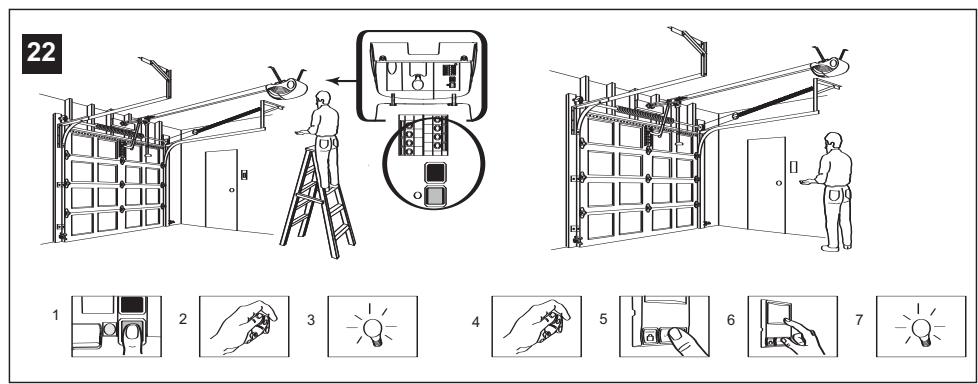
22 Program your Opener & Remote/Wireless Wall Control
Activate the opener only when door is in full view, free of obstruction and properly adjusted. No one should enter or leave garage while door is in motion. Do not allow children to operate push button(s) or remote(s). Do not allow children to play near the door.
Your garage door opener receives and controls remote control transmitter are set to a matching code. If you purchase additional remote controls, the garage door opener must be programmed to accept the new remote code.
Program the Receiver to Match Additional Remote Control Codes: Using the orange "LEARN" Button
- Press and release the orange "learn" button on the opener. The learn indicator light will glow steadily for 30 seconds (1).
- Within 30 seconds, press and hold the button on the hand-held remote that you wish to operate your garage door (2).
- Release the button when the opener light blinks. It has learned the code. If the light bulb is not installed, two clicks will be heard (3).
Using the Multi-Function Door Control:
- Press and hold the button on the hand-held remote that you wish to operate your garage door (4).
- While holding the remote button, press and hold the LIGHT button on the Multi-Function Door Control (5).
- Continue holding both buttons while you press the push bar on the Multi-Function Door Control (all three buttons are held) (6).
- Release buttons when the opener light blinks. It has learned the code. If the light bulb is not installed, two clicks will be heard (7). Now the opener will operate when the remote control push button is pressed. If you release the remote control push button before the opener light flashes, the opener has not learned the code.
To Erase all Remote Control Codes
To deactivate any unwanted remote, first erase all codes: Press and hold the orange "learn" button on opener until the learn indicator light goes out (approximately 6 seconds). All previous codes are now erased. Reprogram each remote or keyless entry you wish to use.
3-Channel Remote:
If provided with your garage door opener, the large button is factory programmed to operate it. Additional buttons on any rolling code 3-channel remote or mini-remote can be programmed to operate this or other rolling code garage door openers.
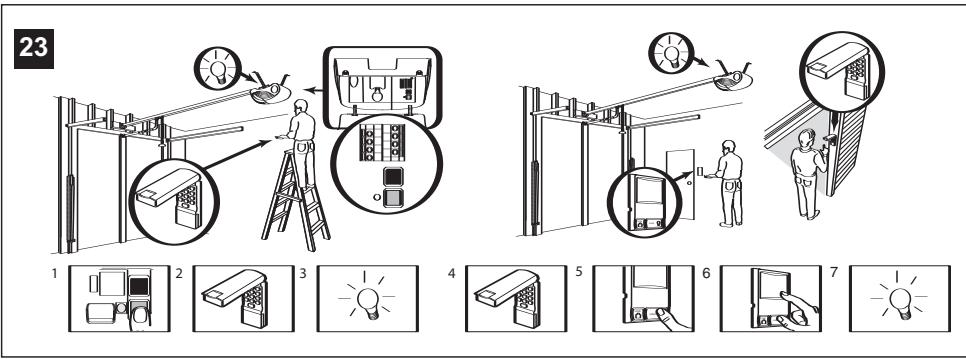
23 Program your Keyless Entry
Activate the opener only when door is in full view, free of obstruction and properly adjusted. No one should enter or leave garage while door is in motion. Do not allow children to operate push button(s) or remote(s). Do not allow children to play near the door.
NOTE: Your new Keyless Entry must be programmed to operate your garage door opener.
Program the Receiver to Match Additional Remote Control Code Using the orange "LEARN" Button:
- Press and release the orange "learn" button (1) on opener. The learn indicator light will glow steadily for 30 seconds.
- Within 30 seconds, enter a four-digit personal identification number (PIN) of your choice on the keypad (2), then press and hold the ENTER button.
- Release the button when the opener light blinks (3). It has learned the code. If the light bulb is not installed, two clicks will be heard.
NOTE: This method requires two people if the Keyless Entry is already mounted outside the garage.
Using the Multi-Function Door Control:
- Enter a four digit personal identification number (PIN) of your choice on the keypad, then press and hold ENTER.
- While holding the ENTER button, press and hold the LIGHT button on the Multi-Function Door Control.
- Continue holding the ENTER and LIGHT buttons while you press the push bar on the Multi-Function Door Control (all three buttons are held).
- Release buttons when the opener light blinks. It has learned the code. If the light bulb is not installed, two clicks will be heard.
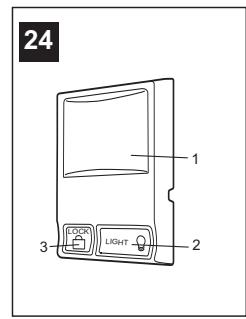
24 Using the Wall-Mounted Door Control
THE MULTI-FUNCTION DOOR CONTROL
Press the push bar (1) to open or close the door. Press again to stop the door.
Light feature
Press the Light button (2) to turn the opener light on or off. It will not control the opener light when the door is in motion. If you turn it on and then activate the opener, the light will remain on for 2-1/2 minutes. Press again to turn it off sooner.
Lock feature
Designed to prevent operation of the door from hand-held remote controls. However, the door will open and close from the Door Control, the Outside Keylock and the Keyless Entry Accessories.
To activate, press and hold the Lock button (3) for 2 seconds. The push bar light will flash as long as the Lock feature is on.
To turn off, press and hold the Lock button again for 2 seconds. The push bar light will stop flashing. The Lock feature will also turn off whenever the "LEARN" button on the opener panel is activated.
ADJUSTMENT SECTION
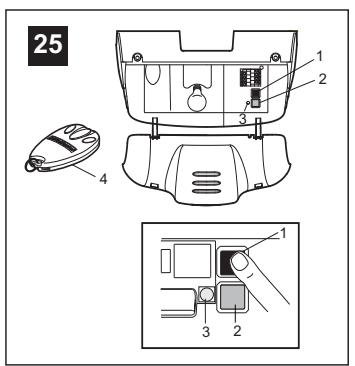
25 Setting the Limits
Travel limits regulate the points at which the door will stop when moving up or down. Follow the steps below to set the limits.
To program the travel limits:
- Open the light lens. Press and hold the black button (1) until the yellow indicator light (3) starts flashing slowly and then release.
- Push and hold the black button (1) until the door reaches the desired open position. Adjust the position of the door by using the black (1) and orange (2) buttons. Black moves the door UP, orange moves the door DOWN.
- Push the programmed remote control (4) or push bar on the door control that was shipped with your opener. This sets the full UP (open) position. The door will travel to the floor and reverse back to the UP (open) position. The opener has learned its travel limits.
Check to be sure the door is high enough for your vehicle. Adjust if necessary.
4. The indicator light (3) will stop flashing when the limits have been learned.
If the door stops or reverses before it reaches the floor repeat steps 1-3 immediately. If this does not set the limits, proceed to #15 of the Having a Problem? section and follow the instructions for setting the limits manually.
NOTE: The worklight blinks 11 times whenever the Limits Setting routine fails. If you get this error, proceed to #15 of the Having a Problem? section and follow the instructions for setting the limits manually.
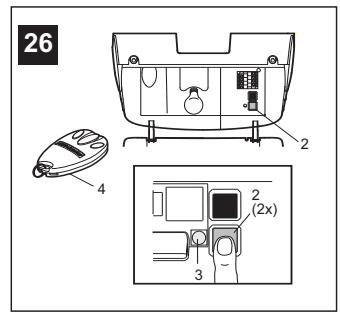
26 Setting the Force
The force setting button is located behind the light lens of the opener. The force setting regulates the amount of power required to open and close the door.
- Open the light lens. Locate the orange button (2).
- Push the orange button (2) twice to enter unit into Force Adjustment Mode. The LED (3) (indicator light) will flash quickly.
- Push the programmed remote control (4) or push bar on the door control that was shipped with your opener. The door will travel to the DOWN (close) position. Push the remote control (4) again, the door will travel to the UP (open) position.
The LED (3) (indicator light) will stop flashing when the force has been learned.
The door must travel through a complete cycle, UP and DOWN, in order for the force to be set properly. If the unit cannot open and close your door fully, inspect your door to insure that it is balanced properly and is not sticking or binding.
The force MUST be learned in order to properly complete the setting of the limits.
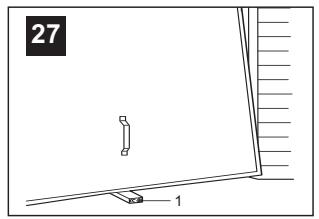
27 Test the Safety Reverse System
The safety reverse system test is important. Garage door must reverse on contact with a 40mm obstacle laid flat on the floor. Failure to properly adjust opener may result in serious personal injury from a closing garage door. Repeat test once a month and adjust as needed.
Procedure: Place a 40mm obstacle (1) laid flat on the floor under the garage door. Operate the door in the down direction. The door must reverse on the obstruction. If the door stops on the obstruction, remove obstruction and repeat Setting the Limits step 25. Repeat test. When the door reverses on the 40mm obstacle, remove the obstruction and run the opener through a complete travel cycle. Door must not reverse in closed position. If it does, repeat Setting the Limits and Force steps 25 and 26 and repeat safety reverse test.
Place 20kg at the center of the door and ensure that the door will not move up more than 500mm.
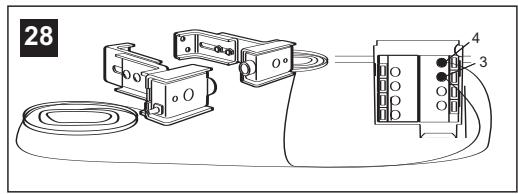
28 Install the Protector SystemTM
(See accessories)
The force, as measured on the closing edge of the door, should not exceed 400N (40kg). If the closing force is more than 400N , the Protector System must be installed.
After opener has been installed and adjusted, The Protector System™ accessory can be installed. Instructions are included with this accessory.
The Protector System™ provides an additional measure of safety against a small child being caught under a garage door.
It uses an invisible beam which, when broken by an obstruction, causes a closing door to open and prevents an open door from closing and is strongly recommended for homeowners with young children.
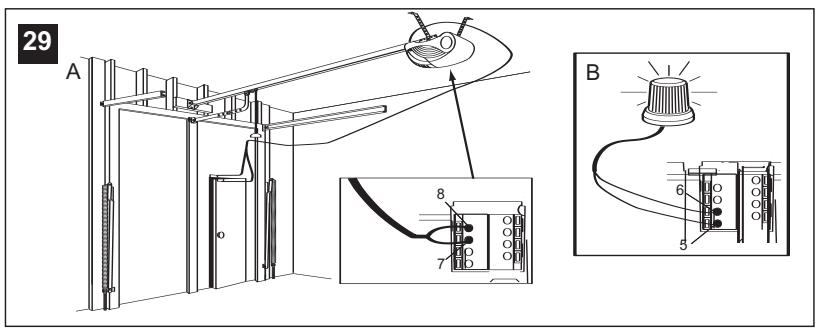
29 Special Features
A. Door within a door connection
Open light lens. Locate auxiliary quick connect terminals. Insert bell wire into quick connect terminals 8 and 7.
B. Flashing light connection
The flashing light can be installed anywhere. Connect light leads to quick connect terminals 6 and 5. Terminal 5 is ground.
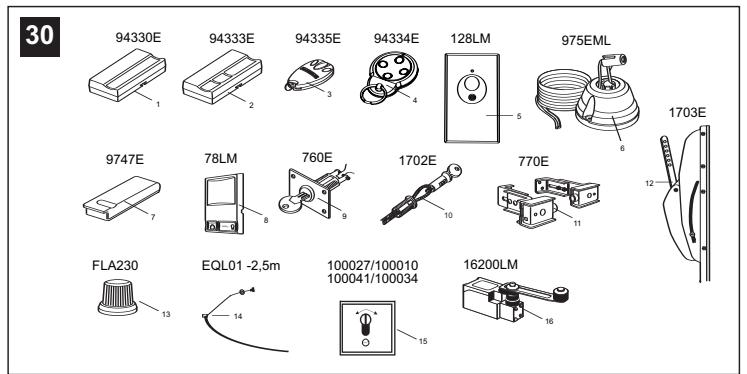
30 Accessories
(1) Model 94330E Single-Function Remote Control
(2) Model 94333E 3-Function Remote Control
(3) Model 94335E 3-Function Mini Remote Control
(4) Model 94334E 4-Function Mini Remote Control
(5) Model 128LM 2-Function Wireless Wall Control
(6) Model 975EML Laser Garage Parking Assist
(7) Model 9747E Keyless Entry System
(8) Model 78LM Multi-Function Door Control Panel
(9) Model 760E Outside Keylock
(10) Model 1702E Outside Quick Release
(11) Model 770E The Protector SystemTM
(12) Model 1703E The Chamberlain Arm™
(13) Model FLA230 Flashing Light Kit
(14) Model EQL01 Door Handle Quick Release
(15) Model 100027 1-Position Key Switch (Flush Mount - 100010)
Model 100041 2-Position Key Switch (Flush Mount - 100034)
(16) Model 16200LM Pedestrian Door Switch
NOT SHOWN
Model MDL100LM Mechanical Door Latch Kit
WIRING INSTRUCTIONS FOR ACCESSORIES
Outside Keylock - To opener terminals: Red-1 and White-2
Protector System™ - To opener terminals: White-3 and Grey-4
Door Control Panel - To opener terminals: Red-1 and White-2
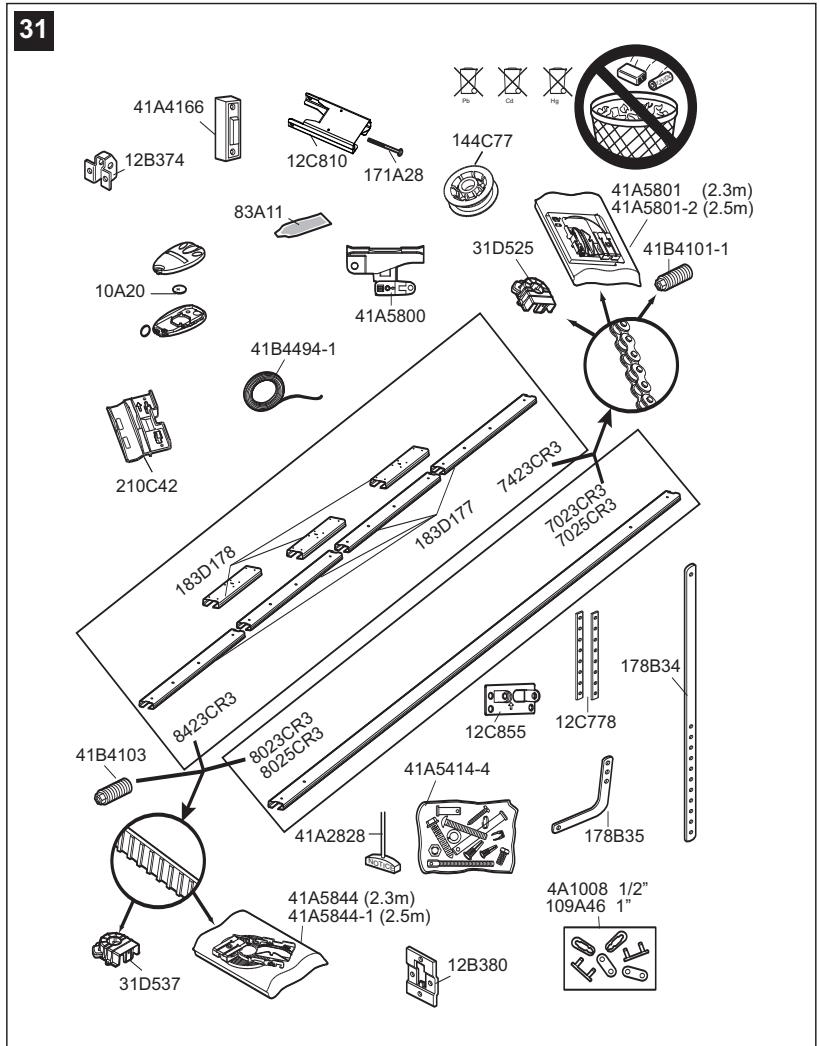
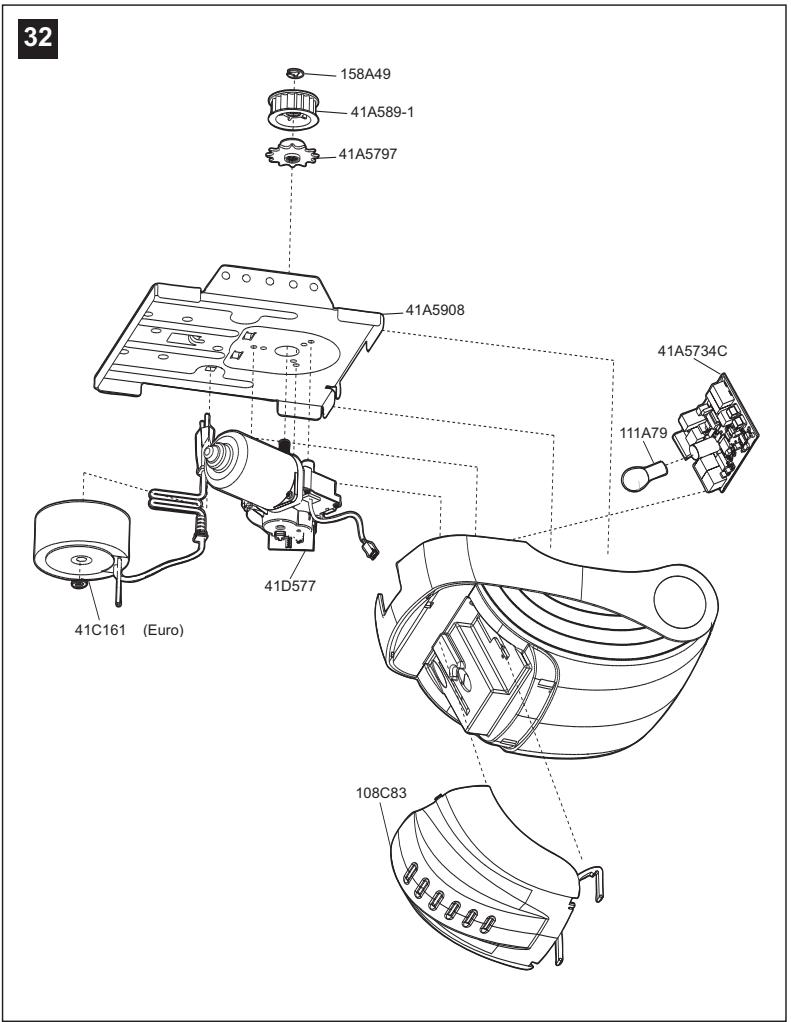
31 32 Replacement Parts
HAVING A PROBLEM?
1. Opener doesn't operate from either door control or remote:
- Does the opener have electric power? Plug lamp into outlet. If it doesn't light, check the fuse box or the circuit breaker. (Some outlets are controlled by a wall switch.)
- Have you disengaged all door locks? Review installation instruction warnings on page 1.
- Is there a build-up of ice or snow under door? The door may be frozen to ground. Remove any obstruction.
- The garage door spring may be broken. Have it replaced.
2. Opener operates from remote but not from door control:
- Is door control button lit? If not, remove the bell wire from the opener terminals. Short the red and white terminals by touching both terminals at the same time with a piece of wire. If the opener runs, check for a faulty wire connection at the door control, a short under the staples, or a broken wire.
- Are wiring connections correct? Review page 4.
3. Door operates from door control but not from remote:
- Replace battery if necessary.
- If you have two or more remotes and only one operates, review Program Your Opener, Remote and Keyless Entry steps 22 and 23.
- Is the door control button flashing? The opener is in lock mode. If you have a Multi-Function Door Control, push and hold the Lock button for 2 seconds. The door control button will stop flashing.
4. Remote has short range:
Is battery installed?
- Change the location of the remote control on the car.
- A metal garage door, foil-backed insulation or metal siding will reduce the transmission range.
5. Door reverses for no apparent reason and opener light doesn't blink:
- Is something obstructing the door? Pull manual release handle. Operate door manually. If it is unbalanced or binding, call for professional garage door service.
- Clear any ice or snow from garage floor area where garage door closes.
- Repeat Setting Limits and Force, see adjustment steps 25 and 26.
Repeat safety reverse test after adjustment is complete.
6. Door reverses for no apparent reason and opener light blinks for 5 seconds after reversing:
Check The Protector System™ (if you have installed this accessory). If the light is blinking, correct alignment.
7. Opener noise is disturbing in living quarters of home:
If operational noise is a problem because of proximity of the opener to the living quarters, Vibration Isolator Kit 41A3263 can be installed. This kit was designed to reduce the "sounding board effect" and is easy to install.
8. The garage door opens and closes by itself:
Make sure remote push button is not stuck "on".
9. Door stops but doesn't close completely:
Repeat Setting the Limits, see adjustment step 25.
Repeat safety reverse test after any adjustment of door arm length, close force or down limit.
10. Door opens but won't close:
- Check The Protector System™ (if you have installed this accessory). If the light is blinking, correct alignment.
- If opener light does not blink and it is a new installation, repeat Setting the Limit and Force steps 25 and 26.
Repeat the safety reverse test after the adjustment is complete.
11. Opener light does not turn on:
Replace light bulb (24V/21W maximum). Replace burned out bulbs with rough service light bulbs.
12. Opener strains:
Door may be unbalanced or springs are broken. Close door and use manual release rope and handle to disconnect trolley. Open and close door manually. A properly balanced door will stay in any point of travel while being supported entirely by its springs. If it does not, call for professional garage door service to correct the problem.
13. Opener motor hums briefly, then won't work:
- Garage door springs are broken. SEE ABOVE.
- If problem occurs on first operation of opener, door is locked. Disable door lock.
Repeat safety reverse test after adjustment is complete.
14. Opener won't activate due to power failure:
- Pull manual release rope and handle down to disconnect trolley. Door can be opened and closed manually. When the power is restored, pull the manual release handle straight back. The next time the opener is activated, the trolley will reconnect.
- The Outside Quick Release accessory (if fitted) disconnects the trolley from outside the garage in case of power failure.
15. Setting the limits manually:
- Press and hold the black button until the yellow indicator light starts flashing slowly then release.
- Push and hold the black button until the door reaches the desired UP (open) position. Adjust the position of the door by using the black and orange buttons. Black moves the door UP (open) and orange moves the door DOWN (close).
Check to be sure the door opens high enough for your vehicle.
3. Push the remote control or door control. This sets the UP (open) limit and begins closing the door. Immediately press either the orange or the black button. The door will stop.
Adjust the desired DOWN (close) limit position using the black and orange buttons. Check to be sure the door is fully closed without applying excessive pressure on the rail (rail should not bow upwards and the chain/belt should not sag or droop below the rail). Push the remote control or door control. This sets the DOWN (close) limit and begins opening the door.
NOTE: If neither the black or the orange button is pressed before the door reaches the floor, the GDO will attempt an Automated Limit Setting, reversing the door off the floor and stopping at the set Up limit. If the worklight does not blink 10 times, limits setting has been successful and doesn't need to be manually done; the DOWN limit will be set to the floor.
Regardless of setting the limits automatically or manually, the force MUST be learned in order to properly complete the setting of limits. Refer to section 26, Setting the Force.
-
Open and close the door with the remote control or door control 2 or 3 times.
-
If the door does not stop in the desired UP (open) position or reverses before the door stops at the DOWN (close) position, repeat Setting the Limits manually one more time.
- If the door stops in both the desired UP (open) and DOWN (close) positions, proceed to Test the Safety Reversal System.
CARE OF YOUR OPENER
When properly installed, opener will provide high performance with a minimum of maintenance. The opener does not require additional lubrication.
Limit and Force Settings: These settings must be checked and properly set when opener is installed. Weather conditions may cause some minor changes in the door operation, requiring some re-adjustments, particularly during the first year of operation.
Refer to Setting the Limits and Force on page 5. Follow the instructions carefully and repeat the safety reverse test after any adjustment.
Remote Control: The remote control may be secured to a car sun visor with the clip provided. Additional remotes can be purchased at any time for use in all vehicles using garage. Refer to Accessories. Any new remotes must be programmed into the opener.
Remote Control Battery: The lithium batteries should produce power for up to 5 years. If transmission range lessens, replace battery.
To Change Battery: To replace batteries, use the visor clip or screwdriver blade to pry open the case. Insert batteries positive side up. To replace cover, snap shut along both sides. Do not dispose of the old battery with household waste. Take batteries to a proper disposal center.
MAINTENANCE OF YOUR OPENER
Once a Month:
- Repeat safety reverse test. Make any necessary adjustments.
- Manually operate door. If it is unbalanced or binding, call for professional garage door service.
- Check to be sure door opens and closes fully. Set Limits and/or Force if necessary.
Once a Year:
Oil door rollers, bearings and hinges. The opener does not require additional lubrication. Do not grease the door tracks. Grease rail and trolley once a year.
Your opener can be activated by any of the following devices:
- The Lighted Door Control Button. Hold the button down until door starts to move.
- The Outside Keylock or Keyless Entry System (if you have installed either of these accessories).
- The Remote Control Transmitter. Hold the push button down until the door starts to move.
Opening the Door Manually:
Door should be fully closed if possible. Weak or broken springs could allow an open door to fall rapidly. Property damage or serious personal injury could result.
The door can be opened manually by pulling the release handle down and back (toward the opener). To reconnect the door, pull the release handle straight down.
Do not use the manual release handle to pull the door opener or closed.
- If open, the door will close. If closed, the door will open.
- If closing, the door will stop.
- If opening, the door will stop (allowing space for entry and exit of pets and for fresh air).
- If the door has been stopped in a partially open or closed position, it will reverse direction.
- If an obstruction is encountered while closing, the door will reverse.
- If an obstruction is encountered while opening, the door will reverse and stop.
- The optional Protector System™ uses an invisible beam which, when broken by an obstruction, causes a closing door to open and prevents an open door from closing. It is STRONGLY RECOMMENDED for homeowners with young children.
Allow a 15 minute cooling period after 5 continuous operations of the opener.
The opener light will turn on: 1. when opener is initially plugged in;
- when the power is briefly interrupted; 3. when the opener is activated.
The light turns off automatically after 2-1/2 minutes. Bulb size is 24V/21W maximum.
GARAGE DOOR OPENER WARRANTY
GB
Chamberlain GmbH warrants to the first retail purchaser of this product (LM60) that the product shall be free from any defect in materials and/or workmanship for a period of 24 full months (2 years) from the date of purchase. Upon receipt of the product, the first retail purchaser is under obligation to check the product for any visible defects.
Conditions: The warranty is strictly limited to the reparation or replacement of the parts of this product which are found to be defective and does not cover the costs or risks of transportation of the defective parts or product.
This warranty does not cover non-defect damage caused by unreasonable use (including use not in complete accordance with Chamberlain's instructions for installation, operation and care; failure to provide necessary maintenance and adjustment; or any adaptations of or alterations to the products), labor charges for dismantling or reinstalling of a repaired or replaced unit or replacement batteries.
A product under warranty which is determined to be defective in materials and/or workmanship will be repaired or replaced (at Chamberlain's option) at no cost to the owner for the repair and/or replacement parts and/or product. Defective parts will be repaired or replaced with new or factory rebuilt parts at Chamberlain's option.
If, during the warranty period, the product appears as though it may be defective, contact your original place of purchase.
This warranty does not affect the purchaser's statutory rights under applicable national legislation in force nor the purchaser's rights against the retailer arising from their sales/purchase contract. In the absence of applicable national or EU legislation, this warranty will be the purchaser's sole and exclusive remedy, and neither Chamberlain nor its affiliates or distributors shall be liable for any incidental or consequential damages for any express or implied warranty relating to this product.
No representative or person is authorized to assume for Chamberlain any other liability in connection with the sale of this product
SPECIFICATIONS
Input Voltage. 230-240 VAC, 50Hz
Max.Pull Force 600N
Power 100W
Standby Power 5,5W
Normal Torque. 5Nm
Motor
Type. DC gearmotor permanent lubrication
Noise level. 55dB
Drive Mechanism
Drive ............ Chain/belt with two-piece trolley on steel rail.
Length of Travel....Adjustable to 2,3m (7-1/2 feet)
Travel Rate............5"-7" (127-178mm) per second
Lamp............On when door starts, off 2-1/2 minutes after stop.
Door Linkage ............Adjustable door arm. Pull cord trolley release.
Safety
Personal .....Push button and automatic stop in down direction. Push button and automatic stop in up direction.
Electronic............Automatic force adjustment
Electrical.......Transformer overload protector and low voltage push button wiring.
Limit Device............Optical RPM/Passpoint detector.
Limit Adjustment.....Electronic, Semi and Fully Automatic.
Start Circuit............Low voltage push button circuit.
Dimensions
Length (Overall) 3,2m (122-1/2")
Headroom Required ....30mm
Hanging Weight. 14,5kg (32 lb)
Receiver
Memory Registers 12
Operating Frequency.....433.92MHz
SPECIAL NOTE: Chamberlain strongly recommends that the protector system be installed on all garage door openers.
CE
The undersigned, hereby declare that the equipment specified, and all accessories, conforms to the Directives and Standards stated.
Model: .LM60
2004/108/EC
2006/95/EC
1999/5/EC
EN55014-1 (2000), EN55014-2 (1997), EN61000-3-2 (2000), EN61000-3-3 (1995), EN 301 489-3 (V1.3.1), EN 300 220-3 (V1.1.1), EN60335-1 (1994), and EN60335-2 95 (2004)
Declaration of Incorporation
A power door operator, in combination with a Garage Door must be installed and maintained according to all the Manufacturer's instructions, to meet the provisions of EN12453, EN13241-1 and Machinery Directive, 89/392/EEC.
Babba P. Keckhoo
B. P. Kelkhoff
Manager, Regulatory Affairs
Chamberlain GmbH
D-66793 Saarwellingen
February, 2008
BEGYND MED AT LAESE FØLGENDE SIKKERHEDSANVISNINGER!

Laengde (total) 3,2m
Ndv. afstand til loft.....30mm
Manager, Regulatory Affairs
Chamberlain GmbH
D-66793 Saarwellingen
February, 2008
Manager, Regulatory Affairs
Chamberlain GmbH
D-66793 Saarwellingen
February, 2008
EKEINHSE DIABAZONTA TIE IAPAKATQ ZHMANTIKEO OAHIGE AZFAAEIA

H napalnouopwn e Tc oynies nou aokouoov npoei va exe wc anotelaoa tn npoknon oobapou tpaumoiou n uiknc znuiac.
- Diabáote TIC obnyiecs autécs npoëkTiKa
O unxaviouos ykapaonoptac exei oxediaoi te kai dokiaotei wate va npoopepea aepaan aeitoupyia oayika nlaioia, uno tov opo otix eei tonoetnei kai xpnmuonoiitei at ouatnpn ouwvia tic onyiec tou napovtoc eyxepiou.
Auta ta npoeioboiniTikca ou6oLa aopaleia c onpaivouv Ppooxh - odnyia oxetikn tnv npooWtikn aoopaia kai tic ulikc c nuiic. diaabaote tic odnyiec autcnpoektiKA.
Ipoeiooian: Av to ykapac oac dEv exei bontnnpota, npeneva yekataaotei o eWtepikoc mXaviaoc taeeia c aneuehepwnc, movtelo 1702E. To ev loyaw aExouap emtpenri Tn xipokivtn Aitoupyia nC ykapaconopra c ano Ew, oe nepintwn diakonnc tou peuatoc.

Aiatnpeite Tny ykapao npota 1oozuyiuev. Mny apnvte To mnxavio avoivmaoc nyckapaoptac va avtotathetai to npoBnaia mucykapaoopntac nou Kkala.Av n npota Kkala, npentai va eunoiop0wei. OI YkapaoopTe, ta elatnpia twv tupwv, Ta oumuatoxova, oipoxaiec, ta unootnpiyata kai ta umxavika EApntma tountoalalovtai eEapetiku uwn taon, kui npoei va pokaloeouo obaapo tpaumaiouo. Mny emxpnoTe va ta xalapwoete, va ta metakivnoeT ne va puhoioe. Kaote evav texviko ykaopaonoptc.
Mny φopáte daxtuλiδia, poλoγia n pixtá pouxa kata tvN EYkataσaσn n Tn ouvtπρσn Tou μnxavioμou avoiμatoc iac ykapαζοπoτaç.
Tia va anopfeuxthetaapoc trpaumaiouc ano evxmev nptlakn, aapeote ola ta oxoiia nou ouvoi t me nvykapolpota, npotou ekataotnoeTo mXavioa ovoiymuato c ykapaonopras.
H eYkataoTaon kai n kalwdiow npénei va oumuoppwetai me touc tonikooc oikoboukuoc kai nAektpkooc kwdeke. H napovaa uokekun avntioixei otnv Klaon npootaiac 2 (npootatetukn movwn) kai xpeiaeTai yiewon.
Elaapc yapaonopc ano vaolabaka (fiberglass), aoumuio n xaui6a npenei va evioxovtai anuavtika, npokeiEvou v aopeuxtheta evexoynzmiia. (betae oelida 4.) H kalutepn luoi eivai v ououeute iTO kataokuaotn Tou ia tvn tooetmoevoc kviOxuong Tg Eykataotaon tou mnxaviou avoiymatoc.
H oikn Tou ouotmuoac aopaleiac avitotpnpicivai nouavnik.H ykapaoonopta oac IPENEIva vntoppei mV oopa kivnoC ts otav ePthetai eEtnapn me eunodio uous 40mm, nou bpioketa oTo danEdo.H oopaevn puogmou tou xavouou aoiyatoc mupoei va odnyonee oobapoprauaiao kaTto Klaio mu Tc ykapaoontpac. Na enavaaabeveT ngkimuaopa to nava kai va kaveteuxov anapaitntcpuoioeic.
H movada auti 8ev tha npenv va eyaioatai oXwpo u evpa n uypaa.
H npota npenei va eekteivetai navw ano i a npofo otav aeitoupye.

To Suotma Ppooataic npenei va Eykahtotatai otav n duvamn klaiaatoc oyn avknptnoptac unepbaive ta 400N (40kg). Evexoevn utepboaikn duvamn emoizien t nootn leitoupyia tou ouotmuatoac aoaaleac avtioptopcn h npokalae zna a otnykapaonopta.

Na eikolalate navtoTe nV npoeiDoinTikn ETKeTa
diIa otov eitoio xiaoknttn TnnpTac, yia va oac
unevthetaic tic axpaaleic diaikaiecs xpno.

AvoIe 0Ae TIC KEAIDapieC TNS YkapaZonopra, yia va anoepuxei Evexoevn Znmu aTnv YkapaZonopra.

TOnotheTnOte To oWtioevo diakontn Tnc npotac (n tuxov npoosou diakontc) oe onueio ano onou paivetai n ykapaGonopta, e uosoc 1.5m toulaixotov, kai onou dev mnpouv va ptaoov nuia. Mny etipenete OE naia va xnpoiuoiouv toh touc diakontc n to nTnIeXeiptnpia.Mnpoei va npokanoei oobapoc Trauaatiooc ano ma ykapaGonopta tou kLeivei n ano tvn eoepaevn XpnoTou mnxavioou aoivmuotc.

EvpyonoiTe to nXavioo avoiyatoC mvo
eooov n npota paivetai oloknpn, 8ev unapxouv
emobia kai eooov o nXaviooos aoiyatoc evai
ootata puohmuevoc. 8ev 0a npenvi va maivei n va
8vaivei kavevac ano to ykapac otav n npota kiveitai.
Mny emipenetE 0e naia va naiov Kovt aTnv
npota.

Na xpnouoie to unxavioxipokivntnc
aenuehepomega vya aonobaeuoe to opeio
kai, av eivai duvatov, mvo av n npota eivai kkeiotn.
Mnv xnpouoie tnv kokkivn xeipolaoh yia va
aovie tnv kkeiote tn npota.

AnouvOeTo To mXavioo Tc ykapaOnoptac ano To pEu npotou EekivnoTe EIOKEueC n aappeTe KaImuata.

To npoiov auto napexetai e kalwio tropoobooiae iokou oxdeltaou, to onio, o nepiwnnou unootei zeta, npenla va avtkataostei ke kalwo tropooboaic tou idou tunou. Teoiou idouc kalwoi npentva npouneueote kai va avaheTETV tonohton Tou e Exiikvmuevo texviko.
2004/108/EC
2006/95/E0
1999/5/EC
EN55014-1 (2000), EN55014-2 (1997), EN61000-3-2 (2000), EN61000-3-3 (1995), EN 301 489-3 (V1.3.1), EN 300 220-3 (V1.1.1), EN60335-1 (1994), KU EN60335-2-95 (2004)
Aaon vomegaatwo
O nXaviaoc, aovjuatoc kapaZooptac, oe uov6uaio me TnV ykapaZoptota, npTei va EKaiotatai ka va uovmpeiatau pfwmae oLsTc oBnyec tou kataekueaouT, yia va atanokpivetai otic taiaeEtuEN 12453, EN13241-1 ka Tc O Bnyiaac 89/392/EOK Tc Eupwnaiknc EvwnC yia nXavnuata.
Babasa P.KekhoH
B. P. Kelkhoff
Manager, Regulatory Affairs
Chamberlain GmbH
D-66793 Saarwellingen
February, 2008

Manager, Regulatory Affairs
Chamberlain GmbH
D-66793 Saarwellingen
February, 2008
LES SIKKERHETSINSTRUKSENE NEDENFOR FØR DU BEGYNNER!


Reservedeler 6 31-32
Har du et problem? 6-7
Stell av apneren 7
TILKOPLINGSVEILEDNING FOR TILBEHOR
VEDLIKEHOLD AV ÅPNEREN
En gang manedlig:
- Gjenta sikkerhetsreverseringstesten. Utfør alle不同程度 justeringer.
- Betjen porten manuelt. Hvis porten ikke er i likevekt eller er treg, ta kontakt med et kualifisert garasjeportverksted.
- Kontroller at porten Åpner og lukker fullstendig. Innstill om nødvendig begrensningen og/eller kraften.
En gang árlig:
Manager, Regulatory Affairs
Chamberlain GmbH
D-66793 Saarwellingen
February, 2008
BEGIN MET HET LEZEN VAN DEZE BELANGRIJKE VEILIGHEIDSREGELS


Manager, Regulatory Affairs
Chamberlain GmbH
D-66793 Saarwellingen
February, 2008
POR FAVOR LEIA PRIMEIRO AS SEGUIENTES INSTRUÇOÉS DE SEGURANÇA!

2. A. Portoes emmadeira
Manager, Regulatory Affairs
Chamberlain GmbH
D-66793 Saarwellingen
February, 2008
LÄS FÖRST IGENOM FÖLJANDE SÄKERHETSANVISNINGAR!


B. P. Kelkhoff
Manager, Regulatory Affairs
Chamberlain GmbH
D-66793 Saarwellingen
February, 2008
LUEENSIMMÄISEKSI SEURAAVAT TURVALLISUUSOHJEET!

Manager, Regulatory Affairs
Chamberlain GmbH
D-66793 Saarwellingen
February, 2008
3aNooyHeTe, KaTo npOyTeTe Ta3n BaxHa nHΦopMaun 3a 6e3OnacHOCTTa


Hecna3BaHeTo Ha HactoIHTe IHCTpyKcIM MoKe Da IOBeE Do cepNo3HO HapaHBAHe IIN NOBpeDa Ha IMyUeCTBO.
- Пожутete Вимаелно Te3и Инстукции
Mexanh3mbt 3a OTbapnHe Ha rapaXn BpaTne npoeKtnpAn n TcTBaH TaKa, ye da Ocnpyn pa3ymHa cTeenH H6e3onacnoct npn n3non3BaHe. Toi ce nHCTaJInpa n n3non3Ba B CTpIKTHO cbOTBeTCTBne C nHCTpykunnte, CbDpbJkauni Ce B TOBA pbKOBOcTBO.
Te3n CmB0JIn 3a 6e3onacHcOt O3Haayabat BHMaHne - HNCTpyKcHn 3a JInuHa 6e3onacHcOCT nIN ppeoTbpaTaBaHe Ha IOBpeDa Ha NMyIecTBO. Ipooyete BHNMaTeJIHO HactoJIHTe INCTpyKcHn.
IpeynpexdneHn: Ako BaWeTo rapaXNo nOmeSeHne He pa3nOla r c dOnbHnTeNHa BxOHa BpaTa, Heo6XoDmO e da HnctaHpaTe MoeJ 1702E YcTpoiCtBO 3a 6b30 ocB6oxDaBaHe OTbH (Outside Quick Release). Toba dOnbHnTeNHO npncnoc6NeHne no3BOLNA pbuHO ynpabLnHne Ha rapaxhata Bpata O BbHnHata CtpaHa B cnUyau Ha nobpeHa Ha 3axpaHbaHeTo.

Iapaxhata Bpata Tpr6ba BnHa n da e
6anaHcnpaHa. He no3BolraBaiTe Ha MexaHn3Ma 3a
OTbaprHe Ha rapaxhata Bpata Da KOMnEHCnpa
3aTpUdHeHOTo DmXeHne Nn 3acuHaHe Ha BpTaTa.
IapaxHn BpTu, KOITo Ce DmXkAt TpyDn OnN 3acuHaT,
TrpBa Da 6bDaT peMOHTnpaHn. IapaxHnTe BpTu,
TexHnTE npYxHn, Ka6eNn, pONK, KOH3OOni
OctaHaJIte enEmeHTn ca NOJIOKeHn Ha
n3KnUChTeHNO HATOBAPBaHe M MoRt Da NOBeJaT DO
cepno3HN LiyHn TpaBMn. He ce ONNTBaTe da rN
oxla6nte, IpemecTe nnn Harnacnte.

IopbpcTe Texnueckata cnky6a, oTROBapra 3a noDpBxKata Ha BaWata rapaxHa BpTa. He Hocete npbCTeHN, YacOBHnIu NII WIPOKn dpexN, KOraTO nHCTaJIpaTe NII pEmoHTnpaTe MExaHn3bM 3a OTBapHe Ha rapaxHa BpTa.

3a da n36eHHe Tce cepno3n JIuHn HapaHbAHnB pe3yntat Ha 3aJIHTaHe, MaxHeTe BCNUK BbXeTa, 3aBbP3aHn 3a rapxHaTb BpTa, npEi Da IHCTaIIpaTe MEXaHN3Ma 3a OTBaPAnHe Ha BpTaTa. IHCTaIIpaHTo N CBp3BaHTo Tpr6Ba Da 6bDat N3BbPShEN B CbOTBeTCTBne CbC CrpaDHNe I eJekTpOExNHueCKN Oo3NaHeHn Ha BaWata CrpaD To3n UpeD OTROBapn Ha CTenEn Ha 3aUHTehoc2 n HMA HykDa OT a3aEMBAHe.

Jekhte BpTaH O fH6porIac, aynmnnn HnCTomana Tp86Ba da 6bDat 3NaHTeJIHO NOcHHeHH,3a da ce n36BerHe NOBpeHa Ha BpaTa. (BnuKTe cTp.4) Han-do6poTo peSeHne e Da ce o6bPHeTe KbM npOn3BODInTeHa BAwaTa rapaXHa BpTa 3a KOMPNeKT 3a IPOCINBAHe npn IHCTaIInpAHe Ha MEXAHN3bM 3a OTbapAHe.

TeCTBaHETo Ha peBepCnBHATA CNCTema 3a 6e30nacHOCT e N3KIOHOTENHO BaxHO. BaWata rapaXHa BPATA TPR5BA Da ce B.DINrHE OTHOBO pRi KOHTAKT C PpeIMet C BVCOHnHA 40 MM, KOITo e NOCTaEBH HnOJa. HeycneShOTO npABINHO HAcTPOBaHe H MaexAHN3Ma 3a OTBapRHe MOKe Ja DOBeDe NO cepNO3HN JIuHN HapaHbAHnO T3aTbAPrUaCe rapaXHa BPATA. IpOBExdAte Tecta EINH PbT Ha Meceu N N3BbPbWbAte HeO6xOJIMnTE HAcTPOKn.

To3n MexaHn3bM He Tpr6Ba da 6bJe HnCtAInpuH BbB BlaxHo Nn MOKpo NomeueHne. IIO BpeMe Ha OTbapRHe BpaTata He Tpr6Ba da ce n3dna Hnd OoeeCTBeHa NtEka/NbT.

3aunthata cnctema Tp86ba da 6bde Hnctanipha, KORATO CNATA Ha p86a Ha 3aTbapuata ce Bpata NaDbnuaba 400 N (40 Kr).Ipekomepnata cnla ue hapuyn npabnnHOTo fynkuOnHpaNe Ha PeBepcnBHaTa cnCTema 3a 6eOtnacOHT nIn Ie Do BoBeDe do nobpeDa ha rapaxhata Bpata.

ПрикpeneteCTa6ино eTuKeTe 3a BHMaHne
Несретдъно Достаьен Ha CTeHata 6уToH 3a
Управелене Ha BpTaTа, за DA Bu HAnOMHЯ 3a
почуdentу, кOTо ТрбБа DA ceИЗВьшВа T сцel
OCnryрbaHе Ha 6e3OnacHocCTTa

Ocbo6oTe BCnKn HauuHn 3aKIOUBaun MexAHN3Mn Ha rapaxHaTa Bpata, 3a da n36erHeTe NOBpeDa Ha rapaxHaTa Bpata.

Инсталраиte освeteонит 6уTOH 3a упаьление Ha bpaTATA (Илд ДОЛьнITEн 6уTOH)Ha MЯСТо, КбDETo rapaxhata BpTa e BUNIMa,Ha BnCOUHnHa He no-MaNka OT 1,5M,ИЗВьн OБсera Ha Deцa. He NO3BOLJIBAIte Ha Deцa DA HaTNCKAT 6уTOHa (Ite) ИлДиCTAHQUHHTOуРabLehne. HenpabINHOTO n3ПON3BaHе Na OTbApoJma MEXaHn3bM MoKeJa dOBeDEdo CepNo3Hn IMuHn HapaHBAHnI pdei3BvKaHn OT 3aTbApoJuaTe ce rapaЖнa BpTa.

AkTNBnpaIte OTbapRusMexaHn3bM CaMO, KORATO BnKdTe BpataTa N3craNo, KORATo HMa npenTCTBnN O TBPaRsiHT MExaHn3bMe npabNlHO nHCTaIIpaH. HkoN He Tpr6Ba Da Bn3a nnN n3nn3a O rapaX na No BpeMe Ha DvnKeHneTo Ha rapaxhata Bpata. He no3BonRaIte Ha deqata da IrpaarB 6n3oCt do Bpata.

OcbueCTBbBaTe pBuHO OCBO60KdaBaHe cMo 3a OCBO60KDaBaHe Ha KOHTAKTHNIA TOKONPnEMNHIK u, aKO e BV3MOXHO, cMo, KORATo BpaTata e 3aTBOpeha. He N3NOJ3BaTe YepBeHata pBuKa 3a OTBaprHe NII 3aTBaprHe Ha BpaTa.

N3KJIIOUeEneKTeP03axpaHbAHetoHaOTBapAunMexAHn3bMaHa rapaxHaTa Bpata npedn da3aNoHTe N3BbPbWbAHTo Ha pEmoTHn DeHocTuNJIN PpeDn Da Maxate Kanaune.

To3n npodykT pa3nonara cbc Cneuanaen
eJeKtpnueckn 3axpaHbaa Ka6eN, KoIto, aKO bDe
noBpeDen, Tp8bBa da ce CmeHn Cbc 3axpaHbaa
Ka6eN ot Cb7nra TIN; TaKbB 3axpaHbaa Ka6eN MoKe
da 6bDe ocNpyeH n NocTaBeH OT CneuanaInCT.
CbIbPkaHne CtpaHua NJIocTpaZna
Ppabnla 3a 6e3oNaChocT .1
Ipei da 3anOuHete 2
TinobeBpaTu 2 1
Heo6xOaMm HnCtpymeHTn 2 2
BkIIOueHn eIeMeHTn 2 3
3aBbPseHa HnctaJaCua 2 4
Crlno6BaHe 2-3 5-11
MOnTnpaHc 3-4 12-21
IporpamipaHe Ha MexaHn3Ma 3a OTBapAne I nDcTaNCHOnHHOTo ynpabJIeHne 5 22
IporpamipaneHaBaapeToPnncno6neHne 3aBIn3ane6e3Klou.5.23
I3noJI3BaHe Ha MOHTnpaHOTo HA cTeHaT a yCTpoiCTBO 3a ynpabJIeHne Ha BpaTaT a .5.24
HactpoBbHe 6 25-26
TectBaHe Ha PeBepCnBHata CnCTema 3a 6e3oNaCHOCT .6.27
MOnTnpaHe Ha 3aunThaTa CnCTema (Protector SystemTM) 6 28
Cpeunaln HpyHKmHa LM60 .6 29
DonbHnTeHH npncnoc6JeHHa 7 30
Pe3epBn qactn 7 31-32 Ako imate npo6neM 7-8
Iolarahe Ha rpnxu 3a MexaHn3Ma 3a OTBaprHe 8
IopdbpkaHe Ha MexaHn3Ma 3a OTbaprHe 8
UnpabJIeHHe Ha MexaHIm3Ma 3a OTBapIHe 8-9
Cneunpkauu .9

Ipei Da 3aOnuHete
- Ornadaite CteHa TJIi TabaHa NaI rapaXHa BpTa. YenHata cKo6a Tpa6Ba da 6bJe 3dpBO 3akpeneHa KbM Hoceu KOn30JN.
- Tabaht BbB BaunrapaX uNaKnoBaH n e? Ako da, Moke da ce HanoXn 3nOJ3BaHeTo Ha Hoceua cKoBa nn DOnbHnTeHN 3akpenBaun enemEnT (He ca BKJIIOUeHN b KOMnJIeKTa).
- B 3aBnCIMoCT OT KOHcTpyKUraTa Ha BaIaTa rapaXHa BpTa, MoKe Ia Bn e Heo6xOIma cneuaHa dPbXka 3a BpaTa. O6bpHeTe ce KbM BaIIN TBproBeu.
- Pa3noIarate Iи C doBJIHInTeHa BxOHa Bpata KbM rapaxka, oCBeH camaT a rapaXHa Bpata? Ako He, Heo6xOIMo e da INCTaIIpaTe DoBJIHInTeJHOTo npCnOc6bHeHne MoDen 1702E UcToPcTBO 3a 6bp3O OcB6oxDaBaHc OTbHN (Outside Quick Release).
1 Tynobe BpaTN
A. EДноганелна вретаCAMOCxopиэталнаpeлca.
B. EJHONAHHeHa BpTa C XOpI3OHTaHa N BepTnKaJIHa peJa - Heo6XoIma e CneuaJIHa DpbKka 3a Bpata (E, DpbKka YEm6bPneHTM (The Chamberlain ArmTM), 3aunTHaTc nCTema (Protector SystemTM) (30(8)). ObpheTe ce KbM Ba7n TaProBeu.
C. Cekuohha Bpata c n3BnTa peIca - BIXTe 20B - CBpb3BaHe Ha npbXkKaT ha Bpata. 3a BpTu, NO-DbIgN ot 2,5 MeTpA,e Heo6xOIMO NoctabHTo Ha foTOKNeTKata Ha 3aunTHata cnCTema (Protector SystemTM) (30(8)).
D. Habecha Bpata - Heo6xOIMM ca cneuaJHa dpBxxka 3a Bpata Ta (E, DpbxxKa Yem6bprH ^TM (The Chamberlain Arm ^TM ), 3aunTHaTa cnCTema (Protector System ^TM ) (30(8)). O6bpHeTe ce KbM Ba7n TaProBeu.
E.ДрьжkaЧemбьрейн™3aВразиТУПВИD.
2 Heo6xoJIMn INHcTpymEnTn
3 BkJIIOUeHn eJeMeHTN
(1) BoJt c wecTocteHna rnaBa
(2) LüncfT C rIaBa N oTbOp
(3) 8MM HOCeU 60NT
(4) BnHTOBe 3a DbPBO
(5) BnHTObe 3a JIamapInHa
(6) Lüntz T C rnaBa n O T Bop
(7) Bbke
(8)Дрьжka
(9)Изолапкрелжни ckobи
(10) Ahkep
(11) Ankep 3a 6eToH
(12) IpyxinnHa ⅢaIb6a cbc
3b6n
(13) ⅢeCTOBtBnHa rAka
(14) Пьбтэновида скоба
(15) MeTpnyeH cAmoHaPra3BaU BnHT
(16) BnHT C wecctOcTeHHa rnaBa
(17) OrpaHnHTeIeH uIΦT
(18) Пужkin.
(19)Плосkaшаьа
(201)OcnrypnteJHa raiKa
(21) Cma3ka 3a peIca
4 3aBbPseHa nHcTaIauZn
B npoeca Ha ocbuectBraBaHe Ha npoueyupnte No crIIO6BaHe, MOHTnpaHe N HAcTPOIBaHe, CbDbPkaUc SE B TOBA pbKOBOdCTBO, MOKe Da BV e Heo6xOIMO Da n3nOJI3BaTe Ta3n INIOCTpaUHa 3aBbPseHa IHCTanaUria.
(1) Yelenha Btynka
(2) KoH3OJa Ha onbBaUa poNka
(3) KohtaTeH TOKOpnEmHHK
(4) Pēncā
(5)Bepira/pembk
(6) Bucya koH3Ola
(7) 3axpaHbaa shhpy
(8) MexaHn3bM 3a OTbaprHe
(9)CBETINHHNnei
(10) BbXe n npBXka 3a pbHcOcBO6OxJaBaHe
(11)ИЗВИТА ДрьЖКа Н Врatura
(12)Права дрьхka Na ВраТа
(13) KoH3oJa n PnOuKa 3a BpaTaTa
(14) YeJHa KOH3OJa
(15)ДрьЖka 3a ocBобЖdaBaHe
Ha KOHTaKTHnI
TOKONpIeMHnI
PA3ДЕЛ CГЛОВBAHE
BAXHO:Ako npntexkabate HaBecha Bpata, Heo6xoJMoO e npn crno6BaHe Ha peIcata da n3NoJ3Bate HNCTpyKUnTe, BKIOUeHN KbM DonbHInTeJHOTo npncnocO6JeHne IpbKka Yem6bpneH™, 3aeHNO c TOBA PbKOBOdCTBO 3a KIneHTa.
5 CrIIO6BaHe Ha peIcata
Cmajete BbTpeuHnTe p6oBe Ha peLcata, KaTo n3nol3BaTe CMa3Ka (1).IocTabeTe qactnte Ha pencaTa (2)Ha rnaJaKa nobbpxhoct, 3a da cn crno6nte. Bcnukte YeTnpu qactn Ha pencaTa ca B3aM03aMeHReMn. Pb3HeTe pencoBata rPbNba (3) Bbpx yactTa ot peLcata. CbPkeTe penlcaTa KaTo nnB3rAte pencoBata rPbNba Bbpy cneDbauaata qact ot penlcaTa. YKHeTe taka crNo6ehata KOhCTpykun (4) Bbpy napye DpbBO (5),doKaTo qactnte Ha penlcatae mpaBnT. NobTopete cbuTe deJeCTBnC ocTaHaHnTe qactn Ha penlcaTa.
6 MoNTupaHe Ha Bepurata/peMbka
I3BaTeBeprata/peMbkaOT KyTnraTa I NaocTabete Ha noDa (BHMabaiTe Da He ycyeTe Beprata/peMbka).
A. Bepira: MyuheTe ΜινΦTOBΕte Ha ΓλaBHATA CΒbP3BaΨa ΜηλHka (3) πe3 3BeHO Ha Bερirata (4) Ι OTbOPa HA 3aDHaTc STpaHa NaKoTHaTKHnI TOKOpnPemHnK (5). (BVXTe NlloCTpaun) MyuHeTe KanaUkKa (2) NaI ΣιΦTa N BbPxy JxLe6OBeTe. ΠΠb3HeTe cKoBaTa Ha npYxuHata (1) NaI KanaUkKaTa N BbPxy JxLe6OBeTe Ha ΣιΦTa, DOKaTo DbTa ΣιΦTa Ca 3dPaBO 3aKpeneHn Ha MxCTOTO.
- PembK: 3akaute KOHeKTOpbT Ha KOHTaKTHnA TOKOpnEmHnK (6) B KaHaJ (7) Bbpxy KOHTaKTHnA TOKOpnEmHnK (8).
7 BkapBaHe Ha KOHTaKTHnTOKOpnEmHnK n KOH3OJaTa Ha onbBaAaTa poNkB peJcata
Пльзhteе конзола淘汰на опьвашида рогka (1) и Вьтpeшни Контактей.TOKОпгимнк (2)В задни Край (менизму 3a OTварян)Ha crлобената penca (3); ybepeTe ce, che CTe NOCTabINI KON3OLATA Ha onlbbaшata polka kaKTO e nokazao Ho Фиурata. Ctrpenkata Bbyx KoNTAKTHNIA TOKOпгимнik (7)ТрбБа DA coUH KbMnpednH (YeHNH)Край Ha peLcata (4). ByTHeTe KOH3OLATA Ha onlbbaшata polka KbM npednH (YeHNH)Край Ha peLcata (4). MyuHete Hocse6bont (5)В OTbopa Ha KOH3OLATA Ha onlbbaшata polka (6).
8 3aKpePbBaHe Ha KOHTaKTTHIa TOKOpnPeMHNK KbM peIcata
Пльзhev Бьншни Контакт end Tokonрп emнк (1)ВЗадни (mexahn3bM 3a OTbacrHe) кай на сглобена peIca (2),kaToТрбвд acce bepnte, Ye dpbkKaT a 3a ocbo6okdabaHae Ha KONTAKTHN TOKONpemHnK (3) coyn B nocOKaT ha MexaHn3Ma 3a OTbacrHe. Пльзhev Бьншни Контакт end Tokonрп emнк Ha dony nOpeJcata,ДOKaTO ce 3akachn 3a BbTpEshnR KOHTaKTeh TOKONpemHnK.

9 3aKpePbAHe Ha peJIcTa KbM MExaHn3Ma 3a OTBaprHe N MOHTnpaHe Ha BepuRaTa/peMbKa
Извашие четирпгшьтб (1) ot ropнатастрана Мexанизma 3a OTварян. Пoctabete penca tata (2) Вьрху МEXAHIN3Ma 3a OTварян, Иравнerte c оранчител (3) ot ropнатастрана МEXAHIN3Ma 3a OTварян. УвийтЕ воритata/peMbka (4) OKONO polkata 3a Воритata (5).Бутөгт-e конлола на орвацота polka KBm п徴н Кран Ha рс lcata, 3a ДпрдOTВратite nIshua xla6bHa Na Воритata/peMbka.Поравнerte dyniknte 3a 6BJTOBETe Bvpy KOH3OInTe (6)c Te3n bVpy MEXAHIN3Ma 3a OTварян.Зakpenete конлолITE bVpXy MEXAHIN3Ma 3a OTварян c 6BJTOBETe, KONTO INBaDIXTE no-paHO. 3aterheTe 6BJTOBETe.
3b6nte Ha pOknata 3a Bepura Ha MexaHn3Ma 3a OTBaprHe, KOrTO ce Hamnpa Ha camna MexaHn3bM, Tpr6Ba da 3axBaHaT Bepurata/peMbKa.
BHIMAHNE:Изпольвайтсамо Te3и 6ОЛTOBE,КоТо ca
пocstавени Вьрху ropнata CTраHA NaMexaHn3Ma 3a OTbapЯHe.
Изпольвано Ha KaKBnTo Ида e ДPyги 6ОЛTOBE ue DoBoeDe do
серноЗн пов体育场 на МexанЗma 3a OTbapЯHe.
10 NocTaBHe Ha KaNaKa Ha poJkata 3a Bepurata
IocTabete KaNaka Ha pOJIkata 3a Bepirata (1) OT rOpHata cTpaHa Ha MexAHIm3Ma 3a OTbapnHe (2) n 3akpenete C BuHTObe (3). IocTabete 6oNT (4) B ORpAHuINTeJIHATA dYnka Ha KOHTaKTHnA TOKOpnEmnK (5), 3aterheC npyXHHa Wai6a (6) n raKa (7).
11 Crno6BaHe Ha YeHnata BTyIka N 3aTraHa He Ha Bepnata/peMbKa
Пьзhteе челната Bтунka (1) Вьрху penca tа (5). Пьзhteе плоскata shaib6a (3),npykinhata (2)и npvykhnHaTa shaib6a (3)Вьрху HOCEшИ 6OHT (4).ИЗпONЗБаTe OБИКНOBЕн ГаЧЕн KЛЮС (7)зда ппгене raikKaTe ДOKATO Веригanta / pemkBT e 2 MM habcpeHATAчacT ha ochobata Ha peIcata. HE ПРТЯГАTE PPEKALEHO CUNJIHO BEPnITATA UNI PEMbKA. BuxTe Фngура (8).
PA3ДЕЛ MOHTИРАНЕ
Hocete npedna3nOuila, Korato pa60nte haI rnaBata cn, 3a da npedna3nTe OuNTe CNOT HapahBahe
Ocbobode BCnHnHaHnHbokn Ha rapaKhata Bpata, 3a da npedotbpaTne NOBpeHa RaapaxHaTa Bpata.
3a da n36berHeTe cepno3Hn IuHn HapaHbAHn B pe3yIITaT Ha 3aJIHTaHe, MaxHeTe BCNUKn BbXeTa, 3aKaueHn KbM rapaXHaTa BpTa, npedn da MOHTnpate MexaHn3Ma 3a OTBapAHe.
IpeOpBvBame MOHTnpaHTo Ha MexaHn3Ma 3a OTBapRHe da ce I3BbPUn Ha 2,1M INI NOBeYe HaI NOJa, KbTeTO TOBa e Bb3MOxHO.
13 MoNTipaHe Ha YeJIHaTa KOH3OJa
3A5ELEKKA: 3a npabunHOTo NOCTABRHe Ha YeHATA KOH3OJa ce pkoBODTe OT BepTKaHHTa CEHTpnpaHa JInnna Hxopn3OHTaHATA LInnna,OT6eJNAHn Ha CTbNka 12.
A. MoHTnpaHe Ha cTeHa: LcHtpnpaIte YeHaTa KOH3OJa (1) BbPxy BeTpKaNHaTc HcTPaJIHa JInNra (2), TaKa Ye DoJNHrT KpaI Ha YeJIHaTc KOH3OJa Da e BbPxy XOpI3OHTaJIHaTc JInNra (4) (CTpeJIkata TpIbBa Da coCh NbM TabaHa). Ot6eJeKeTe BCNUKn DynKNa Ha YeJIHaTc KOH3OJa (5). PIO6bIte C 6OpMaunHa CNomaraTeHNyKn C pa3MeP 4,5 MM N 3aTeHrHeTe YeHATA KOH3OJa C NOMoUaTn Ha BNHTObE 3a DbPBO (3).
6. MoHTnpaHe Ha TabaHa: IpoIbJnxTe BepTnKaJIHATA ZeHTpaNHa IINHIA (2) Bbpy TaBaHa. LcEHTpnpaiTe YeJIHATA KOH3Ola (1) cnpAIMO BePknKaJHATA OTBeJIa3Ha IINHn HA pa3CToRHe O T CteHata He NOrJMOOT 150 MM. YBepeTe ce, ye CTpeKATA COU KbM MexaHIma 3a OTbapHe. OTBeJIeXeTe BCuKN dynKn Ha YeJIHATA KOH3Ola (5). IpObInTe C 6OpMaUnHa CNOMaraTeIeHN DyIKn C pa3Mepe 4,5 MM n 3aTeHHeTe YeJIHATA KOH3Ola C NOMOHTa Ha BVINTObe 3a DbpBO (3). Ppi MOHTnpaHe Bbpy 6eToHen TabAH N3POn3BaIte PpeDoctabeHInTe anKepe 3a 6eToH (6).
14 3aKpeNbaHe Ha peIcata Bbpxy YenHaTa KOH3OJa
IocTaBeTe MEXAHN3Ma 3a OTBaprHe Ha IOna Ha rapaxa NOD YeHnata KOH3OJa. IV3NoTBAuTe ONAKOBKaTa, 3a NaIpeJNa3nte Kanaka. BdInrHeTe peIcata, DOKaTO DyINKInTe B YeHnTa B TylnKa IN Te3N B YeHnATA KOH3OJa Ce I3paBnHT. CbeDInHeTe NocpeDCTBOM UnCfT C rnaBa n OTBop (1). IocTaBeTe npbCTeHOBnHa cKo6a (2) 3a 3aKOHTpHe.
3A5ELEKKA: 3a Да осугп'te Вьзмхнocт pencata DA
пеминава Свобоги NOКрайnpжнite Ha Cekцоннaita Вра,
Мождae He NaLoXnДа NOBdINrHete МexaHn3Ma 3a OTbapRhe Bbpy
ВрemHa ПОДпopa. МexaHn3MbT 3a OTbapRhe Tp6Ba ИлДа e
ПОCTaBeH CTaBnIHo BbPy NOДпopa, ИлДа ce DbpxN 3dpaBOHa
ЯСTO DTpyr QOBek.
- MexaHn3MbT 3a OTbapHe He ce 3aJeIcTBa nopadn nobpeDa B 3axpaHbAheTo:
-Дрьн electe bxxeto n dpxkkaTа 3a pchO Ocbo6oxdaBaHe,3a da OTkaHTe KOHTaKTHnTOKOpnPmeMnK. Bpata TMOKe da 6bde OTbOpeHa n 3aTbOpeHa pchO. KoroTa 3axpaHbAHeTo 6bDe Bb3CTaHOBeHo,Дрьн electe obpaTHo dpxkKaTа 3a pchO OCbo6oxdaBaHe.Пи cIeJbAto akTNBupaHe Ha MexaHn3Ma 3a OTbapAHe, KOHTaKTHnT TokOpnPmeMHN Ie ce CBbpke OTHBO.
ДоьнHTENHOTnpncnocOJIeNE3a6bp30OCBO6OKdAbaHe OTbBn (ako e noCTaBeHO) OTKaHa KOHTaKTHN TOKOpnpeMHNK OT BbHnHaTcPaHa BClyuay Ha nobpeDa 3axpaHBAHeTO.
-
Pbyho HacToBaHe Ha OrganuHneHraTa:
-
HatncheTe n 3aPbKTe YepHn6byToH, DOKaTO XbTnTcBETnHe HnDnKaTOp 3aOnHe 6abHO Da Mira, CneI KoETo OTnyChTe.
- Hatncheu 3aPbXte UepnH6yToH,doKaTO BpaTaTaoocHe do XeJanaHata TOPHA (OTBopeHa) no3uH.NacTpOte no3uHraHa Bpata,T KaTO n3NoJ3BaTe UepnHnN opAnXeBn6yToH. UepnHT npDvBnKbBA Bpata HAGOPE (OTBopeHa), a opAnXeBnT npDvBnKbBA Bpata HAOnLY (3aTBopeHa).
YBepete ce,Ye Bpata Ta ce OTbapra DoctaTbUHO BnCOKO,3a Da MoKe Da npemHe Baunr ABTomo6nI.
3. Hatnche TnctaHcHOnHTo ynpabHe nI yCTpoNCTBOTo 3a ynpabHe nHa BpTaTata.ToBa hactpoBb TOPHOTo (OTbopeHo orpaHueHne n 3anoYBa da 3aTBapBbPaTaTata.He3a6abHO haTnche nIy cepHn, nI npopAnXeBn 6yToH. BpTaTata ue cnpe da ce DnIXn.
HactpoTe JxelaHaTIOJHA (3aTBOpHe) no3nui, n3non3BaKn
UepnIu OpaJXeBn6yToH. YBepeTe Ce, ye BpTaTa e HAnbIHO
3aTBOpEHa, 6e3 Da ynpaxKnBa DOnbIHNITeNeH HaTcck Bbpxy
peLcata (peLcata He Tpr6Ba Da ce OrbBa Harope, a
Bepurata/peMbka He Tpr6Ba Da npOBncBa IIN naDa npD peLcata).
HaTNCheTe dmctanHOnHOTo ynpabLeHne IIN ycTpoCTBOTo 3a
ynpabLeHne Ha BpTaTa. ToBa HactpoBa IOJIHOTO (3aTBOpHo)
OrpAHueHne N 3anoCbA da OTbApB r BpTaTa.
3A5EIXEKKA: Ako HnTo YepHnT, HnTo OpaHxEeNt 6yToH 6bIaT HaTnCHaTn IpeDn BpTaT a Da IOCTnTHe Do NoDA, MEXAH3MbT 3a OTBapRHe Ha rapaXhATA BpTa Tc Ce OnTA da N3BbPmN aBTOMaTuH0 NaCTpoBaHe Ha ORpaHcyHnTa, BnuRaN KOnTOHO BO BpTaT a cPiapKn R b HacTpoEHOT FOPHO orpaHcyHne. Ako pa6oTHata lamna He CBETHe 10 nTn, HacTpoBaHoTe Ha orpaHcyHnTa e npemHaNo ycNeuHO n He e He neO6xoJMo Da ce npaBn pUHo; 3a DOLHO OrpaHcyHne ige Ce npeme DoctnHaTe Do nOda.
He3aBnCmO OT TOBa daJIu ORpaHnueHnra Tce HacTpoBAt ABtOMaTHUHO nJIN pbUHO, CnJaTa TPR8BA da 6bJe 3anamTeHa, 3a da MoKe IpaBnHNO da Ce N3BbPns HacTpoBaHTo Ha orpaHnueHnra. BnXTe pa3dEn 26 rHaCTpoBaHe Ha cnNata."
-
Otvbopete n 3aTbopete BpataTa 2 nIn 3 nbTn nocpeDCTBOM dntaHcnoHHOT ynpabLeHne nIn yctpoiCTBOTO 3a ynpabJeHne Ha BpataTa.
-
Ako Bpaata He cnpe B JxelaHata TOPHA (OTBopeHa) no3nui nIc Be BpIa npEi Da e CnpraB D OJIHa (3aTbopeHa) no3nui, noBTOpe OSe EIN HbT PbHOTO HaCTpoiBaHe Ha ORpaHueHHTa.
- Ako bpaata cnpa n B dBeTe JeHaHn no3uHn TOPHA (OTbopeHa) n OJIHa (3aTbopeHa), npOdbJKeTe c rTeCTBaHe Ha PeBepcNBhata cnCTema 3a 6e3OnacHOCT".
OrpaHnueHne ...EneKtpoHHO, nony- n HAnbIHO aBtOMaTmUHO.
IyckoBa Bepura .HickobontoBa Bepura c 6byTO
Pa3mepn
ДьnxHa (пьнha) ...3,2M
Heo6xoDIma r6abapnTa
BINGOCHHa
TeroHa OKaYBaHe.....14,5Kr
PncnBbp
Pamet perncptn.12
Pa6oTHa YecToTa 433,92MHz
CNEUJAJIHA 3AEBJEXKA: Chamberlain cnIHO npenopbYBa 3aIHTHaTa CNTeMa Da CE MOHTnpa Ha BCNUKm MexaHn3Mn 3a OTBaprHe Ha rapaXn Bpatn.
ДeКларачи3a cБOTBETCTBNE

DonynoiDnIcAHHaT DeKnapRam, Ye NocOeHToO 6bOpYBaHne I BCuKhN npInneJeaHn DoJIbHNtEnHn pIncNOCoBJeHn Ha nocOeHHe TNepeKTbN b CTaNdaptN. Moen: .LM60
√2004/108/EC
2006/95/EC
1999/5/EC
EN55014-1 (2000), EN55014-2 (1997), EN61000-3-2 (2000), EN61000-3-3 (1995), EN 301 489-3 (V1.3.1), EN 300 220-3 (V1.1.1), EN60335-1 (1994), IN EN60335-2-95 (2004)
B. P. Kelkhoff
Manager, Regulatory Affairs
Chamberlain GmbH
D-66793 Saarwellingen
February, 2008
NEJDRIVE SI PROSIMP RÉCTÉTE NÁSLEDUJÍCí BEZPEÇNOSTNÍ UPOZORNÉNI!

Instalace. 2-4 12-21
(6) Model 975EML Laser Garage Parking Assist
Manager, Regulatory Affairs
THE CHAMBERLAIN GROUP, INC.
845 Larch Ave.
Elmhurst, IL 60126
USA
February, 2008

KERJUK, HOGY ELOSZOR AZ ALABBI BIZTONSAGTECHNIKAI TUDNIVALOKAT OLVASSA EL!

2006/95/EC
1999/5/EC
EN55014-1 (2000), EN550 14-2 (1997), EN61000-3-2 (2000), EN61000-3-3 (1995), EN 301 489-3 (V1.3.1), EN300 220-3 (V1.1.1), EN60335-1 (1994), és EN60335-2-95 (2000)
Manager, Regulatory Affairs
THE CHAMBERLAIN GROUP, INC.
845 Larch Ave.
Elmhurst, IL 60126
USA
February, 2008
Na počětku pročitajte ove važne upute o sigurnosti

(6) Model 975EML Laser Garage Parking Assist
(7) Model 9747E Uredaj sustava za ulaz bez ključa
2004/108/EC
2006/95/EC
√ 1999/5/EC
EN55014-1 (2000), EN55014-2 (1997), EN61000-3-2 (2000), EN61000-3-3 (1995), EN 301 489-3 (V1.3.1), EN 300 220-3 (V1.1.1), EN60335-1 (1994), i EN60335-2-95 (2004)
Izjava o ugradnji
Pogon vrata i sama garazna vrata moraju se ugraditi i odrzavati u skladu sa svim uputama proizvodaça kako bi bila u skladu s propisima EN12453, EN13241-1 i Direktivom o strojevima 89/392/EEC.
Baaaba P.KekhoH
B.P.Kelkhoff
Manager, Regulatory Affairs
THE CHAMBERLAIN GROUP, INC.
845 Larch Ave.
Elmhurst, IL 60126
USA
February, 2008

NAJPIERW PRZECZYTAC PONIŠZE INSTRUKCJE BEZPIECZENSTWA!

GWARANCJA NA NAPED DRZWI GARAZOWYCH
2004/108/EC
2006/95/EC
√1999/5/EC
EN55014-1 (2000), EN55014-2 (1997), EN61000-3-2 (2000), EN61000-3-3 (1995), EN 301 489-3 (V1.3.1), EN 300 220-3 (V1.1.1), EN60335-1 (1994), oraz EN60335-2-95 (2004)
Manager, Regulatory Affairs
THE CHAMBERLAIN GROUP, INC.
845 Larch Ave.
Elmhurst, IL 60126
USA
February, 2008
Incepei prin a citi acoste instruţiuni importante de siguranta

2004/108/EC
√2006/95/EC
1999/5/EC
EN55014-1 (2000), EN55014-2 (1997), EN61000-3-2 (2000), EN61000-3-3 (1995), EN 301 489-3 (V1.3.1), EN 300 220-3 (V1.1.1), EN60335-1 (1994) sI EN60335-2-95 (2004)
Declaratie de incorpore
Manager, Regulatory Affairs
THE CHAMBERLAIN GROUP, INC.
845 Larch Ave.
Elmhurst, IL 60126
USA
February, 2008


HeBbInonHHeHne HnKecIeDyUOxuYka3aHn No TexHnke 6e3oNaCHOCTM MoXe IpNBcTe N K TAgKeblm TpaBm m MaTePnaIbHomy yuepe6y.
- Празиотаite Внмательно 3TN указаня.
- PnBOD cnPnoektnoBaHc yYeTOM Tpe6oBaHm 6e30nacHoro ynpaBLeHn H npOweI COOTBeCTByIOUne IcNbItAHn. Be30nacHocTb 3KcnIyatauH, Ondako, MoKet 6bITb rapaHTnpoBaHa ToIbKO npToTOHm Co6JIIOHeHn yka3AHn no MOHTaxy u npaBLeHHIO, coDePkaunxscB HactoIeM pykoBOdCTBE.
3TN CmB0JIb O3NaHauoT "PPEIOCTEPEXEHNE" n cTOr TpePe yka3aHnMn TaM, rKe cJeDuYe OCTeperaTbCn TpaBM NIN MATEpHaJbHoro yUep6a. IpouHTaTe BHNMaTeJbHo 3TN yKa3AHnI.
IPEIOCTEPEXHEHNE:EcnnB Bawaem rapaxe HeT 60KOBOn IBeep,TO CneJyET yCTaHOBnTB BHeWHee abapuHoe pa36NOKpOBAHne - MoedeJIb 1702E.Pn HApUSeHHN 3NeKTPoCHA6XeHnE 3TO pa36NOKpOBAHne N03BOJnE TOKpbITB BOPota BpyHyIO.

Bopota doJXhbl 6bItb ypaBHObeWeHbl. PnI nOMOUs npNBOda He CJIeJeTyET pNBOITb B DvIXeHne IIOXO uUyue Hn 3aCtPABWne BOpota - TaKne BOpota dONJXbl 6bItb OTpeMOHTnpOBaHb. B IpOTNBOM cIyuae, PnI BKNIOHeHn pNBOda, BOpota nX qAChn - npjxHbB BOPOT, KaBeIN, UaBbI, DePkaTeIN, peIbcsI - IODbepraIoTc 3KCTpeMaJIbHbIM HAnpIXeHnM, YTO MOKeT npNBeCTn K TAKeJIbIM TpaBMAM. He NItaTecb PnI 3OM OCBo6OJTb BOpota, npNBeCTn IN X B DvIXeHne INN BblPOBHbT, ObaNTecB B 6nIXaIuYo K Bam cIyX6by TexHmYeCKOrO 06cIyXnBaHnR.
Ipiu ycTaHOBKe IIN TeXHnueCKOM O6CnyXnBaHIn npBODa BOPOT HeNb3HaDeBaTb yKpaWeHn, Yacbl IIN Hocntb CBO6OHyOeJy.
Bo n36ekaHne TaeKeJIbIX TpaBM, KOtOpBle MOrY IMeTb MeCTO B pe3yIbTaTe 3aNyTbIbAHnI, nepeJ yCTaHOBkoI npIBoDA BOPOT CNeIyET dEmOHtIPOBaTB BCE npICoEINHeHHbIe K BOPOTAM TpOCbI NcENI.
Ipyu yCTaHOBKe I 3NeKTPoPOnDKJIIOUeHIN IOJXHBi CO6NIOJaTcBa BCE MeCTHbIpeDINICAHIN NO CTPOITeJIbCTBy I 3NeKTPoObOpyDoBaHInO. 3TO T np6Op COOTBeTCTBye KNaCCy 3aUHTbI 2 N He Tpe6ByET 3a3EmJIeHnI.


Bo n36eXaHne nobpeKdEHHB Ccnyae
obIerueHHbIX BOPOT (HaIpIMep, H3
CTeKIOBOLOKHa, aJIOMHNu IIN CTaJIbHbIX Tpy6)
BOPOTA cJeYet COOTBeTCTByIOUm 06pa3OM
yKePnITb (cm. cTp.4). OpaauTeCb B φIpMy-
n3ROTOBNTb BOPOT.

Pa6oTa aBToMaTnueckoro peBepca no yCNoBnIO 6e3oNacHocTOndoJXHa nepnoDnueckn npOBepaTbCn. PnKoHTAKTe C haoJaunmca Ha 3eMne npenrTCTBnEM BbICOTOn 40 MM rapaXhbIe BOPota DOJXKnbl Nttn Ha3ad. HenpaBnIbHa nactpoJa npBODa BOPOT MoXET npNBecTN K nOlyuHenIO TAnKeJIbIX TpaBM npi 3akpbITn BOPOT. IpOBepKa DOJXHa npBOOpNTcbra Pa3 B MeCu, n Po ee pe3yNbTaTAM DoJXKnbl npINHMaTbCn Heo6xoDnMbIe Mpebl.
JaHHbI aperat He DoJXeYCTaHaBJIbBaTbcn BO BJIaXHbIX NIN CbIPbIX NOMeUHeNIX.

Pn 3KcIpyataunBopota Hn np KaKnx 6oCToTbCTbax He doJXhbl Co3daBaTb npenTCTBnI dN o6eCTBeHHoro npoxOda.

Ecnn 3aKpbIbAIOxncB BOpOT npEBIwaet 400Hm (40 Kr),TOdoJXeH 6bITyCTaHOBnE hpoTo3JIeKTPnueckn 6apBep The Protector System. Nperppy3ka BOpT npINBOiNT K yUdUeHNIO paOToBI aOMaTNUeCKoN CnCTeMblpeBepca no YcLOBuO 6eONaCHOCn IIn K IN NOBpeXJeHNIO.

B ueJx 6e3oNaChOCTn Ha HAcTeHHo KOHcONn DoJIxHeN 6bIb npIKpeJIeH 3nK ppeOcTepeXeHn.

Bo n36exaHne nobpeXeHn npnbOda rapaxhblx BOpT,do hauana MOHTaxa IprbOda CJIeJeT pa36IoknoPbOaTb INI CNrTb BCE IMeIOUmeCra rapaxHbIe 3aONpB I 3aMKn.

CBeTJUHcHAcTeHHyIO KOHcONb (INIpynIE DOnONHtEnbHbIe BaKJIouaTeNl) CJeDyET 3aKpeNtB V HeOJraEMoCTn IJa DeTeH Na BbICote He MEHee 1,5 M B XOpsoI NpOCMaTpInBaEMOM MecTe B 3OHe rapaXhBIX BOPOT. He No3BOJnTeDeTm NOJb3OBaTbcS KHONoTHBM BkJIooTaTeNem n PaHNOyPabJIeHEm, TAK KaK HENpaBnHObHcNcNb3ObaHne PnpBOda rapAaKbHbX BOPOT, nHx INx BHe3aHOM 3aKpbITn, MOXet PnIBECTn K TArKeJIbIM TpaBMam.

BkIooaIte npBOD rapaxhblx BOPOT ToIbKO TOrda, KOrda 3OHa BOPOT npocMaTPNBaeTc NOIHOCTbIO, B6n3N BOPOT He HaxoJATCR npedMeTbI, npenTCTByUoIe DnIXKeHIO BOPOT, n npBOD npabInlHo HAcTpoE.Ho BpEm ADbXKeHIN BOPOT, npn OTKpbITNI HmZakpbITNI, HNKTO He DoJOnKe BXoDHTb Nn N BbIXoDHTb N3 rapAka. PnBkIOUChEN npBODa Detn Ha DOJIKNbI HaxoDHTCB6bn3N BOPOT.

AbarinHoe pa36bOKIOBcAHne IOnXHO NcONb3OBaTbC8 TOIbKO B CEJIAX OTKJIOUHEHIN FyHKUIN XOIOBbIX peIbCOB IN, NO BO3MOXHOCTN, IMeHHO TOrJa, KOrJa BOPoTa 3aKpbITb. HeIb3N cNoJIb3OBaTb KpaCHyO pyKy dIra YACTNUHORO OTKpbITn Hnn npITARHBHn BOPOT.

Ipeed npoBeHnem IIObIX peMOHTbIX pa6OT nnn CHrTneM KoxyXOB C o6OpYObaHHN CJIeJyET BbIKIOuHTb 3JIeKTPoNTaHHe npNUOda rapaXhBIX BOPOT.

DaHHOe N3dEJIne OCHAaTc TcNEIaNbHbIM 3JIeKTPUeCkIM Ka6eIeM. PnI NOBpeJDeHm Ka6eIb dONJKe 6bITb 3aMeHEn HObIM Ka6eIeM TORO Je TIna. 3TOt Ka6eIb Bb MoXeTe npNo6peCTN B BaWe M CteIaINHUPOBaHOM Mara3HHe, rde Bam TaKxe NOMOT NC ERO NODKNIOueHHeM.
CopepkanHe
Ctp.
Pnc.
Yka3aHnno TEsHHke 6e3OnachOCTn .1
PpeKeJeHemHaayatb 1
TINBI BOPOT 2 1
Heo6xOuMbIe INHCTpyMeHTbl 2 2
MeIknE DeTaN B KOMnJIeKTe NocTaBKn .2 3
Arperat B c6ope 2 4
MoHTax 2-3 5-11
YcTaHOBka 3-4 12-21
IporpammmpoBaHne npuBoa n
paIIOynpaBJIeHn 5 22
IporpaMMNPOBaHne CnCTEmbI DoCTyHa
6e3 KJIoua 5 23
UnpaBHeHne npn nOmoOn
HacTeHHoN KOHcOJI .5 24
IOctnpoBka 6 25-26
PpOBepKa peBepCa no yCNOBIO
6e3oNaChocTn .6 27
MoHTaxx Protector System
BHIMAHNE: EcnI Tpe6yetcO6pe3aTb Tpoc, To 6pe3aHHbKOHe Tpoca DonJxeh 6bITb ONJIaBNeH B IJIaMeHe CnUKN NIN 3axNraJIKN, UTo6bl OH He pactpeNaCn.
3neKtpoNoKlnuOeHne
ПИ YCTAHOBKE ПИВОДA ГАРЖьIX BOPOT BO N3БЕЖAHNE OCLOXКHEHи ПЕВОВ BKЛЮЧЕНЕ ПИВОДA CLEДYET ПОИЗВODITb TOЛьКО TOГДA, KOrДA ДЯ 3TOGO IMEETCR KOHKPETHOE YKA3AHNE.
PnBODdoJXeH NOKIOUaTbCra TOnbKO BkIOUeHEm Ka6eJI B WTeNCelbHyO p03eTKy.
18 MoHTaX JAmnOuKn
OTKNUHYb KOJNAK OCBEeHnA (2). He CHIMaTb KOJNAK NOHOCtBu! BBNHTnTB B nATPOH JAMN0Ucky MaKc. 24B/21Bt, KaK NOKa3aHo Ha pncyHke. OCBSeHHeNe npIBoDa BKJIIOucaTeCn OJHOBpeMeHHO C BKJIIOUeHnEM npIBoDa n OTKJIIOucaTeCn ChOba Yepez 2 MInHytbl. PocIe yCTaHOBKn JAMN0UcKn 3axIONHyb KOJNAk.
IpeperopeBwaJ lamnoUka doJxHa 6bItb 3ameHeHa ydaponpOuHoi lamNoUkOi.
19 MoHTaX KpeJIeHnB BOpOT
Ecn Baun onpoknubibaioouece BOPota ochaenbI BepTnkaNbHbIM XOOBbIM peIbcom,To nIpeoehaueHn Tpe6yeTcN cneuaNBaHn KOHCONb BOpOT.B 3tOM cnuyae cneyuTe INCTpyKuMn,CoepJxaueCBB KOMIIeKTE NOCTABKN CNEuaNBHO KOHCOnN BOpOT.Pnp pacnaKOBKe I MOHTaxe CNEuaNBHO KOHCOnN BOPOT Co6NJaTe OCTopoXHoCTb N He bepntecb pykam 3a cDvraiouneceJeTaTI.
YKA3AHNE: O6nerYeHHbIe rapaXHbIe BOPoTa cIeNyEt yKpeNtB, KaK no ropu3OHTaII, TAK I NO BePruKaII.
MOHTAX CekUOHHbIX IIN ONDCTBOPaTBx BOPOT:
В кренин BорOT (1) сева и справа ИмeoTся Кренихьie OTberpctnЯ.Есnlдг yctaHOBKи Heo6xOДМо IcNoIb3ObaTb Верхquee HnIXHee Kprenezhbie OTberpctnЯ, BOCNoJb3yITeCb BapnaHTOM Kренин BорOT BmecTe C NaHelko (2),Κak nokaasoHa рсунke.
- PpInIOxNtB KpeJIeHne K BHyTpHeHc CTOpOHe BOpOT nOcePeIiHe CBepxY (Pn Heo6XoDmOCTn BMeCTe C KpeIeKHOI NaHeJIbIO). Hametntb OTBepCTna.
2. A. DepeBHHbIe BOpota
Посверлть OTберсту ДамаMuTpo8 MMи 3aФИКСИРВaТь Kрпелене BOPOT пи ПOMоцг raйк, CTОнорHошаиьи 6ONTaФИКсатopa(3).
3akpenTb shpynami (4).
C. Ondoctbopatbte Bopota - dononHntelhoe obopyoBaHne 3akpeNTb wypnami (4).
20 MoHTax KOhCoJI N BOpOT
A. MOHTAX OДHOCTBOPHYbIX BOPOT
CkpEnHb Dpyr C npYrom npAble (1) n 30rHyTbe (2) KOHcOnn BOpOT Ha BO3MOXHO 6OJbWee dInHe (C nepeKpbITnEM DO dBx INn Tpex OTBepCTn) npn NOMOUs COeHNHTbHbX 3JeMeHToB (3,4,5) n3 KOMNJIeKTA NOCTABKN. Pn 3aKpbTbIX BOPoTAX pNcOeHNHTc NOMOUs KOJbCeBO 6OJTa (6) K KpeIeHNIO BOPOT pRMyIO KOHcOB (1) n 3aΦHKcnPOBaTB eKoJbUeBbIM KpeJIeHEm (7). Pa3BeHNHTB BHYTpEHNOu H BHeHNOU qACTNu KapeTK. CmecTtB BHeHNOU qAcTb KapeTK Ha3aD B HApPABLeHnPiNbOda n 3aΦHKcnPOBaTB n3OrHyTuO KOHcOB BOPOT (2) B pNemHom OTBepCTn KapeTK (8) KOJbUeBbIM 6OITom (6). Pn 3tOM BO3MOXHO NOTpe6yETc SclErKa pNpOAnHbT BOpota. 3aΦHKcnPOBaTB CoeHNHeHne KOJbUeBbIM KpeJIeHEm (7).
YKA3AHHE:Пи HabtropoKe KOHcEBOrO BbIKHouaTeJI R bIOJOxHeH N "OTKpblTO"BOPota, haxoJIeNecR B nONHOCTbIO OTKpbITOM COCTOHN, He IOnXhbl HAKIoHrTcR BnH.ДaJke IeRkn HAKIOH BnH3 (9) BeTeK TOMy, UTo npI OTKpbITuN (UIN 3aKpbITuN) BOPOT BO3HnKaet HeHyXhbl XoD BOPOT N3 PONHOCTbIO OTKpbIToro COCTOHN B o6paTHOM HApBaJIeHNI.
B. MOHTAX CEKUNOHHbIX BOPOT
BbIopHnItb KpEnJ, KaK noka3aHo Ha pnc. B, n nepeiTu K lary 21.
21 3aKpePJIeHHe HAcTeHHoN KOHcOJIu
HacteHHyIO KOHcONb CNeJeY TcTaHaBJIuBaTb B IprMoB BVdMOCtN rapaxhbIX BOPOT BHe 3OHbI BOPOT IN HAnpaBIAOxN,Ha BbICOTe He Mehee 1,5 M BHe DoCraEMOCTn dnerTei.
HenpaBnIbHoE nCOnIb3ObaHne rpaXhbIX BOpOT MOKET npNBecTN K TjKeJIbIM TpaBMam pN 3aKpbITn NJN OTKpbITn BOpOT.
Helen3a donyckaTb deTeK ynpabIeHIO npn nOmoN hAcTeHHo KOHCJIN NO3BOJrTb IM NOJIb3OBaTbCpaNOynpabJeHEm.
B ueJx 6e3onachocnHa hAcTeHHoN KOHcONn CneJyET npNKpeNTb 3NaK npDeoctepeXeHn.
Ha 6bTHoH CTOpOHe HAcTeHHoH KOHcOni (2) HaxoJATcB DA bHTOBbIX KOtAKThbIX 3aXmMa (1). CHbI N3OJIaNIO CmHbHLbHO rpoBOda (4) Ha yUacTKe OKOIO 6 MM. Pa3BeCTn XJIbI pnoBOda Ha DOCTaTOOHpe PACToTHe dpyr OT dpyra TaK, YTObI MoKHO 6blIO pncOeDInHTb 6JIbI c KpACbIM pNOBoK 3aXkMMy C 06O3NaueHEm RED (1), a 6JIbI pNOBoK 3aXkMMy C 06O3NaueHEm WHT (2).
CMOHtnpoBaTb HeCTeHHyO KOHcOJIb npn NOMOuIcMoHape3aIOUxN BHTOB (3)Ha BHTpEnHei CTeHKe rapaxa. B Cnyae CTeHb I3 CyXOJ WtYkaTypKn pOcBepNTb OTBepCTnI dAmEtpom 4 MM N BCTaBtB HIX DIOBeII (6). PeKOMeHdyeTc npOn3BOmITb MOtAOK OKO BoKOBOr BxOa B rapax B HcDOcraEMOctn DnIeTeI.
KoHueBbIe BbIKHouaTeI npOrpaMMpyOTc cNeDyUOIM 6pa3OM:
- OTKpbIb KOJInak OCEBSeHnA. HaxaTb YepHb KHONoUHb BbIKIOuHaTeB (1) I depKaTaB erO do Tex nop, noka He NaHET peDKo MInrTaB XeJbIcD (3), 3aTeM OTNcyCTnTb KONKy.
- HaxaTb chehBb BkIIOuataIb (1) n depKaTb ero do Tex nop, noka BOpTa He DocTnHyT JKeJaEMrO noLoXeHnra "OTKpblTO". OtperyNupOBaTb No3nOHNPOBaHne BOPot npn NOMOnu CheHoro (1) u opAnXeBOrO (2) KHONoTHbIX BkJIIOUaTeJe. HaxaTne Ha chepyIO kONky npINBoDIT K DmXeHnIO BOpT BBEPX, a ha opAnXeByIO - BHIN3.
- HaxaTb Ha 3anpOrpaMMnOBAHHyo KNONky paAnoynpaBJIeHn IIN Ha 60nbSyuHO KNONky BbIKNoUaTeJHa HAcTeHHo KOHCOnI N3 BaIero KOMPNeKta noCTaBKn npIBoDa BOpOT. PIn 3Tom 6yIeT BbIOHeHa HAcTPOKa KOHcEBOrO BbIKNoUaTeJn IJa IIOJOKeHn BOpOT "OTKPbITO". YcTaHOBKn KOHcEBOr BO bIKNoUaTeJn 6yDyT 3aONMeHbl.
YdoctOBepbTecb B TOM, yTO BOPOTA OTKpbIBAOTCA DOCTaTOHOb, YTO6bI B rapax MOR bExaTb Baaw ABTomO6nJIb.
4. Korda KOHcEbIe BbIKJIOuAteJI NOKa3bIbAIOTcraPpOrpaMMnPOBaHHbIMN, MIRaHne C(3) npekpaaaeTcra.
Ecni BOPota ndyt Ha3ad nIIN octaHaBnIBaOTc nepeTEm, KaK doCTnYb NOJa rapaXa, NocJeIOBaTeJbHOCTb Onerpaunl Warob 1-3 DoJXHa 6blb HemeJeHHO BbINOJIHeHa 3aHOBO. EcIn KOHcEBlBe BbIKLIOuateJIb OKa3bIBaOTc Bce Xe HAcTpoEHbIMN HEnpaBUNbHO, BbINOJIHNTe Yka3AHn dJa pyHOn HAcTPOkN KOHCeBbIX BbIKLIOUaTeNei n3 pa3deJa "Y Bac Bo3HKnI npo6Iembl...". n. 15.
YKA3AHNE: Ecnnn HactpoKa KOHcBbX BbIKIouaTeNe He npOnCxOanT, to pa6ooye ocBeuHne MnaeT 11 pa3. Ppi nOnBLeHn 3ToR "coo6ueHn" o6 ouhke nepeiunte K n. 15 u3 pa3dena "Y Bac BO3HNKn pno6JIembl... N BbInONHnTe Yka3aHn dI pyHoN HactpoKn KOHcBbX BbIKIouaTeNe.
26 Hac troponka cnbli Taryn
Khoonohb BbIKHouateJIb IaHaHcTpoKn CnIbI TaHn HaxoNTcnoKoNnakOMocBSeHn. IocpeDCTBOM oOyuHn CnIbITarOcuJeCTBnEeTc HAcTpoKa Heo6xOanMOMy ycHnIO dIaOTKpbITnI 3aKpbITnBOPOT.
- OTPpbITb KOJINaK OCBeUeHnA. PIoD KOJINaKOM HAXOДNTcA opaHKeBb KHONoCHb BbIKHouaTeJIb (2).
2.Посрдьом Дыкрахоги Накати оранжебого Kнончого Bыкноуаел (2) можног ВьтпВ ржим Habстpoйсплbl TягИ. CД (3) нанhaet чаго моготь.
- HaxaTb Ha 3anporpammmpoBaHHyO KHONky paNIOynpaBleHn (4) nHa Ha 60JIbwo KHONoCHbI BbIKIOuATEJIb Ha HAcTeHHo KOHCOnn n3 BaWero KOMPNeKta NoCTabKn npINBOda BOpOT. BOpota NdyT Bn3 BnoXeHne "3AKPbITO". HaxaTb Ha 3anporpammmpoBaHHyO KHOkny paNIOynpaBleHn (4) cHOba - BOpTa NdyT Do KOHca BBepx B noIOxehne "OTKpblTO".
IocneToR, KaK cnla TaTn 6yTe3anomHeHa, MraHne C(3) npekpaTntc.ДЯ npabInbHOY yCTaHOBKn cInb TnB BOPota cJeDyET OIN pa3 nporHaTb NO NOnHOMy UKNly OTkpblITN-3aKpblITN. EcIn BOPota OTkpblAIOrCn 3aKpbIBaIOrCn He Do KOHua, IpOBepbTe 6aJIahCnPOBky BOPot, a TaKxpeBHTCB OTCyCTBn 3aklnHHBaHHu INI 3acTepeBaHHu BOPOT.
IpaBnBHOIOKOHaTeJbHOH HAcTPOKN KOHeBbIX BbIKIOATEJe DOJIXHO 6bITb BBINOnHeHO OByeHne CNbI Tarn.
27Пюверka peBepca no yCNoBnIO 6e3OpaChocTn
Поверка реверca по услобию 6e3онасночи IMeet 6oIbwoe 3naueHne. Пи КонтakTe C lekaunm Ha nOly rapaxa npenTCTBnEM BlicOTOn 40 MM rapaxHbIe BOPota DoJxHbI BblONHЯт bpepc. EcIn npINbOD hAcTpoEn HenpaBnIbHO, To 3akpbITne BOPOT MOKeT ImeT bTKeJIbIe NocJeNctTBn. Поверка реверca и CB3aHHaC HNe peryNIpOBKa DoJXHbI npOn3BOIDtbcpeYrJaPHO OdIN pa3В MecaU.
Iopraok DeicTBn: IomeCTNb npenrTCTBne BbICOTO 40 MM (1) Ha NOJy nO rapaXhbIMN BOPoAMN. 3aNyCTNb BOPoHa 3aKpbITNe, T.e. BHIN. PIn KOnTaKTe C npenrTCTBnEM BOPoA DOJXHb BO3BpaUaTbCn HA3a.I. Ecnn BOPoA OCTaHaBnBaIoTcY npenrTCTBn, TO cJeDyET NOBTopntb Oepaunu Sharob 25 n 26 no HactpoeKe KOHcEBix BVIKIOHateJIe N CINb TgN. PocIe 3TORo Heo6xOIMo 3aHOBO BblONHtB npOBepkY aBTOMaTHueCKOrO peBepca No ycNoBIO 6e3onacHOctN.
EcnnoJIOKntbHa cepeINHy BOpOT rpy3 20 Kr,To BOpota DOnXHbl npOBNHyTbcBBPx MaKcIMyM Ha BbICOTy 500 MM.
28 MoHTaxx Protector System
(cm.PnHaNekxHocTn)
YcHnne,3amepeHHoe Ha KpaHO BOpOT,He DoJnxHO npeBbIaTb 400 H (40 Kr).Ecnn OHO OKa3bIbAeTc8 6OJIbe 400 H,To DoJnxHa yctahabnBaTbCnCTema Protector System.
Protector System kak donolnHtBHe o6bpyoBaHne moKet 6bItb yCTaHOBJIeHa nocLe BblONHeHn MOHTaXa N IOCTnPOBKn pInBOda rapaxhBx BOPOT. OHa moKet NOCTaBnTbCn B COCTabe npHaNDexKHOcte. Pn3TOM npINaraeTc nOdp6Hoe ONiCaHne nocJeDoBaTeBHOCTn MOHTaXa.
Protector System obecneuBaet donoJHnteBHyto 6e3onacHOCT. Pn3 3TOM MOXHO NCKLIOHTb pNCK noJyueHn TpaMbI B pe3yIbTaTe 3aKaTnH (HaNPmep, MaJeHbKnx DeTei) DBNjxumncra rapaxhbIMn BOPotamn. Protector System pa6otaet C nCOnJb3OBAHnEM INdpaKpachoro Jyua. EcIn Jyur npepbIAeTc npenrTCTBnEM, TO 3TO BbIHJyKaJaET 3aKpbIbAIOUmeCRA BOPota OTKpbIBaTbCS INN 6NoKpyET 3aKpbITNe yXe OTKpbITbIX BOPOT. DAnHna CNTema HactoTeJIbHO peKOMeHnyETc BJaDeJIb4am rapaxke np HaJIvNN B CeMbe MaJeHbKnx DeTei.
29 CneuNaIbHoe oChaSeHne
Y BAC BO3HnKJI N PPOBJEMbl...
1.ПивOD He Функцонуретнс с HabteHHOJ KOHcIbI,нс paanoynpablenem:
-Подано Ли на пьовд наразжени?Вклочь побнуламночу вштencьную розту.Есни лamоча не загораетс,то сеунуET npobерпь 6лok п dedохсангелейллгавьнувikлочаел.
Bce JIN 3aMKN BOPOT pa36JoknpoBaHb? IpoHntaTb npedynpeKdAIOUne yKa3AHn NO MONTaxy Ha cTp.1.
- EcTb JIN IOBOPaMn CHER IINJIeI? BOpota MOry T npImep3aTb K 3emJIe. YdaIITb PpEnrTCTBne DInI DnBxKeHn BOpOT.
- Bo3MOxKHo, He pa6oTaIOT npyXnHb I BOpT. 3aMeHnTb npyXnHbI.
2.Пивовcfункцониуетсраадиоупавленим,Но He pa6oTaET cHaCTeHHOJ KOHCoJIbIbI:
CBeHTcHaCTeHHaKoHcOJIb?EcIIN HeT,TOOTCoEiHNITb CnHJIbHbI npOBOD OT 3aXIMOB npIBOa.3AMKHyTb HAKOPOTKO KpaChbl N 6Bbl 3aXIMbl, CoEiINHB INK KOPOTKMnpOBDNIKOM. EcIIN npOBod pa60taet, TO y6eIbTbc B ICnPaBHOCTN pICoEiNHHeHn npOBDa K HAcTeHNOI KOHcOJIa, a TAKKe B OTCyTCTBNI KOPOTKOrO 3aMbIkaHNA B 3OHe 3aXIMOB IIn N ObpbIba npOBDoA.
- Bce JI npoBOHbIe coeINHeHnB nOpAKe? IpoUHTaIte yKa3aHnHa cTp. 4.
Y BAC BO3HNII IPOBJEMbl...
Y BAC BO3HnKJI N PPOBJEMbl...
13.Дигателн HeKOTOpoe BpeM rYdnt, a 3aTeM nepctaet pa6oTaB:
- Bo3MOxHOb, HeuCnpaBnbl npyXnHb BOpOT. CM. BblIIE.
- EcIn npo6JIeMa BO3HnKaet npi nepBOM BKNIOueHmnpINBOa,TO, OyeBnIDHO,BOPOTa 3aneptb. OTkpItb 3amKn BOPOT.
Iocne okonuHnO npaunBbINOJHnTe NOBTOpHyIO npOBepKy peBepca no ycNoBIO 6e3oNaCHOCTN.
BpejKme roTOBHOCTN 5,5BT
HopmaJIbHbI MOMENT
BpaueHn .5H
Manager, Regulatory Affairs
THE CHAMBERLAIN GROUP, INC.
845 Larch Ave.
Elmhurst, IL 60126
USA
February, 2008

Thread other end of rope through hole in release arm of the outer trolley (4). Adjust rope length so that handle is 1,8m (6 feet) above the floor. Secure with an overhand knot.
OPOMBA: Če je treba vrv skrajšati, odrezan konec zapečatite z ognjem vžigalice ali vžigalnika, da preprećite paranje.
Povezava elektriche energije
DA BI SE IZOGNILI TEZAVAM PRI NAMEŠCANJU, ODPIRALA GARAZNIH VRAT NE ZAZENITE, DOKLER NI NAVODIL ZA TO.
Odpiralo vrat povezite le z elektrico vtičnico z dvopolnim stikalom.
18 Naneščanje luči
2004/108/EC
2006/95/EC
1999/5/EC
EN55014-1 (2000), EN55014-2 (1997), EN61000-3-2 (2000), EN61000-3-3 (1995), EN 301 489-3 (V1.3.1), EN 300 220-3 (V1.1.1), EN60335-1 (1994), in EN60335-2-95 (2004)
Manager, Regulatory Affairs
THE CHAMBERLAIN GROUP, INC.
845 Larch Ave.
Elmhurst, IL 60126
USA
February, 2008
(6) Model 975E Laser Garage Parking Assist
Manager, Regulatory Affairs
THE CHAMBERLAIN GROUP, INC.
845 Larch Ave.
Elmhurst, IL 60126
USA
February, 2008
2004/108/EC
2006/95/EC
1999/5/EC
EN55014-1 (2000), EN55014-2 (1997), EN61000-3-2 (2000), EN61000-3-3 (1995),
EN 301 489-3 (V1.3.1), EN 300 220-3 (V1.1.1), EN60335-1 (1994), ve EN60335-2-95 (2004)
B. P. Kelkhoff
Manager, Regulatory Affairs
THE CHAMBERLAIN GROUP, INC.
845 Larch Ave.
Elmhurst, IL 60126
USA
February, 2008
IpbO npoHTajTe Oba BaXHa ynyTCTBa 3a 6e36eHNo pyKOBaHe

YkoJIkuO ce He npIpdjKabate cIpeHx ynyTCTaba, MoKeTe ce O36nIbHO NOBpeDHTN IIN OWTeTHTN ONpEmy.
- PaxJBnBO npoHTajTe OBA ynyTCTBa
- Ypejaj 3a OTbapahe Bpata rapaxe npojekTobah je n TecTupan kako 6n 6e36edno paNo noy yCNoBOM da je NOCTaBJeH na Ce Hnme pyKyje TaHNO y CknaDy ca yNyTCTBnMa n3 OOB npnpuyNka.
Obaj cmmbo yno3opeha 3nau Onpe3 - ynyTCTBO ce oDnocn Ha 6e36ednoct oncIyXmoa nHa ha Moryhe owTehe onpeme. NaKbNO pnoHTajte ynyTCTBa 03NaHeHa OBIM cmmboJOM. NaKbNO pnoHTajte OBA ynyTCTBa.
Uyno3opehe: UkOnko Bawa rapaxa Hema padha yna3Ha Bpata, HeonXoJHO je da nocTbTe doaTHn ypehaj Moden 1702E Outside Quick Release. Obaj nomohn ypehaj omoryhaba pyH o pKOBaBe bpaTma rapaKe ca cnobaaHe cTpane y cnyauj npeknda cTpyje.

Bpata rapaxe yBeK Tpe6a Da 6dy ypaBHOTexHa.
Yeaj 3a OTbapha Bpata rapaxe He Tpe6a Da
HaokhaJye HeocTaTKe Kao WTo cy TeuKO OTbapHe
IINs 3aRnabNbBaHbe Bpata rapaxe. HeonxOHO je
nonpaBHTBpata KOja ce 3arNaBByj NIn TEuKO
OTbapajy. Bpata rapaxe, Onpyre Ha BpATMa, Ka6NoBn,
JaHauHnU/peMeHnue, HocAyn HbXOBn EJeMeHTN
PepaPepHyTN cy n Mory O3bHbNO NOBpeDHTN
ONcLyXnOua. He koyawabte da nx nonycntte,
nomepute nnnoecite. Ptoobnte cnyk6y 3a
nonpaBky Bpata rapaxe.
He hocnte npcthe, yacobnke nno OeHy 1npokor kpoja npnnkOM nocTaBbaHa nnn nonpaBke ypehaja 3a otBapaHbe BpTa rapaKe.
Ia ce He 6nCTe yIeTbAyn y ykaI n O3bHNOBpeINy, yKJIOHInTe CBy yXaI NOBe3aHy Ca BpaTIma rapaxe Ipe noctabba ypehaja 3a OTbapahe Bpata.


IocTaBbABe n eNeKtpnHa nHcTaIaunJa Mopajy da 6byu yckNaJebn ca BaWOM 3rpaIOM n Ca O3HaKaMa Ha eNeKtpnHOJ nHcTaIaunJn. Obaj ypehaj ncnyBaBa 3axTebe 3aawTtHe Knce 2 n Hema noTppe6e 3a y3emJIbeHem.

Heonxodno je da 3naujho oajate naqana Bpata 3npaheha od ctaKlehe Byne, anymnjyma nnn 9eNka kaco Ce he 6n OwTeTnla. (Porraje Jte cTpaHnu4 He Hajboje je da oncnpuynca Bpata bawae rapaxe nopuynte raphHTpya 3o oajabaBbpe Bpata npnilkOM noCTabbaHa ypehaja 3a HxOBO OTbapaHe.
PpOBepa pada cnryphoCHor cnCTema 3a XOD BpaTa yHa3aD BPNo je BaXHa.

BpataBaawe rapaxe MOPAJy da KpeHy yHa3aJd
yKoJIko DoHy y DoINp ca npEpipeKOM BelenuHne 40
mm Koja ce Hana3n Ha noy. YKoJIko He NoDecnTe
ncPabHO ypehaj 3a OTbapaHe BpTa, MoKeTe ce
O63bIbHO NOpBeNTn PrnNIKOM 3aTbapaHa BpTa
rapaXe. N3BpUte pOBoBy jeDaHny MeceHo, KaO
n CBA Notpe6HaNoDeeaBaHa.
Obaj ypehaj He 6n Tpe6ano da noctabute Ha BnaXHO nn MOKpo MeTo.
Ppnnikom pada, Bpata He cmejy da 3axBaatajy npocstop jabhor nyta.

Heonxodno je noctabnntu Protector System kada Bpeidnoc Tne Ha nBmUe Bpata Koja ce 3aTbapaj npemaayje 400N (40kg).IpebeNka cna he Hapywni Ncnpaban paad cnpyPHoCHor CnCTema Xoda Bpata yHa3aD ININ OwTeTnBpata rapaxe.

Tpajno npuBpCTnTe 03haky Koja 3Haun onpe3 y 6IINHH dyIgMeTa 3a ynpabbahe BpaTIma nOCTaBbEHor Ha 3nD Koja Bac noDceHa Ha onpe3 npuiNKOM paJa.

DeaknBupajte Cbe noctoje he 6pabe Ha BpaTma rapaxe kako ux He 6ncte owtetnn.

IocTaBnTE CBeTIOCHO yUrme 3a ynpaBbAbe BpaTnMa (nnn 6nno KaKAB DOaTHN PpeKnDauch) Ha MeTo Ca Kora ce BVne BpTa rapaXe, KoJe je BucOko 6ap 1,5 m n BAH DomaJa dee. He Do3BOJInTe Deu n da pykyj npKeHdauem (PpeKnDaHMa) nn ypehajem (ypehajma) 3a daBnHcKO ynpaBbAbe. O3bnHe NOBpeDe npNIkOM 3aTbApBaHa BpTa MOry 6nTn pe3yIaT norgseHor OTBapBaHa.

AknBupajte ypehaj 3a OTbapHe Bpata camo onda KaJa ce Bpata BnDE y notnyHocTN - 6e3 npenpeka, n KaJa je ypehaj 3a OTbapHe Bpata nCnpabHo nOdeuhen. HnK He 6n Tpebano da yna3n y rapaxy nnNnNnNn NHe KaJa ce Bpata Kpehy. He Do3BOJInTe Deucn Da ce nrgpajy y 6bn3HHn Bpata

YnoTpe6nTe ypehaj 3a puHNo ocnoBaHahe cAmo 3a DeakTNBpaHe TpOne H, NO MoryhCTBy, cAmo KaJa cy BpTa 3aTbOpHa. He KopncTnte UpbEny puHcy 3a OTbapaHe Nn 3aTbapaHe BpTa.

Uckbuynte doBOOc cTpyje do ypehaja 3a OTbapahe Bpata rapaxe npe nonpaBkn nn yKnaHaBa noklonana.
Obaj npo3BOD nma Ka6n 3a Hanajahe cTpyjom noc6he KOHcTpyKuJe KoJn ce, y Cnyajy OwTeHeBa, Mopa 3aMeHNTn Ka6lom 3a Hanajahe cTpyjom HCTe BpCTe; TaKaB Ka6n 3a Hanajahe cTpyjom MoKe IcnpuyHTn UYrpaIHTn cTpyHNo NIIe.

Caipxkaj
Ctpana Nnyctpaunja
IpaBnna 3a 6e36eHNO pyKOBaHe ....1
Ipe Hero wTo noUHHe ta paDom. 2
BpcTa BpTa 2.1
Heonxoidan aalat 2.
EneKtpoHcKa.....Aytomatcko noeShaBaHe cnle
EneKtpnHa ... Ypehaj 3a 3aunTu TpaHcfoMpMaTopo od npeonTepeheHa u HNCKOHaONHcKa eEeKtpnHa INCTaIauJa ca DyRMToM.
Ypehaj 3a orpaHnauBaHe .onTnukn RPM/Passpoint dTeKTop.
Iopdewaabahe rpaHnHnx
BpeHocTn. .eIeKTPoHcKO, IOnyayTomaTcKO I NOTnyHO ayTomaTcKO.
CtpyjHo kOJIO 3a
noeTaKa pada.......HnckoHaoncKo ctpjHo KOI ca DyRMToM.
ДиMuHNeJe
Дужima (укунна)................................3,2m
Heonxoan npocstop.....30mm
TeKina nela ypehaja
koju Bucn 14,5kg
PnpjemnK
Perncpn y Memopnjn.....12
Paɪná φpɛkBɛnɪja......433,92MHz
Manager, Regulatory Affairs
THE CHAMBERLAIN GROUP, INC.
845 Larch Ave.
Elmhurst, IL 60126
USA
February, 2008

Anleitungen - Garagentorantriebe Modell LM60K, LM60R-128, K700
Instructions - Modèle LM60K, LM60R-128, K700 de outre-port te de garage
Instructions - Garage Door Operator Model LM60K, LM60R-128, K700
Instruktioner - Model LM60K, LM60R-128, K700 Gar ageportsabner
Instrucciones - Abridor de la puer ta de garage, Modelo LM60K, LM60R-128, K700
Odyic -MxavioaO Avoiymuos Kapaonopta, MovTeLo LM60K, LM60R-128, K700
Istruzioni - Apriorta per garage ModelooLM60K, LM60R-128, K700
Instruksjonene - Garasjpeportapner, Modell LM60K, LM60R-128, K700
Instrukties - Model LM60K, LM60R-128, K700 Gar agedeupener
Instruções - Operador automatico de por ta, Modelo LM60K, LM60R-128, K700
Instruktioner - Garageportoppnare Modell LM60K, LM60R-128, K700
Ohjeet - Autotallin ovenavaaja, Malli LM60K, LM60R-128, K700
Ihctpykznn - UcpoCTBO 3a ynpablenhe na rapaxha Bpata Moen LM60K, LM60R-128, K700
Návody - Pohon garázovych vrat model LM60K, LM60R-128, K700
Hu Utmatok - A LM60K, LM60R-128, K700 -as modell: garázsajtók hajtószerkezete
Upute Uredaj za otvaranje garaznih vrata Model LM60K, LM60R-128, K700
Instrukcje -naped drzwigarażowych model LM60K,LM60R-128,K700
Instruetiuni Dispositiv de deschis usa garajului modelul LM60K, LM60R-128, K700
ru INHCTpyKUIN -PnBvOd rapaxhblx BOpOT,MOdeJIb LM60K,LM60R-128,K700
Pogonska - enota garaznih vrat model LM60K, LM60R-128, K700
sk Obrázky - Otvárač garážovych vrát model, LM60K, LM60R-128, K700
Talimatlar - Garaj Kapisi Operatörü Model LM60K, LM60R-128, K700
sr YnytCTBa - Yepej3a pykoBae bpaTma rapaxe Moen LM60K, LM60R-128, K700
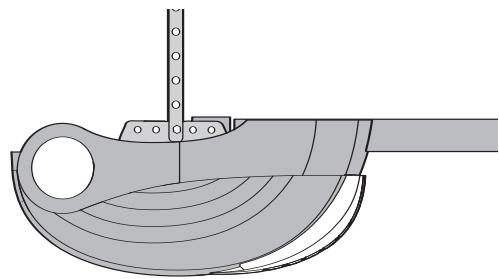


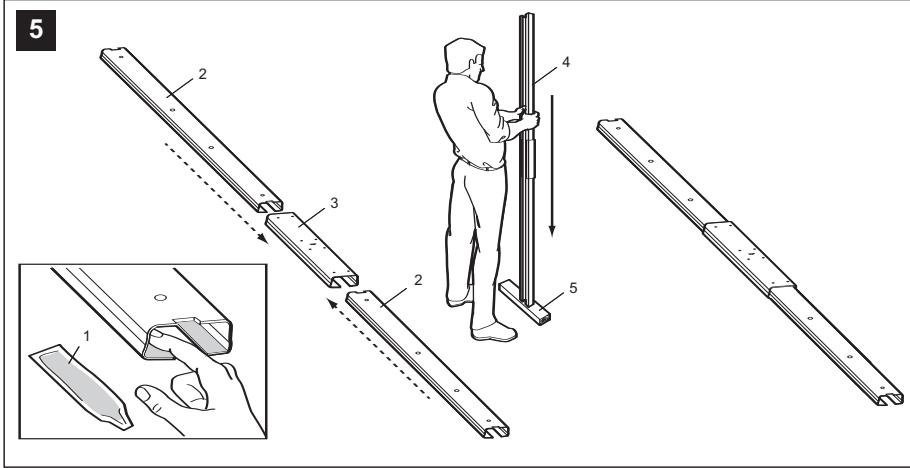
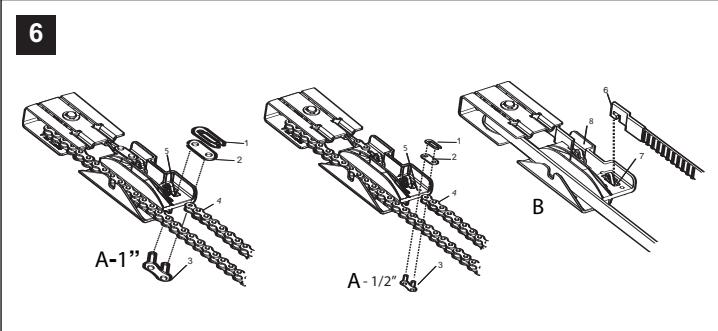
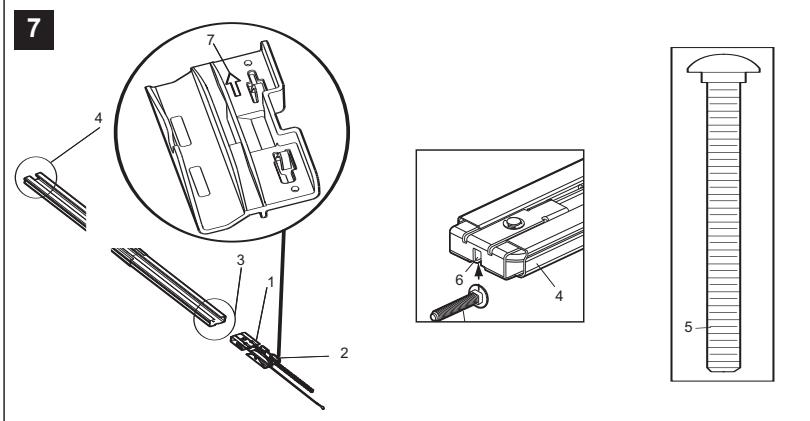
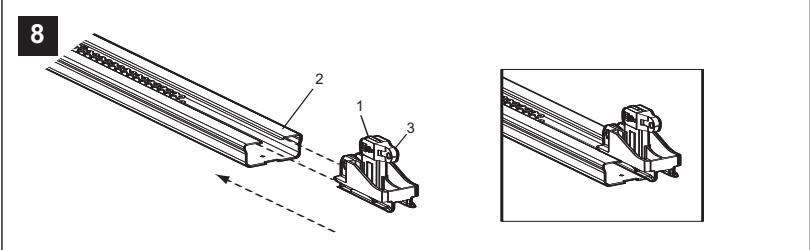

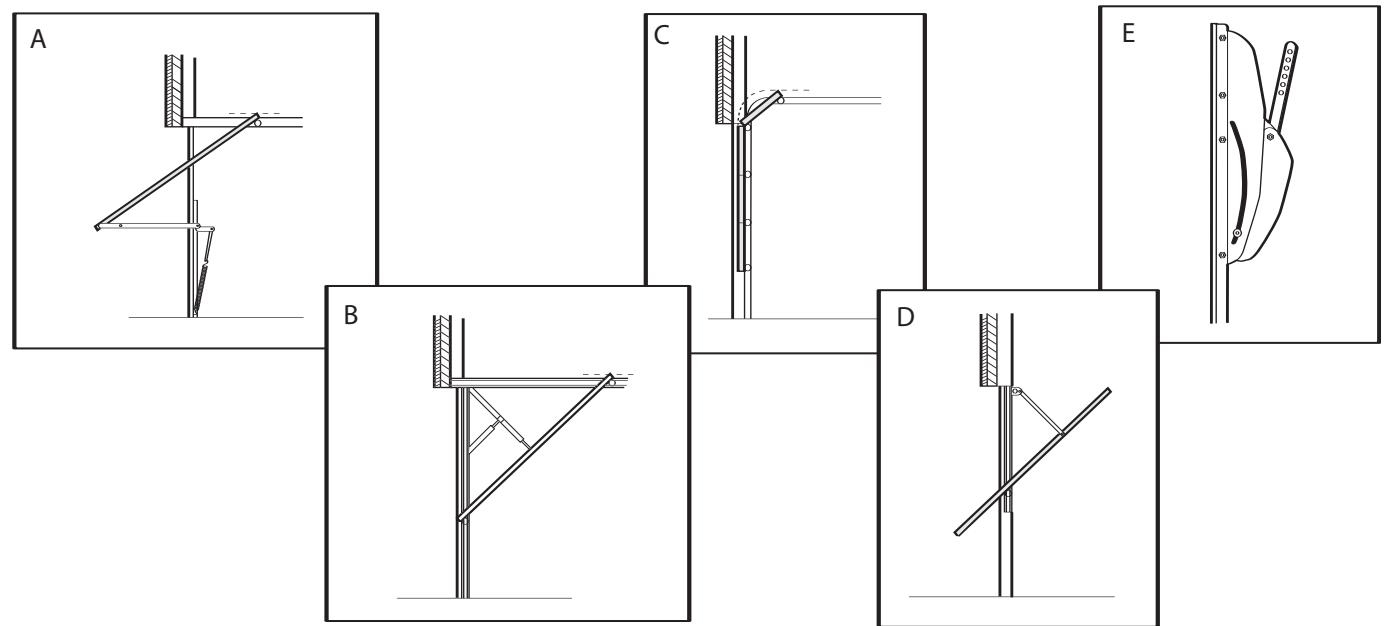
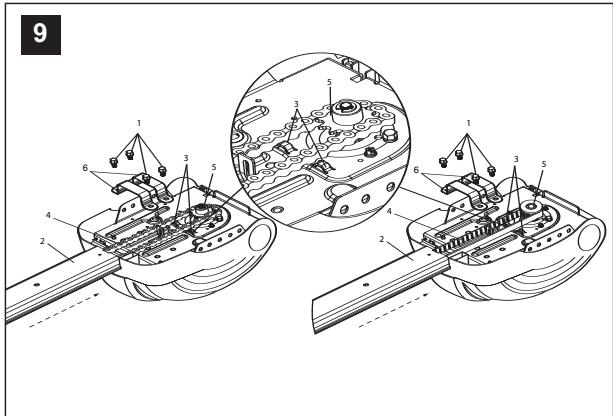
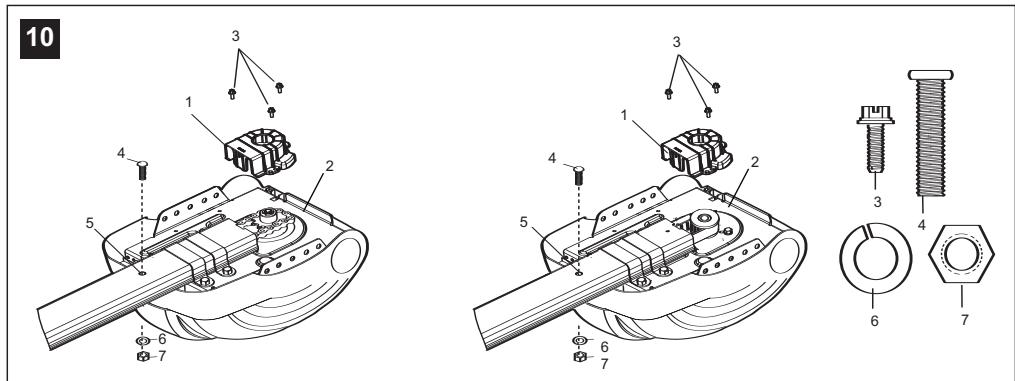

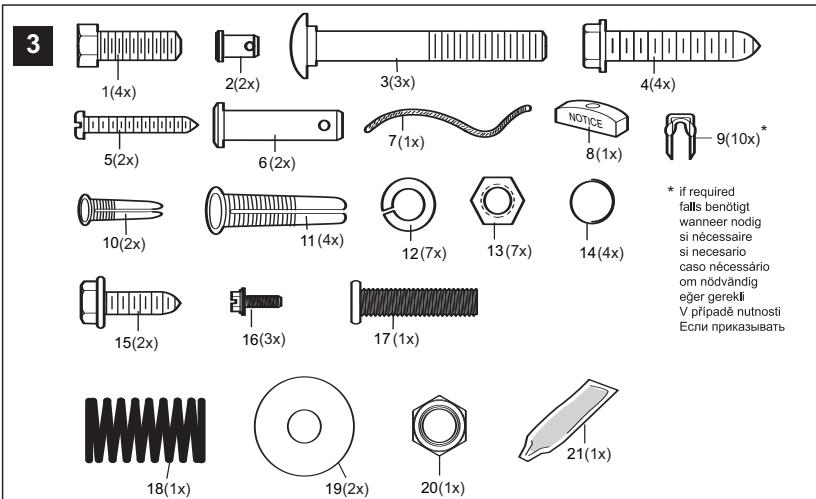
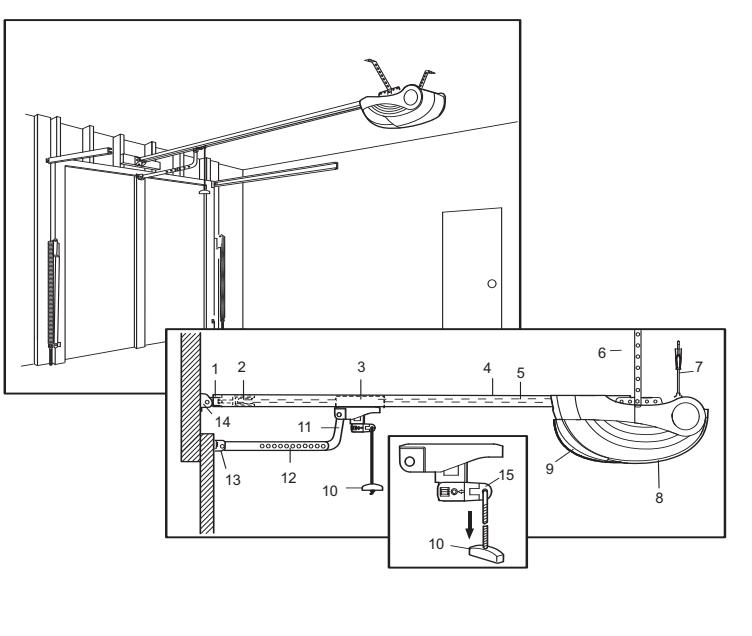
4
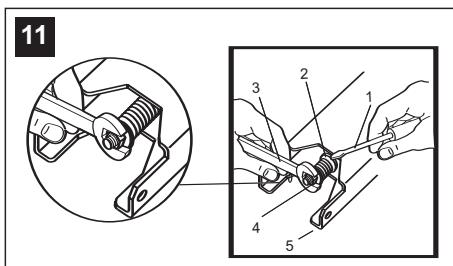
13
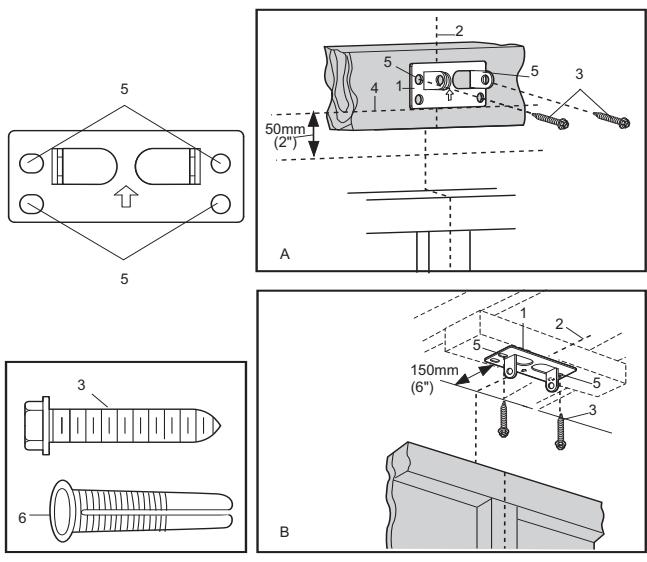
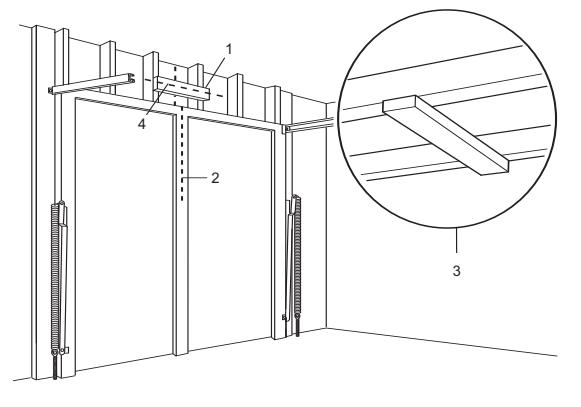
12