
PerfectCare 9000 PSG9040 - Iron PHILIPS - Free user manual and instructions
Find the device manual for free PerfectCare 9000 PSG9040 PHILIPS in PDF.


| Brand | Philips |
| Model | PerfectCare 9000 PSG9040 |
| Product Type | Steam Iron |
| Dimensions (approx) | 30 x 15 x 15 cm |
| Weight (approx) | 1.5 kg |
| Power Consumption | 2400 W |
| Water Tank Capacity | 300 ml |
| Continuous Steam Output | Up to 50 g/min |
| Steam Boost | Up to 200 g/min |
| Soleplate Type | OptimalGlide Pro |
| Temperature Control | Automatic (OptimalTemp technology) |
| Auto Shut-off | Yes (when left unattended) |
| Anti-Calc / Descaling | Integrated anti-calc system |
| Cord Length | 2.5 m |
| Safety Features | Auto shut-off, thermal fuse |
| Accessories Included | Measuring cup, user manual |
| Energy Class | A |
| Warranty | 2 years (subject to terms) |
| Maintenance | Descaling every 1-2 months; clean soleplate with damp cloth |
Frequently Asked Questions - PerfectCare 9000 PSG9040 PHILIPS
User questions about PerfectCare 9000 PSG9040 PHILIPS
0 question about this device. Answer the ones you know or ask your own.
Ask a new question about this device
Download the instructions for your Iron in PDF format for free! Find your manual PerfectCare 9000 PSG9040 - PHILIPS and take your electronic device back in hand. On this page are published all the documents necessary for the use of your device. PerfectCare 9000 PSG9040 by PHILIPS.
USER MANUAL PerfectCare 9000 PSG9040 PHILIPS
Congratulations on your purchase and welcome to Philips! To fully benefit from the support that Philips offers, register your product at www.philips.com/welcome.
Read the separate important information leaflet and the user manual carefully before you use the appliance. Save both documents for future reference.
Product overview (Fig. 8)
1 Steam supply hose
2 Steam trigger
3 Intelligent automatic steam button
4 Iron ready light
5 Soleplate
6 ActiveSense camera
7 Iron platform
8 Carry lock release button
9 Filling hole
10 Detachable water tank
11 Steam supply hose storage compartment
12 Cord storage compartment
13 Mains cord with plug
14 EASY DE-CALC knob
15 On/off button with light
16 Calc alert
17 Max steam setting light
18 Low water alert light
Preparing for use
Type of water to use
This appliance has been designed to be used with tap water. However, if you live in an area with hard water, fast scale build-up may occur. Therefore, it is recommended to use distilled or demineralized water (50% demineralized/distilled water mixed with water could be used as well) to prolong the lifetime of the appliance.
Warning: Do not use perfumed water, water from the tumble dryer, vinegar, starch, descaling agents, ironing aids, chemically descaled water or other chemicals, as they may cause water spitting, brown staining or damage to your appliance.
Getting the product ready
Fill the water tank before every use or when the 'low water alert' light flashes. You can refill the water tank at any time during use.
1 Remove the water tank from the appliance and fill it with water up to the MAX indication.
2 Put the water tank back into the appliance by fitting the bottom part into the appliance first.
3 Push in the top part of the water tank until it locks into place ('click').
Put the mains plug in an earthed wall socket and press the on/off button to switch on the steam generator. Wait until the 'iron ready' light lights up continuously. Once your appliance is ready, you will also hear a short beep.
Note: For first time use, we recommend you to place the iron on the ironing board before you turn on the appliance for optimum performance.
There will be sound from the base of your product due to the water being pumped for steam generation.
Low water alert light
When the water tank is almost empty, the 'low water alert' light flashes. Fill the water tank and press the steam trigger to let the appliance heat up again. When the 'iron ready' light lights up continuously, you can continue steam ironing.
Using your appliance
ActiveSense technology
Your appliance comes with the world's very first fabric sensing technology in irons called ActiveSense. It works with artificial intelligence recognizing fabrics during ironing with built-in camera, adjusting the ideal temperature and steam amount automatically. You can also leave your iron on the ironing board without risk of burns.

The ActiveSense technology enables you to iron all types of ironable fabrics, in any order, without adjusting the iron temperature setting.
The 'iron ready' light can light up steadily in either blue or white, corresponding to the level of temperature/steam needed (normal and high for the respective light), based on the fabric detected.
Fabrics with these symbols are ironable (Fig. 9), for example linen, cotton, polyester, silk, wool, viscose and rayon.
Note: Do not iron on prints, even if the fabric around is ironable.

For certain delicate fabric and finishing (e.g: suede, velvet, metallic weaving, sequins), it is recommended to steam a short distance above the garment. Fabrics with this symbol are not ironable (Fig. 10). These fabrics include synthetic fabrics such as Spandex or elastane, Spandex-mixed fabrics and polyolefins.

During ironing, you can place the iron either on the iron platform or horizontally on the ironing board. Thanks to the ActiveSense technology, the soleplate will not damage the ironing board cover (Fig. 11).
Note: There may be some steam observed when the iron is resting for a longer period of time. This is normal as it is part of the system process to ensure the soleplate is at the right temperature during rest. During this process, the 'iron ready' light will be breathing in blue.
Note: Minimise touching the front of the iron as it will get warm.

8 ENGLISH
Ironing with intelligent automatic steam mode

Your appliance comes with intelligent automatic steam thanks to DynamiQ sensor technology which recognizes how and when your iron is moving. When you turn on your appliance, this mode will be activated by default (Fig. 12). Coupled with ActiveSense technology, your iron will steam automatically the right amount of steam based on your movements and the fabric type without the need to use the steam trigger.

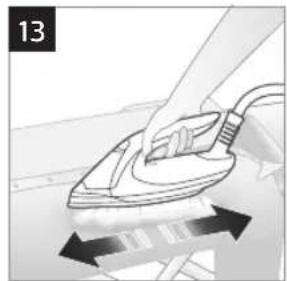
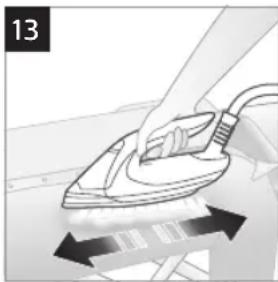
In intelligent automatic steam mode, steam comes out automatically when you move the iron and stops when you stop moving the iron (Fig. 13). You can still press the steam trigger in this mode to activate the steam when the iron is not moving.
Note: For your safety, in intelligent automatic steam mode, the steam stops when the iron is lifted up.
Ensure that the board is fitting to the size and weight of steam generator.
Ironing in manual mode

You can control the amount of steam manually during ironing by turning off the intelligent automatic steam mode .
- To exit the intelligent automatic steam mode, press the intelligent automatic steam button (Fig. 14). The intelligent automatic steam light turns off. You need to press the steam trigger to continue your ironing.
- In manual mode, ActiveSense technology will still adjust the temperature and steam amount automatically to different fabrics, but you need to press the steam trigger to activate steam release.
Warning: Never direct steam at people.
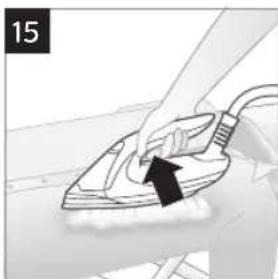
Note: For best result on tough fabrics such as cotton, linen and denim, keep the steam trigger pressed continuously when you move the iron over the fabric (Fig. 15). Then move the iron over the same area a few more times without steam to dry the fabric.
Note: For the best results on silk and shiny synthetic fabrics, it is recommended to keep the steam trigger pressed continuously while ironing.
Steam boost function
The steam boost function is designed to help tackle difficult creases.
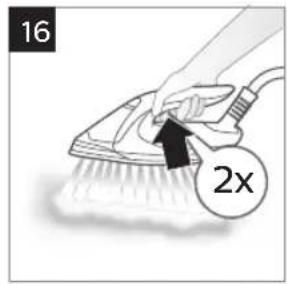
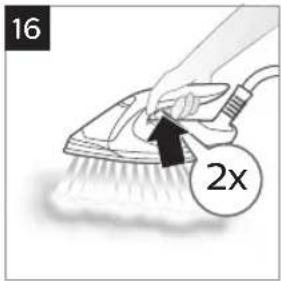
- Press the steam trigger twice quickly to activate the steam boost function. The appliance releases 3 powerful shots of steam (Fig. 16).
Vertical ironing
Hot steam is emitted from the iron. Never attempt to remove creases from a garment that someone is wearing. Do not apply steam near your or someone else's hand.
You can use the iron in vertical position to remove wrinkles from hanging fabrics.
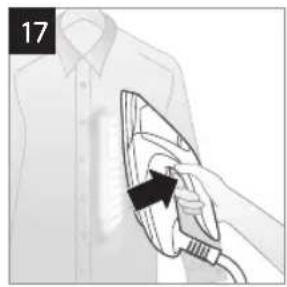
1 Hold the iron in vertical position, press the steam trigger and touch the garment slightly with the soleplate (Fig. 17).
Note: For your safety, the intelligent automatic steam mode is not available for vertical ironing.
MAX setting
For higher amount of steam, you can use the MAX setting.
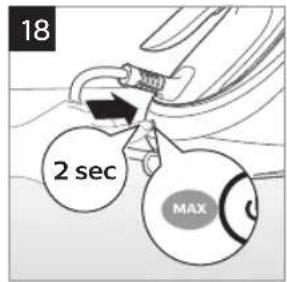
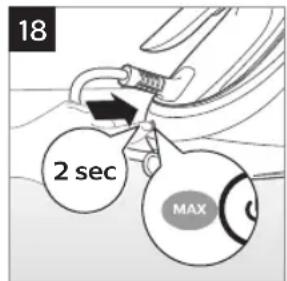
1 Press and hold the on/off button for 2 seconds until the MAX light turns white (Fig. 18).
Note: In Max setting, your appliance will always give the maximum steam amount, while the temperature will still adjust automatically.
2 The appliance returns to normal steam mode automatically after 15 minutes to save energy.
3 To directly switch off the MAX setting at any time, press and hold the on/off button for 2 seconds until the MAX light goes off.
Auto shut-off
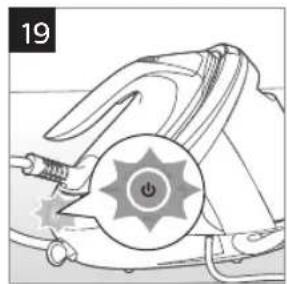
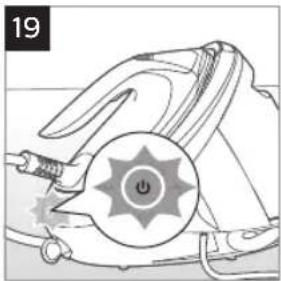
- To save energy, the appliance enters the standby mode if it has not been used for 4-5 minutes. The light in the on/off button starts to flash (Fig. 19).
- To activate the appliance again, press the on/off button or the steam trigger. The appliance starts to heat up again.
- The appliance switches off automatically if it has not been used for another 10 minutes after it enters the standby mode. The light in the on/off button goes off.
10 ENGLISH
IMPORTANT - EASY DE-CALC

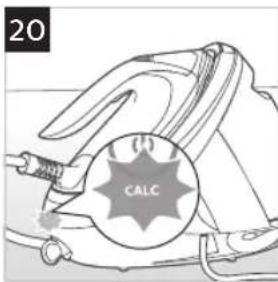
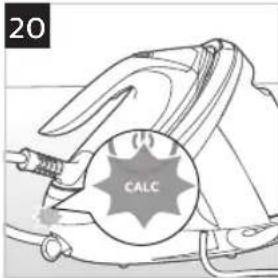
It is very important to use the EASY DE-CALC function as soon as the EASY DE-CALC light starts to flash (Fig. 20) and the appliance beeps continuously.
The EASY DE-CALC light flashes and the appliance beeps continuously after about a month or 10 ironing sessions to indicate that the appliance needs to be descaled. Perform the following EASY DE-CALC procedure before you continue ironing.
1 Remove the plug from the wall socket.
2 Place the appliance on the edge of the tabletop.

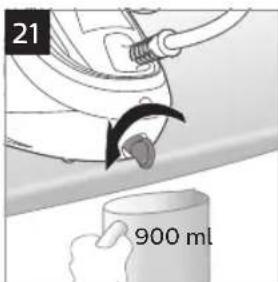
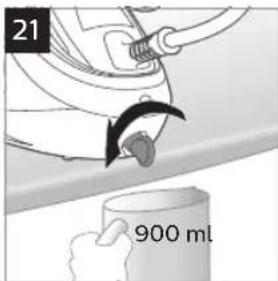
3 Hold a cup (with a capacity of at least 900ml) under the EASY DE-CALC knob and turn the knob anticlockwise (Fig. 21).

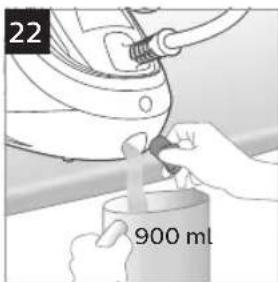
4 Remove the EASY DE-CALC knob and let the water with scale particles flow into the cup (Fig. 22).

5 When no more water comes out of the appliance, reinsert the EASY DE-CALC knob and turn it clockwise to fasten it (Fig. 23).
6 You can continue using your iron immediately after completing the EASY DE-CALC procedure.
Note: If you are performing the EASY DE-CALC procedure immediately after ironing, unplug the appliance and let it cool down for at least two hours before you perform the procedure.
IMPORTANT – Descaling the soleplate
If you do not use the EASY DE-CALC function regularly, scale particles may build up in the soleplate and brown stains may come out of the soleplate during ironing. In this situation, you need to descale the soleplate by following the procedure below. We advice you to repeat the procedure twice to better clean the soleplate.
To avoid the risk of burns, unplug the appliance and let it cool down for at least two hours before you descale the soleplate (Fig. 24).
1 Remove the plug from the wall socket.
2 Place the appliance on the edge of the tabletop.
3 Make sure that the water tank is empty.
4 Hold a cup (with a capacity of at least 900ml) under the EASY DE-CALC knob and turn the knob anticlockwise (Fig. 25).
5 Remove the EASY DE-CALC knob and let the water with scale particles flow into the cup (Fig. 26).
6 Hold the appliance in the position that EASY DE-CALC opening is facing up and pour 900ml distilled water into the opening (Fig. 27).
Note: Be mindful on the heavy weight of the appliance when you tilt it.
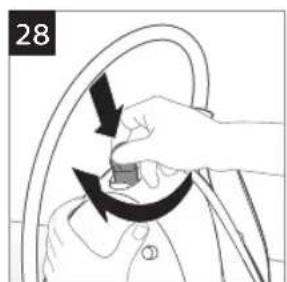
7 Keep the EASY DE-CALC opening facing up, reinsert the EASY DE-CALC knob and turn it clockwise to fasten it (Fig. 28).


12 ENGLISH

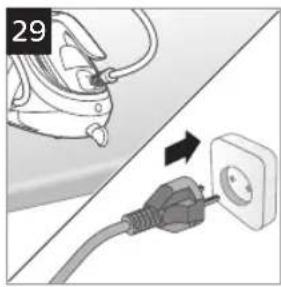
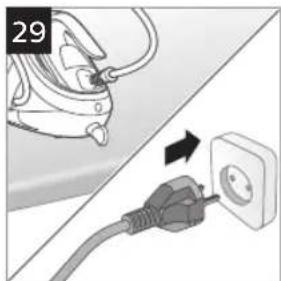
8 Put the appliance back on a stable and even surface. Plug in the appliance and switch it on (Fig. 29).
9 Fill the water tank.
10 Wait for 5 minutes for the appliance to heat up.
11 Switch off DynamiQ function by pressing the intelligent automatic steam button on the top of the iron handle.
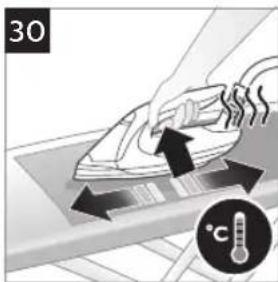
12 Keep the steam trigger pressed continuously while you move the iron on a piece of thick cloth for 3 minutes (Fig. 30).
Warning: Hot, dirty water comes out of the soleplate.
13 Stop moving the iron when no more water comes out.
14 Unplug the appliance after the descaling is completed and let it cool down for at least two hours.
15 Hold a cup (with a capacity of at least 900ml) under the EASY DE-CALC knob and turn the knob anticlockwise.
16 Remove the EASY DE-CALC knob and let the water with scale particles flow into the cup.
17 When no more water comes out of the appliance, reinsert the EASY DECALC knob and turn it clockwise to fasten it.
Storage

1 Switch off the appliance and unplug it.
2 Put the iron on the iron platform. Push the carry lock to lock the iron onto the platform.
3 Remove the water tank and empty it.
4 Wrap the steam supply hose around the base.
5 Slot it into the supply hose storage compartment by pushing the hose through the gap (Fig. 31).

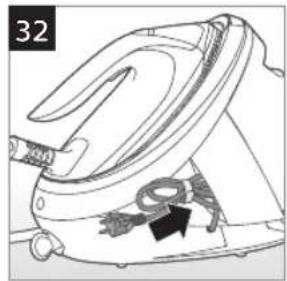
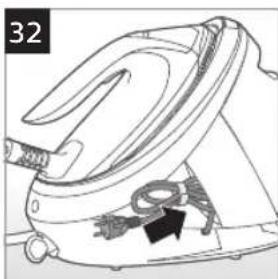
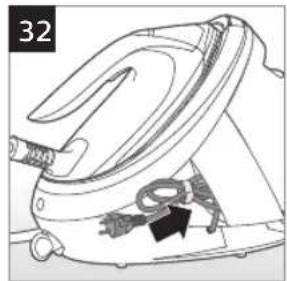
6 Fold the mains cord with the velcro provided, and insert it into the cord storage compartment (Fig. 32).
7 You can carry the appliance with one hand by the handle of the iron.
Note: Do not carry the appliance by holding the water tank release lever
Note: If there is calc/fibre build up around the ActiveSense camera, remove it gently with a cotton swab or equivalent.
Troubleshooting
This chapter summarises the most common problems you could encounter with the appliance. If you are unable to solve the problem with the information below, visit www.philips.com/support for a list of frequently asked questions or contact the Consumer Care Centre in your country.
| Problem Possible cause Solution | ||
| The ironing board cover becomes wet or there are water droplets on the garment during ironing. | Steam has condensed on the ironing board cover after a long ironing session. | Replace the ironing board cover if the foam material has worn out. You can also add an extra layer of felt material under the ironing board cover to prevent condensation on the ironing board. You can buy felt in a fabric shop. |
| You have an ironing board cover that is not designed to cope with the high steam rate of the appliance. | Put an extra layer of felt material under the ironing board cover to prevent condensation on the ironing board. You can buy felt in a fabric shop. | |
| Automatic steam mode has been used for a long period of time. | Switch off the automatic steam mode and use the manual trigger to activate the steam when needed. | |
| Water condenses on the iron during ironing. | Automatic/Max steam mode has been used for a long period of time. | Switch off the automatic/Max steam mode and use the manual trigger to activate the steam when needed. |
| Steam is reflected from the ironing board and condenses on the iron. | Use a board/board cover that allows steam to penetrate through. | |
| Water droplets come out of the soleplate. | The steam that was still present in the hose has cooled down and condensed into water. This causes water droplets to come out of the soleplate. | Steam away from the garment for a few seconds. |
| Some steam comes out of soleplate when iron is resting. | The iron has rested for a longer period of time and is regulating to ensure that the soleplate is at the right temperature during rest. This is normal. | If the steam continues for a long period when the iron is resting, switch off the appliance and remove the plug from the wall socket. Contact an authorised Philips service centre. |
| Steam and/or water come out from under the EASY DE-CALC knob. | The EASY DE-CALC knob is not tightened properly. | Switch off the appliance and let the appliance cool down for 2 hours. Unscrew the EASY DE-CALC knob and screw it back onto the appliance properly. Note: Some water may escape when you remove the knob. |
| The rubber sealing ring of the EASY DE-CALC knob is worn. | Contact an authorised Philips service centre for a new EASY DE-CALC knob. | |
| Dirty water and impurities come out of the soleplate or the soleplate is dirty. | Impurities or chemicals present in the water have deposited in the steam vents and/or on the soleplate. | Clean the soleplate with a damp cloth. |
| Too much scale and minerals have accumulated inside the appliance. | Descale the appliance regularly (see chapter 'Important - EASY DE-CALC' and 'Important -Descaling the soleplate'). | |
| The iron leaves a shine or an imprint on the garment. | The surface to be ironed was uneven, for instance because you were ironing over a seam or a fold in the garment. | ActiveSense is safe on all ironable garments. The shine or imprint is not permanent and will come off if you wash the garment. Avoid ironing over seams or folds or you can place a cotton cloth over the area to be ironed to avoid imprints at seams and folds. |
14 ENGLISH
| Problem Possible cause Solution | ||
| The appliance does not produce any steam. | There is not enough water in the water tank (the 'low water alert' light flashes). | Fill the water tank (see chapter 'Using your appliance', section 'Getting the product ready'). |
| The appliance is not hot enough to produce steam. | Wait until the 'iron ready' light on the iron lights up continuously. | |
| The automatic steam mode is off and you did not press the steam trigger. | Press the steam trigger and keep it pressed while you iron or ensure that the automatic steam mode is on. | |
| The water tank is not placed in the appliance properly. | Slide the water tank back into the appliance firmly ('click'). | |
| The appliance is not switched on. | Insert the plug in the wall socket and press the on/off button to switch on the appliance. | |
| The Easy De-calc light is on. | Descale the appliance (see chapter 'IMPORTANT - EASY DE-CALC'). | |
| The appliance has switched off. The light in the on/off button flashes. | The auto-off function is activated automatically when the appliance has not been used for more than 4-5 minutes. | Press the power on/off button to switch on the appliance again. |
| The appliance has switched off. | There is poor contact of power plug to socket. | This is a high power product. Ensure that the plug is properly plugged to the wall socket. It is not recommended to use extension cord or adapter. |
| The 'iron ready' light changes between blue and white during my ironing session. | The 'iron ready' light will be in blue to indicate that the iron is in the optimal state for certain fabrics like silk, polyester. When the 'iron ready' light turns white, the iron is providing higher temperature/steam for other types of fabrics, for example, cotton, linen, denim. | This is normal. With the ActiveSense technology, the 'iron ready' light automatically turns blue or white to indicate the temperature/steam state of the iron. |
Въведение

18 БЪЛГАРСКИ
Съхранение

26 ČEŠTINA
Nastavení MAX
Automatické vypnutí
28 ČEŠTINA
DÜLEŽITÉ – EASY DE-CALC


40 ΕΛΛΗΝΙΚΑ
Lisaauru funktsioon

OLULINE: EASY DE-CALC

Veaotsing
54 HRVATSKI
Postavka MAX
VAŽNO – EASY DE-CALC
Vrlo je važno upotrijebiti funkciju EASY DE-CALC čim indikator EASY DE-CALC počne bljeskati (sl. 20), a aparat stalno ispušta zvučne signale.
Indikator EASY DE-CALC počet će bljeskati, a aparat će se početi oglašavati konstantnim zvučnim signalom nakon približno mjesec dana ili 10 glačanja, što naznačuje da treba ukloniti kamenac iz aparata. Prije nastavka glačanja izvršite sljedeći EASY DE-CALC postupak.
1 Izvucite utikač iz zidne utičnice.
2 Postavite aparat na rub stola.

56 HRVATSKI

58 HRVATSKI

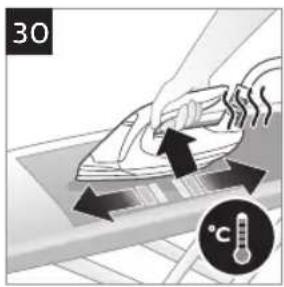
12 Držite gumb za paru pritisnutim dok glačalo pomičete po komadu debele tkanine 3 minute (sl. 30).
Upozorenje: vruća, prljava voda izlazi is površine za glačanje.
13 Prestanite pomicati glačalo kada voda prestane izlaziti.
14 Iskopčajte aparat nakon dovršetka uklanjanja kamenca i ostavite ga da se hladi najmanje dva sata.
15 Postavite šalicu (kapaciteta najmanje 900 ml) ispod regulatora EASY DE-CALC i okrenite ga suprotno od smjera kazaljki na satu.
16 Izvadite regulator EASY DE-CALC tako da se voda s česticama kamenca izlije u šalicu.
1 Isključite aparat i iskopčajte ga.
2 Stavite glačalo na postolje. Gurnite zapor za sigurno prenošenje kako biste glačalo fiksirali na postolje.
3 Odvojite spremnik za vodu i ispraznite ga.
4 Omotajte crijevo za dovod pare oko postolja.
5 Umetnite ga u odjeljak za spremanje crijeva za dovod pare tako ga gurnete crijevo kroz otvor (sl. 31).

6 Kabel za napajanje savijte pomoću priloženog čička i umetnite ga u odjeljak za spremanje kabela (sl. 32).
7 Aparat možete nositi jednom rukom tako da ga držite za ručku glačala.

64 MAGYAR
Gözlövet funkció
Hibakeresés
72 КАЗАКША
Автоматты өшіру
74 КАЗАКША
МАНЫЗДЫ - EASY DE-CALC

82 LIETUVIŠKAI
Nustatymas MAKS.
84 LIETUVIŠKAI
SVARBU – „EASY DE-CALC“

86 LIETUVIŠKAI

Laikymas

Papildu tvaika funkcija
Traucējummeklēšana
100 POLSKI
Ustawienie MAX
102 POLSKI
WAŻNE - FUNKCJA EASY DE-CALC

104 POLSKI

110 ROMÂNĂ
IMPORTANT - EASY DE-CALC

Depozitarea

114 ROMÂNĂ
Depanare
118 РУССКИЙ
Режим МАХ
120 РУССКИЙ
128 SLOVENČINA
Nastavenie MAX
130 SLOVENČINA
DÔLEŽITÉ – EASY DE-CALC (JEDNODUCHÉ ODSTRÁNENIE VODNÉHO KAMEŇA)
132 SLOVENČINA

138 SLOVENŠČINA
Opomba: če želite postopek EASY DE-CALC opraviti takoj po likanju, izvlecite vtič aparata iz vtičnice in počakajte, da se aparat ohladi, preden izvedete postopek.
140 SLOVENŠČINA
7 Odprtina EASY DE-CALC naj ostane obrnjena navzgor, medtem ko znova vstavite gumb EASY DE-CALC in ga privijete v desno (slika 28).
SLOVENŠČINA 141
8 Aparat postavite nazaj na stabilno in ravno površino. Aparat priključite na napajanje in ga vklopite (slika 29).
9 Napolnite posodo za vodo.
10 Počakajte 5 minut, da se aparat segreje.
11 Funkcijo DynamiQ izklopite tako, da pritisnete gumb za pametni samodejni izpust pare na vrhu ročaja likalnika.
12 Likalnik 3 minute premikajte po kosu debele tkanine in pri tem držite pritisnjen sprožilnik pare (slika 30).
Opozorilo: iz likalne ploskve prihaja vroča umazana voda.

Shranjevanje

Odpravljanje težav
146 SRPSKI
Peglanje u inteligentnom režimu automatske pare

Aparat ima inteligentni režim automatske pare zahvaljujući tehnologiji senzora DynamiQ koja prepoznaje kada se i kako pegla pomera. Kada uključite aparat, podrazumevano se aktivira ovaj režim (Sl. 12). U kombinaciji sa tehnologijom ActiveSense, pegla automatski primenjuje odgovarajuću količinu pare na osnovu pokreta i tipa tkanine, bez potrebe za korišćenjem dugmeta za paru.

U inteligentnom automatskom režimu pare, para izlazi automatski kada pomerate peglu i prestaje da izlazi kada prestanete da pomerate peglu (Sl. 13). Svakako možete da pritisnete dugme za paru u ovom režimu da biste aktivirali paru kada se pegla ne pomera.
Napomena: Radi vaše bezbednosti, u inteligentnom automatskom režimu pare, para prestaje da izlazi kada podignete peglu.
Proverite da li daska odgovara veličini i težini posude za paru.
Postavka MAX
Za veću količinu pare možete da upotrebite postavku MAX.
1 Pritisnite dugme za uključivanje/isključivanje i zadržite ga 2 sekunde dok indikator MAX ne promeni boju u belu (Sl. 18).
Napomena: Na postavci Max, aparat uvek pruža maksimalnu količinu pare, a temperatura se i dalje automatski podešava.
2 Aparat se nakon 15 minuta automatski vraća u normalni režim pare radi uštede energije.
3 Da biste direktno isključili postavku MAX bilo kada, pritisnite dugme za uključivanje/isključivanje i zadržite ga 2 sekunde dok se indikator MAX ne isključi.

148 SRPSKI
VAŽNO – EASY DE-CALC
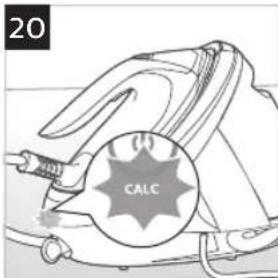
Veoma je važno da upotrebite funkciju EASY DE-CALC čim indikator EASY DE-CALC počne da trepće (Sl. 20) i aparat se stalno oglašava zvučnim signalom.
Indikator EASY DE-CALC počinje da trepće i aparat počinje da emituje neprekidni zvučni signal nakon približno jednog meseca ili 10 sesija peglanja, što ukazuje na to da je potrebno ukloniti kamenac iz aparata. Obavite sledeći postupak EASY DE-CALC pre nego što nastavite sa peglanjem.
1 Izvadite utikač iz zidne utičnice.
2 Postavite aparat na ivicu stola.
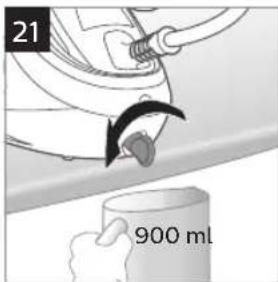
3 Držite čašu (kapaciteta bar 900 ml) ispod regulatora EASY DE-CALC i okrenite regulator suprotno od kazaljke na satu (Sl. 21).

4 Uklonite regulator EASY DE-CALC i pustite da voda sa česticama kamenca istekne u čašu (Sl. 22).

5 Kada voda prestane da ističe iz aparata, vratite regulator EASY DE-CALC i okrenite ga u smeru kazaljke na satu da biste ga pričvrstili (Sl. 23).
6 Možete da nastavite da koristite peglu odmah po završetku postupka EASY DE-CALC.
Napomena: Ako postupak EASY DE-CALC obavljate neposredno nakon peglanja, isključite aparat sa električne mreže i ostavite ga da se hladi bar dva sata pre nego što obavite postupak.
150 SRPSKI
1 Isključite aparat i izvucite kabl iz struje.
2 Stavite peglu na postolje. Pritisnite bravu za nošenje da biste fiksirali peglu a postolju.
3 Uklonite posudu za vodu i ispraznite je.
4 Umotajte crevo za dovod pare oko postolja.
5 Ubacite ga u pregradu za odlaganje creva za dovod tako što ćete crevo gurnuti kroz prorez (Sl. 31).

Manuel modda ütüleme
156 TÜRKÇE
ÖNEMLİ - EASY DE-CALC

Saklama
Sorun giderme
Налаштування MAX
166 УКРАЇНСЬКА
174 AZ∅RBAYCAN
VACİB - EASY DE-CALC

Problemi
182 RU3TRTL
Unnnlnni' qninn2ni uwwunwlywnwnu wu hutlugh wulunnuwn nzhhiny

2tn uwnpu niuh qinnn2ni uwnuwqwnpnuwu hutlugh wuunnuiwun ntadhú, nnp hwwuwutih t DynamiQ utiunnwjuh uhtuuninqhwjh zunphhu, nnp hwulwuniu t' huzwtu u tnpe t wnnniyn 2wndynui: Uwnpn uhwgutihu wju ntadhún ywhwnpnuwó ltpwnu lywlunhluwuu (tyj. 12): ActiveSense unthuuninqhwjh htun uhwuhu wju ntdhún pnyll t unwju, nnwtuqh atn wpnniŋu wuunnuiwun ltpwnu npn2h qinnn2ni owunhuiw puuwlyn' hhup nunniutinu wpnniyh 2wndniutinu u qnndylwoph untuwln` wnwug qinnn2ni uwnuwqwnpnuwu lynawlyu oqnwwqnotini wuhnwdt2unnipajwu:
9n1nn2ni uwwnwlywnwnpuiwú hutjugh wylnniwin ntbdhúniu qinnp2hù wylnnuwin lytpwnu lwwnwlywnwnpnuwú t wpnniyn 2wpndtju u nwnwnpiwú t, tnpe stip oqnwnqnpnniw wpnniyn (uly. 13): Uju ntbdhúniu npip lywnn tn p utnutiq qinnp2ni uwwnwlywnwnpuiwú ynǎwyn. wjn dwuwuuw y qinnp2hù yluwwnwlywnwnpuh unyúhuì ywù ntwpniw, tnpe wnnpniyn zh 2wpndniw:
12 niú. Uújúnwùqníajwù újwùnwn2niútphg tiútǐnu' qnìnn2ni úwùnwlywnwnúwù hútiwgh wújnnúwùn ntādhúniú qnìnn2ni úwùnwlywnwniún ηωηwnniú t, tnp wnpnilyn pwnàŋwgūniú tp:
3wúnqutp, np wnynliyh unwhunwny hwnúwn 5 tuúwù suihh l u pu2h qninnzni qtútnwunnph oqnwwqnndúwù hwnúwn:
Unnlyniú n₂ wùnnúwùn nǎchúnú
2qn12wgn1ú. 9n1nn2hù tn3tp úh ni7n3p úwnnlywùg ynw:
L2niú. ǔnǚhùn qnnóu wǎpùtn, onhùwú' pūwíp wújùw, yúnzh l u zhùuwjhù qnnóu wǎpùtn, wnnniútìhu lǚw lǚwnjiúph huuùtǐni huuúwn qnnnn2ni úwunwúwnwnúwù lynówyn 2wnniúwú utnújúwǒ uwwhtp, tnp wnnniún puniú tþ qnnóu wǎpòh yúnw (úy. 15): Ujùnihtunl uwnniún ûh pūwúh wùqwú putp ünujù hwnuiwòh yúnw' wzuwùg qnnnn2ni úwunwúwnwnúwù' yunnnn znnwgútǐni huuúwn:
MAX nbdhu
9n1nn2ni hùntiúuhú úwunwúwunwnúwú hwiúwú lqwnn bù oqunwqnδtāl MAX ntdʒhún:
1 Utnutap Lu wuhup uhwuguwu/wuqwnuwu lynawlyn 2 uwjnyiwu, uhuLu MAX lnyun qwnuh uwhunwu qnijunyl (uly. 18):
L2niú. Max ntchúniú àtn uwnpn úh2n lúwwunwlywnwnh qnlnn2ni wnuultiwqnju puùwln, hul 2tnúwwunhǎwùn wylnnúwn lútnwnl lhywnqwlnnuŋ:
2 Eutnqhu huiwjtni uwwunwnynu 15 nnwt wug uwnpù wylnnúwun ytnwnu yutpnwnwnuw qninn2ni uwwnwlpwnwniw unynpwlywù ntdhuhù:
3 MAX nādhūn àtnpnu wùgwuntīni hwiúwn utnūtṛ p u wwhtp uħwguśwǔ/wùgwunúwǔ lynǎwln 2 uŋynljuwǔ uħuṣu MAX nādhūh gnighsh iŋyún úwnḥ:
ปุynnุนน ขิ้งพันธ์
- Etqnqhu huiwjtini uwwwnwnynl uwnpn yuwuguh uwwuuwu ntadhuhu, 4pt 4-5 nnwt zoqunwqnnduh: Uhwguiwu/wuigwnnwiunyduh jnyun yuluh pwnpati (uly. 19):
- Uwnpn ünphg wlynhylwgutini hwuiwn utnüdp uhwguwu/wuqwnniwu lynäwyn yuw qninn2ni uwwnwlywnwnnuwu lynäwyn: Uwnpn yuluh ünphg unwpuwuj:
- Uwnpù wǔnnúwùn lánpùnú lǐwǔqúnuǐh, tǎpā uìwùuúwù nǎdhuǐh wǔgǔtínig hǎun lu 10 pnuǐ zǒqúnwàqnòuǐh: Uḥwǔguìwù/wǔqúnuúwù lǐnǎwǔh jīnjuŋ lǐwǔnh:

yurtynr stn64nh@3nhlltr. EASY DE-CALC

Cwun lwnlunn t lwnwnnti EASY DE-CALC wnngtnnnnuu htug nn EASY DE-CALC-h gnighzh inyuun uluh pwnrati (ul. 20), u uwnpn uluh 2wnniuwluywlu wqnwu2wui unui:
EASY DE-CALC-h gnighzh inyun ulunui t jwnrati, huy wwnpn 2wnniuwlywluw u wjuwwjhu wqnwu2wu t unwju hnuunwlnnwwtu utiy wuhu wug lywi wnnniyluwu 10 w2hwnwnw2nguwhg htunn` hh2tgutinyl, np hwnlywulnn t uwnpn 'uuunlwodphg uwpnti: 4wnwntp hbtunjwl EASY DE-CALC wnngtnnnipwu' wnnniyniun 2wnniuwytinig wnwg:
1 3wutp hunngn 5tyunnwuuniguwu ywnnwlyhg:
2 Uwnpn nntp utnwuh tqnhu:
3 EASY DE-CALC-h ywuhnyh unwly uh pwduy npap (wnuulwq 900 ul unwnnnnujuwip) u ywuhnyh wunubp dwuwgnyh ulwph hwlywnwyl ninnnujuwup (üy. 21):
4 3wutp EASY DE-CALC-h lwwhnynn u lwwuylwoph uwwuhlyutnnul gnnn pwwutp pwdwlyh utg (uly. 22):

5 6np uwph uhgh gnnp wnwnwnlyh, unphg untwnwntp EASY DE-CALC-h lwwhnynn u winntp dwuwgnyh ulwph ninnniapwup, uhülu \$hpuih (uly. 23):
6 7nip lqunnn ti p 2wnniuwltyi oqnwqnndti wnnnilyn EASY DE-CALC wnngtinninwù wulwnnting wuhngwwtu htunn:
7 3bunutp, npwbuqh EASY DE-CALC-h wugpu ninnuwrj huh ntuwh ytn, unphg untwnnptp EASY DE-CALC-h lwwhnynn lu wunutp wju dwuwgnjgh ulwph ninnnyajwup, uhwlu \$hpuyh (ty. 28):
8 Uwnpn ünphg ntpp ywjniù u hwnpa üwyltnunyah ynw: Etyuynnnuünigüwù ywnnwuhù uhwgntp uwnpn l u ihwgntp wjù (ty. 29):
9 2nin igntp hughyh ubg:
10 Uwwutp 5 nnvt, uħuħu uwnpn unwpwuw:
11 Uugwntp DynamiQ \$niuylghwù' utnuījnl qninnzni hutjugh wylnniwwun uwwnwlywnwnuw lynǎwlp' wnnnlhy pnǔwlyh ytnluh uwwuni:
12 9n1nn2ni uwwwnlywnwnpuiwlyunuynluyw8wwhtp'wnnnilyn3pnwt hwwun yunnph ynw putinyl (uly. 30):
2qn12wgnu#. Upnnlyh unwljh hwnulwdhg unwp, lytnnnnn gnin nnlnu lyqw:

13 7wnwntgntp wnnniyn 2wndt, tnp wjluu gnin nninu zqw:
14 Luunluwoph uwpnuiwu wylwnhg htunn uwpu wugwntp uwnnywhg lu panntip, nnwbuqh wnuulwqutlnyi dwu uwzh:
15 EASY DE-CALC-h lwwhnynh unwly uh pwduwy nptp (wnuulwqü 900 ül unwnnnnujuwüp) u lwwhnynh wunutp dwuwgnygh ulwph hwlywnwyl ninnnujuwüp:
16 Rwutp EASY DE-CALC-h lywnnyng u lwwunylwaph uwwuhlyutnnu yninn powutp powdwlph utg:
17 Enp uwnph uhgh gninp wnwnwnpyh, unphg untwnwntp EASY DECALC-h ywhnynn u wenntip dwuwgnygh ulwph ninnnujwup, uhülu \$hpuyh:
הכלה

1 Uugwntp uwnpn, wwwh htyunnwutungfuwu qwnnwlyhg wugwntp:
2 Unnnln yntp wnnnlhy unwhunwlyh ynu: Utnutp wnqtiwwhwlquwu uutzhyn' wnnnln yn wwnynhh ynu wunwgutni hwiwn:
3 2wutp gnh unwnwi u nwnwnytp:
4 Nunutp qinnp2ni uwwnwlywnwnuwu aywuhnyh hhuph 2ninq:
5 Stnwnntp wju dlywhnlyh wwhuwu hughyniu dlywhnlyn wugph utg uhtlny (uly. 31):

6 ǒwītp hnuwùph jwnp unpwúwnŋnluwǒ utnúhʒnú l u utnúwnntip wju jwnh ywhúwù hughýniú (uly. 32):
g2g3m0b0m0g0d5: sf g2g3m0b0m0b5d5, ls g2m0d5b5 b5g0m0, d5f6n, ls g2b5g0g0m0, bs g2g3m0g0g5b5 g2d5g0b0m0b5g0m0g0g5, g2g3m0g0m0b5g0m0g0g5, g2g3m0g0m0b5g0m0g0g5, g2g3m0g0m0b5g1m0g0m0g0g5, g2g3m0g0m0b5g1m0g0m0g0g5, g2g3m0g0m0b5g1n g2g3m_ 0b _ 5, g2g3m_ 0b _ 5, g2g3m_ 0b _ 5, g2g3m_ 0b _ 5, g2g3m_ 0b _ 5, g2g3m_ 0
Dynamiq-ol bgbimnbl bysmmdnon nd36bn dmbymdnmmds mfondjnnl dm6ngmn ozfmdsyfn gsdmdzgndn fnggndnss smfghznnn. gl bgd6mmgnns saggb, mngmq os fnmnbl dmfdnmd丑 yom. dmbymdnmmdnl bsmonzniub gl fngjndn bszymnubdgzso nd6gds smhgymn (byn. 12).
ActiveSense-nh φgg6mmmmgnbnsb gmmsq gl fngjndn gonmb lsdygmgdss dnbygdls, s3fmdshymsq gubbsmzmml mmonjmnl maftndsmymdn msmvgbmds dmbymdnmmnbl dmdmsnlonus qos glumzmnnl fhntnl dnbgzmnm qos lusfnm sm nfbjds mmonjmnl udamlsdʒgòn mnmsznl udmygbdès.

3060257960000000000000000000000000000000
### MAX
mthngjdmnl n6ggblnyfmq dnl5bmpgddmsq ddgnndmnson, gudmnyjbmom mggjndn MAX.
సందిస్యారు గురమణాన
196 ๐๕๑๒๔๙

g2g3m1n2n3g4s: g1m1 d1n2n3b g2g3n, d1n2d1y1n b1y2n g3d1m3.
1 გამორთეთ მონყობილობა და გამოაცრთეთ ელექტრონუაროდან.
2 upon upon upon upon upon upon upon upon upon upon upon upon upon upon upon upon upon upon upon upon upon upon upon upon upon upon upon upon upon upon upon upon upon upon upon upon upon upon upon upon upon upon upon upon upon upon upon upon upon upon upon upon upon upon upon upon upon upon upon upon upon upon upon upon upon upon upon upon upon upon upon upon upon upon upon upon upon upon upon upon upon upon upon upon upon upon upon upon upon upon upon upon upon upon upon upon upon upon upon upon Upon Upon Upon Upon Upon Upon Upon Upon Upon Upon Upon Upon Upon Upon Upon Upon Upon Upon Upon Upon Upon Upon Upon Upon Upon Upon Upon Upon Upon Upon Upon Upon Upon Upon Upon Upon Upon Upon Upon Upon Upon Upon Upon Upon Upon Upon Upon Upon Upon Upon Upon Upon Upon Upon Upon Upon Upon Upon Upon Upon Upon Upon Upon Upon Upon Upon Upon Upon Upon Upon Upon Upon Upon Upon Upon Upon Upon Upon Upon Upon Upon Upon Upon Upon Upon Upon Upon Upon Upon Upon Upon Upon Upon Upon Upon Upon Upon Upon Upon Upon Upsuited
3 ამოიუთ ნულის რებერკუარი და დაცალეთ.
4 gydgl gmdgdm dgdsubzngm mfngjnnu dnbsbmggdgnn dnmn.
5 მოთაცელი ის მოლის მესანახ განყოვილებაში. ამისთვის გამოუენეთ ნახვრეტი (სურ. 31).
202 КЫРГЫЗЧА
MAX жөндөөсу
204 КЫРГЫЗЧА
МААНИЛУУ - EASY DE-CALC

206 КЫРГЫЗЧА

Дар холати интеллектуалии таъминоити буг ба таври худкор, ваçте ки шумо дарзмолро харакат медихед, буг ба таври худкор мебарояд ва хангоми қать кардани харакат қать мешавад (Рас. 13). Шумо метавонед то хол дар ин режим триггери бугро пахш кунед, то бугро хангоми харакат накардани дарзмол фаьол созед.
Эзоъ: Барои ба даст овардани натичахои бехтарин дар матоъхои сахт ба мисли пахта, катон ва джинс, хангоми харакат додани охан болои матоъ триггери буғро пайваста пахш кунед (Рас. 15). Сипас дарзмолро дар хамон як минтақа чанд маротиба дигар бе буғ гузаронед, то матоъ хушк шавад.
Танзимоти MAX
Барои микдори зиёди буғ, шумо метавонед танзимоти МАХ -ро истифода баред.
1 Тугмаи фурўзон/хомўшро дар тўли 2 сония пахш карда нигох доред, то чароғи МАХ равшан нашавад (Рас. 18).
Хомўшкунии худкор
214 ТОЧИКЙ
МУХИМ - EASY DE-CALC

Ütükleýän wagtyňyz ütügi platformasynyň üstünde ya-da ütük tagtasynyň üstünde keseligine yerleşdirip bilersiñiz. ActiveSense tehnologiýasy arkaly ütügiň dabany ütük tagtasynyň örtügine zeper yetirmeýär (Şekil 11).
Akylly awtomatik bug tertibinde ütügi hereket etdireniñizde awtomatik usulda bug çykýar we ütügi durzanyñyzda buguň çykmagy kesilýär (Şekil 13). Şu iş tertibinde ütük hereket etmeyän wagty bug çykarmak üçin bug goýberiji düwmä basyp bilersiñiz.
Bellik: Siziň howpsuzlygyňyz üçin akylly awtomatik bug tertibinde ütügi ýokary götereniñizde bug çykmagy kesilýär.
222 TÜRKMENÇE
- Energiyany tygşytlamak üçin enjamynyz 4-5 sekuntlap ulanylmasa, garaşyan tertibe geçyär. Açyan/öçüryän düwmänniğ çyrasy yanyp-öçüp başlayar (Şekil 19).
- Enjamy gaytadan işjeğleşdirmek üçin açyan/öçüryän düwmä ya-da bug goýberiji düwmä basyň. Enjam gaytadan gyzyp başlaýar.
- Enjam garaşyan tertibe geçeninden soň ýene 10 minutlap ulanylmasa, energiyany tygşıtlamak üçin ol awtomatik usulda öçýär. Açyan/öçüryân düwmänniğ çyrasy öçýär.
MÖHÜM - EASY DE-CALC
EASY DE-CALC çyrasy yanyp-öçüp başlan (Şekil 20) we enjam yzygiderli sesli duýduryş berip başlan dessine EASY DE-CALC funksiyasyny ulaşmak iňnän möhüm ähmiyete eye bolup durýar.
Bellik: EASY DE-CALC prosedurasyny ütük edeniñizden soň bada-bat ýerine ýetirýän bolsaňyz, enjamy tokdan ayryň we prosedurany ýerine ýetirmezden ozal onuň azyndan iki sagatlap sowamagyna maý beriň.
224 TÜRKMENÇE
7 EASY DE-CALC agzyny yokary sereder yaly edip saklaň, EASY DE-CALC nurbadyny yerine dakyň we ony berkitmek üçin sagadyň diliniň ugruna ayılaň (Şekil 28).
TÜRKMENÇE 225
8 Enjamy durnukly we tekiz üstde yerleşdiriň. Enjamy toga dakyň we ony işlediň (Şekil 29).
9 Suw gabyny dolduryň.
10 Enjamyn gyzmagy üçin 5 minut garaşyn.
11 Ütügiğ tutawajynyğ depesindaki akylly awtomatik bug düwmesine basmak arkaly DynamiQ funksiyasyny öçüriğ.
12 Ütügi galyň mata böleginiň üstünde 3 minutlap hereket etdiriň we şol wagtyň dowamynda bug goýberiji düwmani basyp saklaň (Şekil 30).

Ammarda saklamak

Näsazlyklary anyklamak we çözmek
Mahsulot sharhi (8-rasm)
1 Bug' ta'minoti shlangi
2 Bug' triggeri
3 Intellektual avtomatik bug' tugmasi
4 Dazmolning tayyorlik chirog'i
5 Asos plita
6 ActiveSense kamerasi
7 Dazmol platformasi
8 Ko'tarishga qarshi gulfni ochish tugmasi
9 To'Idirish teshigi
10 Ajraladigan suv baki
11 Bug' ta'minoti shlangini saqlash bo'lmasi
12 Shnurni saqlash bo'lmasi
13 Vilka bilan tarmoq shnuri
14 EASY DE-CALC murvati
15 Chiroqli yoqish/o'chirish tugmasi
16 Cho'kma signali
17 Maksimal bug' sozlamasi chirog'i
18 Kam suv signali chirog'i
230 O'ZBEK
Intellektual avtomatik bug' rejimi bilan dazmollash

Jihozingiz DynamiQ datchik texnologiyasi hisobiga intellektual avtomatik bug' tizimi bilan keladi, bu dazmol qanday va qachon harakatlanishini taniydi. Jihozni yoqsangiz, standartga ko'ra bu rejim faollashtiriladi (12-rasm). ActiveSense texnologiyasi bilan juftlanganida dazmol bug' triggeridan foydalanmay turib, u harakatlaringiz va mato turiga qarab to'g'ri miqdordagi bug'ni avtomatik ajratib turadi.

Intellektual avtomatik bug' rejimida dazmolni harakatlantirsangiz, bug' avtomatik ajralib chiqadi va dazmolni harakatlantirishni to'xtasangiz, u ham to'xtaydi (13-rasm) Dazmol harakatlanmayotganida bug'ni faollashtirish uchun bu rejimda bug' triggerini bosishingiz mumkin.
Eslatma: xavfsizligingiz uchun intellektual avtomatik bug' rejimida dazmol ko'tarilsa, bug' ajralishi to'xtaydi.
Doska bug' generatorining o'lchami va vazniga mos kelishini ta'minlang.
Qo'Ida rejimida dazmollash
Dazmollash vaqtida intellektual avtomatik bug' rejimini o'chirish orqali bug' miqdorini qo'lda boshqarishingiz mumkin.

- Intellektual avtomatik bug' rejimidan chiqish uchun intellektual avtomatik bug' tugmasini bosing (14-rasm) Intellektual avtomatik bug' chirog'i o'chadi. Dazmollashni davom ettirish uchun bug' triggeri tugmasini bosishingiz kerak.
- Qo'l rejimida ActiveSense texnologiyasi harorat va bug' miqdorini turli matolarga avtomatik sozlaydi, lekin bug' triggerini bug' chiqarishni faollashtirish uchun bosishingiz zarur.
Ogohlantirish: Hech qachon bug'ni odamlarga qaratmang.

Eslatma: qattiq matolar, masalan, paxta, jig'ir va jinsi matosi uchun uning ustida dazmolni harakatlantirishda bug' triggerini davomli bosib turing (15-rasm) So'ng matoni quritish uchun bug'siz dazmolni bir xil maydonda bir necha marta harakatlantiring.
Eslatma: Ipak va yaltiroq sintetik matolarda eng yaxshi natija uchun dazmollash vaqtida bug' triggerini davomli bosib turish tavsiya etiladi.
MAKS sozlama
Avtomatik o'chirish
- Quvvatni tejash uchun 4-5 daqiga davomida jihoz ishlatilmasa, u kutish rejimiga o'tib qoladi. Yoqish/o'chirish tugmasidagi chiroq yonishni boshlaydi (19-rasm)
232 O'ZBEK
MUHIM – EASY DE-CALC FUNKSIYASI
EASY DE-CALC funksiyasini EASY DE-CALC chirog'i yonishni boshlashi bilan ishlatish juda muhim (20-rasm) va jihoz muntazam tovush chiqaradi.
EASY DE-CALC chirog'i yonadi va jihozni cho'kmadan tozalash zarurligini ko'rsatish uchun har oy yoki 10 marta dazmollagandan keyin jihoz avtomatik tovush chiqaradi. Dazmollashni davom ettirishdan oldin quyidagi EASY DE-CALC tartibini amalga oshiring.
1 Vilkani rozetkadan oling.
2 Jihozni stol usti qirrasiga joylang.
3 Stakanni (kamida 900 ml sig'imi bilan) EASY DE-CALC murvatining ostiga qo'ying va murvatni soat miliga qarshi buring (21-rasm)

4 EASY DE-CALC murvatini oling va cho'kma zarralari suv bilan stakanga tushishiga imkon bering (22-rasm)

5 Jihozdan suv chiqmasa, EASY DE-CALC murvatini qayta qo'ying va qotirish uchun uni soat miliga qarab buring (23-rasm)
6 EASY DE-CALC tartibini yakunlagandan keyin zudlik bilan dazmoldan foydalanishni davom ettirishingiz mumkin.
Eslatma: Dazmollagandan keyinoq EASY DE-CALC tartibini amalga oshirayotgan bo'lsangiz, jihozni tarmoqdan uzing va jarayonni boshlashdan oldin kamida ikki soat sovishiga imkon bering.
MUHIM – Asos plita cho'kmasini tozalash
Agar EASY DE-CALC funksiyasini muntazam ishlatmasangiz, cho'kma zarralari asos plitada to'planishi va dazmollash vaqtida jigarrang dog' ajralib chiqishi mumkin. Bunday holatda quyidagi tartibga amal qilib asos plitadagi cho'kmani tozalashingiz zarur. Asos plitani yaxshiroq tozalash uchun jarayonni ikki marta takrorlashni maslahat beramiz.
Kuyish xavfining oldini olish uchun jihozni tarmoqdan uzing va asos plitadan cho'kmani tozalashdan oldin jihoz kamida ikki soat sovishiga imkon bering (24-rasm)
1 Vilkani rozetkadan oling.
2 Jihozni stol usti qirrasiga joylang.
3 Suv baki bo'shligini tekshiring.
4 Stakanni (kamida 900 ml sig'imi bilan) EASY DE-CALC murvatining ostiga qo'ying va murvatni soat miliga qarshi buring (25-rasm)
5 EASY DE-CALC murvatini oling va cho'kma zarralari suv bilan stakanga tushishiga imkon bering (26-rasm).
6 Jihozni EASY DE-CALC teshigi yuqoriga qaragan holda ushlang va teshikka 900ml distillangan suv quying (27-rasm)
Eslatma: Jihozni egsangiz, uning og'ir vaznidan ehtiyot bo'ling.
7 EASY DE-CALC teshigini yuqoriga qaratib qo'ying, EASY DE-CALC murvatini qayta qo'ying va uni qotirish uchun soat miliga qarab buring (28-rasm)


234 O'ZBEK

8 Jihozni barqaror va tekis joyga qo'ying. Jihozni tarmoqqa ulang va uni yoqing (29-rasm).
9 Suv bakini to'ldiring.
10 Jihozni qizdirish uchun 5 daqiga davomida kutib turing.
11 Dazmolning yuqorisidagi intellektual avtomatik bug' tugmasini bosib, Dynamiq funksiyasini o'chiring.
12 Dazmolni qalin matoning ustida 3 daqia harakatlantirsangiz, bug' triggerini muntazam bosib turing (30-rasm)
Ogohlantirish: Asos plitadan issiq, iflos suv chiqadi.

13 Dazmoldan suv chiqmasa, uni harakatlantirishni to'xtating.
14 Qasmoqlardan tozalash jarayoni yakunlangach, jihozni tarmoqdan uzing va kamida ikki soat soviting.
15 Stakanni (kamida 900 ml sig'imli) EASY DE-CALC murvatining ostiga qo'ying va murvatni soat miliga teskari buring.
16 EASY DE-CALC murvatini oling va cho'kma zarralari suv bilan stakanga oqib tushsin.
17 Jihozdan boshqa suv chiqmasa, EASY DE-CALC murvatini qayta qo'ying va qotirish uchun uni soat mili yo'nalishida buring.
Saqlash

1 Jihozni o'chiring va tarmoqdan uzing.
2 Dazmolni dazmol platformasiga qo'ying. Dazmolni platformaga qulflash uchun ko'tarishga qarshi qulfni bosing.
3 Suv bakini oling va uni bo'shating.
4 Bug' ta'minoti shlangini asosning atrofiga o'rang.
5 Uni ta'minot shlangini saqlash bo'lmasiga shlangni bo'shliq bo'ylab bosib joylang (31-rasm).
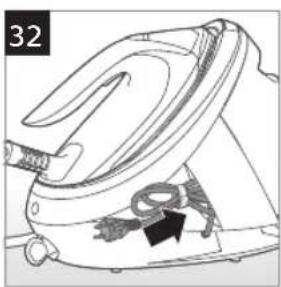
6 Tarmoq shnurini berilgan yopishqoq tasma bilan yig'ing va uni shnurni saqlash bo'lmasiga qo'ying (32-rasm)
7 Jihozni dazmolning dastagidan ushlab bitta qo'lda ko'tarishingiz mumkin. Eslatma: Jihozni suv bakini bo'shatish dastagini ushlab ko'tarmang
Eslatma: ActiveSense kamerasi atrofida cho'kma/tola to'plansa, uni paxta tampon yoki shunga o'xshash narsa bilan olib tashlang.
240 МАКЕДОНСКИ
244 МАКЕДОНСКИ

250 SHQIP
- PRODUCT OVERVIEW (FIG. 8)
- PREPARING FOR USE
- TYPE OF WATER TO USE
- GETTING THE PRODUCT READY
- LOW WATER ALERT LIGHT
- USING YOUR APPLIANCE
- ACTIVESENSE TECHNOLOGY
- 8 ENGLISH
- IRONING WITH INTELLIGENT AUTOMATIC STEAM MODE
- IRONING IN MANUAL MODE
- WARNING: NEVER DIRECT STEAM AT PEOPLE
- STEAM BOOST FUNCTION
- VERTICAL IRONING
- MAX SETTING
- AUTO SHUT-OFF
- 10 ENGLISH
- IMPORTANT - EASY DE-CALC
- IMPORTANT – DESCALING THE SOLEPLATE
- 12 ENGLISH
- WARNING: HOT, DIRTY WATER COMES OUT OF THE SOLEPLATE
- STORAGE
- TROUBLESHOOTING
- 14 ENGLISH
- ВЪВЕДЕНИЕ
- 18 БЪЛГАРСКИ
- СЪХРАНЕНИЕ
- 26 ČEŠTINA
- NASTAVENÍ MAX
- AUTOMATICKÉ VYPNUTÍ
- 28 ČEŠTINA
- DÜLEŽITÉ – EASY DE-CALC
- 40 ΕΛΛΗΝΙΚΑ
- LISAAURU FUNKTSIOON
- OLULINE: EASY DE-CALC
- VEAOTSING
- 54 HRVATSKI
- POSTAVKA MAX
- VAŽNO – EASY DE-CALC
- 56 HRVATSKI
- 58 HRVATSKI
- UPOZORENJE: VRUĆA, PRLJAVA VODA IZLAZI IS POVRŠINE ZA GLAČANJE
- 64 MAGYAR
- GÖZLÖVET FUNKCIÓ
- HIBAKERESÉS
- 72 КАЗАКША
- АВТОМАТТЫ ӨШІРУ
- 74 КАЗАКША
- МАНЫЗДЫ - EASY DE-CALC
- 82 LIETUVIŠKAI
- NUSTATYMAS MAKS
- 84 LIETUVIŠKAI
- SVARBU – „EASY DE-CALC
- 86 LIETUVIŠKAI
- LAIKYMAS
- PAPILDU TVAIKA FUNKCIJA
- TRAUCĒJUMMEKLĒŠANA
- 100 POLSKI
- USTAWIENIE MAX
- 102 POLSKI
- WAŻNE - FUNKCJA EASY DE-CALC
- 104 POLSKI
- 110 ROMÂNĂ
- DEPOZITAREA
- 114 ROMÂNĂ
- DEPANARE
- 118 РУССКИЙ
- РЕЖИМ МАХ
- 120 РУССКИЙ
- 128 SLOVENČINA
- NASTAVENIE MAX
- 130 SLOVENČINA
- DÔLEŽITÉ – EASY DE-CALC (JEDNODUCHÉ ODSTRÁNENIE VODNÉHO KAMEŇA)
- 132 SLOVENČINA
- 138 SLOVENŠČINA
- 140 SLOVENŠČINA
- SLOVENŠČINA 141
- OPOZORILO: IZ LIKALNE PLOSKVE PRIHAJA VROČA UMAZANA VODA
- SHRANJEVANJE
- ODPRAVLJANJE TEŽAV
- 146 SRPSKI
- PEGLANJE U INTELIGENTNOM REŽIMU AUTOMATSKE PARE
- 148 SRPSKI
- 150 SRPSKI
- MANUEL MODDA ÜTÜLEME
- 156 TÜRKÇE
- ÖNEMLİ - EASY DE-CALC
- SAKLAMA
- SORUN GIDERME
- НАЛАШТУВАННЯ MAX
- 166 УКРАЇНСЬКА
- 174 AZ∅RBAYCAN
- VACİB - EASY DE-CALC
- PROBLEMI
- 182 RU3TRTL
- UNNNLNNI' QNINN2NI UWWUNWLYWNWNU WU HUTLUGH WULUNNUWN NZHHINY
- UNNLYNIÚ N₂ WÙNNÚWÙN NǍCHÚNÚ
- 2QN12WGN1Ú. 9N1NN2HÙ TN3TP ÚH NI7N3P ÚWNNLYWÙG YNW
- MAX NBDHU
- ปุYNNุนน ขิ้งพันธ์
- YURTYNR STN64NH@3NHLLTR. EASY DE-CALC
- 2QN12WGNU#. UPNNLYH UNWLJH HWNULWDHG UNWP, LYTNNNNN GNIN NNLNU LYQW
- הכלה
- 3060257960000000000000000000000000000000
- MAX
- సందిస్యారు గురమణాన
- 196 ๐๕๑๒๔๙
- G2G3M1N2N3G4S: G1M1 D1N2N3B G2G3N, D1N2D1Y1N B1Y2N G3D1M3
- 202 КЫРГЫЗЧА
- MAX ЖӨНДӨӨСУ
- 204 КЫРГЫЗЧА
- МААНИЛУУ - EASY DE-CALC
- 206 КЫРГЫЗЧА
- ТАНЗИМОТИ MAX
- ХОМЎШКУНИИ ХУДКОР
- 214 ТОЧИКЙ
- МУХИМ - EASY DE-CALC
- 222 TÜRKMENÇE
- MÖHÜM - EASY DE-CALC
- 224 TÜRKMENÇE
- TÜRKMENÇE 225
- AMMARDA SAKLAMAK
- NÄSAZLYKLARY ANYKLAMAK WE ÇÖZMEK
- MAHSULOT SHARHI (8-RASM)
- 230 O'ZBEK
- INTELLEKTUAL AVTOMATIK BUG' REJIMI BILAN DAZMOLLASH
- QO'IDA REJIMIDA DAZMOLLASH
- OGOHLANTIRISH: HECH QACHON BUG'NI ODAMLARGA QARATMANG
- MAKS SOZLAMA
- AVTOMATIK O'CHIRISH
- 232 O'ZBEK
- MUHIM – EASY DE-CALC FUNKSIYASI
- MUHIM – ASOS PLITA CHO'KMASINI TOZALASH
- 234 O'ZBEK
- OGOHLANTIRISH: ASOS PLITADAN ISSIQ, IFLOS SUV CHIQADI
- SAQLASH
- 240 МАКЕДОНСКИ
- 244 МАКЕДОНСКИ
- 250 SHQIP
Brand : PHILIPS
Model : PerfectCare 9000 PSG9040
Category : Iron