
SPDP 18 A1 - DVD player SILVERCREST - Free user manual and instructions
Find the device manual for free SPDP 18 A1 SILVERCREST in PDF.

| Product Type | Portable DVD Player |
| Brand | SilverCrest |
| Model | SPDP 18 A1 |
| Dimensions (L x W x H) | Approx. 25 x 18 x 4 cm |
| Weight | Approx. 1.2 kg |
| Power Supply | AC adapter 100-240 V 50/60 Hz or built-in rechargeable battery |
| Screen Size | 18 cm (7 inches) LCD |
| Playable Formats | DVD, CD, MP3, JPEG, DivX |
| Main Functions | Disc playback, shockproof, USB input, SD card reader, headphone jack, AV output |
| Care and Cleaning | Clean with a soft, dry cloth. Do not use abrasive products. |
| Safety | Auto power-off, parental lock, overvoltage protection |
| Spare Parts and Repairability | Available on request from the manufacturer. Repairability index not provided. |
| Included Accessories | AC adapter, AV cable, remote control, rechargeable battery |
| Regional Compatibility | Multi-region (plays DVDs from all zones) |
Frequently Asked Questions - SPDP 18 A1 SILVERCREST
User questions about SPDP 18 A1 SILVERCREST
0 question about this device. Answer the ones you know or ask your own.
Ask a new question about this device
Download the instructions for your DVD player in PDF format for free! Find your manual SPDP 18 A1 - SILVERCREST and take your electronic device back in hand. On this page are published all the documents necessary for the use of your device. SPDP 18 A1 by SILVERCREST.
USER MANUAL SPDP 18 A1 SILVERCREST
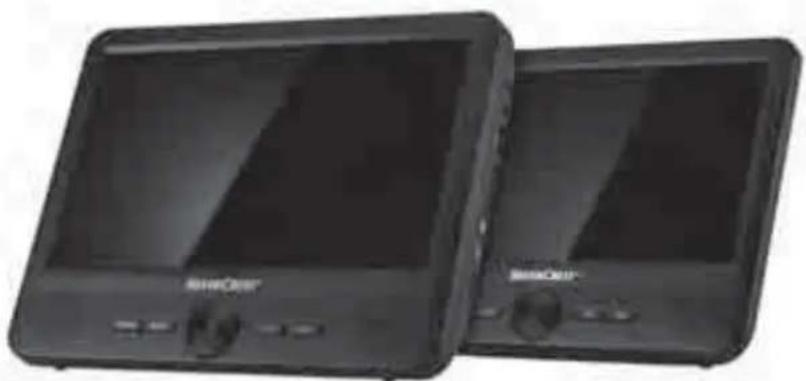
natural_image
Two black rectangular electronic devices with control buttons and display screens (no visible text or symbols)PORTABLE DVD PLAYER / TRAGBARER DVD-PLAYER LECTEUR DVD PORTABLE SPDP 18 A1
GB IE
PORTABLE DVD PLAYER
Operating instructions and safety instructions
FR BE
LECTEUR DVD PORTABLE
GB / IE Operating instructions and safety instructions Page 1
B
natural_image
Line drawing of a coiled cable and plug with a labeled connector (69), no text or symbols present.Contents
Introduction 2
Information about these operating instructions .... 2
Notes on trademarks 2
Intended use 2
Warnings and symbols used 2
Safety ....
Basic safety instructions .... 3
Parts and operating elements .... 5
Setting up ....
Check package contents 6
Inserting/changing the remote control batteries 6
Connecting the power supply....6
Charging the DVD player battery.... 6
Connecting the DVD player to the second monitor 7
Further connection options 7
Mounting the DVD player in a vehicle .....7
Handling and operation....9
General notes on handling and operation 9
Switching the devices on/off 9
Inserting/connecting a data medium 10
Selecting the playback source 10
Adjusting the volume/muting 10
Playback functions....1 1
Menu functions 13
Screen settings on the second monitor 16
Playback of JPEG/MP3/MPEG4 files 16
Troubleshooting 18
Cleaning....18
Storage when not in use 18
Disposal....19
Disposal of the appliance....19
Disposal of the packaging 19
Disposal of batteries ....1
Attachment....20
6Technical data 20
Kompernass Handels GmbH warranty 21
Service 22
Importer 22
Introduction
Information about these operating instructions
Congratulations on the purchase of your new device.
You have selected a high-quality product. The operating instructions are part of this product. They contain important information on safety, usage and disposal. Before using the product, please familiarise yourself with all operating and safety instructions. Use the product only as described and for the range of applications specified. Retain these operating instructions for future reference. Please also pass these operating instructions on to any future owner.
Notes on trademarks
USB ^® is a registered trademark of USB Implementers Forum, Inc.
The SilverCrest trademark and the retail name are the property of their respective owner.
All other names and products may be trademarks or registered trademarks of their respective owner.
Intended use
This device is a consumer electronics device used to play DVDs and other compatible media.
Audio and video files from USB media or SD/MMC memory cards can also be played back.
Any other use or use beyond the scope described herein shall be deemed improper. The device is not intended for use in commercial or industrial environments. The manufacturer accepts no responsibility for damage caused by failure to observe these instructions, improper use or repairs, unauthorised modifications or the use of unapproved replacement parts. The risk is borne solely by the user.
Warnings and symbols used
The following warnings are used in these operating instructions, on the packaging and on the appliance (where applicable):
DANGER
A warning at this hazard level indicates a hazardous situation.
Failure to avoid this hazardous situation will result in serious injuries or death.
▶ Follow the instructions on this warning label to avoid the risk of death or serious injuries.
WARNING
A warning at this hazard level indicates a potentially hazardous situation.
Failure to avoid this hazardous situation could result in serious injuries or death.
▶ Follow the instructions on this warning label to avoid the risk of death or serious injuries.
CAUTION
A warning at this hazard level indicates a potentially hazardous situation.
Failure to avoid this hazardous situation could result in injuries.
▶ Follow the instructions on this warning label to prevent injuries.
ATTENTION
A warning at this hazard level indicates a risk of property damage.
Failure to avoid this situation could result in property damage.
▶ Follow the instructions in this warning notice to prevent property damage.
NOTE
▶ A note provides additional information to help you handle the product.
The following warning symbols are used on the device:
| Symbol Meaning | |
 | Pay heed to warning and safety notices! |
 | WARNING! Laser radiation! To avoid damage to your eyes, do not expose yourself to the laser beam. |
Safety
This chapter contains important safety instructions for using the device. Improper use may result in personal injury and property damage.
Basic safety instructions
To ensure safe operation of the device, follow the safety guidelines set out below:
-
Check the device for visible external damage before use. Do not operate a device that has been damaged or dropped.
This device may be used by children aged 8 years and above and by persons with limited physical, sensory or mental capabilities, or lack of experience and knowledge, provided that they are under supervision or have been told how to use the device safely and are aware of the potential risks. Do not allow children to play with the device. Cleaning and user maintenance tasks may not be carried out by children unless they are supervised.
DANGER! Do not allow children to play with the packaging material! Keep all packaging materials away from children. There is a risk of suffocation!
If the cables or connections are damaged, have them replaced by authorised specialists or the customer service department.
■ Protect the power cable from hot surfaces and sharp edges. Ensure that the mains power cable is not overtaut or kinked. Do not leave the mains power cable hanging over edges (tripping hazard).
All repairs must be carried out by authorised specialist companies or by the customer service department. Improper repairs may put the user at risk. They will also invalidate any warranty claim.
■ Defective components must always be replaced with original replacement parts. Compliance with the safety requirements can only be guaranteed by using these replacement parts. -
Do not make any unauthorised modifications or alterations to the device. Never open the housing of the device.
- Do not insert any objects into the ventilation slots or other openings on the device.
■ Always place the device on a stable and level surface. It can be damaged if dropped. When installing in a car, care must be taken to ensure firm mounting.
Do not fit the headrest bracket in the deployment area of an airbag. When the airbag is deployed, it releases high impact pressure which can hurl the headrest bracket, the securing strap and the DVD player through the vehicle interior.
Before each journey, make sure that the headrest bracket, the securing strap and the DVD player are still securely fastened and cannot come loose unexpectedly.
Do not leave the DVD player unattached inside the vehicle, as it may fly through the interior of the vehicle during jerky manoeuvres or in an accident.
■ Do not expose the device to direct sunlight or high temperatures. Otherwise, it may become overheated and irreparably damaged. - Ensure sufficient air circulation to prevent heat build-up. Never cover the device. There is a risk of fire!
- Do not place the product near heat sources such as radiators or other heat-generating devices.
- Keep the device away from open flames (e.g. candles) at all times.
This device is only intended for use in dry indoor areas.
■ The device is not intended for use in rooms with high temperature or humidity levels (e.g. bathrooms) or excessive dust.
■ Protect the device from drips or splashes of water. Never submerge the device in water; do not place the device near water and do not place any object filled with liquid (e.g. vases) on top of the device.
If you notice a burning smell or smoke, pull out the mains adapter from the mains socket immediately (or the car adapter from the car's on-board power supply).
■ Always hold the mains adapter or the car adapter by its housing. Never pull on the power cable itself and never touch the mains adapter or car adapter with wet hands.
In case of malfunction or during a thunderstorm, disconnect the power adapter from the mains power socket.
The device consumes power in standby mode. To completely disconnect the device from the power source, the mains adapter must be removed from the mains socket or the car adapter from the on-board power socket.
■ Make sure that the power outlet in use is always easily accessible so that the device can be quickly disconnected from the power supply in an emergency.
- Do not use any defective or damaged media (DVD/CD) in the device's DVD drive.
The DVD drive is a class 1 laser product. During operation, do not look directly into the laser beam or into the opening from which it emerges.
■ Never aim the laser beam at reflective surfaces, people or animals. Even brief visual contact with a laser beam can result in eye injuries.
■ Use the second monitor only with the DVD player and connect it only with the AV/DC cable provided.
■ To prevent damage, do not touch the screen with your fingers or any sharp objects.
- Do not exert any pressure on the screen. There is a risk that the screen will break.
WARNING: If the screen is broken, there is a risk of injury. Wear protective gloves when collecting the broken parts. If any liquid escapes and gets on your hands or clothing, wash the affected areas immediately with soap and water. If any liquid splashes into your eyes, immediately flush your eyes out with clean, running water for at least 15 minutes and consult a physician.
The DVD player has an integrated lithium-ion battery. Incorrect handling can lead to fire, explosions, leakage of dangerous substances or other hazards!
■ Do not throw the DVD player into an open fire.
■ Do not leave the DVD player behind the windscreen in the vehicle.
■ Use only the supplied mains adapter or car adapter to charge the battery.
Handling lithium-ion batteries
Handling batteries
The remote control is battery operated. Mishandling batteries can cause fires, explosions, leakage of dangerous substances or other hazards!
- Keep batteries out of the hands of children. Store batteries out of the reach of children.
If a battery has been swallowed, seek medical assistance immediately.
■ Batteries must never be short-circuited, taken apart, deformed or thrown into a fire.
■ Never try to charge non-rechargeable batteries.
■ Chemicals from leaking or damaged batteries can cause skin irritations when touched. Use suitable protective gloves if this occurs. In the event of contact with your skin, rinse off with plenty of water. If the chemicals come into contact with your eyes, rinse them thoroughly with plenty of water and do not rub them. Consult a physician immediately.
■ Always use batteries of the same type! Never mix old batteries with new ones!
■ Always use the stated battery type.
■ Ensure that the batteries are inserted with the correct polarity. This information is displayed in the battery compartment.
■ Clean the battery and device contacts before inserting the battery, if necessary.
■ Remove the batteries from the remote control if you are not likely to be using it for a long time.
■ Remove discharged batteries from the remote control immediately.
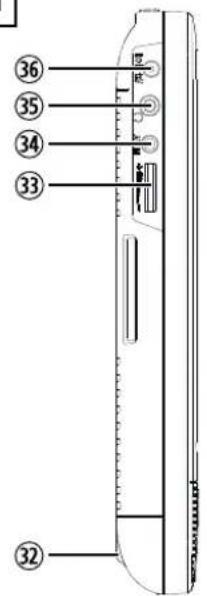
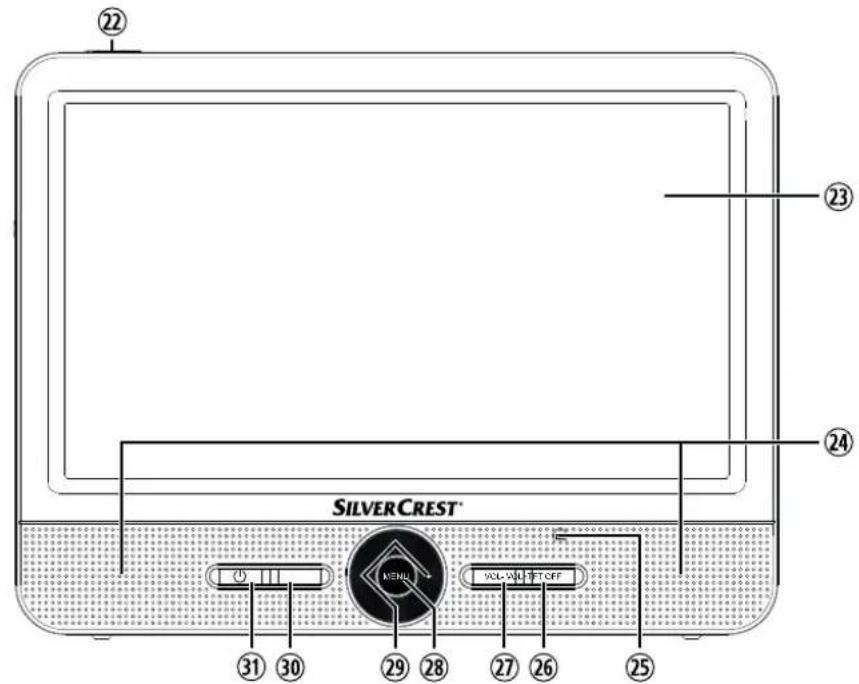
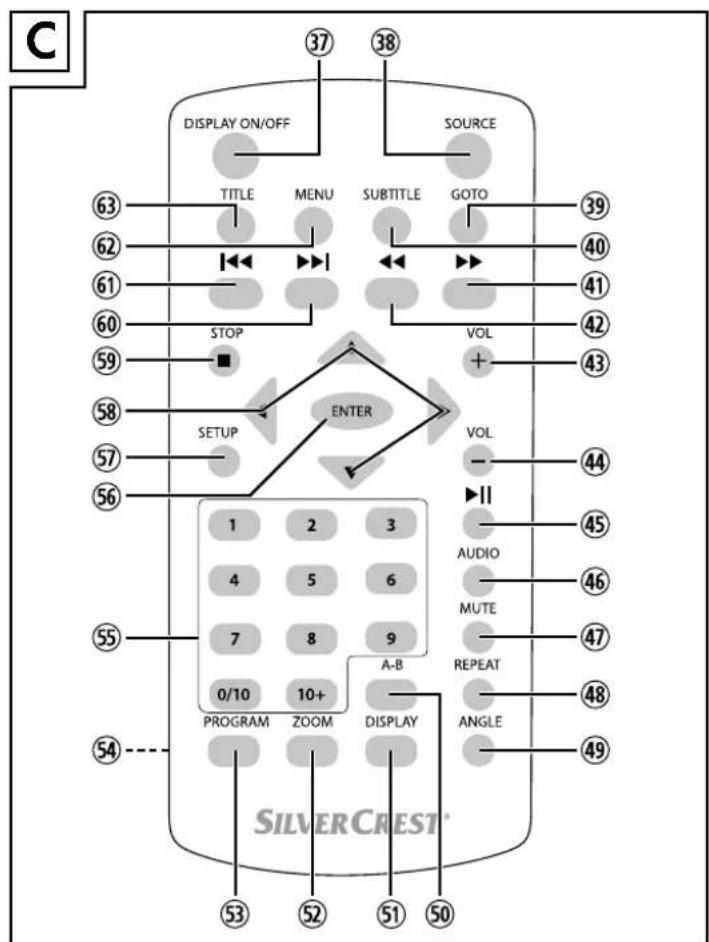
Parts and operating elements
For illustrations see fold-out pages
Figure A: DVD player
① Disc compartment release OPEN
② On/Off switch ON/OFF
③ DC IN socket ⊖ ⊙ ⊕
④ DC OUT socket ⊖-●-+
⑤ USB port
⑥ Memory card slot CARD
⑦ AV OUT socket
⑧ Headphone jack
⑨ Main volume control
⑩ Fold-out stand (rear)
⑪ Power LED (blue)
⑫ Charging LED (red)
⑬ VOL +button
⑭ VOL button
⑮ OK button
⑯ Navigation keys ◀▶ ▲▼
⑰ SETUP button
⑱ SOURCE button
⑲ Sensor for remote control
⑳ Speakers
②1 Screen
Figure B: Second monitor
②2 On/Off switch ON/OFF
②3 Screen
⑳ Speakers
⑲ Power LED (blue)
②6 VOL +button
⑳ VOL button
⑳ MENU button
⑲ Navigation keys ◀▶ ▲▼
③0 TFT OFF button
③1 Button
③2 Fold-out stand (rear)
③3 Volume control
③4 AV IN socket
③5 Headphone jack
③6 DC IN socket
Figure C: Remote control
③7 DISPLAY ON/OFF button
③8 SOURCE button
⑲ GOTO button
④0 SUBTITLE button
④1 ▶ button
④2 ◀button
④3 VOL +button
④4 VOL -button
④5 button
④6 AUDIO button
④7 MUTE button
④8 REPEAT button
④9 ANGLE button
⑤0 A-B button
⑤1 DISPLAY button
⑤2 ZOOM button
⑤3 PROGRAM button
⑤4 Battery compartment (rear)
⑤5 Numeric keypad
⑤6 ENTER button
⑤7 SETUP button
⑤8 Navigation keys ◀▶ ▲▼
⑤9 STOP button
⑥0 ▶▶ button
⑥1 | button
⑥2 MENU button
⑥3 TITLE button
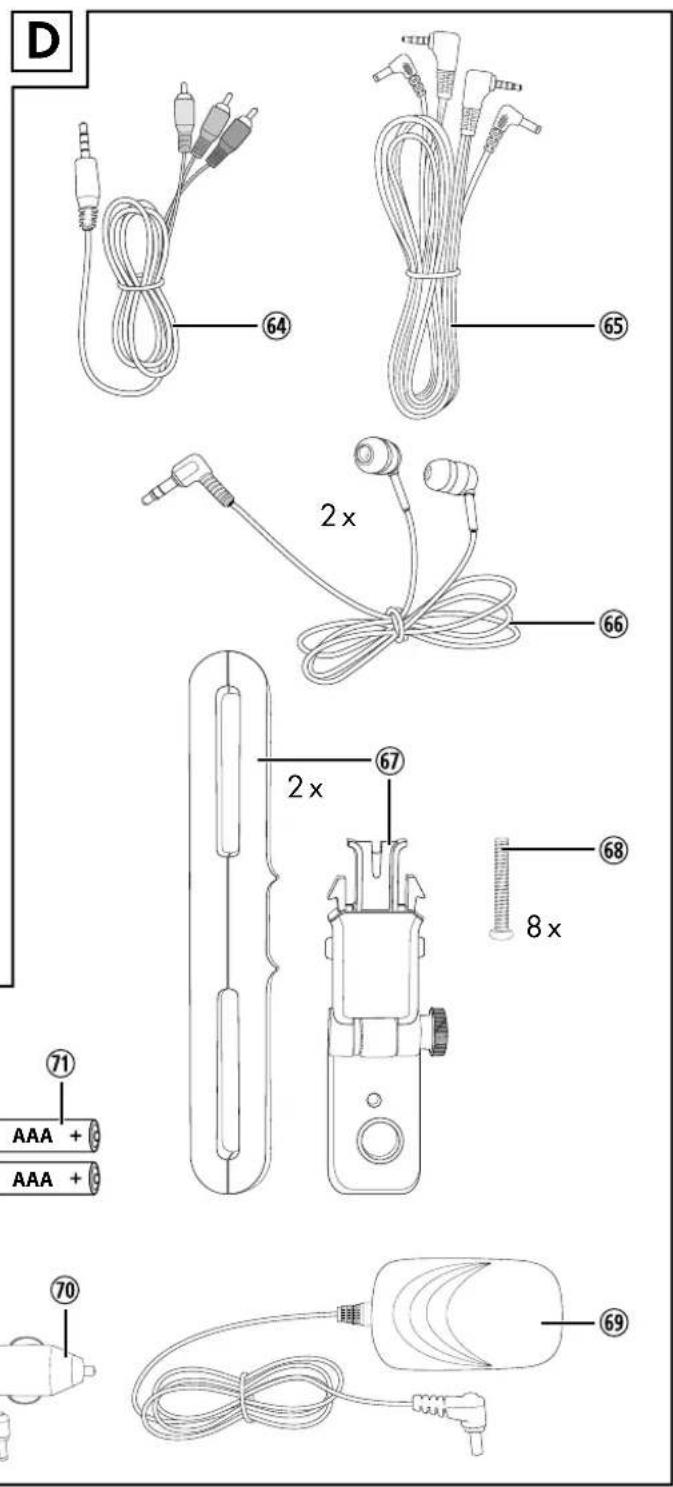
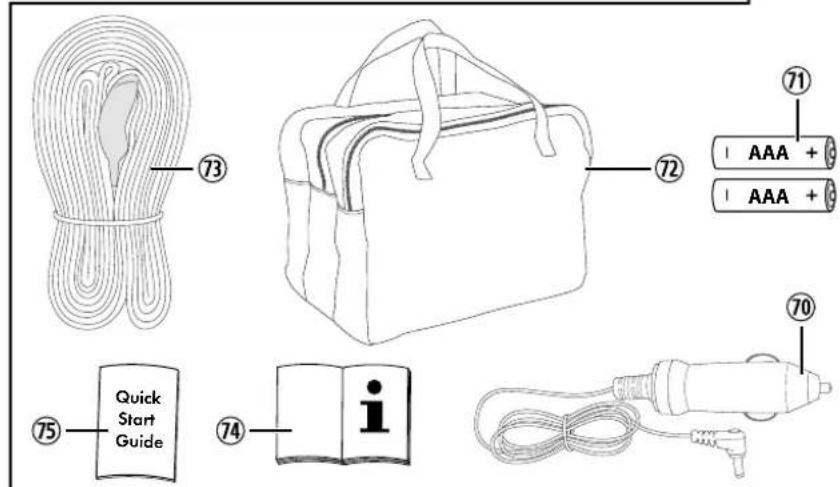
Figure D: Accessories
⑥4 AV cable
⑥5 AV/DC cable
⑥ Earphones (2x)
⑥7 Headrest brackets (2x)
⑥8 Long fixing screws (8x)
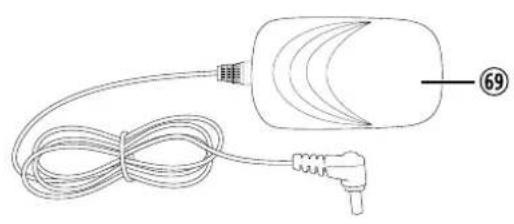
⑥9 Mains adapter
⑦ Car adapter
⑦ Batteries, type AAA/Micro (2x)
⑦2 Transport bag
⑦3 Securing strap (2x)
⑦4 Operating instructions
⑦5 Quick start guide
Setting up
Check package contents
(See fold-out page for illustrations)

DANGER
▶ Do not allow children to play with packaging materials. There is a risk of suffocation!
◆ Remove all parts of the device and the operating instructions from the box.
◆ Remove all packing materials and the protective films from the screens.
◆ Remove the transport lock from the DVD drive.
The following components are included in the delivery:
- DVD player
- Second monitor
- Remote control
- 2 headrest brackets
- 2 securing straps
- 8 spare screws
- Mains adapter
- Car adapter
- AV/DC cable
● AV cable (3.5 mm jack plug to cinch) - 2 x AAA/Micro batteries
- 2 earphones
- Transport bag
- Quick start guide
• These operating instructions
NOTE
▶ Check the package for completeness and signs of visible damage.
▶ If the delivery is incomplete or damage has occurred as a result of defective packaging or during transport, contact the customer service hotline (see Service chapter).
Inserting/changing the remote control batteries
◆ Open the battery compartment ^54 on the rear of the remote control.
♦ Insert two AAA/Micro batteries into the remote control, as shown in the battery compartment ⑤4.
◆ Close the battery compartment⑤4 again.
Connecting the power supply
In order to use the device, you must connect the power supply. You can connect it to a mains socket or operate it using the integrated rechargeable battery or the car adapter.
CAUTION
▶ Make sure that all devices are switched off before connecting them. Do not switch on the devices until all connections have been established.
Mains power operation:
♦ Insert the plug of the supplied mains adapter ^69 into the DC IN socket ③ on the side of the DVD player A.
♦ Plug the mains adapter ^69 into a mains socket that is always within easy reach.
Operation using the car adapter:
CAUTION
The car adapter ^70 is not suitable for use with a 24 V on-board power socket.
♦ Insert the plug of the supplied car adapter⑦0 into the DC IN socket ③ on the side of the DVD player A.
Connect the car adapter to a suitable 12 V on-board socket, e.g. the car's cigarette lighter.
Charging the DVD player battery
Once you have connected the power supply, the integrated rechargeable battery in the DVD player A will charge automatically. During charging, the charging LED ⑫ lights up red. As soon as the battery is fully charged, the charging LED ⑫ turns off.
NOTE
▶ If the DVD playerA is not going to be used for some time, the battery should be recharged at regular intervals to maintain battery performance.
Connecting the DVD player to the second monitor
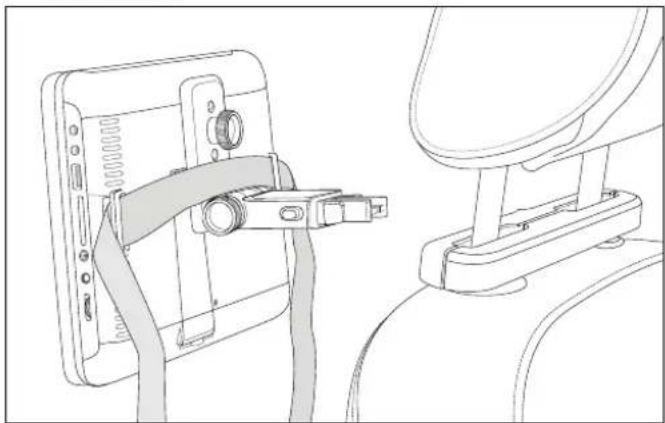
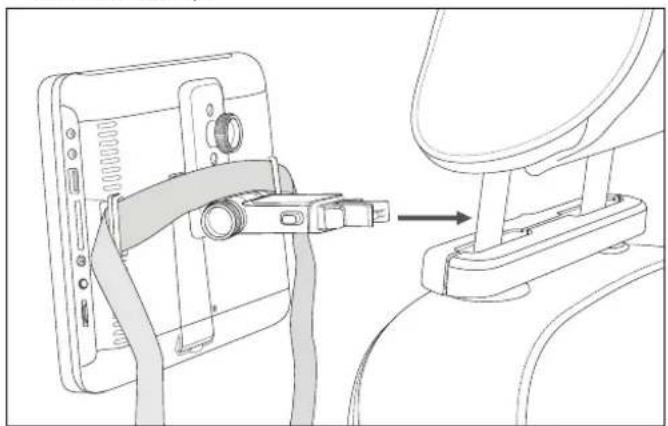
The device is delivered with a second monitor B, which you can connect to the DVD player A and thus play the content on two monitors simultaneously.
First connect the jack plugs of the AV/DC cable ^65 to the AV OUT socket ⑦ of the DVD player A and to the AV IN socket ③4 of the second monitor B.
Then use the remaining coaxial power connectors of the AV/DC cable ⑥5 to connect the DC OUT socket ④ of the DVD player A to the DC IN socket ③6 of the second monitor B. This will supply the second monitor B with the required operating voltage.
Further connection options
Headphone jack
The DVD player A and the second monitor B each have a headphone jack (1), 8, 35) suitable for 3.5 mm jack plugs. As soon as you connect the earphones, the sound will be played back via the earphones. The speakers are automatically muted.
WARNING


Using earphones at excessive volume can cause permanent hearing damage.
▶ Use only the supplied earphones ^66 , type SPDP 18 A1. Other earphones could produce harmful sound pressure.
▶ Before putting on the earphone ^66 , reduce the volume to minimum.
Connection to an external device
You can also play the picture and sound signal from the DVD player A on an external device, such as a TV.
◆ Insert the 3.5 mm jack plug of the AV cable⑥4 into the AV OUT socket ⑦ of the DVD player A.
Connect the external device via the cinch connectors of the AV cable 64. Connect the yellow cinch plug to the video input as well as the red cinch plug to the right and the white cinch plug to the left audio input of the desired device.
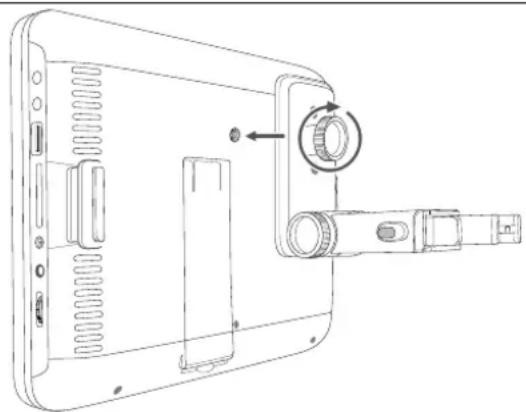
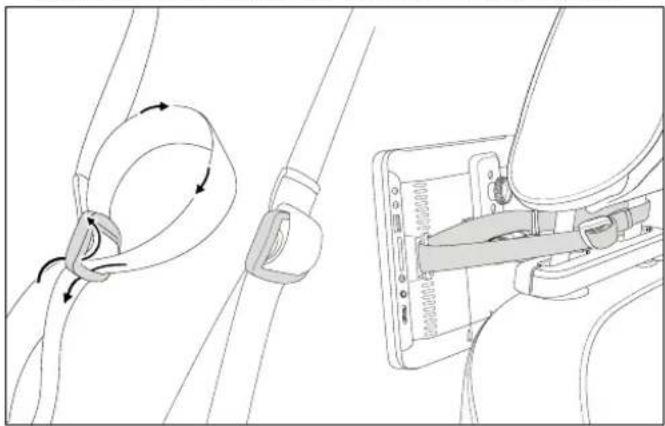
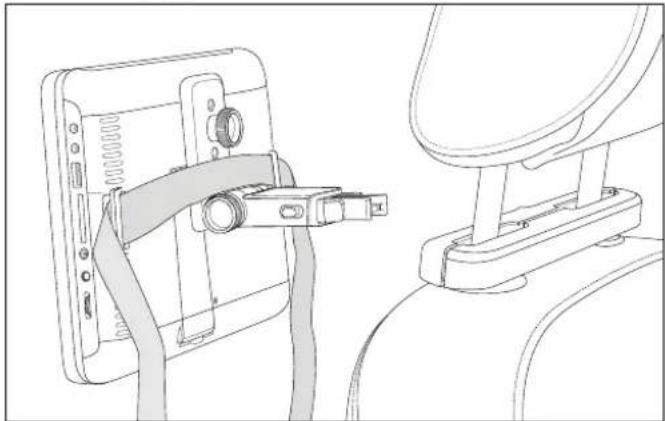
Mounting the DVD player in a vehicle
Use the supplied headrest bracket ⑥7 and the securing strap ⑦3 to securely secure the device behind the headrest of a front seat.
DANGER
▶ Do not fit the headrest bracket ^67 in the deployment area of an airbag. When the airbag is deployed, it releases high impact pressure which can hurl the headrest bracket, the securing strap ^73 and the DVD player through the vehicle interior.
Before each journey, make sure that the headrest brackets ^67 , the securing strap ⑦ and the DVD player are still securely fastened and cannot come loose unexpectedly.
▶ Do not leave the DVD player unattached inside the vehicle, as it may fly through the interior of the vehicle during jerky manoeuvres or in an accident.
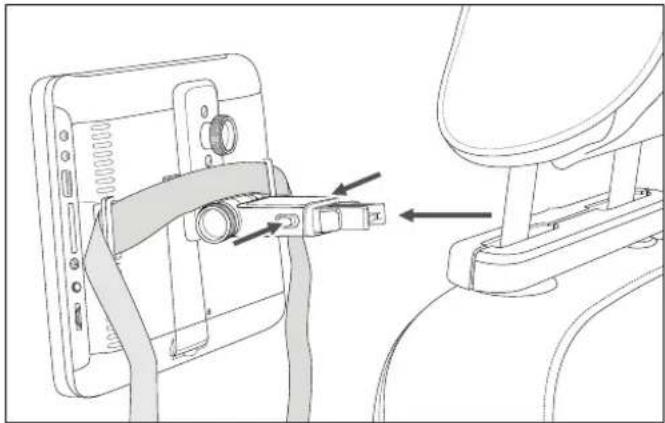
♦ Screw the angle bracket into the threaded hole on the back of the DVD player A.
natural_image
Line drawing of a device's internal components, including a scroll wheel and mechanical assembly (no text or symbols)SILVERCREST®
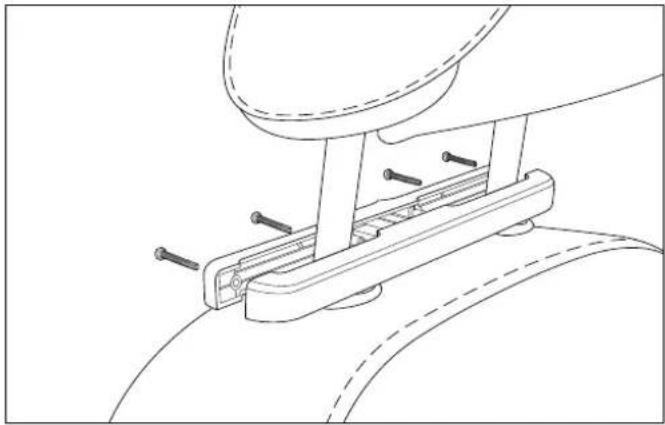
◆ Remove the four screws from the headrest bracket clamp using a Phillips screwdriver.
◆ Place the clamp of the headrest bracket around the headrest supports and tighten with the four screws.
NOTE
▶ Depending on the diameter of your headrest supports, use either the pre-assembled screws or the supplied long fixing screws ⑥8.
natural_image
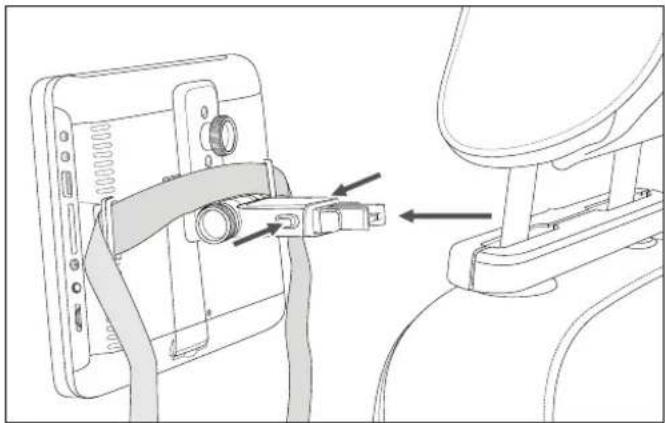
Technical line drawing of a mechanical assembly with no visible text or symbols◆ Pass the securing strap ^73 through the brackets on the back of the DVD player A.
natural_image
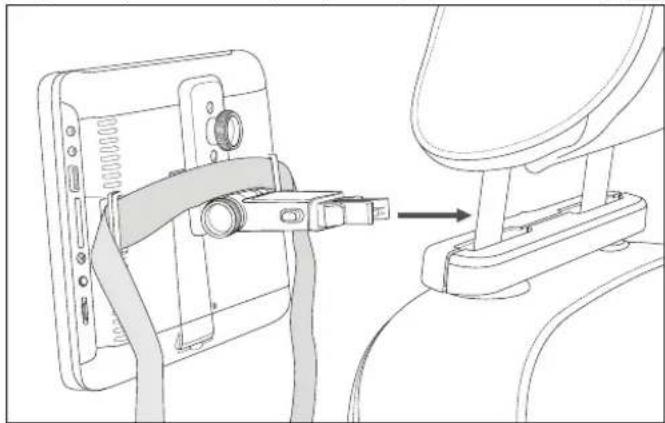
Technical line drawing of a device with attached cable and bracket (no text or symbols)Now press the angle bracket into the holder of the clamp until it is fully engaged. Check that the angle bracket and the DVD player A are fitted securely.
natural_image
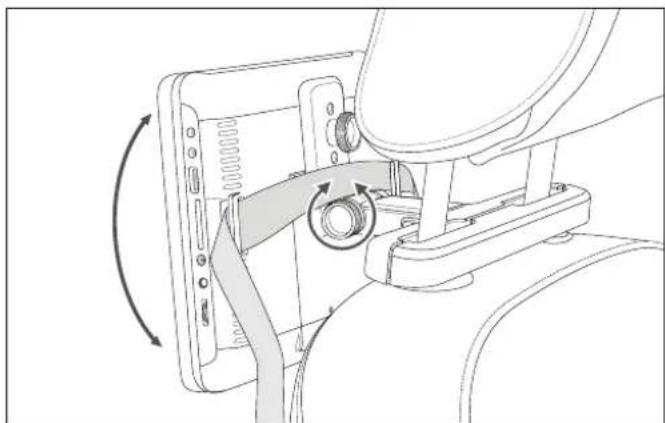
Line drawing of a device being inserted into a device, showing cable and connector (no text or symbols)- Undo the side screw on the angle bracket and set the desired inclination angle of the DVD player A.
◆ Secure the position by tightening the side screw again.
natural_image
Technical line drawing of a mechanical assembly with rotating components (no text or symbols)◆ Guide the securing strap ^73 around the headrest supports and push it twice through the strap buckle. Tighten the securing strap ^73 .
natural_image
Technical line drawing showing cable fastening and mounting mechanism (no text or symbols)To remove the securing strap ^73 from the headrest supports, release it from the strap buckle. To remove the securing strap ^73 from the DVD player completely, pull it out of the brackets on the back of the DVD player A.
To release the angle bracket from the clamp, press the release buttons on the right and left of the angle bracket and simultaneously pull it out.
natural_image
Technical line drawing of a mechanical assembly with no visible text or symbolsNow attach the second monitor B to the other headrest in the same way.
Handling and operation
General notes on handling and operation
Operating the device using the controls on the player or remote control
The DVD player A and the second monitor B have a number of controls and buttons that you can use to control the main functions. In addition to the basic controls, the remote control C also provides numerous additional options for using all the functions of your device.
These operating instructions refer mainly to the buttons on the remote control C. If the instructions refer to the controls of the DVD player A or the second monitor B, it will be expressly stated.
If you select a function that is not possible with the inserted media or not available in the current mode or at the current time, the ☐on appears on the screen.
Switching the devices on/off
There is an ON/OFF switch (②, ⑳) on the top of the DVD player A and the second monitor B.
NOTE
Switching off the DVD playerA also switches off the power to the second monitor B.
Slide the ON/OFF switch (②, ⑳) to the left into the ON position to switch on the devices. The power LEDs (⑪, ⑮) light up blue when switched on.
Slide the ON/OFF switch (②, ②) to the right into the OFF position to switch off the devices. The power LEDs (⑪, ⑤) turn off.
NOTE
▶ If the device does not receive any signals for 15 minutes, it will automatically switch to power-saving mode.
To quit power-saving mode, press the DISPLAY ON/OFF button ③7 on the remote control. Alternatively, you can move the ON/OFF switch (②, ②2) to the right to the OFF position and then back to the ON position.
Switching the screen on/off
During audio playback, you can separately switch the screen on the DVD player A and the second monitor B on or off. The sound will still be transmitted.
Press the DISPLAY ON/OFF button ③7 to switch the DVD player A screen on or off.
Press the TFT OFF button ③0 to switch the screen on the second monitor B on or off.
Inserting/connecting a data medium
Inserting a DVD/CD
Slide the disc compartment release OPEN ① on top of the DVD player A to the left and fold the screen ② forward to open the disc tray.
◆ Insert the DVD/CD so that the label side is facing up and press it carefully onto the retaining hub in the middle until the DVD/CD clicks into place.
◆ To close the disc compartment, gently push the screen ^21 back until you hear it click into place.
DVD/CD playback normally starts automatically after a few seconds. You may need to press the PLAY/PAUSE▶II button ④5 or a menu may appear asking you to make a selection using the navigation keys

Connecting a USB flash drive
You can connect a USB flash drive to the USB port ⑤ to play audio, video, or image files.
CAUTION
▶ To avoid damaging the device, do not use a USB extension cable and do not connect the device directly to the USB port of a computer.
The USB port is designed for use with USB flash drives only. Other external storage media, such as external hard drives, cannot be operated via the USB port.
◆ Insert a USB flash drive into the USB port⑤ on the right side of the DVD player A to play files from the USB flash drive.
Connecting SD/MMC memory cards
You can insert an SD/MMC memory card into the memory card slot ⑥ to play back audio, video, or image files.
Insert the memory card into the memory card slot on the right side of the DVD player with the contacts to the rear and the bevelled corner at the top.
Selecting the playback source
The default playback source of the device is DVD. If other media (USB flash drive or SD/MMC memory card) are inserted, you can switch between the playback sources.
Press the SOURCE button ③8 repeatedly to switch between the playback sources (DVD, USB and SD). When the DVD drive is selected as the playback source, "DVD" or "CD" is displayed at the top left of the screen after the data is read.
Adjusting the volume/muting
The main volume control ⑨, which controls the overall volume of the AV OUT socket ⑦, the headphone jack ⑧ and the speaker ⑳, is located on the side of the DVD player A. If the main volume control ⑨ is set to minimum, no sound will be emitted or transmitted to the second monitor B.
♦ Set the main volume control ^⑨ to maximum to maintain the full volume range of the device.
Then adjust the volume using the VOL + ④3 and VOL - ④4 buttons on the remote control C or directly on the device with the VOL + ⑬ and VOL - ⑭ buttons. Changing the volume on the DVD player A also affects the volume on the second monitor B.
To adjust the volume of the second monitor separately, use either the volume control ③ or the VOL + ② and VOL - ⑦ buttons.
NOTE
▶ Press the VOB (13, 43) button to adjust the volume of the DVD player A up to "16". A message will appear to warn you of possible hearing damage at high volume. You cannot increase the volume up to "20" until you have confirmed this message with the ENTER button 56 or the OK button 15.
◆ Press MUTE button ^47 to mute the sound on the DVD player A and the second monitor B.
◆ Press the MUTE button④7 again to cancel the mute function.
Playback functions
Start/pause playback
◆ Press the PLAY/PAUSE ▶|| button ④5 to start playback.
The ▶ icon appears on the screen.
◆ Press the PLAY/PAUS▶II button ④5 again to pause playback. The □on appears on the screen.
Stop playback
◆ Press the STOP button ⑤ once to stop playback. In this mode you can resume playback from the same spot by pressing the PLAY/PAUSE button ④5 again.
Press the STOP button ⑤9 twice to completely stop playback. In this mode, playback restarts from the beginning of the inserted DVD/CD. The ■ on appears on the screen.
Skip track forwards/backwards
During playback press the button ⑥0 or the ◄◆ button ⑥1 to skip forwards or backwards (for DVDs: from chapter to chapter; otherwise: from track to track).
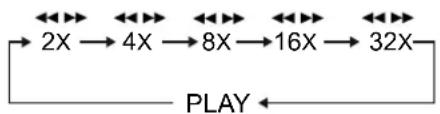
Fast forward/rewind
During playback, press either the 41 or the ◀◀ 42 button to start fast-forwarding or rewinding.
◆ Press the ④① or ◀◀ ④② buttons repeatedly to set the following playback/cueing speeds:
flowchart
graph LR
    A["2X"] --> B["4X"]
    B --> C["8X"]
    C --> D["16X"]
    D --> E["32X"]
    E --> F["PLAY"]
    F --> A
Press the PLAY/PAUSE ▶II button ④5 to stop fast forward/rewind and return to normal playback speed
NOTE
▶ The sound is muted during fast forward/rewind.
Direct selection via the GOTO button
Press the GOTO button ⑲ to go directly to a chapter, a track or a specific time. Each press changes the selection. Playback starts from the selected location.
To enter two-digit numbers press 10+ repeatedly for the tens, then a numeric key for the second digit.
For example: For the number "28", press the 10+ key twice and then the number 8.
The function of the GOTO button ⑲ varies for different media:
DVD:
- Press the GOTO button ⑲ once: Enter the desired chapter within a title using the numbers on the numeric keypad ⑵. Use the navigation keys ◀▶ ⑥ to switch between chapter input and title input.
- Press the GOTO button ⑲ twice: enter the desired time within a title in the format h:mm:ss (only possible when playing a title/chapter).
- Press the GOTO button ⑲ three times: enter the desired time within a chapter in the format h:mm:ss (only possible when playing a title/chapter).
Audio CD/VCD:
- Press the GOTO button ⑲ once: enter the desired time point on the CD in the format mm:ss.
- Press the GOTO button ⑲ twice: enter the desired time point within the current track in the format mm:ss.
- Press the GOTO button ⑲ three times: enter the number of the desired track.
MP3:
NOTE
▶ Direct selection of all titles on the storage medium is only possible if the folder structure is hidden (see also section Playback of JPEG/MP3/MPEG4 files).
▶ Press the PROGRAM button ⑤3 until the display "Filelist" appears at the bottom of the information bar. The folders are now hidden and all tracks on the storage medium are displayed in a list.
- Press the GOTO button ⑲ once: enter the number of the desired track.
- Press the GOTO button ⑲ twice: enter the desired time point within a current track in the format mm:ss.
Direct selection using the number keys
You can also enter chapters (for DVD) or tracks (for other media) directly using the numbers on the numeric keypad ⑤5). Playback starts directly from the selected location.
To enter two-digit numbers press 10+ repeatedly for the tens, then a numeric key for the second digit.
For example: For the number "28", press the 10+ key twice and then the number 8.
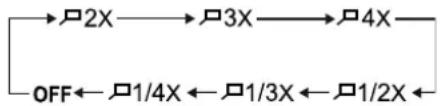
Zoom
During playback of a video file, you can enlarge or reduce the image on the screen in three stages.
◆ Press the ZOOM button ^52 repeatedly to zoom in or out by the following factors:
flowchart
graph LR
    A[" "] --> B[" "] --> C[" "] --> D[" "]
    E["OFF"] <--_F[" "] <--_G[" "] <--_H[" "] <--_I[" "] <--_J[" "] <--_K[" "] <--_L[" "] <--_M[" "] <--_N[" "] <--_O[" "] <--_P[" "] <--_Q[" "] <--_R[" "] <--_S[" "] <--_T[" "] <--_U[" "] <--_V[" "] <--_W[" "] <--_X[" "] <--_Y[" "] <--_Z[" "] <--_AA[" "] <--_AB[" "] <--_AC[" "] <--_AD[" "] <--_AE[" "] <--_AF[" "] <--_AG[" "] <--_AH[" "] <--_AI[" "] <--_AJ[" "] <--_AK[" "] <--_AL[" "] <--_AM[" "] <--_AN[" "] <--_AO[" "] <--_AP[" "] <--_AQ[" "] <--_AR[" "] <--_AS[" "] <--_AT[" "] <--_AU[" "] <--_AV[" "] <--_AW[" "] <--_AX[" "] <--_AY[" "] --> Z
The zoom section can be shifted using the navigation keys ◀▶ ▲▼ ⑤8.
Switching camera positions
Some DVD films contain chapters that were recorded simultaneously from different camera angles. For films that have such chapters, you can view the same chapter from different perspectives.
Press the ANGLE button ④9 repeatedly during playback. Each time you press the ANGLE button ④9 the image switches to one of the available camera angles.
Changing the playback language
Some films on DVD/VCD offer a choice of playback languages.
During playback, press the AUDIO button 46 repeatedly to select the desired playback language. Each time you press the AUDIO button 46, the next available playback language is selected.
Selecting a subtitle language
Some films on DVD/VCD offer a choice of subtitle languages.
During playback, press the SUBTITLE button 40 repeatedly to select the desired subtitle language. Each time you press the SUBTITLE button 40, the next available subtitle language is selected.
Showing disc information
During playback, press the DISPLAY button ⑤1 repeatedly to display information on played and remaining titles, chapters, and time. Each time you press the DISPLAY button ⑤1, the next disc information item is shown.
Repeat function
During playback press the REPEAT button 48. The icon appears on the screen and each time the button is pressed, the section to be repeated, such as Chapter, Title or All (DVDs and audio CDs only). When playing MP3 files, the repeat function is different:
- Single: The current track is played once.
- Repeat One: Current track is repeated.
- Repeat Folder: All tracks in the current folder are repeated.
- Repeat Off: All tracks in the current folder are played once.
Repeat section
During playback press the A-B button 50 to set the beginning of the section that you want to repeat. A is displayed on the screen.
Press button A-B50 a second time to set the end of the section. The ▶A-B symbol appears permanently on the screen and the specified section is repeated endlessly.
◆ Press the A-B button⑤0 again to return to normal playback.
Programming the playback order of tracks
With this programming function you can play up to 20 chapters (DVD) or tracks (audio CD) in an order of your choosing. This function is not available for MP3 media.
Press the PROGRAM button ⑤3. A table with 10 program positions appears on the screen.
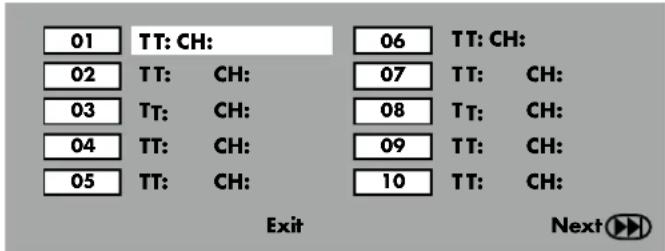
♦ Enter the desired track (TT) for program position 1 using the numbers on the numeric keypad ⑤. To enter two-digit numbers press 10+ repeatedly for the tens, then a numeric key for the second digit.
♦ Enter the desired chapter (CH) for program position 1 using the numbers on the numeric keypad ⑤.
◆ After input, the cursor jumps to the next program position.
Enter additional program positions in the same way. To enter 10 additional program positions, move the cursor to the "Next ▶" entry at the bottom of the menu using the navigation keys ◀▶ ▲▼ ⑤8 and confirm with the ENTER button ⑤6.
If you select the "Exit" entry at the bottom of the menu, the programming function is aborted. All settings will be lost.
Starting a programmed playback sequence
As soon as the first program position has been entered, the word "Start" appears at the bottom of the menu.
Use the navigation keys ▶▲▼ 58 to move the cursor to "Start" and press the PLAY/PAUSE ▶II button 45 or ENTER 56.
The preprogrammed playback sequence starts and "Program" is permanently displayed on the screen during playback.
Use the PROGRAM button ^53 to call up and change the table with the program positions again.
To stop playback and clear the programmed playback order, press the STOP ☐ button ⑤ twice.
At the end of the programmed playback sequence, the DVD player automatically switches to stop mode. The previously programmed playback sequence is not saved.
Opening the DVD menu
Many DVD films contain a main menu on the disc with several options besides the option to play the main film, e.g. playback of bonus material.
Please note that it depends on the DVD which menu is displayed when a key is pressed.
◆ Pressing the MENU button ^62 usually calls up the main menu of the DVD.
- Pressing the TITLE button ⑥3 usually opens the DVD title menu.
Menu functions
Navigating the menus
Press the SETUP button ⑤7 to enter the setup menu. The General Setup page appears.
Use the navigation keys ◀▶▲▼ ⑤8 and the ENTER button ⑤6 to adjust all the settings in the menu.
-Use the navigation keys◀▶ to select a menu by moving the yellow marking under the corresponding menu symbol.
- Use the navigation keys ▲▼ to select an item in a menu by moving the green bar over the item.
- Use the ▶ navigation key to switch to the submenu of an entry and the ◀ navigation key to go back one menu level.
- To confirm a selection, press the ENTER button ⑤6.
- To exit the setup menu, press the SETUP button ⑤7.
General Setup menu
 |  |  |  |
| -- General Setup Page -- | |||
| TV Display | 16:9 | ||
| Angle Mark | Off | ||
| OSD Lang | ENG | ||
| Captions | Off | ||
| Screen Saver | On | ||
| Last Memory | On | ||
| Go To General Setup Page | |||
TV Display
Here you can adjust the height and width of the image display on the playback device used.
4:3 PANSCAN: Select this setting to display programs in the usual 4:3 format on a 4:3 TV. Films in 16:9 format are displayed in full screen without the black bars, but the margins of the image are trimmed.
4:3 LETTERBOX: Displays a film in 16:9 format on a conventional television in 4:3 format. The image is displayed with black bars at the bottom and top of the screen.
16:9: For displaying the picture on a widescreen TV in 16:9 format.
Angle Mark
On some DVDs certain scenes have been recorded from multiple angles.
Select the "On" entry to switch to the next viewing angle during film playback by pressing the ANGLE button ④9. To deactivate this function, choose the entry "Off".
OSD language
This sets the language in which the setup menu is displayed on the screen of the DVD player A.
Captions
Here you can set whether the subtitles (if any) should be automatically displayed on the screen each time a DVD is played. To do this, set the function to "On". If you want to activate the subtitles manually, set this function to "Off".
Subtitles can be adjusted during playback with the SUBTITLE button ④0.
Screen Saver
To activate the screen saver, set this function to "On". The screen saver will now turn on if no input is made for about 3 minutes while playback is paused.
To turn off the screen saver, set the function to "Off".
Last Memory
Select the "On" setting to play a disc at the last played position after removal and re-inserting. If set to "Off", disc playback starts from the beginning.
When the DVD player A is switched off, the stored position is not retained.
Audio Setup menu
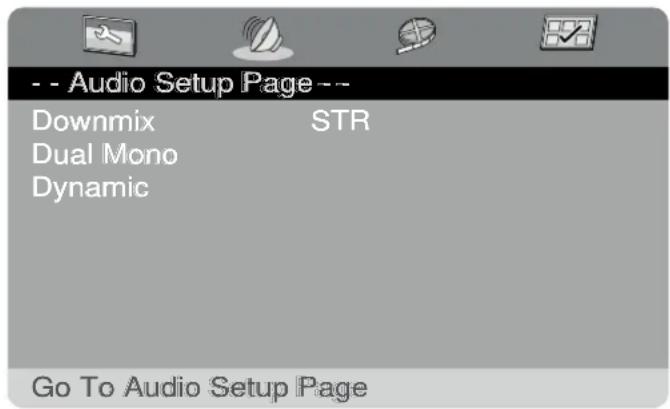
Downmix
This allows you to adjust the sound settings for the AV OUT socket ⑦.
LT/RT: Select this setting if you have connected the DVD player A to a surround system.
Stereo: Select this setting when the sound is played through only two speakers.
Dual Mono
This sets how the two-channel audio is transmitted from the AV OUT socket ⑦.
Stereo: A stereo signal is transmitted via the left and right speakers or via the AV OUT socket ⑦.
L-Mono: The left mono channel is transmitted from both speakers or the AV OUT socket ⑦.
R-Mono: The right mono channel is transmitted from both speakers or the AV OUT socket ⑦.
Mix-Mono: The left and right mono channels are transmitted as a mono signal from both speakers or the AV OUT socket ⑦.
Dynamic
The Dynamic setting allows you to adjust the volume difference between soft and loud passages on a scale from OFF to FULL in nine steps.
OFF: The sound is played back unchanged. Loud passages are reproduced loudly and quiet passages are reproduced quietly.
FULL: The volume difference is minimised, i.e. loud passages are quieter and quiet passages are louder.
Video Setup menu
| - - Vio Setup Page -- | |
| S arpness | Med |
| rig tness | 00 |
| Contrast | 00 |
| ue | 00 |
| Saturation | 00 |
| Go To Vio Setup Page | |
Please note that the settings made in this menu only apply to the DVD player A and do not affect the second monitor B.
Sharpness
Here you can change the sharpness of the image to one of the three preprogrammed settings (High, Medium, Low).
Brightness, contrast, hue, saturation
◆ Use the navigation keys▲▼ ⑤8 to select the setting to be changed.
◆ Press ENTER ^56 to confirm your selection and enter the setting mode.
◆ Use the navigation keys or ▶ ⑤8 to select the desired value.
Confirm the set value by pressing ENTER ⑤6. The setting is saved and the setting mode is exited.
Preference Setup menu
| -- P e e ence Page---- | |
| T Di play | PAL |
| Audio | G R |
| Su title | G R |
| Di c Menu | G R |
| De ault | |
| Go To P e e ence Page | |
The Preference Setup menu is not available during playback. First stop playback by pressing the STOP ☐ button ⑤9 twice.
TV Display
If you connect the DVD player A to a television, you can set the colour format of your television here.
PAL TV: This colour format is used in most European countries
AUTO: Automatic recognition of the format to be used
NTSC TV: This colour format is common in North America
Audio
Set the default audio language to be used for film playback.
Subtitle
Set the default subtitle language to be used for film playback.
Disc Menu
Set the default disc menu language to be used for film playback.
Default
Restores the DVD player A to its factory defaults.
Select the entry "Reset" and confirm the selection with ENTER ⑤6.
Screen settings on the second monitor
◆ Press the MENU button ^28 on the second monitor B to display the Setup menu.
The following settings are available:
-BRIGHTNESS
-CONTRAST
-COLOUR
- LANGUAGE (e.g. ENGLISH)
-RESET
Use the navigation keys ▲▼ 29 on the second monitor B to select the desired setting. The selected setting is indicated by the red typeface with the hand icon in front of it.
Use the navigation keys ▶ ⑲ on the second monitor B to change settings. It is not necessary to confirm the entries. The Setup menu disappears after a short time and the entries are automatically saved.
NOTE
The Setup menu has its own language management. If you have selected an OSD language in the "General Setup" menu, it will not be used for this menu.
▶ Set the desired language in the menu item Language. You can choose between Czech, Dutch, English, French, Slovak, Polish and German.
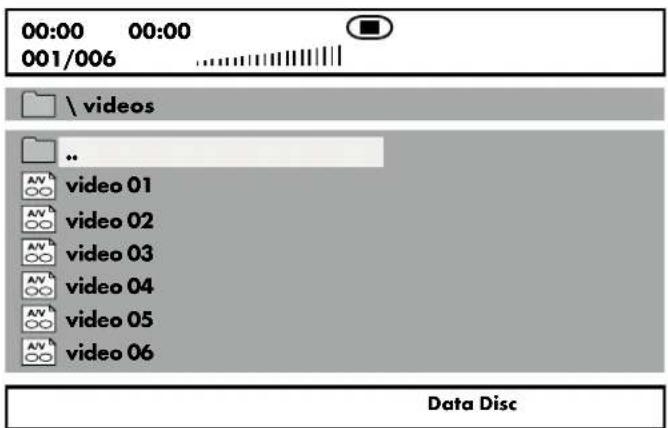
Playback of JPEG/MP3/MPEG4 files
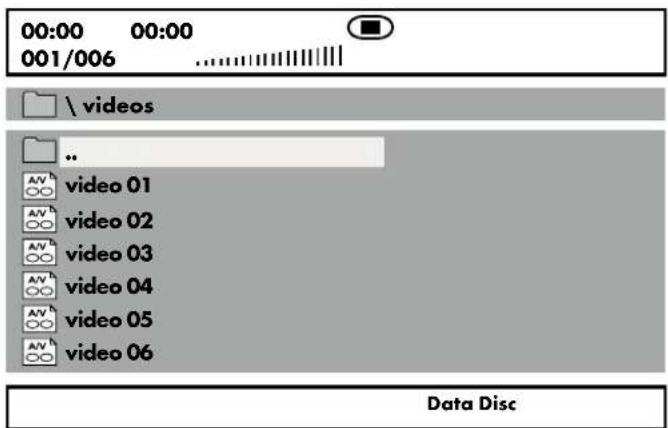
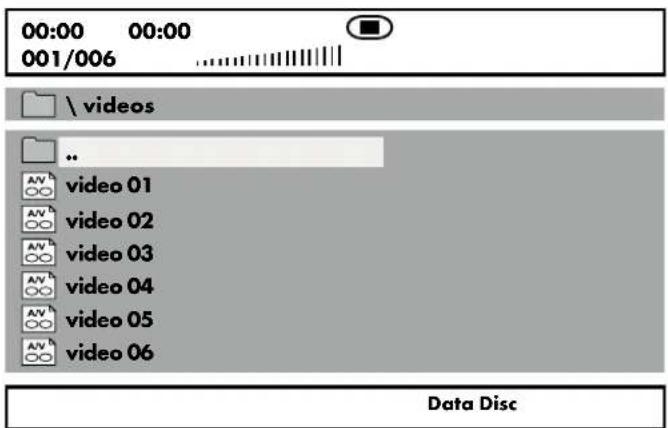
Insert a storage medium into the DVD player A. When using a memory card or USB flash drive, press the SOURCE button 38 repeatedly until the desired playback source is displayed. The contents of the data medium (CD, DVD, USB flash drive or memory card) are displayed on the screen:


Displaying MP3 files


Resolution 1600 x 1200
Data Disc
Displaying JPEG files
Displaying AVI and MPEG files
◆ The files are listed on the left (file window). Folders are displayed with the icon.
To display folders on the storage medium, press the PROGRAM button ⑤3 until the "Folder" display appears on the information bar at the bottom.
- To open a folder, select the folder and press ENTER ⑤6. The contents of the folder are displayed.
- To move up one folder level, select the 📄 .. icon and press ENTER ⑤6.
Press the PROGRAM button ⑤3 again until the display "Filelist" appears at the bottom of the information list. The folders are now hidden and all the files on the storage medium are displayed in a list.
The area on the right is intended for previewing JPEG images. A preview appears when you highlight a JPEG file in the File pane.
At the bottom is the information bar that displays the image size (JPEG images) and the medium (DISC, USB or SD) on which the files are stored.
Select a file using the navigation keys▲▼ 58. Press ENTER 56 to confirm your selection. The file is played back or the JPEG photo is displayed.
Playback of JPEG files
◆ Highlight an image with the navigation keys▲▼ 58 and press ENTER 56 or PLAY/PAUSE▶II 45 to open the image. The image is displayed on the screen. The view then changes to the next image on the disc or in the folder.
To display the currently displayed image longer, press PLAY/PAUSE▶II ④5.
◆ To resume playback, press PLAY/PAUS▶II ④5 again.
You can display an image directly by entering the file number of the image using the numbers on the numeric keypad ⑤5 and confirming your selection with ENTER ⑤6.
You can use the navigation keys 58 to rotate the image in 90° increments during playback.
Use the navigation keys ▲▼ ⑤8 to flip the image horizontally or vertically during playback.
During playback, press the STOP button ⑤9 to display a thumbnail preview of all images in the folder or on the disc. Each page displays 12 thumbnails.
Select an image with the navigation keys ▶ ▲ ▼ ⑤8 and start playback with ENTER ⑤6 or PLAY/PAUSE ▶ || ④5.
Use the navigation keys ▶ ▲ ▼ 58 to select one of the following entries from the bottom of the menu and confirm with ENTER 56.
Slide Show: Starts a slide show of the images in the folder or on the disc.
Menu: Displays available button functions for JPEG playback. Press ENTER 56 until this overview is hidden.
Previous: Goes back to the previous page
Next: Goes to the next page
◆ Press the MENU button⑥2 to return to the file list
Select slide show transitions:
You can select different transitions to switch from one image to the next.
During the slide show, press the PROGRAM button ⑤ until the name of the desired transition appears in the upper left corner of the screen.
Troubleshooting
No function in battery mode
- The built-in battery may be discharged. Connect the mains adapter ⑥9 or the car adapter ⑦0 and charge the battery.
Display shows "No Disc" despite the fact that a disc has been inserted
- Check whether the disc has been inserted with the label side facing up.
- The disc is dirty, scratched or damaged. Clean the disc or insert a different disc.
The remote control does not work
- Check that the batteries have been inserted into the battery compartment of the remote control [C] the right way round (check the polarity).
- Check whether the batteries of the remote control are discharged and replace both batteries if necessary.
- Make sure that there are no obstacles between the remote control and sensor ⑲ of the DVD player .
- Reduce the distance between the remote control C and the DVD player A (max. 5 m).
No image on the second monitor
-Check that all connecting cables between the DVD player A and the second monitor B are firmly plugged into the appropriate sockets.
-Check whether the second monitor B is switched on (ON/OFF switch 22) is in the ON position).
- Check whether the screen ^23 of the second monitor B is switched on (press the TFT OFF button ^30 ).
No sound
-Check to see if the DVD player is muted.
-Check to see if the main volume control⑨ is set to minimum.
Cleaning
DANGER
Risk of fatal injury from electrocution!
▶ Disconnect the device from the power supply before you start cleaning.
CAUTION
Damage to the device!
▶ To avoid irreparable damage to the device, ensure that no moisture can get into the device during cleaning.
▶ Do not use any caustic, abrasive or solvent-based cleaning agents. They can damage the screen and the surfaces of the device.
In general, the laser unit does not require cleaning. We do not recommend the use of cleaning media.
- Clean the housing and the screerof the device with a soft, dry cloth.
- We recommend using a commercially available screen cleaner for cleaning the screen.
Storage when not in use
If you do not intend to use the device for an extended period of time, disconnect it from the mains power supply and store it in a clean, dry place, away from direct sunlight. For protection against dirt, we recommend storage in the supplied carrying bag ⑦2.
◆ Recharge the battery of the DVD playerA periodically to ensure a long battery life.
If you are not going to be using the remote control IC for an extended period, remove the batteries to prevent leakage.
Disposal
Applies only to France:

The product, its packaging and the operating instructions are recyclable. They are subject to an extended manufacturer responsibility and will be collected separately.
Disposal of the appliance
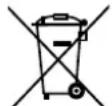
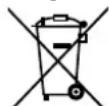
The adjacent symbol of a crossed-out dustbin means that this appliance is subject to Directive 2012/19/EU. This directive states that this appliance may not be disposed of in the normal household waste at the end of its useful life, but must be taken to specially set-up collection locations, recycling depots or disposal companies.
The disposal is free of charge for the user. Protect the environment and dispose of this appliance properly.
If your old appliance has stored any personal data, you are responsible for deleting it yourself before returning it.
If it is possible to do so without destroying the old appliance, remove the old batteries or rechargeable batteries and lamps before returning the appliance for disposal and take them to a separate collection point. In the case of permanently installed rechargeable batteries, you must indicate during disposal that the appliance contains a battery.
The integrated rechargeable battery in this appliance cannot be removed for disposal.

Your local community or municipal authorities can provide information on how to dispose of the worn-out product.
Disposal of the packaging

The packaging materials have been selected for their environmental friendliness and ease of disposal and are therefore recyclable. Dispose of packaging materials that are no longer needed in accordance with applicable local regulations.
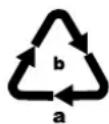
Dispose of the packaging in an environmentally friendly manner. Note the labelling on the packaging and separate the packaging material components for disposal, if necessary. The packaging material is labelled with abbreviations (a) and numbers (b) with the following meanings: 1–7: plastics, 20–22: paper and cardboard, 80–98: composites.
Disposal of batteries
Batteries/rechargeable batteries must be treated as hazardous waste and must therefore be disposed of in an environmentally sound manner by appropriate bodies (dealers, specialist dealers, public municipal bodies, commercial disposal companies). Batteries/rechargeable batteries may contain toxic heavy metals.
The heavy metals contained are identified by letters below the symbol: Cd = cadmium, Hg = mercury, Pb = lead.
For this reason, do not dispose of batteries/rechargeable batteries in domestic waste. Take them to a specialist collection point.
Only return batteries that are fully discharged.
Attachment
Technical data
| DVD PLAYER | |
| Input voltage/current 12 V | === (direct current) / 1.5 A |
| Output voltage/current 12 V | === (direct current) / 0.5 A |
| Power consumption Max. 6 W | |
| Integrated battery (lithium-ion) | 7.4 V / 1800 mAh (13.32 Wh) |
| Screen size (diagonal) 22.7 cm (9") | |
| Display resolution 800 | × 480 pixels |
| Video resolution Max. 720 | × 576 pixels |
| Supported region codes | |
| Supported storage media/formats | USB, SD, MMC, DVD±R, DVD±RW, CD-R, CD-RW, VCD, SVCD, CD-Audio, MP3, MPEG1, MPEG2, AVI, XVID, JPEG |
| USB port 2.0 | |
| USB file system FAT/FAT 32 | |
| USB capacity 2-32 GB | |
| SD/MMC file system FAT/FAT | 32 |
| SD/MMC capacity 2-32 GB | |
| Audio/video output 3.5 mm jack socket | |
| Headphone jack | 3.5 mm jack socket |
| Max. output voltage headphone jack | 150 mV |
| Operating temperature | 0°C to 40°C |
| Storage temperature | -5°C to 45°C |
| Humidity (no condensation) | ≤ 75% |
| Dimensions (W × H × D) | approx. 23 × 17.6 × 3.9 cm |
| Weight | approx. 730 g |
| SECOND MONITOR | |
| Input voltage/current 12 V | === (direct current) / 0.5 A |
| Power consumption Max. 6 W | |
| Screen size (diagonal) 22.7 cm | (9") |
| SECOND MONITOR | |
| Display resolution 800 | ×480 pixels |
| Video resolution Max. 720 | ×576 pixels |
| Audio/video input | 3.5 mm jack socket |
| Headphone jack | 3.5 mm jack socket |
| Operating temperature | 0°C to 40°C |
| Storage temperature | -5°C to 45°C |
| Humidity(no condensation) | ≤75% |
| Dimensions (W x H x D) | approx. 23 × 17.5 × 2.4 cm |
| Weight | approx. 370 g |
| REMOTE CONTROL | |
| Model | SPDP 18 A1 |
| Operating voltage | 2 × 1.5 V batteries(type AAA/Micro) |
| HEADPHONES | |
| Model | SPDP 18 A1 |
| Wide band characteristic voltage (SPCV) | 130 mV ± 10% |
| CAR ADAPTER | |
| Model | SPDP 18 A1 |
| Input voltage/current 12 V | (direct current) / 2 A |
| Output voltage/current 12 V | (direct current) / 1.5 A |
| Fuse | T 2A L 250 V |
| Polarity of the coaxial power connector | (positive inside, negative outside) |
| MAINS ADAPTER | |
| Manufacturer | Shenzhen TEKA Technology Co., Ltd. Building A, No. 21, Xi Fu Road, Red Star Community, Song Gang Street, Baoan District, Shenzhen, Guangdong Province, 518105, P.R. China Commercial register number: 914403007703151648 |
| Importer: KOMPERNASS HANDELS GMBH, BURGSTRASSE 21, 44867 BOCHUM, GERMANY Register court: AG Bochum Register number: HRB 4598 | |
| Model TEKA018-1201500EU | |
| Input voltage 100-240 V ~ (alternating current) | |
| Input AC frequency 50/60 Hz | |
| Output voltage 12.0 V | (direct current) |
| Output current 1,5 A | |
| Output power 18.0 W | |
| Average operating efficiency 86.7 % | |
| Low load efficiency (10%) 80.5 % | |
| No-load power consumption 0.07 W | |
| Input current 0.5 A max. | |
| Polarity | - - |
| Protection class | II/ (double insulation) |
| Efficiency class | 6 |
This appliance has a 3-year warranty valid from the date of purchase. If this product has any faults, you, the buyer, have certain statutory rights. Your statutory rights are not restricted in any way by the warranty described below.
Warranty conditions
The warranty period starts on the date of purchase. Please keep your receipt in a safe place. This will be required as proof of purchase.
If any material or manufacturing fault occurs within three years of the date of purchase of the product, we will either repair or replace the product for you or refund the purchase price (at our discretion). This warranty service requires that you present the defective appliance and the proof of purchase (receipt) within the three-year warranty period, along with a brief written description of the fault and of when it occurred.
If the defect is covered by the warranty, your product will either be repaired or replaced by us. The repair or replacement of a product does not signify the beginning of a new warranty period.
Warranty period and statutory claims for defects
The warranty period is not prolonged by repairs effected under the warranty. This also applies to replaced and repaired components. Any damage and defects present at the time of purchase must be reported immediately after unpacking. Repairs carried out after expiry of the warranty period shall be subject to a fee.
Scope of the warranty
This appliance has been manufactured in accordance with strict quality guidelines and inspected meticulously prior to delivery.
The warranty covers material faults or production faults. The warranty does not extend to product parts subject to normal wear and tear or to fragile parts which could be considered as consumable parts such as switches, batteries or parts made of glass.
The warranty does not apply if the product has been damaged, improperly used or improperly maintained. The directions in the operating instructions for the product regarding proper use of the product are to be strictly followed. Uses and actions that are discouraged in the operating instructions or which are warned against must be avoided.
This product is intended solely for private use and not for commercial purposes. The warranty shall be deemed void in cases of misuse or improper handling, use of force and modifications / repairs which have not been carried out by one of our authorised Service centres.
Warranty claim procedure
To ensure quick processing of your case, please observe the following instructions:
■ Please have the till receipt and the item number (IAN) 411102_2204 available as proof of purchase.
- You will find the item number on the type plate on the product, an engraving on the product, on the front page of the operating instructions (below left) or on the sticker on the rear or bottom of the product.
If functional or other defects occur, please contact the service department listed either by telephone or by e-mail.
■ You can return a defective product to us free of charge to the service address that will be provided to you. Ensure that you enclose the proof of purchase (till receipt) and information about what the defect is and when it occurred.

You can download these instructions along with many other manuals, product videos and installation software at www.lidl-service.com.
This QR code will take you directly to the Lidl service page (www.lidl-service.com) where you can open your operating instructions by entering the item number (IAN) 411102_2204.
Service
GB Service Great Britain
Tel.: 0800 404 7657
E-Mail: kompernass@lidl.co.uk
IE Servicelreland
Tel.: 1800 101010
E-Mail: kompernass@lidl.ie
IAN 411102_2204
Importer
Please note that the following address is not the service address.
Please use the service address provided in the operating instructions.
KOMPERNASS HANDELS GMBH
BURGSTRASSE 21
44867 BOCHUM
GERMANY
www.kompernass.com
Inhaltsverzeichnis
Einleitung......
natural_image
Line drawing of a tablet device showing internal components and a mounted lens assembly (no text or symbols)SILVERCREST®
natural_image
Technical line drawing of a mechanical assembly with clamps and a curved base (no text or symbols)natural_image
Technical line drawing of a device with attached cable and connector (no text or symbols)natural_image
Line drawing of a device being inserted into a device, showing cable and connector (no text or symbols)natural_image
Technical line drawing of a mechanical assembly with rotating components (no text or symbols)natural_image
Technical line drawing showing cable fastening and mounting mechanism (no text or symbols)natural_image
Technical line drawing showing cable being inserted into a device (no text or symbols present)KOMPERNASS HANDELS GMBH
BURGSTRASSE 21
44867 BOCHUM
DEUTSCHLAND
www.kompernass.com
Table des matières
Introduction 46
④ Prise DC OUT ⊖ ⊙ ⊕
⑤ Port USB
natural_image
Line drawing of a device's front panel and internal components, showing a scroll wheel and adjustment mechanism (no text or symbols)SILVERCREST®
natural_image
Technical line drawing of a mechanical assembly with no visible text or symbolsnatural_image
Technical line drawing of a device with attached cable and bracket (no text or symbols)natural_image
Diagram showing a device being inserted into a device, with no visible text or symbolsnatural_image
Technical line drawing of a mechanical assembly with rotating components (no text or symbols)natural_image
Technical line drawing showing cable fastening and clamping process (no text or symbols)natural_image
Technical line drawing of a device with cable and connector, showing mechanical assembly (no text or symbols)Resolution 1600 x 1200
Data Disc
KOMPERNASS HANDELS GMBH
BURGSTRASSE 21
44867 BOCHUM
ALLEMAGNE
www.kompernass.com
Inhoud
Inleiding....
natural_image
Line drawing of a device rear panel with a circular adjustment knob and arrow indicating rotation (no text or symbols)SILVERCREST®
natural_image
Technical line drawing of a mechanical assembly with clamps and a curved base (no text or symbols)natural_image
Technical line drawing of a device with cable and connector, no text or symbols presentnatural_image
Line drawing of a device with cable and connector, showing a mechanical assembly (no text or symbols)natural_image
Technical line drawing of a mechanical assembly with rotating components (no text or symbols)natural_image
Technical line drawing showing cable fastening and clamping process (no text or symbols)natural_image
Technical line drawing of a device with cable and connector, showing mechanical assembly (no text or symbols)KOMPERNASS HANDELS GMBH
BURGSTRASSE 21
44867 BOCHUM
DUITSLAND
www.kompernass.com
Obsah
Úvod 92
natural_image
Line drawing of a device's front panel and internal components, showing a scroll wheel and adjustment mechanism (no text or symbols)SILVERCREST®
natural_image
Technical line drawing of a mechanical assembly with no visible text or symbolsnatural_image
Technical line drawing of a device with attached cable and connector (no text or symbols)natural_image
Diagram showing a device being inserted into a device, with no visible text or symbolsnatural_image
Technical line drawing of a mechanical assembly with rotating components (no text or symbols)natural_image
Technical line drawing showing cable fastening and clamping process (no text or symbols)natural_image
Technical line drawing of a device with cable and connector, showing mechanical assembly (no text or symbols)KOMPERNASS HANDELS GMBH
BURGSTRASSE 21
44867 BOCHUM
NĚMECKO
www.kompernass.com
SILVERCREST®
Spis treści
Wstep....114
natural_image
Line drawing of a device rear panel with a circular adjustment knob and scroll wheel (no text or symbols)SILVERCREST®
natural_image
Technical line drawing of a mechanical assembly with clamps and a curved base (no text or symbols)natural_image
Technical line drawing of a device with attached cable and bracket (no text or symbols)natural_image
Line drawing of a device with cable and connector, showing a mechanical assembly (no text or symbols)natural_image
Technical line drawing of a mechanical assembly with rotating components (no text or symbols)natural_image
Technical line drawing showing cable fastening and disassembly steps (no text or symbols)natural_image
Technical line drawing showing cable being inserted into a device (no text or symbols present)- JEZYK (NP. ENGLISH)
-RESET
Resolution 1600 x 1200
Data Disc
KOMPERNASS HANDELS GMBH
BURGSTRASSE 21
44867 BOCHUM
NIEMCY
www.kompernass.com
Obsah
Úvod 136
natural_image
Line drawing of a device rear panel with internal components and a circular adjustment knob (no text or symbols)SILVERCREST®
natural_image
Technical line drawing of a mechanical assembly with clamps and a curved base (no text or symbols)natural_image
Technical line drawing of a mechanical assembly with no visible text or symbolsnatural_image
Line drawing of a device with cable and connector, showing a mechanical assembly (no text or symbols)natural_image
Technical line drawing of a mechanical assembly with rotating components (no text or symbols)natural_image
Technical line drawing showing cable fastening and disassembly steps (no text or symbols)natural_image
Technical line drawing showing cable being inserted into a device (no text or symbols present)Resolution 1600 x 1200
Data Disc
KOMPERNASS HANDELS GMBH
BURGSTRASSE 21 • 44867 BOCHUM
NEMECKO
www.kompernass.com
Índice
Introducción ....
natural_image
Line drawing of a tablet device showing internal components and a close-up view of the screen (no text or symbols)SILVERCREST®
natural_image
Technical line drawing of a mechanical assembly with clamps and a handle (no text or symbols)natural_image
Technical line drawing of a device with attached cable and connector (no text or symbols)natural_image
Line drawing of a device with cable and connector, showing a mechanical assembly (no text or symbols)natural_image
Technical line drawing of a mechanical assembly with rotating components (no text or symbols)natural_image
Technical line drawing showing cable fastening and mounting bracket assembly (no text or symbols)natural_image
Technical line drawing of a device with cable and connector, showing mechanical assembly (no text or symbols)
natural_image
Line drawing of a rose with leaves, no text or symbols presentResolution 1600 x 1200
Data Disc
KOMPERNASS HANDELS GMBH
BURGSTRASSE 21
44867 BOCHUM
ALEMANIA
www.kompernass.com
Indholdsfortegnelse
Indledning 180
natural_image
Line drawing of a device rear panel with a circular adjustment knob and scroll wheel (no text or symbols)SILVERCREST®
natural_image
Technical line drawing of a mechanical assembly with clamps and a curved base (no text or symbols)natural_image
Technical line drawing of a device with attached cable and bracket (no text or symbols)natural_image
Technical line drawing showing a device being inserted into a cable, with no visible text or symbolsnatural_image
Technical line drawing of a mechanical assembly with rotating components (no text or symbols)natural_image
Technical line drawing showing cable fastening and mounting bracket assembly (no text or symbols)natural_image
Technical line drawing of a device with cable and connector, showing mechanical assembly (no text or symbols)
Visning of JPEG-filer

KOMPERNASS HANDELS GMBH
BURGSTRASSE 21
44867 BOCHUM
TYSKLAND
www.kompernass.com
Indice
Introduzione 202
natural_image
Line drawing of a device's internal components, showing a scroll wheel and handle assembly (no text or symbols)SILVERCREST®
natural_image
Technical line drawing of a mechanical assembly with clamps and a curved base (no text or symbols)natural_image
Technical line drawing of a device with attached cable and connector (no text or symbols)natural_image
Line drawing of a device with cable and connector, showing a mechanical assembly (no text or symbols)natural_image
Technical line drawing of a mechanical assembly with rotating components (no text or symbols)natural_image
Technical line drawing showing cable fastening and mounting bracket assembly (no text or symbols)natural_image
Technical line drawing of a device with cable and connector, showing mechanical assembly (no text or symbols)Brightness, Contrast, Hue, Saturation
KOMPERNASS HANDELS GMBH
BURGSTRASSE 21
44867 BOCHUM
GERMANIA
www.kompernass.com
Tartalomjegyzék
Bevezető ......2
natural_image
Line drawing of a device's internal components, including a scroll wheel and mechanical assembly (no text or symbols)SILVERCREST®
natural_image
Technical line drawing of a mechanical assembly with clamps and a curved base (no text or symbols)natural_image
Technical line drawing of a device with attached cable and bracket (no text or symbols)natural_image
Line drawing of a device being inserted into a device, showing cable and connector (no text or symbols)natural_image
Technical line drawing of a mechanical assembly with rotating components (no text or symbols)natural_image
Technical line drawing showing cable fastening and disassembly steps (no text or symbols)natural_image
Technical line drawing showing cable being inserted into a device (no text or symbols present)Resolution 1600 x 1200
Data Disc
Cd = kadmium, Hg = higany, Pb = ólom.
KOMPERNASS HANDELS GMBH
BURGSTRASSE 21
44867 BOCHUM
NÉMETORSZÁG
www.kompernass.com
Kazalo
Uvod 246
Informacije o teh navodilih za uporabo 246
Opombe k blagovnim znamkam 246
Predvidena uporaba....246
Varnostna opozorila in simboli v teh navodilih 246
Varna uporaba 247
Osnovna varnostna navodila 247
Deli in upravljalni elementi 249
Začetek uporabe 250
Preverjanje obsega dobave 250
③7 Tipka DISPLAY ON/OFF
③8 Tipka SOURCE
⑲ Tipka GOTO
④0 Tipka SUBTITLE
④1 Tipka
④2 Tipka
④3 Tipka VOL +
④ Tipka VOL -
④5 Tipka ▶II
④6 Tipka AUDIO
④7 Tipka MUTE
④8 Tipka REPEAT
④9 Tipka ANGLE
⑤0 Tipka A-B
⑤1 Tipka DISPLAY
⑤2 Tipka ZOOM
⑤3 Tipka PROGRAM
⑤4 Predalček za baterije (hrbtna stran)
natural_image
Line drawing of a device's front panel and internal components, showing a scroll wheel and connector (no text or symbols)SILVERCREST®
natural_image
Technical line drawing of a mechanical assembly with clamps and a handle (no text or symbols)natural_image
Technical line drawing of a device with attached cable and connector (no text or symbols)natural_image
Line drawing of a device with cable and connector, showing a mechanical assembly (no text or symbols)♦ Odvijte stranski vijak na kotnem nosilcu in nastavite želeni kot nagiba DVD-predvajalnika [A].
Zavarujte položaj tako, da znova privijete stranski vijak.

natural_image
Technical line drawing of a mechanical assembly with rotating components (no text or symbols)natural_image
Technical line drawing showing cable fastening and clamping process (no text or symbols)natural_image
Technical line drawing of a device with cable and connector, showing mechanical assembly (no text or symbols)Prikaz datotek JPEG
Prikaz datotek AVI in MPEG
♦ Levo so navedene datoteke (okno datoteke). Mape so prikazane s simbolom.
Za prikaz map, shranjenih na pomnilniškem mediju, držite pritisnje- no tipko PROGRAM ⑤3, dokler se spodaj v informacijski vrstici ne prikaže »Mapa«.
KOMPERNASS HANDELS GMBH
BURGSTRASSE 21
44867 BOCHUM
NEMČIJA
www.kompernass.com
Pooblaščeni serviser
SI ServisSlovenija
Tel.: 080 080 917
E-Mail: kompernass@lidl.si
IAN 411102_2204
Garancijski list
③7 Tipka DISPLAY ON/OFF
③8 Tipka SOURCE
⑲ Tipka GOTO
④0 Tipka SUBTITLE
④1 Tipka
④2 Tipka
④3 Tipka VOL +
④ Tipka VOL -
④5 Tipka ▶ II
④6 Tipka AUDIO
④7 Tipka MUTE
④8 Tipka REPEAT
④9 Tipka ANGLE
⑤0 Tipka A-B
⑤1 Tipka DISPLAY
⑤2 Tipka ZOOM
⑤3 Tipka PROGRAM
⑤4 Pretinac za baterije (pozadina)
⑤5 Polje s brojčanim tipkama
⑤6 Tipka ENTER
⑤7 Tipka SETUP
⑤8 Navigacijske tipke ◀▶ ▲▼
⑤9 Tipka STOP
⑥0 Tipka
⑥1 Tipka
⑥2 Tipka MENU
⑥3 Tipka TITLE
Slika D: Pribor
⑥4 AV kabel
⑥5 AV-/DC kabel
⑥6 Slušalice (2x)
⑥7 Nosač za naslon za glavu (2x)
natural_image
Line drawing of a tablet device showing internal components and a close-up view of the screen (no text or symbols)SILVERCREST®
- Izvadite četiri vijka iz kopče nosača za naslon za glavu pomoću križnog odvijača.
Postavite kopču nosača za naslon za glavu oko šipki naslona za glavu i čvrsto pritegnite četiri vijka.
NAPOMENA
▶ Ovisno o promjeru šipki naslona za glavu koristite ili unaprijed montirane vijke ili produžene vijke za pričvršćivanje ⑥8 priložene u opsegu isporuke.

natural_image
Technical line drawing of a mechanical assembly with clamps and a curved base (no text or symbols)♦ Traku za pričvršćivanje⑦3 provucite kroz nosače na stražnjoj strani DVD uređaja A.
natural_image
Technical line drawing of a device with cable and connector (no text or symbols)Zatim pritisnite kutni nosač u sjedište kopče sve dok potpuno ne ulegne. Provjerite čvrsto nasjedanje kutnog nosača i DVD uređaja A.
natural_image
Line drawing of a device with cable and connector, showing a mechanical assembly (no text or symbols)♦ Otpustite bočni vijak na kutnom nosaču i postavite željeni kut nagiba DVD uredaja [A].
♦ Osigurajte položaj pritezanjem bočnog vijka.
natural_image
Technical line drawing of a mechanical assembly with rotating components (no text or symbols)natural_image
Technical line drawing showing cable fastening and mounting bracket assembly (no text or symbols)Da biste uklonili traku za pričvršćivanje ^73 sa šipki naslona za glavu, otpustite je iz kopče za traku. Ako traku za pričvršćivanje ^73 želite potpuno skinuti s DVD uređaja, izvucite je iz nosača na stražnjoj strani DVD uređaja A.
Kako biste skinuli kutni nosač s kopče, pritisnite gumbe za otpuštanje s desne i lijeve strane kutnog nosača i istodobno ga izvucite.
natural_image
Technical line drawing of a device with cable and connector, showing mechanical assembly (no text or symbols)♦ Sada na isti način pričvrstite sekundarni zaslonB na drugi naslon za glavu.
Rukovanje i rad
Prikaz JPEG datoteka
Prikaz AVI i MPEG datoteka
♦ Datoteke su navedene s lijeve strane (prozor s datotekama). Mape su označene simbolom.
Za prikaz postojećih mapa na mediju za pohranu pritisnite tipku PROGRAM ⑤3, sve dok se u dolje u traci s informacijama ne prikaže „Mapa”.
- Kako biste otvorili mapu, odaberite mapu i pritisnite tipku ENTER ⑤6. Ispisuje se sadržaj mape.
- Kako biste se pomaknuli jednu razinu mape naviše, odaberite simbol .. i pritisnite tipku ENTER 56.
KOMPERNASS HANDELS GMBH
BURGSTRASSE 21
44867 BOCHUM
NJEMAČKA
www.kompernass.com
Cuprins
Introducere....290
⑰ Tasta SETUP (SETĂRI)
⑱ Tasta SOURCE (SURSĂ)
③7 Tasta DISPLAY ON/OFF
③8 Tasta SOURCE (SURSĂ)
⑲ Tasta GOTO
④0 Tasta SUBTITLE (SUBTITRARE)
④1 Tasta
④2 Tasta
④3 Tasta VOL+
④7 Tasta VOL-
④5 Tasta ▶ II
④6 Tasta AUDIO
④7 Tasta MUTE
④8 Tasta REPEAT (REPETĂ)
④9 Tasta ANGLE (UNGHI)
⑤0 Tasta A-B
⑤1 Tasta DISPLAY
⑤2 Tasta ZOOM
⑤3 Tasta PROGRAM
⑤7 Tasta SETUP (SETĂRI)
⑤8 Tasta de navigare ◀▶ ▲▼
⑤9 Tasta STOP
⑥0 Tasta▶▶
⑥1 Tasta
⑥2 Tasta MENU (MENIU)
⑥3 Tasta TITLE (TITLU)
Figura D: Accesorii
⑥4 Cablu AV
⑥5 Cablu AV/DC
⑥6 Căști intraauriculare (2x)
natural_image
Line drawing of a device rear panel with a magnifying glass and adjustment knob (no text or symbols)SILVERCREST®
natural_image
Technical line drawing of a mechanical assembly with clamps and a curved base (no text or symbols)natural_image
Technical line drawing of a device with attached cable and connector (no text or symbols)natural_image
Line drawing of a device with cable and connector, showing a mechanical assembly (no text or symbols)natural_image
Technical line drawing of a mechanical assembly with rotating components (no text or symbols)natural_image
Technical line drawing showing cable fastening and clamping mechanism (no text or symbols)natural_image
Technical line drawing of a device with attached cable and connector (no text or symbols)KOMPERNASS HANDELS GMBH
BURGSTRASSE 21
44867 BOCHUM
GERMANIA
www.kompernass.com
Съдържание
Въведение .... 312
natural_image
Line drawing of a tablet device showing internal components and a close-up view of the screen (no text or symbols)SILVERCREST®
natural_image
Technical line drawing of a mechanical assembly with no visible text or symbolsnatural_image
Technical line drawing of a device with attached cable and connector (no text or symbols)natural_image
Line drawing of a device being inserted into a device, showing cable and connector (no text or symbols)natural_image
Technical line drawing of a mechanical assembly with rotating components (no text or symbols)natural_image
Technical line drawing showing cable fastening and mounting bracket assembly (no text or symbols)natural_image
Technical line drawing showing a device with cable and connector, no text or symbols presentnatural_image
Line drawing of a device rear panel with a circular adjustment knob and mechanical bracket (no text or symbols)SILVERCREST®
natural_image
Technical line drawing of a mechanical assembly with no visible text or symbolsnatural_image
Technical line drawing of a device with attached cable and connector (no text or symbols)natural_image
Line drawing of a device with cable and connector, showing a mechanical assembly (no text or symbols)natural_image
Technical line drawing of a mechanical assembly with rotating components (no text or symbols)natural_image
Technical line drawing showing cable fastening and mounting bracket assembly (no text or symbols)natural_image
Technical diagram showing a device with cable and connector, no text or symbols presentKOMPERNASS HANDELS GMBH
BURGSTRASSE 21 • 44867 BOCHUM
ГЕРMANIA
www.kompernass.com

KOMPERNASS HANDELS GMBH
BURGSTRASSE 21
44867 BOCHUM
GERMANY
www.kompernass.com
Last Information Update · Stand der Informationen · Version des informations · Stand van de informatie · Stav informaci Stan informaci · Stav informacií · Estado de las informaciones · Tilstand af information · Versione delle informazioni Informaciók állása · Stanje informacij · Stanje informacija · Versiunea informațiilor · Актуалност на информацията 'Ekdoşn twn πληροφοριών: 11/2022 · Ident.-No.: SPDP18A1-092022-2
IAN 411102_2204
8