
KH 6524 - DVD player SILVERCREST - Free user manual and instructions
Find the device manual for free KH 6524 SILVERCREST in PDF.

| Product type | DVD player |
| Brand | SILVERCREST |
| Model | KH 6524 |
| Dimensions (W x D x H) | 430 x 250 x 40 mm |
| Weight | 1.4 kg |
| Power supply | 220-240 V ~ 50/60 Hz |
| Power consumption | 12 W (standby < 1 W) |
| Compatible disc formats | DVD, DVD±R/RW, CD, CD-R/RW |
| Supported file formats | MP3, JPEG, DivX, Xvid |
| Maximum video resolution | 1080p (via HDMI) |
| Video outputs | HDMI, composite (RCA), component (YUV) |
| Audio outputs | HDMI, digital coaxial audio, analog audio (RCA stereo) |
| Main functions | Play, pause, stop, fast forward/rewind, title/chapter skip, zoom, camera angle, subtitles, audio languages |
| OSD settings | Language, display format, parental control, screen saver, position memory |
| Maintenance and cleaning | Clean with a soft, dry cloth. Do not use solvents. Clean the lens with an appropriate kit. |
| Safety | Do not expose to moisture, liquids, or excessive heat. Unplug before cleaning. |
| Spare parts and repairability | Remote control, audio/video cable, power adapter (internal). Repair only by an authorized professional. |
| General information | User manual available for download as PDF at notice-facile.com |
Frequently Asked Questions - KH 6524 SILVERCREST
User questions about KH 6524 SILVERCREST
0 question about this device. Answer the ones you know or ask your own.
Ask a new question about this device
Download the instructions for your DVD player in PDF format for free! Find your manual KH 6524 - SILVERCREST and take your electronic device back in hand. On this page are published all the documents necessary for the use of your device. KH 6524 by SILVERCREST.
USER MANUAL KH 6524 SILVERCREST
GB DVD Player
CY Operating instructions
BG DVD nneynbp
PbKOBOcTBo 3a eKcnnoatauia
GR DVD-Player
Cy Osnnyiec xphong

INDEX
PAGE
- Technical Data 2
- Intended use 2
- Package contents 2
- Operating components 2
- Setting up of the DVD player 3
- Safety instructions 3
- Remote control 4
7.1 Inserting the batteries 4
7.2 Using the remote control 4
7.3 Replacing the batteries 4
- Connecting the DVD player to a television 4
8.1 Connecting to a television via ScartCable/RGB 5
8.2 Connecting to a television via S-Video 5
8.3 Connection to a television via video input (Composite Video) 5
8.4 Connecting via component signal (YPbPr/YUV) 5
8.5 Connecting to a television via HDMI 6
- Connecting audio components to the DVD player 6
9.1 Requirements for the connection of a HiFi system 6
9.2 Connecting digital audio components via digital cables 6
9.3 Connecting audio components via an analogue cable 7
9.4 Connecting the headphones 7
- OSD menu settings 8
10.1 Using the OSD Menu 8
10.2 Setup menu GENERAL 8
10.3 Setup menu AUDIO 9
10.4 Setup menu DOLBY 10
10.5 Setup menuVIDEO 10
10.6 Setup menu PREFERENCE 11
- Initial operation of the DVD player 12
11.1 Switching the DVD player on/off 12
11.2 Inserting the DVD 12
11.3 Inserting memory cards/USB memory sticks with MP3/WMA/ MPEG4/JPEG data. 12
11.4 Removing memory cards/USB memory sticks 13
- Playing back DVDs, VCDs or S-VCDs 13
12.1 Features during playback of a DVD, VCD or S-VCD 14 - Playback of JPEG-Photo CD/WMA/MP3/MPEG4 18
- CD Ripping function 19
- Cleaning of the DVD player 19
- Disposal 19
- Troubleshooting 20
- Glossary / Key Word Index 21
19.Warranty and Service 22
20.Importer 22
This documentation is copyright protected.
Any duplication and/or reproduction, wholly or partially including extracts as well as the reproducing of illustrations also in modified form is only permitted with written agreement from the manufacturer.
1. Technical Data
This device conforms regarding compliance to the basic requirements and other relevant provisions of the low-voltage directive 2006/95/EC, the EMV directive 2004/108/EC as well as the Ecological design directive 2009/125/EC (Ordinance 1275/2008) Supplement II, Number 1).
| Power supply: | AC 220 V - 240 V ~ 50 Hz |
| Power consumption: | max. 20 Watt |
| Power consumption: | |
| Standby: | < 1 W |
| Protection class: | II / ☑ |
| TV standard: | PAL/NTSC |
| Operating temperature: | +5 ~ +40°C |
| Humidity: | 5 ~ 90% (no condensation) |
| Measurements | |
| (L x W x H): | 22,3 x 43 x 4,5 cm |
| Weight : | 1,65 kg approx. |
| Laser class: | 1 |
| Video Output | |
| Format: | 4:3 / 16:9 |
| Decoder: | MPEG 2 |
| D/A converter: | 12 Bit |
| Audio Output | |
| Decoder: | MPEG Dolby Digital (AC-3) |
| DTS only possible with additional external decoder | |
| D/A converter: | 24 Bit / 96 kHz |
| USB port | |
| Readable | |
| USB memory sticks: | USB1.1 and 2.0 up to a capacity of 4 GB |
| Max. current output: | 100 mA |
| Memory card slot | |
| Readable memory cards: | SD (2 GB no SDHC), MS/MSPro (4 GB), MMC (4 GB) |
| Headphones output | |
| Jackplug: | 3,5 mm |
| Maximum | |
| output voltage: | 130 mV |
Playable mediums/formats
| VIDEO: | DVD, DVD+R, DVD+RW, DVD-R, DVD-RW, DVD-R DL, DVD+R DL, VCD, S-VCD |
| Audio: | CD, CD-R, CD-RW, Audio-DVD, MP3, WMA, OGG Vorbis |
| Additional formats: | AVI, MPEG 4, Xvid, JPEG (Foto-CD) |
| Regional code: | 2 or 0 |
2. Intended use
The SilverCrest KH 6524/25 DVD player is intended exclusively for stationary use in enclosed spaces. The device is intended exclusively for private, non-commercial use.
The device is intended for use as a home entertainment device.
No liability/warranty will be accepted for damages that result from improper use of the device or from unauthorized reconstruction!
3. Package contents
DVD Player
Infrared remote control
- 2 Batteries for remote control, type AAA/ (Micro cells)
RGBScart cable
Audio/Video RCA Cinch cable
HDMI cable
- Operating manual
4. Operating components
A. DVD player front panel
1 Disc tray
Display (with standby LED and IR sensor for remote control)
OPEN/CLOSE button
4 PLAY/PAUSE button
STOP button
6 STANDBY button
7 Headphones output for 3,5 mm jackplug
USB port
9 Memory card slot for SD/MMC/MS and MSPro cards
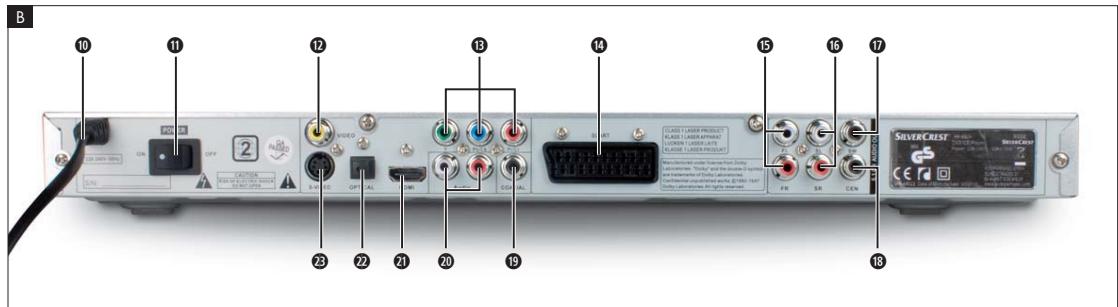
B. DVD player rear panel
10 Power cable
1 POWER switch
12VIDEO:Composite video output
B Y, U/Ph, V/Pr: Component video outputs
14 SCART:Scart/RGB output
FL/FR: Output for front, left and right audio channels
16 SL/SR: Output for rear, left and right audio channels
SW: Output for bass audio channel
CEN: Output for front and centre audio channels
19 COAXIAL: Coaxial audio output
20 AUDIO L/R: Left and right audio outputs
21HDMI:HDMI output
2 OPTICAL: optical digital audio output
S-VIDEO: S-Video output
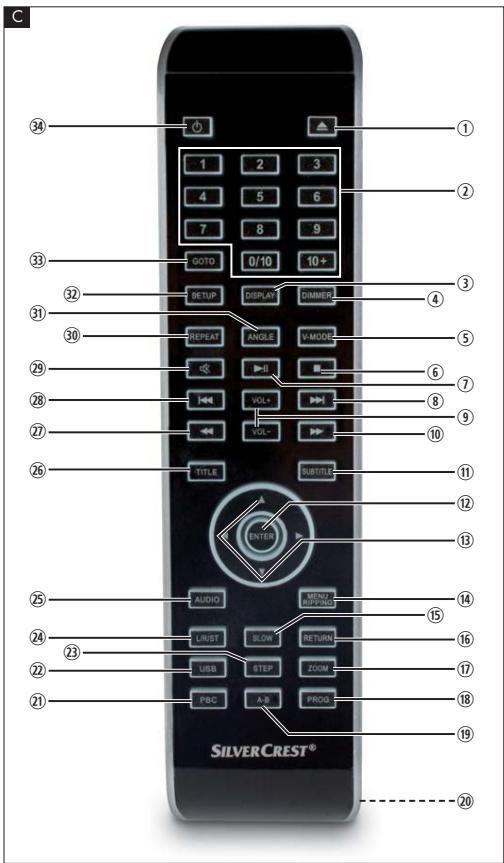
C. Remote control
① OPEN/CLOSE ▲: Open/Close the disc tray
② Number buttons
③ DISPLAY: Superimpose disc information
④ DIMMER: Adjust the display brightness
⑤ V-MODE: Set the video output
⑥ STOP■:Stopplayback
⑦ PLAY/PAUSE II: Start/Suspend playback
⑧ SKIP FWD Chapter skip forwards
9 VOL+/: Raise/lower the sound level
10 FAST FWD:Fast search forward
11 SUBTITLE: Set the subtitle
⑫ ENTER: Confirm input
13 Control buttons
14 MENU/RIPPING: Access disc menu/ripping function
SLOW: Slow motion function
16 RETURN: Set the playback mode
⑰ ZOOM: Set the image enlargement
PROG: Access the programme function
19 A-B: Repeat sequence
20 Battery compartment (on the rear panel)
21 PBC: PBC function activate/deactivate (VCD, SVCD only)
22 USB: Change between disc playback and USB/card playback
STEP: Individual frame playback
24 L/R/ST: Set the audio channel
25 AUDIO: Set the audio language
26 TITLE: Access the title menu
FAST RWD: Fast search backwards
28 SKIP BWD Chapter skip backwards
29 MUTE : Switch the sound on/off
30 REPEAT: Set the repeat function
③ 1 ANGLE: Change the camera perspective
② SETUP: Access the OSD menu
GOTO:Access titles, chapters and time direct select menus
34 STANDBY : Switch the device to standby mode
5. Setting up of the DVD player
- Carefully remove the DVD player and the supplied accessories from the packing.
- Remove the protective foil from the display.
- Place the DVD player on a flat, even and firm base. Do not subject the device to any external heat or moisture source. Make sure that the device has sufficient ventilation on all sides. Do not place any television directly on top of the DVD player.
Attention!
Do not plug the DVD player into an electrical outlet at this time.
Wait until you have connected the DVD player to a television set.
In the event that you wish to change the type of video or audio connection you must first pull the power plug from the power socket! Otherwise the DVD player and possibly equipment connected to it could become irreparably damaged through voltage peak strikes!
6. Safety instructions
- This device is not intended for use by individuals (including children) with restricted physical, physiological or intellectual abilities or deficiencies in experience and/or knowledge unless they are supervised by a person responsible for their safety or receive from this person instruction in how the device is to be used.
Children should be supervised to ensure that they do not play with the device. - To avoid unintentionally switching on the device pull the power cord from the mains supply after use and before cleaning.
- Check the device and all parts for visible damages. The safety concept can work only if the device is in a faultless condition.
- The power plug must always be easily accessible, so that the device can be quickly disconnected from the mains in the event of an emergency.
Risk of electrical shocks!
- Connect the device only to correctly installed and earthed mains sockets. Ensure that the rating of the local power supply tallies completely with the details given on the rating plate of the device.
- Arrange for defective power plugs and/or cables to be replaced at once by qualified technicians or our Customer Service Department.
- Arrange for customer service to repair or replace connecting cables and/or devices that are not functioning properly or have been damaged.
- Never immerse the device in water. Wipe it only with a slightly damp cloth.
- Do not expose the device to rain and never use it in a humid or wet environment.
- Ensure that the power cable never becomes wet during operation.
- You must not open the housing or repair the device yourself. Should you do so, device safety can no longer be assured and the warranty will become void.
- Protect the device against drip and spray water. Do not place any water-filled vessels (e.g. flower vases) on the device.
Risk of fire!
- Do not use the device in the vicinity of hot surfaces.
- Do not locate the device in places exposed to direct sunlight. If you do, it may overheat and become irreparably damaged.
- Do not leave the device unattended when in use.
- Never cover the ventilation slots of the device while it is being used.
- Do not place any open sources of fire, like candles, on the device.
Injury hazard!
- Keep children away from the connecting cable and the device. Children frequently underestimate the dangers of electrical equipment.
- Ensure that the device stands with a safe and secure positioning.
- Do not operate the device if it has sustained a fall or is damaged. Arrange for the device to be checked and/or repaired by qualified technicians.
- Batteries/ battery cells are potentially fatal if swallowed. Store batteries out of the reach of children. If a battery is swallowed medical assistance must be sought immediately.
- Also, store the packaging foils well away from children. There is a risk of suffocation.
Danger! Laser radiation!
This device is fitted with a „Class 1 Laser".
- Never open the device.
- Never attempt to repair the device.
- There is invisible laser radiation inside the device. Do not expose yourself to the laser beam.
① Note:
Some aggressive furniture finishes can have a destructive influence on the device's rubber feet. If necessary, place the device on a nonslip pad.
Thunderstorms!
Equipment connected to a power supply can be damaged during a thunderstorm. You should therefore always pull the power plug from the power socket when there is a storm.
Notice regarding electrical power surges (EFT / electrical fast transient) and electrostatic discharges:
In the case of malfunction due to an electrical fast transient (power surge) and/or electrostatic discharge, the device must be returned to default settings in order to re-establish normal operation. The power supply may have to be disconnected and then reconnected. The batteries (if present) must be removed and then reinserted.
Notice regarding disconnection from mains-power
The POWER switch does not completely disconnect the device from the power network. Additionally, the device consumes power when in standby-mode. To completely disconnect the device from mains-power, the power plug MUST be removed from the wall socket.
Information regarding the handling of batteries
The remote control is operated by batteries.
For the safe handling of batteries please observe the following safety information:
Danger exists from uses other than those intended!
- Do not throw the batteries into a fire.
- Do not short circuit the batteries.
- Do not attempt to recharge the batteries.
- Regularly check the condition of the battery. Leaking battery acid can cause permanent damage to the device. When handling a damaged or leaking battery special care should be taken. Danger from acid burns! Wear protective gloves.
Clean the battery compartment and the battery contacts with a dry cloth. - Store batteries out of reach of children. When swallowed seek immediate medical attention.
- Remove the batteries from the device if you do not intend to use the device for an extended period of time.
- Never open batteries, never solder or weld batteries.
The risk of explosions and injuries exists!
Attention!
No liability/warranty will be considered for damage to the DVD player caused by the effects of moisture, water penetration or overheating!
7. Remote control
7.1 Inserting the batteries
- Open the battery compartment on the rear of the remote control.
- Place the two supplied batteries type AAA (micro cells) into the battery compartment. Make sure that the batteries are inserted in accordance with the correct polarity.
- Replace the battery compartment cover.
7.2 Using the remote control
In order to guarantee faultless operation when using the remote control...
Always point the remote control, during use, directly at the DVD player
- Make sure that there are no obstructions between the remote control and the DVD player that will hinder reception.
- When using the remote control place yourself not more than 5 metres from the DVD player
otherwise interferences can occur during operation of the DVD player functions with the remote control.
7.3 Replacing the batteries
If the operation of the DVD player via the remote control does not function properly or does not function at all the batteries must be replaced
Always renew all batteries in order to return the remote control to its full performance ability.
8. Connecting the DVD player to a television
After setting up the DVD player, you can now connect it to a television.
The DVD player can be connected to televisions which operate with the PAL and NTSC standards.
If you want to use the DVD player on a television with the NTSC standard you must change the video setting in the DVD players "OSD menu". There PAL is set as the television standard at the factory. Depending on the televisions equipment there are different methods of connecting the DVD player to it, these are explained as follows.
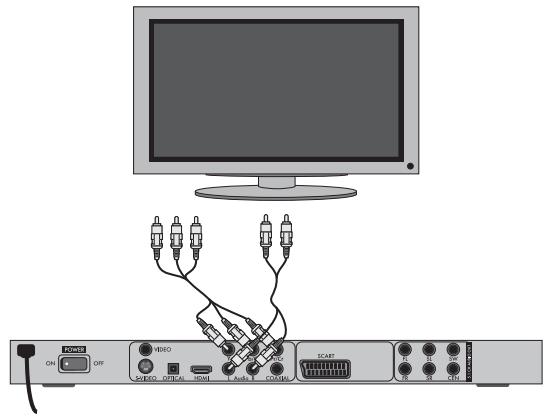
8.1 Connecting to a television via ScartCable/RGB
① Note:
Connecting the DVD player to a television with a Scart cable via the RGB input offers a high quality connection. Select this connection variation in the case of televisions equipped with an RGB input. If you are not sure if the television is equipped with an RGB input then you can check this by consulting the television's instruction manual.
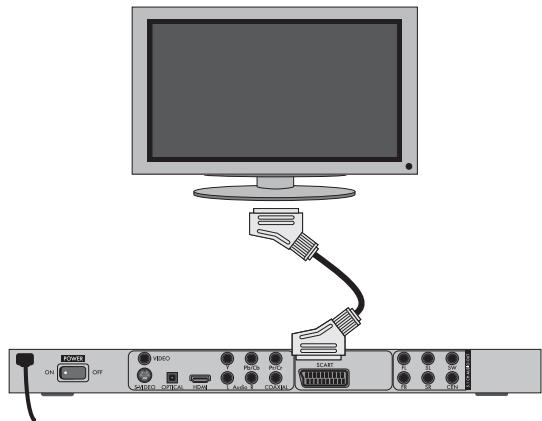
- Connect the jack inscribed with SCART to a television Scart socket by using the supplied Scart cable.
- For playback select the matching channel on your television Check with the television's instruction manual on how you can set the AV channel.
- In the OSD menu select under the VIDEO/VIDEO OUTPUT/RGB or S-VIDEO menus.
The menu option VIDEO OUTPUT is only selectable when the HDMI output is deactivated. On this subject see also chapter 10 "Settings in the OSD menu".
8.2 Connecting to a television via S-Video
① Note:
For this type of connection the television must have available an S-Video input and two audio "IN" cinch sockets. If you are not sure if the television is equipped with S-Video and/or cinch sockets you can check this by consulting the television's instruction manual.
For this connection variant you will need:
- an audio cinch cable (not supplied)
- an S-video cable (not supplied) These can be obtained from your dealer. To connect the DVD player to a television via S-video:

- Connect the jack inscribed with S-VIDEO to a television S-Video socket using an S-Video cable.
-
Connect the audio output sockets AUDIO L/R on the rear panel of the DVD player via an audio cinch cable to the corresponding audio inputs on the television. Make sure that the red and white colour markings correspond.
-
For playback select the matching channel on your television Check with the television's instruction manual on how you can set the AV channel.
- In the OSD menu select the menu option VIDEO/VIDEO OUTPUT/S-VIDEO.
The menu option Video OUTPUT is only selectable when the HDMI output is deactivated. On this subject see also chapter 10 "Settings in the OSD menu".
8.3 Connection to a television via video input (Composite Video)
For this connection variant the television must be equipped with Audio/Video cinch sockets (Composite Video).
In order to connect the DVD player to a television via Composite Video you will need
- an audio/video RCA cinch cable (supplied)
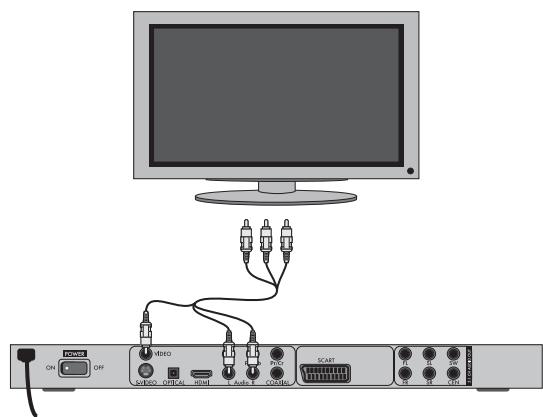
- Connect the yellow marked video socket with the yellow VIDEO socket on the television.
- Connect the audio output sockets AUDIO L/R on the rear panel of the DVD player to the corresponding audio inputs on the television. Make sure that the colour markings yellow, red and white correspond.
- For playback select the matching channel on your television Check with the television's instruction manual on how you can set the AV channel.
- In the OSD menu select the menu option VIDEO/VIDEO OUTPUT/S-VIDEO.
The menu option VIDEO OUTPUT is only selectable when the HDMI output is deactivated. On this subject see also chapter 10 "Settings in the OSD menu".
8.4 Connecting via component signal (YPbPr/YUV)
This connection variant is only possible with very high grade televisions, LCD/Plasma screens or Video projectors.
Check with the instruction manual of the corresponding playback device to see if this connections variant is available. It is possible that additional playback device settings may have to be implemented.
The so called "Component signal" is put out via the YPbPr socket of the DVD player. Component signals are available in the form of the so called "YUV" signal (Half image) as well as in the form of the so called "YPbPr" signal (Full image/Progressive scan).
On this topic, please refer to Section 18. "Glossary / KeyWord Index".
The cable connections are the same in both cases; YPbPr-signal for Progressive Scan however can only be used if the television (or Video projector), to which you want to connect the DVD player, is capable of Progressive Scan. If you are not sure whether the television (or Video projector), to which you want to connect the DVD player is capable of Progressive Scan and has cinch sockets available then you can check this by consulting the television's (or Video projectors's) instruction manual.
For both variations - "YPbPr" and "YUV" - you will need
- an audio cinch cable (not supplied)
- an YUV cable (not supplied) These can be obtained from your dealer.
On the rear panel of the DVD player you will find the connection sockets
Y, Pb/Cb and Pr / Cr
Connecting the DVD player via component signal:
- Connect the sockets Y (green), Pb/Cb (blue) and Pr / Cr (red) with the corresponding sockets on the television.
- Connect the audio output sockets AUDIO L/R on the rear panel of the DVD player to the corresponding audio inputs on the television with an audio cinch cable.
Make sure that the red and white colour markings correspond.
- For playback select the matching channel on your television Check with the television's instruction manual on how you can set the AV channel.
- In the OSD menu select the menu optionVIDEO/VIDEO OUTPUT/YUV.
The menu option Video OUTPUT is only selectable when the HDMI output is deactivated. On this subject see also chapter 10 "Settings in the OSD menu".
8.5 Connecting to a television via HDMI
This connection variant is only possible with very high grade televisions, LCD/Plasma screens or Video projectors
Check with the instruction manual of the corresponding playback device to see if this connections variant is available. It is possible that additional playback device settings may have to be implemented. For this type of connection you will need the HDMI cable (supplied);
Connecting the DVD player via HDMI:
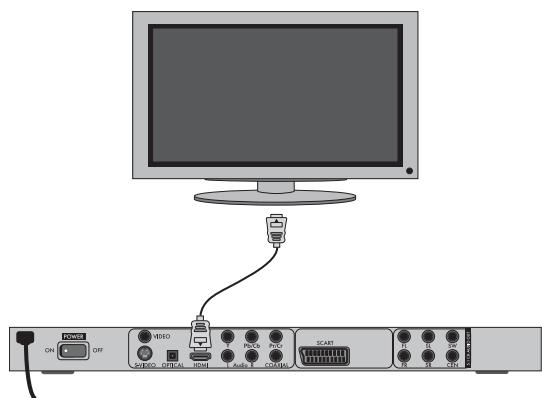
- Connect the jack inscribed with "HDMI" using a HDMI cable to the corresponding socket on the television.
- For playback select the matching channel on your television Check with the television's instruction manual on how you can set the AV channel.
- In the OSD menu select the menu option VIDEO/HDMI Setup/ON.
On this subject see also chapter 10 "Settings in the OSD menu".
9. Connecting audio components to the DVD player
Besides sound playback of DVDs, VCDs/S-VCDs and audio and MP3-CDs via the speaker of the television, to which the DVD player is connected, sound can also be played back via external audio components such as a HiFi system, Dolby digital/DTS receiver or a surround sound system.
9.1 Requirements for the connection of a HiFi system
In order to enjoy a full sound experience when playing DVDs with the DVD player you can connect a HiFi system to the player. Before connecting check with the HiFi system's instruction manual to verify...
- if the HiFi system is suitable for connection to a DVD player.
- if the HiFi system is equipped with cinch sockets; if yes, you can connect the HiFi system to the DVD player via cinch cables.
Connecting a HiFi system:
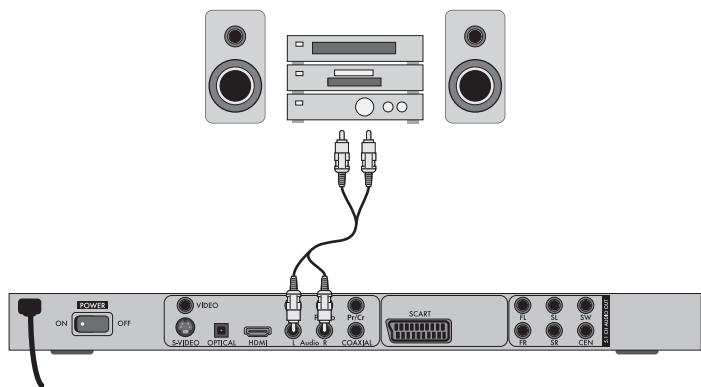
- Connect the audio output sockets AUDIO L/R on the rear panel of the DVD player to the corresponding audio inputs on the HiFi system with an audio cinch cable. Make sure that the red and white colour markings correspond.
- Check with the instruction manual which settings on the HiFi system may be necessary in order to reproduce sound via the HiFi system during the playback of a DVD, VCD/S-VCD, audio or MP3-CD from the DVD player.
① Note:
For an optimal sound experience place your HiFi system's loud speakers to the left and to the right of the television, on which you connected the DVD player.
If you connected the DVD player to the television via a Scart cable the audio signal will be transmitted via the cinch cable to your HiFi system as well as via the Scart cable to the television. In this case, set the volume of the television to the lowest value.
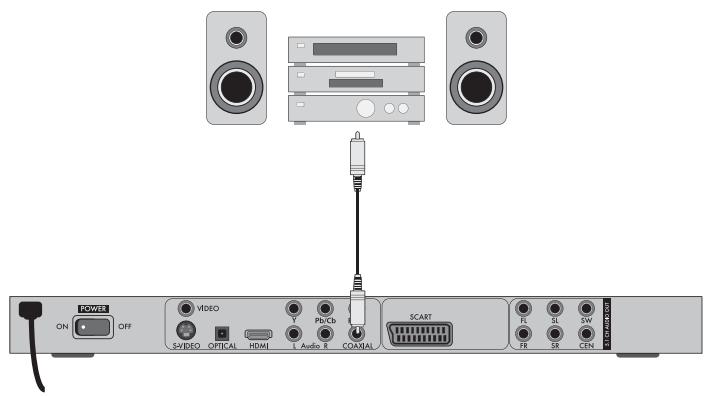
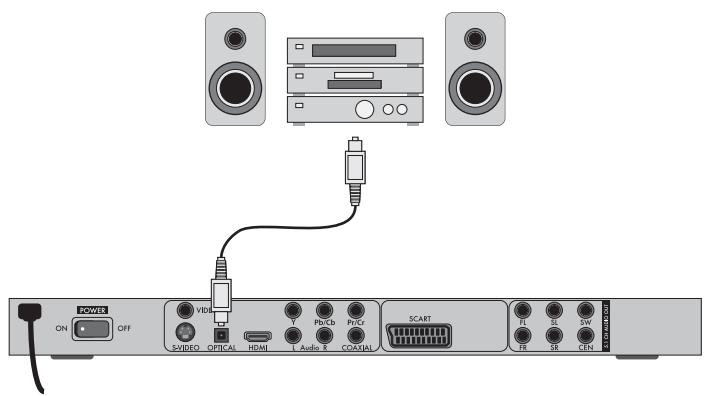
9.2 Connecting digital audio components via digital cables
In order to enjoy sound playback throughout the room from correspondingly equipped DVDs (recognizable by the Dolby Digital or DTS logos), you can connect the DVD player to a digital audio component, for example, a Dolby Digital or DTS receiver or a suitable surround sound system.
The cables necessary for the following described connection variations can be obtained from your dealer.
Firstly check with the digital component's instruction manual to see if it allows for connection to the DVD player...
via a coaxial cable
or via an optical cable.
Connection via coaxial cable
To connect the DVD player to a digital audio component with a digital coaxial cable:
- Connect the "COAXIAL" inscribed plug to the corresponding socket on the digital audio component.
Connecting via optical cable
To connect the DVD player to a digital audio component with an optical cable:
- Remove the protective plug from the "OPTICAL" inscribed socket on the rear panel of the DVD player and insert the optical cable plug.
- Insert the plug at the other end of the optical cable in the corresponding socket of the digital audio component.
① Note:
The optical cable is a glass fibre cable and must not be bent during installation. Otherwise the glass fibre contained in the cable could break and the cable would become unusable.
① Note:
Make sure that no dirt can enter into the optical cable socket. This could cause signal interference. Always insert the protective plug into the socket if no optical cable is connected.
9.3 Connecting audio components via an analogue cable
If a digital input is not available on the audio component you can connect the DVD player to it via conventional analogue cinch cables.
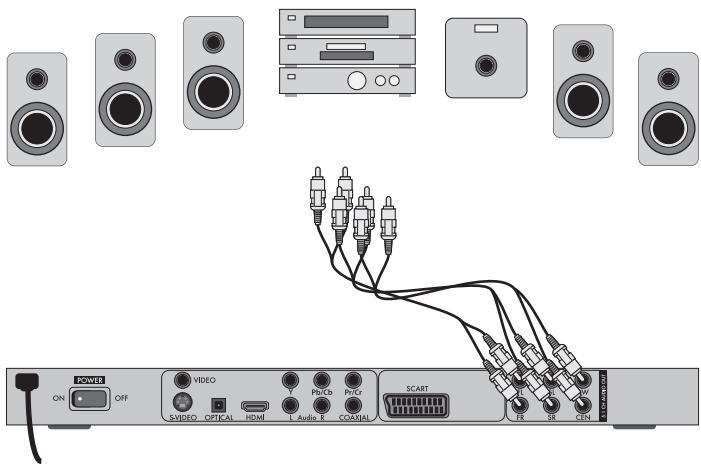
To connect the DVD player with analogue cables:
Plug a cinch cable into each of the sockets FL (front left channel), FR (front right channel), SL (rear left channel), SR (rear right channel), CEN (front centre channel) and SW (Bass) on the rear panel of the DVD player.
- Insert the cinch cables into the corresponding analogue inputs of the audio component.
9.4 Connecting the headphones
The headphones output is located on the front panel of the DVD player.
Plug the 3.5mm headphones jackplug into the headphones output. The audio output also continues to come out via the television set.

Attention!
Listening to music with headphones for long periods and at high volume levels can lead to hearing damage!
All of the DVD player's settings can be made with the remote control via the so called "On Screen Display" menu ("OSD menu" for short). The OSD Menu will be superimposed on the television screen.
① Note:
In these instructions the English OSD menu is described. At any time you can set the menu to your country's language as described in "GENERAL > OSD LANGUAGE".
| GENERAL | AUDIO | DOLBY | VIDEO | PREFERENCE |
| TV DISPLAY | PS | |||
| ANGLE MARK | ON | |||
| OSD LANGUAGE | ENG | |||
| CLOSED CAPTIONS | OFF | |||
| SCREEN Saver | ON | |||
| LAST MEMORY | OFF | |||
Before you use the DVD player for the first time for playback of DVDs, VCDs/S-VCDs or audio/MP3-CDs you must implement a few settings via the OSD Menu. These settings are dependent amongst others on...
- the language, in which you want the OSD menu to be displayed
- which TV standard corresponds to the television, to which you want to connect the DVD player
- Which image format your television can display
Administering settings via the OSD menu
- First insert the connector plug of the DVD player's power cord into a power socket.
- To switch the DVD player on activate the POWER switch on the rear panel of the DVD player. If the DVD player is already switched on but is in standby mode, press the button STANDBY on the remote control to switch the DVD player on. The standby mode is identified by the LED in the display on the front panel of the device.
The device will check to see if a disc is inserted. The SilverCrest logo appears on the television screen:

If no disc is inserted the notification NO DISC appears on the television screen and in the display.
- Firstly please familiarize yourself with the OSD Menu's operation by means of the following brief introduction.
10.1 Using the OSD Menu
- To access the DVD players OSD menu press the SETUP button on the remote control. The OSD Menu with its menu options will appear on the television screen:
| GENERAL | AUDIO | DOLBY | VIDEO | PREFERENCE |
| TV DISPLAY | PS | |||
| ANGLE MARK | ON | |||
| OSD LANGUAGE | ENG | |||
| CLOSED CAPTIONS | OFF | |||
| SCREEN SAYER | ON | |||
| LAST MEMORY | OFF | |||
The following menu options can be selected:
GENERAL, AUDIO, DOLBY, VIDEO and PREFERENCE.
- With the control buttons and the ENTER button you can carry out all the settings in the menu.
- With the control buttons you can select a menu by moving the yellow marking onto the corresponding menu symbol.
- With the control buttons you select an input in a menu by moving the green bar over an input.
- With the control button you change an input in the sub menu and with the control button you move back to the previous menu level.
- To confirm a selection press the ENTER button.
All navigation possibilities in a current menu are displayed at the lower edge of the menu.
- To exit the OSD menu press the SETUP button again.
10.2 Setup menu GENERAL
In this menu you can, for example, set the image presentation or the language of the OSD menu.
| GENERAL | AUDIO | DOLBY | VIDEO | PREFERENCE |
| TV DISPLAY | PS | |||
| ANGLE MARK | ON | |||
| OSD LANGUAGE | ENG | |||
| CLOSED CAPTIONS | OFF | |||
| SCREEN SAYER | ON | |||
| LAST MEMORY | OFF | |||
TV DISPLAY
Note:
The menu option TV DISPLAY is only selectable when the HDMI output is deactivated.
-4:3/PANSCAN Select this setting to display broadcasts in the usual 4:3 format on a 4:3 television set. Broadcasts in the 16:9 format will be displayed in full screen without the distracting bars although the side edges of the image will be trimmed.
-4:3/LETTERBOX Display of a film in 16:9 format on a traditional 4:3 format television. The image is displayed with black bars on the lower and upper edges of the screen.
-16:9 This setting is recommended when using a wide screen television in 16:9 format. An image in 4:3 format will be adapted horizontally to the image width.
- Wide Squeeze An image in 4:3 format will be presented with black bars on the right and left edges.
ANGLE MARK
| -ON | If scenes are recorded on a DVD in different perspectives this will automatically be signified by a camera symbol displayed on the television screen. Press the ANGLE button on the remote control to display the various perspectives. |
| -OFF | Deactivate function. No symbol appears on the television screen. |
OSD LANGUAGE
Here you set the language, in which the OSD Menu will be shown on the display.
CLOSED CAPTIONS
| -ON | Select this setting if by every playback of a DVD the subtitle (if present) is to be automatically displayed on the television screen. |
| -OFF | Select this setting to manually activate the subtitle. The subtitles can also be set, during playback, with the SUBTITLE button. |
SCREENSAVER
| -ON | Screen saver activated. The screen saver will now switch on when the playback is stopped and no activity takes place for several minutes. |
| -Off | Deactivate function. |
LAST MEMORY
| -ON | Select this setting to playback a disc from the previously halted position after removal and re-insertion. |
| -OFF | Deactivate function. The disc playback starts back at the beginning after removing and then reinserting. |
① Note:
If the DVD player is turned off with the POWER switch the saved position will not be preserved.
10.3 Setup menu AUDIO
In this OSD menu you can, for example, carry out settings for the analogue as well as the digital audio outputs.
| GENERAL | AUDIO | DOLBY | VIDEO | PREFERENCE |
| ANALOG AUDIO | ||||
| DIGITAL AUDIO | ||||
| CHANNEL DELAY | ||||
| EQUALIZER | ||||
| 3D PROCESSING | ||||
ANALOG AUDIO
DOWNMIX
If you use the analogue 5.1 output in this menu you can carry out the appropriate settings.
| -LT/RT | Only the left and right channels at the sockets FL and FR will put out signals. |
| -STEREO | A stereo sound will be put out. Select this setting if you are not using the analogue 5.1 outputs. The menu options CENTER SPEAKER and REAR SPEAKER are then not required and therefore inactive. |
-3D SURROUND Select this setting to produce a virtual surround effect from a stereo or multi channel sound.
-5.1 CH Select this setting to activate the analogue 5.1 outputs.
FRONT SPEAKER, CENTER SPEAKER, REAR SPEAKER and SUBWOOFER
In these menu inputs you can activate/deactivate the individual speaker types and set the size.
Large Select this setting if the diameter of the speaker membrane is greater than 12cm
-Small Select this setting for smaller speakers.
-Off Deactivate sound output for these types of speakers
i
The menu input FRONT SPEAKER can not be deactivated since the sound output for the front speakers always remains switched on.
DIALOG In this menu input you can set the dialogue volume (0-20).
D.R.C. (Dynamic Range Control)
This function sets the level of the dynamic range for motion picture soundtracks which are optimised for Dolby Digital. The function is particularly useful when listening to surround sound with a low volume level.
-ON Function activated
-OFF Function deactivated.
-AUTO Function (if available) is automatically activated
DIGITAL AUDIO
DIGITAL OUTPUT
In this menu input you can set the SPDIF output signal.
-SPDIF/OFF No digital audio signal is being put out at the sockets COAXIAL or OPTICAL.
-SPDIF / RAW The crude data of the Dolby Digital sound is put out.
-SPDIF /PCM Select the setting PCM (Pulse Code Modulation) when there is a connection to a digital amplifier/receiver. Your DVD player transmits, through the PCM signal, the same audio formats that are rendered on the disc. In addition an audio signal will be put out via the sockets FL and FR.
LPCM OUTPUT Select this input to set the sampling frequency for the processing of the crude data.
-48K: Default setting.
-96K: Only for DVDs with the corresponding sampling frequency.
i
The LPCM OUTPUT function is only available if you have set the SPDIF audio output signal to PCM.
CHANNEL DELAY
Select this menu input to set the channel delay of the individual speakers. With optimal settings the sound reaches your ears simultaneously from all directions.
With the control button go to the graphics field beside the input.
With the control buttons or select the speaker.
With the control buttons you increase/decrease the value in increments of 10cm . The maximum setable deviation for the CENTER speaker is 170~cm .
The maximum setable deviation for the SUBWOOFER and the rear speakers is 510~cm .
Confirm your entry by pressing the ENTER button.
i
The channel delay is determined by the front speakers therefore these are not selectable.
EQUALIZER
- SOUND MODE Select this menu input if, when playing back sound, you want to use one of the preset equalizer levels ROCK, POP, LIVE, DANCE, TECHNO, CLASSIC or SOFT. To deactivate this function select the input OFF.
-BASS BOOST Select the setting ON if you want to boost the playback of the base tone. To deactivate this function select the input OFF.
-SUPER BASS Select the setting ON to use the super base sound effect. In addition playback of the base tone will be boosted. To deactivate this function select the input OFF.
-TREBLE BOOST Select the setting ON if you want to boost playback of the treble sounds. To deactivate this function select the input OFF.
3D PROCESSING
Select this menu input if you want to activate/deactivate the Pro Logic II process.
① Note:
The menu option PRO LOGIC II can only be selected if the analogue
5.1 outputs are activated.
-PRO LOGIC II Select the setting ON if the process is to be activated all the time.
Select the setting AUTO if the process is only to be activated when Dolby Pro Logic II encoded content is located on the playback medium.
To deactivate this function select the input OFF.
-MODE In this menu you can set the Pro Logic II process mode.
MUSIC: Sound is played back through the speakers without delay.
MOVIE: Sound is played back with a delay of 10 ms through the rear speakers.
PRO
LOGIC: Earlier version of the DOLBY PRO LOGIC processes.
AUTO: Automatic setting of the processes (depending on the contents of the playback medium).
① Note:
The menu inputs PANorama, DIMENSION and CENTER WIDTH serve to fine tune the sound and are only available if you have set the process mode MUSIC.
-PANORAMA Select the setting ON to activate this sound enhancement. To deactivate this function select the input OFF.
- DIMENSION Select one of the settings SIZE -3 to SIZE 3 to activate this sound enhancement.
-CENTER WIDTH Select one of the settings LEVEL 0-7 to receive a corresponding sound enhancement.
REVERB MODE Select this menu input if you want to use, for sound playback, one of the preset reverbs CONCERT, LIVING ROOM, HALL, BATHROOM, CAVE, ARENA, or CHURCH. To deactivate this function select the input OFF.
10.4 Setup menu DOLBY
In this OSD menu you can carry out settings for the Dolby-Digital output.
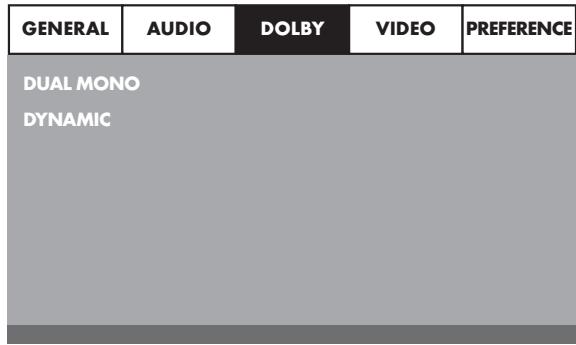
DUAL MONO Select this menu input to set the Dolby-Digital output to either STEREO, L-MONO, R-MONO or MIX-MONO.
DYNAMIC Select this menu input to enable an optimal sound playback with reduced volume. In the setting FULL the louder passages will be surpressed and the softer passages will be played back louder.

Note:
This function is only possible when using a digital audio component.
10.5 Setup menuVIDEO
In this menu you can, for example, carry out settings for the video output, resolution or colour.
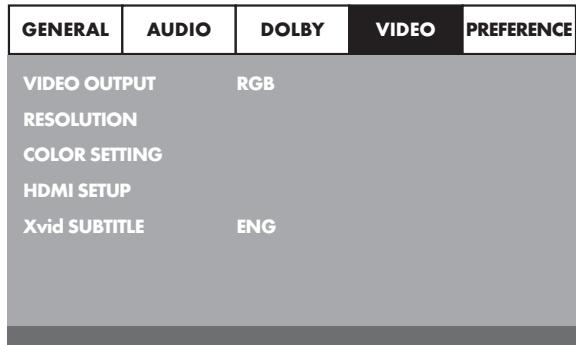
VIDEO OUTPUT
-S-VIDEO The video signal will be put out via the S-video output and the composite video output.
-YUV The video signal will be put out in YUV colour format via the component video outputs Y, U/Pb, V/Pr.
-RGB The video signal will be put out in RGB colour format via the SCART connection.

Note:
This setting is only active if the HDMI setup is deactivated.
The composite video output on the DVD player is always activated. If the selected setting deviates from the actual connection variation (apart from composite video) it is possible that no image or a poor image will be displayed on the television screen. In this event press, when playback is stopped, several times the V-MODE button on the remote control until the image is displayed properly.
RESOLUTION In this menu input you can set the different resolutions (480i/480p/576i/576p/720p/1080i/1080p) for the HDMI output/component video output.
① Note:
Be aware that for the TV standard PAL a setting with 50Hz and for the TV standard NTSC a setting with 60Hz must be selected.
COLOR SETTING
In this menu input you can implement the settings, for example, for the brightness, contrast or hue.
-SHARPNESS Select this menu input to set one of the predefined sharpness values (HIGH, MEDIUM or LOW).
-BRIGHTNESS With the help of the control buttons set the brightness from -20 to +20. Subsequently press the ENTER button to continue.
-CONTRAST With the help of the control buttons set the contrast from -16 to +16. Subsequently press the ENTER button to continue.
-GAMMA Select this menu to set one of the predefined gamma values (HIGH, MEDIUM, LOW or NONE).
-HUE With the help of the control buttons set the hue from -9 to +9 . Subsequently press the ENTER button to continue.
- SATURATION With the help of the control buttons set the saturation level from -9 to +9. Subsequently press the ENTER button to continue.
-LUMA DELAY Select this menu input to set one of the predefined gamma values (0 T or 1 T).
HDMI Setup
-ON Select this menu input to activate the HDMI output.
-Off Select this menu input to deactivate the HDMI output.
Xvid SUBTITLE In this menu input you can set the Xvid subtitle language that is to be the standard used when playing back films.
10.6 Setup menu PREFERENCE
In this menu you can, for example, carry out the settings for the video output, activate/deactivate the child lock or change the password.
① Note:
The menu option PREFERENCE is only selectable when playback is completely finished.
| GENERAL | AUDIO | DOLBY | VIDEO | PREFERENCE |
| TV TYPE | PAL | |||
| AUDIO | ENG | |||
| SUBTITLE | ENG | |||
| DISC MENU | ENG | |||
| PARENTAL | ||||
| password | ||||
| DEFAULT | ||||
TV TYPE
-PAL PAL television standard
-NTSC NTSC television standard.
AUDIO In this menu input you can set the language that is to be the standard used when playing back films.
SUBTITLE In this menu input you can set the subtitle language that is to be the standard used when playing back films.
DISC MENU In this menu input you can set the disc menu language that is to be the standard used when playing back films.
PARENTAL In this menu input you can determine the age restrictions.
① Note:
Only a few DVDs have a technical age restriction available. If there is no technical age restriction on the DVD your DVD players child lock feature can not be activated. The child lock can only function if it is activated on the DVD player and a corresponding code is available on the inserted DVD.
If you insert a DVD which, according to the child lock, may not be played back a window appears on the screen, in which you must enter your password and confirm with ENTER. Some DVDs and CDs are encoded with encryption signals. In this way DVDs can be divided into eight different approval classes.
Select one of the following approval classes to protect the playback of this media class with a password request:
1 KID SAFE: also suitable for young children
2 G: for all age groups
3 PG: adult supervision recommended;
4 PG 13: adult supervision strongly recommended; some scenes are not suitable for children under 12
5 PGR: for children under 16; adult supervision recommended
6 R: for children under 16; adult supervision strongly recommended
7 NC 17: not for teenagers under 18 years of age
8 ADULT: for adults only
Example
If a DVD was encoded with, for example, approval class 7 or 8 and you have an approval class setting between 1 and 6 then a message follows and the password must be entered. Also only parts of the DVD, that is to say certain film scenes, may be encoded with an approval class or various approval classes.
- To activate the approval class you must select, in the PARENTAL menu, the desired approval class and enter the password (136900).
Confirm your entry by pressing the ENTER button.
TOKEN
In this menu input you can change the factory default password (136900) and assign your own password.
Only the numbers 0-9 can be used.
① Note:
In the event that you forget your new password you can use the factory preset password (136900).
DEFAULT
In this menu input you can restore the DVD players factory defaults.
11. Initial operation of the DVD player
After you have ...
- placed the DVD player in a suitable location
- connected the DVD player to a television by one of the designated connection options
- connected the DVD player, if desired, to a HiFi or Surround system (analogue/digital) for example a Dolby Digital or DTS receiver
made the remote control ready for operation by inserting the batteries - and know how to activate and operate the OSD menu with the remote control
... the DVD player is ready for operation.
11.1 Switching the DVD player on/off
- Insert the mains power cable into a properly installed mains power socket.
- Place the POWER switch on the rear panel of the device to the ON position. The DVD player is now in standby mode.
- With the STANDBY button on the remote control or the STANDBY button on the device you switch the DVD player on and/or back to the standby mode.
- To switch the DVD player off place the POWER switch on the rear panel of the device to the OFF position.
① Note:
The device has no display indicators when it is switched off or in the standby mode. In standby mode the standby LED lights up in the display.
11.2 Inserting the DVD
To play a disc with the DVD player:
- Switch on your television.
Make sure that the DVD player is ready for operation.
If the television, the DVD player and possibly other connected devices (i.e. an audio component) are ready for operation and are switched on and the DVD player is connected correctly to the television you will now see the Silvercrest logo on the TV screen
If no disc is inserted into the DVD player's disc tray:
The message NO DISC is displayed on the television screen.
- Open the disc tray by pressing the button OPEN/CLOSE on the remote control or on the front panel of the DVD player. OPEN is displayed on the television screen.
- Insert the disc in the disc tray with the inscribed/labled side up. For two-sided discs: The side you would like to play must face down.
After you have inserted the disc press the button OPEN/CLOSE on the remote control or on the front panel of the DVD player again to close the disc tray. - The contents of the disc will now be loaded; this may take a few seconds. In the meantime LOADING is displayed on the television screen.
11.3 Inserting memory cards/USB memory sticks with MP3/WMA/ MPEG4/JPEG data.

Note:
The DVD Player always starts in DVD mode. To read memory cards/USB memory sticks press the USB button on the remote control. The DVD player recognizes the data formats JPEG, MP3, WMA and MPEG4.
In order to insert memory cards of the types SD, MS/MSPro and MMC into the DVD player:
- Switch on your television.
Make sure that the DVD player is ready for operation.
If the television, the DVD player and possibly other connected devices (i.e. an audio component) are ready for operation and are switched on and the DVD player is connected correctly to the television you will now see the Silvercrest logo on the TV screen
If no disc is inserted into the DVD player's disc tray: The message NO DISC is displayed on the television screen.
- Slide the memory card into the memory card slot.
Then proceed with the following steps depending on the type of memory card that you want the device to read.
Warning!
Always make sure that you insert memory cards into the memory card slot as described hereafter! Under no circumstances bend or buckle the memory card when inserting into the memory card slot! Slide the memory card up to the stop in the memory card slot, with a light pressure.
Allow the memory card to slide in without force:
- Check to make sure that the memory card is one that the DVD player is capable of reading.
Do not attempt to insert memory cards of another type in the memory card slot!
- Make sure that you have inserted the memory card into the memory card slot in the correct manner.
- Under no circumstances attempt to force the memory card into the memory card slot!
Otherwise the DVD player, memory card and the data on the memory card could be damaged!
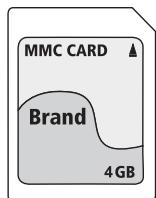
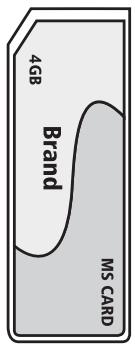
Supported memory card types and capacities
Memory cards of the types SD (2 GB not SDHC), MS/MSPro (4 GB), MMC (4 GB) can be played back.

Note:
Your DVD player can only read storage mediums with several data formats if each folder contains only one data format.
MultiMediaCard-/SecureDigital memory cards (MMC/SD)
Insert the MMC/SD memory cards with the contacts forward and slide them straight into the memory card slot.
With this the side of the memory card, on which the contacts are located must face downwards with the chamfered corner facing to the right.
MemoryStick/memory cards (MS/MSPro)
Slide the MS memory card into the memory card slot, level and with the contacts facing forward.
With this the side of the memory card, on which the contacts are located must face downwards with the chamfered corner facing to the left.
USB memory sticks (USB)
The DVD player supports USB memory sticks 1.1 and 2.0 up to a capacity of 4GB.
USB memory sticks must be inserted into the USB port.

- Press the USB button on the remote control. If several memory mediums (USB and memory card) are inserted press, repeatedly, the USB button until the contents of the USB memory stick is displayed. This procedure also applies to particular memory cards.
11.4 Removing memory cards/USB memory sticks
Memory cards/USB Memory sticks should only be removed after the memory card slot is deactivated. Thus avoiding the possibility of damage or data loss.
- Press the USB button on the remote control to return to the DVD mode. For this a disc must be inserted into the DVD player.
- You can now remove the memory card/USB memory stick from the memory card slot/USB port.
12. Playing back DVDs, VCDs or S-VCDs
To play back a DVD/VCD/S-VCD with the DVD player...
- Switch on your television.
Make sure that the DVD player is ready for operation.
If the television, the DVD player and possibly other connected devices (i.e. an audio component) are ready for operation and are switched on and the DVD player is connected correctly to the television you will now see the "Silvercrest" logo on the TV screen

- Open the disc tray on the front panel of the DVD player by pressing the OPEN/CLOSE button.
OPEN now appears in the display on the front panel of the DVD player and on the television screen.
- Insert a DVD/VCD/S-VCD disc in the disc tray with the inscribed/labbed side up.
- Press the OPEN/CLOSE button again to close the disc tray.
CLOSE will appear in the display on the front panel of the DVD player and on the television screen while the disc tray is closing.
- The contents of the inserted DVD/VCD/S-VCD will now be loaded; this may take a few seconds. In the meantime LOADING blinks in the display on the front panel of the DVD player and on the television screen.
- Playback of the inserted DVD/VCD/S-VCD starts automatically.
i
Note:
DVDs, VCDs and S-VCDs that you want to playback with the DVD player may possibly have a country code which is printed on the DVD's jacket.
The DVD player can only playback DVDs/VCDs/S-VCDs with the country code

If no country code is printed on the cover of a DVD/VCD/S-VCD...

- but instead the symbol l , then the DVD/VCD/S-VCD can be played back with the DVD player
- then the DVD/VCD/S-VCD can possibly not be played back with the DVD player. You can check this by attempting to play back the DVD.
Depending on the inserted DVD/VCD/S-VCD it is possible that the contents of the DVD/VCD/S-VCD will not playback immediately, rather first a selection menu appears on the television screen.
In this event select the menu option, which will start the playback of the film, with the control buttons on the remote control.
- To start playback of the film press the ENTER button on the remote control or press the PLAY/PAUSE button.
In the display on the front panel of the DVD player, the following notices appear:
With DVDs:
"DVD"
the number of the currently playing chapter
- the played back so far time of the currently playing DVD in minutes and seconds
With VCDs/S-VCDs:
"VCD" or "S-VCD"
the number of the currently playing title
- the played back so far time of the currently playing VCD/S-VCD in minutes and seconds
12.1Features during playback of a DVD, VCD or S-VCD
During the playback of a DVD/VCD/S-VCD you can use the following DVD player features...
Pause playback
To pause the playback of the inserted DVD/VCD/S-VCD...
During playback press the PLAY/PAUSE button
II will now appear in the display on the front panel of the DVD player and on the television screen.
On the television screen you will see a freeze frame of the scene that has just been halted.
To continue playback of the film press the PLAY/PAUSE button.
Stop playback (STOP■)
To stop playback of the film on the inserted DVD/VCD/S-VCD press the STOP button.
With resume function
If you have cancelled playback of the inserted DVD/VCD/S-VCD by pressing the STOP button once the DVD player automatically saves the position where playback was interrupted. This function is called the "resume function".
PRESS PLAY KEY TO CONTINUE appears on the television screen. As soon as you press the PLAY/PAUSE button again playback will continue from the saved position.
Without resume function
If you have cancelled playback of the inserted DVD/VCD/S-VCD by pressing the STOP button once and you press the STOP button a second time the saved position, at which you interrupted the playback, will be cleared.
When you press the PLAY/PAUSE button again playback of the inserted DVD/VCD/S-VCD starts from the beginning.
Access the DVD menu (MENU)
Note:
This function may not be available on all DVDs! If you attempt to execute a function that is not available, the symbol is displayed on the television screen.
With many films on DVDs there is a main menu on the disc which, apart from the option of playing back the main film, allows you to select from the following contents:
the subtitle and film dialogue languages
- direct chapter selection
to playback the films bonus material (Background information, "Making of" etc.)
If such a menu is present on the DVD inserted in the DVD player you can access it during playback by pressing the MENU button on the remote control.
You can select particular menu options by pressing the control buttons
on the remote control.
To confirm the selected menu option press the PLAY/PAUSE button or the ENTER button on the remote control.
To return to playback press the MENU button on the remote control again.
① Note:
If you cancel playback by pressing the STOP button twice (Playback stop without resume function) access to the disc's main menu is no longer possible.
Playback Control (PBC) with VCDs/S-VCDs
Many VCDs/S-VCDs have Playback Control (in short "PBC"). Playback Control indicates a main menu that allows operation of several functions of the VCD/S-VCD.
If PCB is available on a VCD/S-VCD inserted in the DVD player you must first activate it in order to be able to superimpose the menu.
- During playback or when playback is stopped press the MENU button. The message PBC: OFF appears in the display.
- Press the MENU button again. The message PBC: ON appears in the display. PBC is now switched on the discs main menu can be accessed with the MENU or TITLE buttons.
① Note:
If you switch on PBC during playback then it is possible that playback will stop and start again from the beginning and/or with the main menu.
Skip to start of chapter (Skip)
① Note:
This function may not be available on all DVDs! If you attempt to execute a function that is not available, the symbol is displayed on the television screen.
With the buttons SKIP FWD and SKIP BWD you can, during playback, within the film on the inserted DVD/VCD/S-VCD ...
- skip forward to the beginning of the next chapter or
- skip backward to the preceding chapter
The respectively selected chapter will playback immediately without having to press the PLAY/PAUSE button. The number of the respectively selected chapter will be displayed on the front panel of the DVD player to the left of the played back so far time.
Title number input via the number buttons
① Note:
This function may not be available on all DVDs! If you attempt to execute a function that is not available, the symbol is displayed on the television screen.
Instead of using the Skip function you can also enter the title from within the film on the inserted DVD/VCD/S-VCD direct by entering the title number via the number buttons on the remote control.
- For this, during playback or when playback is stopped, press the number buttons on the remote control corresponding to the title number, for example, the 3 button for the third title.
- Playback of the entered title number will now start automatically.
Direct chapter or time selection via the Search function (GOTO)
① Note:
This function may not be available on all DVDs/VCDs/S-VCDs! If you attempt to carry out functions that are not available the symbol will be displayed on the television screen.
Entry of the time position via search function DVD, VCD and SVCD:
- During playback press the GOTO button on the remote control. The time menu is superimposed on the television screen:
- The entry field TITLE is automatically selected first. Press the ENTER button and enter, with the number buttons, the desired title. On DVDs title 01 is most often the main film.
- Press the navigation button to select the entry field CHAPTER. Press the ENTER button and enter, with the number buttons, the desired chapter.
- Press the navigation button to select the entry field AUDIO. Press the ENTER button and select, with the navigation buttons , an audio language.
- Press the navigation button to select the entry field SUBTITLE. Press the ENTER button and select, with the navigation buttons , a subtitle language.
- Press the navigation button to select the entry field ANGLE. Press the ENTER button and select, with the navigation buttons , another camera perspective (if available).
- Press the navigation button to select the entry field TT TIME. Press the ENTER button and enter, with the number buttons, the desired title time.
- Press the navigation button to select the entry field CH TIME. Press the ENTER button and enter, with the number buttons, the desired chapter time.
- Press the navigation button to select the entry field REPEAT. Press the ENTER button and select, with the navigation buttons , a repeat function (see also repeat functions).
- Press the navigation button to select the entry field TIME DISP. Press the ENTER button and select, with the navigation buttons , a time presentation (see also superimpose disc information).
- To fade the menu out press the GOTO button again.
Audio CD
- During playback press repeatedly the GOTO button on the remote control. The following notices appear, one after the other, in which you can enter a time position with the number buttons:
DISC GOTO: Enter here a time position on the disc from where playback should start.
TRACK GOTO: Enter here a time position for the currently playing back title from where playback should start.
SELECT TRACK: Enter here a title number from where playback should start.
MPEG CD
SELECT: Enter here a title number on the disc from where playback should start.
GOTO: Enter here a time position for the currently playing back title from where playback should start.
Fast scan forward/backward
With fast scan you can select designated passages from the inserted DVD/VCD/S-VCD during playback.
- For fast scan forwards/backwards press the FAST FWD and/or FAST RWD button repeatedly to set the following fast scan speeds:
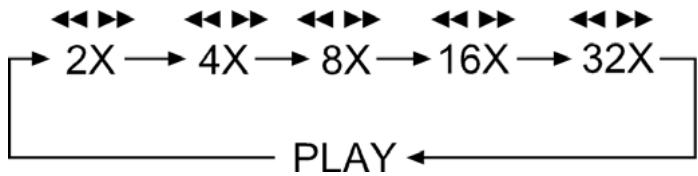
① Note:
During fast scan no sound will be played back.
- To continue playback of the film at the selected place in normal speed press, during fast scan the PLAY/PAUSE button.
Slow playback forward (Slow motion)
To playback the contents of the inserted DVD/VCD/S-VCD in slow motion ...
- For slow playback forwards press the SLOW button repeatedly to set the following playback speeds:

① Note:
During slow motion playback no sound will be played.
- To continue playback from a selected position in normal speed, during slow motion playback press the PLAY/PAUSE button.
Image enlargement (Zoom)
① Note:
This function may not be available on all DVDs! If you attempt to execute a function that is not available, the symbol is displayed on the television screen.
During the playback of an inserted DVD/VCD/S-VCD you can enlarge the image on the television screen in three levels. For this press the ZOOM button on the remote control to set the following enlargement levels:

With the control buttons sections of the enlargement can be suspended.
To switch off the enlargement function and return to the normal image size press repeatedly the Z00M button.
Change camera aspect (Angle)
① Note:
This function may not be available on all DVDs! If you attempt to execute a function that is not available, the symbol is displayed on the television screen.
Many films on DVD contain chapters which were recorded simultaneously from various camera perspectives. With films that have such chapters available you can view the same chapter from different perspectives.
For this press the ANGLE button on the remote control during playback of an inserted DVD. Each press of the ANGLE button will switch to one of the available camera perspectives.
Superimpose/fade out subtitles
① Note:
This function may not be available on all DVDs! If you attempt to execute a function that is not available, the symbol is displayed on the television screen.
If the film on the inserted DVD has subtitles available you can superimpose these on the television screen during playback by pressing the SUBTITLE button on the remote control.
With the first press of the SUBTITLE button the subtitle of the first available language will be superimposed on the television screen. With each further press of the SUBTITLE button the subtitles of other available languages will be superimposed successively on the television screen.
The number of the currently superimposed subtitle language will be superimposed on the television screen ( i.e. 1/10 for the first of ten available subtitle languages).
When the last of the available subtitle languages is superimposed (i.e. 10/10 for the tenth of ten available subtitle languages) you can switch off the subtitle function by pressing the SUBTITLE button again. OFF is superimposed on the television screen.
Change playback language
① Note:
This function may not be available on all DVDs! If you attempt to execute a function that is not available, the symbol is displayed on the television screen.
With many films on DVD you can, during playback, select another playback language by pressing the AUDIO button on the remote control.
The first press of the AUDIO button switches to the first available playback language. With each further press of the AUDIO button other available playback languages, one after the other, are switched on.
The currently switched on playback language will be superimposed on the television screen.
Programmed playback (PROG)
① Note:
This function may not be available on all DVDs/VCDs/S-VCDs! If you attempt to execute a function that is not available, the symbol is displayed on the television screen.
With the "Programme" function you can put together your own film programme in so far as you can select only certain chapters of an inserted DVD/VCD/S-VCD for playback. In this way you can determine for yourself the sequence, in which the chapters are played back. You can compile a maximum of 20 chapters of a film for programmed play.
- Press the PROG button on the remote control during playback or when playback is stopped.
The Programme menu will be displayed on the television screen.
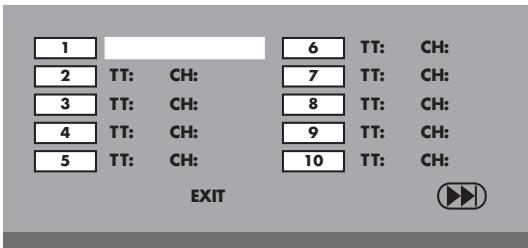
Programme window
First are listed the programme positions 1-10, programme position 1 is highlighted.
- With the number buttons enter the number of the title that is to be played back first. The highlight changes to chapter entry (CH:).
- With the number buttons enter the number of the chapter that is to be played back. The highlighting moves to the programme position 2.
- Select, with the navigation buttons , further programme positions and enter title and chapter numbers for the programme positions.
- To display the next 10 programme positions select, with the navigation buttons , the field and press the ENTER button.
You can allocate up to 20 programme positions.
- To delete entries in a programme position select the programme position and press the ENTER button.
- To stop the programme function select the field EXIT and press the ENTER button. All allocated programme positions are deleted.
- You start playback of the programme positions by selecting the field START and press the ENTER button.
During the programmed playback the notice PROGRAM appears in the display. To delete the programmed playback press twice, during playback, the STOP button on the front panel of the DVD player or on the remote control.
① Note:
If you are not sure what number a title and/or chapter to be programmed has then select the corresponding chapter, during playback of the film, with the buttons SKIP FWD and SKIP BWD and ssequently press the DISPLAY button on the remote control to superimpose all information from the inserted DVD/VCD/ S-VCD onto the television screen. Here you will find, amongst others, the current title and chapter numbers.
On this topic see also the section "Superimpose disc information".
Superimpose disc information
① Note:
This function may not be available on all DVDs/VCDs/S-VCDs! If you attempt to execute a function that is not available, the symbol is displayed on the television screen.
With this function you can superimpose all the available information from a DVD/VCD/S-VCD inserted into the DVD player onto the television screen during playback.
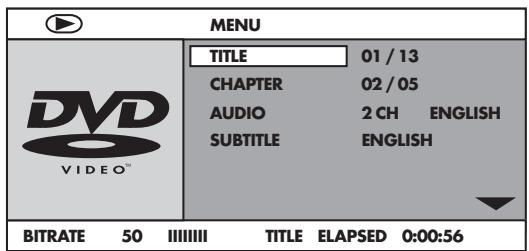
- For this, during playback, press the DISPLAY button on the remote control. On the television screen will be superimposed:
With DVDs:
- the current title number/the total number of titles
- the current chapter number/the total number of chapters
- the played back so far time in hours, minutes and seconds (TITLE ELAPSED)
- the time to the end of the film in hours, seconds and minutes (TITLE REMAIN)
- the played back so far time of the chapter in hours, minutes and seconds (CHAPTER ELAPSED)
- the time to the end of the chapter in hours, seconds and minutes (CHAPTER REMAIN)
With VCDs/S-VCDs:
- the current title number/the total number of titles
- the played so far time of the current playback title on the VCD/SVCD in hours, minutes and seconds (SINGLE ELAPSED)
- the time to the end of the current playback title in hours, seconds and minutes (SINGLE REMAIN)
To stop display of the disc information press repeatedly the DISPLAY button until the notice DISPLAY OFF appears on the television screen.
Repeat function for DVDs, VCDs, S-VCDs and audio CDs
With the repeat function you can...
... in the case of DVDs, selectively repeat title, chapter or the entire DVD.
... in the case of VCDs/S-VCDs individual titles and/or the entire VCD/S-VCD repeatedly playback.
... in the case of audio CDs, playback repeatedly a particular track and/or the entire CD.
To switch on repeat playback...
- Press the REPEAT button several times during playback.
The repeat symbol appears in the display with one of the following notifications:
CHAPTER Select CHAPTER to continuously repeat the currently playing back chapter until repeat playback is switched off or playback is cancelled by pressing the STOP button twice.
TITLE
Select TITLE to continuously repeat the currently playing back title until repeat playback is switched off or playback is cancelled by pressing the STOP button twice.
ALL
Select ALL to continuously repeat all available titles on the disc, thus the entire disc, until playback repeat is switched off or playback is cancelled by pressing the STOP button twice.
To switch off repeat playback press the REPEAT button repeatedly, during playback, until no more notifications appear on the television screen.
Repeat function with MP3/WMA/MPEG/ JPEG/Xvid discs
During playback press the REPEAT button several times to apply the following repeat functions (the set function appears in the display):
RANDOM
Random playback of the titles on the disc and/or the data carrier.
SINGLE
One time playback of the current title/image.
REPEAT ONE
Endless repeat of the current title/image.
REPEAT FOLDER
Repeat the current folder.
ALL
Repeat all titles on the disc and/or data carrier.
Repeat sequence (A-B)
With this function you can repeat playback of a favourite sequence within a chapter of the current playback disc.
To do this ...
- During playback press the A-B button on the remote control as soon as the desired sequence starts to playback. A appears on the television screen.
- Press the A-B button again as soon as the end of the desired sequence is played back. Pay careful attention to the fact that the start and finish of the sequence must be located within a chapter.
AB appears on the television screen.
Repeat playback of the selected sequence begins immediately without you having to press the PLAY/PAUSE button. The sequence will continuously repeat until you press the A-B button again in order to switch off the function.
Setting playback volume
Press the VOL + button on the remote control during playback to increase playback volume or the VOL - button to reduce playback volume.
Dimmer
Press the DIMMER button on the remote control to change the DVD player's display brightness in three levels.
To switch playback sound to mute (MUTE)
To switch the playback sound to mute press the × (MUTE) button on the remote control during playback of DVDs, VCDs/S-VCDs, audio CDs and CD-Rs/CD-RWs with MP3 or WMA data. MUTE is displayed on the television screen.
When you want to switch the playback sound back on press the (MUTE) button again or the VOL + and VOL - buttons. MUTE OFF or the corresponding volume level is displayed on the television screen.
13. Playback of JPEG-Photo CD/WMA/MP3/MPEG4
Insert a storage medium into the DVD player. If you use a memory card or USB stick press repeatedly the USB button until the desired playback source is depicted.
The contents of the data carrier (CD, DVD, USB memory stick or memory card) will be displayed on the television:
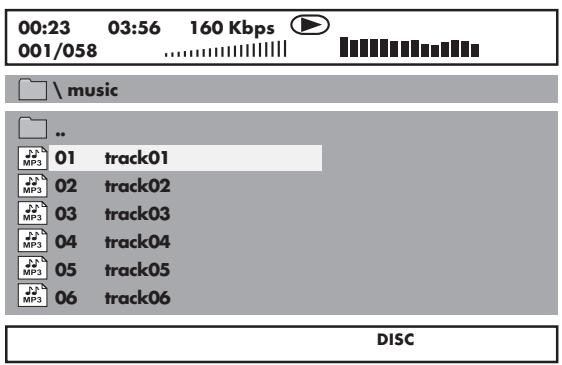
Display of MP3 data
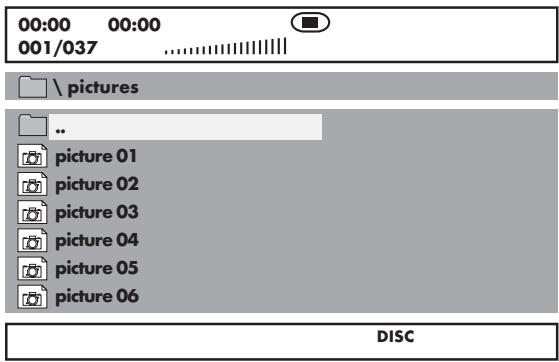
Display of JPEG data
Display of AVI and MPEG data
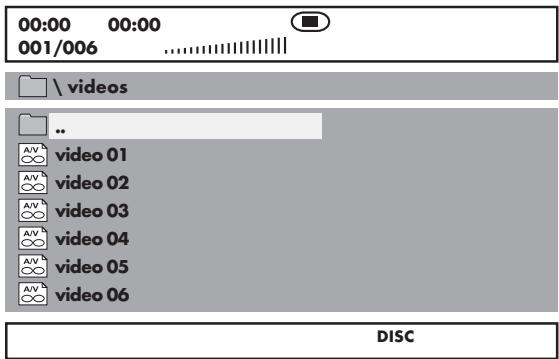
- The data is listed on the left (Data window). Folders will be depicted with the symbol .
- To superimpose the folders available on the disc press the PROG button repeatedly until the notice FOLDER appears at the bottom of the display.
- Press the PROG button again repeatedly until the notice FILELIST appears at the bottom of the display. Folders will now be faded out and all data on the disc is represented in a list.
- The area on the right is intended for the previewing of JPEG images. A preview appears as soon as you highlight a JPEG file in the file window.
- At the bottom is located the information bar, in which is displayed the image size (JPEG Image) as well as the medium (DISC, USB or CARD), on which the files are located.
-
Select a file with the aid of the navigation buttons . You confirm the selection by pressing the ENTER button. The file will be played back and/or the JPEG Photo displayed.
-
To open a folder select the folder and press the ENTER button. The contents of the folder will be listed.
- To reach a higher folder level select the symbol with the entry ". ." and press the ENTER button.
Playback of JPEG discs
- With the navigation buttons highlight an image and press the ENTER button or the PLAY/PAUSE button to open the image.
The image is shown on the display
Subsequently change the view to the next available image on the disc/in the folder.
- To display the currently shown image press the PLAY/PAUSE button longer.
- To continue the playback press the PLAY/PAUSE button again.
- You can access an image directly by entering the image's file number with the number buttons and subsequently confirm the entry with the ENTER button.
- With the navigation buttons you can rotate the image in 90^ increments during playback.
- With the navigation buttons you can mirror the image horizontally or vertically during playback.
- During playback press the STOP button to display a miniature view of all images in the folder/on the disc. 12 miniatures will be displayed on each page.
- Select with the navigation buttons an image and start playback with ENTER or PLAY/PAUSE II.
- Select with the navigation buttons one of the following entries from the bottom display lines and confirm the entry with the ENTER button.
Slide Show Starts a slide show of the images in the folder/on the disc
Menu Shows the available button functions for JPEG playback.
Press the ENTER button until this menu has faded out.
Prev switches to the previous page
Next switches to the next page
- Press the MENU button to switch to the file list again
Selection of slide show transitions:
You can select different transitions for changing from one image to the next. WIPE TOP, WIPE BOTTOM, WIPE LEFT, WIPE RIGHT, DIAGNONTAL WIPE LEFT TOP, DIAGNONTAL WIPE RIGHT TOP, DIAGNONTAL WIPE LEFT BOTTOM, DIAGNONTAL WIPE RIGHT BOTTOM, EXTEND FROM CENTER H, EXTEND FROM CENTER V, COMPRESS TO CENTER H, COMPRESS TO CENTER V, WINDOW H, WINDOW V, WIPE FROM EDGE TO CENTER and NONE.
- During the slide show press the PROG button until the name of the desired transition appears in the upper left corner of the television screen.
14. CD Ripping function
With the DVD player you can transfer music and speech files in the format .cda (CD Audio) or from a disc onto a USB memory stick. Thereby files in the MP3 format will be saved onto the USB memory stick.
① Note:
When transferring audio files to a data carrier be aware of the existing copyright laws and regulations! Make sure that you are producing copies for private use only and do not violate applicable laws!
| CD RIP | |||
| OPTIONS | TRACK | ||
| Speed | Normal | track01 | 04:09 |
| Bitrate | 128kbps | track02 | 04:43 |
| Create ID3 | Yes | track03 | 04:09 |
| Device | USB | track04 | 04:49 |
| track05 | 00:53 | ||
| SUMMARY | track06 | 01:08 | |
| Selected | TRACK 0 | track07 | 05:00 |
| Selected | Time 00:00 | ||
| Start | Exit | Select all | Select none |
- Place an audio CD into the disc tray.
- Insert a USB memory stick into the USB port.
- Whilst playback is stopped press the RIPPING MENU button on the remote control. The menu depicted above appears on the television screen.
Speed Select this menu input to set the speed of the transfer either to Normal or Fast.
Bitrate Select this menu input to set the MP3 quality. Possible bitrates are 96 kbps, 112 kbps and 128 kbps. A higher bitrate will result in a larger MP3 file on the data carrier after copying.
Create ID3 Select this menu input to automatically create an ID3 tag for the MP3 files.
- Select, with the control buttons ▲▼, a title from the Title list and confirm with the ENTER button. The title will be marked with a tick. In the same way you select further titles for copying in MP3 format.
- To mark all titles for copying in MP3 format select, with the control buttons the input Select all and confirm with the ENTER button. All titles will be marked with ticks.
- To cancel the marking of all titles select, with the control buttons , the input Select none and confirm with the ENTER button. The markings will be deleted.
- To start the copying process select, with the control buttons the input Start and confirm with the ENTER button.
- To exit the CD-Ripping function select, with the control buttons , the input EXIT and confirm with the ENTER button.
A window appears, in which is displayed the copying process with a progress bar.
| CD RIP | ||
| Ripping | Selected | TRACK |
| TRACK Progress | track01 | 28 % |
| track02 | 04:43 | |
| Total Progress | track03 | 04:09 |
| track04 | 04:49 | |
| CANCEL | track05 | 00:53 |
| SUMMARY | track06 | 01:08 |
| Now ripping | track07 | 05:00 |
| TRACK 01 / 16 | ||
- To prematurely abort the copying process select the input CANCEL and confirm with the ENTER button.
Attention!
Never remove the USB memory stick from the USB port during copying! Otherwise it could lead to data loss on the storage medium.
Note
On the memory medium the index RIP001 will be applied for the MP3 files. For each further copy process of a new CD another index RIP002, RIP003 etc. will be applied.
15. Cleaning of the DVD player
Clean the housing of the DVD player with a slightly damp cloth and a mild cleanser only. When cleaning, make sure that no moisture gets into the DVD player!
Clean the inside of the disc tray, if necessary, exclusively with a clean dry brush (i.e. a lens brush obtainable from a photographic dealer).
Never clean the inside of the disc tray with anything moist!
Warning!
Moisture penetrating into the DVD player creates the risk of an electric shock! The DVD player may also be irreparably damaged!
16. Disposal
Disposing of the device

Do not, under any circumstances, discard the device in the household refuse. This product is subject to the European directive 2002/96/EC.
Dispose of the device through an approved disposal centre or at your community waste facility.
Observe the currently applicable regulations. In case of doubt, please contact your waste disposal centre.
Disposing of batteries!
Do not dispose of the batteries with household waste. Every consumer is legally obliged to dispose of batteries at a collection site in his community/city district or at a retail store.
This obligation is intended to ensure that batteries are disposed of in an environmentally friendly manner.
Only dispose of batteries when they are fully discharged.
Disposal of packaging

Dispose of the packaging materials in an environmentally responsible manner.
17. Troubleshooting
Display is blank/DVD player shows no functions even though it is switched on
A Check to see that the power cable is inserted properly into the power socket.
B Check to ensure that the power socket in which you have plugged the power cable of the DVD player is live by connecting another device to it. If necessary plug the DVD players power cord into another power socket.
C Check to see that the display dimmer function is switched off. To do this press the DIMMER button on the remote control.
D Switch off the DVD player by activating the POWER switch and then wait ten seconds. Then switch the DVD player back on by activating the POWER switch again.
The display shows "No Disc" even though there is a disc inserted
A The disc is dirty, scratched or damaged. Clean the disc or insert another disc.
B The Country/Region code on the inserted DVD/VCD/S-VCD does not correspond to the Country/Region code of the DVD player. In this case the DVD/VCD/S-VCD cannot be played with the DVD player.
Inserted disc will not playback
It is possible that a layer of condensation has built up on the DVD players laser scan lens. This can be the case especially if the DVD player has been subjected to strong temperature fluctuations.
If this is the case place the DVD player in a dry environment at normal room temperature. First remove the currently inserted disc from the disc tray.
Then leave the DVD player switched off for at least one hour without using until the condensation film has evaporated.
No image or Black/White image only
A Check to make sure that all connection cables between the DVD player and the television (or Video projector) are firmly inserted into the corresponding sockets
B Check to make sure that the settings in the OSD menu match the connections variant, with which you have connected the DVD player to the television (or Video projector).
For this see chapter 8. "Connecting the DVD player to a television".
C Check by means of the televisions (or Video projectors) operating instructions to see if settings to the television (or Video projector) may be necessary in order to use the DVD player with the television.
No sound
A Check to see if the television and/or DVD player have possibly been switched to mute.
B Check to see if all connection cables between the DVD player and potentially connected audio components are plugged firmly into the corresponding sockets.
C Check whether the settings in the OSD menu match the connection option you have used to connect the audio components to the DVD player.
For this see chapter 9. "Connecting an audio component to the DVD player".
D Using the television's instruction manual check to see if current settings to the television are necessary in order to use the DVD player with the television.
Check by means of the operating instructions for a potential connected audio component if settings to it are necessary in order to use it with the DVD player.
F If you ...
have connected the DVD player to a stereo television and have not connected an audio component to the DVD player or
have connected a Dolby Prologic compatible audio component via the analogue stereo outlet (via cinch cables to the cinch sockets L and R) of the DVD player:
Check to see that you have selected in the OSD menu AUDIO with the menu input FRONT SPEAKER the setting LARGE.
No 4:3 or 16:9 image
A Check by means of the televisions operating instructions, which image formats the television has at its disposal.
B Check to see if the settings in the OSD menu match the available image format of the television.
Remote control not functioning
A Check to make sure that the remote control batteries have been inserted into the battery compartment with the correct polarity.
B Check to see if the remote control batteries are exhausted and, if necessary, change both batteries.
Make sure that there are no obstacles located between the remote control and the DVD player.
D Remain within five meters of the DVD player when using the remote control.
Playback language/ Subtitle language do not correspond to the settings in the OSD menu
The playback language/Subtitle language setting in the OSD menu is not available on the inserted disc.
One or several functions can not be switched on
The selected functions may not be available on all DVDs/VCDs/S-VCDs! If you attempt to execute a function that is not available, the symbol is displayed on the television screen.
None of the buttons on the device or on the remote control are functioning/other malfunctions
A Switch off the DVD player by pressing the POWER switch. Wait ten seconds and then activate the POWER switch again to switch the DVD player on once more.
In the event that the malfunction is still present: Reset the DVD player to its default settings.
For this see chapter 10.6 "Setup menu PREFERENCE".
Contact one of our service partners in your area if ...
the stated function defect can not be resolved as described or
other functional defects arise.
For this see chapter 19 "Warranty and service".
What are DVDs, VCDs and S-VCDs?
DVDs
DVD is the short form for "Digital Versatile Disc". DVDs are a storage medium for audio and video data; they are available in 8 cm and 12 cm (Diameter) formats. Because of the much higher storage capacity as compared to CD-Rs/ CD-RWs DVDs can provide a playback duration of up to eight hours for the audio and video data stored on them.
VCDs/S-VCDs
"Video CD" (VCD) and "Super Video CD" (S-VCD) are designations for two processes of compressed storage, thus space saving, of films on CDs. VCDs and S-VCDs are available in 8 cm and 12 cm (Diameter) formats. Their storage capacity is a great deal lower than that of DVDs. For this reason they only offer a playback duration, for the saved audio and video data on them, of 20 minutes (8 cm format) and/or 74 minutes (12 cm format).
VCDs are available in two versions:
- Only audio and video data can be played back on version 1.1 VCDs/S-VCDs.
- PBC (Playback control) functions are available on version 2.0 VCDs/ S-VCDs. In addition still images can be played back in a higher resolution.
Playback Control (PBC)
Version 2.0 VCDs/S-VCDs have Playback Control (in short "PBC") at their disposal. Then on the VCD/S-VCD a main menu is available, by which various functions of the VCD/S-VCD are allowed to be operated.
What are Title and Chapter?
Title is the name given to the largest units of image and sound units on DVDs; on many DVDs the (Main) film has the title number 01. For bonus material (i.e. Film trailer, background information etc.), that is available on many DVDs, other possible title numbers can be used.
Chapter is the name given to the next smaller image and sound units beneath title. If the DVD/VCD/S-VCD or its title is divided into chapters, numbers are assigned to you, through the input of which the chapter can be selected direct.
Bear in mind that not on all DVDs ...
are the DVD or the title divided into (numbered) chapters
- Chapters are also designated as "Scenes" (i.e. in the main menu of DVDs)
What are Scart, S-Video, Composite-Video Progressive Scan, YUV and HDMI?
Scart
Scart denotes a 21 pole standardized plug connection, via which the RGB signal, video signal and S-Video signal as well as a number of control and auxiliary signals are transmitted.
S-video
When the DVD player is connected to a television via S-Video the brightness and colour signals are transmitted separately; in this way a greater image sharpness and a reduced so called "Colour noise" is achieved.
Colour noise refers to the overlaying of the colours, mostly heavily saturated parts of a video image, through an irregular, restive breakdown structure.
Composite video
Video signal or FBAS signal; thereby it involves an image signal, in which colour and brightness information are included at the same time.
Progressive scan
In the normal way TV devices and Video projectors are controlled with so called "Half images". Thereby clearly visible line structures develop. Contrary to this, Progressive Scan denotes the output of full images (with this DVD player, at the output YPbPr). Progressive Scan signals can only be processed by playback devices equipped for this purpose (in particular large screen televisions and projectors). The image quality as opposed to traditional image signals is considerably higher.
YUV (component video out)
YUV indicates the component signal, which with this device is available at the output YPbPr in the form of so called "Half images"; as a rule this is the best signal for the control of large screen televisions and projectors, which can not process Progressive Scan signals. As with the RGB image transmission, YUV is comprised of three separated image signals:
the brightness signal "Y" and
the two colour differential signals "U/Pb" and "V/Pr
Half images (Interlace)/Full images (Progressive Scan)
A standard television image is comprised of 576 visible lines; at first all odd and then all even image lines are displayed alternatively, thus each displays a half image. Thereby only 25 full images (50 Half images) can be displayed per second. This technique is designated as "Interlace" format.
Contrary to this with the so called progressive or "Progressive Scan" format all image lines are displayed every time, that is to say 50 full images per second are displayed. Thereby increasing the total quality of the images, still images and text for example appear sharper.
HDMI
HDMI is short for "High Definition Multimedia Interface" and refers to a 19 contact interface for complete digital transmission of audio and video data. With its high bandwidth HDMI handles all known today home electronics digital video and audio formats. HDMI transmits audio data up to frequencies of 192kHz with text widths of up to 24 Bit on up to 8 channels. Thus not only all of today's image and sound formats introduced into home electronics including HDTV (up to the highest present resolution of 1080i) are transmitted without loss of quality but also future formats with yet higher resolutions.
Decoder
The sound on DVDs with home theatre sound is saved on the DVD in encrypted (encrypted) form. Different encryption formats exist for several purposes, for example AC-3 for the playback of Dolby Digital Surround Sound.
In order to playback encrypted sound, the playback device (i.e. the DVD player) and/or the audio component connected to it (for example Surround system) must be equipped with a so called decoder, which converts the encrypted signal back into music and/or sound.
The Silvercrest KH 6524/KH 6525 DVD player is equipped with an AC-3 Decoder (for Dolby Digital 5.1 Surround Sound signals).
Dolby Surround
Dolby Surround is an analogue sound format, by which the two channels of a stereo sound signal are used in order to accommodate room sound information for further channels. Dolby Surround decoders convert the signals back into sound or music and send the audio to two additional speakers that are situated behind the listener.
Dolby Prologic
In comparison to Dolby Surround sound format, with Dolby Prologic an additional channel in the stereo signal is used; this is the so called "Centre" channel. The corresponding centre loudspeaker is to be situated in the middle between the stereo loudspeakers. The deepest sounds are fed to a bass loudspeaker, the so called "Subwoofer". The subwoofer can be placed in any desired location in the room; the logic for this is that the bass sounds that the subwoofer puts out can scarcely be localized exactly by the human ear
Dolby Digital (5.1)
Dolby Digital, also designated as AC3, is a digital sound format, by which up to six separate audio channels can be transported. With most of the current DVDs, the sound is stored in the so called "Dolby Digital 5.1" format; the "5" in the name "5.1" stands for the three front and two rear surround sound channels, the "1" stands for the subwoofer channel.
DTS
DTS is the abbreviation for "Digital Theatre System" and denotes one of the most common surround sound formats for DVDs. As with Dolby Digital 5.1, DTS uses three front and two rear surround sound channels as well as a bass sound channel.
What are PAL and NTSC?
PAL
PAL is the abbreviation for "Phase Alternation Line". PAL is the mid and west Europe (Exception: France = SECAM) customary and widest distributed colour television standard.
NTSC
NTSC is the abbreviation for "National Television System Committee". NTSC is a colour television standard that is primarily used in the USA and Japan.
Audio CDs
Audio CDs contain exclusively audio data; they are also available in 8 cm and 12 cm (Diameter) formats. The playback duration for the audio data stored on them amounts to 20 minutes (8 cm format) and/or 74 minutes (12 cm format). Audio data is stored on audio CDs in CDA format.
MP3
MP3 denotes a process and/or format developed by the Fraunhofer Institute for the compression of audio data. In the MP3 format compressed music pieces are only a fraction of their original size, which, for example, on CD-Rs/CD-RWs allows for storage of a considerably greater volume of music than on commercially available audio CDs, on which audio data is stored in the CDA format.
WMA
WMA ("Windows® Media Audio") is a data format developed by Microsoft® for audio data.
JPEG
JPEG ("Joint Photographics Expert Group") denotes a wide spread graphic format, developed by the organization with the same name, with which image data of the colour and grey scales are compressed.
MPEG
MPEG ("Moving Picture Experts Group") refers to a video compression format.
USB memory sticks
The term USB memory stick refers to a plugable USB device, which is approximately the size of a cigarette lighter. The expression is only colloquial and not a designation for a type of product. For the most part with this expression is meant a USB device that serves as an interchangeable storage media.
What are folders?
As opposed to audio CDs the title on a CD-R/CD-RW with MP3, WMA or JPEG files can be stored in folders, for example, in order to file titles from different genres.
The structure of an MP3-CD can, for example, appear as follows, if the MP3 files are stored in folders:
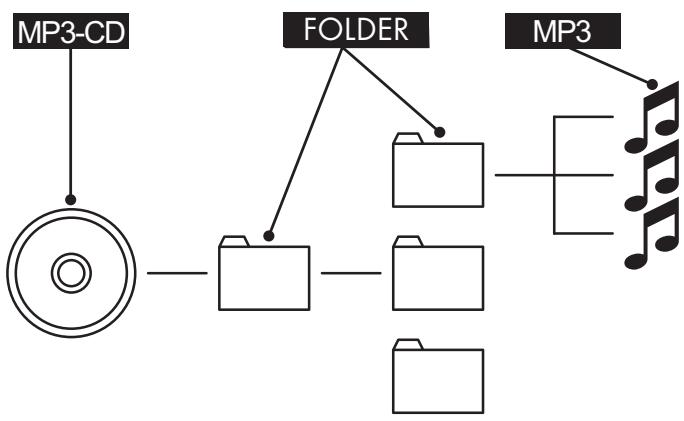
19. Warranty and Service
The warranty for this appliance is for 3 years from the date of purchase. The appliance has been manufactured with care and meticulously examined before delivery. Please retain your receipt as proof of purchase. In the event of a warranty claim, please make contact by telephone with our Service Department. Only in this way can a post-free despatch for your goods be assured.
The warranty covers only claims for material and manufacturing defects, but not for transport damage, for wearing parts or for damage to fragile components, e.g. buttons or batteries. This product is for private use only and is not intended for commercial use. The warranty is void in the case of abusive and improper handling, use of force and internal tampering not carried out by our authorized service branch. Your statutory rights are not restricted in any way by this warranty.
The warranty period will not be extended by repairs made under warranty. This applies also to replaced and repaired parts. Any damage and defects extant on purchase must be reported immediately after unpacking the appliance, at the latest, two days after the purchase date. Repairs made after the expiration of the warranty period are subject to payment.
20. Importer
KOMPERNASS GMBH
BURGSTRASSE 21
44867 BOCHUM, GERMANY
www.kompernass.com
DVD Player KH6524/25
In order to guarantee a cost free repair procedure please get in touch with the service hotline. Make sure you have your sales slip handy.
Sender, please write clearly:
Last name
First name
Street
City/Town
Country
Telephone
Date/Signature
Description of the defect:
GB
DES UK LTD
Tel.: 0871 5000 700 (£ 0.10 / minute)
e-mail: support.uk@kompernass.com
IE
Kompernass Service Ireland
Tel.: 1850 930 412 (0,082 EUR/Min.)
Standard call rates apply. Mobile operators may vary.
e-mail: support.ie@kompernass.com
CY
Kompernass Service Cyprus
Tel.: 800 944 01
e-mail: support.cy@kompernass.com
CbDbpxkHne
CtpaHnca
- TexHHueckx xapaKteprnctHK 26
- Ynotpe6a no npedna3nayene 26
- O6eM Ha doctabkata 26
- Elenentn ha o6nykbahe 26
5.Инсталпане на DVD плевра 27
6.Yka3aHn8 3a 6e3oNaCHOCT 27
7.Дистанцонноупавлень 28
7.1 NocTabaHe Ha 6atepuHte 28
7.2 Ⅱ3noJI3BaHe Ha IINCTaHcIHOHHOTO ynpabJIeHne 28
7.3 CmHa Ha 6aTeepHte 28
8.BkIIOUBaHe Ha DVD IIeIbpa KbM TeJIeBn3Op 28
8.1 BkIIOUbaHe KbM TeneBn3Op 4pe3 ckapT Ka6en/RGB 29
8.2 BkIIOUBAHe KbM TeIeBn3Op Upe3 S BnIeO 29
8.3 BkIIOUBAHe KbM TeIeBn3Op Upe3 BnOe BxOJa (Composite Video) 29
8.4 BkIIOUBAHe ype3 KOMIOHHeTEN CnIHaI (YPbPr/YUV) 29
8.5 BkIIOUBAHe KbM TeJIeBn3Op ype3 HDMI 30
9.BkIIOUbaHe Ha aydno KOMNoHEnTH KbM DVD pIeIbpa 30
9.1 13nckbaHHa 3a BxOJ/3XoJa Ha HiFi nHctanaun .30
9.2 BkIIOUBAHe Ha uio pOBn ayDIO KO mnoHENTupe3 uio pOB Ka6eI .30
9.3 BkIIOUbaHe Ha aydno KOMNoHEnTH upe3 aHaIorOB Ka6eI 31
9.4 BkIIOUbaHe Ha cnUaJIkn 31
- HactpoBbHe Ha OSD MeHIOTo 32
10.1 O6cnykBaHe Ha OSD MeHIOTo 32
10.2 INCTaJIauCIOHNO MeHNO GENERAL 32
10.3 INCTaJIauCIOHNO MEHNO AUDIO 33
10.4 INCTaJIauCIOHNO MeHNO DOLBY 34
10.5 INCTaJIauCIOHNO MEHNO VIDEO 34
10.6 INCTaJIauCIOHNO MeHNo PREFERENCE 35
9.1 INsKBAHn3a BxOa/HxOHa Ha HiFi HnctaIauIaIaIaIaIaIaIaIaIaIaIaIaIaIaIaIaIaIaIaIaIaIaIaIaIaIaIaIaIaIaIaIaIaIaIaIaIaIaIaIaIaIaIaIaIaIaI
3a da ce hacnaxdaBate n3zauHO na bIbHooceHHO 3ByKOBO npexHBBAhe npn Bb3pOn3BExJdAneto Ha DVD-ta c DVD pIeNbpa, Bne MoKeTe da BKIOUHTe KbM Hero HiFi ype6a. PpeDN da BKIOUHTe, npOBepete c nomoUta ha pbKOBoDCTBOTO 3a ekCnloatauHa HiFi ype6ata ...
10.1 O6cnykBaHe Ha OSD MeHOTO
3aДаИЗВИКATEOSDMeHOToHADVDПпeьра,HATINCHETe6yTOH SETUP HaIINCTAHUHOHHTOуnpabNeHne.HaekpaHa ce noRBAOSD MeHOTOCOTdENHITcNIOdMeHOTa:
| GENERAL | AUDIO | DOLBY | VIDEO | PREFERENCE |
| TV DISPLAY | PS | |||
| ANGLE MARK | ON | |||
| OSD LANGUAGE | ENG | |||
| CLOSED CAPTIONS | OFF | |||
| SCREEN SAYER | ON | |||
| LAST MEMORY | OFF | |||
TyrMOrat da ce H36epa cneHnTe IOnMeHOTa:
GENERAL, AUDIO, DOLBY,VIDEO PREFERENCE
C 6ytoHnte 3a ynpabNeHne n 6yToH ENTER Bne MoKTe da npabNte BCNUKN HAcTPOKN B MeHOTO.
C 6bytoHnTe 3a ynpabIeHne <> n36hpate MeHIO KATO npuBxKHe TkblTATA MAPKnOpOBKa KbM CbOTBeTHN CmBOJ HA MeHOTO.
C 6bytoHnte 3a ynpabIeHne n3bnpate TOUka OT MeHOTOKATO npuBnKInTe 3eneHATA neHTA HAD TOKATA.
C 6ytoHa 3a ynpablenHe npemHHabeT B NOIMeHIO To HA TOKaTa, a C 6ytoHa 3a ynpablenHe ce Bp山ate OTHO B c EDHO HBO Ha3aJ.
3a da notbbpnte n36opa cn, HATNCHE 6ytoh ENTER. BcnuKn HABNRAUHOHH VB3MOXHOCTH B aKtyaHHTO MeHIO ca n3o6pa3EHn BdoHNATA NeHTA Ha MeHOTO.
- 3aДанчсichte OSD MeHIOTo, HATNCHete OTHOB6yTOH SETUP.
10.2 INCTaJIauZHOHNO MeHIO GENERAL
B ToBa MeHIO MoKTe Da HacTpOnTe HapnMpEep N3o6paXeHneTo Ha KapTHaTAt NIn E3Nka Ha OSD MeHIoTo.
| GENERAL | AUDIO | DOLBY | VIDEO | PREFERENCE |
| TV DISPLAY | PS | |||
| ANGLE MARK | ON | |||
| OSD LANGUAGE | ENG | |||
| CLOSED CAPTIONS | OFF | |||
| SCREEN SAYER | ON | |||
| LAST MEMORY | OFF | |||
TV DISPLAY
① yKa3aHnne
MeHIOTo TV DISPLAY MoKeIa Ce H36epe Camo npn DeakTHBpuA H3xoH HDMI.
-4:3/PANSCAN IV36epete Ta3n HactpoKa, 3a da n3o6pa3ite npedabAHnraB CTanapTHnA fOpMat 4:3 npn TeNEBn3op 4:3. PpeDABAHn BbB fOpMat 16:9 ce n3o6pa38at 6e3 Cmyuzaaui neHTn, Ho cTpaHnUHnte neHTn Ha n3o6paxenHeTo ca n3pr3aHH.
-4:3/LETTERBOX IeIaHe Ha fHIM BbB fOpMaT 16:9 Ha cTaHapTeH TeIeBn3Op C fOpMaT 4:3. KapTHaTc Ce H3o6pa3Ba C cepHIn IeHTN B rOpHATA n DOnHATA qACT Ha ekpaHa.
-16:9 Ta3n Hactpoika ce npenopbUba, Korato ce n3non3Ba shnpokoeKpaHEn TepeBn3Op c fOpmat 16:9. N3o6paJehneTo BbB fOpMat 4:3 ce HanacBa Xopn3OHTaIHO Ha shnpouHHata Ha N3o6paJaeHneTo.
-Wide Squeeze 1306paXeHHeTo BBb fOpMaT 4:3 ce 1306pa3raBa c cepHn leHTN B IaCHATA N IaBata Yact Ha ekpaHa.
ANGLE MARK
-ON Ako hkyon ot cuenite Ha DVD ca 3acHet noi pa3nueh 3pnteneh bbl, Te ce nOBBA bat aBtOMaTHNO ha ekpaHa nocpeDCTBOM CmBbON Ha kamepa. HatncHete 6ytoN ANGLE Ha dInctAHcUNOHHO ynpabJIeHne, 3a da n3o6pa3nTe pa3nUHNTe 3pntenHH bfln.
-OFF ФункцятaeldeakntnBupaHa.HaekpahHece noRBA HNKAKbB CnMBoI.
OSD LANGUAGE
D.R.C. (Dynamic Range Control)
TaNfynKcHn HAcToBnBa HNBOTo Ha DnHAMnHnO6XbAT 3a 3ByKOBInTe nIbTeKN Ha IrpAinHn FInm, KOInTO ca ONTHMn3npanHn 3a DoJ6n DnITan. Ta3N fynKcHn e Ooc6eNo Heo6xOdIma npn CnyuHaHTo Ha cbpaYnD 3Byk npn HnCKa Cnna Ha 3Byka.
-ON 0yHKnraTa eaktnbnpaHa.
-OFF 0yHKnraTa e daekTbnpaHa.
-AUTO ①yHKUraTa (aKo HMA TAKABa) Ce aKTINbpa ABTOMATHNO.
DIGITAL AUDIO
DIGITAL OUTPUT
B Ta3n Touka OI MeHIO To MoXeTe Ia HAcTPOte N3xoHnra CnHrAn SPDIF.
-SPDIF/OFF KbM 6yKcTe COAXIAL nIN OPTICAL He ce n3daBa cnpob ayuio cnHnJ.
-SPDIF/RAW 13Bexkat ce Heo6pa6oteHnte daHHn Ha 3Byka don6n dHrtan.
-SPDIF /PCM 136epete hactpoikata PCM (Pulse Code Modulation), KOrato e HAniue Bp3ka c uHpob ycInbateI/peCnBep. Upe3 PCM CnHana BaHnT DVD npehbp npedaba cbuNTe ayNo fOpMaTH, KOHTO ca 3aapanMeTeHN Ha DnCKa. IOnbHnTeHNO KbM TOBa pE3 6yKcnte FL n FR ce N3BeJda ayNIO cnHAn.
LPCM OUTPUT 136epete Ta3n To4ka, 3a da hacptponte yectotata Ha cemnnipane 3a o6pa6oTbahe Ha Heo6pa6oteHnte daHHN.
-48K: CtaHapHa HactpoiKa.
-96K: Camo 3a DVD-Ta CbC cbOTBEHATA YecToTA Ha cemnnpahe.
① yKa3aHnHe
Функцятla LPCM OUTPUTe cmo toraba ha pa3noJoxeHne, korato ayinno 3xOdHHcHn SPDIF e Hactpoeh Ha PCM.
CHANNEL DELAY
I36peTe Ta3n ToCAk OMT MeHOTo, 3a Da HactpOnTe 3a6abAHeTo Ha KaHAna
Ha OTdENHt E BnCOKOrOBOpHTe. Pn ONTMAnHa HactPOnKa 3ByKbT
IOCTrA eNHOBpeMeHHO O TBCuKN NocOKn MAcTOTO Ha CnyUaHe. PpeMInHete
c UnpabBAaJus 6yTOH B rpaHCHOTo NOE DO TOcKATA. I36peTe
BnCOKOrOBOpHTe C npabBaJauHte 6yTOHn A HIN V. CynpabBaJauHte
6yTOHn YBEJIuABate/HAMANBATE CTOHOCCTTa HA CTbKnO tno 10 cm.
MaKcHMAnHTo perynHyPeMo OTKnOHeHne 3a BnCOKOrOBOpHTe CENTER e
170 cm. MaKcHMAnHTo perynHyPeMo OTKnOHeHne 3a SUBWOOFER n
3aDHnTE BnCOKOrOBOpHTe n e 510 cm. NotBbPdTe BBBeDeHnte ot Bac daHHn
KATO HATNCHE 6yTOH ENTER.
① yKa3aHnE
3a6abHeta Ha KaHana ce onpeHEn oT npEHNHe BnCOKOrOBOpHTeN, 3aTOBa Te He MoRat da Ce H36epaT.
EQUALIZER
-SOUND MODE ɪЗбөрete таи точka OT менио, áко пи вьзприэ- Вждането на звука щение та иллэготе рда иллэготе рда отпөдөрүлүног орөдөнгүлү орцүнHa ekвалайзөрэ ROCK, POP, LIVE, DANCE, TECHNO, CLASSIC nii SOFT. 3a да дeakтнырate таи Фуннкүя, n3бөрete tɔчкata OFF.
-BASS BOOST 136epete hactpoikata ON, koroato xekaeTe da ycunite 6acobnte toHOBE.3a da deaktnbnpate Ta3n fynkuiy, 136epete toykata OFF.
-SUPER BASS 136epete hactpoikata ON, 3a da n3non3bate 3bykOBITE efeKTn Cynp 6ac. Bacobite toHObe ce ycINBAT. 3a da deakTNBpate Ta3n fYHKsna, n36peTe ToKata OFF.
-TREBLE BOOST I36epete Hactpoikata ON, ako kejaete da ycniTe BncoKInTe ToHOBe. 3a da deakTbnpate Ta3n fynKcun, I36epete OFF.
3D PROCESSING
I36peTe Ta3n ToKa OT MeHIOTo, KOrato XeJaete Da aKTbBnPaTe/daekTbBnPaTe npouecbT Pro Logic II.
① yKa3aHnHe
ПоДмEHOTO PRO LOGIC II MoJE Za ce n36epe cAmo, Korato ca aKTHBnpaHn ananorobnte n3xOdn 5.1.
-PRO LOGIC II 136epete hactpoikata ON, kOrato npouecbT Tp6Ba da e akTHBpuH BnHaH.
I36epeTe HactpoiKaTa AUTO, KOrato npouecBt Tp8BaDa ce akTbHpa cAmO, Korato B HocHTeNa CeHAMnpaKoHaPHOcbbpXaHne Ha Dolby Pro Logic II. 3a daDeakTbHpaTe Ta3n fYHKuN, I36epeTe ToKata OFF.
-MODE B TOBA MEHHO MOKTe Da HacTPOHe pExnMa Ha Pro Logic II. MUSIC 3BykBT Ce Bb3POn3BExJa BB BnCOKOrOBOpHTeNTe 6e3 HnKaBO 3a6aBHe.
MOVIE 3ByKbT Ce Bb3pnOn3BExJa cbc 3a6abAhe ot 10 ms B 3aDnHTe BnCOKOrOBOpTeHn.
PRO
LOGIC IopapnHa BercnHa npoceca DOLBY PRO LOGIC.
AUTO: ABTomatnHa HactpoiKa Ha npoueca (3abcnOT cblbpXaHHeTo Ha HocHTen).
① yKa3aHnHe
Подеменита PANORAMA, DIMENSION n CENTER WIDTH cnyka t 3a фина Habсторька на 3bvyeheto n ca на pa3noJoxeHne camo, korato нассторе npoceseh pexm MUSIC.
-PANORAMA 136epete hactpojkaTOn, 3a da akTNbpuTe TOba noo6peHne Ha 3ByueHeTo. 3a da deakTNbpuTe Ta3n _YHKU, 136epete tokata OFF.
-DIMENSION 136epeTe eHa oT hactpoKnTe SIZE-3 do SIZE 3,3a da aKTHBnpate ToBa nOdo6peHne Ha 3Byka.
-CENTERWIDTH IV36epete eHa oT hAcToPoiKHTe LEVEL 0-7,3a da noIyUHTe cbOTBETHOTO nOIO6peHne Ha 3ByueHeTo.
REVERB MODE I36epeTe Ta3n To4ka OT MeHIOTo, AKO npn Bb3npoN3-BeKdaHeTO Ha 3ByKa JeNaTe Da H3non3BaTe eEINOT npedBapntEnHO onpeDeneHnTe eΦeKT Ha Xon CONCERT, LIVING ROOM, HALL, BATHROOM, CAVE, ARENA, INI CHURCH. 3a da DeakTbInPate Ta3n FyHKuY, I36epeTe To4kata OFF.
10.4 INCTaJIauHNoHHo MeHIO DOLBY
B ToBa OSD MeHIO MoKTe Da HappaBHTe HactpoiKnTe 3a N3xoJa Dolby Digital.

DUAL MONO 136epete Ta3n T0ka OT MeHIOTo, 3a Da HactponTe I3xoJa Ha Dolby Digital Ha STEREO, L-MONO, R-MONO nn MIX-MONO.
DYNAMIC 136epete Ta3n To4ka OT MeHOTo, 3a da nonyHTe ONTHMJIHO Bb3POn3BExKaHe Ha 3Byka pRIM MHNMaJIHa Cnla Ha 3Byka.
B NahtpoKa FULL cnHnHte nacJx ce 3aIywaBat n TnxTe nacJx ce Bb3npOn3BexkDat no-BnCOKO.
① yKa3aHnE
Ta3n ΦyHKUe E B3MOKHA cAmO, KOrato Ce H3IOJ3BA UΦPOB ayDINO KOMTOHEHT.
10.5 INCTaJIauHNoHH MeHo VIDEO
B ToBa MeHIO MoKTe Da I3BbPwHte HAp. HAcTpOuKn Ha BnDeo N3XoJa, pe3OInOuNra Tn HAcTpoKn Ha cBeta.
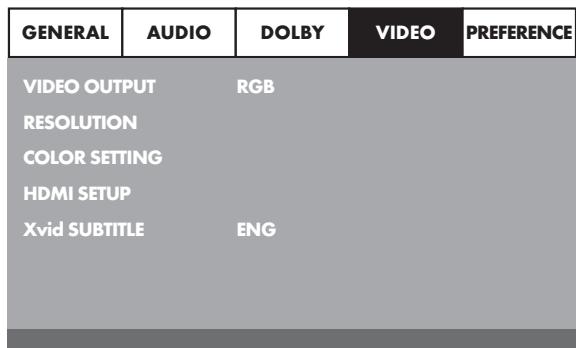
VIDEO OUTPUT
-S-VIDEO BnIeocnHaJIbT Ce n3BexJa npE3 n3xoJa S-Video n 3xOJa Composite Video.
-YUV BnIeOCHHnBt Ce n3Bexka BbB φOpMaT YUV BnIeO n3XoJnte Ha KOMnoHeHTnte Y, Pb/Cb, Pr/Cr.
-RGB BndeocnHaJIbTe H3BExKa B CBeTeH fOpMaT RGB npe3 SCART Bpb3kata.
① yKa3aHnHe
Tazn Hactponka e aktnbHa cAmO, Korato e deaktnBnpaHa HHctanaHra HDMI.
Изховrt Composite Video на DVD пениbraе винага Актувоган. Ак озбраната настюka ce pa3ичава OT DeиctBNTeHnna BapuANT ha CBp3bahe (ocben npri Composite Video), e Вьзможно Да hyma Kaptnha Ha ekpana Илп Тд се ИЗБрэяв по.В takвсCityaн HatncheMeHOROKpaTHO 6yTOH V-MODE Ha nCTAHUNHO ynpabJIeHne, KOrato e cnpno ВьзпрОИЗБжДанeto,ДOKATO Ha ekpana се NOЯВи павиното ИЗБржehne.
RESOLUTION B TOBA NOIMeHIO MOKeTe Da HAcTPOInTe pa3NIuHInTe pe3OJIouzIN (480i/480p/576i/576p/720p/1080i/1080p) 3a N3XoJa HDMI/BnJeO N3XoJHa KOMNoHEnTHe.
① yKa3aHHe
O6bphete BnHMaHne Ha ToBa, Ye 3a TeNeBn3HOHHNc TAndapt PAL Tp86Ba da ce N36pe HactpoiKa c 50 Hz, a 3a TeNEBn3HOHHNc TAndapt NTSC NaCTpoiKa c 60 Hz.
COLOR SETTING
B ToBa nOdMeHIO MoKTe Ja HAnpabIne HAcTpoiKn HAp. 3a JRPKocT, KOHTPACT NnN ZBeTeH TOH.
-SHARPNESS 136epete TOBa NOmEnH, 3a da HacTpOnTe eHa ot npedBapHTeNHO ONpeJeIeHInTe cToHocTn 3a _OKCNPOBkata HIGH, MEDIUM NIN LOW).
-BRIGHTNESS Hactpoite c nomoeta ha ynpabraaunte 6ytoHn npkocta ot-20 do +20.Cnei TOBa hATNCHTe 6ytoH ENTER,3a da npoobnxnte.
-CONTRAST HactpoIte c nomoIa Ha ynpabIbIbIaIte 6yToHn KOnIpaCTa ot -16 do +16. CneI TOBa hATncHeTe 6yToH ENTER,3a da npOblJxHte.
-GAMMA IV36peTe TOBa nOIMeHIO, 3a da HactpOnTe eHa oT npedBapHTeINHO ONpeIeHInTe cToHocTn Ha rAmata (HIGH, MEDIUM, LOW NONE).
-HUE HactpoIte c nomoTa Ha ynpablaBaunite 6ytoHn I CBetTHra ToH ot-9do+9.CneT TOBa HATNChe 6yToH ENTER,3a da npoBlnkTe.
- SATURATION Hacrpoite c nomoeta ha ynpabraaunte 6ytoHn HacnuaheTo Ha zbeta ot -9 do +9. Cne ToBa hATnchete 6ytoH ENTER, 3a da npodbnxnte.
-LUMA DELAY IV36peTe TOBa nOIMHeIO, 3a da HactpOnTe eHa oT npedBapuTeHNO ONpeDeneHIne CTOnHOCTn Ha rAmata (OTnn1T).
HCTaIIpaHeHaHDMI
-ON 136epete TOBa nOIMHeo,3a da aKTHBnPaTe HDMI n3xoJa.
-OFF 136epete TOBa IOnMeHIO, 3a Da DeakTHBnpaTe HDMI n3XoJa.
Xvid SUBTITLE B TOBA NOIMENHO MOKETe Da HAcTPOINe E3Nka HA cy6HTPnTe, KOINTO Tp86Ba Da Ce H3NON3BAT CTAHApTHO npn rIeJaHe Ha Xvid.
10.6 Истадацноно Meню PREFERENCE
B ToBa MeHIO MoKete Da HAnpabInTe HAnp. HAcToPoiKN Ha BnIeO I3XoJa, Da aKTbInPate/DeaekTbInPate DetCKata 3aunTa Nn Da npomeHte naponata.
① yKa3aHnHe
ToBa MeHIO MoKe Ia Ce I36epe cAmo npn 3aBbPseHo Bb3npOn3BExKaHe PREFERENCE.
| GENERAL | AUDIO | DOLBY | VIDEO | PREFERENCE |
| TV TYPE | PAL | |||
| AUDIO | ENG | |||
| SUBTITLE | ENG | |||
| DISC MENU | ENG | |||
| PARENTAL | ||||
| PASSWORD | ||||
| DEFAULT | ||||
TV TYPE
-PAL TeNeBn3HOnHHa HOpMa PAL
-NTSC TeNEBn3HOnHHa HOpMa NTSC.
AUDIO B TOBA IIOJMeHIO MOKTeJa HAcTPOHTe e3Nka, KOHTO Tp86Ba Da Ce H3NON3BA CTAndapTHo npn IneJaHe Ha fHIMN.
SUBTITLE B TOBA NOIMEHIO MOKTe Da HAcTPOnte e3Nka Ha cy6HTPnTe, KOINTp8Ba Da ce H3NON3BAT cTaNapTHo npn rIeDaHe Ha fHm.
DISC MENU B TOBA NOJMEHIO MOKETe Na HAcTPOTe E3Nka Ha IINcKa, KOJTO Tp86Ba Da ce H3NON3Ba CTAHApTHo npn rIpeJaHe HA φιπM.
PARENTAL B Ta3n To4ka OT MeHOTo MOKeTe Da onpeDenHe TB3pactOBTO ORpaHHueHne.
i yKa3aHnHe
MHoro MaIKO DVD-Ta Hmat TexHnuecko Bb3pactOBO orpaHnueHne. Ako HaDVD-TO Hma Bb3pactOBO orpaHnueHne, To Detckata 3aunHa HA DVD PnEynba He MoKe Da Ce AKTNbPa. JTeckata 3aunHa FyHKnOHnpa CAmO, Korato e AKTNbPana Ha DVD PnEynba N B NoctabEnn Dnck e Hannce onpeDenen Koi. Korato NoCTaBnTe DVD, KOrTo Cnopei detckata 3aunHa He MoKe Da Ce nycHe, Ha ekpana Ce noRBA npOzopeu, B KoIto Tp6Ba Da BBBeDeTe nponata N da NotBbpDnte c ENTER. HkON DVD-Ta N KomnakTHnte DnCKOBe ca KaINPAHn C KodnPauN cnHann. TaKa DVD-Ta MoIat Da 6bDat pa3deneHn Ha ocem pa3nUHN Knaca. N36epete eEHN OT cIeHNte Knaca, 3a da 3aunHTe Bb3pOn3BExJdAHeTo HocHTeMy c npona :
1 KID SAFE: noxdoxoia n 3a maJkn deca
2G: 3a BCNUK Bb3paCTOBn Ipynn
3 PG: npenopbUba ce poNTeNcKn Hau3Op
4 PG 13: ctporo ce npenopbva pointeckn ha30p hkyon ot cuehnte ca 3a6paheHH 3a deua no12 roHH
5 PGR: 3a Mnaexn no16 roHH; npenopbua ce poHnteckn Hau3Op
6R: 3a MnaJexn noi 16 roHn; cTporo ce npenopbya poNTeNcN HAD3Op
7 NC 17: 3a6paheHo 3a MnaJExn noI 18 roJHH
8 ADULT: CAMO 3a Bb3paCTH
Pnmep
Ako onpejeneno DVD e kojnapo Hnnp. c kna 7 nnn 8, a Bne cte hacponnn enHn ot knaocobe 1 do 6, b taKbCnyaie ce noBra Cbo6ueHne n Bne Tp6Ba da BBBeTe nponata. B3mOxHO e n KoJpaHeto cmo Ha qactn ot DVD-to, toecHa onpejenen CuEHn ot fHnma.
3a da akTNbnpate Klnaca 3a doctbn, Tp86ba da n36peTe xenahn oT Bac klan B MeHIO PARENTAL N da BBBeDeTe nponata (136900). IOTBbpTe BBeDeHnte ot Bac daHHN Kato HATNCHe 6yToH ENTER.
PASSWORD
B Ta3n Tocka OT MeHTo MoKTe Da npomehnte
fa6pnuHo HactpoeHata napona (136900) n da BbBeTe Co6CTbeHa. 3a He rMOrat da ce n3nON3BAT cMo zuΦpnte
0-9.
① yKa3aHnHe
Ako cte 3a6paBnHOBata cn npona, moKTe da n3non3bATE fo6puHo HacTpoehata npona (136900).
DEFAULT
B Ta3n Touka OT MeHOTO MoKete Da Bb3ctAHOBHTe DVD NneBpa B CbCToHHeta My npu DoCTABkata.
Cnei KaTo Buee ...
- HCTaHpaXte DVD npebpa Ha noDxoJauo Macto
BKNIOHxTe DVD nIeNbpa KbM TeNEBn3Opa Upe3 eHa nocOueHnTe Bb3MOXHOCTN
BkHouxTe no JeanHe DVD nnebpa KbM HiFi nn Surround ype6a (aHaIorOba/ucpOba) pecn. KbM pecnBep Dolby Digital nn DTS
NoTbxTe NCTaHnOHHOynpabHeHKe KATO NOCTABxTe B Hero 6atepnte
HaynxTe KAc Ce H3BnKBa N O6cnykBa C IInCTaHIOHHOTynpabNeHne OSD MeHOTO
... cera Baunr DVD nneBp e roTob 3a ekcnnoatauia.
11.1 BkIIOUbaHe/H3KJIIOUbaHe Ha DVD IIeIbpa
BknHoueTeKa6eBaKoHTaK,INCTaIIpaHnO npabInlata.
- Поставete пекьсач POWER Haобразнataстара Ha урета Ha no3иця ON. DVD ппьрт се hamima cera в ржим Ha rotobhoct.
C 6ytoHa STANDBY Hn Da nctaHOnHHTO ynpabHeHne nn 6yToH STANDBY Ha ypeB Bne MoXeTe da BKIOUHTe DVD npebpa pecn. da ro N3KIOUHTe OTHOB B pexHM HA rTOBHOCT.
3a da n3knnoHTe DVD nneBpa, noctabete npekbcbaua POWER ha 6o4pHaTata cTpHa Ha ypeDa B no3nua OFF.
① y_Ka3aHHe
Korato e n3KnIOueH nnn KOrato ce hAmnpa B pexnHa rotobhoct, Ha dncnpe He ce noBBA bat HkakBn Hndnkaun. B pexnHa rotobhoct Ha dncnpe CBETH CBETOHOHDATA NAMNNUKA.
11.2 NocTabRHe H DVD
3a da Bb3npoH3Bede TDCVD nnebpa:
BKNIOUcTe TeJIeBn3Opa.
yBepete ce, ye DVD nIeIbpbIc Ce HAMIPA b peKIM HA rOTOBHOCT.
Korato teneBn3OpbT, DVD nneBpBt n eBeHTyAnHNo dpyrnte BkIooHen ypeHn (HaNP. ayDnO kOMnOHeHTN) ceHAMnPAT B rOtOBHocT n Ca BkIooHen n DVD nneBpBt e BkIooHen npabvInHO kBm teneBn3opa, Bne MoXete da BnIte Ha ekpaHa noroto Ha Silvercrest.
AkoB DVD nnebpa He e noctaben nnck:
Ha eKpaHa ce noBBA HnIkaunTa NO DISC.
- OTbopete otIeHHeHTo 3a IINCKa KATO HATnCHTe 6yToH ▲ OPEN/CLOSE Ha NCTaHcHOnHHTO ynpabJIeHne IINHa npedHata CtpaHa Ha DVD IIeYba. Ha ekpaHa ce noBRAu INdNkaunTa OPEN.
- Noctabete dNcKa c HauHncaHata/etHKeTnpaHata cTpaHa harope. 3a DboHn dNCKObE: cTpaHata, KoTo XeNaete da 6bDe Bb3npOn3BedeHa, Tp6Ba Da coNu HAnOy.
CneI KATO NOCTABNTE DnCKa, HATNCHE T OTHOB6yTOH ▲ OPEN/CLOSE Ha DnCTAHUONHOYnpAByNEHHe NnHa NpEHaTcPAnHa DVD nneBpa, 3a Da 3aTbOpNte OTdeneHHeTo Ha DnCKa. - Cьлбржанно на дипа ce захда;_TOBA може д прдьнги Няково секун; Ппeз TOBA врeme на ekpa ha ce появba LOADING.
11.3 NocTaBHe Ha NaMeTHn KapTH/USB cTHK c MP3-/ WMA-/ MPEG4-/JPEG- aHNoBe
① yKa3aHnHe
DVD Ппевьгсторы ванги в ржим DVD. 3а дичтate nametн KapTN/USB Меропс STNKOBe, HATNCHete 6yToHa USB Ha nuctahnOHHOTO ynpablenne.
DVD nneBpbr pa3no3HbA foPMAHTHe JPEG, MP3, WMA n MPEG4.
3a da noctabnTe nameTHn Kaptn B DVD nneBpa ot Tnna SD, MS/MsPro m MMC:
BKNIOUcTe TeNEBu3Opa.
- yBepete ce, ye DVD nIeIbptc HeHAMIPA bpeKIM Ha rotobHOCT.
Korato TeleBn3OpbT, DVD nneBpbT u eBeHTyAnHO npyTte BkIoueHn ypeN (HaNP. ayIno KOMnoHeTHn) ce HAMnPAT B rOtOBHoc T ca BkIoueHn n DVD nneBpbT e BKIOUeH npabINHO kBm TeLEBn3Opa, Bne MoXeTe da BnDte Ha ekpHa loroto Ha Silvercrest.
AkoB DVD pneiYbaPe He e nocTaBeHnck:Ha ekpaHa ce noRaBA Hnndkaunra NO DISC.
- ΠbxHete namETHATA KAPTa B ONpeJeHnHa Hea CNOT.
B 3aBnCmOCT OT TnHa Ha NamEtHata KapTa, KOrTo JeJaTe Da NoctabHte, CneBaIte CneHNITE CTbKN.
IpeynpexJeHne!
O6pbuaTe BnHaBn BnHaMaHne Ha ToBa Da nocTabaTe NaMeTHnte KaptN B Cnota No HauHna Oncan No-dony! B HnKaKbB cnyaH He npereBaHTe NaMeTHnte KapTn Pn nocTabaHre B cnota! NbxHete NaMeTHnte KapTn C lek HATNC B CNOTa N BHaHn DOKpaH.
He noctabraye namethne kaptn 6e3 da ynpaxhbaTe HATNCK:
- Kontrponpaite. Далу CTaba Вьпoc за Nametha Kapta, Кая може за ce ВьзронзBEde c DVD ппьра.
Ako Ha Kytna H a DVD/VCD/S-VCD He e otneatah KoHa ctpaHata ...
a camao cnmbola TO DVD/VCD/S-VCD Moxe da ce Bb3npn3BeJe c DVD nnnepa.
TO DVD/VCD/S-VCD HMa da MoKe da ce Bb3npoH3BeDe eBeHTaJIHo c DVD nneBpa. Ipobepete ToBa KaTo ce oNtate da Bb3npoH3BeTeDVD.
B 3aBnCmOcT OT NOCTABeHOTo DVD/VCD/S-VCD e Bb3MoJxHO CbIbPjXaHHeTo Ha DVD/VCD/S-VCD Da He MoJxe Da Ce Bb3IpOn3BeJe BeHara, TbN KATO Ha ekpaHa Ha TeneBn3Opa Ce NpBraMbPO MeHIO 3a H36Op.
B takb cnuya n36epete c npabnaibaute 6ytoHn H a nctahnoH- hoto ynpablenhe tokata ot meHHOTo, c KOrTO ce CTapTnpa B3npo3BexJaHeTo Ha fHmTa.
3a da cnapate Bb3npoN3BexJaHToHa fHnMa, HATnCHete 6yToH ENTER HA nCTAHnOHnHO ynpabHeHne nn HATnCHete 6yToH PLAY/PAUSE II.
Ha nucnne Ha npedhata ctpaHa h DVD npebpa ce noBBA cneHnte Hndkaun:
Pn DVD-ta:
DVD
HOMepaHaIgabata,KoTcCeIeDaBMomeHTa
- ɪЗмнанлOTO дocera врeme Ha akтuyaиното DVD B мнунтуи секунди
Прн VCD/S-VCD-тa:
"VCD"nnn "S-VCD"
HOMepbT Ha akTyalHOTa3aJIaBHe, KOeTO Ce IneBa B MomeHTa
- ɪЗмнаноTo Дocera Врeme Ha aktyанhoTo VCD/S-VCD B Mнути N Cekyнд
12.1ФyHKun npn Bb3npoH3BexJaHe Ha DVD,VCD nnS-VCD
Iokato ce b3npo3Bexka DVD/VCD/S-VCD, moke Te n3no13BaTe cneHnTe cyHKuHa DVD nnebpa:
Cnnpahe Ha Bb3npoH3BekKaHeto (nay3a)
3a da cnpete Bb3npoH3BexJaHTo Ha noctabeHoto DVD/VCD/S-VCD ...
- HATNCHEte NO Bpeme Ha b3npoH3BexJaHeTo 6ytoH PLAY/PAUSE II Ha nncnna Ha npednata cTpaHa Ha DVD nnebpa n Ha ekpaHa ce noRaBa II. Ha ekpaHa Ha TeleBn3opa BxKdTe Cton-KaIbP Ha cnprHa T B MOMeHa cUeHa.
3a da npoIbIKNte Bb3npOn3BExJaHTo Ha 0nMa, HATncHeTe NOBTOHO 6yToH PLAY/PAUSE II.
PpeKbcBaHe Ha Bb3npOn3BexkdaHeto (STOP■)
3a da npekbcheTe Bb3npOn3BexJaHTo Ha fHnMa Ha noctabehoto DVD/ VCD/S-VCD, HATNCHeTe 6yTOH STOP
Cpe3oMnpauaΦyHKuia
Ako cte npekbchann B3npon3BexdaHTo Ha noctabehoto DVD/VCD/S-VCD 4pe3 eDnokpatHO HATnCKaHe Ha 6yToH STOP , To DVD nneIbpT 3anametra BA bTOMaTHUHO MCTOTO, Ha KOrTO cTe npekbchann B3npon3BexdaHTo. Ta3n fynkua CE HAPuHa "pe3Hmnpa7a Fynkua". Ha ekpana Ha tenebnOpa ce IOBRABa PRESS PLAY KEY TO CONTINUE.AKO HATnCHete NOBTOPO 6yToH PLAY/PAUSE II, B3npon3BexdaHTo 3ano7Ba Ha 3anametehoto MRCTO.
Be3 pe3Hmnpaia yHKua
Ako cte npekbchann B3npoan3BexkdaheTo Ha noctabehn DVD/VCD/S-VCD 6pye3 eHOKpatoHO HATNCaHe Ha 6ytoHa STOP n HATNChe Toe BeHbX 6ytoh STOP bTOnn T, To 3anameteHOTmRcTo, Ha Koeto Cte npekbchann B3npoan3BexkdaheTo, ce n3tpnBa. Ako HATNChe OTHOBO 6ytoH PLAY/PAUSE II, B3npoan3BexkdaheTo Ha noctabeHoto DVD/VCD/S-VCD 3anoYba oTHaCaNo.
N3BnKBAHe Ha DVD MeHIOTo (MENU)
① y_Ka3aHnE
Bb3mOxHo e Ta3n fynKzna da He ce HAmnpa Ha pa3noJoxHe npi BCnuKDVDTa! Korato ce onntate da n3BbpWite fynKzna, koTo He e Ha pa3noJoxEne,Ha ekpaHa ce noka3Ba cHMBOna 0.
Pn MHoro OT ΦHIMITE Ha DVD Ha INsCA HMa IINABHO MEHIO, KOETO -OCBEN B3MOXHOCTTA 3a IIneDAHe HA OCHOBHnΦHm-Bn DABA B3MOXHOCT 3a N36Op Ha CneHNITE CbIbpxAHN:
e3nK Ha cy6HTPnTe n 3ByKa Ha hnIma
- InpekTeH n36Op Ha oTdeHnHe rIabN
Bb3npoH3BexJaHe Ha 6ohyceH MaTepeHAn KbM fHJMa (foHOba HfOpMaun, "Making of" n np.)
Ako nma takoBa MeHIO Ha NoctabeHHa B DVD nIeBpa Dnck, Bne MoKeTe da ro N3BnKate PO BpeMe HA B3Ppon3BexKaHeTo KATO HATnCHete 6yToH MEnu Ha nCTaHcNHOHTO ynpabNeHne.
OTeHNHtE NOmEHOTa MoKTe Da N36peTe Upe3 HATnCKaHe Ha ynpabnaHTe 6ytoHn Na DCntAHUHOHTo ynpabHeHne.
3aДа NOTвьрдпe ИЗбразно КОДмЕнHo,НATиСЧETe 6уTOH PLAY/PAUSE >II nIIN 6уTOH ENTER Ha ДИСТАнцИнHOTO ynpabNeHne.
3a da ce Bbphete OTHOBO KbM BB3npo3Bexdaheto, HATNCHEte OTHOB6yTOH
MENU HaIINCTAHUHOHHOTUynpabHeHne.
① y_Ka3aHnE
Ako cte npekbchanBb3npo3BbexdaHETOpe3DBykpatHO HATNCKaHe Ha 6yToH STOP (CnnpaHcHa B3npo3BbXdHETO6e pe3HompaHa yHKu, N3BKNBAHETO HA nabHOTMeHHO DAcka He e Bb3MOxHO.
Playback Control (PBC) npn VCD/S-VCD
HЯkon VCD/S-VCD ot Bercnpa3nonarat c Playback Control (HaKpatko „PBC").
Playback Control o6o3haaba IaBHO MeHIO,OT Koeto MoRat da ce o6cnykbat pa3nunn Hya VCD/S-VCD.
Ako eHa ot noctabehnte B DVD nneynbpa VCD/S-VCD pa3nonara c PBC, Bne Tp6Ba da a AKTNBnpate nbpBO, 3a da MOKETe da N3o6pa3nTE meHHTO.
- По Врeme Ha Bьзпроньжданeto Ии пи ппсьсато Вьзпроньжданeн Hatиснete 6утон MENU. Ha Диспгя ce noявва Индана PBC: OFF.
- Hatnchete OTHO6yToH MENU. Ha nCnpeCe noaBbA HnNkauTAt PBC: ON. PBC e BKnHueh cera, rnaBHOTo MeHHo Ha nCKa MoKe da ce n3BnKa C 6yToHnte MENU nIN TITLE.
① yKa3aHnHe
Ako BkIIOuHrpe PBC no BpeMe Ha cAmOTO Bb3IpOn3BExJaHe, To toraba e Bb3MoxHO To da Ce npeKbcHe H da 3aOpHe OT cAmOTO Haano peCn. C rnaBHOTo MeHIO.
IpeMHabane KbMaHauanToHa rnaBata (Skip)
① y_KA3aHnE
Bb3mOxHO e Ta3n fynKzna da He ce HAMnpa Ha pa3noJoxHe npu BCnKu DVD-Ta! Korato ce onntate da n3BbpWte fynKzna, KOrTO He e Ha pa3noJox-ehne, Ha ekpaHa ce noka3Ba cHMBOna
C 6ytoHnTe SKIP FWD H SKIP BWD NO BpeMe Ha IneJaHe Ha fHnMa OT noctabeHaTAT DVD/VCD/S-VCD Bne MoKte ...
Ja npeckoHTe Happei KbMaHauJIoTO Ha cneBaIaTAt IaBaa IIIN
Ja ce Bbphete 6paTHo Kbmpednata rnaBa
I36paHATA rnaBa ce Bb3npOn3BexJa BeHara 6e3 da e Heo6xOJMo da HATINCHETe 6yToHa PLAY/PAUSE II . HomepbT Ha cBoTBetHO I36paHata rnaBa ce NOKa3BA Ha dncnpe Ha npedHata cTpHa Ha DVD nneBpa BnBO ot BpeMeTO 3a Bb3npOn3BexJaHe.
BbBexkdahe Ha HOMepa Ha 3arnabneto qpe3 uHpOBnTe 6yToHH
① y_ka3aHne
Bb3mOxHO e Ta3n fynKuJra da He ce HAMnpa Ha pa3noJoxHe npu BCnuKDVDTa! Korato ce onntate da n3BbpWte fynKU, KOrTo He e Ha pa3noJoxEHe, Ha ekpaHa ce noka3Ba cMBoNa 0.
BmecTo Ia n3non3bATE fynkunra Ta Skip Bne Moxete Ia BBBeTe 3aIabnTa ot hIIma Ha NoctabeHOTo DVD/VCD/S-VCD N dIpeKTHO Upe3 BbbexJaHe HA HOMepa Ha 3aIabneto C NOMOuTa Ha uNpOBte 6yTOHn Ha dIcTahNoHHOTO ynpablenHe.
3a ceNTa HATnCHete NO BpeMe HA B3npOn3BExdHaTeO HnN pN cIpraHO B3npOn3BExdAne OTTOBaPArIe NaΦpOBIne 6yToHn Ha NCTaHcNoHHOTO ynpabLeHne HOMepa Ha 3aRnabYrta - HAp. 6yToH 3a TpeTOTO 3aRnabHe.
Bb3npo3BexdaheTo Ha 3aIabHeTo C nocouehnHOmep cTapTnpa ABTOMATNHO.
HnpeKeTeH n36op Ha InaBa H BpeMe NocpeaCTBOM fYHKunraTa 3a TbpceHe (GOTO)
① yKa3aHnne
Bb3mOxHO e t3n fynKuIN da He ce HAMipat Ha pa3nONoXeHne npn BCn4Kn DVD-Ta/VCD-Ta/S-VCD-Ta! Korato ce onntate da n3BbPwHte fynKcIn, KOHTo He ca Ha pa3noNoXeHne, Ha ekpaHa ce noka3Ba cmbona
BbBexKaHe Ha No3nIa 3a BpeMe ype3 fynKuIra 3a TbpceHe DVD, VCD n SVCD:
- По време на Вьзпponивекдане натусятete 6утог GOTO на дuctанциноюу упавленье. MeHOTO 3a време се пояbra ha ekpaHA ha tenebnOpa.
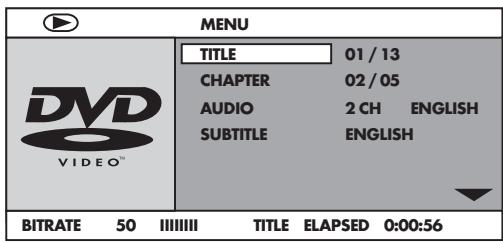
- Плелот Title e n36paHO abTomatuHNO kato nbpBO. HATnchete 6ytoH ENTER bBbEeTe c nomoTuHa uΦpOBHe 6yToHx JeJahOTo 3aIaBne. 3aIaBne 01 e npN DVD-Ta B NObeUeTO cnuyan rnaBHnФmM.
- Hatnchete Habratauohnn6ytoh 3a da n36peTe noneto CHAPTER. Hatnchete 6ytoh ENTER N BbBeTe c nomoTu ha uHpObnte 6ytoHn XeNaHATA rnaBa.
- Hatnche T HABINIaIIOHNN6yTOH 3a da n36epTe noJeTo AUDIO. Hatnche 6yTOH ENTER n n36epTe c HABINIauIOHnHTe 6yTOH aYdno e3NK.
- Hatnchete Habnraunohnn 6ytoh , 3a da n36epete noneto SUBTITLE. Hatnchete 6ytoh ENTER n n36epete c Habnraunohnnte 6ytoh n e3nk ha cy6ntptne.
- Hatnchete HabiruaioHHna 6ytoh , 3a da n36epete noIeTo ANGLE. Hatnchete 6ytoh ENTER n36epete c HabiruaioHHnte 6ytoHn Apyra nepcneKTbHa KaMepata (ako hma Takaba).
- Hatnchete Habrauohnn6ytoh 3a da n36epete noneto TT TIME. Hatnchete 6ytoh ENTER n BbBeTe c nOmoTu Ha uHpOBte 6ytoHn JeJahOTO BpeMe Ha 3arnaBHeTo.
- Hatnchete Habiratunohnn6ytoh 一 3a da n36epete noneto CH TIME. Hatnchete 6ytoh ENTER n BbveTe c nomoTa Ha cnlpobnte 6ytoHn Jeelanato BpeMe Ha InaBata.
- Hatnchete HabiruaioHHna 6ytoh , 3a da n36epete noneto REPEAT. Hatnchete 6ytoh ENTER n36epete c HABIRuaioHHnte 6ytoHn yHKcua 3a NOBTOpeHne (BIXK cbso OyHKcua 3a NOBTOpeHne).
- Hatnchete HabiruaioHHn6ytoh 3a da n36epete noIeTO TIME DISP. Hatnchete 6ytoH ENTER n36epete c HABIRuaioHHnTe 6ytoH n3o6pa3raBaHe Ha Bpemeto (Bnx CbIo n3o6pa3raBaHe Ha NfOpmaun3a DnCKa).
3aДаИЗКПОНЧITE MEHOTO, HATINCHETE OTHOBO 6yTOH GOTO.
Aydno KOMnakTeH nck
- ПО Врeme на Вьзпроньждане Натис悔у HeKoNkoKpaTHO 6yToH GOTO HA ДИстанцюното уралгенne. Слднite ИndиКаци с появBat nocnéобателно, в Конт ВиЕ можete д a Вьбedede ВрemeBa loЗиця с цфpondITE 6yToH:
DISC GOTO: BbBeTe Tuk BpeMeBa No3nua Ha NsKa,OT KOrTO Tp6Ba Da cTAPHa B3npOn3BexJaHeTo.
TRACK GOTO: BbBedeTe Tuk BpeMeBa No3nua 3a akTuAnHTo 3aarrabHe, OT KOrTo Tp6Ba Da CTapTnpa B3npOn3BeKdAHeTO.
SELECT TRACK: BbBeTe TyK HOMepa Ha 3aIaNabHeTo, OT KoITo Tp86Ba Da cTApTnpa B3PpOn3BExJdAHeTo.
MPEG-CD
SELECT: BbBeTe Tk Homepa Ha 3aIJIaBHeTo Ha IINCKA,OT KOITo Tp6Ba Da cTApTnpa Bb3POn3BExKaHEno.
GOTO: BbBeTeTe Tk BpeMeBa No3nua 3a AkTyAnHTo 3aRnabHe, OT KOrTo Tp6Ba Da CTapTnpa B3npOn3BexJaHeto.
Bbpo TbpceHe HnpeaHa3a
C 6b30TO TbcpeHe MoKTe No BpeMe Ha B3POnu3BExKaHae Ha nocTaBeHoT O DVD/VCD/S-VCD da H36epete onpeJeHn nacaxn.
3a 6b30 to bpche Hnpei/Ha3ad HaTHcHete MHOKpaTHo 6yTOH FAST FWD pecn. 一 FAST RWD, 3a da hactponTe cneHNITE CKOpocTH Na TbpcHe:

① y_ka3aHnE
IbpeMeHa 6bp3oTo Tbpcene He ce Bb3POnuBExKa3ByK.
3a npoBnKHe Bb3npOn3BExJaHTo Ha fHIMa C HopMaHa cKopocT Ha H36paHOTo MaCTO, HatncHete No Bpeme Ha TbpcHeTo PLAY/PAUSE II.
BabHO B3npoH3BeKdahe Happei (BpeMeBa lyna)
3aДа ВьзпponИЗveTe 3a6abEHO cIbIpbXaHHeTo Ha nOCTaBeHOTo DVD/VCD/S-VCD ...
3a 3a6abEHO Bb3npOn3BExJaHe HATnChete MHOrOkoPaTHo 6yToH SLOW, 3a Da HAcTpoHtCneDnHTe CKOpOCTHa Bb3npOn3BExJaHe:
① yKa3aHnHe
IbpeHa 6abHTo Bb3npOn3BexJaHe He ce N3daBA 3ByK.
3aДЯпpoДьЖиTe Bb3npOu3BExJaHTo C HopMaJHa CkOpOCT Ha 36paHOTo MxTO, HATnCHete NO BpeMe HA 3a6aBeHOTo Bb3npOu3BExJaHc 6yToH PLAY/PAUSE II.
YBeHnUaBaHe Ha n3o6paXkeHHeTo (Zoom)
i yKa3aHHe
Bb3MOxH0 e Ta3n fynKuJra da He ce HAMnpa Ha pa3nonoXeHne npn BCnuKDVDTa! Korato ce onntate da n3BbPwnte fynKuJra, koTo He e Ha pa3nonoXeHne, Ha ekpana Ce noka3Ba cMBOJa 0
По Врeme Ha Bb3npoH3BexJaHe Ha noctaBeHo DVD/VCD/S-VCD, BHe MoKTeДуВeHnHTe n3O6paxKeHneTo Ha ekpaHa Ha Tprn CTeHn. 3a ZeIta HATnCHete 6yTOH Z0OM Ha NCTaHcHOnHHTo ynpabNeHne, 3aДa HAcTponTe CNeHnTE CTeHn Ha yrOleMraBaHe:

C 6ytoHnTe 3a ynpabVeHne 1 MoKe Ia ce npemecTn n3praHaHata qact Ha yroJeMaBaHeto.
3a da n3KlnouHTe fynkunra 3a yrolembahe n 3a da ce BbPHeTe KbM HopmaHata rolemnHa Ha n3o6paXeHne, HATNCHEte MHOROKpHo 6yToH Z00M.
Помяна на персөнгүдага на камерatura (ANGLE)
i yKa3aHHe
Bb3MoJHO e Ta3n fynKuJra da He ce HAMnpa Ha pa3noJoxHe npu BCnuKDVDTa! Korato ce onntate da n3BbPwnte fynKuJra, KOrTO He e Ha pa3noJoxHeHne, Ha ekpaHa ce noka3Ba cMBOJa
HЯков сил'mа DVD сдьржатлави, ко'to ca 3achetn eDHOBpeMeHNo ot pa3niuHn nepcneKTNBHa kaMepaTa.Пprсил'm, kOTo pa3noIarat c takBa tlabN, Bne moKTe da ha6JIIOAbate cbUata tlaba ot pa3niuHn nepcneKTNB.
3a ueIHa hATnchete no BpeMe Ha VB3npOn3BexdAheTo Ha NoctabeHoto DVD 6ytoH ANGLE HA nCTaHUnOHTO ynpabHeHne. C BcKaO HATnCKaH e Ha 6ytoH ANGLE ce npEbkInouBa Ha eHa o HAHNHTe nepCneKTHbH a Kamepata.
BknIOyBaHe/H3KNOyBaHe Ha cy6THTpn
① yKa3aHnHe
Bb3mOxHO e Ta3n fynKuJra da He ce Hamnpa Ha pa3noJoxHe npu BCnuKDVDTa! Korato ce onntate da n3BbPunTe fynKU, KOrTo He e Ha pa3noJoxEHHe, Ha ekpana Ce noka3Ba cmmBoNa
Ako fHmbl Ha noctabehoto DVD pa3nonara cbc cy6ntprn, Bne moxete da Tn BKIOHTe Ha ekpaHa nO BpeMe Ha B3npOH3BexJaHeTo KATO HATNCHEt 6yTOH SUBTITLE Ha nCTAHUHOHTo ynpabIeHne.
ПрипьвOTO habиckeане ha 6уто SUBTITLE cy6tntpinte ce no8BA bat Ha ekpaHa ha nbpbBna e3NK, koTo ce hamupa ha pa3noIooKeHne. CBcako cneBaaso habиckeанe ha 6уто SUBTITLE cy6tntpinte ce no8BA bat Ha ekpaHa B cneBaunte hAnuHn e3NUn.
Ha ekpaHa ce noRABa Homepa Ha akTyalHo n3o6pa3eHnE3NK Ha cy6HTpnte (Hanp. 1/10 3a nbPBnOr O decETte HANuHn e3Nka HA cy6HTpnte).
Korato n noceHnA rT O HauuHnTe e3nCe noBn (Ha np. 10/10 3a Decetn oT Decet HauuHn E3nKa), Bne MoKeTe da n3KnHouHte yHKnTa Ha cy6ntpnte KATO OTHOBo HATInCHete 6yToH SUBTITLE. Ha ekpaHa ce noBBA OFF.
PpomHa Ha e3nKa Ha Bb3npOn3BexKaHe
① y_ka3aHnE
Bb3mOJHO e Ta3n fynKzua da He ce HAMnpa Ha pa3noJoxHe npu BCnKu DVD-Ta! Korato ce onntate da n3BbpWte fynKzua, KOrTo He e Ha pa3noJox-ehne, Ha ekpana Ce noka3Ba cnmboJa
HactpoBaHe Ha cInnata Ha 3Byka Ha bB3npOn3BExKaDaHe
HaTHcHete 6yToH V0L + Ha NCTaHcUHOHHoY npabIeHne, 3a da yBEnuHTe CnIATA Ha 3Byka no BpeMe Ha B3npOn3BexJaHe HIn 6yToHa V0L -, 3a da HAMaJIte CnIATA Ha 3Byka.
ДиМер
HaTnchete 6yToH DIMMER Ha nIcTaHauHnHTo ynpaBneHne,3a da npemHeTe Ha TpN CTeHenr rpkocCTHa HnCnPnE Ha DVD nnEynpa.
N3KNIOUBAHe Ha 3Byka (MUTE)
3aДаИЗКЛЮЧИte 3Byka,HaTиСHTe NO BpeMe HA Bb3nрОиВБexДаHTo Ha DVD,VCD/S-VCD,aYДио KOMПakTHITEДИСКOBe n CD-R/CD-RW cФайноB MP3 ИИ WMA 6yTOH (MUTE)HaДиCTAHцINOHOTO ynpabIeHne.Ha ekpaHa Ha TeleBn3Opa ce noRЯBa MUTE.
AkoXeNaTe Da BKnHouNte OTHOBo 3Byka, HATnCHete NOBTOpHO 6yToHa (MUTE) nn 6yToHnTe VOL ^+ n VOL-. Ha ekpaHa Ha TeNeBnOpa Ce NoaBA MUTE OFF nn CbOTBeTHata CTeneH Ha CNnata Ha 3Byka.
He hane 3o6paxhe 4:3 nn 16:9
A C nomoeta Ha pkoBOcTBOTo 3a ekCnnoatauHa TeneBn3opa KOHTponpaIte, KaBb e ofoMaTa HA N3O6paXeHne Ha TeneBn3opa.
B KoHTpoJIpaIte DaII NaH HAcTPOJKeITe B OSD MeHTo OTIOBaprHa HAnuHnA fOpMaT Ha N3o6paXeHHe Ha TeJeBn3Opa.
ДиctанционнуypaBHeHne6e3ФyHKnIa
A KontrponipaTe daHn 6aTepeHnTe ca noctabeHn B rHe3dTo c npabnHa noIpaHocT.
B Konhtponnapte danca n3pa3x0oDbAHn 6atepnnte Ha ndaHOnHHTo ynpabneHne n aKo e heo6xoDnmo CmeHete n Dbete 6atepn.
C YBepeTe ce, ye MeKdy nIcTaHcuOHnTo ynpabHeHne i DVD npebpa Hma npeyKn.
D Korato n3non3BATE nctaunOHnO ynpabneHne ce otaneyete ha noBeue ot net metpa ot DVD nnepbpa.
E3NK Bb3npon3Bexdahe/e3NK cy6HTnpH He OTROBapHa HactpoiKHTe B OSD MeHOTO.
HactpoeHHaTa B OSD MeHIOTo e3NK Bb3npOn3BexJaHe/e3NK cy6TnTpH e HAnIue B NoCTABeHHaNCK.
EHa HnH noBuee fynKcHn He ce Hampat Ha pa3noJoxHe
N36paHataФyHKnIbBepoAHTHO He ce HAMIPA Ha pa3nONOKeHne npn BCNUKkDVD-Ta/VCD-Ta/S-VCD-Ta. Korato ce onNTBaTe da N3BbPunTeФyHKnIkaTO He e Ha pa3nONOKeHne,Ha ekpHaCe NOKa3Ba CmMBOJa
Ha ypea nn nntctahunohnoy npablenne He yHKnOHnp 6ytoH/nn e Hanue npya deektha yHKnna
A N3KJIIOUcTe DVD nIeINbpa KaTO HATnCHeTe npeKbcBaaya POwER. N3yakaiTe Decet CeKYHm IN BkIIOUeTe CneI TOBa OTHOBo npeKbcBaaya POwER, 3a Da BkIIOUHTe DVD nIeINbpa.
B Ako nobpeata ce noBBA oTHOBo: BbPhe TE DVD nneBpa KbM cTaNdaptHnTE My HactpOKn.
① 3a ceIa BnKTe naba 10.6. "HcTanaioHNO MeHIO PREFERENCE".
O6bphete ce KbM eINOT HauHTE cepBn3n napTHbOpn B 6n3ocT do Bac, Korato ...
NOCOCHHTe CmUeHnBb BfYHKnraTa He MOrat Ja Ce OToTpaHrt, KAKTO TOBa 6e OnncAoNo-rope.
HactbIpyrOITIOPOOeHHTyKCMUeHnBvBfYHKuOHnHaHeto.
3a zentra bNkTe rna 19,“IapauHnA & CepBn3".
KaKBo npeEdctabraBAT DVD, VCD u S-VCD?
DVD
DVD e cbkpaeanhe Ha anfniNCKOTO 06o3haenne 3a „Digital Versatile Disc". DVD cnykat 3a 3anametrahe Ha aydno H Bndeo daHH; Te ca BbB opmatn 8 cm n 12 cm (DnAmetbp). DVD Dabat - npaH MnorokpatHO noronemra Cn n ameteh kanaTET B cpabHeHne C CD-R/CD-RW - Bb3MoXhoCT 3a Bb3npoun3Bexkdahe Ha 3anametehnte aydno H Bndeo daHHdo OCem yaca.
VCD/S-VCD
C „Video-CD" (VCD) и „Super Video-CD" (S-VCD) ce obosthaayabat dBa MeToDa 3a komnpmmpahe - Toec 3a neceThe Ha MrcTo - 3anametraBe H a hInM Bbpy KOMnakTHN DnCKObE. VCD n S-VCD ce cpeuat BbB fOpMatn 12 cm (DnAmetbP). TexHnT NamTeH KanauHET e MHOro No-MaIbK OT To3n HA DVD. IopAn ToBa npOdbJnxHTeHocTt Ha Bb3pOn3BExkdaHe Ha 3anametehte Ha Txq Aydno N BnDeo DaHHn e 20 MNHyTH (fOpmat 8 cm) pecn. 74 MNHyTH (fOpmat 12 cm).
Ima Ibe Bepcn H a VCD:
- Пи Версан 1.1 VCD/S-VCD Morat Да Вьзpon3BexДAT само aydno И видев данн.
- Пи Верся 2.0 на VCD/S-VCD ca habице Функциnte PBC (Playback Control). Пи Това тук могат за ce вьзпюньедат неюдвжни Видаеокадри с виска peэлioция.
Playback Control (PBC)
VCD/S-VCD ot Bercn 2.0 pa3nonarat c Playback Control (Hakpatko „PBC").
Пи TOBa Ha VCD/S-VCD Има павно MeHо, OT Koeto Morat Ia ce o6cnyxbat pa3nuchnФункци Ha VCD/S-VCD.
KaKBO O3Haayabat 3aIaabne H InaBa?
3aIaBne ce hapuat hai-ronemte einnnun ot einnnunite 3a n3o6paXeHne
n 3buk Ha DVD; npn ronma qact ot DVD (ochobnrt) fnnm Hma Homep Ha
3aIaBne 01. Pn 6ohcHn MaTePnaHn (hApr. TpeInbp, HnOfOpMaun npn
3acHeMahe n dp.) KOnTo ce cpeaat Ha DVD dNCKOBete, Morat da ce n3non3Bat
eBeHTayanHO n dpytn Homepa Ha 3aIaBnTa.
Глава се начca сдевацata no-Manka edinHица 3a n3o6paжehne n 3byk, hamipaça ce noД 3aIgabneto. Ako 3aIgabneto nInn 3aIgabneta Ha DVD/ VCD/S-VCD ca pa3deneHH ha Igabn, Te nmat onpeDeneHH Homepa, npn BbBexdaHTo HA KOHTO MOKe Ja ce n36epe dIpuKTHO cbOTBeTHa Trlaba.
O6bphete BHHMaHHe Ha ToBa, Ye He npn BCnKn DVD-Ta ...
3aarnabneto nnn 3arnabnra ta ca pa3npedeeneh Ha (Homepapn) rnaBn
OTeHNHTe rIaBN MoRat da 6bDat o6o3NaueHn Kato "cueHn" (HaNP. B rIaBHOTo MeHIO Ha DVD)
KaKBo ca Scart, S-Video, Composite-Video Progressive Scan, YUV HDMI?
Scart
Scart (ckapt) o6o3nauaba 21 nHOBO, cTaHapTHO cBeHNHeHne, npe3 Koeto ce npedabat RGB cnHaIIN, BInDeocnHann IN S BInDeocnHann, KaKTo IN pa3nUHN ynpaBnlaBauN iOnbHnHTenHn CnHann.
S-Video
Прив BKиюванeto Ha DVD Пийьра Кьм Телевзора урет S-Video (S Bndeo) cnHannite 3a ярковпси CBETНе синани ce npedabat nootdelenho; no To3n HauHn ce noctHTa NO-BvCOKA DeTaNHOCT Ha N3O6paXeHNET O Taka HapeyeHOTOn-HNcKO „CBETOBO N3KpINBBAHe". LBeTOBO N3KpINBBAHe ce hapua HacnARBaHTo Ha CBETHNE, B NOBeyeTO cnyuAn CNHNO HACNTEN qACTN Ha BIneo N3O6paXeHNeto Upe3 HepeDObHa, HecnOKOH a CmUaBaIa CTpykTpya.
Composite-Video
BnIeO cnHn Hn FBAS cnHn; TYK CTaBA Bbnpoc 3a cnHn Ha n3o6paKeHneTo, B KOnTO Ce cbIbpxkT eNHOBpemEHNO HhOpMaunn 3a Zbeta N npKocTTa.
Progressive Scan
D.R.C. (Dynamic Range Control)
Aut n eitoupyia puOtziTn oTaOu Tou duvaikou Eupous ia nxotpoxiek kuiac kivmuatoypaikov taivw, o otioec exouv bEaioToiOnei ae Dolby Digital. H eitoupyia evai xpoiun idaiitepa onv akpoan nXou Surround e xamn Evtaon.
-ON Aetoupyia evypoioinmuevn
-OFF Aetoupyia aTVEpOToiInuEvn.
-AUTO H i toupyia a eevpyoioi auotupa (eav untapxE1)
DIGITAL AUDIO
DIGITAL OUTPUT
Apyn avanapaywyn npoc ta eepoC (Apyn kivnon)
Tia va avanapayete To Tepiexoxevo Twv TOnoetnEvw DVD/VCD/S-VCD
Oe apynkivnon ...
- Iia apyn avattapaywyn npoc ta eptpoc nathote noaec opec to nknpto SLOW, wate va puthetaene tic akolouoec taxutntec avattapaywnic:
① Y i
Kata nny apyn avanapaywn 8v avanapayetai kaveac nxcoc.
Tia va ouvexioeTe Tnv avanapaywyn oE ia eTIIEyEvn Theo eKavovikn taxutnta, nate kata Tnv apyn avanapaywyn to nktpo PLAY/PAUSE II.
Me Ta nKtpa Eeyxou Tc eoyeOuvons.
Tia va termuatiaete Tn aeitoupyia eyeeovonc kai va yupiaete oTo kavoviko eeyoc eikovac nte nolcc fopec to nKtpo Z00M.
Alambda' anoysw kaepac (ANGLE)
① Y_
Autn Leitoupyia biatetai evexoevwc oλa ta DVD! Eav dokiuoeTe va siedayete i n n siaeoiun leitoupyia, ephiaviZetai to oujboo O otyn oovn tnleopaoan.
MepiKc taivc, oe DVD nepiXouv kefaia ta oioia eyypaovtai tautoxpova ato diaopetikc atoyeic kapeac. Se taivc, oi oioec diaeouv teioia kefaiaia, mtopeite va npakoalouhote to idio kefaiaio ato diaopetikc, atoyeic.
Iia auto nataote katayavanapaywy tou totoeetnevou DVD to nikpto ANGLE oTo tnlexeiipotnpio.Me kaTe natma tou niktpou ANGLE yivetai evlambdayn oia aTic diaoeciuepnc pooottikec kapeac.
AnEvpyoIoiOn nXou avanapaywyic (Mute)
Tia va anevepyoioiogete tov hxo tnC avanapaywyng natiote kata tnv avanapaywyh DVDs, VCDs/S-VCDs, CDs hXou kai CD-Rs/CD-RWs apxiea MP3- n WMA to nAnktpo (MUTE) oTo nIeepiOtnpio. TnV nIeopaon th a ephiaviotei to MUTE.
(local charge 0,031 EUR/minute (including VAT 19%
e-mail: support.gr@kompernass.com
C Kompernass Service Cyprus
Tel.: 80094401
e-mail: support.cy@kompernass.com
Piypaphi odaμatoC: