
TERRUN350 - Treadmills HMS Premium - Free user manual and instructions
Find the device manual for free TERRUN350 HMS Premium in PDF.

User questions about TERRUN350 HMS Premium
0 question about this device. Answer the ones you know or ask your own.
Ask a new question about this device
Download the instructions for your Treadmills in PDF format for free! Find your manual TERRUN350 - HMS Premium and take your electronic device back in hand. On this page are published all the documents necessary for the use of your device. TERRUN350 by HMS Premium.
USER MANUAL TERRUN350 HMS Premium
natural_image
Line drawing of a standard treadmill with control panel and wheels (no text or symbols)-
Manual instruction EN
-
Instrukcja obsługi PL
-
Návod k obsluze CZ
-
Manuel instruktion DA
-
Gebrauchsanweisung DE
-
Manual de instrucciones ES
-
Käsijuhend ET
-
Manuel d'instruction FR
-
Kézi utasítás HU
-
Manuale di istruzioni IT
-
Naudojimo instrukcijos LT
-
Rokasgrāmatas instrukcija LV
-
Handmatige instructie NL
-
Manual de instruções PT
-
Instructiuni manuale RO
-
Návod na obsluhu SK
-
Navodila za uporabo SL
-
Instruktionsbok SV
-
Інструкція з експлуатації UK

A 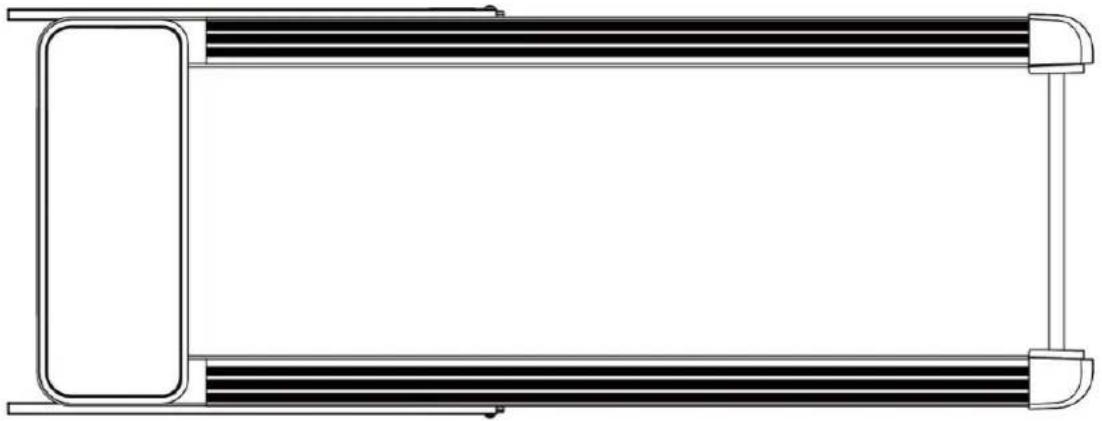 | |||
B  | C  | ||
D  | 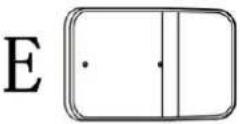 (C14) (C14) | ||
 (E12) (E12) | |||
G  (B08) (B08) | |||
I 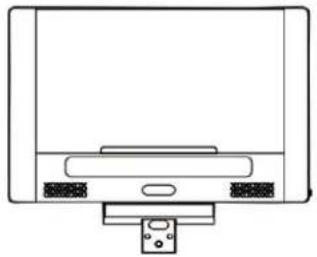 | H 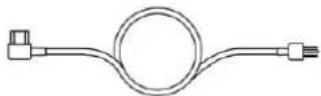 (E10) (E10) | ||
| J (C19) | 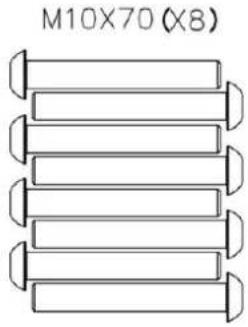 (D25) (D25) | ||
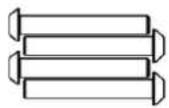
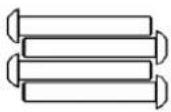
 | M8X35(X4) 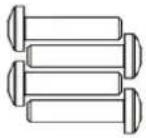 (D13) (D13) | M8X60(X3) 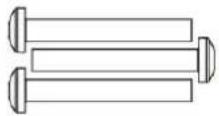 (D14) (D14) | M4X25(X2)  (D15) (D15) |

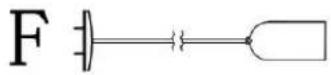
1- 1
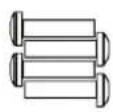
| M10X70 | S6 |
 (4X) (4X) | 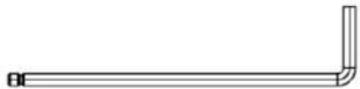 (1X) (1X) |

1- 2
| M10X70 | S6 |
 (4X) (4X) | 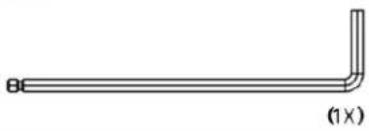 |

natural_image
Line drawing of a treadmill with a vertical support and labeled component C, showing no text or symbols beyond the label.1- 3
| M8X35 | S5 | ||
 (4X) (4X) |  (1X) (1X) |
1- 4
| M8X60 | S6 |
 |  |
| (3x) | (1x) |
1- 5
| M4X25 | S5 |
| (2X) | (1X) |

1- 6
1- 7

1
natural_image
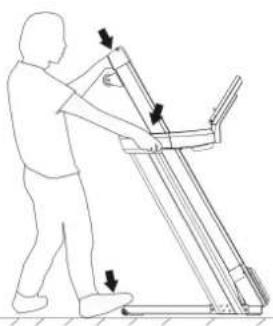
Line drawing of a person using a treadmill to lift a table, with arrows indicating motion direction (no text or symbols)2
natural_image
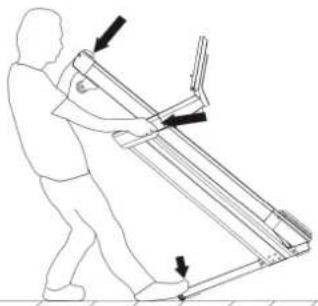
Line drawing of a person pushing a treadmill with arrows indicating motion direction (no text or symbols)3
natural_image
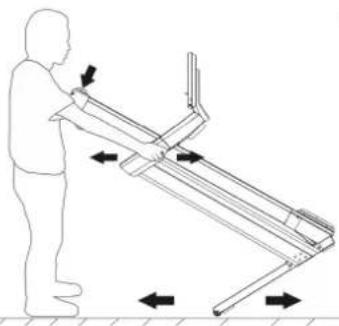
Line drawing of a person using a treadmill with directional arrows indicating movement (no text or symbols)4
natural_image
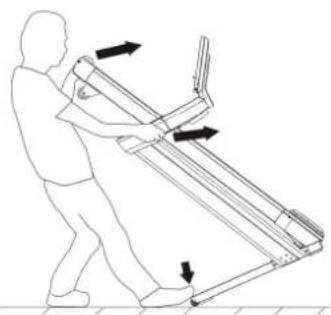
Line drawing of a person pushing a treadmill with directional arrows indicating movement (no text or symbols)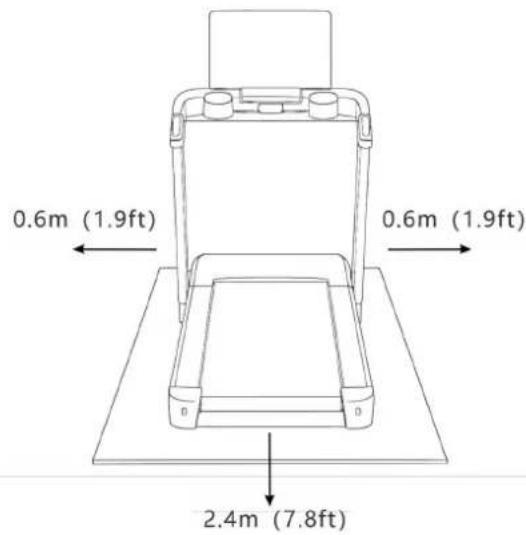
[Non-Text]
| TIME INTERVAL= setting time/16 (Speed Unit: kilometer per hour) | ||||||||||||||||||
| 1 | 2 | 3 | 4 | 5 | 6 | 7 | 8 | 9 | 10 | 11 | 12 | 13 | 14 | 15 | 16 | |||
| P1 | SPEED 2 3 | 3 4 | 5 3 4 | 5 5 3 | 4 2 3 | 3 5 3 | ||||||||||||
| SLOPE -2 | -2 -1 -1 | -1 0 0 | 0 -1 -1 | -2 -1 | -1 -1 -1 | -1 | ||||||||||||
| P2 | SPEED 2 4 | 4 5 | 6 4 6 | 6 6 4 | 4 2 2 | 5 4 2 | ||||||||||||
| SLOPE -2 | -1 -1 -1 | -1 0 0 | -1 -1 -1 | -1 -1 -1 | 0 0 -1 | -1 | ||||||||||||
| P3 | SPEED 2 4 | 4 6 | 6 4 7 | 7 7 4 | 4 2 4 | 5 3 2 | ||||||||||||
| SLOPE -1 0 | 0 -1 | -1 0 0 | 0 -1 -1 | -1 -1 1 | 0 -1 -1 | -1 | ||||||||||||
| P4 | SPEED 3 5 | 5 6 | 7 7 5 | 7 7 8 | 5 6 6 | 4 4 3 | ||||||||||||
| SLOPE -1 0 | 0 -1 | -1 0 0 | 0 -1 -1 | -1 -1 1 | 0 -1 -1 | -1 | ||||||||||||
| P5 | SPEED 2 4 | 4 5 | 6 7 7 | 5 6 7 | 3 3 6 | 5 4 2 | ||||||||||||
| SLOPE 0 0 | 0 1 | 1 2 2 | 2 1 1 | 1 1 2 | -1 -1 -1 | |||||||||||||
| P6 | SPEED 2 4 | 4 4 | 5 6 8 | 8 6 7 | 4 2 5 | 4 3 2 | ||||||||||||
| SLOPE 0 2 | 2 2 | 1 1 1 | 0 0 0 | 0 1 1 | 1 0 -1 | |||||||||||||
| P7 | SPEED 2 3 | 3 3 | 4 5 3 | 4 5 3 | 3 6 6 | 5 3 3 | ||||||||||||
| SLOPE 1 1 | 1 1 | 0 0 3 | 3 3 4 | 4 5 5 | 2 1 1 | |||||||||||||
| P8 | SPEED 2 3 | 3 6 | 7 7 4 | 6 7 4 | 6 2 3 | 4 4 2 | ||||||||||||
| SLOPE 1 2 | 2 2 | 3 3 3 | 4 5 6 | 6 6 7 | 5 3 0 | |||||||||||||
| P9 | SPEED 2 4 | 4 7 | 7 4 7 | 8 4 8 | 4 5 6 | 3 3 2 | ||||||||||||
| SLOPE 2 2 | 2 3 | 3 3 1 | 1 3 3 | 2 2 5 | 4 1 -1 | |||||||||||||
| P10 | SPEED 2 4 | 5 6 | 7 5 4 | 6 8 8 | 4 2 4 | 4 3 3 | ||||||||||||
| SLOPE 2 3 | 3 3 | 4 2 5 | 5 1 1 | 1 2 2 | 5 3 0 | |||||||||||||
| P11 | SPEED | 2 | 5 | 8 | 10 | 7 | 7 | 10 | 10 | 7 | 7 | 9 | 9 | 5 | 5 | 4 | 3 | |
| SLOPE 1 2 | 0 -1 | 3 3 -1 | -1 -1 -1 | -1 1 2 | 2 -1 -3 | |||||||||||||
| P12 | SPEED 2 4 | 9 9 | 5 9 5 | 8 5 9 | 9 9 5 | 7 6 3 | ||||||||||||
| SLOPE -2 | -1 0 -1 | 0 2 2 | -3 -3 -1 | 0 2 4 | 2 0 0 | |||||||||||||
| P13 | SPEED 2 6 | 7 5 | 9 9 7 | 5 5 7 | 9 5 9 | 9 4 3 | ||||||||||||
| SLOPE 0 0 | 2 3 | 2 0 0 | 4 2 0 | -1 -3 -3 | 0 -1 -2 | |||||||||||||
| P14 | SPEED 2 2 | 4 5 | 6 5 4 | 3 2 1 | 6 5 4 | 3 2 1 | ||||||||||||
| SLOPE 1 1 | 1 1 | 0 0 3 | 3 3 4 | 4 5 5 | 2 1 1 | |||||||||||||
| P15 | SPEED 2 4 | 6 8 | 6 6 4 | 4 2 2 | 6 6 4 | 4 2 2 | ||||||||||||
| SLOPE 0 0 | 0 1 | 1 2 2 | 2 1 1 | 1 1 2 | -1 -1 -1 | |||||||||||||
| P16 | SPEED 2 3 | 3 3 | 4 5 5 | 5 3 3 | 2 4 2 | 3 5 3 | ||||||||||||
| SLOPE -2 | -2 -1 0 | 0 -1 -1 | -1 -1 -1 | -2 -2 -1 | -1 -2 -1 | -1 | ||||||||||||
| P17 | SPEED 2 4 | 4 4 | 6 5 6 | 6 6 4 | 2 4 2 | 5 4 2 | ||||||||||||
| SLOPE -2 | -1 -1 0 | 0 -1 -1 | -1 -1 -1 | -1 -1 -1 | 0 0 -1 | -1 | ||||||||||||
| P18 | SPEED 2 4 | 4 4 | 7 6 6 | 7 7 4 | 4 4 2 | 5 3 2 | ||||||||||||
| SLOPE -1 0 | 0 0 | 0 0 -1 | -1 -1 -1 | -1 1 1 | -1 -1 1 | |||||||||||||
| P19 | SPEED 2 5 | 5 7 | 5 6 7 | 7 7 8 | 6 5 6 | 4 4 3 | ||||||||||||
| SLOPE -1 0 | 0 0 | 0 0 -1 | -1 -1 -1 | -1 -1 1 | 1 -1 -1 | |||||||||||||
| P20 | SPEED 2 4 | 4 7 | 7 5 6 | 5 6 7 | 6 3 3 | 5 4 2 | ||||||||||||
| SLOPE 0 0 | 0 2 | 2 2 1 | 1 1 1 | 1 1 2 | 0 -1 -1 | |||||||||||||
| P21 | SPEED 2 4 | 4 6 | 8 4 5 | 8 6 7 | 5 4 2 | 4 3 2 | ||||||||||||
| SLOPE 0 2 | 2 1 | 1 0 2 | 1 0 0 | 0 1 1 | 0 0 -1 | |||||||||||||
| P22 | SPEED 2 3 | 3 5 | 3 3 4 | 4 5 3 | 6 3 6 | 5 3 3 | ||||||||||||
| SLOPE 1 1 | 1 0 | 3 3 1 | 0 3 4 | 4 5 5 | 6 1 1 | |||||||||||||
| P23 | SPEED 2 3 | 3 7 | 4 6 7 | 6 7 4 | 3 4 2 | 4 4 2 | ||||||||||||
| SLOPE 1 2 | 2 3 | 3 4 2 | 3 5 6 | 6 6 7 | 7 3 0 | |||||||||||||
| P24 | SPEED 2 4 | 4 4 | 7 7 7 | 8 4 8 | 6 4 5 | 3 3 2 | ||||||||||||
| SLOPE 2 2 | 2 3 | 1 1 3 | 3 3 3 | 2 2 5 | 6 1 -1 | |||||||||||||
| P25 | SPEED 2 5 | 5 5 | 7 7 7 | 8 4 7 | 5 4 5 | 3 3 2 | ||||||||||||
| SLOPE 1 2 | 2 3 | 1 1 3 | 3 2 2 | 4 4 6 | 6 3 -3 | |||||||||||||
| P26 | SPEED 2 4 | 4 5 | 8 7 7 | 8 4 8 | 6 4 5 | 3 3 2 | ||||||||||||
| SLOPE 1 2 | 2 3 | 2 2 3 | 3 4 4 | 2 2 5 | 6 6 -1 | |||||||||||||
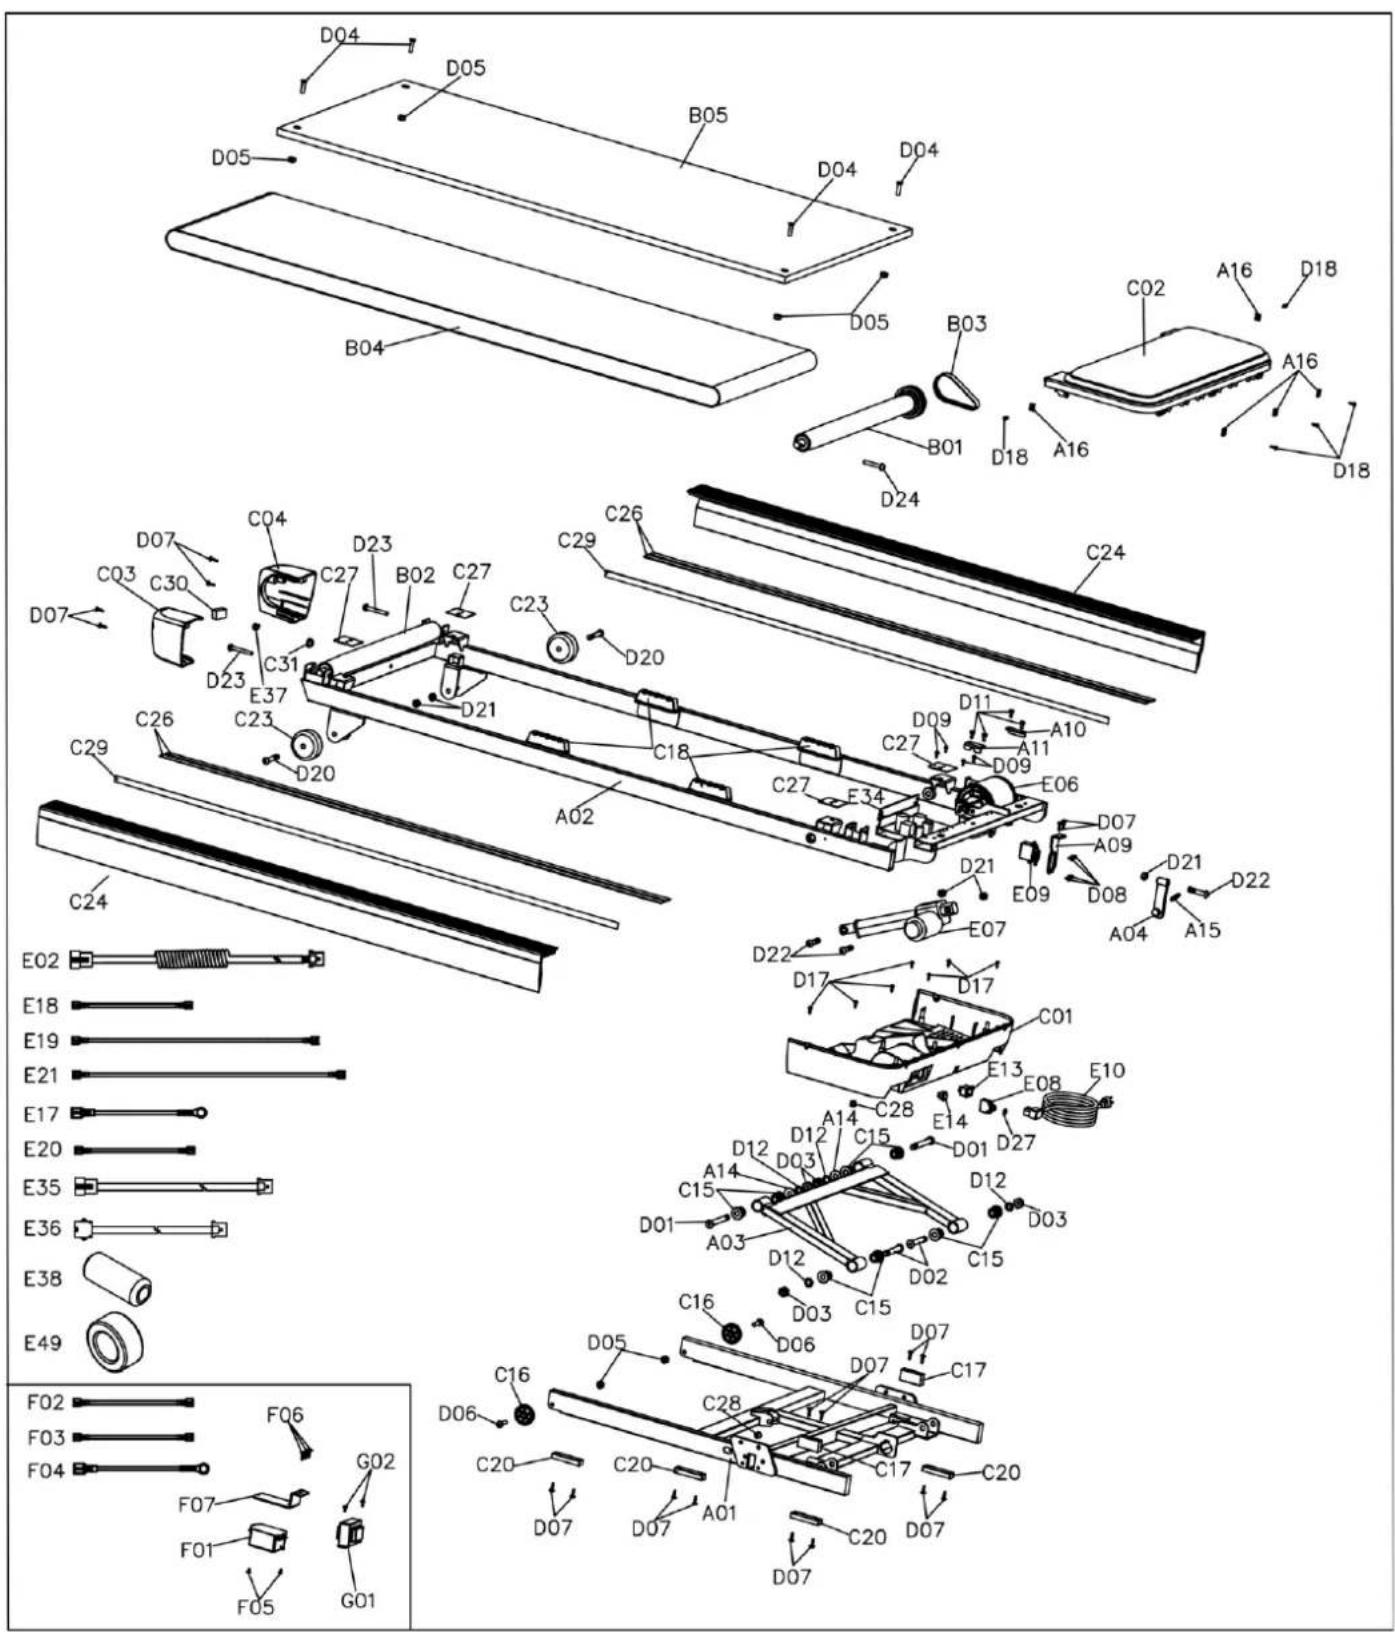
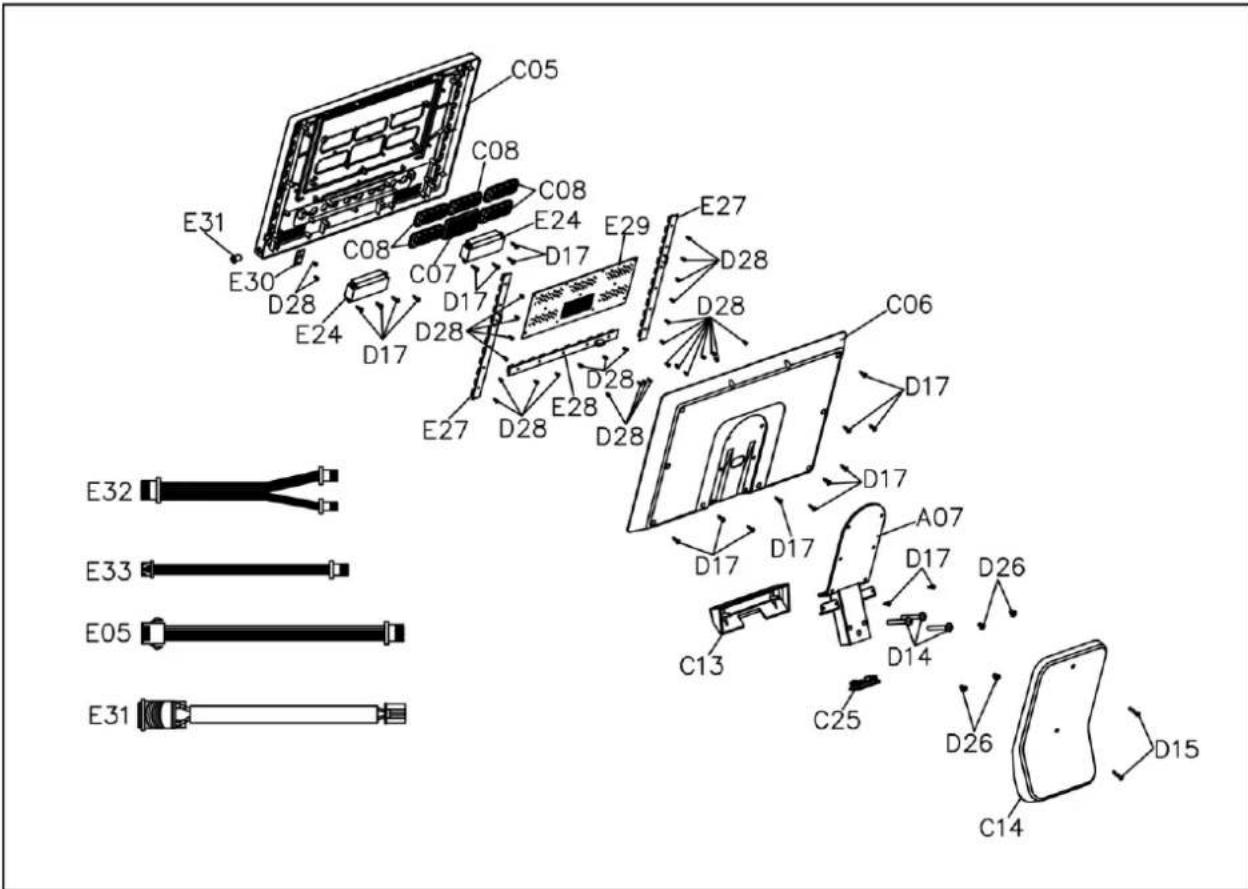
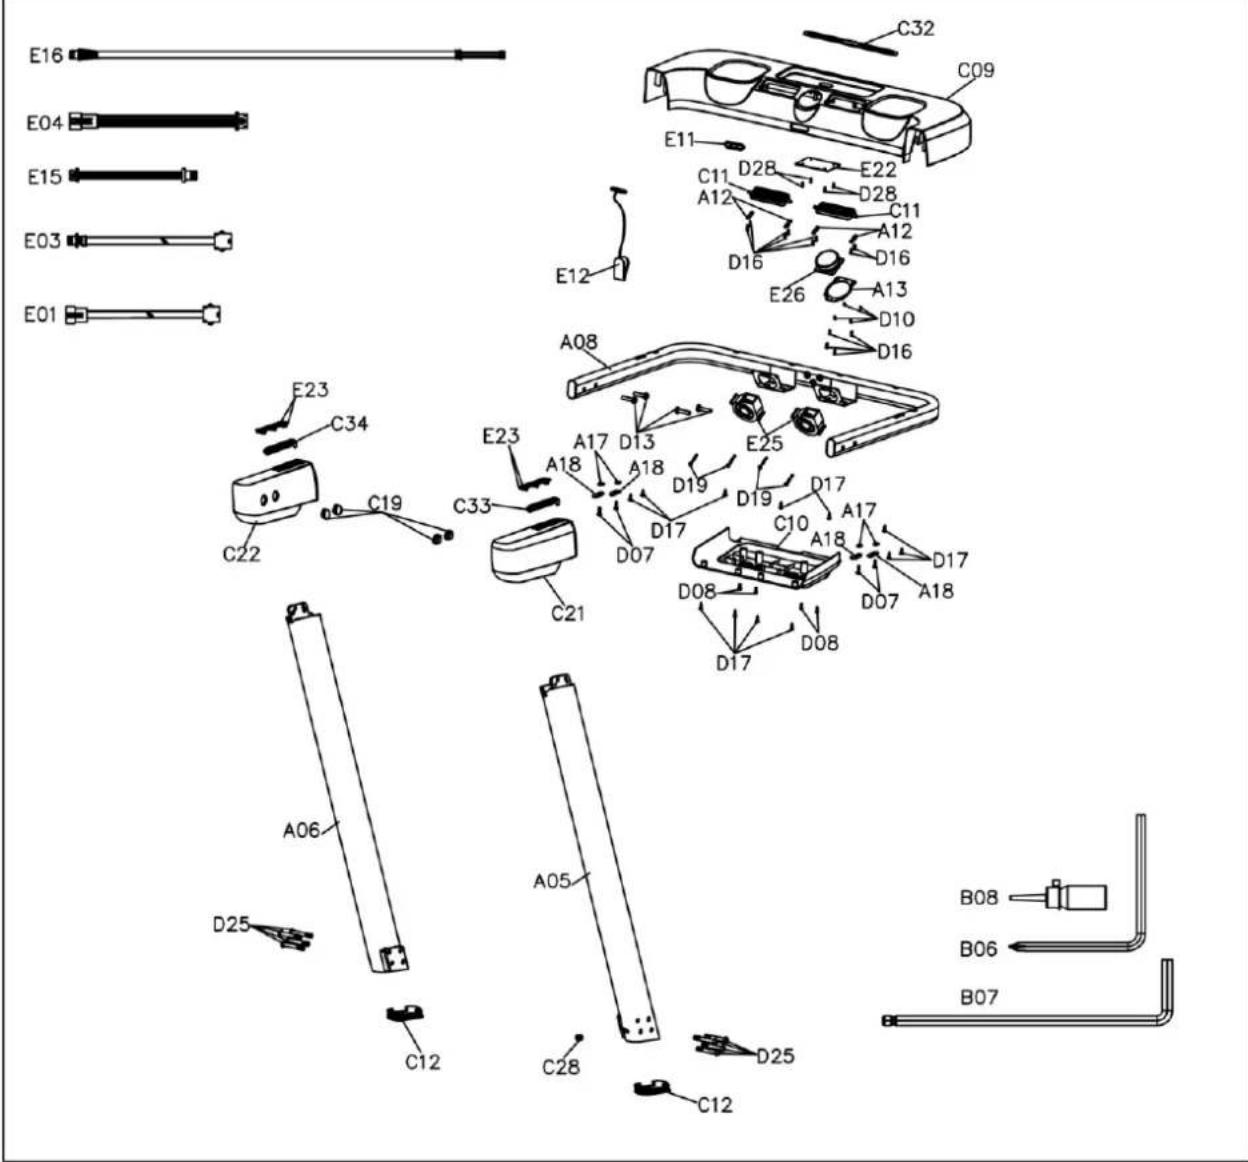
| Part No. | Description | Quantity | Part No. | Description | Quantity |
| A01 | Lower frame | 1 | D09 | M4*12 screw | 4 |
| A02 | Main frame | 1 | D10 | M3*6 screw | 4 |
| A03 | Lifting assembly | 1 | D11 | M5*12 screw | 4 |
| A04 | Rotary assembly | 1 | D12 | Spring washer | 4 |
| A05 | Right vertical pipe | 1 | D13 | M8*35 screw | 4 |
| A06 | Left vertical pipe | 1 | D14 | M8*60 screw | 3 |
| A07 | Console assembly | 1 | D15 | M4*25 screw | 2 |
| A08 | Steering assembly | 1 | D16 | Screw ST2.9*10 | 12 |
| A09 | Servo motor board | 1 | D17 | ST4.2*16 screw | 39 |
| A10 | Motor mount 1 | 1 | D18 | Screw ST4.2*13 | 5 |
| A11 | Motor mount 2 | 1 | D19 | M4*35 screw | 4 |
| A12 | Fan mounting plate | 4 | D20 | M10*60 screw | 2 |
| A13 | Knob mounting flange | 1 | D21 | M10 nut | 5 |
| A14 | Lifting sleeve | 2 | D22 | M10*45 screw | 3 |
| A15 | Tension spring | 1 | D23 | M8*62 screw | 2 |
| A16 | Motor cover connector | 5 | D24 | M8*50 screw | 1 |
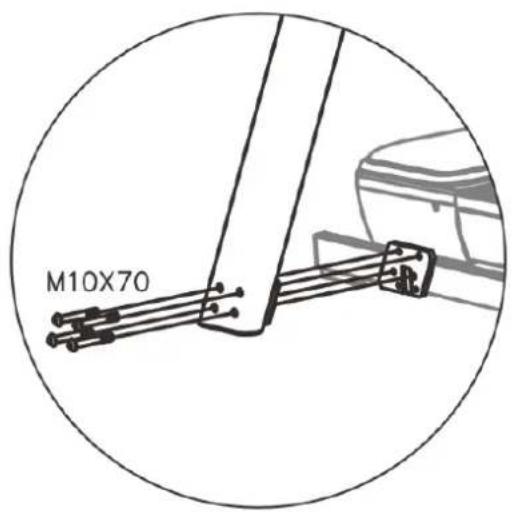
| A17 | Flat washer (Φ14) | 4 | D25 | M10*70 screw | 8 |
| A18 | Steering wheel washer | 4 | D26 | M6*20 screw | 4 |
| B01 | Front roller | 1 | D27 | Flat washer (Φ16) | 1 |
| B02 | Rear roller | 1 | D28 | ST2.9*8 screw | 34 |
| B03 | Motor belt | 1 | E01 | PCB and control board connection cable - centre | 1 |
| B04 | Running belt | 1 | E02 | PCB and control board connection cable - lower | 1 |
| B05 | Running board | 1 | E03 | PCB and control board connection cable - upper | 1 |
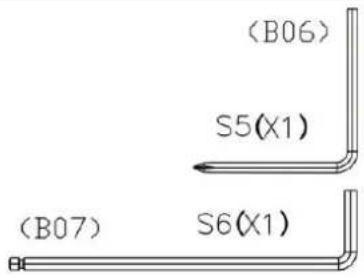
| B06 | S5 key | 1 | E04 | PCB control board connection cable | 1 |
| B07 | S6 key | 1 | E05 | Display panel connection cable | 1 |
| B08 | Lubricating oil | 1 | E06 | Engine | 1 |
| C01 | Lower engine cover | 1 | E07 | Lifting motor | 1 |
| C02 | Upper motor cover | 1 | E08 | Overcurrent switch | 1 |
| C03 | Rear cover (P) | 1 | E09 | Servo motor and rotor | 1 |
| C04 | Rear cover (L) | 1 | E10 | Power cord | 1 |
| C05 | Upper console cover (with stickers) | 1 | E11 | Safety key slot | 1 |
| C06 | Lower console cover | 1 | E12 | Safety key | 1 |
| C07 | Perforated element 1 | 1 | E13 | Power socket | 1 |
| C08 | Perforated element 2 | 5 | E14 | Power switch | 1 |
| C09 | Upper centre steering wheel cover | 1 | E15 | Knob connection cable | 1 |
| C10 | Lower centre cover of steering wheel | 1 | E16 | Hand pulse sensor cable | 2 |
| C11 | Fan control cover | 2 | E17 | Grounding cable (L=200) | 2 |
| C12 | Vertical pipe lock | 2 | E18 | Power cable (P, L=120) | 2 |
| C13 | Front decorative cover for console | 1 | E19 | Power cord (P, L=200) | 1 |
| C14 | Rear decorative cover for console | 1 | E20 | Power cord (N, L=120) | 1 |
| C15 | POM sleeve | 8 | E21 | Power cable (N, L=230) | 1 |
| C16 | Transport wheel | 2 | E22 | PCB control board | 1 |
| C17 | Main frame cushion | 2 | E23 | Hand pulse sensor | 4 |
| C18 | Cushion | 4 | E24 | Speaker | 2 |
| C19 | End caps | 4 | E25 | Fan | 2 |
| C20 | Footrest | 4 | E26 | Knob set | 1 |
| C21 | Handlebar foam - right | 1 | E27 | Quick tilt/speed selection panel | 2 |
| C22 | Handlebar foam - left | 1 | E28 | Keyboard | 1 |
| C23 | Bearing wheel | 2 | E29 | Display panel | 1 |
| C24 | Side rail | 2 | E30 | USB port | 1 |
| C25 | Console assembly lock | 1 | E31 | Folding switch kit | 1 |
| C26 | Upper side rail foam | 4 | E32 | Keyboard cable | 3 |
| C27 | Running board foam | 4 | E33 | USB cable | 1 |
| C28 | Power cord latch | 3 | E34 | Control board | 1 |
| C29 | Sliding rail tape | 2 | E35 | IRS cable - front | 1 |
| C30 | IRS cushion | 1 | E36 | IRS cable - rear | 1 |
| C31 | Bushing | 1 | E37 | IRS (infrared sensor) | 1 |
| C32 | Silicone pad for wireless charging | 1 | E38 | Magnetic ring | 1 |
| C33 | Hand pulse sensor attachment (P) | 1 | E39 | Magnetic ring Φ28 | 1 |
| C34 | Hand pulse sensor mount (L) | 1 | F01 | Filter - optional | 1 |
| D01 | M12*98 screw | 2 | F02 | Power cable (P, L=120 mm) - optional | 1 |
| D02 | M12*79 screw | 2 | F03 | Power cable (N, L=120 mm) - optional | 1 |
| D03 | M12 nut | 4 | F04 | Grounding cable - optional | 1 |
| D04 | M8*32 screw | 4 | F05 | M4*6 screw (filter) - optional | 2 |
| D05 | M8 nut | 6 | F06 | ST4.2*19 flange screw - optional | 3 |
| D06 | M8*30 screw | 2 | F07 | Filter mounting plate - optional | 1 |
| D07 | ST4.2*19 flange screw | 22 | G01 | Inductance - optional | 1 |
| D08 | M4*8 screw | 8 | G02 | M4*8 screw (inductance) - optional | 2 |
SPECIAL INSTRUCTIONS
- Read this manual carefully before installation and use.
- Keep the manual for future reference.
- The product may differ from the illustrations due to model upgrades.
SAFETY INSTRUCTIONS – electricity
DANGER – risk of electric shock: always unplug the appliance after use and before cleaning.
WARNING – risk of burns, fire, electric shock or injury:
- Never leave the treadmill plugged in without supervision.
- Use only as intended in the instructions.
- Protect the cable from hot surfaces.
- Do not block the ventilation openings or insert any objects into them.
- Do not use outdoors.
- Do not use in rooms with aerosols or when administering oxygen.
- Always switch off the treadmill and disconnect it from the power supply after use.
- Only connect to a properly grounded socket.
- The device is intended for adult use only. Children under 13 years of age must not use the treadmill.
- Do not move by pulling on the cable.
- For home use only.
-
After finishing your workout, remove the safety key and keep it out of the reach of children.
-
Do not use if the cable or plug is damaged, the treadmill is not working properly or has fallen into water. Contact customer service.
. CAUTION: Take special care when stepping on and off the moving belt.
IMPORTANT SAFETY RULES
- Consult your doctor before starting training, especially if you are taking medication that affects your heart, blood pressure or cholesterol.
- Pay attention to your body's signals – stop exercising if you feel pain, shortness of breath, dizziness or nausea.
- Keep children and pets away from the treadmill.
- Place the treadmill on a stable, flat surface with a protective mat. A minimum of 240~cm of free space at the rear and 60~cm at the side is recommended.
- Regularly check the bolts and nuts and the technical condition of the device.
- In the event of damage or unusual noises, discontinue training and do not use the device until it has been repaired.
- Exercise in appropriate clothing – avoid loose clothing.
- Do not put your hands or objects into moving parts.
- The treadmill is not intended for therapeutic or commercial use.
- Store in a dry, cool place. Avoid extreme temperatures and humidity.
- If you suddenly feel unwell, grab the handrails and step down onto the side rails.
IMPORTANT OPERATING INSTRUCTIONS
- Plug the power cord directly into the power outlet.
- Always read the instructions before starting.
- Speed changes do not occur immediately – exercise caution.
- Maintain your balance during exercise and walk in the centre of the belt.
- The treadmill starts at a low speed - begin by standing on the side rails.
- The safety key must be inserted into the console – in an emergency, remove it to stop the treadmill immediately.
- The device is intended for adults only – children may only be near it under supervision.
- Pregnant or breastfeeding women should consult their doctor.
- Drink water during and after training.
- Do not lift the treadmill on your own.
- Lubricate the treadmill belt before first use.
CHECKING THE CONTENTS OF THE PACKAGE
Before assembly, carefully check that all components are in the box and in good condition. If anything is missing or damaged, please contact customer service!

TREADMILL ASSEMBLY
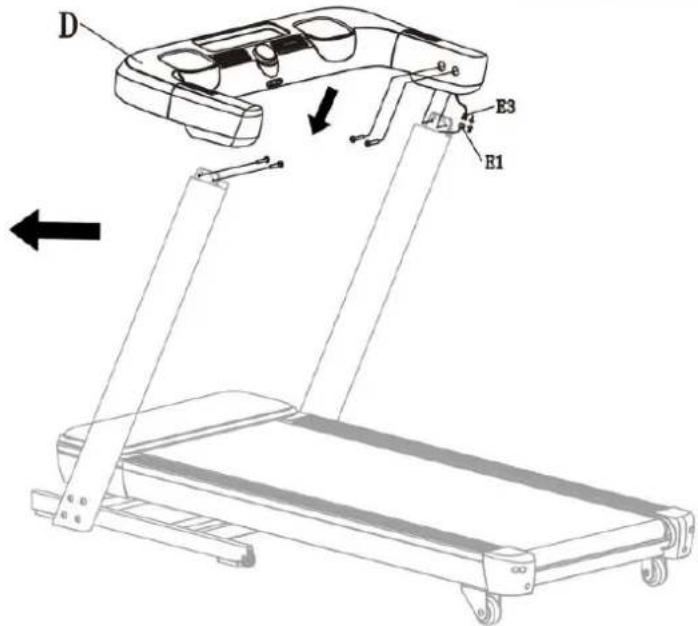
STEP 1: Assembling the right upright tube
- Attach the right upright tube (B) to the main frame.
• Use the supplied Allen key and screws (do not tighten them completely yet). - Connect the signal cables: E1 (lower) and E2, then place the cable in the frame opening on the left side.
STEP 2: Assembling the left column (Left Upright Tube)
- Attach the left upright tube (C) to the main frame.
• Use the screws and Allen key to pre-tighten.
- Attach the left upright tube (C) to the main frame. - Use the screws and Allen key to pre-tighten.
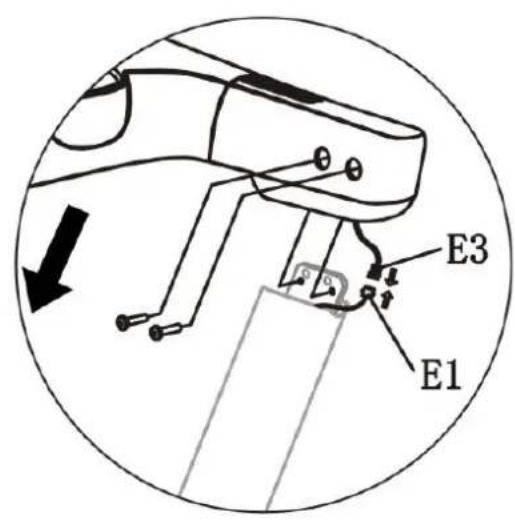
STEP 3: Handlebar Assembly
- Connect signal cables E3 and E1 (upper).
- Attach the handlebar assembly (D) to both uprights.
- Tighten the screws with an Allen key. Now you can fully tighten all screws.
Note: Ensure that the cables are not pinched.
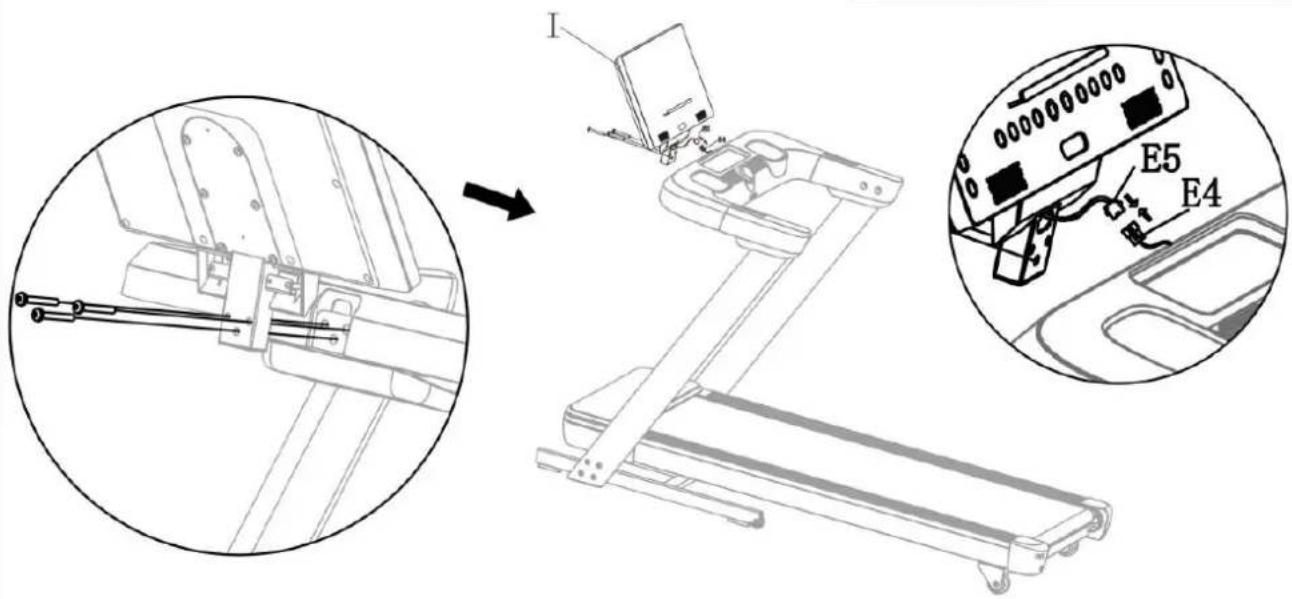
STEP 4: Console Screen Installation
- Connect wires E4 and E5.
-
Attach the console (I) to the steering wheel assembly.
-
Tighten the screws with an Allen key and tighten them completely.
Note: ensure that the cables are not pinched.
STEP 5: Installing the rear console cover
- Attach the rear cover (E) to the console (I).
• Tighten the screws using an Allen key.
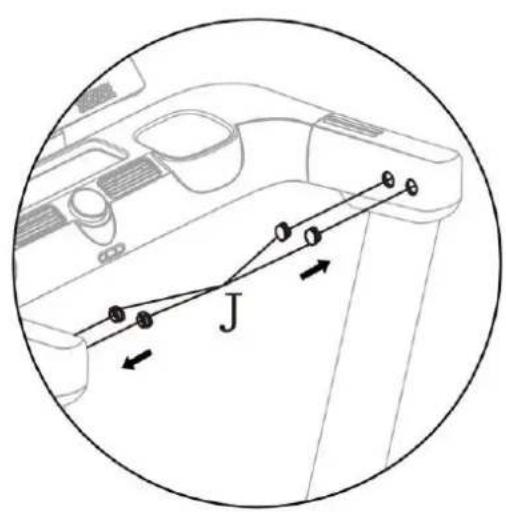
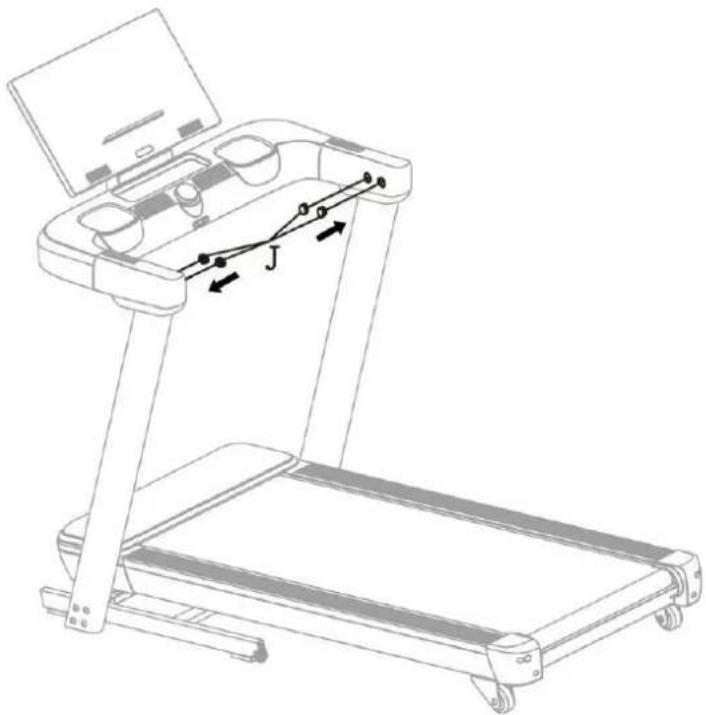
STEP 6: Installing the end caps
- Insert 4 end caps (J) into the left and right brackets.
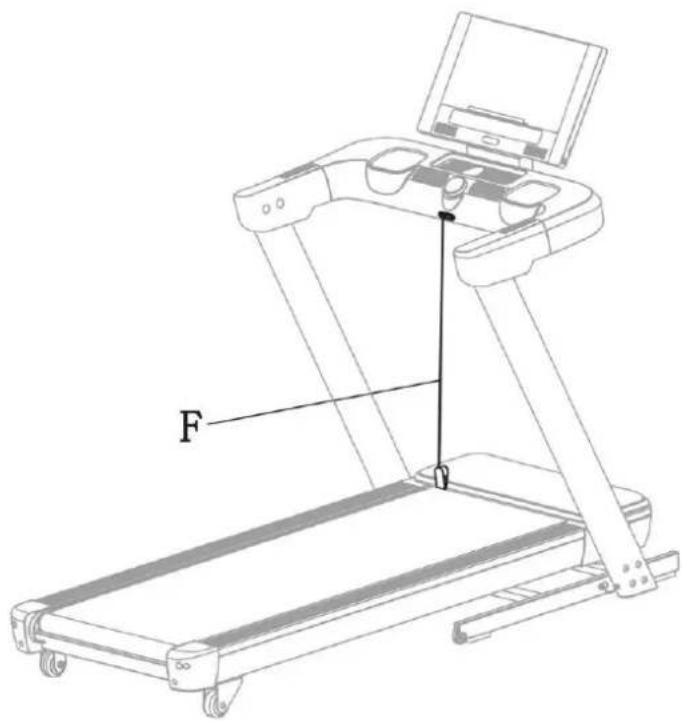
STEP 7: Final tightening and safety key
• Fully tighten the screws from steps 1 and 2.
• Insert the safety key (F) into the console.
Assembly complete!
• After using the treadmill, store the safety key out of the reach of children.
• Before you start running, make sure that all bolts are tightened securely.
FOLDING AND UNFOLDING THE TREADMILL (PowerTouch)
Important note
The treadmill has an automatic PowerTouch system. Do not fold or unfold it manually, as this may damage the mechanism and void the warranty.
How to fold/unfold
- Press the FOLD/UNFOLD button (No. 2, right side of the console).
• The treadmill will automatically raise or lower the deck.
• If you press the button again during the process, it will pause (FOLDPAUSE). Press again to continue.
Unfolding (UNFOLD)
. Before unfolding, ensure that there are no persons, animals or objects under the treadmill.
• With the treadmill folded and the message "FOLD" displayed, briefly press the FOLD/UNFOLD button.
• The display will show "UNFOLDING". Once unfolding is complete, the device will enter standby mode.
• If necessary, the process can be stopped and resumed.
Safety:
• A built-in infrared sensor detects people or animals in the danger zone.
- In this case, a warning signal will sound and the process will be paused. Once the zone is vacated, the treadmill will resume unfolding after 2–4 seconds.
Folding (FOLD)
. Before folding, ensure that there are no persons or objects on the treadmill.
- With the treadmill unfolded, press the FOLD/UNFOLD button.
• "FOLDING" will appear on the display.
• The process can be stopped and resumed with the button.
Forced Unfold
- Press and hold the FOLD/UNFOLD button for 2 seconds – the treadmill will force itself to unfold.
Safety notes
- If a person is standing on the treadmill during folding (angle < 30°), the system will automatically interrupt the process and return to unfolding.
- If the angle is >30^ and an obstacle appears, the folding process will stop (display: "FOLD"). Press FOLD/UNFOLD again to start the unfolding mode.

TRANSPORTING THE TREADMILL AND ITS CORRECT POSITIONING
IMPORTANT ELECTRICAL INFORMATION
WARNING - This treadmill requires an adequate power source to operate properly. For your safety and the safety of others, ensure that the power source is adequate before connecting the unit.
An incorrect power source may cause serious damage to the equipment or pose a risk to the user.
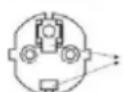
Grounding
- The device must be grounded – this ensures the lowest resistance to current flow and reduces the risk of electric shock.
- The plug should be connected to a properly installed and grounded socket in accordance with local regulations.
• The socket must match the plug configuration – do not use adapters or converters. - The product is designed to operate in a standard circuit with a grounded plug (see diagram A).
DANGER: Incorrect connection of the protective conductor may result in electric shock.
• If you have any doubts about the installation, contact a qualified electrician.
- Do not modify the original plug. If it does not fit the socket, have an electrician install a suitable socket.
GROUNDING METHODS
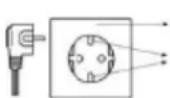
GROUNDED JUNCTION BOX
GROUNDED ELECTRICAL SOCKET
GROUNDING WIRE
(A)
WARNINGS
- Never use a GFCI (ground fault circuit interrupter) socket with this treadmill.
Keep the power cord away from moving parts of the machine, including the lift mechanism and transport wheels.
- Do not use generators or uninterruptible power supplies (UPS) to power the treadmill.
-
Do not remove any covers while the treadmill is connected to the mains.
-
Do not expose the device to rain or moisture.
The treadmill is not intended for outdoor use, near swimming pools or in high humidity environments.

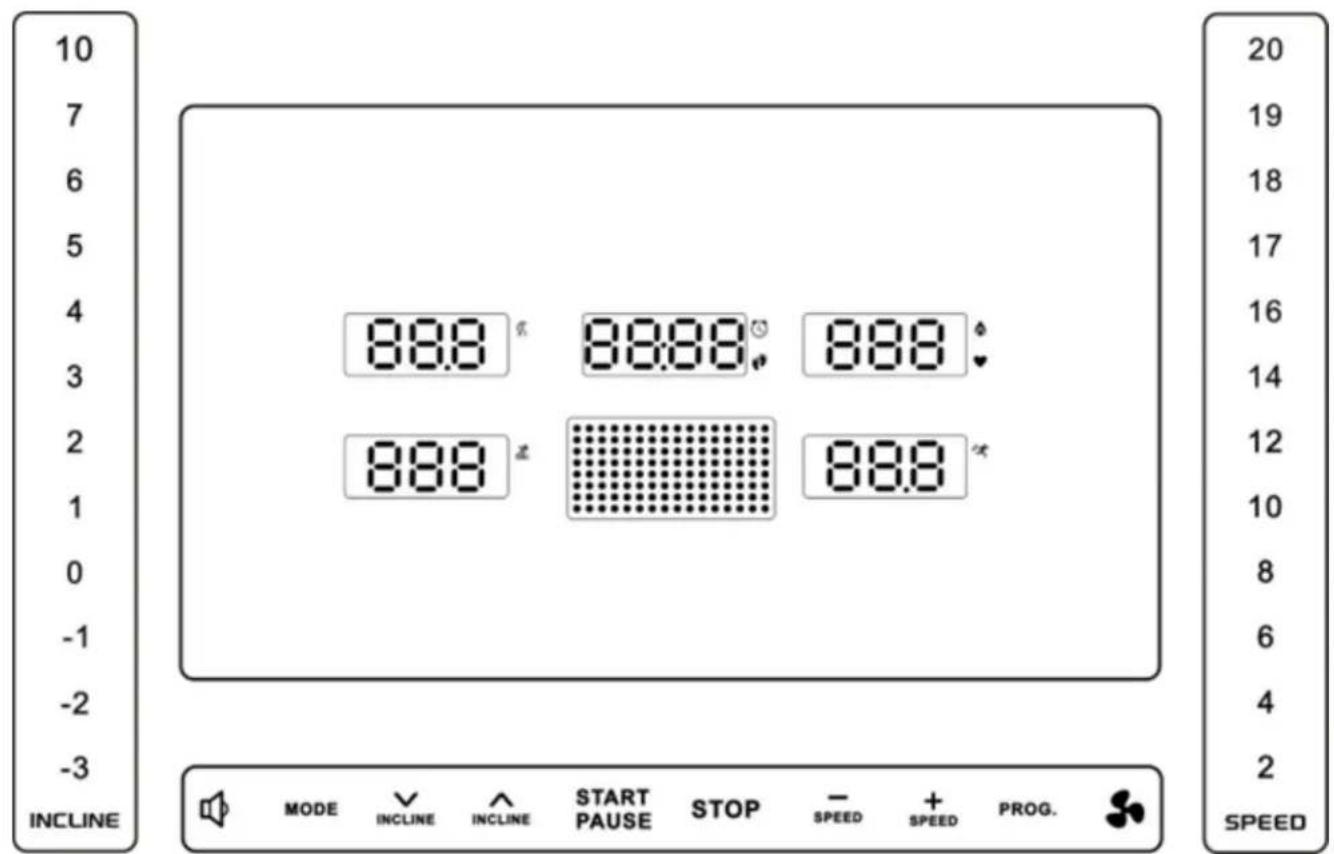
OPERATING INSTRUCTIONS DISPLAY (1)

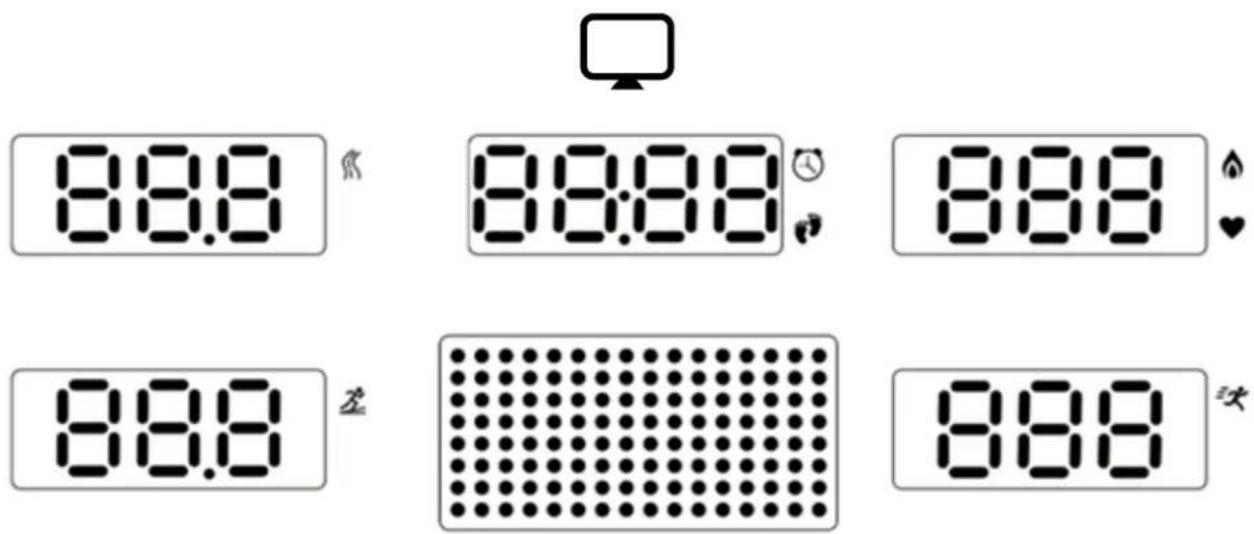
Distance - shows the distance currently covered.

Time - shows the training time (from 0:00). When the maximum limit is reached, the treadmill will stop automatically.

Steps - shows the number of steps taken.
• The TIME/STEPS window displays the data alternately every 5 seconds.

Calories – shows the number of calories burned.

Heart rate – displays your current heart rate. To measure:
• hold both sensors on the handles or
connect a Bluetooth® heart rate monitor.
The result will appear after approx. 5 seconds (approximate, non-medical data).
The CALORIES/PULSE window alternates – during heart rate measurement, it continuously displays your pulse, otherwise it displays calories.

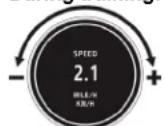
Speed – shows your current speed. Adjust with the SPEED +/- buttons.
• At an incline of -3 to -1: speed range 1–13 km/h.
• At an incline of 0 to 10: speed range 1–22 km/h.
Matrix window – in run mode, it shows the current laps; in PROG mode, it shows the programme graph.

Incline – shows the current incline angle. Adjustable with the INCLINE +/- buttons in the range from -3% to 10%.
CONSOLE BUTTON FUNCTIONS
-
Volume - a short press increases the level, a long press decreases it.
-
MODE – select the countdown mode (time, distance, calories). Confirm with START/PAUSE.
TIME COUNT DOWN – set the countdown time.
○ DISTANCE COUNT DOWN – set the distance.
- CALORIES COUNT DOWN – set the number of calories.
-
INCLINE ^v – decrease the incline.
-
INCLINE ^ - increase incline.
-
Quick incline selection – buttons -3, -2, -1, 0, 1...10.
-
START/PAUSE – start, pause or resume training.
-
STOP – stop the treadmill immediately.
-
SPEED - - decrease speed by 0.1 km/h.
-
SPEED + - increase speed by 0.1 km/h.
-
Quick speed selection – buttons 2–20 km/h.
-
PROG (programmes):
- Default programmes (26) – select and start, each programme has 16 segments (the treadmill will stop automatically when finished).
- User programmes (U1–U5) – create your own plans (16 segments). Set the time, speed and incline for each segment. Maximum programme time: 99 minutes.
- Heart rate controlled programmes (HR1–HR3) – Bluetooth® belt required. The system automatically adjusts the speed and incline to maintain the set heart rate.
| Programme | Default age | HR target (BPM) | Max speed |
| HP1 | 30 | 142 | 8 km/h |
| HP2 | 30 | 161 | 9 km/h |
| HP3 | 30 | 190 | 10 km/h |
- Body fat test (FAT) – after setting your gender, age, height and weight, hold the pulse sensors for 5 seconds. The result will appear on the screen:
o ≤19 - slim,
- 20–25 – normal,
- 26–29 – overweight,
- ≥30 - obesity.
The results are indicative, not medical.
-
Fan – airflow control:
-
press - level 1,
- press – level 2,
- press – switch off.
| Code | Parameter | Range / Value | Description |
| F-1 | Gender (Sex) | 01 – Male02 – Female | |
| F-2 | Age | 10–99 | |
| F-3 | Height | 100–200 cm | |
| F-4 | Weight | 20–150 kg | |
| F-5 | Fat level (Fat %) | ≤ 19% | Thin |
| 20–25 | Normal | ||
| 26% – 29 | Overweight | ||
| ≥ 30% | Obese |
Note: The test result has no medical value — it is for informational purposes only!
KNOB FUNCTIONS
- Short press — starts a 3-2-1 countdown, after which the training session starts automatically.
• Display – changes every 5 seconds between:
○ Time / Speed
○ Distance / Pace
○ Calories / Incline
During training:
• Turn left → decrease speed.
- Turn right → increase speed.
After starting training:
• Short press → pause.
• Long press → complete stop.

BLUETOOTH – connection to Kinomap
applications
- Add a new device → select FTMS in the TREADMILL section.
- Select the Bluetooth name beginning with "TERRUN 350".
- Press the START/PAUSE button on the treadmill to begin.
Zwift
- Select RUN SPEED in the PAIRED DEVICES section.
- Select the Bluetooth name beginning with "TERRUN 350".
- Press START/PAUSE on the treadmill to begin.
Bluetooth Audio
• Turn on Bluetooth on your device and search for a name beginning with "TERRUN 350-A".
• Once connected, audio from your device will play through the treadmill speakers.
• The volume can be adjusted:
- using the buttons on your mobile device,
- or the volume control buttons on the treadmill.
Connection to a wireless heart rate sensor
The treadmill supports compatible Bluetooth® devices with heart rate transmission.
Requirements:
• Heart Rate Broadcast support.
• Standard Bluetooth® protocol.
Before connecting:
• The broadcast function is often disabled by default to save battery power.
- Enable broadcast mode in your device settings.
Tips:
• Once broadcasting is enabled, the treadmill will automatically detect and display your heart rate.
- Keep the device at a safe distance
Charging the device
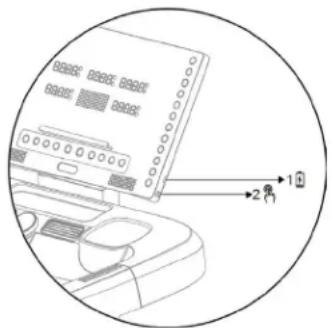
- Connect your phone or tablet to the USB port (zone 1) using a cable to charge the device.
LUBRICATION REMINDER FUNCTION
• The treadmill reminds you to lubricate every 300 kilometres (187 miles) of total distance.
• At that point, an audible signal will sound every 10 seconds and the message "OIL" will appear on the display.
• Lubricate the centre of the running belt with oil according to the instructions.
• After lubrication, hold down the STOP button for 3 seconds in standby mode – the warning signal will disappear.
SAFETY LOCK FUNCTION
• In any mode, removing the safety key will immediately stop the treadmill.
• The display will show "---" and the machine will beep.
• The treadmill will not restart until the key is reinserted.
ENERGY SAVING FUNCTION
• In standby mode, if you do not perform any operation for 10 minutes, the treadmill will enter energy saving mode.
• The screen will turn off.
• To restart it, press any button.
Important safety recommendations
- Start your workout at a slow speed and keep your hands on the handrails until you feel confident.
- Insert the safety key into the console and clip the safety cord to your clothing.
- To end your workout safely, press STOP or pull the safety cord – the treadmill will stop immediately.
TECHNICAL PROBLEMS AND SOLUTIONS
| Problem | Possible cause | Recommended action |
| The treadmill does not start | Not connected to the power supply | Plug the cord into the power outlet |
| No safety key (on the console "----") | Insert the safety key into the console | |
| Off-centre treadmill belt | Adjust the rear roller screws on both sides | |
| Display not working | Loose cables | Check all cables between the PCB and the control panel |
| E01 | Software overload | 1. Switch off the treadmill and restart it |
| E02 | Hardware overload | 1. Switch off the treadmill and restart it2. Replace the control board |
| E03 | Control board overheating protection | 1. Switch off the treadmill and restart2. Replace the control board |
| E04 | Input voltage too low | 1. Switch off the treadmill and restart2. Replace the control board |
| E05 | Input voltage too high | 1. Switch off the treadmill and restart it2. Replace the control board |
| E06–E09 | Incorrect motor or cable connection | 1. Switch off the treadmill2. Wait 1 minute3. Switch it back on |
| Damage to motor or cables | Check the motor cables, repair or replaceReplace the motor if necessary | |
| Blocked moving part of the treadmill | 1. Check the moving parts2. Listen to the motor (noise, smell)3. Replace the motor4. Replace the control board5. Lubricate the treadmill | |
| Incorrect power supply voltage | 1. Restart2. Check the input voltage | |
| E10 | Overload protection | 1. Switch off the treadmill and restart2. Replace the control board or motor |
| E12 | Communication error between systems | 1. Switch off the treadmill and restart2. Check the cables between the console and the control board3. Replace the control board or PCB |
| E15 | Servomotor failure | 1. Disconnect the safety key2. Press the "Incline -" and "STOP" buttons simultaneously for 3 seconds3. After the beep, automatic calibration will begin4. Wait for calibration to complete |
MAINTENANCE AND CLEANING OF THE TREADMILL
Regular cleaning will help extend the life and improve the performance of your treadmill. To keep your machine in good condition:
• Vacuum and clean all components regularly.
• Clean both sides of the running belt to prevent dust from accumulating underneath.
- Keep your sports shoes clean — dirt from your shoes can accelerate wear on the belt and running deck.
- Wipe the running belt surface with a clean, damp cloth.
• Children should not clean or maintain the treadmill without adult supervision. To better care for your
treadmill and extend its life, we recommend:
• Switching off the machine for 10 minutes every 2 hours of use.
• Turn off the treadmill completely when not in use.
Tighten the running belt
• A belt that is too loose may cause slippage while running.
- An overly tight belt reduces engine performance and increases friction between the roller and the belt.
- The optimum tension is when the belt can be lifted to a height of 50–75 mm from the drive plate.
Centring the running belt
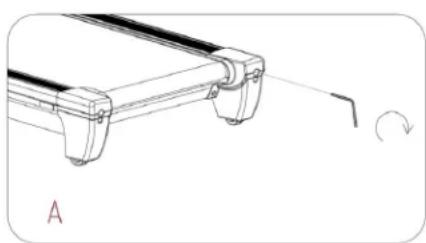
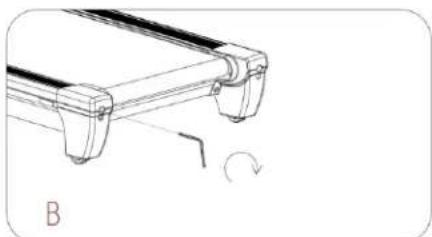
Place the treadmill on a level surface and run it at a speed of 6–9 km/h. If the belt moves to one side, follow these steps:
A. Belt moves to the right
- Turn the adjustment screw on the right side 14 turn clockwise.
- Then turn the left screw 14 turn counterclockwise.
- Repeat the action until the belt is centred (see figure A).
natural_image
Technical line drawing of a mechanical component with a curved arrow indicating rotation (no text or symbols)B. The belt moves to the left
Turn the left adjustment screw 14 turn clockwise.
- Then turn the right screw 14 turn anticlockwise.
○ Repeat until the belt is centred (see figure B).
C. The belt may become loose over time
To tighten it, turn both adjustment screws (left and right) a full turn clockwise.
- Check the belt tension and repeat the process until you achieve the correct tension.
- Ensure that both sides are adjusted evenly (see Figure C).
Lubricating the treadmill
IMPORTANT: The running belt must be lubricated before first use.
Why is lubrication important?
Lubricating the deck and running belt is crucial — friction between them affects the life and performance of the machine. Regular checks of these components are recommended.
WARNING: Always disconnect the treadmill from the power supply before cleaning, lubricating or repairing it.
How to lubricate:
natural_image
Technical line drawing of a mechanical component with a curved arrow indicating rotation (no text or symbols)
natural_image
Technical line drawing of a mechanical component with curved arrows indicating rotation (no text or symbols)- Lift the belt on one side and apply lubricant to the running deck. Spread it thoroughly with a cloth. Repeat on the other side.
- Moving parts should operate smoothly and quietly. Abnorma I operation may affect safety. Check and tighten screws regularly.
- To maintain the efficiency of the treadmill, maintenance should be performed regularly.
Recommended lubrication schedule:
| User type | Maintenance frequency |
| Light (less than 3 hours/week) | every 6 months |
| Medium (3–5 hours/week) | Every 3 months |
| Intensive (over 5 hours) | every 2 months |
FUNKCJE POKRETŁA (Knob Function)
natural_image
Technical line drawing of a mechanical component with mounting flanges and a curved arrow indicating rotation (no text or symbols)natural_image
Technical line drawing of a mechanical component with a curved arrow indicating rotation (no text or symbols)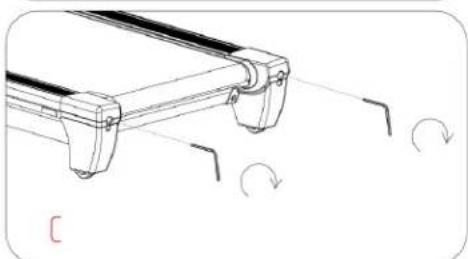
natural_image
Technical line drawing of a mechanical component with curved notches and rotational arrows indicating motion (no text or symbols)Smarowanie bieżni
natural_image
Technical line drawing of a mechanical component with a curved arrow indicating rotation (no text or symbols)B. Řemen se posune doleva
natural_image
Technical line drawing of a mechanical component with a curved arrow indicating rotation (no text or symbols)
natural_image
Technical line drawing of a mechanical component with curved features and directional arrows indicating rotation (no text or symbols)natural_image
Technical line drawing of a mechanical component with a curved arrow indicating rotation (no text or symbols)natural_image
Technical line drawing of a mechanical component with a curved arrow indicating rotation (no text or symbols)
natural_image
Technical line drawing of a mechanical component with curved features and rotational arrows (no text or symbols)natural_image
Technical line drawing of a mechanical component with a curved arrow indicating rotation (no text or symbols)natural_image
Technical line drawing of a mechanical component with a curved arrow indicating rotation (no text or symbols)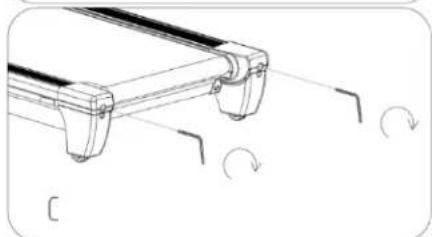
natural_image
Technical line drawing of a mechanical component with curved features and rotational arrows (no text or symbols)natural_image
Technical line drawing of a mechanical component with a curved arrow indicating rotation (no text or symbols)natural_image
Technical line drawing of a mechanical component with a curved arrow indicating rotation (no text or symbols)
natural_image
Technical line drawing of a mechanical component with curved features and rotational arrows (no text or symbols)OLULISED OHUTUSREEGLID
OLULISED KASUTUSJUHENDID
KASUTUSJUHEND DISPLAY
(1)

natural_image
Technical line drawing of a mechanical component with a curved arrow indicating rotation (no text or symbols)natural_image
Technical line drawing of a mechanical component with a curved arrow indicating rotation (no text or symbols)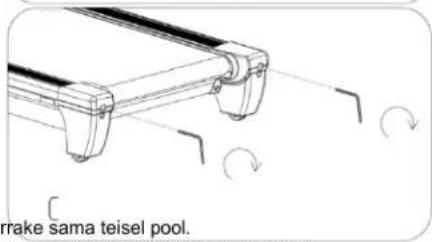
BLUETOOTH – connexion aux applications
Kinomap
natural_image
Technical line drawing of a mechanical component with a curved arrow indicating rotation (no text or symbols)natural_image
Technical line drawing of a mechanical component with curved ends and a rotation arrow (no text or symbols)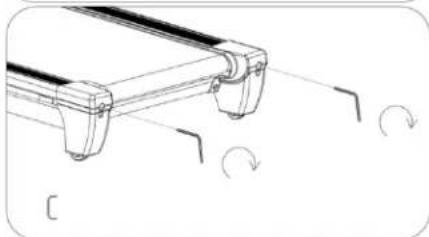
natural_image
Technical line drawing of a mechanical component with curved features and rotational arrows (no text or symbols)natural_image
Technical line drawing of a mechanical component with a curved arrow indicating rotation (no text or symbols)natural_image
Technical line drawing of a mechanical component with a curved arrow indicating rotation (no text or symbols)
natural_image
Technical line drawing of a mechanical component with curved features and rotational arrows (no text or symbols)natural_image
Technical line drawing of a mechanical component with a curved arrow indicating rotation (no text or symbols)natural_image
Technical line drawing of a mechanical component with a curved arrow indicating rotation (no text or symbols)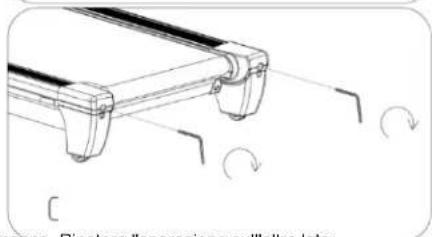
natural_image
Technical line drawing of a mechanical component with rotational arrows indicating motion (no text or symbols)natural_image
Technical line drawing of a mechanical component with a curved arrow indicating rotation (no text or symbols)natural_image
Technical line drawing of a mechanical component with a curved arrow indicating rotation (no text or symbols)
natural_image
Technical line drawing of a mechanical component with curved features and rotational arrows (no text or symbols)natural_image
Technical line drawing of a mechanical component with a curved arrow indicating rotation (no text or symbols)natural_image
Technical line drawing of a mechanical component with a curved arrow indicating rotation (no text or symbols)
natural_image
Technical line drawing of a mechanical component with curved features and rotational arrows (no text or symbols)Skrejcela ellošana
De montage is voltooid!
Opvouwen/uitklappen
SMEERHERINNERINGSFUNCTIE
natural_image
Technical line drawing of a mechanical component with a curved arrow indicating rotation (no text or symbols)natural_image
Technical line drawing of a mechanical component with a curved arrow indicating rotation (no text or symbols)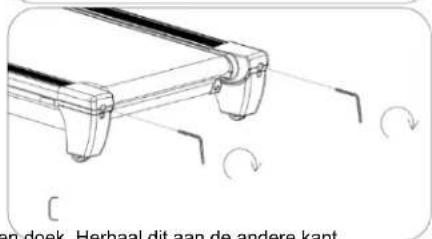
natural_image
Technical line drawing of a mechanical component with a curved arrow indicating rotation (no text or symbols)natural_image
Technical line drawing of a mechanical component with a curved arrow indicating rotation (no text or symbols)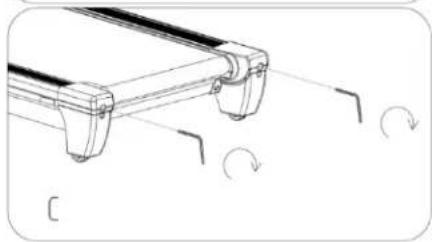
natural_image
Technical line drawing of a mechanical component with curved arrows indicating rotation (no text or symbols)natural_image
Technical line drawing of a mechanical component with a curved arrow indicating rotation (no text or symbols)natural_image
Technical line drawing of a mechanical component with a curved arrow indicating rotation (no text or symbols)
natural_image
Technical line drawing of a mechanical component with curved features and rotational arrows (no text or symbols)natural_image
Technical line drawing of a mechanical component with a curved arrow indicating rotation (no text or symbols)B. Pás sa posúva dol'ava
natural_image
Technical line drawing of a mechanical component with a curved arrow indicating rotation (no text or symbols)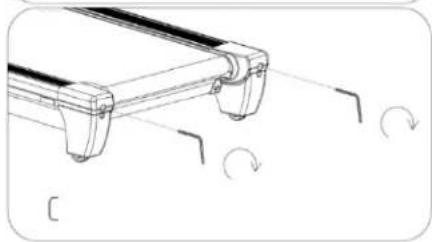
natural_image
Technical line drawing of a mechanical component with curved arrows indicating motion or rotation (no text or symbols)natural_image
Technical line drawing of a mechanical component with a curved arrow indicating rotation (no text or symbols)B. Pas se premakne v levo
○ Levi nastavni vijak zavrtite za ¼ obrata v smeri urinega kazalca.
○ Nato zavrtite desni vijak za ¼ obrata v nasprotni smeri urinega kazalca.
○ Ponavljajte, dokler pás ni poravnan (glej sliko B).
natural_image
Technical line drawing of a mechanical component with a curved arrow indicating rotation (no text or symbols)
natural_image
Technical line drawing of a mechanical component with curved ends and directional arrows indicating rotation (no text or symbols)SMÖRJNINGSPÄMINNELSESFUNKTION
natural_image
Technical line drawing of a mechanical component with a curved arrow indicating rotation (no text or symbols)natural_image
Technical line drawing of a mechanical component with a curved arrow indicating rotation (no text or symbols)
natural_image
Technical line drawing of a mechanical component with curved arrows indicating rotation (no text or symbols)natural_image
Technical line drawing of a mechanical component with a curved arrow indicating rotation (no text or symbols)natural_image
Technical line drawing of a mechanical component with a curved arrow indicating rotation (no text or symbols)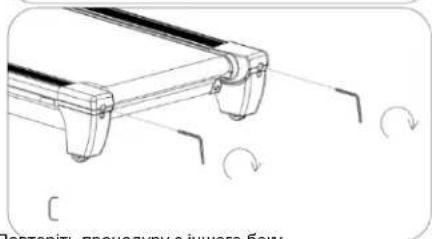
EN: The marking of the equipment with the crossed-out waste container symbol indicates that it is prohibited to place used electrical and electronic equipment with other waste. According to the WEEE Directive on the management of used electrical and electronic waste, separate disposal methods must be used for this type of equipment.
The user who intends to dispose of this product is obliged to take it to a collection point for used electrical and electronic equipment, thus contributing to reuse, recycling or recovery and thus to the protection of the environment. To do this, please contact the point from which the appliance was purchased or your local authority. Hazardous components contained in electronic equipment may cause long-term adverse effects on the environment, as well as harmful effects on human health.
- The Seller, on behalf of the Guarantor, provides a guarantee in the territory of the Republic of Poland for a period of 24 months from the date of sale.
-
The guarantee will be honoured by the shop or service centre upon presentation by the customer:
-
a legibly and correctly completed warranty card with the sales stamp and the seller's signature,
- a valid proof of purchase of the equipment with the date of sale / receipt, the goods claimed.
- Any defects and damage discovered during the warranty period will be repaired free of charge within a maximum of 21 days from the date of delivery of the goods to the service.
- In the case of the necessity to import parts, the repair period may be extended by the time necessary for their import, but not longer than 90 days.
-
The warranty does not cover:
-
mechanical damage and defects caused by them,
- damages and defects resulting from improper use and storage,
- improper assembly and maintenance,
-
damage and wear of components such as cables, straps, rubber parts, pedals, sponge grips, wheels, bearings, etc.
-
The warranty is void in the event of:
- expiry date,
- self-repair,
- failure to observe the rules of correct operation.
- Product returned for repair should be complete and clean. In the case of defects the service has the right to refuse acceptance for repair. If the product is delivered dirty, the service centre may refuse to accept it or clean it at the customer's expense with his written consent.
- The warranty does not cover installation and maintenance work, which, according to the user manual, must be carried out by the user himself.
- The guarantor also informs that it provides post-warranty service.
- The goods should be protected for shipping.
- In order to make use of the warranty, please follow the procedure on the website: https://serwis.abisal.pl/.
In case of non-conformity of the sold thing with the contract, the buyer is entitled by law to legal remedies from and at the expense of the seller. The guarantee does not affect such remedies.
THE EQUIPMENT IS NOT INTENDED FOR REHABILITATION AND THERAPY
NOTES ON THE COURSE OF REPAIRS
| Item | Date of notification | Date of provision | Course of repairs | Signature of the recipient (shop, owner) |
KARTA GWARANCYJNA
CONDITIONS DE GARANTIE:
HMS-FITNESS.COM

HMS®
IMPORTER: ABISAL SP. Z O.O., ul. Pyskowicka 17, 41-807 Zabrze, Polska
DISTRIBUTOR: ABISTORE SPORT S.R.O, U Cihelny 230/3, 74801 Hlučín, Česká Republika
- SPECIAL INSTRUCTIONS
- SAFETY INSTRUCTIONS – electricity
- IMPORTANT SAFETY RULES
- IMPORTANT OPERATING INSTRUCTIONS
- CHECKING THE CONTENTS OF THE PACKAGE
- TREADMILL ASSEMBLY
- STEP 2: Assembling the left column (Left Upright Tube)
- STEP 3: Handlebar Assembly
- STEP 4: Console Screen Installation
- STEP 5: Installing the rear console cover
- STEP 6: Installing the end caps
- STEP 7: Final tightening and safety key
- Assembly complete!
- FOLDING AND UNFOLDING THE TREADMILL (PowerTouch)
- Important note
- How to fold/unfold
- Unfolding (UNFOLD)
- Safety:
- Folding (FOLD)
- Forced Unfold
- Safety notes
- TRANSPORTING THE TREADMILL AND ITS CORRECT POSITIONING
- IMPORTANT ELECTRICAL INFORMATION
- Grounding
- WARNINGS
- OPERATING INSTRUCTIONS DISPLAY (1)
- CONSOLE BUTTON FUNCTIONS
- KNOB FUNCTIONS
- During training:
- After starting training:
- BLUETOOTH – connection to Kinomap
- applications
- Zwift
- Bluetooth Audio
- Connection to a wireless heart rate sensor
- Requirements:
- Before connecting:
- Tips:
- Charging the device
- LUBRICATION REMINDER FUNCTION
- SAFETY LOCK FUNCTION
- ENERGY SAVING FUNCTION
- Important safety recommendations
- MAINTENANCE AND CLEANING OF THE TREADMILL
- Tighten the running belt
- Centring the running belt
- Belt moves to the right
- The belt moves to the left
- The belt may become loose over time
- Lubricating the treadmill
- Why is lubrication important?
- How to lubricate:
- Recommended lubrication schedule:
- FUNKCJE POKRETŁA (Knob Function)
- Smarowanie bieżni
- Řemen se posune doleva
- OLULISED OHUTUSREEGLID
- OLULISED KASUTUSJUHENDID
- KASUTUSJUHEND DISPLAY
- BLUETOOTH – connexion aux applications
- Kinomap
- Skrejcela ellošana
- De montage is voltooid!
- Opvouwen/uitklappen
- SMEERHERINNERINGSFUNCTIE
- Pás sa posúva dol'ava
- Pas se premakne v levo
- SMÖRJNINGSPÄMINNELSESFUNKTION
- THE EQUIPMENT IS NOT INTENDED FOR REHABILITATION AND THERAPY
- KARTA GWARANCYJNA
- CONDITIONS DE GARANTIE:
Brand : HMS Premium
Model : TERRUN350
Category : Treadmills