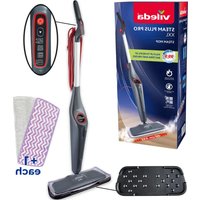
Steam Plus Pro XXL - Steam cleaner Vileda - Free user manual and instructions
Find the device manual for free Steam Plus Pro XXL Vileda in PDF.


| Product type | Steam cleaner |
| Brand | Vileda |
| Model | Steam Plus Pro XXL |
| Power supply | 230 V ~ 50-60 Hz |
| Power | 1 550 W |
| Water tank capacity | 400 ml |
| Steam flow rate | 7 g/min (min) to 25 g/min (max) |
| Automatic shut-off | After 20 minutes of inactivity |
| Weight (without water) | 2.2 kg |
| Cable length | 7.0 m |
| Dimensions (L x W x H) | 20.5 x 27 x 122.3 cm |
| Protection rating | IPX4 |
| Protection class | I |
| Cleaning modes | 4 modes: tile, carpet, sealed floors, delicate floors |
| Functions | Descaling with light reminder, hygienic treatment of covers |
| Cleaning pads | Machine washable at 60°C, without fabric softener |
| Included accessories | Steam base, cleaning pad, sensitive surfaces pad, carpet accessory, measuring cup, storage tray |
| White pad material | 91% polyester, 9% other |
| Standby consumption | 0.3 W |
Frequently Asked Questions - Steam Plus Pro XXL Vileda
User questions about Steam Plus Pro XXL Vileda
0 question about this device. Answer the ones you know or ask your own.
Ask a new question about this device
Download the instructions for your Steam cleaner in PDF format for free! Find your manual Steam Plus Pro XXL - Vileda and take your electronic device back in hand. On this page are published all the documents necessary for the use of your device. Steam Plus Pro XXL by Vileda.
USER MANUAL Steam Plus Pro XXL Vileda
GB Table of Contents
1 General information. 7
2Assembly .8
3 Operation 9
4 Maintenance and care. 13
5 Storage. 14
6 Troubleshooting 15
7 Technical data. 16
DE Inhalt
Thank you for purchasing the new Vileda Steam Plus Pro (XXL/Compact).
Read this operating manual and the enclosed safety manual before using the device for the first time.
Disregard of the instructions in the operating manual and the safety manual may cause injury or damage the device.
The safety manual and the operating manual are also available on:
www.vileda.com
Table of Contents
1 General information. 7
2Assembly. 8
3 Operation. 9
4 Maintenance and care 13
5 Storage. 14
6 Troubleshooting. 15
7 Technical data. 16
Symbols used in this manual

Warning concerning health hazards describing possible risks of injury.

Warning concerning possible dangers to the device or other objects.

Highlights useful hints and information.
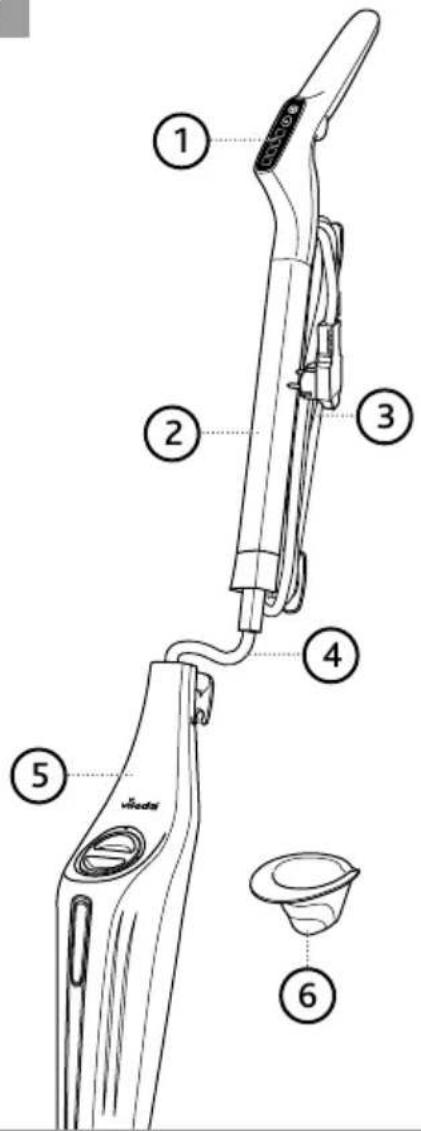
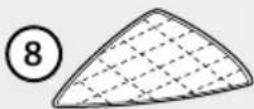
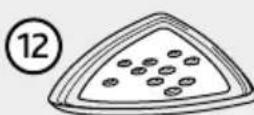
Scope of supply (Fig. 1)
1 control panel, see Fig. 8
2 handle
3 mains cable with plug
4 internal wire
5 body unit
6 water cup
7 steam base
8 cleaning pad
9 sensitive pad
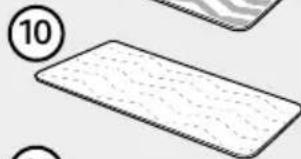
10 power pad
11 carpet glider
12 storage tray
optionally included (some models only)
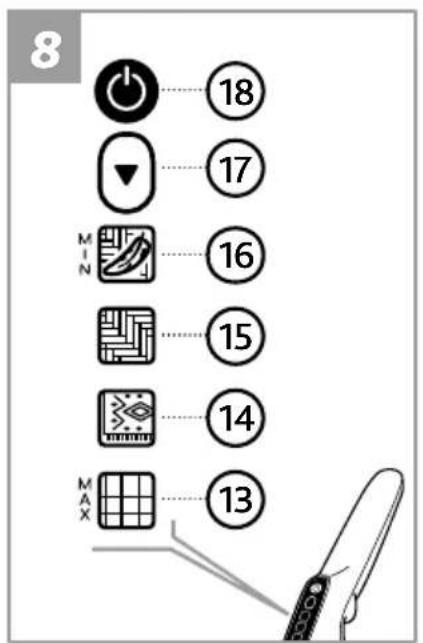
Control panel (Fig. 8)
13 MAX mode for tiles
14 carpet mode
15 sealed floor mode
16 MIN mode for delicate floors
17 mode button and descending reminder
18 ON/OFF button

WARNING!
Risk of injury due to electric current!
The plug must be removed from the socket outlet when assembling the device.
- Insert the handle tube into the body unit until you hear a click (Fig. 2).
- Pay attention to push the internal wire (Fig. 2 /black) into the tube.

Insert the handle tube into the body unit only once.
The handle tube should not be detached from the body unit again.
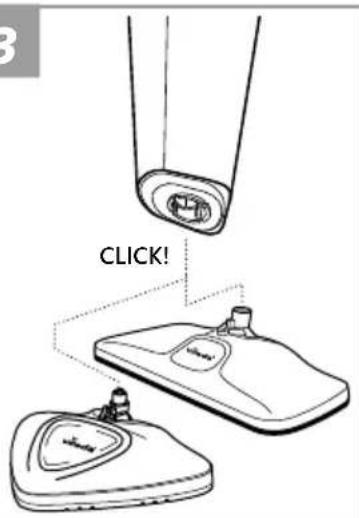
- Push the body unit onto the steam base until you hear a click (Fig. 3).
- Place a cleaning pad on the floor with the velour side facing up.
- Place the steam base carefully centred on the cleaning pad so that the cleaning pad is completely covered by the frame of the base (Fig. 4).

NOTICE
Risk of property damage due to improper use of the device!
The cleaning pad must be completely covered by the frame of the base to prevent damage to the device.

NOTICE
Risk of property damage due to improper use of the device!
Never use the device without or with a misaligned cleaning pad.

NOTE
The device can be used on hard floors and carpets. If the device is used on carpet, the carpet glider needs to be used (Fig. 9) and the carpet should have a max. height of 15mm .
3.1 Preparing for operation

NOTICE
Risk of property damage due to improper water tank filling!
-
Only use cold tap water or, in case of hard tap water in your area, distilled water.
-
Do not fill hot or boiling water into the water tank.
Do not use detergents. -
Do not overfill the tank. Observe the MAX level sign.
-
Remove the cap of the water tank by turning it anti-clockwise (Fig. 5).
- Fill cold, clean water into the water tank (Fig. 6).

Do not fill the water tank above the maximum capacity of 0.4 litres (MAX level sign).
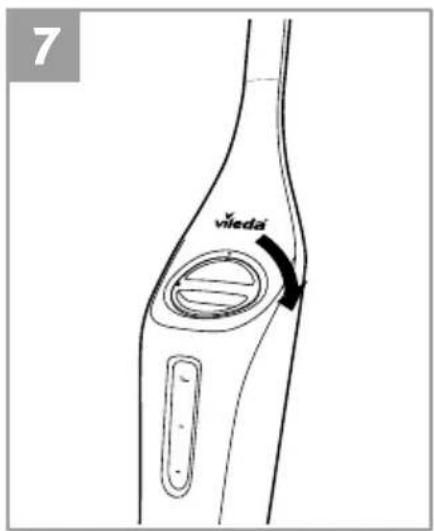
- Attach the cap to the water tank by turning the cap clockwise by 90^ until it sits tightly (Fig. 7).
- Unwrap the power cord from the cord hooks and plug it into a mains power socket.
3.2 Steam-cleaning

WARNING!
Risk of scalding due to steam exposure!
Always hold the device in an upright position with the cleaning pad placed on the floor when adjusting the amount of steam.

NOTICE
Risk of property damage due to improper use of the device!
The steam cleaner is recommended for use on sealed floors only. It may damage the floor if it is used on unsealed floors.
The device can be used for cleaning as soon as a cleaning pad has been attached and the water tank has been filled.
- Turn on the device by pressing the ON/OFF button (on the control panel.
The water in the water tank starts heating up.
It takes approx. 15 seconds for the water to heat up to working temperature.
The steam cleaner is ready for use when the indicator light on the control panel stops blinking and remains steadily illuminated.
- Select one of the four pre-set cleaning modes by pressing the mode button on the control panel.
fortiles
forcarpet
for sealed floors
for delicate floors / low steam
It is recommended to use the sensitive mode with the sensitive pad mounted.
3.3 Refreshing carpets

WARNING!
Risk of scalding due to steam exposure!
Always attach the carpet glider to the steam base by placing it on the floor (Fig. 9). Never turn a device that is switched on upside down to attach the carpet glider. Always switch off the device and remove the plug from the socket before remo ving the carpet glider from the steam base.

WARNING!
Risk of burning due to hot surfaces!
Always let the device cool down before removing the carpet glider from the steam base.

NOTE
For best cleaning results, vacuum the carpet before using the steam cleaner.
The carpet glider accessory is needed if you want to refresh a carpet with the device.
-
Place the device with the attached cleaning pad carefully centered on the carpet glider and gently push it down (Fig. 9).
-
Place the carpet glider on the floor (Fig. 9).
The carpet glider is attached. - Select the setting on the control panel.
The device can be used for refreshing carpets.
3.4 Refilling the water tank
The water tank needs to be refilled when the amount of steam decreases.

NOTE
When the device is operated with an empty water tank for too long, the 'self-protection mode' is activated. In this case it may take a few seconds for the device to be ready again after the water tank has been refilled.
- Press and hold the ON/OFF button (on the control panel for 3 seconds.
The device is switched off.
-
Remove the cap of the water tank by turning it anti-clockwise (Fig. 5).
-
Fill cold, clean water into the water tank (Fig. 6).

Do not fill the water tank above the maximum capacity of 0.4 litres (MAX level sign).
- Attach the cap to the water tank by turning the cap clockwise by 90^ until it sits tightly (Fig. 7).
The device is ready for operation.
3.5 Treating the cleaning pads hygienically

NOTICE
Risk of property damage due to hot steam!
- Make sure that the floor you place the device on for treating the cleaning pad can sustain high temperatures (e.g. ceramic tiles). In case of doubt, refer to information of the floor manufacturer.
- Never use the device in the highest steam mode for longer than 1 minute without moving it.
The pads can be treated hygienically to eliminate bacteria and viruses after usage.
- Place the device with the attached cleaning pad on a heat-resistant floor.

NOTICE
Risk of property damage due to hot steam!
Performing this operation on the storage tray may cause damage. Avoid doing so.
- Select the MAX setting on the control panel.
- Leave the device standing for 1 minute.
The cleaning pad is hygienically treated.
3.6 Ending operation

WARNING!
Risk of scalding due to hot surfaces and water!
Always let the device cool down before removing any components.
- Press and hold the ON/OFF button (on the control panel for 3 seconds.
The device is switched off.
- Unplug the power cord from the mains power socket by pulling its plug.
- Wrap the power cord on the cord hooks of the device.
- Let the device and its components cool down.
- Remove the cleaning pad from the frame and let it dry in a well-aired place.
- Store the device in accordance with "5 Storage" on page 14.

WARNING!
Risk of injury due to electric current!
The plug must be removed from the mains socket before cleaning or maintaining the device. Handle the plug, not the cable, when unplugging the power cord.
4.1 Removing limescale

WARNING!
Risk of injury and property damage due to acidic steam exposure!
Never expose yourself or any other person to the steam output at the steam base when removing limescale.
Make sure that no animals or children can suddenly come close to the steam base while removing limescale.
Never point the steam base towards floors, walls, furniture or any other objects that may be damaged by acidic hot steam.

NOTICE
Risk of property damage due to hot steam!
Performing this operation on the storage tray may cause damage. Avoid doing so.
Over time, limescale can build up inside the device and affect product performance by impairing the steam output. Limescale should be removed on a regular basis.
The arrow () on the control panel starts blinking red when the device needs descal-. ing. If the arrow is blinking red, proceed as follows to descale the device:
- Remove the cleaning pad from the steam base, if attached.
- Prepare a solution of 1/3 of vinegar and 2/3 of tap water.

For a complete tank filling, 135ml white vinegar mixed with 265ml of water are needed.

NOTE
Coffee machine descalers are also recommended for effective steam cleaner descaling.
- Fill the prepared solution into the water tank.
-
Place the device so that the steam released from the device does not reach objects or persons. Use a heat-resistant and easy-to-clean surface, e.g. shower tub or tiles.
-
Select the MAX setting on the control panel.
- Leave the device unmoved, until the water tank is empty.

Limescale removal takes approx. 20 minutes of time.
- Press and hold the ON/OFF button (on the control panel for 3 seconds.
- Fill cold, clean water into the water tank and repeat steps 4 to 7.

NOTE
If the steam output is still impaired after performing a limescale removal, repeat the procedure.
To prevent damage from vinegar residue in the water tank, it is recommended to clean a sturdy floor (e.g. ceramic tile floor) first after each limescale removal.
- To reset the descending reminder from blinking, press the mode button ( ) for 5 seconds.
4.2 Washing the cleaning pads
Cleaning pads can be machine washed at 60^ . Do not use fabric softener as this can affect the performance of the pads.
5 Storage

NOTICE
Risk of property damage due to improper storage!
The device can retain water and humidity when not in use.
Do not store the device where there is a danger of freezing. Freezing will damage components and will void the guarantee.
- Wrap the cord around the cord hooks (Fig. 10). Be careful not to wrap the cord too tightly.
- Make sure that the cleaning pad is removed and let the humid cleaning pad dry separately.
- Store the device on its storage tray in a protected and dry area.
- Lean the device against a wall or another fixed object to prevent it from falling over.
| Problem Possible cause Possible solution | ||
| Reduced steam output or no steam | Water tank may be empty | Switch off device. Refill water tank with cold water. |
| System is clogged due to limescale | Switch off device. Refill water tank with vinegar solution (33%) and perform a limescale removal in accordance with "4.1 Removing limescale" on page 13. | |
| Device does not turn on | Device not properly plugged into the mains socket or issue with mains power | Check that mains power socket works with another appliance. Ensure proper connection of device to the mains power socket. Try a different power socket. |
| Cord is damaged Switch off and unplug device immediately. Send device to the authorised customer service. | ||
| Safety thermostat active due to overheating | Switch off device and let it cool down. Switch on the device again. If the problem persists, contact the authorised customer service. | |
| Water is dripping from the water tank | Foamy detergent was used | Switch off and unplug device. Empty water tank and fill in clean tap water instead. |
| Water tank is too full | Switch off and unplug device. Empty water tank. | |
| Water tank not closed properly | Switch off device. Attach the cap to the water tank properly. | |
| Arrow (◎) on handle control is blinking red. | System is clogged due to limescale | Switch off device. Refill water tank with vinegar solution (33%) and perform a limescale removal according to "4.1 Removing limescale" on page 13. |
| Controls on hand grip are not responding | Controls are damaged | Contact the authorised customer service. |
i NOTE
If you are in doubt, if the problem is not listed here or if the given solution is not working, please contact the authorised customer service.
7 Technical data
| Power connection | |
| Voltage 230 V | 50 – 60 Hz |
| Ingress protection code IPX 4 | |
| IEC protection class I | |
| Automatic OFF after 20 min | |
| Power consumption after Automatic OFF ("phantom load") | < 0.3 W |
| Performance data | |
| Installed power 1550 W | |
| Steam amount (MIN position) 7 g/min | |
| Steam amount (MAX position) 25 g/min | |
| Filling quantity | |
| Water tank 400 ml | |
| Cleaning pad materials | |
| White pad 91% polyester, 9% other | |
| Sensitive pad 100% polyester | |
| Power pad 91% polyester, 9% other | |
| Dimensions | |
| Cable length XXL: 7.0 m; | Compact 6.0 m |
| Weight (without water) | 2.2 kg |
| Length | 20.5 cm |
| Width | 27 cm |
| Height | 122.3 cm |
1

Steam Plus Pro Compact



Steam Plus Pro XXL




2
3

4




Ovladacipanel (Obr.8)
13 MAX rezim pre dlažbu
14 rezim koberec
15 rezim utesnenia podlahy
16 MIN režim jemne podlahy
17 tlacidlo rezimu a pripomienka odstranenie vodneho kameña
18 ON/OFF tlačidlo

VAROVANIE!
Freudenberg Home and Cleaning Solutions GmbH


- GB Table of Contents
- DE Inhalt
- Table of Contents
- Symbols used in this manual
- Scope of supply (Fig. 1)
- Control panel (Fig. 8)
- WARNING!
- NOTICE
- NOTE
- Preparing for operation
- Steam-cleaning
- Refreshing carpets
- Refilling the water tank
- Treating the cleaning pads hygienically
- Ending operation
- Removing limescale
- Washing the cleaning pads
- Storage
- i NOTE
- Technical data
- Ovladacipanel (Obr.8)
- VAROVANIE!
Brand : Vileda
Model : Steam Plus Pro XXL
Category : Steam cleaner