
M-488A - Vacuum Cleaner Vileda - Free user manual and instructions
Find the device manual for free M-488A Vileda in PDF.


| Product Type | Cylinder Vacuum Cleaner |
| Brand | Vileda |
| Model | M-488A |
| Power Consumption | 1400 W |
| Dust Capacity | 2.0 L |
| Filtration System | HEPA 13 |
| Noise Level | 80 dB |
| Cord Length | 6 m |
| Weight | 4.5 kg |
| Dimensions (W x D x H) | 350 x 250 x 220 mm |
| Suction Control | Electronic slide switch |
| Operating Radius | 8 m |
| Included Attachments | Floor nozzle, crevice tool, dusting brush |
| Bagless | Yes, cyclonic |
| Filter Washable | Yes, washable HEPA filter |
| Automatic Cord Rewind | Yes |
| Power Cable Type | Retractable |
| Overheat Protection | Yes |
| Handle Type | Ergonomic soft grip |
| Color | Black and red |
| Warranty | 2 years |
Frequently Asked Questions - M-488A Vileda
User questions about M-488A Vileda
0 question about this device. Answer the ones you know or ask your own.
Ask a new question about this device
Download the instructions for your Vacuum Cleaner in PDF format for free! Find your manual M-488A - Vileda and take your electronic device back in hand. On this page are published all the documents necessary for the use of your device. M-488A by Vileda.
USER MANUAL M-488A Vileda
natural_image
Close-up of a black circular robotic device with a logo and 'EPOLIA' text, no readable text beyond the branding.M-488A Cleaning Robot
Owner's Manual
Dear Owner,
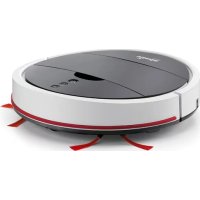
Thank you for purchasing your new Vileda Cleaning Robot.
After many years of studying consumer needs, we have designed this cleaning robot to make your life easier and more enjoyable. At one press of a button, the Vileda Cleaning Robot moves by itself around your home, picking up particles, dust and hair from your floors, even under furniture and other hard to reach places such as corners and edges. The Vileda Cleaning Robot works efficiently on all kinds of hard floors, and even on short-piled carpets.
We believe we have produced the most stylish and easy to use tool to help you with your everyday cleaning tasks.
Enjoy it!
CONTENTS
General Warnings Pg 4
Part Location Pg 7
Anatomy Pg 8
Battery Charging & Recharging Pg 9
Using the Product Pg 10
Cleaning Modes Pg 10
Cleaning System Pg 11
Removing and Emptying the Dust Bin Pg 12
Cleaning Dust Bin & Filter Pg 12
Cleaning Main Brushes Pg 13
Cleaning Vacuum Inlet Cover Pg 14
Replacing Side Brush Pg 14
Troubleshooting Pg 15
Environmental and Product Recycling Pg 16
Battery Removal Pg 17
Technical Specification Pg 17
Guarantee Information Pg 18
GENERAL WARNINGS

IMPORTANT:
READ ALL INSTRUCTIONS BEFORE USE.
RETAIN INSTRUCTIONS FOR FUTURE REFERENCE.
WARNING:
USE THE UNIT ONLY AS DESCRIBED IN THIS MANUAL. FAILURE TO FOLLOW ALL INSTRUCTIONS LISTED BELOW MAY RESULT IN ELECTRIC SHOCK, FIRE AND/OR SERIOUS INJURY.
WHEN USING ANY ELECTRICAL APPLIANCE, BASIC SAFETY PRECAUTIONS SHOULD ALWAYS BE OBSERVED, INCLUDING THE FOLLOWING, IN ORDER TO REDUCE THE RISK OF FIRE, ELECTRICAL SHOCK, LEAKING BATTERIES OR PERSONAL INJURY.
USE RESTRICTIONS

- Only for indoor use. Do not use outdoors or on balconies.
- Intended for domestic use only.
- Device is not a toy. Do not sit or stand on it. Small children and pets should be supervised when the robot is cleaning.
- Do not pick up anything that is flammable, burning or smoking.
- Do not use this device to pick up anything wet.
- Do not use with long-piled carpets.
PERSONAL SAFETY

- The intended use is described in this manual. The use of any accessory or attachment or the performance of any operation with this appliance other than those recommended in this instruction manual may present a risk of personal injury.
- Children and animals must be supervised to ensure they do not play with the appliance.
- This appliance can be used by children aged from 8 years and above and persons with reduced physical, sensory or mental capabilities or lack of
experience and knowledge if they have been given supervision or instruction concerning use of the appliance in a safe way and understand the hazards involved.
• Children shall not play with the appliance.
- Cleaning and user maintenance shall not be made by children without supervision.
- Store in a dry place.
- Store out of reach of children.
- Use only with the attachments recommended by the manufacturer.
- Do not use without the filter in place.
- Keep the product and all accessories away from hot surfaces.
- Do not immerse the appliance in water or other liquid.
ELECTRICAL SAFETY INSTRUCTIONS

- Never modify the charger in any way.
- The charger has been designed for a specific voltage. Always check that the mains voltage is the same as that stated on the rating plate.
- Only use the charger supplied with the product. Do not attempt to use the charger with any other product nor attempt to charge this product with another charger.
- Before use, check the charger cord for signs of damage or ageing.
- Do not abuse the charger cord; never carry the charger or charger stand by the cord.
- Never pull the charger cord to disconnect from a socket; grasp the charger and pull to disconnect.
- Keep the charger cord away from hot surfaces and sharp edges.
- Do not handle the charger or the unit with wet hands.
- Do not store or charge the unit outdoors.
- Unplug the charger before cleaning.
Product contains electronic parts. DO NOT submerge it or spray it with water. Clean with a dry cloth only.
BATTERY USE AND CARE

- Using a charger from a different product may cause a risk of fire.
- Leaks from battery cells can occur under extreme conditions. If the liquid gets on the skin, wash it immediately with soap and water. If the liquid gets into the eyes, flush them immediately with clean water for a minimum of 10 minutes and seek medical attention.
- This product contains NiMH batteries. Do not incinerate batteries or expose to high temperatures, as they may explode.
- When the battery pack is not in use, keep away from other metal objects such as: paper clips, coins, keys, nails, screws or other small metal objects that can make a connection from one terminal to another.
- Shorting the battery terminals may cause fire.
- The battery must be removed from the appliance before it is discarded.
- The battery is to be disposed of safely.
- The appliance must be disconnected from the mains supply when removing the battery.
• In an emergency situation contact professional help immediately!
SERVICE

- Before using the machine and after any impact, check for signs of wear or damage and repair as necessary.
- Do not use the appliance if any part is damaged or defective.
- Repairs should be carried out by a service agent or a suitably qualified person in accordance with relevant safety regulations. Repairs by unqualified persons could be dangerous.
- Never modify the appliance in any way as this may increase the risk of personal injury.
- Only use replacement parts or accessories provided or recommended by the manufacturer.
PART LOCATION
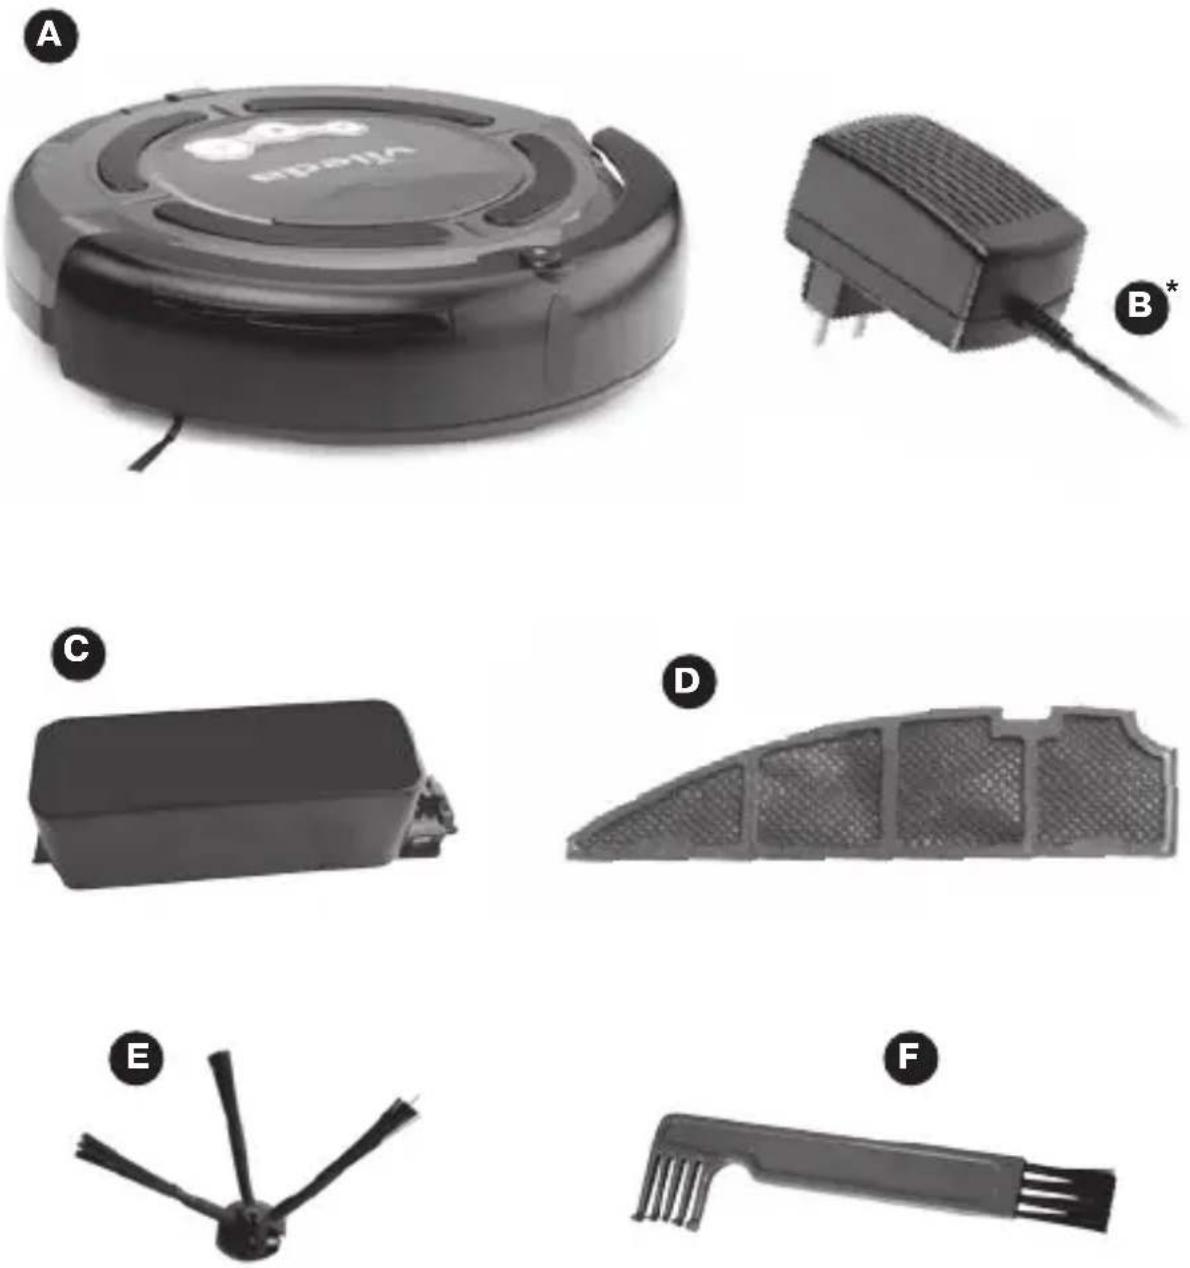
A. 1 Main Unit
B. 1 Battery Charger (* Picture may differ from provided box content)
C. 1 Rechargeable Battery Pack (installed)
D. 1 Filter Mesh (extra)
E. 1 Side Brush (extra)
F. 1 Maintenance Brush
ANATOMY
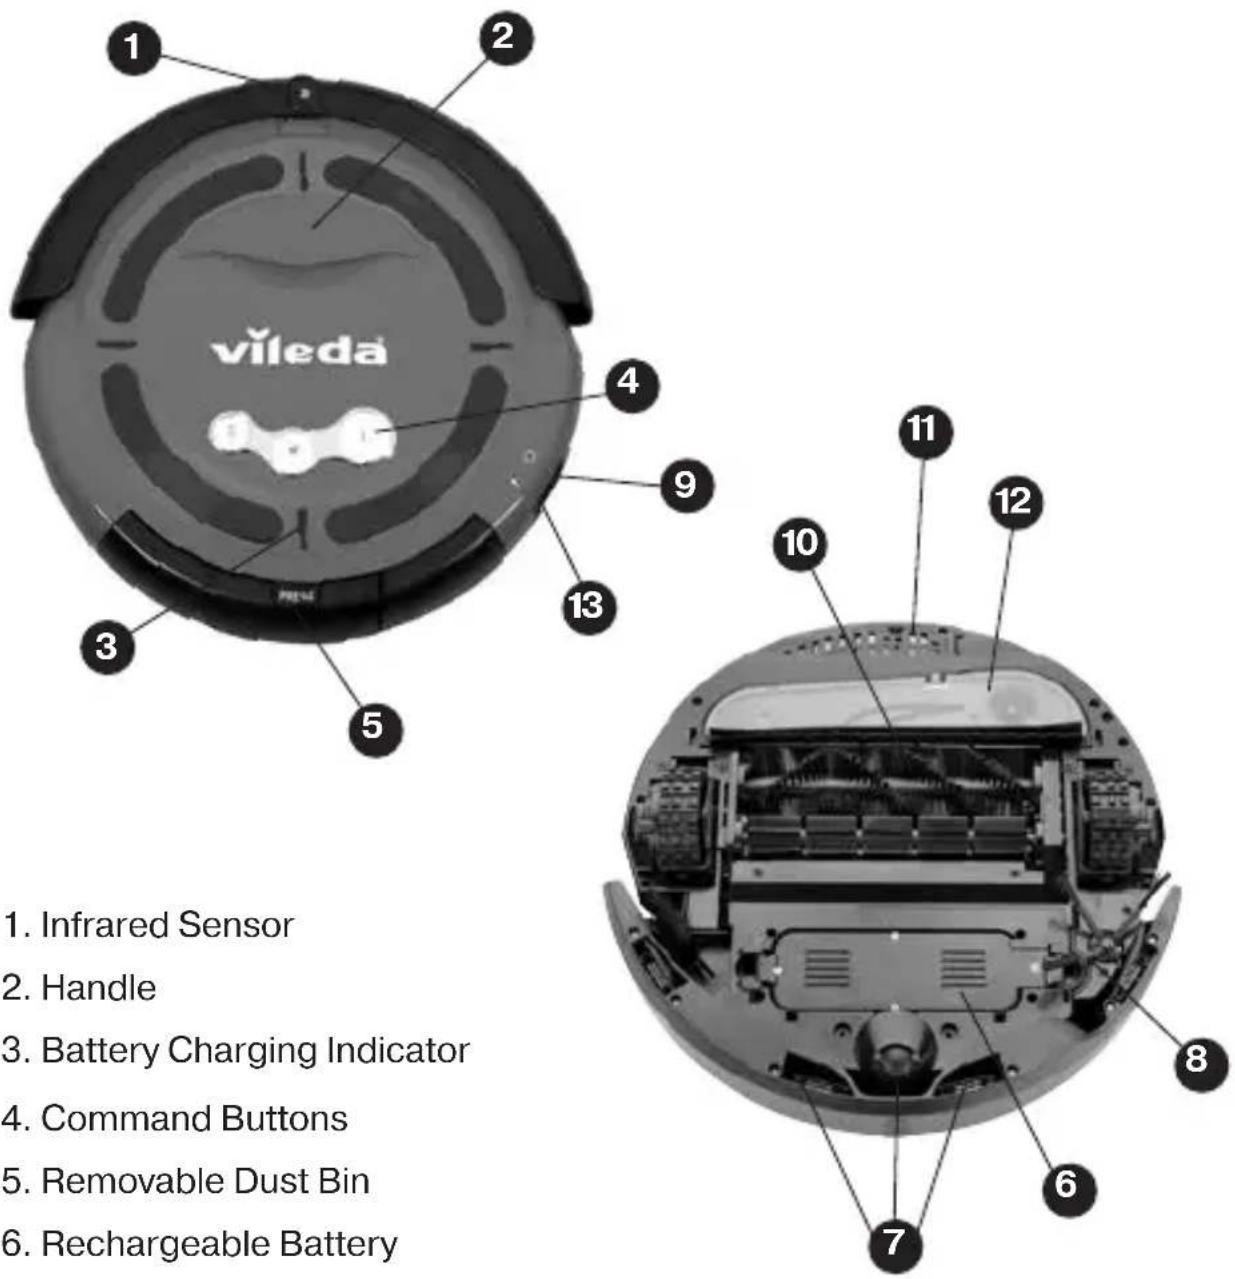
- Infrared Sensor
- Handle
- Battery Charging Indicator
- Command Buttons
- Removable Dust Bin
- Rechargeable Battery
- Cliff Sensors
- Side Brush
- Power Switch
- Main Rotating Brush
- Filter
- Vacuum Inlet Cover
- Battery Charger Socket
BATTERY CHARGING & RECHARGING
WARNING: if the battery is damaged in any way do not attempt to recharge it. Contact Vileda in the UK on 0845 769 7356.
Charge the battery for 8 hours before first use.


natural_image
Black circular device with a power outlet connected to its base, showing a small plug inserted into the top-left corner (no text or symbols visible)1 Connect the supplied battery charger into the battery charging socket located beside the power switch.
2 Once the battery is fully charged unplug the charger from the battery charging socket (13). Do not pull the charger cord, grasp the charger and pull to disconnect from the socket.
Note: charging time is about 4-5 hours.
Battery autonomy is up to 80 minutes. Battery charging indicator will turn red when battery level is down. Then recharging is needed.
To maintain peak performance of the battery it is recommended to charge 8 hours before first use or when used again after a long time.
WARNING: Only use a replacement battery as supplied by the manufacturer.
USING THE PRODUCT
Before using, pick up objects like clothing, loose papers, pull cords for blinds or curtains, power cords, and any fragile objects as they may entangle with the cleaning brushes. If the device passes over a power cord and drags it, there is a chance an object could tumble off a table or shelf.
1 Ensure the battery is charged.
2 Place Vileda Cleaning Robot in the middle of the room.
3 To turn Vileda Cleaning Robot ON press the main Power Switch.
4 To START Vileda Cleaning Robot, press one of the Command Buttons to choose the desired cleaning mode (see section "Cleaning Modes").
5 To PAUSE Vileda Cleaning Robot, press one of the Command Buttons.
6 To RESUME Vileda Cleaning Robot, press one of the Command Buttons again.
7 To turn Vileda Cleaning Robot OFF, press the main power Switch.
IMPORTANT: For most efficient cleaning, keep your floors as clear as possible (e.g. temporarily remove wires, rugs, chairs, small objects, ...). With less obstacles, the Vileda Cleaning Robot will move faster and clean more effectively.
CLEANING MODES
WARNING: Certain types of floors and stairs could reduce the reliability of drop sensors - Test with your specific floor and stairs before use.

flowchart
graph TD
    A["Start"] --> B["SOFA"]
    B --> C["TABLE"]
    C --> D["End"]
    style A fill:#f9f,stroke:#333
    style B fill:#ccf,stroke:#333
    style C fill:#cfc,stroke:#333
    style D fill:#fcc,stroke:#333
Vileda Cleaning Robot can avoid obstacles and is equipped with cliff sensors to avoid falling down the stairs.
Vileda Cleaning Robot has 3 cleaning modes: SHORT (S), MEDIUM (M) and LARGE (L), which represent the size of the room.
- SHORT (S): robot cleans for 5 minutes.
Ideal for spot cleaning in one area.
• MEDIUM (M): robot cleans for 30 minutes.
Ideal for mid-sized rooms (up to 25 m ^4 ).
• LARGE (L): robot cleans for 60 minutes.
Ideal for big rooms (more than 25 m ^4 ).
CLEANING SYSTEM
flowchart
graph TD
    A["1"] --> B["2"]
    B --> C["3"]
    C --> D["4"]
    D --> E["5"]
    E --> F["6"]
    F --> G["7"]
    G --> H["8"]
    H --> I["9"]
    I --> J["10"]
    J --> K["11"]
    K --> L["12"]
    L --> M["13"]
    M --> N["14"]
    N --> O["15"]
    O --> P["16"]
    P --> Q["17"]
    Q --> R["18"]
    R --> S["19"]
    S --> T["20"]
    T --> U["21"]
    U --> V["22"]
    V --> W["23"]
    W --> X["24"]
    X --> Y["25"]
    Y --> Z["26"]
    Z --> AA["27"]
    AA --> AB["28"]
    AB --> AC["29"]
    AC --> AD["30"]
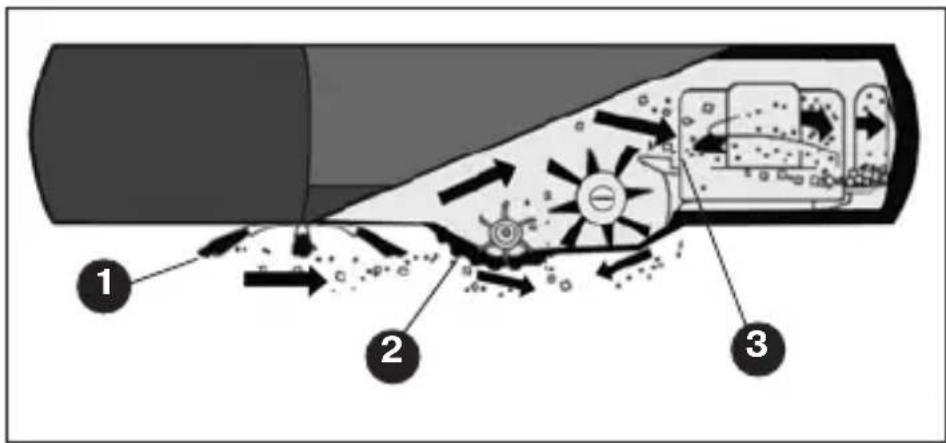
1 Side brush sweeps into corners and along edges.
2 Two rotating brushes pick up dirt, hair and particles into the dustbin.
3 Vacuum power picks up the remaining fine dirt.
Vileda Cleaning Robot works on all hard floors such as wood, parquet, tiles, linoleum and short-pile carpets.
Do not use Vileda Cleaning Robot with long-piled carpets.
REMOVING AND EMPTYING THE DUST BIN
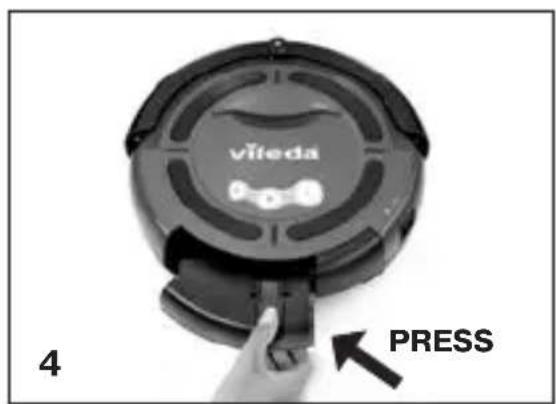
1 Turn off the power switch.
2 Press down the dust bin release button and pull out the dust bin as indicated in illustrations.
3 Empty the dust bin in the rubbish bin.
4 Reinsert dust bin and push until you hear a clicking sound.

CLEANING DUST BIN AND FILTER
1 Turn dust bin upside down.
2 Press bottom slightly and take filter mesh out as indicated in illustrations.
3 Clear the dirt on the filter mesh.
4 Reinsert filter mesh back to the dust bin.
5 Press slightly until it clips.
6 Reinsert dust bin in the robot.

natural_image
Illustration of hands using a tool to cut a mechanical component, labeled '245' (no text or symbols on the diagram itself)
natural_image
Illustration of hands holding a mechanical component with a hatched section (no text or symbols visible)
natural_image
Illustration of hands holding a device with a circular button and grid pattern (no text or symbols)Product contains electronic parts. Do not submerge it or spray it with water. Clean with a dry cloth only.
WARNING: to buy new filters, please contact Vileda in the UK on 0845 769 7356.
CLEANING MAIN BRUSHES
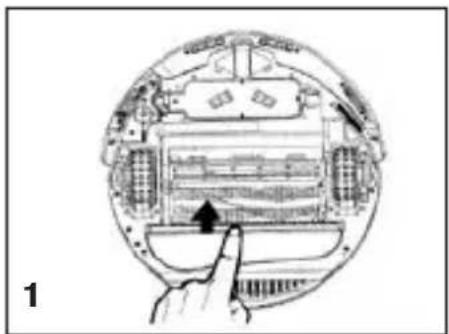
1 Turn off the power switch and turn the robot upside down on a flat surface.
2 Use a cross-head screwdriver to remove the fixing screw on the right.
3 Take out the main brush, rubber brush and brush coupler together as shown in the illustration.
4 Remove all hair and dirt from both brushes. Clean brushes chamber.
5 Wipe out dirt on the metal shaft and bearing of the brush coupler as indicated in the illustration.
6 Put brush coupler and brushes back.
7 Tighten the screw.
natural_image
Diagram of a car interior with a hand pointing to a component, showing internal layout and no text or symbols.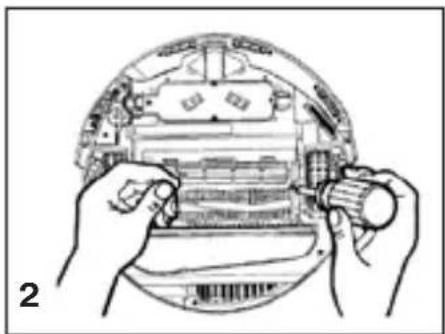
natural_image
Illustration of hands assembling a circular electronic component with visible circuitry and components (no text or symbols)
natural_image
Diagram of a robotic device with a hand inserting a gear into a housing, showing internal components and a magnified inset (no text or symbols)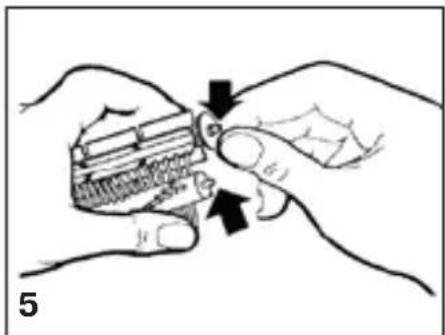
natural_image
Illustration of hands holding a mechanical component with arrows indicating motion (no text or symbols)Main brushes do not need to be cleaned after each use. However, regular cleaning is recommended to avoid excessive build up of hair that could damage the robot.
CLEANING VACUUM INLET COVER
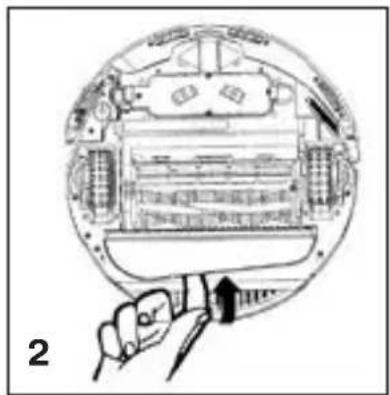
1 Turn off the power switch and turn the robot upside down.
2 Remove vacuum inlet cover as shown in the illustration.
3 Clean vacuum inlet cover and the fan mechanism to ensure good ventilation.
4 Reinsert the vacuum inlet cover by guiding the hinge tabs back into the holes carefully.
natural_image
Diagram of a car interior showing internal components and a hand holding a device (no text or labels)REPLACING SIDE BRUSH
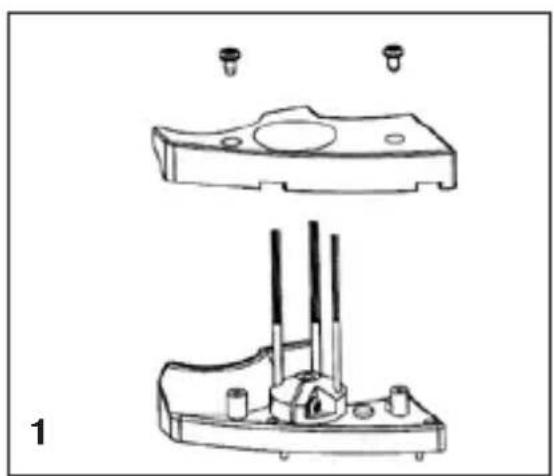
1 Use a cross-head screwdriver to remove side brush cover.
2 Insert new side brush and put back the cover.
3 Tighten the screws.
natural_image
Technical line drawing of a mechanical component with three vertical rods inserted into a housing (no text or symbols)
natural_image
Technical line drawing of a mechanical device with no visible text or symbolsFor further help, technical advice, or to order spare or replacement parts please contact Vileda in the UK on 0845 769 7356.
TROUBLESHOOTING
| Problem Possible | reason Possible solution | |
| Robot does not detect cliffs / drops. | · Sensors are dirty. · Wipe away dust from sensors with a dry cloth. | |
| Robot stops while cleaning and all light indicators turn on. | · Main brushes are blocked.· Main brushes are jammed. | · Clean main brushes and restart.· Remove jam and restart. |
| Robot stops and battery charge indicator is on. | · Low battery. · Recharge battery. | |
| Robot only moves in circles in the same position. | · One wheel is blocked. · | Remove hairs and dirt from wheels. |
| Battery does not recharge. | · Battery is not installed correctly.· Charger is not plugged correctly. | · Reinstall battery. Two beeps should be heard when installed properly.· Check charger is plugged correctly to the outlet and to the robot. |
For further help, technical advice, or to order spare or replacement parts contact Vileda in the UK on 0845 769 7356.
ENVIRONMENTAL AND PRODUCT RECYCLING

The Vileda Cleaning Robot fulfils the EU directive 2002/96/CE, covering electrical and electronic appliances and the management of its disposal.
The packaging material is entirely recyclable, and marked with the recycling symbol. Follow local regulations for scrapping. Keep the packaging materials (plastic bags, polystyrene parts, etc.) out of the reach of children, as they are potentially dangerous.
When the product has reached the end of its life please do not dispose of it with general household waste. To prevent possible harm to the environment or human health from uncontrolled waste disposal, recycle it responsibly to promote the sustainable reuse of material resources.

The symbol identifies the Vileda Cleaning Robot as a product submitted to the regime of selective electrical appliance recycling collection.
The product contains a NiMH battery which should not be disposed of with general household waste. Call, or deposit the battery in an official collection point for its recycling.
Batteries can be detrimental for the environment and can explode if they are exposed to high temperatures.
The violation of these precautions could cause fire and / or serious injuries.
For more detailed information about treatment, recovery and recycling of this product, please contact your local city office, your household waste disposal service or the shop where you purchased the product.
BATTERY REMOVAL
At the end of the product's or battery's life the battery should be removed for disposal and recycling.
Follow these instructions to remove and reinstall the battery:
1 Turn off the power switch and turn the robot upside down.
2 Push both flaps inwards and pull up until battery pack comes out.
3 Reinstall battery by pushing until you hear a clicking sound.

natural_image
Top-down technical diagram of a vehicle showing engine components and directional arrows (no text or symbols)WARNING: NEVER touch both the metal battery terminals at the same time with any metal objects as this will short circuit the battery and may create sparks that can cause small burns.
TECHNICAL SPECIFICATION
| Battery type 14.4V DC, 1700 mAh NiMH | |
| Charging time 4-5 hours | |
| Charger output 24V DC | |
| Charger input 100-240V AC | |
| Unit Average Power 19W ~ 25W | |
| Suction Power 3.00W | |
| Airflow 63.6dm | ^3 /min |
| Dust Capacity 0,25L | |
| Unit Size 34cmx9cm | |
GUARANTEE INFORMATION
2 Year Limited Guarantee:
GB Vileda Customer Support
Freudenberg Household Products
Vileda House
2 Chichester Street
Rochdale, Lancashire
OL16 2AX
UK
www.vileda.co.uk
Customer Care Line: 0845 769 7356
D FHP Export GmbH
69448 Weinheim
The present guarantee is only valid for the Vileda Cleaning Robot.
The Vileda Cleaning Robot guarantee complies with the directive 1999/44/CE.
Vileda guarantees that the Cleaning Robot will be free of defects due to defective materials or manufacture. If defects arise during the period of guarantee, Vileda will guarantee the replacement of the defective part or provide a new unit.
IMPORTANT: Please keep your purchase receipt! Vileda will repair the robot or will replace some of its pieces or the entire product only if proof of purchase is provided and the claim is within the period of guarantee.
The Vileda limited guarantee of 2 years does not cover non authorized repairs.
The limited guarantee does not include batteries.
The limited guarantee will automatically come to an end 2 years after the purchase date.
The guarantee will be annulled if the product is not used as indicated in the instructions manual, including, as an example:
1 If it has been damaged due to incorrect use or maintenance.
2 If any part is modified or replaced or if it is used in any way that is not recommended by Vileda.
3 If it is used with any parts not produced or not recommended by Vileda.
4 If it is used for purposes other than those specified by Vileda. If used outdoors or for commercial purposes.
If after following the manual, you are sure that the product is defective, call Vileda on 0845 769 7356. Be ready with the product, a complete description of the problem, proof of purchase, your name, address and telephone number.
Vileda does not take responsibility for consequential or indirect damages caused by the use of the product. The total liability of Vileda for all losses and damages howsoever caused shall not exceed the purchase price of the product. If you have any doubts referring to the correct use of the product or referring to the guarantee, call Vileda Customer Service.
vileda®

GB Vileda Customer Support
Freudenberg Household Products
Vileda House
2 Chichester Street
Rochdale, Lancashire
OL16 2AX
UK
www.vileda.co.uk
D FHP Export GmbH
69448 Weinheim
04048-72-26-204





- CONTENTS
- GENERAL WARNINGS
- IMPORTANT:
- WARNING:
- USE RESTRICTIONS
- PERSONAL SAFETY
- ELECTRICAL SAFETY INSTRUCTIONS
- BATTERY USE AND CARE
- SERVICE
- PART LOCATION
- ANATOMY
- BATTERY CHARGING & RECHARGING
- USING THE PRODUCT
- CLEANING MODES
- CLEANING SYSTEM
- REMOVING AND EMPTYING THE DUST BIN
- CLEANING DUST BIN AND FILTER
- CLEANING MAIN BRUSHES
- CLEANING VACUUM INLET COVER
- REPLACING SIDE BRUSH
- TROUBLESHOOTING
- ENVIRONMENTAL AND PRODUCT RECYCLING
- BATTERY REMOVAL
- TECHNICAL SPECIFICATION
- GUARANTEE INFORMATION
- vileda®
Brand : Vileda
Model : M-488A
Category : Vacuum Cleaner