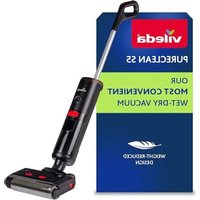
Pure Clean S5 Plus - Vacuum Cleaner Vileda - Free user manual and instructions
Find the device manual for free Pure Clean S5 Plus Vileda in PDF.


| Product type | Cordless wet-dry vacuum |
| Brand | Vileda |
| Model | Pure Clean S5 Plus |
| Dimensions (L x W x H) | 28.5 x 27.5 x 110.5 cm |
| Weight (without water) | 3.8 kg |
| Power adapter | Model CZH024310080EUWQ, input 100-240 V, 50/60 Hz, output 31-32.5 V DC, 750-900 mA, 24.8 W |
| Runtime | Up to 30 minutes |
| Clean water tank capacity | 450 ml |
| Dirty water tank capacity | 500 ml |
| Cleaning modes | Standard, Power, Dry |
| Self-cleaning | Yes, automatic after each use |
| Brush roller speed | 550 rpm ±10% |
| Noise level | ≤ 78 dB |
| Filter | Hand washable, replace every 6 months |
| LED indicator | Multicolor ring (blue, white, green, yellow, red) |
| Voice messages | Yes, can be disabled |
| Compatible floor types | Hard sealed floors (stone, tile, parquet, laminate) |
| Storage temperature | 4 to 40 °C |
| Available spare parts | Replacement filter, replacement brush roller, cleaning tool |
Frequently Asked Questions - Pure Clean S5 Plus Vileda
User questions about Pure Clean S5 Plus Vileda
0 question about this device. Answer the ones you know or ask your own.
Ask a new question about this device
Download the instructions for your Vacuum Cleaner in PDF format for free! Find your manual Pure Clean S5 Plus - Vileda and take your electronic device back in hand. On this page are published all the documents necessary for the use of your device. Pure Clean S5 Plus by Vileda.
USER MANUAL Pure Clean S5 Plus Vileda
PureClean S5 PureClean S5 Plus
Model No: 2769-01
GB Operating Manual
Cordless Vacuum & Washer
Operating Manual....9
Read also the enclosed safety manual to ensure safe and proper use of this product.
DE
natural_image
Line drawing of a hand using a vacuum cleaner to press down a cylindrical device with directional arrows (no text or symbols)
natural_image
Line drawing of a cleaning or cleaning device with a faucet and water level (no text or symbols)

flowchart
graph TD
    A["Water Droplet"] --> B["Downward Arrow"]
    B --> C["Downward Arrow"]
    C --> D["Downward Arrow"]
    D --> E["Downward Arrow"]
flowchart
graph TD
    A["Water Drop Symbol"] --> B["Central Turbine"]
    C["Water Drop Symbol"] --> B
    D["Water Drop Symbol"] --> B
    E["Water Drop Symbol"] --> B
    F["Water Drop Symbol"] --> B
    G["Water Drop Symbol"] --> B
    H["Water Drop Symbol"] --> B
    I["Water Drop Symbol"] --> B
    J["Water Drop Symbol"] --> B
    K["Water Drop Symbol"] --> B
    L["Water Drop Symbol"] --> B
    M["Water Drop Symbol"] --> B
    N["Water Drop Symbol"] --> B
    O["Water Drop Symbol"] --> B
    P["Water Drop Symbol"] --> B
    Q["Water Drop Symbol"] --> B
    R["Water Drop Symbol"] --> B
    S["Water Drop Symbol"] --> B
    T["Water Drop Symbol"] --> B
    U["Water Drop Symbol"] --> B
    V["Water Drop Symbol"] --> B
    W["Water Drop Symbol"] --> B
    X["Water Drop Symbol"] --> B
    Y["Water Drop Symbol"] --> B
    Z["Water Drop Symbol"] --> B
    AA["Water Drop Symbol"] --> B
    AB["Water Drop Symbol"] --> B
    AC["Water Drop Symbol"] --> B
    AD["Water Drop Symbol"] --> B
    AE["Water Drop Symbol"] --> B
    AF["Water Drop Symbol"] --> B
    AG["Water Drop Symbol"] --> B
    AH["Water Drop Symbol"] --> B
    AI["Water Drop Symbol"] --> B
    AJ["Water Drop Symbol"] --> B
    AK["Water Drop Symbol"] --> B
    AL["Water Drop Symbol"] --> B
    AM["Water Drop Symbol"] --> B
    AN["Water Drop Symbol"] --> B
    AO["Water Drop Symbol"] --> B
    AP["Water Drop Symbol"] --> B
    AQ["Water Drop Symbol"] --> B
    AR["Water Drop Symbol"] --> B
    AS["Water Drop Symbol"] --> B
    AT["Water Drop Symbol"] --> B
    AU["Water Drop Symbol"] --> B
    AV["Water Drop Symbol"] --> B
    AW["Water Drop Symbol"] --> B
    AX["Water Drop Symbol"] --> B
    AY["Water Drop Symbol"] --> B
After each use • Nach dem Gebrauch • Dopo utilizzo • Après utilisation Na elk gebruik • Po każdym użyciu • Después de uso • Após cada utilização


natural_image
Line drawing of a hand using a vacuum cleaner to press down a component (no text or symbols present)
natural_image
Illustration of hands assembling a cylindrical device with an upward arrow indicating assembly (no text or symbols present)
natural_image
Line drawing of a hand pouring liquid from a container (no text or symbols)
natural_image
Illustration of hands installing or adjusting a device component, showing a mechanical assembly with an upward arrow (no text or symbols present)
natural_image
Illustration of a hand holding a cleaning tool with a faucet above it (no text or symbols)
natural_image
Diagram of a faucet pouring liquid into a device with a grid-patterned chamber (no text or symbols)
natural_image
Line drawing of a hand pouring liquid into a container with a tool, above a faucet (no text or symbols)

natural_image
Line drawing of a vacuum cleaner with a screwdriver inserted, mounted on a base (no text or symbols)
natural_image
Illustration of hands assembling a device into a circular housing (no text or symbols)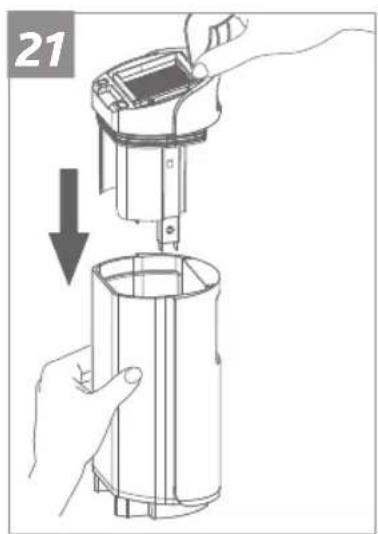
natural_image
Illustration of a hand using a device to press or install a cylindrical container, with no visible text or symbols.
natural_image
Line drawing of a hand pressing down on a cylindrical device with two arrows indicating movement (no text or symbols)
natural_image
Illustration of a hand washing a tiled surface with a faucet pouring liquid (no text or symbols)
natural_image
Line drawing of a hand using a microscope to adjust or install a cylindrical device (no text or symbols visible)
natural_image
Line drawing of a hand using a handheld device to press or install a cylindrical component, with an arrow indicating the process (no text or symbols present)
natural_image
Illustration showing two hands holding a tool and a rolled-up sheet, with no visible text or symbols.
1 General information
GB
Thank you for purchasing the new Vileda PureClean S5.
Read this operating manual and the enclosed safety manual before using the device for the first time.
Disregard of the instructions in the operating manual and the safety manual may cause injury or damage the device.
Keep both manuals in a safe place for future reference and include them when passing on the device to someone else.
The safety manual and the operating manual are also available at:
www.vileda.com
Table of Contents
Product overview 3
Quick start guide 4
1 General information 9
2 Assembly 10
3 Charging 10
4 Operation 11
5 After each use 15
6 Storage 19
7 Disassembly 19
8 Troubleshooting 20
9 Accessories and spare parts 22
10 Technical data 23
Symbols used in this manual

Warning concerning health hazards describing possible risks of injury.

Warning concerning possible dangers to the device or other objects.
i Highlights useful hints and information.
Parts in product overview
1 handle 14 brush roller release
2 self-cleaning 15 voice control button button
3 mode selection button 16 cleaning tool with integrated hair knife
4 ON/OFF button
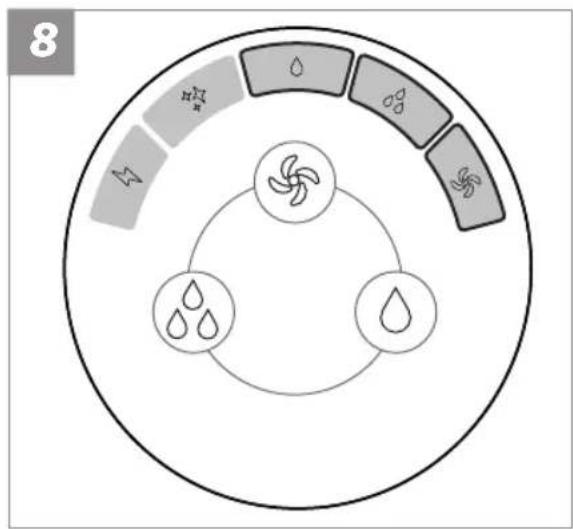
5 digital display, see fig. 8 17 hair knife release 18 cap with hair knife
6 multi-color LED ring, see also chapter "4.5" 19 spare filter* 20 spare brush roller* 31 adaptor/with type
7 dirty water tank info)
22 mains plug
8 dirty water tank 23 power cord
3 clean water tank 24 adaptor plug
10 clean water tank filling lid 25 charging base
11 brush roller 26 cleaning brush holder
12 clean water tank release buttons 27 charging contacts
12 brush roller handle 28 brush roller holder
*included optionally with some models
2 Assembly
Unpack all parts from the box (see 'Product overview' on page 3).
Remove the protective film and cardboard packaging.
Insert the handle with the shaft into the top of the device housing.
When the handle is correctly engaged, you will hear a "click" (Fig. 1).
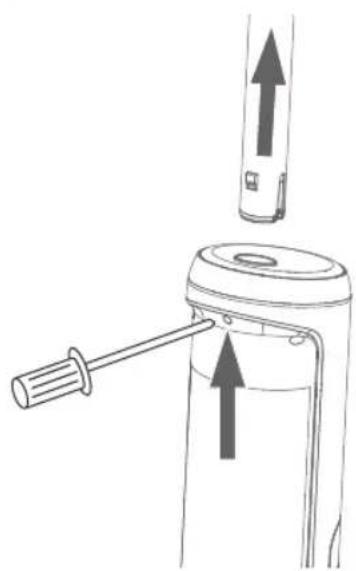
i The handle can be released from the main unit by inserting a tool (e.g. a screwdriver) into the opening at the back of the main unit and simultaneously pulling the handle upwards with force (as shown in „7 Disassembly“ on page 19).
3 Charging

WARNING!
Risk of injury due to electric current!
Only charge the device with the supplied adaptor (model CZH024310080EUWQ).
Place the charging base on a horizontal surface.
Connect the adaptor to the charging base and to the socket (Fig. 2).
Place the main unit on the charging base (Fig. 2).
The voice prompts "start charging", indicating that charging mode has started.

Fully charge (100%) the device prior to first use.
As soon as 100% appears on the display (Fig. 2), charging is finished.

If the battery is empty, charging time is about 3 hours.

After a full charge and 1 minute of inactivity, the device will go to sleep.

When the product has been running continuously for an extended period of time, the device cool down before charging in order to prolong battery life. Cooling time is about 1 hour.

Charge the battery at least once every three months to avoid damage due to deep discharge.
4.1 Filling the clean water tank

NOTICE
Risk of property damage due to improper filling of the water tank!
Do not add hot or boiling water to the clean water tank.
Only use cold or warm tap water (with a maximum temperature of 40^ C).
Do not use foaming or oily detergents. Preferably, use detergent suitable for electrical floor tools (i.e. sweeping robots or floor washers).
Do not overdose the detergent. Add no more than 3 to 4 drops of detergent.
Also consult the detergent manufacturer's instructions for correct dosage.
Do not overfill the tank.

To check whether a detergent is foamy, shake the detergent and observe if any foam appears.
natural_image
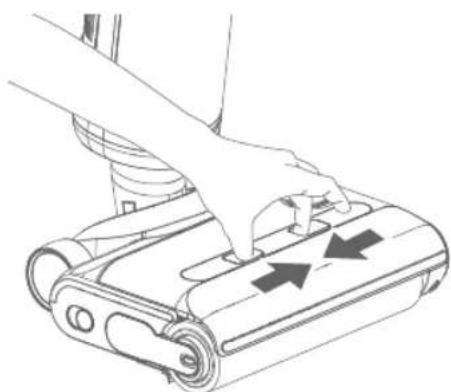
Line drawing of a hand using a vacuum cleaner to press down a device with directional arrows (no text or symbols)Release the clean water tank as shown (arrows).
Open the lid of the clean water tank (Fig. 4).
Fill the clean water tank with cold or warm tap water (maximum 40°C).
i Optionally add a few drops (1 to 4) of non-foaming and non-oily detergent into the water tank. We recommend using any detergent suitable for electrical floor tools (i.e. sweeping robots or floor washers).
Close the lid of the clean water tank.

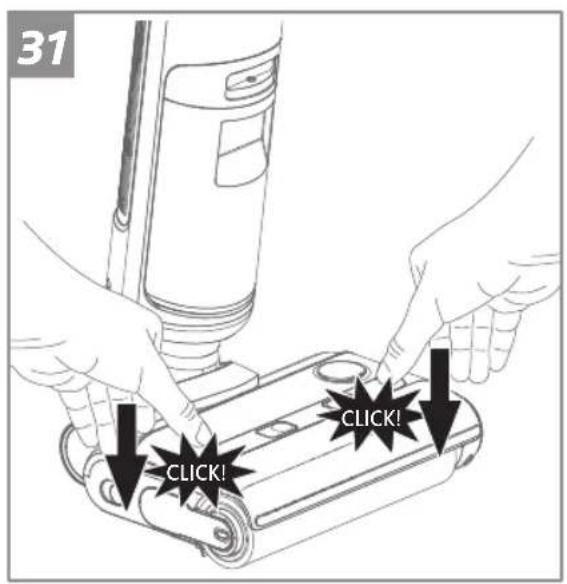
Firmly re-install the clean water tank in its console (as shown on the left). A 'click' sound on both sides of the fresh water tank indicates successful installation.
i In case of a high limescale concentration in your local tap water, it is recommended to add limescale remover to the water tank to avoid limescale accumulation in the device. Refer to the information of the limescale remover manufacturer for the correct dosage of the limescale remover.
4.2 Switching on

Recline the body of the device by placing your foot gently on the nozzle and tilting the handle backwards (as shown on the left/1.).
Press the ON/OFF button (2., "") on the handle shortly to switch on the device.
i The main unit will pause when the body is upright under working condition.
i Do not tilt the device by more than 125 degrees to avoid water leakage.
i Do not lift, lay the machine flat or tilt it sideways while it is working to prevent water from flowing back into the motor.
4.3 Selecting cleaning modes
i The device is exclusively to be used on sealed hard floors (e.g. stone floors, tiles and sealed wooden floors, such as sealed parquet and laminate) that can withstand the moisture of the device. Do not use on unsealed floors.

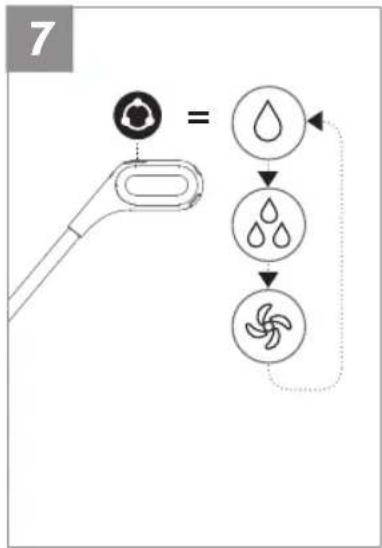
i You can toggle between modes by using the mode selection button " " on the handle.
i In case of particularly stubborn stains, use the power mode ( ) and move the device over the dirty area several times until it is clean.
i In case of water puddles building up on the floor, use the dry mode ( ) to soak up water.
i You can achieve optimum cleaning results by moving forwards and backwards evenly. You should drive back along the same path you drove forwards on.
4.4 Activating/deactivating and understanding voice prompts

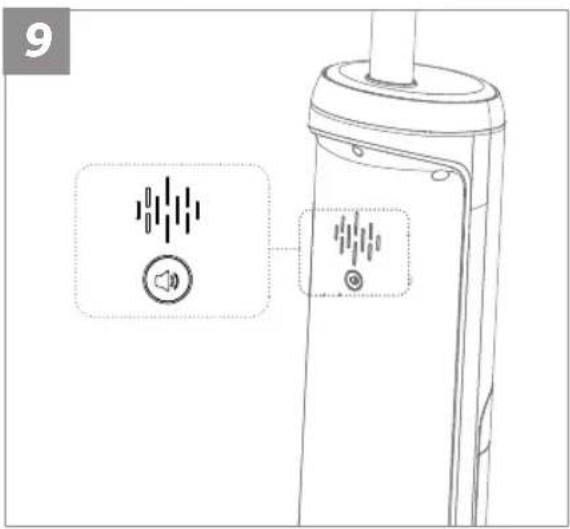
To deactivate voice prompts, press the voice control button on the back of the main unit for about 2 seconds. The device confirms that the voice is deactivated.
To activate voice prompts, press the voice control button on the back of the main unit for about 2 seconds. The device confirms that voice prompts are activated.
The following table lists all prompts the device is able to emit (always in English) with their respective meaning:
| Voice prompts (always in English) | Meaning |
| Power off The device switches off. | |
| Standard mode The device is in standard mode. | |
| Suction mode The device is in dry mode. | |
| Turbo mode The device is in power mode. | |
| Clean water shortage, please fill in fresh water. | The fresh water tank is empty. Please refill it. |
| Dirty water is full, please clean dirty water tank. | The dirty water tank is full. Please empty it. |
| Low power, please charge. The battery is empty. | Please charge the device. |
| Start charging, please fill with water to start self-cleaning. | Charging process begins. Please fill the clean water tank and start self-cleaning.(This prompt is being emitted independently from the current filling level of the clean water tank.) |
| Start charging Charging process begins. | |
| Start self-cleaning Self-cleaning has started. | |
| Low power, please charge to more than 10% to start self-cleaning. | Battery level too low. Charge device to more than 10% and restart self-cleaning. |
| Self-cleaning has been completed, to avoid odour, please clean the dirty water tank and air-dry the roller brush. | Self-cleaning is complete, to avoid odour, clean the dirty water tank and allow the roller brush and filter to air-dry. |
| Please use after install dirty water tank. Dirty w | water tank is not installed. Please insert or check for correct installation. |
| Roller brush is not installed, or the clean water tank is not installed well. | Check the roller brush and check the clean water tank for correct installation. |
| Please clean the roller brush. Please clean the roller brush. | |
| Charging abnormal, please use the matching charger. | Error during charging. Check the charger. |
| Battery abnormal Error detected in the battery. | (Contact us www.vileda.com/support) |
| Voice assist on Voice prompts on. | |
| Voice assist off Voice prompts off. | |
| Please put on charging base for self-cleaning. Place the device in the charging base to start self-cleaning. | |
| Self-cleaning finished Self-cleaning completed. | |

natural_image
Line drawing of a handheld device with a starburst pattern on the handle (no text or symbols)4.5 Understanding LED ring colours
The LED ring is lit in the following colours representing the following states:
| Colour State/meaning | |
| mixed colours normal feedback given by the appliance 3 seconds after power-on | |
| blue appliance is in use(no malfunctions) | |
| white self-cleaning in progress | |
| green charging | |
| yellow dirty water tank malfunction(either full or assembled incorrectly) | |
| red malfunction | (of the clean water tank, dirty water tank, the roller brush or the roller brush cover, see also „8 Troubleshooting“ on page 20) |
5 After each use
GB

WARNING!
Risk of injury due to electric current!
Make sure to unplug the adapter from the charging base when cleaning or maintaining the charging base.
5.1 Self-cleaning after ending operation
i The device should self-clean after each use.
Put the device back to the plugged-in charging base after each use. The voice prompts "Start charging, please fill with water to start self-cleaning". This happens independently of the actual water level.
Empty and re-install the dirty water tank (Fig. 11 to Fig. 13).
If necessary, fill the clean water tank (Fig. 3 to Fig. 5).
If the battery charging status is below 10 %, let the device charge to at least 10%.
Shortly press the self-cleaning button "💡" (position 2 in "Product overview") on top of the handle to start self-cleaning.
Now proceed with chapters "5.2" to "5.5".
i The self-cleaning function can only be used when the power level of the battery is ≥10% . If it is below 10 %, charge the battery first as described under "3 Charging" on page 10".
i The device automatically completes the self-cleaning process.
i The self-cleaning process takes about 60 seconds.
i Once self-cleaning is completed, empty and clean the dirty water tank.
i For optimal performance and to prevent odours, always clean and dry tanks, filter and brush roller completely after each use and even after self-cleaning.
5.2 Emptying and cleaning the dirty water tank

natural_image
Technical line drawing of a mechanical device with three views: top view, side view, and bottom view (no text or symbols)Switch off the device using the ON/OFF button " (!)
Pull on the red grip of the dirty water tank (position 7 in "Product overview") and remove the dirty water tank from the device (Fig. 11).
Pull the tank cover upwards (as shown on the left) and dispose of waste water in an environmentally friendly manner.
Rinse the dirty water tank thoroughly with clean water and set it aside to dry.
i You can use the cleaning tool delivered with the device to remove coarse dirt (Fig. 17).
5.3 Cleaning the tank cover and the filter
natural_image
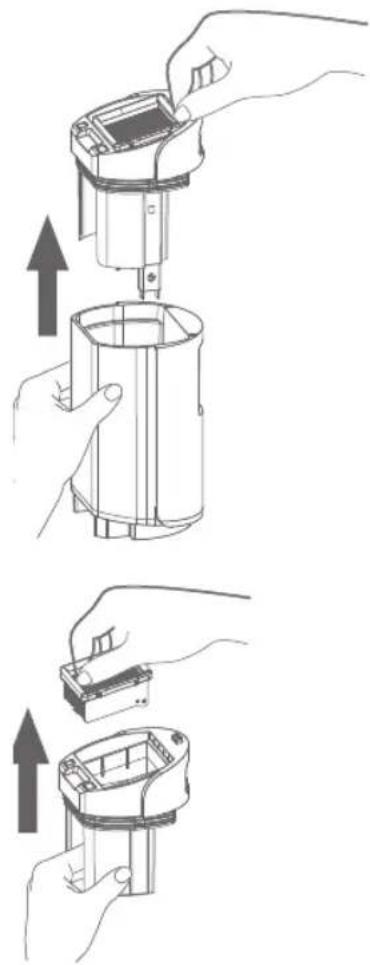
Illustration of hands installing or adjusting a mechanical component, showing step-by-step assembly (no text or symbols)Remove the dirty water tank cover (as shown).
Remove the filter from the tank cover by pulling it up (as shown).
i Replace the filter every 6 months or in case of heavy soiling.
Separate the mesh grid from the filter by swivelling (Fig. 16).
Rinse the mesh grid and and the filter thoroughly with warm water to remove debris and coarse particles.
i The filter can be washed (Fig. 16) but must be hand-washed. It is not machine-washable!
Hand-wash the tank cover (without filter) to remove trapped debris and coarse dirt (Fig. 15).
i If the area inside the casing where the dirty water tank is located is dirty, wipe it clean with a cloth or sponge.
i You can use the cleaning tool delivered with the device to remove coarse dirt (Fig. 17).
Set all parts aside to dry before reassembling (Fig. 18).
5.4 Reassembling dirty water tank components
Make sure that all parts are dry.
Swivel the mesh grid back to the filter.
Put the filter back into the tank cover (Fig. 20).
i Make sure the mesh is pointing downwards.
i It is only possible to reinsert the dirty water tank if the filter has been inserted correctly.
Firmly put the tank cover into the dirty water tank (Fig. 21).
i It is only possible to reinsert the dirty water tank if the tank cover has been fully inserted.
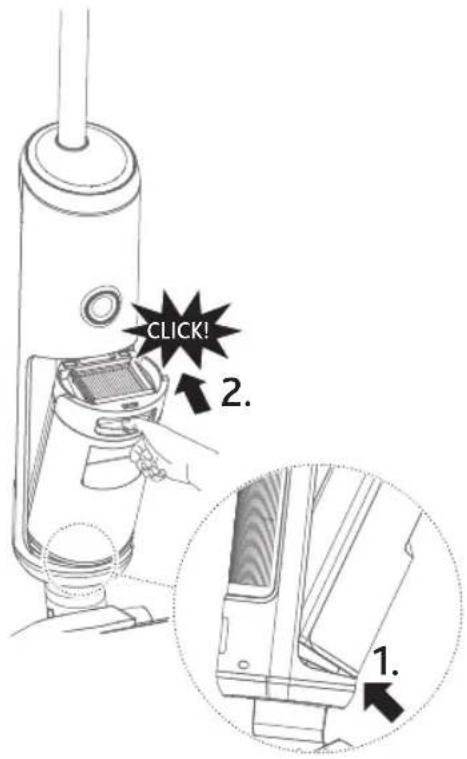
Return the reassembled dirty water tank to the main unit as follows: Insert the dirty water tank at the bottom (as shown on the left/1.), tilt and press it into the device (as shown on the left/2.).
A "click" sound will indicate successful installation.
5.5 Cleaning the nozzle and the brush roller

natural_image
Line drawing of a hand inserting a spring into a mechanical device (no text or symbols)Switch off the device using the ON/OFF button "(!)
Remove the clean water tank as shown in Fig. 3.
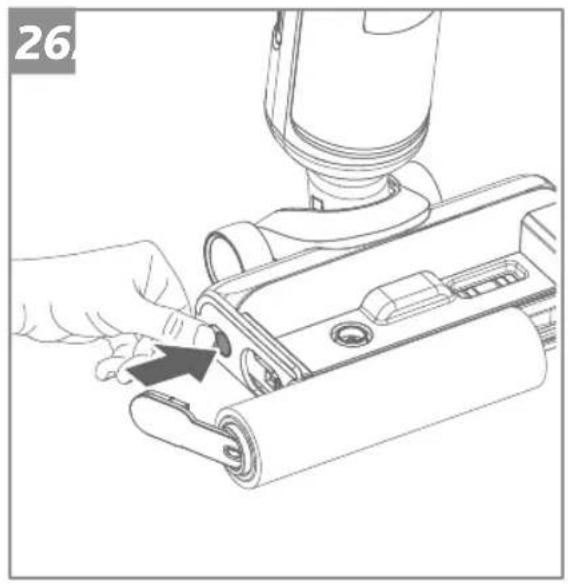
Press the brush release button (position 14 in "Product overview" and as shown on the left). The brush-carrying handle pops out.
Pull up the handle (position 13 in "Product overview") to remove the brush.
Clean the nozzle by using the cleaning tool (position 16 in "Product overview") provided with the device (Fig. 19).
Release the hair knife (position 18 in "Product overview") from the cleaning tool by pressing the hair knife release (position 17 in "Product overview") and pulling it (as shown on the left).
Use the hair knife to remove tangled hairs or debris, etc. (as shown on the left).
Rinse the brush roller with clean water or deep-clean it by hand.
i The brush roller is not machine-washable.
i Replace the brush roller every 6 months or in case of heavy soiling/damage.
Set all parts aside to dry before reassembling.
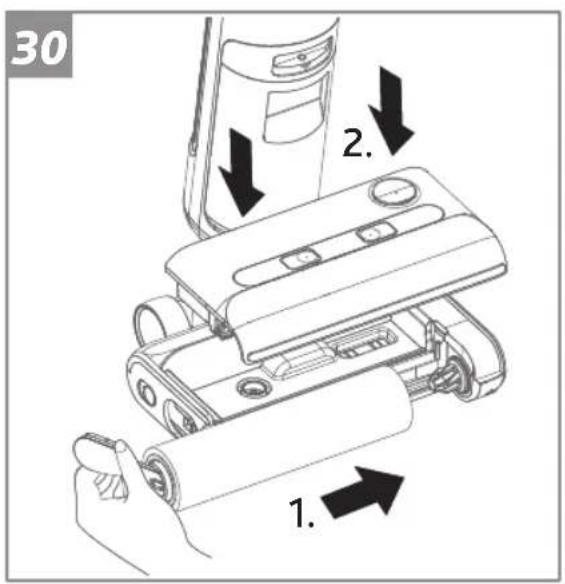
If completely dry, re-insert the brush roller into its console (as shown on the left).
Re-insert the brush roller by clicking its handle into place. A "click" sound will indicate successful installation.
Re-insert the clean water tank as shown in Fig. 5. A "click" sound on both sides will indicate successful installation.

natural_image
Illustration showing two hands performing a cable or wire manipulation technique (no text or symbols present)
natural_image
Technical line drawing of a vacuum cleaner's internal components (no text or symbols)6 Storage
GB

NOTICE
Risk of damage if not emptied or cleaned!
Make sure that the tanks are emptied and have been cleaned prior to storing. Make sure that the brush roller and the filter have dried prior to storing.

natural_image
Line drawing of a vacuum cleaner with attached base (no text or symbols)
NOTICE
Risk of damage due to improper storage!
The device can retain water and humidity when not in use.
Always store the device in a dry place.
Always store the device on the charging base to prevent any harm to delicate floors. Do not store the device on an unsealed floor.
Do not store the device in direct sunlight.
Recommended temperature range: 4 to 40°C.
Do not store the device where there is a danger of freezing.
Freezing will damage components and will void the guarantee.
7 Disassembly
natural_image
Diagram of a mechanical device with a lever and upward arrows indicating motion or force (no text or symbols)In the event that the product must be shipped, first de-install the handle:
Release the spring with a tool (e.g. a screwdriver) as shown and then pull up the handle with force.
8 Troubleshooting
| Problem Possible cause Possible solution | ||
| Device is not working | Battery charging status is insufficient | Let the device charge on its charging base as described in „3 Charging“ on page 10. |
| Nozzle or brush roller is clogged | Remove blockages and/or clean the brush roller as described in „5.5 Cleaning the nozzle and the brush roller“ on page 18. | |
| Dirty water tank is full or has not been re-installed properly after emptying/cleaning | Empty and re-install dirty water tank properly as described in „5.4 Reassembling dirty water tank components“ on page 17.A click sound indicates correct installation (“must not be lit). | |
| Handle not fitted in place | Check handle installation and/or install it again as described in „2 Assembly“ on page 10. | |
| Device is not charging | Battery temperature is too high | Wait for up to one hour. Device should resume charging. |
| Charging base or its adaptor is not plugged in correctly | Make sure that everything is plugged in correctly. | |
| Loss of suction power | Dirty water tank is full and needs to be emptied | Empty dirty water tank as described in „5.2 Em-ptying and cleaning the dirty water tank“ on page 16. |
| Vacuum channel in nozzle is clogged by debris | Clean the nozzle as described in „5.5 Cleaning the nozzle and the brush roller“ on page 18. | |
| Filter clogged by debris | Clean the filter as described in „5.3 Cleaning the tank cover and the filter“ on page 16.If the filter is still clogged after cleaning or if it is damaged, replace the filter, see „9 Accessories and spare parts“ on page 22. | |
| Unusual noise while motor is running | Vacuum channel in nozzle is clogged by debris | Clean the nozzle as described in „5.5 Cleaning the nozzle and the brush roller“ on page 18. |
| Problem Possible cause Possible solution | ||
| Reduced spray or no spray | Clean water tank may be empty | Fill clean water tank as described in „4.1 Filling the clean water tank“ on page 11. |
| Clean water tank not re-installed correctly | Re-install clean water tank correctly as described in „4.1 Filling the clean water tank“ on page 11. | |
| Internal system may be clogged with dirt | Clean nozzle as described in „5.5 Cleaning the nozzle and the brush roller“ on page 18. | |
| Spray tips on nozzle may be clogged with dirt or limescale | Clean nozzle as described in „5.5 Cleaning the nozzle and the brush roller“ on page 18.If the problem persists, we recommend using distilled water or adding descaler to your cleaning solution. | |
| Water puddles remain on floor during usage | Inappropriate cleaning mode selected | Select dry mode as described in „4.3 Selecting cleaning modes“ on page 12. |
| Rubber element eroded R | Replace the rubber element with a new one.Contact our customer service at www.vileda.com/support | |
| Brush roller is not turning | Blocking has caused brush roller to stop | Clean blockages as described in „5.5 Cleaning the nozzle and the brush roller“ on page 18. |
| Clean water tank not re-installed properly | Re-install clean water tank properly as described in „4.1 Filling the clean water tank“ on page 11. | |
| Brush roller has not been re-installed properly after cleaning/ replacing | Re-install brush roller properly as described in „5.5 Cleaning the nozzle and the brush roller“ on page 18. | |
| Water spillage on floor during self-cleaning | Dirty water tank was not emptied before running self-cleaning | Empty and clean the dirty water tank as described in „5.2 Emptying and cleaning the dirty water tank“ on page 16. |
| Self-cleaning does not work | Battery is low (below 10 %) | Charge as described in „3 Charging“ on page 10. |
| Brush roller jammed Clean | and re-install brush roller as described in „5.5 Cleaning the nozzle and the brush roller“ on page 18. | |
| Vacuum channel in nozzle is clogged by debris | Clean the nozzle as described in „5.5 Cleaning the nozzle and the brush roller“ on page 18. | |
| Problem Possible cause Possible solution | ||
| Water is leaking | Foaming detergent was used | Use non-foaming detergent instead. |
| Dirty water tank is full and needs to be emptied | Empty dirty water tank as described in „5.2 Em-ptying and cleaning the dirty water tank“ on page 16. | |
| Dirty water tank not re-installed properly | Re-install dirty water tank as described in „5.4 Reassembling dirty water tank components“ on page 17. | |
| Clean water tank not re-installed properly | Re-install clean water tank as described in „4.1 Filling the clean water tank“ on page 11. | |
| Voice prompts are not emitted | Voice prompts are turned off | Turn on voice prompts as described in „4.4 Activating/deactivating and understanding voice prompts“ on page 13. |
| Voice prompts "Battery abnormal" | Error detected within the battery | Contact us via www.vileda.com/support |
| ””is being displayed | There should be a recommendation emitted by the voice prompts | Voice prompt recommends an action: Proceed as recommended by the voice prompt see „4.4 Activating/deactivating and understanding voice prompts“ on page 13. |
| No voice prompts: Turn on voice prompts as described in „4.4 Activating/deactivating and understanding voice prompts“ on page 13. | ||
i If the above-mentioned troubleshooting measures fail to provide a solution, please visit our website www.vileda.com/support for further advice.
9 Accessories and spare parts

WARNING
Risk of injury from using incorrect accessories or spare parts!
Use of incorrect or faulty accessories or spare parts can pose a risk and result in damage, malfunction or a total failure of the device.
Only use the manufacturer's genuine accessories or spare parts.
i Change filter and brush roller regularly (every 6 months or in case of heavy soiling). Purchase accessories from authorised dealers or directly from the manufacturer (www.vileda.com).
i For other spare parts please contact our customer service centers (see page 1).
i If non-approved spare parts are used, the manufacturer's guarantee is voided.
10 Technical data
| Adaptor | |
| Model CZH024310080EUWQ | |
| Input voltage 100 – 240 V | |
| Input AC frequency 50/60 Hz | |
| Output voltage (no loading) 31 – 32.5 V DC | |
| Output current 750 – 900 mA | |
| Output power 24.8 W | |
| Average active efficiency 86.32 % | |
| Average efficiency at 25% load 85 % | |
| No load power consumption ≤0.1 W | |
| IP code IP20 | |
| Protection class II (isolated) | |
| Performance Data | |
| Operation duration (when fully charged) | ≤30 min |
| Roller revolutions per minute | 550 ±10% rpm |
| Filling quantity | |
| Clean water tank | 450 ml |
| Dirty water tank | 500 ml |
| Dimensions | |
| Weight (without water) | 3,8 kg |
| Length | 28.5 cm |
| Width | 27.5 cm |
| Height | 110.5 cm |
| Emissions | |
| Noise | ≤78 db |
natural_image
Line drawing of a hand using a vacuum cleaner to press down a mechanical component (no text or symbols)flowchart
graph TD
    A["Start"] --> B{Condition}
    B --> C["Circle with Down Arrow"]
    C --> D["Down Arrow to Circle"]
    D --> E["Down Arrow to Triangle"]
    E --> F["Down Arrow to Diagonal"]
natural_image
Line drawing of a handheld electric shaver with a starburst pattern on the cover (no text or symbols)natural_image
Technical line drawings of three different mechanical components or devices, showing internal structures and flow direction (no text or symbols)natural_image
Illustration of hands installing a device into a cylindrical container, showing step-by-step assembly (no text or symbols)natural_image
Line drawing of a hand using a mechanical device to adjust or install a scroll (no text or symbols present)natural_image
Illustration showing two hands performing a manual tool manipulation technique (no text or symbols present)natural_image
Line drawing of a hand using a vacuum cleaner to press or install a sheet of paper (no text or symbols present)natural_image
Line drawing of a vacuum cleaner with attached base and side-mounted device (no text or symbols)
HINWEIS
natural_image
Diagram of a mechanical device with a lever and two upward arrows indicating force or movement (no text or symbols present)flowchart
graph TD
    A["Water Drop"] --> B["Liquid Drop"]
    B --> C["Turbine"]
natural_image
Line drawing of a handheld device with a starburst pattern on the lid (no text or symbols)natural_image
Technical line drawing of a mechanical device with three views: top view, side view, and bottom view (no text or symbols)natural_image
Illustration of hands installing a digital device into a cylindrical container with an upward arrow (no text or symbols)natural_image
Illustration of hands installing or adjusting a device component with an upward arrow (no text or symbols)natural_image
Line drawing of a hand inserting a cable into a mechanical device (no text or symbols)natural_image
Illustration showing two hands performing a tool manipulation technique (no text or symbols present)natural_image
Line drawing of a hand using a handheld device to press or install a cylindrical component, with an arrow indicating motion (no text or symbols present)natural_image
Line drawing of a vacuum cleaner with attached base (no text or symbols)
AVVERTENZA
natural_image
Diagram of a device with a lever and upward arrows indicating motion or force (no text or symbols present)natural_image
Line drawing of a handheld device with a starburst pattern on the handle (no text or symbols)natural_image
Technical line drawings of a mechanical device with three views: top, front, and side (no text or symbols)natural_image
Illustration of hands assembling a cylindrical device into two views (no text or symbols present)natural_image
Line drawing of a hand using a tool to adjust or install a mechanical component (no text or symbols visible)natural_image
Illustration showing two hands performing a cable or wire manipulation technique (no text or symbols present)natural_image
Line drawing of a hand using a handheld device to press or install a cylindrical component, with an arrow indicating motion (no text or symbols present)natural_image
Line drawing of a vacuum cleaner device with no visible text or symbols
REMARQUE
natural_image
Diagram of a mechanical device with a lever and upward arrows indicating motion or force (no text or symbols present)natural_image
Line drawing of a handheld electric shaver with a starburst design on the cover (no text or symbols)natural_image
Technical line drawing of a mechanical device with three views: top view, side view, and bottom view (no text or symbols)natural_image
Illustration of hands installing or adjusting a mechanical component, showing step-by-step assembly (no text or symbols)natural_image
Line drawing of a hand inserting a cable into a mechanical device (no text or symbols)natural_image
Illustration showing two hands holding a pen and a rolled-up document, with no visible text or symbols.
natural_image
Line drawing of a hand using a vacuum cleaner to press or install a cylindrical device (no text or symbols present)6 Opslag
LETOP
natural_image
Line drawing of a vacuum cleaner device with no visible text or symbolsLETOP Gevaar v
LETOP
natural_image
Diagram of a device with a lever and a cylindrical component, showing upward force arrows (no text or symbols)natural_image
Line drawing of a handheld electronic device with a starburst pattern on the top (no text or symbols)natural_image
Technical line drawings of three different mechanical components or devices, showing internal structures and flow direction (no text or symbols)natural_image
Illustration of hands using a digital device to press or install a cylindrical component, with an upward arrow indicating motion (no text or symbols present)natural_image
Illustration of two hands inserting a device into a device housing, showing internal components and an upward arrow (no text or symbols)natural_image
Line drawing of a hand using a tool to adjust or install a mechanical component (no text or symbols visible)natural_image
Illustration showing two hands performing a cable or wire manipulation technique (no text or symbols present)natural_image
Line drawing of a hand using a vacuum cleaner to press or install a cylindrical component, with an arrow indicating motion (no text or symbols present)natural_image
Line drawing of a vacuum cleaner with handle and base (no text or symbols)
UWAGA
natural_image
Diagram of a mechanical device with a lever and two upward arrows indicating motion or force (no text or symbols present)natural_image
Line drawing of a hand using a vacuum cleaner to press down a mechanical component (no text or symbols)natural_image
Line drawing of a handheld device with a starburst pattern on the lid (no text or symbols)natural_image
Technical line drawing of a mechanical device with three views: top view, side view, and bottom view (no text or symbols)natural_image
Illustration of hands assembling a cylindrical device with an attached bracket (no text or symbols)natural_image
Line drawing of a hand inserting a cable into a mechanical device (no text or symbols)natural_image
Illustration showing two hands performing a tool manipulation technique (no text or symbols present)natural_image
Line drawing of a hand using a vacuum cleaner to press or install a cylindrical device (no text or symbols visible)natural_image
Line drawing of a vacuum cleaner device with no visible text or symbols! AVISO ¡Riesgo d
natural_image
Diagram of a mechanical device with a lever and upward arrows indicating motion or force (no text or symbols)4.5 Compreender as cores do anel LED

natural_image
Line drawing of a handheld electronic device with a starburst pattern on the top (no text or symbols)natural_image
Technical line drawings of three mechanical components: a cylindrical housing, a cylindrical container with internal structure, and a curved housing with liquid flow (no text or symbols)natural_image
Three-step diagram showing hand positioning of a device into a cylindrical container, with arrows indicating upward movement (no text or symbols present)natural_image
Line drawing of a hand inserting a small object into a mechanical device (no text or symbols)natural_image
Line drawing of a hand using a handheld device to press or install a cylindrical component, with an arrow indicating motion (no text or symbols present)6 Armazenamento

AVISO
natural_image
Line drawing of a vacuum cleaner device with handle and base (no text or symbols)
AVISO
natural_image
Diagram of a mechanical device with a lever and two upward arrows indicating motion or force (no text or symbols present)Freudenberg Home and Cleaning
Solutions
NL
Barchon Office Center
Rue des Pinsons 2
4671 Barchon
Belgique/België
www.vileda.be
www.vileda.nl
PL
FHP Vileda Sp. z o. o.
ul. Puławska 182
02-670 Warszawa
www.vileda.pl
ES
Freudenberg Home and Cleaning
Solutions Ibérica, S.L.U.
C/ Can Gurri 1A
Pol. Ind. Can Volart
Freudenberg Home and Cleaning
Solutions Ibérica, S.L.
Apartado 12170
1061-001 Lisboa Códex, PT
www.vileda.pt
NEED SOME HELP?

www.vileda.com/support

www.vileda.com service@vileda.com
Freudenberg Home and Cleaning Solutions GmbH


- PureClean S5 PureClean S5 Plus
- DE
- General information
- Table of Contents
- Symbols used in this manual
- Parts in product overview
- Assembly
- Charging
- WARNING!
- Filling the clean water tank
- NOTICE
- Switching on
- Selecting cleaning modes
- Activating/deactivating and understanding voice prompts
- Understanding LED ring colours
- After each use
- Self-cleaning after ending operation
- Emptying and cleaning the dirty water tank
- Cleaning the tank cover and the filter
- Reassembling dirty water tank components
- Cleaning the nozzle and the brush roller
- Storage
- Disassembly
- Troubleshooting
- Accessories and spare parts
- WARNING
- HINWEIS
- AVVERTENZA
- REMARQUE
- Opslag
- LETOP
- LETOP Gevaar v
- UWAGA
- ! AVISO ¡Riesgo d
- Compreender as cores do anel LED
- Armazenamento
- AVISO
- NL
- PL
- ES
- NEED SOME HELP?
Brand : Vileda
Model : Pure Clean S5 Plus
Category : Vacuum Cleaner