5829 - Coffee machine Cloer - Free user manual and instructions
Find the device manual for free 5829 Cloer in PDF.

User questions about 5829 Cloer
0 question about this device. Answer the ones you know or ask your own.
Ask a new question about this device
Download the instructions for your Coffee machine in PDF format for free! Find your manual 5829 - Cloer and take your electronic device back in hand. On this page are published all the documents necessary for the use of your device. 5829 by Cloer.
USER MANUAL 5829 Cloer
natural_image
Exterior view of a modern espresso machine (no signage or text visible on the device itself)natural_image
Black and white photo of a teacup on a saucer, enclosed in a circular frame (no text or symbols)SPRACHEN - LANGUAGES
DE Bedienungsanleitung S. 5
EN Instruction Manual.... S. 11
NL Gebruiksaanwijzing....S. 16
FR Notice d'utilisation.... S. 21
IT Istruzioni sull'uso....S. 27
ES Instrucciones de uso S. 32
PT Instruções de uso....S. 39
LT Naudojimo instrukcija ....S. 45
LV Lietošanas instrukcija ....S. 50
DK Brugsanvisning S. 55
NO Bruksanvisning ....S. 60
SE Bruksanvisning S. 65
FI Használati utasitás S. 70
HU Használati utasitás S. 76
PL Οδηγίες Χρήσης.... S. 81
text_image
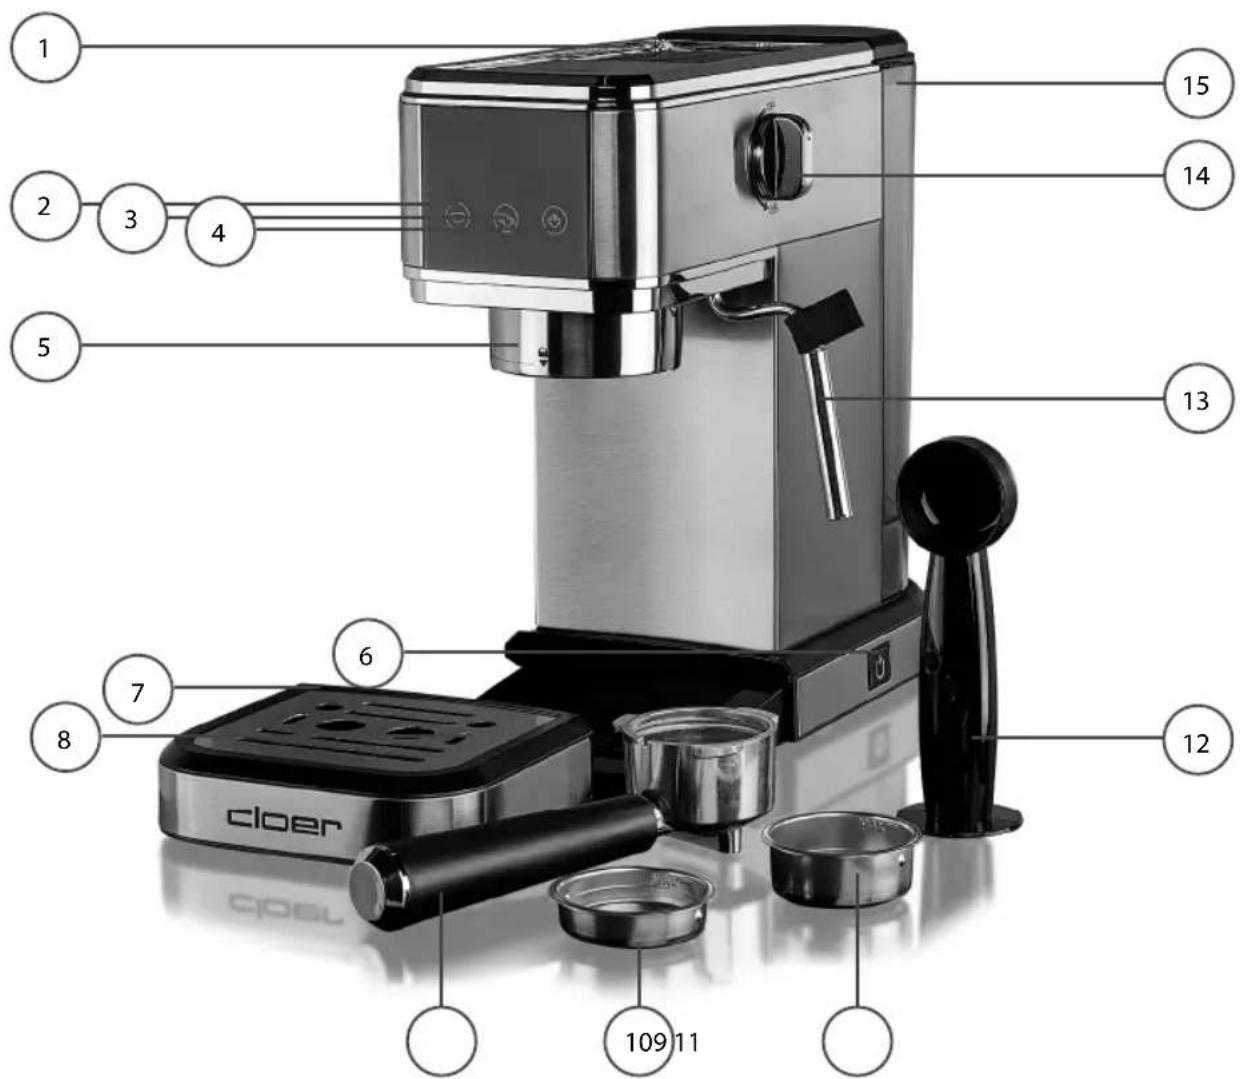
1 2 3 4 5 6 7 8 cloer 109 11 12 13 14 15| DE1 Tassenwärmer2 Ausgabetaste für eine Tasse3 Ausgabetaste für zwei Tassen4 Ausgabetaste für Dampf5 Duschsieb des Brühkessels6 Ein/Aus-Schalter7 Tassenrost8 Wasserstandsanzeige der Abtropfschale9 Siebträger10 1 Tasse Sieb 11 2 Tassen Sieb12 Messlöff el mit Stopfer13 Heißwasser-/Dampfrohr14 Ausgabeknopf für Dampf15 Wassertank | EN1 Cup warmer2 Single cup dispensing button3 Double cup dispensing button4 Steam dispensing button5 Shower screen of the brew boiler6 On/Off switch7 Cup tray8 Water level indicator of the drip tray9 Portafi Iter10 1-cup fi Iter basket 11 2-cup fi Iter basket12 Measuring spoon with tamper13 Hot water/steam wand14 Steam dispensing button15 Water tank |
| NL1 Kopjeswarmer2 Uitgifteknop voor één kopje3 Uitgifteknop voor twee kopjes4 Uitgifteknop voor stoom5 Douchezeef van de brouwketel6 Aan/Uit-schakelaar7 Kopjesrek8 Waterstandaanduiding van de lekbak9 Piston10 1-kopszeef 11 2-kopszeef12 Maatlepel met tamper13 Heetwater-/stoompijp14 Stoomafgifteknop15 Watertank | FR1 Chauff e-tasses2 Bouton de distribution pour une tasse3 Bouton de distribution pour deux tasses4 Bouton de distribution de vapeur5 Tamis de la chaudière d'infusion6 Interrupteur marche/arrêt7 Égouttoir à tasses8 Indicateur de niveau d'eau du bac d'égouttage9 Porte-fi Itre10 Panier-fi Itre 1 tasse 11 Panier-fi Itre 2 tasses12 Messlöff el mit Stopfer13 Tube d'eau chaude/vapeur14 Bouton de distribution de vapeur15 Réservoir d'eau |
| IT1Scaldatasse2Pulsante di erogazione per una tazza3Pulsante di erogazione per due tazze4Pulsante di erogazione del vapore5Setaccio della caldaia per l'infusione6Interruttore On/Off7Griglia per le tazze8Indicatore del livello dell'acqua del vassoio di raccolta9Portafiltro10Filtro per 1 tazza 11Filtro per 2 tazze12Misurino con pressino13Tubo per acqua calda/vapore14Pulsante di erogazione del vapore15Serbatoio dell'acqua | ES1Calienta tazas2Botón de salida para una taza3Botón de salida para dos tazas4Botón de salida de vapor5Filtro de la caldera de infusión6Interruptor de encendido/apagado7Bandeja para tazas8Indicador de nivel de agua del recipiente de goteo9Portafiltro10Filtro para 1 taza 11Filtro para 2 tazas12Cucharilla dosificadora con prensador13Tubo de agua caliente/vapor14Botón de salida de vapor15Depósito de agua |
| PT1Aquecedor de xícaras2Botão de saída para uma xícara3Botão de saída para duas xícaras4Botão de saída de vapor5Peneira do aquecedor de água6Interruptor Liga/Desliga7Bandeja para xícaras8Indicador de nivel de água da bandeja de gotejamento9Porta-filtro10Filtro para 1 xícara 11Filtro para 2 xícaras12Colher dosadora com compactador13Tubo de água quente/vapor14Botão de saída de vapor 15Reservatório de água | LT1Puodelių šildytuvas2Išleidimo mygtukas vienam puodeliui3Išleidimo mygtukas dviem puodeliams4Garso išleidimo mygtukas5Kavos virimo katilo dūžio sietelis6Ijungimo/išjungimo jungiklis7Puodelių lentyna8Nutekėjimo indelio vandens lygio indikatorius9Kavos filtravimo laikiklis101 puodelis sietelis 112 puodelių sietelis12Matavimo šaukštelis su stumdomu stiebu13Karšto vandens/garų vamzdi§14Garso išleidimo mygtukas 15Vandens bakas |
| LV1Krūzes silditājs2Dozēšanas poga vienai tasei3Dozēšanas poga divām tasītēm4Tvaika atbrivošanas poga5Brew tējkannas dušas sietiņš6leslēgšanas/izslēgšanas slēdzis7Kausa rūsa8Údens limeņa indikators uz pilienu paplātes9Portafiltr101 glāze sietiņš tases sietiņš112 glāze sietiņš tases sietiņš12Mērkarote ar stūmēju13Karstā ëdens/tvaika caurule14Tvaika atbrivošanas poga 15ūdens tvertne | DK1Kopvarmer2Dispenseringsknapp til en kop3Dispenserknapp til to kopper4Dampudløserknap5Brew kedel bruser si6Tænd/sluk-knap7Kop rust8Vandstandsindikator på drypbakken9Portafilter101 kop si kop si 112 kop si kop si12Måleske med pusher13Varmtvand/damprør14Dampudløserknap15vandtank |
| NO1Koppvarmer2Dispenseringsknapp for en kopp3Dispenseringsknapp for to kopper4Damputløserknap5Brew vannkoker dusjsil6På / av bryter 7Kopper rust7Vannnivåindikator på dryppbrettet8Portafilter101 kopp sil kopp sil 112 kopp sil kopp sil12Måleskje med skyver13Varmtvann/damprør14Damputløserknap 15vanntank | SE1Koppvärmare2Dispenseringsknapp för en kopp3Dispenseringsknapp för två koppar4Ängfrigöringsknapp5Brew vattenkokare duschsil6På / Av knapp 7Kopp rost7Vattennivåindikator på droppbrickan8Portafilter101 kopp sil kopp sil 112 kopp sil kopp sil12Måttsked med påskjutare13Varmvatten/ångrör14Ängfrigöringsknapp 15vattentank |
| FI1Kupin lämmitin2Annostelupainike yhdelle kupille3Annostelupainike kahdelle kupille4Steamin vapautuspainike5Keitinkeitin suihkusuodatin6On / off kytkin 7Kupin ruostetta7Vesitason ilmaisin tippa-alustalla8Portafilter101 kuppi siivilä kuppisivilä 112 kuppi siivilä kuppisivilä12Työntimellä varustettu mittalusikka13Kuuma vesi/höyryputki14Steamin vapautuspainike 15vesisäiliö | HU1Csésze melegítő2Adagoló gomb egy csészéhez3Adagoló gomb két csészéhez4Steam kioldó gomb5Brew vizforraló zuhanyszürő6Be/Ki kapcsoló 7Pohár rozsda8Vízszintjelző a csepptálcán9Portafilter101 csésze szűrő csésze szűrő112 2 csésze szűrő csésze szűrő12Mérőkanál tolóval 13Melegvíz/gőz cső14Steam kioldó gomb 15víztartály |
| PL1Podgrzewacz filiżanek2Przycisk dozowania na jedną filiżankę3Przycisk dozowania dwóch filiżanek4Przycisk uwalniający parę5Sitko prysznicowe czajnika do zaparzania6Przelącznik włącz / wyłącz7Rdza kubkowa | 8Wskaźnik poziomu wody na tacy ociekowej9Portafiltr10Sitko na 1 filiżankę 11Sitko na 2 filiżankę12Lyżka miarowa z popychaczem13Rurka ciepłej wody/pary14Przycisk uwalniający parę15zbiornik wodny |
https://service.cloer.com/register/
Basic safety instructions
- The appliance is intended to be used in household only and using in:
— staff kitchen areas in shops, offices and other working environments,
– in farm houses,
– by clients in hotels, motels and other residential type environments,
– on bed and breakfast type environments.
- Have repairs of Cloer electronic appliances carried out only by authorized Cloer specialist dealers or by the Cloer customer service. Improper repairs can involve substantial dangers for the user. Furthermore, this will void your warranty claims.
- Only operate the appliance at household-usual power sockets. Check if the mains voltage stated on the type plate is up to that of your power supply network.
- The device must be connected to a power outlet with protective ground.
- If the supply cord is damaged, it must be replaced by Cloer, its service agent or similarly qualified persons in order to avoid a hazard.
- Pull power plug of the power socket
– in case of a defect,
- if the appliance is not used for a longer time,
– before any cleaning.
- Only pull at the plug, never at the feed cable.
- Do not stretch the feed cable over sharp edges and do not tighten it too tight.
- Do not use it for carrying and protect it from heat (hotplate, for example).
- Do not tighten the feed cable too tight as otherwise the appliance is likely to tip over.
- This appliance can be used by children aged from 8 years and above and persons with reduced physical, sensory or mental capabilities or lack of experience and knowledge if they have been given supervision or instruction concerning use of the appliance in a safe way and understand the hazards involved.
- Do not leave children unattended to ensure they do not play with the appliance.
- Keep the appliance and its cord out of reach of children less than 8 years.
- Cleaning and user maintenance shall not be made by children unless they are older than 8 and supervised.
- Do not immerse the appliance in water.
- Protect your appliance from humidity (splash water / rain).
- Let the appliance cool off before cleaning or stowing away.
- Do not use the appliance outdoors.
- Allow the device to cool completely before cleaning/storing it. You can find information about cleaning on the following pages.
- Use this appliance to prepare espresso and froth milk only. Injuries may occur with other applications.
- Make sure that the cup warmer still emits residual heat after use.
- Surfaces marked with the symbol become hot during operation and must not be touched.
- Be careful when handling steam and hot water, as this can cause burns.
- Do not place the espresso machine in a cupboard while preparing espresso.
Technical Data
| type volt hz watt | |||
| 582 220 | 240 50/60 13 | 50 | |
Before the first use

Read these operating instructions carefully before using the appliance for the first time.
- Remove all packaging parts and any stickers, not the nameplate and serial number.
- Clean all removable parts with a damp cloth.
- Place the espresso machine on a dry, non-slip and level surface.
- Clean the espresso machine as described in the Initial start-up section.
EC Label / Safety information

The appliance meets the requirements of the applicable EC directives.

The appliance is designed for indoor domestic use only.
ATTENTION! Always unplug the appliance when not in use and before cleaning.
Filling the water tank
- Pull the water tank out upwards.
- Open the lid and fill the tank with cold water. Take care not to exceed the MAX mark.
- Reinsert the tank and press lightly to open the valve at the bottom of the tank.
- Alternatively, the tank can also be filled with a jug without removing it.
- Please note! When inserting and removing the water tank, a few drops of water may collect in the area underneath the water tank. This is not a defect. Please remove the water with a clean sponge.
- Do not use the machine if there is no water in the tank. Top up the water in good time if the water level falls below the MIN mark.
Initial commissioning
- Press the on/off button to start the machine.
- The machine automatically performs a self-check, indicated by the three buttons flashing in sequence.
- If the self-test has been passed, the beep will sound. The machine will heat up. The indicator lamps flash and 3. as soon as the indicator lamps light up continuously, the appliance is ready for operation.
- Place a cup (200 ml) under the sieve holder and press the button 📋 to make a brew without espresso powder.
- Then empty the cup and repeat the process 5 times.
-
Now place a cup under the hot water/steam nozzle to rinse this through as well.
-
Turn the hot water / steam dispensing knob to the hot water / steam position 🏠 and dispense a cup of hot water.
- Close the output switch by turning it „OFF“.
Setting the menu programmes
- Ensure that the machine is ready for operation before calling up the menu. Press and hold the button for 5 seconds until the three indicator lights flash one after the other. The machine is now in menu setting mode.
- The menu setting mode is automatically cancelled if no button is pressed for 15 seconds.
- Select the button 📋 to set the espresso temperature and the button 🔒 to set the water hardness.
Setting the espresso temperature
- Press the button for the desired temperature:
Low
Medium
High
- The button flashes, indicating that the selection has been saved.
- The menu setting mode is then exited.
Setting the water hardness
- Press the button for the water hardness in your region:
Soft
Medium
Hard
- The button flashes, indicating that the selection has been saved.
- The menu setting mode is then exited.
| soft water | medium water | hard water |
| <10^ dH 10^ dH | H - 20^ dH >20^ dH | |
| <18^ fH 18^ fH | H - 36^ fH >36^ fH | |
| <180 mg/l CaCo_3 | 180-360 mg/l CaCo_3 | >360 mg/l CaCo_3 |
- You will need to descale your espresso machine more or less often depending on the hardness of the water in different regions.
- The interval between the machine's descaling messages is changed by setting the water hardness.
Programming the amount of espresso in the cup
- If you want to change the preset quantities for a single or double espresso, proceed as follows:
- Place one or two cups under the sieve holder.
- Press the button to be programmed ( ▼ or □ and keep it pressed.
- The machine starts to dispense espresso and the indicator light for the unpressed cup flashes, indicating that the espresso machine is in programming mode.
- As soon as the desired amount of espresso is in the cup, release the button: dispensing is cancelled and the amount of espresso is saved.
Preparation of esspresso
- Select the sieve for 1 or 2 cups.
- Insert the sieve for the espresso powder into the sieve support. Make sure that the marking is inserted into the gap provided.
- Pour one measuring spoon of espresso powder (7-8g) into the sieve for one cup. You can also fill in more or less, but not above the MAX mark. Press the espresso powder lightly with the tamper. Use two measuring spoons for a double espresso.
- Pressing the espresso powder is very important for making a good espresso. The espresso will be slow and strong if you press too hard. On the other hand, if you press too little, the espresso comes out too quickly and is weak.
- Brush excess powder off the edge of the sieve holder and lock the sieve holder onto the espresso machine by turning it from ☐ to the right to 🔒
- Place the cup(s) under the sieve holder and select the desired programme. As soon as the signal tone sounds three times, the espresso is ready.
- Disengage the sieve holder by turning the handle from right to left to 📂.
- Attention! Never disengage the sieve holder during coffee dispensing.
- If you want to use a large cup, you can remove the drip tray.
Preparation of cappuccino
- Proceed as described in the previous section to prepare an espresso.
- Place a container with approximately 100 ml of milk per cappuccino under the hot water/steam nozzle.
- When choosing the size of the milk container, bear in mind that the volume of milk doubles or triples.
- Press the button ⚪, the button flashes and the appliance prepares water vapour. As soon as the button lights up permanently, the machine is ready.
- Immerse the milk frother in the milk container and ensure that the black handle is never immersed.
- Turn the output knob to 📁.
- Steam escapes from the milk frother to froth the milk.
- To achieve creamy milk froth, hold the container at a slight angle and immerse the nozzle deeply. As the foam volume increases, pull the nozzle up slightly. Prolonged foaming leads to coarser foam. Therefore, do not froth the milk for too long.
- When the desired foam volume has been reached, turn the dispensing knob back to „OFF“.
- Pour the frothed milk into the cups with the previously -ly prepared espresso.
- The cappuccino is ready and can be decorated with a little cocoa powder to taste.
- Please note! The hot water/steam nozzle should be cleaned after each use.
- Please note! Before the steam escapes from the milk frother, some water and air escape. You can drain this residual water into an empty container before frothing the milk. To do this, open the dispensing button for 1-2 seconds. Be careful as splashes of hot water may occur.
- Please note! Do not use the steam function for longer than 60 seconds.
Cooling the radiator
- The steam function ⚫ deactivated 30 seconds after the dispensing button is closed and the indicator lights ⬇ and ⚫. flash to show that the heater is cooling down. This is necessary, otherwise the espresso will come out burnt. To shorten the cooling time (e.g. if you want to prepare the espresso after frothing the milk), proceed as follows:
- After frothing the milk, close the dispensing button and press 📋 or 🌐
- Position a container under the hot water/steam nozzle, then turn the steam dispensing knob to dispense steam and hot water and cool down the brewing boiler.
- Attention! Risk of splashing and burning. Take a little distance.
- Hot water production stops automatically when the radiator cools down: when the pump stops and no more water comes out, close the steam production button.
• After a short period of time, the espresso machine will be ready for use again.
Hot water generation
- Switch on the espresso machine by pressing the on/off button. Wait until the indicator lamps light up continuously and the appliance is ready for operation.
- Position a container under the hot water/steam nozzle.
- Turn the dispensing knob to 🏠: the hot water flows out of the hot water/steam nozzle.
- To cancel hot water dispensing, close the dispensing button.
- Hot water dispensing is limited to 120 seconds. At the end of this time, the machine will automatically switch off.
Recommendation for a hotter espresso
- Before preparing the espresso, preheat the cups by rinsing them with hot water or running a water-only cycle.
- Set a higher espresso temperature in the menu setting mode.
- The cup warmer gets hot during operation. Place the cups to be used on it.
Automatic switch-off function
- To minimise power consumption, the machine automatically switches to standby mode after 30 minutes.
- To switch the machine back on, press any button on the control panel.
- To switch the machine off completely, press the On/Off button.
Cleaning
- Clean all parts of the espresso machine regularly.
• Always disconnect the mains plug before cleaning. - Do not use solvents, scouring milk or alcohol to clean the machine.
- Never immerse the machine in water.
- Clean the drip tray and cup stand by removing the cup stand and wiping both with a damp cloth.
-
Make sure to empty the drip tray as soon as the water level indicator is visible.
-
Rinse the coffee sieve under running water and check that the small holes are not blocked.
- Rinse the shower filter of the brewing unit every 200 es - presso dispenses by making 3 passes without the sieve holder and filter.
- Clean the water tank with a mild detergent and a damp cloth.
Descaling
- Descale the espresso machine when all three indicator lights are permanently lit. The interval between descaling messages depends on the set water hardness.
- Mix the descaling solution according to the manufacturer's instructions and pour into the water tank up to the MAX mark.
- Ensure that a container is positioned under the hot water/steam nozzle and under the shower filter of the brewing unit.
- Press the button 📂 for 5 seconds until all three indicator lights flash in succession.
- Turn the dispensing knob to 🏠 and press the button 🔊 to start the descaling programme.
- The descaling programme starts and the descaling solution comes out of the hot water outlet.
- The process takes approx. 5 minutes and involves pumping approx. 750~ml of descaling solution through the machine. Make sure that the collection containers are large enough.
- This process can only be stopped using the on/off button.
- Please note! To clean the shower filter of the brewing unit during descaling, close the steam dispensing button in between. The descaling solution is then pressed through the shower sieve.
• Empty and clean the tank after the cycle.
- Fill the tank with fresh water and start the process again.
Factory setting
- This process resets the appliance settings and cup settings to the factory settings. The counter for the descaling message is also reset.
- Call up the menu settings mode.
- Turn the output knob to
- Press the button 📋 and the three indicator lights will flash simultaneously, indicating that all settings have been reset to factory defaults.
- If the and indicator lights and flash this means that the hot water/steam control knob must be set to 'OFF'.
- If the hot water/steam button is turned to ,OFF', the appliance can be used again.
Meaning of the indicator lamps
| Control lamps | Process Significance of the Control lamps | |
| Self Test | The appliance carries out a self-diagnosis, which is indicated by the successive flashing of the indicator lamps. | |
| Preparing Espresso | Indicator lights flash: the appliance is heating up for espresso preparation. | |
| Indicator lights permanently switched on: the appliance is ready for espresso preparation. | ||
| The indicator lights flash 3 times in quick succession: the machine needs to cool down after dispensing steam (see „Cooling down the heating element“). | ||
| The steam release button is open and the indicator lights flash twice in quick succession. | ||
| Preparing Water Vapour | Indicator light flashes: the appliance is heating up to release steam. | |
| Control light permanently switched on: the appliance is ready to dispense steam. | ||
| Permanent lighting | Descaling message | Carry out descaling as described in the „Descaling’ section. |
Malfunctions
| Issue Cause Solution | ||
| The Espresso no longer runs out. | No water in the tank. | Fill the water tank. |
| The sieves are clogged. | Clean the sieves under running water, especially the small hole on the underside. | |
| The water tank is not inserted correctly and the valves at the bottom are not open. | Press the water tank lightly so that the valves at the bottom open. | |
| Lime in the water cycle. | Carry out descaling as described in the „Descaling“ section. | |
| The espresso drips over the edges of the sieve holder instead of out of the holes. | The sieve holder is not inserted correctly or is dirty. | Engage the sieve holder correctly and turn it firmly as far as it will go. Clean the edge of the sieve holder. |
| The seal above the sieve holder no longer seals correctly. | Clean the seal first. If the fault persists, contact customer service to replace the seal. | |
| The espresso powder is pressed too hard. | Do not press the espresso powder too hard. | |
| The sieve holder does not engage with the appliance. | The sieve is filled with too much espresso. | Do not fill the sieves above the MAX mark. |
| The crema of the espresso is light (the coffee runs out of the spout too quickly). | The espresso powder was not pressed sufficiently. | Press the espresso powder harder. |
| Too little espresso powder. | Use more espresso powder. | |
| The espresso is ground too coarsely. | Only use espresso powder for espresso machines. | |
| The quality of the espresso powder is not suitable. | Use espresso powder of a different quality. | |
| The crema of the espresso is too dark (the espresso comes out of the spout too slowly). | The espresso powder was pressed too hard. | Press the espresso powder less. |
| Too much espresso powder. | Use less espresso powder. | |
| The shower filter of the brewing unit is clogged. | Clean the shower sieve with a damp cloth. Run descaling solution through the shower sieve (see section, Descaling'). | |
| The sieves are clogged. | Clean the sieves under running water, especially the small hole on the underside. | |
| The espresso is ground too finely. | Only use espresso powder for espresso machines, which must not be too moist. | |
| Lime in the water cycle. | Descale the appliance. | |
| The espresso machine is not working and all indicator lights are flashing. | NTC Error | Please contact customer service. |
| No milk foam forms during the preparation of cappuccino. | The milk frother is dirty. | Clean the milk frother. Cleaning the milk frother after each use'. |
| Lime in the water cycle. | Carry out descaling as described in the „Descaling" section. | |
| The pump is louder than normal. | Water tank is empty. | Fill the water tank with water. |
Environmentally friendly disposal
We use environmentally friendly packaging for the transport of our appliances. Please recycle cardboard/ paper and plastic packaging appropriately.
ATTENTION!
Electrical appliances should not be disposed of with the household trash.
Electrical appliances contain valuable raw materials. When an appliance is worn-out, please take it to a recognised recycling facility. Consult the local authorities for information on recycling appliances.
Warranty
Cloer electrical appliances are in conformity with the currently required EC-guidelines and safety regulations. If your Cloer electrical appliance has a defect or it does not work properly, contact your specialist dealer. Registered clients have at their disposal our technical customer service.
cloer Technical customer service
Mail: service-gb@cloer.com https://service.cloer.com
Manufacturer warranty
Please register your appliances in the period of 6 months since the purchase in order to benefit from our manufacturer warranty. The published conditions of warranty in the moment of the registration are valid. You will find conditions of warranty and product registration here:

Manufacturer warranty
https://cloer.eu/gb/guarantee/
NL
type voltage hz watt
582 220-240 50/60 1350
https://cloer.eu/it/guarantee
https://cloer.eu/pt/guarantee