
67694 - Hand blender Lund - Free user manual and instructions
Find the device manual for free 67694 Lund in PDF.

| Product type | Immersion blender with accessories |
| Brand | Lund |
| Model | 67694 |
| Rated voltage | 220-240 V~ |
| Rated frequency | 50/60 Hz |
| Rated power | 1000 W |
| Insulation class | II |
| Net weight | 0.7 kg |
| Protection degree | IPX0 |
| Number of speeds | Variable speed with regulator + maximum speed |
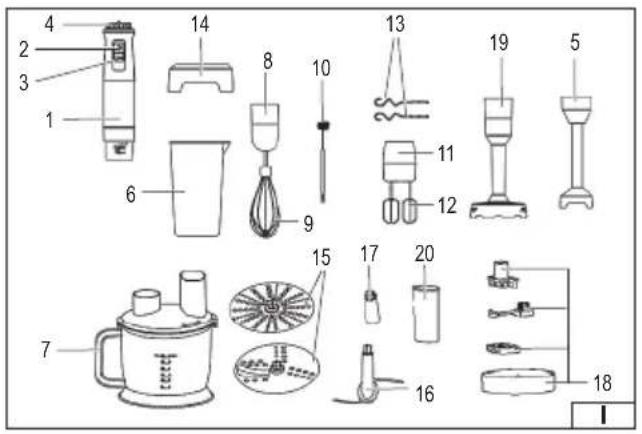
| Included accessories | Blending foot, whisk, frother beater, mixing blades, spiralizer, purée attachment, food processor with cutting/slicing disc, graduated container, silicone lid |
| Main functions | Blend, beat, mix, knead, purée, chop, slice, grate |
| Motor housing material | Plastic |
| Blade material | Stainless steel |
| Included container | Food processor bowl and graduated container |
| Care and cleaning | Clean accessories under running water (except motor housing, which should only be wiped with a damp cloth) |
| Important safety instructions | Do not immerse motor housing, do not use hot liquids, unplug before assembly/disassembly |
| Intended use | Household use only |
| Warranty | See manufacturer's terms |
Frequently Asked Questions - 67694 Lund
User questions about 67694 Lund
0 question about this device. Answer the ones you know or ask your own.
Ask a new question about this device
Download the instructions for your Hand blender in PDF format for free! Find your manual 67694 - Lund and take your electronic device back in hand. On this page are published all the documents necessary for the use of your device. 67694 by Lund.
USER MANUAL 67694 Lund
natural_image
Exterior view of a modern stainless steel LUND brand micrometer (no text or symbols visible on body)CE
PL EN DE RU UA LT LV CZ SK HU RO ES FR IT NL GR BG PT HR AR
natural_image
Two line drawings of a hairdryer with a handle, showing the left and side views (no text or symbols)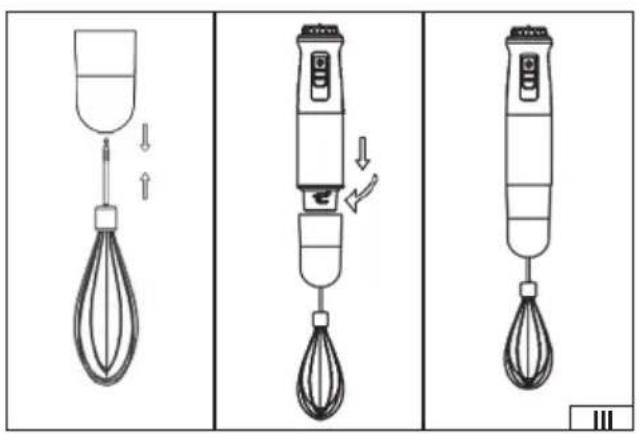


natural_image
Technical line drawings of a blender and blender with labeled parts (no text or symbols present)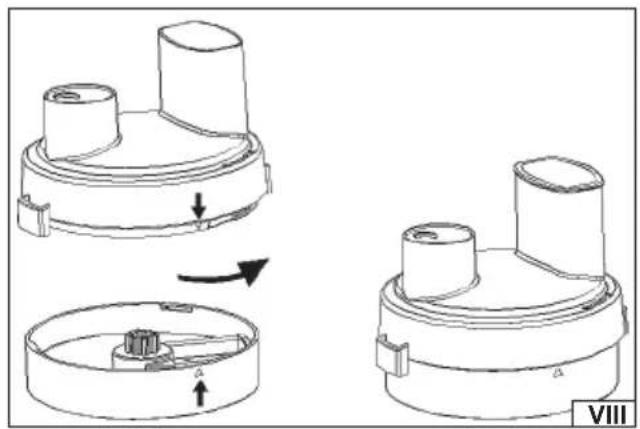
natural_image
Technical line drawing of a mechanical component with three views (top, front, side) showing internal structure and assembly (no text or symbols)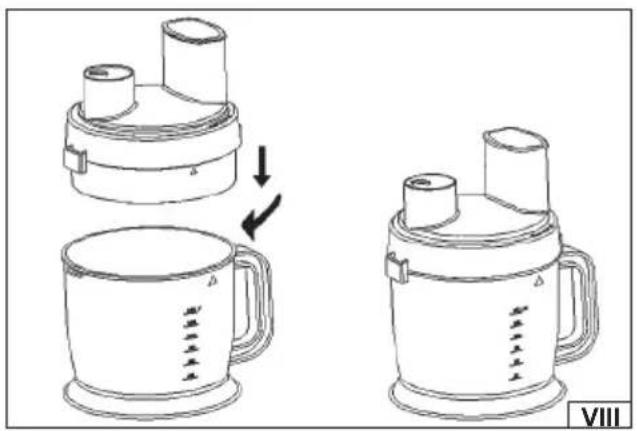
natural_image
Line drawing of a two-step cooking process: adding liquid into a steamer with a lid, then adding a pan to a coffee mug (no text or symbols)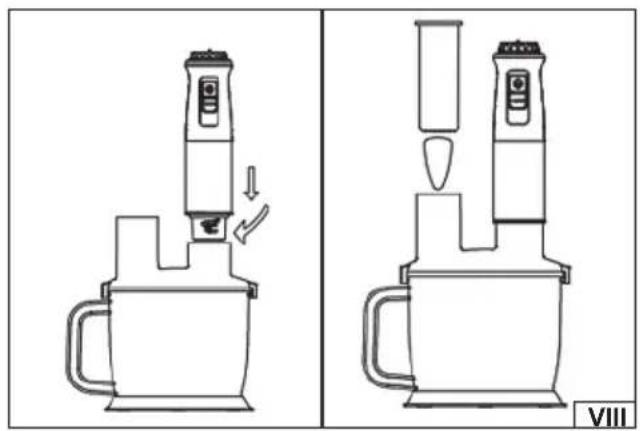
natural_image
Line drawings of a blender with a handle and spool, showing a stepwise process (no text or symbols)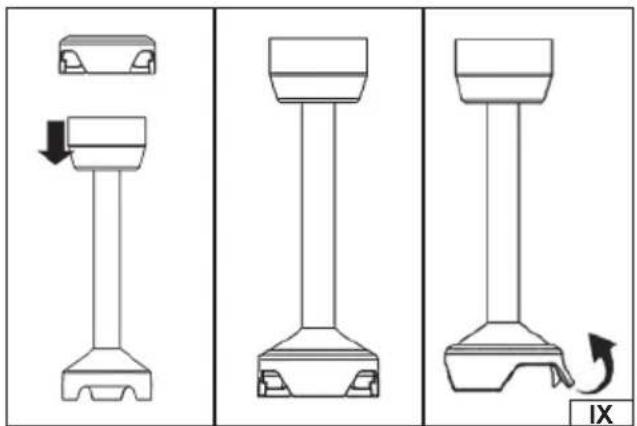
natural_image
Three technical line drawings of a mechanical component with base and top views, showing a rotation arrow (no text or symbols)PL
- drive housing
- low speed switch
- high speed switch
- speed controller
- blending attachment
- graduated container
- mixer container
- beater attachment
- whisk mixer
- foaming mixer
- mixing attachment
- mixing stirrer
- spiral mixer
- silicone blender cover
- food processor plate
- food processor cutting attachment
- mixer plate handle
- cutting attachment
- puree starter
- pusher
DE
Read the operating instruction
Safe contact with food
Second class of insulation
This symbol indicates that waste electrical and electronic equipment (including batteries and storage cells) cannot be disposed of with other types of waste. Waste equipment should be collected and handed over separately to a collection point for recycling and recovery, in order to reduce the amount of waste and the use of natural resources. Uncontrolled release of hazardous components contained in electrical and electronic equipment may pose a risk to human health and have adverse effects for the environment. The household plays an important role in contributing to reuse and recovery, including recycling of waste equipment. For more information about the appropriate recycling methods, contact your local authority or retailer.
PRODUCT CHARACTERISTICS
blender is used for food preparation. Its extensive range of accessories allows for easy and efficient preparation of food that needs to be blended, mixed, or chopped. This product is intended for home use only and is not intended for commercial use. Proper, reliable, and safe operation of the device depends on proper use, therefore:
Before using the product, please read the entire manual and keep it.
The supplier is not liable for any damage resulting from failure to comply with the safety regulations and recommendations of this manual.
EQUIPMENT
The product is delivered complete, but requires preparatory activities before starting work, described later in the manual. The accessories shown in the illustration (I) are supplied with the product.
SAFETY INSTRUCTIONS
Warning! Read all instructions below. Failure to follow them may result in electric shock, fire, or personal injury.
FOLLOW THE INSTRUCTIONS BELOW
Do not use the product in environments with an increased risk of explosion, containing flammable liquids, gases, or vapors. Before operation, check the product, its accessories, and the connecting cable for damage. If any damage is detected, do not attempt to use the product. The power cable must not be repaired; it must be replaced with a new one. Any replacement of damaged components, including the power cable, must be performed by authorized repair shops. Do not attempt to repair the product yourself. The product is intended for indoor use only. Do not expose the product to precipitation or moisture. Water or moisture entering the product increases the risk of electric shock. Do not immerse the product in water or any other liquid. The product should only be connected to a power supply with the voltage and frequency indicated on the device's rating plate. The power cable plug must match the power outlet. Do not modify the plug. Do not use any adapters to adapt the plug to the outlet. An unmodified plug that fits the outlet reduces the risk of electric shock. After each use, disconnect the power cord from the wall outlet. Always unplug the product from the power supply if it is left unattended and before assembling, disassembling, or cleaning. Keep the power cord away from product attachments. This reduces the risk of the power cord being caught, cut, or otherwise damaged. Do not overload the power cord. Do not use the power cord for carrying, connecting, or disconnecting the plug from the wall outlet. Avoid contact between the power cord and heat, oil, sharp edges, or moving parts. Damage to the power cord increases the risk of electric shock. If the power cord is damaged (e.g., cut, melted insulation), immediately disconnect the power cord from the outlet and take the product to an authorized repair center. Do not use the product with a damaged power cord. The power cord must not be repaired; it must be replaced by an authorized service center. Before assembling, disassembling, or adjusting product accessories, disconnect the power plug from the power outlet. Use extreme caution when handling sharp parts of the product. Do not touch the moving blades. The blades are very sharp, and even when the blades are stationary, there is a risk of injury. Use extreme caution when handling any accessories containing blades. Before using the product, ensure that the selected accessory is properly installed. Do not place the
EN
containers supplied with the product on hot surfaces. This may cause the containers to melt. Do not overload the product. The housing temperature must not exceed 60 °C . Overloading the product will cause faster wear and tear, may cause damage, and increases the risk of electric shock. Do not use the product to prepare hot food. Food may splatter during preparation. Splashing of hot food can cause burns. This product is not intended for use by children. Keep the product and its cable out of the reach of children. Ensure that children do not use the product as a toy. Children should not clean or maintain this product without supervision. This product is not intended for use by persons with reduced physical or mental capabilities, or by persons lacking experience and knowledge of the appliance, unless supervision or instruction is provided regarding the safe use of the product so that the hazards involved are understood.
PRODUCT SERVICE
Preparing for work
The product should be unpacked, completely removing all packaging components. It is recommended that you retain the packaging; it may be helpful for future transportation and storage of the product.
Inspect the product for damage. If any damage is found, do not use the product until the damage is repaired or the damaged components are replaced with new, damage-free components.
Wash the product according to the instructions in the „Product Maintenance" section.
Note! Before attaching or removing the attachment, ensure that the product's power cord plug has been disconnected from the mains socket.
Install the selected attachment as intended, as shown in the following illustrations:
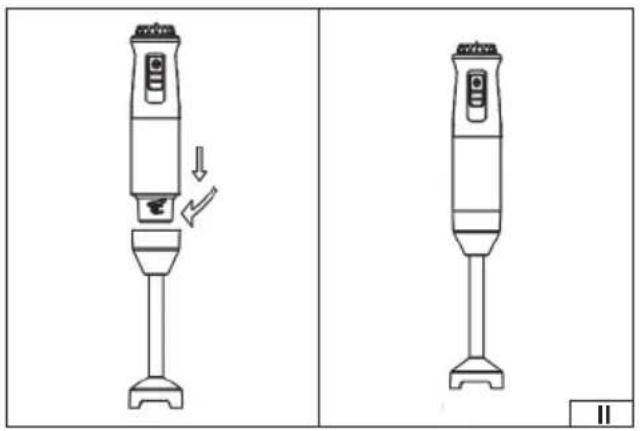
(II) – Blending attachment
The attachment housing should be placed on the drive housing mount so that the edge of the attachment mounting fits around the entire circumference, and then turned until it stops.
(III) – Beater attachment
Insert the beater or foaming beater into the beater attachment slots until they click into place. Then, place the beater housing onto the drive housing mount, ensuring the edge of the attachment mount is flush with the entire circumference, and then turn it until it stops.
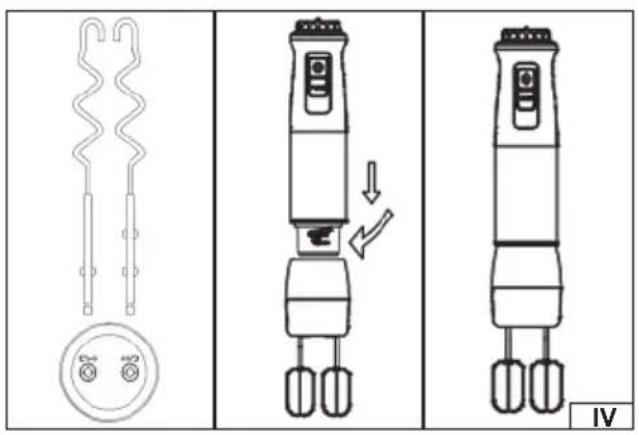
(IV) - Mixing attachment
Insert the mixing paddles or spiral mixers into the appropriate slots on the mixing attachment until they click into place. Then, place the attachment housing onto the drive housing mount, ensuring the edge of the attachment mount is flush with the entire circumference, and then turn it until it stops.
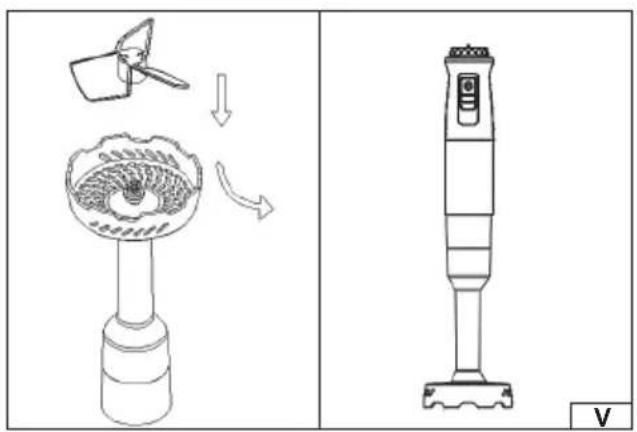
(V) – Puree attachment
Insert the mixing knife into the knife slot in the attachment housing, turning it counterclockwise until it clicks into place. Then, place the attachment housing onto the drive housing mount, ensuring the edge of the attachment mount is flush with the entire circumference, and then turn it until it stops.
(VI) – Food processor cutting attachment
Warning! The blades are very sharp – take extra care when assembling and cleaning.
Place the container on a flat, stable surface. Insert the food processor's chopping attachment into the container and place the food inside in pieces no larger than 2 cm.
Next, place the food processor lid on the food processor so that the attachment's mounting edge is flush against its entire circumference, then turn it all the way in. Place the drive housing on the food processor lid so that the attachment's mounting edge is flush against its entire circumference, then turn it all the way in.
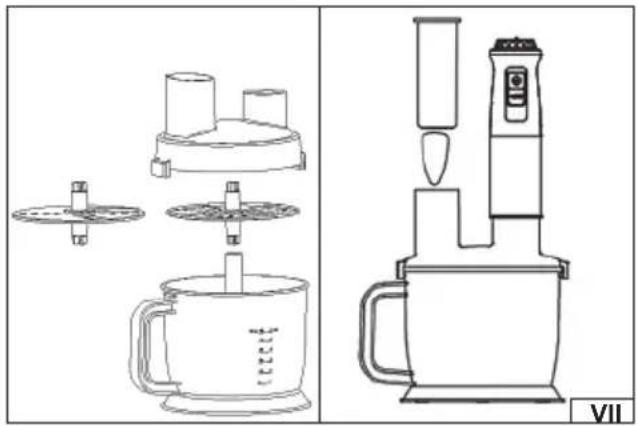
(VII) - Mixer plate
Warning! The disc blades are very sharp – take special care during assembly and cleaning.
Place the container on a flat, stable surface. Insert the food processor plate holder into the container, then place the chosen food processor plate on top. Place the food processor container lid on the container, ensuring the attachment's mounting edge is flush with the entire circumference, and then turn it until it stops.
The drive housing should be placed on the lid of the food processor container so that the attachment mounting edge fits around the entire circumference, and then turned until it stops.
(VIII) – Slicing attachment
Insert the cutting grid into the chopping attachment, ensuring it is properly seated. Next, insert the mixing blade vertically into the attachment's socket until you feel it seat. With the attached components, place the food processor lid on the attachment, ensuring the attachment's mounting edge is flush with the lid, then turn it all the way. Place the food processor lid with the attachment on
EN
the food processor bowl, ensuring the attachment's mounting edge is flush with the lid, then turn it all the way.
Finally, place the drive housing onto the mounting in the cover so that the edge of the attachment mounting fits around the entire circumference, and then turn it until it stops.
(IX) - Silicone blender cover
The silicone cover should be placed over the blender attachment foot.
Check that the attachment does not disconnect spontaneously during operation. If the attachment cannot be disconnected by pulling away from the drive housing, and its edge is flush with the drive housing along its entire circumference, this indicates correct assembly.
Application of attachments
Blender attachment
It's used for chopping fruits and vegetables, blending soups and sauces, and preparing smoothies and creams. It's recommended to use a tall, narrow container to reduce splashing.
Beater attachment
- With a whisk attachment, it is used to prepare egg whites, whip cream and mix light and thin batters, e.g. pancake batter.
- With a frothing stirrer, it is used for frothing milk, drinks and quickly mixing light liquids.
Mixing attachment with mixing or spiral beaters
Designed for working with doughs and masses of various consistencies.
- With mixing paddles, it is used to prepare light cakes, creams and for grinding ingredients.
- With spiral mixers, it is designed for kneading thick and medium-heavy doughs, e.g. yeast or bread dough.
Puree attachment
Designed for preparing puree from cooked potatoes and other vegetables, the mixing blade effectively crushes and blends the pieces, achieving a uniform consistency.
Food processor cutting attachment
It is designed for chopping meat, cheese, onions, herbs, garlic, carrots, nuts, almonds, prunes, and other similar foods. Place ingredients in the food processor bowl in pieces no larger than 2 cm before closing the lid.
CAUTION! Do not crush very hard foods such as ice cubes, nutmeg, coffee beans or cereals.
Food processor plate
Designed for slicing or shredding vegetables, fruit, cheese, and other food products, it allows for quick and even cutting into slices or shreds, depending on the selected plate.
CAUTION! Do not crush very hard foods such as ice cubes, nutmeg, coffee beans or cereals.
Slicing attachment
Used for dicing cooked vegetables, especially potatoes. The cutting grid and mixing blade ensure even portioning of ingredients.
Food processor container – rules of use
The food processor bowl can only be used with the plate, cutting attachment or slicing attachment.
- When using the food processor cutting attachment (blade), place the products directly into the container before closing the lid.
- When using the food processor or chopping attachment, insert food into the bowl only through the opening in the bowl lid, pushing it in only with the pusher provided. Using other objects or your hands for this purpose may result in damage to the product or lead to serious injury.
Container with scale
It can be used as a work container with the blender attachment, whisk attachment, and foaming beater. The scale makes measuring ingredients easy.
Silicone blender cover
Protects delicate surfaces of dishes from scratches when using the blender attachment.
Product support
Install the selected attachment.
Without touching the switch, connect the power cord plug to the mains socket.
If a blender, whisk or mixer attachment is fitted, insert the end of the attachment into the food container and then turn on the product by pressing and holding the switch.
The product is equipped with two switches: the upper one allows operation at the speed set using the controller, and the lower one allows operation at maximum speed. The product must be turned on for no longer than 1 minute, after which the drive must be allowed to cool for at least 4 minutes.
To turn off the product, release the switch. Allow the moving parts of the attachments to stop rotating, then unplug the power cord from the outlet and remove the attachment from the food container and/or disassemble the attachment.
If using attachments with blades (e.g., a blender or food processor), it's recommended to start at a lower speed and gradually increase it until you achieve satisfactory results. A lower speed for all attachments will reduce splashing of liquid foods and spilling of dry ingredients.
EN
Product maintenance
CAUTION! Before each cleaning, turn off the product, disconnect the power cord from the socket, wait for it to cool down and only then proceed with maintenance.
NOTE: It's recommended to clean attachments immediately after cooking. This will prevent food residue from drying on and make cleaning easier.
CAUTION! The blades are very sharp – use extreme caution when disassembling and cleaning.
If the drive housing becomes contaminated with processed food during operation, stop working, clean the product and only then resume operation.
To clean this product, use only mild cleaning agents intended for kitchenware. Do not use abrasive cleaning agents (e.g., scouring powder or cream) or agents containing caustic substances. Do not use solvents, gasoline, or alcohol.
Dilute the cleaning agent with water according to the instructions provided with it, then apply it to a soft cloth and clean the outside of the drive housing.
Remove any remaining cleaning agent with a soft cloth lightly dampened with clean water. Then dry all surfaces with a soft, dry cloth.
CAUTION! The drive housing is not intended to be cleaned with a water jet. Do not immerse the drive housing in water.
blender cover, mixing blades, food processor plates, and cutting elements of the slicing attachments can be cleaned with a water jet or by immersion in water, after first disconnecting them from the attachments. Other product components should only be cleaned with a damp cloth.
The blender blade and puree attachment can be cleaned with a jet of water after disconnecting the attachment from the drive and taking care not to allow the parts connecting to the drive to get wet.
Dry all components thoroughly before using the product again.
None of the product components are intended for washing in dishwashers or with a high-pressure jet.
NOTE: When preparing different dishes in succession using the same attachment, you can remove food residue by immersing the blender or mixing blade and briefly running the attachment in a container of clean, lukewarm water.
When cleaning the blades, avoid contact with the human body. Clean them using brushes or sponges.
Product transportation and storage
Before storing or transporting the product, thoroughly clean it of any food residue.
During storage, store the product indoors, protecting it from dust, dirt, and moisture. It is recommended to store the product in its original packaging.
TECHNICAL DATA
| Parameter Unit of measurement Value | ||
| Catalog number 67694 | ||
| Nominal voltage [V~] 220-240 | ||
| Nominal frequency [Hz] 50 / 60 | ||
| Rated power [W] 1000 | ||
| Insulation class II | ||
| Net weight [kg] 0.7 | ||
| Degree of protection | IPX0 |
PRODUKTMERKMALE
PRODUKTA RAKSTUROJUMS
CARACTÉRISTIQUES DU PRODUIT


- PL
- DE
- PRODUCT CHARACTERISTICS
- EQUIPMENT
- SAFETY INSTRUCTIONS
- FOLLOW THE INSTRUCTIONS BELOW
- EN
- PRODUCT SERVICE
- Preparing for work
- (II) – Blending attachment
- (III) – Beater attachment
- (IV) - Mixing attachment
- – Puree attachment
- (VI) – Food processor cutting attachment
- (VII) - Mixer plate
- (VIII) – Slicing attachment
- Application of attachments
- Product support
- Product maintenance
- Product transportation and storage
- TECHNICAL DATA
- PRODUKTMERKMALE
- PRODUKTA RAKSTUROJUMS
- CARACTÉRISTIQUES DU PRODUIT
Brand : Lund
Model : 67694
Category : Hand blender