PPOG 120 A1 - Measuring equipment PARKSIDE - Free user manual and instructions
Find the device manual for free PPOG 120 A1 PARKSIDE in PDF.

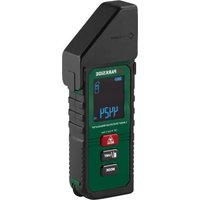
| Product Type | Material Detector |
| Brand | Parkside |
| Model | PPOG 120 A1 |
| Category | Measuring Equipment |
| Dimensions (L x W x H) | 224 x 84 x 80 mm |
| Weight (without batteries) | 320 g |
| Power Supply | 3 AA 1.5V batteries (LR06) |
| Protection Type | IP5X |
| Max. Detection Depth (metal) | 120 mm |
| Max. Detection Depth (electrical wires) | 60 mm |
| Max. Detection Depth (wood in drywall) | 38 mm |
| Measurement Accuracy (center of object) | ± 10 mm |
| Operating Modes | Metal, Object (wood, thin cables) |
| Detection | Ferrous and non-ferrous metals, live electrical wires, wood |
| Display | 2.8" screen with icons |
| Audible Signal | Activate/Deactivate |
| Calibration | Automatic and manual |
| Auto Shut-off | After 5 minutes of inactivity |
| Operating Temperature | -10 °C to 40 °C |
| Warranty | 5 years (under conditions) |
| Package Contents | Detector, 3 AA batteries, storage bag, manual |
| Care and Cleaning | Dry lint-free cloth; do not use solvents |
| Safety | Do not expose to moisture; follow battery instructions |
| Spare Parts Available | Storage bag (ref. 91120175) |
Frequently Asked Questions - PPOG 120 A1 PARKSIDE
User questions about PPOG 120 A1 PARKSIDE
0 question about this device. Answer the ones you know or ask your own.
Ask a new question about this device
Download the instructions for your Measuring equipment in PDF format for free! Find your manual PPOG 120 A1 - PARKSIDE and take your electronic device back in hand. On this page are published all the documents necessary for the use of your device. PPOG 120 A1 by PARKSIDE.
USER MANUAL PPOG 120 A1 PARKSIDE
Translation of the original instructions
NL BE
Detectieapparaat
Before reading, unfold the page containing the illustrations and familiarise yourself with all functions of the device.
FR BE
....3× Alkaline-Batterie 1,5V AA (LR06)
Schutzart IP5X
• 3× Alkaline-Batterie 1,5V AA (LR06)
Vorgehen (Abb. B)
Introduction......19
Proper use....19
Scope of delivery/accessories....20
Overview.... 20
Description of functions...... 20
Technical data.... 20
Safety information...... 21
Meaning of the safety information.... 21
Pictograms and symbols......21
Safety instructions for the detector....21
Safety information for batteries.... 22
Preparation......23
Inserting/replacing batteries.....23
Operation....23
Working instructions...... 23
How the device works....23
Switching on and off...... 24
Switching the signal tone on/off....24
Operating modes......24
Detecting objects...... 25
Determining the object centre.... 26
Marking objects......27
Recalibrating the detector......27
Checking the battery capacity....27
Transport...... 28
Cleaning, maintenance and storage....28
Cleaning....28
Maintenance....28
Storage....28
Disposal/environmental protection....28
Service....29
Guarantee....29
Repair service....30
Service Centre....31
Importer....31
Spare parts and accessories......31
Translation of the original EU declaration of conformity....32
Exploded view....163
Introduction
Congratulations on purchasing your new detector (hereafter referred to as device or power tool).
You have chosen a high-quality device. This device was quality-tested and subjected to a final inspection during production, therefore ensuring proper functioning of your device.


The instruction manual forms part of this device. It contains important information on safety, use and disposal. Read the instruction manual carefully. Familiarise yourself with the controls and how to use the device correctly. Use the device only as described and for the stated fields of application. Store the instruction manual carefully and ensure that all documents are handed over in the event that the device is passed on to another user.
Proper use
This device is only intended for the following use:
- Detection of objects in walls, ceilings and floors (wall types: concrete, drywall, masonry).
- Material identification of live wires, metal and wood.
Only operate in dry areas.
Any other use that is not expressly permitted in this instruction manu-
al may pose a serious hazard to the user and result in damage to the device. The operator or user of the machine is responsible for any accidents or personal injury and/or material damage to third parties or their property. The machine is intended to be used by do-it-yourselfers. It was not designed for heavy commercial use. The warranty is void in the case of commercial use. The manufacturer is not liable for damage caused by improper use or incorrect operation.
Scope of delivery/ accessories
Unpack the device and check that everything is present.
Dispose of the packaging material properly.
- Wall Scanner
• 3× Battery (1.5V AA (LR06)) - Storage bag
• Translation of the original instructions
Overview
The illustrations for the device can be found on the front and back fold-out page.
1 Marking aid (top)
2 Sensor area
3 Marking aid (left/right)
4 Button Calibration
5 On/Off button
6 Lock (Cover)
7 Cover Battery compartment
8 Handle
9 Button Signal tone
10 Button Operating mode Objects
11 Button Operating mode Metal
12 Display
13 Signal light
14 Sliding surface
15 Battery
16 Storage bag
17 Belt loop
Fig. A
18 Warning indication (Live wires)
19 Indication Signal strength
20 Battery indication
21 Indication Detection depth
22 Position display
23 Display Calibration
24 Display Operating mode Metal
25 Display Operating mode Objects
26 Display Object centre CENTRE
27 Display Non-magnetic/Magnetic metal
28 Indication Signal tone
Fig. B
29 Battery compartment
Description of functions
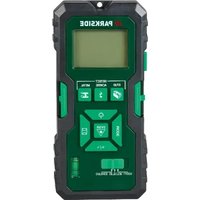
In terms of building services, the detector is used to locate invisible objects within walls, ceilings and floors. The sensor recognises objects that differ in material from the wall to be inspected. Depending on the condition and material of the surface, the device can detect live wires, metal and wood.
Please refer to the descriptions below for information on how the operating elements work.
Technical data
Wall Scanner ...... PPOG 120 A1
Power supply
.....3× Alkaline battery 1.5V AA (LR06)
Protection type ......IP5X
Max. detection depth ..... 120 mm
- Magnetic metal ....120 mm
- Non-magnetic metal .....120 mm
- Live wires 60 mm
- Wooden substructures (in drywalls) 38 mm
Measuring accuracy to the centre of the object .... ± 10 mm
Frequency range of sensor .... 5 kHz ± 0.5 kHz
Dimensions ......224 x 84 x 80 mm Display diagonal ...... 2.8"
Weight (Without battery) ....320 g transmitted power .... 40 dBμA/m Temperature ....
- Operation ......-10-40°C
Safety information
This section deals with the basic safety instructions for using the device.
Meaning of the safety information
⚠️ DANGER! If you do not observe this safety instruction, an accident will occur. The result of which is severe bodily injury or death.
⚠ WARNING! If you do not observe this safety instruction, an accident may occur. The result of which is likely severe bodily injury or death.
⚠️ CAUTION! If you do not observe this safety instruction, an accident will occur. The result of which is likely minor or moderate bodily injury.
NOTICE! If you do not observe this safety instruction, an accident will occur. The result of which is possible damage to property.
Pictograms and symbols Symbols on the device

Read the instruction manual

The product meets the relevant harmonisation legislation of the European Union.
Waste electrical and electronic equipment (WEEE) must not be disposed of with domestic waste.

On/Off button

Button Signal tone

Button Calibration

Button Operating mode Objects

Button Operating mode Metal
Symbols used in the instruction manual

Attention!
Safety instructions for the detector
⚠️ CAUTION! All instructions must be read and followed. If the measuring tool is not used in accordance with these instructions, the integrated protective devices in the measuring tool may be impaired. Keep these instructions in a safe place.
- Only have the device repaired by qualified specialists and only with original spare parts. This ensures that the safety of the device is maintained.
- Avoid violent shocks or drops of the device. Please contact the Service Centre in the event of severe external influences or anomalies in functionality.
- For technological reasons, the device cannot guarantee one hundred percent security. To rule out hazards, make sure you have other sources of information such as construction plans, photos from the construction phase, etc. before drilling, sawing or milling into walls, ceilings or floors. Environmental influences such as humidity or proximity to other electrical devices can affect the accuracy of the device. The nature and condition of the walls (e.g. moisture, building materials containing metal, conductive wallpaper, insulating materials, tiles) as well as the number, type, size and position of the objects can distort the measurement results.
- During the measurement, ensure sufficient earthing. If the earthing is insufficient (e.g. due to insulating footwear or standing on a ladder), it will not be possible to locate live wires.
- If there are gas pipes in the building, check that no gas pipes have been damaged after any work on walls, ceilings or floors.
- Live cables can be found more easily if power consumers (e.g. lights, appliances) are connected to the cable being searched for and switched on. Switch off the power consumers and de-ener-gise the live wires before drilling, sawing or milling in walls, ceilings and floors. After all work, check that objects attached to
the substrate are not under tension.
- When fixing objects to drywall, check that the wall or fixing materials have sufficient load-bearing capacity, especially when fixing to the substructure.
Safety information for batteries
Under normal operating conditions, a hermetically sealed battery does not present any hazards. A battery can present a hazard in the following cases:
⚠️ DANGER! Danger to life due if swallowed! Keep children away from batteries.
⚠️ CAUTION! Risk of explosion and burns! When handling batteries, observe the following:
- Never open or damage batteries.
- Never try to charge disposable batteries.
- Never expose batteries to a source of heat, fire or direct sunlight.
- Never short-circuit batteries.
- Never mix used and new batteries in a device.
- Pay attention to the correct polarity when inserting the batteries.
• Take leaking batteries out of the battery compartment immediately.
⚠ WARNING! Risk of chemical burns and poisoning from battery acid! If toxic and caustic battery acid leaks:
- After eye contact: Flush the eyes with a large amount of running water for 30 minutes. Call a doctor right away.
-
After skin contact: Take off soiled clothing and rinse the skin with a large amount of running water for at least 15 minutes. Call a doctor if irritation, injury or pain persists.
-
After breathing it in: Get some fresh air if you notice your respiratory tract is irritated. Call a doctor if irritation persists.
- After swallowing: Do not force vomiting. If the affected person is conscious, make sure that they rinse their mouth and the surrounding areas of skin with water for at least 15 minutes. Consult a doctor right away. Call a doctor right away.
Preparation
Inserting/replacing batteries
Requirements
• 3× Alkaline battery 1.5V AA (LR06)
Procedure (Fig. B)
- Press the lock (6) downwards and remove the battery cover (7).
- Remove any used batteries (15).
- Insert the batteries (15) in the battery compartment (29).
Use the polarity alignment inside the battery compartment (29) as a guide. - Replace the battery cover (7).
- To switch on, briefly press the on/off button (5). The battery indication (20) on the display (12) at the top right shows the battery capacity.
Operation
Working instructions
- Protect the device from moisture and direct sunlight.
-
Do not wear rings or watches when using the device. Metal can influence the measurement.
-
Do not expose the device to extreme temperatures or temperature fluctuations. If the temperature fluctuates significantly, allow it to cool down before switching it on. Extreme temperatures or temperature fluctuations can affect the precision of the device and the indication in the display.
- Hold the device only by the handle (8) so as not to influence the measurement.
- Do not affix any stickers or signs in the sensor area (2). Metal signs in particular influence the measurement results.
- The measurement result can be worse in terms of accuracy and detection depth if the subsurface is unfavourable.
- Before switching on the device, make sure that the sensor area (2) is not damp. If necessary, rub the device dry with a cloth.
How the device works
The device analyses the subsurface of the sensor area (2) in the measuring direction A up to the maximum detection depth. Objects that differ from the material of the wall are detected.
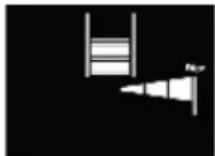
Procedure (Fig. C)
- Move the device in a straight line in the direction B over the wall.
- Move the device over the surface with constant light pressure. The contact pressure should not be changed during the measuring process.
- Do not lift the device during the measurement process. The sliding surfaces (14) must always be in contact with the ground during the entire measuring process.
Switching on and off
Switching on
- Press the on/off button (5). The device starts in Metal mode.
Switching off
- Press and hold the on/off button (5) for about 2 seconds.
Notes
- If no buttons are pressed for approx. 5 minutes and no objects are detected, the automatic switch-off function is activated. The device switches off automatically to save the batteries.
Switching the signal tone on/off
- Press the button (9) to switch the signal tone on or off.
When the audible signal is switched on, the signal tone indication (12) appears on the display (28).
Operating modes
The device is automatically in Metal mode when it is switched on.
You can adjust the operating mode according to the object to be detected (Changing the operating mode, p. 24). This prevents unwanted objects from being displayed.
The correct choice of operating mode ensures the best possible measurement result.
| Operating mode | Object | Metal |
| Types of wall • Plasterboard | ard and dry-wallNot suitable for:Brick wallsConcrete wallsCement walls | • Brick walls• Concrete walls• Cement wallsNot suitable for:• Plasterboard and dry-wall |
| Types of object types • Metal | Non-metal (wood)Thinner cables ( < 1.5 mm^2 )Live wires | • Metal, even with earthed walls• Thicker cables ( ≥ 1.5 mm^2 )• Live wires |
Notes
- Live wires are displayed in every operating mode. If the device detects a live wire, the warning indication (18) appears on the display (12).
- The device can also recognise and display the following types of object:
• (27): non-magnetic, but metallic (e.g. copper pipe)
• ⚙ (27): magnetic (e.g. reinforcing bars)
• 4 (18): live (e.g. power line)
Changing the operating mode
Selecting the appropriate operating mode lets you detect objects made of wood, metal or live wires.
Procedure
- Press the button for the desired operating mode:
• Detection of objects: (10)
• Detection of metal: Ⓗ (11)
Detecting objects
⚠ WARNING! Risk of injury! Ambient influences and the condition of the wall can affect measurement results. Before you drill, saw or mill into the wall, protect yourself from hazards using other sources of information.
Object mode
Procedure
-
Press the on/off button (5) to switch the device on.
-
Press the button (10). The display (12) shows the indication (25) for Object mode.
-
Hold the device by the handle (8) and place it on the surface to be examined.
If possible, select a location where you know that there is no object you are looking for.
The indication (23) appears on the display (12) and the signal light (13) does not light up. The device adapts to the surface to be analysed.
-
Wait until the signal light (13) lights up green and the indication (23) goes out. The device is now ready for operation.
-
Move the device steadily with light pressure in the direction of B. Ensure that the sliding surfaces (14) are always in contact with the surface being examined.
As the device approaches an object, the deflection of the signal strength indication (19) increases.
If the device moves away from an object, the deflection decreases. The signal light (13) and signal tone indicate whether an object has been detected.
- Signal light lights up green: no object detected
• Signal light lights up yellow: Approaching an object -
Signal light lights up red: Object detected
• Signal light flashes red: live wire detected -
Move the device back and forth repeatedly over the object to localise it more precisely. The position indication (22) is activated regardless of the operating mode.
- Determine the centre of the object (Determining the object centre, p. 26).
Notes
- If the display (12) shows a permanent, high deflection of the signal strength indication (19) and/or the position indication (22), restart the measurement process. Place the device on the surface in a different position and the device will recalibrate itself.
You can also start the calibration process manually (Recalibrating the detector, p. 27).
- Nails and screws in the substrate can cause a wooden beam to be shown as a metal object on the display (12).
- Objects with a larger width in the subsurface can be recognised by a permanent and high deflection of the signal strength indication (19) and the position indication (22). The signal light (13) lights up red continuously.
Metal mode Ⓗ
In Metal mode, magnetic and non-magnetic objects can be detected regardless of the wall composition. The indication (27) shows the actual type of object.
Procedure
-
Press the on/off button (5) to switch the device on. The device already starts in Metal mode. The signal light (13) lights up green and signals that the device is ready to measure.
-
Hold the device by the handle (8) and place it on the surface to be examined. If possible, select a location where you know that there is no object you are looking for.
-
Press the button (4) to start the calibration process.
The indication (23) appears on the display (12).
The signal light (13) does not light up during the calibration process.
-
Wait until the signal light (13) lights up green. The calibration process is complete. The device is now ready for operation.
-
Move the device steadily with light pressure in the direction of B. Ensure that the sliding surfaces (14) are always in contact with the surface being examined.
As the device approaches an object, the deflection of the signal strength indication (19) increases. If the device moves away from an object, the deflection decreases.
The signal light (13) and signal tone indicate whether an object has been detected.
- Signal light lights up green: no object detected
• Signal light lights up yellow: Approaching an object
- Signal light lights up red: Object detected
- Signal light flashes red: live wire detected
The indication (21) shows the distance (object depth: ≤ 12 cm) from the sensor area (2) to the object.
- Move the device back and forth repeatedly over the object to localise it more precisely. The position indication (22) is activated regardless of the operating mode.
- Determine the centre of the object (Determining the object centre, p. 26).
Notes
- If the display (12) shows a permanent, high deflection of the signal strength indication (19) and/or the position indication (22), recalibrate the device (Recalibrating the detector, p. 27).
- The signal strength of a live line depends on its position. Live cables cannot be reliably detected behind metal surfaces or surfaces with a high moisture content. Use other sources of information to check whether a live wire is present.
- You can find non-live wires as metal objects in Metal mode. Stranded cables are not displayed (unlike solid cables).
Determining the object centre
Requirements
- An object was detected. The signal light (13) lights up red.
Notes
• Always pay attention to all signals from the device (signal light (13),
signal strength indication (19), position indication (22)) when determining the centre of the object.
- The edge detection of objects only works in Object mode.
Procedure
- Look at the position indication (22). The position indication (22) gives an indication of the centre of the object by means of a deflection. The "Edge" indication also provides an orientation aid in Object mode. This signals that the edge of the object has been recognised.
Operating mode
Operating mode ⓘ
- Move the device in the direction of the deflection of the position indication (22) to locate the centre of the object.
- The signal strength indication (19) and position indication (22) show the maximum deflection. The centre cross and the display for the object centre (CENTRE) (26) appear on the display (12).

- If necessary, mark the object (Marking objects, p. 27).
Marking objects
You can mark detected objects as required. To do this, measure as usual and use the marking aids (1/3) on the device.
Requirements
- Boundaries or centre of an object were detected
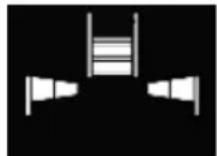
Procedure (Fig. D)
- Mark the location you are looking for on the top (1) and side marking aids (3).
- Connect the markings with a vertical and a horizontal line. The centre of the object is located at the intersection of the lines.
Recalibrating the detector
If the detector continuously displays a deflection of the signal strength indication (19) and/or the position indication (22) even though there is no object in the vicinity of the device, you can calibrate the device manually.
Procedure
- Make sure that all objects that could be displayed are removed from the vicinity of the device.
- Hold the device by the handle (8) and place it on the surface to be examined.
If possible, select a location where you know that there is no object you are looking for. - Press the button (4) to start the calibration process.
The indication (23) appears on the display (12).
The signal light (13) does not light up during the calibration process. - Wait until the signal light (13) lights up green. The calibration process is complete. The device is now ready for operation.
Checking the battery capacity
The battery indication (20) on the display (12) continuously shows the current capacity of the batteries (15).
Transport
Information on transporting the device:
- Switch off the device.
- Always carry the device by the handle (8) or use the supplied storage bag (16).
Cleaning, maintenance and storage
You should have any repair and maintenance work that is not described in these instructions carried out by our Service Centre. Only use original replacement parts.
Cleaning
⚠ WARNING! Electric shock! Never spray down the device with water. NOTICE! Risk of damage. Chemical substances may attack the plastic parts of the machine. Do not use any cleaning agents or solvents.
• Always keep the device in a clean and dry operating condition.
- Use a dry, lint-free cloth for general cleaning of the device.
- Do not remove the sliding surfaces (14) on the back of the device.
Maintenance
⚠ WARNING! Check the device each time before using. If there is visible damage or loose parts inside the device, safe operation can no longer be guaranteed.
Storage
Notes
Always store the device and accessories:
- clean
- dry
- protected against dust
- protected against frost
• In the supplied storage bag (16)
• out of the reach of children
Notes
- Remove the batteries if you will not be using the product for a longer period of time.
Disposal/ environmental protection
Take the batteries out of the device and recycle the device, batteries, accessories and packaging in an environmentally friendly manner.

Waste electrical and electronic equipment (WEEE) must not be disposed of with domestic waste.
The symbol of the crossed-out wheeled bin means that this product must not be disposed of as unsorted municipal waste at the end of its useful life.
Directive 2012/19/EU on waste electrical and electronic equipment:
Consumers are legally obliged to recycle electrical and electronic equipment in an environmentally sound manner at the end of its life. In this way, environmentally friendly and resource-saving recycling is ensured. Depending on the implementation in national law, you may have the following options:
- Return to a shop,
- Hand over to an official collection point,
- Return to the manufacturer/distributor.
This does not affect accessories enclosed with the old devices or tools without any electrical components.

Dispose of the batteries according to local regulations. Hand in the batteries at a used battery collection point where they are recycled in an environmentally friendly manner. For more information, please contact your local waste management provider or the service centre.
Service
Guarantee
Dear Customer,
This product is provided with a 5 year guarantee from the date of purchase. In case of defects, you have statutory rights against the seller of the product. These statutory rights are not restricted by our guarantee presented below.
Terms of Guarantee
The guarantee period begins on the date of purchase. Please retain the original receipt. This document is required as proof of purchase. If a material or manufacturing defect occurs within five years of the date of purchase of this product, we will repair or replace – at our choice – the product for you free of charge. This guarantee requires the defective product and proof of purchase to be presented within the five-year period with a brief written description of what constitutes the defect and when it occurred. If the defect is covered by our guarantee, you will receive either the repaired product or a new product. No new guarantee period begins on repair or replacement of the product.
Guarantee Period and Statutory Claims for Defects
The guarantee period is not extended by the guarantee service. This also applies for replaced or repaired parts. Any damages and defects already present at the time of purchase must be reported immediately after unpacking. Repairs arising after expiry of the guarantee period are chargeable.
Guarantee Cover
The product has been carefully produced in accordance with strict quality guidelines and conscientiously checked prior to delivery.
The guarantee applies for all material and manufacturing defects. This guarantee does not extend to cover product parts that are subject to normal wear and may therefore be considered as wearing parts (e.g. Battery) or to cover damage to breakable parts.
This guarantee shall be invalid if the product has been damaged, used incorrectly or not maintained. Precise adherence to all of the instructions specified in the operating manual is required for proper use of the product. Intended uses and actions against which the operating manual advises or warns must be categorically avoided.
The product is designed only for private and not commercial use. The guarantee will be invalidated in case of misuse or improper handling, use of force, or interventions not undertaken by our authorised service branch.
Processing in Case of Guarantee
To ensure efficient handling of your query, please follow the directions below:
- Please have the receipt and product number (IAN 472714_2407) ready as proof of purchase for all enquiries.
- Please refer for the product number to the type plate on the product, an engraving on the product, the title page of the operating instructions (bottom left) or the sticker on the back or underside of the product.
- Should functional errors or other defects occur, please initially contact the service centre specified below by telephone or use the contact form available on parkside-diy.com in the category Service.
- After consultation with our customer service, a product recorded as defective can be sent postage paid to the service address communicated to you, with the proof of purchase (receipt) and specification of what constitutes the defect and when it occurred. In order to avoid acceptance problems and additional costs, please be sure to use only the address communicated to you. Ensure that the consignment is not sent carriage forward or by bulky goods, express or other special freight. Please send the appliance inc. all accessories supplied at the time of purchase and ensure adequate, safe transport packaging.

You can view and download these and many other manuals on parkside-diy.com. This QR code will take you directly to parkside-diy.com. Select your country and search for the operating instructions via the search mask. You can open your operating instructions by entering the article number (IAN) 472714_2407.
Repair service
For repairs that are not covered by warranty, contact the service centre. They will gladly create a cost estimate for you.
• We can only work on devices which are sent in properly packed and with postage paid.
Note: Please send your device cleaned and with an indication of the defect to the address named for the service centre.
- The following are not accepted: devices sent in without prepaid postage, sent as bulky goods, sent as an Express shipment, or devices sent as any other form of special freight.
• We will dispose of defective devices you ship to us free of charge.
Service Centre

Service Great Britain
Tel.: 0800 051 8970
Contact form on
parkside-diy.com
IAN 472714_2407

Service Malta
Tel.: 800 65168
Contact form on
parkside-diy.com
IAN 472714_2407
Importer
Please note that the address below is not a service address. Contact the service centre named above first.
Spare parts and accessories
You can get spare parts and accessories from www.grizzlytools.shop. If you have any problems with your order, contact us via our online shop. If you have any other questions, contact: Service Centre, p. 31
Pos. nr. Name Order No.
16 Storage bag 91120175
Translation of the original EU declaration of conformity
Product: Wall Scanner
Model: PPOG 120 A1
Serial number: 000001 - 085000
The object of the declaration described above is in conformity with the relevant Union harmonisation legislation:
2011/65/EU & (EU) 2015/863 2014/53/EU
The object of the declaration described above is in conformity with Directive 2011/65/EU of the European Parliament and of the Council of 8 June 2011 on the restriction of the use of certain hazardous substances in electrical and electronic equipment.
To ensure conformity, the following harmonised standards and national standards and regulations have been applied:
EN 61010-1:2010/A1:2019
EN 62311:2008 • EN 301 489-3 V2.3.2:2023
EN 61326-1:2013 • EN 301 489-1 V2.2.3:2019
EN IEC 61326-1:2021 • EN IEC 63000:2018
EN 50665:2017 • EN 303 454 v1.1.1 (2018-01)
This declaration of conformity is issued under the sole responsibility of the manufacturer:
Authorised representative of documentation
Sommaire
Introduction......33
Garantie (France)......45
.....3× Alkaline-accu 1,5V AA (LR06)
• 3× Alkaline-accu 1,5V AA (LR06)
Procedure (Fig. B)
Pantalla diagonal 2,8"
E. Muyama Pennsylvania in mode
• 3× Batéria (1,5V AA (LR06))
- Úložná taška
Reparationsservice......160
Service-Center 160
Importør......160