PMME 5 A1 - Measuring equipment PARKSIDE - Free user manual and instructions
Find the device manual for free PMME 5 A1 PARKSIDE in PDF.

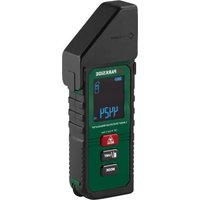
| Product type | Multi-material detector with laser range finder |
| Brand | Parkside |
| Model | PMME 5 A1 |
| Power supply | 2 AAA/LR03 alkaline batteries (1.5 V) |
| Distance measurement range | 0.175 m to 20 m |
| Measurement units | m, ft+in |
| Distance measurement accuracy | ± 0.15 mm/m |
| Metal detection depth | Up to 19 mm |
| Detection depth of electrical lines (AC) | Up to 30 mm |
| Detection depth of wooden structures | Up to 13 mm |
| Marking laser range | Up to 5 m (depending on brightness) |
| Laser class | Class 2 |
| Max. laser power | < 1 mW |
| Operating temperature | 0 °C to 40 °C |
| Storage temperature | -20 °C to 60 °C |
| Permissible humidity | < 80 % (without condensation) |
| Main functions | Distance, area, volume measurement, addition, memory, stud detection (wood/metal), live electrical line detection, horizontal/vertical laser marking |
| Spirit level | Integrated |
| Weight (approx.) | 200 g |
| Dimensions (approx.) | 15 x 7 x 3 cm |
| Warranty | 3 years (excluding normal wear) |
| Maintenance | Clean with a dry cloth; do not immerse |
| Recycling | Device and batteries to be disposed of at recycling center or store |
Frequently Asked Questions - PMME 5 A1 PARKSIDE
User questions about PMME 5 A1 PARKSIDE
0 question about this device. Answer the ones you know or ask your own.
Ask a new question about this device
Download the instructions for your Measuring equipment in PDF format for free! Find your manual PMME 5 A1 - PARKSIDE and take your electronic device back in hand. On this page are published all the documents necessary for the use of your device. PMME 5 A1 by PARKSIDE.
USER MANUAL PMME 5 A1 PARKSIDE
MULTI-FUNCTION DETECTOR WITH LASER RANGE FINDER, MULTIFUNKTIONSDETEKTOR MIT LASERENTFERNUNGSMESSER, DÉTECTEUR MULTI-MATÉRIAUX AVEC TÉLÉMÈTRE LASER PMME 5 A1
GB / IE MULTI-FUNCTION DETECTOR WITH LASER RANGE FINDER
Operating instructions
DE / AT / CH MULTIFUNKTIONSDETEKTOR MIT LASERENTFERNUNGSMESSER
Bedienungsanleitung
FR / BE DÉTECTEUR MULTI-MATÉRIAUX AVEC TÉLÉMÈTRE LASER
Mode d'emploi
NL / BE MULTIFUNCTIONEEL DETECTOR MET LASERAFSTANDSMETER
Gebruiksaanwijzing
CZ MULTIFUNKČNÍ DETEKTOR S LASEROVÝM MĚŘIČEM VZDÁLENOSTI
Návod k obsluze
PL DETEKTOR WIELOFUNKCYJNY Z DALMIERZEM LASEROWYM
Instrukcja obsługi
IAN 477825_2410
DE / FR
BE / NL
CZ / PL / SK
SK
MULTIFUNKČNÝ DETEKTOR S LASEROVÝM MERAČOM VZDIALENOSTI
Návod na obsluhu
ES
DETECTOR MULTIFUNCIONAL CON MEDIDOR LÁSER DE DISTANCIAS
GB/IE Operating instructions Page 1
| DE/AT/CH Bedienungsanleitung Seite 43 | |||
| FR/BE Mode d’emploi Page 85 | |||
| NL/BE Gebruiksaanwijzing Pagina 135 | |||
| CZ Návod k obsluze Strana 177 | |||
| PL Instrukcja obsługi Strona 217 | |||
| SK Návod na obsluhu Strana 259 | |||
| ES | Instrucciones de uso | Página | 301 |
| DK | Betjeningsvejledning | Side | 345 |
| IT | Istruzioni per l’uso | Pagina | 387 |
| HU | Használati utas’tás | Oldal | 429 |
flowchart
graph TD
    A["Mobile Phone 1"] -->|Data Transfer| B["Mobile Phone 2"]
    B -->|Data Transfer| C["Mobile Phone 3"]
    C -->|Data Transfer| D["Device 4"]
    D -->|Data Transfer| E["Device 5"]
    E -->|Data Transfer| F["Device 6"]
    F -->|Data Transfer| G["Device 7"]
    G -->|Data Transfer| H["Device 8"]
    H -->|Data Transfer| I["Device 9"]
    I -->|Data Transfer| J["Device 10"]
    J -->|Data Transfer| K["Device 11"]
    K -->|Data Transfer| L["Device 12"]
    L -->|Data Transfer| M["Device 13"]
    M -->|Data Transfer| N["Device 14"]
    N -->|Data Transfer| O["Device 15"]
    O -->|Data Transfer| P["Device 16"]
    P -->|Data Transfer| Q["Device 17"]
    Q -->|Data Transfer| R["Device 18"]
    R -->|Data Transfer| S["Device 19"]
    S -->|Data Transfer| T["Device 20"]
    T -->|Data Transfer| U["Device 21"]
    U -->|Data Transfer| V["Device 22"]
    V -->|Data Transfer| W["Device 23"]
    W -->|Data Transfer| X["Device 24"]
    X -->|Data Transfer| Y["Device 25"]
Contents
Introduction 3
Information about these instructions for use 3
Intended use 3
Warnings and symbols used ..... 4
Safety 5
Basic safety instructions .... 5
Safety instructions for handling batteries . 9
Check package contents.... 12
Inserting/replacing the batteries ..... 13
Instructions for distance measurement .. 14
Notes on inaccurate measurement results 15
Single distance measurement ..... 16
Continuous distance measurement ..... 18
Adding distances....19
Memory 19
Measuring areas.... 20
Adding areas 21
Measuring volumes 22
Adding volumes 23
Detecting concealed objects ..... 24
Detecting wooden objects....27
Laser marking 28
Troubleshooting 30
Disposal 33
Disposal of the appliance.... 33
Disposal of the packaging ..... 34
Disposal of batteries 35
Appendix 36
Technical data 36
Kompernass Handels GmbH warranty .. 37
Service 41
Importer 41
Introduction
Information about these instructions for use
Congratulations on the purchase of your new device. You have selected a high-quality device. The instructions for use are part of this device. They contain important information about safety, usage and disposal. Before using the device, please familiarise yourself with all operating and safety instructions.
Use this device only as described and for the
documents when passing the device on to third parties.
Intended use
The device is used exclusively for detecting electrical wiring, wooden substructures and metal indoors. The device is also used for distance measurement and alignment using laser marking. Observe the laws and regulations of the country in which you are using the device.
Commercial or industrial use is not permitted. No liability will be assumed in cases of improper use. No liability will be assumed for damage caused by misuse or improper handling, the use of force or unauthorised
The risk is borne solely by the user.
Warnings and symbols used
The following warnings and symbols are used in these instructions for use, on the packaging and on the device:
 | WARNING! A warning with this symbol and the signal word "WARNING" indicates a potentially hazardous situation which could result in death or serious injury if not avoided. |
 | ATTENTION! A warning with this symbol and the signal word "ATTENTION" indicates a potential situation which could result in property damage if not avoided. |
 | Note: A note provides additional information aimed at making it easier to use the device. |
 | DC current/voltage |
 | AC current/voltage |
 | Protect yourself from laser radiation! |
 | Use the device indoors only. |

This product is made partly from recycled material.
Safety
This section contains important safety instructions for using the device. This device complies with statutory safety regulations. Improper use may result in personal injury and property damage.
Basic safety instructions
⚠ WARNING! To ensure safe operation of the device, follow the safety guidelines set out below:
- Do not allow children to play with the packaging material! Keep all packaging materials away from children.
This device may be used by children aged 8 years old and above and by persons with limited physical, sensory or mental capabilities or lack of experience and knowledge, provided that they are under supervision or have been told how to use the device safely and are aware of the potential risks. Do not allow children to use the device as a toy. Cleaning and user maintenance tasks may not be carried out by children unless they are supervised.
- Check the device before every use to make sure it is in perfect condition. Do not use the device if it is damaged in any way.
test it on a familiar surface to ensure that it works properly.
■ Do not leave the device unattended when
directly after use. Other people could be blinded by the laser beam.
■ Do not use the device in locations where
■ Protect the device from wetness or direct sunlight.
■ Do not expose the device to any extremes
For example, do not leave it lying in a car for extended periods. After exposure to
device to acclimatise before using it again. The precision of the device can be ad-
■ Never immerse the device in water or other liquids, and never expose the device to spraying or dripping water. Use the device only in dry indoor areas.
■ Avoid hefty knocks or dropping the device.
■ Do not expose the device to a magnetic environment.
remove the batteries from the device if you notice unusual noises, a burning smell or smoke. Have the device checked by a
■ Do not use the device in hospitals or other
the function of life-support systems.
■ Do not use the device to detect AC voltage in exposed or uninsulated electrical wiring.
■ Do not use the device as a replacement for a voltmeter.
■ Handle the holding needles with care. These are sharp and can cause injuries.
tions or alterations to the device.
■ Never open the device housingNone of the components in the device can be serviced or replaced by the user. This will also invalidate the warranty.
■ ⚠️ WARNING! Protect yourself from laser radiation!
- Laser radiation! Do not look into the

- Never look directly into the laser beam aperture.
- Looking at a laser beam through optical instruments (e.g. magnifying glasses or similar) can cause eye injuries.
- If operating and adjustment equipment
here are used, this may result in hazardous radiation exposure.
surfaces, people or animals. Even brief visual contact with a laser beam can result in eye injuries.
Safety instructions for handling batteries
WARNING! Mishandling the batteries can
hazards!
Keep batteries out of the reach of children.
■ Make sure that no one can swallow the batteries.
If a battery is swallowed, seek medical assistance immediately.
■ Always use the stated battery type.
■Never try to recharge non-rechargeable batteries.
■ Remove rechargeable batteries from the device before recharging them.
or water.
■ Never expose batteries to high temperatures or direct sunlight.
■ Never open or deform batteries.
Do not short-circuit the terminals.
■ Remove depleted batteries from the device and dispose of them safely.

teries together or mix new batteries with used batteries.
Always ensure that the batteries are installed in the device with the correctly aligned polarity.
If you do not intend to use the device for an extended period, remove the batteries.
- Check the condition of the batteries at regular intervals. Leaking batteries can cause injuries as well as damage to the device.
■ Always use protective gloves when handling leaking batteries! Clean the battery and device contacts and the battery compartment with a dry cloth. Do not let the chemicals get into contact with your skin and mucous membranes, especially your eyes. In case of contact with chemicals,
and immediately seek medical attention.
Operating elements / parts
(For illustrations see fold-out pages)
Fig. A/B/C:
① Suspension point
② Measuring edge
③ Display
4 ↘ ACWORE
5 METAL
⑥ Holding needle buttons
⑦ Memory button
⑧ +/= button
⑨ Spirit level
⑩ Function switch
⑪ MODE button
12 MEAS
13
14 button
15 Battery compartment cover
16 PUSH button
⑰ Laser beam aperture
18 Receiver lens
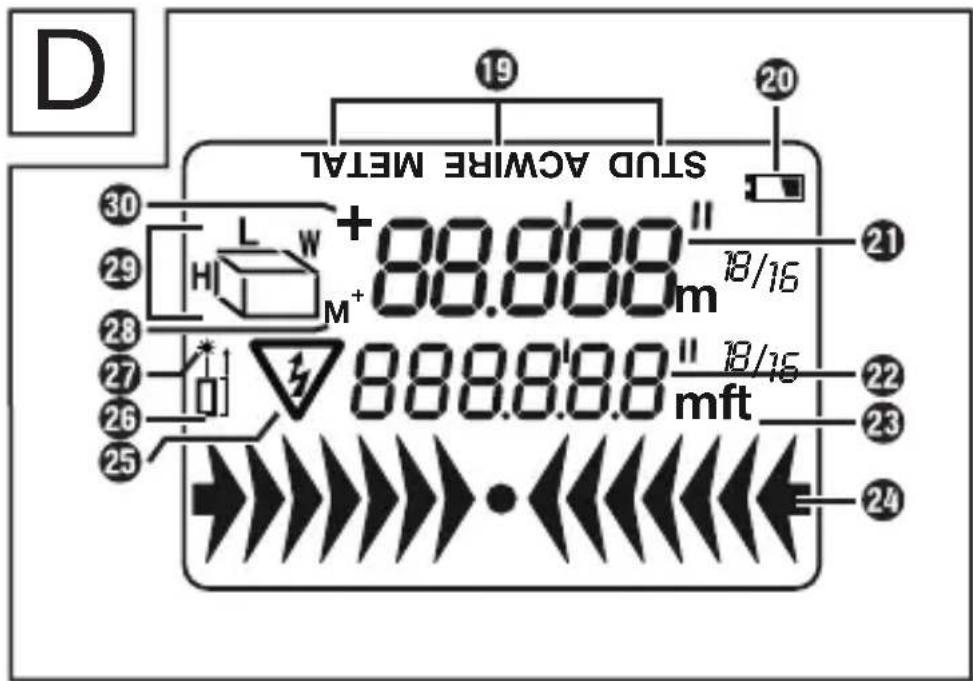
Fig. D:
19 Mode display
20 Low battery level
②1 Top line
22 Bottom line
23 Units of measurement
24 Arrows for discerning the intensity
25 High voltage warning symbol
26 Distance measuring point symbol
27 Laser active symbol
28 M ^+ Memory symbol
29 Measurement mode display symbol
30 + Addition symbol
Getting started
Check package contents
- 1× Multi-Function Detector with Laser Range Finder
AAA/Micro/LR03
• These instructions for use
◆ Remove all components from the packaging. Remove all packaging materials and the
3.
Note: Check the package for completeness and signs of visible damage. If the delivery is incomplete or damage has occurred as a result of defective packaging or during transport, contact the Customer Service hotline (see section Service).
Inserting/replacing the batteries
The device is delivered and operated with two --- alkaline batteries, type AAA/Micro/LR03. If the display ③ indicates low battery level □ ②0, you must replace the batteries.
- Loosen the screw on the battery compartment cover 15 and remove the battery compartment cover 15.
Remove any used batteries and insert two new batteries into the battery compartment. Make sure that the polarity is correct, as indicated in the battery compartment.
◆ Replace the battery compartment cover 15 and tighten the screw.
Operation and use
the device.


(i) Note: (1) If no button is pressed for
no button is pressed for 30 seconds, the
ed in LASER mode.
Instructions for distance measurement Observe the following instructions to avoid measurement errors: The measurement is performed by a laser emitted from the laser beam aperture ⑰.
face and received by the receiver lens 18. The distance is calculated by the device based on the runtime of the laser beam. The following conditions must be met to ensure accurate measurement:
■ The device must be oriented at a right
■ The measuring range is between 0.175 m and 20 m.
■ There must be no objects in the measuring range that could obstruct the laser beam.
The display ③ shows an error message "Err" if a clear measurement is not possible. The measurement must then be repeated (see section Troubleshooting).
The display ③ shows the memory symbol M^+ ②8 when a measured value has been saved.
Notes on inaccurate measurement results
■ Under certain conditions, you may obtain inaccurate measurement results. The following conditions can cause inaccurate measurement results:
- very thick walls
- metal-clad walls
- low-lying electrical wiring or pipes
- shielded electrical wiring
- thick walls with thin pipes or electrical wiring
- very humid conditions
- low batteries
■ You cannot use this device to detect electrical wiring in circuits that are
- isolated from the mains voltage supply.
- carrying direct current.
- used for computer or telecommunication systems.
■ You can only detect metal pipes with this device. Pipes made of plastic or other non-metallic materials cannot be detected with this device.
Single distance measurement
- Move the function switch ⑩ to position DISTANCE. The display ③ switches on. If the display ③ is not switched on, press ⏻ ⑬ to switch on the display ③. You can choose between metres and feet/inches as units. To switch between metres and feet/inches, press and hold the memory button ⑦ for
then changes.
(i) Note: The unit of measurement can be changed after each measurement.
- Measurements start at the bottom of the device, also called the measuring edge ②. This means that the bottom of the device is the distance measuring point ⑳. The distance measuring point symbol □j ⑳ is shown as information in the display ③.
- If the measurement is outside the measuring range, an error message "Err" (see section Troubleshooting) or an illogical numerical value appears in the display ③. The distance to be measured must be between 0.175 m and 20 m long.
- Make sure that no error message is shown on the display ③ before each measurement. The error message can al-
MODE
continues to appear, press the MODE button ⑪ repeatedly until the error message disappears from the display ③.
- Point the device horizontally at the wall to which you wish to measure the distance. The receiver lens 18 must point at right angles to the wall. Use the spirit level 9 for this. Align the device so that the bubble of the spirit level 9 is centred between the two markings.
2. Press the MEAS

beam is switched on. The display ③ shows ☐☐ ②7.
i
onds, the device, including the laser
13
to switch the display ③ on again. Then press the MEAS button ⑫ to switch on the laser beam.
3. Press the MEAS button ⑫ again.
The measured distance appears on the display ③.
(i) Note: (1) You can carry out a new distance measurement by repeating steps 2 to 3. (2) If necessary, press the MODE button (i) three times to enter self-timer mode. The measurement is carried out automatically after 10 seconds.
Continuous distance measurement
◆ Follow steps 1 and 2 in the previous section to switch on the laser beam.
Press and hold the MEAS button ⚠️ for 2 seconds and move the device slowly over the surface to be measured. The device continuously measures the distances. The measured values are shown in the display ③.
Note: Move the device slowly during continuous distance measurement. If you move the device too quickly, this could lead to incorrect (or unreliable) readings. Wait a little more than one second after each movement. You will then receive a correct value in the display ③. You can then move the device slowly for the next measurement.
- Press the MEAS button ⚠️ ⑫ to end the continuous distance measurement. The measured distance appears on the display ③.
Adding distances
the section Single distance measurement.
-
Press the+/=button ⑧ to switch to addition mode. The addition symbol + ⑩ appears in the display ③, and the measured distance is shown in the bottom line ⑫ of the display ③.
-
Measure the next distance. The newly measured distance is shown in the top
of the display ③ shows the result of the measurements.
- Repeat step 3 if necessary to add further measured values.
⑬ to exit addi-
tion mode.
Memory
◆ Press the memory button ⏻ ⑦ to enter memory mode. The memory symbol M⁺ ⑳
◆ Press the memory button 🔒 ⑦ to call up the measured values one after the other.
- Press and hold the memory button 📄 ⑦ for 2 seconds to delete the memory completely.

ory mode.
Measuring areas
-
Move the function switch ⑩ to position DISTANCE. The display ③ switches on. If the display ③ is not switched on, press ⏻ ⑬ to switch on the display ③.
-
Press the MODE button ⑪ once. The measurement mode display symbol for areas appears in the display ③. The
-
Press the MEAS button ⑫ to measure the length. The measured length appears in the top line ⑳ of the display ③. The
play ③.
- Press the MEAS

the width. The measured width appears in the top line ② of the display ③. The result of the area calculation appears in the bottom line ② of the display ③.
(i) Note: (1) If no button is pressed for
MEAS
button ⚠️ ⑫ to activate the display ③. (2) You can switch between m² and ft². To do this, press and hold the memory button ⑦ for 2 seconds. The unit of measurement ②3 then changes.
Adding areas
-
Measure an area as described in the section Measuring areas.
-
Press the+/=button ⑧ to switch to addition mode. The addition symbol + ⑩ appears in the display ③.
-
Measure the next area. The bottom line 22 of the display 3 shows the result of the measurement.
-
Press the+/= button ⑧. The result of the
followed immediately by the sum of both area calculations. The addition symbol +
-
Press the+/=button ⑧ to add another area if necessary. The addition symbol +
-
If necessary, repeat steps 3 to 5 to add further measured values.
-
Move the function switch ⑩ to position DISTANCE. The display ③ switches on. If the display ③ is not switched on, press ⏻ ⑬ to switch on the display ③.
-
Press theMODE button ⑪ twice. The measurement mode display symbol ⑲ for volumes appears in the display ③. The
-
Press the MEAS button ⑫ to measure the length. The measured length appears in the top line ⑳ of the display ③. The
play ③.
-
Press the MEAS the width. The measured width appears in the top line ② of the display ③. The letter
-
Press the MEAS button ⑫ to measure the height. The measured height appears in the top line ⑳ of the display ③. The result of the volume calculation appears in the bottom line ⑳ of the display.
(i) Note: (1) If no button is pressed for
MEAS
button ⚠️ ⑫ to activate the display ③. (2) You can switch between m³ and ft³. To do this, press and hold the memory button ⑦ for 2 seconds. The unit of measurement ②3 then changes.
Adding volumes
-
Measure a volume as described in the section Measuring volumes.
-
Press the+/=button ⑧ to switch to addition mode. The addition symbol + ⑩ appears in the display ③.
-
Measure the next volume. The bottom
of the measurement.
- Press the+/=button ⑧. The result of the
followed immediately by the sum of both volume calculations. The addition symbol + 30 disappears from the display ③.
-
Press the+/=button ⑧ to add another volume if necessary. The addition symbol + ⑩ appears again in the display ③.
-
If necessary, repeat steps 3 to 5 to add further measured values.
Detecting concealed objects
WARNING! Danger of electric shock! If the device detects electrical wiring with alternating current, the high voltage warning symbol 🔒 appears on the display ③. Do not drill in this location under any circumstances!
i
time, test it on an electrical wire or a metal pipe whose position you know exactly. If in
Tips for detection
■ Press and hold the PUSH button 16 during the entire calibration and search process.
■ Avoid calibrating too close to the object or directly on it. This means that the calibration full intensity
appears in the display ③.
A long beep also sounds. Move the device a few centimetres away from the location of the last calibration and try again.
■ Repeat the process a few times to ensure that the measurement is correct.
- Avoid touching the display ③ during the racy of the device.
■ Depending on the nature of the wall you are examining, incorrect measurements may occur. Therefore, check the position of a known wooden or metal support or a known electrical wire before each measurement. If these are not recognised by the device, the surface is not suitable for searching with this device.
■ Please note that electrical wiring can also be detected as metal or as supports. Always also use the voltage search to rule out misinterpretations.
Please note that metal supports are also detected in the support search function "STUD". If you want to ensure that the support found is not a metal support (or a water pipe, for example), also use the metal search "METAL".
■ Depending on the wall thickness and ma-
before it is above the material. In this case, mark the start and end of the signalled range at the notch of the measuring head. The centre of the object you are looking for is then located in the middle between the two marks.
■ Please note that the easier metal objects are to magnetise, the better they will be detected. Iron is detected at a much greater distance than copper, for example.
Please note that electrical wiring can only be detected as such if it is live. For example, light switches must always be switched on so that the conductor coming from them is live. All fuses or circuit breakers must also be screwed in or switched on. Please note that only voltages of
The detection of concealed objects is the same in all three modes STUD, ACWIRE and METAL.
-
Move the function switch ⑩ to position DETECTOR. The display ③ switches on. If the display ③ is not switched on, press ⏻ ⑬ to switch on the display ③.
-
Press the STUD button ⑭ the ACWIRE button ④ or the METAL ⑤. The corresponding mode display ⑲ in the display ③ automatically indicates the correct material.
the desired position on the wall.
-
Press and hold the PUSH until you hear a beep. The device has now adapted to the wall thickness. Continue to hold down the PUSH button 16.
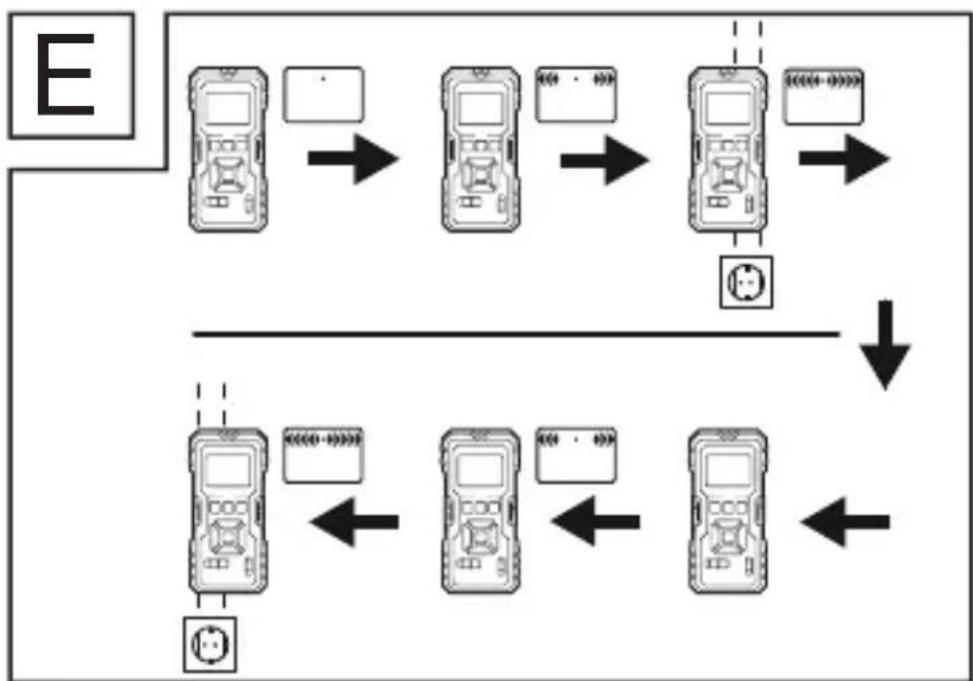
-
Move the device slowly along the wall. As you get closer to the object you are looking for, the arrows for discerning the intensity 24 increase in the display 3. If the arrow for discerning the intensity 24 is exactly above the object being searched for, the bars touch and a continuous signal tone sounds (see Fig. E).
-
Now repeat the procedure. Approach the object from the other side this time. As soon as the beep sounds, mark this position (see Fig. E). The hidden object runs between these two positions.
-
When searching for electrical wiring, the high voltage warning symbol ⚠️ 25 appears on the display ③ in addition to the arrow for discerning the intensity ⑳.
Detecting wooden objects
-
To detect wooden objects, proceed as described in the section Detecting concealed objects.
-
When you have found an object with the device, mark it. To make sure that the object found is made of wood, press the METAL button 25 to activate metal search mode.
-
Look for metal in the same place. If you
device in "METAL" mode, the object is
point with the device in " METAL" mode, it is made of metal. In this case, search at another location in " STUD" mode and repeat steps 1 to 3.
Laser marking

The device contains a class 2 laser. Never point the laser beam at people or animals. Never look directly into
the laser beam.
The laser can cause serious eye damage.
Use the laser line to align cabinets, pictures, etc. horizontally or vertically. Depending on the ambient lighting, a maximum of one laser line can be projected up to 5 metres.
- Move the function switch 10 to position LASER. A laser line is projected. If the
⑬ to project the laser line.
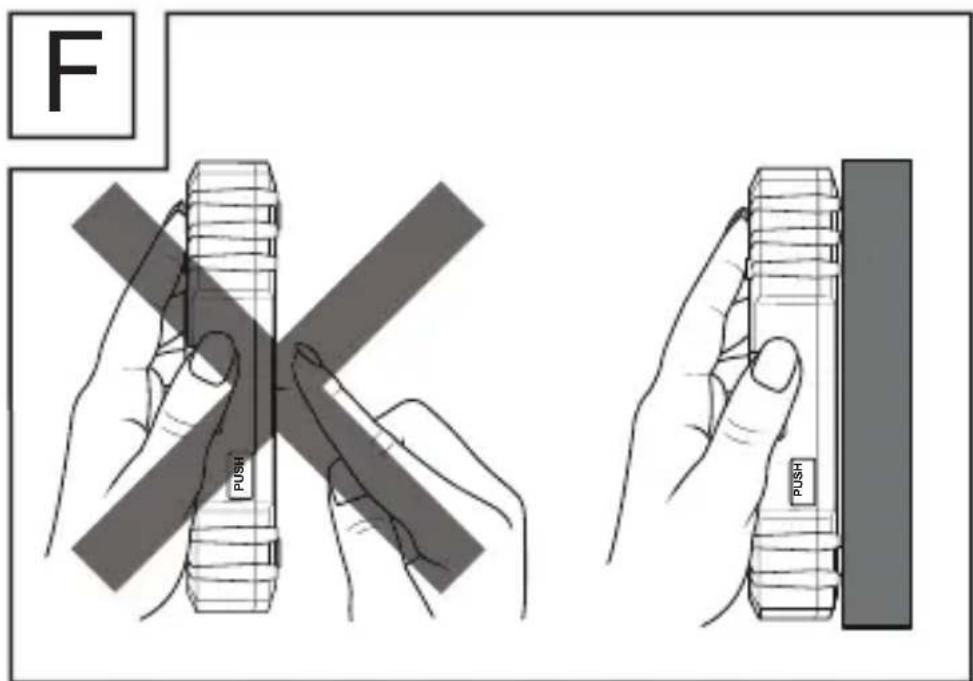
Horizontal laser line

WARNING! Handle the holding needles with care. These are sharp and can cause injuries (see Fig. F). Do not use the holding needle buttons ⑥ on stone or metal walls, but only on walls with a soft surface such as wood.
Hold the device horizontally against the wall, e.g. against a wooden wall. Align the device so that the bubble of the spirit level ⑨ is centred between the two markings.

Push the two holding needle buttons 6
bore slightly into the wall so that the device does not fall down (see Fig. F).
Vertical laser line
◆ Attach a thread to the eyelet at the suspension point ①.
◆ Hang the device on the wall (e.g. from a nail) where you want to project the vertical line. The device hangs vertically downwards like a plumb bob. The laser projects a vertical line onto the wall.
Troubleshooting
This device contains sensitive electronic components. It is possible that the device may be disturbed by radio transmission devices in the immediate vicinity. If faulty displays occur, remove such devices from the vicinity of the device.
Electromagnetic interference/high-frequency interference emissions can lead to malfunctions. In the event of such malfunctions, temporarily remove the batteries and reinsert them (see section Inserting/ replacing batteries.
Error code table:
| Error code | Cause Remedy | |
| 203 | Operating temperature outside the range | Use the device within the operating temperature. |
| 220 Batteries low | Replace the batteries. | |
| 254 | Calculation error | Repeat the procedure. |
| 255 | Unfavourable condition of the target surface or measurement timeout | Change the condition of the target surface and take another measurement. |
| 256 | Excessive re-target surface | Change the condition of the target surface and take another measurement. |
| 259 | Outside the measuring range | Stay within the maximum measuring range of the device. |
| 301 Hardware fault | Switch the device code still appears despite repeated switching on and Service hotline. | |
Cleaning
! ATTENTION! Damage to the device!
The device is not waterproof. To avoid irreparable damage to the device, do not immerse the device in water and make sure that no moisture can get into it during cleaning. Do not use caustic, abrasive or solvent-based cleaning agents. They can damage the surfaces of the device.
- Clean the surfaces of the device with a soft, dry cloth.
Clean the laser beam aperture 17 and receiver lens 18 with a gentle jet of air. In the event of more serious contamination, remove the dirt with a damp cotton swab. Do not exert any strong pressure!
- Clean the device regularly, ideally after every use.
Storage
If you decide not to use the device for a long period, remove the batteries and store them in a clean, dry place away from direct sunlight.
Disposal
Applies only to France:
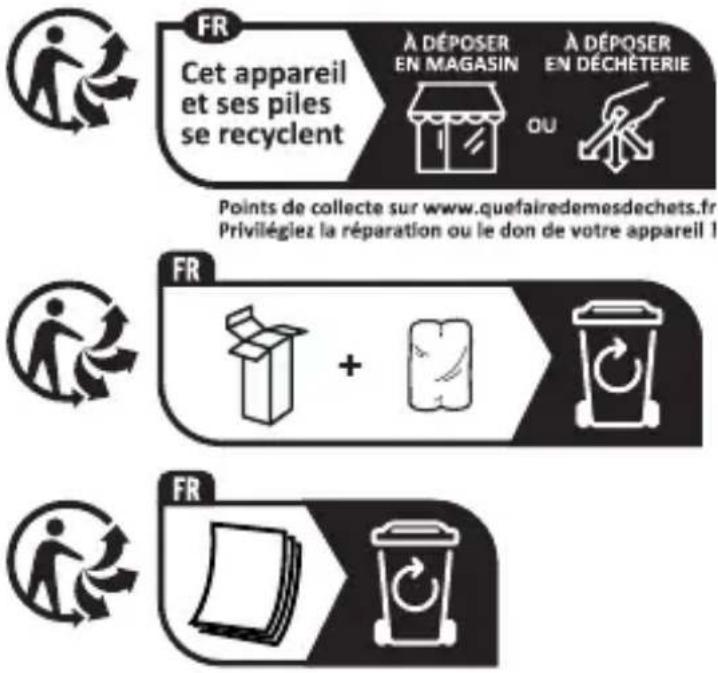
The product, its packaging and the operating instructions are recyclable. They are subject to an extended manufacturer responsibility and will be collected separately.
Disposal of the appliance
natural_image
Symbol of a trash bin crossed with a diagonal line, representing no waste or discharge (no text or labels)The adjacent symbol of a crossed-out dustbin means that this appliance is subject to Directive 2012/19/EU. This directive states that this appliance may not be
disposed of in the normal household waste at the end of its useful life, but must be taken to specially set-up collection locations, recycling depots or disposal companies.
The disposal is free of charge for the user. Protect the environment and dispose of this appliance properly.
If your old appliance has stored any personal data, you are responsible for deleting it yourself before returning it.
If it is possible to do so without destroying the old appliance, remove the old batteries or rechargeable batteries before returning the appliance for disposal and take them to a separate collection point. In the case of permanently installed rechargeable batteries, you must indicate during disposal that the appliance contains a battery.

Your local community or municipal authorities can provide information on how to dispose of the worn-out product.
Disposal of the packaging

natural_image
Simple line drawing of a five chasing recycling symbol (three chasing arrows in a triangle)The packaging materials have been selected for their environmental friendliness and ease of disposal and are therefore recyclable. Dispose of packaging materials that are no longer needed in accordance with applicable local regulations.
Dispose of the packaging in an environmentally friendly manner. Note the labelling on the packaging and separate the packaging material components
for disposal, if necessary. The packaging material is labelled with abbreviations (a) and numbers (b) with the following meanings:
Applies only to Spain:
The packaging contains paper and/or cardboard components.

The packaging contains plastic and/or metal components.
Disposal of batteries
natural_image
Symbol of a trash bin crossed with no text or labelsBatteries/rechargeable batteries must be treated as hazardous waste and must therefore be disposed of in an environmentally sound manner by appropriate
bodies (dealers, specialist dealers, public municipal bodies, commercial disposal companies). Batteries/rechargeable batteries may contain toxic heavy metals.
For this reason, do not dispose of batteries/rechargeable batteries in domestic waste.
Take them to a specialist collection point.
Only return batteries that are fully discharged.
Appendix
Technical data
| Operating voltage | --- alkaline batteries of type AAA/Micro/LR03 |
| Maximum measuring range | (Measurement from bottom) |
| Measurement units m/ft + in | |
| Detection of metal | up to approx. 24 mm depth |
| Detection of electrical wiring | up to approx. 35 mm depth |
| Detection of wood structures | up to approx. 38 mm depth |
| Range of the marking laser | up to max. 5 m (depending on ambient light) |
| Laser class Class 2 | |
| Max. output power ( P_max ) | |
| Operating temperature | 0°C to 40°C |
| Humidity (no condensation) | |
ties, please use a target plate.
tolerance of ± 0.15 mm/m must be taken into account. Under unfavourable conditions such as strong sunlight, poorly
deviation is to be expected.
Kompernass Handels GmbH warranty Dear Customer,
This appliance has a 3-year warranty valid from the date of purchase. If included with the product on delivery, the battery packs of the
a 3-year warranty from the date of purchase. If this product has any faults, you, the buyer, have certain statutory rights. Your statutory rights are not restricted in any way by the warranty described below.
Warranty conditions
The warranty period starts on the date of purchase. Please keep your receipt in a safe place. This will be required as proof of purchase.
If any material or manufacturing fault occurs within three years of the date of purchase of the product, we will either repair or replace the product for you or refund the purchase price (at our discretion).
This warranty service requires that you present the defective appliance and the proof of purchase (receipt) within the three-year warranty period, along with a brief written description of the fault and of when it occurred.
If the defect is covered by the warranty, your product will either be repaired or replaced by us. The repair or replacement of a product does not signify the beginning of a new warranty period.
Warranty period and statutory claims
The warranty period is not prolonged by
applies to replaced and repaired components. Any damage and defects present at the time of purchase must be reported immediately after unpacking. Repairs carried out after expiry of the warranty period shall be subject to a fee.
Scope of the warranty
This appliance has been manufactured in accordance with strict quality guidelines and inspected meticulously prior to delivery.
The warranty covers material faults or production faults. The warranty does not cover product parts that are subject to normal wear and tear and can therefore be considered wearing parts, such as saw blades, replacement blades, abrasive papers, etc. or for damage to fragile parts, such as switches or parts made of glass.
The warranty does not apply if the product has been damaged, improperly used or improperly maintained. The directions in the operating instructions for the product regarding proper use of the product are to be strictly followed. Uses and actions that are discouraged in the operating instructions or which are warned against must be avoided.
This product is intended solely for private use and not for commercial purposes. The warranty shall be deemed void in cases of misuse or improper handling, use of force and
carried out by one of our authorised Service centres.
The warranty does not apply to
■ Normal reduction of the battery capacity
■ Commercial use of the product
■ Damage to or alteration of the product by the customer
■ Non-compliance with safety and maintenance instructions, operating errors
■ Damage caused by natural hazards
Warranty claim procedure
To ensure quick processing of your case, please observe the following instructions:
■ Please have the till receipt and the item
proof of purchase.
plate on the product, an engraving on the product, on the front page of the operating instructions (below left) or on the sticker on the rear or bottom of the product.
If functional faults or other defects occur,
ment listed below by telephone or use
parkside-diy.com in the Service category.
■ You can return a defective product to us free of charge to the service address that will be provided to you. Ensure that you enclose the proof of purchase (till receipt) and information about what the defect is and when it occurred.
You can view and download these instructions along with many other manuals at parkside-diy.com. This QR code will take you directly to parkside-diy.com. Select your country and use the search box to search for the operating instructions. Enter
the operating instructions for your article.
Service
GB Service Great Britain
Tel.: 0800 051 897 0
Contact form on parkside-diy.com
IE Service Ireland
Tel.: 1800 851251
Contact form on parkside-diy.com
IAN 477825_2410
Importer
Please note that the following address is not the service address. Please use the service address provided in the operating instructions.
KOMPERNASS HANDELS GMBH
BURGSTRASSE 21
44867 BOCHUM
GERMANY
www.kompernass.com
Inhaltsverzeichnis
Einführung.... 45
natural_image
Simple line drawing of a trash bin with crossed lines indicating no waste or restriction (no text or symbols)natural_image
Simple line drawing of a recycling symbol with three chasing arrows forming a triangle (no text or labels)natural_image
Symbol of a trash bin crossed with a diagonal line, representing no waste or discharge (no text or labels)KOMPERNASS HANDELS GMBH
BURGSTRASSE 21
44867 BOCHUM
DEUTSCHLAND
www.kompernass.com
Table des matières
natural_image
Simple line drawing of a trash bin with no text or symbolsnatural_image
Simple line drawing of a five chasing recycling symbol (no text or labels)natural_image
Symbol of a trash bin crossed with a diagonal line, representing no waste or discharge (no text or labels)KOMPERNASS HANDELS GMBH
BURGSTRASSE 21
44867 BOCHUM
ALLEMAGNE
www.kompernass.com
Inhoud
⚠ WAARSCHUWING! Beveilig uzelf te- gen laserstraling!
natural_image
Simple line drawing of a trash bin with two crossed lines indicating no waste or prohibition (no text or symbols)natural_image
Simple line drawing of a recycling symbol (three chasing arrows) with no text or labelsnatural_image
Simple line drawing of a trash bin with crossed lines indicating no waste or restriction (no text or symbols)KOMPERNASS HANDELS GMBH
BURGSTRASSE 21
44867 BOCHUM
DUITSLAND
www.kompernass.com
Obsah
Likvidace obalu 209
Technické údaje 211
 | |
 | |
 | |
 | |
 | |
 | |
 | |
| Global Recycled Standard |

pokyny:

FR

natural_image
Icon showing a document and a recycling bin with a circular arrow (no text or symbols)
natural_image
Simple line drawing of a trash bin with crossed lines indicating no waste or plastic (no text or symbols)
Likvidace obalu

natural_image
Simple line drawing of a five chasing recycling symbol (three chasing arrows in sequence)
natural_image
Simple line drawing of a trash bin with crossed lines indicating no waste or restriction (no text or symbols)zcela vybité.
Dodatek
Technické údaje
KOMPERNASS HANDELS GMBH
BURGSTRASSE 21
44867 BOCHUM
www.kompernass.com
lasera.
natural_image
Simple line drawing of a trash bin with crossed diagonals (no text or symbols)natural_image
Simple line drawing of a recycling symbol with three chasing arrows (no text or labels)mi przepisami.

natural_image
Symbol of a trash bin crossed with no text or labelsDane techniczne
KOMPERNASS HANDELS GMBH
BURGSTRASSE 21
44867 BOCHUM
NIEMCY
www.kompernass.com
Obsah
Upozornenia pre meranie vzdialenosti . . 272
Meranie plôch. 278
Meranie objemu 280
Technické údaje 294
ného otvoru lasera.
zraku.


batérie.

ani do vody.

deformujte.

ripojovacie svorky neskratujte.
ne ich zlikvidujte.
STUD, ACWIRE a Mioval
naké.
DETECTOR. Displej ③ sa zapne. Ak nie
⑬ a displej ③ zapnite.

PUSH
PUSH 16.
- Postup teraz zopakujte. Tentoraz sa pri-
natural_image
Symbol of a trash bin crossed with no text or labelsnatural_image
Symbol of a trash bin crossed out by two diagonal lines (no text or numbers present)KOMPERNASS HANDELS GMBH
BURGSTRASSE 21
44867 BOCHUM
NEMECKO
www.kompernass.com
Índice
Introducción 303
oculares.
natural_image
Simple line drawing of a trash bin with two crossed lines indicating no waste or prohibition (no text or symbols)natural_image
Simple line drawing of a recycling symbol (three chasing arrows) with no text or labelsnatural_image
Symbol of a trash bin crossed out by two diagonal lines (no text or numbers present)KOMPERNASS HANDELS GMBH
BURGSTRASSE 21
44867 BOCHUM
ALEMANIA
www.kompernass.com
Indholdsfortegnelse
natural_image
Symbol of a trash bin crossed with a diagonal line, representing no waste or discharge (no text or labels)natural_image
Simple line drawing of a five chasing recycling symbol (three chasing arrows in a triangle)natural_image
Simple line drawing of a trash bin with crossed lines indicating no waste or restriction (no text or symbols)Batterier/genopladelige batterier
miljøvenligt på de relevante steder (forhandlere, specialforretninger,
KOMPERNASS HANDELS GMBH
BURGSTRASSE 21
44867 BOCHUM
TYSKLAND
www.kompernass.com
Indice
natural_image
Simple line drawing of a trash bin with two crossed lines indicating no waste or prohibition (no text or symbols)natural_image
Simple line drawing of a recycling symbol (three chasing arrows), no text or labels present.natural_image
Simple line drawing of a trash bin with crossed lines indicating no waste or restriction (no text or symbols)KOMPERNASS HANDELS GMBH
BURGSTRASSE 21
44867 BOCHUM
GERMANIA
www.kompernass.com
Tartalomjegyzék
Biztonság 433
Üzembe helyezés 440
natural_image
Simple line drawing of a trash bin with crossed lines indicating no waste or restriction (no text or symbols)natural_image
Simple line drawing of a five chasing recycling symbol (three chasing arrows forming a triangle)
anyagok.
natural_image
Symbol of a trash bin crossed with a diagonal line, representing waste or discharge (no text or labels)KOMPERNASS HANDELS GMBH
BURGSTRASSE 21
44867 BOCHUM
www.kompernass.com


KOMPERNASS HANDELS GMBH
BURGSTRASSE 21
44867 BOCHUM
GERMANY
www.kompernass.com