PKI 2.8 C4 - Measuring equipment PARKSIDE - Free user manual and instructions
Find the device manual for free PKI 2.8 C4 PARKSIDE in PDF.

| Product type | Inspection camera |
| Brand | Parkside |
| Model | PKI 2.8 C4 |
| Dimensions (L × W × H) | approx. 253 × 86.5 × 45 mm |
| Weight (main unit without batteries) | approx. 190 g |
| Weight (gooseneck with camera head) | approx. 94 g |
| Power supply | 4 AA/LR6 batteries (1.5 V) – 6 V |
| Battery life | approx. 350 minutes (with new batteries) |
| Protection rating (camera head and gooseneck) | IP67 |
| Camera diameter | 5.5 mm |
| Flexible gooseneck length | approx. 120 cm |
| Minimum bending radius | 45 mm |
| Lighting | 6 white LEDs, adjustable to 12 levels |
| Display (diagonal) | 2.8 inches (7.1 cm) |
| Display resolution | 640 × 480 pixels |
| Image/video resolution | 1280 × 720 pixels |
| File formats | Image: JPEG, Video: AVI |
| Internal memory | 1 GB (FAT32) |
| Connections | 1 USB-C input, 1 microSD card slot |
| Operating temperature | +5 °C to +35 °C |
| Storage temperature | 0 °C to +45 °C |
| Package contents | Main unit, gooseneck with camera, 4 adapters (simple hook, double hook, mirror, magnet), carrying case, USB cable, 4 AA batteries, instruction manual |
| Warranty | 3 years |
Frequently Asked Questions - PKI 2.8 C4 PARKSIDE
User questions about PKI 2.8 C4 PARKSIDE
0 question about this device. Answer the ones you know or ask your own.
Ask a new question about this device
Download the instructions for your Measuring equipment in PDF format for free! Find your manual PKI 2.8 C4 - PARKSIDE and take your electronic device back in hand. On this page are published all the documents necessary for the use of your device. PKI 2.8 C4 by PARKSIDE.
USER MANUAL PKI 2.8 C4 PARKSIDE
PDF ONLINE
parkside-diy.com
natural_image
Illustration of a medical endoscope with a coiled tube, no visible text or symbolsINSPEKTIONSKAMERA/INSPECTION CAMERA/CAMÉRA D'INSPECTION PKI 2.8 C4
DE AT CH
INSPEKTIONSKAMERA
Assembly, operating and safety instructions
FR BE
CAMÉRA D'INSPECTION
GB/IE Assembly, operating and safety instructions Page 31
natural_image
Line drawing of a cable with two connectors and a labeled connection point (no text or symbols beyond the number 5)


E
Warnings and symbols used.... Page 32
Introduction ...... Page 34
Intended use.... Page 34
Scope of delivery ...... Page 34
Description of parts ...... Page 35
Technical data ...... Page 35
Trademark notices.... Page 36
Safety instructions ...... Page 36
Safety instructions for batteries .... Page 38
Setup Page 40
Operation...... Page 41
Troubleshooting Page 49
Cleaning.... Page 50
Storage when not in use.... Page 50
Disposal Page 50
Warranty...... Page 51
Warranty claim procedure.... Page 52
Service Page 53
| Warnings and symbols usedThe following symbols and warnings are used in the operating instructions, the short manual, on the packaging and on the product: | |
 | DANGER! This symbol with the signal word “DANGER” indicates a hazard with a high level of risk which, if not avoided, will result in serious injury or death. |
 | WARNING! This symbol with the signal word “WARNING” indicates a hazard with a medium level of risk which, if not avoided, could result in serious injury or death. |
 | CAUTION! This symbol with the signal word “CAUTION” indicates a hazard with a low level of risk which, if not avoided, could result in minor or moderate injury. |
 | ATTENTION! This symbol with the signal word “ATTENTION” indicates a possible property damage. |
 | This symbol indicates to wear suitable protective gloves. Follow the instructions to avoid hands striking or being struck by objects or being in contact with thermal or chemical materials. |
 | WARNING! EXPLOSION HAZARD!A warning with this symbol and word “WARNING! EXPLOSION HAZARD” indicates the potential threat of explosion. Failure to observe this warning may result in serious or fatal injuries and potential property damage. Follow the instructions in this warning to prevent serious injuries, a danger to life or property damage! |
 | NOTE: This symbol with the signal word “Note” provides additional useful information. |
| --- | Direct current/voltage |
 | Warning against optical radiation |
 | This symbol means that the operating instructions must be observed before using the product. |
  | Keep out of reach of children |
 | Do not dispose of in fire |
 | Do not insert incorrectly |
 | Do not deform/damage |
 | Do not open/dismantle |
 | Do not mix different types or brands |
 | Do not mix new and used |
 | Do not charge |
 | Keep away from water and excessive moisture |
 | Do not short circuit |
 | Insert correctly |
 | CE mark indicates conformity with relevant EU directives applicable for this product. |
| [SIGNATURE] | Safety informationInstructions for use |
INSPECTION CAMERA
● Introduction
We congratulate you on the purchase of your new product. You have chosen a high quality product. The instructions for use are part of the product. They contain important information concerning safety, use and disposal. Before using the product, please familiarise yourself with all of the safety information and instructions for use. Only use the product as described and for the specified applications. If you pass the product on to anyone else, please ensure that you also pass on all the documentation with it.
Intended use
This product is under IT related category and intended for optical examination, inspection. The product contains a built-in camera for image recording.
The integrated light is a special purpose light. The light only serves to illuminate the work area. The light is not intended for household lighting.
This product may only be used privately and not for industrial or commercial purposes.
This product may not be used in tropical climates. Any other use is considered improper.
- Any claims resulting from improper use or due to unauthorised modification of the product will be considered unwarranted. Any such use is at your own risk.
- Scope of delivery
After unpacking the product, check if the delivery is complete and if all parts are in good condition. Remove all packaging materials before use.
Contact our customer service if parts are missing or damaged.
1 Main unit
1 Adaptor – Single hook
1 Adaptor – Double hook
1 Adaptor - Mirror
1 Adaptor - Magnet
1 Carry case
1 USB cable (USB-A to USB-C)
4 Batteries (AA/LR6)
1 Manual
1 Flexible gooseneck with camera head and LED light
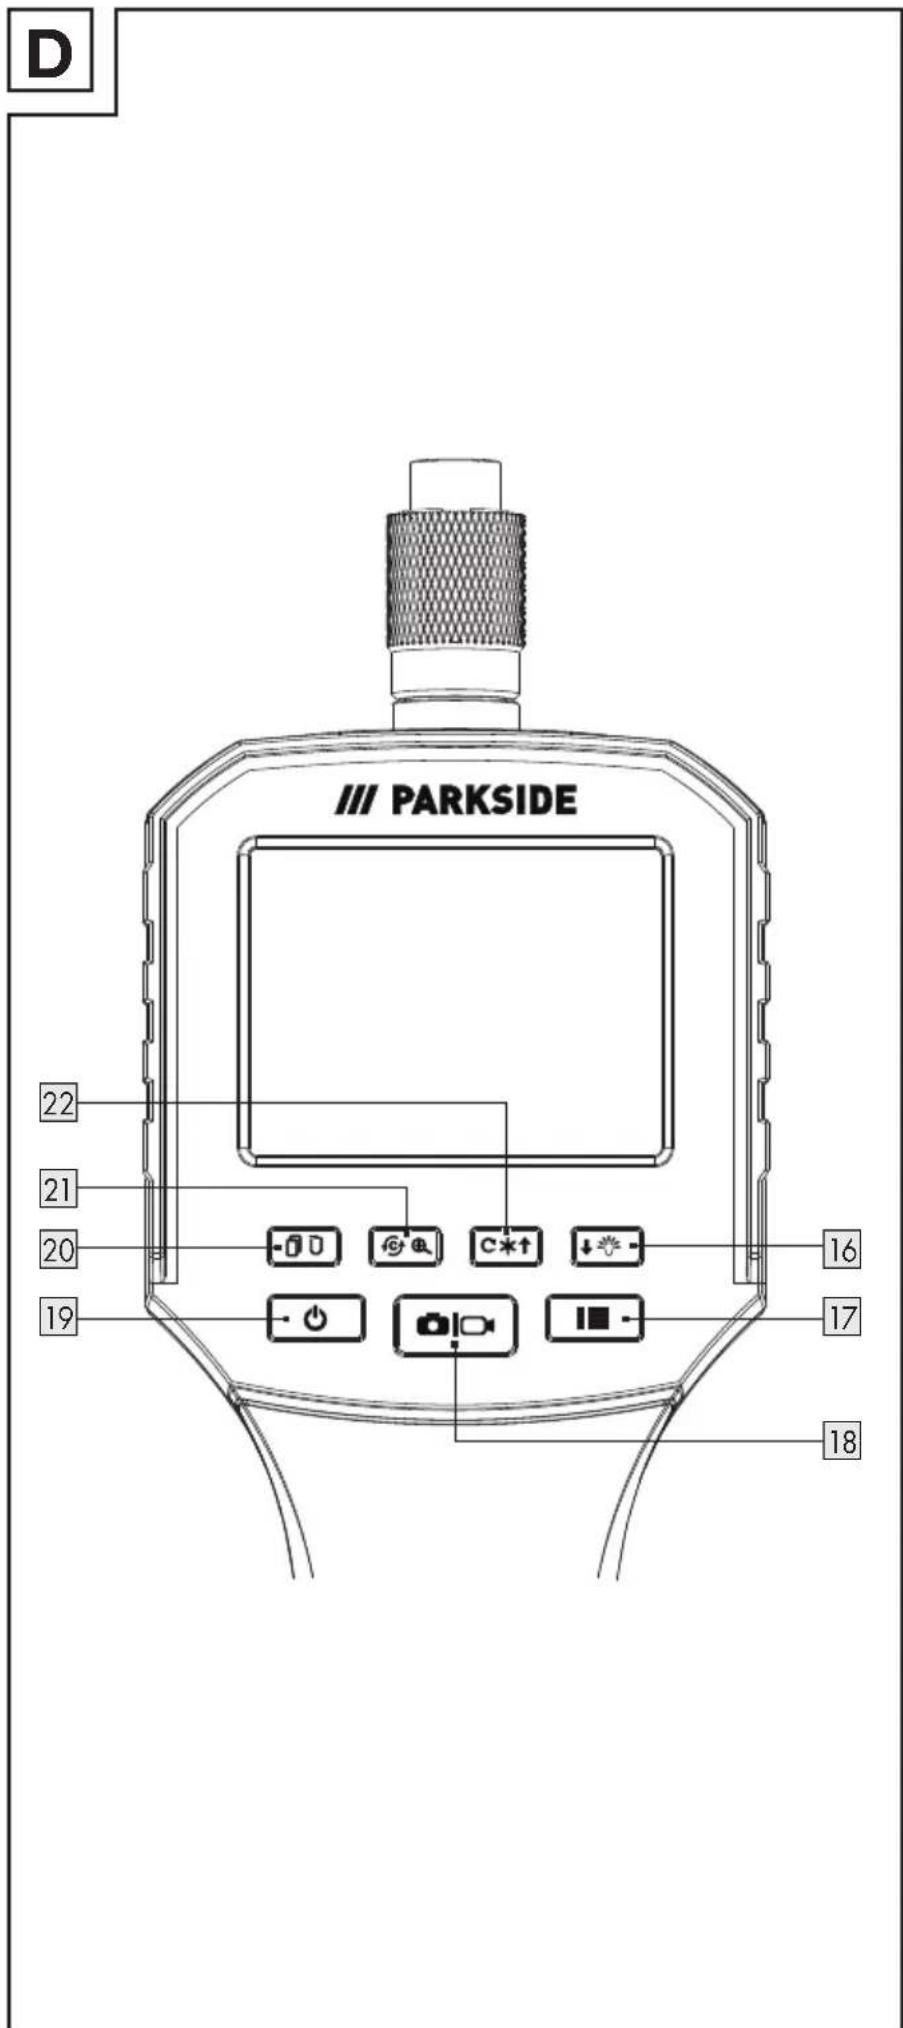
● Description of parts
Before reading, unfold the page containing the illustrations and familiarise yourself with all functions of the product.
1 Adapter – Single hook
2 Adapter – Double hook
3 Adapter - Magnet
4 Adapter - Mirror
5 USB cable (USB-A to USB-C)
6 Batteries (AA/LR6)
7 Main unit
8 USB-C input port (with rubber cover)
9 microSD card slot (with rubber cover)
10Handle
11 Carry case
12Display
13Connection port
14 Camera head with LED
15 Flexible gooseneck
16 button (down/camera head LED brightness)
17 button (menu)
18 button (image/video)
19 button (on/off)
20 button (picture-in-picture/delete)
21 button (colour mode/zoom)
22 button (rotation/up/display brightness)
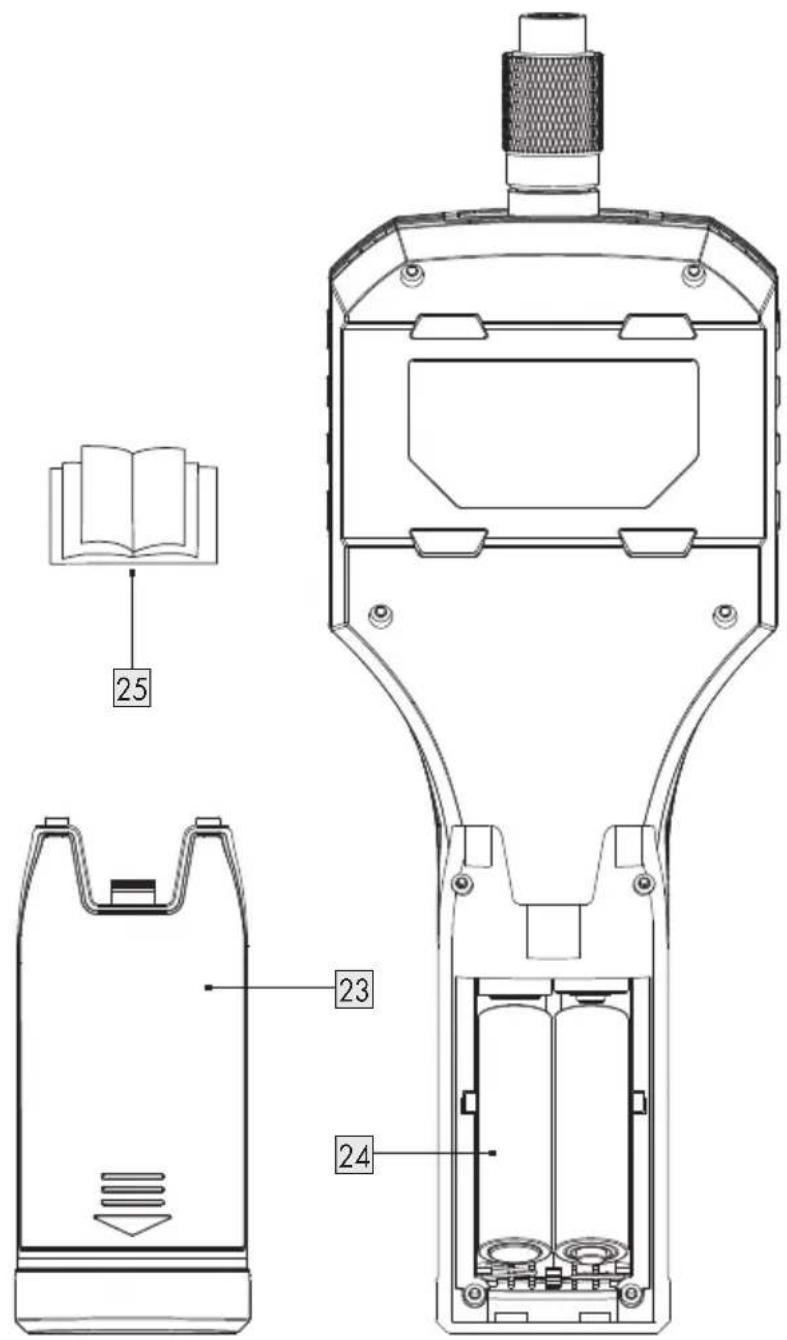
23Battery compartment cover
24Battery compartment
25Manual
● Technical data
| Supply voltage: 6 V | ---(Batteries: 4× 1.5 V AA/LR6) |
| Operation time: approx. 350 | minutes(with new batteries) |
| Protection type: IP67 (protection against dust and short time immersion in water – only for camera head and gooseneck) | |
| Minimum bending radius: 45 mm | |
| Camera diameter: 5.5 mm | |
| Camera lighting: 6 white LEDs, adjustable to 12 levels | |
| Display (diagonal): | 2.8"/7.1 cm |
| Display (resolution): | 640 pixel × 480 pixel |
| Flexible gooseneck length: | approx. 120 cm |
| File format: Image: JPEG | Video: AVI |
| Resolution (picture/video): | 1,280 pixel × 720 pixel |
| Connections: 1 USB-C input | port (for data transfer)1 microSD card slot |
| Internal memory: 1 GB (FAT32 format)(for up to 10,000 images) | i NOTE: Some of the memory space is occupied for formatting and other functions thus it is not available for storage. |
| Operating temperature: +5 °C to +35 °C | |
| Storage temperature: 0 °C to +45 °C | |
| Humidity: 10 % RH to 85 % | RH |
| Dimension (L × W × H): | approx. 253 mm × 86.5 mm × 45 mm |
| Weight: Main unit: approx. 190 g(without batteries)Gooseneck together with camera head approx. 94 g | |
Trademark notices
The Parkside trademark and trade name is the property of their respective owners.
■ Any other names and products may be trademarks or registered trademarks of their respective owners.

Safety instructions
Before using the product, familiarise yourself with all of the safety instructions and instructions for use. When passing this product on to others, also include all the documents.
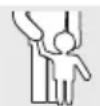
DANGER! DANGER TO LIFE AND RISK OF ACCIDENT FOR INFANTS AND CHILDREN!
⚠️ DANGER! RISK OF SUFFOCATION!
- Never leave children unsupervised with the packaging material. The packaging material poses a suffocation hazard. Children frequently underestimate the dangers. The packaging material is not a toy.
This product may be used by children age 8 years and up, as well as by persons with reduced physical, sensory or mental capacities or lacking experience and/or knowledge, so long as they are supervised or instructed in the safe use of the product and understand the associated risks. Do not allow children to play with the product. Cleaning and user maintenance should not be performed by children without supervision. The product is not a toy.
⚠️ DANGER! Some of the provided parts may be swallowed. If a part is swallowed, seek immediate medical attention.
⚠ WARNING! RISK OF INJURY!
Handling the product improperly may results in injury.

Avoid injury to eyes and skin when in the vicinity of optical radiation.
Do not look directly into the light source or with optical devices.
- Do not use the gooseneck near live parts. Keep this in mind as well when inspecting the inside of machines.
- Do not use the gooseneck near moving parts. Keep this in mind as well when inspecting the inside of machines.
- Secure switched-off cables and devices against accidental restart.
- Do not operate the product in potentially explosive environments in which substances such as flammable liquids, fumes are present.
The product is not a medical device. Do not use the product on persons or animals.
⚠ WARNING! RISK OF INJURY! RISK OF DISPLAY
DAMAGE! Do not apply any pressure to the screen and keep sharp objects away from the screen. A broken screen represents a risk of injury. Wear gloves when collecting the broken parts and contact the manufacturer if necessary.
If fluid does escape, proceed as follows:
- If the fluid comes into contact with the skin, wipe off with a clean cloth and rinse with plenty of water. Contact a doctor if necessary.
- If the fluid is swallowed, first rinse the mouth out with water and then drink plenty of water. Contact a doctor immediately!
⚠ WARNING! HEALTH HAZARD!
Drains and waste pipes may contain matter or chemicals which may be poisonous, infectious or corrosive.
■ Always take precautions appropriate to the area you wish to inspect.
- Wear appropriate personal protective equipment such as protective gloves, safety goggles and a mask, respirator or face shield.
After use, rinse the product's gooseneck thoroughly under running water.
⚠️ DANGER! DANGER TO LIFE! RISK OF INJURY! The product is not approved for medical applications! It must never be inserted into bodily orifices! There is the risk of life-threatening injuries!

Safety instructions for batteries
⚠️ DANGER! Keep batteries out of reach of children. If accidentally swallowed, seek immediate medical attention. Swallowing may lead to burns, perforation of soft tissue, and death. Severe burns can occur within 2 hours of ingestion.
⚠ WARNING! EXPLOSION HAZARD! Never recharge non-rechargeable batteries. Do not short-circuit batteries and/or open them. Overheating, fire or bursting can be the result.
■ Never throw batteries into fire or water.
- Do not exert mechanical loads to batteries.
Risk of leakage of batteries
- Avoid extreme environmental conditions and temperatures, which could affect batteries, e.g. radiators/direct sunlight.
If batteries have leaked, avoid contact with skin, eyes and mucous membranes with the chemicals. Flush immediately the affected areas with fresh water and seek medical attention.
In the event of a leakage of batteries, immediately remove them from the product to prevent damage. - Only use the same type of batteries. Do not mix used and new batteries.
■ Remove batteries if the product is not used for a longer period.
WEAR PROTECTIVE GLOVES!

Leaked or damaged batteries can cause burns upon contact with the skin. Wear suitable protective gloves at all times if such an event occurs.
Batteries
■ Only use the specified type of batteries.
- Insert batteries according to the polarity marks (+) and (−) on the battery and the product.
- Clean the contacts on the battery and in the battery compartment before inserting.
■ Remove exhausted batteries from the product immediately.
⚠️ ATTENTION! RISK OF PROPERTY DAMAGE!
- Check the product before every use. Discontinue use if any damage to the product is detected.
■ Sudden temperature changes may cause condensation inside the product. In this case, allow the product to acclimate for some time before using it again to prevent short circuits. - Do not operate the product near heat sources, e.g. radiators or other devices emitting heat.
- Do not throw the product into fire and do not expose it to high temperatures.
- Never open the product. The product has no internal parts requiring maintenance.
ATTENTION!
- Ensure that no direct heat sources (e.g. heating) can affect the product.
- Avoid any contact with splash and dripping water and corrosive liquids. Do not operate the product in the vicinity of water. Do not submerge the product in liquid. Do not place any vessels filled with liquid (e.g. vases or drinks) on or near the product.
- Do not use the product in the immediate vicinity of magnetic fields (e.g. speakers).
- Do not place any fire sources (e.g. burning candles) on or near the product.
- Do not insert objects into the interior of the product.
- Do not subject the product to excessive shocks and vibrations.
- Do not expose the product to strong artificial light.
- Do not bend the gooseneck excessively. Observe the minimum bending radius of 45 mm.
Only the camera head and the gooseneck may be immersed in liquids. Do not immerse these parts deeper than 100 cm. The fluid must not conduct electricity. The parts may only be immersed in neutral liquids. Use in acids, alkalis or solvents can destroy the product. - Keep the main unit dry.
The OWIM GmbH & Co KG is not responsible for unauthorised modifications of this product.
The user of the product is fully responsible for unauthorised modifications of the product, as well as replacement of such products.
It is necessary to repair the product if it has been damaged in any way, for example, if the housing is damaged, if liquid or objects have penetrated the product or if the product has been exposed to rain or moisture.
■ Repair work is also required if the product is not working properly or has been dropped.
If smoke is produced, or there are any unusual sounds or smells, turn the product off immediately and remove the batteries. In such cases, the product should not be used until it has been inspected by authorised service personnel. Only have the product repaired by qualified personnel.
Never open the housing of the product.
Setup
☐ Follow the instructions below to configure the product for initial use.
| Action Fig. | |
| Installing batteries1. Remove the battery compartment cover 23 (located at the back of the main unit 7).2. Insert the 4 batteries 6 (1.5 V type AA/ LR6) into the battery compartment 24. Insert the batteries with correct polarity (observe the markings in the battery compartment and on the batteries).3. Replace the battery compartment cover on the battery compartment. | E |
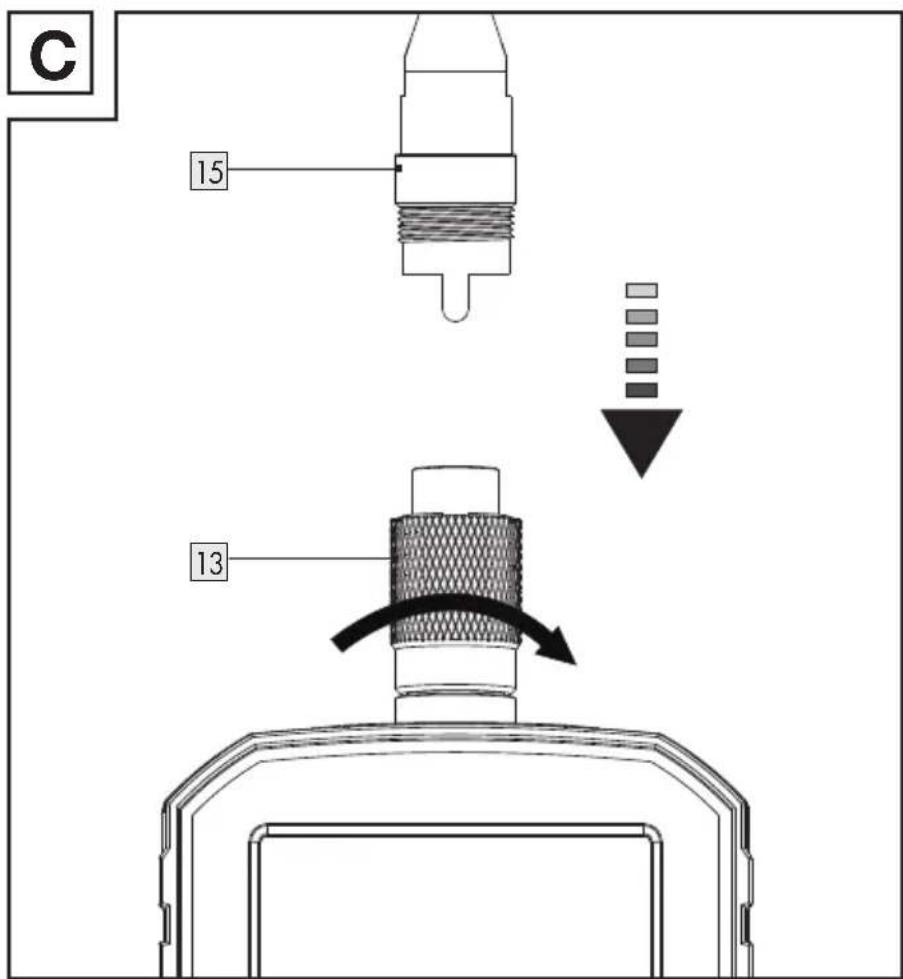
| Connecting the flexible gooseneck1. Connect the flexible gooseneck 15 with the connection port 13.2. Screw the outer thread of the connection port onto the flexible gooseneck. | C |
Inserting microSD card (optional)
i NOTES:
- You may use a microSD card (not included) to expand the memory capacity if the internal memory capacity (1 GB) is not enough for use.
- The internal memory is not available when the microSD card is connected.
-
The internal memory is available again once the microSD card is ejected.
The product only recognises microSD cards with the format FAT or FAT32. If the microSD card is using the format exFAT or NTFS, you need to format the microSD card via the product (see “Operation” → “Changing the camera settings” → “Format”). -
Inserting microSD card: Open the rubber cover at the side. Fully insert a microSD card with the label facing down and the pins facing up into the microSD card slot 9 until you hear a click sound.
- Ejecting microSD card: Push the microSD and release. The microSD card is ejected from the microSD card slot 9.
- Close the rubber cover after inserting or removing the microSD card.
Operation
Switching on and off
i NOTES:
The product automatically switches off if no button is pressed for approx. 20 minutes.
- Changing the auto power off setting: see “Changing the camera settings”
-
Switching on the product: Press and hold the button 19 for approx. 2 seconds. The display 12 switches on. The product enters live mode. The camera head's LED 14 lights up.
-
Switching off the product: Press and hold the button 19 for approx. 2 seconds.
Changing the camera settings
NOTE: Before using the product, change the camera settings in the setup menu.
- Enter the setup menu: Press the button 17 and then the button 22 or the button 16 to select the following icon:

- Confirm selection: Press the button 18.
The following settings are available in the setup menu:
| Setting Description | |
| Auto power off | Set the idle time for activating the auto power off function:Off:Turn off the auto power off function.5 minutes:Auto power off after being idle for 5 minutes20 minutes:Auto power off after being idle for 20 minutes |
| Language | Set your desired language of the user interface. |
| Date/Time | Set the date and time.1 NOTE: When you remove the batteries, the date and time are reset. Set the date and time again after inserting new batteries. |
| Quality | Set the quality of the captured images and videos:Standard: standard quality with larger file sizeLower: lower quality with smaller file size |
| Format | Format the internal memory or the microSD card (if connected).1 NOTE: After formatting the internal memory or the microSD card, all files are deleted. The microSD card is formatted to FAT32 when you use this function. |
| Default settings | Reset the product to the factory default settings. |
| Version | View the current firmware version of the product. |
- When you are finished with the settings: Press the button 17 1x to return to the setup menu. Press the button 2x. The product returns to the live mode.
Display information in live mode
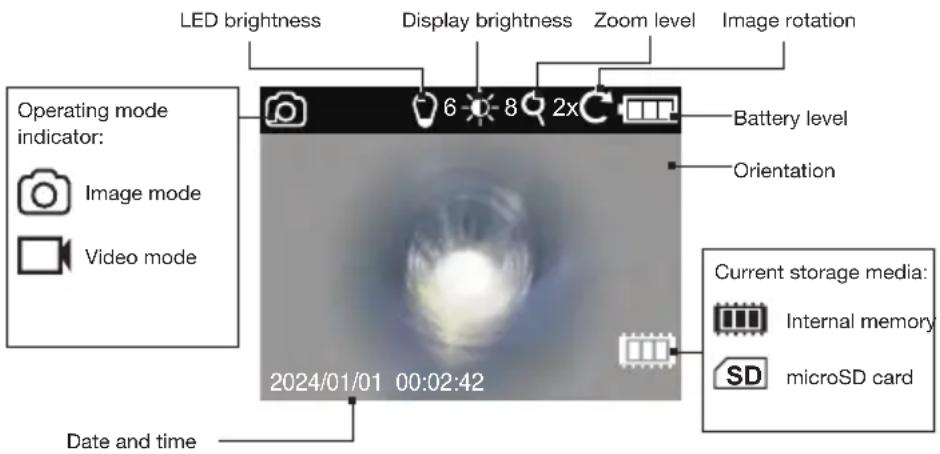
Setting the brightness of the camera head LED 📞 ^02
☐ Repeatedly press the ↓ button 16 until you reach the desired brightness level.
- You can set the brightness of the camera head LED ^14 to 12 different brightness levels.
- When you have reached the highest brightness level, the LED 14 goes off. When you press the ↓ button 16 again, the LED starts at brightness level 1.
The brightness setting is indicated on the display ^12 by the LED brightness level indicator.
Setting the display brightness

☐ Repeatedly press the Ⓞ:† button 22 until you reach the desired brightness level.
- You can set the display 12 to 12 different brightness levels.
- When you reached the highest brightness level, the display brightness returns to the lowest level. When you press the ⓢ*† button 22 again, the display brightness starts at brightness level 1.
The display brightness setting is indicated on the display 12 by the display brightness level indicator.
Image rotation ©
NOTE: At some inspection locations (e.g. curved pipes) it is hard to obtain a clear view. In such situations, change the display's 12 picture orientation. The orientation is indicated on the display by the orientation indicator F (located under the battery level indicator).
□ Press the ⓢ:† button 22.
| Function | Orientation indicator | |
| Press 1× for 2 s | Picture is rotated by 180° (reversed). | |
| Press 2× for 2 s each | Picture is reversed and mirrored. | |
| Press 3× for 2 s each | Picture is mirrored. | |
| Press 4× for 2 s each | Original position |
NOTE: After the product has been shut down and switched on again, the picture is shown in its original position.
Zooming
☐ Setting the zoom level of the camera: Press the button 21 repeatedly.
■ The product features a zoom function up to 6x:
| Display Function | ||
| Press 1× | Picture is magnified 2×. | |
| Press 2× | Picture is magnified 3×. | |
| Press 3× | Picture is magnified 4×. | |
| Press 4× | Picture is magnified 5×. | |
| Press 5× | Picture is magnified 6×. | |
| Press 6× – | Picture is displayed in its original size. | |
NOTE: After the camera has been shut down and turned on again, the picture is shown in its original size.
Changing the colour mode
NOTE: The colour mode can only be changed in the live view mode.
☐ Press and hold the ☑ button 21 for approx. 2 seconds.
The colour of the display ^12 and the captured images/video clips toggles between colour and monochrome modes.
Image capturing and video recording functions

i NOTES:
■ The maximum duration of each video is 2 minutes.
If the video recording is over 2 minutes, the recording is not stopped. The video is divided into several files instead. The number of the divided video files depends on the duration of the recording (e.g. 3 files for a 6 minute video).
This product does not have a microphone. The recorded video does not have any sound.
The picture-in-picture and zoom functions are not available for video recording.
If the memory is full, one of the following icons is shown on the display 12:


Internal memory is full Memory card is full
☐ Delete unwanted images or video clips to free up the memory (see "Deleting files").
| Live mode Action | |
| Image mode (default in the live mode) | Capturing an image: Press thebutton18. |
| Picture-in-picture functionThis function allows you to check the difference between the live view and the screen captured before.Activating the picture-in-picture function: Press thebutton20. Capturing a screen: Press thebutton18. The captured screen is displayed in the small screen on the display12. The live view remains on the main screen.Switching off the picture-in-picture function: Press thebutton20. NOTE:The captured screen in the picture-in-picture mode will not be saved as image. To take image files please switch off this function first. | |
| Video mode | Start video recording: In live mode, press and hold thebutton18for approx. 2 seconds. The video mode iconand the recording time are displayed on the top left corner of the display12. NOTE: You can adjust the brightness of the camera head's LED14and the display during video recording.Stop video recording: Press thebutton18. The product returns to the image mode. |
Media files playback
i NOTES:
If a microSD card is connected, only the files stored in the microSD card can be viewed. The images and video files in the internal memory can only be viewed if no microSD is connected.
If the internal memory or microSD card does not contain any images or video files, the following icon is shown on the display 12:

- Press the ☐ button 17 and then the ⓢ*† button 22 or the ↓♦ button 16 to select the following playback icon:

- Confirm selection: Press the button 18.
- Select the image or video you would like to view/play: Press the ⓒ† button 22 or the ↓* button 16 repeatedly.
- Press the button 17 to return to the setup menu.
Image playback
| Button Function | |
| □ Press the button repeatedly to zoom in the image with the following zoom levels:– Press 1×: Image is magnified 2×– Press 2×: Image is magnified 3×– Press 3×: Image is magnified 4×– Press 4×: Image is magnified 5×– Press 5×: Image is magnified 6×– Press 6×: Image is restored to the original size■ After the image is zoomed, the zoom section (enclosed with red rectangle) is displayed on the top right corner of the image. | |
| □ After the image is zoomed, press both buttons repeatedly to shift the zoom section to the right and left. □ button 22 for left, and □ button 16 for right. | |
| □ After the image is zoomed, press both buttons repeatedly to shift the zoom section up and down. □ button 20 for up, □ button 19 for down. | |
Video playback
| Button Function | |
 | i NOTE: Zoom function is not available for video playback.1. Start playback: Press the button. The playback time is displayed on the top of the display 12.2. Pause playback: Press the button again. |
Deleting files
i NOTES:
☐ Only the files in the current storage media can be selected and deleted. If you want to delete any files stored in the internal memory, remove the connected microSD card from the microSD card slot 9 first.
☐ Delete all files in the current storage media: Use the formatting function in the setup menu (see “Changing the camera settings”).
- Press the ☐ button 17, then ⓚ:† button 22 or ↓ button 16 to select the playback icon.

-
Confirm selection: Press the button 18.
-
Select a file you want to delete: Press the Ⓞ*† button 22 or the button 16 repeatedly.
-
Press the button 20. The following icon is shown on the display 12:

- Confirm to delete the selected file: Press the button 18. Alternatively, press the button 17 to cancel the selection and return to the playback mode and select another file to delete.
Transferring files to a computer
i NOTES:
This product features a USB-C input port 8 so that you can transfer the images and video clips stored in your current storage media to a computer.
☐ If a microSD card is inserted into the product, only the files in the microSD card can be read by the computer. To transfer the files stored in the internal memory, remove the microSD card first before connecting the product to a computer.
- Switching on the product: Press and hold the button 19.
- Lift up the rubber cover on the side.
- Connect the USB-C plug of the USB cable 5 to the USB-C input port 8.
- Connect the other end of the USB cable 5 to a computer.
- The current storage media is detected and read automatically. One of the following icons is shown on the display 12:

External memory card is read Internal memory is read

- To obtain the files from the internal memory or the microSD card, open the file manager on your computer. Double click on the corresponding USB drive. The files are stored in the DCIM folder.
- Transfer the files to the computer.
- After the file transfer is finished: Safely remove the product from the computer using the operating system's eject function before physically disconnecting the product from your computer or removing the microSD card from the product.
- Close the rubber cover after disconnecting the USB cable 5 from the product.
ATTENTION! LOSS OF DATA!
The file name must be in the format PARKSIDEXXXXX.jpg or PARKSIDEXXXXX.avi, where each of the 5 digits XXXXX represents the number 0 to 9.
☐ Do not rename the folders and the files via the computer. Otherwise the files can no longer be read by the product.
☐ Only rename the files or folders after they are copied from the product to your computer.
- Incorrect disconnection of the product or microSD card could result in data loss or damage to the internal memory or microSD card.
Before disconnecting the product from the computer or removing the microSD card from the microSD card slot 9, verify that the data transfer is complete.
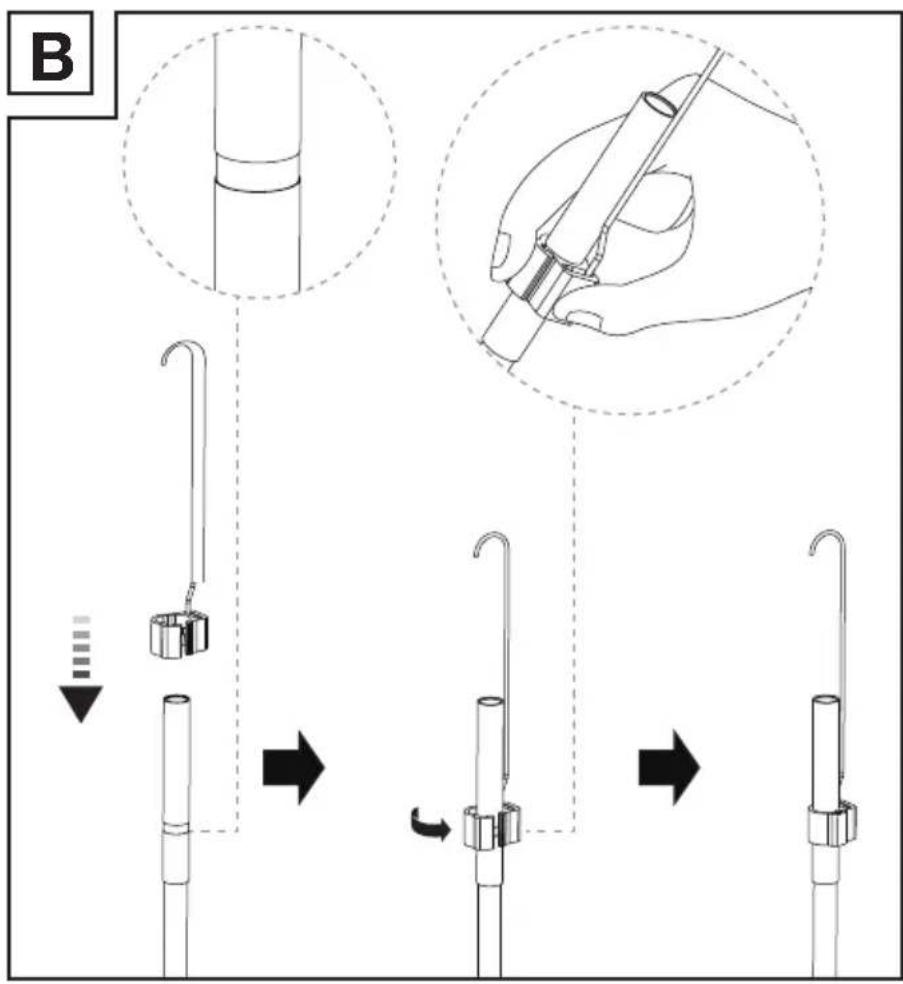
Adapters
NOTE: The product includes 4 adapters that can be attached to the camera head 14.
| Adapter Purpose | |
| Single hook 1 | Retrieving objects (e.g. rings)Double hook |
| Magnet 3 | |
| Mirror 4 | Examining inaccessible areas |
- Attaching the adapters (Fig. B):
— Select the desired adapter.
— Attach the adapter to the camera head ^14 .
— Secure the bracket of the selected adapter firmly around the camera head 14.
- Store the adapters in the compartment provided in the carry case 11.
Low battery indication
- When the battery is low, the following icon is shown on the display 12. The product is about to shut down.
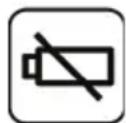
o Replace the batteries (see "Installing batteries" and Fig. E).
● Troubleshooting
| Problem Possible | causes Solution | |
| The product does not work. | The batteries are not properly inserted. | Remove the batteries.Re-insert the batteries with correct polarities. |
| The product displays no picture or the picture is displayed weak. | The batteries' voltage may be low. | Insert new batteries. Re-start the product. |
| The LED brightness level is too low. | Increase the LED brightness level. | |
| The file transmission to the computer does not function correctly. | Connection incorrect. | Check the connection between the product and the computer. |
| No more pictures or videos can be captured. | The internal memory or the microSD card is full. | Free up the memory by removing the unnecessary files. |
| The product does not recognise the microSD card. | The microSD card does not use the format FAT or FAT32. | Format the microSD card via the product (see “Operation” → “Changing the camera settings” → “Format”). |
- Cleaning
Before cleaning: Switch the product off. Remove all batteries and accessories.
No acid, chafing or solvent cleaning agents should be used or the product can be damaged.
□ Clean the housing of the product using a soft, dry cloth only.
At persistent soiling, a mild cleaning agent can be used.
● Storage when not in use
Before storage: Remove batteries from the product.
□ Store the product and its accessories in the carry case 11 (Fig. F).
☐ Store the carry case 11 in a dry indoor location protected from direct sunlight.
- Disposal
The packaging is made entirely of recyclable materials, which you may dispose of at local recycling facilities.

Observe the marking of the packaging materials for waste separation, which are marked with abbreviations (a) and numbers (b) with following meaning: 1–7: plastics/20–22: paper and fibreboard/80–98: composite materials.
Product:

The product incl. accessories and packaging materials are recyclable and are subject to extended producer responsibility.
Dispose them separately, following the illustrated Info-tri (sorting information), for better waste treatment.
The Triman logo is valid in France only.

Contact your local refuse disposal authority for more details of how to dispose of your worn-out product.
To help protect the environment, please dispose of the product properly when it has reached the end of its useful life and not in the household waste. Information on collection points and their opening hours can be obtained from your local authority.
Faulty or used batteries/rechargeable batteries must be recycled. Return the batteries/rechargeable batteries and/or the product to the available collection points.
Environmental damage through incorrect disposal of the batteries/rechargeable batteries!
Remove the batteries/battery pack from the product before disposal.
Batteries/rechargeable batteries may not be disposed of with the usual domestic waste. They may contain toxic heavy metals and are subject to hazardous waste treatment rules and regulations. The chemical symbols for heavy metals are as follows: Cd = cadmium, Hg = mercury, Pb = lead. That is why you should dispose of used batteries/rechargeable batteries at a local collection point.
Warranty
The product has been manufactured to strict quality guidelines and meticulously examined before delivery. In the event of material or manufacturing defects you have legal rights against the retailer of this product. Your legal rights are not limited in any way by our warranty detailed below.
The warranty for this product is 3 years from the date of purchase. The warranty period begins on the date of purchase. Keep the original sales receipt in a safe location as this document is required as proof of purchase.
Any damage or defects already present at the time of purchase must be reported without delay after unpacking the product.
Should the product show any fault in materials or manufacture within 3 years from the date of purchase, we will repair or replace it – at our choice – free of charge to you. The warranty period is not extended as a result of a claim being granted. This also applies to replaced and repaired parts.
This warranty becomes void if the product has been damaged, or used or maintained improperly.
The warranty covers material or manufacturing defects. This warranty does not cover product parts subject to normal wear and tear, thus considered consumables (e.g. batteries, rechargeable batteries, tubes, cartridges), nor damage to fragile parts, e.g. switches or glass parts.
● Warranty claim procedure
So that your request can be processed quickly, please observe the following instructions:
For all inquiries, please have the receipt and item number (IAN 470382_2407) ready as proof of purchase.
The article number can be taken from the identification label on the product, engraving on the product, the front cover of your manual (at the bottom left), or the sticker on the back or bottom of the product.
If malfunctions or other defects arise, first contact the service department indicated below by phone or email.
You can then send a product recorded as defective to the communicated service address postage-free, making sure to enclose proof of purchase (receipt) and information on the details of the defect and when it occurred.

You can download and view this and numerous other manuals at parkside-diy.com. This QR code takes you directly to parkside-diy.com. Choose your country and use the search screen to search for the operating instructions. Entering the item number (IAN) 470382_2407 takes you to the operating instructions for your item.
Service
GB Service Great Britain
Tel.: 0800 0569216
E-Mail: owim@lidl.co.uk
IE Service Ireland
Tel.: 1800 200736
E-Mail: owim@lidl.ie
CE
⚠ WAARSCHUWING! GEZONDHEIDSRISICO!
NOSIĆ RĘKAWICE OCHRONNE!

NOSTE OCHRANNÉ RUKAVICE!

NOSTE OCHRANNÉ RUKAVICE!