
J30 - Vacuum Cleaner MOVA - Free user manual and instructions
Find the device manual for free J30 MOVA in PDF.

| Product type | Cordless stick vacuum |
| Brand | MOVA |
| Model | J30 |
| Power supply | Rechargeable lithium-ion battery 25.9 V, 2500 mAh (model HC-21Y-1) |
| Rated power | 450 W (body) + 15 W (multi-surface brush) |
| Charging time | Approximately 4.5 hours |
| Filters | Air intake filter and exhaust filter (washable) |
| Main functions | Upright and handheld vacuuming, illuminated multi-surface brush, mini motorized brush, crevice tool, wide combination tool |
| Care and cleaning | Clean the dust compartment, filters and brushes regularly; let dry for 24 hours after rinsing |
| Safety | Indoor use only; do not immerse; do not vacuum flammable liquids; supervise children; charging temperature 5 °C to 38 °C |
| Spare parts and repairability | Removable battery (HC-21Y-1), brushes and filters available; contact after-sales service for repairs |
| General information | Body model VJ12A; battery 64.75 Wh; class II; compliant with European standards |
Frequently Asked Questions - J30 MOVA
User questions about J30 MOVA
0 question about this device. Answer the ones you know or ask your own.
Ask a new question about this device
Download the instructions for your Vacuum Cleaner in PDF format for free! Find your manual J30 - MOVA and take your electronic device back in hand. On this page are published all the documents necessary for the use of your device. J30 by MOVA.
USER MANUAL J30 MOVA
Cordless Stick Vacuum User Manual
Contents
EN User Manual 001
Please scan the QR code for the user manual
A-1
natural_image
Technical line drawing of a mechanical component with no visible text or symbols1

natural_image
Line drawing of a mechanical component with concentric rings and a central hole (no text or symbols)2
natural_image
Technical line drawing of a handheld device with two views (no text or symbols)4

natural_image
Technical line drawing of a mechanical component with no visible text or symbols3
natural_image
Simple line drawing of a curved mechanical component with two vertical pins (no text or symbols)5
natural_image
Pure technical line drawing of a mechanical component or bracket (no text or symbols)6
natural_image
Simple geometric shape composed of two rectangles, one outlined and one filled with wavy lines (no text or symbols)7
8
A-2
B-1
natural_image
Technical line drawing of a mechanical device with an arrow indicating motion or assembly (no text or symbols)B-2
natural_image
Technical line drawing of a handheld device with two separate views (no text or symbols)C-1
natural_image
Technical line drawing of a mechanical component assembly (no text or symbols)C-2
flowchart
graph TD
    A["Motor"] -->|Signal| B["Switch"]
    B --> C["Load"]
    B --> D["Switch"]
    B --> E["Load"]
    B --> F["Switch"]
C-3
natural_image
Line drawing of a handheld device with an inset circular diagram showing internal components (no text or symbols)D-1
natural_image
Line drawing of a vacuum cleaner on tiled floor (no text or symbols)D-2
natural_image
Line drawing of a desktop computer with a keyboard and mouse (no text or symbols)D-3
natural_image
Line drawing of a mechanical device emitting particles from a surface (no text or symbols)D-4
natural_image
Line drawing of a vacuum cleaner inside a corner, showing mechanical components and mounting base (no text or symbols)D-5
natural_image
Line drawing of a robotic arm operating on a textured surface (no text or symbols)E-1
E-2
natural_image
Line drawing of a hand holding a cup and a handheld device with a rotating arrow indicating rotation (no text or symbols)E-3
natural_image
Diagram of a cylindrical container with an upward arrow indicating flow or movement (no text or symbols)E-4
natural_image
Illustration of household appliances including a faucet, sun, 24-hour timer, and washing machine (no text or symbols)E-5
E-6
E-7
natural_image
Line drawing of a hand holding a small cylindrical object, with two arrows indicating rotation (no text or symbols)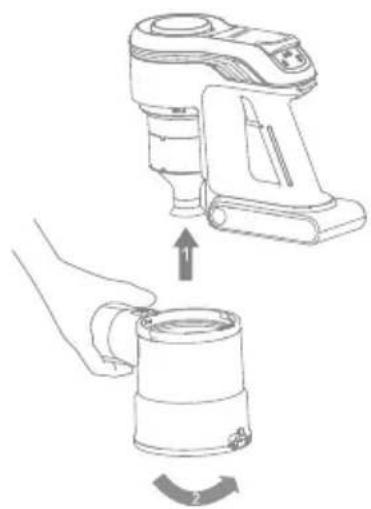
natural_image
Line drawing showing a hand operating a device to lift a cup, with no text or symbols present.E-8
natural_image
Line drawing of a handheld electric shaver with handle and mounting bracket (no text or symbols)E-9
natural_image
Line drawing of a handheld electronic device with no visible text or symbolsE-10
natural_image
Illustration of four basic household items: a faucet, sun, timer, and ventilation grille (no text or symbols)E-12
natural_image
Line drawing of scissors cutting through a wavy pipe with a handle (no text or symbols)E-11
natural_image
Line drawing of a hand cleaning a mechanical device with a cloth (no text or symbols)E-13
natural_image
Illustration of a faucet pouring liquid into a wavy pipe (no text or symbols)E-14

E-15
natural_image
Technical line drawing of a mechanical component with an inset circular view showing a switch and two buttons (no text or symbols)E-16
natural_image
Technical line drawing of a mechanical component with no visible text or symbolsE-17
natural_image
Line drawing of scissors cutting through a cylindrical tube with evenly spaced pins (no text or symbols)E-19

E-18

natural_image
Illustration of a faucet releasing water into a rack with teeth (no text or symbols)Safety Instructions
EN
READ ALL INSTRUCTIONS BEFORE USING (THIS APPLIANCE). Failure to follow the warnings and instructions may result in electric shock, fire and/or serious injury.
Warning— To reduce the risk of fire, electric shock, or injury:
• This appliance is for indoor use only.
- This product can be used by children aged from 8 years and above and persons with physical, sensory, intellectual deficiencies, or limited experience or knowledge under the supervision of a parent or guardian to ensure safe operation and to avoid any risk of hazards. Cleaning and maintenance shall not be carried out by children without supervision.
- The vacuum is not a toy. Children shall not play with or operate this product. Please exercise caution when using the vacuum near children. Do not allow children to clean or maintain the vacuum unless supervised by a parent or guardian.
- Do not use the vacuum outdoors or on wet surfaces. Only use the vacuum on dry indoor surfaces. Do not touch the plug or any part of the vacuum with wet hands.
- To reduce the risk of fire, explosion, or injury, make sure that the lithium battery and supply cord are undamaged before use. Do not use the vacuum if either the lithium battery or supply cord is damaged.
- The brushes, battery, extension rod and vacuum are electrically conductive and should not be immersed in water or other liquid. Make sure to dry all filters after cleaning.
- To prevent injury caused by moving parts, turn off the vacuum before cleaning them. These parts must all be properly installed before using the vacuum.
- Do not use the vacuum to pick up flammable or combustible liquids, such as gasoline, or bleach, ammonia, drain cleaners or other liquids.
- Do not use the vacuum to pick up drywall particles, ashes like fireplace ash, or smoking or burning materials such as coal, cigarette butts or matches.
- Check the area to be cleaned before use. To prevent the openings from being blocked, clear the larger paper, spitball, plastic cloth or sharp objects (such as glass, nails, screws, coins, etc.) and any object which is larger than openings.
- Keep hair Loose clothing, fingers and other parts of the body away from the vacuum's openings and moving parts. Do not point the hose, wand or tools at your eyes or ears or put them in your mouth.
- Do not put any object into the vacuum's openings. Do not use the vacuum with any opening blocked. Keep free of dust, lint, hair; or other items which may reduce airflow.
- Do not Lean the vacuum against a chair, table, or other unstable surface, as this may cause damage to the machine or personal injury. If the vacuum becomes damaged or is otherwise malfunctioning, please contact our authorized service department. Never attempt to disassemble the device on your own.
- All instructions in the manual for recharging the battery must be strictly followed. Failure to properly charge the battery within the specified temperature range could damage the battery.
- Only use accessories and replacement parts recommended by the manufacturer.
- Make sure the vacuum is off and unplugged when not used for extended periods as well as prior to performing any maintenance or repairs.
EN
- Please be extra careful when using the vacuum to clean stairs.
- Do not install, charge, or use this product outdoors, in bathrooms, or around a pool.
- Fire Hazard Warning: Do not apply any type of fragrance to the vacuum's filter. These types of products are known to contain flammable chemicals which may cause the vacuum to catch fire.
- Only use the approved battery type (Model HC-21Y-1). Do not use any non-rechargeable battery pack. Failing to do so may cause the lithium-ion battery to catch fire.
- If the battery material is released, remove personnel from area until the batteries cool down and fumes dissipate.
- Provide maximum ventilation to clear out hazardous gases and avoid skin and eye contact or inhalation of vapors.
- Remove spilled liquid with absorbent and incinerate waste.
- Do not use and store in extremely hot or cold environments (below 5°C/41°F or above 38°C/100.4°F). Please charge the cordless vacuum in temperature above 5°C/41°F and below 38°C/100.4°F.
- The supply terminals are not to be short-circuited.
- If the supply cord is damaged, it must be replaced by the manufacturer, its service agent or similarly qualified persons in order to avoid a hazard.

For indoor use only

Class II equipment

time-lag miniature fuse-link where T10A is the symbol for the time/current characteristic
We, XingKuang Innovation Technology (Suzhou) Co., Ltd. hereby, declares that this equipment is in compliance with the applicable Directives and European Norms, and amendments. The full text of the EU declaration of conformity is available at the following internet address: https://www.mova.tech
For detailed e-manual, please go to https://www.mova.tech/pages/user-manuals-and-faqs
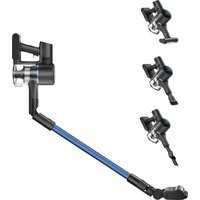
Product Overview
Accessories
- Illumination multi-surface brush
- Vacuum body
- Folding tube
- Crevice nozzle and wide combination tool
- Wall mount
- Motorized mini-brush
- Accessory mount
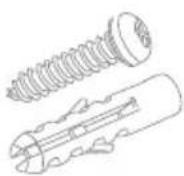
- Accessory kit (screw 2 + expansion tube 3)
Fig. A-1
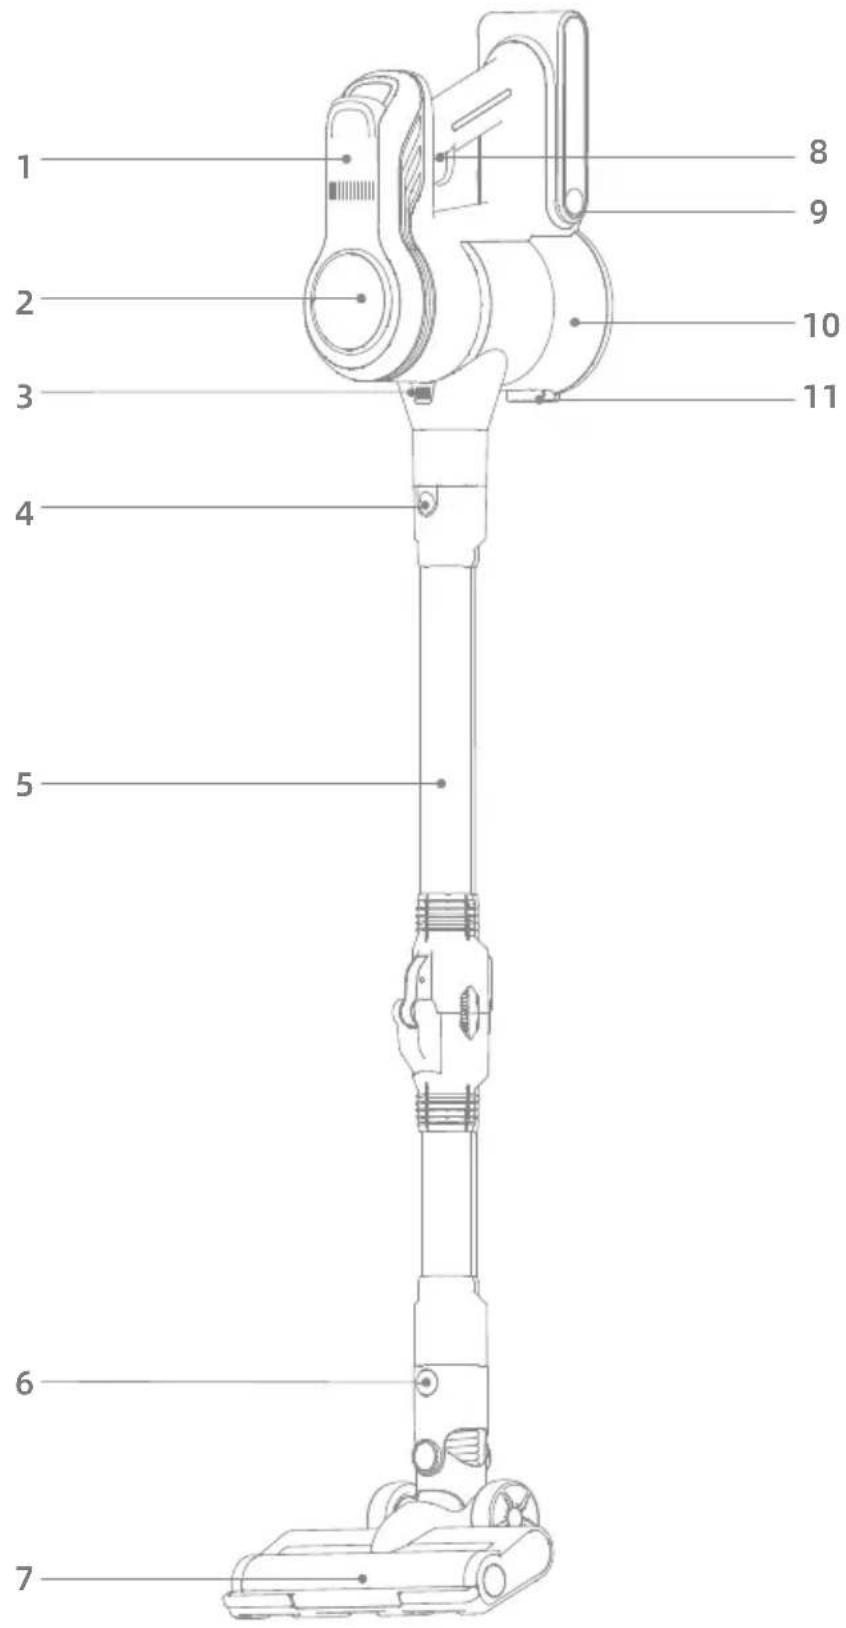
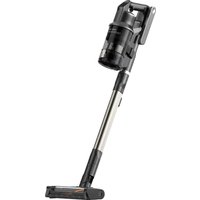
Component Names
Vacuum Cleaner
- Air outlet filter cover plate
- Display screen
- Dust cup release button
- Folding tube release button
- Folding tube
- Floor brush release button
- Floor brush
- Power Button
- Battery pack release button
- Dust cup
- Dust cup bottom cover release button
Fig. A-2
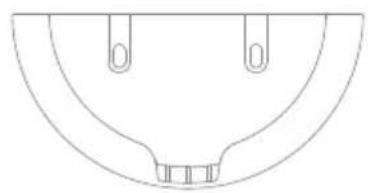
Installation
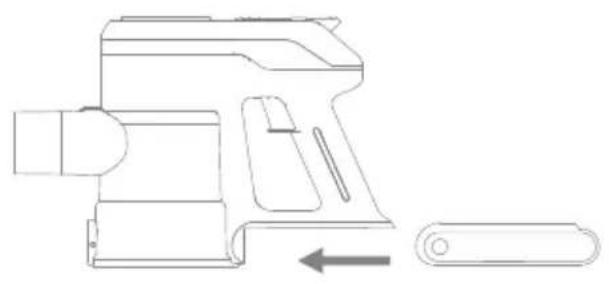
Installation and removal of battery pack
- Align the battery pack with the rear end of the vacuum body, slide it inside, and buckle it in place.
- With the battery pack release button pressed, pull outward to remove the battery pack.
Fig. B-1
Charging
Insert the charging plug of the power adapter into the charging port of the vacuum body for charging. The display screen pack can be detached and charged separately.
During charging, the figure on the display screen indicates the current battery level in percentage, and when the figure turns to "100", the charging is completed.
Fig. B-2
Prompts
- Keep power off during charging, and do not take out the battery pack when connecting the vacuum body for charging, which will take about 4.5 hours.
- For initial use, this product shall be charged and discharged for 1-3 times, so that the battery activity can be fully activated.
- The socket of the power cord can be adjusted according to the user's needs.
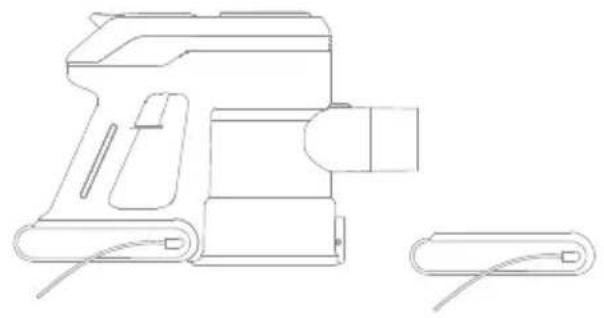
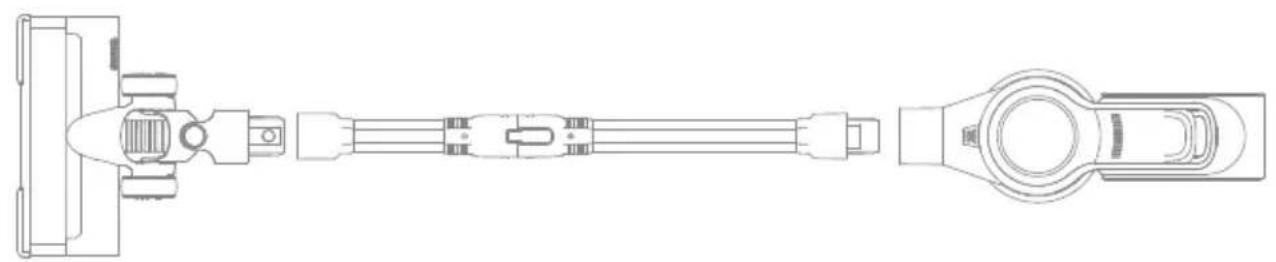
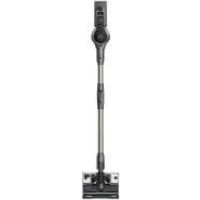
How to Use
Used as a vertical vacuum cleaner
- Open the folding tube and straighten it.
- Align the folding tube with the illumination multi-surface brush connector, and buckle it in place.
- Clip the suction end of the vacuum body down into the connecting end of the folding tube, and buckle it in place.
- Tilt the vacuum body backward, press the power button, and push the vacuum cleaner forward and backward to make it start working; press the power button again to make it stop working.
Fig. C-1
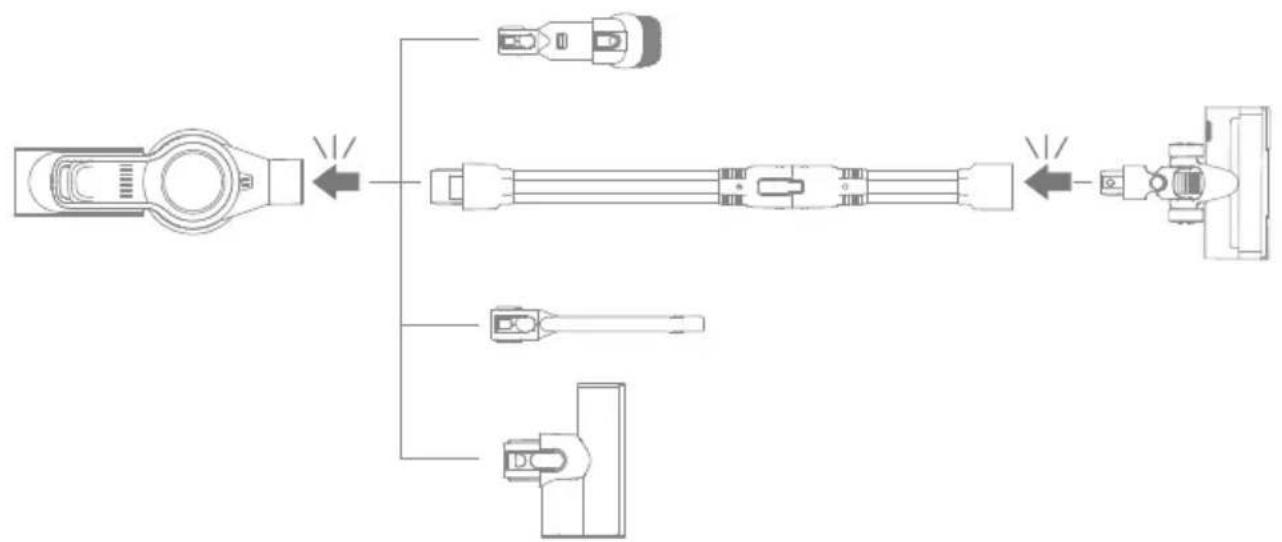
Used as a handheld vacuum cleaner
- As required, the vacuum body can be connected with a crevice nozzle, wide combination tool, illumination multisurface brush, and motorized mini-brush used as a handheld vacuum cleaner.
Fig. C-2
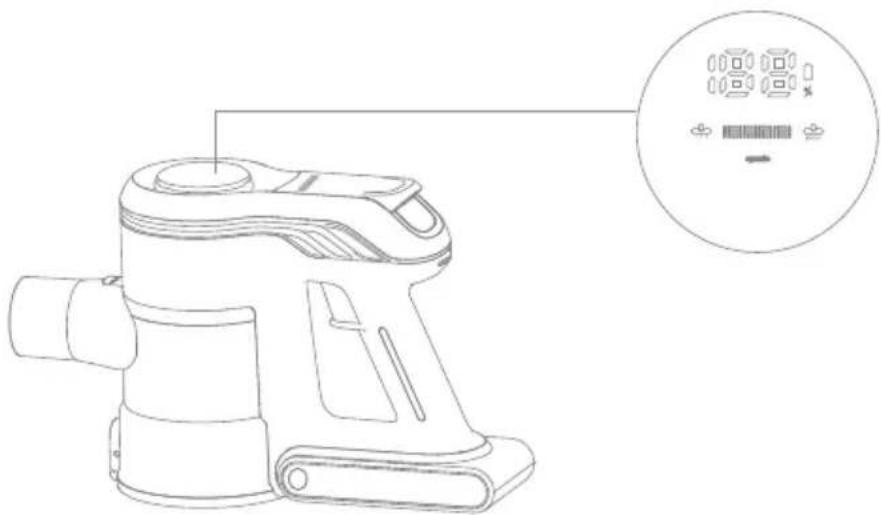
EN
Startup for use
The energy-saving mode is as default for startup. Press "###" on the display screen for gear speed regulation. There are 3 gear speed regulation modes.
Prompts
During operation, the display screen shows the current battery level and current gear level. When the battery level is lower than 20, please charge in time.
Fig. C-3
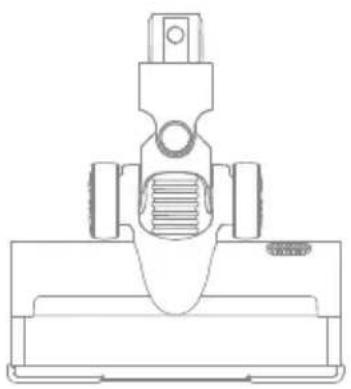
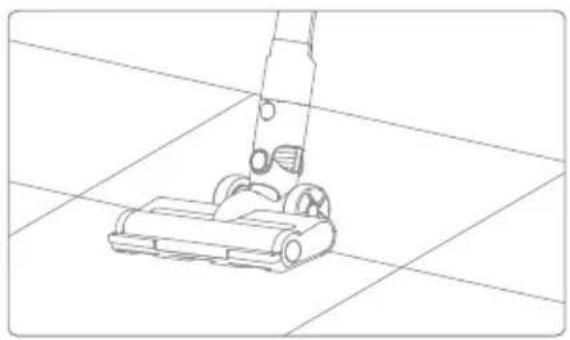
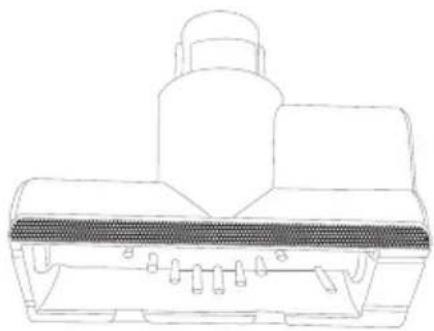
Illumination multi-surface brush
While the illumination multi-surface brush is working, the LED light at the front end is turned on, facilitating its use in a dark environment.
Prompts
- When used for auxiliary dust vacuuming, the illumination multi-surface brush constantly rotates at high speed, so that please do not stay at a same place for too long, otherwise the floor surface may be damaged. There is an over current protection function provided at the end of illumination multi-surface brush. If the illumination multi-surface brush is wound or blocked, the preset protection program will cut off the power supply, the illumination multi-surface brush will stop running, and the 3 capacity indicators will flash all the time. At this point, please shut down the machine immediately, remove the battery pack, check and clean the illumination multi-surface brush, remove the blockage, and then load back the battery pack and start the machine for reuse.
Fig. D-1
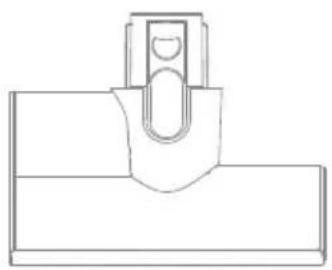
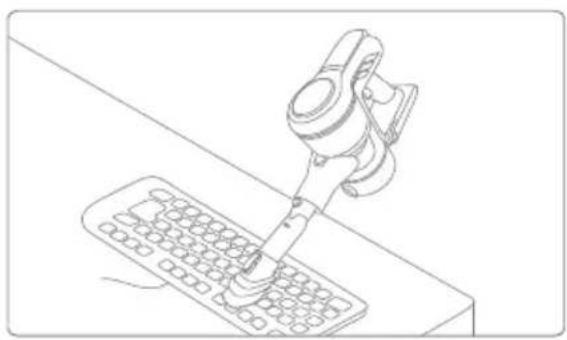
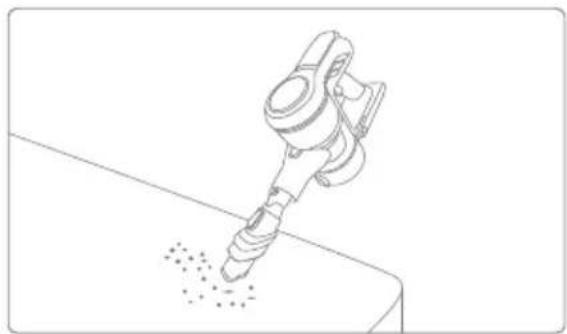
Wide combination tool
It can be used to vacuum the dust from desktops, keyboards, sofa gaps, household appliances, and other surfaces.
Fig. D2-D3
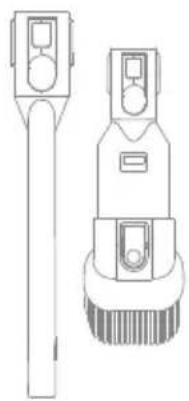
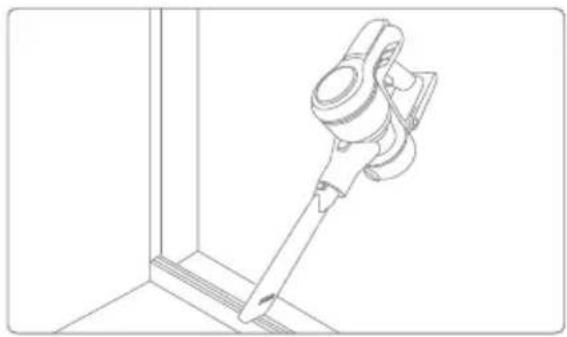
Crevice nozzle
Applicable to cleaning dust at wall corners, gaps, door and window corners, and shallow and narrow places.
Fig. D-4
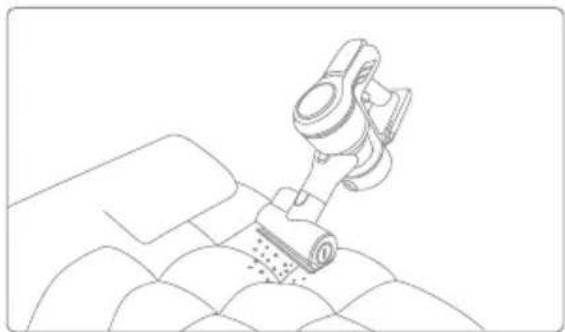
Motorized Mini-Brush
Used as a tool for cleaning household carpets, sofa, mattresses, etc., an electric motor with high-speed rotation can quickly and effectively remove dust, bacteria, mites and other dirt from carpets and furniture surfaces.
Fig. D-5
Note:
- Before installing and replacing accessories, power off the vacuum cleaner.
- This product cannot keep itself upright without fixed support. For storage, the machine and the accessories shall be stably placed.
Care & Maintenance
- Always use genuine parts to avoid voiding the warranty.
- If the filter is clogged, the vacuum cleaner will stop functioning shortly after it is turned on. Please clean up the filter to restore the function.
Before cleaning the dust cup, please verify that the plug has been disconnected and the power button of the vacuum cleaner has been left in the "OFF" position. - If the vacuum cleaner is not used for a long time, please fully charge it, unplug the power cord, take out the battery, and store it in a cool and low -humidity environment, avoiding direct sunlight. To avoid excessive battery discharging, please charge the battery at least once every three months.
Cleaning the vacuum cleaner
Wipe the vacuum cleaner with soft, dry cloth.
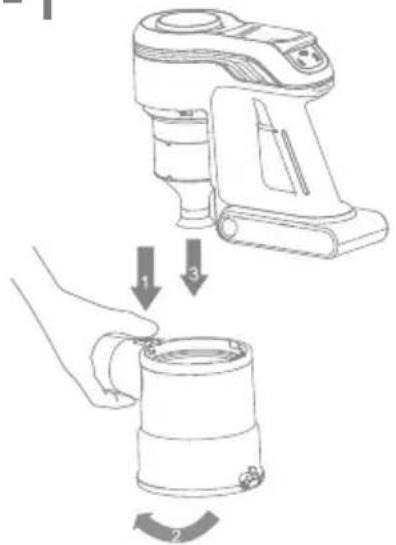
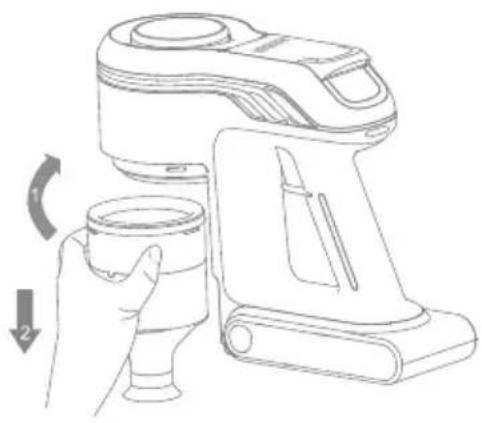
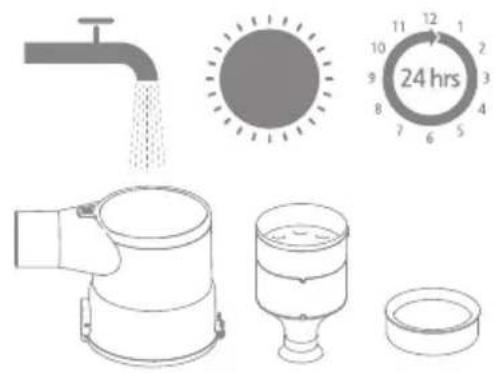
Cleaning the dust cup, air inlet filter, and cyclone separator assembly
- Press the dust cup release button, and remove the cup from the vacuum cleaner.
-
Hold the separator, and rotate it clockwise to remove it from the vacuum cleaner.
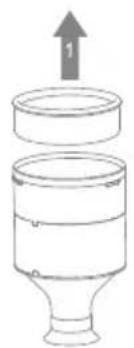
-
Remove the air inlet filter from the cyclone separator.
- Rinse the cyclone assembly, air inlet filter, and dust cup until they are clean. After cleaning, dry it by air for at least 24 hours.
Fig. E1-E4
Attention: Please clean the dust cup as required.
It is recommended to clean the cyclone system and air inlet filter at least once every 3-4 months.
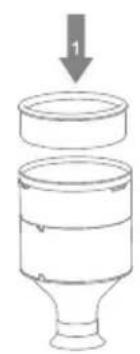
Installation of dust cup, air inlet filter, and cyclone separator assembly
- Put the inlet filter back into the cyclone separator.
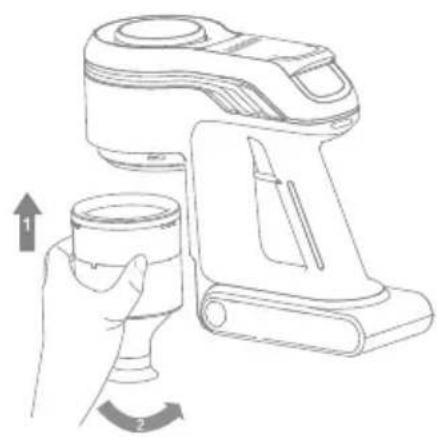
- Hold the cyclone separator, and rotate it counterclockwise onto the vacuum cleaner.
- Align the dust cup with the slot on the vacuum cleaner, and rotate it slowly until the dust cup clicks into place.
Fig. E5-E7
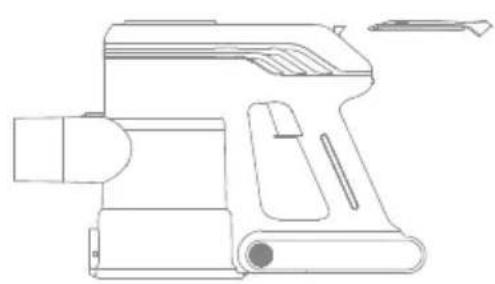
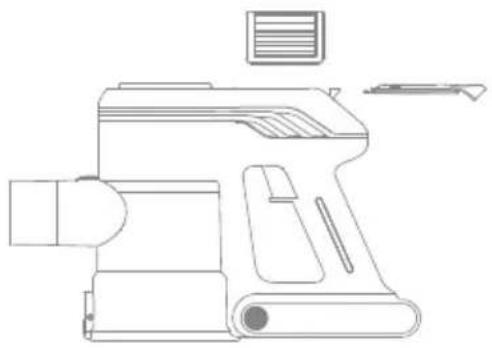
Cleaning air outlet filter
- Open the cover plate of air outlet filter
- Take out the air outlet filter
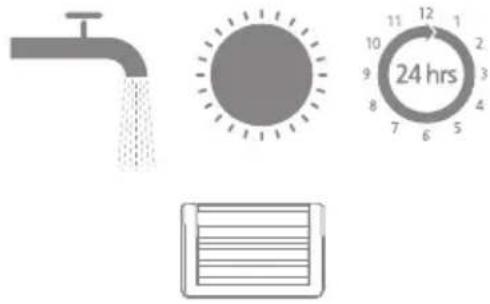
- Rinse the air outlet filter with clean water, and after it is cleaned, dry it by air for at least 24 hours.
Fig. E8-E10
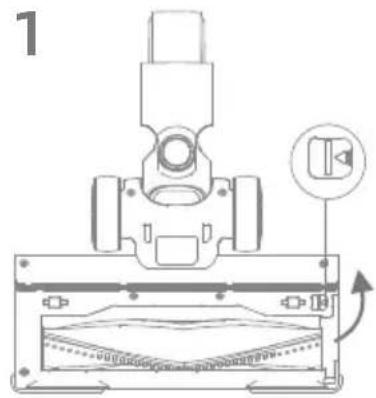
Cleaning illumination multi-surface brush
- Toggle the lock knob of the roller brush in the arrow direction and lift the roller pressing plate at the same time, and then take out the roller brush.
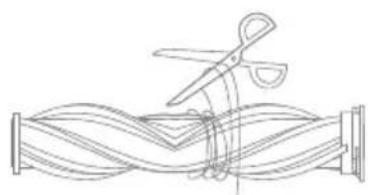
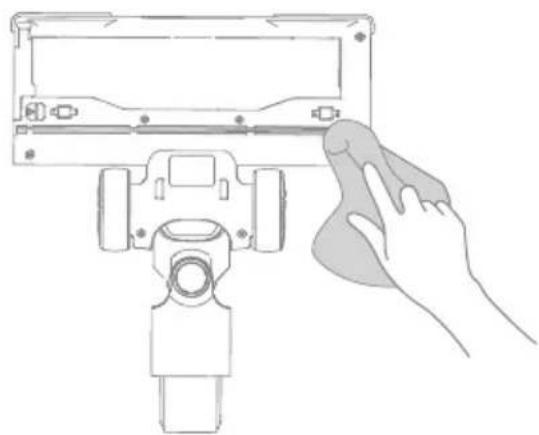
- Cut off the hair and fiber adhering to the brush roller with scissors, and wipe up the dust from the groove and transparent cover with dry cloth or tissue. Wipe it up completely before use.
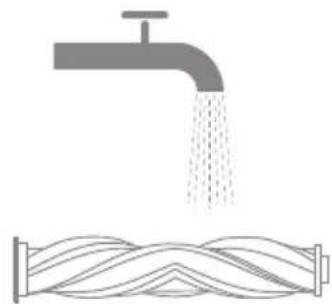
- Rinse the brush roller, if it is dirty, with clean water until it is clean.
- Stand the brush roller upright for at least 24 hours until it is dry completely.
Fig. E11-E14
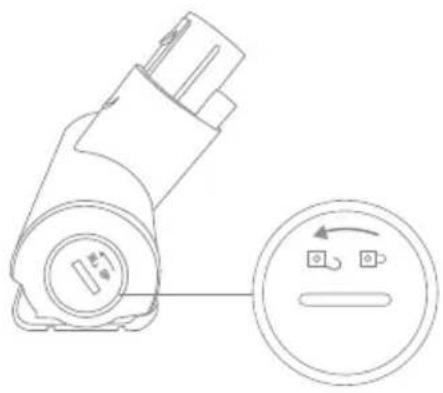
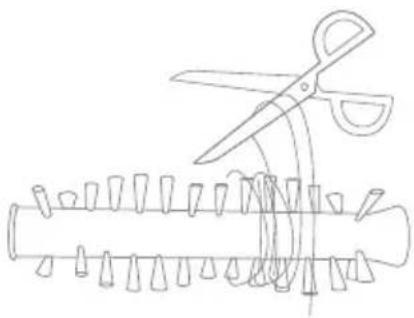
Cleaning motorized mini-brush
- Use a coin to turn the lock counterclockwise until you hear click, then pull out the roller brush.
- Use scissors to cut and pick out any hair or other debris tangled around the roller brush. Wipe the slot and transparent cover with dry cloth or tissue.
- When it is dirty, rinse the roller with clean water until it is clean.
- Stand the roller upright for at least 24 hours until it is completely dry.
Fig. E15-E19
Important note
When the vacuum cleaner works abnormally, please turn off the appliance and cut off the power!
| Errors Possible causes Troubleshooting method | ||
| The appliance cannot start, and the power indicator light flickers for several times and then goes out automatically | Low battery power Charge the product | |
| The vacuum cleaner has no suction power or little suction power | The dust cup is full | Empty the trash in the dust cup |
| The dust cup or separator filter is not installed correctly | Reinstall the dust cup or separator filter properly | |
| There is an obvious dust leak from the vacuum cleaner | The dust cup is full | Empty the trash in the dust cup |
| The dust cup or separator filter is not installed correctly | Reinstall the dust cup or separator filter properly | |
| The roller brush stops rotating, the power indicator light keeps flickering, and the appliance shuts down automatically 30 seconds later | The roller brush gets entangled or stuck, and the protection device starts up | Clean the entanglements in the floor brush |
| The air duct or dust cup filter element is blocked, the machine stops working, the indicator light keeps flickering, and the machine automatically shuts down 30 seconds later | Too many or too large particles of garbage are inhaled in | Clean up the air duct and filter element of the machine |
| The service time is shortened after charging | The charging time is insufficient | Please charge the product fully |
| The battery is aged | Purchase an original battery to replace | |
Specifications
EN
| Vacuum Body | |||
| Model VJ12A Charging Time | Approximately 4.5 hours | ||
| Rated Power 450 W Rated Voltage 25.9 V | — | ||
| Illumination Multi-Surface Brush | |||
| Model VJ12A | |||
| Rated Power 15 W Rated Voltage 25.9 V | — | ||
| Rechargeable Lithium-Ion Battery Pack | |||
| Model HC-21Y-1 Nominal Voltage 25.9 V | — | ||
| Rated Capacity 2500 mAh | |||
| Energy 64.75 Wh | |||
The lithium-ion pack contains substances that are hazardous to the environment. Before disposing of the vacuum, please remove the battery pack, then discard or recycle it in accordance with local laws and regulations of the country or region it is used in.
The appliance must be disconnected from the power supply when removing the battery. Keep batteries out of the reach of children. Never put batteries in mouth. If swallowed, contact your physician or local poison control.
Under abusive conditions, never contact the battery from which the liquid may be ejected. If contact accidentally occurs, rinse with water. If liquid contacts eyes, seek medical help immediately. Liquid ejected from the battery may cause irritation or burns.
All products bearing this symbol are waste electrical and electronic equipment (WEEE as in directive 2012/19/EU) which should not be mixed with unsorted household waste. Instead, you should protect human health and the environment by handing over your waste equipment to a designated collection point for the recycling of waste electrical and electronic equipment, appointed by the government or local authorities. Correct disposal and recycling will help prevent potential negative consequences to the environment and human health. Please contact the installer or local authorities for more information about the location as well as terms and conditions of such collection points.
Sicherheitshinweise
DE
https://www.mova.tech :הכלההוּרָהוּרָהוּרָהוּרָהוּרָהוּרָהוּרָהוּרָהוּרָהוּרָהוּרָהוּרָהוּרָהוּרָהוּרָה
:הכלההוּרָהוּרָהוּרָהוּרָהוּרָהוּרָהוּרָהוּרָהוּרָהוּרָהוּרָהוּרָהוּרָהוּרָהוּרָה
https://www.mova.tech/pages/user-manuals-and-faqs
https://www.mova.tech

- Cordless Stick Vacuum User Manual
- Contents
- Safety Instructions
- Warning— To reduce the risk of fire, electric shock, or injury:
- EN
- Product Overview
- Accessories
- Component Names
- Vacuum Cleaner
- Installation
- Charging
- Prompts
- How to Use
- Used as a vertical vacuum cleaner
- Used as a handheld vacuum cleaner
- Startup for use
- Fig. C-3
- Illumination multi-surface brush
- Fig. D-1
- Wide combination tool
- Fig. D2-D3
- Crevice nozzle
- Fig. D-4
- Motorized Mini-Brush
- Fig. D-5
- Note:
- Care & Maintenance
- Cleaning the vacuum cleaner
- Cleaning the dust cup, air inlet filter, and cyclone separator assembly
- Installation of dust cup, air inlet filter, and cyclone separator assembly
- Cleaning air outlet filter
- Cleaning illumination multi-surface brush
- Cleaning motorized mini-brush
- Important note
- Specifications
- Sicherheitshinweise
Brand : MOVA
Model : J30
Category : Vacuum Cleaner