
S4 Detect - Vacuum Cleaner MOVA - Free user manual and instructions
Find the device manual for free S4 Detect MOVA in PDF.

| Brand | MOVA |
| Model | S4 Detect (VS15A) |
| Type | Stick vacuum cleaner |
| Rated voltage | 28.8 V |
| Rated power | 425 W |
| Battery | Rechargeable lithium-ion, 2500 mAh (rated capacity), 66.24 Wh |
| Charging time | Approximately 4 hours |
| Dust compartment capacity | 0.5 L (estimated) |
| Suction levels | Multiple, adjustable via speed button (includes Turbo mode) |
| Display screen | Yes, with charge indicator, alarms (temperature, blockage, filter) |
| Operating modes | Continuous (trigger lock) and non-continuous |
| Included accessories | Multi-surface brush, mini motorized brush, combination tool, wide combination tool, flexible adapter, extension rod, wall mount, charger |
| Filter | Washable with clean water, dry 24 h, periodic replacement |
| Safety | Automatic shut-off in case of overheating or blockage, overload protection |
| Maintenance | Regular cleaning of dust compartment, filter, and brushes |
| Spare parts | Recommended original battery, filter, brushes, charger |
| Repairability | Replaceable battery, washable filter and brushes, after-sales service available |
| Weight | Approximately 2.5 kg (estimated) |
| General information | Domestic use only, complies with European standards |
Frequently Asked Questions - S4 Detect MOVA
User questions about S4 Detect MOVA
0 question about this device. Answer the ones you know or ask your own.
Ask a new question about this device
Download the instructions for your Vacuum Cleaner in PDF format for free! Find your manual S4 Detect - MOVA and take your electronic device back in hand. On this page are published all the documents necessary for the use of your device. S4 Detect by MOVA.
USER MANUAL S4 Detect MOVA
For more information & after-sales support, contact us via aftersales@dreame.tech or https://mova-tech.com Dreame Trading (Tianjin) Co., Ltd. Made in China
MOVA S4 Detect Cordless Stick Vacuum User Manual
EN User Manual 1
DE Benutzerhandbuch 11
FR Manuel d'utilisation 23
IT Manuale utente 35
ES Manual de usuario 46
PL Instrukcja Obstugi 57
NL Gebruiksaanwijzing 68
AR دليل المستخدم 79
HE 乾地販売
SE Användarmanual 97
NO Brukerhåndbok 107
TR Kullanıcı Kılavuzu 117
DK Brugermanual 127
FIN Käyttöohjeet 137
TH คู่มือการใช้งาน 147
VI Hóng Dǎn Sù Dùng 156
ID Panduan Pengguna 165
A-1
natural_image
Technical line drawing of a mechanical component with internal wave pattern (no text or symbols)1
2
natural_image
Simple line drawing of a vertical cylindrical device with a side arm and a small protrusion (no text or symbols)3

natural_image
Simple line drawing of a vertical cylindrical object with a small protrusion on top (no text or symbols)4
5
natural_image
Simple line drawing of a mechanical clip or bracket (no text or symbols)6
natural_image
Pure electrical circuit lines without any symbols7
8
A-2 A-3
B-1
flowchart
graph TD
    A["Device 1"] --> B["Component 1"]
    B --> C["Component 2"]
    C --> D["Component 3"]
    D --> E["Component 4"]
    E --> F["Component 5"]
    F --> G["Component 6"]
    G --> H["Component 7"]
    H --> I["Component 8"]
    I --> J["Component 9"]
    J --> K["Component 10"]
    K --> L["Component 11"]
    L --> M["Component 12"]
    M --> N["Component 13"]
    N --> O["Component 14"]
    O --> P["Component 15"]
    P --> Q["Component 16"]
    Q --> R["Component 17"]
    R --> S["Component 18"]
    S --> T["Component 19"]
    T --> U["Component 20"]
B-2
C-1

natural_image
Line drawing of a mechanical device with attached cable and housing (no text or symbols)C-2
C-3
natural_image
Technical line drawing of a mechanical device with an inset circular detail showing internal components (no text or symbols)D-1
natural_image
Technical line drawing of a mechanical device with no visible text or symbolsD-2
natural_image
Line drawing of a mechanical device with no visible text or symbolsD-3 D-4
natural_image
Technical line drawing of a robotic arm mounted on a base (no text or symbols)D-6D-5
natural_image
Technical line drawing of a mechanical clamp or bracket assembly on a patterned surface (no text or symbols)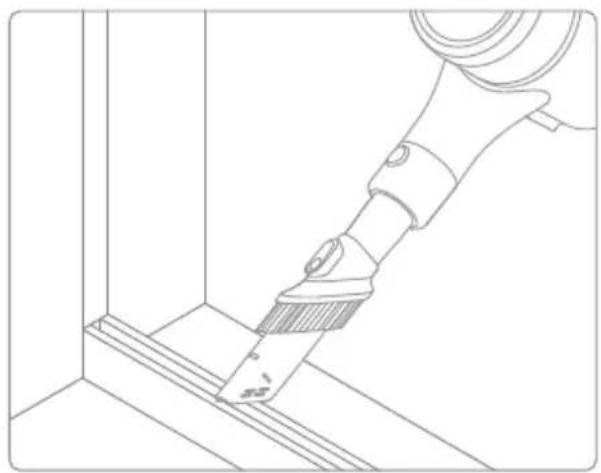
natural_image
Technical line drawing of a robotic arm gripping a small object on a wooden surface (no text or symbols)D-7 D-8
natural_image
Technical line drawing of a mechanical assembly with a magnified inset showing gear and shaft components (no text or symbols)
natural_image
Technical line drawing of a vacuum cleaner device with front and side views (no text or symbols)E-1
natural_image
Line drawing of a mechanical device emitting particles from a tray, with an inset showing a close-up of the tray (no text or symbols)E-2
natural_image
Line drawing of a handheld device with an inset showing internal components (no text or symbols)
natural_image
Line drawing of a hand holding a device with a curved arrow indicating rotation (no text or symbols)E-3
E-4
natural_image
Line drawing of a hand cleaning a small object with a warning symbol (no text or labels)E-5


natural_image
Simple line drawing of a mechanical component with two labeled parts (① and ②), no text or symbols present.E-6
E-7

natural_image
Line drawing of a hand operating a cleaning machine with a magnified inset showing the handle (no text or symbols)E-8
E-9
natural_image
Diagram showing a device being processed into a cylindrical component (no text or symbols present)E-10 E-11


E-12

natural_image
Diagram of a handheld device with a button and arrow indicating direction (no text or symbols)E-14
natural_image
Diagram of a mechanical device with a circular dial indicator showing rotary knob (no text or symbols)E-16

natural_image
Illustration of a faucet pouring liquid into a coiled hose (no text or symbols)E-13
natural_image
Line drawing of a hand operating a cleaning machine with a magnified inset showing the blade detail (no text or symbols)E-15
natural_image
Line drawing of a hand cleaning a small electronic device with scissors and a screen (no text or symbols)E-17
natural_image
Illustration of a twisted rope and a sun with a 24-hour clock (no text or symbols on the diagram itself)E-18 E-19
natural_image
Diagram showing a device connected to a circular dial with an arrow indicating rotation (no text or symbols present)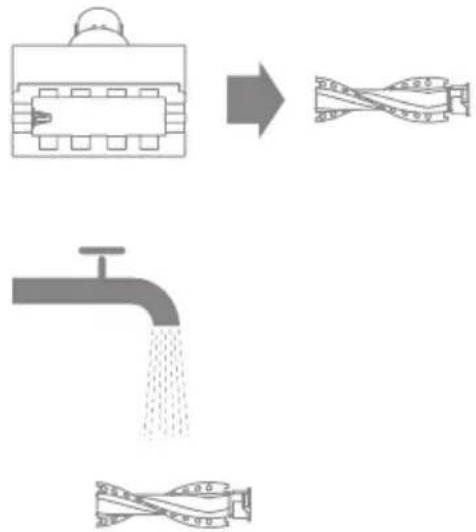
E-20

E-21
natural_image
Diagram showing a plug inserted into a circular dial with a circular knob and directional arrow (no text or symbols)E-22
natural_image
Technical line drawing of a mechanical device with an inset close-up showing a component detail (no text or symbols)To prevent accidents including electric shock or fire caused by improper use, please read this manual carefully before use and retain it for future reference.
Warning
- This product can be used by children aged from 8 years and above and persons with physical, sensory, intellectual deficiencies, or limited experience or knowledge under the supervision of a parent or guardian to ensure safe operation and to avoid any risk of hazards. Cleaning and maintenance shall not be carried out by children without supervision.
- This appliance is not intended for use by persons (including children) with reduced physical, sensory or mental capabilities, or lack of experience and knowledge, unless they have been given supervision or instruction concerning use of the appliance by a person responsible for their safety.
• Children should be supervised to ensure that they do not play with the appliance. - The vacuum is not a toy. Children shall not play with or operate this product. Please exercise caution when using the vacuum near children. Do not allow children to clean or maintain the vacuum unless supervised by a parent or guardian.
- Do not use the vacuum outdoors or on wet surfaces. Only use the vacuum on dry indoor surfaces. Do not touch the plug or any part of the vacuum with wet hands.
- To reduce the risk of fire, explosion, or injury, make sure that the lithium battery and charging adapter are undamaged before use. Do not use the vacuum if either the lithium battery or charger is damaged.
- The brushes, battery, extension rod and vacuum are electrically conductive and should not be immersed in water or other liquid. Make sure to dry all filters after cleaning.
- To prevent injury caused by moving parts, turn off the vacuum before cleaning them. These parts must all be properly installed before using the vacuum.
- Only use the original charging adapter. Never use an unoriginal adapter, as this may cause the lithium battery to catch fire.
- Do not use the vacuum to pick up flammable or combustible liquids, such as gasoline, or bleach, ammonia, drain cleaners or other liquids.
- Do not use the vacuum to pick up sharp or hard objects, such as glass, nails, screws, or coins, which may damage the machine. Do not use the vacuum to pick up drywall particles, ashes like fireplace ash, or smoking or burning materials such as coal, cigarette butts or matches.
- Check the area to be cleaned before use. To prevent the openings from being blocked, clear the larger paper, spitball, plastic cloth or sharp objects (such as glass, nails, screws, coins, etc.) and any object which is larger than openings.
- Keep hair, loose clothing, fingers and other parts of the body away from the vacuum's openings and moving parts. Do not point the hose, wand or tools at your eyes or ears or put them in your mouth.
-
Do not put any object into the vacuum's openings. Do not use the vacuum with any opening blocked. Keep free of dust, lint, hair, or other items which may reduce airflow.
-
Do not lean the vacuum against a chair, table, or other unstable surface, as this may cause damage to the machine or personal injury. If the vacuum becomes damaged or is otherwise malfunctioning, please contact our authorized service department. Never attempt to disassemble the device on your own.
- All instructions in the manual for recharging the battery must be strictly followed. Failure to properly charge the battery within the specified temperature range could damage the battery.
- Only use accessories and replacement parts recommended by the manufacturer.
- Make sure the vacuum is unplugged when not used for extended periods as well as prior to performing any maintenance or repairs.
- Please be extra careful when using the vacuum to clean stairs.
- Do not install, charge, or use this product outdoors, in bathrooms, or around a pool.
- Fire Hazard Warning: Do not apply any type of fragrance to the vacuum's filter. These types of products are known to contain flammable chemicals which may cause the vacuum to catch fire.
- Only use the original charger (Model TPQ-88E340090VW01). Failing to do so may cause the lithium-ion battery to catch fire.
- WARNING: For the purposes of recharging the battery, only use the detachable supply unit provided with this appliance.
- Only use the approved battery type (Model V2213V-8S1P-BWA). Failing to do so may cause the lithium-ion battery to catch fire.
- If the battery material is released, remove personnel from area until the batteries cool down and fumes dissipate.
- Provide maximum ventilation to clear out hazardous gases and avoid skin and eye contact or inhalation of vapors.
- Remove spilled liquid with absorbent and incinerate waste.
- Do not use and store in extremely hot or cold environments (below 0°C /32°F or above 40°C /104°F). Please charge the cordless vacuum in temperature above 0°C /32°F and below 40°C /104°F.
• This product is designed for home use only. - The supply terminals are not to be short-circuited.

Detachable supply unit
We, Dreame Trading (Tianjin) Co., Ltd., hereby, declares that this equipment is in compliance with the applicable Directives and European Norms, and amendments. The full text of the EU declaration of conformity is available at the following internet address: https://mova-tech.com
For detailed e-manual, please go to https://www.mova-tech.com/pages/user-manuals-and-faqs
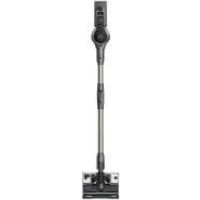
Product Overview
Note: The images in this manual are for illustrative purposes only. The actual product may differ.
Accessories
- Multi-Surface Brush
- Combination Tool
- Charger
- Extension Rod
- Wide Combination Tool
- Motorized Mini-Brush
- Wall Mount (Including screw × 2, wall plug × 2, and mounting template sticker)
- Flexible Adapter
Fig. A-1
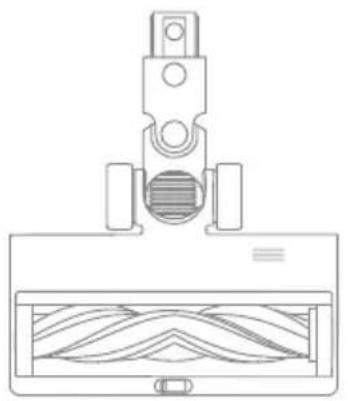
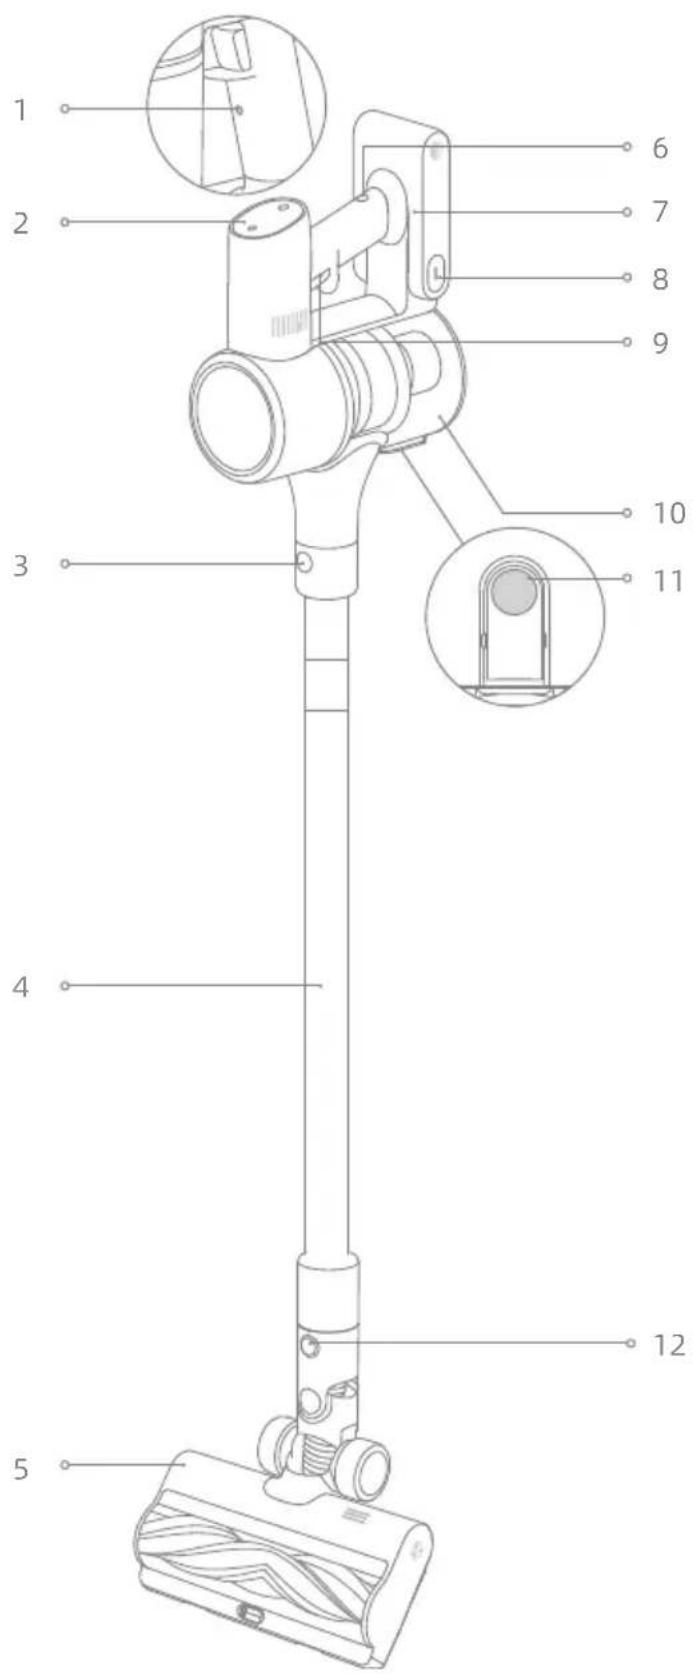
Component Names
- Antistatic Contact
- Display Screen
- Extension Rod Release Button
- Extension Rod
- Multi-Surface Brush
- Charging Port
- LED Battery Status Indicator
- Battery Release Button
- Power Button
- Press to turn on
- Release to turn off
- Dust Cup
-
Brush Release Button
-
Dust Cup Bottom Cover Release Button
Fig. A-2
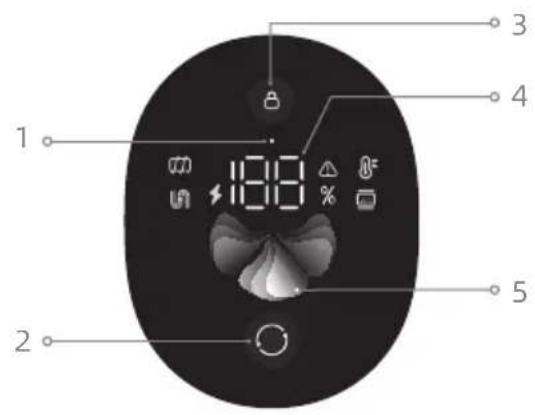
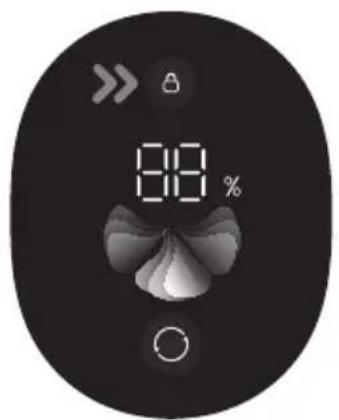
Introduction of Display Screen

High-temperature Alert

Roller Brush Stuck

Air Duct Blocked

Error

Filter is expiring
Charging/Low Battery Level Indicator
- Blinking red: Battery level ≤ 10%
- Pulsing red: Battery level ≤ 10% (charging)
- Pulsing green: Battery level > 10% (charging)
- Lock Status
- Suction Level Switch Press briefly to switch the suction level.
- Trigger Switch Lock Press briefly to enter/exit lock.
- Battery Level Percentage When the display screen shows "LO", it indicates that the battery level is lower than 10%.
- Suction Level The color of fan-shaped icon changes with different modes.
Fig. A-3
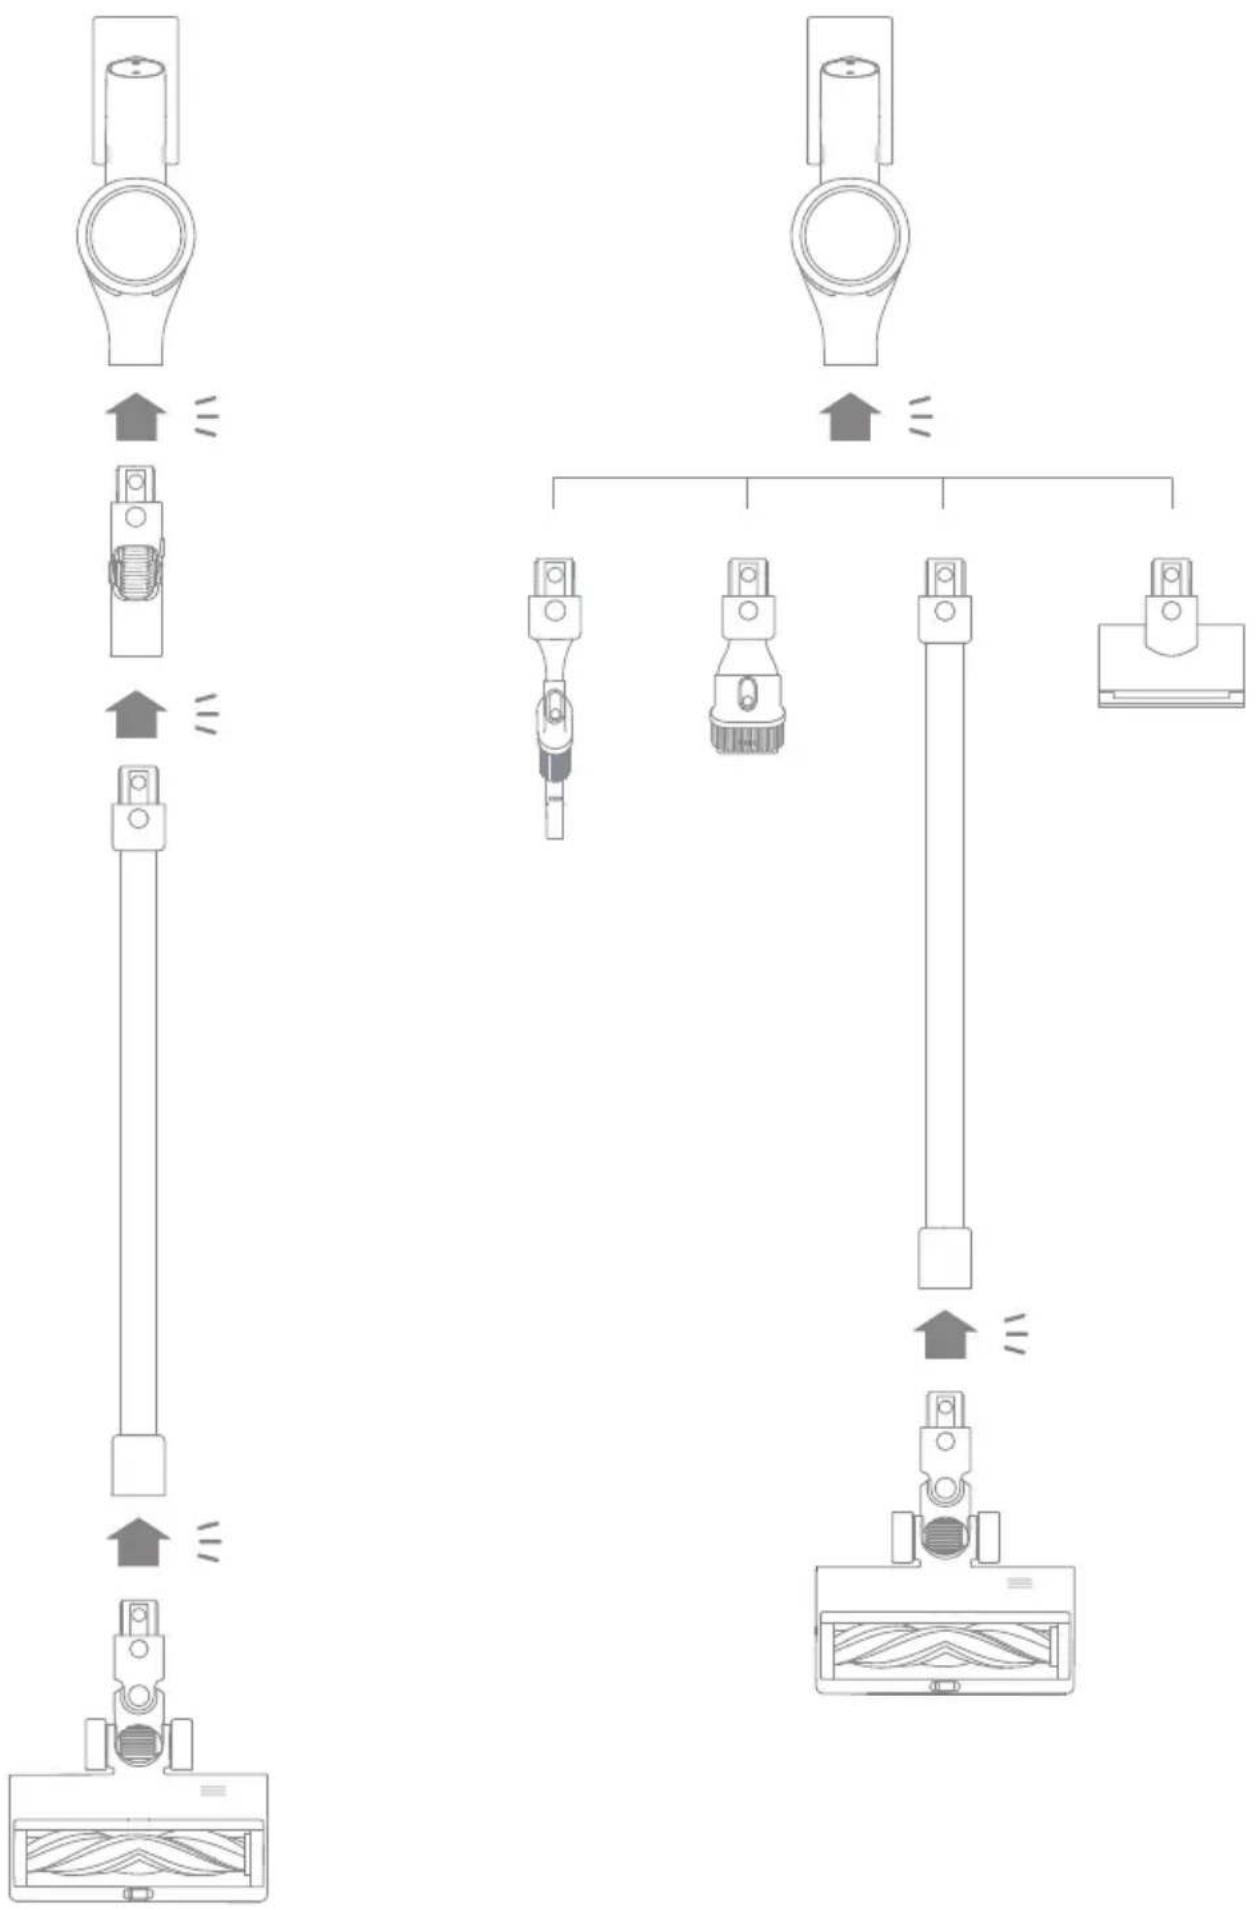
Installation
Vacuum Installation Diagram
= Click
Fig. B-1
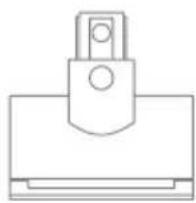
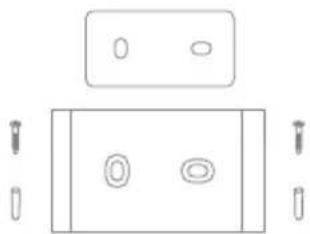
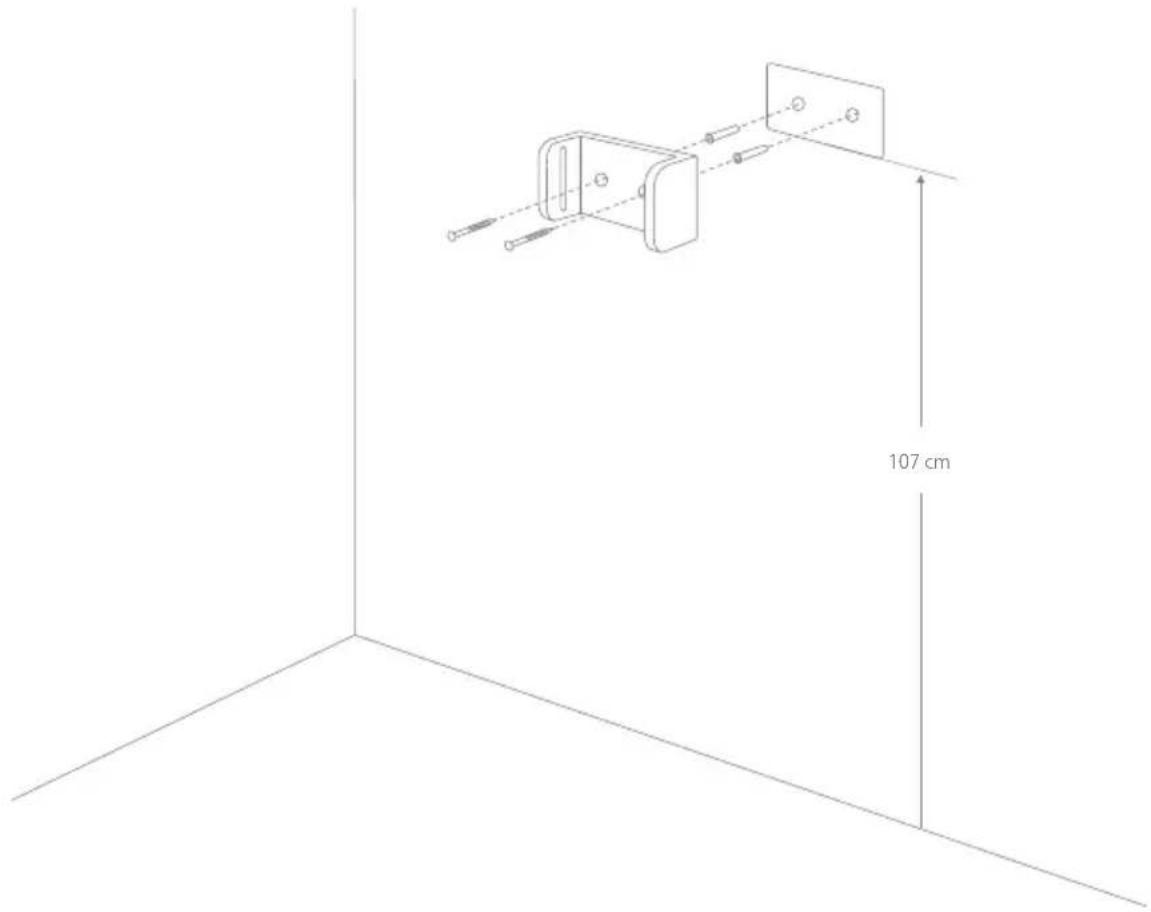
Wall Mount Installation Diagram
- Paste the mounting template sticker on the wall. The bottom edge of the mounting template sticker should be parallel to and about 107cm from the ground.
- Use a power drill with an 8 mm drill bit to drill a hole into each marker on the mounting template sticker, then insert a wall plug into each hole.
- Align the locating holes on the mount with the holes on the wall. Fasten it to the wall with the included screws.
Fig. B-2
Note: • The wall mount is an optional accessory. You can install it based on your needs.
- The wall mount should be installed on a cool, dry surface with an electrical outlet nearby. Prior to installing, ensure that there are no electrical wires or pipes in the space directly behind installment position.
Charging
Note:
- Fully charge the vacuum before using it for the first time.
• A full charge will take approx. 4 hours.
• Vacuuming in Turbo Mode for a prolonged period will cause the battery to heat up, which increases charging time. Allow the vacuum to cool down for 30 minutes before charging it.
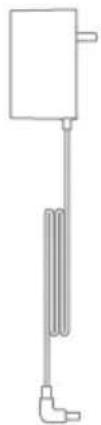
Charging Methods
Charging the vacuum with the charger
Fig. C-1
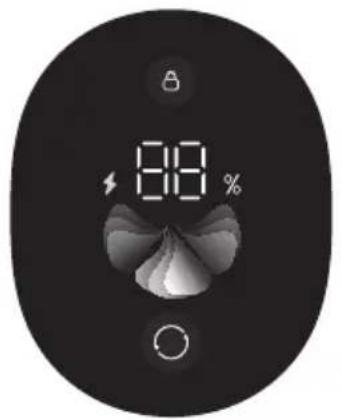
Battery Status Display
Display Screen
The number on the display screen represents the current battery level in a percentage during charging. When the number becomes 100, the battery is fully charged.
Fig. C-2
LED Battery Status Indicator

Note: Once the vacuum is fully charged, the indicator will turn off after 5 minutes, and the vacuum will enter energy-saving mode.
Fig. C-3
How to Use
Working Methods
Select from two working methods for the vacuum, which can be selected based on your own needs.
Method 1: Discontinuous Cleaning Mode
Press and hold the power button to start the appliance, and release the button to stop immediately.
Fig. D-1
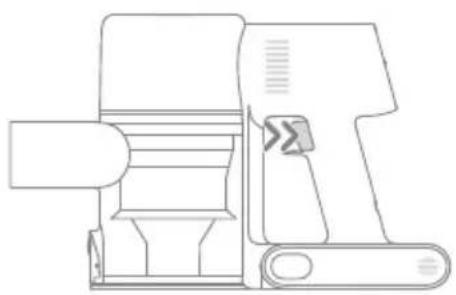
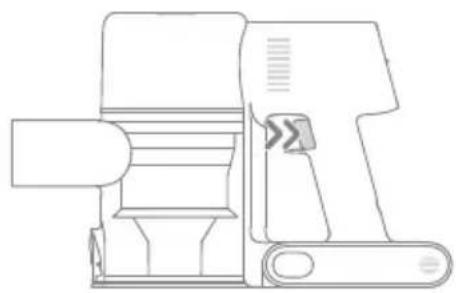
Method 2: Continuous Cleaning Mode (Trigger Switch Lock)
Press the trigger switch lock to switch to Continuous Cleaning Mode, and then briefly press the power button to keep the vacuum in Continuous Cleaning Mode.
Fig. D-2
Note:
- Use the trigger switch lock to free your fingers from fatigue caused by holding the switch.
- Press the trigger switch lock again to quit Continuous Cleaning Mode.
Using Different Accessories
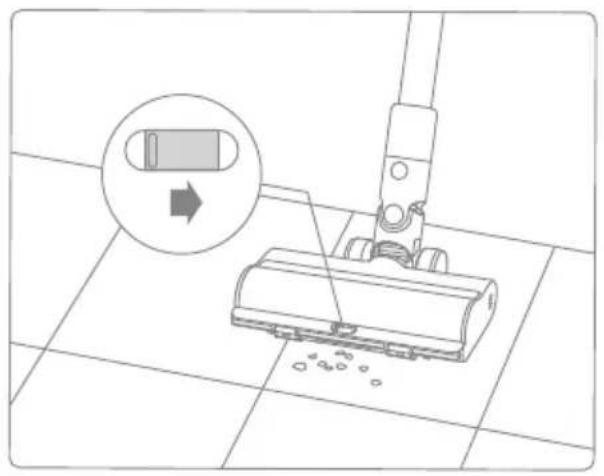
Multi-Surface Brush
Note:
- The multi-surface brush can be attached directly to the vacuum.
- When the appliance starts, the lights in front of the brush roller will automatically turn on, which is convenient for use.
- When using on baby play mats, carpets or for vacuuming coffee beans, pop corn and other pellets, turn on the switch on the brush.
- When vacuuming on tiles, wooden floors or other hard surfaces, turn off the switch.
Fig. D-3
Wide Combination Tool
For vacuuming dust from curtains, keyboards, ceilings, sofas, vehicle interiors, coffee tables, etc.
Fig. D-4
Motorized Mini-Brush
For vacuuming dirt, pet hair, and other stubborn debris from sofas, bedding, and other fabric surfaces.
Note: It is not recommended to vacuum on fragile surfaces, such as silk.
Fig. D-5
Combination Tool
Suitable for vacuuming cracks, corners of doors and windows, stairs, and other hard-to-reach places.
Fig. D-6
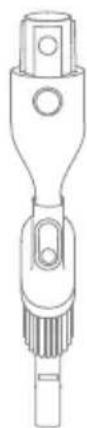
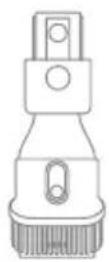
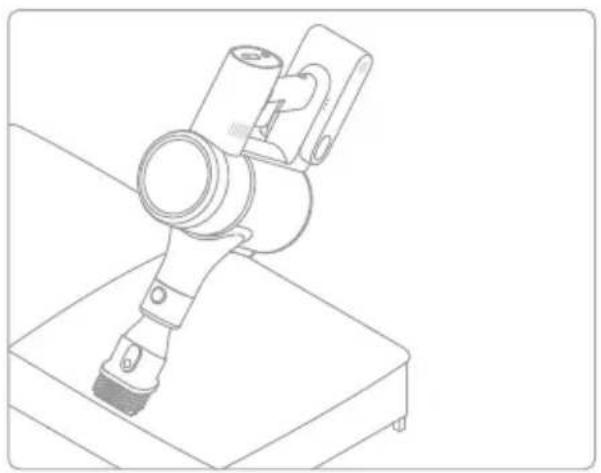
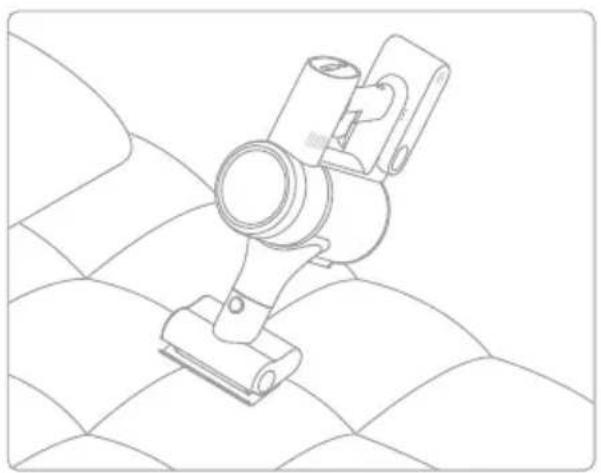
Flexible Adapter
Bending and extending the rod with one click can easily reach under low-lying furniture, such as bed and sofa.
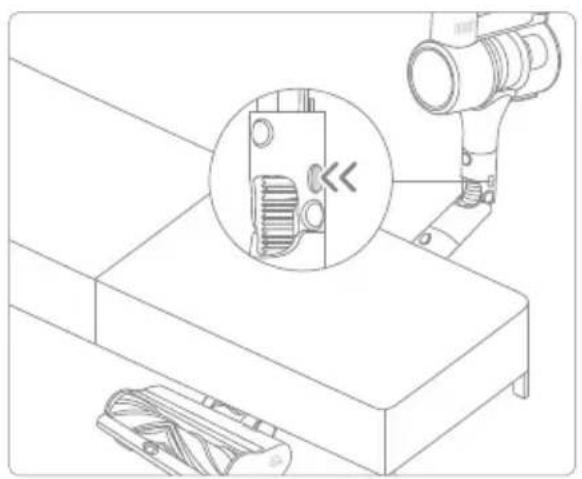
Fig. D-7
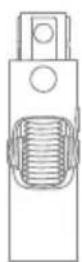
Wall Mount
The vacuum cleaner can be placed on the wall mount when it is not in use.
Fig. D-8
Note:
- Do not put the vacuum cleaner alone on the wall mount.
- Place it on the wall mount after connecting it with the extension rod and the smart multi-surface brush.
Note:
- If any rotating part becomes stuck, the vacuum may shut off automatically. Remove any trapped foreign objects, then resume use.
- When the battery becomes overheated, the vacuum will automatically shut off. Then resume use until the battery temperature returns to normal.
Care & Maintenance
Tips:
• Always use genuine parts to keep your warranty from becoming void.
- If the filter or nozzle becomes clogged, the vacuum will stop working shortly after being turned on. To restore normal functions, clean the filter and/or nozzle.
- If the vacuum is not be used for an extended period, fully charge it, unplug its charger, and store it in a cool, low-humidity environment away from direct sunlight. To avoid over-discharging the battery, recharge the vacuum at least once every three months.
Cleaning the Vacuum
Wipe the vacuum with a soft dry cloth.
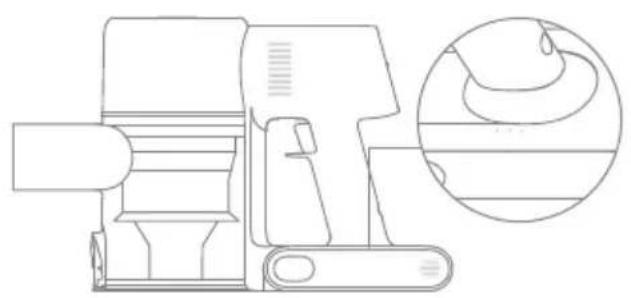
Cleaning the Dust Cup, Pre-Filter, and Cyclone Assembly
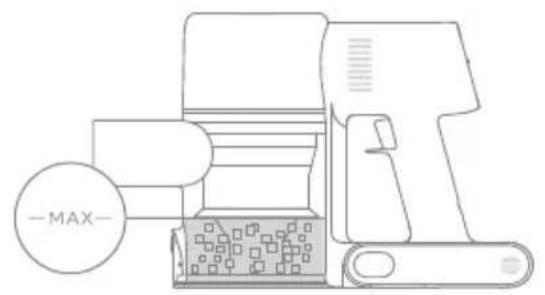
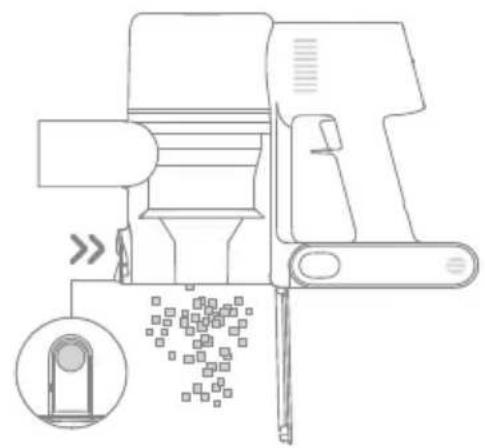
- Press the dust cup bottom cover release button, then empty the contents.
- Push the dust cup release switch in the direction indicated by the arrow, then gently remove the dust cup from the vacuum.
Note:
- The vacuum's cleaning ability will be reduced if the dust cup is filled to the "MAX" mark. To regain performance, empty the dust cup in a timely manner.
- Before emptying the cup, make sure the vacuum is disconnected from the power, and do not press its power button.
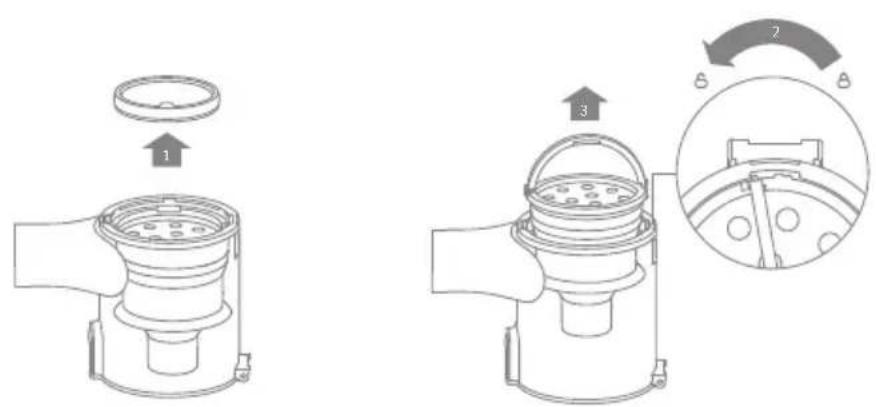
- Remove the pre-filter first, then lift the handle of the cyclone assembly and turn it counterclockwise until it stops, then pull to lift out the cyclone assembly.
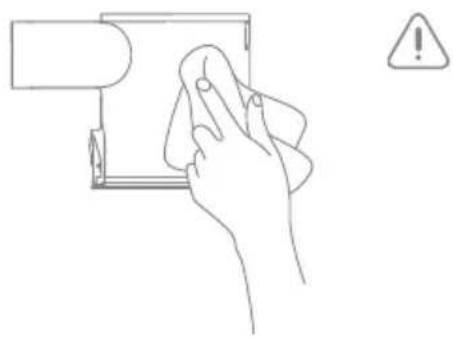
- Wipe the dust cup with a soft wet cloth. Pay attention to wring out the discloth before using.
⚠️To reduce the risk of electric shock, do not rinse the dust cup with water.
- Rinse the cyclone assembly and prefilter until they are clean. After washing, air dry for at least 24 hours.
① Cyclone Assembly
② Pre-Filter
Fig. E-1-Fig. E-5
Note: It is recommended to clean the pre-filter at least once every 3 months and the cyclone system at least once every 6 months.
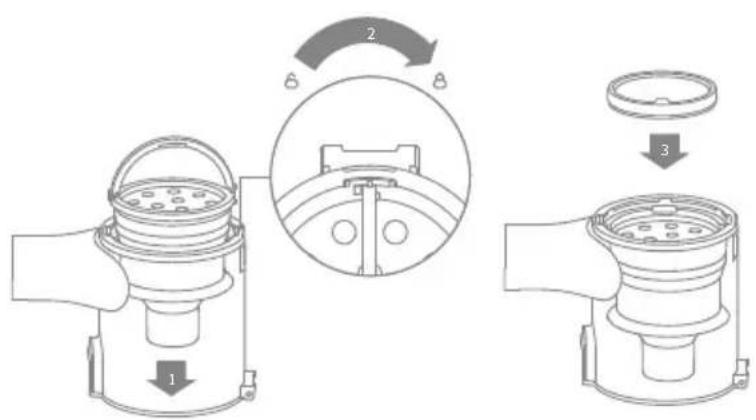
Installing the Dust Cup, Pre-Filter, and Cyclone Assembly
- Insert the cyclone assembly vertically into the dust cup, and make sure that the handle of the cyclone assembly line up with the slot on the left side of the dust cup. Turn the handle clockwise until it locks, then flip the handle down.
- Place the pre-filter with its front side facing up into the cyclone assembly.
- Slightly tilt the dust cup so its slot aligns with the clip on the vacuum. Then gently push the dust cup until it clicks into place.
Fig. E-6-Fig. E-7
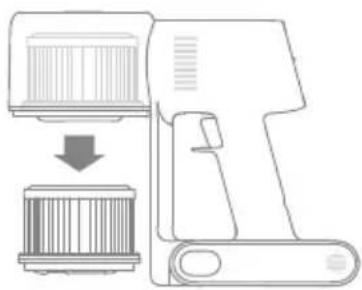
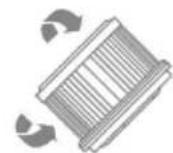
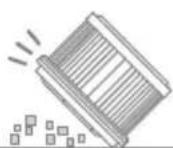
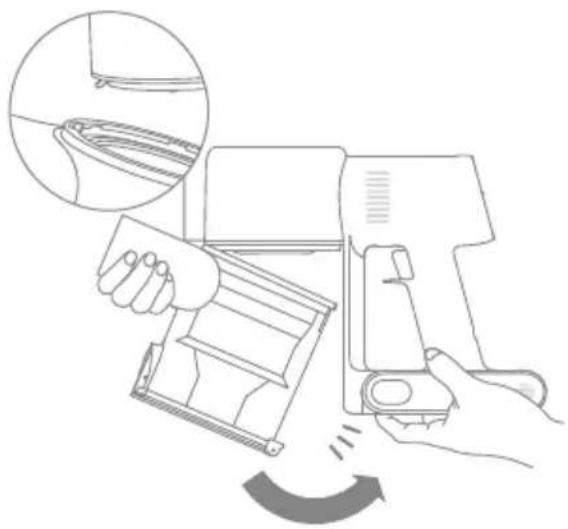
Cleaning the Filter
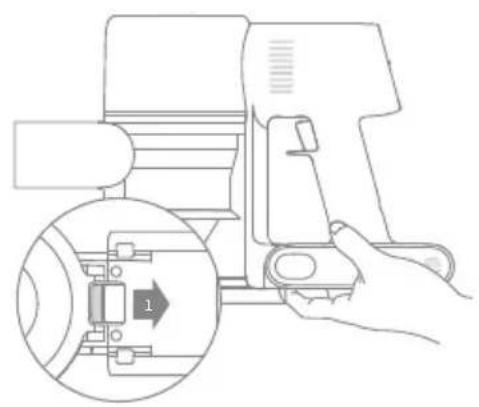
- Remove the dust cup as shown in the figure.
- Remove the filter from the vacuum by pulling it down in the direction shown in the figure.
- Clean the filter with clean water. Make sure you rotate the filter 360^ to thoroughly and remove all dust caught in the filter. Lightly tap the filter several times to remove any excess dirt.
- Allow the filter to air dry for 24 hours.
Fig. E-8-Fig. E-11
Note:
- It is recommended to clean the filter once every 4 to 6 months.
- Only use clean water to wash the filter. Do not use detergent.
- Do not attempt to clean the filter with a brush or finger.
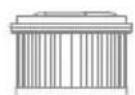
Installing the Filter
- Insert the filter into the vacuum and gently press down, as illustrated.
- Reinstall the dust cup.
Fig. E-12-Fig. E-13
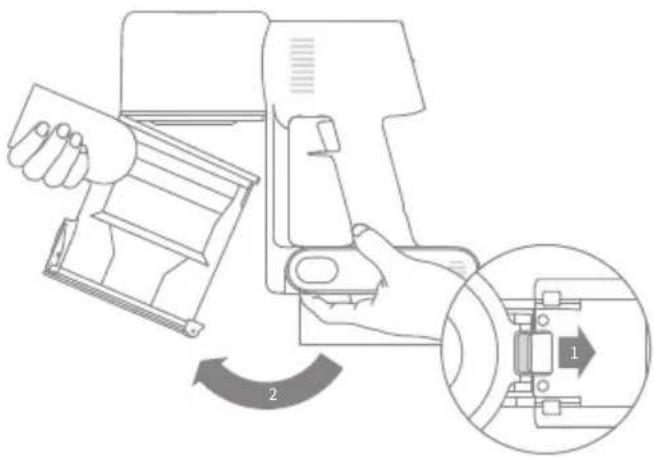
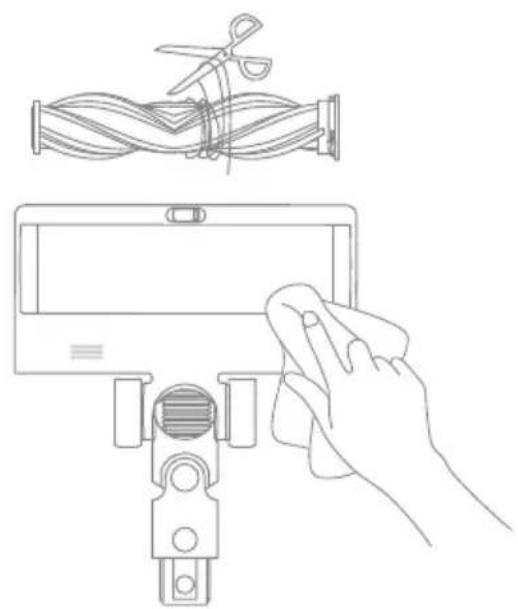
Cleaning the Multi- Surface Brush
- Turn the lock counterclockwise until it stops, then remove the brush roller from the brush.
- Use scissor to cut off the hairs and fibers that get stuck on the brush. Wipe the dust from the notch and transparent cover with a dry cloth or paper towel. Thoroughly dry before use.
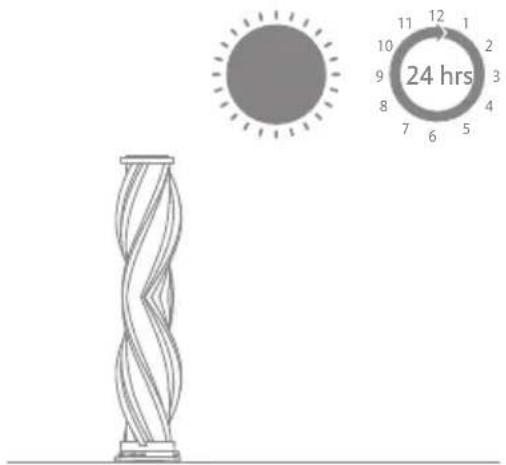
- When it is dirty, rinse the brush roller with clean water until it is clean.
- Stand the brush roller upright for at least 24 hours until it is fully dry.
Fig. E-14-Fig. E-17
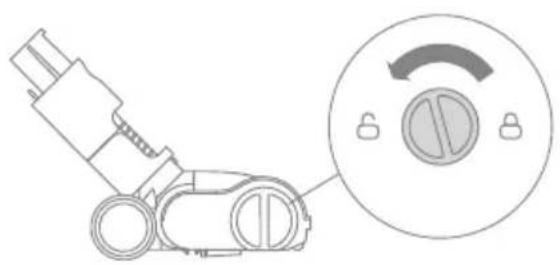
Cleaning the Motorized Mini-Brush
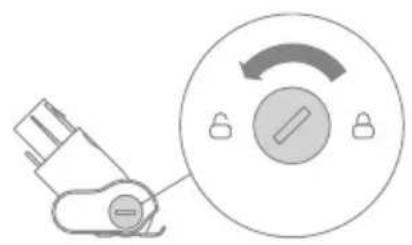
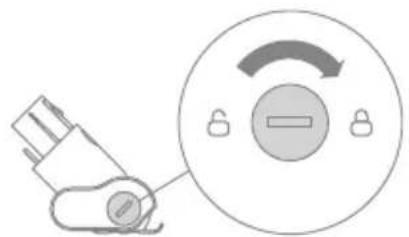
- Use a coin as illustrated to rotate the lock counterclockwise until you hear a click.
- After unlocking the motorized mini-brush, remove the brush roller, then rinse and clean it.
- Stand the brush roller upright in a well-ventilated area for at least 24 hours until it is fully dry.
- Once the brush roller is dry, reinstall it by following the disassembly steps in reverse.
Fig. E-18-Fig. E-21
EN
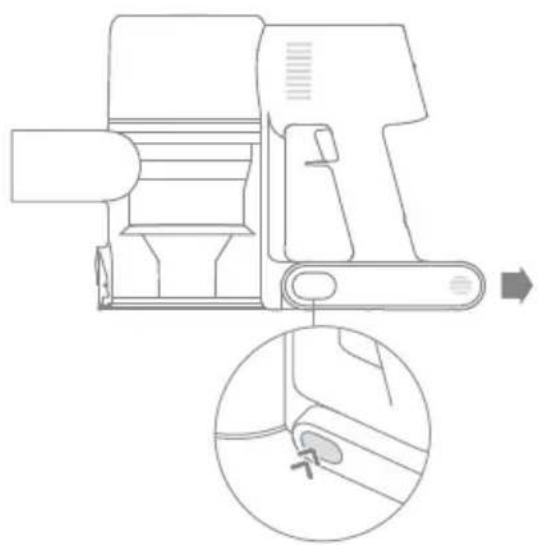
Battery Pack
The vacuum contains a removable rechargeable lithium-ion battery pack which has a limited number of recharge cycles. After extended use, the battery pack may no longer hold a charge. If this happens, it means the battery pack has reached the end of its life cycle and needs to be replaced.
- Press down the battery pack release button and slide the battery pack to the right, as illustrated, to remove it.
- Install the new battery pack.
Fig. E-22
Specifications
EN
| Vacuum | |||
| Model VS15A | |||
| Charging Voltage 34 | V Rated Voltage 28.8 V | --- | |
| Rated Power 425 | W Charging Time Approx. 4 hours | ||
| Motorized Mini-Brush | |||
| Model VMM4 | |||
| Rated Power 20 W | Rated Voltage 25.2 V | --- | |
| Multi-Surface Brush | |||
| Model VMBZ | |||
| Rated Power 40 W | Rated Voltage 25.2 V | --- | |
| Charger | |||
| Model TPQ-88 | E340090VW01 | ||
| Input | 100-240 V ~ 50/60 Hz 0.8 A | Output 34 V | 0.9 A --- |
| Average Active Efficiency | 87.01% | Efficiency at Low Load (10%) | 87.01% |
| No-load Power Consumption | 0.1 W | ||
| Rechargeable Lithium-Ion Battery Pack | |||
| Model | V2213V-8S1P-BWA | ||
| Nominal Voltage | 28.8 V Nominal Capacity 2500 mAh | ||
| Rated Capacity | 2300 mAh | Energy | 66.24 Wh |
The lithium-ion pack contains substances that are hazardous to the environment. Before disposing of the vacuum, please remove the battery pack, then discard or recycle it in accordance with local laws and regulations of the country or region it is used in.
The appliance must be disconnected from the power supply when removing the battery. Keep batteries out of the reach of children. Never put batteries in mouth. If swallowed, contact your physician or local poison control.
Under abusive conditions, never contact the battery from which the liquid may be ejected. If contact accidentally occurs, rinse with water. If liquid contacts eyes, seek medical help immediately. Liquid ejected from the battery may cause irritation or burns.
If the vacuum is not working properly, please refer to the table below.
| Errors Possible Causes Solutions | ||
| Vacuum does not work. | Vacuum is out of battery or low on power. | Fully charge the vacuum, then continue to use it. |
| Overheat protection mode triggered by a blockage. | Clean the suction openings or air duct. Wait until the vacuum cools down, then reactivate it. | |
| Suction opening or air duct is blocked. | Clear any blockage from suction opening or air duct. | |
| Weak suction force. | Dust cup is full and/or filter assembly is clogged. | Empty the dust cup and clean the filter assembly. |
| Attachment is blocked. | Clear any blockage in the attachment. | |
| Motor is making a strange noise. | Main suction opening or extension rod is blocked | Clear any blockage in the main suction opening or extension rod. |
| The first indicator is red when using the vacuum. | Battery pack is damaged. | Please contact the after-sales service department for maintenance. |
| The first indicator blinks red when charging the vacuum. | The charger is incompatible. | Only use the original charger to charge the vacuum. |
| The battery indicator does not light when charging. | The charger does not plug into the vacuum well. | Check whether the charger is properly plugged into the vacuum. |
| The battery is fully charged and went into sleep mode. | The vacuum can be used normally. | |
| If the problem persists after ruling out the above two possibilities, please contact the after-sales service department for maintenance. | ||
| The vacuum charges slowly. | Battery temperature is too low or too high. | Wait until the battery's temperature returns normal, then continue to use the vacuum. |
| LED lights of the multi-surface brush do not work. | LED lights are damaged. | Please contact the after-sales department for maintenance. |
Troubleshooting
EN
If the vacuum is not working properly, the screen display will show an error message. Please refer to the troubleshooting table to find your solution.
| Error Icon Status Error Message Solutions | |||
 | Blinking Red | High-temperature Alert | Please wait and continue to use after motor temperature is normal. |
 | Blinking Orange Roller brush stuck | Refer to the [Cleaning the Multi-Surface Brush] section to clean the debris and hair tangled on the brush roller. | |
 | Blinking Orange Air Duct | Blocked | Check whether the dust cup, extension rod, multi-surface brush, or motorized mini-brush is blocked. |
 | Solid orange Filter is expiring | Please replace the filter in time. After replacing the filter, press and hold the trigger switch lock for 3 seconds to reset the filter. | |
| If one of the error codes from E0 to E4 appears on the display, please contact the after-sales service team for repair. | |||
WEEE Information
All products bearing this symbol are waste electrical and electronic equipment (WEEE as in directive 2012/19/EU) which should not be mixed with unsorted household waste. Instead, you should protect human health and the environment by handing over your waste equipment to a designated collection point for the recycling of waste electrical and electronic equipment, appointed by the government or local authorities. Correct disposal and recycling will help prevent potential negative consequences to the environment and human health. Please contact the installer or local authorities for more information about the location as well as terms and conditions of such collection points.
Brosse multi-surfaces
Remarque :
https://www.mova-tech.com/pages/user-manuals-and-faqs
https://www.mova-tech.com/pages/user-manuals-and-faqs
.הכלה 24הכלההוּרָהוּרָהוּרָהוּרָהוּרָהוּרָהוּרָהוּרָהוּרָהוּרָהוּרָהוּרָהוּרָהוּרָהוּרָה:4
E-11 אַרְהָא- E-8 אַרְהָא
:תְרָה
• אַרְהָם
.ב'UTIN א'ר
•.
https://www.mova-tech.com/pages/user-manuals-and-faqs

Produktoversigt
- Slippes, for at slukke


- MOVA S4 Detect Cordless Stick Vacuum User Manual
- A-2 A-3
- Warning
- Detachable supply unit
- Product Overview
- Accessories
- Component Names
- Introduction of Display Screen
- Installation
- Vacuum Installation Diagram
- Wall Mount Installation Diagram
- Charging
- Note:
- Charging Methods
- Battery Status Display
- Display Screen
- LED Battery Status Indicator
- How to Use
- Working Methods
- Method 1: Discontinuous Cleaning Mode
- Method 2: Continuous Cleaning Mode (Trigger Switch Lock)
- Using Different Accessories
- Multi-Surface Brush
- Wide Combination Tool
- Fig. D-4
- Motorized Mini-Brush
- Fig. D-5
- Combination Tool
- Fig. D-6
- Flexible Adapter
- Fig. D-7
- Wall Mount
- Fig. D-8
- Care & Maintenance
- Tips:
- Cleaning the Vacuum
- Cleaning the Dust Cup, Pre-Filter, and Cyclone Assembly
- Fig. E-1-Fig. E-5
- Installing the Dust Cup, Pre-Filter, and Cyclone Assembly
- Fig. E-6-Fig. E-7
- Cleaning the Filter
- Fig. E-8-Fig. E-11
- Installing the Filter
- Fig. E-12-Fig. E-13
- Cleaning the Multi- Surface Brush
- Fig. E-14-Fig. E-17
- Cleaning the Motorized Mini-Brush
- Fig. E-18-Fig. E-21
- Battery Pack
- Specifications
- Troubleshooting
- WEEE Information
- Brosse multi-surfaces
- E-11 אַרְהָא- E-8 אַרְהָא
- Produktoversigt
Brand : MOVA
Model : S4 Detect
Category : Vacuum Cleaner