
LS-200 - Turntable LENCO - Free user manual and instructions
Find the device manual for free LS-200 LENCO in PDF.

| Product type | Vinyl turntable with Bluetooth reception and transmission and built-in speakers |
| Brand and model | Lenco LS-200 |
| Dimensions (closed lid) | 325 × 320 × 105 mm |
| Weight | 4.85 kg |
| Power supply | AC adapter 100-240 V ~50/60 Hz, output 12 V ⎓ 2 A |
| Power consumption | 24 W (standby < 0.5 W) |
| Drive motor | DC servo motor |
| Playback speeds | 33 1/3 and 45 RPM |
| Bluetooth version | 5.2 |
| Bluetooth range | 10 m |
| Bluetooth transmission power | < 6 dBm |
| Audio power of speakers | 2 × 10 W RMS |
| Speaker dimensions (per speaker) | 144 × 175 × 220 mm |
| Inputs / Outputs | AUX 3.5 mm input, RCA output, speaker inputs (left/right) |
| Bluetooth functions | Transmission (output) and reception (input) |
| Automatic stop | Yes, with ON/OFF switch |
| Included accessories | 2 speakers, turntable mat, 45 RPM adapter, dust cover, EU/UK power adapters |
| Maintenance | Clean the exterior with a soft damp cloth every month; replace the stylus every 300-500 hours |
| Intended use | Domestic, indoor only |
Frequently Asked Questions - LS-200 LENCO
User questions about LS-200 LENCO
0 question about this device. Answer the ones you know or ask your own.
Ask a new question about this device
Download the instructions for your Turntable in PDF format for free! Find your manual LS-200 - LENCO and take your electronic device back in hand. On this page are published all the documents necessary for the use of your device. LS-200 by LENCO.
USER MANUAL LS-200 LENCO
Turntable with Bluetooth® reception, transmission, and wooden speakers
USER MANUAL
EN User manual 3
DE Betriebsanleitung 12
FR Manuel d'utilisation 21
NL Gebruikershandleiding 30
IT Manuale d'uso 39
ES Manual del usuario 48
PT Manual do utilizador 57
sv Användarmanual 66
FI Käyttäjän käsikirja 75
NO Brukerhåndbok 84
DA Brugervejledning 93
HU Felhasználói kézikönyv 102
PL Podręcznik użytkownika 111
EL Εγχειρίδιο χρήσης
SK Používatel'ská príručka 129
cs Uživatelská příručka 138
RO Manual de utilizare 147
120
Turntable with Bluetooth® reception, transmission, and wooden speakers
LS-200
Aboutthisdocument
This document is the user manual and contains all the information for correct, efficient, and safe use of the product.
Ensure you have fully read and understood the instructions in this document before you install or use the product. Keep the packaging and this document for future reference.
Symbols used
| WARNING! | Signal word used to indicate a potentially hazardous situation which, if not avoided, could result in death or serious injury. |
| CAUTION! | Signal word used to indicate a potentially hazardous situation which, if not avoided, could result in minor or moderate injury. |
| NOTICE | Signal word used to address practices not related to physical injury. |
| i | Indicates important information that is not directly related to safety. |
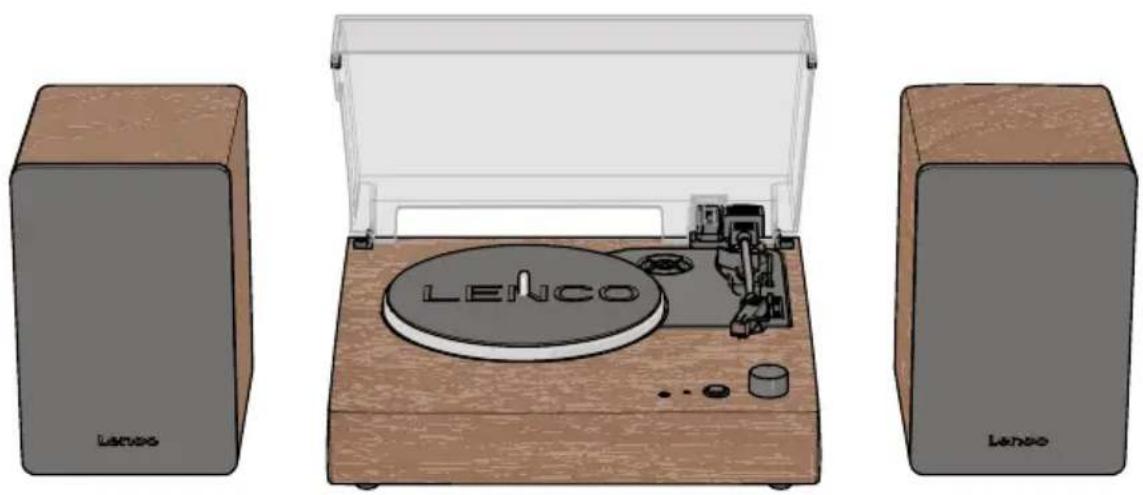
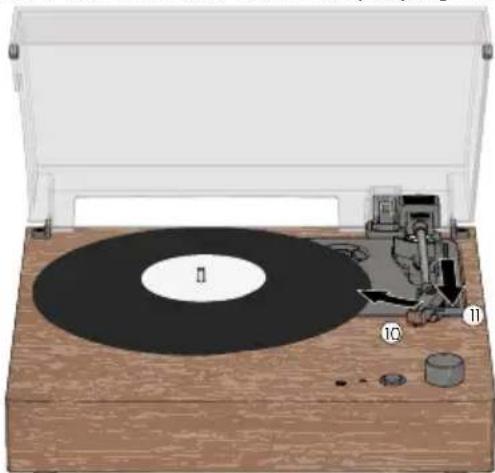
Productdescription

① Turntable mat
②Turntableplatter
3Turntablespindle
4AUXoutput
⑤IndicatorLED
⑥ Modebutton
⑦ Power/Volumedial
8 Dustcover
945RPM adapter
10 Tonearm
11 Cartridge
12 Speedselector switch(33, 45 RPM)
13 Auto-stopswitch
14 Cuelever
15EU/UKpoweradapter*
19 RCAoutput
23 Speakerconnector
16UKpoweradapter*
20 AUXinput
24 Meshspeakercover(2×)
17Rightspeakerinput
21 Powerinput
18 Leftspeakerinput
22Speakers(2×)
*The product is delivered with either the interchangeable EU/UK power adapter or the fixed UK power adapter.
Indicator LED
IndicatorLED Mode / status Description
| Green solid | Phono mode | Receiving music input from vinyl record. |
| Greenblinking Bluetooth® transmitting mode pairing Looking for a Bluetooth® speaker/headphones to connect. | ||
| Cyan green solid Bluetooth® transmitting mode connected | Connected to a Bluetooth® speaker/headphones. | |
| Blueblinking Bluetooth® receiving mode pairing Looking for a Bluetooth® audio source/device. | ||
| Bluesolid Bluetooth® receiving mode connected Connected to a Bluetooth® audio source/device. | ||
| Playbackactive Music is playing. | ||
| Purple solid | Aux input mode | Receiving music input from audio source connected via AUX input. |
| Red solid | Playback paused | Music playback is paused. |
Specifications
| Specifications | Value / Description |
| LS-200 | |
| Product | Turntable with Bluetooth reception, transmission, and wooden speakers |
| Drivemotor DC servo motor | |
| Speedsettings | 33, 45 RPM |
| Standby power consumption | < 0.5 W |
| Bluetooth®version | 5.2 |
| Bluetooth® frequency range | 2402 - 2480 MHz |
| Bluetooth® operating distance | 10m |
| Max. transmission power | < 6 dBm |
| Powerconsumption | 24W |
| Dimensions (1 × w × h) | 325 × 320 × 105 mm (lid closed) |
| Weight | 4.85kg |
| Poweradapter | |
| Power adapter manufacturer | HUIZHOU FUJIA APPLIANCE TECH. CO., LTD. |
| Power adapter types | FJ-SWI24S1202000N / FJ-SWI24S1202000B |
| Inputvoltage | 100 - 240 V ~ 50/60 Hz |
| Outputvoltage | 12V |
| Outputcurrent | 2A |
| Outputpower | 24W |
| Average active efficiency >=86.2% | |
| Efficiency at low load (10%) 72.88% | |
| No load power consumption < 0.1 W | |
| Speakers | |
| Audio power output (RMS) 2×10 W | |
| Dimensions (per speaker) 144 × 175 × 220 mm | |
Intended use
This product is intended as turntable with a built-in amplifier, 2 wooden speakers, and Bluetooth functionality.
This product is intended for indoor use only.
Only use the product as described in this user manual.
This product is not intended for commercial use.
This device is not intended for use by persons (including children) with reduced physical, sensory or mental capabilities, or lack of experience and knowledge, unless they have been given supervision or instruction concerning use of the device by a person responsible for their safety, regarding the use of the device.
Safety instructions
Ensure you have fully read and understood the instructions in this document before you install or use the product. Keep the packaging and this document for future reference.
WARNING!
Chokinghazard:
- Do not let children play with packaging material. Packaging materials can lead to choking and suffocation. Always keep the packaging material out of reach of children.
Electricalhazard:
- Do not expose the product to water, rain, moisture, or high humidity.
- Do not use the product in damp environments, such as a bathroom or kitchen.
- Never insert any object into the ventilation opening of the product. The product contains electrical components.
- Only use the provided power adapter.
- Keep the product away from pets and other animals. Animals can bite through the power cable and suffer electrical shock.
- Do not open the product, there are no user serviceable parts inside.
- This product may only be serviced by a qualified technician for maintenance.
Firehazard:
- Do not use the product if a part is damaged or defective. Always replace a damaged or defective product immediately.
- Unplug the product from the power source and other equipment if problems occur.
- Do not cover the ventilation openings. Always leave at least 5 cm of space around the product.
- Do not place the product on top of other electrical equipment.
- Never use the product with a damaged power cable or adapter.
CAUTION!
Risk of hearing loss:
- Extended exposure to high volumes can cause hearing loss.
NOTICE
Risk of damaging the product:
- Keep the product away from heat sources, such as radiators, heaters, stoves, and naked flames.
- Keep the product away from strong magnetic objects.
• Always keep the power cable and the product away from usual walkways. -
Do not disconnect the product by pulling on the cable. Always grasp the connector and pull.
-
Avoid electrostatic discharge when handling the product. Electrostatic discharge can disturb the normal functioning of the product.
- Use the product only in moderate climates. Avoid extremely cold or hot environments. The recommended operating temperature is between 0°C and 35°C.
- Only use accessories provided by the manufacturer.
- Disconnect the product from the power outlet during lightning storms or before prolonged periods of disuse.
- Only use the product as described in this document.
- Do not drop the product and avoid bumping.
- Clean the outside of the product every month with a soft, damp cloth. Avoid abrasives that can damage the surface.
Installation
Check the contents of the package
Check that all parts are present and that no damage is visible on the parts. If parts are missing or damaged, contact the Lenco B.V. service desk via the website: www.lenco.com.
Installing the product
- Remove the protective packaging.
- Place the product on a flat, stable, and low resonance surface close to a power outlet.
- (Only for models with the interchangeable EU/UK power adapter) Depending on your power outlet, insert and slide the EU or UK plug on the power adapter.
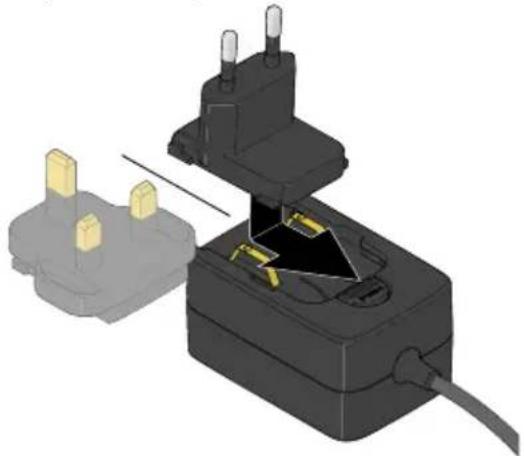
natural_image
3D illustration of a plug-in socket with two gold pins inserted, showing internal components and wiring (no text or symbols)-
Plug the power adapter into the power input.
-
Plug the other end of the power adapter into a power outlet.
To remove the EU or UK plug, press the button on the Interchangeable EU/UK power adapter, and slide and pull the UK or EU plug up.
- Place the turntable mat on top of the platter.
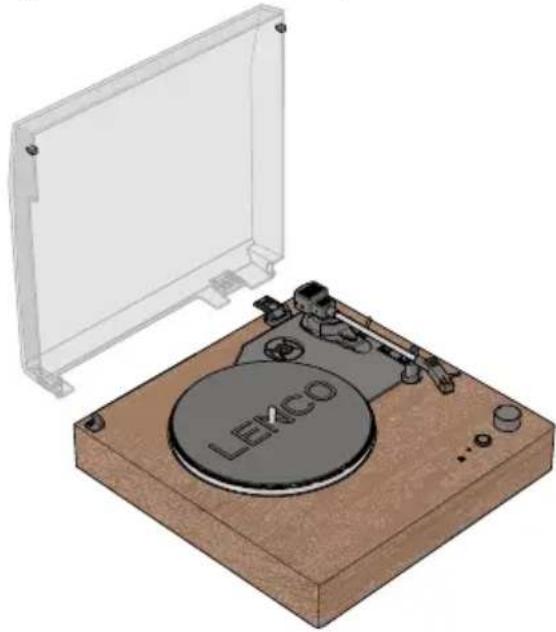
Installing the dust cover
- Make sure the dust cover hinge on the turntable is oriented flat towards the back of the turntable.
- Line up the dust cover with the hinge on the turntable.
- Press the dust cover on the hinge and click the two axle pins into the two clips on the turntable.
natural_image
Illustration of a LEKCO radio receiver on a wooden base, with no visible text or symbols beyond the brand label.Connecting the included speakers
- Position the speakers on either side of the turntable. Keep at least 10 cm distance between the speakers and the turntable.
- Plug the left speaker wire into the left speaker input on the back of the turntable.
- Plug the right speaker wire into the right speaker input on the back of the turntable.
Connecting to an external (pre-)amplifier
- Plug one end of a RCA cable (not included) into the RCA output of the turntable.
- Plug the other end of the RCA cable into the PHONO input on your (pre-)amplifier.
Insert the R plug into the red RCA output jack. Insert the L plug into the white RCA output jack. - Press the mode button to select Phono mode.
The indicator LED lights up green.
The volume is controller by the external (pre-)amplifier.
Use
Playing a vinyl record
- Open the dust cover.
- Slightly turn the power/volume dial clockwise to switch on the product. Do not turn the power/volume dial all the way to the max. volume.
- Press the mode button to select Phono mode.
- Press the mode button to select Bluetooth® output mode.
The indicator LED lights up green. - Optionally: Place the 45 RPM adapter on the turntable shaft. Only needed for singles (45 RPM) and other vinyl records with a larger centre hole.
- Set the speed switch (33 1/3 or 45 RPM) corresponding to the applicable speed of the vinyl record.
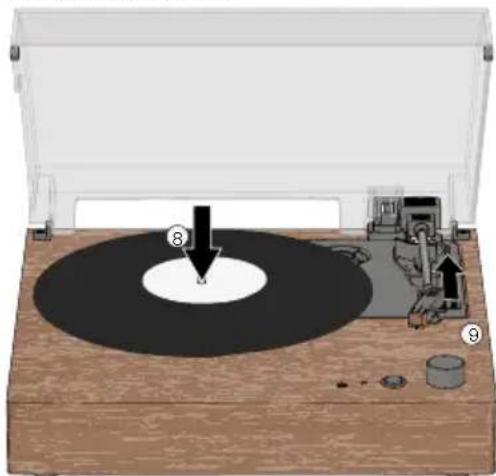
-
Carefully remove the stylus guard.
-
Carefully place a vinyl record on the turntable platter.
-
Push the cue lever backwards to lift the tonearm.
natural_image
Diagram of a vinyl record with a base, showing mechanical components and a circular dial (no text or symbols)-
Carefully move the tonearm over the part you want play to on the vinyl record.
-
Push the cue lever forward to lower the tonearm and start playing the vinyl record.
natural_image
Illustration of a vintage rotary disc with labeled parts (no text or symbols present)-
Press and hold the mode button to start playing the vinyl record.
-
Adjust the volume with the volume dial.
Stop playing a vinyl record
With auto-stop switched on
The turntable automatically stops rotating the vinyl record when the vinyl record is finished playing. Always pay close attention when listening to vinyl records for the first time, do not rely on auto-stop to stop the turn table.
With auto-stop switched off
Auto-stop does not work for most singles (45 RPM) and some 33 RPM vinyl records. The turntable can either stop before the end of the vinyl record, or not stop after the end of the vinyl record.
Always set the auto-stop switch to OFF when auto stop does not seem to work for the specific vinyl record.
-
Push the cue lever backwards to rise the tonearm.
-
Move the tonearm over to the rest position.
-
Push the cue lever forward to rest the tonearm.
-
Turn the power/volume dial all the way anti-clockwise to switch off the turntable.
Playing a vinyl record via external Bluetooth® speaker/headphones
The product can wirelessly connect to external Bluetooth® speakers or headphones (not included).
-
Slightly turn the power/volume dial clockwise to switch on the product. Do not turn the power/volume dial all the way to the max. volume.
-
Press the mode button to select Bluetooth® output mode. The indicator LED blinks green.
-
Activate Bluetooth® pairing mode on your speaker or headphones.
Make sure your Bluetooth ^® speaker or headphones are within one metre from the turntable.
Make sure no other devices are in pairing mode.
The turntable automatically pairs to your Bluetooth ^® speaker/headphones.
The indicator LED lights up cyan-green when the connection is successful.
- Follow steps 5. - 13. of Playing a vinyl record.
Listening to a vinyl record with wired headphones
- Rotate the power/volume dial to the minimum volume without switching off the turntable.
- Plug the AUX cable from your headphones into the AUX output of the turntable.
- Slowly increase the listening volume to your desired setting.
Always start in minimum volume to reduce the chance of hearing loss due to unexpected high volumes.
Listening to music from a smartphone or other Bluetooth® device
- Turn the power/volume dial clockwise to switch on the product. Do not turn the power/volume dial all the way to the max. volume.
- Press the mode button to select Bluetooth® input mode.
The indicator LED blinks blue.
- Switch on Bluetooth ^® on your device.
- Select "Lenco LS-200" and connect to the product.
The power LED lights up blue.
Manual pairing will only be required the first time you connect to the product.
In case your device requires a password, enter "0000" and press OK.
- Adjust the volume with the power/volume dial.
Press and hold the mode button to disconnect the Bluetooth® connect. Press and hold the mode button again to reconnect the Bluetooth® connection.
Playing external audio to the speakers
- Plug one end of a 3.5 mm AUX cable (not included) into the AUX input of the turntable.
- Plug the other end of the 3.5 mm AUX cable into your external audio source.
- Press the mode button to select AUX input mode.
The indicator LED lights up purple.
The volume is controller by the external audio source.
Maintenance
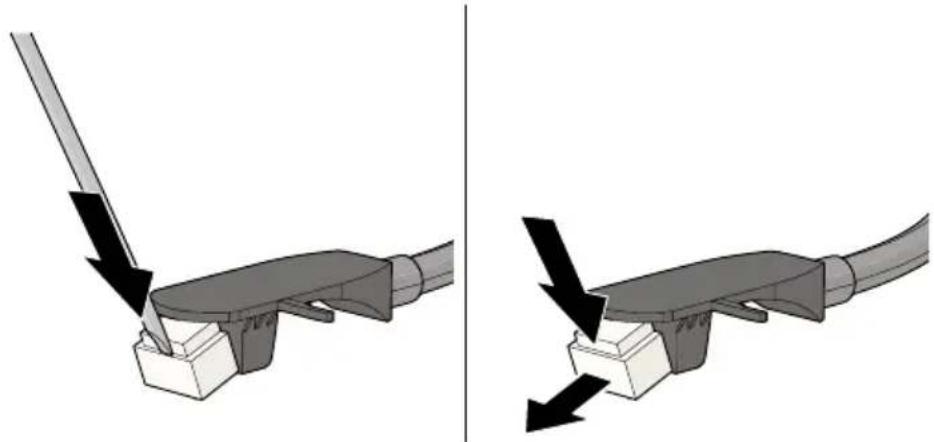
Replacing the stylus
For the best listening experience the needle should be replaced every 300 - 500 listening hours.
To replace the stylus:
- Switch off the product and disconnect the power adapter from the power outlet.
- Make sure the tonearm is in the resting position and the tonearm lock is engaged.
- Carefully place a screwdriver on the tip of the needle cartridge and press down.
The needle shifts downwards.
- Pull the needle down and away from the tonearm.
natural_image
Diagram showing two mechanical components with arrows indicating force or movement, no text or symbols present-
Place the new needle diagonally in the bottom part of the tonearm.
-
Carefully push the needle upwards to lock the new needle into place.
Cleaning
Clean the outside of the product every month with a soft, damp cloth. Avoid abrasives that can damage the surface.
Clean your vinyl records with anti-static cloth for the best listening experience. We recommend using the Lenco TTA-3-in-1, TTA-5-in-1 or TTA-6-in-1 cleaning kit (not included).
Troubleshooting
If you experience problems with the product, refer to the table below for possible causes and solutions. Always ensure the product is installed and used as described in this manual.
PossiblecausePossiblesolutionPossiblesolution
| The product is switched on, but the platter does not rotate. | The product is not set to PHONO mode. | Press the mode button to select Phono mode. |
| The turntable platter rotates, but there is no sound/not enough sound. | The cue lever is in the up position. | Push the cue lever forwards to lower the tonearm. |
| The speakers are not connected to the turntable. | SeechapterConnecting the included speakers. | |
| The stylus cover is still installed. | Remove the stylus cover from the stylus. | |
| No sound emitted from the Bluetooth® speakers. | The selected input does not match the source. | Select the correct source input. |
| Distinguishable humming sound on PHONO mode. | The speakers are positioned too close to the turntable. | Place the speaker further away from the turntable. |
| Distorted and/or inconsistent sound from one more channels. | The turntable is connected to the wrong (pre-)amplifier input. | Make sure the turntable is connected to the PHONO input on your external (pre-)amplifier. |
| The needle or cantilever of the stylus is damaged. | Check the stylus for any defects and replace is required. | |
| There is dust on the stylus. Carefully remove the dust from the stylus, brushing with an appropriate anti-static brush from the back of the needle to the front.Do not brush the needle from left to right, this can cause damage to the needle. | ||
Guarantee
Commaxx B.V. offers service and warranty in accordance with the European law, which means that in case of repairs (both during and after the warranty period) you should contact your local dealer.
- It is not possible to send products that need repairs to Commaxx B.V. directly.
• If this unit is opened or accessed by a non-official service centre in any way, the warranty expires. - This device is not suitable for professional use. In case of professional use, all warranty obligations of the manufacturer will be voided.
Disclaimer
Updates to firmware and/or hardware components are made regularly. Therefore some of the instruction, specifications, and pictures in this documentation may differ slightly from your particular situation. All items described in this guide are for illustration purposes only and may not apply to your particular situation. No legal right or entitlements may be obtained from the description made in this manual.
Disposal

natural_image
Symbol of a trash bin crossed with no visible text or labelsThis symbol indicates that the relevant electrical product or battery should not be disposed of as general household waste in Europe. To ensure the correct waste treatment of the product and battery, please dispose them in accordance to any applicable local laws of requirement for disposal of electrical equipment or batteries. In doing so, you will help to conserve natural resources and improve standards of environmental protection in treatment and disposal of electrical waste (Waste Electrical and Electronic Equipment Directive).
DeclarationofConformity
We, Commaxx B.V. declare as manufacturer that the product LS-200 from our brand Lenco®, produced in China, has been tested according to all relevant CE standards and regulations and that all tests have been passed successfully. This includes, but is not limited to the RED 2014/53/EU regulation.
The complete Declaration of Conformity (and the safety datasheet if applicable) can be found and downloaded via:
doc.nedis.com/en-us/LS200WD
Service
For more information and helpdesk support, please visit www.lenco.com Commaxx B.V. Wiebachstraat 37, 6466 NG, Kerkrade, The Netherlands.
natural_image
3D illustration of a black electrical plug with two gold pins inserted, showing internal components and wiring (no text or symbols)natural_image
Illustration of a vintage LEXCO radio with open lid and base (no text or symbols on device)natural_image
Diagram of a vintage rotary disc with labeled parts, showing mechanical components and a circular base (no text or symbols present)natural_image
Illustration of a vintage gramophone with labeled parts (no text or symbols on the object itself)natural_image
Diagram showing two mechanical assembly steps with arrows indicating force or movement (no text or symbols present)natural_image
3D illustration of a black electrical plug with two gold pins inserted, showing internal components and wiring (no text or symbols)natural_image
Illustration of a vintage LEXCO radio with open lid and base (no text or symbols on device)natural_image
Diagram of a vinyl record with a base, showing mechanical components and a circular dial (no text or symbols)natural_image
Illustration of a vintage gramophone with labeled parts (no text or symbols present)natural_image
Diagram showing two mechanical components with arrows indicating force or movement, no text or symbols presentnatural_image
Symbol of a trash bin crossed out by two crossed lines, with a blank rectangular base below (no text or symbols)natural_image
3D illustration of a black electrical plug with two gold pins inserted into a socket, showing internal components and wiring (no text or symbols)natural_image
Illustration of a LEXCO radio driver on a wooden base, showing its open lid and base mount (no text or symbols beyond branding)natural_image
Illustration of a vintage typewriter with a CD and mechanical components (no text or symbols)natural_image
Diagram showing two mechanical components with arrows indicating force or movement, no text or symbols presentnatural_image
3D illustration of a black electrical plug with two gold pins inserted into a socket, showing internal components and wiring (no text or symbols)natural_image
Illustration of a LEXCO radio driver on a wooden base, with no visible text or symbols beyond the brand label.natural_image
Diagram of a vinyl record with a base, showing mechanical components and a circular dial (no text or symbols)natural_image
Illustration of a vintage gramophone with labeled parts (no text or symbols on the object itself)natural_image
Diagram showing two mechanical components with arrows indicating force or movement, no text or symbols presentnatural_image
Symbol of a trash bin crossed with no text or numbers, representing waste sorting or disposal (no text present)natural_image
3D illustration of a black electrical plug with two gold pins inserted, showing internal components and wiring (no text or symbols)natural_image
Illustration of a vintage LEXCO radio with a wooden base and open lid, no text or symbols presentnatural_image
Diagram of a vinyl record with a base, showing mechanical components and a circular dial (no text or symbols)natural_image
Illustration of a vintage gramophone with labeled parts (no text or symbols present)natural_image
Diagram showing two mechanical assembly steps with arrows indicating force or movement (no text or symbols present)natural_image
3D illustration of a black electrical plug with two gold pins inserted into a socket, showing internal components and wiring (no text or symbols)natural_image
Illustration of a vintage LEXCO radio with open lid and base (no text or symbols on device)natural_image
Diagram of a vinyl record with a base, showing mechanical components and a circular dial (no text or symbols)natural_image
Illustration of a vintage typewriter with a CD and mechanical components (no text or symbols)natural_image
Diagram showing two mechanical components with arrows indicating force or movement, no text or symbols presentnatural_image
3D illustration of a black electrical plug with two gold pins inserted, showing internal components and wiring (no text or symbols)natural_image
Illustration of a vintage LEXCO radio with a wooden base and open lid (no text or symbols on the device itself)natural_image
Diagram of a vinyl record with a base, showing mechanical components and a circular dial (no text or symbols)natural_image
Diagram of a vintage rotary disc with labeled parts (no text or symbols present)natural_image
Diagram showing two mechanical components with arrows indicating force or movement, no text or symbols presentnatural_image
3D illustration of a black electrical plug with two gold pins inserted into a socket, showing internal components and wiring (no text or symbols)natural_image
Illustration of a vintage LEKCO radio with open lid and base (no text or symbols on device)natural_image
Diagram of a vintage vinyl record with labeled parts (no text or symbols present)natural_image
Illustration of a vintage typewriter with a black CD and mechanical components (no text or symbols)natural_image
Mechanical assembly diagram showing two views of a tool interacting with a base, with arrows indicating force direction (no text or symbols present)natural_image
3D illustration of a black electrical plug with two gold pins inserted, showing internal components and wiring (no text or symbols)natural_image
Illustration of a vintage LEMCO radio with a flat-screen case and base (no text or symbols on the device itself)natural_image
Diagram of a vintage CD or vinyl record with mechanical components and a marked point (no text or symbols)natural_image
Illustration of a vintage typewriter with a CD and mechanical components (no text or symbols)-
Trykk på Modus-knappen og hold den inne for å starte avspillingen av vinylplaten.
-
Juster volumet med volumhjulet.
natural_image
Mechanical assembly diagram showing two views of a tool interacting with a base, with arrows indicating force direction (no text or symbols present)① Pladetallerken-måtte
②Pladespiller-tallerken
natural_image
3D illustration of a black electrical plug with two gold pins inserted into a socket, showing internal components and wiring (no text or symbols)natural_image
Illustration of a vintage LEACD machine with open lid and base, no visible text or symbols on the device itselfnatural_image
Diagram of a vintage vinyl record with labeled parts (no text or symbols present)natural_image
Illustration of a vintage typewriter with a black CD and mechanical components (no text or symbols)natural_image
Diagram showing two mechanical components with arrows indicating force or movement, no text or symbols presentnatural_image
Symbol of a trash bin crossed out by two crossed lines, no text or numbers presentnatural_image
3D illustration of a black electrical plug with two gold pins inserted, showing internal components and wiring (no text or symbols)natural_image
Illustration of a vintage LEACD machine with open lid and base (no text or symbols on the device itself)natural_image
Diagram of a vintage vinyl record with a base, showing mechanical components and a circular dial (no text or symbols)natural_image
Illustration of a vintage typewriter with a CD and mechanical components (no text or symbols)natural_image
Diagram showing two mechanical components with arrows indicating force or movement, no text or symbols presentnatural_image
Symbol of a trash bin crossed with no text or numbers, representing waste sorting or disposal (no text present)natural_image
3D illustration of a black electrical plug with two gold pins inserted, showing internal components and wiring (no text or symbols)natural_image
Illustration of a vintage LEACD radio with a blank screen and base (no text or symbols on the device itself)natural_image
Illustration of a vintage typewriter with a CD and mechanical components (no text or symbols)natural_image
Diagram showing two mechanical components with arrows indicating force or movement, no text or symbols presentnatural_image
3D illustration of a black electrical plug with two gold pins inserted into a housing, showing internal components and wiring (no text or symbols)natural_image
3D rendering of a LEKCO printer on a wooden base, showing its open lid and base mount (no text or symbols beyond branding)natural_image
Illustration of a vintage typewriter with a CD and mechanical components (no text or symbols)natural_image
Mechanical assembly diagram showing two views of a tool interacting with a base, with arrows indicating force direction (no text or symbols present)natural_image
3D illustration of a black electrical plug with two gold pins inserted, showing internal components and wiring (no text or symbols)- Zapojte napájací adaptér do elektrickej zásuvky.
- Druhý koniec napájacieho adaptéra zapojte do elektrickej zásuvky.