
HT-SB121 - Soundbar SHARP - Free user manual and instructions
Find the device manual for free HT-SB121 SHARP in PDF.
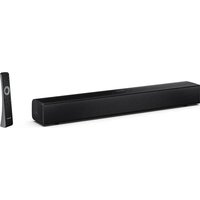


| Product type | Compact 2.0 soundbar |
| Brand | Sharp |
| Model | HT-SB121 |
| Dimensions (approx.) | 400 x 70 x 60 mm (W x D x H) |
| Weight (approx.) | 1.5 kg |
| Power supply | AC adapter 100-240V AC, 50/60 Hz |
| Power consumption | Level VI energy efficiency |
| Audio inputs | HDMI ARC, Optical, Bluetooth, AUX IN (3.5 mm), USB |
| Audio output | HDMI ARC (with audio return) |
| Supported audio formats | MP3, WAV (via USB) |
| Bluetooth connectivity | Yes, unspecified version |
| Remote control | Yes, included (AAA batteries supplied) |
| Wall mountable | Yes, mounting kit included |
| Preset equalizer | Voice, Movie, Sports, Game, Night, Music, Custom |
| Auto standby function | Yes, after 15 minutes without signal (can be disabled) |
| Safety class | Class II (double insulation) |
| Cleaning and maintenance | Unplug before cleaning; soft dry cloth |
| Operating temperature | Avoid heat sources and direct sunlight |
| Package contents | Soundbar, remote control, AC adapter, wall mount kit, documentation |
Frequently Asked Questions - HT-SB121 SHARP
User questions about HT-SB121 SHARP
0 question about this device. Answer the ones you know or ask your own.
Ask a new question about this device
Download the instructions for your Soundbar in PDF format for free! Find your manual HT-SB121 - SHARP and take your electronic device back in hand. On this page are published all the documents necessary for the use of your device. HT-SB121 by SHARP.
USER MANUAL HT-SB121 SHARP
Product images are for illustration purposes only. Actual product may vary.
Trademarks:

The terms HDMI, HDMI High-Definition Multimedia Interface, HDMI Trade dress and the HDMI Logos are trademarks or registered trademarks of HDMI Licensing Administrator, Inc.

Bluetooth
The Bluetooth® word mark and logos are registered trademarks owned by Bluetooth SIG, Inc. and any use of such marks by Sharp Consumer Electronics is under license. Other trademarks and trade names are those of their respective owners.

Roku TV, Roku TV Ready, and the Roku TV Ready logo are trademarks of Roku, Inc.
This product is Roku TV Ready-supported in the United Kingdom. Countries are subject to change. For the most current list of countries in which this product is Roku TV Ready-supported, please email rokutvready@roku.com
ENGLISH
Important safety instructions
Please follow all safety instructions and warnings. Keep this manual for reference.

Consult user manual for safety, operation, and maintenance information.

Class II equipment: Double insulation, no need for electrical earth (ground) connection.

Alternating current (AC): Voltage marked is AC. Direct current (DC): Voltage marked is DC.

Indoor use only.
Energy efficiency marking with level VI

Polarity of d.c. power connector
Precautions
Damage
Inspect the product after unpacking; if damaged, do not use and consult your dealer.
CAUTION
RISK OF ELECTRIC SHOCK
DO NOT OPEN

User should not attempt repair nor expose the internal parts; this action can be hazardous and will void your warranty. Contact only authorized service centers for repairs.
Power connection and accessibility
- Do not handle the power cord with wet hands. Do not force the plug into the outlet. Turn off and unplug the product when not in use. Keep the power plug accessible, without using extension cables.
Power source
- Use only AC 100-240V 50/60Hz outlets. Higher voltages can cause malfunction or fire.
- The AC power adapter should be removed from the power outlet if not in use for an extended period of time.
- Only use the supplied mains adapter. Failure to do this may result in a safety risk and/or damage to the product.
Power source
- Use only AC 100-240V 50/60Hz outlets. Higher voltages can cause malfunction or fire.
Power cord protection
- Protect the power cord from damage; do not overload, stretch, or bend it. If damaged, it can result in fire or electric shock. Damaged cords must be replaced by the manufacturer or a qualified technician.
Fused moulded power plug (non-rewireable) - UK, Malta, Cyprus and Ireland only.
- The power lead includes a 3A Amp fuse. Replace only with a BS1362 approved fuse of the same rating.
Child safety
- Use basic safety precautions around children to prevent misuse of the product.
Location
- Place on a flat, stable surface without overhang. If wall mountable, refer to the wall-mounting instructions in this user manual.
Ventilation
- Do not block, cover or insert objects into the ventilation slots. Do not insert objects into the product's openings. Doing so may result in a safety risk and/or damage to the product. Ensure a minimum distance of 5 cm around the product for sufficient ventilation to avoid overheating.
Heat and operating temperature
- Do not place the product near heat sources or direct sunlight for prolonged periods.
Naked flames
- Keep open flames away from the product to prevent fire.
Water, moisture, and liquid entry
- Do not expose the product to liquids; keep away from rain, water, and objects filled with liquids to prevent fire or electric shock.
Storms and lightning
- Disconnect all cables during storms or lightning to prevent damage.
Maintenance
- Disconnect power cords from the product before cleaning and use a soft, dry cloth without chemicals or detergents. If using a vacuum cleaner, use the soft brush attachment.
Batteries
Installation
- Use only specified batteries; do not mix types or new with old. Use the correct polarity upon battery insertion.
Use and maintenance
- Keep batteries away from heat, such as near fire or in direct sunshine. Remove batteries if unused for over a month to prevent leaking. Replace leaking batteries inside the battery compartment.
Child safety
- Ensure battery compartment is secure. Keep batteries away from children's reach. Seek immediate medical help if swallowed.
Environmental conditions
- Keep batteries away from low pressure or high heat to avoid explosion or leakage.
Disposal
- Dispose of the battery pack according to the manual (see "Disposal: equipment and batteries"). Do not throw into fire, disassemble or recharge non-rechargeable batteries, as it may leak or explode.
Disposal: equipment and batteries
Information for users on collection and disposal of old equipment.
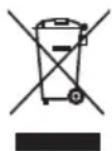
Symbol indicates product contains batteries per EU Directive 2023/1542/EU; cannot be disposed with household waste. Cd, Hg, or Pb shows battery contains cadmium, mercury, or lead.

This symbol means that the product is designed and manufactured so that it can be recycled and reused.
These symbols on the products, packaging, and/or accompanying documents mean that used electrical and electronic products and batteries should not be mixed with general household waste. Household users should contact either the retailer where they purchased this product, or their local government office, for details of where and how they can take these items for environmentally safe recycling.
CE and UKCA statement:
- Hereby, Sharp Consumer Electronics Poland sp. z o.o. declares that this audio device is in compliance with the essential requirements and other relevant provisions of RED Directive 2014/53/EU and UK Radio Equipment Regulations 2017.
- The full CE text and UKCA declaration of conformity are available at sharpconsumer.com and then entering download section of your model and choosing "Declaration of Conformity".
What is included in the box:
- HT-SB121 / HT-SB123 Compact 2.0 Soundbar Remote control (inc. batteries) Power adapter
- 2 pin (type C) plug adapter
- 3 pin (type G) plug adapter (HT-SB121 only)
- Wall-mount kit
- User documentation
Controls
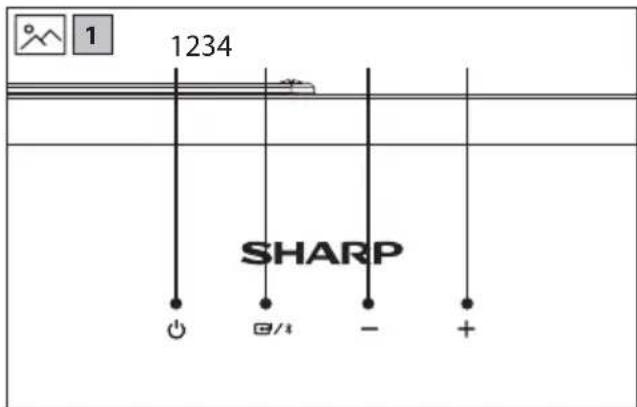
(Refer to page 2)
- Switch the unit between ON and STANDBY.
- Select the audio source (TV (HDMI), Bluetooth, Optical, Aux in or USB).
- Volume down.
- Volume up.
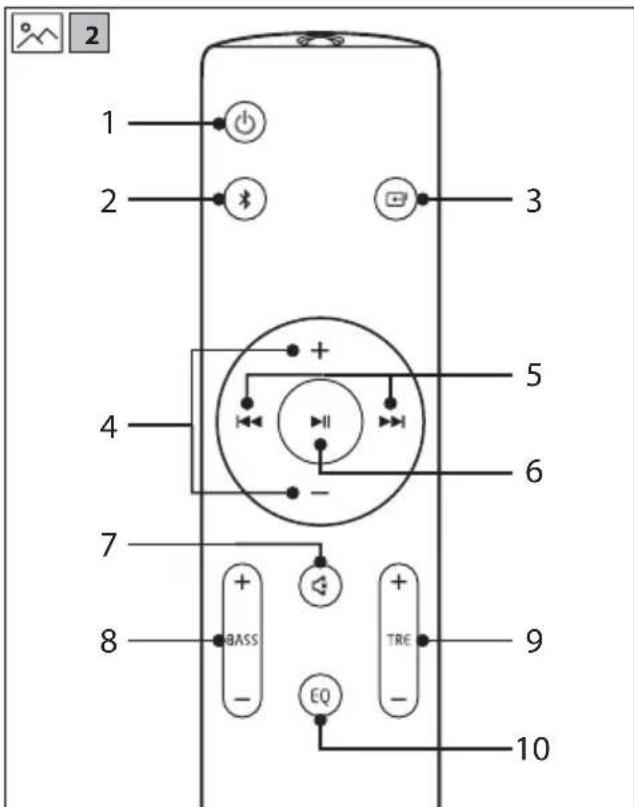
(Refer to 2 on page 2).
- Switch the unit between ON and STANDBY mode.
- Select Bluetooth mode. Press and hold to activate the pairing function in Bluetooth mode or disconnect the existing paired Bluetooth device.
- Press to select the audio source (HDMI ARC, OPTICAL, BLUETOOTH, AUX IN and USB).
- + / - Increase/decrease the volume level.
- Previous/next track in Bluetooth or USB mode.
- Play/pause/resume playback in Bluetooth or USB mode.
- - Mute or resume the sound.
- BASS: Adjust bass level. This only changes custom EQ settings.
- TRE: Adjust treble level. This only changes custom EQ settings.
- EQ: Press repeatedly to switch between EQ off, voice, movie, sport, game, night, music and custom equaliser modes.
Inputs/outputs
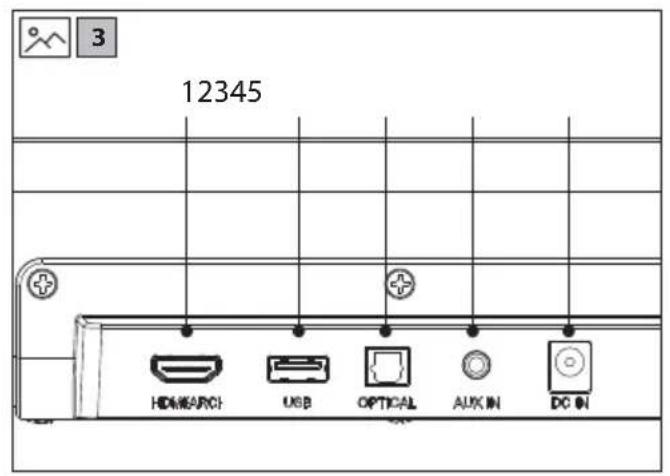
(Refer to 30 on page 3).
- HDMI (ARC)
Connect to a TV via HDMI cable (HDMI version 1.4 or higher).
- USB
Insert USB flash drive to play music.
- OPTICAL
Optical input jack.
- AUX IN
Connect to an external audio device.
- DC IN
Connect power cable.
Initial set up
Remote control operation
The provided remote control allows the unit to be operated from a distance.
- Even if the remote control is operated within the effective range of 6 m, operation may be impossible if there are any obstacles between the unit and the remote control.
- If the remote control is operated near other products which generate infrared rays, or if other remote control devices using infrared rays are used near the unit, it may operate incorrectly. Conversely, the other products may operate incorrectly.
Battery installation
- To open the battery compartment, push your thumb down on to the battery compartment cover and slide it down.
- Fit two AAA batteries observing polarity + / - as shown. When replacing the batteries, use only the same type of battery supplied.
- Re-fit the battery cover and clip it in place.
First time installation
Placement and mounting
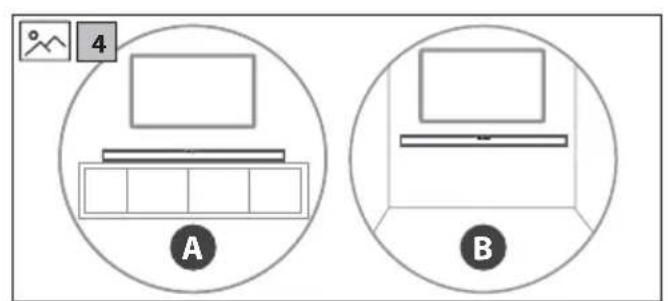
(Refer to A0n page 3).
A: Normal placement B: Wall mounting
Wall mounting
NOTES:
Installation must be carried out by qualified personnel only. Incorrect assembly can result in severe personal injury and property damage (if you intend to install this product yourself, you must check for installations such as electrical wiring and plumbing that may be buried inside the wall). It is the installer's responsibility to verify that the wall will safely support the total load of the soundbar and wall brackets. Additional tools (not included) are required for the installation. Do not overtighten screws. Keep this instruction manual for future reference. Use an electronic stud finder to check the wall type before drilling and mounting.
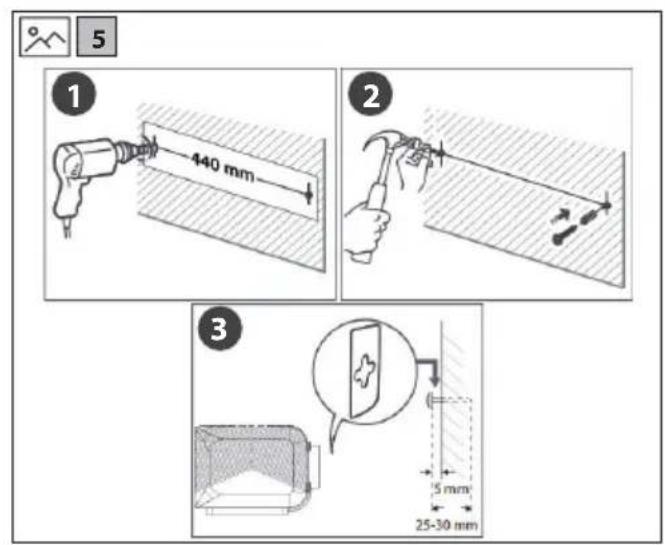
(Refer to 5 on page 3).
- Drill 2 parallel holes into the wall (0.5-6 mm each according to the wall type). The distance between the holes should be 440 mm.
- Firmly fix 1 plug into each hole in the wall. Screw in the supplied screw into the plug ensuring you leave a 5 mm gap between the screw head and the wall.
- Align the mounting bracket holes over the screw heads, then slide the unit down to secure it in place.
HDMI ARC
(Refer to 60 page 3).
The ARC (Audio Return Channel) function allows you to send audio from your ARC-compliant TV to your unit through a single HDMI connection. To enjoy the ARC function, please ensure your TV is both HDMI-CEC and ARC compliant and set up accordingly. When correctly set up, you can use your TV remote control to adjust the volume output (+/- and +) of the soundbar.
- Connect the HDMI cable (not included) from the unit's HDMI (ARC) socket to the HDMI (ARC) socket on your ARC compliant TV.
TIPS:
Your TV must support the HDMI-CEC and ARC function and this must be set to "ON" or "ACTIVE" in the TV settings menu. The setting method of HDMI-CEC and ARC may differ depending on the TV. For details about ARC function, please refer to your TV manual. Only HDMI cables of version 1.4 or higher can support the ARC function.
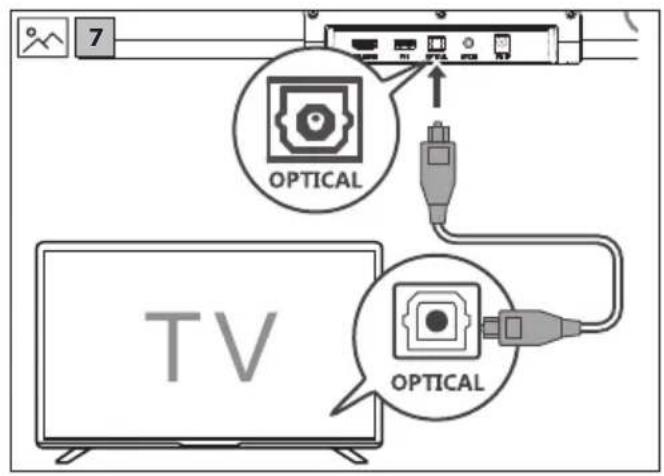
Optical
(Refer to 70 on page 3).
- Connect an OPTICAL cable (not included) to the TV's OPTICAL OUT socket and the OPTICAL socket on the unit.
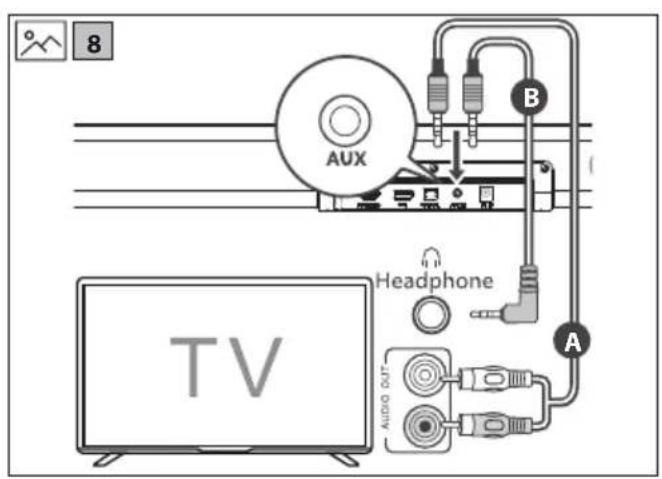
(Refer to 8 on page 3).
A:
Use a RCA to 3.5mm audio cable (not included) to connect the TV's or external audio device's audio output sockets to the AUDIO IN socket on the unit.
B: Use a 3.5mm to 3.5mm audio cable (not included) to connect the TV's or external audio device headphone socket to the AUDIO IN socket on the unit.
TIP:
When you use the headphone output on the TV set, you will be able to adjust the volume level directly using the TV remote control.
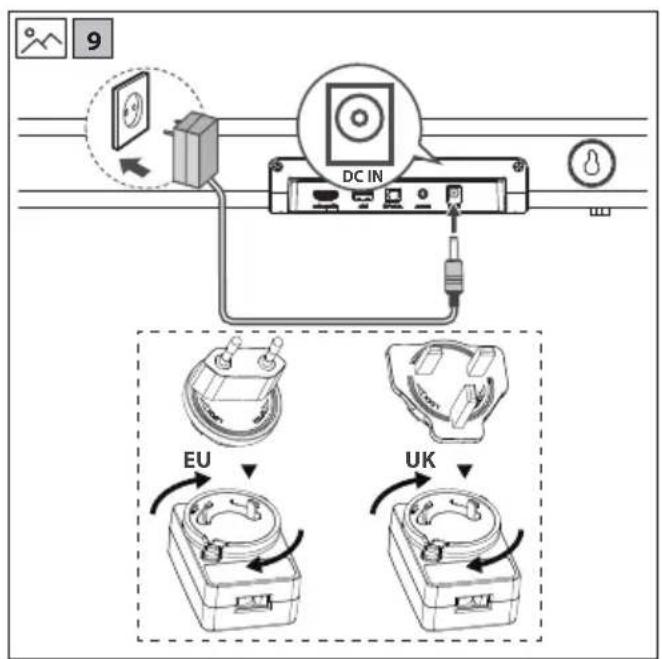
Connect to power
(Refer to 90 on page 3).
- Before connecting the power cable, ensure you have completed all other connections.
Risk of product damage!
- Ensure that the power supply voltage corresponds to the voltage printed on the back of the unit.
- Before connecting the DC adapter, ensure you have completed all other connections.
Soundbar
- Connect the adapter to the DC socket of the soundbar and then into a mains socket.
Basic operation
Standby/ON
- When you first connect the unit to the power socket, the unit will be in STANDBY mode.
- Press the down arrow on the remote control or on the unit to switch the unit ON or OFF.
- Disconnect the plug from the power wall socket if you want to switch the unit off completely.
Change source
- Short press to change between HDMI ARC, OPTICAL, BLUETOOTH, AUX IN, and USB. The unit's LED will light up as shown below to signal which source is selected.
| SOURCE LED COLOUR | |
| HDMI (ARC) Cyan | |
| OPTICAL Yellow | |
| BLUETOOTH Blue | |
| AUX IN Green | |
| USB Purple |
Volume control
- Press the volume buttons on the unit or on the remote control to adjust the volume.
- If you wish to turn the sound off, press the mute button on the remote control. Press it again or press the volume buttons on the unit or on the remote control to resume normal listening.
- While adjusting the volume, the LED will flash quickly. When maximum or minimum volume levels are achieved, the flashing will stop.
- With HDMI CEC control, you can use your TV remote to increase/decrease the volume.
Equaliser
During playback, press the EQ button on the remote control to cycle through the preset equaliser modes. Each time you press the button, the unit's LED will blink a specific colour to indicate the selected mode, as shown below:
| EQUALISER LED COLOUR | |
| EQ OFF Off | |
| VOICE Cyan | |
| MOVIE Purple | |
| SPORT Blue | |
| GAME Yellow | |
| NIGHT Red | |
| MUSIC Green | |
| CUSTOM White |
Adjust bass and treble
Press BASS+ TREBLE+ on the remote control to enter Custom EQ mode.
The white LED will blink twice to indicate Custom EQ mode is active. The LED will then show the current value of Bass or Treble:
| Custom EQ Level LED COLOUR | |
| +3 Red - fast blink | |
| +2 Red - medium blink | |
| +1 Red - slow blink | |
| 0 White - Steady | |
| -1 Green - slow blink | |
| -2 Green - medium blink | |
| -3 Green - fast blink |
While the LED is displaying the current value (within 3 seconds), press the same button again to adjust the setting.
If no button is pressed within 3 seconds, the current value is saved.
- The white LED will blink twice (1.5 seconds total) to confirm the new value has been saved. The unit will return to normal operation.
Auto standby
By default, the unit will go into standby if no signal is detected for 15 minutes on Optical, Bluetooth and Audio In sources.
To turn auto-standby on or off, long press the for 5 seconds when the unit is on.
| AUTO-STANDBY LED COLOUR | |
| OFF | Red – blinks 3 times |
| ON | Green – blinks 3 times |
LED dimmer
After performing an operation on the soundbar, the LED will dim. You can toggle the behaviour of the LED to OFF or DIMMED. The default is DIMMED.
To make the LED turn OFF after an operation:
- Press on the unit or remote control to select HDMI (ARC) source.
- Quickly press the button on the remote control. The LED will blink red two times. Wait ten seconds, making sure not to press any other buttons on the unit or remote control.
- The unit's LED will now turn OFF after performing an operation.
To make the LED DIMMED after an operation:
- Press on the unit or remote control to select HDMI (ARC) source.
- Quickly press the button on the remote control. The LED will blink green two times. Wait ten seconds, making sure not to press any other buttons on the unit or remote control.
- The unit's LED will now be DIMMED after performing an operation.
Roku TV™ Ready operation
For UK only.
If you have a Roku TV™ model, setup is easy. Just use a cable to connect your soundbar to the HDMI ARC port on your TV and follow the on-screen instructions.

√ Simple setup √One remote Quick settings
Bluetooth operation
The first time you connect your Bluetooth device to this player, you need to pair your device to this player.
NOTE:
Compatibility with all Bluetooth devices is not guaranteed. Any obstacle between this unit and a Bluetooth device can reduce the operational range. If the signal strength is weak, your unit may disconnect, but it will re-enter pairing mode automatically.
- Press the G button to select Bluetooth. The LED will turn blue and start blinking.
- Activate your Bluetooth device and select the search mode. "SHARP HT-SB121" or "SHARP HT-SB123" will appear on your Bluetooth device list.
- Select "SHARP HT-SB121" or "SHARP HT-SB123" from the list of devices. Once connected, the LED will turn solid blue.
- Begin playing music from the connected Bluetooth device.
- To pause or resume play, press the button on the remote control.
- To skip to the previous/next file, press the / / buttons on the remote control.
- Some mobile device applications will not allow you to press and hold / skip parts of a track.
NOTE:
To unpair a device, long press (3 seconds) the button on the unit or the on the remote control to start the pairing process.
USB operation
- Insert the USB device into the soundbar's USB socket.
- Press the button repeatedly on the soundbar or the remote control to select the USB source.
- Press to play the selected track.
- During playback:
To pause or resume play, press the button on the remote control. To skip to the previous/next file, press the / buttons on the remote control. Press and hold fast rewind / fast forward a track.
TIPS:
USB devices up to 64GB are supported.
Only MP3/WAV files can be played back.
The USB port is for playback or upgrading the software of the soundbar.
It is not for charging purposes.
Troubleshooting
Perform a factory reset
To perform a factory reset, press and hold the 1 and the off the unit for 5 seconds. When complete, the unit will go into standby.
No power
Ensure that the plug is properly connected.
Ensure that there is power at the AC outlet.
Press standby button on the remote control or unit to turn the unit ON.
No sound
For HDMI ARC to work, ensure you are using a version 1.4 or higher HDMI cable.
Increase the volume. Press + on the remote control or on the unit.
Press on the remote control to ensure the unit is not muted. Press to select a different input source.
When connected to a digital source (HDMI or Optical), if there is no audio:
- Try setting the TV output to PCM or your TV may be set to variable audio output. Confirm that the audio output setting is set to FIXED or STANDARD, not VARIABLE. Consult your TV's user manual for more detailed information.
If using Bluetooth, ensure that the volume on your source device is turned up and that the device is not muted.
Remote control does not work
Before you press any playback control button, first select the correct source.
Reduce the distance between the remote control and the unit.
Insert the battery with its polarities (+/-) aligned as indicated.
Replace the battery.
Aim the remote control directly at the sensor on the front of the unit.
I hear buzzing or humming
Ensure all cables and wires are securely connected.
Connect a different source device to see if the buzzing persists. If it does not, the problem may be with the original device.
Connect your device to a different input on the unit.
I can't find the Bluetooth name of this unit on my Bluetooth device
Ensure the Bluetooth function is activated on your Bluetooth device. Re-pair the unit with your Bluetooth device.
This device is set to standby after 15 minutes of no source signal.
When the unit's external input signal level is too low, the unit will be turned off automatically in 15 minutes. Please increase the volume level of your external device. This feature is a requirement of ERPII and is designed to save energy when the unit is not in use.
BULGARIAN
Important safety instructions
Read all safety instructions and heed all warnings. Keep the manual for reference.

Consult the user manual for information regarding safety, operation, and maintenance.

Class II equipment: double insulation, no protective earth (grounding) required.

Alternating current (AC): rated voltage is AC. Direct current (DC): voltage is DC.

Polarity of DC power connector
Standby
Power
Check the product for damage; if damaged, do not use it and consult your dealer.
WARNING

Attempts to repair or open internal parts are prohibited; this action may be dangerous and will void the warranty. Contact only authorized service centers for repairs.
Connecting to the electrical power supply
Do not touch the cable with wet hands. Do not damage the contacts. Unplug the product from the electrical outlet when not in use. Keep the outlet clean and dry, without using extension cables.
Power supply
- Use only AC 100-240V 50/60Hz for the console. Higher voltages may cause malfunction or fire.
- The AC adapter must be unplugged from the electrical outlet if not used for a long time.
- Use only the AC adapter provided by Sharp. This may create a safety risk and/or damage the product.
Power supply
Use only AC 100-240V 50/60Hz for the console. Higher voltages may cause malfunction or fire.
Safety of the power cord
Protect the power cord from damage; do not bend, stretch, or twist it. If damaged, it may cause fire or electric shock. Damaged cords must be replaced by the manufacturer or a qualified technician.
Plug with fuse (UK) - see for Great Britain, Malta, Cyprus, Ireland.
- The electrical cord is fitted with a fuse. Use only an approved BS1362 fuse with the correct rating.
Safety for children
- Important safety instructions for use, to prevent incorrect use of the product.
Placement
- Place on a flat, stable surface without vibration. If wall mounting is possible, follow the wall instructions in this user manual.
Ventilation
Make sure the air inlet and outlet are not blocked. Do not place objects in the product's openings. This may cause a safety risk and/or damage the product. Maintain a minimum distance of 5 cm around the product for proper ventilation, to avoid overheating.
Heat sources and optimal operating temperature
Do not place the product near heat sources, flames, or strong light for extended periods.
Open flames
Keep open flames away from the product to prevent fire.
Water, moisture, and heat
Do not expose the product to heat; keep it away from fire, water, and objects with heat, to prevent fire or electric shock.
Thunderstorms
Disconnect all cables during thunderstorms or lightning to prevent damage.
Cleaning and maintenance
- Unplug the power cable from the product before cleaning and use a soft, dry cloth without chemicals. If using a vacuum cleaner, use the brush attachment.
Battery
Instructions
Look at the battery; Do not mix old and new batteries. Install the battery correctly according to the polarity.
Battery use
Keep batteries away from heat sources such as radiators or direct sunlight. Remove batteries if they will not be used for more than a month to prevent leakage. Replace batteries that leak inside the battery compartment.
Child safety
- Make sure the battery compartment is securely closed. Keep batteries out of reach of children. Seek medical help immediately if swallowed.
Environmental conditions
Keep batteries away from fire or high temperatures to avoid explosion or leakage.
Disposal
- Dispose of the battery pack according to the instructions (see "Disposal: devices and batteries". Do not dispose of in fire, do not disassemble or short-circuit batteries that are not short-circuited, to prevent leakage or explosion.
Disposal: devices and batteries
Information for consumers regarding the collection and disposal of old equipment.
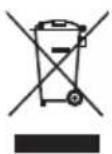
The symbol indicates that the product battery pack complies with EU Directive 2023/1542/EU; it cannot be disposed of together with household waste. Cd, Hg, or Pb indicate that the battery pack contains cadmium, mercury, or lead.

This symbol indicates that the product is designed and manufactured so that it can be recycled and reused.
These products, their packaging and/or accompanying documents indicate that these electrical and electronic products, including batteries, must not be disposed of together with ordinary household waste. The household consumer must contact the retailer from whom they purchased this product, or the local administration, to obtain information on how they can safely recycle these articles for the final environment.
Declaration of Conformity CE and UKCA:
Hereby, Sharp Consumer Electronics Poland sp. z o.o. declares that this audio device is in compliance with the essential requirements and other relevant provisions of Directive RED 2014/53/EU and the UK Radio Equipment Regulations 2017. The full text of the CE and UKCA Declaration of Conformity is available at sharpconsumer.com, after entering the section for downloading your model and selecting "Declaration of Conformity".
Package contents:
- HT-SB121 / HT-SB123 Compact 2.0 Soundbar - Remote control (incl. battery) - Batteries for remote control - 2 x AC adapters - 2 x AC adapters (only HT-SB121) - Wall mounting kit - User documentation
Controls
(Refer to page 2)
- -Switch between standby and on mode.
- —Turn on the soundbar.
- Increase the sound volume.
(Refer to page 2).
- -Switch the device between standby and on mode.
- -Select Bluetooth mode. Press and hold to activate the pairing function in Bluetooth mode or disconnect the connection with the currently paired device.
- -Press to select the audio source (HDMI ARC, OPTICAL, BLUETOOTH, AUX IN and USB).
- +/- Adjust the volume of the sound.
- Play the previous/next track in Bluetooth or USB mode.
- > / / - Play/Pause/Resume playback in Bluetooth or USB mode.
- - Mute and restore the sound.
- Adjust the bass level. This changes the settings of the personalized equalizer.
- TRE+ Adjust the treble level. This changes the settings of the personalized equalizer. 10. EQ - Press repeatedly to switch between EQ off, Jazz, Pop, Sport, Rock, Hip-hop, Music, and Speech personalized equalizer.
Inputs/Outputs
(Refer to page 3).
- HDMI (ARC)
Connect to the TV via an HDMI cable (HDMI version 1.4 or higher).
- USB
Insert a USB flash drive to play music.
- OPTICAL
Optical input jack.
4. AUX input
Device for remote control.
5. DCIN
Connecting to the charging dock.
Remote setup
Using the remote control
The remote control allows the device to be controlled from a distance.
- For the remote control to be used within its effective range of 6 m, operation may be impossible if there are obstacles between the remote and the device. If the remote control is used close to other products that generate infrared signals, or if other remote-controlled devices use infrared signals close to the device, it may not work correctly. Conversely, other products may also work incorrectly.
Inserting the batteries
- To open the battery compartment, press the button with your finger and slide the cover in the direction of the arrow.
- Insert two AAA batteries, observing the polarity +/- as shown. Use only the batteries provided with the device.
- Put the battery compartment cover back on and snap it into place.
Automatic standby time
After turning on the device, it will enter standby mode if no signal is received for 15 minutes via Optical, Bluetooth, or Audio In.
To enable or disable the automatic standby mode, press and hold the button for 5 seconds while the device is on.
| ABTO-PEXIM HA FOTOBHOCT | LED COLOUR |
| ИЗКЛ. | Червен - м大姐 3 nbти |
| ВКЛ. | Зelen - м大姐 3 nbти |
LED indicator
After completing the operation, the LED light will not be lit.
You can set the LED behavior to OFF or DIMMED. The default setting is DIMMED.
To turn off the LED after operation:
- Press the button on the device or the remote control to select HDMI (ARC) as the source.
- Then press the button on the remote control. The LED will blink red twice. Wait ten seconds, making sure you do not press any buttons on the device or the remote control.
- The LED on the device will turn off after the operation is completed.
To turn on the LED after operation:
- Press the button on the device or the remote control to select HDMI (ARC) as the source.
- Then press the button on the remote control. The LED will blink green twice. Wait ten seconds, making sure you do not press any buttons on the device or the remote control.
- The LED on the device will be turned on after the operation is completed.
√ Simple setup √One remote Quick settings
Bluetooth operation
When connecting your Bluetooth device to this soundbar, you need to pair the device with the soundbar.
CAUTION:
• Compatibility with all Bluetooth devices is not guaranteed. • The range between this device and the Bluetooth device may be limited. • If the signal strength is weak, your device may disconnect, but it will not automatically reconnect in pairing mode. 1. Press the button G to select Bluetooth. The indicator will turn blue and start blinking. 2. Activate your Bluetooth device and select the search mode. "SHARP HT-SB121" or "SHARP HT-SB123" will appear in the Bluetooth device list. 3. Select "SHARP HT-SB121" or "SHARP HT-SB123" from the device list. Once connected, the indicator will turn solid blue. 4. Start playing music from the connected Bluetooth device.
To pause or resume playback, press the button on the remote control. To go to the previous/next track, press the buttons on the remote control. - Some applications for mobile devices may not allow you to press and hold / skip parts of the track.
PAUSE:
To pause playback, press the button on the device or on the remote control for a second, to stop the playback process.
Working with USB devices
- Insert the USB device into the USB port on the soundbar.
- Press the button on the soundbar or the remote control repeatedly to select the USB source.
- Press to start playback.
4. STOPPING PLAYBACK:
To pause or resume playback, press the button on the remote control.
To go to the previous/next track, press the buttons
on the remote control. Press and hold / to fast forward or rewind.
TIPS:
USB devices up to 64GB are supported. Only MP3/WAV files can be played.
The USB port is intended for playback and updating the soundbar's software. It is not intended for charging.
TROUBLESHOOTING
To turn on the device, press and hold the button until the device enters standby mode.
Power on
Make sure the device is properly connected.
Make sure the electrical outlet has power.
Press the button on the remote control or the device to turn it on.
Sound
To use ARC, make sure you use a high-speed HDMI cable.
Increase the volume. Press the button on the remote control or the device.
On the remote control, make sure the device is not muted.
Press the button to select a different input source.
When connected to a digital source (HDMI or optical), if there is sound:
- Try adjusting the audio output of the TV. The TV may be set to a variable audio output. Make sure the audio output setting is set to fixed or standard, not variable. Consult your TV's user manual for more information.
If using Bluetooth, make sure the volume of the device's source is increased and the device is not muted.
The remote control works.
Press the button on the remote control to turn on the device, then select the correct source. Press the button to switch between the remote control and the device.
Insert the batteries with the correct polarity (+/-), as shown.
Replace the battery cover.
Point the remote control directly at the sensor on the front of the device.
Press the button or the button.
Make sure all cables and wires are connected correctly.
Connect the power supply to check if the device is working. If it is not working, the problem may be with the device.
Connect the device to the appropriate input on the device.
I cannot find the Bluetooth name of this device in my Bluetooth list.
Make sure the Bluetooth function is enabled on your Bluetooth device.
Pair the device with your Bluetooth device.
This device enters standby mode after 15 minutes without power.
When the input signal to the device is weak, the device will automatically turn off after 15 minutes. The sound signal from your device may be weak. This function is designed to save energy when the device is not in use.
√ Simple setup √One remote Quick settings
Bluetooth operation
When connecting a Bluetooth device to this player for the first time, you must pair the device with this player.
WARNING:
Compatibility with all Bluetooth devices is not guaranteed. Any obstacle between this unit and the Bluetooth device may reduce the operating range. If the signal strength is weak, your unit may disconnect, but it will automatically re-enter pairing mode.
Alternating current (AC): The marked voltage is AC. Direct current (DC): The marked voltage is DC.

Roku TV™ Ready operation
UK only.
√ Simple setup √ One remote Quick settings
Bluetooth use
√ Simple setup √ One remote Quick settings
Bluetooth operation
√ Simple setup √ One remote Quick settings
√ Simple setup √ One remote Quick settings
Important safety instructions
√ Simple setup √ One remote Quick settings
Using Bluetooth
When connecting a Bluetooth device to this sound projector for the first time, you must first pair the device with the unit.
WARNING!
√ Simple setup √ One remote Quick settings
Using Bluetooth
√ Simple setup √ One remote Quick settings
Bluetooth function
√ Simple setup √ One remote Quick settings
√ Simple setup √ One remote Quick settings
√ Simple setup √ One remote Quick settings
Using Bluetooth
Mains (AC): Voltage is AC. Direct current (DC): Voltage is DC.

For indoor use only.
Energy efficiency class VI marking

To turn auto-standby on or off, long press the power button for 5 seconds when the unit is on.
| AUTO-GAIDSTÄVES REZİMS | LED KRÖSA |
| IZSLEGTS | Sarkans - mirgo 3 reizes |
| Deg | Zaşi - mirgo 3 reizes |
√ Simple setup √ One remote Quick settings
Bluetooth operation
√ Simple setup √ One remote Quick settings
Bluetooth operation
√ Simple setup √ One remote Quick settings
Using Bluetooth
When you connect your Bluetooth device to this soundbar for the first time, you will need to pair the devices.
WARNING:
√ Simple setup √ One remote Quick settings
- Simple setup
- One remote
- Quick setting
√ Simple setup √ One remote Quick settings
Bluetooth operation
√ Simple setup √ One remote Quick settings
Bluetooth operation
When connecting your Bluetooth device to this soundbar for the first time, you will need to pair your device with this device.
WARNING:
Compatibility with all Bluetooth devices is not guaranteed.
Any obstacles between this device and the Bluetooth device may reduce the transmission range. If the signal strength is weak, your device may disconnect, but it will automatically re-enter pairing mode. 1. Press the Bluetooth selection button. The LED will turn blue and start blinking. 2. Turn on the Bluetooth device and select search mode. "SHARP HT-SB121" or "SHARP HT-SB123" will appear in your Bluetooth device list. 3. Select "SHARP HT-SB121" or "SHARP HT-SB123" from the device list. After connection, the LED will turn blue and stay lit. 4. Start playing music from the connected Bluetooth device.
√ Simple setup √One remote Quick settings
Bluetooth operation
When you first connect your device to this Bluetooth player, you must pair it.
WARNING:
√ Simple setup √One remote Quick settings
Bluetooth function
The first time you connect your Bluetooth device to this soundbar, you must pair your device to this unit.
WARNING: Risk of explosion or damage to equipment if the wrong type of batteries are used.
- Do not touch the power cord with wet hands. Do not press the plug into the socket in an improper way. When the product is not in use, unplug it from the mains. Keep the power cord accessible, without using extension cords.
Power source
Use only the power adapter with a rating of 100-240V 50/60Hz. If the voltage is incorrect, disconnect the device or damage may occur. - The power adapter should be unplugged from the mains if it is not used for a long time. Use only the Sharp AC adapter. This may cause danger or damage to the product.
Power source
Connect the device to a power outlet with a voltage of 100-240V 50/60Hz. Incorrect voltage may cause malfunction or damage.
Power cord protection
Protect the power cord from being walked on or pinched, especially at plugs, convenience receptacles, and the point where they exit from the apparatus. If the power cord is damaged, it may cause malfunction or electric shock. Damaged cords must be replaced by the manufacturer or a qualified technician.
Unplug the device during lightning storms or when unused for long periods of time.
- The mains plug is used as the disconnect device. Ensure the plug remains easily operable. Replace the fuse only with the same rating and type, approved to BS1362.
Children's safety
Follow basic safety precautions to prevent incorrect use of the product.
Placement
- Place on a flat, stable surface without protrusions. If any part is damaged, refer to the user manual for proper use.
Ventilation
Do not block, cover, or insert objects into the ventilation openings. Do not insert objects into the open parts of the product. This may cause danger or damage to the product. Ensure a minimum distance of 5 cm around the product for adequate ventilation and to prevent overheating.
Heat and temperature
Do not place the product near heat sources or in direct sunlight for extended periods.
Open flame
- Keep open flames away from the product to prevent fire.
Do not disassemble the device; keep it away from water and objects filled with liquid to prevent damage or electric shock.
Thunderstorms
Unplug all cables during thunderstorms or lightning, to prevent damage.
Maintenance
Unplug the device from the power source before cleaning and use a dry cloth without chemical or abrasive agents. If you use a damp cloth, use a slightly damp cloth.
Battery
Construction
Use only the specified batteries; do not mix different types or new and used ones. When inserting batteries, observe the correct polarity.
Use and maintenance
- Keep batteries away from heat, fire, water, or direct sunlight. If batteries are not used for a long time, it is better to remove them to avoid leakage. Replace the batteries inside the battery compartment.
Child safety
- Make sure the battery compartment is securely closed. Keep batteries away from children. If a battery is swallowed, seek medical help immediately.
Environmental conditions
- To avoid explosion or leakage, do not throw batteries into fire or expose them to high temperatures.
Do not throw batteries into fire, do not disassemble or recharge them, as they are not rechargeable, which may lead to explosion or fire.
Battery disposal
Information for users on the collection and disposal of old batteries.
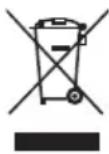
The symbol indicates that the batteries must be disposed of separately in accordance with Directive 2023/1542/EU; do not dispose of them with household waste. Cd, Hg, or Pb indicate that the battery contains cadmium, mercury, or lead.

This symbol indicates that the product has been designed and manufactured to be reused and recycled.
The symbols on products, packaging, or accompanying documents indicate that used electrical and electronic products and batteries must not be mixed with general household waste. Household users should return them to the retailer where they purchased the product or to a local collection point where they can be recycled in an environmentally safe manner.
CE and UKCA declarations:
Sharp Consumer Electronics Poland sp. z o.o. hereby declares that this device complies with the essential requirements and other relevant provisions of Directive RED 2014/53/EU and the UK Radio Equipment Regulations 2017. The full CE and UKCA declarations of conformity are available at sharpconsumer.com. Go to the section for your model and select "Declaration of Conformity".
Box contents:
- HT-SB121 / HT-SB123 2.0 Soundbar Remote control (including battery)
- Power supply unit - 2-pin plug (Type C)
- 3-pin plug adapter (Type G) (for HT-SB121 only) Wall mounting kit - User manual
Controls
(See page 2)
- Press the button to switch between sound modes. To turn off.
- G/ - Select the sound source (TV (HDMI), Bluetooth, Optical, Aux in or USB).
- -Decrease the volume.
- +-Increase the volume.
(See page 2).
- -Press the button to switch between sound modes. To turn off.
- -Select Bluetooth mode. Press and hold the button to activate the pairing function in Bluetooth mode or to turn off the paired Bluetooth device.
- -Press the button to select the sound source (HDMI ARC, OPTICAL, BLUETOOTH, AUX IN and USB).
- +/- -Increase/Decrease the volume level.
- // - Skip to previous/next track in Bluetooth and USB modes.
- / / - Play, pause, resume playback in Bluetooth and USB modes.
- -Mute/Unmute the sound.
- BASS+/- - Adjust the bass. This changes the parameters of the custom EQ.
- TRE+/- -Adjust the treble. This changes the parameters of the custom EQ. 10.EQ-Press the button several times to switch between EQ modes: Off, Voice, Film, Sport, Game, Hi-Fi, Music and Custom equalizer.
Inputs/Outputs
Power on the unit.
4. AUX IN
Connect the audio input device.
5. DC IN
Connect the power adapter.
Initial Setup
Using the Remote Control
The remote control allows you to operate the device from a distance.
The remote control works within the effective range of 6 meters. Operation may be impossible if there are obstacles between the remote control and the device. - If the remote control is operated near other products which generate infrared rays, or if other remote control devices using infrared rays are used near the unit, it may operate incorrectly. The devices may also operate incorrectly.
Installing Batteries
- To open the battery compartment, press the cover with your thumb and slide it down.
- Insert two batteries, observing the +/- polarity as shown. When replacing batteries, use only the same type of batteries as supplied.
- Replace the battery compartment cover and secure it.
Initial Installation
Positioning and Mounting
(see figure 3).
A: Wall mounting
B: Partial installation
Partial installation
NOTES:
Installation must be carried out by qualified personnel. Incorrect assembly can lead to serious personal injury and material damage (even if you intend to perform installation work yourself, do not forget to check that the electrical wiring and plumbing are properly installed at the installation site). The installer must ensure that the wall can support the full weight of the device and the mounting brackets. Additional tools (not included in the kit) are required for installation. Do not overtighten the screws. Keep this operating manual for future use.
Before mounting the bracket on the wall, check the internal structure of the wall using an electronic detector for hidden utilities.
(See page 3).
1. Drill two parallel holes (5.5-6 mm each) into the wall. The distance between the holes should be 440 mm.
- If necessary, insert wall plugs into each hole. Tighten the screws provided, leaving a 5 mm gap between the screw head and the wall.
- Align the bracket holes over the screw heads, then slide the device down to lock it in place.
HDMI ARC
(See page 3).
The ARC function (audio return channel) allows you to send audio from your TV, which supports ARC, to your device via a single HDMI connection. To use the ARC function, make sure your TV supports HDMI-CEC and ARC, and configure it accordingly. Once everything is set up correctly, you can use the TV remote control to adjust the volume (+/-) and mute.
Connect the HDMI cable (not included) from the HDMI (ARC) port on your device to the HDMI (ARC) port on your TV, which supports ARC.
TIP:
To use the HDMI-CEC and ARC functions, the TV must be set to the "TV" or "ACTIVE" position in the TV's menu.
The HDMI-CEC and ARC setup method may vary depending on the TV. For detailed information about the ARC function, please refer to the TV's instruction manual.
The ARC function only supports HDMI cables version 1.4 or higher.
OPTICAL
(See page 3).
Connect the optical cable (not included) to the OPTICAL OUT port of the TV and the OPTICAL port on the device.
AUX
(See page 3).
A:
Use an RCA to 3.5 mm cable (not included) to connect the audio output of the TV or an external audio device to the AUDIO IN port on the device.
B: Use a 3.5 mm to 3.5 mm cable (not included) to connect the headphone jack of the TV or an external audio device to the AUDIO IN port on the device.
TIP:
If you use the headphone output on the TV, you can adjust the volume directly using the TV's remote control.
Connection
(See figure 3).
- Before using the device, make sure all connections are complete.
Risk of electric shock!
- Make sure the supply voltage matches the voltage indicated on the rear panel of the device.
- Before using the DC adapter, make sure all connections are complete.
Warning
Simple setup √One remote Quick settings
Using Bluetooth
To connect your Bluetooth device to this program, you need to establish a connection between the device and the program.
NOTE
ü Compatibility with all Bluetooth devices is not guaranteed. ü Any interference between your device and the Bluetooth device may reduce the operating range. ü If the signal is weak, your device may disconnect, but it will automatically reconnect in standby mode.
- Press the C button to select Bluetooth. The indicator will turn blue and start blinking.
- Activate your Bluetooth device and select the search mode. "SHARP HT-SB121" or "SHARP HT-SB123" will appear in the list of Bluetooth devices.
- Select "SHARP HT-SB121" or "SHARP HT-SB123" from the device list. After connection, the indicator will light up with a steady blue color.
- Play music from the connected Bluetooth device.
To resume playback, press button 11 on the remote control. To go to the previous/next track, press the / buttons on the remote control. To fast-forward or rewind, press and hold the button.
NOTE:
To stop the device, press and hold the button on the device or on the remote control for 3 seconds to start the shutdown process.
Working with USB devices
- Insert the USB drive into the USB port on the soundbar.
- Press the button on the soundbar or on the remote control several times to select the USB source.
- Press to play or pause the track. 4. During playback: To pause or resume playback, press the button on the remote control. To go to the previous/next track, press the / buttons on the remote control. Press and hold the button to fast-forward or rewind the track.
TIPS:
Supports USB devices up to 64GB. Only MP3/WAV files can be played.
The USB port is intended for playback or updating the soundbar's software. It is not intended for charging.
Troubleshooting
Factory reset
To perform a factory reset, press and hold the button on the device for 5 seconds. After the reset is complete, the device will enter standby mode.
Disposal
We recommend that the plug is inserted securely.
Check the socket and voltage.
Press the power button on the remote control or the device to turn it on.
No sound
HDMI HDMI version 1.4 or higher
Increase the volume. Press + on the remote control or the device.
Press on the remote control to make sure the device is not in silent mode.
Press the input/source button to select another source.
When connecting to a digital source (HDMI or optical), if there is no sound:
Try to adjust the TV input to PCM or check if the TV is set to variable audio output. Make sure the audio output is set to "Fixed" or "Standard", not "Variable". Contact the user manual of your TV for more information.
If you use a receiver, make sure the volume on your device is increased and the sound is not muted.
The remote control does not work
Press the buttons on the device to turn it on, first select the correct source.
Change the distance between the remote control and the device. Insert the battery, observing the polarity (+/-) according to the indications. Replace the battery.
Point the remote control directly at the sensor on the front panel of the device.
If the device is locked
The device is switched on and the connection to the network is established.
Check the network connection, if necessary, reconnect the device. If not, there may be a problem with the output device. Connect the device to its input on the device.
I cannot find the Bluetooth of this device on my Bluetooth device list.
Check that the Bluetooth function on your device is enabled. Reconnect the device to your Bluetooth device.
The device switches to standby mode after 15 minutes without a signal from the source.
If the external signal level of the device is too low, the device automatically switches off after 15 minutes. Increase the volume level of your external device. This function is in its standby mode and is designed to save energy when the device is not in use.
Technical specification
| EN | BG | CS | DA |
| Model | Моden | Model | Model |
| Soundbar | сayндбар | soundbar | soundbar |
| Power supply | Зхранвае | Napájení | Strømforsyning |
| Power consumption | Консу мача на[eнөргий | Spot'reba energia | Strømforbrug |
| Stand-by power consumption | Консу мача на[eнөргий в реким на говиност | Spot'reba v pohotovostním režimu | Standby strømforbrug |
| Output power | ИзхODна моцност | Vystupné výkon | Udgangseffekt |
| Frequency Response | Чебтөн диалазан | Frekvenčné rozsah | Frekvenskurve |
| Bluetooth | Bluetooth | Bluetooth | Bluetooth |
| Version | Версан | Verze | Version |
| Maximum power transmitted | Мakсимална преавана моцност | Maximálné prěnášen'y výkon | Maksimal overført effekt |
| Frequency bands | Чебтөн дeнтп | Frekvenčné pásma | Frekvensbänd |
| Remote Control | Дистанцюнho | dálkové ovládání | fjernbetjening |
| Battery Type | ТПь батерия | typ baterie | batterype |
Technical data
| ET | FI | FR | HR |
| Mudel | Malli | Modèle | Model |
| soundbar | soundbar | barre de son | soundbar |
| Vooluvarustus | Virtalähde | Alimentation | Napajanje |
| Vöimsustarve | Virrankulutus | Consommation énergétique | Potrošnja energije |
| Vöimsustarve ooteolekus | Valmiustilan energiankulutus | Consommation en mode veille | Potrošnja u stanju priapravnosti |
| Väljundvöimsus | Lähtöteho | Puisance de sortie | Izlazna snaga |
| Sagedusreaktsion | Taajuusvaste | Réponse en fréquence | Frekvencijski odaziv |
| Bluetooth | Bluetooth | Bluetooth | Bluetooth |
| Versoon | Versio | Version | Verzija |
| Maksimaalne edastatav vöimsus | Suurin lähetyetty teho | Puisance maximale transmise | Maksimalna prenesena snaga |
| Sagedusribad | Taajuuskaistat | Bande de fréquences | Rasponi frekvencija |
| puldiga pult | kaukosäädin | telecommande | daljinski upravljač |
| akutüup | akkutyyppi | type de batterie | tip baterije |
| Stromversorgung | Tροφοδσία ρεύματος | Fuente de eliminación | DC 15V=1.6A |
| Stromverbrauch | Κατανάλωση οχύος | Consumo de energia | 24W |
| Stand-by-Energieverbrauch | Κατανάλωση οχύος σε αναμουή | Consumo de energia en modo en上限 | <0.5W |
| Ausgangsleistung | ιαχύς εξόδου | Potencia de salute | 2 x 20W (RMS) |
| Frequenzababhängigkeit | Ανταπόκριση συχνοτήτων | Respuesta de Frequencia | 70Hz - 20kHz |
| Bluetooth | Bluetooth | Bluetooth | |
| Version | 'Ekδοση | Version | 5.3 |
| Maximaler übertragener Strom | Μέγιση μεταδιδόμενη ιαχύς | Potencia máima transmitida | 4 dBm |
| Frequenzbänder | Zωνες συχνοτήτων | Bandas de Frequencia | 2402 MHz ~ 2480 MHz |
| Fernbedienung | Τηλεχειριοήριο | control remoto | |
| Batterietyp | τύπος μαιαρίας | tipode batería | AAA (1.5V X 2) |
| HU | IT | LT | |
| Model | Modello | Modelis | HT-SB121 / HT-SB123 |
| Áramforrás | Alimentazione: | Maitinimas | DC 15V=1.6A |
| Teljesitményfelvétel | Consumo energetico | Energios sānaudos | 24W |
| Készenléti áramfogyasztás | Consumo energetico in stand-by | Energios sānaudos parengties režimu | <0.5W |
| Kimeneti teljesitmény | Potenza in uscita | Irenginio galia | 2 x 20W (RMS) |
| Frekvencia-átvitel | Risposta di frequenza | Dažnio atsakas | 70Hz - 20kHz |
| Bluetooth | Bluetooth | Bluetooth | |
| Verzió | Versione | Versija | 5.3 |
| Maximális átvitt teljesitmény | Potenza massima trasmessa | Didžiausia perduodama galia | 4 dBm |
| Frekvenciasáv | Bande di frequenza | Dažniúj juostos | 2402 MHz ~ 2480 MHz |
| távirányító | telecomando | nuotollinis valdymas | |
| akkumulátor tipus | tipodi batteria | baterijos tipas | AAA (1.5V X 2) |
Technical specifications
| LV | NL | NO | PL | PT | RO |
| Modelis | Model | Modell | Model | Modelo | Model |
| skanas josla | soundbar | soundbar | soundbar | barra de som | soundbar |
| Strãvas padeve | Stroomvoorziening | Strømforsyning | Zasilanie | Alimentação eletrica: | Alimentare electrică |
| Energijas pateriš | Energieverbruik | Strømforbuk | Pobór mocy | Consumo de energia | Consum de energia |
| Strãvas pateriš gaidstāves laikā | Energieverbruik stand-by | Strømforbuk i standby | Zužycle energia w trybie czuwania | Consumo de energia em standby | Consum de energia in standby |
| Izejas jauda | Uitgangsvermogen | Utgangseffekt | Moc wyjsciowa | Potência de saía | Putere de ilesire |
| Frekvences atbilde | Frequentierespons | Frekvensrespons | Reakçja na.czestot-liwosć | Frequência de responsta | Raspuns freventa |
| Bluetooth | Bluetooth | Bluetooth | Bluetooth | Bluetooth | Bluetooth |
| Version (Versija) | Versie | Versjon | Wersja | Versão | Versiune |
| Maksimă lă parraidità jauda | Maximaal overgodra-gen vermogen | Maksimal strøm overfort | Maksymalny poziom przykazywanej mocy | Potência Tmaxima transmitida | Putere maximā transmisā |
| Frekvenču joslas | Frequentiebanden | Frekvensbänd | Pasma.czestotliwość | Bandas de Frequência | Benzi de freventa |
| tãlvadibas pults | fjernkontroll | afstandsbediening | pilot | control remoto | telecomanda |
| baterijas tips | batteritype | batterijtype | typ baterii | tipo de bateria | tipul bateriei |
1.25 kg
| Model | Model | Model | Model | Модаль | HT-SB121 / HT-SB123 |
| soundbar | soundbar | soundbar | soundbar | сayндбар | |
| Napájanie | Napajalnik | Dovod napajanja | Strömförsörning | Джереньки веняп | DC 15V----1.6A |
| Spotreba energia | Poraba elektricne energiae | Potrošnja napajanja | Strömforbrukning | Стоожива на поуж- нICTь | 24W |
| Spotreba v pohotovostnom režime | Poraba energia v načinu pripravljenosti | Potrošnja napajanua u pripravnosti | Strömforbrukning i standby-läge | Стоожива на поуж- trpoеергii в рекимi оочува��я | <0.5W |
| Vystupnévykon | Izhodna moč | Izlaz napajanja | Uteffekt | Вухида поужнисты | 2 x 20W (RMS) |
| Frekvenčné odozva | Frekvenčné odzivanje | Odgovor frekvencije | Frekvensomfäng | Частотнахакты- риска | 70Hz - 20kHz |
| Bluetooth | Bluetooth | Bluetooth | Bluetooth | Bluetooth | |
| Verzia | Različica | Verzija | Version | Версан | 5.3 |
| Maximálny prenašaný vykon | Največka moč prenašanja | Maksimalno preneseno napajanje | Max. effektüberfung | Мамасмална вирироминова на поужнисты | 4 dBm |
| Frekvenčné pásma | Frekvenčné pasovi | Frekvencija talasa | Frekvensband | ЧастOTи діацәни | 2402 MHz ~ 2480 MHz |
| dialkové ovládanie | daljinski upravljalnik | daljinski upravljač | fjärrkontroll | пунь діstанцій- ного керувань | |
| typ batérie | tip baterije | tip baterije | batteryp | тіп батеі | AAA (1.5V X 2) |
CC
Sharp Consumer Electronics Poland sp. z o.o.
Ostaszewo 57B, 87-148 Lysomice, Poland
Made in China
SAU/MAN/0213 V5
SHARP


- TRADEMARKS
- BLUETOOTH
- ENGLISH
- IMPORTANT SAFETY INSTRUCTIONS
- PLEASE FOLLOW ALL SAFETY INSTRUCTIONS AND WARNINGS. KEEP THIS MANUAL FOR REFERENCE
- PRECAUTIONS
- DAMAGE
- CAUTION
- RISK OF ELECTRIC SHOCK
- DO NOT OPEN
- POWER CONNECTION AND ACCESSIBILITY
- POWER SOURCE
- POWER CORD PROTECTION
- FUSED MOULDED POWER PLUG (NON-REWIREABLE) - UK, MALTA, CYPRUS AND IRELAND ONLY
- CHILD SAFETY
- LOCATION
- VENTILATION
- HEAT AND OPERATING TEMPERATURE
- NAKED FLAMES
- WATER, MOISTURE, AND LIQUID ENTRY
- STORMS AND LIGHTNING
- MAINTENANCE
- BATTERIES
- INSTALLATION
- USE AND MAINTENANCE
- ENVIRONMENTAL CONDITIONS
- DISPOSAL
- DISPOSAL: EQUIPMENT AND BATTERIES
- CE AND UKCA STATEMENT
- WHAT IS INCLUDED IN THE BOX
- CONTROLS
- INPUTS/OUTPUTS
- INITIAL SET UP
- REMOTE CONTROL OPERATION
- BATTERY INSTALLATION
- FIRST TIME INSTALLATION
- PLACEMENT AND MOUNTING
- WALL MOUNTING
- NOTES
- HDMI ARC
- TIPS
- OPTICAL
- A
- TIP
- CONNECT TO POWER
- RISK OF PRODUCT DAMAGE
- SOUNDBAR
- BASIC OPERATION
- STANDBY/ON
- CHANGE SOURCE
- VOLUME CONTROL
- EQUALISER
- ADJUST BASS AND TREBLE
- AUTO STANDBY
- LED DIMMER
- TO MAKE THE LED TURN OFF AFTER AN OPERATION
- TO MAKE THE LED DIMMED AFTER AN OPERATION
- ROKU TV™ READY OPERATION
- BLUETOOTH OPERATION
- NOTE
- USB OPERATION
- TROUBLESHOOTING
- PERFORM A FACTORY RESET
- NO POWER
- NO SOUND
- REMOTE CONTROL DOES NOT WORK
- I HEAR BUZZING OR HUMMING
- I CAN'T FIND THE BLUETOOTH NAME OF THIS UNIT ON MY BLUETOOTH DEVICE
- THIS DEVICE IS SET TO STANDBY AFTER 15 MINUTES OF NO SOURCE SIGNAL
- BULGARIAN
- STANDBY
- POWER
- WARNING
- CONNECTING TO THE ELECTRICAL POWER SUPPLY
- POWER SUPPLY
- SAFETY OF THE POWER CORD
- PLUG WITH FUSE (UK) - SEE FOR GREAT BRITAIN, MALTA, CYPRUS, IRELAND
- SAFETY FOR CHILDREN
- PLACEMENT
- HEAT SOURCES AND OPTIMAL OPERATING TEMPERATURE
- OPEN FLAMES
- WATER, MOISTURE, AND HEAT
- THUNDERSTORMS
- CLEANING AND MAINTENANCE
- BATTERY
- INSTRUCTIONS
- BATTERY USE
- DISPOSAL: DEVICES AND BATTERIES
- DECLARATION OF CONFORMITY CE AND UKCA
- PACKAGE CONTENTS
- AUX INPUT
- DCIN
- REMOTE SETUP
- USING THE REMOTE CONTROL
- INSERTING THE BATTERIES
- AUTOMATIC STANDBY TIME
- LED INDICATOR
- TO TURN OFF THE LED AFTER OPERATION
- TO TURN ON THE LED AFTER OPERATION
- PAUSE
- WORKING WITH USB DEVICES
- POWER ON
- SOUND
- THE REMOTE CONTROL WORKS
- PRESS THE BUTTON OR THE BUTTON
- I CANNOT FIND THE BLUETOOTH NAME OF THIS DEVICE IN MY BLUETOOTH LIST
- THIS DEVICE ENTERS STANDBY MODE AFTER 15 MINUTES WITHOUT POWER
- BLUETOOTH USE
- USING BLUETOOTH
- BLUETOOTH FUNCTION
- UNPLUG THE DEVICE DURING LIGHTNING STORMS OR WHEN UNUSED FOR LONG PERIODS OF TIME
- CHILDREN'S SAFETY
- HEAT AND TEMPERATURE
- OPEN FLAME
- CONSTRUCTION
- BATTERY DISPOSAL
- CE AND UKCA DECLARATIONS
- BOX CONTENTS
- AUX IN
- DC IN
- INITIAL SETUP
- INSTALLING BATTERIES
- INITIAL INSTALLATION
- POSITIONING AND MOUNTING
- PARTIAL INSTALLATION
- AUX
- CONNECTION
- FACTORY RESET
- THE REMOTE CONTROL DOES NOT WORK
- IF THE DEVICE IS LOCKED
- I CANNOT FIND THE BLUETOOTH OF THIS DEVICE ON MY BLUETOOTH DEVICE LIST
- THE DEVICE SWITCHES TO STANDBY MODE AFTER 15 MINUTES WITHOUT A SIGNAL FROM THE SOURCE
Brand : SHARP
Model : HT-SB121
Category : Soundbar