
EL 380 - Lawn mower MOUNTFIELD - Free user manual and instructions
Find the device manual for free EL 380 MOUNTFIELD in PDF.


| Product Type | Corded Electric Lawn Mower |
| Brand | Mountfield |
| Model | EL 380 |
| Cutting Width | 38 cm |
| Cutting Height | Adjustable from 20 to 70 mm |
| Grass Bag Capacity | 35 L |
| Motor Power | 1300 W |
| Power Supply | Mains 230 V / 50 Hz |
| Sound Pressure Level | 80.3 dB(A) |
| Measured Sound Power Level | 92.2 dB(A) |
| Guaranteed Sound Power Level | 94 dB(A) |
| Vibration Level | 1.29 m/s² |
| Weight | 22 kg |
| Chassis Material | Steel |
| Blade Type | Rotary Steel |
| Blade Reference | 81004154/0 |
| Cutting Systems | Bagging, rear discharge, mulching (with kit) |
| Handlebar | Foldable and height-adjustable (types I and II) |
| Vertical Storage | Yes, with folded handlebar |
| Safety | Double lever switch, automatic stop, blade guard |
| Recommended Electrical Protection | Residual Current Device (RCD ≤ 30 mA) |
| Minimum Extension Cord Section | 1.5 mm² (H05V-F or H05VV-F) |
| Recommended Maximum Extension Cord Length | 25 m |
Frequently Asked Questions - EL 380 MOUNTFIELD
User questions about EL 380 MOUNTFIELD
0 question about this device. Answer the ones you know or ask your own.
Ask a new question about this device
Download the instructions for your Lawn mower in PDF format for free! Find your manual EL 380 - MOUNTFIELD and take your electronic device back in hand. On this page are published all the documents necessary for the use of your device. EL 380 by MOUNTFIELD.
USER MANUAL EL 380 MOUNTFIELD
natural_image
Simple line drawing of an electrical plug with a terminal block (no text or symbols)Type EL 380 EL 420
text_image
Type EL 380 EL 420IT Rasaerba con operatore a piedi - MANUALE DI ISTRUZIOI
FR Tondeuse à conducteur marchant - MANUEL D'UTILISATIO
EN Pedestrian controlled lawnmower - OPERATOR'S MANUAL
DE Handgeführter Rasenmäher - GEBRAUCHSANWEISUNG
NL Lopend bediende grasmaaier - GEBRUIKERSHANDLEIDING
ES Cortadora de pasto con conductor de pie - MANUAL DE INSTRUCCIONI
PT Cortador de relva com operador a pé - MANUAL DE INSTRUÇÕES
EL Χλοοκοπτικό με όρθιο χειριστή - ΟΔΗΓΙΕΣ ΧΡΗΣΠΣ
TR Yaya kumandalı çim biçme makinesi - KULLANIM KILAVUZ
MK Тревокосачка со оператор на нозе - УПАТСТВА ЗА УПОТРЕБ,
NO Gressklipper for gående fører - INSTRUKSJONSBOK
SV Gräsklippare med operatör till fots - BRUKSANVISNING
DA Plæneklipper til gående fører - BRUGSANVISNING
FI Seisaaltaan ajettava ruohonleikkuri - KÄYTTÖOHJEET
CS Sekačka se stojící obsluhou - NÁVOD K POUŽITÍ
PL Kosiarka z operatorem chodzącym - INSTRUKCJE OBSŁUG
HU Lábbal szabályozható fűnyíró - HASZNÁLATI UTASÍTÁS
RU Газонокосилка с пешеходным управлением - РУКОВОДСТВО С ИНСТРУКЦИЯМИ
HR Kosilica sa vozačom koji hoda - PRIRUČLNIK ZA UPORAE
SL Kosilnica za stoječega delavca - PRIROČNIK ZA UPORABO
BS Kosilica za travu na guranje - UPUTSTVO ZA UPOTREBU
SK Kosačka so stojacou obsluhou - NÁVOD NA POUŽITIE
RO Maşină de tuns iarba cu conducător pedestru - MANUAL DE INSTRUCT
LT Žoliapjové su stovinčiu operatoriumi - INSTRUKCIJŲ VADOVA:
LV Stumjama zāliena plaujmašina - OPERATORA ROKASGRĀMAT
SR Kosilica sa vozačem na nogama - PRIRUČNIK SA UPUTSTVII
BG Косачка с изправен оператор - УПЪТВАНЕ ЗА УПОТРЕІ
ET Seisva juhiga muruniitja - KASUTUSJUHEND
IT ITALIANO - Istruzioni Originali 6 - 20
FR FRANÇAIS - Traduction de la notice originale (Istruzioni Originali) ...... 6
EN ENGLISH - Translation of the original instructions (Istruzioni Originali) 7
DE DEUTSCH - Übersetzung der Originalbetriebsanleitung (Istruzioni Originali) 7 -
NL NEDERLANDS - Vertaling van de oorspronkelijke gebruiksaanwijzing (Istruzioni Originali) 8 - 32
ES ESPAÑOL - Traducción del Manual Original (Istruzioni Originali) 8
PT PORTUGUÊS - Tradução do manual original (Istruzioni Originali) 9
EL ΕΛΛΗΝΙΚΑ - Μετάφραση του πρωτοτύπου των οδηγιών χρήσης (Istruzioni Original) - 41
TR TÜRKÇE - Orijinal Talimatların Tercümesi (Istruzioni Originali) 10 - 44
MK МАКЕДОНСКИ -Превод на оригиналните упатства (Istruzioni Originali) 10 - 47
NO NORSK - Oversettelse av orginal bruksanvisning (Istruzioni Originali) 11
SV SVENSKA - Översättning av bruksanvisning i original (Istruzioni Originali) 11
DA DANSK - Oversættelse af den originale brugsanvisning (Istruzioni Originali) 12 - 56
FI SUOMI - Alkuperäisten ohjeiden käännös (Istruzioni Originali) 12 - 59
CS ČESKY - Překlad původního návodu k používání (Istruzioni Originali) 13
PL POLSKI - Tłumaczenie instrukcji oryginalnej (Istruzioni Originali) 13
HU MAGYAR - Eredeti használati utasítás fordítása (Istruzioni Originali) 14
RU РУССКИЙ - Перевод оригинальных инструкций (Istruzioni Originali) 14 - 71
HR HRVATSKI - Prijevod originalnih uputa (Istruzioni Originali) 15
SL SLOVENŠČINA - Prevod izvirnih navodil (Istruzioni Originali) 15
BS BOSANSKI - Prijevod originalnih uputa (Istruzioni Originali) 16 -
SK SLOVENSKY - Preklad pôvodného návodu na použitie (Istruzioni Originali) 16
RO ROMÂN - Traducerea manualului fabricantului (Istruzioni Originali) 17 - 86
LT LIETUVIŠKAI - Originalių instrukcijų vertimas (Istruzioni Originali) 17 -
LV LATVIEŠU - Instrukciju tulkojums no oriğinālvalodas (Istruzioni Originali) 18 - 92
SR SRPSKI - Prevod originalnih uputstva (Istruzioni Originali) 18 .
BG БЪЛГАРСКИ - Инструкция за експлоатация (Istruzioni Originali) 19 - 98
ET EESTI - Algupärase kasutusjuhendi tõlge (Istruzioni Originali) 19 - 101
text_image
1.1a 17 16 14 18 15 3 4 15 12 15 13 13 1 2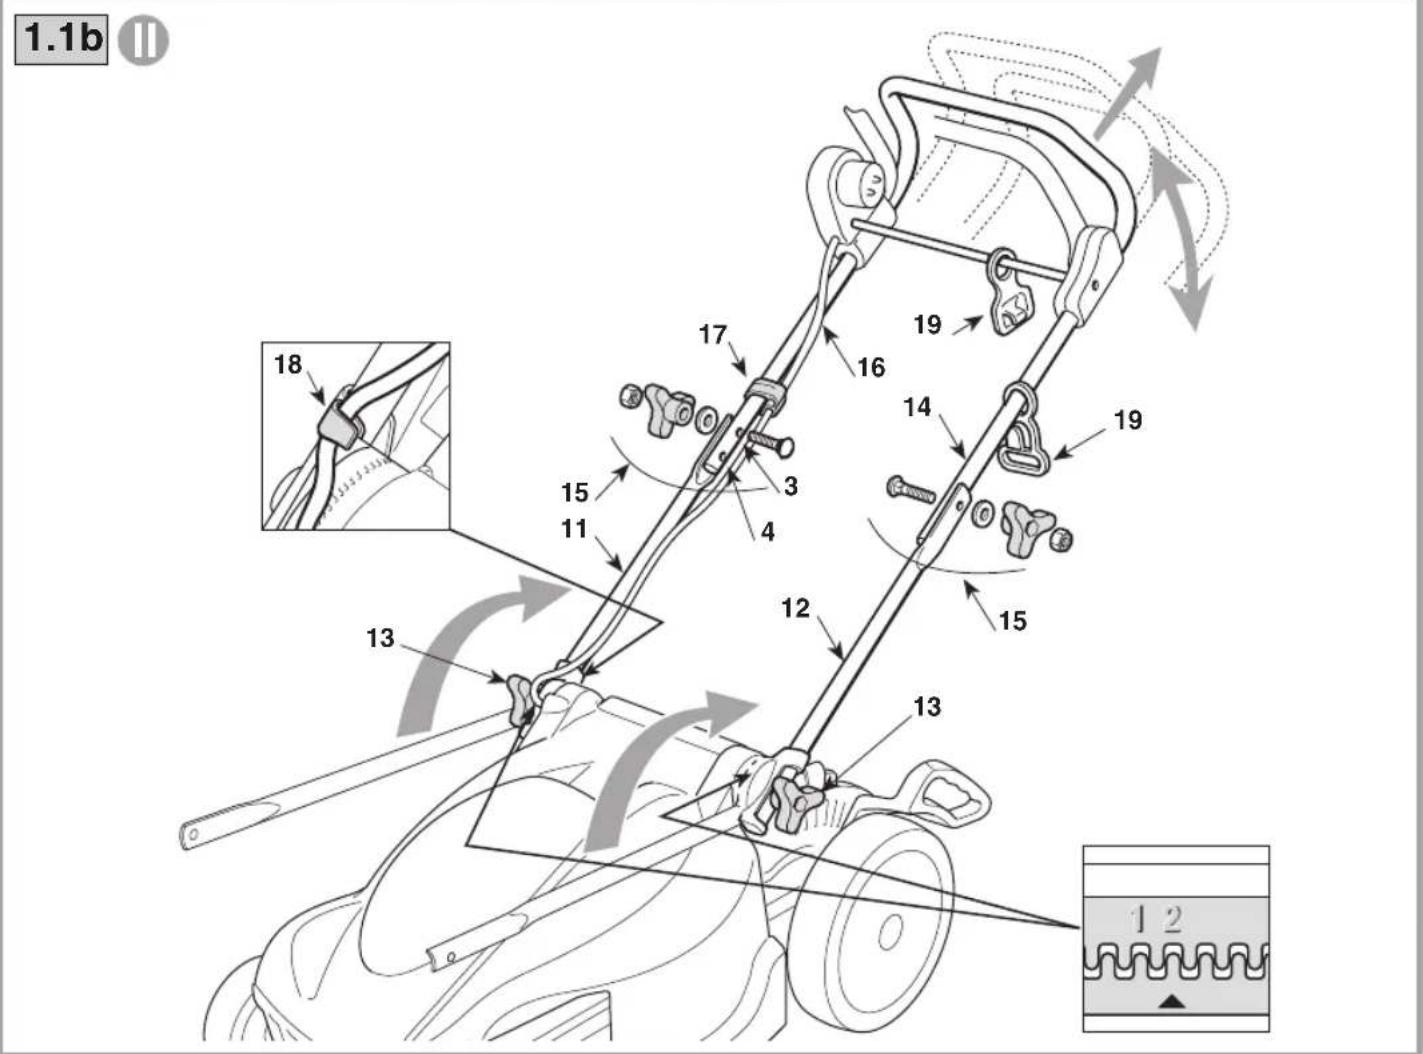
text_image
1.1b 18 13 15 11 17 16 19 14 3 4 12 13 15 19 15 13 1 2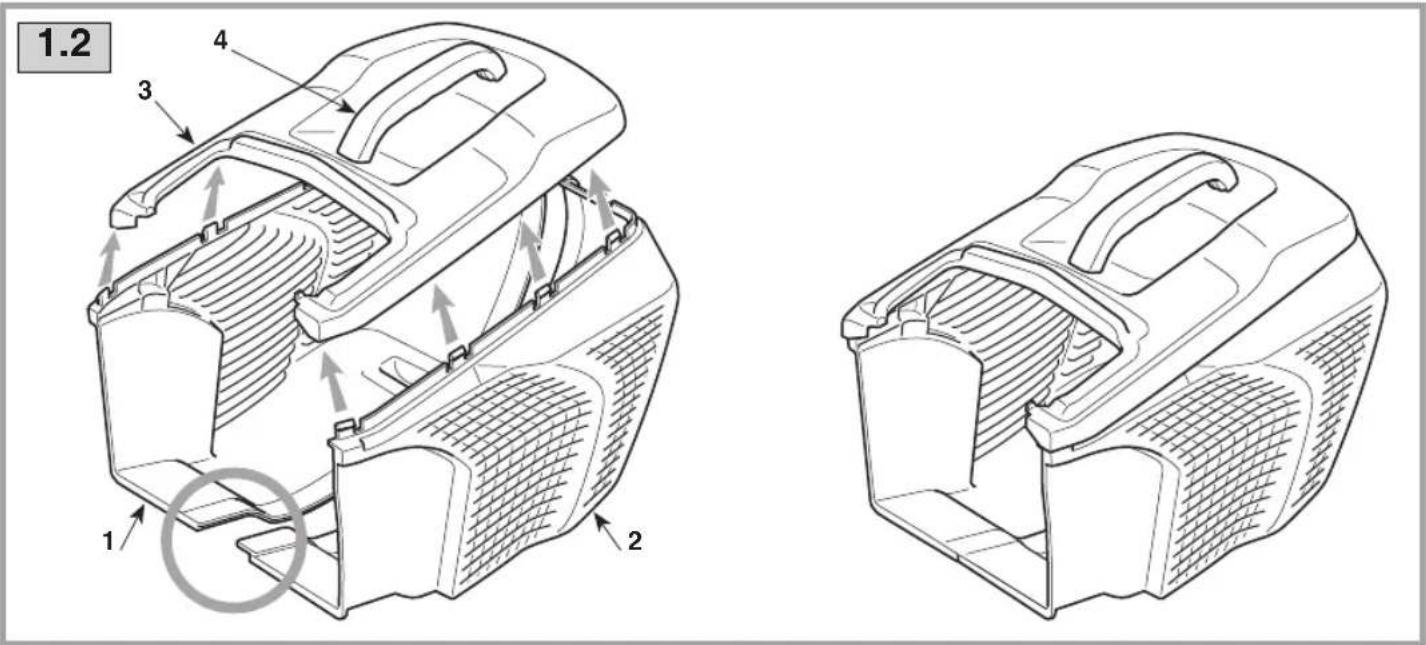
text_image
2.1 2.2 I START 1a STOP I START 1a STOP II I START 1 2 STOP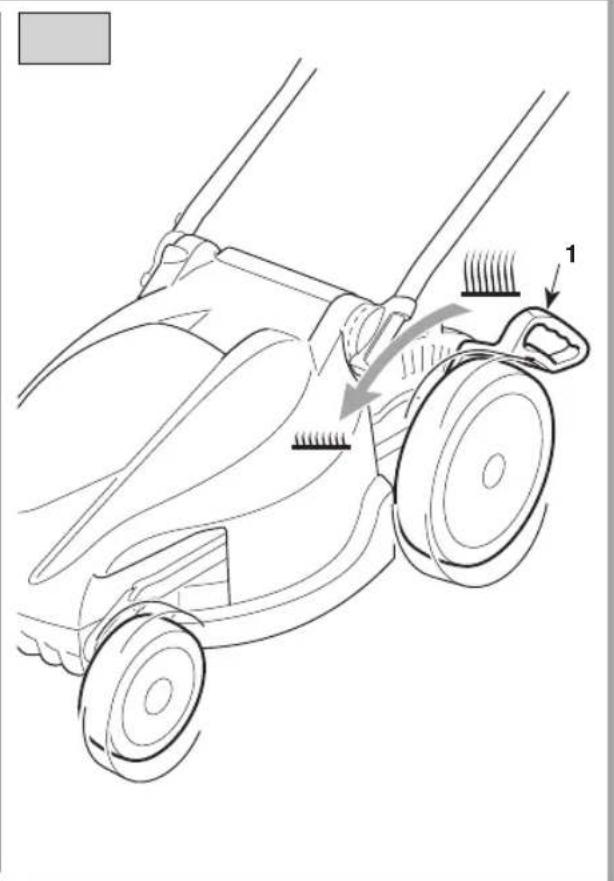
text_image
Technical diagram of a lawn mower with labeled parts and motion arrows indicating tool path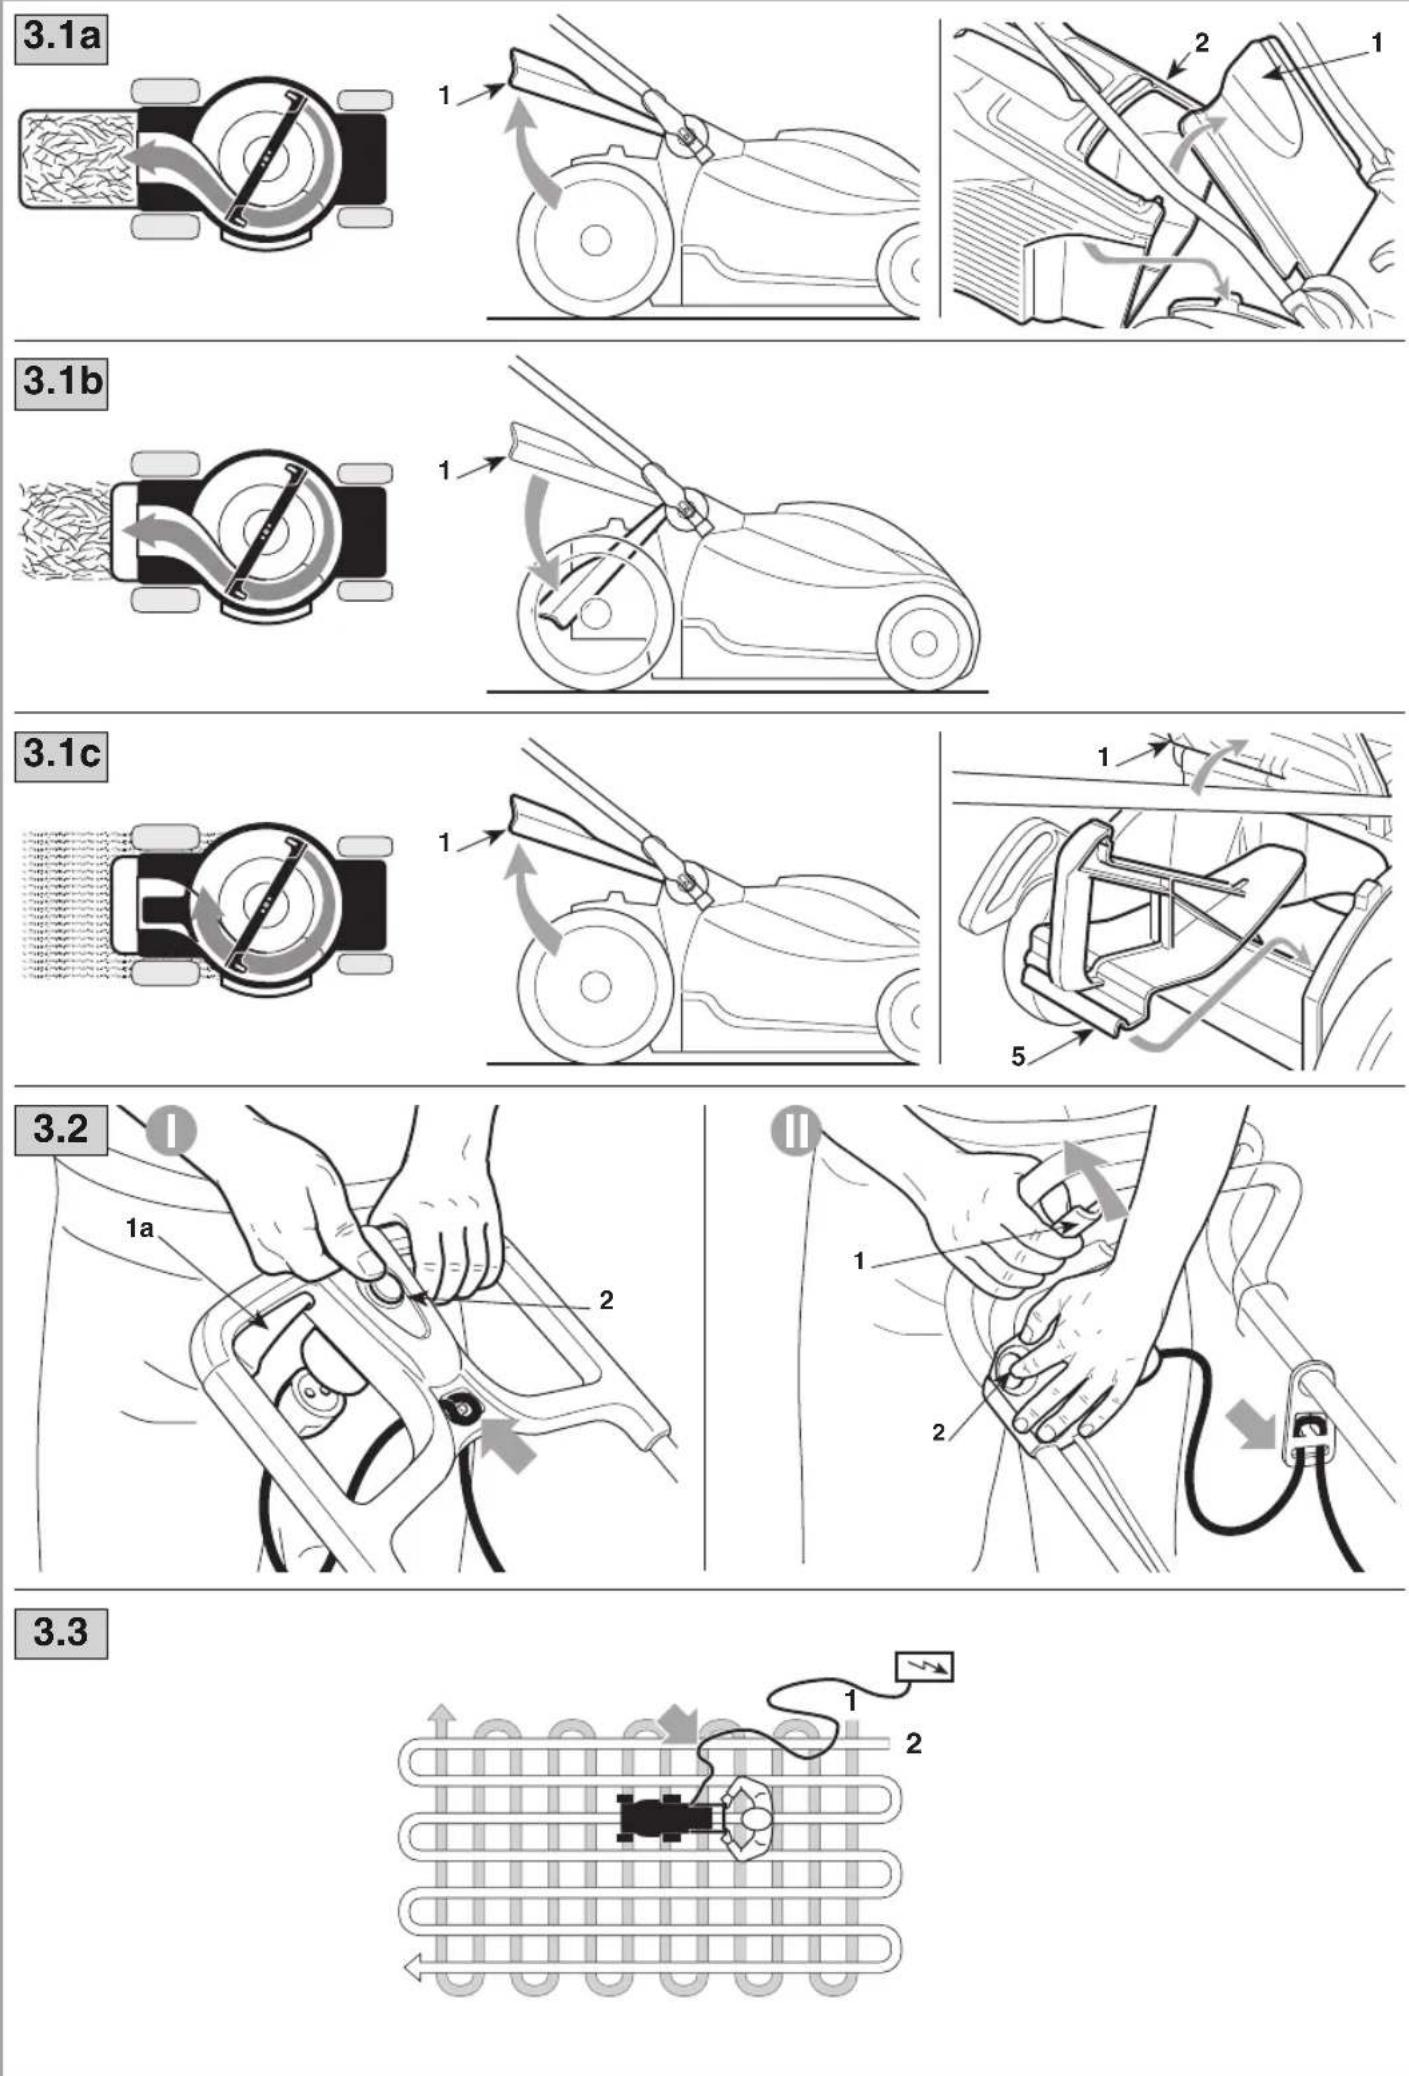
text_image
3.4 1a 1a 2 3 3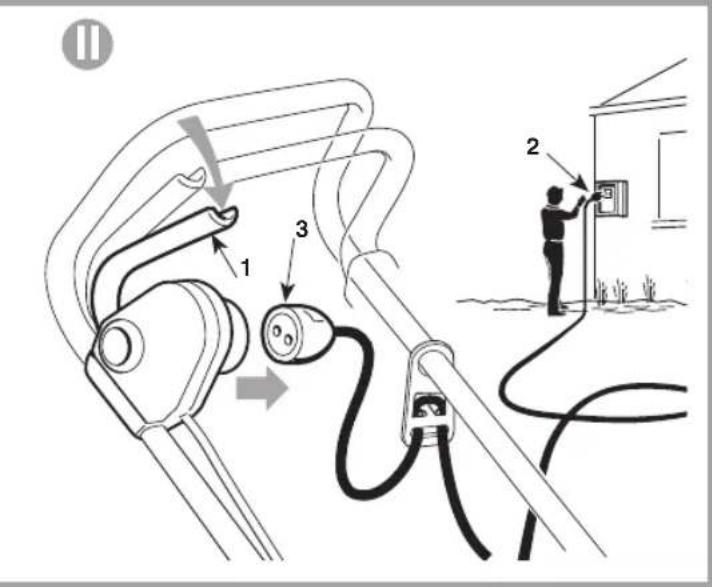
text_image
Diagram illustrating the installation of an electric plug with labeled components and a person installing a panel.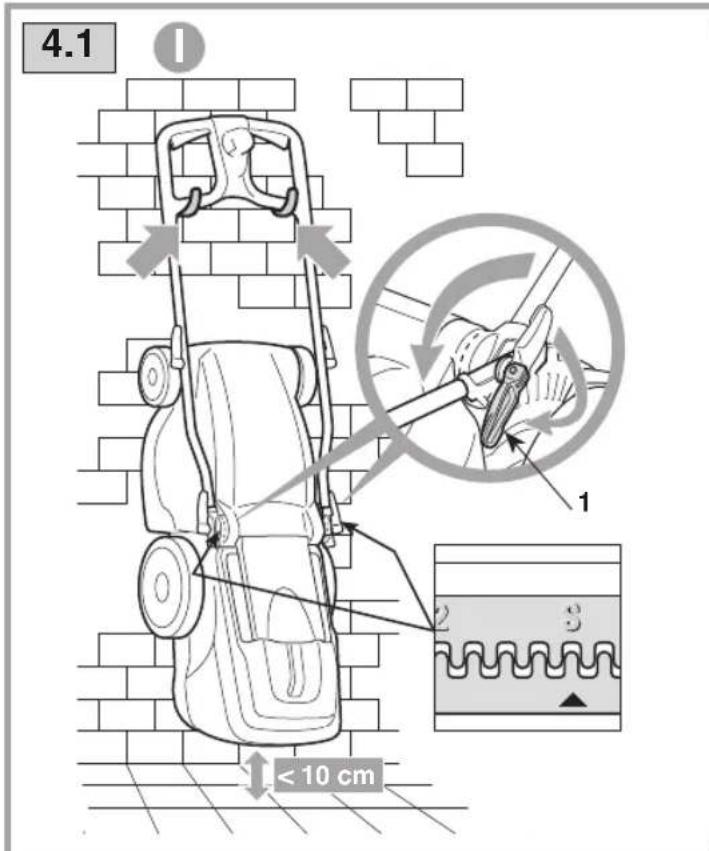
text_image
4.1 1 1 2 3 < 10 cm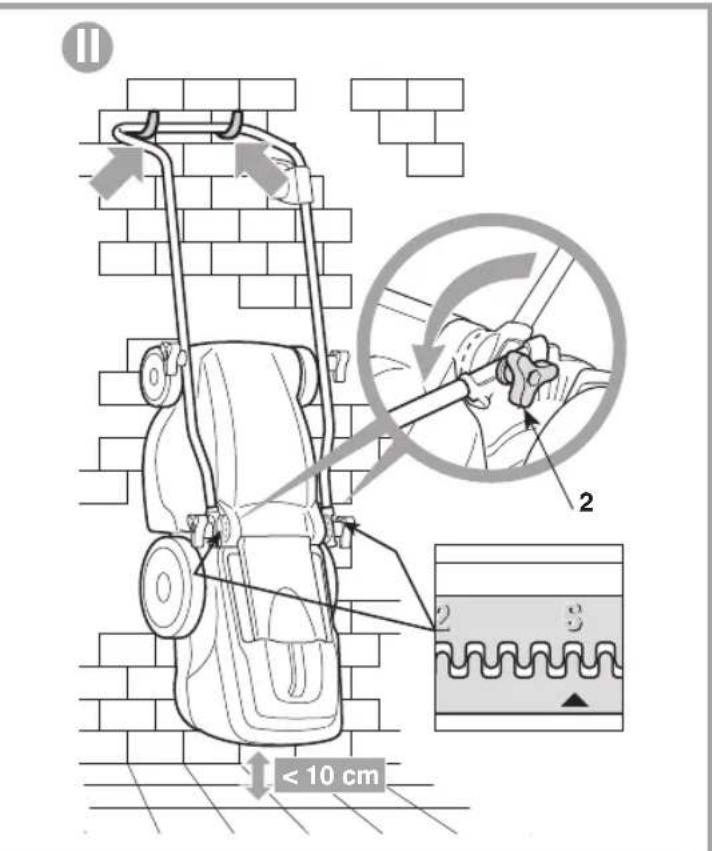
text_image
< 10 cm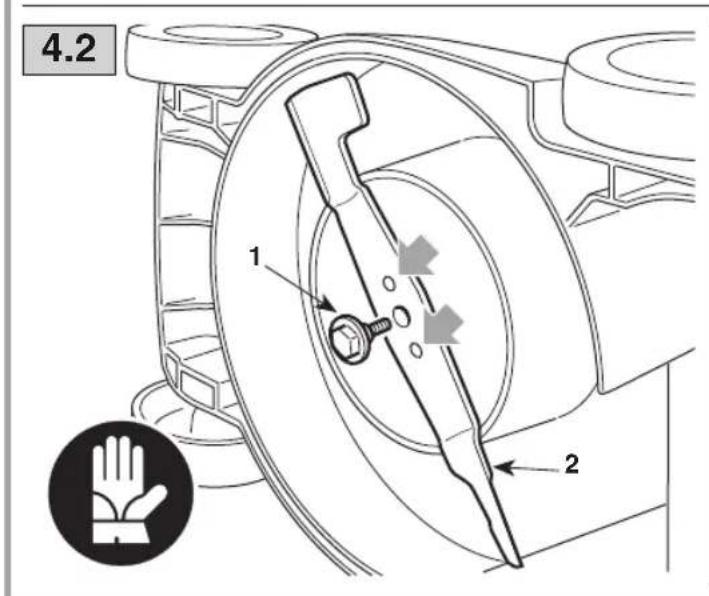
text_image
4.2 1 2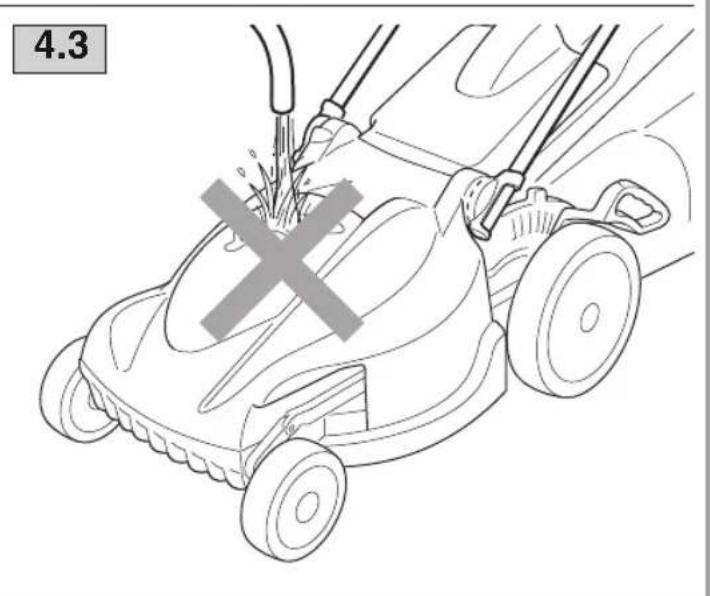
text_image
4.3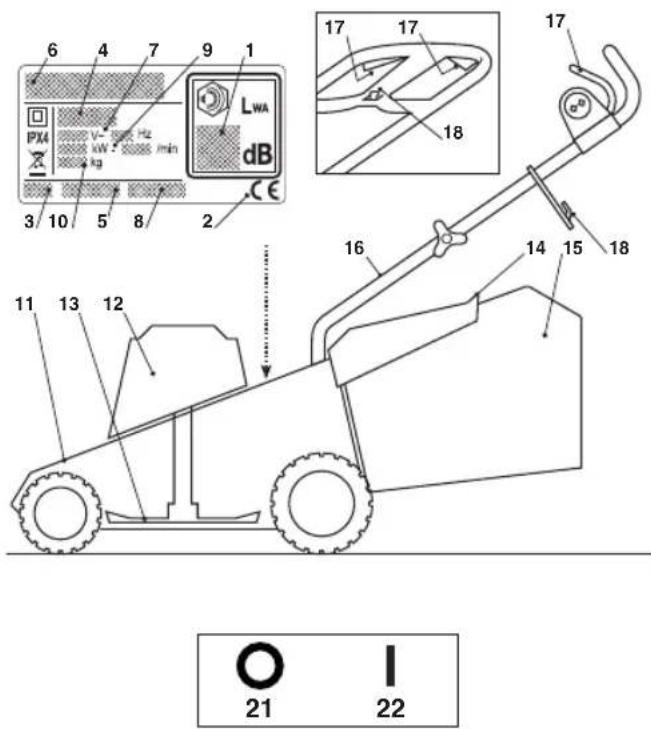
text_image
6 4 7 9 1 LWA dB PV4 V- 500 Hz kW 2000 min kg 3 10 5 8 2 17 17 18 17 16 14 15 18 11 13 12 21 22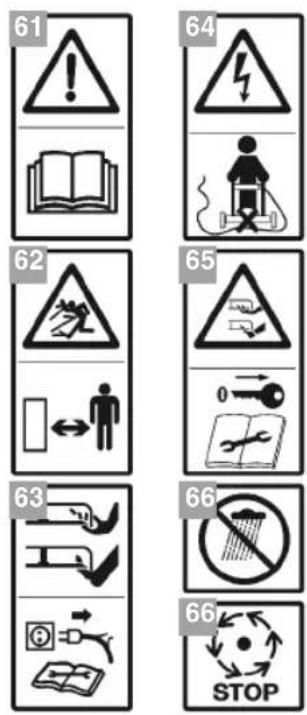
text_image
61 64 62 65 63 66 66 STOPIT
Guaranteed acoustic power level
(according to directive 2000/14/EC, 2005/88/EC) db(A) 94 96
extérieur
Vibration level (according to the regulation EN 1033) ......2... mts87 1,29
- Measurement uncertainty (2006/42/EC - EN 12096) ...... ^2 m/s 0,6 0,5
- Acoustic power level according to directive 2000/14/EC
- Conformity marking according to directive 2006/42/EC
- Year of manufacture
- Type of lawnmower
- Serial number
- Name and address of Manufacturer
- Supply voltage and frequency
- Article Code
- Motor power and speed
- Mass in kilograms
As soon as you have purchased the machine, write the identification numbers. Stopp 22. Ein (3 - 4 - 5) in the spaces on the last page of the manual.
- Chassis 12. Motor 13. Blade (Blade) 14. Stone-guard 15. Grass-catcher 16. Handle 17. Control lever 18. Electric cable fitting

Do not dispose of electrical equipment with household waste materi servance of European Directive 2002/96/EC on waste electrical and tronic equipment and its implementation in accordance with national
tions, electric equipment that has reached the end of its life must be collected separately and recycled in an ecologically compatible way. If electrical equipment is
disposed of in dumps or in landfills, hazardous substances can leak into the ground-
water and get into the food chain, damaging your health and well-being. Für Achteng: Vor dem Gebrauch des Rasenmähers lesen Sie die Gebrauchsa information on the disposal of this product, contact a domestic waste collectionweisungen.
thority or your dealer. 62. Au
DESCRIPTION OF SYMBOLS ON CONTROLS (where applicable)
- Stop 22. Running
SAFETY REQUIREMENTS - Your lawnmower must be used carefully. Symbols have therefore been placed on various parts of the machine to remind you of cautions to be taken. Their meaning is explained below. You are also asked to carefully read the safety regulations in the specific chapter of this manual. Replace damaged or unreadable labels.
Maximum noise and vibration levels
| Model | EL 380 | EL 420 |
| Operator ear noise pressure level (according to regulation 81/1051/EEC) | db(A) 80,3 | 82,9 |
| - Measurement uncertainty (2006/42/EC - EN 27574) | db(A) 1,4 | 0,4 |
| (in conformitate cu directivele 2000/14/CE, 2005/88/CE) | db(A) | 94 | 96 |
IMPORTANT - Only use the lawnmower for the purpose for which it was namely mowing and collecting grass. Any other usage may be hazardous a persons and/or damage things. Examples of improper use may include, but limited to:
- transporting persons, children or animals on the machine;
- letting oneself be transported by the machine;
- using the machine to tow or push loads;
- using the machine for leaf or debris collection;
- using the machine to trim hedges, or for cutting vegetation other than
- use of the machine by more than one person;
- using the blades on surfaces other than grass.
A) TRAINING
1) Read the instructions carefully. Become familiar with the controls and the proper use of the lawnmower. Learn how to stop the motor quickly.
2) Never allow children or persons unfamiliar with these instructions to use nmower. Local regulations can restrict the minimum age of the operator.
3) Never use the lawnmower:
- when people, especially children or pets are nearby;
- if the operator has taken medicine or substances that may impair his react and be attentive.
4) Bear in mind that the operator or user is responsible for accidents or ted events occurring to other people or their property.
B) PRELIMINARY OPERATIONS
1) While mowing, always wear sturdy footwear and long trousers. Do not the lawnmower when barefoot or wearing open sandals. Avoid wearing cloth is loose fitting or has hanging cords or ties.
2) Thoroughly inspect the entire work area and remove anything that could thrown by the machine or damage the cutting unit or motor (stones, branes, wire, bones, etc.).
3) Before use, always inspect generally and in particular to see that the screws and cutting unit are not worn or damaged. Replace damaged or des and screws in their entirety to preserve balance.
4) Before use check the supply and extension cord for signs of damage If the cord becomes damaged during use, disconnect the cord from the mediately. DO NOT TOUCHTHE CORD BEFORE DISCONNECTING THE PLY. Do not use the machine if the cord is damaged or worn.
C) DURING USE
1) Mow only in daylight or good artificial light.
2) Avoid mowing wet grass or when it is raining.
3) Make sure you have a steady foothold on slopes.
4) Never run, always walk; do not let the lawnmower pull you.
5) Always mow transversely on slopes and never up and down.
6) Be extremely carefully when changing directions on slopes.
7) Never mow on overly steep slopes.
8) Be extremely careful when pull the lawnmower toward you.
9) Immobilise the blade if the lawnmower must be inclined for transport, ving over surfaces other than grass and when the lawnmower is transport or to an area that must be cut.
10) Never operate the lawnmower with damaged guards or without the gcher or stone-guard.
11) On power-driven models, disengage wheel drive before starting up the
12) Start up the motor carefully according to the instructions, keeping feet from the blade.
13) Do not incline the lawnmower when starting the motor, unless necessary start up. In this event, do not incline it more than is absolutely necessary lift the part that is far from the operator. Always ensure that both hands working position before lowering the lawnmower again.
14) Never place your hands and feet near or under rotating parts. Keep the discharge opening.
15) Do not lift or transport the lawnmower when the motor is running.
16) Stop the machine and remove plug from the socket. Make sure that parts have come to a complete stop:
- when transporting the machine;
- whenever you leave the machine.
- before clearing blockages or unclogging chute;
– before checking, cleaning or working on the machine;
- after striking a foreign object. Inspect the machine for damage and make before restarting and operating the machine.
If the machine starts to vibrate abnormally (check immediately):
- inspect for damage;
- replace or repair any damaged parts at a specialised centre;
– check for and tighten any loose parts.
17) Stop the motor:
- whenever you remove or reattach the grass-catcher;
- whenever you adjust the cutting height.
18) When mowing, always keep a safe distance from the rotary blade, g
length of the handle.
19) WARNING - If something breaks or an accident occurs during mowing, off the motor immediately and move the machine away to prevent further da if an accident occurs with injuries or third parties are injured, carry out the measures most suitable for the situation immediately and contact the medica thorities for any necessary health care. Carefully remove any debris that mig cause damage or harm persons or animals should it not be seen.
design MAINTENANCE AND STORAGE
are not
1) Be careful during adjustment of the machine to prevent entrapment of the gers between moving blades and fixed parts of the machine.
2) Always allow the machine to cool down before storing.
3) When servicing the blades be aware that, even though the power sources ched off, the blades can still be moved.
4) Keep all nuts and screws tight to be sure the machine is always in safe grass condition. Routine maintenance is essential for safety and for maintaining a l performance level.
5) To reduce fire hazards, keep lawnmower and in particular, the motor, freegrass, leaves, or excessive grease. Never leave containers with cut grass in a storage area.
6) Check the stone-guard and grass-catcher frequently for wear or deteriorati
7) For safety reasons, never use the machine when it has worn or damage Parts must be replaced and not repaired. Use original spare parts. Parts that not of the same quality can damage the equipment and impair your safety.
E) GENERAL PRECAUTIONS
ability to 1) Before each use, check the machine for damage. Any repairs must be c a specialised centre. Turn off the machine and disconnect the plug from the unexpec. ket if the machine begins to vibrate abnormally, then contact a specialised o for inspection.
2) Keep both hands on the grip during start up.
3) Parts subject to wear must only be replaced at a specialised centre.
4) Never use the machine if the power cable or extension cable are damaged, worn to
(5) Never connect a damaged cable to a mains socket and never touch a cable that is connected to the mains socket. Damaged or deteriorated cable cause contact with energised parts.
Do not touch the blade until the machine is disconnected from the main:
nches, iron
ket and that the blade is completely still.
7) Keep the extension cable away from the blade. The blade can damage the blade and cause contact with energised parts.
8) Carefully read the instructions for using the machine safely.
9) Power up the machine using a differential switch (RCD - Residual Currer of aging service) with a tripping current of max. 30 mA.
SUP: If the machine's power cable is damaged, it can only be replaced with ginal spare part by your dealer or an authorised service centre.
F) ADDITIONAL WARNINGS
1) The permanent connection of any electrical equipment to the mains of a ding must be installed by a qualified electrician in conformity with the regular in force. Incorrect wiring can cause serious injury and even death.
2) WARNING: DANGER! Moisture and electricity are not compatible:
- always handle and connect electric cables in dry conditions;
- never allow electric sockets or cables to contact wet areas (puddles or w grass);
- connections between cables and sockets must always be watertight. Only
extension leads with intact, watertight and approved sockets sold on the n when mo-
3) The quality of the extension leads must be no less than H07RN-F or H0 grass-cat-m. with a minimum section of 1.5 and a recommended maximum length of 25
4) Attach the extension lead to the cable fastener before starting the machin motor. 5) Before starting work, fit the discharge guards (grass-catcher or stone-guard
6) Never run the lawnmower over the electric cable. While mowing, always d
cable behind the lawnmower on the side where grass has already been cut
sary for
the cable fastener to prevent the cable from disconnecting accidentally as in
and only
ted in this manual. Make sure it is connected to the socket without being f
are in the
7) Never use the power cable to pull the lawnmower or pull the cable to plug. Do not expose the cable to sources of heat, or let it come into contact away from oil, solvents and sharp objects.
8) Wear work gloves for disassembling and reassembling blades.
9) Keep the blade balanced during sharpening. All work on the blade (disas by, sharpening, balancing, reassembly and/or replacing) are demanding jobs that require special skills as well as special tools. For safety reasons, these are best carried out at a specialised centre.
G) TRANSPORTATION AND HANDLING
repairs
1) Whenever the machine is to be handled, lifted, transported or tilted you – wear sturdy work gloves;
- grasp the machine at the points that offer a safe grip, taking account of weight and its distribution.
- use an appropriate number of people for the weight of the machine and characteristics of the vehicle or the place where it must be placed or coll ted.
2) During transport, fasten the machine securely with cables or chains.
EN OPERATING INSTRUCTIONS
2. CONTROL DESCRIPTION
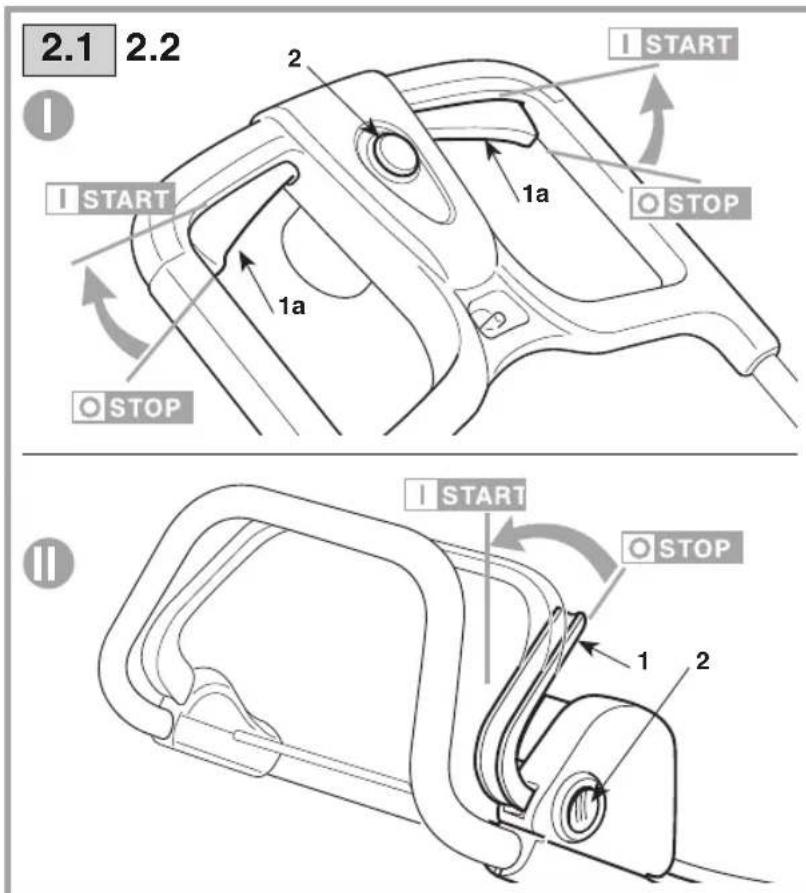
NOTE - The number which precedes each paragraph links the motor is controlled by a dual-action switch to references in the text to the respective illustrations (listed on vent accidental start ups. page 2 and following pages). Press the button (2) and pull the lever (1), or one of the
1. COMPLETE ASSEMBLY
Press the button (2) and pull the lever (1), or one of the levers (1a) for start up. The motor will automatically stop when the lever (1) or k levers (1a) are released.
NOTE - The machine can be supplied with some part 2a1. The cutting height is adjusted by the specific lever ready assembled. DO THIS WHEN THE BLADE IS STOPPED.
WARNING - Unpacking and completing the assembly 3. GRASS CUTTING
should be done on a flat and stable surface, with enough
space for moving the machine and its packaging, al-NOTE - This machine lets you mow lawn in different ways using suitable equipment. fore starting work, prepare the machine based on how the Disposal of the packaging should be done in accor-lawn is to be mowed.
DO THIS WHEN THE MOTOR IS OFF.
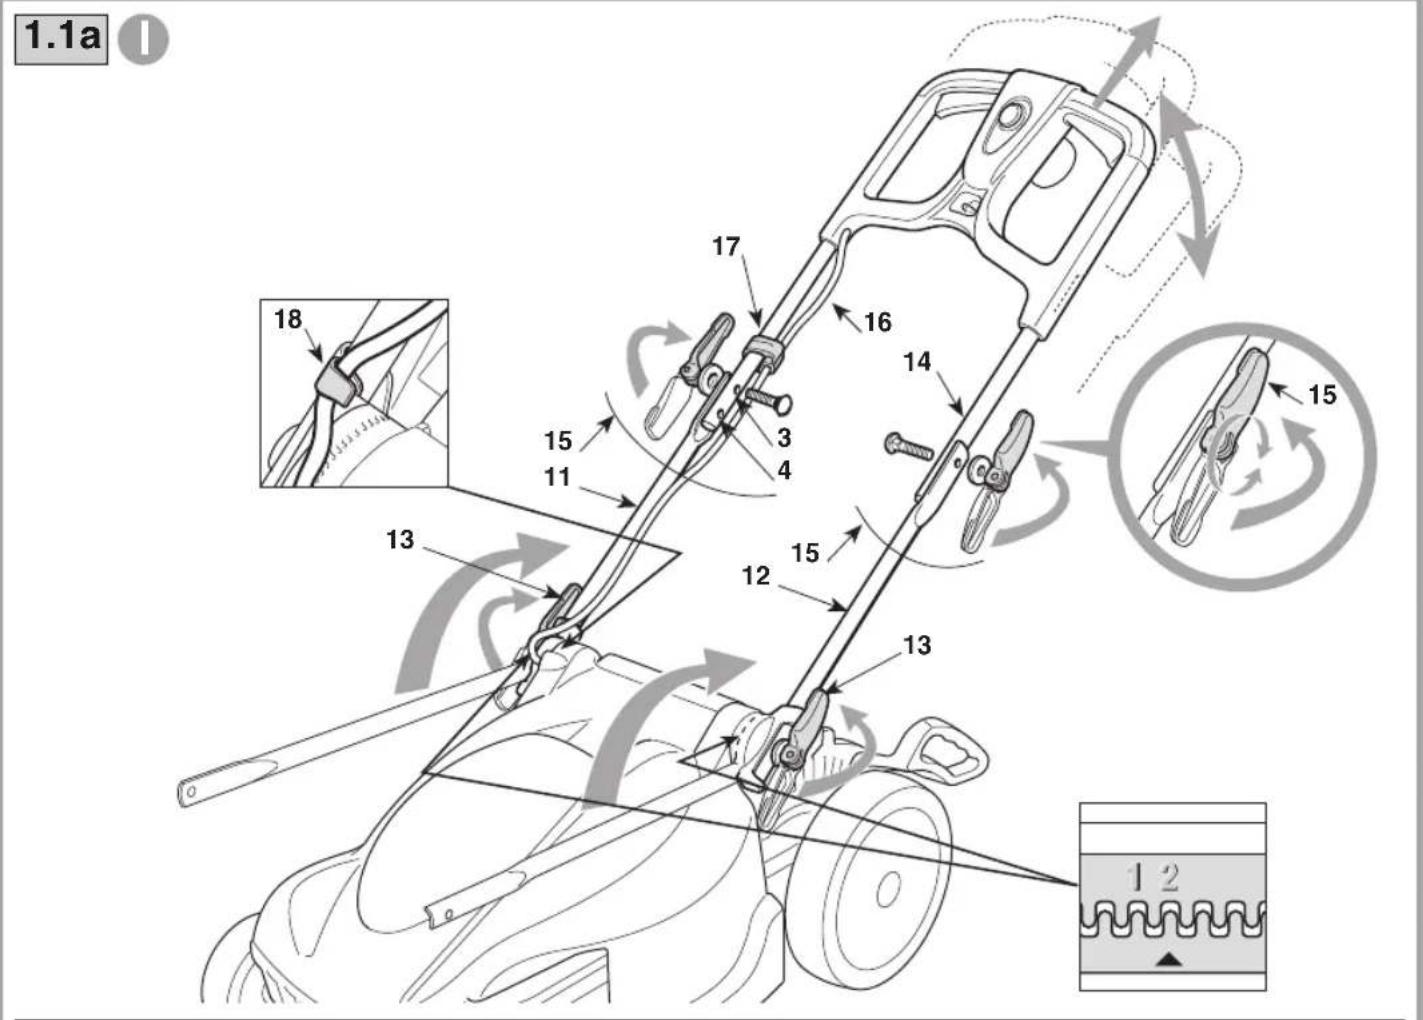
1.1a Handle type "I"
3.1a Preparation for mowing and collection already in grass-catcher
Move the two lower parts of the handle (11) and (12), already in grass-catcher pre-assembled, to the working position, matching the tooth Lift the rear stone-guard (1) and fasten the grass-catch marked with «>> EXCLUSIVELY with one of the two com-correctly as shown in the illustration.
partments marked with «1» or «2» of the teeth, according to the desired height, then lock the two lower levers (13).
The position must be the same for both sides.
Assemble the upper part of the handle (14) and lock it to the grass discharge two lower parts (11) and (12) using the upper levers (15) remove the grass-catcher and make sure that the rear viously removed from their respective holes), inserted in one stone-guard (1) remains down stably. of the two holes (3) or (4) according to the desired final height.
To adjust the holding force, each lever (15) must be released then tightened or loosened on its axle as much as is next. Preparation for mowing and mulching sary to ensure that the upper part (14) is firmly fastened to the (if provided)
lower parts of the handle (11) and (12), without using excess lift the rear stone-guard (1), fit the deflector cap (5) in sive force to lock or release them. outlet and push it down until the lower contour fastens Fasten the cable (16) to the cable fasteners (17) and (18) properly to the edge of the outlet. shown.
1.1b Handle type "II"
To remove the deflector cap (5), lift the stone-guard (1) pull it, keeping it lifted so as to unfasten the lower control above the edge of the outlet.
Move the two lower parts of the handle (11) and (12), pre-assembled, to the working position, matching the tooth marked with «>> EXCLUSIVELY with one of the two com-
partments marked with «1» or «2» of the teeth, according to Fasten the extension cable correctly as shown. The desired height, then lock the two lower knobs (13). To start the motor, push the safety button (2) and pull the position must be the same for both sides. switch lever (1) or one of the two levers (1a).
Assemble the upper part of the handle (14) and lock it to the
two lower parts (11) and (12) using the upper knobs (1) IMPORTANT - When starting up the machine, there can (previously removed from their respective holes), inserted in momentary drops in voltage.
one of the two holes (3) or (4) according to the desired make sure that its impedance is lower than 0.42 ohm to height. vent disturbances to other equipment connected to the pc Fasten the cable (16) to the cable fasteners (17) and (18) supply. shown.
The correct position of the electric cable fitting (19) is as shown.
1.2 Join the two side components (1) and (2) of the grass appearance of the lawn will improve if you alternate catcher, then fit the top part (3), inserting all the outer fittings in both directions at the same height. correctly.
Assemble the lever (4) on the top part of the grass-catcheFor mulching: always avoid removing a large quantity snapping it into the appropriate seats. Grass.Never cut more than one third of the total grass
3.3 While mowing, make sure the electric cable is always behind you and on the side of the lawn that has already cut.
The appearance of the lawn will improve if you alternate fittings in both directions at the same height.
in a single passage! Regulate the forward speed according to the blade (2) with the code and markings fa to the lawn conditions and the amount of grass removed ground, following the steps indicated in the illustration Tighten the central screw (1) using a torque wrench set
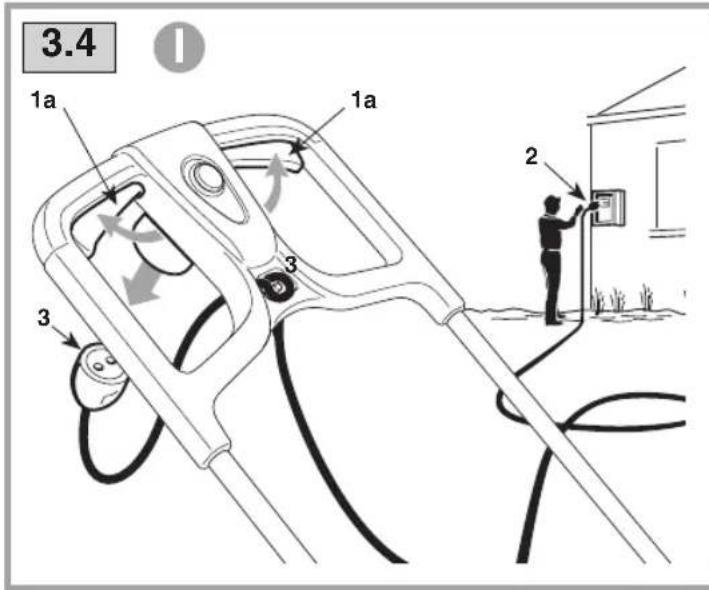
3.4 When finished mowing, release the lever (1) or bo20 Nm.
levers (1a).
Disconnect the extension cable FIRST from the general
socket (2) THEN from the side of the lawnmower switch (3). Do not spray water onto and avoid wetting the mc WAIT UNTIL THE BLADE STOPS before making an adjusted electrical components.
ments to the lawnmower.
Do not use aggressive liquids to clean the chassis.
IMPORTANT - If the motor stops because it is overheated
while mowing, you must wait about 5 minutes before restart-
ing it.
5. ENVIRONMENTAL PROTECTION
4. STORAGE AND MAINTENANCE
Environmental protection should be a priority of consideral importance when using the machine, for the benefit of social coexistence and the environment in which we live.
IMPORTANT - Routine and accurate maintenance is es-
sential in maintaining original machine safety and performance levels.
Store the lawnmower in a dry place.
1) Wear sturdy work gloves before cleaning, maintaining adjusting the machine.
2) Accurately wash the machine with water after cutting, move grass debris and mud accumulated in the chas prevent it from drying and causing problems the next the lawnmower is used.
3) Always make sure the air intakes are free of debris.
er- Try not to cause any disturbance to the surrounding a
- Scrupulously comply with local regulations for the dispo of waste materials after mowing.
- Scrupulously comply with local regulations for the dispo or of packaging, deteriorated parts or any elements with a strong environmental impact; this waste must not be dis
reposed of as normal waste, it must be separated and t sistotospecified waste disposal centres where the material time recycled.
- When decommissioning, do not pollute the environment with the machine, hand it over to a disposal centre, in cordance with the local regulations in force.
4.1 If necessary, the machine can be stored vertically,
hanging from a hook.
WARNING - Make sure the hook and its fastening system are adequate and able to sustain the machine's weight; exercise caution and make sure children or animals do not climb on the machine, weighing down the hook.
Fasten the machine so that the blade faces a wall or is properly covered, so it is not dangerous in the event of accidental contact with persons, children or animals.
To store the machine vertically, release the levers (1 - Type "I") or loosen the knobs (2 - Type "II") and turn the handle forward so the tooth marked with «>> matches EXCLUSIVELY with the compartment marked «S» of the teeth, then lock the levers
(1 - Type "I") or the knobs (2 - Type "II"). The position must be the same for both sides.
The position must be the same for both sides.
4.2 Each adjustment made to the blade is best if done at a specialised Centre that has the most appropriate tools.
Only blades with the following code must be used on this machine:
81004154/0 (for model 380)
81004155/0 (for model 420)
Blades must always be marked «GGP». Given product evo-
lution, the above mentioned blades may be replaced in time
by others, with similar interchangeable and operating safety for any doubts or problems, please do not hesitate to c features. your nearest Customer Service Centre or Your Dealer.
1.1b Steel type "II"
Ripp VEDLIKEHOLD OG OPPBEVARING
4. VEDLIKEHOLD OG OPPBEVARING
SR PRAVILA KORIŠĆENJA
2. OPIS KOMADI
NAPOMENA - Slaganje između uputstava sadržanih u tek21 Motorom se upravlja pomoću prekidača sa dvostruki i odgovarajućih figura (koje se nalaze na str.2.i narednim stra aktivranjem, kako bi se izbeglo slučajno pokretanje.
nama) dato je brojem koji prethodi svakom paragrafu.
Za puštanje u pogon, pritisnite dugme (2) i povucite polu ili jednu od poluga (1a).
Motor se automatski zaustavlja puštanjem poluge (1) ili ol poluge (1a).