
Emperor 50 - Lawn mower MOUNTFIELD - Free user manual and instructions
Find the device manual for free Emperor 50 MOUNTFIELD in PDF.


| Product Type | Lawn mower |
| Brand | Mountfield |
| Model | Emperor 50 |
| Cutting Width | 50 cm (20 inches) |
| Engine Type | 4-stroke petrol engine |
| Engine Power | ~6.0 hp (4.5 kW) |
| Drive System | Self-propelled (rear wheel drive) |
| Cutting Height Adjustment | Central lever, 6 positions (25-75 mm) |
| Grass Collector Capacity | 60 liters |
| Mulching Function | Yes, with mulching plug |
| Deck Material | Steel |
| Wheel Size | Front: 7 inches, Rear: 10 inches |
| Weight | Approx. 35 kg |
| Dimensions (L x W x H) | 1400 x 550 x 1000 mm |
| Fuel Tank Capacity | 1.0 liter |
| Oil Capacity | 0.6 liter |
| Starting System | Recoil start |
| Safety Features | Operator presence control (OPC), blade brake |
| Maintenance | Check oil, clean deck, sharpen blade annually |
| Spare Parts Availability | Blade, air filter, spark plug, oil filter |
Frequently Asked Questions - Emperor 50 MOUNTFIELD
User questions about Emperor 50 MOUNTFIELD
0 question about this device. Answer the ones you know or ask your own.
Ask a new question about this device
Download the instructions for your Lawn mower in PDF format for free! Find your manual Emperor 50 - MOUNTFIELD and take your electronic device back in hand. On this page are published all the documents necessary for the use of your device. Emperor 50 by MOUNTFIELD.
USER MANUAL Emperor 50 MOUNTFIELD
Please Read These Instructions Before Using Your Mower
Mountfield
Operating Instructions
for
Emperor 40 & Emperor 50 Cylinder Lawnmowers

Product Codes:
MPR14010
MPR15010
Call our Helpline if you have any problems:-
0845 600 2912
Open from 9:00am to 5:00pm Monday to Saturday
10:00am to 4:00pm on Sunday

Do not operate this machine before it has been assembled correctly and you have read and understood these instructions.

These instructions are intended as a general guide and do not supersede national or local codes in any way. Contact local Authorities for clarity of laws relating to operation of this appliance.
Keep the instructions in a safe place for future use.
Contents
| 2lau | |
| Symbols used on the machine | 2 |
| IdesPr | 3 |
| Safety Precautions | 3 |
| Cylinder Mower General Arrangement | 4 |
| Contents of the Shipping Container | 4 |
| Assembly Instructions | 5 |
| Before you Start | 6 |
| Using your Cylinder Mower | 7 |
| Adjustments for best performance | 7 |
| General Maintenance | 9 |
| Cleaning and storage | 9 |
| Specifications | 9 |
| Troubleshooting | 10 |
Symbols in this Owner's Manual

Threatened hazard or hazardous situation. Not observing this instruction can lead to injuries or cause damage to property.

Important information on proper handling. Not observing this instruction can lead to faults in the machine.

User information. This information helps you to use all the functions correctly.
Symbols used on the Machine

misSpread and understand this Owner's Manual before operating the machine.

Keep bystanders clear. Danger of flying objects.

Always wear ear and eye protection when using the machine.

Warning! Keep hands and feet clear of rotating blade.

OPC Lever, see page 6.

Above. Roller clutch engagement. On or Off.
Proper Use
For safety reasons, the Cylinder Mower is not to be used by children, young people, or any other persons who are not acquainted with these directions for use.

Specific safety information Please read this safety information and the directions for use carefully and be sure to follow the instructions to the letter.

Warning
Even though this machine has been designed to be safe in use, it is essential to follow the Safe Working instructions carefully to avoid accidents to persons or property.
Safety Precautions
Read and understand the owner's manual and labels affixed to the Cylinder Mower. Learn its application and limitations as well as the specific potential hazards peculiar to it.
DRUGS, ALCOHOL AND MEDICATION
Do not operate the Cylinder Mower while under the influence of drugs, alcohol, or any medication that could affect your ability to use it properly.
- Your Cylinder Mower is a piece of power equipment, not a toy, and should be operated with extreme caution at all times.
-
Children should never be allowed to operate the Cylinder Mower. Only persons acquainted with the rules of safe operation set forth in this manual should be allowed to operate the machine.
-
Read the complete manual to fully understand the function of all the accessories and controls.
-
Keep other people, children and pets well away from the area of operation as there is a risk of objects being thrown out during operation.
-
Do not stand in front of the machine when starting the engine or when the machine is running.
6 Wear hearing and eye protection.
-
Do not operate the machine barefoot or with open sandals. Quality footwear is recommended.
-
Do not wear loose fitting clothing that could become caught in the moving parts of the machine.
-
Do not place feet or hands on or near the blades while the engine is running.
-
Do not attempt to adjust the blades when the engine is running.
-
Do not leave the machine unattended when the engine is running.
-
Check the fuel supply before starting the engine. Do not fill the fuel tank with the machine indoors, while the engine is running or while the engine is hot. Replace the fuel cap securely, and wipe off any spilled petrol before starting the engine.



Warning!
Petrol is extremely flammable; spilled fuel can cause a fire or explosion.
- Do not run the machine indoors. Engine exhaust gases are deadly poisonous.
-
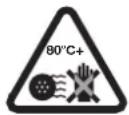
Do not touch the engine muffler during or after operation of the machine. It is extremely hot and can cause severe burns.
-
Do not change the engine governor speed setting. Over-revving of engine can damage the machine and endanger the operator.
-
Before doing maintenance on the machine, remove the spark plug wire and ground it to the engine block for added safety.
-
Do not attempt to remove debris from the blades without stopping the engine and removing the spark plug wire for added safety. Make sure the blades have stopped completely before attempting to clear the debris.
-
Keep all bolts and fasteners on the machine tight and check them at regular intervals.
-
Do not leave the machine exposed to the weather. Use the grass catcher to cover the motor—even when stored indoors.
-
Do not store the machine inside a building with petrol in the tank where fumes can reach an open flame or spark. Allow the engine to cool completely before storing inside any enclosure.

Important!
The engine is shipped WITHOUT FUEL or OIL. After assembly, fill engine with petrol and oil as instructed in the separate engine manual packed with your unit. Running your mower with insufficient oil will damage the engine and invalidate your warranty.

Note!
Reference to right or left side of your Cylinder Mower is viewed from the operating position.

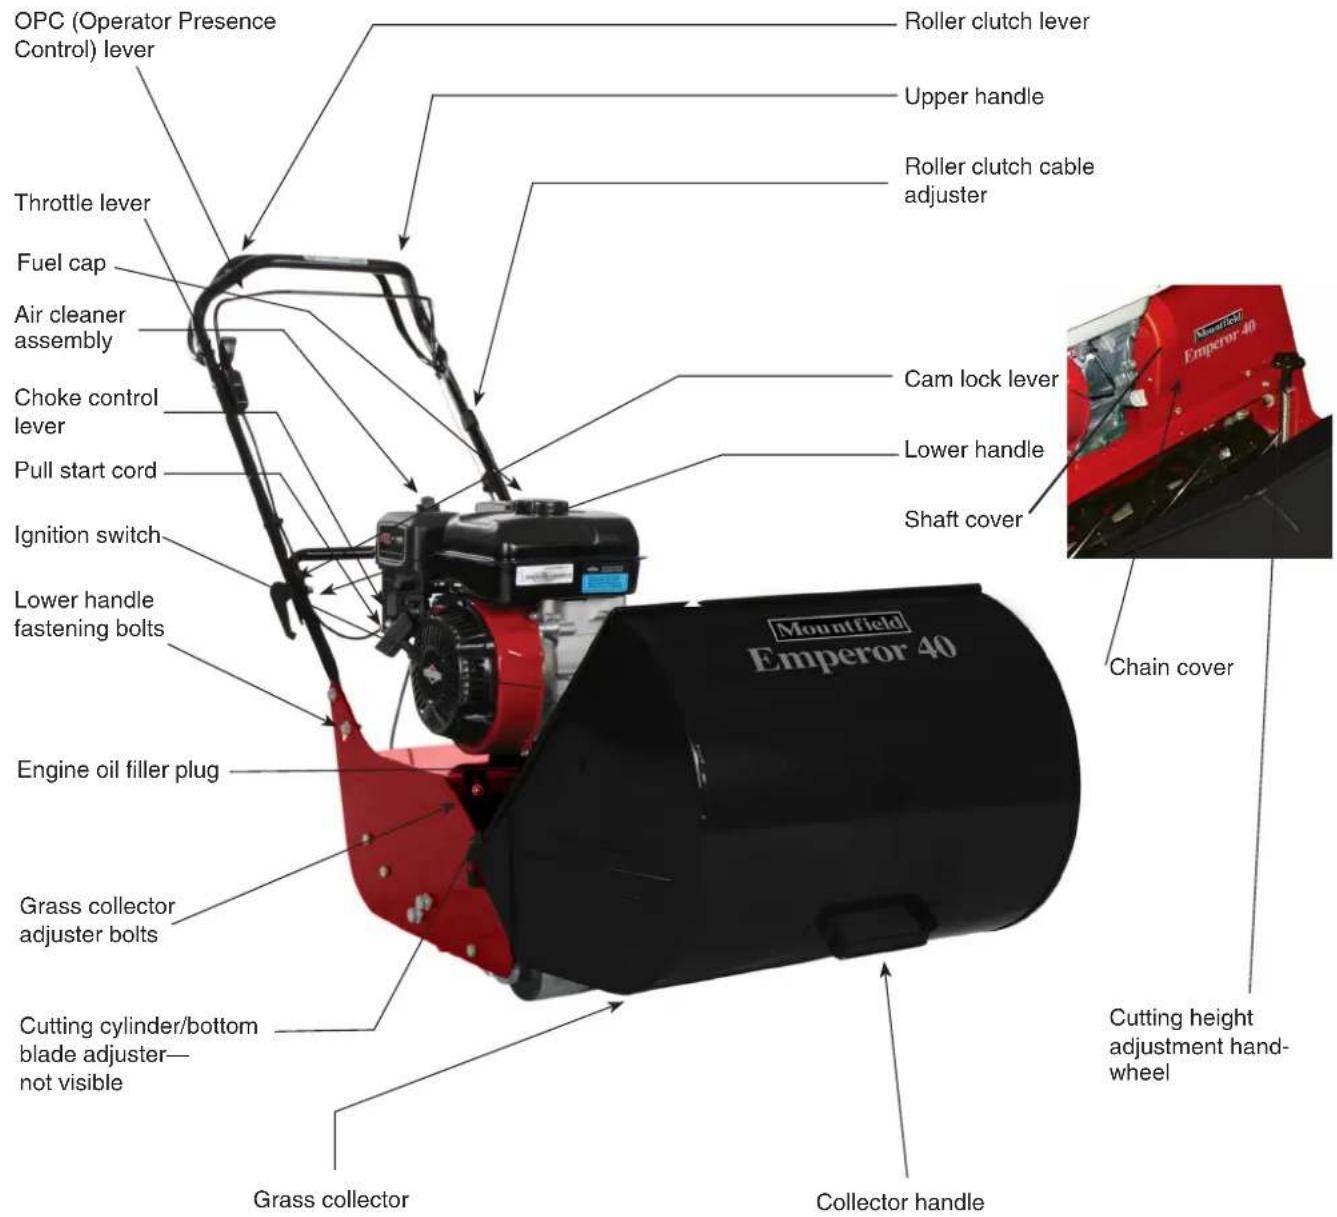
Cylinder Mower General Arrangement
Contents of the shipping container
In the carton you will find...
• One cylinder mower—assembled.
• One grass catcher.
• Upper and lower handle assembly.
- Owner's Manual—this publication.
• Engine Owner's Manual.
• 4 Plastic cable ties.
- 6mm Nut and bolt for Roller clutch cable adjuster.
Assembly Instructions
The complete handle assembly must be attached to the main mower body.
Fasten the lower handle to the mower with the lower handle fastening bolts—see diagram above. There is a set of bolts on each side, you'll need two 13mm spanners, or sockets and/or an adjustable wrench(s).
Swing the upper handle to the operating position and lock it in
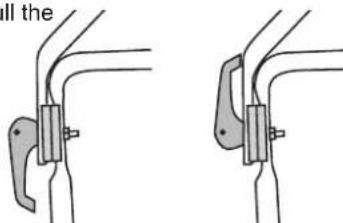
place by pushing the Cam Lock Lever(s) upwards towards the upper handle. The firmness of the locking action can be adjusted by turning the nut on the inside of the cam lock bolt.

The camlock handles on some mowers are reversed for shipping.
To turn them around unwind the nut to the end of the thread with a 13mm A/F spanner/socket, pull the //
camlock handle outwards and rotate it 180. Retighten the nut until the handle locks firmly in place and it does not change position when in use.
ATTACHING THE CABLES
All models have three cables that need to be attached.
- The engine throttle control cable.
- The roller clutch cable.
- The OPC (Operator Presence Control) cable.
1. FITTING THE ENGINE THROTTLE CONTROL CABLE.
The cable is shipped attached to the handle and must be fitted and adjusted at the lower end. Feed inner cable 'z' fitting through the small hole in the carburettor lever and lightly clamp the the outer casing of the cable under the saddle clamp as illustrated below.

Before fully tightening the saddle clamp, check the action of the the throttle control lever by moving it back and forth.
When the 'FAST'/ and 'SLOW'/ positions of the throttle lever are satisfactory tighten the saddle clamp firmly.
This cable will be already attached to the mower at the lower end. The clutch cable is the one that enters the mower under the shaft cover. With the cable running above the cross bar of the lower handle, feed the end of the 'z' fitting—at the top of the flexible inner cable—though the small hole in the roller clutch bail, found below the handle. Turn the 'z' fitting so the cable is running alongside the upper handle.

Fit the cable anchor up under the handle tube and attach it to the tube with the fastener provided.

natural_image
Line drawing of a hand holding a medical or surgical tool with a device handle (no text or symbols)It may be necessary to adjust the cable operation after fitting the cable, see page 8 for details.
3. FITTING THE OPC CABLE.
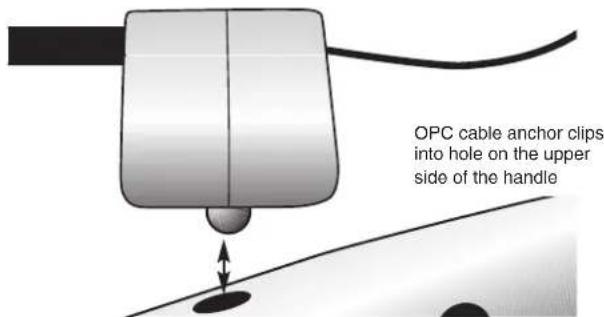
The OPC (Operator Presence Control) cable is attached to a switch box close to the engine output shaft. Route the cable above the lower handle crossbar and feed the end of the 'z' fitting on the inner cable though the small hole in the OPC lever—above the handle.
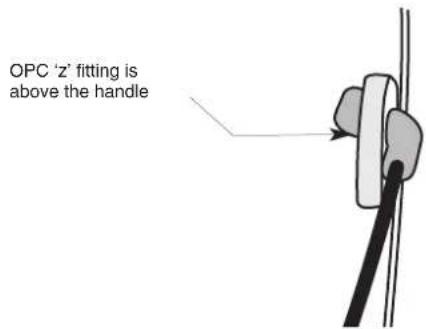
Clip the OPC cable anchor to the upper handle from above by inserting it's peg into the hole in the handle. Press it down firmly until it locks into position.
FINISHING CABLE INSTALLATION.
Try folding the upper handle to ensure the cables are not being strained. If necessary re-route cables that are unduly stressed. When the cables are satisfactorily routed secure them in place using the cable ties provided.
Before you start

Important!
The engine is shipped WITHOUT FUEL or OIL. After assembly, fill the engine with petrol and oil as instructed in the separate engine manual packed with your machine. Running your mower with insufficient oil will damage the engine and invalidate your warranty.
Be sure that...
• The operator reads and understands this manual,
- The daily maintenance checks have been properly carried out and the mower is in good working order.
- The operator wears safe clothing and eye protection. Failure to do so could result in damage and risk to health and safety
IDENTIFICATION OF CONTROLS
OPC (OPERATOR PRESENCE CONTROL) LEVER
This control is located on the top of the handle bar. It is used to stop the engine quickly when the operator releases the OPC lever. To start the engine, you must pull the lever back and hold it against the handle bar. This allows the engine to be started. When you release the OPC lever the engine will automatically shut off.


Warning!
If the OPC mechanism is not adjusted correctly or is damaged the engine will continue to run after the OPC lever is released. In this situation, do not use the mower. Contact your local servicing specialist.
THROTTLE CONTROL LEVER
The throttle control lever is located to the right of the upper handle. It controls the engine speed which governs how fast the machine is propelled forward. As engine speed rises a centrifugal clutch automatically engages to drive the cutting cylinder. At idle the cutting cylinder automatically stops.

Note!
The engine speed dictates the speed the mower is propelled as well as the speed of the cutting cylinder.
ROLLER CLUTCH LEVER
The roller clutch lever is behind the upper handle cross bar and is spring loaded to the disengaged position. When engaged the mower moves forward. Move the lever towards the handlebar to engage the drive to the rear roller. Release the lever to stop the mower.
RECOIL PULL START HANDLE
Refer to the engine owner's handbook for details.
CLEAR THE AREA TO BE MOWN
Before commencing mowing, ensure the lawn is free from obstructions, such as stones, etc. Contact with objects of this type may damage the cutting cylinder and bottom blade.
Using your cylinder mower
STARTING THE ENGINE
Ensure the roller clutch lever is in the disengaged position before starting the engine. Turn the ignition switch (if fitted) to the 'ON' position.
Starting Procedure
If the engine has not been running recently move the choke control to the 'ON'/position. The choke is on the side of the engine by the carburettor, refer engine owner's manual.

Important!
OPC Lever. To start the engine you must pull the lever back and hold it against the handle bar, then follow the starting procedures below. This releases the engine break and allows the engine to be started. If you release the OPC lever the engine will automatically shut off again.
Stand to the right of the mower, grasp the starter cord handle grip, pull slowly until a resistance is felt and then pull forcefully to prevent kick-back. Repeat until the engine starts. Do not pull the cord with a jerk or release it until fully rewound.—When the engine starts and has warmed up for a short time, move the choke to the 'OFF' position and throttle control to the desired speed. Should the engine not start due to 'flooding', move the Choke control to 'OFF' and pull the starter six times to clear the flooding.
After allowing the engine a few moments to warm up, mowing may commence by setting the throttle lever so the engine is running sufficiently fast to engage the automatic clutch. Then engage the roller clutch by moving the Roller clutch lever forward to the handlebar. Adjust the throttle to achieve a comfortable walking pace and guide the machine in the desired direction.
To stop the machine, release the Roller clutch lever. Then reduce the engine speed.
HINTS FOR EASY STARTING.
- Start a warm engine with the throttle control lever in the SLOW position.
- Keep the mower clean and the cylinder clear of debris.
HARD STARTING CHECK LIST
Look for these faults:-
FUEL.
- Insufficient fuel in tank.
- Stale fuel.
- Water or dirt in fuel.
- Blocked air vent in fuel tank cap.
IGNITION.
- Loose spark plug wire.
- Dirty spark plug electrodes.
- Incorrect spark plug gap.
- Incorrect spark plug type.
OTHER.
- Choked air filter (Dirt or oil).
- Engine throttle control cable incorrectly adjusted.
- Lower cutting blade incorrectly adjusted.
- Faulty OPC system.
MOWING FLAT OPEN AREAS
When mowing flat open areas it is best to first cut a margin approximately three mower widths at each end where you wish to turn the mower and then mow at right angles to the margins with parallel cuts until the area is completed. This leaves your lawn with a very pleasing appearance. When turning at the end of each cut, disengage the clutch and press down on the handles, turning the mower on its rear roller. Once the throttle has been set to suit your pace, there is no need for further adjustment unless you should encounter very heavy grass growth. The mower can be controlled entirely by means of the Roller clutch lever.
When making tight turns, release the Roller clutch lever to its open position and re-engage the clutch when you want to resume cutting.
When mowing around verges, the cutting cylinder and rear roller should slightly overhang the edge.
MOWING SLOPING AREAS

Important!
Mowing on slopes requires extra care.
Generally speaking, your mower will mow lawns on which you can reasonably walk. When mowing a sloping area, mow across the slope wherever possible, with your machine pointing slightly uphill. This way you will find it will do a satisfactory job without sliding. If you find it necessary to mow up and down the slope and the rear roller shows a tendency to slip on the upward run, then press down on the handle to increase traction.
PAUSING BETWEEN MOWING
When emptying the grass collector close the throttle to allow the engine to idle. Idling the engine automatically uncouples the drive to the cutting cylinder, reducing wear. Release the OPC lever and the engine will stop automatically.
Adjustments for best performance
CUTTING HEIGHT ADJUSTMENT
The height of cut 'C' can be altered to suit grass and/or ground conditions by simple rotation of the handwheel situated immediately forward of the chain cover, see photo page 4.

natural_image
Diagram of a car's side view showing steering wheel and dashboard (no text or symbols)'C' Cut height
- For a shorter cut turn the hand wheel anti-clockwise.
- For a longer cut turn the handwheel clockwise.
Never set the cutting height so low that the baseplate touches the ground. For a healthy attractive lawn we do not recommend cutting at heights below 12mm. Very long grass is best tackled with the rollers set to give the highest possible cut.
If it becomes apparent that one side of the machine is cutting at a lower height than the other, this can be simply adjusted after slackening the bolt located on the inside of the front right hand roller bracket (as viewed from the operating position) and tapping that end of the roller up or down as required. Retighten bolt when the correct position has been achieved.
GRASS DEFLECTOR ADJUSTMENTS
When cutting grass at various lengths, it may be found that the cuttings tend to be thrown either too high or low in the collector. in which case uneven loading will result. To eliminate this the deflector should be adjusted. This can be done quite simply by slackening off the two bolts 'A' on the front edge of the main frame and moving the deflector in or out until the desired effect is obtained, then re-tighten the bolts. If set too far back, grass will be thrown too low in the collector, or if too close to the cutting cylinder, grass will be thrown over the top of the collector.

CUTTING CYLINDER ADJUSTMENTS
To obtain clean cutting, it is necessary to maintain the setting of the cutting cylinder relative to the baseplate. When shipped, the setting is correct, but after a period of use, adjustment will be required.
It will normally be necessary to move the cutting cylinder closer to the baseplate to accommodate wear. To do this the adjusting screws 'B' on both sides of the machine should be turned clockwise making small alterations to each screw alternately until the cutting cylinder just makes contact with the baseplate
blade. This can be determined by placing a sheet of copy paper between the cylinder and the blade. Rotate the cylinder by hand, and the paper should be cut. Once this has adjustment been established THE SET SHOULD THEN BE BACKED OFF SLIGHTLY SO THAT THE PAPER IS JUST FOLDED—NOT CUT. Provided the cylinder and baseplate are in good condition this setting will give clean cutting without undue cylinder-to-baseplate pressures.


Important!
Harsh settings increase the load on the mower and accelerate the wear of the cutting cylinder.
TRANSMISSION ADJUSTMENT
Normal stretch and wear makes periodic chain adjustments necessary. When adjusted correctly all chains should be slightly slack in all directions. To check or adjust chains it is necessary to remove the chain cover by removing its retaining screws and freeing it from machine. Adjust as follows:
PRIMARY CHAIN
- Slacken nut which secures nylon adjuster 'C'.
- Re-position adjuster to give correct chain adjustment.
- Re-tighten nut
DRIVE CHAINS—SECONDARY AND FINAL
These chains normally only require adjustment when the cutting unit is re-ground. If, however, adjustment is required before this it is recommended you contact your nearest Mountfield Service Agent. If at any time a chain is removed, take care when replacing the connecting link that the gap in the spring clip, points away from the direction of rotation.

REAR ROLLER CLUTCH ADJUSTMENTS
After a period of use, adjustment will be required to compensate for cable stretch etc.
There are two adjusting points.
- The cable anchor at the top of the handle.
2.The draw bolt though the centre of the clutch.
ADJUSTING THE ROLLER CLUTCH CABLE
Do not adjust the draw bolt unless the upper cable anchor has
reached the end of its travel. To adjust the cable anchor rotate the the thumb wheel anti-clockwise (viewed from behind the handle) to increase the clutch pressure.
If the draw bolt requires adjustment remove the chain and

shaft covers. Adjust the nut 'A' on the inner end of the draw bolt until the clutch operating lever 'B' is parallel to the mower side plate when the clutch drive is just engaging. It should not be necessary to adjust the ferrule at the lower end of the clutch cable.

General Maintenance
SERVICING THE ENGINE
See separate engine Owner's Manual.
INSPECTING AND LUBRICATING THE MOWER
The cylinder bearings are sealed for life and do not require lubrication.
The following lubrication points should be oiled approximately every 25 hours of operation with SAE30-40 oil.
- Driving Chains. Keep moistened with oil. This lubrication requires the removal of the chain cover, which can be lifted clear after unscrewing the two retaining screws.
- Roller clutch lever pivot points.
- Front rollers. Apply oil to roller shaft at each end of the rollers.
- Height Adjustment screw thread. Hand wheel and all pivot points.
- Cables. Apply oil to each end.
- Self Adjusting Chain Adjuster. Apply oil to pivot.

Warning! NEVER LUBRICATE WHILE ENGINE IS RUNNING.
Cleaning and storage
There is a direct relationship between the mower's life and the care and attention given to the mower both during and after operation. It is important that the mower is thoroughly cleaned down after use and inspected so that it will be in good working order the next time it is required.
Thoroughly clean the engine, under the chassis, the rollers and the grass catcher. Use of a high pressure water jet, especially around the engine, may force water into places where it may drive out lubricants or cause hard starting from ignition damage.
LONG TERM STORAGE:
After each mowing season or if the mower is not going to be used for 30 days or more, it is recommended that the fuel shut off valve be closed off (where fitted) and the fuel tank be drained as modern fuels have a short shelf life. The mower should then be started up and run until all of the fuel left in the system is used. While the engine is warm, drain the engine oil and refill with the correct grade to the required level. Remove the spark plug and pour 5ml of engine oil into the engine cylinder, crank slowly to distribute the oil and replace the spark plug. Store the mower in a clean dry area away from direct sunlight.
Adjust the cutting cylinder away from the bottom blade and apply a thin layer of grease to the cutting edges to prevent corrosion through the storage period. If possible, spray the mower with a thin film of light oil to protect it.
Always store the mower on a flat, level surface.
Specifications
Model
Emperor 40 Emperor 50
Weight 69kg 73kg
Cut width 400mm 500mm
ENGINE INFORMATION
FOR DETAILED SPECIFICATIONS SEE SEPARATE ENGINE OWNER'S MANUAL.
Troubleshooting
| ydemeResuaC elbissoPtluaF | ||
| Some uncut or poorly cut strands of grass. | Cutting cylinder is partially out of contact with the bottom blade. | Re-adjust cutting cylinder to bottom blade. |
| Cutting cylinder is in heavy contact with bottom blade. | Re-adjust cutting cylinder to bottom blade. | |
| Height of cut is too high. | Lower height of cut setting. | |
| Cutting edges of cutting cylinder/bottom blade are rounded. | Regrind cutting edges. | |
| Scalping. | Undulations too severe for height of cut setting. | Raise height of cut. |
| Excessive bottom blade wear. | Bottom blade in heavy ground contact. | Raise height of cut. |
| Cutting edges of cutting cylinder/ bottom blade are rounded. | Regrind cutting edges. | |
| Cutting cylinder is in heavy contact with the bottom blade. | Re-adjust cutting reel to bottom blade. | |
| Damaged cutting cylinder or bottom blade. | Regrind or replace as necessary. | |
Troubleshooting
| ydemeResuaC elbissoPtluaF | ||
| Engine does not start, runs erratically or looses power. | Choke incorrectly set. | Move choke lever. |
| Fuel tank empty or fuel shut off valve closed. | Fill tank with recommended fuel grade and open fuel shut-off valve. | |
| Faulty recoil starter. | Return unit to dealer. | |
| Air cleaner element is dirty. | Service or replace air cleaner. | |
| Spark plug loose | Tighten spark plug. | |
| Spark plug cable disconnected. | Refit cable to spark: plug. | |
| Defective spark plug. | Replace damaged spark plug. | |
| Spark plug gap incorrect. | Replace damaged spark plug. | |
| Carburettor is flooded with fuel. | Refer to Engine Manual. | |
| Dirt water or stale fuel in the tank. | Move throttle to ‘Stop’ position pull the starter cord 5–6 times, move throttle to ‘Run’ and start engine. | |
| Vent hole in the filler cap is blocked. | Drain and clean fuel tank, Refill with clean fresh fuel before starting. | |
| Clean or replace fuel cap. | ||
| Engine misfires at high speed | Spark plug gap too small. | Refer to Engine Manual. |
| Engine idles poorly. | Air cleaner element is dirty. | Service or replace air cleaner. |
| Engine overheats | Blocked engine cooling fins and air passages. | Remove debris from around engine. |
| Cooling air flow restricted | Remove debris from around engine. | |
| Incorrect spark plug fitted | Refer to Engine Manual. | |
| Low engine oil level | Check oil level and top, up if needed | |
| Engine vibrates and/or is noisy | Worn or damaged bearing(s) | Remove and inspect suspect bearings, replace if necessary. |
| Worn or damaged drive chains and/or sprockets | Remove and inspect suspect chains and sprockets, replace if necessary. | |
| Oil Leaks from silencer or air cleaner | Engine oil sump over filled | Check oil level and drain excess oil. |
| Mower tipped or handled incorrectly | Check oil level, air cleaner and spark plug and correct as necessary. | |
Should faults persist, consult your Authorised Mountfield Service Agent.
Guarantee
Congratulations of the purchase of your Mountfield lawnmower. This product has been manufactured to high quality standards and is guaranteed for domestic use against faulty parts or manufacture for a period of 2 years from the date of purchase. If the machine is used commercially the guarantee period is 90 days from the date of purchase.
If your product fails due to a defect in materials or workmanship during this period it will be repaired or replaced at no charge to yourself provided all repairs are carried out by an authorised service dealer. Delivery and collection of the machine is the owner's responsibility and not covered under the terms of this guarantee.
This guarantee is subject to the product being serviced at the recommended intervals by an authorised service dealer. Please phone 08456002912 to locate your nearest service dealer or visit www.servicelink.org.uk.
This guarantee is not transferable. Proof of purchase will be required in the event of a claim.
Normal wear and tear and the routine replacement of parts which are subject to normal wear and tear are not covered by this guarantee. Likewise any defect which is the result of misuse, alteration, improper assembly or adjustment, neglect or accident is not covered by this guarantee.
The engine manufacturer guarantees the engine fitted to this machine.
This guarantee is in addition to and does not detract from the contractual rights of the owner under statute or common law.
On delivery of your new Mountfield mower, we suggest that you complete the box to the right.
The information for your machine is on the serial number lable, which is fixed on the cutter deck at the base of the handles. You will be asked for these details if you have any problems or require spare parts.
Please keep your receipt, proof of purchase will be required in the event of a claim.
SERIAL No.
Model:
Type: ____
(Year): ____ CE

Service Record
1st Service 2nd Service
Date of Service ....
Next Service Due ....
Dealer's Signature ....
Dealer's Stamp: Dealer's Stamp:
Date of Service ....
Next Service Due ....
Dealer's Signature ....
GGP UK Limited,
Unit 8 Bluewater Estate,
Bell Close, Plympton,
Plymouth, PL7 4JH
Tel: 01752 231500
- Please Read These Instructions Before Using Your Mower
- Mountfield
- Operating Instructions
- Symbols in this Owner's Manual
- Symbols used on the Machine
- Proper Use
- Warning
- Safety Precautions
- DRUGS, ALCOHOL AND MEDICATION
- Warning!
- Important!
- Note!
- Cylinder Mower General Arrangement
- Contents of the shipping container
- Assembly Instructions
- The camlock handles on some mowers are reversed for shipping.
- ATTACHING THE CABLES
- FITTING THE ENGINE THROTTLE CONTROL CABLE.
- FITTING THE OPC CABLE.
- FINISHING CABLE INSTALLATION.
- Before you start
- IDENTIFICATION OF CONTROLS
- OPC (OPERATOR PRESENCE CONTROL) LEVER
- THROTTLE CONTROL LEVER
- ROLLER CLUTCH LEVER
- RECOIL PULL START HANDLE
- CLEAR THE AREA TO BE MOWN
- Using your cylinder mower
- STARTING THE ENGINE
- Starting Procedure
- HINTS FOR EASY STARTING.
- HARD STARTING CHECK LIST
- MOWING FLAT OPEN AREAS
- MOWING SLOPING AREAS
- PAUSING BETWEEN MOWING
- Adjustments for best performance
- CUTTING HEIGHT ADJUSTMENT
- GRASS DEFLECTOR ADJUSTMENTS
- CUTTING CYLINDER ADJUSTMENTS
- TRANSMISSION ADJUSTMENT
- PRIMARY CHAIN
- DRIVE CHAINS—SECONDARY AND FINAL
- REAR ROLLER CLUTCH ADJUSTMENTS
- General Maintenance
- SERVICING THE ENGINE
- INSPECTING AND LUBRICATING THE MOWER
- Cleaning and storage
- LONG TERM STORAGE:
- Specifications
- ENGINE INFORMATION
- Guarantee
- SERIAL No.
- Service Record
- 1st Service 2nd Service
Brand : MOUNTFIELD
Model : Emperor 50
Category : Lawn mower