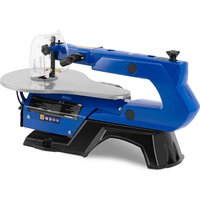
SAW 16 SCROLL - Saw MSW - Free user manual and instructions
Find the device manual for free SAW 16 SCROLL MSW in PDF.


| Product Type | Scroll Saw |
| Model | MSW-SCIE 16 SCROLL |
| Rated Voltage | 230 V ~ / 50 Hz |
| Rated Power | 120 W (S2 10 min) / 60 W (S1) |
| Throat Capacity | 406 mm |
| Maximum Cutting Height | 50 mm at 90°, 20 mm at 45° |
| Stroke | 19 mm |
| Stroke Speed | 400-1650 strokes/min |
| Blade Length | 127 mm |
| Table Tilt | 0° to 45° |
| Dimensions (L x W x H) | 630 x 330 x 325 mm |
| Weight | 12 kg |
| Variable Speed | Yes, by electronic control |
| Integrated Lighting | Yes, independent switch |
| Emergency Stop | Yes, red button |
| Transparent Blade Guard | Yes, included |
| Lubrication | Every 50 hours, SAE 20 oil |
| Blade Replacement | With pins, by clamping screw |
| Intended Use | Woodworking, curved and straight cuts |
Frequently Asked Questions - SAW 16 SCROLL MSW
User questions about SAW 16 SCROLL MSW
0 question about this device. Answer the ones you know or ask your own.
Ask a new question about this device
Download the instructions for your Saw in PDF format for free! Find your manual SAW 16 SCROLL - MSW and take your electronic device back in hand. On this page are published all the documents necessary for the use of your device. SAW 16 SCROLL by MSW.
USER MANUAL SAW 16 SCROLL MSW
This User Manual has been translated for your convenience using machine translation. Reasonable efforts have been made to provide an accurate translation; however, no automated translation is perfect nor is it intended to replace human translators. The official User Manual is the English version. Any discrepancies or differences created in the translation are not binding and have no legal effect for compliance or enforcement purposes. If any questions arise related to the accuracy of the information contained in the User Manual, please refer to the English version of those contents which is the official version.
Technical data
| Parameter description Parameter value | |
| Product name | Scroll saw |
| Model | MSW-SAW 16 SCROLL |
| Rated voltage [V~] / frequency [Hz] | 230/50 |
| Rated power [W] | S2 10 min 120 W / S1 60 W |
| Throat Capacity [mm] | 406 |
| Max Cutting Height | 50 mm @ 90° / 20 mm @ 45° |
| Stroke [mm] | 19 |
| Stroke Speed [/min] | 400-1650 |
| Blade Length [mm] | 127 |
| Table Tilt | 0°~45° |
| Dimensions [width x depth x height; mm] | 630 x 330 x 325 |
| Weight [kg] | 12 |
1. General description
The user manual is designed to assist in the safe and trouble-free use of the device. The product is designed and manufactured in accordance with strict technical guidelines, using state-of-the-art technologies and components. Additionally, it is produced in compliance with the most stringent quality standards.
DO NOT USE THE DEVICE UNLESS YOU HAVE THOROUGHLY READ AND UNDERSTOOD THIS USER MANUAL.
To increase the product life of the device and to ensure trouble-free operation, use it in accordance with this user manual and regularly perform maintenance tasks. The technical data and specifications in this user manual are up to date. The manufacturer reserves the right to make changes associated with quality improvement. The device is designed to reduce noise emission risks to a minimum, taking into account technological progress and noise reduction opportunities.
Legend

The product satisfies the relevant safety standards.
Read instructions before use.
The product must be recycled.
WARNING! or CAUTION! or REMEMBER! Applicable to the given situation. (general warning sign)
Wear a dust mask (respiratory tract protection).
Use guard.

ATTENTION! Electric shock warning!

ATTENTION! Rotating parts, entanglement hazard!

WARNING! Toxic substances, danger of poisoning!

ATTENTION! Hand crush hazard!
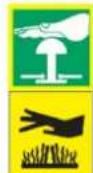
Emergency stop!

ATTENTION! Hot surface, risk of burns!

PLEASE NOTE! Drawings in this manual are for illustration purposes only and in some details may differ from the actual product.
2. Usage safety

ATTENTION! Read all safety warnings and all instructions. Failure to follow the warnings and instructions may result in electric shock, fire and/or serious injury or even death.
The terms "device" or "product" are used in the warnings and instructions to refer to:
Scroll saw
2.1. Electrical safety
a) The plug must fit the socket. Do not modify the plug in any way. Using original plugs and matching sockets reduces the risk of electric shock.
b) Avoid touching earthed elements such as pipes, heaters, boilers and refrigerators. There is an increased risk of electric shock if the earthed device is exposed to rain, comes into direct contact with a wet surface or is operating in a damp environment. Water getting into the device increases the risk of damage to the device and of electric shock.
c) Do not touch the device with wet or damp hands.
d) Use the cable only for its designated use. Never use it to carry the device or to pull the plug out of a socket. Keep the cable away from heat sources, oil, sharp edges or moving parts. Damaged or tangled cables increase the risk of electric shock.
e) Do not use the device if the power cord is damaged or shows obvious signs of wear. A damaged power cord should be replaced by a qualified electrician or the manufacturer's service centre.
f) To avoid electric shock, do not immerse the cord, plug or device in water or other liquids. Do not use the device on wet surfaces.
g) ATTENTION! DANGER TO LIFE! While cleaning, never immerse the device in water or other liquids.
h) Do not use in very humid environments or in the direct vicinity of water tanks.
i) Before the first use, please check whether the main voltage type and current comply with the indicated data on the type plate.
2.2. Safety in the workplace
a) Make sure the workplace is clean and well lit. A messy or poorly lit workplace may lead to accidents. Try to think ahead, observe what is going on and use common sense when working with the device.
b) If you discover damage or irregular operation, immediately switch the device off and report it to a supervisor without delay.
c) If there are any doubts as to the correct operation of the device, contact the manufacturer's support service.
d) Only the manufacturer's service point may repair the device. Do not attempt any repairs independently!
e) In case of fire, use a powder or carbon dioxide (CO2) fire extinguisher (one intended for use on live electrical devices) to put it out.
f) Children or unauthorised persons are forbidden to enter a work station. A distraction may result in loss of control over the device.
g) Use the device in a well-ventilated space.
h) The device produces dust and debris during operation. It is important to protect bystanders from their harmful effects.
i) Use the "EMERGENCY STOP" if there is a risk of injury or death, accident or damage.
j) Regularly inspect the condition of the safety labels. If the labels are illegible, they must be replaced.
k) Please keep this manual available for future reference. If this device is passed on to a third party, the manual must be passed on with it.
I) Keep packaging elements and small assembly parts in a place not available to children.
m) Keep the device away from children and animals.
n) If this device is used together with another equipment, the remaining instructions for use shall also be followed.

Remember! When using the device, protect children and other bystanders.
2.3. Personal safety
a) Do not use the device when tired, ill or under the influence of alcohol, narcotics or medication which can significantly impair the ability to operate the device.
b) The machine may be operated by physically fit persons who are able to handle the machine, are properly trained, who have reviewed this operating manual and have received training in occupational health and safety.
c) When working with the device, use common sense and stay alert. Temporary loss of concentration while using the device may lead to serious injuries
d) Use personal protective equipment as required for working with the device, specified in section 1 "Legend". The use of correct and approved personal protective equipment reduces the risk of injury.
e) To prevent the device from accidentally switching on, make sure the switch is on the OFF position before connecting to a power source.
f) Do not overestimate your abilities. When using the device, keep your balance and remain stable at all times. This will ensure better control over the device in unexpected situations.
g) Do not wear loose clothing or jewellery. Keep hair, clothes and gloves away from moving parts. Loose clothing, jewellery or long hair may get caught in moving parts.
h) Remove all adjusting tools or spanners before turning the device on. A tool or spanner left in the revolving part of the device may cause injury.
i) The device is not a toy. Children must be supervised to ensure that they do not play with the device.
j) If suction is to be connected to the device, check all connections and make sure they are tight. Using a deducting system may reduce the risks associated with dust.
2.4. Safe device use
a) Do not overload the device. Use the appropriate tools for the given task. A correctly-selected device will perform the task for which it was designed better and in a safer manner.
b) Do not use the device if the "ON/OFF" switch does not function properly (does not switch the device on and off). Devices which cannot be switched on and off using the ON/OFF switch are hazardous, should not be operated and must be repaired.
c) Make sure the plug is disconnected from the socket before attempting any adjustments, accessory replacements or before putting the device aside. Such precautions will reduce the risk of accidentally activating the device.
d) When not in use, store in a safe place, away from children and people not familiar with the device who have not read the user manual. The device may pose a hazard in the hands of inexperienced users.
e) Keep the device in perfect technical condition. Before each use check for general damage, especially check moving components for cracked parts or elements, and for any other conditions which may impact the safe operation of the device. If damage is discovered, hand over the device for repair before use.
f) Keep the device out of the reach of children.
g) To ensure the operational integrity of the device, do not remove factory-fitted guards and do not loosen any screws.
h) When transporting and handling the device between the warehouse and the destination, observe the occupational health and safety principles for manual transport operations which apply in the country where the device will be used.
i) Avoid situations where the device stops working during use due to excessive loading. This may result in overheating of the drive elements and damage to the device.
j) Do not touch articulated parts or accessories unless the device has been disconnected from the power source.
k) Do not move, adjust or rotate the device in the course of work.
I) Do not leave this appliance unattended while it is in use.
m) Clean the device regularly to prevent stubborn grime from accumulating.
n) Do not work on two workpieces at the same time.
o) It is forbidden to interfere with the structure of the device in order to change its parameters or construction.
p) Keep the device away from sources of fire and heat.
q) Do not cover the ventilation openings!
r) NOTE: During operation, some elements of the device become very hot - scalding hazard!
s) Use protective glasses. When working in a dusty environment, additionally wear a dust mask.
t) Keep handles dry, clean and free of oil or grease.

ATTENTION! Despite the safe design of the device and its protective features, and despite the use of additional elements protecting the operator, there is still a slight risk of accident or injury when using the device. Stay alert and use common sense when using the device.
3. Use guidelines
The machine is designed for woodworking. Precision cutting is possible, allowing the contours of small parts to be cut out.
The product is intended for home use only.
The user is liable for any damage resulting from unintended use of the device.
3.1. Device description
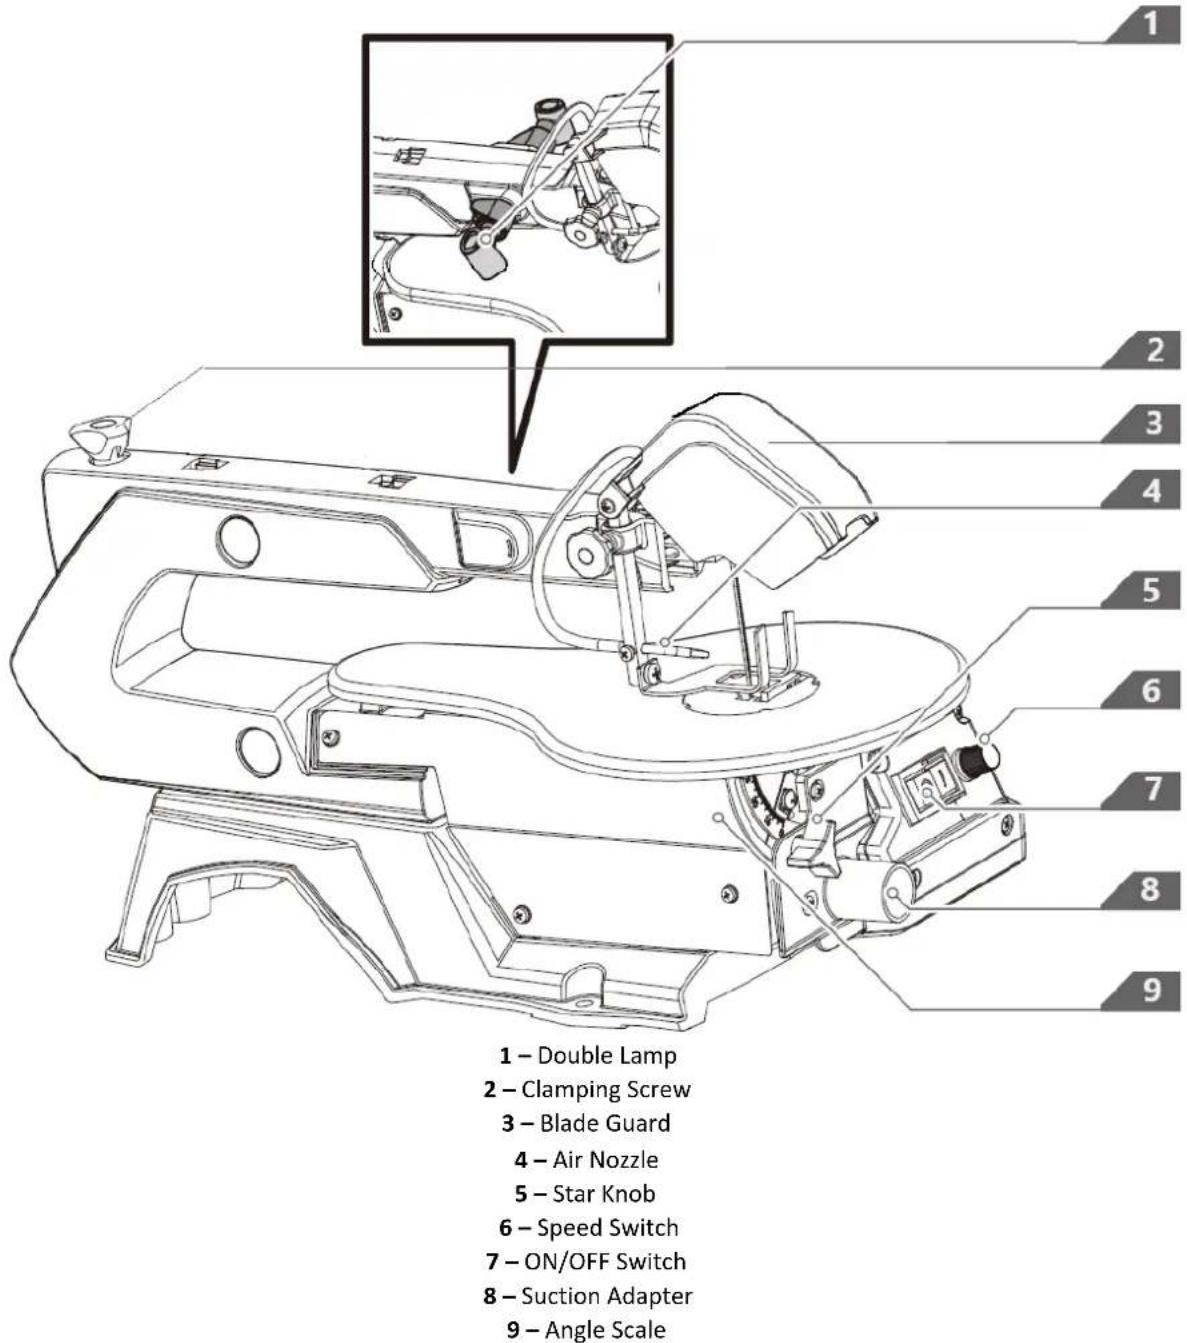
3.2. Preparing for use
APPLIANCE LOCATION
The temperature of environment must not be higher than 40^ and the relative humidity should be less than 85% . Ensure good ventilation in the room in which the device is being used. There should be at least 10cm distance between each side of the device and the wall or other objects. The device should always be used when positioned on an even, stable, clean, fireproof and dry surface, and be out of the reach of children and persons with limited mental and sensory functions. Position the device such that you always have access to the power plug. The power cord connected to the appliance must be properly grounded and correspond to the technical details on the product label.
3.3. Assembling the device
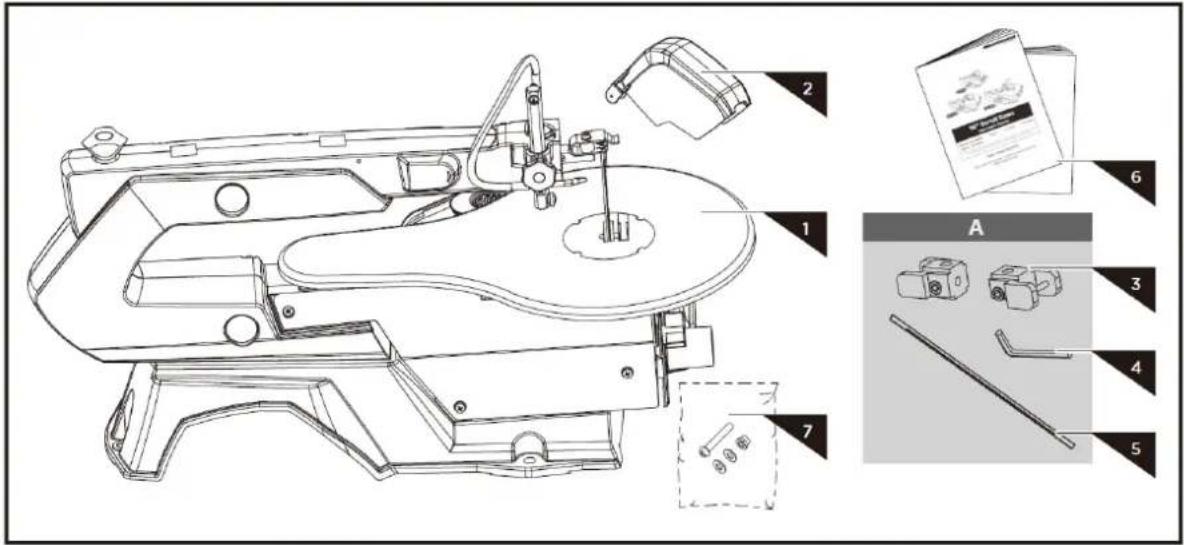
-
Main Machine
-
Blade guard
A-OPTIONAL FEATURE:
-
Saw-blade Adapter (Optional Feature A)
-
Allen Wrench (Optional Feature A)
-
Flat Sawblade (Optional Feature A)
-
Operator's Manual
-
Hardware Bag
Blade Guard Assembly
Install the blade guard to the holder. Secure the screw with a nut and two washers.
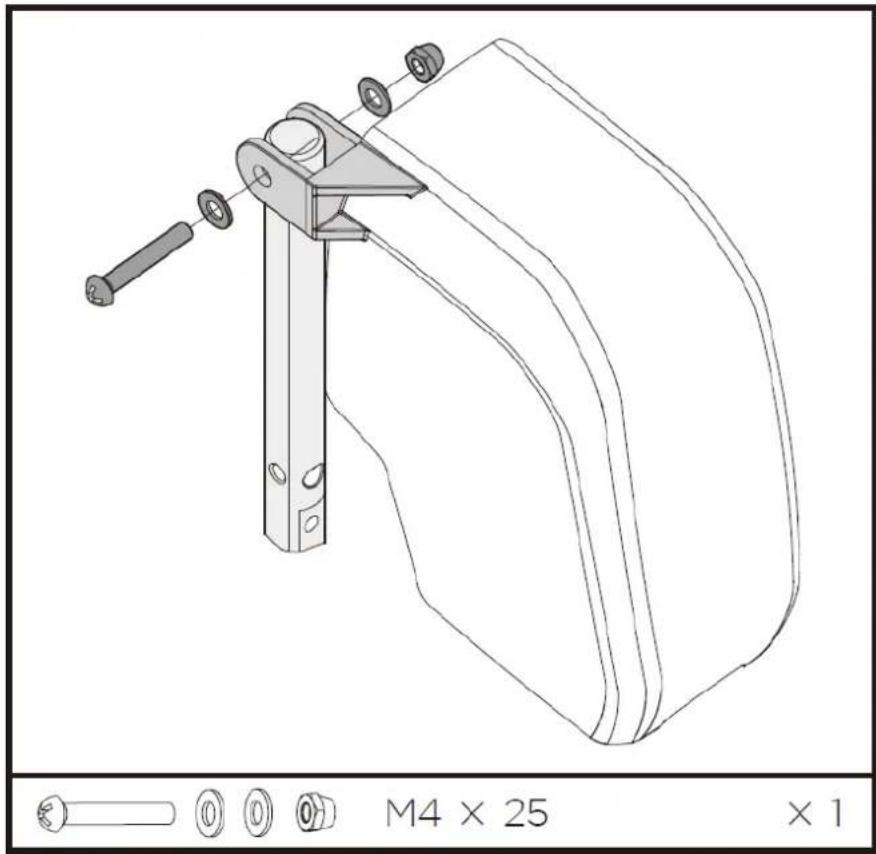
3.4. Device use
Mounting the machine on a work bench
A workbench made from solid wood is better than one made of plywood, as interfering vibrations and noise are more noticeable with plywood. The necessary tools and small parts for assembling the saw on a workbench are not supplied with the saw. However, use equipment of at least the following:
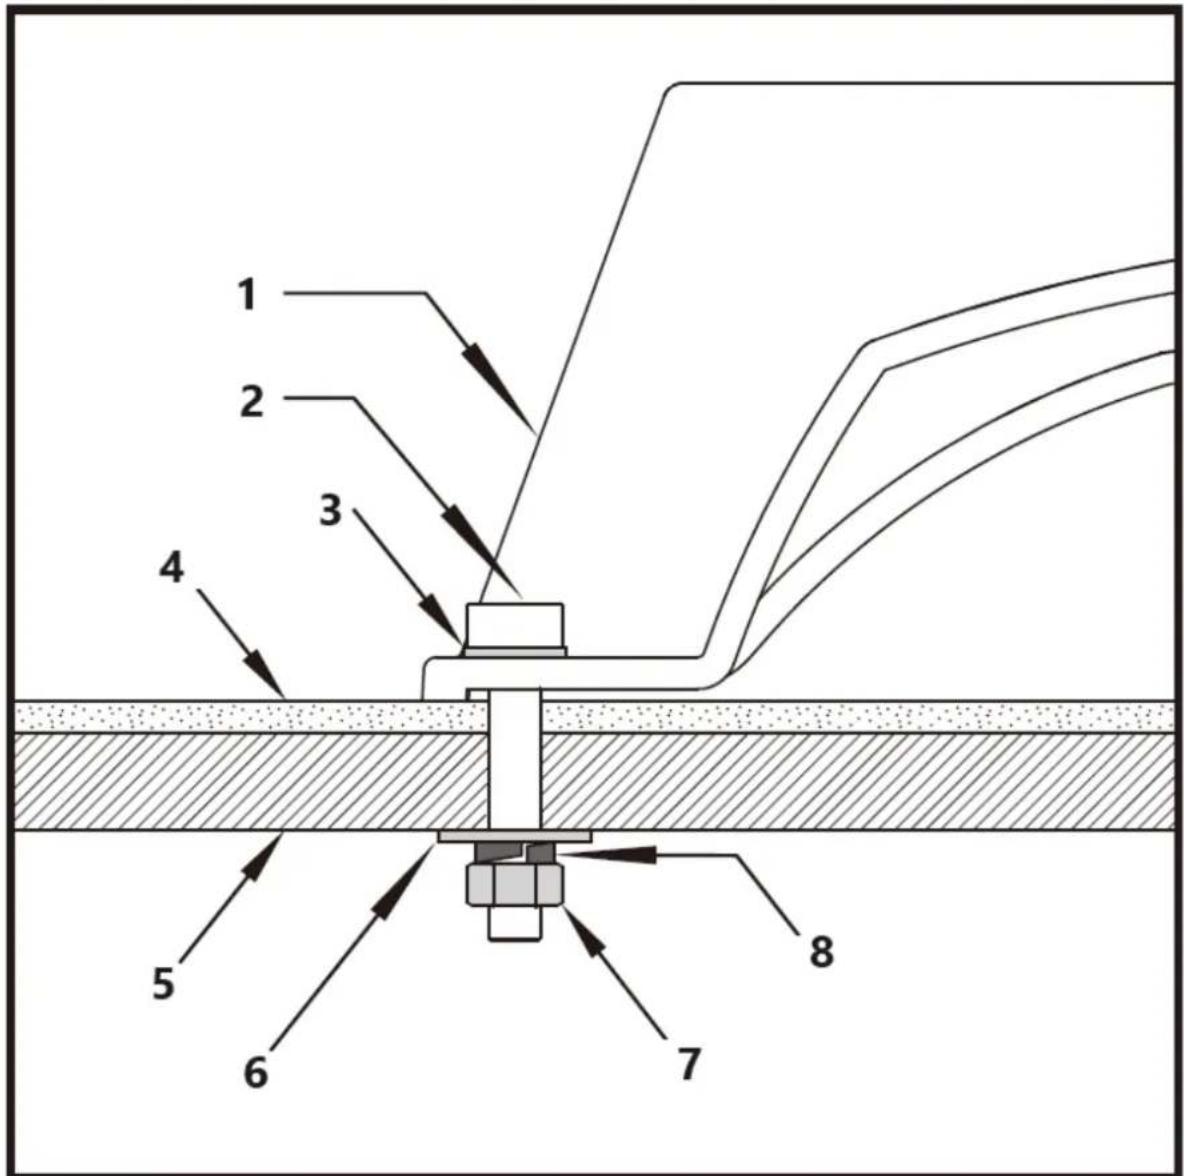
1-Support Leg
2-Bolt M8 (x3)
Flat Washer 8 (x3)
4-Rubber Pad
5-Worktable
6-Big Flat Washer 8(x3)
7-Nut M8 (x3)
8-Lock Washer 8 (x3)
First, drill holes into the seating surface and then Insert the screws. A foam rubber base for reduction of noise is not supplied with the saw either. However, we expressly recommend that you use such a base to keep vibration and noise to a minimum. Ideal size 400 × 240 mm.
Setting the Saw Bench
- Release the star button and bring the saw bench to a right angle in relation to the saw blade. Use a 90^ angle L-square measure the right angle between the blade and the bench. The saw blade be at 90^ to the angle.
- Close the star button when the distance between the blade and the 90^ angle is at a minimum. The bench should then be at 90^ to the saw blade.
Setting the angle scale
- Release the lock screw and bring the indicator to the zero position. Fasten the screw. Please note: the angle scale is a useful piece of supplementary equipment, but should not be used for precision work. Use scrap wood for saw tests, adjust the bench if necessary.
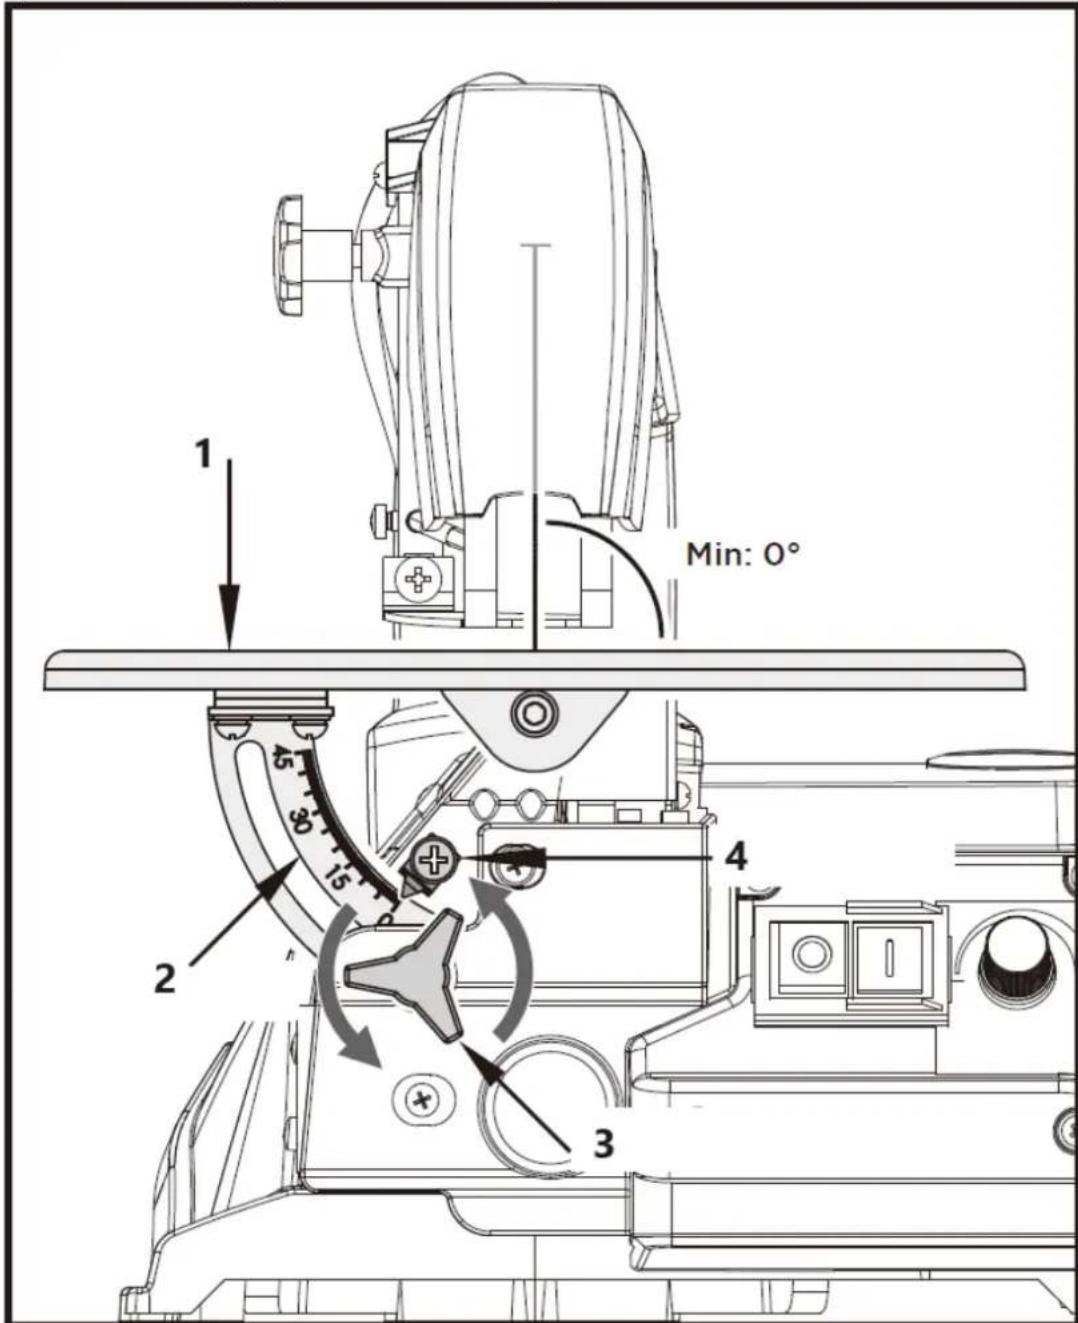
1-Saw Bench
2-Angle scale
3- Star Knob
4-LockScrew
Horizontal Saw Bench and Diagonal Cuts
The saw bench can be positioned into a 45^ diagonal position or be left in the horizontal position. You can read off the approximate slope angle by using the angle scale located under the work bench. For more exact adjustment, use scrap wood for some saw tests; adjust the bench if necessary.
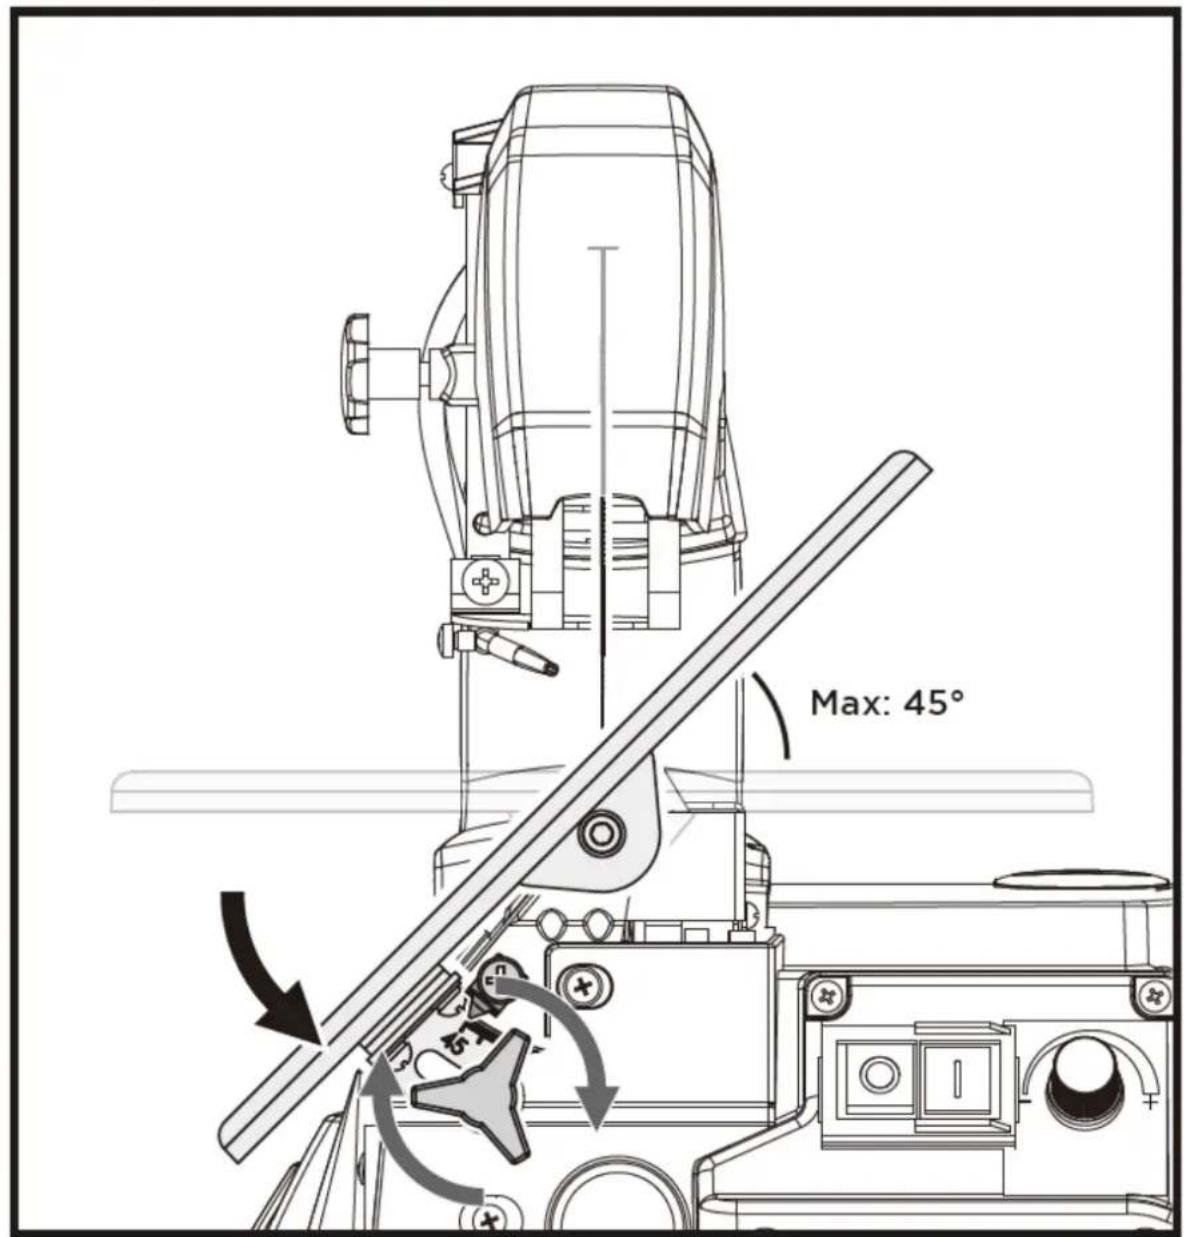
A scroll saw is fundamentally a "curve cutting tool" but which can also carry out straight and angled edge cuts. Familiarise yourself with the following important points prior to commissioning the saw.
- The saw does not automatically cut wood. You must feed the wood against the saw blade manually.
- The cutting process occurs only while the blade is moving downwards.
- Feed the wood slowly against the saw blade as the saw blade teeth are small and cut only while moving downwards.
- All persons carrying out work with the saw require training. The saw blade may break easily during this training time while the operator is still unfamiliar with the saw.
- The saw is best suited for sheets of wood less than 2.5cm thick.
-
Feed the wood especially slowly against the blade and avoid abrupt curves to prevent the saw blade from breaking, if you wish to cut wood sheets thicker than 2.5 ~cm .
-
Saw blade teeth becomes blunt over time, saw blades must be replaced. The saw blades are sufficient for 1/2 to 2 operating time depending upon the type of wood.
- Try and make sure that the saw blade follows the grain of the wood in order to obtain a clean cut.
- The saw speed must be reduced to minimum when cutting precious and non-ferrous metals.
Inside Cuts

Warning: Switch off the saw and remove the mains supply plug before doing inside cuts in order
to avoid injuries caused by unintentional activation of the saw.
This saw is suited also to inside cuts cut not starting at the edge of the work piece. Proceed as follows:
- Drill a 6mm hole in the work piece.
- Loosen the clamping screw (blade tensioner) and release the tension in the blade.
- Place the bore hole over the saw blade slot in the work bench.
- Install the saw blade through the hole in the work piece and through the work blade slot, and fasten the blade to the holders.
- When you have completed the inside cut, remove the saw blade and then remove the work piece from the bench.
Continuous Operation
It is possible to switch the saw on by pressing the green "1" button for continuous operation. In order to switch the saw off, it is necessary to press the red "0" button. With the continuously variable electronic speed control, the cutting speed can be increased by turning to the right or reduced by turning to the left.
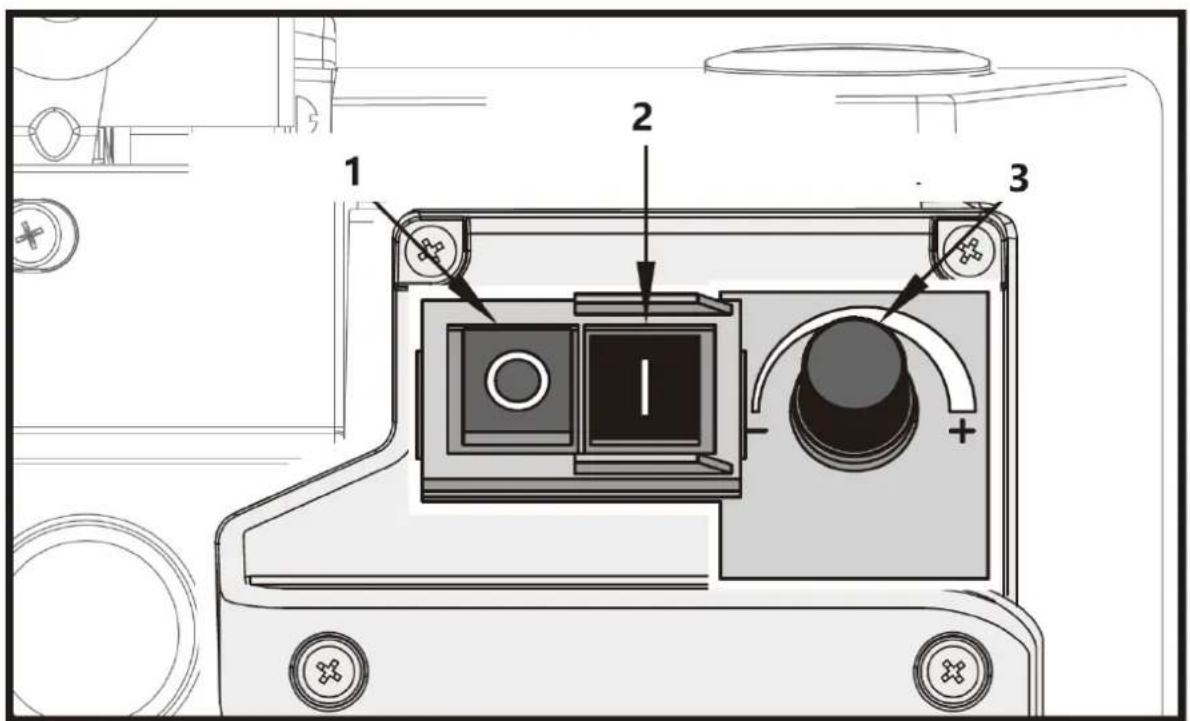
1-Red"0"button
2-Green "I" button
3 - Speed Switch
Lighting System
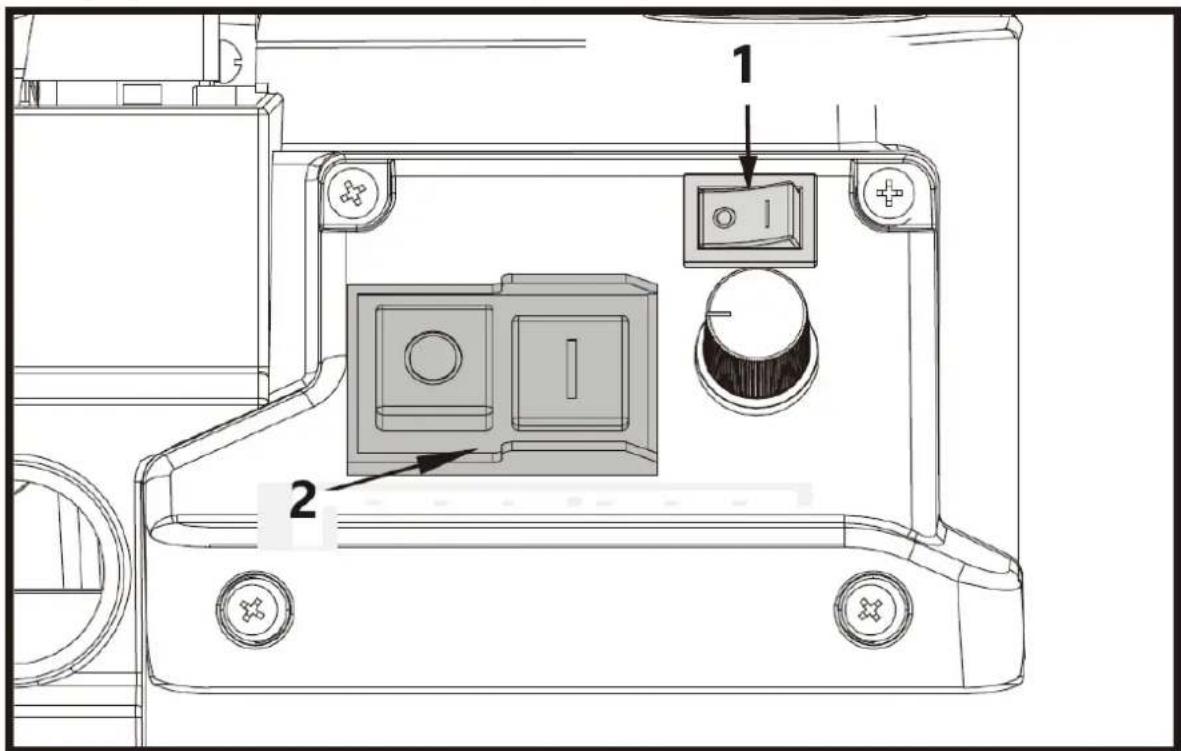
Press "I" to turn on the lamp.
Press "O" to turn off the lamp.
This light switch can only work when the ON/OFF switch for the product is turned on.
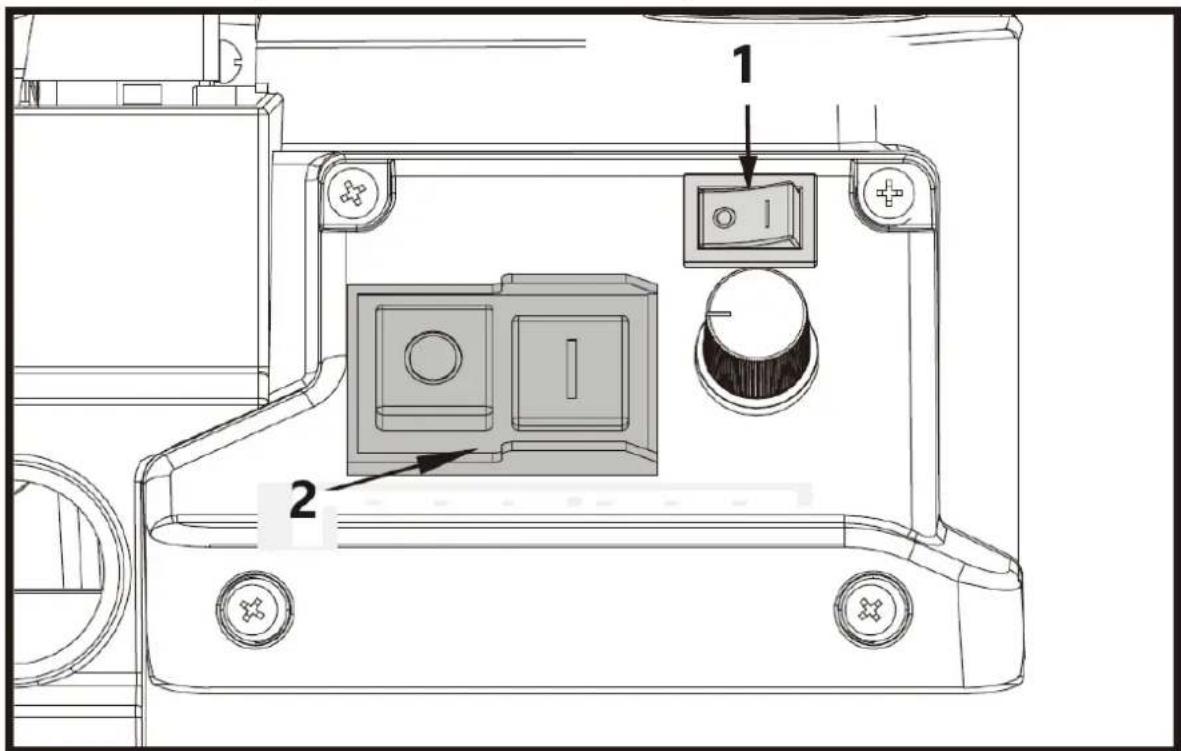
1-Lamp Switch
2-ON/OFF switch for the device
CAUTION: Do not stare at operating lamp.
3.5. Cleaning and maintenance

Warning! In the interests of operational safety, always switch off the saw and remove the mains before carrying out maintenance work.
General
Wipe chips and dust off the machine from time to time using a cloth. Re-application of the wax coating on the workbench makes feeding the workpiece to the blade easier. The mains cable should be replaced immediately if pulled out, cut or damaged in any other way. Do not lubricate the motor bearings or internal parts!
Changing the Saw Blade with pins

Switch off the saw and remove the mains supply plug before installing saw blades to avoid injuries by unintentional activation of the saw.
-
Saw blade removal. Extract the sawblade by unscrewing the Clamping screw. Remove the sawblade from the upper and lower support by slightly pressing the upper arm down.
-
Inserting the new sawblade. Lead one end of the sawblade through the perforation in the table and insert the saw-blade pins into the notch. Repeat this procedure at the upper blade support. Before hooking it in. Slightly press the upper arm down. Check the position of the blade pins at the supports.
Tighten the blade by means of the Clamping screw. Check the blade's tightness. Keep on rotating clockwise to tighten the blade even more.
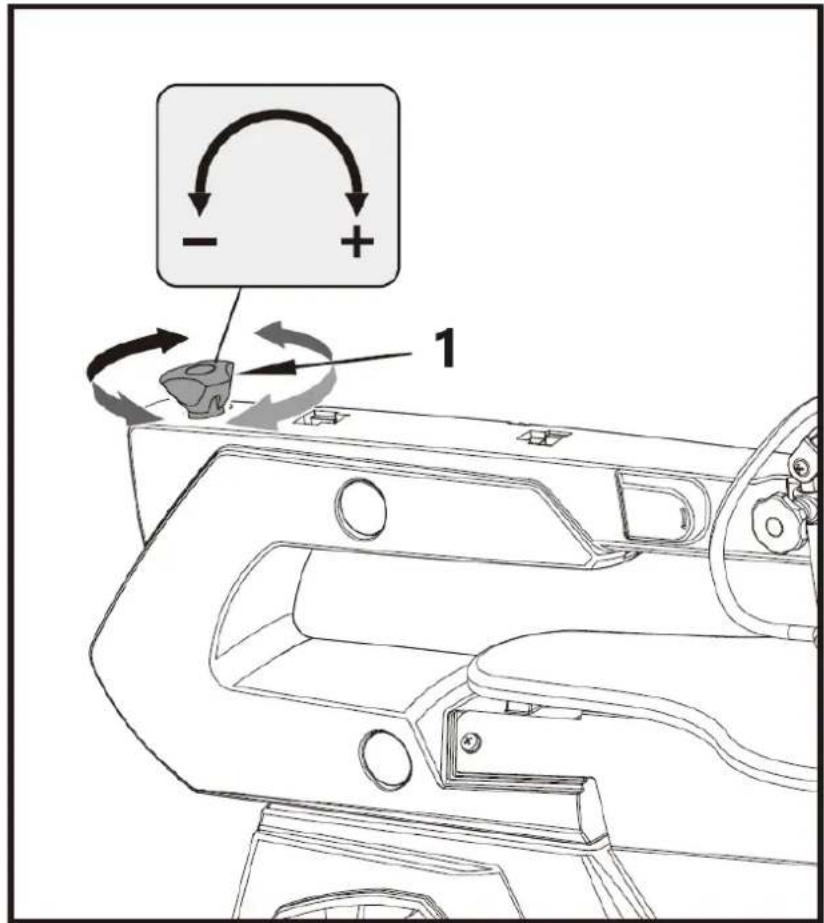
1- Clamping Screw
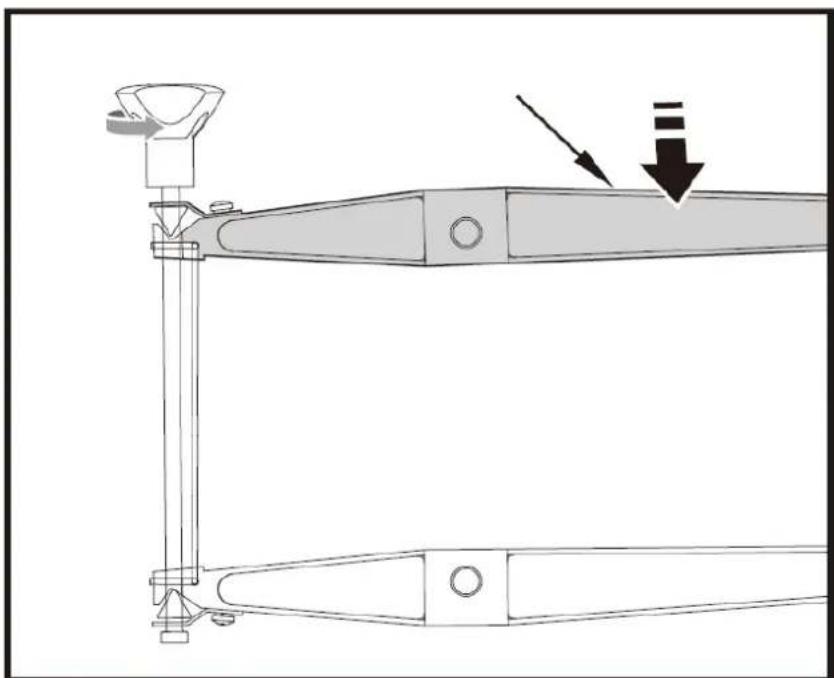
1 - Upper Arm
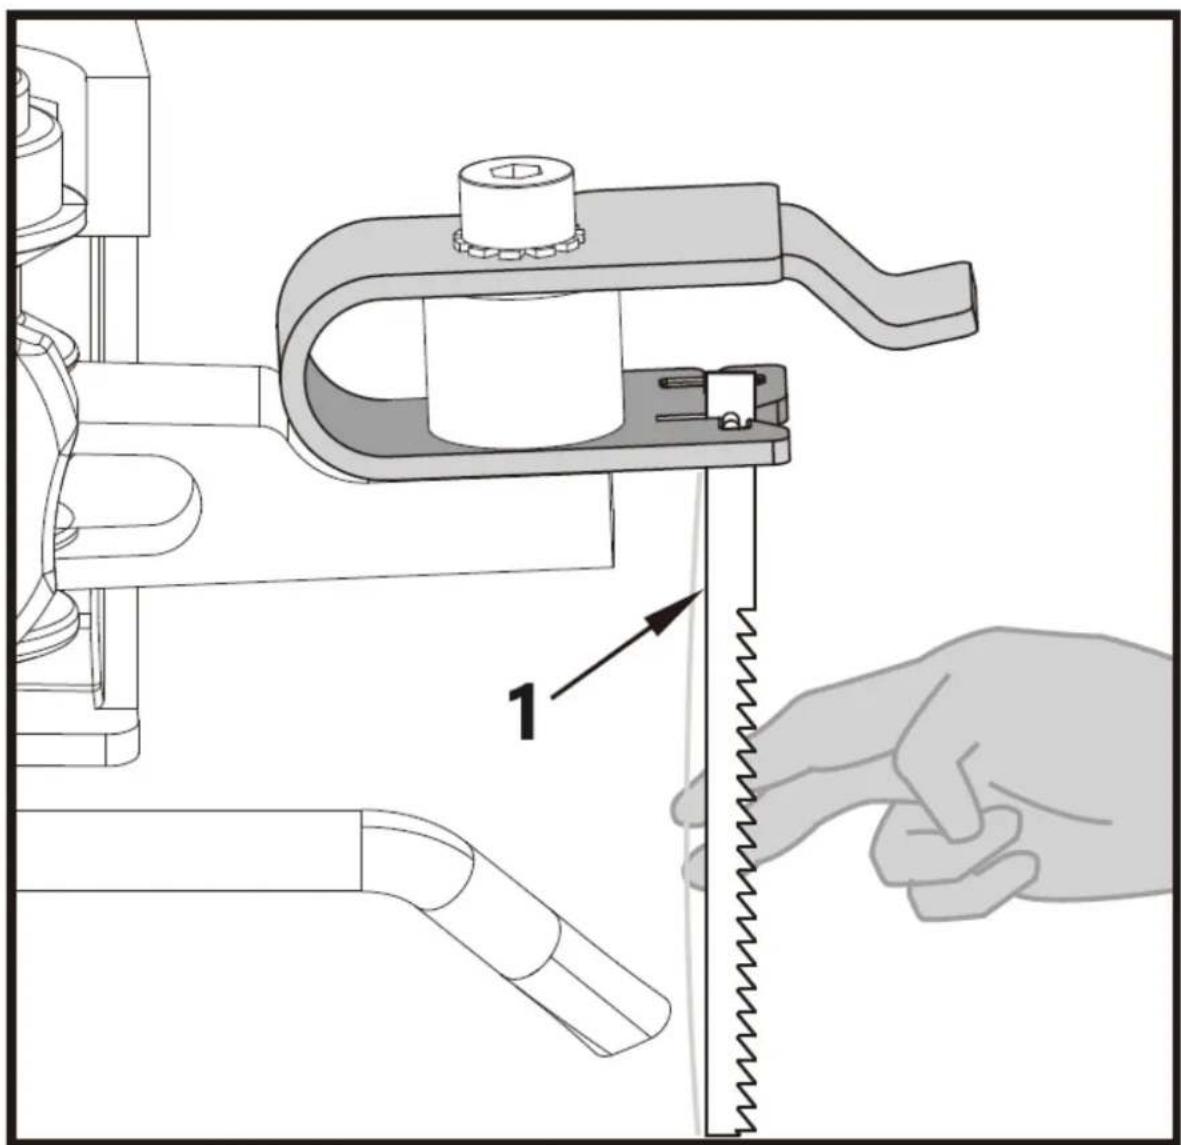
1-Sawblade with pin
Lubrication
Lubricate the saw arm bearings every 50 hours. Proceed as above figure shown. Turn the saw to the side. Apply a generous amount of SAE 20 oil to the shaft end and bronze bearings. Let the lubricant oil work in overnight. Repeat the procedure the next day on the other side of the saw.

1-Oil Seal
Carbon Brushes Inspection
In case of excessive sparking, have the carbon brushes checked only by a qualified electrician.
Danger! The carbon brushes should not be replaced by anyone but a qualified electrician.
Transport
- Be sure turn off the power and pull out the plug after use.
- Pull down the transparent blade guard to prevent hand cutting during transportation.
- Disconnect the vacuum cleaner and the other connecting devices, and remove the connection bolts between the machine and the worktable.
- Hold the upper end of the U-shaped arm with one hand while moving; If the saw-blade adapter & allen wrench (Optional Feature A) is on the top of the U-shaped arm, you can move it with both hands.
- Raw materials or precision-cut semi-finished products are recommended to be removed from the worktable before moving, which may damage the saw blade and its fixing device.
Storage
Store the equipment and accessories in a dark and dry place at above freezing temperature. The ideal storage temperature is between 5 and 30^ . Store the electric tool in its original packaging. Cover the electric tool in order to protect it from dust and moisture.
Troubleshooting
| Problem | Cause | Remedy |
| Saw blades break | Tension incorrectly set | Set the correct tension |
| Too much load | Feed the workpiece more slowly | |
| Incorrect saw blade variety | Use the correct saw blades | |
| Workpiece not fed straight | Avoid exerting pressure from the side | |
| Motor does not function | Mains Cable faulty | Change faulty parts |
| Motor faulty | Call customer service. Do not attempt to repair the motor yourself as this should be carried out by trained personnel. | |
| Vibration (NOTE: The saw vibrates slightly when the motor is running in normal operation.) | Saw incorrectly installed | Set the correct tension |
| Unsuitable underlay | Change underlay to more suitable | |
| The work bench is not screwed down | Secure the work bench | |
| The motor is not secured | Secure the motor | |
| Saw blade swings out., holders not aligned straight | Holders not aligned | Losen the screws with which the holders are fastened to the arm. Align the holders so that they are perpendicular to each other and retighten the screws |
DISPOSING OF USED DEVICES:
Do not dispose of this device in municipal waste systems. Hand it over to an electric and electrical device recycling and collection point. Check the symbol on the product, instruction manual and packaging. The plastics used to construct the device can be recycled in accordance with their markings. By choosing to recycle you are making a significant contribution to the protection of our environment.
Contact local authorities for information on your local recycling facility.

A-FONCTION OPTIONNELLE:
OBS! Giftige stoffer, fare for forgiving!

OBS! Fare for knusning af haender!
Nodstop!

OBS! Varm overflade, risiko for forbrendering!

APPARATETS PLACERING
Tryk pā "O" for at slukke lampen.
Denne lyskontakt kan kun fungere, nar ON/OFF-kontakten tilprodukter taendt.
A-VALINNAINEN OMINAISUUDET:
PLAATS VAN HET APPARAAT
ADVARSEL! Giftige stoffer, fare for forgiving!

OBS! Varm overflate, fare for forbrenning!

1-Rd"0"-knapp
2-Grønn "I"-knapp
3-Hastighetsbryter
Lys system
Trykk "I" for a sla p a lampen.
1-Lampebryter
2-PA/AV-bryter for enheten
APPARATENS PLACERING
For the disposal of the device please consider and act according to the national and local rules and regulations.
CONTACT
expondo Polska sp. z o.o. sp. k.
- Technical data
- General description
- DO NOT USE THE DEVICE UNLESS YOU HAVE THOROUGHLY READ AND UNDERSTOOD THIS USER MANUAL.
- Legend
- Usage safety
- Electrical safety
- Safety in the workplace
- Personal safety
- Safe device use
- Use guidelines
- Device description
- Preparing for use
- APPLIANCE LOCATION
- Assembling the device
- Blade Guard Assembly
- Device use
- Mounting the machine on a work bench
- Setting the Saw Bench
- Setting the angle scale
- Horizontal Saw Bench and Diagonal Cuts
- Inside Cuts
- Continuous Operation
- Cleaning and maintenance
- General
- Lubrication
- Carbon Brushes Inspection
- Transport
- Storage
- DISPOSING OF USED DEVICES:
- APPARATETS PLACERING
- A-VALINNAINEN OMINAISUUDET:
- PLAATS VAN HET APPARAAT
- Lys system
- APPARATENS PLACERING
- CONTACT
Brand : MSW
Model : SAW 16 SCROLL
Category : Saw